spring boot 集成科大讯飞星火认知大模型
首先到官网https://console.xfyun.cn/services/aidoc申请key
一、安装依赖
<?xml version="1.0" encoding="UTF-8"?>
<project xmlns="http://maven.apache.org/POM/4.0.0" xmlns:xsi="http://www.w3.org/2001/XMLSchema-instance"xsi:schemaLocation="http://maven.apache.org/POM/4.0.0 https://maven.apache.org/xsd/maven-4.0.0.xsd"><modelVersion>4.0.0</modelVersion><parent><groupId>org.springframework.boot</groupId><artifactId>spring-boot-starter-parent</artifactId><version>2.6.13</version><relativePath/> <!-- lookup parent from repository --></parent><!-- Generated by https://start.springboot.io --><!-- 优质的 spring/boot/data/security/cloud 框架中文文档尽在 => https://springdoc.cn --><groupId>com.example</groupId><artifactId>xunfeigpt</artifactId><version>0.0.1-SNAPSHOT</version><name>xunfeigpt</name><description>xunfeigpt</description><properties><java.version>1.8</java.version><netty.verson>4.1.45.Final</netty.verson></properties><dependencies><dependency><groupId>org.projectlombok</groupId><artifactId>lombok</artifactId></dependency><dependency><groupId>com.google.code.gson</groupId><artifactId>gson</artifactId><version>2.8.2</version></dependency><dependency><groupId>com.squareup.okhttp3</groupId><artifactId>okhttp</artifactId><version>4.9.0</version></dependency><dependency><groupId>com.alibaba</groupId><artifactId>fastjson</artifactId><version>1.2.47</version></dependency><dependency><groupId>org.springframework.boot</groupId><artifactId>spring-boot-starter</artifactId></dependency><dependency><groupId>org.springframework.boot</groupId><artifactId>spring-boot-starter-web</artifactId></dependency><dependency><groupId>org.springframework</groupId><artifactId>spring-context</artifactId></dependency><dependency><groupId>io.netty</groupId><artifactId>netty-all</artifactId><version>${netty.verson}</version></dependency><dependency><groupId>org.apache.commons</groupId><artifactId>commons-lang3</artifactId><version>3.12.0</version></dependency></dependencies><build><plugins><plugin><groupId>org.springframework.boot</groupId><artifactId>spring-boot-maven-plugin</artifactId><configuration><excludes><exclude><groupId>org.projectlombok</groupId><artifactId>lombok</artifactId></exclude></excludes></configuration></plugin></plugins></build></project>
二、配置文件
在科大讯飞官网申请key
server:port: 1644xf:config:hostUrl: https://spark-api.xf-yun.com/v3.5/chatappId: xxxxxxxapiSecret: xxxxxxxxapiKey: xxxxxxxmaxResponseTime: 30
三、项目结构
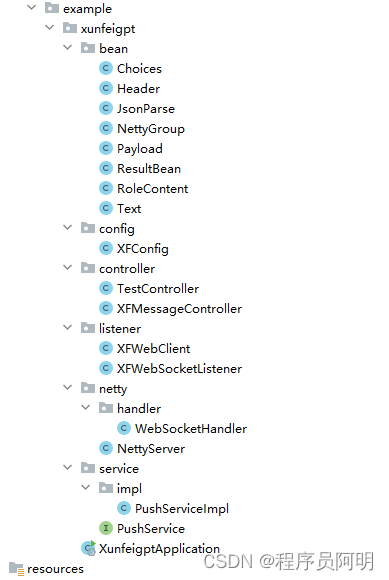
四、各个模块代码
1、在bean目录下
1)Choices类
package com.example.xunfeigpt.bean;import lombok.Data;import java.util.List;@Data
public class Choices {private List<Text> text;
}
2)Header类型
import lombok.Data;@Data
public class Header {private int code;private int status;private String sid;
}
3)JsonParse类型
import lombok.Data;@Data
public class JsonParse {private Header header;private Payload payload;
}
4)NettyGroup类型
package com.example.xunfeigpt.bean;import io.netty.channel.Channel;
import io.netty.channel.group.ChannelGroup;
import io.netty.channel.group.DefaultChannelGroup;
import io.netty.util.concurrent.GlobalEventExecutor;import java.util.concurrent.ConcurrentHashMap;public class NettyGroup {private static ChannelGroup channelGroup = new DefaultChannelGroup(GlobalEventExecutor.INSTANCE);/*** 存放用户与Chanel的对应信息,用于给指定用户发送消息*/private static ConcurrentHashMap<String, Channel> channelMap = new ConcurrentHashMap<>();private NettyGroup() {}/*** 获取channel组*/public static ChannelGroup getChannelGroup() {return channelGroup;}/*** 获取连接channel map*/public static ConcurrentHashMap<String, Channel> getUserChannelMap() {return channelMap;}
}
5)Payload类型
import lombok.Data;@Data
public class Payload {private Choices choices;
}
6)ResultBean类型
package com.example.xunfeigpt.bean;import lombok.*;/*** @Author: ChengLiang* @CreateTime: 2023-05-22  11:04* @Description: TODO* @Version: 1.0*/
@Getter
@Setter
@ToString(callSuper = true)
@AllArgsConstructor
@NoArgsConstructor
public class ResultBean<T> {private String errorCode;private String message;private T data;public ResultBean(T data) {this.errorCode = ErrorMessage.SUCCESS.getErrorCode();this.message = ErrorMessage.SUCCESS.getMessage();this.data = data;}public ResultBean(ErrorMessage errorMessage, T data) {this.errorCode = errorMessage.getErrorCode();this.message = errorMessage.getMessage();this.data = data;}public static <T> ResultBean success(T data) {ResultBean resultBean = new ResultBean(data);return resultBean;}public static <T> ResultBean fail(T data) {ResultBean resultBean = new ResultBean(ErrorMessage.FAIL.getErrorCode(), ErrorMessage.FAIL.getMessage(), data);return resultBean;}public enum ErrorMessage {SUCCESS("0", "success"),FAIL("001", "fail"),NOAUTH("1001", "非法访问");private String errorCode;private String message;ErrorMessage(String errorCode, String message) {this.errorCode = errorCode;this.message = message;}public String getErrorCode() {return errorCode;}public void setErrorCode(String errorCode) {this.errorCode = errorCode;}public String getMessage() {return message;}public void setMessage(String message) {this.message = message;}}
}
7)RoleContent类型
import lombok.AllArgsConstructor;
import lombok.Data;
import lombok.NoArgsConstructor;@Data
@AllArgsConstructor
@NoArgsConstructor
public class RoleContent {public static final String ROLE_USER = "user";public static final String ROLE_ASSISTANT = "assistant";private String role;private String content;public static RoleContent createUserRoleContent(String content) {return new RoleContent(ROLE_USER, content);}public static RoleContent createAssistantRoleContent(String content) {return new RoleContent(ROLE_ASSISTANT, content);}
}
8)Text类型
import lombok.Data;@Data
public class Text {private String role;private String content;
}
2、在config目录下新建XFConfig类
import lombok.Data;
import org.springframework.boot.context.properties.ConfigurationProperties;
import org.springframework.stereotype.Component;@Data
@Component
@ConfigurationProperties("xf.config")
public class XFConfig {private String appId;private String apiSecret;private String apiKey;private String hostUrl;private Integer maxResponseTime;
}
3、在listener目录下
1)新建XFWebClient类
import com.alibaba.fastjson.JSONArray;
import com.alibaba.fastjson.JSONObject;
import com.example.xunfeigpt.bean.RoleContent;import com.example.xunfeigpt.config.XFConfig;
import lombok.extern.slf4j.Slf4j;
import okhttp3.*;
import org.springframework.beans.factory.annotation.Autowired;
import org.springframework.stereotype.Component;import javax.crypto.Mac;
import javax.crypto.spec.SecretKeySpec;
import java.net.URL;
import java.nio.charset.StandardCharsets;
import java.text.SimpleDateFormat;
import java.util.*;@Slf4j
@Component
public class XFWebClient {@Autowiredprivate XFConfig xfConfig;/*** 发送消息** @param uid       每个用户的id,用于区分不同用户* @param questions 发送给大模型的消息,可以包含上下文内容* @return 获取websocket连接,以便于我们在获取完整大模型回复后手动关闭连接*//*** @description: 发送请求至大模型方法* @author: ChengLiang* @date: 2023/10/19 16:27* @param: [用户id, 请求内容, 返回结果监听器listener]* @return: okhttp3.WebSocket**/public WebSocket sendMsg(String uid, List<RoleContent> questions, WebSocketListener listener) {// 获取鉴权urlString authUrl = null;try {authUrl = getAuthUrl(xfConfig.getHostUrl(), xfConfig.getApiKey(), xfConfig.getApiSecret());} catch (Exception e) {log.error("鉴权失败:{}", e);return null;}// 鉴权方法生成失败,直接返回 nullOkHttpClient okHttpClient = new OkHttpClient.Builder().build();// 将 https/http 连接替换为 ws/wss 连接String url = authUrl.replace("http://", "ws://").replace("https://", "wss://");Request request = new Request.Builder().url(url).build();// 建立 wss 连接WebSocket webSocket = okHttpClient.newWebSocket(request, listener);// 组装请求参数JSONObject requestDTO = createRequestParams(uid, questions);// 发送请求webSocket.send(JSONObject.toJSONString(requestDTO));return webSocket;}/*** @description: 鉴权方法* @author: ChengLiang* @date: 2023/10/19 16:25* @param: [讯飞大模型请求地址, apiKey, apiSecret]* @return: java.lang.String**/public static String getAuthUrl(String hostUrl, String apiKey, String apiSecret) throws Exception {URL url = new URL(hostUrl);// 时间SimpleDateFormat format = new SimpleDateFormat("EEE, dd MMM yyyy HH:mm:ss z", Locale.US);format.setTimeZone(TimeZone.getTimeZone("GMT"));String date = format.format(new Date());// 拼接String preStr = "host: " + url.getHost() + "\n" +"date: " + date + "\n" +"GET " + url.getPath() + " HTTP/1.1";// SHA256加密Mac mac = Mac.getInstance("hmacsha256");SecretKeySpec spec = new SecretKeySpec(apiSecret.getBytes(StandardCharsets.UTF_8), "hmacsha256");mac.init(spec);byte[] hexDigits = mac.doFinal(preStr.getBytes(StandardCharsets.UTF_8));// Base64加密String sha = Base64.getEncoder().encodeToString(hexDigits);// 拼接String authorization = String.format("api_key=\"%s\", algorithm=\"%s\", headers=\"%s\", signature=\"%s\"", apiKey, "hmac-sha256", "host date request-line", sha);// 拼接地址HttpUrl httpUrl = Objects.requireNonNull(HttpUrl.parse("https://" + url.getHost() + url.getPath())).newBuilder().//addQueryParameter("authorization", Base64.getEncoder().encodeToString(authorization.getBytes(StandardCharsets.UTF_8))).//addQueryParameter("date", date).//addQueryParameter("host", url.getHost()).//build();return httpUrl.toString();}/*** @description: 请求参数组装方法* @author: ChengLiang* @date: 2023/10/19 16:26* @param: [用户id, 请求内容]* @return: com.alibaba.fastjson.JSONObject**/public JSONObject createRequestParams(String uid, List<RoleContent> questions) {JSONObject requestJson = new JSONObject();// header参数JSONObject header = new JSONObject();header.put("app_id", xfConfig.getAppId());header.put("uid", uid);// parameter参数JSONObject parameter = new JSONObject();JSONObject chat = new JSONObject();chat.put("domain", "generalv2");chat.put("temperature", 0.5);chat.put("max_tokens", 4096);parameter.put("chat", chat);// payload参数JSONObject payload = new JSONObject();JSONObject message = new JSONObject();JSONArray jsonArray = new JSONArray();jsonArray.addAll(questions);message.put("text", jsonArray);payload.put("message", message);requestJson.put("header", header);requestJson.put("parameter", parameter);requestJson.put("payload", payload);return requestJson;}
}
2)新建XFWebSocketListener类
package com.example.xunfeigpt.listener;import com.alibaba.fastjson.JSON;import com.example.xunfeigpt.bean.JsonParse;
import com.example.xunfeigpt.bean.Text;
import lombok.extern.slf4j.Slf4j;
import okhttp3.Response;
import okhttp3.WebSocket;
import okhttp3.WebSocketListener;import java.io.IOException;
import java.util.*;@Slf4j
public class XFWebSocketListener extends WebSocketListener {//断开websocket标志位private boolean wsCloseFlag = false;//语句组装buffer,将大模型返回结果全部接收,在组装成一句话返回private StringBuilder answer = new StringBuilder();public String getAnswer() {return answer.toString();}public boolean isWsCloseFlag() {return wsCloseFlag;}@Overridepublic void onOpen(WebSocket webSocket, Response response) {super.onOpen(webSocket, response);log.info("大模型服务器连接成功!");}@Overridepublic void onMessage(WebSocket webSocket, String text) {super.onMessage(webSocket, text);JsonParse myJsonParse = JSON.parseObject(text, JsonParse.class);log.info("myJsonParse:{}", JSON.toJSONString(myJsonParse));if (myJsonParse.getHeader().getCode() != 0) {log.error("发生错误,错误信息为:{}", JSON.toJSONString(myJsonParse.getHeader()));this.answer.append("大模型响应异常,请联系管理员");// 关闭连接标识wsCloseFlag = true;return;}List<Text> textList = myJsonParse.getPayload().getChoices().getText();for (Text temp : textList) {log.info("返回结果信息为:【{}】", JSON.toJSONString(temp));this.answer.append(temp.getContent());}log.info("result:{}", this.answer.toString());if (myJsonParse.getHeader().getStatus() == 2) {wsCloseFlag = true;//todo 将问答信息入库进行记录,可自行实现}}@Overridepublic void onFailure(WebSocket webSocket, Throwable t, Response response) {super.onFailure(webSocket, t, response);try {if (null != response) {int code = response.code();log.error("onFailure body:{}", response.body().string());if (101 != code) {log.error("讯飞星火大模型连接异常");}}} catch (IOException e) {log.error("IO异常:{}", e);}}
}
4、在netty目录下
1)新建NettyServer类
package com.example.xunfeigpt.netty;import com.example.xunfeigpt.netty.handler.WebSocketHandler;
import io.netty.bootstrap.ServerBootstrap;
import io.netty.channel.ChannelFuture;
import io.netty.channel.ChannelInitializer;
import io.netty.channel.EventLoopGroup;
import io.netty.channel.nio.NioEventLoopGroup;
import io.netty.channel.socket.SocketChannel;
import io.netty.channel.socket.nio.NioServerSocketChannel;
import io.netty.handler.codec.http.HttpObjectAggregator;
import io.netty.handler.codec.http.HttpServerCodec;
import io.netty.handler.codec.http.websocketx.WebSocketServerProtocolHandler;
import io.netty.handler.codec.serialization.ObjectEncoder;
import io.netty.handler.stream.ChunkedWriteHandler;
import lombok.extern.slf4j.Slf4j;
import org.springframework.beans.factory.annotation.Autowired;
import org.springframework.beans.factory.annotation.Value;
import org.springframework.stereotype.Component;import javax.annotation.PostConstruct;
import javax.annotation.PreDestroy;
import java.net.InetSocketAddress;@Slf4j
@Component
public class NettyServer {/*** webSocket协议名*/private static final String WEBSOCKET_PROTOCOL = "WebSocket";/*** 端口号*/@Value("${webSocket.netty.port:62632}")private int port;/*** webSocket路径*/@Value("${webSocket.netty.path:/webSocket}")private String webSocketPath;@Autowiredprivate WebSocketHandler webSocketHandler;private EventLoopGroup bossGroup;private EventLoopGroup workGroup;/*** 启动** @throws InterruptedException*/private void start() throws InterruptedException {bossGroup = new NioEventLoopGroup();workGroup = new NioEventLoopGroup();ServerBootstrap bootstrap = new ServerBootstrap();// bossGroup辅助客户端的tcp连接请求, workGroup负责与客户端之前的读写操作bootstrap.group(bossGroup, workGroup);// 设置NIO类型的channelbootstrap.channel(NioServerSocketChannel.class);// 设置监听端口bootstrap.localAddress(new InetSocketAddress(port));// 连接到达时会创建一个通道bootstrap.childHandler(new ChannelInitializer<SocketChannel>() {@Overrideprotected void initChannel(SocketChannel ch) throws Exception {// 流水线管理通道中的处理程序(Handler),用来处理业务// webSocket协议本身是基于http协议的,所以这边也要使用http编解码器ch.pipeline().addLast(new HttpServerCodec());ch.pipeline().addLast(new ObjectEncoder());// 以块的方式来写的处理器ch.pipeline().addLast(new ChunkedWriteHandler());/*说明:1、http数据在传输过程中是分段的,HttpObjectAggregator可以将多个段聚合2、这就是为什么,当浏览器发送大量数据时,就会发送多次http请求*/ch.pipeline().addLast(new HttpObjectAggregator(8192));/*说明:1、对应webSocket,它的数据是以帧(frame)的形式传递2、浏览器请求时 ws://localhost:58080/xxx 表示请求的uri3、核心功能是将http协议升级为ws协议,保持长连接*/ch.pipeline().addLast(new WebSocketServerProtocolHandler(webSocketPath, WEBSOCKET_PROTOCOL, true, 65536 * 10));// 自定义的handler,处理业务逻辑ch.pipeline().addLast(webSocketHandler);}});// 配置完成,开始绑定server,通过调用sync同步方法阻塞直到绑定成功ChannelFuture channelFuture = bootstrap.bind().sync();log.info("Server started and listen on:{}", channelFuture.channel().localAddress());// 对关闭通道进行监听channelFuture.channel().closeFuture().sync();}/*** 释放资源** @throws InterruptedException*/@PreDestroypublic void destroy() throws InterruptedException {if (bossGroup != null) {bossGroup.shutdownGracefully().sync();}if (workGroup != null) {workGroup.shutdownGracefully().sync();}}@PostConstruct()public void init() {//需要开启一个新的线程来执行netty server 服务器new Thread(() -> {try {start();log.info("消息推送线程开启!");} catch (InterruptedException e) {e.printStackTrace();}}).start();}
}
2)在handler目录下新建handler类
package com.example.xunfeigpt.netty.handler;import com.alibaba.fastjson.JSON;
import com.alibaba.fastjson.JSONObject;import com.example.xunfeigpt.bean.NettyGroup;
import com.example.xunfeigpt.bean.ResultBean;
import com.example.xunfeigpt.service.PushService;
import io.netty.channel.ChannelHandler;
import io.netty.channel.ChannelHandlerContext;
import io.netty.channel.SimpleChannelInboundHandler;
import io.netty.handler.codec.http.websocketx.TextWebSocketFrame;
import io.netty.util.AttributeKey;
import lombok.extern.slf4j.Slf4j;
import org.springframework.beans.factory.annotation.Autowired;
import org.springframework.stereotype.Component;@Slf4j
@Component
@ChannelHandler.Sharable
public class WebSocketHandler extends SimpleChannelInboundHandler<TextWebSocketFrame> {@Autowiredprivate PushService pushService;@Overridepublic void handlerAdded(ChannelHandlerContext ctx) throws Exception {log.info("handlerAdded被调用,{}", JSON.toJSONString(ctx));//todo 添加校验功能,校验合法后添加到group中// 添加到channelGroup 通道组NettyGroup.getChannelGroup().add(ctx.channel());}@Overrideprotected void channelRead0(ChannelHandlerContext ctx, TextWebSocketFrame msg) throws Exception {log.info("服务器收到消息:{}", msg.text());// 获取用户ID,关联channelJSONObject jsonObject = JSON.parseObject(msg.text());String channelId = jsonObject.getString("uid");// 将用户ID作为自定义属性加入到channel中,方便随时channel中获取用户IDAttributeKey<String> key = AttributeKey.valueOf("userId");//String channelId = CharUtil.generateStr(uid);NettyGroup.getUserChannelMap().put(channelId, ctx.channel());boolean containsKey = NettyGroup.getUserChannelMap().containsKey(channelId);//通道已存在,请求信息返回if (containsKey) {//接收消息格式{"uid":"123456","text":"中华人民共和国成立时间"}String text = jsonObject.getString("text");//请求大模型服务器,获取结果ResultBean resultBean = pushService.pushMessageToXFServer(channelId, text);String data = (String) resultBean.getData();//推送pushService.pushToOne(channelId, JSON.toJSONString(data));} else {ctx.channel().attr(key).setIfAbsent(channelId);log.info("连接通道id:{}", channelId);// 回复消息ctx.channel().writeAndFlush(new TextWebSocketFrame(JSON.toJSONString(ResultBean.success(channelId))));}}@Overridepublic void handlerRemoved(ChannelHandlerContext ctx) throws Exception {log.info("handlerRemoved被调用,{}", JSON.toJSONString(ctx));// 删除通道NettyGroup.getChannelGroup().remove(ctx.channel());removeUserId(ctx);}@Overridepublic void exceptionCaught(ChannelHandlerContext ctx, Throwable cause) throws Exception {log.info("通道异常:{}", cause.getMessage());// 删除通道NettyGroup.getChannelGroup().remove(ctx.channel());removeUserId(ctx);ctx.close();}private void removeUserId(ChannelHandlerContext ctx) {AttributeKey<String> key = AttributeKey.valueOf("userId");String userId = ctx.channel().attr(key).get();NettyGroup.getUserChannelMap().remove(userId);}
}
5、在service目录下
1)新建PushService接口
import com.example.xunfeigpt.bean.ResultBean;public interface PushService {void pushToOne(String uid, String text);void pushToAll(String text);ResultBean pushMessageToXFServer(String uid, String text);
}
2)在impl文件夹下新建PushServiceImpl类
package com.example.xunfeigpt.service.impl;import com.alibaba.fastjson.JSON;import com.example.xunfeigpt.bean.NettyGroup;
import com.example.xunfeigpt.bean.ResultBean;
import com.example.xunfeigpt.bean.RoleContent;
import com.example.xunfeigpt.config.XFConfig;
import com.example.xunfeigpt.listener.XFWebClient;
import com.example.xunfeigpt.listener.XFWebSocketListener;
import com.example.xunfeigpt.service.PushService;
import io.netty.channel.Channel;
import io.netty.handler.codec.http.websocketx.TextWebSocketFrame;
import lombok.extern.slf4j.Slf4j;
import okhttp3.WebSocket;
import org.springframework.beans.factory.annotation.Autowired;
import org.springframework.stereotype.Service;
import org.springframework.util.StringUtils;import java.util.ArrayList;
import java.util.concurrent.ConcurrentHashMap;@Slf4j
@Service
public class PushServiceImpl implements PushService {@Autowiredprivate XFConfig xfConfig;@Autowiredprivate XFWebClient xfWebClient;@Overridepublic void pushToOne(String uid, String text) {if (StringUtils.isEmpty(uid) || StringUtils.isEmpty(text)) {log.error("uid或text均不能为空");throw new RuntimeException("uid或text均不能为空");}ConcurrentHashMap<String, Channel> userChannelMap = NettyGroup.getUserChannelMap();for (String channelId : userChannelMap.keySet()) {if (channelId.equals(uid)) {Channel channel = userChannelMap.get(channelId);if (channel != null) {ResultBean success = ResultBean.success(text);channel.writeAndFlush(new TextWebSocketFrame(JSON.toJSONString(success)));log.info("信息发送成功:{}", JSON.toJSONString(success));} else {log.error("该id对于channelId不存在!");}return;}}log.error("该用户不存在!");}@Overridepublic void pushToAll(String text) {String trim = text.trim();ResultBean success = ResultBean.success(trim);NettyGroup.getChannelGroup().writeAndFlush(new TextWebSocketFrame(JSON.toJSONString(success)));log.info("信息推送成功:{}", JSON.toJSONString(success));}//测试账号只有2个并发,此处只使用一个,若是生产环境允许多个并发,可以采用分布式锁@Overridepublic synchronized ResultBean pushMessageToXFServer(String uid, String text) {RoleContent userRoleContent = RoleContent.createUserRoleContent(text);ArrayList<RoleContent> questions = new ArrayList<>();questions.add(userRoleContent);XFWebSocketListener xfWebSocketListener = new XFWebSocketListener();WebSocket webSocket = xfWebClient.sendMsg(uid, questions, xfWebSocketListener);if (webSocket == null) {log.error("webSocket连接异常");ResultBean.fail("请求异常,请联系管理员");}try {int count = 0;int maxCount = xfConfig.getMaxResponseTime() * 5;while (count <= maxCount) {Thread.sleep(200);if (xfWebSocketListener.isWsCloseFlag()) {break;}count++;}if (count > maxCount) {return ResultBean.fail("响应超时,请联系相关人员");}return ResultBean.success(xfWebSocketListener.getAnswer());} catch (Exception e) {log.error("请求异常:{}", e);} finally {webSocket.close(1000, "");}return ResultBean.success("");}
}
6、测试controller
import com.example.xunfeigpt.bean.ResultBean;
import com.example.xunfeigpt.service.PushService;
import lombok.extern.slf4j.Slf4j;
import org.apache.commons.lang3.StringUtils;
import org.springframework.beans.factory.annotation.Autowired;import org.springframework.web.bind.annotation.GetMapping;
import org.springframework.web.bind.annotation.RequestMapping;
import org.springframework.web.bind.annotation.RestController;@Slf4j
@RestController
@RequestMapping("/xfModel")
public class XFMessageController {@Autowiredprivate PushService pushService;@GetMapping("/test")public ResultBean test(String uid, String text) {if (StringUtils.isEmpty(uid) || StringUtils.isEmpty(text)) {log.error("uid或text不能为空");return ResultBean.fail("uid或text不能为空");}return pushService.pushMessageToXFServer(uid, text);}
}
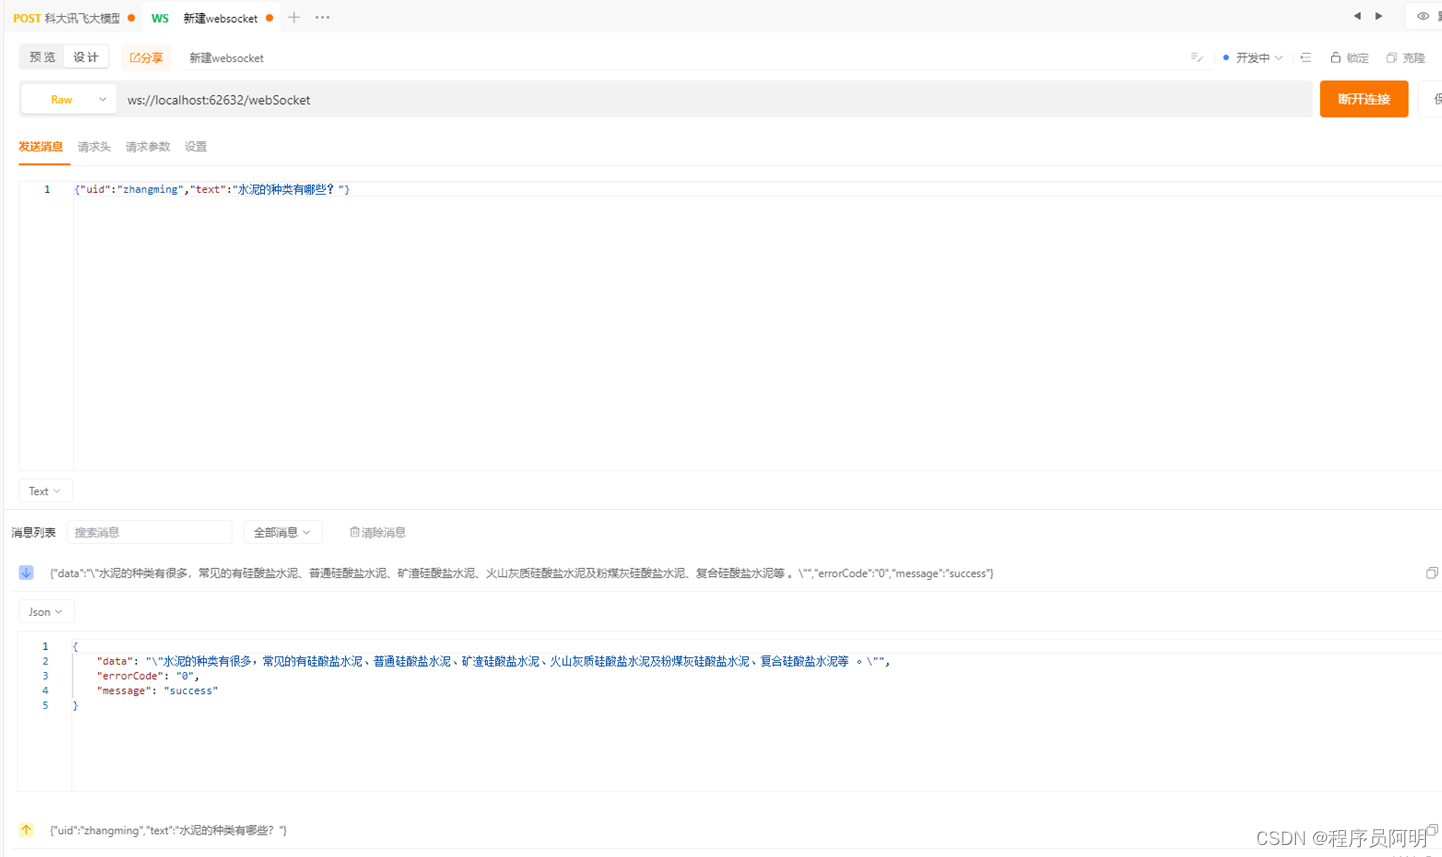
7、websocket测试
地址:ws://localhost:62632/webSocket
传参:
["uid":"xxxxxx","text";"水泥的种类有哪些?}
相关文章:
spring boot 集成科大讯飞星火认知大模型
首先到官网https://console.xfyun.cn/services/aidoc申请key 一、安装依赖 <?xml version"1.0" encoding"UTF-8"?> <project xmlns"http://maven.apache.org/POM/4.0.0" xmlns:xsi"http://www.w3.org/2001/XMLSchema-instance&…...

springboot/ssm高校宣讲会管理系统Java企业招聘宣讲系统web
演示视频:https://www.bilibili.com/video/BV1vz421R7cg/、 基于springboot(可改ssm)vue项目 开发语言:Java 框架:springboot/可改ssm vue JDK版本:JDK1.8(或11) 服务器:tomcat 数据库&am…...
2024.02.23作业
1. 尝试处理普通信号 #include "test.h"#define MAXSIZE 128void handler(int signo) {if (SIGINT signo){printf("用户按下了 ctrl c 键\n");} }int main(int argc, char const *argv[]) {if (signal(SIGINT, SIG_IGN) SIG_ERR){perror("signal …...

倒模专用制作耳机壳UV树脂:改性丙烯酸树脂
倒模专用制作耳机壳的UV树脂是经过改性的丙烯酸树脂,具有高透明度、高粘度、快速固化的特点。这种树脂可以通过紫外线光固化,快速形成坚硬的表面,并且具有较高的硬度和耐磨性,因此非常适合用于制作耳机壳。 此外,改性丙…...

chatgpt:还有哪些人工智能和科技值得关注?
今天,很多人的目光都被ChatGPT吸引,其实,人工智能的范围很大,远不止ChatGPT或者其他自然语言的处理工具。所以说不管ChatGPT的结果如何,人工智能依然是未来。 那么在ChatGPT之外,还有没有什么值得关注的人…...

LeetCode 2997.使数组异或和等于K的最少操作次数
给你一个下标从 0 开始的整数数组 nums 和一个正整数 k 。 你可以对数组执行以下操作 任意次 : 选择数组里的 任意 一个元素,并将它的 二进制 表示 翻转 一个数位,翻转数位表示将 0 变成 1 或者将 1 变成 0 。 你的目标是让数组里 所有 元素…...
计算机设计大赛 深度学习大数据物流平台 python
文章目录 0 前言1 课题背景2 物流大数据平台的架构与设计3 智能车货匹配推荐算法的实现**1\. 问题陈述****2\. 算法模型**3\. 模型构建总览 **4 司机标签体系的搭建及算法****1\. 冷启动**2\. LSTM多标签模型算法 5 货运价格预测6 总结7 部分核心代码8 最后 0 前言 ǵ…...
WPF 附加属性+控件模板,完成自定义控件。建议观看HandyControl源码
文章目录 相关连接前言需要实现的效果附加属性添加附加属性,以Test修改FontSize为例依赖属性使用触发器使用直接操控 结论 控件模板,在HandyControl的基础上面进行修改参考HandyControl的源码控件模板原型控件模板 控件模板触发器完整样式简单使用 结论 …...

编程笔记 Golang基础 040 defer、panic 和 recover
编程笔记 Golang基础 040 defer、panic 和 recover 一、defer二、panic三、recover小结 在Go语言中,defer、panic 和 recover 是一组用于错误处理和控制程序流程的关键字。它们之间的交互有助于实现异常处理机制,并确保资源的正确释放。 一、defer defe…...

通过redfish协议实现服务器固件升级、从虚拟光驱启动自检盘并等待完成,最后截图保存
通过redfish协议实现服务器固件升级、从虚拟光驱启动自检盘并等待完成,最后截图保存 版本信息代码新开发的PCIE设备在做服务器适配时,有时需要服务器厂家更新BMC或BIOS固件。同时,我们也希望对PCIE设备做一些检测,最后收集一些信息存档。如果需要处理的服务器很多,通过BMC的界面…...

ARM 版银河麒麟桌面系统下 Qt 开发环境搭建指南
目录 前言安装Linux ARM 版 QtCreator配置 Qt Creator配置构建套件 第一个麒麟 Qt 应用程序小结 前言 在上一篇文章信创ARM架构QT应用开发环境搭建中建议大家使用 Ubuntu X86 系统作为信创 ARM 架构 QT 应用的开发环境,里面使用了交叉编译的方式。这对于自己的 Qt …...
)
架构面试题汇总:缓存(二)
目录 1. 问题:什么是缓存,以及为什么我们需要缓存?2. 问题:你能解释一下缓存击穿、缓存雪崩和缓存预热是什么吗?3. 问题:如何在Java中实现缓存?4. 问题:你如何决定哪些数据应该被缓存…...

【docker入门】1-
文章目录 参考: Docker – 容器虚拟化平台。 参考: docker入门,这一篇就够了。【零基础入门Docker】Dockerfile中的USER指令以及dockerfile命令详解dockerfile copy命令...

微信小程序-全局配置
个人笔记,仅供参考。 1.entryPagePath 代码: "entryPagePath": "pages/index/index" 具体用法: 2.pages 小程序中新增/减少页面,都需要对 pages 数组进行修改。 代码: "pages": [&…...

【Android】性能优化之内存、网络、布局、卡顿、安装包、启动速度优化
欢迎来到 Android 开发老生常谈的性能优化篇,本文将性能优化划分为内存、网络、布局、卡顿、安装包、启动速度七块,从这七块优化出发,阐述优化的 Application 的方式。 目录 内存优化避免内存泄漏使用内存分析工具优化数据结构和算法数据缓存…...
第3.6章:StarRocks数据导入——DataX StarRocksWriter
一、Datax 1.1 DataX 3.0概述 DataX3.0是一个异构数据源离线同步工具,可以方便的对各种异构数据源进行高效的数据同步。 其github地址为: https://github.com/alibaba/DataX/blob/master/introduction.mdhttps://github.com/alibaba/DataX/blob/mast…...
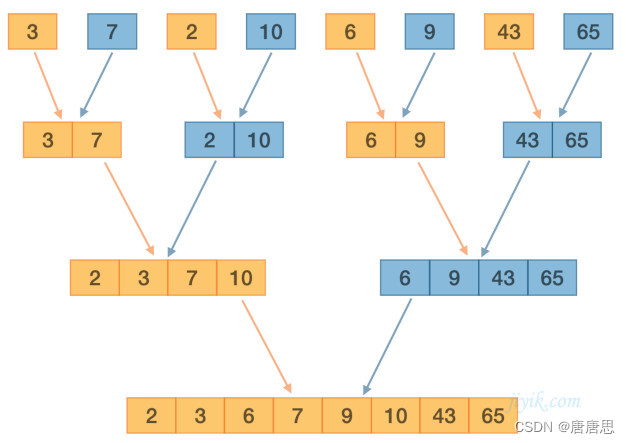
【非递归版】归并排序算法(2)
目录 MergeSortNonR归并排序 非递归&归并排序VS快速排序 整体思想 图解分析 代码实现 时间复杂度 归并排序在硬盘上的应用(外排序) MergeSortNonR归并排序 前面的快速排序的非递归实现,我们借助栈实现。这里我们能否也借助栈去…...

[C++]C++实现本地TCP通讯的示例代码
这篇文章主要为大家详细介绍了C如何利用TCP技术,实现本地ROS1和ROS2的通讯,文中的示例代码讲解详细,感兴趣的小伙伴可以跟随小编一起学习一下 概要服务端代码 头文件源代码客户端代码 概要 利用TCP技术,实现本地ROS1和ROS2的通讯。 服务端代码 头文件 #include &…...

Sora - 探索AI视频模型的无限可能
文章目录 每日一句正能量前言技术解析应用场景未来展望伦理与创意用户体验与互动后记 每日一句正能量 . 一个人,如果没有经受过投资失败的痛楚,又怎么会看到绝望之后的海阔天空。很多时候,经历了人生中最艰难的事,反而锻造了最坚强…...

【JavaScript 漫游】【022】事件模型
文章简介 本篇文章为【JavaScript 漫游】专栏的第 022 篇文章,对 JavaScript 中事件模型相关的知识点进行了总结。 监听函数 浏览器的事件模型,就是通过监听函数(listener)对事件做出反应。事件发生后,浏览器监听到…...
)
告别命令行恐惧:用RU.EXE快捷键玩转硬件诊断(附常用命令速查表)
告别命令行恐惧:用RU.EXE快捷键玩转硬件诊断(附常用命令速查表) 在工业计算机维护和硬件诊断领域,RU.EXE一直是资深工程师的秘密武器。但对于每天奔波在不同现场的技术支持人员来说,面对这个功能强大却界面复古的工具&…...
)
Windows 11下保姆级安装Isaac Sim 4.5.0与Isaac Lab避坑全记录(含CUDA 12.8配置)
Windows 11下Isaac Sim 4.5.0与Isaac Lab全流程部署指南(RTX 4090实测版) 对于机器人仿真和AI开发领域的从业者来说,NVIDIA Isaac Sim和Isaac Lab无疑是当前最强大的工具组合之一。然而,当我在自己的RTX 4090显卡上首次尝试部署这…...
Pixel Fashion Atelier保姆级教程:修复WebUI中文乱码与像素字体缺失问题
Pixel Fashion Atelier保姆级教程:修复WebUI中文乱码与像素字体缺失问题 1. 问题背景与现象 Pixel Fashion Atelier作为一款融合复古像素风格的AI图像生成工具,其独特的界面设计是其核心亮点之一。然而,部分用户在部署和使用过程中可能会遇…...

AsrTools全攻略:革新语音转文字效率的智能解决方案
AsrTools全攻略:革新语音转文字效率的智能解决方案 【免费下载链接】AsrTools ✨ AsrTools: Smart Voice-to-Text Tool | Efficient Batch Processing | User-Friendly Interface | No GPU Required | Supports SRT/TXT Output | Turn your audio into accurate tex…...

douyin-downloader:抖音视频批量下载解决方案
douyin-downloader:抖音视频批量下载解决方案 【免费下载链接】douyin-downloader 项目地址: https://gitcode.com/GitHub_Trending/do/douyin-downloader 在数字内容爆炸的时代,视频资源的高效管理已成为内容创作者、教育工作者和社交媒体运营者…...

京东云GPU服务器省钱攻略:如何根据业务需求灵活选择计费模式和虚拟化方案
京东云GPU服务器成本优化实战指南:精准匹配业务需求的选型策略 在AI与高性能计算领域,GPU服务器已成为企业技术基础设施的核心组件。然而,面对复杂的计费模式、多样的硬件配置以及差异化的虚拟化方案,许多技术决策者常常陷入"…...

深入解析影像显示驱动:MIPI与I2C的协同设计与应用
1. MIPI与I2C:影像显示驱动的黄金搭档 第一次拆开手机屏幕排线时,我看到两条截然不同的线路——细如发丝的MIPI差分对和普通的I2C双绞线。这就像发现城市地下的两套管网系统:MIPI是高压供水主管道,每秒输送数GB的图像数据…...
)
Linux服务器运维:5个最容易被忽略的故障排查技巧(附实战命令)
Linux服务器运维:5个最容易被忽略的故障排查技巧(附实战命令) 在Linux服务器运维的日常工作中,有些故障排查点往往被工程师们忽视,直到问题爆发才追悔莫及。本文将揭示五个最容易被忽略但至关重要的排查技巧ÿ…...

Qwen3.5-4B-Claude-Opus高性能推理教程:Q4_K_M量化下GPU吞吐量实测分析
Qwen3.5-4B-Claude-Opus高性能推理教程:Q4_K_M量化下GPU吞吐量实测分析 1. 模型概述 Qwen3.5-4B-Claude-4.6-Opus-Reasoning-Distilled-GGUF是基于Qwen3.5-4B架构的推理蒸馏模型,特别强化了结构化分析、分步骤回答以及代码与逻辑类问题的处理能力。该版…...

清华学位论文高效排版:thuthesis一站式规范生成解决方案
清华学位论文高效排版:thuthesis一站式规范生成解决方案 【免费下载链接】thuthesis LaTeX Thesis Template for Tsinghua University 项目地址: https://gitcode.com/gh_mirrors/th/thuthesis 🎯 价值定位:为什么选择thuthesis模板&a…...