python爬虫之协程知识点记录
一、协程
概念
-
协程
又称微线程(纤程),是一种用户态的轻量级线程
-
子程序
在所有的语言中都是层级调用的,比如A中调用B,B在执行过程中调用C,C执行完返回,B执行完返回,最后是A执行完毕。这是通过栈实现的,一个函数就是一个执行的子程序,子程序的调用总是有一个入口、一次返回,调用的顺序是明确的
-
理解协程
普通理解:线程是系统级别的,它们是由操作系统调度。协程是程序级别,由程序员根据需求自己调度。我们把一个线程中的一个个函数称为子程序,那么一个子程序在执行的过程中可以中断去执行别的子程序,这就是协程。也就是说同一个线程下的一段代码1执行执行着就中断,然后去执行另一段代码2,当再次回来执行代码1时,接着从之前的中断的位置继续向下执行
-
优点
a、最大的优势就是协程极高的执行效率。因为子程序切换不是线程切换,而是由程序自身控制,因此,没有线程切换的开销,和多线程比,线程数量越多,协程的性能优势就越明显。
b、不需要多线程的锁机制,因为只有一个线程,也不存在同时写变量冲突,在协程中控制共享资源不加锁,只需要判断状态就好了,所以执行效率比多线程高很多。
-
缺点
a、无法利用多核CPU,协程的本质是单个线程,它不能同时将多个CPU的多个核心使用上,失去了标准线程使用多CPU的能力。
b、进行阻塞操作(操作IO)会阻塞整个程序
二、同步与异步
1、同步与异步的概念
-
前言
python由于GIL(全局锁)的存在,不能发挥多核的优势,其性能一直饱受诟病。然而在IO密集型的网络编程里,异步处理比同步处理能提升成百上千倍的效率
IO密集型就是磁盘的读取数据和输出数据非常大的时候就是属于IO密集型 由于IO操作的运行时间远远大于cpu、内存运行时间,所以任务的大部分时间都是在等待IO操作完成,IO的特点是cpu消耗小,所以,IO任务越多,cpu效率越高,当然不是越多越好,有一个极限值。
-
同步
指完成事务的逻辑,先执行第一个事务,如果阻塞了,会一直等待,直到这个事务完成,再执行第二个事务,顺序执行
-
异步
是和同步相对的,异步是指在处理调用这个事务的之后,不会等待这个事务的处理结果,直接处理第二个事务去了,通过状态、通知、回调来通知调用者处理结果
2、同步与异步代码
-
同步
import time def run(index):print("lucky is a good man", index)time.sleep(2)print("lucky is a nice man", index) for i in range(1, 5):run(i) -
异步
说明:后面的课程中会使用到asyncio模块,现在的目的是使同学们理解异步思想
import time
import asyncio
async def run(i): print("lucky is a good man", i) # 模拟一个耗时IO await asyncio.sleep(2) print("lucky is a nice man", i)
if name == "main": loop = asyncio.get_event_loop() tasks = [] t1 = time.time()
for url in range(1, 5):coroutine = run(url)task = asyncio.ensure_future(coroutine)tasks.append(task)loop.run_until_complete(asyncio.wait(tasks))t2 = time.time()print("总耗时:%.2f" % (t2 - t1))## 三、asyncio模块 ### 1、概述 - asyncio模块 是python3.4版本引入的标准库,直接内置了对异步IO的操作 - 编程模式 是一个消息循环,我们从asyncio模块中直接获取一个EventLoop的引用,然后把需要执行的协程扔到EventLoop中执行,就实现了异步IO - 说明 到目前为止实现协程的不仅仅只有asyncio,tornado和gevent都实现了类似功能 - 关键字的说明 | 关键字 | 说明 || ----------- | ---------------------------------------- || event_loop | 消息循环,程序开启一个无限循环,把一些函数注册到事件循环上,当满足事件发生的时候,调用相应的协程函数 || coroutine | 协程对象,指一个使用async关键字定义的函数,它的调用不会立即执行函数,而是会返回一个协程对象。协程对象需要注册到事件循环,由事件循环调用 || task | 任务,一个协程对象就是一个原生可以挂起的函数,任务则是对协程进一步封装,其中包含了任务的各种状态 || async/await | python3.5用于定义协程的关键字,async定义一个协程,await用于挂起阻塞的异步调用接口 | ### 2、asyncio基本使用 - 定义一个协程
```pythonimport asyncioimport time
# 通过async关键字定义了一个协程,协程是不能直接运行的,需要将协程放到消息循环中async def run(x):print("waiting:%d"%x)await asyncio.sleep(x)print("结束run")
#得到一个协程对象coroutine = run(2)asyncio.run(coroutine)等同于
import asyncioimport time
# 通过async关键字定义了一个协程,协程是不能直接运行的,需要将协程放到消息循环中async def run(x):print("waiting:%d"%x)await asyncio.sleep(x)print("结束run")
#得到一个协程对象coroutine = run(2)
# 创建一个消息循环loop = asyncio.get_event_loop()
#将协程对象加入到消息循环loop.run_until_complete(coroutine)-
创建一个任务
import asyncio import time async def run(x):print("waiting:%d"%x)await asyncio.sleep(x)print("结束run") coroutine = run(2) #创建任务 task = asyncio.ensure_future(coroutine) loop = asyncio.get_event_loop() # 将任务加入到消息循环 loop.run_until_complete(task) -
阻塞和await
async可以定义协程,使用await可以针对耗时操作进行挂起,就与生成器的yield一样,函数交出控制权。协程遇到await,消息循环会挂起该协程,执行别的协程,直到其他协程也会挂起或者执行完毕,在进行下一次执行
-
获取返回值
import time import asyncio async def run(url):print("开始向'%s'要数据……"%(url))# 向百度要数据,网络IOawait asyncio.sleep(5)data = "'%s'的数据"%(url)print("给你数据")return data # 定义一个回调函数 def call_back(future):print("call_back:", future.result()) coroutine = run("百度") # 创建一个任务对象 task = asyncio.ensure_future(coroutine) # 给任务添加回调,在任务结束后调用回调函数 task.add_done_callback(call_back) loop = asyncio.get_event_loop() loop.run_until_complete(task)
3、多任务
-
同步
同时请求"百度", "阿里", "腾讯", "新浪"四个网站,假设响应时长均为2秒
import time def run(url):print("开始向'%s'要数据……"%(url))# 向百度要数据,网络IOtime.sleep(2)data = "'%s'的数据"%(url)return data if __name__ == "__main__":t1 = time.time()for url in ["百度", "阿里", "腾讯", "新浪"]:print(run(url))t2 = time.time()print("总耗时:%.2f"%(t2-t1)) -
异步
同时请求"百度", "阿里", "腾讯", "新浪"四个网站,假设响应时长均为2秒
使用ensure_future创建多任务
import time import asyncioasync def run(url):print("开始向'%s'要数据……"%(url))await asyncio.sleep(2)data = "'%s'的数据"%(url)return datadef call_back(future):print("call_back:", future.result())if __name__ == "__main__":loop = asyncio.get_event_loop()tasks = []t1 = time.time()for url in ["百度", "阿里", "腾讯", "新浪"]:coroutine = run(url)task = asyncio.ensure_future(coroutine)task.add_done_callback(call_back)tasks.append(task)# 同时添加4个异步任务# asyncio.wait(tasks) 将任务的列表又变成 <coroutine object wait at 0x7f80f43408c0>loop.run_until_complete(asyncio.wait(tasks))t2 = time.time()print("总耗时:%.2f" % (t2 - t1))-
封装成异步函数
import time
import asyncio
async def run(url):print("开始向'%s'要数据……" % (url))await asyncio.sleep(2)data = "'%s'的数据" % (url)return data
def call_back(future):print("call_back:", future.result())
async def main():tasks = []t1 = time.time()for url in ["百度", "阿里", "腾讯", "新浪"]:coroutine = run(url)task = asyncio.ensure_future(coroutine)task.add_done_callback(call_back)tasks.append(task)# 同时添加4个异步任务await asyncio.wait(tasks)t2 = time.time()print("总耗时:%.2f" % (t2 - t1))if __name__ == "__main__":loop = asyncio.get_event_loop()loop.run_until_complete(main())
-
使用loop.create_task创建多任务
import timeimport asyncioasync def run(url):print("开始向'%s'要数据……" % (url))await asyncio.sleep(2)data = "'%s'的数据" % (url)return datadef call_back(future):print("call_back:", future.result())if __name__ == "__main__":loop = asyncio.get_event_loop()tasks = []t1 = time.time()for url in ["百度", "阿里", "腾讯", "新浪"]:coroutine = run(url)# task = asyncio.ensure_future(coroutine)task = loop.create_task(coroutine)task.add_done_callback(call_back)tasks.append(task)# 同时添加4个异步任务loop.run_until_complete(asyncio.wait(tasks))t2 = time.time()print("总耗时:%.2f" % (t2 - t1))-
封装成异步函数
import time
import asyncio
async def run(url):print("开始向'%s'要数据……" % (url))await asyncio.sleep(2)data = "'%s'的数据" % (url)return data
def call_back(future):print("call_back:", future.result())
async def main():tasks = []t1 = time.time()for url in ["百度", "阿里", "腾讯", "新浪"]:coroutine = run(url)task = loop.create_task(coroutine)task.add_done_callback(call_back)tasks.append(task)# 同时添加4个异步任务await asyncio.wait(tasks)t2 = time.time()print("总耗时:%.2f" % (t2 - t1))if __name__ == "__main__":# asyncio.run(main())loop = asyncio.get_event_loop()loop.run_until_complete(main())
使用asyncio.create_task创建多任务
import timeimport asyncioasync def run(url):print("开始向'%s'要数据……" % (url))await asyncio.sleep(2)data = "'%s'的数据" % (url)return datadef call_back(future):print("call_back:", future.result())async def main():tasks = []t1 = time.time()for url in ["百度", "阿里", "腾讯", "新浪"]:coroutine = run(url)task = asyncio.create_task(coroutine)task.add_done_callback(call_back)tasks.append(task)# 同时添加4个异步任务await asyncio.wait(tasks)t2 = time.time()print("总耗时:%.2f" % (t2 - t1))if __name__ == "__main__":# asyncio.run(main())loop = asyncio.get_event_loop()loop.run_until_complete(main())4、Task 概念及用法
-
Task,是 python 中与事件循环进行交互的一种主要方式。
创建 Task,意思就是把协程封装成 Task 实例,并追踪协程的 运行 / 完成状态,用于未来获取协程的结果。
-
Task 核心作用: 在事件循环中添加多个并发任务;
具体来说,是通过 asyncio.create_task() 创建 Task,让协程对象加入事件循环中,等待被调度执行。
注意:Python 3.7 以后的版本支持 asyncio.create_task() ,在此之前的写法为 loop.create_task() ,开发过程中需要注意代码写 法对不同版本 python 的兼容性。
-
需要指出的是,协程封装为 Task 后不会立马启动,当某个代码 await 这个 Task 的时候才会被执行。
当多个 Task 被加入一个 task_list 的时候,添加 Task 的过程中 Task 不会执行,必须要用
await asyncio.wait()或await asyncio.gather()将 Task 对象加入事件循环中异步执行。 -
一般在开发中,常用的写法是这样的:
-- 先创建 task_list 空列表; -- 然后用 asyncio.create_task() 创建 Task;
-- 再把 Task 对象加入 task_list ;
-- 最后使用 await asyncio.wait 或 await asyncio.gather 将 Task 对象加入事件循环中异步执行。
注意: 创建 Task 对象时,除了可以使用 asyncio.create_task() 之外,还可以用最低层级的 loop.create_task() 或 asyncio.ensure_future() ,他们都可以用来创建 Task 对象,其中关于 ensure_future 相关内容本文接下来会一起讲。
-
Task 简单用法
import asyncioasync def func():print(1)await asyncio.sleep(2)print(2)return "test"async def main():print("main start")# python 3.7及以上版本的写法task1 = asyncio.create_task(func())task2 = asyncio.create_task(func())# python3.7以前的写法# task1 = asyncio.ensure_future(func())# task2 = asyncio.ensure_future(func())print("main end")ret1 = await task1ret2 = await task2print(ret1, ret2)# python3.7以后的写法 asyncio.run(main())# python3.7以前的写法 # loop = asyncio.get_event_loop() # loop.run_until_complete(main())""" 在创建task的时候,就将创建好的task添加到了时间循环当中,所以说必须得有时间循环,才可以创建task,否则会报错 """
-
task用法实例
import asyncio
import arrowdef current_time():'''获取当前时间:return:'''cur_time = arrow.now().to('Asia/Shanghai').format('YYYY-MM-DD HH:mm:ss')return cur_time
async def func(sleep_time): func_name_suffix = sleep_time # 使用 sleep_time (函数 I/O 等待时长)作为函数名后缀,以区分任务对象 print(f"[{current_time()}] 执行异步函数 {func.name}-{func_name_suffix}") await asyncio.sleep(sleep_time) print(f"[{current_time()}]函数{func.name}-{func_name_suffix} 执行完毕") return f"【[{current_time()}] 得到函数 {func.name}-{func_name_suffix} 执行结果】"
async def run(): task_list = [] for i in range(5): task = asyncio.create_task(func(i)) task_list.append(task) done, pending = await asyncio.wait(task_list) for done_task in done: print((f"[{current_time()}]得到执行结果 {done_task.result()}")) def main(): loop = asyncio.get_event_loop() loop.run_until_complete(run())
if name == 'main': main()
+ 代码执行结果如下:```python/usr/local/bin/python3.7 /Users/xialigang/PycharmProjects/爬虫/123.py[2022-07-01 16:44:57] 执行异步函数 func-0[2022-07-01 16:44:57] 执行异步函数 func-1[2022-07-01 16:44:57] 执行异步函数 func-2[2022-07-01 16:44:57] 执行异步函数 func-3[2022-07-01 16:44:57] 执行异步函数 func-4[2022-07-01 16:44:57]函数func-0 执行完毕[2022-07-01 16:44:58]函数func-1 执行完毕[2022-07-01 16:44:59]函数func-2 执行完毕[2022-07-01 16:45:00]函数func-3 执行完毕[2022-07-01 16:45:01]函数func-4 执行完毕[2022-07-01 16:45:01]得到执行结果 【[2022-07-01 16:44:59] 得到函数 func-2 执行结果】[2022-07-01 16:45:01]得到执行结果 【[2022-07-01 16:44:57] 得到函数 func-0 执行结果】[2022-07-01 16:45:01]得到执行结果 【[2022-07-01 16:45:00] 得到函数 func-3 执行结果】[2022-07-01 16:45:01]得到执行结果 【[2022-07-01 16:44:58] 得到函数 func-1 执行结果】[2022-07-01 16:45:01]得到执行结果 【[2022-07-01 16:45:01] 得到函数 func-4 执行结果】Process finished with exit code 0
5、协程嵌套与返回值
使用async可以定义协程,协程用于耗时的io操作,我们也可以封装更多的io操作过程,这样就实现了嵌套的协程,即一个协程中await了另外一个协程,如此连接起来
import time
import asyncioasync def run(url):print("开始向'%s'要数据……"%(url))await asyncio.sleep(2)data = "'%s'的数据"%(url)return datadef call_back(future):print("call_back:", future.result())async def main():tasks = []for url in ["百度", "阿里", "腾讯", "新浪"]:coroutine = run(url)task = asyncio.ensure_future(coroutine)# task.add_done_callback(call_back)tasks.append(task)# #1、可以没有回调函数# dones, pendings = await asyncio.wait(tasks)# #处理数据,类似回调,建议使用回调# for t in dones:# print("数据:%s"%(t.result()))# #2、可以没有回调函数# results = await asyncio.gather(*tasks)# # 处理数据,类似回调,建议使用回调# for result in results:# print("数据:%s"%(result))# 3、有无回调函数均可以# return await asyncio.wait(tasks)# 4、有无回调函数均可以# return await asyncio.gather(*tasks)if __name__ == "__main__":t1 = time.time()loop = asyncio.get_event_loop()#1、# loop.run_until_complete(main())# asyncio.run(main()) # 等同于上面两行代码#2、# loop.run_until_complete(main())# # 3、# dones, pendings = loop.run_until_complete(main())# #处理数据,类似回调,建议使用回调# for t in dones:# print("数据:%s"%(t.result()))# 4、# results = loop.run_until_complete(main())# for result in results:# print("数据:%s"%(result))t2 = time.time()print("总耗时:%.2f" % (t2 - t1))-
asyncio.wait和asyncio.gather的异同
-
异同点综述
相同:从功能上看, asyncio.wait 和 asyncio.gather 实现的效果是相同的,都是把所有 Task 任务结果收集起来。
不同: asyncio.wait 会返回两个值: done 和 pending , done 为已完成的协程 Task , pending 为超时未完成的协程 Task ,需通过 future.result 调用 Task 的 result ;而 asyncio.gather 返回的是所有已完成 Task 的 result ,不需要再进行调用或其他操作,就可以得到全部结果。
-
asyncio.wait 用法:
最常见的写法是:
await asyncio.wait(task_list) 。import asyncio import arrowdef current_time():'''获取当前时间:return:'''cur_time = arrow.now().to('Asia/Shanghai').format('YYYY-MM-DD HH:mm:ss')return cur_timeasync def func(sleep_time):func_name_suffix = sleep_time # 使用 sleep_time (函数 I/O 等待时长)作为函数名后缀,以区分任务对象print(f"[{current_time()}] 执行异步函数 {func.__name__}-{func_name_suffix}")await asyncio.sleep(sleep_time)print(f"[{current_time()}]函数{func.__name__}-{func_name_suffix} 执行完毕")return f"【[{current_time()}] 得到函数 {func.__name__}-{func_name_suffix} 执行结果】"async def run():task_list = []for i in range(5):task = asyncio.create_task(func(i))task_list.append(task)done, pending = await asyncio.wait(task_list)for done_task in done:print((f"[{current_time()}]得到执行结果 {done_task.result()}"))def main():loop = asyncio.get_event_loop()loop.run_until_complete(run())if __name__ == '__main__':main()代码执行结果如下:
/usr/local/bin/python3.7 /Users/xialigang/PycharmProjects/爬虫/123.py
[2022-07-04 15:31:47] 执行异步函数 func-0
[2022-07-04 15:31:47] 执行异步函数 func-1
[2022-07-04 15:31:47] 执行异步函数 func-2
[2022-07-04 15:31:47] 执行异步函数 func-3
[2022-07-04 15:31:47] 执行异步函数 func-4
[2022-07-04 15:31:47]函数func-0 执行完毕
[2022-07-04 15:31:48]函数func-1 执行完毕
[2022-07-04 15:31:49]函数func-2 执行完毕
[2022-07-04 15:31:50]函数func-3 执行完毕
[2022-07-04 15:31:51]函数func-4 执行完毕
[2022-07-04 15:31:51]得到执行结果 【[2022-07-04 15:31:49] 得到函数 func-2 执行结果】
[2022-07-04 15:31:51]得到执行结果 【[2022-07-04 15:31:47] 得到函数 func-0 执行结果】
[2022-07-04 15:31:51]得到执行结果 【[2022-07-04 15:31:50] 得到函数 func-3 执行结果】
[2022-07-04 15:31:51]得到执行结果 【[2022-07-04 15:31:48] 得到函数 func-1 执行结果】
[2022-07-04 15:31:51]得到执行结果 【[2022-07-04 15:31:51] 得到函数 func-4 执行结果】Process finished with exit code 0
-
asyncio.gather 用法:
最常见的用法是:
await asyncio.gather(*task_list),注意这里task_list前面有一个*。import asyncio import arrowdef current_time():'''获取当前时间:return:'''cur_time = arrow.now().to('Asia/Shanghai').format('YYYY-MM-DD HH:mm:ss')return cur_timeasync def func(sleep_time):func_name_suffix = sleep_time # 使用 sleep_time (函数 I/O 等待时长)作为函数名后缀,以区分任务对象print(f"[{current_time()}] 执行异步函数 {func.__name__}-{func_name_suffix}")await asyncio.sleep(sleep_time)print(f"[{current_time()}]函数{func.__name__}-{func_name_suffix} 执行完毕")return f"【[{current_time()}] 得到函数 {func.__name__}-{func_name_suffix} 执行结果】"async def run():task_list = []for i in range(5):task = asyncio.create_task(func(i))task_list.append(task)results = await asyncio.gather(*task_list)for result in results:print((f"[{current_time()}]得到执行结果 {result}"))def main():loop = asyncio.get_event_loop()loop.run_until_complete(run())if __name__ == '__main__':main()代码执行结果如下:
/usr/local/bin/python3.7 /Users/xialigang/PycharmProjects/爬虫/123.py
[2022-07-04 15:33:24] 执行异步函数 func-0
[2022-07-04 15:33:24] 执行异步函数 func-1
[2022-07-04 15:33:24] 执行异步函数 func-2
[2022-07-04 15:33:24] 执行异步函数 func-3
[2022-07-04 15:33:24] 执行异步函数 func-4
[2022-07-04 15:33:24]函数func-0 执行完毕
[2022-07-04 15:33:25]函数func-1 执行完毕
[2022-07-04 15:33:26]函数func-2 执行完毕
[2022-07-04 15:33:27]函数func-3 执行完毕
[2022-07-04 15:33:28]函数func-4 执行完毕
[2022-07-04 15:33:28]得到执行结果 【[2022-07-04 15:33:24] 得到函数 func-0 执行结果】
[2022-07-04 15:33:28]得到执行结果 【[2022-07-04 15:33:25] 得到函数 func-1 执行结果】
[2022-07-04 15:33:28]得到执行结果 【[2022-07-04 15:33:26] 得到函数 func-2 执行结果】
[2022-07-04 15:33:28]得到执行结果 【[2022-07-04 15:33:27] 得到函数 func-3 执行结果】
[2022-07-04 15:33:28]得到执行结果 【[2022-07-04 15:33:28] 得到函数 func-4 执行结果】Process finished with exit code 0
-
四、aiohttp与aiofiles
1、安装与使用
pip install aiohttp
2、简单实例使用
aiohttp的自我介绍中就包含了客户端和服务器端,所以我们分别来看下客户端和服务器端的简单实例代码。
客户端:
import aiohttp
import asyncioasync def fetch(session, url):async with session.get(url) as response:return await response.text()async def main():async with aiohttp.ClientSession() as session:html = await fetch(session, "http://httpbin.org/headers")print(html)asyncio.run(main())
"""输出结果:
{"headers": {"Accept": "*/*", "Accept-Encoding": "gzip, deflate", "Host": "httpbin.org", "User-Agent": "Python/3.7 aiohttp/3.6.2"}
}
"""
这个代码是不是很简单,一个函数用来发起请求,另外一个函数用来下载网页。
3、入门
简单示范
首先是学习客户端,也就是用来发送http请求的用法。首先看一段代码,会在代码中讲述需要注意的地方:
import aiohttp
import asyncioasync def main():async with aiohttp.ClientSession() as session:async with session.get('http://httpbin.org/get') as resp:print(resp.status)print(await resp.text())asyncio.run(main())
代码解释:
在网络请求中,一个请求就是一个会话,然后aiohttp使用的是ClientSession来管理会话,所以第一个重点,看一下ClientSession:
class ClientSession:"""First-class interface for making HTTP requests."""
在源码中,这个类的注释是使用HTTP请求接口的第一个类。然后上面的代码就是实例化一个ClientSession类然后命名为session,然后用session去发送请求。这里有一个坑,那就是ClientSession.get()协程的必需参数只能是str类和yarl.URL的实例。
当然这只是get请求,其他的请求都是支持的:
session.post('http://httpbin.org/post', data='data')
session.get('http://httpbin.org/get')
4、在URL中传递参数
有时候在发起网络请求的时候需要附加一些参数到url中,这一点也是支持的。
import aiohttp
import asyncioasync def main():async with aiohttp.ClientSession() as session:params = {'key1': 'value1', 'key2': 'value2'}async with session.get('http://httpbin.org/get',params=params) as resp:print(resp.url)asyncio.run(main())我们可以通过params参数来指定要传递的参数,
同时如果需要指定一个键对应多个值的参数,那么MultiDict就在这个时候起作用了。你可以传递两个元祖列表来作为参数:
import aiohttp
import asyncioasync def main():async with aiohttp.ClientSession() as session:params = [('key', 'value1'), ('key', 'value2')]async with session.get('http://httpbin.org/get',params=params) as r:expect = 'http://httpbin.org/get?key=value2&key=value1'# assert str(r.url) == expectprint(r.url)
asyncio.run(main())
5、读取响应内容
我们可以读取到服务器的响应状态和响应内容,这也是使用请求的一个很重要的部分。通过status来获取响应状态码,text()来获取到响应内容,当然也可以之计指明编码格式为你想要的编码格式:
async def main():async with aiohttp.ClientSession() as session:async with session.get('http://httpbin.org/get') as resp:print(resp.status)print(await resp.text(encoding=utf-8))"""输出结果: 200 <!doctype html> <html lang="zh-CN"> <head> ......"""
6、非文本内容格式
对于网络请求,有时候是去访问一张图片,这种返回值是二进制的也是可以读取到的:
await resp.read()
将text()方法换成read()方法就好。
7、请求的自定义
ClientResponse(客户端响应)对象含有request_info(请求信息),主要是url和headers信息。 raise_for_status结构体上的信息会被复制给ClientResponseError实例。
(1) 自定义Headers
有时候做请求的时候需要自定义headers,主要是为了让服务器认为我们是一个浏览器。然后就需要我们自己来定义一个headers:
headers = {"User-Agent": "Mozilla/5.0 (Windows NT 10.0; Win64; x64) ""AppleWebKit/537.36 (KHTML, like Gecko)"" Chrome/78.0.3904.108 Safari/537.36"}
await session.post(url, headers=headers)
(2) 如果出现ssl验证失败的处理
import aiohttp
import asyncio
from aiohttp import TCPConnectorasync def main():async with aiohttp.ClientSession(connector=TCPConnector(ssl=False)) as session:pass
asyncio.run(main())
(3) 自定义cookie
发送你自己的cookies给服务器,你可以为ClientSession对象指定cookies参数:
url = 'http://httpbin.org/cookies'
cookies = {'cookies_are': 'working'}
async with ClientSession(cookies=cookies) as session:async with session.get(url) as resp:assert await resp.json() == {"cookies": {"cookies_are": "working"}}
(4) 使用代理
有时候在写爬虫的时候需要使用到代理,所以aiohttp也是支持使用代理的,我们可以在发起请求的时候使用代理,只需要使用关键字proxy来指明就好,但是有一个很难受的地方就是它只支持http代理,不支持HTTPS代理。使用起来大概是这样:
proxy = "http://127.0.0.1:10809
async with aiohttp.ClientSession(headers=headers) as session:async with session.get(url=login_url, proxy=proxy) as response:resu = await response.text()
使用起来大概是这样,然后代理记得改成自己的。
8、aiofiles文件读写
8.1 概述
平常使用的file操作模式为同步,并且为线程阻塞。当程序I/O并发次数高的时候,CPU被阻塞,形成闲置。
线程开启文件读取异步模式
用线程(Thread)方式来解决。硬盘缓存可以被多个线程访问,因此通过不同线程访问文件可以部分解决。但此方案涉及线程开启关闭的开销,而且不同线程间数据交互比较麻烦。
from threading import Thread
for file in list_file:tr = Thread(target=file.write, args=(data,))tr.start()
使用已编写好的第三方插件-aiofiles,支持异步模式
使用aio插件来开启文件的非阻塞异步模式。
8.2 安装方法
pip install aiofiles
这个插件的使用和python原生open 一致,而且可以支持异步迭代
8.3 实例
打开文件
import asyncio
import aiofilesasync def main():async with aiofiles.open('first.m3u8', mode='r') as f:contents = await f.read()print(contents)if __name__ == '__main__':asyncio.run(main())
迭代import asyncio
import aiofilesasync def main():async with aiofiles.open('filename') as f:async for line in f:print(line)if __name__ == '__main__':asyncio.run(main())
9、并发控制
semaphore,控制并发
semaphore = asyncio.Semaphore(10)
实例
#!/usr/bin/python
import asyncio
import os
import aiofiles
import aiohttp
import requests
from bs4 import BeautifulSoupdef get_page_source(web):headers = {'user-agent': 'Mozilla/5.0 (Windows NT 10.0; Win64; x64) AppleWebKit/537.36 (KHTML, like Gecko) Chrome/100.0.4896.75 Safari/537.36'}response = requests.get(web, headers=headers)response.encoding = 'utf-8'return response.textdef parse_page_source(html):book_list = []soup = BeautifulSoup(html, 'html.parser')a_list = soup.find_all('div', attrs={'class': 'mulu-list quanji'})for a in a_list:a_list = a.find_all('a')for href in a_list:chapter_url = href['href']book_list.append(chapter_url)return book_listdef get_book_name(book_page):book_number = book_page.split('/')[-1].split('.')[0]book_chapter_name = book_page.split('/')[-2]return book_number, book_chapter_nameasync def aio_download_one(chapter_url, signal):number, c_name = get_book_name(chapter_url)for c in range(10):try:async with signal:async with aiohttp.ClientSession() as session:async with session.get(chapter_url) as resp:page_source = await resp.text()soup = BeautifulSoup(page_source, 'html.parser')chapter_name = soup.find('h1').textp_content = soup.find('div', attrs={'class': 'neirong'}).find_all('p')content = [p.text + '\n' for p in p_content]chapter_content = '\n'.join(content)if not os.path.exists(f'{book_name}/{c_name}'):os.makedirs(f'{book_name}/{c_name}')async with aiofiles.open(f'{book_name}/{c_name}/{number}_{chapter_name}.txt', mode="w",encoding='utf-8') as f:await f.write(chapter_content)print(chapter_url, "下载完毕!")return ""except Exception as e:print(e)print(chapter_url, "下载失败!, 重新下载. ")return chapter_urlasync def aio_download(url_list):tasks = []semaphore = asyncio.Semaphore(10)for h in url_list:tasks.append(asyncio.create_task(aio_download_one(h, semaphore)))await asyncio.wait(tasks)if __name__ == '__main__':url = 'https://www.51shucheng.net/daomu/guichuideng'book_name = '鬼吹灯'if not os.path.exists(book_name):os.makedirs(book_name)source = get_page_source(url)href_list = parse_page_source(source)loop = asyncio.get_event_loop()loop.run_until_complete(aio_download(href_list))loop.close()
相关文章:

python爬虫之协程知识点记录
一、协程 概念 协程 又称微线程(纤程),是一种用户态的轻量级线程 子程序 在所有的语言中都是层级调用的,比如A中调用B,B在执行过程中调用C,C执行完返回,B执行完返回,最后是A执行完毕。这是通过栈实现的&a…...
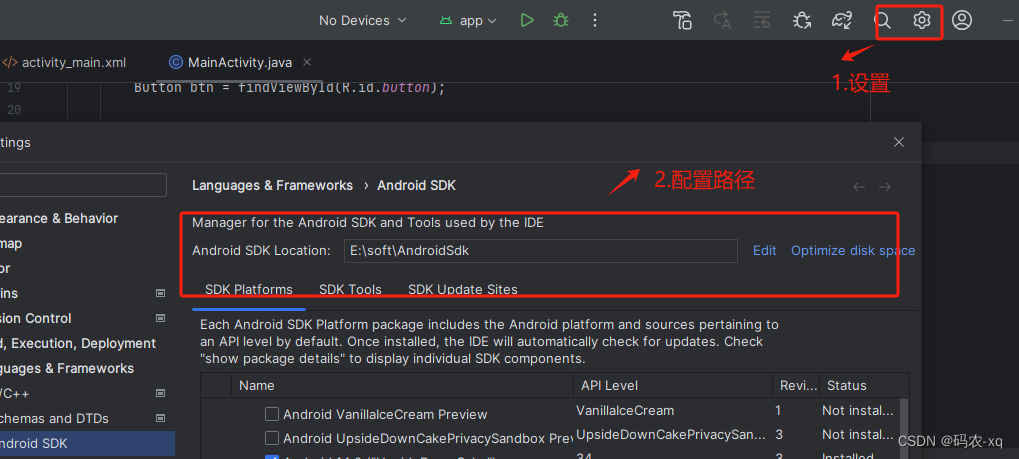
安卓开发1- android stdio环境搭建
安卓开发1-android stdio环境搭建 Jdk环境搭建 1. 准备Jdk,这边已经准备好了jdk1.8.0,该文件直接使用即可 2. 系统变量添加 %JAVA_HOME%\bin JAVA_HOME 3. 系统变量,Path路径添加 4. 添加完成后,输入命令javac / java -version,验证环…...

qt QRadioButton 及QButtonGroup 使用
QRadioButton 放在组合框QGroupBox中,再点击时,即使有多个QRadioButton按钮,同时选中的也就只有一个。 如下图所示, 对于多个QRadioButton,每个按钮都写一个槽函数是不太明智的选择,需要将QRadioButton放在…...
)
【LeetCode-178】最长重复子串(动归)
目录 LeetCode718.最长重复子串 题目描述 解法1:动态规划 代码实现 题目链接 题目描述 给两个整数数组 A 和 B ,返回两个数组中公共的、长度最长的子数组的长度。 示例: 输入: A: [1,2,3,2,1] B: [3,2,1,4,7] 输出&…...
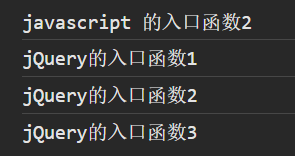
1、jQuery介绍、css()、选择器、事件、动画
一、jQuery介绍? 1、什么是jQuery? 是一个JavaScript函数库 2、jQuery特点 写的少,做的多 3、jQuery的安装 直接下载引入 <script src"jquery-1.10.2.min.js"></script>通过cdn引入 <script src"https…...
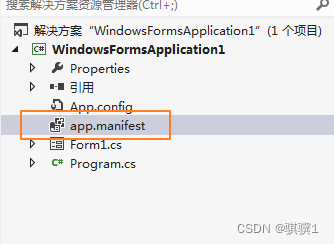
ArcEngine 调用GP工具时,出现C++ R6034错误
1、Arcengine 调用GP工具时,遇到正试图在 os 加载程序锁内执行托管代码 问题 使用:把VS菜单的 调试->异常->Managed Debuggin Assistants->LoaderLock 的选中状态去掉。不会弹出该错误。 2 编译后运行EXE时,出现C R6034问题 ArcEng…...

windows下基于docker-desktop 安装 mysql 5.7
0.背景 docker-desktop v4.27.1Windows 11 22H2 docker-desktop 需要wsl的支持,一般win11新机子都默认开启了,安装docker-desktop 一路next即可.win10老版本需要自行安装开启wsl.一个小建议是,如果你的win10安装wsl时各种错误无法解决,建议升级到win11大概率解决,本人亲身经历…...

什么是Rust 语言
Rust 是一种专注于性能和内存安全的系统编程语言,其设计目标包括提供:零开销抽象、移动语义、内存安全、线程无数据竞争、类型安全和实时 gc 等功能。Rust 使用 RAII(Resource Acquisition Is Initialization)管理资源,…...

2024年四川媒体新闻发布渠道,媒体邀约资源表
传媒如春雨,润物细无声,大家好,我是51媒体网胡老师。 四川有哪些媒体新闻发布渠道,媒体邀约资源表? 2024年四川媒体新闻发布渠道,媒体邀约资源表 四川本地媒体:如四川日报、华西都市报、成都商…...

14:00面试,14:07就出来了,问的问题过于变态了。。。
我从一家小公司转投到另一家公司,期待着新的工作环境和机会。然而,新公司的加班文化让我有些始料未及。虽然薪资相对较高,但长时间的工作和缺乏休息使我身心俱疲。 就在我逐渐适应这种高强度的工作节奏时,公司突然宣布了一则令人…...

利用 Python 抓取数据探索汽车市场趋势
一、引言 随着全球对环境保护意识的增强和技术的进步,新能源汽车作为一种环保、高效的交通工具,正逐渐受到人们的关注和青睐。在这个背景下,对汽车市场的数据进行分析和研究显得尤为重要。 本文将介绍如何利用 Python 编程语言,结…...

新闻网站封锁AI爬虫 AI与新闻媒体博弈继续
随着ChatGPT等新兴AI模型的兴起,它们所依赖的网络爬虫正面临来自全球主流新闻网站的大规模封锁。Richard Fletcher博士团队对十个国家主流新闻网站的统计发现,到2023年底,48%的网站屏蔽了OpenAI的爬虫,24%屏蔽了Google的爬虫。那么…...

Python Web开发记录 Day5:jQuery(JavaScript库)
名人说:莫道桑榆晚,为霞尚满天。——刘禹锡(刘梦得,诗豪) 创作者:Code_流苏(CSDN)(一个喜欢古诗词和编程的Coder😊) 目录 五、jQuery1、jQuery-选择器和菜单案例①快速上…...

前端-Vue3递归组件自定义Tree
需求 PS:写在前面,需求想要一个Tree 形结构展示当前的组织机构,最末层节点可以选择,层级明确。第一选择网上npm官网或者github 找找成型的东西 element-ui Tree 没有组织结构线js-tree 好看,但是适配Vue3 有点费劲&a…...

《TCP/IP详解 卷一》第12章 TCP初步介绍
目录 12.1 引言 12.1.1 ARQ和重传 12.1.2 滑动窗口 12.1.3 变量窗口:流量控制和拥塞控制 12.1.4 设置重传的超时值 12.2 TCP的引入 12.2.1 TCP服务模型 12.2.2 TCP可靠性 12.3 TCP头部和封装 12.4 总结 12.1 引言 关于TCP详细内容,原书有5个章…...

作业1-224——P1015 [NOIP1999 普及组] 回文数
题目描述 思路 首先此题为一道高精度题,然后本题按照题目意思模拟即可。我们可以开两个数组来记录高精度数字,这样方便我们处理。判断“该数组是否回文”、“c翻转存入d再做cd”可以写成两个单独的函数。然后主程序组织一下他们即可。注意好退出循环的…...
)
后端知识(理解背诵)
文章目录 🍺 来源🍺 C🍻 new 和 malloc 的区别?2🍻 delete 和 delete[] 的区别?0🍻 内存泄漏是什么?如何避免?1 🍺 计算机网络🍻 URL 输入后发生了…...
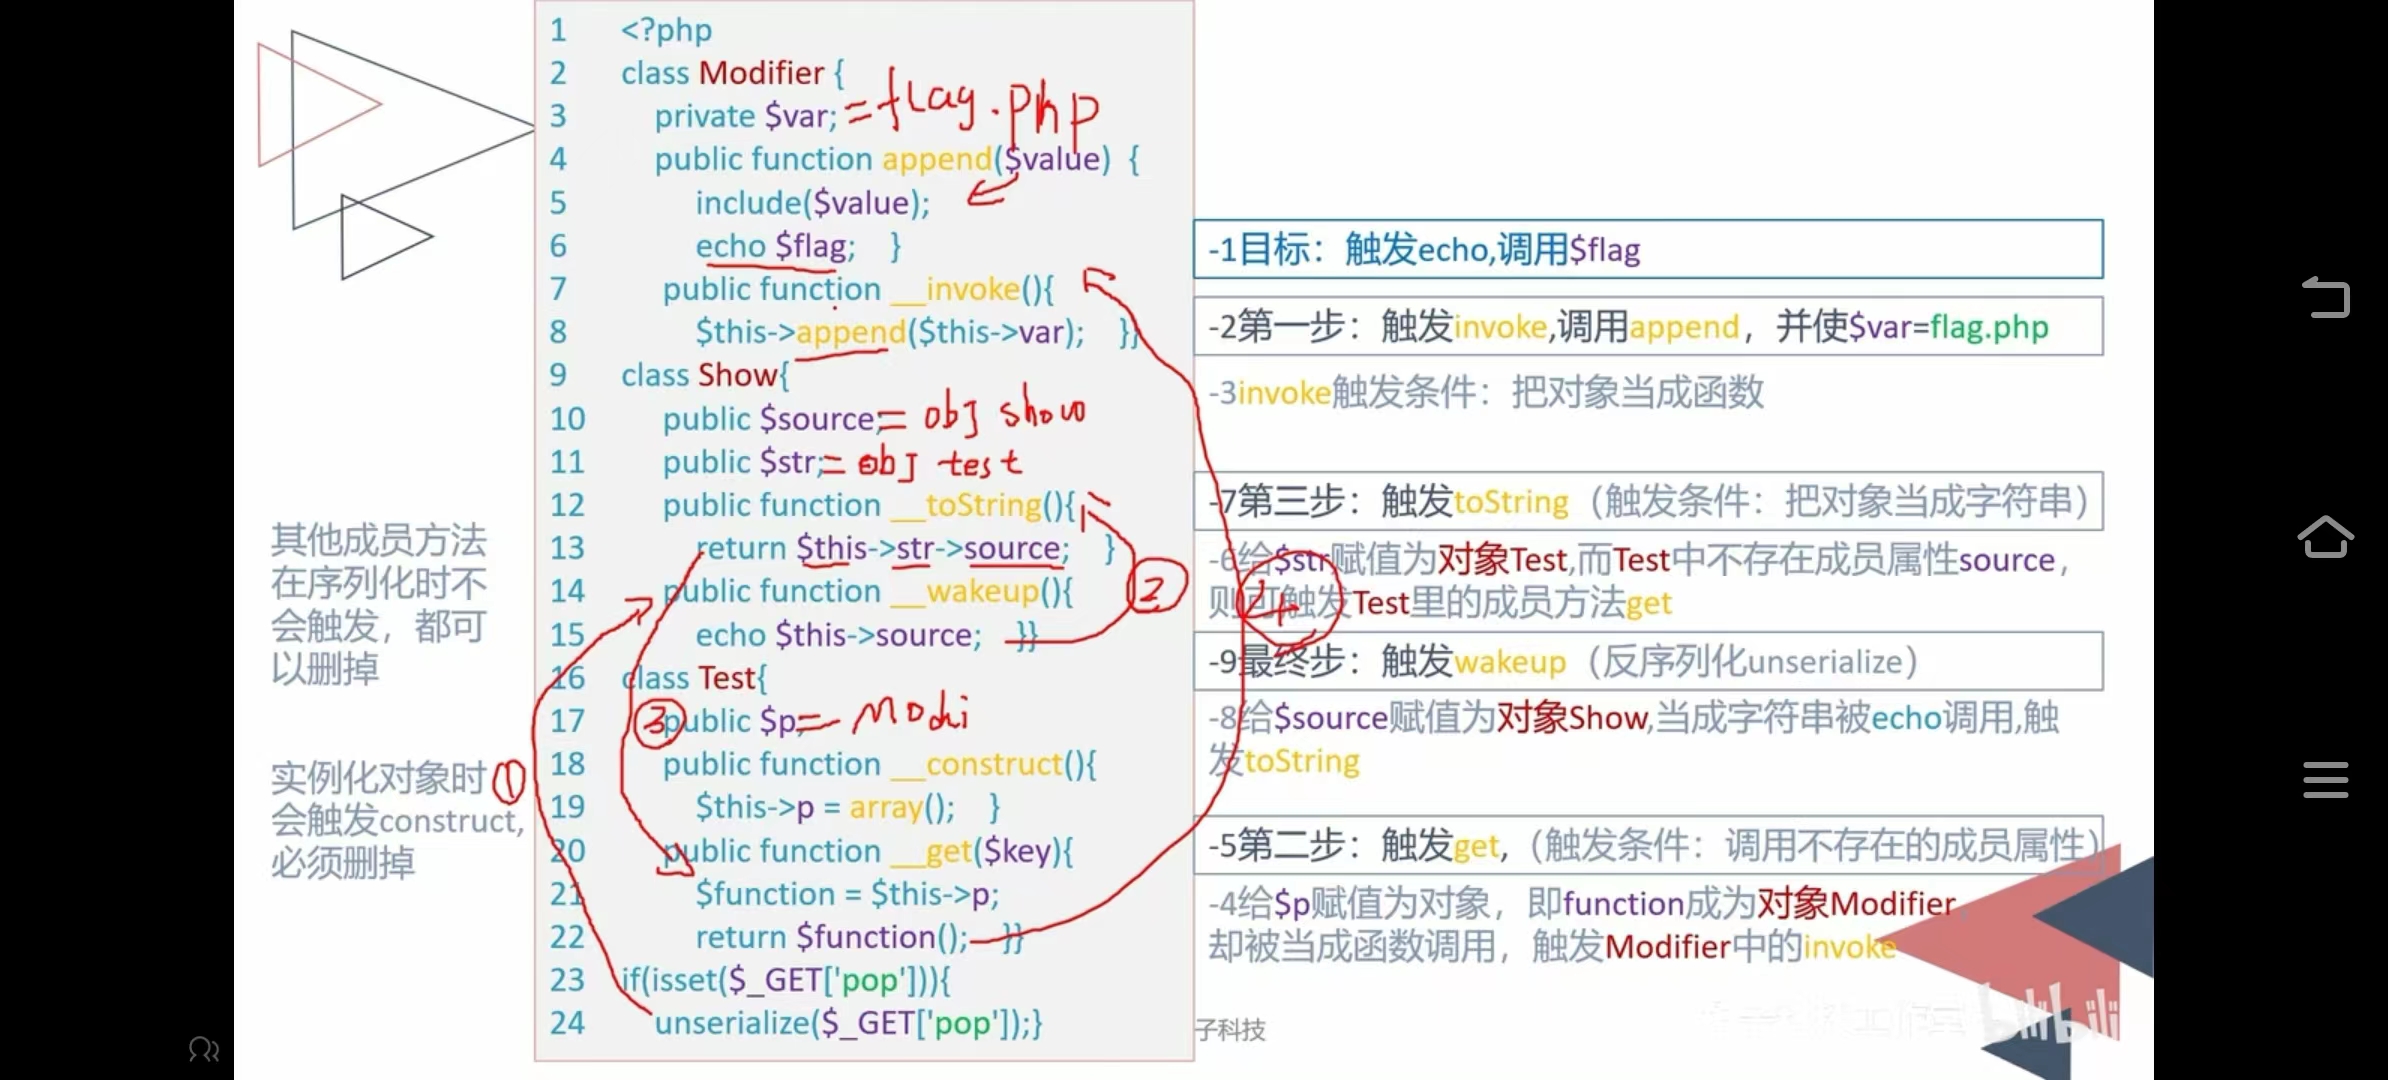
构造pop链
反序列化视频笔记 第一步:找到目标触发echo调用$flag 第二步:触发_invoke函数调用appeng函数$varflag.php(把对象当成函数) 第三步:给$p赋值为对象,即function成为对象Modifier却被当成函数调用ÿ…...
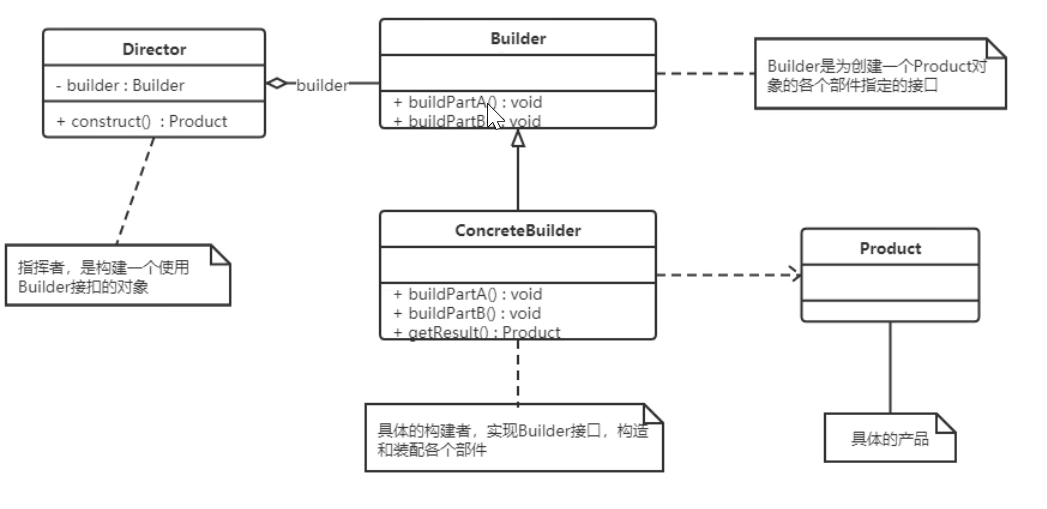
JAVA设计模式——创建型模式
JAVA设计模式——创建型模式 一、创建型模式1.单例模式(Singleton Pattern)1.1 饿汉式1.2 懒汉式1.3 双重检验锁(double check lock)(DCL)1.4 静态内部类1.5 枚举1.6 破坏单例的几种方式与解决方法1.6.1 反序列化1.6.2 反射 1.7 容器式单例1.8 ThreadLoc…...
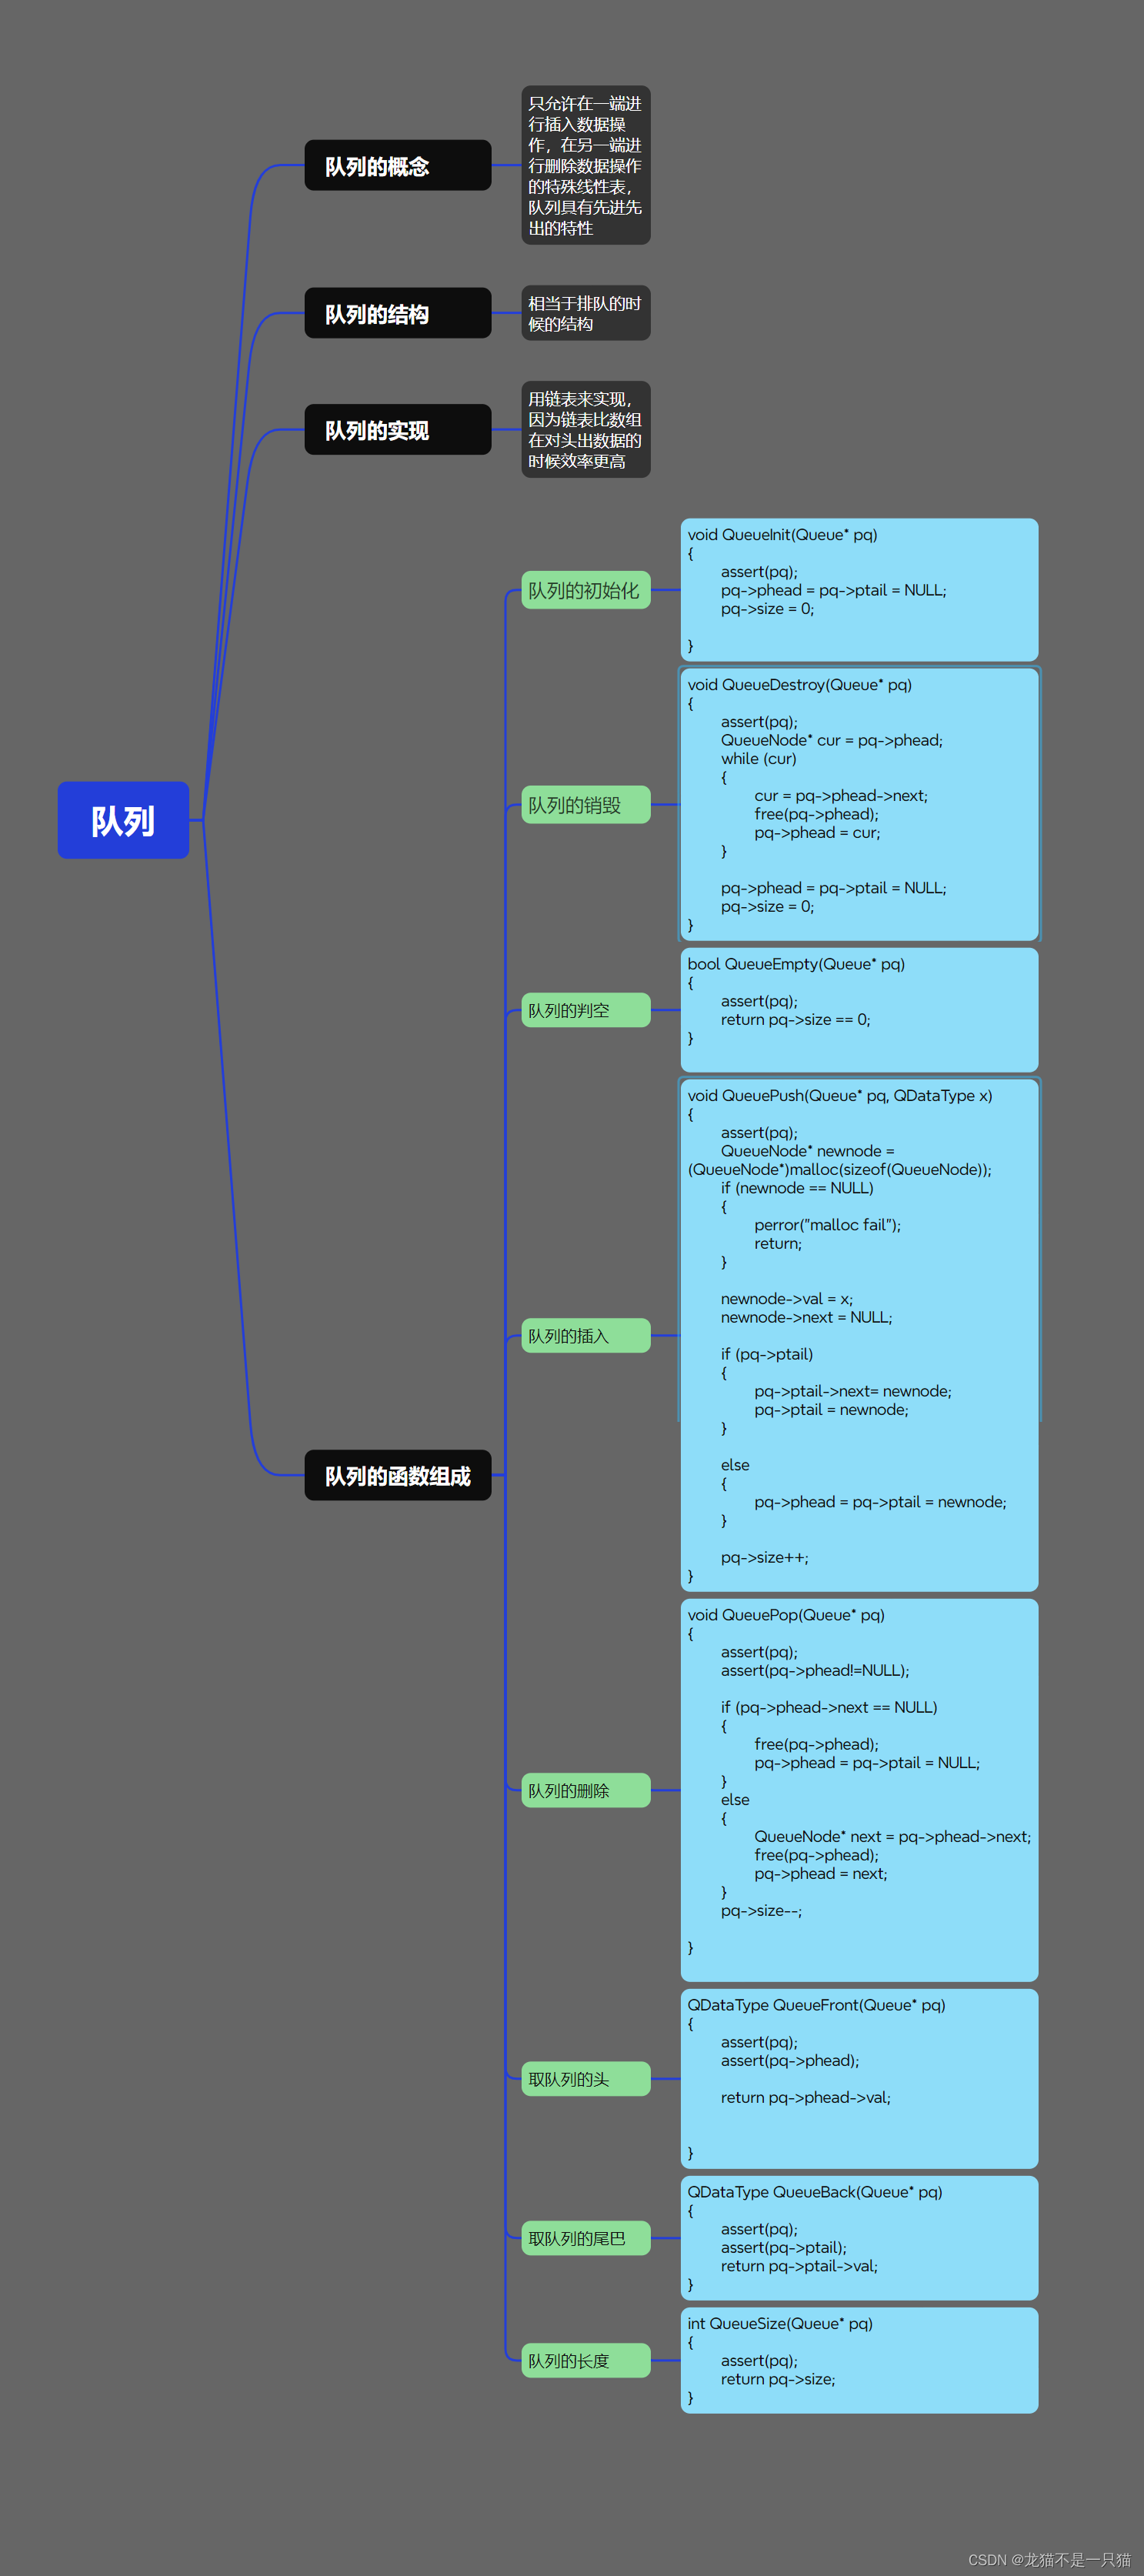
队列的结构概念和实现
文章目录 一、队列的结构和概念二、队列的实现三、队列的实现函数四、队列的思维导图 一、队列的结构和概念 什么是队列? 队列就是只允许在一端进行插入数据操作,在另一端进行删除数据操作的特殊线性表,队列具有先进先出 如上图所示&#x…...
)
LLVM实战:如何用Graphviz可视化你的数据流图(DFG)
LLVM实战:如何用Graphviz可视化你的数据流图(DFG) 在编译器优化和程序分析领域,数据流图(Data Flow Graph, DFG)是理解程序行为的重要工具。它清晰地展现了数据在指令间的流动路径,帮助开发者识…...

如何一键解锁网易云音乐NCM格式:ncmdumpGUI完整使用指南
如何一键解锁网易云音乐NCM格式:ncmdumpGUI完整使用指南 【免费下载链接】ncmdumpGUI C#版本网易云音乐ncm文件格式转换,Windows图形界面版本 项目地址: https://gitcode.com/gh_mirrors/nc/ncmdumpGUI 你是否曾在网易云音乐下载了心爱的歌曲&am…...

Cursor Free VIP:打破AI编程工具的付费墙,让每个开发者都能免费使用Pro功能
Cursor Free VIP:打破AI编程工具的付费墙,让每个开发者都能免费使用Pro功能 【免费下载链接】cursor-free-vip [Support 0.45](Multi Language 多语言)自动注册 Cursor Ai ,自动重置机器ID , 免费升级使用P…...
)
别再只跑Demo了!用AISHELL-1数据集给你的FunASR模型做个‘体检’(附完整测试脚本)
从Demo到实战:用AISHELL-1为FunASR模型打造专业级测试方案 在语音识别技术快速迭代的今天,许多开发者虽然能够成功部署模型,却往往止步于简单的Demo演示,缺乏对模型真实性能的系统评估。这种"Demo即终点"的现象…...

小白程序员必备:收藏!从运维到网络安全,开启高薪新篇章
小白程序员必备:收藏!从运维到网络安全,开启高薪新篇章 运维是确保IT系统高效稳定运行的核心岗位,工作内容包括系统监控、故障排查、性能优化、安全防护等。随着网络安全人才缺口达70万,运维转型网络安全成为高薪新趋势…...

深入解析复位机制:同步复位与异步复位的实战应用与优化策略
1. 复位机制的基础概念 数字电路中的复位机制就像电脑的重启按钮,当系统出现异常或需要初始化时,它能将电路恢复到已知的稳定状态。想象一下你正在玩一个卡死的游戏,按下复位键就能让游戏重新开始而不需要关闭整个主机——这就是复位在数字电…...

解决pyzbar依赖缺失:从FileNotFoundError到Visual C++运行库的全面排查
1. 问题现象与初步诊断 当你兴致勃勃地准备用pyzbar识别二维码时,突然蹦出这样的错误提示: FileNotFoundError: Could not find module C:\...\libzbar-64.dll (or one of its dependencies)这个报错就像突然发现手机没电时的感觉——明明刚才还能用&…...

数据库面试通关秘籍——从原理到实战的DBA技术剖析
1. 数据库复制机制深度解析 数据库复制是DBA面试必问的核心技术点,也是实际工作中保障数据高可用的基础。我经历过多次因为复制问题导致的线上故障,深刻理解不同数据库的复制特性差异。下面就以Oracle、MySQL、PostgreSQL三大主流数据库为例,…...

我在选域名服务时,慢慢开始关注这3个点
在前面几篇里,我更多是在整理域名本身的问题。但最近在实际操作的时候,发现:👉 选“在哪管理域名”,其实也挺重要的1. 一开始容易忽略的点最开始,我只是随便选了一个能用的方式。但后面才发现:&…...

【BLheli_S】P01 上位机参数修改、编译生成固件以及脱机烧录教程
目录 1.1 脱机烧录器购买 1.2 BLHeli_S相关资料下载 1.2.1 源码结构分析: 1.3 BLHeli_S 工程文件创建 1.3.1 Keil-C51 工程创建 1.4 BLHeli_S 参数修改 1.5 BLHeli_S 引脚定义说明 1.6 脱机烧录教程配置 1.1 脱机烧录器购买 阿莫智能设备 1.2 BLHeli_S相关资料下载 源码下载 上…...