PyTorch 中的 apply
Abstract
nn.Module[List].apply(callable)Tensor.apply_(callable) → TensorFunction.apply(Tensor...)
nn.Module[List].apply()?
源码:
def apply(self: T, fn: Callable[['Module'], None]) -> T:"""Typical use includes initializing the parameters of a modelArgs:fn: function to be applied to each submoduleReturns:self"""for module in self.children():module.apply(fn) # 看来这里是先 apply 了子模块fn(self) # 最后才是根return self
nn.ModuleList 是 PyTorch 中用于存储子模块的容器,而 apply() 方法可以应用一个函数到 ModuleList 中的每个子模块。具体来说,apply() 方法会递归地将指定的函数应用到 ModuleList 中的每个子模块以及每个子模块的子模块上。这个方法的语法如下:
nn.ModuleList.apply(fn)
其中 fn 是要应用的函数,它接受一个 Module 参数并且没有返回值。在 apply() 方法被调用后,会遍历 ModuleList 中的每个子模块,并把这个函数应用到每个子模块上。
例如,假设有一个 ModuleList 包含了若干线性层(Linear),我们想要初始化所有线性层的权重为 0,可以使用 apply() 方法:
import torch
import torch.nn as nn# 创建一个 ModuleList 包含两个线性层
module_list = nn.ModuleList([nn.Linear(10, 5), nn.Linear(5, 2)])# 定义一个函数用于初始化权重为0
def init_weights(module):if isinstance(module, nn.Linear):module.weight.data.fill_(0)# 应用函数到 ModuleList 的每个子模块上
module_list.apply(init_weights)# 打印每个线性层的权重
for module in module_list:print(module.weight)
在这个例子中,我们定义了一个函数 init_weights,它会将输入的 nn.Linear 模块的权重初始化为 0。然后我们通过 apply() 方法将这个函数应用到 ModuleList 中的每个线性层上,并最终打印出每个线性层的权重。
Tensor.apply_(callable) → Tensor
对张量的每个元素执行 callable 操作, 并且是 inplace 的, 即它不返回新的张量.
import torchdef add(x):return x + 1a = torch.randn(2, 3)
print(a)
# tensor([[-1.6572, -0.7502, -0.9984],
#		  [ 0.3035, -0.6085, -0.1091]])b = a.apply_(add)
print(a)
print(b)
# tensor([[-0.6572,  0.2498,  0.0016],
#		  [ 1.3035,  0.3915,  0.8909]])
# tensor([[-0.6572,  0.2498,  0.0016],
#		  [ 1.3035,  0.3915,  0.8909]])print(b is a)
# True, 说明 a.apply_(add) 不返回新的张量, 是 inplace 的
NOTE
仅对 CPU 上的张量有效, 不应在要求高效的代码段中使用. 官方这么说, 大概是它效率不高吧.
a = torch.randn(2, 3, device='cuda:0')
a.apply_(lambda x: x + 1)
# TypeError: apply_ is only implemented on CPU tensors
NOTE
似乎没有不 in-place 的方法.
a.apply(lambda x: x + 1)
# AttributeError: 'Tensor' object has no attribute 'apply'. Did you mean: 'apply_'?
Function.apply(Tensor…)
以上的两个 apply 函数都是由对象 (Module 或 Tensor) 发起, 参数为 Callable. Function.apply(Tensor...) 不一样, 它由 Function 发起, 接收参数为张量, 起到"运行 forward"的作用. 先看 Relu 是如何求微分的:
import torch
from torch import autogradclass CustomReLUFunction(autograd.Function):@staticmethoddef forward(ctx, *args, **kwargs):x = args[0]ctx.save_for_backward(x)return x.clamp(min=0)@staticmethoddef backward(ctx, *grad_outputs):x, = ctx.saved_tensorsgrad_output = grad_outputs[0]grad_input = grad_output.clone()  # 意思是不改变传进来的 outputs 的 grad 吗?grad_input[x < 0] = 0return grad_input# 使用自定义的 ReLU 激活函数
custom_relu = CustomReLUFunction.apply  # 注意这里的 apply
a = torch.randn(5, requires_grad=True)
output = CustomReLUFunction.apply(a)
output.backward(torch.ones_like(a))print(a)
print(output)
print(a.grad)#########################
tensor([-1.8688, -0.0540, -0.6364, -0.9364,  1.2601], requires_grad=True)
tensor([0.0000, 0.0000, 0.0000, 0.0000, 1.2601],grad_fn=<CustomReLUFunctionBackward>)
tensor([0., 0., 0., 0., 1.])
没错, 代码里出现了 apply. 这需要了解 torch.autograd.
Extending torch.autograd
PyTorch 的自动微分机制是通过动态计算图实现的, 图中的张量 Tensor 是节点, 连接节点的边是叫做 Function 的东西. 一般的 PyTorch 内置运算都可以自动求微分, 这才使得优化模型时仅仅需要三行代码:
optimizer.zero_grad()
loss.backward()
optimizer.step()
就可以完成梯度下降. 如果一些运算不可微呢?比如计算一些积分, 或者比较简单的 Relu 函数在 0 处也是不可微的, 又或者运算中需要优化的部分使用了 Numpy 等其他库, 则需要我们自己实现求微分. 做法就是继承 class torch.autograd.Function, 实现其中的三个 method:
def forward(ctx: Any, *args: Any, **kwargs: Any) -> Any
def setup_context(ctx: Any, inputs: Tuple[Any, ...], output: Any)
def backward(ctx: Any, *grad_outputs: Any) -> Any
然后通过 Function.apply 导出运算. 见上面的 CustomReLUFunction, 不过它是老版的, 新版(pytorch>=2.0) 建议使用这三个方法. 先看官方给的例子:
from torch import autogradclass LinearFunction(autograd.Function):# Note that forward, setup_context, and backward are @staticmethods@staticmethoddef forward(input, weight, bias):output = input.mm(weight.t())if bias is not None:output += bias.unsqueeze(0).expand_as(output)return output@staticmethod# inputs is a Tuple of all of the inputs passed to forward.# output is the output of the forward().def setup_context(ctx, inputs, output): # output 没用到input, weight, bias = inputsctx.save_for_backward(input, weight, bias)# This function has only a single output, so it gets only one gradient@staticmethoddef backward(ctx, grad_output):input, weight, bias = ctx.saved_tensorsgrad_input = grad_weight = grad_bias = None# These needs_input_grad checks are optional and there only to# improve efficiency. If you want to make your code simpler, you can# skip them. Returning gradients for inputs that don't require it is# not an error.if ctx.needs_input_grad[0]:grad_input = grad_output.mm(weight)if ctx.needs_input_grad[1]:grad_weight = grad_output.t().mm(input)if bias is not None and ctx.needs_input_grad[2]:grad_bias = grad_output.sum(0)return grad_input, grad_weight, grad_bias
之后, 就可以使用 Function.apply(input, weight, bias) 进行运算了(不可直接调用 forward), 它可以实现执行 forward 方法, 并通过 setup_context 将计算状态(输入值等)保存进 ctx 对象中, 供反向传播时的 backward 使用.
新老版的区别:
老版的def forward(ctx, *args, **kwargs)第一个参数是ctx, 环境的保存需要在forward中完成;
新版的def forward(*args, **kwargs)仅接收输入就行了, 保存环境的工作交给setup_context(ctx, inputs, output)完成;
不过这些都不需要用户关心.
建议用新版, 因为它和 pytorch 内置的 operator 更接近, 兼容性更好.
参数数量方面需要注意的是: forward 和 backward 的参数数量和返回值数量要对应, 互反: forward 的输出数量对应 backward 的参数数量; backward 的输出数量对应 forward 的参数数量; 这很好理解, 传播一正一反嘛, 张量和其对应的梯度!
forward 的 non-Tensor 参数的梯度必须为 None, 不能省, 数量要一致.
class MulConstant(Function):@staticmethoddef forward(tensor, constant):return tensor * constant@staticmethoddef setup_context(ctx, inputs, output):# ctx is a context object that can be used to stash information# for backward computationtensor, constant = inputsctx.constant = constant # 非 Tensor 直接保存在 ctx 中, 而不是 save_for_backward@staticmethoddef backward(ctx, grad_output):# We return as many input gradients as there were arguments.# Gradients of non-Tensor arguments to forward must be None.return grad_output * ctx.constant, None # const 的梯度
注意, non-tensors should be stored directly on ctx, 如 ctx.constant = constant.
set_materialize_grads 告诉 autograd engine 梯度计算与 inputs 无关, 以提升计算效率
**class MulConstant(Function):@staticmethoddef forward(tensor, constant):return tensor * constant@staticmethoddef setup_context(ctx, inputs, output):tensor, constant = inputsctx.set_materialize_grads(False) # 不太懂这个 materialize 啥意思ctx.constant = constant@staticmethoddef backward(ctx, grad_output):# Here we must handle None grad_output tensor. In this case we# can skip unnecessary computations and just return None.if grad_output is None:return None, None# We return as many input gradients as there were arguments.# Gradients of non-Tensor arguments to forward must be None.return grad_output * ctx.constant, None**
虽然不太懂这个 materialize 是啥意思.
明白了 loss.backward()
也许只知道一句 loss.backward() 可以求梯度, 不知为何当 loss 不是标量时需要传入一个与 output 形状相同的张量? 传入之后究竟经历了什么?
import torchx = torch.randn(2, 3, requires_grad=True)
y = torch.norm(x, dim=1)  # 是个向量shape=(2)y.retain_grad()
grad = torch.randn(2)  # y 的 grad, 平时调用 loss.backward() 空参数, 其实是 loss.backward(torch.tensor(1.0)), 也即 loss 自己的 grad
y.backward(grad)  # 调用 backward 函数会执行其 grad_fn 的 backward, 沿着计算图链式地反向传播print(grad)
print(y.grad_fn)
print(y.grad)
print(x.grad)# %%
x = torch.randn(2, 3, requires_grad=True)
z = torch.norm(x)z.retain_grad()
grad = torch.tensor(1.0)
z.backward(grad)  # 其实是 loss.backward(torch.tensor(1.0))print(z.grad_fn)
print(z.grad)
print(x.grad)
传入 xxx.backward(grad_of_xxx) 的张量 grad_of_xxx 是 xxx 自己的 grad, 需要它来进行链式法则的计算, 在 LinearFunction.backward 中输出 *grad_output 看一看:
@staticmethoddef backward(ctx, *grad_output): # save_for_backward, 所以 backward 还是需要 ctx 的, 不像 forwardprint(grad_output) # 验证 .backward(grad)x, weight, bias = ctx.saved_tensorsgrad_input = grad_weight = grad_bias = None # 先设置好 None, 那么不需要梯度的变量, 梯度就返回 Noneif ctx.needs_input_grad[0]:grad_input = grad_output[0].mm(weight)if ctx.needs_input_grad[1]:grad_weight = grad_output[0].t().mm(x)if bias is not None and ctx.needs_input_grad[2]:grad_bias = grad_output[0].sum(0)return grad_input, grad_weight, grad_bias
输出 *grad_output:
linear = LinearFunction.apply
a = torch.randn(2, 3)
w = torch.randn(4, 3, requires_grad=True)
b = torch.randn(4, requires_grad=True)ln = linear(a, w, b)
ln.backward(torch.ones(2, 4))
##################################
(tensor([[1., 1., 1., 1.],[1., 1., 1., 1.]]),)
小结
至于 LinearFunction.apply 具体是如何工作的, 源码比较多, 看不懂! 反正比直接调用 forward 多了些工作, 为反向传播做准备!
Function.apply 问答
新旧版的参数保存方式
假如我需要在 Function 中保存一个数值 gamma, 新旧版分别是如何做的?
旧版:
class F(torch.autograd.Function):def __init__(self, gamma=0.1):super().__init__()self.gamma = gammadef forward(self, args):passdef backward(self, args):pass#################################
F(gamma)(inp)
新版:
class F_new(torch.autograd.Function):@staticmethoddef forward(ctx, args, gamma):ctx.gamma = gammapass@staticmethoddef backward(ctx, args):pass####################################
F_new.apply(inp, gamma)
-
问: 每次调用
F.apply, 都会创建新的 “instance” with its own context 吗?
答: 对, 每次调用.apply都会有a different context. 所以你可以安全地保存 everything 到其中, 并无风险. -
问: 我可以用
ctx.intermediary = intermediary语句保存 intermediary results 吗?
答: 对于 intermediary results, 你可以将它们保存到ctx的属性中. -
问: 为什么需要用
save_for_backward? 仅仅是 a convention? 或者它执行了额外的 checks?
我 尝试用save_for_backwards保存 intermediary tensors, 但 failed, 所以我将它们作为 attributes 保存到了 self (ctx now) 中.
答: 是的,save_for_backwardis just for input and outputs, 它会执行额外的 checks (make sure that you don’t create non-collectable cycles). For intermediary results, you can save them as attribute of the context yes. [记得说求梯度的变量一定要 是 input or output]
相关文章:

PyTorch 中的 apply
Abstract nn.Module[List].apply(callable)Tensor.apply_(callable) → TensorFunction.apply(Tensor...) nn.Module[List].apply()? 源码: def apply(self: T, fn: Callable[[Module], None]) -> T:"""Typical use includes initializing the paramete…...

张宇30讲学习笔记
初等数学 x \sqrt{x} x 是算数平方根,一定≥0; x 2 \sqrt{x^2} x2 |x| x2|x2||x|2 x3≠|x3||x|3 不等式 a>0,b>0,则ab≥2 a b \sqrt{ab} ab 对数 ln a b \frac{a}{b} balna-lnb 高等数学 单调性 线性代数...
SpringBoot接口防抖(防重复提交)的一些实现方案
前言 啥是防抖 思路解析 分布式部署下如何做接口防抖? 具体实现 请求锁 唯一key生成 重复提交判断 前言 作为一名老码农,在开发后端Java业务系统,包括各种管理后台和小程序等。在这些项目中,我设计过单/多租户体系系统&a…...

Qt/C++音视频开发67-保存裸流加入sps/pps信息/支持264/265裸流/转码保存/拉流推流
一、前言 音视频组件除了支持保存MP4文件外,同时还支持保存裸流即264/265文件,以及解码后最原始的yuv文件。在实际使用过程中,会发现部分视频文件保存的裸流文件,并不能直接用播放器播放,查阅资料得知原来是缺少sps/p…...

【Web】速谈FastJson反序列化中TemplatesImpl的利用
目录 简要原理分析 exp 前文:【Web】关于FastJson反序列化开始前的那些前置知识 简要原理分析 众所周知TemplatesImpl的利用链是这样的: TemplatesImpl#getOutputProperties() -> TemplatesImpl#newTransformer() -> TemplatesImpl#getTransl…...

RK3568 RK809电源管理 RTC功能使能 定时唤醒
概述 RK809 是一款高性能 PMIC,RK809 集成 5 个大电流 DCDC、9 个 LDO、2 个 开关SWITCH、 1个 RTC、1个 高性能CODEC、可调上电时序等功能。 系统中各路电源总体分为两种:DCDC 和 LDO。两种电源的总体特性如下(详细资料请自行搜索): DCDC:输入输出压差大时,效率高,但…...
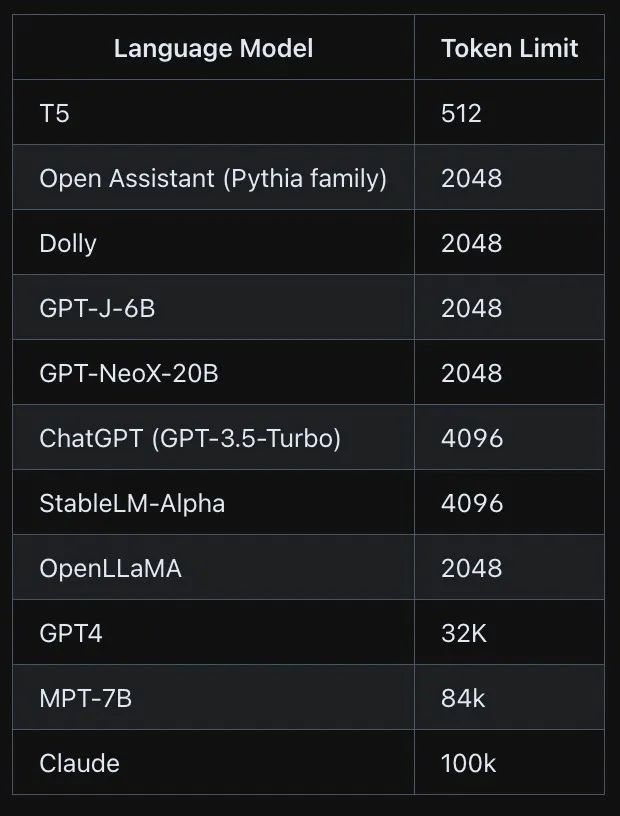
大模型(LLM)的token学习记录-I
文章目录 基本概念什么是token?如何理解token的长度?使用openai tokenizer 观察token的相关信息open ai的模型 token的特点token如何映射到数值?token级操作:精确地操作文本token 设计的局限性 tokenizationtoken 数量对LLM 的影响训练模型参…...
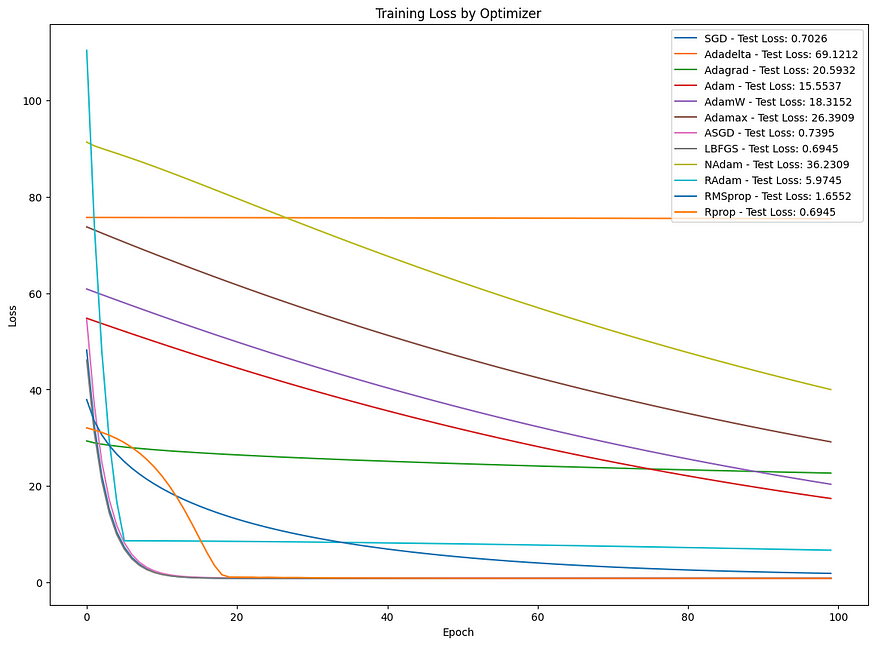
探索前景:机器学习中常见优化算法的比较分析
目录 一、介绍 二、技术背景 三、相关代码 四、结论 一、介绍 优化算法在机器学习和深度学习中至关重要,可以最小化损失函数,从而改善模型的预测。每个优化器都有其独特的方法来导航损失函数的复杂环境以找到最小值。本文探讨了一些最常见的优化算法&…...

基于MRI的阿尔兹海默症病情预测
《阿尔兹海默症病情预测系统:老年痴呆患者的福音》 引言项目背景和意义数据介绍与分析模型介绍模型训练与评估模型应用与展望 引言 阿尔兹海默症(Alzheimer’s Disease)是一种常见的老年疾病,给患者及其家庭带来了巨大的困扰和负…...

高维中介数据: 联合显着性(JS)检验法
摘要 中介分析在流行病学和临床试验中越来越受到关注。在现有的中介分析方法中,流行的联合显着性(JS)检验会产生过于保守的 I 类错误率,因此功效较低。但是,如果在使用 JS 测试高维中介假设时,可以准确控制…...

冒泡排序 和 qsort排序
目录 冒泡排序 冒泡排序部分 输出函数部分 主函数部分 总代码 控制台输出显示 总代码解释 冒泡排序优化 冒泡排序 主函数 总代码 代码优化解释 qsort 排序 qsort 的介绍 使用qsort排序整型数据 使用qsort排序结构数据 冒泡排序 首先,我先介绍我的冒泡…...

asp.net core webapi接收application/x-www-form-urlencoded和form-data参数
框架:asp.net core webapiasp.net core webapi接收参数,请求变量设置 目录 接收multipart/form-data、application/x-www-form-urlencoded类型参数接收URL参数接收上传的文件webapi接收json参数完整控制器,启动类参考Program.cs 接收multipar…...
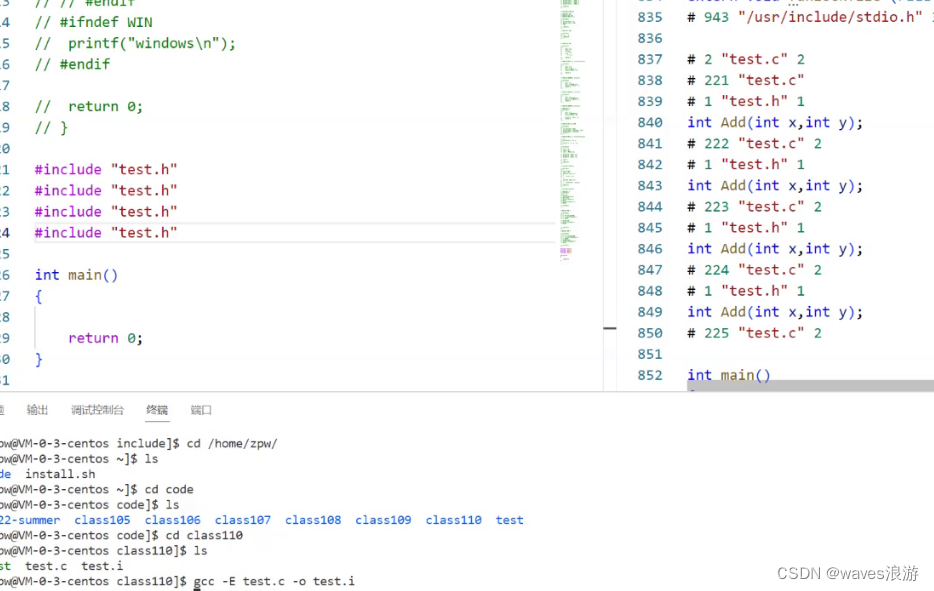
程序环境和预处理(2)
文章目录 3.2.7 命名约定 3.3 #undef3.4 命令行定义3.5 条件编译3.6 文件包含3.6.1 头文件被包含的方式3.6.2 嵌套文件包含 4. 其他预处理指令 3.2.7 命名约定 一般来讲函数和宏的使用语法很相似,所以语言本身没法帮我们区分二者,那我们平时的一个习惯是…...

Redis安全加固策略:绑定Redis监听的IP地址 修改默认端口 禁用或者重命名高危命令
Redis安全加固策略:绑定Redis监听的IP地址 & 修改默认端口 & 禁用或者重命名高危命令 1.1 绑定Redis监听的IP地址1.2 修改默认端口1.3 禁用或者重命名高危命令1.4 附:redis配置文件详解(来源于网络) 💖The Beg…...
Vuepress的使用
介绍 将markdown静态资源转换成html。 动态资源的转换还有很多,为什么要使用Vuepress? 目录分析 项目配置 详情 具体配置请看文档 插件配置 vuepress-theme-vdoing 主题插件 npm install vuepress-theme-vdoing -D先安装依赖配置主题 使用vuep…...

docker安装php7.4安装
容器 docker pull centos:centos7 docker run -dit -p9100:9100 --name“dade” --privilegedtrue centos:centos7 /usr/sbin/init 一、安装前库文件和工具准备 1、首先安装 EPEL 源 yum -y install epel-release2.安装 REMI 源 yum -y install http://rpms.remirepo.net/en…...

曲线生成 | 图解Dubins曲线生成原理(附ROS C++/Python/Matlab仿真)
目录 0 专栏介绍1 什么是Dubins曲线?2 Dubins曲线原理2.1 坐标变换2.2 单步运动公式2.3 曲线模式 3 Dubins曲线生成算法4 仿真实现4.1 ROS C实现4.2 Python实现4.3 Matlab实现 0 专栏介绍 🔥附C/Python/Matlab全套代码🔥课程设计、毕业设计、…...

「Vue3系列」Vue3 组件
文章目录 一、Vue3 组件二、Vue3 组件实例三、Vue3 官方组件四、Vue3 常用组件五、相关链接 一、Vue3 组件 Vue3 是 Vue.js 的最新版本,它引入了许多新的特性和改进。在 Vue3 中,组件是构建应用程序的核心部分,它们可以重用、组合和嵌套。Vu…...
Git实战(2)
git work flow ------------------------------------------------------- ---------------------------------------------------------------- 场景问题及处理 问题1:最近提交了 a,b,c,d记录,想把b记录删掉其他提交记录保留: git reset …...
Java ElasticSearch-Linux面试题
Java ElasticSearch-Linux面试题 前言1、守护线程的作用?2、链路追踪Skywalking用过吗?3、你对G1收集器了解吗?4、你们项目用的什么垃圾收集器?5、内存溢出和内存泄露的区别?6、什么是Spring Cloud Bus?7、…...

基于k-可加Choquet积分的SHAP值高效近似与特征交互分析
1. 项目概述:当模型解释遇上博弈论在机器学习项目落地的最后一步,我们常常会遇到一个尴尬的局面:模型预测准确率高达95%,但当业务方或监管方问起“为什么这个客户的贷款申请被拒绝了?”时,我们却只能给出一…...

JWT签名机制与常见攻击实战:从PortSwigger靶场12关学透算法混淆、密钥混淆与JWKS劫持
1. 为什么JWT不是“加密令牌”,而是“签名凭证”——从PortSwigger靶场第一关开始讲起很多人一看到JWT就下意识觉得:“这是个加密的token,只要我拿到它,就等于拿到了用户密码或者敏感密钥。”这种误解直接导致他们在实战中反复碰壁…...
一个都不能少)
CentOS7最小化安装后,这3个必做的配置(换源、设静态IP、更新)一个都不能少
CentOS7最小化安装后的三大关键配置实战指南刚完成CentOS 7最小化安装的系统就像毛坯房——虽然基础框架已经就位,但距离真正"拎包入住"还有一段距离。作为运维人员,我们最迫切的需求是快速搭建一个稳定、高效的基础服务器环境。本文将聚焦三个…...

电脑‘假关机’真烦人!深入聊聊Windows电源管理里的‘快速启动’到底是个啥
Windows快速启动技术揭秘:高效与兼容性的博弈深夜加班结束,你点击关机按钮准备休息,却发现显示器刚暗下去又突然亮起——这不是灵异事件,而是Windows的快速启动功能在"作祟"。这种介于关机和休眠之间的混合状态…...
)
AI Agent在政务审批系统中的零故障部署实践(工信部试点项目全链路复盘)
更多请点击: https://codechina.net 第一章:AI Agent在政务审批系统中的零故障部署实践(工信部试点项目全链路复盘) 在工信部“智能政务基础设施升级”试点项目中,某省政务服务网完成全国首个面向全流程审批闭环的AI …...
:信息收集介绍,域名信息收集,主域名查询,ICP备案号查询,备案实体查询,工业和信息化部政务服务平台查询,怎样收集)
【Web安全】-企业资产信息收集(1):信息收集介绍,域名信息收集,主域名查询,ICP备案号查询,备案实体查询,工业和信息化部政务服务平台查询,怎样收集
🦆 个人主页:深邃- ❄️专栏传送门:《C语言》《数据结构与算法》《Web安全》 🌟Gitee仓库:《C语言》《数据结构与算法》 特此声明:本次信息收集均在日期授权时间内收集,并且都将所有人员信息打…...

无授权不感知、无穿戴可溯源:无感定位重构公安新型治安底座
无授权不感知、无穿戴可溯源:无感定位重构公安新型治安底座镜像视界浙江科技有限公司依托国家十四五重点课题研究成果、镜像视界浙江普陀时空大数据应用技术联合研究院联合研发体系与河南省电检院权威认证资质,以自研空间计算技术为根基打磨无感定位体系…...

Rust 环境搭建指南
Rust 环境搭建指南 引言 Rust 是一种系统编程语言,以其高性能、内存安全和并发特性而闻名。在本文中,我们将详细讲解如何搭建 Rust 开发环境,包括安装 Rust 语言、配置编辑器以及使用 Rust 包管理器 Cargo。 安装 Rust 系统要求 在开始之前,请确保您的计算机满足以下系…...

5分钟掌握NoFences:告别杂乱桌面的免费桌面整理终极指南
5分钟掌握NoFences:告别杂乱桌面的免费桌面整理终极指南 【免费下载链接】NoFences 🚧 Open Source Stardock Fences alternative 项目地址: https://gitcode.com/gh_mirrors/no/NoFences 你是否每天都要面对一个布满杂乱图标的Windows桌面&#…...
)
告别野指针和内存泄漏:用Cppcheck给你的C/C++项目做个免费‘体检’(附VS项目集成教程)
用Cppcheck为C/C项目构建自动化代码质量防护网 在软件开发领域,代码质量直接影响着产品的稳定性和安全性。对于C/C这类系统级语言来说,内存泄漏、野指针等问题往往潜伏在代码深处,直到运行时才突然爆发。而静态代码分析工具就像一位经验丰富的…...