【Golang星辰图】图像和多媒体处理的创新之路:Go语言的无限潜能
图像处理、音视频编辑,Go语言不再局限:揭秘opencv和goav的威力
前言:
在当今的数字时代,图像处理和多媒体技术在各个领域中的应用越来越广泛。无论是计算机视觉、图像处理还是音视频处理,选择合适的库和工具至关重要。本文将介绍Go语言中一些功能强大的图像和多媒体处理库,帮助开发者了解它们的特点和用法,并提供示例代码来展示其实际应用。
欢迎订阅专栏:Golang星辰图
文章目录
- 图像处理、音视频编辑,Go语言不再局限:揭秘opencv和goav的威力
- 前言:
- 1. image
- 1.1 图像解码与编码
- 1.2 图像格式转换
- 1.3 图像操作与处理
- 2. imaging
- 2.1 图像缩放与裁剪
- 2.2 图像滤镜与效果
- 2.3 图片合成与叠加
- 3. ffmpeg-go
- 3.1 视频解码与编码
- 3.2 音频解码与编码
- 3.3 多媒体格式转换
- 4. portaudio-go
- 4.1 音频输入与输出
- 4.2 实时音频处理
- 4.3 音频流转发与录制
- 5. opencv
- 5.1 图像特征检测与提取
- 5.2 目标识别与跟踪
- 5.3 图像分割与处理
- 6. goav
- 6.1 音视频解码与编码
- 6.2 流媒体处理与传输
- 6.3 音视频编辑与合成
- 总结:
1. image
Go标准库中的image包提供了一组接口和类型,用于处理图像的解码、编码,以及进行一些基本的图像操作和处理。通过这个包,你可以打开、创建、保存和操作图像文件。
1.1 图像解码与编码
要解码和编码图像,你可以使用image.Decode()函数和image.Encode()函数。下面是一个示例代码,演示如何使用image包解码图像文件并将其重新编码为不同的格式:
package mainimport ("fmt""image""image/jpeg""image/png""os"
)func main() {// 打开图像文件file, err := os.Open("input.jpg")if err != nil {fmt.Println("Failed to open image:", err)return}defer file.Close()// 解码图像img, _, err := image.Decode(file)if err != nil {fmt.Println("Failed to decode image:", err)return}// 创建新的输出文件outFile, err := os.Create("output.png")if err != nil {fmt.Println("Failed to create output file:", err)return}defer outFile.Close()// 将图像重新编码为PNG格式并保存到输出文件err = png.Encode(outFile, img)if err != nil {fmt.Println("Failed to encode image:", err)return}fmt.Println("Image saved as output.png")
}
1.2 图像格式转换
在image包中,你可以使用image.Image类型来表示图像数据。如果你有一个图像对象,并且想将其转换为不同的图像格式,你可以使用image.NewRGBA()函数创建一个新的RGBA图像,并将原始图像绘制到新图像上,然后使用image.Encode()函数保存新图像。
下面是一个示例代码,演示如何将图像对象转换为JPEG格式:
package mainimport ("fmt""image""image/jpeg""os"
)func main() {// 打开图像文件file, err := os.Open("input.png")if err != nil {fmt.Println("Failed to open image:", err)return}defer file.Close()// 解码图像img, _, err := image.Decode(file)if err != nil {fmt.Println("Failed to decode image:", err)return}// 创建新的RGBA图像newImg := image.NewRGBA(img.Bounds())// 在新图像上绘制原图像draw.Draw(newImg, newImg.Bounds(), img, img.Bounds().Min, draw.Src)// 创建新的输出文件outFile, err := os.Create("output.jpg")if err != nil {fmt.Println("Failed to create output file:", err)return}defer outFile.Close()// 将图像重新编码为JPEG格式并保存到输出文件err = jpeg.Encode(outFile, newImg, nil)if err != nil {fmt.Println("Failed to encode image:", err)return}fmt.Println("Image saved as output.jpg")
}
1.3 图像操作与处理
在image包中,你可以使用image/draw包提供的一组函数来进行图像操作和处理,例如裁剪、缩放、旋转等。下面是一个示例代码,演示如何将图像缩放为指定的大小:
package mainimport ("fmt""image""image/jpeg""image/png""os""github.com/nfnt/resize"
)func main() {// 打开图像文件file, err := os.Open("input.jpg")if err != nil {fmt.Println("Failed to open image:", err)return}defer file.Close()// 解码图像img, _, err := image.Decode(file)if err != nil {fmt.Println("Failed to decode image:", err)return}// 缩放图像newImg := resize.Resize(300, 0, img, resize.Lanczos3)// 创建新的输出文件outFile, err := os.Create("output.png")if err != nil {fmt.Println("Failed to create output file:", err)return}defer outFile.Close()// 将图像重新编码为PNG格式并保存到输出文件err = png.Encode(outFile, newImg)if err != nil {fmt.Println("Failed to encode image:", err)return}fmt.Println("Image saved as output.png")
}
以上示例代码演示了如何使用github.com/nfnt/resize包中的Resize()函数将图像缩放为指定的大小。
以上是关于Go标准库中的image包的介绍和示例代码。通过使用image包,你可以进行图像的解码与编码、图像格式转换以及各种图像操作和处理。下面将介绍更多功能丰富的图像处理库imaging。
2. imaging
imaging是一个Go语言的图像处理库,提供了更多的功能和灵活性,包括图像缩放、裁剪、滤镜、效果以及图片的合成和叠加等。
2.1 图像缩放与裁剪
imaging库提供了函数来对图像进行缩放和裁剪。下面是一个示例代码,演示如何使用imaging库对图像进行缩放和裁剪:
package mainimport ("fmt""github.com/disintegration/imaging"
)func main() {// 打开图像文件src, err := imaging.Open("input.jpg")if err != nil {fmt.Println("Failed to open image:", err)return}// 缩放图像dst := imaging.Resize(src, 300, 0, imaging.Lanczos)// 裁剪图像dst = imaging.CropCenter(dst, 250, 250)// 保存图像到文件err = imaging.Save(dst, "output.jpg")if err != nil {fmt.Println("Failed to save image:", err)return}fmt.Println("Image saved as output.jpg")
}
在以上示例代码中,通过使用imaging.Open()函数打开图像文件,并使用imaging.Resize()函数对图像进行缩放。然后使用imaging.CropCenter()函数对图像进行裁剪,并使用imaging.Save()函数保存图像到文件。
2.2 图像滤镜与效果
imaging库还提供了一系列的滤镜和效果函数,可以对图像进行处理。下面是一个示例代码,演示如何使用imaging库为图像添加黑白滤镜和高斯模糊效果:
package mainimport ("fmt""github.com/disintegration/imaging"
)func main() {// 打开图像文件src, err := imaging.Open("input.jpg")if err != nil {fmt.Println("Failed to open image:", err)return}// 将图像转换为黑白dst := imaging.Grayscale(src)// 添加高斯模糊效果dst = imaging.Blur(dst, 5.0)// 保存图像到文件err = imaging.Save(dst, "output.jpg")if err != nil {fmt.Println("Failed to save image:", err)return}fmt.Println("Image saved as output.jpg")
}
以上示例代码演示了如何使用imaging.Grayscale()函数将图像转换为黑白,并使用imaging.Blur()函数添加高斯模糊效果。
2.3 图片合成与叠加
imaging库还提供了函数来合成和叠加多张图片。下面是一个示例代码,演示如何使用imaging库将两张图片叠加在一起:
package mainimport ("fmt""github.com/disintegration/imaging"
)func main() {// 打开背景图像文件bg, err := imaging.Open("background.jpg")if err != nil {fmt.Println("Failed to open background image:", err)return}// 打开前景图像文件fg, err := imaging.Open("foreground.png")if err != nil {fmt.Println("Failed to open foreground image:", err)return}// 将前景图像叠加在背景图像上dst := imaging.Overlay(bg, fg, image.Pt(100, 100), 1.0)// 保存合成后的图像到文件err = imaging.Save(dst, "output.jpg")if err != nil {fmt.Println("Failed to save image:", err)return}fmt.Println("Image saved as output.jpg")
}
在以上示例代码中,使用imaging.Open()函数打开背景图像和前景图像,然后使用imaging.Overlay()函数将前景图像叠加在背景图像上,并使用imaging.Save()函数保存合成后的图像到文件。
以上是关于imaging库的介绍和示例代码。通过使用imaging库,你可以轻松地进行图像缩放、裁剪、滤镜和效果的处理,还可以对图像进行合成和叠加。接下来将介绍更多与音视频处理相关的库。
3. ffmpeg-go
ffmpeg-go是一个用于FFmpeg的Go绑定库,可以用于处理音视频文件,包括视频解码与编码、音频解码与编码以及多媒体格式转换等功能。
3.1 视频解码与编码
使用ffmpeg-go库可以进行视频文件的解码和编码。下面是一个示例代码,演示如何使用ffmpeg-go库将视频文件解码为帧序列,并将帧序列重新编码为不同的视频格式:
package mainimport ("fmt"ffmpeg "github.com/vansante/go-ffmpeg"
)func main() {// 创建输入上下文inputCtx := ffmpeg.AvformatAllocContext()// 打开视频文件err := inputCtx.AvformatOpenInput("input.mp4", nil, nil)if err != nil {fmt.Println("Failed to open input file:", err)return}// 查找流信息err = inputCtx.AvformatFindStreamInfo(nil)if err != nil {fmt.Println("Failed to find stream information:", err)return}// 寻找视频流videoStreamIndex := -1for i, stream := range inputCtx.Streams() {if stream.CodecParameters().CodecType() == ffmpeg.AVMEDIA_TYPE_VIDEO {videoStreamIndex = ibreak}}if videoStreamIndex == -1 {fmt.Println("Could not find video stream in the input file")return}// 创建解码器上下文videoCodecCtx, err := inputCtx.AvcodecFindDecoderByStreamIndex(videoStreamIndex)if err != nil {fmt.Println("Failed to find video decoder:", err)return}// 打开解码器err = videoCodecCtx.AvcodecOpen2(nil)if err != nil {fmt.Println("Failed to open video decoder:", err)return}// 读取帧序列packet := ffmpeg.NewAVPacket()for inputCtx.AvreadFrame(packet) == nil {// 解码帧if packet.StreamIndex() == videoStreamIndex {frames, _ := videoCodecCtx.AvcodecDecodeVideo2(packet)// 处理解码后的帧数据for _, frame := range frames {// 处理帧数据...}}// 释放帧的引用计数packet.AvPacketUnref()}// 关闭解码器和输入文件videoCodecCtx.AvcodecClose()inputCtx.AvformatCloseInput()fmt.Println("Video decoding completed")
}
以上示例代码使用ffmpeg-go库打开视频文件,并对视频流进行解码,将解码后的帧数据进行处理。你可以根据自己的需求对解码后的帧数据进行处理,例如,进行图像处理、特征提取等操作。
3.2 音频解码与编码
除了视频解码与编码,ffmpeg-go库还可以进行音频文件的解码和编码。下面是一个示例代码,演示如何使用ffmpeg-go库将音频文件解码为音频帧序列,并将音频帧序列重新编码为不同的音频格式:
package mainimport ("fmt"ffmpeg "github.com/vansante/go-ffmpeg"
)func main() {// 创建输入上下文inputCtx := ffmpeg.AvformatAllocContext()// 打开音频文件err := inputCtx.AvformatOpenInput("input.wav", nil, nil)if err != nil {fmt.Println("Failed to open input file:", err)return}// 查找流信息err = inputCtx.AvformatFindStreamInfo(nil)if err != nil {fmt.Println("Failed to find stream information:", err)return}// 寻找音频流audioStreamIndex := -1for i, stream := range inputCtx.Streams() {if stream.CodecParameters().CodecType() == ffmpeg.AVMEDIA_TYPE_AUDIO {audioStreamIndex = ibreak}}if audioStreamIndex == -1 {fmt.Println("Could not find audio stream in the input file")return}// 创建解码器上下文audioCodecCtx, err := inputCtx.AvcodecFindDecoderByStreamIndex(audioStreamIndex)if err != nil {fmt.Println("Failed to find audio decoder:", err)return}// 打开解码器err = audioCodecCtx.AvcodecOpen2(nil)if err != nil {fmt.Println("Failed to open audio decoder:", err)return}// 读取音频帧序列packet := ffmpeg.NewAVPacket()for inputCtx.AvreadFrame(packet) == nil {// 解码音频帧if packet.StreamIndex() == audioStreamIndex {frames, _ := audioCodecCtx.AvcodecDecodeAudio4(packet)// 处理解码后的音频帧数据for _, frame := range frames {// 处理音频帧数据...}}// 释放音频帧的引用计数packet.AvPacketUnref()}// 关闭解码器和输入文件audioCodecCtx.AvcodecClose()inputCtx.AvformatCloseInput()fmt.Println("Audio decoding completed")
}
以上示例代码使用ffmpeg-go库打开音频文件,并对音频流进行解码,将解码后的音频帧数据进行处理。你可以根据自己的需求对解码后的音频帧数据进行处理,例如,进行音频处理、特征提取等操作。
3.3 多媒体格式转换
除了音视频解码和编码,ffmpeg-go库还可以进行多媒体格式的转换。下面是一个示例代码,演示如何使用ffmpeg-go库将视频文件转换为不同的视频格式:
package mainimport ("fmt"ffmpeg "github.com/vansante/go-ffmpeg"
)func main() {// 创建输入上下文inputCtx := ffmpeg.AvformatAllocContext()// 打开视频文件err := inputCtx.AvformatOpenInput("input.mp4", nil, nil)if err != nil {fmt.Println("Failed to open input file:", err)return}// 查找流信息err = inputCtx.AvformatFindStreamInfo(nil)if err != nil {fmt.Println("Failed to find stream information:", err)return}// 找到输出文件格式outputFormat := ffmpeg.AvGuessFormat("mov", "", "")if outputFormat == nil {fmt.Println("Failed to guess output format")return}// 创建输出上下文outputCtx := ffmpeg.AvformatAllocContext()outputCtx.SetOutputFormat(outputFormat)// 打开输出文件err = outputCtx.AvioOpen("output.mov", ffmpeg.AVIO_FLAG_WRITE)if err != nil {fmt.Println("Failed to open output file:", err)return}// 将输入流复制到输出流err = inputCtx.AvformatDumpStream(outputCtx, true, true)if err != nil {fmt.Println("Failed to copy stream:", err)return}// 关闭输入和输出inputCtx.AvformatCloseInput()outputCtx.AvformatCloseOutput()fmt.Println("Media format conversion completed")
}
以上示例代码使用ffmpeg-go库打开视频文件,将视频文件的流复制到新的输出文件中,并将输出文件保存为不同的视频格式。你可以根据需要指定不同的输出格式。
以上是关于ffmpeg-go库的介绍和示例代码。通过使用ffmpeg-go库,你可以进行视频和音频文件的解码和编码,以及多媒体格式的转换,提供了丰富的功能和灵活性。接下来将介绍更多与音频处理相关的库portaudio-go。
4. portaudio-go
portaudio-go是一个用于PortAudio音频输入输出的Go绑定库,提供了音频输入输出、实时音频处理以及音频流转发和录制等功能。
4.1 音频输入与输出
使用portaudio-go库可以进行音频的输入和输出。下面是一个示例代码,演示如何使用portaudio-go库播放一个音频文件:
package mainimport ("fmt""github.com/gordonklaus/portaudio""io""os"
)func main() {// 打开音频文件file, err := os.Open("audio.wav")if err != nil {fmt.Println("Failed to open audio file:", err)return}defer file.Close()// 初始化PortAudioerr = portaudio.Initialize()if err != nil {fmt.Println("Failed to initialize PortAudio:", err)return}defer portaudio.Terminate()// 打开默认的输出设备outputParameters := portaudio.DefaultOutputStreamParameters()outputParameters.Output.Channels = 2 // 设置为2通道立体声outputParameters.SampleRate = 44100  // 设置采样率为44100Hzstream, err := portaudio.OpenStream(outputParameters, nil)if err != nil {fmt.Println("Failed to open PortAudio stream:", err)return}defer stream.Close()// 开始播放音频stream.Start()defer stream.Stop()// 播放音频文件中的音频数据buf := make([]int32, 512) // 缓冲区大小为512个样本for {// 从文件中读取音频数据n, err := file.Read(buf)if err != nil && err != io.EOF {fmt.Println("Failed to read audio data from file:", err)return}// 将音频数据写入PortAudio流err = stream.Write(buf[:n])if err != nil {fmt.Println("Failed to write audio data to PortAudio stream:", err)return}// 判断是否读取完整个音频文件if err == io.EOF {break}}fmt.Println("Audio playback completed")
}
以上示例代码使用portaudio-go库打开音频文件,并使用PortAudio在默认的输出设备上播放音频文件的音频数据。
4.2 实时音频处理
除了音频的输入和输出,portaudio-go库还提供了实时音频处理的功能。下面是一个示例代码,演示如何使用portaudio-go库进行实时音频处理,将输入音频信号进行放大:
package mainimport ("fmt""github.com/gordonklaus/portaudio""math"
)func main() {// 初始化PortAudioerr := portaudio.Initialize()if err != nil {fmt.Println("Failed to initialize PortAudio:", err)return}defer portaudio.Terminate()// 打开默认的输入和输出设备inputParameters := portaudio.DefaultInputStreamParameters()outputParameters := portaudio.DefaultOutputStreamParameters()inputParameters.Channels = 1 // 输入为1通道outputParameters.Channels = 1 // 输出为1通道stream, err := portaudio.OpenStream(inputParameters, outputParameters, 44100, 256, processAudio)if err != nil {fmt.Println("Failed to open PortAudio stream:", err)return}defer stream.Close()// 开始音频处理err = stream.Start()if err != nil {fmt.Println("Failed to start PortAudio stream:", err)return}defer stream.Stop()// 等待音频处理完成fmt.Println("Press Enter to stop...")fmt.Scanln()
}func processAudio(in, out []int32) {// 对输入音频信号进行放大for i, sample := range in {out[i] = int32(math.Min(float64(sample)*2, float64(math.MaxInt32)))}
}
在以上示例代码中,通过调用portaudio.OpenStream()函数打开默认的输入和输出设备,并设置回调函数processAudio()来进行实时音频处理。在processAudio()函数中,对输入音频信号进行放大,并将处理后的音频信号写入输出缓冲区。
4.3 音频流转发与录制
使用portaudio-go库还可以进行音频流的转发和录制。下面是一个示例代码,演示如何使用portaudio-go库将输入音频流转发到输出,并同时录制音频流到文件:
package mainimport ("fmt""github.com/gordonklaus/portaudio""io""os"
)func main() {// 打开音频输入设备inputParameters := portaudio.DefaultInputStreamParameters()inputParameters.Channels = 1 // 输入为1通道inputStream, err := portaudio.OpenStream(inputParameters, nil, 44100, 256, nil)if err != nil {fmt.Println("Failed to open input stream:", err)return}defer inputStream.Close()// 打开音频输出设备outputParameters := portaudio.DefaultOutputStreamParameters()outputParameters.Channels = 1 // 输出为1通道outputStream, err := portaudio.OpenStream(nil, outputParameters, 44100, 256, nil)if err != nil {fmt.Println("Failed to open output stream:", err)return}defer outputStream.Close()// 打开音频文件用于录制file, err := os.Create("recording.wav")if err != nil {fmt.Println("Failed to create output file:", err)return}defer file.Close()// 初始化PortAudioerr = portaudio.Initialize()if err != nil {fmt.Println("Failed to initialize PortAudio:", err)return}defer portaudio.Terminate()// 开始音频流转发和录制err = inputStream.Start()if err != nil {fmt.Println("Failed to start input stream:", err)return}err = outputStream.Start()if err != nil {fmt.Println("Failed to start output stream:", err)return}// 录制音频流到文件buf := make([]int32, 256) // 缓冲区大小为256个样本for {// 从输入流读取音频数据err := inputStream.Read(buf)if err != nil {fmt.Println("Failed to read audio data from input stream:", err)return}// 将音频数据写入输出流err = outputStream.Write(buf)if err != nil {fmt.Println("Failed to write audio data to output stream:", err)return}// 将音频数据写入文件_, err = file.Write([]byte(buf))if err != nil {fmt.Println("Failed to write audio data to file:", err)return}}fmt.Println("Audio streaming and recording completed")
}
以上示例代码使用portaudio-go库打开输入和输出设备,并通过inputStream.Start()和outputStream.Start()方法开始音频流转发。使用inputStream.Read()方法读取输入流的音频数据,并使用outputStream.Write()方法将音频数据写入输出流。同时,将音频数据写入文件,以实现音频流的录制。
以上是关于portaudio-go库的介绍和示例代码。通过使用portaudio-go库,你可以进行音频的输入输出、实时音频处理,以及音频流的转发和录制,提供了强大的音频处理能力。接下来将介绍与图像处理相关的库opencv。
5. opencv
opencv是一个跨平台的计算机视觉和图像处理库,提供丰富的图像处理算法和函数,包括图像特征检测与提取、目标识别与跟踪、图像分割与处理等功能。
5.1 图像特征检测与提取
使用opencv库可以进行图像的特征检测和提取。下面是一个示例代码,演示如何使用opencv库检测并提取图像中的关键点:
package mainimport ("fmt""gocv.io/x/gocv"
)func main() {// 读取图像文件img := gocv.IMRead("input.jpg", gocv.IMReadColor)if img.Empty() {fmt.Println("Failed to read image file")return}// 创建ORB特征检测器orb := gocv.NewORB()defer orb.Close()// 检测关键点并计算描述子keypoints := orb.Detect(img)keypoints, descriptors := orb.Compute(img, keypoints)// 在图像上绘制关键点imgWithKeypoints := gocv.NewMat()gocv.DrawKeypoints(img, keypoints, &imgWithKeypoints, color.RGBA{255, 0, 0, 0}, 2)// 保存带有关键点的图像gocv.IMWrite("output.jpg", imgWithKeypoints)fmt.Println("Image keypoints extracted and saved")
}
以上示例代码使用gocv.IMRead()函数读取图像文件,并使用gocv.NewORB()函数创建ORB特征检测器。通过调用orb.Detect()函数检测关键点,并通过orb.Compute()函数计算关键点的描述子。最后,通过调用gocv.DrawKeypoints()函数在图像上绘制关键点,并使用gocv.IMWrite()函数保存带有关键点的图像。
5.2 目标识别与跟踪
opencv库还提供了目标识别和跟踪的功能。下面是一个示例代码,演示如何使用opencv库进行目标识别和跟踪:
package mainimport ("fmt""gocv.io/x/gocv"
)func main() {// 打开视频文件video, err := gocv.VideoCaptureFile("input.mp4")if err != nil {fmt.Println("Failed to open video file:", err)return}defer video.Close()// 创建KCF跟踪器tracker := gocv.NewTrackerKCF()defer tracker.Close()// 读取第一帧图像作为目标区域img := gocv.NewMat()video.Read(&img)rect := gocv.SelectROI("Video", img)tracker.Init(img, rect)// 开始跟踪目标并显示跟踪结果for {if ok := video.Read(&img); !ok {break}rect, _ := tracker.Update(img)gocv.Rectangle(&img, rect, color.RGBA{255, 0, 0, 0}, 2)window.IMShow("Video", img)if window.WaitKey(1) >= 0 {break}}fmt.Println("Object tracking completed")
}
在以上示例代码中,使用gocv.VideoCaptureFile()函数打开视频文件,并使用gocv.NewTrackerKCF()函数创建KCF跟踪器。然后,读取第一帧图像并在图像上选择目标区域,使用tracker.Init()函数初始化跟踪器。接下来,使用tracker.Update()函数进行目标跟踪,并使用gocv.Rectangle()函数在图像上绘制跟踪框。最后,使用window.IMShow()函数显示跟踪结果,并使用window.WaitKey()函数等待用户退出。
5.3 图像分割与处理
opencv库提供了多种图像分割和处理的算法和函数。下面是一个示例代码,演示如何使用opencv库进行简单的图像分割和处理:
package mainimport ("fmt""gocv.io/x/gocv"
)func main() {// 读取图像文件img := gocv.IMRead("input.jpg", gocv.IMReadColor)if img.Empty() {fmt.Println("Failed to read image file")return}// 将图像转换为灰度图像gray := gocv.NewMat()gocv.CvtColor(img, &gray, gocv.ColorBGRToGray)// 对图像进行阈值分割thresholdImg := gocv.NewMat()gocv.Threshold(gray, &thresholdImg, 127, 255, gocv.ThresholdBinary)// 对图像进行中值滤波medianBlurImg := gocv.NewMat()gocv.MedianBlur(thresholdImg, &medianBlurImg, 5)// 保存处理后的图像gocv.IMWrite("output.jpg", medianBlurImg)fmt.Println("Image segmentation and processing completed")
}
以上示例代码使用gocv.IMRead()函数读取图像文件,并使用gocv.CvtColor()函数将图像转换为灰度图像。然后,通过调用gocv.Threshold()函数对图像进行阈值分割,并使用gocv.MedianBlur()函数对图像进行中值滤波。最后,使用gocv.IMWrite()函数保存处理后的图像。
以上是关于opencv库的介绍和示例代码。通过使用opencv库,你可以进行图像的特征检测和提取、目标识别和跟踪,以及图像分割和处理,提供了丰富的图像处理能力。接下来将介绍与音视频处理相关的库goav。
6. goav
goav是一个用于音视频处理的Go库,它使用了底层的FFmpeg和PortAudio等库,提供了音视频解码与编码、流媒体处理与传输、音视频编辑与合成等功能。
6.1 音视频解码与编码
使用goav库可以进行音视频文件的解码和编码。下面是一个示例代码,演示如何使用goav库将视频文件解码为帧序列,并将帧序列重新编码为不同的视频格式:
package mainimport ("fmt""goav.googlecode.com/hg/avcodec""goav.googlecode.com/hg/avformat"
)func main() {// 打开输入文件formatCtx := avformat.AvformatAllocContext()err := formatCtx.AvOpenInputFile("input.mp4", nil, nil)if err != nil {fmt.Println("Failed to open input file:", err)return}defer formatCtx.AvCloseInputFile()// 查找流信息err = formatCtx.AvFindStreamInfo(nil)if err != nil {fmt.Println("Failed to find stream information:", err)return}// 找到视频流videoStream := formatCtx.Streams()[0]// 找到视频解码器videoCodecCtx := videoStream.Codec()videoCodec := avcodec.AvcodecFindDecoder(videoCodecCtx.CodecId())if videoCodec == nil {fmt.Println("Failed to find video decoder")return}// 打开视频解码器err = videoCodecCtx.AvcodecOpen(videoCodec)if err != nil {fmt.Println("Failed to open video decoder:", err)return}// 读取帧序列packet := avcodec.AvPacketAlloc()for formatCtx.AvReadFrame(packet) >= 0 {if packet.StreamIndex() == videoStream.Index() {// 解码帧frame := avcodec.AvcodecAllocFrame()videoCodecCtx.AvcodecDecodeVideo(frame, packet)// 处理帧数据...}// 释放帧的引用计数packet.AvPacketUnref()}fmt.Println("Video decoding completed")
}
以上示例代码使用avformat.AvOpenInputFile()函数打开视频文件,并使用formatCtx.AvFindStreamInfo()函数查找流信息。然后,找到视频流和视频解码器,并通过videoCodecCtx.AvcodecOpen()函数打开视频解码器。最后,通过循环调用formatCtx.AvReadFrame()函数读取帧序列,并使用videoCodecCtx.AvcodecDecodeVideo()函数对帧数据进行解码。
6.2 流媒体处理与传输
除了音视频解码和编码,goav库还可以进行流媒体处理和传输。下面是一个示例代码,演示如何使用goav库从摄像头捕获视频流并进行实时传输:
package mainimport ("fmt""goav.googlecode.com/hg/avcodec""goav.googlecode.com/hg/avformat""goav.googlecode.com/hg/avutil""goav.googlecode.com/hg/swscale"
)func main() {// 打开摄像头formatCtx := avformat.AvformatAllocContext()err := avformat.AvformatOpenInput(&formatCtx, "0", nil, nil)if err != nil {fmt.Println("Failed to open input device:", err)return}defer avformat.AvformatCloseInput(&formatCtx)// 设置视频编码器参数codec := avcodec.AvcodecFindEncoder(avcodec.CodecId(AV_CODEC_ID_H264))if codec == nil {fmt.Println("Failed to find video encoder")return}codecCtx := avcodec.AvcodecAllocContext3(codec)defer avcodec.AvcodecClose(codecCtx)codecCtx.Width = 640codecCtx.Height = 480codecCtx.PixFmt = avcodec.AV_PIX_FMT_YUV420PcodecCtx.BitRate = 400000// 打开视频编码器err = avcodec.AvcodecOpen2(codecCtx, codec, nil)if err != nil {fmt.Println("Failed to open video encoder:", err)return}// 创建视频帧frame := avutil.AvFrameAlloc()frame.Width = codecCtx.Widthframe.Height = codecCtx.Heightframe.Format = int32(codecCtx.PixFmt)// 创建视频帧缓冲区bufSize := avutil.AvpictureGetSize(int32(codecCtx.PixFmt), codecCtx.Width, codecCtx.Height)buf := avutil.AvMalloc(bufSize)// 将缓冲区与视频帧关联avutil.AvpictureFill((*avutil.AVPicture)(frame), buf, int32(codecCtx.PixFmt), codecCtx.Width, codecCtx.Height)// 视频帧转换上下文swsCtx := swscale.SwsGetContext(formatCtx.Width(), formatCtx.Height(), formatCtx.PixFmt(),codecCtx.Width, codecCtx.Height, codecCtx.PixFmt,swscale.SWS_BICUBIC, nil, nil, nil,)// 开始实时传输视频流for {// 读取视频帧avformat.AvReadFrame(formatCtx, packet)// 转换视频帧swscale.SwsScale2(swsCtx,avutil.Data(packet), avutil.Linesize(packet), 0, formatCtx.Height(),avutil.Data(frame), avutil.Linesize(frame),)// 编码视频帧avcodec.AvcodecEncodeVideo(codecCtx, data, frame)// 发送视频数据avformat.AvWriteFrame(formatCtx, packet)}fmt.Println("Video streaming completed")
}
以上示例代码使用avformat.AvformatOpenInput()函数打开摄像头,并使用avcodec.AvcodecFindEncoder()函数找到视频编码器。设置视频编码器的参数,并使用avcodec.AvcodecOpen2()函数打开视频编码器。然后,创建视频帧对象和缓冲区,并使用swscale.SwsGetContext()函数创建视频帧转换上下文。最后,循环读取摄像头的视频帧,进行转换和编码,并使用avformat.AvWriteFrame()函数发送视频数据。
6.3 音视频编辑与合成
goav库可以进行音视频的编辑和合成。下面是一个示例代码,演示如何使用goav库将音频和视频文件进行编辑和合成:
package mainimport ("fmt""goav.googlecode.com/hg/avcodec""goav.googlecode.com/hg/avformat"
)func main() {// 打开输入音频文件audioFormatCtx := avformat.AvformatAllocContext()err := avformat.AvformatOpenInput(&audioFormatCtx, "input.wav", nil, nil)if err != nil {fmt.Println("Failed to open input audio file:", err)return}defer avformat.AvformatCloseInput(&audioFormatCtx)// 查找音频流信息err = audioFormatCtx.AvFindStreamInfo(nil)if err != nil {fmt.Println("Failed to find stream information for audio:", err)return}// 打开输入视频文件videoFormatCtx := avformat.AvformatAllocContext()err = avformat.AvformatOpenInput(&videoFormatCtx, "input.mp4", nil, nil)if err != nil {fmt.Println("Failed to open input video file:", err)return}defer avformat.AvformatCloseInput(&videoFormatCtx)// 查找视频流信息err = videoFormatCtx.AvFindStreamInfo(nil)if err != nil {fmt.Println("Failed to find stream information for video:", err)return}// 创建输出音视频文件outputFormatCtx := avformat.AvformatAllocContext()err = avformat.AvformatAllocOutputContext2(&outputFormatCtx, nil, nil, "output.mkv")if err != nil {fmt.Println("Failed to create output file:", err)return}defer avformat.AvformatFreeContext(outputFormatCtx)// 将音频流复制到输出文件audioStreamIdx := avformat.AvFindBestStream(audioFormatCtx, avformat.AVMEDIA_TYPE_AUDIO, -1, -1, nil, 0)audioStream := audioFormatCtx.Streams()[audioStreamIdx]outputAudioStream := avformat.AvformatNewStream(outputFormatCtx, nil)outputAudioStream.CodecContext().SetCodecTag(avformat.AvCodecGetTag(outputFormatCtx.Oformat().CodecTag(), audioStream.CodecParameters().CodecId()))avcodec.AvcodecParametersCopy(outputAudioStream.CodecParameters(), audioStream.CodecParameters())// 将视频流复制到输出文件videoStreamIdx := avformat.AvFindBestStream(videoFormatCtx, avformat.AVMEDIA_TYPE_VIDEO, -1, -1, nil, 0)videoStream := videoFormatCtx.Streams()[videoStreamIdx]outputVideoStream := avformat.AvformatNewStream(outputFormatCtx, nil)outputVideoStream.CodecContext().SetCodecTag(avformat.AvCodecGetTag(outputFormatCtx.Oformat().CodecTag(), videoStream.CodecParameters().CodecId()))avcodec.AvcodecParametersCopy(outputVideoStream.CodecParameters(), videoStream.CodecParameters())// 写入文件头err = avformat.AvformatWriteHeader(outputFormatCtx, nil)if err != nil {fmt.Println("Failed to write output file header:", err)return}// 编写音频数据和视频数据packet := avcodec.AvPacketAlloc()for {// 读取音频数据err := avformat.AvReadFrame(audioFormatCtx, packet)if err != nil {break}// 设置音频流信息packet.StreamIndex(audioStreamIdx)// 写入音频数据err = avformat.AvInterleavedWriteFrame(outputFormatCtx, packet)if err != nil {fmt.Println("Failed to write audio packet:", err)return}// 释放音频数据引用packet.AvPacketUnref()}for {// 读取视频数据err := avformat.AvReadFrame(videoFormatCtx, packet)if err != nil {break}// 设置视频流信息packet.StreamIndex(videoStreamIdx)// 写入视频数据err = avformat.AvInterleavedWriteFrame(outputFormatCtx, packet)if err != nil {fmt.Println("Failed to write video packet:", err)return}// 释放视频数据引用packet.AvPacketUnref()}// 写入文件尾err = avformat.AvWriteTrailer(outputFormatCtx)if err != nil {fmt.Println("Failed to write output file trailer:", err)return}fmt.Println("Audio and video editing and composition completed")
}
以上示例代码使用avformat.AvformatOpenInput()函数打开音频和视频文件,并使用avformat.AvFindStreamInfo()函数查找音频和视频流信息。然后,创建输出音视频文件,并复制音频流和视频流到输出文件中。最后,通过循环调用avformat.AvReadFrame()函数读取音频和视频数据,并使用avformat.AvInterleavedWriteFrame()函数将数据写入输出文件。
以上是关于goav库的介绍和示例代码。通过使用goav库,你可以进行音视频的解码和编码、流媒体的处理和传输,以及音视频的编辑和合成,提供了强大的音视频处理能力。这里介绍的是一些常用的图像和多媒体处理库,你可以根据自己的需求选择合适的库进行图像和多媒体处理。
总结:
本文全面介绍了Go语言中一些功能强大的图像和多媒体处理库。通过使用这些库,开发者能够轻松处理和操作图像、音频和视频。从解码和编码到格式转换,从图像操作和处理到音频输入和输出,本文提供了丰富的示例代码,帮助读者深入了解这些库的用法和特点。通过选择合适的库和工具,开发者可以高效地处理和处理图像和多媒体数据。
相关文章:

【Golang星辰图】图像和多媒体处理的创新之路:Go语言的无限潜能
图像处理、音视频编辑,Go语言不再局限:揭秘opencv和goav的威力 前言: 在当今的数字时代,图像处理和多媒体技术在各个领域中的应用越来越广泛。无论是计算机视觉、图像处理还是音视频处理,选择合适的库和工具至关重要。本文将介绍…...

MES管理系统中电子看板都有哪些类型?
随着工业信息化和智能制造的不断发展,MES管理系统已经成为现代制造业不可或缺的重要工具。MES管理系统通过集成和优化生产过程中的各个环节,实现对生产过程的实时监控、调度和管理,提高生产效率和质量。 在生产制造过程中,看板管…...
【Flutter 面试题】await for 如何使用?
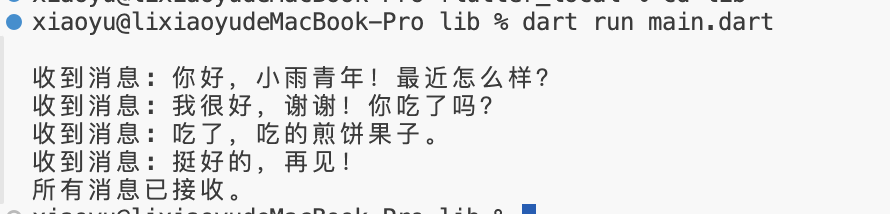
【Flutter 面试题】await for 如何使用? 文章目录 写在前面解答补充说明完整代码示例运行结果详细说明 写在前面 🙋 关于我 ,小雨青年 👉 CSDN博客专家,GitChat专栏作者,阿里云社区专家博主,51…...

MongoDB聚合运算符:$dayOfWeek
$dayOfWeek返回日期中“星期”的部分,值的范围1-7,即Sunday~Saturday。 语法 { $dayOfWeek: <dateExpression> }参数说明: <dateExpression>为可被解析为Date、Timestamp或ObjectID的表达式<dateExpression>也可以是一个…...

Visual Studio单步调试中监视窗口变灰的问题
在vs调试中,写了这样一条语句 while((nfread(buf, sizeof(float), N, pf))>0) 然而,在调试中,只要一执行while这条语句,监视窗口中的变量全部变为灰色,不能查看,是程序本身并没有报错,能够继…...
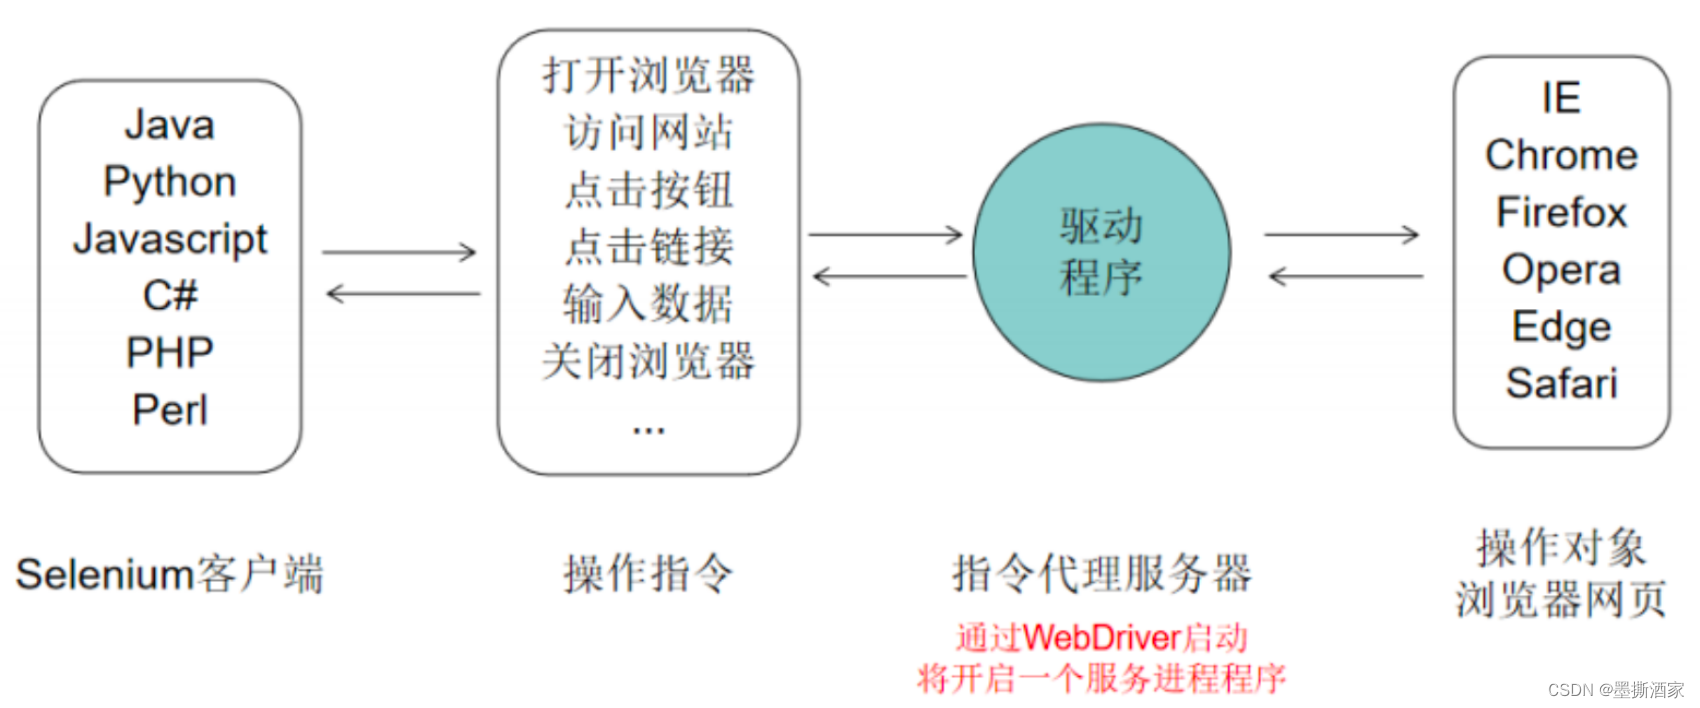
【Selenium】selenium介绍及工作原理
一、Selenium介绍 用于Web应用程序测试的工具,Selenium是开源并且免费的,覆盖IE、Chrome、FireFox、Safari等主流浏览器,通过在不同浏览器中运行自动化测试。支持Java、Python、Net、Perl等编程语言进行自动化测试脚本编写。 官网地址&…...
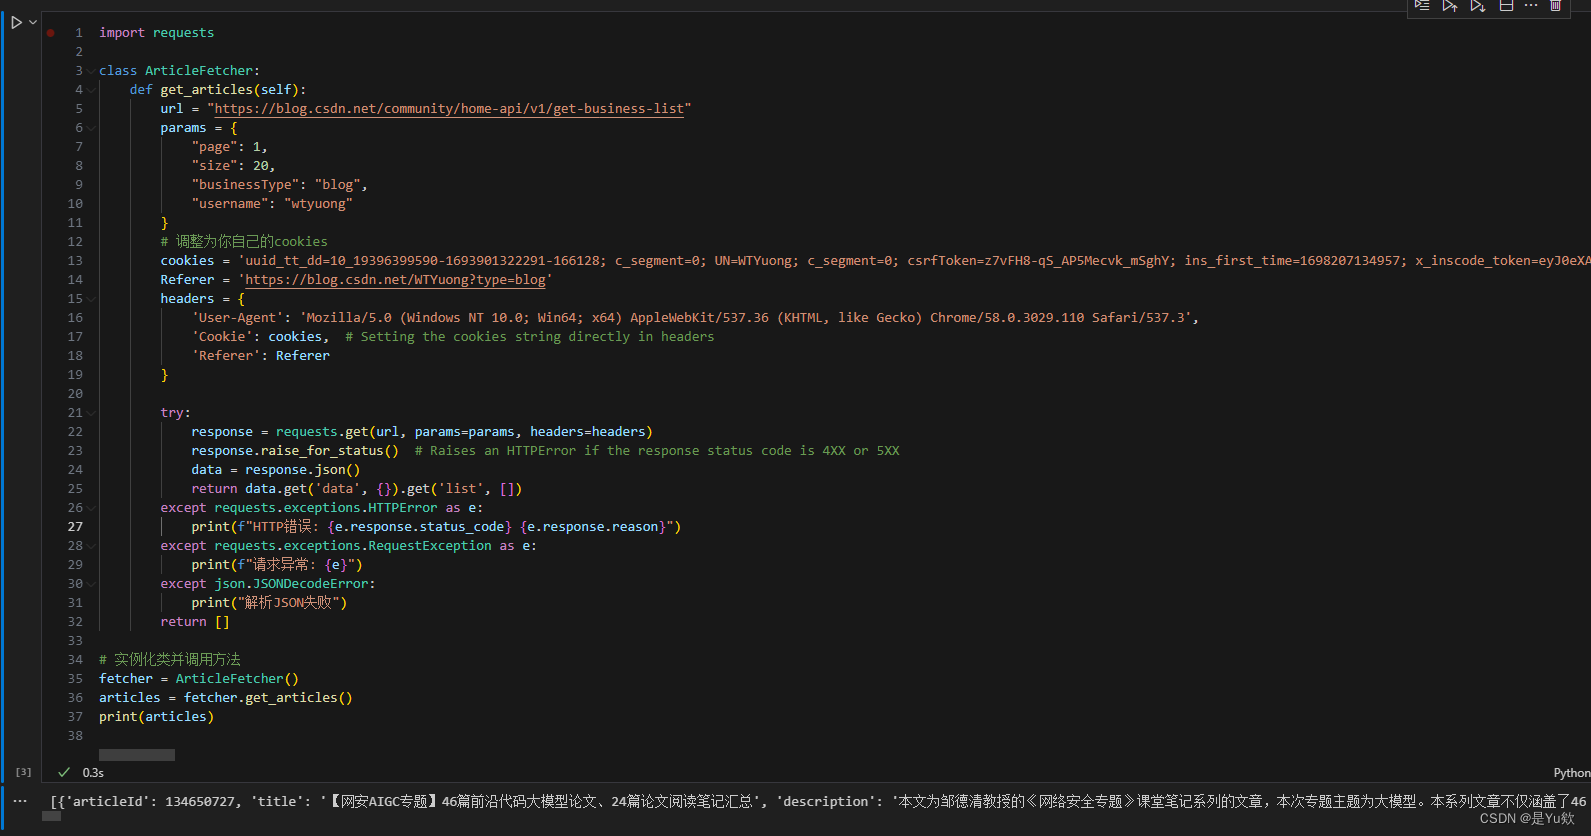
【2024-完整版】python爬虫 批量查询自己所有CSDN文章的质量分:附整个实现流程
【2024】批量查询CSDN文章质量分 写在最前面一、分析获取步骤二、获取文章列表1. 前期准备2. 获取文章的接口3. 接口测试(更新重点) 三、查询质量分1. 前期准备2. 获取文章的接口3. 接口测试 四、python代码实现1. 分步实现2. 批量获取文章信息3. 从exce…...

Nuxt3: useFetch使用过程常见一种报错
一、问题描述 先看一段代码: <script setup> const fetchData async () > {const { data, error } await useFetch(https://api.publicapis.org/entries);const { data: data2, error: error2 } await useFetch(https://api.publicapis.org/entries);…...

当代计算机语言占比分析
在当今快速发展的科技领域,计算机语言作为程序员的工具之一,扮演着至关重要的角色。随着技术的不断演进,各种编程语言层出不穷,但在实际开发中,哪些计算机语言占据主导地位?本文将对当代计算机语言的占比进…...

基于大模型和向量数据库的 RAG 示例
1 RAG 介绍 RAG是一种先进的自然语言处理方法,它结合了信息检索和文本生成技术,用于提高问答系统、聊天机器人等应用的性能。 2 RAG 的工作流程 文档加载(Document Loading) 从各种来源加载大量文档数据。这些文档…...
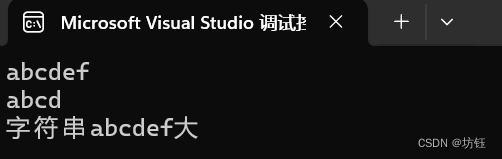
【C语言】比较两个字符串大小,strcmp函数
目录 一,strcmp函数 1,strcmp函数 2,函数头文件: 3,函数原型: 4,返回取值: 二,代码实现 三,小结 一,strcmp函数 1,strcmp函数 …...
深入理解与应用Keepalive机制
目录 引言 一、VRRP协议 (一)VRRP概述 1.诞生背景 2.基本理论 (二)VRRP工作原理 (三)VRRP相关术语 二、keepalive基本理论 (一)基本性能 (二)实现原…...

嵌入(embedding)概念
嵌入(embedding)在数学和相关领域中的确是指将一个数学对象在保持其某些关键性质不变的前提下,注入到一个更大或更高维的空间中。这个过程不仅仅是简单的映射,而是要求注入的对象在新空间中的表现形式能够完整反映原有对象的内在结…...

豆瓣书影音存入Notion
使用Python将图书和影视数据存放入Notion中。 🖼️介绍 环境 Python 3.10 (建议 3.11 及以上)Pycharm / Vs Code / Vs Code Studio 项目结构 │ .env │ main.py - 主函数、执行程序 │ new_book.txt - 上一次更新书籍 │ new_video.…...

Lucene 分词 示例代码
import org.apache.lucene.analysis.tokenattributes.CharTermAttribute; import org.apache.lucene.analysis.TokenStream; import org...

2.18 校招 实习 内推 面经
绿*泡*泡VX: neituijunsir 交流*裙 ,内推/实习/校招汇总表格 1、自动驾驶一周资讯 - 李想回应“年终奖有点大”;智界升级为奇瑞独立事业部;小鹏汽车春节累计智驾总里程公布 自动驾驶一周资讯 - 李想回应“年终奖有点大”&…...

spring中事务失效的场景有哪些?
异常捕获处理 在方法中已经将异常捕获处理掉并没有抛出。 事务只有捕捉到了抛出的异常才可以进行处理,如果有异常业务中直接捕获处理掉没有抛出,事务是无法感知到的。 解决:在catch块throw抛出异常。 抛出检查异常 spring默认只会回滚非检…...
Visual Studio 2022之Release版本程序发送到其它计算机运行
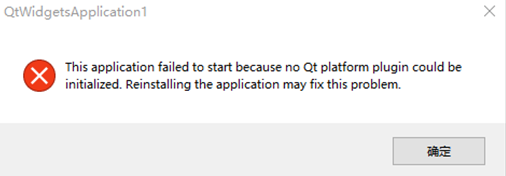
目录 1、缺少dll 2、应用程序无法正常启动 3、This application failed to start because no Qt platform plugin could be initialized. 代码在Debug模式下正常运行,然后切换到Release模式下,也正常运行,把第三方平台的dll拷贝到exe所在…...
.)
Xcode下载模拟器报错Could not download iOS 17.4 Simulator (21E213).
xcode14以后最小化安装包,从而将模拟器不集中在安装包中 因此xcode14至以后的版本安装后第一次启动会加载提示安装模拟器的提示框 或者根据需要到xcode中进行所需版本|平台的模拟器进行安装 Xcode > Settings > Platforms 问题来了尝试多次都安装失败例如…...

mac在终端设置代理
前言 本篇文章介绍如何在mac终端设置代理服务器,有时候,我们需要在终端进行外网的资源访问,比如我构建v8引擎项目的时候,需要使用gclient更新组件和下载构建工具。如果单单设置了计算机的代理,依然是无法下载资源的&a…...

openpilot终极指南:如何为你的爱车免费升级自动驾驶辅助系统
openpilot终极指南:如何为你的爱车免费升级自动驾驶辅助系统 【免费下载链接】openpilot openpilot is an operating system for robotics. Currently, it upgrades the driver assistance system on 300 supported cars. 项目地址: https://gitcode.com/GitHub_T…...
)
Unity 2D游戏地图制作:从零上手Tile Palette的7个核心工具(附快捷键清单)
Unity 2D游戏地图制作:从零上手Tile Palette的7个核心工具(附快捷键清单)在独立游戏开发领域,2D游戏因其独特的艺术风格和相对较低的开发门槛,始终保持着旺盛的生命力。无论是复古风格的平台跳跃游戏,还是精…...

JavaScript 高频基础面试题
在前端面试与日常开发中,JavaScript 基础语法、数组操作、循环、函数、定时器等知识点是必考、必用的核心内容。我整理了从 41 到 52 题的高频经典题目,搭配标准回答 代码示例 核心要点,逻辑清晰、面试直接背诵,一篇搞定基础通关…...

深入Linux内核链表:从of_property_read_bool看设备树属性的组织与查找
深入Linux内核链表:从of_property_read_bool看设备树属性的组织与查找 在Linux内核开发中,设备树(Device Tree)作为描述硬件配置的标准方式,其高效解析机制一直是内核开发者关注的焦点。当我们调用 of_property_read_…...

Fay数字人框架服务器安全基线实战指南
1. 为什么一份“数字人框架服务器安全基线”不是可选项,而是上线前的生死线你花三个月调好了Fay数字人的语音唤醒灵敏度,优化了TTS情感韵律,把LLM上下文窗口拉到32K,连虚拟形象的微表情帧率都压到了60fps——结果刚部署到云服务器…...

完整掌握Stressapptest:高效系统稳定性测试的实用指南
完整掌握Stressapptest:高效系统稳定性测试的实用指南 【免费下载链接】stressapptest Stressful Application Test - userspace memory and IO test 项目地址: https://gitcode.com/gh_mirrors/st/stressapptest Stressful Application Test(简称…...

别再手动下载DLL了!用Windows自带工具SFC/SCANNOW一键修复kernel32.dll错误
别再手动下载DLL了!用Windows自带工具SFC/SCANNOW一键修复kernel32.dll错误当电脑屏幕上突然弹出"无法定位程序输入点kernel32.dll"的红色警告框时,大多数人的第一反应是打开浏览器搜索"如何下载kernel32.dll"。这个看似合理的操作背…...
)
从原理到操作:彻底搞懂Linux服务器UEFI启动项管理(efibootmgr命令详解)
深入解析Linux服务器UEFI启动管理:efibootmgr命令全攻略当你在Linux服务器上执行efibootmgr命令时,是否曾被那些神秘的Boot000X条目搞得一头雾水?作为现代服务器的主流启动方式,UEFI远比传统的BIOS复杂得多。本文将带你从底层原理…...

2026保姆级免费在线去水印教程:想保存无水印视频?用这些方法就够了
你是不是也遇到过这样的尴尬:刷到一个特别喜欢的视频想保存下来做素材,结果画面中间杵着大大的水印;或者朋友发来一张好图,角落的Logo怎么都去不掉?自己研究半天,又是下软件又是找教程,结果要么…...

2026最新免费在线去除视频水印保姆级教程,不用下载软件一步到位!
你是不是也遇到过这种崩溃瞬间:刷到一个绝美空镜想拿来做转场,结果角落挂着硕大的平台台标;翻到一条神评论视频想分享给朋友,水印叠水印糊成一片;好不容易找到素材想剪辑个二创,却被满屏的浮动水印直接劝退…...