Linux运维_Bash脚本_编译安装FreeRDP-3.3.0
Linux运维_Bash脚本_编译安装FreeRDP-3.3.0
Bash (Bourne Again Shell) 是一个解释器,负责处理 Unix 系统命令行上的命令。它是由 Brian Fox 编写的免费软件,并于 1989 年发布的免费软件,作为 Sh (Bourne Shell) 的替代品。
您可以在 Linux 和 MacOS 机器上使用 Bash,甚至可以通过适用于 Linux 的 Windows 子系统在 Windows 10 机器上使用。
使用方法
- 下载源码包:
eudev-3.2.14.tar.gz
pkcs11-helper-1.30.0.tar.bz2
e2fsprogs-1.45.5.tar.gz
krb5-1.21.2.tar.gz
icu4c-74_2-src.tgz
libusb-1.0.27.tar.bz2
cups-2.4.7-source.tar.gz
fuse-3.16.2.tar.gz
freerdp-3.3.0.tar.gz
- 放于指定路径:
这里 Bash Shell 脚本的全局变量 STORAGE 指定的存放源码包的路径 /home/goufeng 可进行修改。
- 执行 Bash Shell 脚本:
输入 /[路径名]/[脚本名].sh 即可进行自动编译部署,过程中提示输入 (y/n) 输入 y 则进行下一步,这样分阶段确认的原因是为了确保能够看到上一个源码编译结果中可能的错误和提示。
完整脚本
#! /bin/bash
# Create By GF 2024-03-13 22:22# --------------------------------------------------
# Install First:
# * GNU-Tools (Contains: pkg-config, m4, autoconf, automake, libtool, gettext, flex, bison, libiconv, make)
# * CMake >= 3.14.0
# * Python == 3.x.x
# * Meson
# * Ninja
# * X11
# * Glib
# * Pango == 1.51.x (Contains: Fribidi, FreeType, Fontconfig / Needed by libinput)
# * FFmpeg == 6.x.x# ------------------- Dependency -------------------
# Need File: eudev-3.2.14.tar.gz
# Need File: pkcs11-helper-1.30.0.tar.bz2
# Need File: e2fsprogs-1.45.5.tar.gz
# Need File: krb5-1.21.2.tar.gz
# Need File: icu4c-74_2-src.tgz
# Need File: libusb-1.0.27.tar.bz2 (Needed by Cups)
# Need File: cups-2.4.7-source.tar.gz
# Need File: fuse-3.16.2.tar.gz
# -------------------- FreeRDP ---------------------
# Need File: freerdp-3.3.0.tar.gz# ##################################################
# Recommended Optional Installation
# * GnuTLS-3.7.0 (GnuTLS是一个安全的通信库, 实现 SSL, TLS 和 DTLS 协议及其周围的技术。它提供了用于访问安全通信协议的简单 C语言 应用程序编程接口 (API), 以及用于解析和编写 X.509, PKCS 和其他所需结构的API。)# ##################################################
STORAGE=/home/goufeng# ############################################ Dependency ############################################# Function: 编译安装(Compile Install) eudev-3.2.14
# ##################################################
function Compile_Install_eudev_3_2_14() {# Attention: may conflict with the original "udev" in the system.# 注意: 可能与系统原有的 "udev" 冲突。# eudev 提供针对内核提供的 udev 设备管理服务的函数库。# udev 是 Linux 2.6 内核的设备管理器。# udev 它在 /dev 目录下动态地 创建/移除 设备节点, 用于在系统中传递解决方案的有关设备信息, 以及在出现设备事件 (如删除、插入设备) 时触发相应的操作。if [[ ! -d "/opt/eudev-3.2.14" ]]; thenlocal VERIFYlocal STEP_UNZIPPED=0local STEP_BUILDED=0local STEP_INSTALLED=0# ------------------------------------------read -p "[Confirm] Compile and Install ( eudev-3.2.14 )? (y/n)>" VERIFYif [[ "$VERIFY" != "y" ]]; then exit 1; fi# ------------------------------------------tar -zxvf $STORAGE/eudev-3.2.14.tar.gz && STEP_UNZIPPED=1# ------------------------------------------cd $STORAGE/eudev-3.2.14 && ./configure --prefix=/opt/eudev-3.2.14 && STEP_BUILDED=1# ------------------------------------------make && make install && STEP_INSTALLED=1# ------------------------------------------if [[ $STEP_INSTALLED == 1 ]]; thenif [[ ! -d "/opt/lib" ]]; then mkdir /opt/lib; fiif [[ ! -d "/opt/lib/pkgconfig" ]]; then mkdir /opt/lib/pkgconfig; fi# Skip # if [[ ! -d "/usr/local/sbin" ]]; then mkdir /usr/local/sbin; fi# ......................................# Skip # ln -sf /opt/eudev-3.2.14/bin/udevadm /usr/local/bin/# Skip # ln -sf /opt/eudev-3.2.14/bin/udevadm /usr/local/sbin/udevadm# ......................................# Skip # ln -sf /opt/eudev-3.2.14/sbin/udevd /usr/local/sbin/# ......................................# Skip # rsync -av /opt/eudev-3.2.14/include/ /usr/local/include/# Skip # rsync -av /opt/eudev-3.2.14/lib/     /usr/local/lib/# ......................................cp -f /opt/eudev-3.2.14/lib/pkgconfig/libudev.pc /opt/lib/pkgconfig/fi# ------------------------------------------cd $STORAGE && rm -rf $STORAGE/eudev-3.2.14 && return 0elseecho "[Caution] Path: ( /opt/eudev-3.2.14 ) Already Exists."# ------------------------------------------return 0fi
}# Function: 编译安装(Compile Install) pkcs11-helper-1.30.0
# ##################################################
function Compile_Install_pkcs11_helper_1_30_0() {if [[ ! -d "/opt/pkcs11-helper-1.30.0" ]]; thenlocal VERIFYlocal STEP_UNZIPPED=0local STEP_CONFIGURED=0local STEP_INSTALLED=0# ------------------------------------------read -p "[Confirm] Compile and Install ( pkcs11-helper-1.30.0 )? (y/n)>" VERIFYif [[ "$VERIFY" != "y" ]]; then exit 1; fi# ------------------------------------------tar -jxvf $STORAGE/pkcs11-helper-1.30.0.tar.bz2 && STEP_UNZIPPED=1# ------------------------------------------cd $STORAGE/pkcs11-helper-1.30.0 && ./configure --prefix=/opt/pkcs11-helper-1.30.0 \PKG_CONFIG_PATH="/opt/lib/pkgconfig" && \STEP_CONFIGURED=1# ------------------------------------------make && make install && STEP_INSTALLED=1# ------------------------------------------if [[ $STEP_INSTALLED == 1 ]]; thenif [[ ! -d "/opt/lib" ]]; then mkdir /opt/lib; fiif [[ ! -d "/opt/lib/pkgconfig" ]]; then mkdir /opt/lib/pkgconfig; fi# ......................................rsync -av /opt/pkcs11-helper-1.30.0/include/ /usr/local/include/rsync -av /opt/pkcs11-helper-1.30.0/lib/     /usr/local/lib/# ......................................cp -f /opt/pkcs11-helper-1.30.0/lib/pkgconfig/libpkcs11-helper-1.pc /opt/lib/pkgconfig/fi# ------------------------------------------cd $STORAGE && rm -rf $STORAGE/pkcs11-helper-1.30.0 && return 0elseecho "[Caution] Path: ( /opt/pkcs11-helper-1.30.0 ) Already Exists."# ------------------------------------------return 0fi
}# Function: 编译安装(Compile Install) e2fsprogs-1.45.5
# ##################################################
function Compile_Install_e2fsprogs_1_45_5() {# e2fsprogs-1.45.5 Provide: chattr        (Binary File)# e2fsprogs-1.45.5 Provide: compile_et    (Binary File)# e2fsprogs-1.45.5 Provide: lsattr        (Binary File)# e2fsprogs-1.45.5 Provide: mk_cmds       (Binary File)# e2fsprogs-1.45.5 Provide: uuidgen       (Binary File)# e2fsprogs-1.45.5 Provide: libblkid.a    (Static Libraries)# e2fsprogs-1.45.5 Provide: libblkid.so   (Shared Libraries)# e2fsprogs-1.45.5 Provide: libcom_err.a  (Static Libraries)# e2fsprogs-1.45.5 Provide: libcom_err.so (Shared Libraries)# e2fsprogs-1.45.5 Provide: libe2p.a      (Static Libraries)# e2fsprogs-1.45.5 Provide: libe2p.so     (Shared Libraries)# e2fsprogs-1.45.5 Provide: libext2fs.a   (Static Libraries)# e2fsprogs-1.45.5 Provide: libext2fs.so  (Shared Libraries)# e2fsprogs-1.45.5 Provide: libss.a       (Static Libraries)# e2fsprogs-1.45.5 Provide: libss.so      (Shared Libraries)# e2fsprogs-1.45.5 Provide: libuuid.a     (Static Libraries)# e2fsprogs-1.45.5 Provide: libuuid.so    (Shared Libraries)if [[ ! -d "/opt/e2fsprogs-1.45.5" ]]; thenlocal VERIFYlocal STEP_UNZIPPED=0local STEP_CONFIGURED=0local STEP_INSTALLED=0# ------------------------------------------read -p "[Confirm] Compile and Install ( e2fsprogs-1.45.5 )? (y/n)>" VERIFYif [[ "$VERIFY" != "y" ]]; then exit 1; fi# ------------------------------------------tar -zxvf $STORAGE/e2fsprogs-1.45.5.tar.gz && STEP_UNZIPPED=1# ------------------------------------------# *  Option: --enable-elf-shlibs: select ELF shared libraries# ..........................................# *  Option: --enable-bsd-shlibs: select BSD shared librariescd $STORAGE/e2fsprogs-1.45.5 && ./configure --prefix=/opt/e2fsprogs-1.45.5 \--enable-elf-shlibs \PKG_CONFIG_PATH="/opt/lib/pkgconfig" && \STEP_CONFIGURED=1# ------------------------------------------make && make install && STEP_INSTALLED=1# ------------------------------------------if [[ $STEP_INSTALLED == 1 ]]; then# Skip # if [[ ! -d "/usr/local/sbin" ]]; then mkdir /usr/local/sbin; fi# ......................................if [[ ! -d "/opt/lib" ]]; then mkdir /opt/lib; fiif [[ ! -d "/opt/lib/pkgconfig" ]]; then mkdir /opt/lib/pkgconfig; fi# ......................................# Skip # ln -sf /opt/e2fsprogs-1.45.5/bin/* /usr/local/bin/# ......................................# Skip # ln -sf /opt/e2fsprogs-1.45.5/sbin/* /usr/local/sbin/# ......................................# Skip # rsync -av /opt/e2fsprogs-1.45.5/include/ /usr/local/include/# Skip # rsync -av /opt/e2fsprogs-1.45.5/lib/     /usr/local/lib/# ......................................cp -f /opt/e2fsprogs-1.45.5/lib/pkgconfig/*.pc /opt/lib/pkgconfig/fi# ------------------------------------------cd $STORAGE && rm -rf $STORAGE/e2fsprogs-1.45.5 && return 0elseecho "[Caution] Path: ( /opt/e2fsprogs-1.45.5 ) Already Exists."# ------------------------------------------return 0fi
}# Function: 编译安装(Compile Install) MIT-Kerberos-V5-1.21.2
# ##################################################
function Compile_Install_MIT_Kerberos_V5_1_21_2() {# Configuring MIT Kerberos V5# #     Config Files#     #         /etc/krb5.conf and /var/lib/krb5kdc/kdc.conf#     #     Configuration Information#     #     Kerberos Configuration#     #             Tip#             #             You should consider installing some sort of password checking dictionary so that you can configure the installation to only accept strong passwords.#             A suitable dictionary to use is shown in the CrackLib-2.9.11 instructions. Note that only one file can be used, but you can concatenate many files into one.#             The configuration file shown below assumes you have installed a dictionary to /usr/share/dict/words.#     #         Create the Kerberos configuration file with the following commands issued by the root user:#     #             cat > /etc/krb5.conf << "EOF"#             # Begin /etc/krb5.conf#             #             [libdefaults]#                 default_realm = <EXAMPLE.ORG>#                 encrypt = true#             #             [realms]#                 <EXAMPLE.ORG> = {#                     kdc = <belgarath.example.org>#                     admin_server = <belgarath.example.org>#                     dict_file = /usr/share/dict/words#                 }#             #             [domain_realm]#                 .<example.org> = <EXAMPLE.ORG>#             #             [logging]#                 kdc = SYSLOG:INFO:AUTH#                 admin_server = SYSLOG:INFO:AUTH#                 default = SYSLOG:DEBUG:DAEMON#             #             # End /etc/krb5.conf#             EOF#         You will need to substitute your domain and proper hostname for the occurrences of the <belgarath> and <example.org> names.#         #         default_realm should be the name of your domain changed to ALL CAPS. This isn't required, but both Heimdal and MIT recommend it.#         #         encrypt = true provides encryption of all traffic between kerberized clients and servers. It's not necessary and can be left off. If you leave it off, you can encrypt all traffic from the client to the server using a switch on the client program instead.#         #         The [realms] parameters tell the client programs where to look for the KDC authentication services.#         #         The [domain_realm] section maps a domain to a realm.#         #         Create the KDC database:#     #             kdb5_util create -r <EXAMPLE.ORG> -s#         Now you should populate the database with principals (users). For now, just use your regular login name or root.#     #             kadmin.local#             kadmin.local: add_policy dict-only#             kadmin.local: addprinc -policy dict-only <loginname>#         The KDC server and any machine running kerberized server daemons must have a host key installed:#     #             kadmin.local: addprinc -randkey host/<belgarath.example.org>#         After choosing the defaults when prompted, you will have to export the data to a keytab file:#     #             kadmin.local: ktadd host/<belgarath.example.org>#         This should have created a file in /etc named krb5.keytab (Kerberos 5). This file should have 600 (root rw only) permissions. Keeping the keytab files from public access is crucial to the overall security of the Kerberos installation.#     #         Exit the kadmin program (use quit or exit) and return back to the shell prompt. Start the KDC daemon manually, just to test out the installation:#     #             /usr/sbin/krb5kdc#         Attempt to get a ticket with the following command:#     #             kinit <loginname>#         You will be prompted for the password you created. After you get your ticket, you can list it with the following command:#     #             klist#         Information about the ticket should be displayed on the screen.#     #         To test the functionality of the keytab file, issue the following command as the root user:#     #             ktutil#             ktutil: rkt /etc/krb5.keytab#             ktutil: l#         This should dump a list of the host principal, along with the encryption methods used to access the principal.#     #         Create an empty ACL file that can be modified later:#     #             touch /var/lib/krb5kdc/kadm5.acl#         At this point, if everything has been successful so far, you can feel fairly confident in the installation and configuration of the package.if [[ ! -d "/opt/krb5-1.21.2" ]]; thenlocal VERIFYlocal STEP_UNZIPPED=0local STEP_CONFIGURED=0local STEP_INSTALLED=0# ------------------------------------------read -p "[Confirm] Compile and Install ( krb5-1.21.2 )? (y/n)>" VERIFYif [[ "$VERIFY" != "y" ]]; then exit 1; fi# ------------------------------------------tar -zxvf $STORAGE/krb5-1.21.2.tar.gz && STEP_UNZIPPED=1# ------------------------------------------# * Explain: sed -i -e '/eq 0/{N;s/12 //}' plugins/kdb/db2/libdb2/test/run.test: The sed command removes a test that is known to fail.#                                                                                sed 命令删除已知失败的测试。if [[ $STEP_UNZIPPED == 1 ]]; thensed -i -e '/eq 0/{N;s/12 //}' $STORAGE/krb5-1.21.2/src/plugins/kdb/db2/libdb2/test/run.testfi# ------------------------------------------# * Default Configure Options:# ./configure --prefix=/usr \#             --sysconfdir=/etc \#             --localstatedir=/var/lib \#             --runstatedir=/run \#             --with-system-et \#             --with-system-ss \#             --with-system-verto=no \#             --enable-dns-for-realm# ..........................................# *  Option: --with-system-et: This switch causes the build to use the system-installed versions of the error-table support software.# ..........................................# *  Option: --with-system-ss: This switch causes the build to use the system-installed versions of the subsystem command-line interface software.# ..........................................# *  Option: --with-system-verto=no: This switch fixes a bug in the package: it does not recognize its own verto library installed previously.#                                    This is not a problem, if reinstalling the same version, but if you are updating, the old library is used as system's one, instead of installing the new version.# ..........................................# *  Option: --enable-dns-for-realm: This switch allows realms to be resolved using the DNS server.# ..........................................# *  Option: --with-ldap: Use this switch if you want to compile the OpenLDAP database backend module.cd $STORAGE/krb5-1.21.2/src && ./configure --prefix=/opt/krb5-1.21.2 \--with-system-et \--with-system-ss \--with-system-verto=no \--enable-dns-for-realm \PKG_CONFIG_PATH="/opt/lib/pkgconfig" && \STEP_CONFIGURED=1# ------------------------------------------make && make install && STEP_INSTALLED=1# ------------------------------------------if [[ $STEP_INSTALLED == 1 ]]; then# Skip # if [[ ! -d "/usr/local/sbin" ]]; then mkdir /usr/local/sbin; fi# ......................................if [[ ! -d "/opt/lib" ]]; then mkdir /opt/lib; fiif [[ ! -d "/opt/lib/pkgconfig" ]]; then mkdir /opt/lib/pkgconfig; fi# ......................................# Skip # ln -sf /opt/krb5-1.21.2/bin/* /usr/local/bin/# ......................................# Skip # ln -sf /opt/krb5-1.21.2/sbin/* /usr/local/sbin/# ......................................# Skip # rsync -av /opt/krb5-1.21.2/include/ /usr/local/include/# Skip # rsync -av /opt/krb5-1.21.2/lib/     /usr/local/lib/# ......................................cp -f /opt/krb5-1.21.2/lib/pkgconfig/*.pc /opt/lib/pkgconfig/fi# ------------------------------------------# Now, as the root user:# cp -vfr ../doc -T /usr/share/doc/krb5-1.21.2# ..........................................# Still as the root user, remove linker flags setting RPATH from the krb5-config script.# These flags are unneeded for an installation in the standard prefix (/usr) and they may cause some packages fail to build:# 仍然作为根用户, 从 krb5-config 配置脚本中删除设置 RPATH 的链接器标志。# 这些标志对于标准前缀 (/usr) 中的安装是不需要的, 它们可能会导致某些包无法构建:# sed '/PROG_RPATH_FLAGS/d' -i /usr/bin/krb5-config# ------------------------------------------cd $STORAGE && rm -rf $STORAGE/krb5-1.21.2 && return 0elseecho "[Caution] Path: ( /opt/krb5-1.21.2 ) Already Exists."# ------------------------------------------return 0fi
}# Function: 编译安装(Compile Install) ICU-74.2
# ##################################################
function Compile_Install_ICU_74_2() {# The International Components for Unicode (ICU) package is a mature, widely used set of C/C++ libraries providing Unicode and Globalization support for software applications.# ICU is widely portable and gives applications the same results on all platforms.# 国际 Unicode 组件 (ICU) 包是一组成熟、广泛使用的 C/C++ 库, 为软件应用程序提供Unicode和全球化支持。# ICU具有广泛的便携性, 在所有平台上都能为应用程序提供相同的结果。# ..............................................# Warning:# Upgrading this package to a new major version (for example, from 72.1 to 74.2) will require rebuilding of many other packages.# If some packages that use the libraries built by icu4c-74 are rebuilt, they will use the new libraries while current packages will use the previous libraries.# If the Linux application loader (/usr/lib/ld-linux-x86-64.so.2) determines that both the old and new libraries are needed, and a symbol (name of data or function) exists in both versions of the library, all references to the symbol will be resolved to the version appearing earlier in the breadth-first sequence of the dependency graph.# This may result in the application failing if the definition of the data or the behavior of the function referred by the symbol differs in two versions.# To avoid the issue, users will need to rebuild every package linked to an ICU library as soon as possible once ICU is updated to a new major version.# 警告:# 将此软件包升级到新的主要版本 (例如, 从 72.1 升级到 74.2) 将需要重建许多其他软件包。# 如果重建了一些使用 icu4c-74 构建的库的包, 它们将使用新的库, 而当前包将使用以前的库。# 如果 Linux 应用程序加载程序 (/usr/lib/ld-Linux-x86-64.so.2) 确定需要旧库和新库, 并且两个版本的库中都存在一个符号 (数据或函数的名称), 则对该符号的所有引用都将解析为依赖关系图的广度优先序列中较早出现的版本。# 如果数据的定义或符号引用的函数的行为在两个版本中不同,这可能会导致应用程序失败。# 为了避免这个问题, 一旦 ICU 更新到新的主要版本, 用户需要尽快重建链接到 ICU 库的每个包。# ..............................................# To determine what external libraries are needed (directly or indirectly) by an application or a library, run:# 要确定应用程序或库 (直接或间接) 需要哪些外部库, 请运行:#     ldd <application or library> # or to see only the directly needed libraries:# 或者只查看直接需要的库:#     readelf -d  <application or library> | grep NEEDEDif [[ ! -d "/opt/icu-74.2" ]]; thenlocal VERIFYlocal STEP_UNZIPPED=0local STEP_CONFIGURED=0local STEP_INSTALLED=0# ------------------------------------------read -p "[Confirm] Compile and Install ( icu-74.2 )? (y/n)>" VERIFYif [[ "$VERIFY" != "y" ]]; then exit 1; fi# ------------------------------------------tar -zxvf $STORAGE/icu4c-74_2-src.tgz && STEP_UNZIPPED=1# ------------------------------------------cd $STORAGE/icu/source && ./configure --prefix=/opt/icu-74.2 && STEP_CONFIGURED=1# ------------------------------------------make && make install && STEP_INSTALLED=1# ------------------------------------------if [[ $STEP_INSTALLED == 1 ]]; then# Skip # if [[ ! -d "/usr/local/sbin" ]]; then mkdir /usr/local/sbin; fi# ......................................if [[ ! -d "/opt/lib" ]]; then mkdir /opt/lib; fiif [[ ! -d "/opt/lib/pkgconfig" ]]; then mkdir /opt/lib/pkgconfig; fi# ......................................# Skip # ln -sf /opt/icu-74.2/bin/* /usr/local/bin/# ......................................# Skip # ln -sf /opt/icu-74.2/sbin/* /usr/local/sbin/# ......................................# Skip # rsync -av /opt/icu-74.2/include/ /usr/local/include/# Skip # rsync -av /opt/icu-74.2/lib/     /usr/local/lib/# ......................................cp -f /opt/icu-74.2/lib/pkgconfig/icu-i18n.pc /opt/lib/pkgconfig/cp -f /opt/icu-74.2/lib/pkgconfig/icu-io.pc   /opt/lib/pkgconfig/cp -f /opt/icu-74.2/lib/pkgconfig/icu-uc.pc   /opt/lib/pkgconfig/fi# ------------------------------------------cd $STORAGE && rm -rf $STORAGE/icu && return 0elseecho "[Caution] Path: ( /opt/icu-74.2 ) Already Exists."# ------------------------------------------return 0fi
}# Function: 编译安装(Compile Install) libusb-1.0.27
# ##################################################
function Compile_Install_libusb_1_0_27() {# Configuring Libusb#     To access raw USB devices (those not treated as a disk by the mass-storage driver), appropriate support must be available in the kernel. Check your kernel configuration:#     #     Device Drivers --->#       [*] USB support --->                                             [USB_SUPPORT]#         <*/M>   Support for Host-side USB                                      [USB]#         [*]     PCI based USB host interface                               [USB_PCI]#         # These are most common USB controller drivers for PC-like systems.#         # For modern systems often [USB_XHCI_HCD] is the only one needed#         # even if the system has USB 2.0 ports:#         < /*/M> xHCI HCD (USB 3.0) support                            [USB_XHCI_HCD]#         < /*/M> EHCI HCD (USB 2.0) support                            [USB_EHCI_HCD]#         < /*/M> OHCI HCD (USB 1.1) support                            [USB_OHCI_HCD]#     For more details on setting up USB devices, see the section called “USB Device Issues”.if [[ ! -d "/opt/libusb-1.0.27" ]]; thenlocal VERIFYlocal STEP_UNZIPPED=0local STEP_CONFIGURED=0local STEP_INSTALLED=0# ------------------------------------------read -p "[Confirm] Compile and Install ( libusb-1.0.27 )? (y/n)>" VERIFYif [[ "$VERIFY" != "y" ]]; then exit 1; fi# ------------------------------------------tar -jxvf $STORAGE/libusb-1.0.27.tar.bz2 && STEP_UNZIPPED=1# ------------------------------------------cd $STORAGE/libusb-1.0.27 && ./configure --prefix=/opt/libusb-1.0.27 \--disable-static \PKG_CONFIG_PATH="/opt/lib/pkgconfig" && \STEP_CONFIGURED=1# ------------------------------------------make && make install && STEP_INSTALLED=1# ------------------------------------------if [[ $STEP_INSTALLED == 1 ]]; thenif [[ ! -d "/opt/lib" ]]; then mkdir /opt/lib; fiif [[ ! -d "/opt/lib/pkgconfig" ]]; then mkdir /opt/lib/pkgconfig; fi# ......................................# Skip # rsync -av /opt/libusb-1.0.27/include/ /usr/local/include/# ......................................# Skip # rsync -av /opt/libusb-1.0.27/lib/ /usr/local/lib/# ......................................cp -f /opt/libusb-1.0.27/lib/pkgconfig/libusb-1.0.pc /opt/lib/pkgconfig/fi# ------------------------------------------# If Doxygen is installed and you wish to build the API documentation, issue the following commands:# 如果安装了 Doxygen, 并且您希望构建 API 文档, 请发出以下命令:#     pushd doc                &&#       doxygen -u doxygen.cfg &&#       make docs              &&#     popd# ..........................................# This package does not come with a test suite.# 此软件包没有附带测试套件。# ..........................................# If you built the API documentation, install it using the following commands as the root user:# 如果您构建了 API 文档, 请使用以下命令作为 root 用户进行安装:#     install -v -d -m755 /usr/share/doc/libusb-1.0.27/apidocs &&#     install -v -m644    doc/api-1.0/* \#                         /usr/share/doc/libusb-1.0.27/apidocs# ------------------------------------------cd $STORAGE && rm -rf $STORAGE/libusb-1.0.27 && return 0elseecho "[Caution] Path: ( /opt/libusb-1.0.27 ) Already Exists."# ------------------------------------------return 0fi
}# Function: 编译安装(Compile Install) Cups-2.4.7
# ##################################################
function Compile_Install_Cups_2_4_7() {# Kernel Configuration#     Note:#     There used to be a conflict between the Cups libusb backend and the usblp kernel driver. This is no longer the case and cups will work with both of these enabled.# # If you want to use the kernel usblp driver (for example, if you wish to use escputil from Gutenprint-5.3.4) enable the following options in your kernel configuration and recompile the kernel:# #     Device Drivers --->#       [*] USB support --->                                             [USB_SUPPORT]#         <*/M> USB Printer support                                      [USB_PRINTER]# If you have a parallel printer, enable the following options in your kernel configuration and recompile the kernel:# #     Device Drivers --->#       <*/M> Parallel port support --->                                     [PARPORT]#         <*/M> PC-style hardware                                         [PARPORT_PC]#       Character devices --->#         <*/M> Parallel printer support                                     [PRINTER]# ..............................................# Configuring Cups# Config Files#     /etc/cups/*# # Configuration Information#     Normally, printers are set up via a web browser.#     The Cups server will normally connect via the url http://localhost:631. From there printers, print jobs, and the server configuration can be set up and managed.#     Remote system administration can also be set up. Configuration can also be done from the command line via the lpadmin, lpoptions, and lpstat commands.# #     Configuration of Cups is dependent on the type of printer and can be complex.#     Generally, PostScript printers are easier. For detailed instructions on configuration and use of Cups, see https://www.cups.org/documentation.html.# #     For non-PostScript printers to print with Cups, you need to install ghostscript-10.03.0 to convert PostScript to raster images and a driver (e.g. from Gutenprint-5.3.4) to convert the resulting raster images to a form that the printer understands.#     Foomatic drivers use ghostscript-10.03.0 to convert PostScript to a printable form directly, but this is considered suboptimal by Cups developers.# # Linux PAM Configuration#     If CUPS has been built with Linux PAM support, you need to create a PAM configuration file to get it working correctly with BLFS.# #     Issue the following command as the root user to create the configuration file for Linux PAM:# #         cat > /etc/pam.d/cups << "EOF"#         # Begin /etc/pam.d/cups#         #         auth    include system-auth#         account include system-account#         session include system-session#         #         # End /etc/pam.d/cups#         EOF# Boot Script#     If you want the Cups print service to start automatically when the system is booted, install the init script included in the blfs-bootscripts-20240209 package:# #         make install-cupsif [[ ! -d "/opt/cups-2.4.7" ]]; thenlocal VERIFYlocal STEP_UNZIPPED=0local STEP_CONFIGURED=0local STEP_INSTALLED=0# ------------------------------------------read -p "[Confirm] Compile and Install ( cups-2.4.7 )? (y/n)>" VERIFYif [[ "$VERIFY" != "y" ]]; then exit 1; fi# ------------------------------------------tar -zxvf $STORAGE/cups-2.4.7-source.tar.gz && STEP_UNZIPPED=1# ------------------------------------------# You will need to add an lp user, as Cups will create some files owned by this user.# (The lp user is the default used by Cups, but may be changed to a different user by passing a parameter to the configure script.)# Use the following command as the root user:# 您将需要添加一个 lp 用户, 因为 Cups 将创建该用户拥有的一些文件。# ( lp 用户是 Cups 使用的默认用户, 但可以通过向配置脚本传递参数将其更改为其他用户。)# 作为 root 用户使用以下命令:useradd -c "Print Service User" -d /var/spool/cups -g lp -s /bin/false -u 9 lp# ..........................................# You will also need a dedicated group that will contain users allowed to do Cups administrative tasks.# Add the group by running the following command as the root user:# 您还需要一个专门的组, 其中包含允许执行 Cups 管理任务的用户。# 通过以 root 用户身份运行以下命令来添加组:groupadd -g 19 lpadmin# ..........................................# If you want to add a user to the Cups administrative group, run the following command as the root user:# 如果要将用户添加到 Cups 管理组, 请以 root 用户身份运行以下命令:#     usermod -a -G lpadmin <username>usermod -a -G lpadmin lp# ..........................................# If you didn't install xdg-utils-1.2.1, use the following sed to change the default browser that will be used to access the Cups web interface:# 如果您没有安装 xdg-util-1.2.1, 请使用以下 sed 更改将用于访问 Cups Web 界面的默认浏览器:#     sed -i 's#@CUPS_HTMLVIEW@#firefox#' desktop/cups.desktop.in# Replace firefox with the web browser of your choice.# 用您选择的 Web 浏览器替换 firefox。sed -i 's#@CUPS_HTMLVIEW@#firefox#' $STORAGE/cups-2.4.7/desktop/cups.desktop.in# ------------------------------------------# Default Configure Options:# ./configure --libdir=/usr/lib \#             --disable-systemd \#             --with-rcdir=/tmp/cupsinit \#             --with-rundir=/run/cups \#             --with-system-groups=lpadmin \#             --with-docdir=/usr/share/cups/doc-2.4.7# ..........................................# *  Option: --disable-systemd: Systemd is not supported by this version of BLFS.# ..........................................# *  Option: --with-rcdir=/tmp/cupsinit: This switch tells the build process to install the shipped bootscript into /tmp instead of /etc/rc.d.# ..........................................# *  Option: --with-rundir=/run/cups: This switch prevents the package from referring to the deprecated /var/run directory.# ..........................................# *  Option: --with-system-groups=lpadmin: This switch ensures that only lpadmin will be used as the Cups administrative group.# ..........................................# *  Option: --disable-libusb: Use this switch if you have installed libusb-1.0.27, but wish to use the kernel usblp driver.# ..........................................# *  Option: --enable-libpaper: Use this switch if you have installed libpaper and wish to use it with Cups.cd $STORAGE/cups-2.4.7 && ./configure --prefix=/opt/cups-2.4.7 \--disable-systemd \--with-system-groups=lpadmin && \STEP_CONFIGURED=1# ------------------------------------------# To test the results, issue: LC_ALL=C make -k check.# An already active graphical session with bus address is necessary to run the tests.# Make sure that there is not other instance of Cups running, otherwise at least 4 tests will fail with "address in use".# 要测试结果, 请使用指令: LC_ALL=C make-k check。# 运行测试需要一个具有总线地址的已激活图形会话。# 确保没有其他 Cup 实例在运行, 否则至少有 4 个测试将失败, 并显示 "地址在使用中"。make && make install && STEP_INSTALLED=1# ------------------------------------------if [[ $STEP_INSTALLED == 1 ]]; then# Skip # if [[ ! -d "/usr/local/sbin" ]]; then mkdir /usr/local/sbin; fi# ......................................if [[ ! -d "/opt/lib" ]]; then mkdir /opt/lib; fiif [[ ! -d "/opt/lib/pkgconfig" ]]; then mkdir /opt/lib/pkgconfig; fi# ......................................# Skip # ln -sf /opt/cups-2.4.7/bin/* /usr/local/bin/# ......................................# Skip # ln -sf /opt/cups-2.4.7/sbin/* /usr/local/sbin/# ......................................# Skip # rsync -av /opt/cups-2.4.7/include/ /usr/local/include/# ......................................# Skip # rsync -av /opt/cups-2.4.7/lib/ /usr/local/lib/# ......................................cp -f /opt/cups-2.4.7/lib/pkgconfig/cups.pc /opt/lib/pkgconfig/fi# ------------------------------------------# Remove the shipped bootscript, which is incompatible with LFS:# 删除附带的与 LFS 不兼容的引导脚本:#     rm -rf /tmp/cupsinit# Create a basic Cups client configuration file by running the following command as the root user:# 通过 root 用户身份运行以下命令, 创建基本 Cups 客户端配置文件:#     echo "ServerName /run/cups/cups.sock" > /etc/cups/client.conf# ..........................................# Note:# This package installs icon files into the /usr/share/icons/hicolor hierarchy and you can improve system performance and memory usage by updating /usr/share/icons/hicolor/index.theme.# To perform the update you must have GTK+-3.24.41 installed and issue the following command as the root user:# 此软件包将图标文件安装到 /usr/share/icons/hicolor 层次结构中, 您可以通过更新 /usr/share/ics/hicolor/index.theme 来提高系统性能和内存使用率。# 要执行更新, 您必须安装 GTK+-3.24.41 并以 root 用户身份使用以下命令:#     gtk-update-icon-cache -qtf /usr/share/icons/hicolor# ------------------------------------------cd $STORAGE && rm -rf $STORAGE/cups-2.4.7 && return 0elseecho "[Caution] Path: ( /opt/cups-2.4.7 ) Already Exists."# ------------------------------------------return 0fi
}# Function: 构建安装(Build Install) Fuse-3.16.2
# ##################################################
function Build_Install_Fuse_3_16_2() {# Kernel Configuration#     Enable the following options in the kernel configuration and recompile the kernel if necessary:#     #         File systems --->#           <*/M> FUSE (Filesystem in Userspace) support                         [FUSE_FS]#     Character devices in userspace should be enabled too for running the tests:#     #         File systems --->#           <*/M> FUSE (Filesystem in Userspace) support                         [FUSE_FS]#           <*/M>   Character device in Userspace support                           [CUSE]# ..............................................# Configuring fuse# Config Files#     Some options regarding mount policy can be set in the file /etc/fuse.conf. To install the file run the following command as the root user:# #         cat > /etc/fuse.conf << "EOF"#         # Set the maximum number of FUSE mounts allowed to non-root users.#         # The default is 1000.#         ##         #mount_max = 1000#         #         # Allow non-root users to specify the 'allow_other' or 'allow_root'#         # mount options.#         ##         #user_allow_other#         EOF#     Additional information about the meaning of the configuration options are found in the man page.if [[ ! -d "/opt/fuse-3.16.2" ]]; thenlocal VERIFYlocal STEP_UNZIPPED=0local STEP_BUILDED=0local STEP_INSTALLED=0# ------------------------------------------read -p "[Confirm] Build and Install ( fuse-3.16.2 )? (y/n)>" VERIFYif [[ "$VERIFY" != "y" ]]; then exit 1; fi# ------------------------------------------tar -zxvf $STORAGE/fuse-3.16.2.tar.gz && STEP_UNZIPPED=1# ------------------------------------------# This command disables the installation of a boot script and udev rule that are not needed:# 此命令禁用不需要的启动脚本和 udev 规则的安装:#     sed -i '/^udev/,$ s/^/#/' util/meson.buildsed -i '/^udev/,$ s/^/#/' $STORAGE/fuse-3.16.2/util/meson.build# ------------------------------------------cd $STORAGE/fuse-3.16.2 && meson build/ --prefix=/opt/fuse-3.16.2 \--buildtype=release && \STEP_BUILDED=1# ------------------------------------------cd $STORAGE/fuse-3.16.2 && ninja -C build/ install && STEP_INSTALLED=1# ------------------------------------------if [[ $STEP_INSTALLED == 1 ]]; then# Skip # if [[ ! -d "/usr/local/sbin" ]]; then mkdir /usr/local/sbin; fi# ......................................if [[ ! -d "/opt/lib" ]]; then mkdir /opt/lib; fiif [[ ! -d "/opt/lib/pkgconfig" ]]; then mkdir /opt/lib/pkgconfig; fi# ......................................# Skip # ln -sf /opt/fuse-3.16.2/bin/fusermount3 /usr/local/bin/# ......................................# Skip # ln -sf /opt/fuse-3.16.2/sbin/mount.fuse3 /usr/local/sbin/# ......................................# Skip # rsync -av /opt/fuse-3.16.2/include/ /usr/local/include/# ......................................# Skip # rsync -av /opt/fuse-3.16.2/lib/ /usr/local/lib/# ......................................cp -f /opt/fuse-3.16.2/lib/pkgconfig/fuse3.pc /opt/lib/pkgconfig/fi# ------------------------------------------# chmod u+s /usr/bin/fusermount3 &&# # cd ..                          &&# cp -Rv doc/html -T /usr/share/doc/fuse-3.16.2 &&# install -v -m644   doc/{README.NFS,kernel.txt} \#                    /usr/share/doc/fuse-3.16.2# ..........................................# The API documentation is included in the package, but if you have Doxygen-1.10.0 installed and wish to rebuild it, issue:# API 文档包含在软件包中, 但如果您安装了 Doxygen-1.10.0 并希望重新生成它, 请使用指令:#     pushd .. &&#       doxygen doc/Doxyfile &&#     popd# ..........................................# To test the results, issue the following commands (as the root user):# 要测试结果, 请使用以下命令 (作为 root 用户):#     python3 -m venv --system-site-packages testenv &&#     source testenv/bin/activate                    &&#     pip3 install looseversion                      &&#     python3 -m pytest#     deactivate# The pytest-8.0.2 Python module is required for the tests.# One test named test_cuse will fail if the CONFIG_CUSE configuration item was not enabled when the kernel was built.# One test, test/util.py, will output a warning due to the usage of an unknown mark in pytest.# One test named test_notify_inval_entry[True-expire_entries] may fail under certain circumstances.# 测试需要 pytest-8.0.2 Python 模块。# 如果在构建内核时未启用 CONFIG_cuse 配置项, 则一个名为 test_cuse 的测试将失败。# 由于在 pytest 中使用了未知标记, 一个测试 test/util.py 将输出警告。# 一个名为 test_notify_inval_entry[True-expire_entries] 的测试在某些情况下可能会失败。# ------------------------------------------cd $STORAGE && rm -rf $STORAGE/fuse-3.16.2 && return 0elseecho "[Caution] Path: ( /opt/fuse-3.16.2 ) Already Exists."# ------------------------------------------return 0fi
}# ############################################# FreeRDP ############################################### Function: 构建安装(Build Install) FreeRDP-3.3.0
# ##################################################
function Build_Install_FreeRDP_3_3_0() {if [[ ! -d "/opt/freerdp-3.3.0" ]]; thenlocal VERIFYlocal STEP_UNZIPPED=0local STEP_CREATED=0local STEP_BUILDED=0local STEP_INSTALLED=0# ------------------------------------------read -p "[Confirm] Build and Install ( freerdp-3.3.0 )? (y/n)>" VERIFYif [[ "$VERIFY" != "y" ]]; then exit 1; fi# ------------------------------------------tar -zxvf $STORAGE/freerdp-3.3.0.tar.gz && STEP_UNZIPPED=1# ------------------------------------------sed -i "29i SET(CMAKE_INCLUDE_PATH /opt/icu-74.2/include /opt/sandbox-X11/include /opt/cups-2.4.7/include /opt/libusb-1.0.27/include)" $STORAGE/freerdp-3.3.0/CMakeLists.txtsed -i "30i SET(CMAKE_LIBRARY_PATH /opt/icu-74.2/lib /opt/sandbox-X11/lib /opt/cups-2.4.7/lib /opt/libusb-1.0.27/lib)" $STORAGE/freerdp-3.3.0/CMakeLists.txt# ..........................................sed -i "s/\/share\/xml\/docbook\/xsl-stylesheets\-\*\-nons/\/share\/xml\/docbook\/xsl-stylesheets\-\*/" $STORAGE/freerdp-3.3.0/cmake/FindDocBookXSL.cmake# ..........................................sed -i "31i LINK_DIRECTORIES(/opt/icu-74.2/lib /opt/fuse-3.16.2/lib)" $STORAGE/freerdp-3.3.0/CMakeLists.txt# ------------------------------------------mkdir $STORAGE/freerdp-3.3.0/build && STEP_CREATED=1# ------------------------------------------# * Problem: CMake Error at cmake/InstallFreeRDPMan.cmake:14 (message):#              docbook xsl not found but required for manpage generation#            Call Stack (most recent call first):#              client/X11/man/CMakeLists.txt:11 (generate_and_install_freerdp_man_from_xml)#   - Solve: 原因是 freerdp-3.3.0/cmake/InstallFreeRDPMan.cmake 中使用 include(FindDocBookXSL) 引入了 FindDocBookXSL.cmake 模块。#            而 FindDocBookXSL.cmake 模块正是查找 XSL 样式表的模块, 其中的路径为:#                ${STYLESHEET_PREFIX_ITER}/share/xml/docbook/xsl-stylesheets-*-nons#            把它修改为:#                ${STYLESHEET_PREFIX_ITER}/share/xml/docbook/xsl-stylesheets-*#            因为系统中能找到的 XSL 样式表目录名称为:#                /usr/share/xml/docbook/xsl-stylesheets-1.79.1#            并没有结尾那个 "-nons"。cd $STORAGE/freerdp-3.3.0/build && cmake -G "Unix Makefiles" \-DCMAKE_INSTALL_PREFIX=/opt/freerdp-3.3.0 \-DCMAKE_BUILD_TYPE=Release \../ && STEP_BUILDED=1# ------------------------------------------make && make install && STEP_INSTALLED=1# ------------------------------------------if [[ $STEP_INSTALLED == 1 ]]; thenif [[ ! -d "/opt/lib" ]]; then mkdir /opt/lib; fiif [[ ! -d "/opt/lib/pkgconfig" ]]; then mkdir /opt/lib/pkgconfig; fi# ......................................ln -sf /opt/freerdp-3.3.0/bin/* /usr/local/bin/# Skip # rsync -av /opt/freerdp-3.3.0/include/ /usr/local/include/# ......................................# Skip # rsync -av /opt/freerdp-3.3.0/lib/ /usr/local/lib/# ......................................cp -f /opt/freerdp-3.3.0/lib/pkgconfig/*.pc /opt/lib/pkgconfig/fi# ------------------------------------------cd $STORAGE && rm -rf $STORAGE/freerdp-3.3.0 && return 0elseecho "[Caution] Path: ( /opt/freerdp-3.3.0 ) Already Exists."# ------------------------------------------return 0fi
}function main() {# ----------- Compilation Environment ----------# 编译 krb5 (MIT Kerberos V5) 时需要引入 e2fsprogs 的 include 头文件。# 编译 libusb 时需要引入 eudev 的 include 头文件。export C_INCLUDE_PATH=/opt/e2fsprogs-1.45.5/include:/opt/eudev-3.2.14/includeexport CPLUS_INCLUDE_PATH=/opt/e2fsprogs-1.45.5/include:/opt/eudev-3.2.14/include# ..............................................# 编译 krb5 (MIT Kerberos V5) 时需要引入 e2fsprogs 的 lib 库文件。# 编译 libusb 时需要引入 eudev 的 lib 库文件。export LIBRARY_PATH=/opt/e2fsprogs-1.45.5/lib:/opt/eudev-3.2.14/libexport LD_LIBRARY_PATH=/opt/e2fsprogs-1.45.5/lib:/opt/eudev-3.2.14/lib# ..............................................# 编译 krb5 (MIT Kerberos V5) 时需要引入 e2fsprogs 的 bin 二进制文件。export PATH=$PATH:/opt/e2fsprogs-1.45.5/bin# ..............................................# 编译 FreeRDP3 时需要引入 PKG_CONFIG_PATH 环境变量。export PKG_CONFIG_PATH=/opt/lib/pkgconfig# ----------------- Dependency -----------------Compile_Install_eudev_3_2_14Compile_Install_pkcs11_helper_1_30_0Compile_Install_e2fsprogs_1_45_5Compile_Install_MIT_Kerberos_V5_1_21_2Compile_Install_ICU_74_2Compile_Install_libusb_1_0_27Compile_Install_Cups_2_4_7Build_Install_Fuse_3_16_2# ------------------ FreeRDP -------------------Build_Install_FreeRDP_3_3_0
}main
总结
以上就是关于 Linux运维 Bash脚本 编译安装FreeRDP-3.3.0 的全部内容。
更多内容可以访问我的代码仓库:
https://gitee.com/goufeng928/public
https://github.com/goufeng928/public
相关文章:

Linux运维_Bash脚本_编译安装FreeRDP-3.3.0
Linux运维_Bash脚本_编译安装FreeRDP-3.3.0 Bash (Bourne Again Shell) 是一个解释器,负责处理 Unix 系统命令行上的命令。它是由 Brian Fox 编写的免费软件,并于 1989 年发布的免费软件,作为 Sh (Bourne Shell) 的替代品。 您可以在 Linux…...

CMake官方教程4--使用表达式生成器
1. 使用表达式生成器产生警告 CMakeList.txt cmake_minimum_required(VERSION 3.15)project(Tutorial VERSION 1.0)add_library(tutorial_compiler_flags INTERFACE) target_compile_features(tutorial_compiler_flags INTERFACE cxx_std_11)set(gcc_like_cxx "$<COM…...

git for windows
记录,git svn混用,检出代码时出错及解决方案, 执行命令: git svn clone svn_project_url 报错: certificate problem.(R)eject,accept (t)emporarily or accept (p)ermanently 解决: 在弹框中 输入P …...
C++实验 面向对象编程
一、实验目的: 掌握类中静态成员的定义方法,初始化方法,使用方法; 掌握类的友元说明方法,理解友元的使用特点 二、实验内容: 1、编写程序,统计某旅馆住宿客人的总数,要求输入客人…...

VC++ 设置网卡接口MTU大小
在 Windows C/C 之中一共有三种方法可以设置网卡的MTU大小。 方法一: SetIpInterfaceEntry 法 static bool SetInterfaceMtu2(int interface_index, int mtu) noexcept{PIP_ADAPTER_ADDRESSES pAddresses NULL;ULONG ulBufLen 0;GetAdaptersAddresses(AF_UNSPEC…...

dpdk-19.11 对向量指令的使用情况分析
不同向量指令识别关键字 __m128i sse uint64x2_t neon __m256i avx2 __m512i avx512 vector altivec dpdk 向量收发包函数 支持 arm neno 向量收发包函数的 pmd 驱动 bnxt hns3 i40e ixgbe mlx5 virtio 支持 sse 向量收发包函数的 pmd 驱动 axgbe hinic fm10k bnxt i40e …...

使用CIP采集欧姆龙EtherNet/IP从入门到精通
本文将会从以下几个方面介绍 1.CIP是什么 2.EtherNet/IP通信是什么 3.CIP通信报文解析 4.使用CIP常用的方法和功能介绍(UCMM) 5.自己封装了一个类,只要知道标签名称,和数据类型即可读写数据 6.demo展示 1.CIP是什么 CIP通信…...

企业如何高效管理微信里的客户?
对于企业来说,懂得高效管理微信列表的客户是非常重要的一件事,只有把客户管理好了,才能更好地提高客户的满意度和忠诚度,我们的销售业务才能顺利进行。 那么,应该怎样管理才能算是高效管理呢?下面就给大家…...
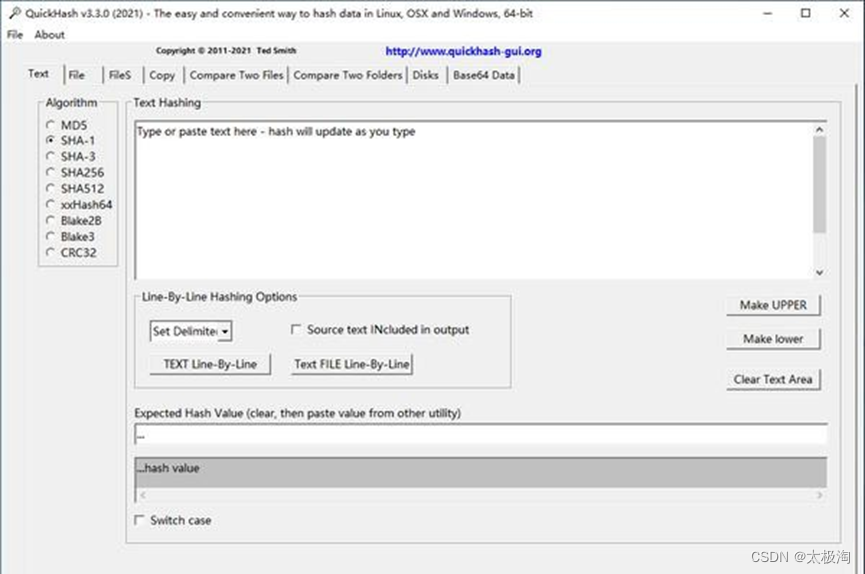
怎么在windows系统上查看kylinos的md5、sha1、sha256值
背景 当前信创行业正如火如荼进行中,当下载kylinos镜像到windows系统下,如何核对镜像是否有损坏,确保文件不被篡改,需要使用工具计算md5、sha1、sha256、sha512值,并与出库邮件中的md5比对。 QuickHash GUI软件简介 QuickHash GUI是一款开源代码的哈希工具,注意哈希能够…...

Windows中在C#中使用Dapper和Mysql.Data库连接MySQL数据库
Windows中在C#中使用Dapper和Mysql.Data库连接MySQL数据库 在Windows中使用C#连接Mysql数据库比较简单,可以直接使用MySql.Data库,目前最新版本为:8.3.0。 当然也可以结合MySql.Data和Dapper库一起使用,目前Dapper的最新版本为&a…...

大一专科,物联网专业,变态成长偏方!
最近看到一个大一,物联网专业的学生提问: 印象中,物联网专业2011年才有的,正好是我毕业那年。 我大概看过物联网专业要学的内容,总结下来就是,比软件不如计算机,比硬件知识不如电子。 不知道老师…...
MyBatis入门(JDBC规范,MyBatis,连接池,Lombok)【详解】
目录 一、JDBC规范【了解】 1. JDBC介绍 2. JDBC示例 3. JDBC的问题 二、MyBatis入门【重点】 1. Mybatis是什么 2. Mybatis使用步骤 3. Mybatis入门案例 1.创建SpringBoot工程 2.创建Mapper 3.功能测试 三、连接池【了解】 1. 什么是连接池 2. 有哪些数据库连接池…...

Vue3--数据和方法
data 组件的 data 选项是一个函数。Vue 在创建新组件实例的过程中会自动调用此函数。 data选项通常返回一个对象,然后 Vue 会通过响应性系统将其包裹起来,并以 $data 的形式存储在组件实例中。 <!DOCTYPE html> <html lang"en"&g…...
网络编程面试题
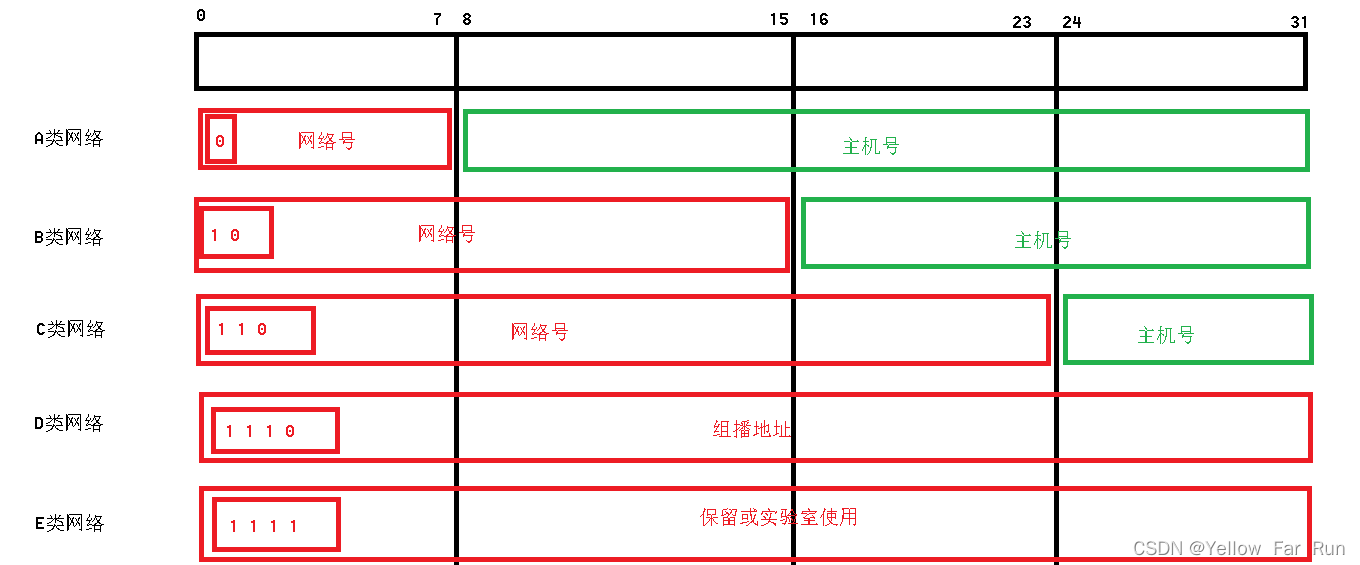
一、什么是IP地址 1.IP地址是主机在网路中的唯一标识,,当主机从一个网络切换到另一个网络时,会更改IP地址,同样的IP地址也是路由器进行路由选择的标识 2.IP地址的分类 IPV4:采用4字节无符号整数存储 IPV6ÿ…...

移动端区分点击和长按
为了适配移动端,图片加入touchstart,touchend,并加了 e.preventDefault() 屏蔽默认菜单。 然而突然发现移动端图片的链接无响应了,PC端没问题。 而且功能需要区分点击和长按。 原生js如何判断移动端的tap,dbltap,lo…...
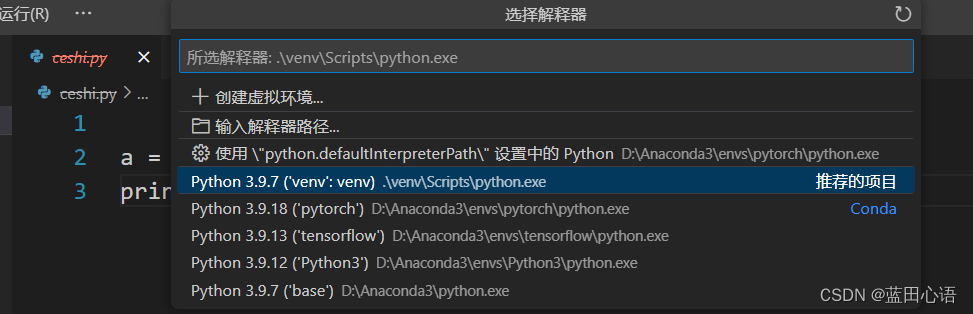
虚拟环境的激活
(此博客仅用于我记录虚拟环境的激活方法) 虚拟环境的激活命令: venv/Scripts/activate 在F:\git repo\Database-Course-Design 这个文件夹中启动命令行 这个文件夹中含有虚拟环境venv 输入命令venv/Scripts/activate,就得到下面的结果: 此时就激活了虚拟环境&…...
宏集案例 | 风电滑动轴承齿轮箱内多点温度采集与处理
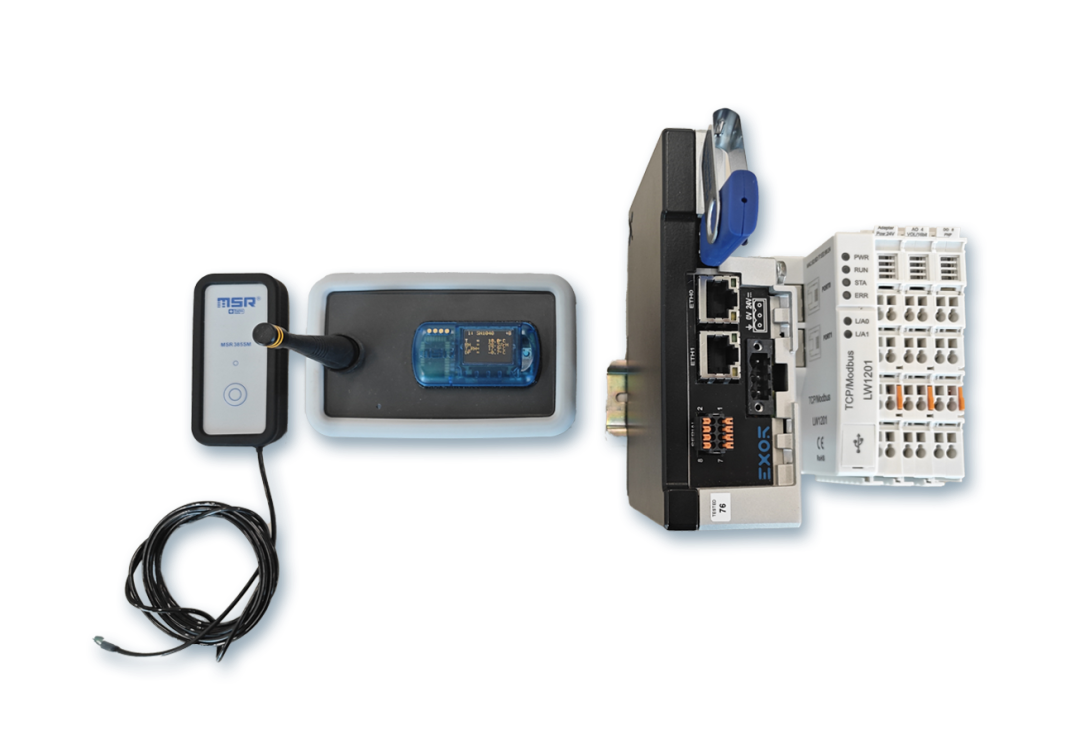
前言 风力发电机组中的滑动轴承齿轮箱作为关键的传动装置,承担着将风能转化为电能的重要角色。齿轮箱内多点温度的实时监测可以有效地预防设备故障和性能下降。实时监测齿轮箱内多点温度可以有效地预防设备故障和性能下降。 为了确保风力发电机组的安全稳定运行&a…...

linux 16进制写入
1.简单用法[推荐] echo 001122334455 | xxd -r -ps > test // 6 个字节xxd // xxd 命令用于用二进制或十六进制显示文件的内容 -r // 把xxd的十六进制输出内容转换回原文件的二进制内容 -ps // 以 postscript的连续十六进制转储输出,这也叫做纯十六进…...

代码随想录算法训练营第60天| Leetcode 84.柱状图中最大的矩形
文章目录 Leetcode 84.柱状图中最大的矩形 Leetcode 84.柱状图中最大的矩形 题目链接:Leetcode 84.柱状图中最大的矩形 题目描述: 给定 n 个非负整数,用来表示柱状图中各个柱子的高度。每个柱子彼此相邻,且宽度为 1 。求在该柱状…...

编写一个简单的cmakelist.txt
文章目录 代码main.cpp头文件和子模块CMakeLists.txtsubModule/CMakeLists.txt顶层CMakeLists.txtCMakeList中的内容说明生成跨平台到Visual studio下上一篇提到了cmake的设计目的与作用,这一篇就来手动编写一个基本的cmakelist.txt,并演示一下如何生成不同平台的构建文件。 …...

探索NHSE:解锁动物森友会存档编辑的终极解决方案
探索NHSE:解锁动物森友会存档编辑的终极解决方案 【免费下载链接】NHSE Animal Crossing: New Horizons save editor 项目地址: https://gitcode.com/gh_mirrors/nh/NHSE 你是否曾经在《动物森友会》中为收集稀有物品而苦恼?是否梦想打造一个完美…...

5分钟掌握跨平台音乐格式转换:Unlock-Music浏览器端音频解密终极指南
5分钟掌握跨平台音乐格式转换:Unlock-Music浏览器端音频解密终极指南 【免费下载链接】unlock-music 在浏览器中解锁加密的音乐文件。原仓库: 1. https://github.com/unlock-music/unlock-music ;2. https://git.unlock-music.dev/um/web 项…...

ComfyUI-Impact-Pack V8完整实战指南:解锁AI图像增强的5大核心功能
ComfyUI-Impact-Pack V8完整实战指南:解锁AI图像增强的5大核心功能 【免费下载链接】ComfyUI-Impact-Pack Custom nodes pack for ComfyUI This custom node helps to conveniently enhance images through Detector, Detailer, Upscaler, Pipe, and more. 项目地…...

基于STM32H750XBH6开发板调试LwIP裸机程序
目录 1 前言 2 正点原子STM32H750XBH6阿波罗开发板介绍 3 配置和调试 3.1 CubeMX配置 3.2 代码修改 1 前言 LwIP 是物联网 / 嵌入式领域使用最广的开源 精简版TCP/IP 协议栈,STM32、ESP32、国产 MCU 全都用它,对于嵌入式 / 物联网初学者来说,亲手调试 LwIP 裸机程序(无操作…...

Hermes Agent对接Taotoken自定义Provider的配置要点详解
🚀 告别海外账号与网络限制!稳定直连全球优质大模型,限时半价接入中。 👉 点击领取海量免费额度 Hermes Agent对接Taotoken自定义Provider的配置要点详解 1. 理解对接的基本前提 Hermes Agent是一个支持多种大模型提供方的开发工…...
CANN-ops-transformer和ATB-昇腾NPU上算子和加速库怎么配合
有人问我:ops-transformer 和 ATB 到底是什么关系?我把 FlashAttention 的代码改了,ATB 的推理结果怎么也跟着变了?这两个仓库在昇腾CANN生态里是上下游关系,但它们的边界不是"底层"和"上层"那么简…...

Python:4 == 4.0 结果为True的原因
特殊情况:在 Python 中,整数和浮点数进行比较时,如果数值相等,则结果为 True。即 4 4.0 的结果是 True。如果两个对象代表相同的概念或数值,即使类型不同(如 int 和 float),也可能返…...
)
NotebookLM时间线创建全流程拆解(从零到专业级时间叙事)
更多请点击: https://codechina.net 第一章:NotebookLM时间线创建全流程拆解(从零到专业级时间叙事) NotebookLM 的时间线(Timeline)功能并非内置独立模块,而是依托其“脚注驱动叙事”机制&am…...

Paramiko vs. Fabric vs. Ansible:Python自动化运维三剑客,我该选哪个?
Paramiko vs. Fabric vs. Ansible:Python自动化运维三剑客深度对比 当服务器数量从个位数增长到三位数时,手工登录每台机器执行命令的效率瓶颈就会暴露无遗。作为Python技术栈的团队,我们通常会在Paramiko、Fabric和Ansible这三个工具中做出选…...
)
为什么你的Agent总在真实场景中“失语”?揭秘LLM调用链中被忽略的2个关键中间态(Meta Llama-3.1内部调试日志首度公开)
更多请点击: https://kaifayun.com 第一章:AI Agent智能体未来趋势 AI Agent正从单任务执行者演进为具备目标分解、工具调用、环境感知与持续反思能力的自主协作体。其发展不再局限于模型规模扩张,而转向系统级架构创新——包括记忆机制标准…...