SpringBoot实战项目——博客笔记项目
提示:文章写完后,目录可以自动生成,如何生成可参考右边的帮助文档
文章目录
- 前言
- 一、项目介绍
- 二、项目的整体框架
- 2.1 数据库模块
- 2.2 前端模块
- 2.3 后端模块
- 三、项目图片展示
- 四、项目的实现
- 4.1 准备工作
- 4.1.1 数据库,表的创建
- 4.1.2 配置数据库和MyBatis
- 4.1.3 引入前端项目
- 4.2 统一功能处理
- 4.2.1 统一异常功能处理
- 4.2.2 统一数据格式返回
- 4.2.3 统一用户登录验证
- 4.3 博客登录页的实现
- 4.3.1 实体类的创建
- 4.3.2 前后端交互
- 4.3.3 后端代码实现
- 4.4 博客列表页的实现
- 4.5 博客修改删除功能实现
- 4.6 博客分页功能实现
- 总结
前言
一、项目介绍
项目名称:博客笔记项目
主要操作的对象是:文章和用户,用户可在该系统上发表自己的博客,查看自己或别人已经发表的文章
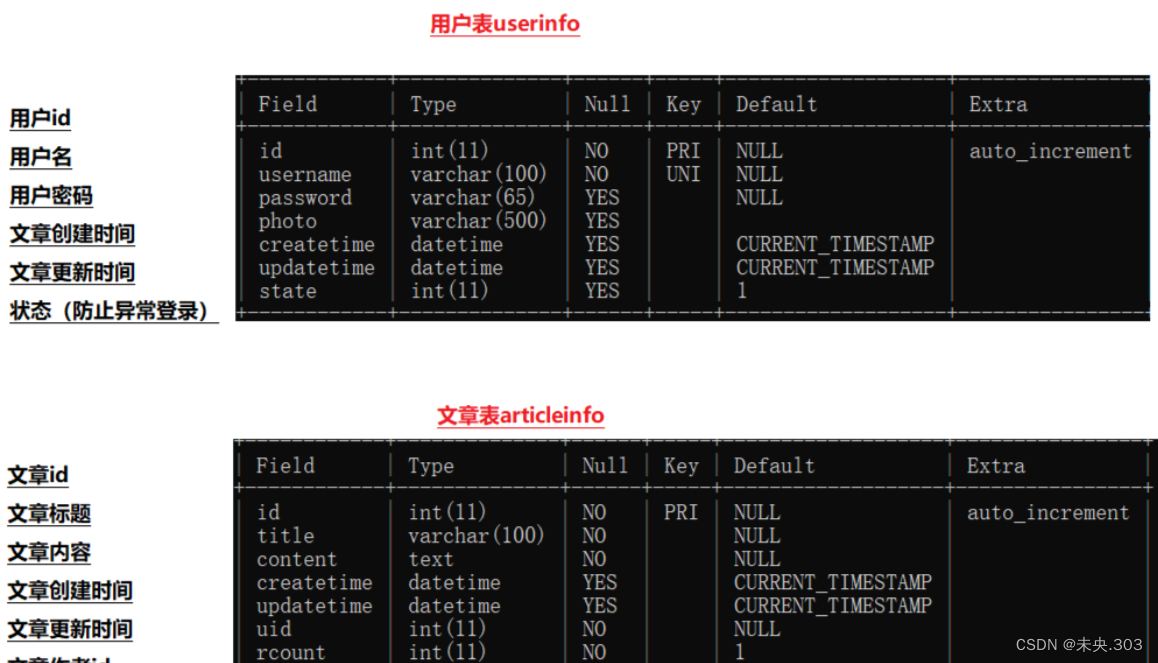
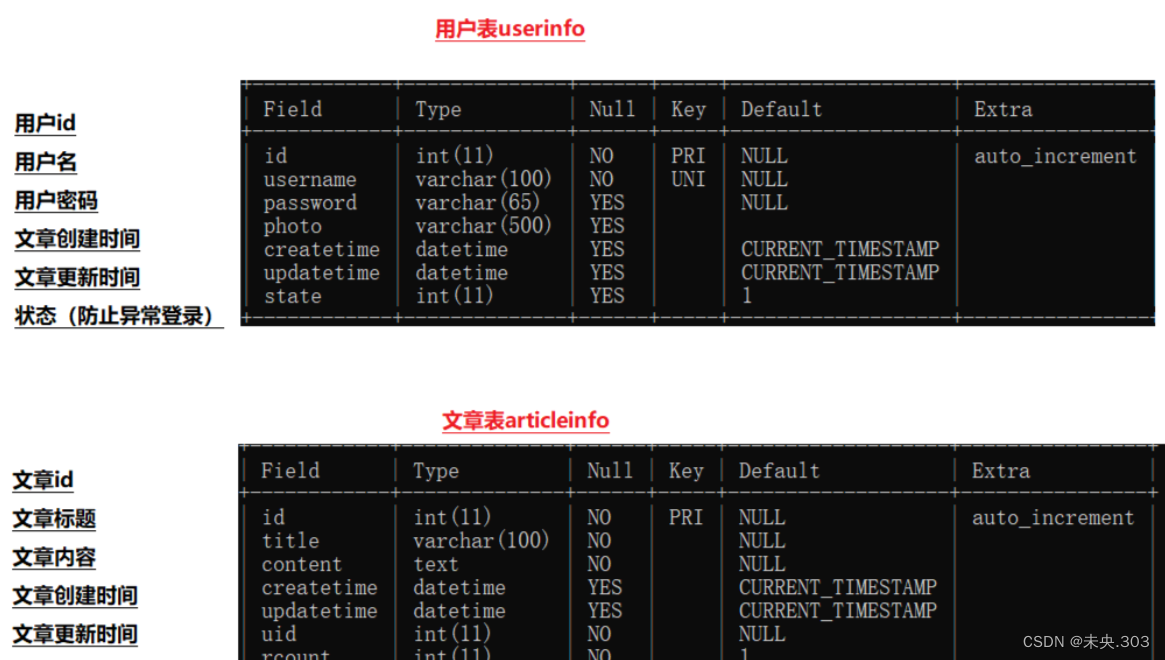
需要用到两张表:userinfo(用户表)、articleinfo(文章表)
需要实现的功能:
登录+注册
博客的分页列表功能
新增发表博客
修改、删除自己的博客
项目亮点
- 手动对用户密码实现随机加盐
- 统一异常处理、拦截器
- 用户登录持久化(session内存)
- 分页功能
项目技术栈
SSM(SpringBoot + SpringMVC + MyBatis)
MySQL
jQuery

二、项目的整体框架
2.1 数据库模块
两张表:用户表 + 文章表
2.2 前端模块
前端设计到7个页面
- login.html登录页
- reg.html注册页
- blog_list.html总的博客列表页——》用到了blog_l
- myblog_list.html个人博客列表页
- blog_content.html博客详情页
- blog_edit.html博客编辑页
- blog_update.html博客修改页

2.3 后端模块
后端模块:
- 控制层(controller包)——》控制器
- 服务层(service包)——》服务类
- 持久层--数据访问层(mapper类 + mapper.xml)——》mapper
- 实体层(model包)——》实体类
- 工具层(config包+util包)——》统一异常处理、统一返回、随机加盐


三、项目具体展示

四、项目的实现
4.1 准备工作
首先我们新建一个springboot项目,项目具体的创建流程我这里就不在赘述。
详细见链接:SpringBoot的创建
http://t.csdnimg.cn/XCd3R
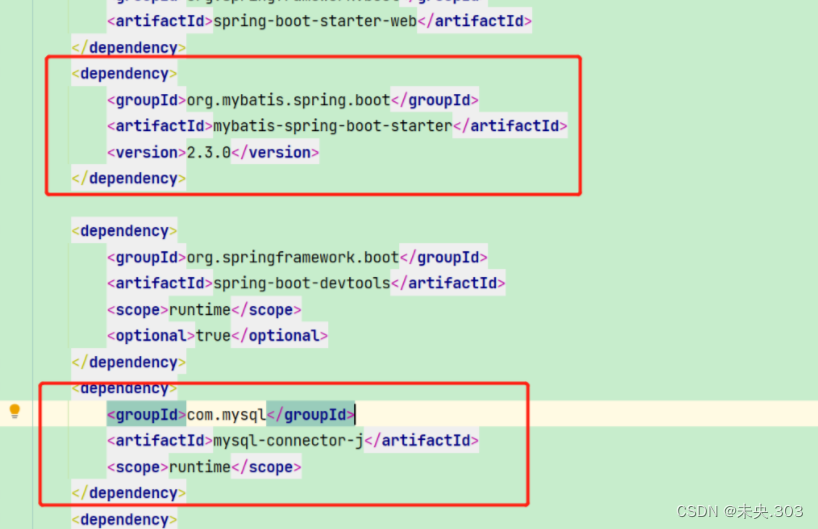
引入需要的依赖pom.xml代码:
<?xml version="1.0" encoding="UTF-8"?>
<project xmlns="http://maven.apache.org/POM/4.0.0" xmlns:xsi="http://www.w3.org/2001/XMLSchema-instance"xsi:schemaLocation="http://maven.apache.org/POM/4.0.0 https://maven.apache.org/xsd/maven-4.0.0.xsd"><modelVersion>4.0.0</modelVersion><parent><groupId>org.springframework.boot</groupId><artifactId>spring-boot-starter-parent</artifactId><version>2.7.8</version><relativePath/> <!-- lookup parent from repository --></parent><groupId>com.example</groupId><artifactId>demo</artifactId><version>0.0.1-SNAPSHOT</version><name>demo</name><description>Demo project for Spring Boot</description><properties><java.version>1.8</java.version></properties><dependencies><dependency><groupId>org.springframework.boot</groupId><artifactId>spring-boot-starter-web</artifactId></dependency><dependency><groupId>org.mybatis.spring.boot</groupId><artifactId>mybatis-spring-boot-starter</artifactId><version>2.3.0</version></dependency><dependency><groupId>org.springframework.boot</groupId><artifactId>spring-boot-devtools</artifactId><scope>runtime</scope><optional>true</optional></dependency><dependency><groupId>com.mysql</groupId><artifactId>mysql-connector-j</artifactId><scope>runtime</scope></dependency><dependency><groupId>org.projectlombok</groupId><artifactId>lombok</artifactId><optional>true</optional></dependency><dependency><groupId>org.springframework.boot</groupId><artifactId>spring-boot-starter-test</artifactId><scope>test</scope></dependency><dependency><groupId>cn.hutool</groupId><artifactId>hutool-all</artifactId><version>5.8.10</version></dependency></dependencies><build><plugins><plugin><groupId>org.springframework.boot</groupId><artifactId>spring-boot-maven-plugin</artifactId><configuration><excludes><exclude><groupId>org.projectlombok</groupId><artifactId>lombok</artifactId></exclude></excludes></configuration></plugin></plugins><finalName>sxy_blog_system</finalName></build></project>
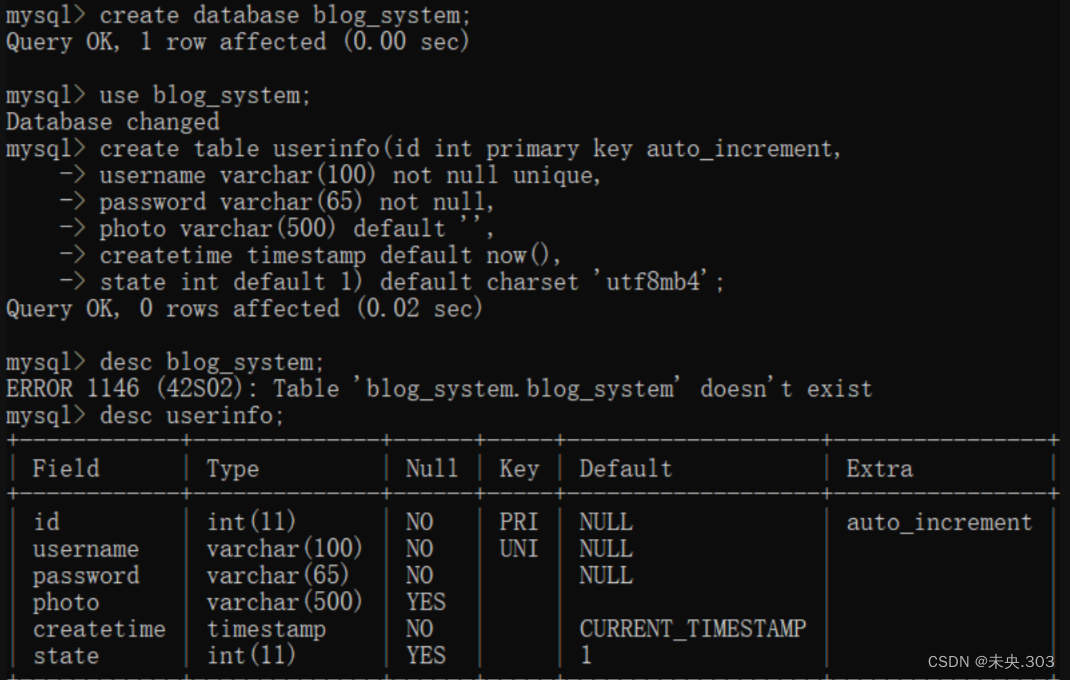
4.1.1 数据库,表的创建
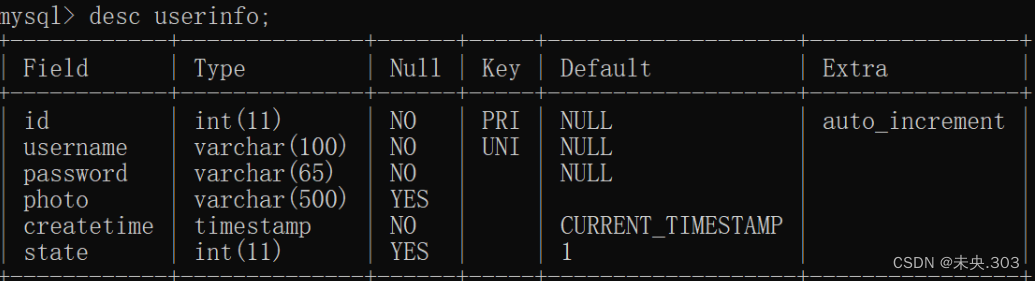
1.用户表的创建
2.文章表的创建

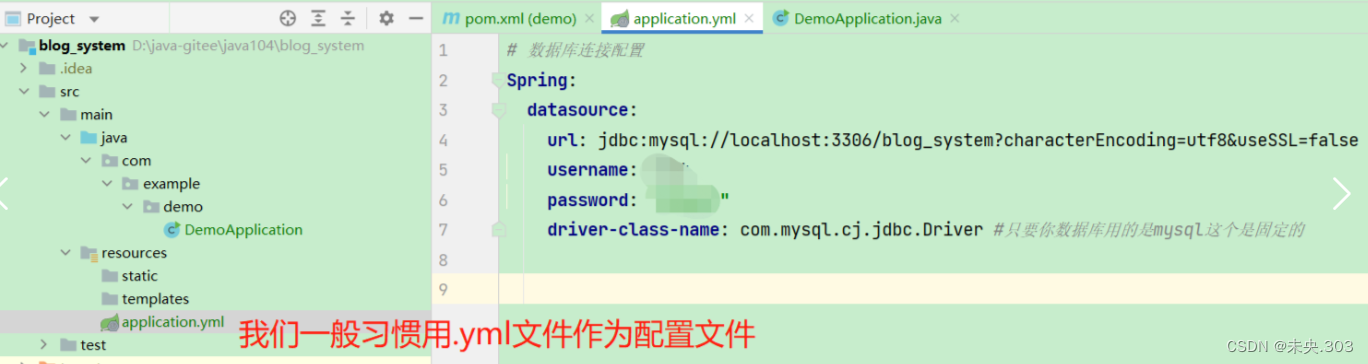
4.1.2 配置数据库和MyBatis
1.配置数据库的连接信息
注意: 这里的很多内容是固定的
# 数据库连接配置
Spring:datasource:url: jdbc:mysql://localhost:3306/你要连接的数据库名?characterEncoding=utf8&useSSL=falseusername: 用户名password: 自己的密码driver-class-name: com.mysql.cj.jdbc.Driver #只要你数据库用的是mysql这个是固定的
2.配置MyBatis XML存放规则和命名规则
此时我们已经在通过maven将MySQL Driver和MyBatis Framework这两个包导入了进来,此时启动项目,项目依然能够正常运行,说明我们数据库连接是正常的。

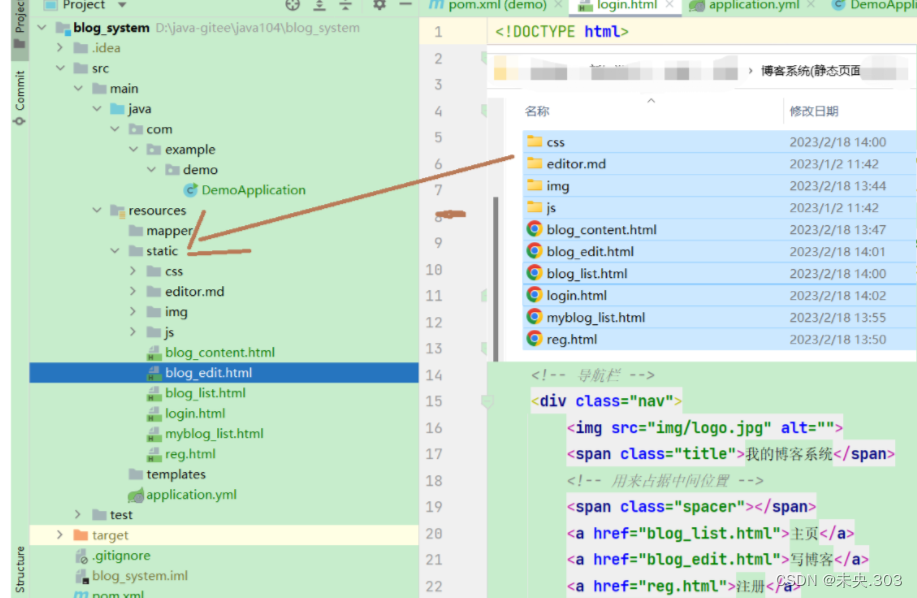
4.1.3 引入前端项目
下面的前端的静态资源复制到我们resource/static目录下面:
4.2 统一功能处理
上面我们说了,当程序出现了异常获取其他情况,我们不统一处理。
4.2.1 统一异常功能处理
所以我们需要单独在工具层中(我们的common包下面,建一个统一异常处理的类)
4.2.2 统一数据格式返回
一般在web项目中,我们前后端都是通过json这种数据格式来交换数据格式
——》我们后端需要给前端返回json格式的数据。
我们前后端用户交互的数据个数一般是统一的,不会出现你一个接口用一种数据格式,而那个接口又换了,这样就会有很多问题,不利于开发。
统一数据的优点:
- 方便前端程序员更好的接受和解析后端数据接口返回的数据。
- 降低前端程序员和后端程序员的沟通成本,按照某个格式实现就可以了,因为所有接口都是这样返回的。
- 有利于项目统一数据的维护和修改。
- 有利于后端技术部门的统一规范的标准制定,不会出现稀奇古怪的返回内容。
统一数据格式的返回有两种实现方式,返回一个公共对象或者重写。
这里我们采用第二种重写(不过他的灵活性有待提升)
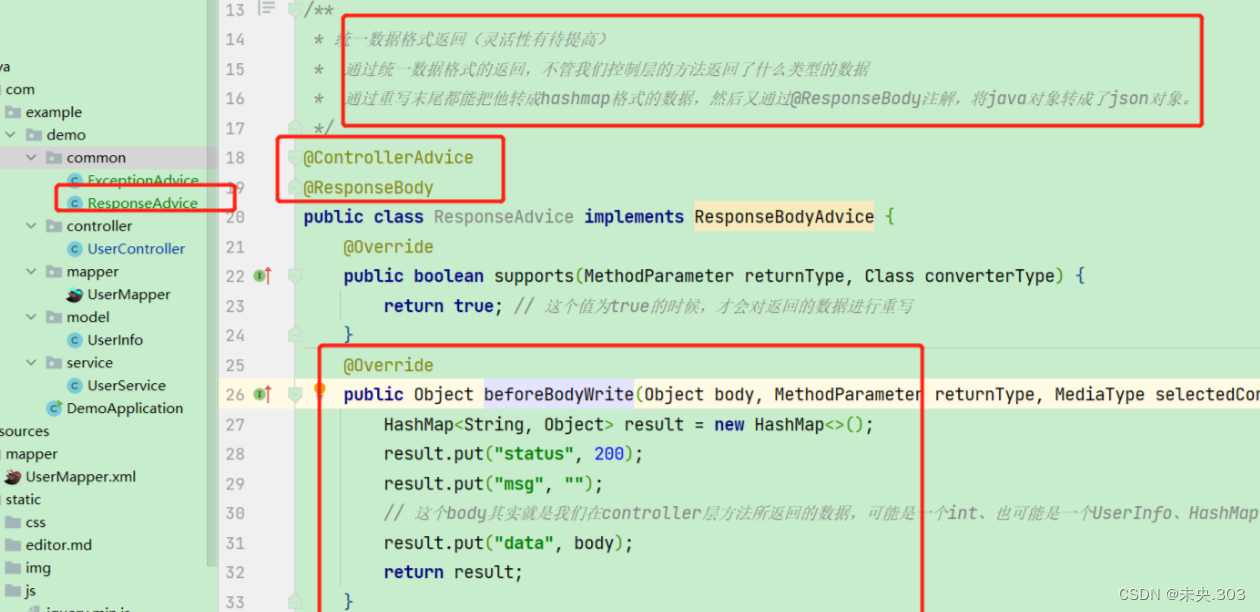
具体的我们可以使用@ControllerAdvice+ResponseBodyAdvice的方式实现,
具体实现代码如下:
但是正如我们上面所说的,通过重写来进行统一数据格式的返回,他的灵活性的确有待提高。你看我们上面只是处理了成功的情况,但要是失败的情况呢?——》并且即使失败,也是分好几种情况呢!!!
我们不如再创建一个工具类,用来自定义返回hashmap数据(再通过@ResponseBody转成json格式)

那么对应的我们的统一数据格式返回类就发生了变化
package com.example.demo.common;import com.fasterxml.jackson.databind.ObjectMapper;
import org.springframework.core.MethodParameter;
import org.springframework.http.MediaType;
import org.springframework.http.server.ServerHttpRequest;
import org.springframework.http.server.ServerHttpResponse;
import org.springframework.web.bind.annotation.ControllerAdvice;
import org.springframework.web.bind.annotation.ResponseBody;
import org.springframework.web.servlet.mvc.method.annotation.ResponseBodyAdvice;import java.util.HashMap;/*** 统一数据格式返回(灵活性有待提高)*  通过统一数据格式的返回,不管我们控制层的方法返回了什么类型的数据*  通过重写末尾都能把他转成hashmap格式的数据,然后又通过@ResponseBody注解,将java对象转成了json对象。*/
@ControllerAdvice
@ResponseBody
public class ResponseAdvice implements ResponseBodyAdvice {@Overridepublic boolean supports(MethodParameter returnType, Class converterType) {return true; // 这个值为true的时候,才会对返回的数据进行重写}@Overridepublic Object beforeBodyWrite(Object body, MethodParameter returnType, MediaType selectedContentType, Class selectedConverterType, ServerHttpRequest request, ServerHttpResponse response) {// 在有了我们自定义数据返回后,我们的这个统一数据格式返回类就像是一个托地的。// 因为controller层可以直接调用AjaxResult,来返回hashmap(通过@ResponseBody转成json)// 但如果controller没有调用AjaxResult,直接返回了if (body instanceof HashMap) {return body;  // 此时已经是hashmap格式了}if (body instanceof Integer){ // 当controller层中的方法直接返回int类型时候int num = (int) body;if (num <= 0) {// 应对int类型错误返回(查询文章列表,新增和删除博客可能会用到)——》也可能用不到,如果新增或查询失败,我直接就在controller就返回了(通过调用AjaxResult)// 新增、删除或查询失败(非得在controller返回int值,再通过这里返回json对象的话,不灵活(出错信息显示的不具体// 所以说这里我们只是以防万一,我们还是选择再controller层直接返回json对象,这样更信息具体,更有怎针对性)return AjaxResult.fail("抱歉,本次操作失败,请稍后再试!"); // 这里无法区分是新增失败还是删除失败// 这里我们本来返回的是一个hashmap格式的对象,但加了@ResponseBody,把我们的java对象转成的了json格式}}if (body == null) { // (比如查询操作,直接返回查询到的UserInfo对象,然后直接返回该对象)// 这里我们本来返回的是一个hashmap格式的对象,但加了@ResponseBody,把我们的java对象转成的了json格式return AjaxResult.fail("抱歉,查询失败!"); // 这时对查询当前用户的特判}// 这里我们本来返回的是一个hashmap格式的对象,但加了@ResponseBody,把我们的java对象转成的了json格式return AjaxResult.success("操作成功", body);// 前端是通过result中的status值来判断操作是否成功的,这个类用来处理操作成功的情况(为操作成功的情况兜底)// 但这可能存在问题,如果操作失败,并且在controller层没有调用AjaxResult中的fail方法(而是直接返回,通过这个类来返回统一的数据格式,就会出现问题——》在这个类我们都是按成功的处理的)// 解决方案,在该类中提前判断body(判断操作失败的情况)--->我们约定如果操作失败就返回负数(在controller层调用AjaxResult的情况)}
}
那么与之对应的我们在controller层的类也就发生了改变
package com.example.demo.controller;import com.example.demo.common.AjaxResult;
import com.example.demo.model.UserInfo;
import com.example.demo.service.UserService;
import org.springframework.beans.factory.annotation.Autowired;
import org.springframework.util.StringUtils;
import org.springframework.web.bind.annotation.RequestMapping;
import org.springframework.web.bind.annotation.RestController;import javax.jws.soap.SOAPBinding;
import javax.servlet.http.HttpSession;
import java.util.HashMap;
/*** 而Spring Boot框架项目接口返回 JSON格式的数据比较简单:* 在 Controller 类中使用@RestController注解即可返回 JSON格式的数据。*  @RestController是@Controller和@ResponseBody两者的结合,使用这个注解后该controller的所有方法都会返回json格式的数据,*  因为@ResponseBody的作用就是把返回的对象转换为json格式,并把json数据写入response的body中,前台收到response时就可以获取其body中的json数据了。* 如果在整个controller类上方添加@RestController,其作用就相当于把该controller下的所有方法都加上@ResponseBody,使每个方法直接返回response对象。*/
@RestController
@RequestMapping("/user")
public class UserController {@Autowiredpublic UserService userService;@RequestMapping("/reg")public Object reg(String username, String password1, String password2) {HashMap<String, Object> result = new HashMap<>();if (!StringUtils.hasLength(username) || !StringUtils.hasLength(password1) || !StringUtils.hasLength(password2)) {return AjaxResult.fail("你输入的参数有误,请重新输入!");}else {if (!password1.equals(password2)) {return AjaxResult.fail("前后密码不一致,请重新输入!");}else {UserInfo userInfo = new UserInfo();userInfo.setUsername(username);userInfo.setPassword(password1);int ret = userService.reg(userInfo);if (ret != 1) {return AjaxResult.fail("数据库添加用户失败,请稍后再试!");}else {return AjaxResult.success("恭喜,注册成功!", ret);}}}}@RequestMapping("/login")public Object login(String username, String password) {HashMap<String, Object> result = new HashMap<>();if (!StringUtils.hasLength(username) || !StringUtils.hasLength(password)) {return AjaxResult.fail("你输入的参数有误,请重新输入!");}else {// 需要在数据库中查询当前登录的用户是否存在UserInfo userInfo = userService.selectByUsername(username);if (userInfo == null || !password.equals(userInfo.getPassword())) {return AjaxResult.fail("你当前的用户名或密码错误,请重新输入!");}else  {return AjaxResult.success("恭喜,登录成功!", "");}}}
}
4.2.3 统一用户登录验证
spring拦截器
对于以上问题Spring中提供了具体的实现拦截器:HandlerInterceptor,
拦截器的实现分为以下两个步骤:
1、创建自定义拦截器,实现 HandlerInterceptor 接口的perHandle(执行具体方法之前的预处理)方法。
2、将自定义拦截器加入 WebMvcConfiger的 addInterceptors方法中。
步骤1:创建用户登录拦截器
步骤2:
将该自定义拦截器放到系统的配置文件中
(将自定义拦截器加入 WebMvcConfiger的 addInterceptors方法中)
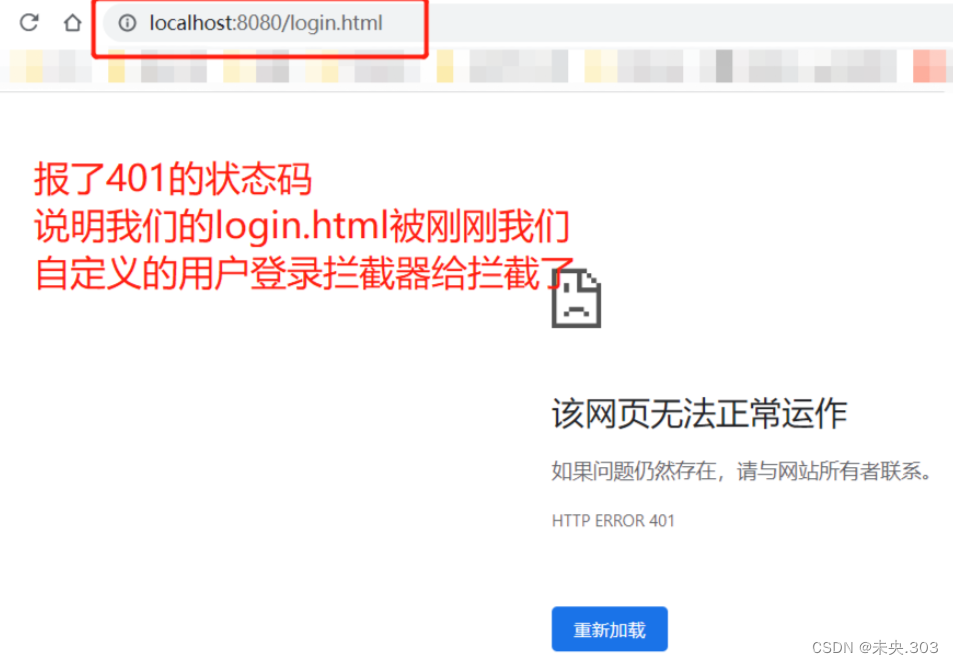
检验:用浏览器测试一下是否真的拦截了


4.3 博客登录页的实现
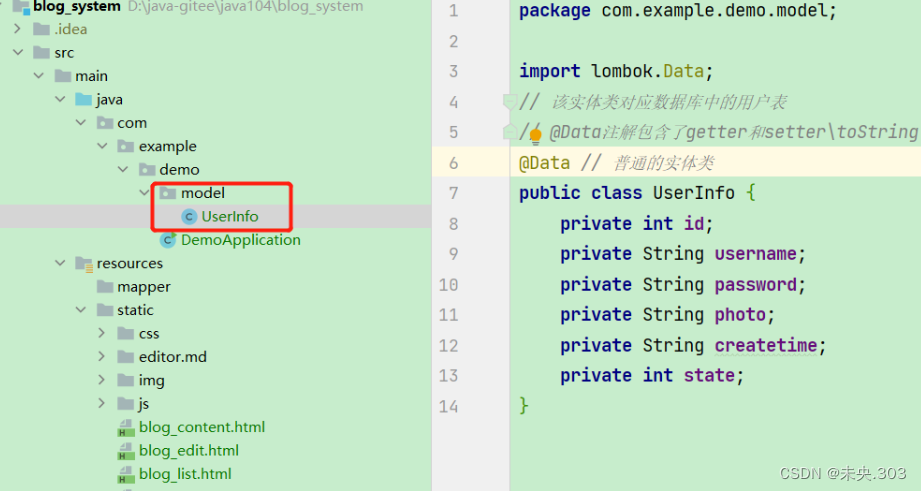
4.3.1 实体类的创建
首先根据我们数据库的表,在我们的程序中创建想对应的实体类——我们的MyBatis是ORM框架,我们的程序对象与关系数据库数据之间有响应的映射关系
只有在启动类的同级目录下,springboot才会对该目录下的类进行扫描,配合类注解存到spring容器中。
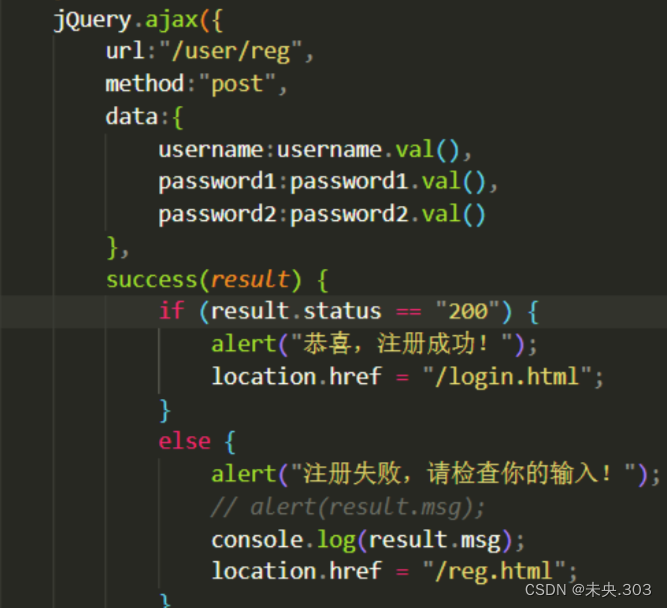
4.3.2 前后端交互
1.首先用户在前端页面输入了用户信息
2.然后前端紧接着就把用户输入的信息传递给后端(提交到后端指定的接口上,比如登录提交的就是/user/reg
3.后端接收到用户信息,存到数据库中,并返回注册的结果(成功了?还是失败了?)
4.前端接受到后端返回的结果后做进一步的处理


4.3.3 后端代码实现
后端流程图:
下面是根据上图流程构建的目录

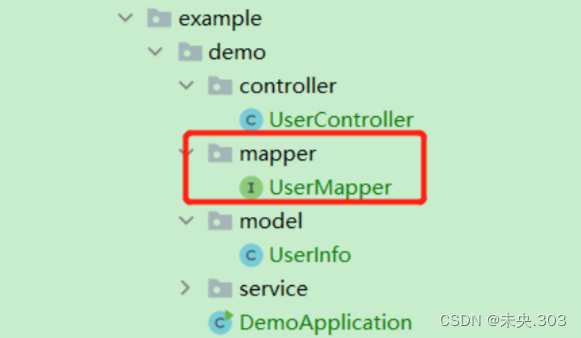
在controller层中调用了service服务层的reg方法
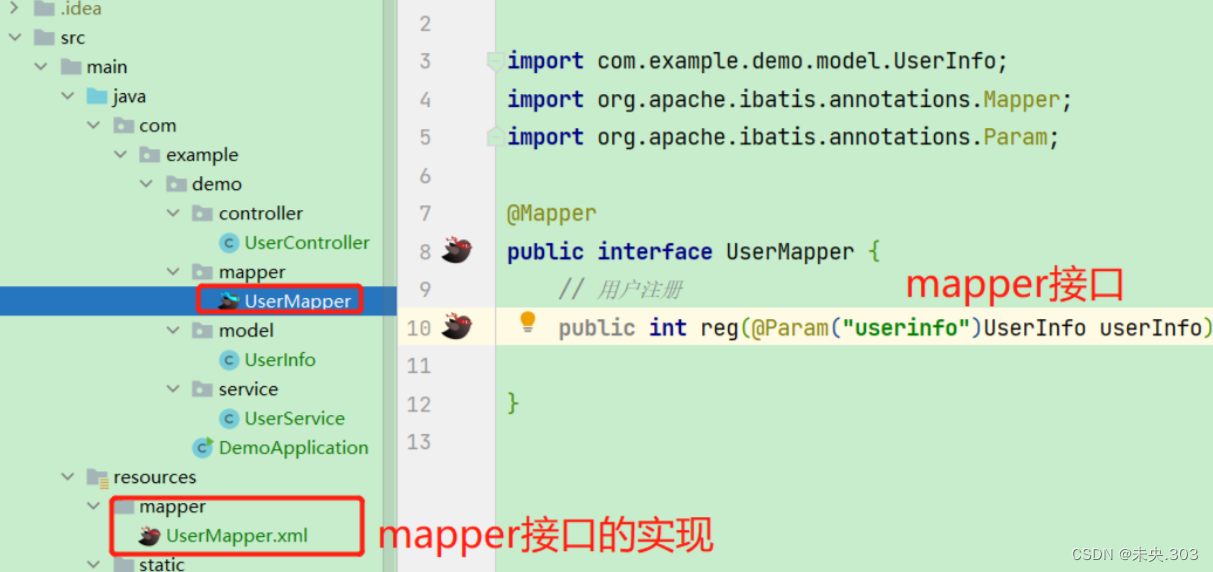
service服务层又调用了持久层中的mapper接口
mapper接口的实现:UserMapper.xml文件
注册前后端流程交互


4.4 博客列表页的实现
controller层代码:
1.ArticleController代码实现:
package com.example.demo.controller;import com.example.demo.config.AjaxResult;
import com.example.demo.model.ArticleInfo;
import com.example.demo.model.UserInfo;
import com.example.demo.service.ArticleService;
import com.example.demo.service.UserService;
import com.example.demo.util.ConstVariable;import lombok.SneakyThrows;
import org.apache.ibatis.annotations.ResultMap;
import org.springframework.beans.factory.annotation.Autowired;
import org.springframework.util.StringUtils;
import org.springframework.web.bind.annotation.RequestMapping;
import org.springframework.web.bind.annotation.RestController;import javax.servlet.http.HttpServletRequest;
import javax.servlet.http.HttpServletResponse;
import javax.servlet.http.HttpSession;
import java.util.*;/*** 而Spring Boot框架项目接口返回 JSON格式的数据比较简单:* 在 Controller 类中使用@RestController注解即可返回 JSON格式的数据。*/
@RestController
@RequestMapping("/article")
public class ArticleController {@Autowiredprivate ArticleService articleService;// 属性注入// 新增操作(发表博客)@RequestMapping("/add")public Object add(HttpServletRequest request, String title, String content) {// todo 非空校验HttpSession session = request.getSession(false);if (session == null || session.getAttribute(ConstVariable.USER_SESSION_KEY) == null) {return AjaxResult.fail(-1, "当前用户未登录,博客发表失败!");}UserInfo userInfo = (UserInfo) session.getAttribute(ConstVariable.USER_SESSION_KEY);int uid = userInfo.getId(); // 标记当前博客是那个用户发布的int rcount = 1; // 表示当前博客的阅读量,初始值(新发表的博客阅读量)==1int state = 1; // state表示当前博客状态 1 ==>已发布, 2==》编辑中,保存草稿// 新增博客ArticleInfo articleInfo = new ArticleInfo();articleInfo.setTitle(title);articleInfo.setContent(content);articleInfo.setUid(uid);articleInfo.setRcount(rcount);articleInfo.setState(state);int result = articleService.add(articleInfo);if (result == 1) {return AjaxResult.success("博客发表成功!", 1);}else {return AjaxResult.fail(-1, "数据库插入失败,博客发表失败,请稍后再试!");}}// 查询指定用户id的所有博客@SneakyThrows@RequestMapping("/get_mylist")public Object getMyBlogList(Integer uid, HttpServletResponse response) {
//        if (uid == null) {
//            response.sendRedirect("/login.html"); // 当前用户未登录
//        }
//        int uid = Integer.parseInt(id);if (uid <= 0) {// response.sendRedirect("/lolgin.html"); // 当前用户未登录return AjaxResult.fail(401, "当前用户未登录");}return AjaxResult.success("查找成功",articleService.getMyBlogList(uid));}// 查看指定博客id的博客详情-->博客详情页,此id为blogId,形参名称要和前端传过来的参数一致@RequestMapping("/get_by_blog_id")public Object selectByBlogId(int id) {if (id <= 0) {return AjaxResult.fail(-1, "参数出错,无法找到指定博客的相关信息!");}ArticleInfo articleInfo = articleService.selectByBlogId(id);if (articleInfo == null) {return AjaxResult.fail(-1, "数据库查询出错");}return AjaxResult.success("查找博客详情成功", articleInfo);}// 获取总的博客列表_无分页功能@RequestMapping("/get_list")public List<ArticleInfo> getBlogList() {return articleService.getBlogList();}// 获取总的博客列表(实现分页功能)@RequestMapping("/get_list_by_page")public Object getListByPage(Integer pindex, Integer psize) {HashMap<String, Object> data = new HashMap<>();// 登录进去后,第一次初始化页面时候url = list.html,即pindex是空的,username等也是空的if (pindex == null || pindex < 1) {pindex = 1;}if (psize == null || psize <= 0) {psize = 2;}// 上面这些特殊情况的处理,很重要(就是应对url = list.html这种情况,如果没有特判,会出错(查询不到数据)// 我们前后端都对这些特殊情况做了处理——不多余(双重保障,你进入公司后前端可不是你写的,所以我们就要把我们负责的后端写的扎实(不管前端怎么传,我后端都能应对)int offset = (pindex - 1) * psize;List<ArticleInfo> list = articleService.getListByPage(psize, offset);// 得出用户名为username,地址为address,邮箱为email的所有用户个数// getPageCount函数————》得到总的博客条数int totalCount = articleService.getPageCount();data.put("list", list);data.put("count", totalCount);return AjaxResult.success("分页功能的实现", data);}// 删除指定博客id的博客@SneakyThrows@RequestMapping("/del")public Object del(HttpServletRequest request, int id, HttpServletResponse response) {ArticleInfo articleInfo = articleService.selectByBlogId(id);HttpSession session = request.getSession(false);if (session == null || session.getAttribute(ConstVariable.USER_SESSION_KEY) == null) {// response.sendRedirect("/login.html");return AjaxResult.fail(401, "当前用户未登录!");}// 这篇博客的作者(uid)和当前登录的用户id相同才有权限删除UserInfo userInfo = (UserInfo) session.getAttribute(ConstVariable.USER_SESSION_KEY);if (articleInfo.getUid() != userInfo.getId()) {
//            response.sendRedirect("/blog_list.html");return AjaxResult.fail(-1, "你不是该篇博客的作者,你无权限进行删除操作");}if (id <= 0) {return AjaxResult.fail(-1, "找不到要删除的博客,删除失败");}int result = articleService.del(id);if (result <= 0) {return AjaxResult.fail(-1, "数据库删除操作失败!");}// 获取该篇博客的作者idQueue<Integer> queue = new LinkedList<>();ArrayList<Integer> list = new ArrayList<>();ArrayList<ArrayList<Integer>> lists = new ArrayList<>();// response.sendRedirect("/blog_list.html");return AjaxResult.success("删除博客成功!", result);}/*** 修改指定id的博客内容或标题*/@RequestMapping("/update")public Object update(HttpServletRequest request, int id, String title, String content) {if (id <= 0) return AjaxResult.fail(-1, "你指定的博客id有误,稍后再试!");ArticleInfo articleInfo = articleService.selectByBlogId(id);HttpSession session = request.getSession(false);if (session == null || session.getAttribute(ConstVariable.USER_SESSION_KEY) == null) {// response.sendRedirect("/login.html");return AjaxResult.fail(401, "当前用户未登录!");}// 这篇博客的作者(uid)和当前登录的用户id相同才有权限删除UserInfo userInfo = (UserInfo) session.getAttribute(ConstVariable.USER_SESSION_KEY);if (articleInfo.getUid() != userInfo.getId()) {
//            response.sendRedirect("/blog_list.html");return AjaxResult.fail(-1, "你不是该篇博客的作者,你无权限进行修改操作");}else {int ret = articleService.update(id, title, content);if (ret <= 0) {return AjaxResult.fail(-1, "数据库更新操作失败!");}else {return AjaxResult.success("更新博客成功", ret);}}}}
2.UserController代码实现:
package com.example.demo.controller;import com.example.demo.config.AjaxResult;
import com.example.demo.model.UserInfo;
import com.example.demo.service.UserService;
import com.example.demo.util.ConstVariable;
import com.example.demo.util.PasswordUtil;import lombok.SneakyThrows;
import org.apache.ibatis.annotations.ResultMap;
import org.springframework.beans.factory.annotation.Autowired;
import org.springframework.util.StringUtils;
import org.springframework.web.bind.annotation.RequestMapping;
import org.springframework.web.bind.annotation.RestController;import javax.servlet.http.HttpServletRequest;
import javax.servlet.http.HttpServletResponse;
import javax.servlet.http.HttpSession;@RestController
@RequestMapping("/user")
public class UserController {@Autowiredprivate UserService userService;/*** 用户注册* @param username* @param password1* @param password2* @return*/@RequestMapping("/reg")public Object reg(String username, String password1, String password2) {if (!StringUtils.hasLength(username) || !StringUtils.hasLength(password1) || !StringUtils.hasLength(password2)) {return AjaxResult.fail(-1, "参数输入错误");}else {if (!password1.equals(password2)) {return AjaxResult.fail(-1, "前后密码不一致");}else {int result = userService.reg(username, PasswordUtil.encrypt(password1));if (result != 1) {return AjaxResult.fail(-1, "数据库添加出错");}return AjaxResult.success("注册成功", "1");}}}/*** 用户登录* @param request* @param username* @param password* @return*/@RequestMapping("/login")public Object login(HttpServletRequest request, String username, String password) {if (!StringUtils.hasLength(username) || !StringUtils.hasLength(password)) {return AjaxResult.fail(-1, "参数输入错误,登录失败");}UserInfo userInfo = userService.selectByUsername(username);// 随机加盐算法,未加密的密码用同样的加密算法和数据库中的加密算法进行比较if (userInfo == null || ! PasswordUtil.decrypt(password, userInfo.getPassword()) || userInfo.getId() <= 0) {return AjaxResult.fail(-1, "账号或密码错误,登录失败");}// 如果程序走到这里,说明登陆成功了// 每次登录成功都要对数据库中的密码进行重新生成,这样才符合随机加密// userService.passwordRefresh()HttpSession session = request.getSession(); // 获取session,如果没有就创建一个session.setAttribute(ConstVariable.USER_SESSION_KEY, userInfo);return AjaxResult.success("登录成功", 1);}/***   获取当前登录的用户名*/@RequestMapping("/get_user")public Object getUser(HttpServletRequest request) {HttpSession session = request.getSession(false);if (session == null) {return AjaxResult.fail(401, "当前用户未登录");}UserInfo userInfo = (UserInfo) session.getAttribute(ConstVariable.USER_SESSION_KEY);if (userInfo == null) {return AjaxResult.fail(401, "当前用户未登录");}return userInfo; // 这里我们可以直接用AjaxResult自定义统一格式返回,也可以传统的统一格式返回}/*** 退出登录* @param request* @param response*/@SneakyThrows@RequestMapping("/logout")public Object logout(HttpServletRequest request, HttpServletResponse response) {HttpSession session = request.getSession(false);if (session == null || session.getAttribute(ConstVariable.USER_SESSION_KEY) == null) {// response.sendRedirect("/login.html"); // 当前用户未登录return AjaxResult.fail(401, "当前用户未登录!");}session.setAttribute(ConstVariable.USER_SESSION_KEY, null);//response.sendRedirect("/login.html");return AjaxResult.success("当前状态正常,可以正常退出!", "true");}/*** 通过个人id(uid)查询个人详细信息* @param authorId* @return*/@RequestMapping("/get_detail_by_uid")public Object selectByUid(Integer authorId) {int uid = authorId;if (uid <= 0) {return AjaxResult.fail(-1, "uid《=0,查询出错!");}UserInfo userInfo = userService.selectByUid(uid);if (userInfo == null) {return AjaxResult.fail(-1, "在数据库中查询不到指定用户id的详细信息,请稍后再试!");}return AjaxResult.success("通过uid查询个人详细信息成功", userInfo);}
}
在controller层中调用了service服务层的reg方法
service服务层又调用了持久层中的mapper接口

4.5 博客修改删除功能实现
mapper层代码:
1.Articlemapper:
package com.example.demo.mapper;import com.example.demo.model.ArticleInfo;
import org.apache.ibatis.annotations.Mapper;
import org.apache.ibatis.annotations.Param;import java.util.List;@Mapper
public interface ArticleMapper {// 发布新文章public int add(@Param("articleinfo")ArticleInfo articleinfo);// 查询指定博客id的博客详情--》用于博客详情页public ArticleInfo selectByBlogId(@Param("blogId") int blogId);// 查询个人的博客列表——》个人博客详情页public List<ArticleInfo> getMyBlogList(@Param("uid") int uid);// 查询总的博客列表(无分页功能)public List<ArticleInfo> getBlogList();// 删除指定博客id的博客public int del(@Param("id") int id);// 得到当前的博客总数目public int getPageCount();// 查询总的博客列表(分页功能的实现)_>注意limit和offset的位置(相对位置(参数的相对位置,不要弄反——》查询数据库会出错public List<ArticleInfo> getListByPage(@Param("limit") int psize, @Param("offset") int offset);// psize对应limit--》表示每页显示的记录条数。pindex对应offset——》表示当前查看的是第几页的数据// 修改指定博客id的博客title和content----------->注意形参的顺序public int update(@Param("title") String title, @Param("content") String content, @Param("id") int id);}
2.Usermapper代码实现:
package com.example.demo.mapper;import com.example.demo.model.UserInfo;
import org.apache.ibatis.annotations.Mapper;
import org.apache.ibatis.annotations.Param;@Mapper
public interface UserMapper {// 用户注册public int reg(@Param("username") String username, @Param("password") String password);// 通过名称查询用户-->用于登录的验证public UserInfo selectByUsername(@Param("username") String username);// 通过个人id(uid)查询个人详细信息public UserInfo selectByUid(@Param("uid") int uid);
}
1.AjaxResult代码:
用户登录拦截器,自定义拦截器添加到系统的配置文件中。
package com.example.demo.config;import org.springframework.stereotype.Controller;import java.util.HashMap;/*** 自定义返回数据(我们通过AjaxResult类返回的都是hashmap格式的对象* 之后还有通过@ResponseBody将java对象转成json格式的数据*/
public class AjaxResult {/*** 操作成功(无msg)* @param data* @return*/public static Object  success(Object data) {HashMap<String, Object> result = new HashMap<>();result.put("state", 200);result.put("msg", "");result.put("data", data);return result;}/*** 操作成功,有msg* @param msg* @param data* @return*/public static Object success(Object msg, Object data) {HashMap<String, Object> result = new HashMap<>();result.put("state", 200);result.put("msg", msg);result.put("data", data);return result;}/*** 操作失败(无data* @param state* @param msg* @return*/public static Object fail(int state, Object msg) {HashMap<String, Object> result = new HashMap<>();result.put("state", state);result.put("msg", msg);result.put("data", "");return result;}/*** 操作失败(有data)* @param state* @param msg* @param data* @return*/public static Object fail(int state, Object msg,  Object data) {HashMap<String, Object> result = new HashMap<>();result.put("state", state);result.put("msg", msg);result.put("data", data);return result;}
}
2.Logininterception代码:
用户登录拦截器(查看当前用户是否登录)
package com.example.demo.config;import com.example.demo.util.ConstVariable;
import org.springframework.stereotype.Component;
import org.springframework.web.bind.annotation.ControllerAdvice;
import org.springframework.web.bind.annotation.ResponseBody;
import org.springframework.web.servlet.HandlerInterceptor;import javax.servlet.http.HttpServletRequest;
import javax.servlet.http.HttpServletResponse;
import javax.servlet.http.HttpSession;
import java.util.HashSet;/*** 用户登录拦截器(查看当前用户是否登录)*/
@Component
public class LoginInterception implements HandlerInterceptor {@Overridepublic boolean preHandle(HttpServletRequest request, HttpServletResponse response, Object handler) throws Exception {HttpSession session = request.getSession(false);if (session == null || session.getAttribute(ConstVariable.USER_SESSION_KEY) == null) {// 当前用户未登录,进行拦截--->跳转到登录页面--->后端我们只用给前端返回状态和数据,我们后端不用管页面怎么,跳转工作是前端的事情// response.sendRedirect("/login.html");// 401表示未登录,没有权限,403不是因为没有登录而没有权限,而是该用户没有权限,管理员和普通用户的区别response.setStatus(401);response.sendError(401, "当前用户为登录,没有权限访问该接口");return false;}return true;}
}
3.ResponseAdvice代码:
数据格式同样返回(这个是兜底的,即使controller层返回的是int或string类型的数据,也可以转换成json格式)
注意:只能兜底int类的返回(可以应对操作成功和失败两种情况)
如果是String或其他格式的返回(可以应对操作成功的情况,但无法应对操作失败的情况,要继续对body进行特判)
package com.example.demo.config;import com.fasterxml.jackson.databind.ObjectMapper;
import lombok.SneakyThrows;
import org.springframework.beans.factory.annotation.Autowired;
import org.springframework.core.MethodParameter;
import org.springframework.http.MediaType;
import org.springframework.http.server.ServerHttpRequest;
import org.springframework.http.server.ServerHttpResponse;
import org.springframework.web.bind.annotation.ControllerAdvice;
import org.springframework.web.bind.annotation.ResponseBody;
import org.springframework.web.servlet.mvc.method.annotation.ResponseBodyAdvice;import java.beans.PropertyEditorSupport;
import java.util.HashMap;/*** 数据格式同样返回(这个是兜底的,即使controller层返回的是int或string类型的数据,也可以转换成json格式)* 注意:只能兜底int类的返回(可以应对操作成功和失败两种情况)* 如果是String或其他格式的返回(可以应对操作成功的情况,但无法应对操作失败的情况,要继续对body进行特判)** 这里我们只是以防万一,我们尽量还是选择再controller层直接返回json对象,这样更信息具体,更有怎针对性)*/
@ControllerAdvice // 统一功能处理需要加这个注解
@ResponseBody
// @ResponseBody的作用就是把返回的对象转换为json格式,并把json数据写入response的body中,前台收到response时就可以获取其body中的json数据了。
public class ResponseAdvice implements ResponseBodyAdvice {@Overridepublic boolean supports(MethodParameter returnType, Class converterType) {return true; // 返回true才会继续执行下面的代码}@SneakyThrows@Overridepublic Object beforeBodyWrite(Object body, MethodParameter returnType, MediaType selectedContentType, Class selectedConverterType, ServerHttpRequest request, ServerHttpResponse response) {if (body instanceof HashMap) {return body;  // 此时已经是hashmap格式了}
//        HashMap<String, Object> result = new HashMap<>();
//        result.put("state", 200);
//        result.put("msg", "");
//        result.put("data", body);if (body instanceof Integer){int num = (int) body;if (num <= 0) {// 应对int类型错误返回(查询文章列表,新增和删除博客可能会用到)——》也可能用不到,如果新增或查询失败,我直接就在controller就返回了(通过调用AjaxResult)// 新增、删除或查询失败(非得在controller返回int值,再通过这里返回json对象的话,不灵活(出错信息显示的不具体// 所以说这里我们只是以防万一,我们还是选择再controller层直接返回json对象,这样更信息具体,更有怎针对性)return AjaxResult.fail(-1,"抱歉,本次操作失败,请稍后再试!"); // 这里无法区分是新增失败还是删除失败// 这里我们本来返回的是一个hashmap格式的对象,但加了@ResponseBody,把我们的java对象转成的了json格式}}if (body == null) { // 应对String类型错误返回// 这里我们本来返回的是一个hashmap格式的对象,但加了@ResponseBody,把我们的java对象转成的了json格式return AjaxResult.fail(-1,"抱歉,查询失败!"); // 这时对查询当前用户的特判}if (body instanceof String) { // 以String类型正确返回ObjectMapper objectMapper = new ObjectMapper();return objectMapper.writeValueAsString(body); // 用jackson中的工具类返回(没弄明白)——》直接返回String吧(不序列化了,详见https://zhuanlan.zhihu.com/p/196372502)}// 这里我们本来返回的是一个hashmap格式的对象,但加了@ResponseBody,把我们的java对象转成的了json格式return AjaxResult.success(body);// 前端是通过result中的state值来判断操作是否成功的,这个类用来处理操作成功的情况(为操作成功的情况兜底)// 但这可能存在问题,如果操作失败,并且在controller层没有调用AjaxResult中的fail方法(而是直接返回,通过这个类来返回统一的数据格式,就会出现问题——》在这个类我们都是按成功的处理的)// 解决方案,在该类中提前判断body(判断操作失败的情况)--->我们约定如果操作失败就返回负数(在controller层调用AjaxResult的情况)}
}
4.6 博客分页功能实现
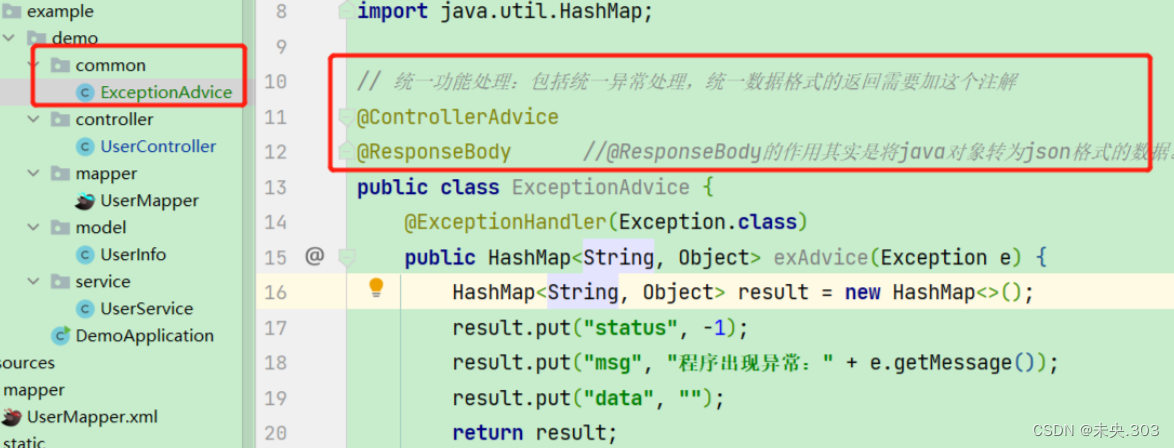
1.ExcptionAdvice代码:
统一异常处理
@ResponseBody的作用就是把返回的对象转换为json格式,并把json数据写入response的body中,前台收到response时就可以获取其body中的json数据了
package com.example.demo.config;import org.springframework.web.bind.annotation.ControllerAdvice;
import org.springframework.web.bind.annotation.ExceptionHandler;
import org.springframework.web.bind.annotation.ResponseBody;import java.util.HashMap;/*** 统一异常处理*/
@ControllerAdvice
@ResponseBody
// @ResponseBody的作用就是把返回的对象转换为json格式,并把json数据写入response的body中,前台收到response时就可以获取其body中的json数据了。
public class ExceptionAdvice {@ExceptionHandler(Exception.class)public Object exceptionAdvice(Exception e) {// 这里我们本来返回的是一个hashmap格式的对象,但加了@ResponseBody,把我们的java对象转成的了json格式return AjaxResult.fail(-1, e.getMessage());}// 你这里的统一异常处理,并不完整}
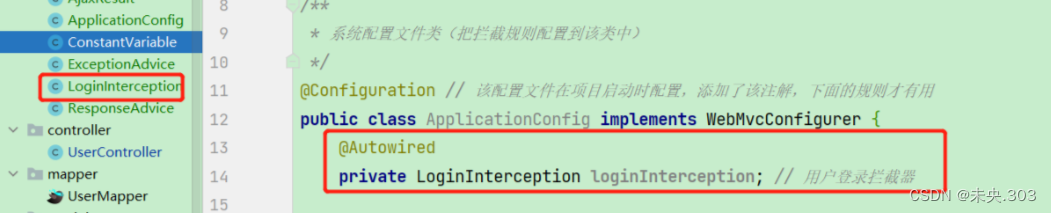
2.ApplicationConfig代码:
package com.example.demo.config;import org.springframework.beans.factory.annotation.Autowired;
import org.springframework.context.annotation.Configuration;
import org.springframework.web.servlet.config.annotation.InterceptorRegistry;
import org.springframework.web.servlet.config.annotation.WebMvcConfigurer;// 系统配置文件类
@Configuration // 该配置文件在项目启动时配置
public class ApplicationConfig implements WebMvcConfigurer {@Autowiredprivate LoginInterception loginInterception; // 用户登录拦截器// 自定义拦截器添加到系统的配置文件中@Overridepublic void addInterceptors(InterceptorRegistry registry) {registry.addInterceptor(loginInterception).addPathPatterns("/**")       // 设置拦截规则
//                .excludePathPatterns("/login.html")// 下面这些指定的url,不会检查是否登录——进行拦截
//                .excludePathPatterns("/reg.html").excludePathPatterns("/**/*.html").excludePathPatterns("/user/login").excludePathPatterns("/user/reg")// 总的博客的列表,和博客详情,我们需要开放权限,即使用户未登录也可以查看.excludePathPatterns("/article/get_list_by_page") // 放行总博客列表.excludePathPatterns("/article/get_by_blog_id") // 放行博客详情页面.excludePathPatterns("/user/get_detail_by_uid")//.excludePathPatterns("/css/**")--->和下一行的作用是一样的//.excludePathPatterns("/**/*.css").excludePathPatterns("/css/**").excludePathPatterns("/js/**").excludePathPatterns("/editor.md/**").excludePathPatterns("/img/**"); // 直接img目录下的所有都放行}
}
总结
相关文章:
SpringBoot实战项目——博客笔记项目
提示:文章写完后,目录可以自动生成,如何生成可参考右边的帮助文档 文章目录 前言一、项目介绍二、项目的整体框架 2.1 数据库模块 2.2 前端模块 2.3 后端模块三、项目图片展示四、项目的实现 4.1 准备工作 4.…...
【海贼王的数据航海】排序——直接选择排序|堆排序
目录 1 -> 选择排序 1.1 -> 基本思想 1.2 -> 直接选择排序 1.2.1 -> 代码实现 1.3 -> 堆排序 1.3.1 -> 代码实现 1 -> 选择排序 1.1 -> 基本思想 每一次从待排序的数据元素中选出最小(或最大)的一个元素,存放在序列的起始位置&…...

Flutter 的 switch 语句补遗
我的 App 里,一个消息气泡变成空白了,非常奇怪,此前一直是没问题的,经过调试定位我发现: static TextSpan _buildRootSpan(BuildContext ctx, List<LinkifyElement> parts, TextStyle? style) {List<InlineS…...

Linux动态库*.so函数名修改
在某些学习或者特殊需求的情况下要对linux下动态库*.so文件内部的函数名进行修改。 比如一个函数ADD(int a,int b);修改为Add(int a,int b); 通过这篇文章你将了解到在linux下动态库函数名寻址的规则,截止2024年3月linux动态库的寻址规则已经出现多种,这…...

adb shell 指令集
1.connect device连接设备: adb devices #return: List of devices attached 0123456789ABCDEF device2.连接终端 adb shell从设备拷贝文件到本地 adb pull <remote> [local] 如: adb pull /sdcard/demo.txt e:\从到本地拷贝文件到设备 adb push &…...

【电子通识】CH340C与CH340G的区别
在USB转串口电路中,网上买到的模块常常用的到是CH340或是CP2102。 但是CH340也有很多的版本,比如CH340C和CH340G,那么他们到底都有哪些差别。 环境特性 从规格书中可以看出环境特性CH340G是-40度到85度,而CH340C批号不是4开头…...

基于YOLOv8/YOLOv7/YOLOv6/YOLOv5的吸烟检测系统(深度学习+Python代码+PySide6界面+训练数据集)
摘要:本文详细说明了如何利用深度学习开发一个用于监测吸烟行为的系统,并分享了完整的代码实现。该系统采用了先进的YOLOv8算法,同时还使用YOLOv7、YOLOv6、YOLOv5算法,并对它们进行了性能比较,呈现了不同模型的性能指…...

Apache Paimon 使用之 Lookup Joins 解析
Lookup Join 是流式查询中的一种 Join,Join 要求一个表具有处理时间属性,另一个表由lookup source connector支持。 Paimon支持在主键表和附加表上进行Lookup Join。 a) 准备 创建一个Paimon表并实时更新它。 -- Create a paimon catalog CREATE CAT…...
)
GO语言-切片底层探索(下)
目录 切片的底层数据结构 扩容机制 总结: 练习验证代码 这是切片的底层探索下篇,上篇地址请见:GO语言-切片底层探索(上) 在上篇我们讲解了切片的两个重要实现或者说是两个特征 切片是引用类型,会进行…...

物理隔离条件下,如何安全高效地进行内外网文件导入导出?
内外网文件导入导出通常指的是在内部网络(内网)和外部网络(外网)之间传输文件的过程。这在企业环境中尤其常见,因为内部网络通常包含敏感数据,而外部网络(如互联网)则允许更广泛的访…...

代码随想录 贪心算法-难度题目-区间问题
目录 55.跳跃游戏 45.跳跃游戏|| 452.用最少数量的箭引爆气球 435.无重叠区间 763.划分字母区间 56.合并区间 55.跳跃游戏 55. 跳跃游戏 中等 给你一个非负整数数组 nums ,你最初位于数组的 第一个下标 。数组中的每个元素代表你在该位置可以跳跃的最大…...

地理数据 vs. 3D数据
在表示我们周围的物理世界时,地理空间数据和 3D 建筑数据是两个最常见的选择。 他们在各个行业和项目中发挥着至关重要的作用。 从构建数字孪生到可视化城市景观和创建沉浸式应用程序。 尽管地理空间和 3D 建筑数据有相似之处,但它们不可互换。 虽然地…...

Redis删除
一、del命令 del命令是Redis提供的一个常规的删除键的命令。它的语法如下: DEL key [key …] 其中,key是要删除的键名。可以指定多个键名,删除多个键。如果指定的键不存在,则会被忽略。 del命令会直接删除指定的键以及与之相关联…...
力扣细节题:字符串中的最大奇数
奇数只要找到第一位是奇数的即可,不是找单个数字 //即从最低位开始,找到第一位为奇数的位 //然后之前的就是需要的数字char * largestOddNumber(char * num){int i strlen(num) - 1;while(i > 0){if((num[i] - 0) % 2 1)break;i--;}//先找到低位开…...
Unity PS5开发 天坑篇 之 申请开发者与硬件部署01
腾了好几天终于把PS5开发机调试部署成功, 希望能帮到国内的开发者, 主机游戏PlayStation/Nintendo Switch都是比较闭塞的,开发者账号是必须的。 开发环境有两个部分,一是DEV Kit 开发机, TEST Kit测试机两部分组成,二是Unity的支持库(安装后…...
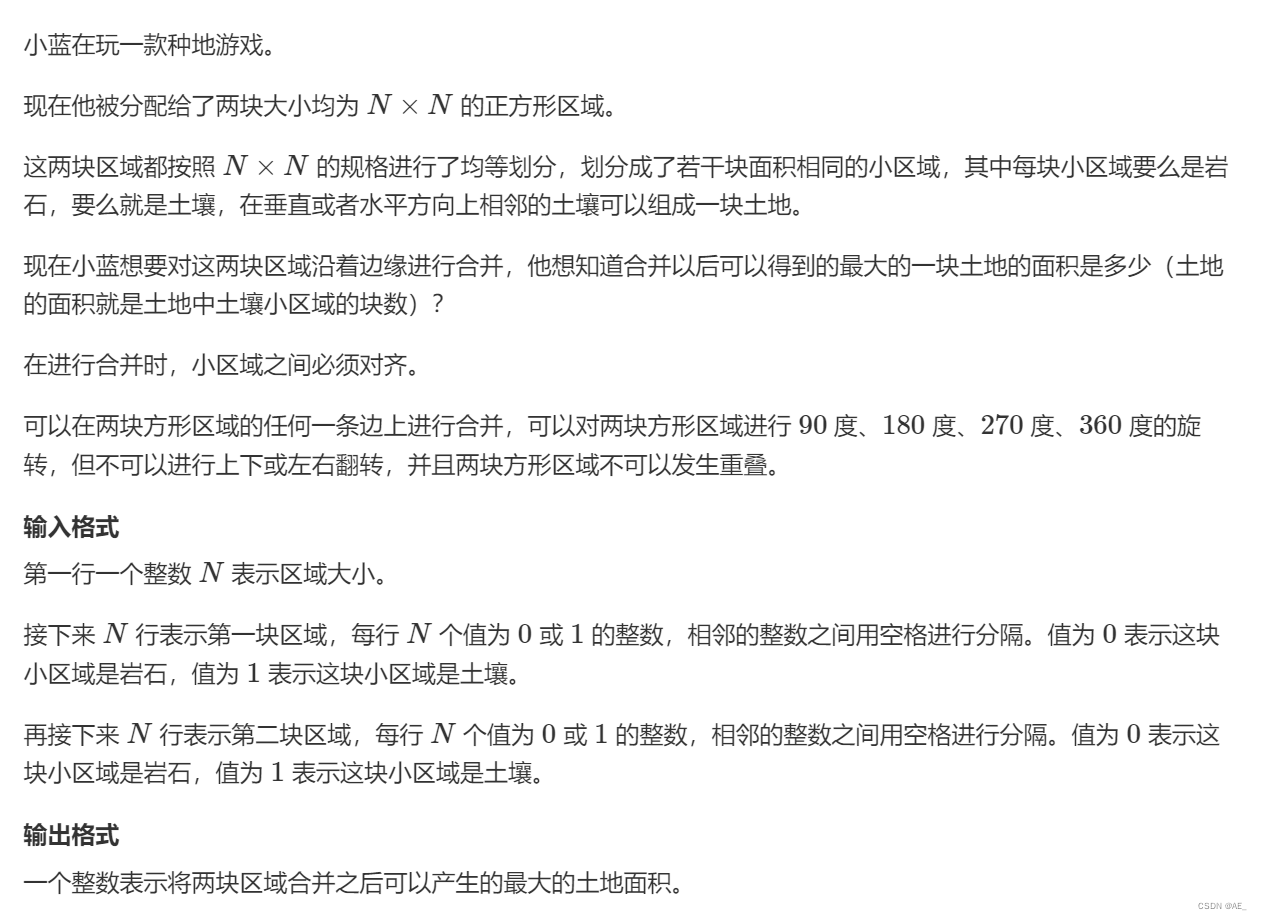
十四届蓝桥杯省赛Java B组 合并区域
就是将两个矩阵进行拼接,两矩阵可以旋转90 180 270 度。 因为数据比较小,所以这基本上就是一个大的枚举模拟加搜索,直接暴力求解。 import java.io.*; import java.util.*;public class Main{static int n;static int N 101;static int mo…...
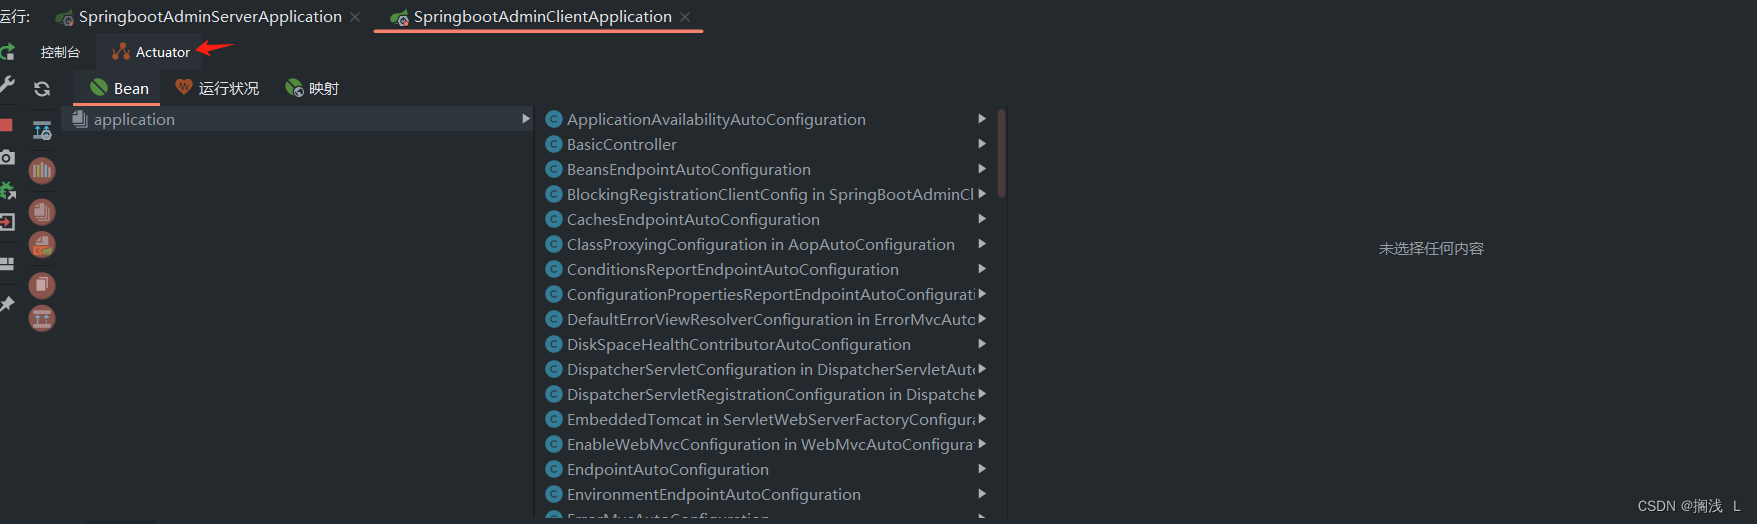
SpringBoot高级
1.自动配置-Condition Condition是Spring4.0后引入的条件化配置接口,通过实现Condition接口可以完成有条件的加载相应的Bean 进入 SpringBoot 启动类,点击进入 run() 可以看到这个方法是有返回值的,返回值为 ConfigurableApplicationConte…...
机试:偶数分解
题目描述: 代码示例: #include <bits/stdc.h> using namespace std; int main(){ // 算法思想1:遍历小于该偶数的所有素数,存入数组中,遍历数组找出两个数之和等于偶数的数int n;cout << "输入样例" << endl;cin >> n;int nums[n];int k …...
一周学会Django5 Python Web开发-Jinja3模版引擎-安装与配置
锋哥原创的Python Web开发 Django5视频教程: 2024版 Django5 Python web开发 视频教程(无废话版) 玩命更新中~_哔哩哔哩_bilibili2024版 Django5 Python web开发 视频教程(无废话版) 玩命更新中~共计35条视频,包括:2024版 Django5 Python we…...

python前端开发
前端开发 快速网站开发 from flask import Flask appFlask(__name__) #创建网址/show/info 和函数index的对应关系, #访问网站,执行index()函数 app.route("/show/info") def index():return "中国联通" if __name__"__main_…...

DISMTools企业部署:在组织中大规模应用的最佳实践
DISMTools企业部署:在组织中大规模应用的最佳实践 【免费下载链接】DISMTools The connected place for Windows system administration 项目地址: https://gitcode.com/GitHub_Trending/di/DISMTools DISMTools是一款专为Windows系统管理设计的连接平台&…...
)
别再乱用npm install了!手把手教你用npx only-allow为项目指定包管理器(支持pnpm/yarn/npm)
用only-allow统一团队包管理器:从配置到CI的全流程指南 你是否曾经在拉取一个新项目后,面对npm install、yarn还是pnpm i的抉择感到困惑?或者更糟的是,团队成员混用不同包管理器导致node_modules结构不一致,引发各种诡…...

BLE四大广播模式详解:可连接/不可连接/定向/周期广播
一、前言在低功耗蓝牙(BLE)开发中,广播(Advertising)是设备发现、连接建立、数据广播、设备重连的核心基石,所有BLE交互流程均始于广播报文的收发。不同于传统经典蓝牙,BLE所有广播行为标准化、…...

AI写的论文双率如何压到20%以下?这几款工具实测有效
毕业季、投稿季用AI写论文已经成为不少人的高效选择,但查重率飘红、AIGC疑似率超标两大问题,让很多人犯了难。2026年学术检测标准持续收紧,知网、维普及主流AIGC检测系统同步上线双检规则,两项指标均控制在20%以下才符合基本提交要…...

基于MAX78000的医疗紧急呼叫系统:边缘AI与低功耗设计实战
1. 项目概述与核心价值大家好,我是Victor Hugo,一名电子工程师。今天我想和大家分享一个我最近完成并参与设计竞赛的项目:一个基于MAX78000 FTHR开发板的医疗紧急呼叫辅助系统。这个项目的核心,不是从零开始造一个新轮子ÿ…...

Unity塔防底层架构:ScriptableObject驱动的数据契约设计
1. 这不是“又一个塔防模板”,而是塔防开发的底层操作系统我第一次在Asset Store点开Tower Defense Toolkit 4(TDTK-4)的预览图时,下意识划走了——界面太“干净”了,没有炫酷的粒子特效演示,没有满屏飞舞的…...

别再把大模型当搜索框了:一文讲透 LLM 的基本原理、能力边界与局限性
写在前面很多人把大语言模型当成“会聊天的搜索引擎”,结果一上线就遇到幻觉、口径不稳、上下文丢失、成本失控。真正理解 LLM,要先抓住一句话:它是基于 Transformer 的概率生成模型,核心能力来自海量预训练、上下文学习与后训练对…...

CentOS 8/Stream 8系统DNF换源后,安装软件还是慢?试试这几个排查命令和优化技巧
CentOS 8/Stream 8系统DNF换源后安装缓慢的深度排查与优化指南当你已经按照教程将CentOS 8/Stream 8的DNF源切换为国内镜像,却发现软件安装速度依然不尽如人意时,这种体验确实令人沮丧。作为长期使用CentOS系统的技术专家,我完全理解这种&quo…...

Hermes Agent工具如何自定义接入Taotoken提供商
🚀 告别海外账号与网络限制!稳定直连全球优质大模型,限时半价接入中。 👉 点击领取海量免费额度 Hermes Agent工具如何自定义接入Taotoken提供商 Hermes Agent 是一款功能强大的AI智能体开发框架,它支持通过自定义提供…...

JMeter实现RSA签名验签全流程实战
1. 为什么RSA加密接口测试总卡在“连通但失败”这一步? 你有没有遇到过这种情况:接口文档写得清清楚楚,Postman里填好URL、Header、Body,一发请求——返回 {"code":4001,"msg":"签名验证失败"} …...