遥感图像地物分类流程
遥感图像地物分类流程
1. 制作标签
使用arcgis pro或者arcgis或者envi,画标签,保存为tiff格式
2. 处理标签数据
用python gdal库安装 osgdal库,如果安装失败就需要下载 对应库得 .whl去安装,网站具体搞忘了,可以百度
或者rasterio库
2.1 读入tif数据
def readTif(fileName):"""dataset包含了tif文件得属性比如波段数高宽数据"""dataset = rasterio.open(fileName)if dataset == None:print(fileName + "文件无法打开")return None# print(dataset.width)return dataset2.2 处理数据
import csv
# 提取栅格图像信息,制作数据
ori_dataset = readTif(orgin_path)
label_dataset = readTif(sample_path)width = ori_dataset.width # 宽
height = ori_dataset.height # 高bands = ori_dataset.count # 波段数
# ori_data = for k in range(bands)label_matri = label_dataset.read(1) #读出标签的矩阵
data_matri = ori_dataset.read() #原始图像的矩阵count = np.count_nonzero(label_matri) #非零就是标签, 有多少非零的就代表样本像素是多少
print(count)
train_data = np.zeros((count, 8), dtype=data_matri.dtype) # 新建一个count*8的numpy数组,第8维度是原始图像的某一像素点对应的标签,0~6代表这一个像素点对应的7ge波段,landsata影像
nonzero_indices = np.nonzero(label_matri) #非零索引, 返回的是
"""
(row:array([ 30,  31,  31, ..., 390, 390, 390], dtype=int64), col:array([166, 165, 166, ..., 186, 187, 188], dtype=int64))
"""
print(nonzero_indices)
# 写入数据csv, 提取训练数据
# 将 train_data 写入 CSV 文件
csv_file = open(csv_filename, mode='w', newline='')
csv_writer = csv.writer(csv_file)
# 写入 CSV 文件的标题行,包括 Label 和 LabelName
csv_writer.writerow(csv_head_name)for i in range(count):print(i)row, col = nonzero_indices[0][i], nonzero_indices[1][i]train_data[i, :7] = data_matri[:, row, col]train_data[i, 7] = label_matri[row, col]label = int(train_data[i, 7])row_data = train_data[i]row_data = np.append(row_data, labels_name[label])  # 在数据行中添加 LabelNamecsv_writer.writerow(row_data)print(f"已将数据写入 CSV 文件: {csv_filename}")
csv_file.close()
2.3 数据格式
生成的数据格式如下
Band1,Band2,Band3,Band4,Band5,Band6,Band7,Label,LabelName
812,774,969,1111,1152,1146,1069,2,building
801,755,846,1016,1177,1411,1472,2,building
794,748,949,1179,1202,1399,1383,2,building
605,567,691,877,1537,1880,2070,2,building
602,556,768,994,1506,1625,1607,2,building
613,570,768,1045,1394,1483,1460,2,building
465,408,562,772,963,1035,990,2,building
549,484,648,828,969,1096,1028,2,building
3. 训练
from sklearn.ensemble import RandomForestClassifier
from sklearn import model_selection
import pickleX = train_data[:, :7]
Y = train_data[:, 7]
# print(X.shape)
# print(Y.shape)
X_train, X_test, y_train, y_test = model_selection.train_test_split(X, Y, test_size=0.1, random_state=42, stratify=Y)
print(y_train)
# 3.用100个树来创建随机森林模型,训练随机森林
classifier = RandomForestClassifier(n_estimators=100,bootstrap = True,max_features = 'sqrt')
classifier.fit(X_train, y_train)#  4.计算随机森林的准确率
print("训练集:",classifier.score(X_train,y_train))
print("测试集:",classifier.score(X_test,y_test))pred_test_y = classifier.predict(X_test)
cfm = CFM(5, labels_name)
cfm.update(pred_test_y, y_test)
acc, comment_numpy = cfm.get_cfm()
print(comment_numpy)
cfm.plot()file = open(model_path, "wb")
#将模型写入文件:
pickle.dump(classifier, file)
#最后关闭文件:
file.close()
4. 使用模型预测
pred_dataset = readTif(pred_path)
pred_width = pred_dataset.width
pred_height = pred_dataset.height
pred_bands = pred_dataset.count
pred_geotrans = pred_dataset.transform
pred_crs = pred_dataset.crsprint(pred_geotrans)
print(pred_crs)file = open(model_path, "rb")
# 把模型从文件中读取出来
rf_model = pickle.load(file)
# 关闭文件
file.close()pred_martix = pred_dataset.read()
data = np.zeros((pred_martix.shape[0], pred_martix.shape[1] * pred_martix.shape[2]))# print(pred_martix.shape)
# print(pred_martix[0])
for i in range(pred_martix.shape[0]):# 第i个波段一维数组data[i] = pred_martix[i].flatten()
# 转换下维度
pred_x = data.swapaxes(0, 1)pred_y = rf_model.predict(pred_x)
# print(pred_y, pred_y.shape)# 将标签还原为图像的二维矩阵
pred_image = pred_y.reshape(pred_martix.shape[1], pred_martix.shape[2])
height_, width_ = pred_image.shape
tif_data = np.zeros((height_, width_, 3), dtype=np.int64)
for label, color in color_mapping.items():tif_data[pred_image == label] = colortif_data = np.transpose(tif_data, (2, 0, 1))im_bands, im_height, im_width = tif_data.shape
driver = gdal.GetDriverByName("GTiff")
dataset = driver.Create(pred_result_tif_path, im_width, im_height, im_bands, gdal.GDT_Byte)
for i in range(im_bands):dataset.GetRasterBand(i + 1).WriteArray(tif_data[i])
# if dataset != None:
#     #将栅格数据和地理坐标系统关联起来
#     dataset.SetProjection(pred_crs)  # 写入投影
#     dataset.SetGeoTransform(pred_geotrans)  # 写入仿射变换参数dataset = None
5. other
import numpy as np
import matplotlib.pyplot as plt
from prettytable import PrettyTableclass CFM:"""混淆矩阵类返回精度和混淆举证"""def __init__(self, num_classes: int, labels: list):self.matrix = np.zeros((num_classes, num_classes))self.num_classes = num_classesself.labels = labelsdef plot(self):matrix = self.matrixprint(matrix)plt.imshow(matrix, cmap=plt.cm.Blues)# 设置x轴坐标labelplt.xticks(range(self.num_classes), self.labels, rotation=45)# 设置y轴坐标labelplt.yticks(range(self.num_classes), self.labels)# 显示colorbarplt.colorbar()plt.xlabel('True Labels')plt.ylabel('Predicted Labels')plt.title('Confusion matrix')# 在图中标注数量/概率信息thresh = matrix.max() / 2for x in range(self.num_classes):for y in range(self.num_classes):# 注意这里的matrix[y, x]不是matrix[x, y]info = int(matrix[y, x])plt.text(x, y, info,verticalalignment='center',horizontalalignment='center',color="white" if info > thresh else "black")plt.tight_layout()plt.show()def update(self, preds, labels):"""_summary_Args:preds (_type_): _description_labels (_type_): _description_preds:预测值labels:真实值confusion martixlabel0 label1 label2 label3pred0pred1pred2pred3"""for p, t in zip(preds, labels):self.matrix[p, t] += 1print("confusion matrix", self.matrix)def get_cfm(self):"""Accuarcy: 正确样本占总样本数量的比例Percision: 精度PrecisionRecall: 召回率Specificaity: 特异性"""sum_true = 0for i in range(self.num_classes):sum_true += self.matrix[i, i]acc = sum_true / np.sum(self.matrix)print("the model accuracy is ", acc)comment_labels = ["categeory", "Precision", "Recall", "Specificity"]tabel = PrettyTable()tabel.field_names = comment_labelscomment_numpy = np.zeros((self.num_classes, 3))for i in range(self.num_classes):# 第i个分类的精确率, 召回率, 特异度TP = self.matrix[i, i]FP = np.sum(self.matrix[i, :]) - TPFN = np.sum(self.matrix[:, i]) - TPTN = np.sum(self.matrix) - TP - FN - FP# 保留三位小数, 如果 TP + FN 不等于零,就计算并将结果四舍五入到小数点后三位;否则,率设置为0。Precision = round(TP / (TP + FP), 3) if TP + FP != 0 else 0.Recall = round(TP / (TP + FN), 3) if TP + FN != 0 else 0.Specificity = round(TN / (TN + FP), 3) if TN + FP != 0 else 0.tabel.add_row([self.labels[i], Precision, Recall, Specificity])comment_numpy[i] = [Precision, Recall, Specificity]print(tabel)return acc, comment_numpyif __name__ == "__main__":cfm = CFM(2, ["cat", "dog"])actual = [1, 0, 1, 1, 0, 1, 0, 0, 1, 0]predicted = [1, 0, 1, 0, 0, 1, 1, 1, 1, 0]cfm.update(predicted, actual)acc, comment_numpy = cfm.get_cfm()print(comment_numpy)cfm.plot()
变量名代表得含义
sample_path = "../sample/sample.tif" #标签图
orgin_path = "../datasets/landsat.tif" #原始图
pred_path = "../datasets/landsat.tif" #需要预测的图
txt_Path = "./result/label_data.txt" #无
labels_name = ["", "tudi", "building", "veg", "water"] # 样本名字,分类的类别
csv_filename = '../result/train_data.csv' # 生成训练数据的存放路径
csv_head_name = ['Band1', 'Band2', 'Band3', 'Band4', 'Band5', 'Band6', 'Band7', 'Label', "LabelName"] # 存放格式
model_path = "../model/myrnf.pickle" # 最终保存的模型路径
pred_result_tif_path = "../result/pred_landsat.tif" # 用训练的模型保存的路径
color_mapping = {1: (255, 255, 0),2: (255, 0, 0),3: (0, 255, 0),4: (0, 0, 255)
}
# 颜色映射从2D标签映射到3D
相关文章:

遥感图像地物分类流程
遥感图像地物分类流程 1. 制作标签 使用arcgis pro或者arcgis或者envi,画标签,保存为tiff格式 2. 处理标签数据 用python gdal库安装 osgdal库,如果安装失败就需要下载 对应库得 .whl去安装,网站具体搞忘了,可以百…...
JS13-事件的绑定和事件对象Event
绑定事件的两种方式/DOM事件的级别 DOM0的写法:onclick element.onclick function () {}举例: <body> <button>点我</button> <script>var btn document.getElementsByTagName("button")[0];//这种事件绑定的方式…...

pycorrector检测OCR错字实践
参考:https://github.com/shibing624/pycorrector/tree/master/examples/macbert stopwords.txt 添加专业停用词,避免错误 设置自定义词典,避免将正确的词错误检测成错误的词 from pycorrector import Corrector m Corrector() m.set_cus…...

RDD算子介绍(三)
1. join 将相同的key的值连接在一起,值的类型可以不同 val rdd1 : RDD[(String, Int)] sc.makeRDD(List(("a", 1), ("b", 2), ("c", 3))) val rdd2 : RDD[(String, Int)] sc.makeRDD(List(("a", 4), ("b", 5…...

Redis的脑裂问题
Redis 脑裂(Split-brain)问题是指在分布式系统中,特别是基于主从复制和哨兵(Sentinel)模式的Redis集群中,由于网络分区(network partition)而导致部分节点组成了独立可用的服务&…...

【算法】雪花算法生成分布式 ID
SueWakeup 个人中心:SueWakeup 系列专栏:学习Java框架 个性签名:人生乏味啊,我欲令之光怪陆离 本文封面由 凯楠📷 友情赞助播出! 目录 1. 什么是分布式 ID 2. 分布式 ID 基本要求 3. 数据库主键自增 4. UUID 5. S…...

FFplay使用滤镜添加字幕到现有视频显示
1.创建字幕文件4k.srt 4k.srt内容: 1 00:00:01.000 --> 00:00:30.000 日照香炉生紫烟2 00:00:31.000 --> 00:00:60.000 遥看瀑布挂前川3 00:01:01.000 --> 00:01:30.000 飞流直下三千尺4 00:01:31.000 --> 00:02:00.000 疑是银河落九天2.通过使用滤镜显示字幕在视…...
【Python + Django】Django模板语法 + 请求和响应
前言: 现在现在,我们要开始将变量的值展现在页面上面啦! 要是只会显示静态页面,我们的页面也太难看和死板了, 并且数据库的数据也没法展现在页面上。 但是呢,模板语法学习之后就可以啦!&…...

大数据面试总结 四
1、当hadoop集群中某一个节点挂了,内部数据流程是如何进行的? 每一个datanode都会定期向namenode发送heardbeat消息,当一段时间namenode没有接收到某一个datanode的消息,此时namenode就会将该datanode标记为死亡,并不…...

Spring Boot: 使用MongoOperations操作mongodb
一、添加依赖 <?xml version"1.0" encoding"UTF-8"?> <project xmlns"http://maven.apache.org/POM/4.0.0"xmlns:xsi"http://www.w3.org/2001/XMLSchema-instance"xsi:schemaLocation"http://maven.apache.org/POM/4…...

PyTorch 深度学习(GPT 重译)(六)
十四、端到端结节分析,以及接下来的步骤 本章内容包括 连接分割和分类模型 为新任务微调网络 将直方图和其他指标类型添加到 TensorBoard 从过拟合到泛化 在过去的几章中,我们已经构建了许多对我们的项目至关重要的系统。我们开始加载数据…...

MyBatis3源码深度解析(十七)MyBatis缓存(一)一级缓存和二级缓存的实现原理
文章目录 前言第六章 MyBatis缓存6.1 MyBatis缓存实现类6.2 MyBatis一级缓存实现原理6.2.1 一级缓存在查询时的使用6.2.2 一级缓存在更新时的清空 6.3 MyBatis二级缓存的实现原理6.3.1 实现的二级缓存的Executor类型6.3.2 二级缓存在查询时使用6.3.3 二级缓存在更新时清空 前言…...

Go --- Go语言垃圾处理
概念 垃圾回收(GC-Garbage Collection)暂停程序业务逻辑SWT(stop the world)程序根节点:程序中被直接或间接引用的对象集合,能通过他们找出所有可以被访问到的对象,所以Go程序的根节点通常包括…...

力扣每日一题30:串联所有单词的子串
题目描述 给定一个字符串 s 和一个字符串数组 words。 words 中所有字符串 长度相同。 s 中的 串联子串 是指一个包含 words 中所有字符串以任意顺序排列连接起来的子串。 例如,如果 words ["ab","cd","ef"], 那么 &q…...

vim | vim的快捷命令行
快捷进入shell界面 -> :nnoremap <F8> :sh<CR> -> 绑定到了F8 :nnoremap <F8> :sh<CR> 快捷执行 -> :nnoremap <F5> :wa<CR>:!g % -o a.out && ./a.out<CR> -> 绑定到了F5 :nnoremap <F5> :wa<CR>…...

项目管理平台-01-BugClose 入门介绍
拓展阅读 Devops-01-devops 是什么? Devops-02-Jpom 简而轻的低侵入式在线构建、自动部署、日常运维、项目监控软件 代码质量管理 SonarQube-01-入门介绍 项目管理平台-01-jira 入门介绍 缺陷跟踪管理系统,为针对缺陷管理、任务追踪和项目管理的商业…...
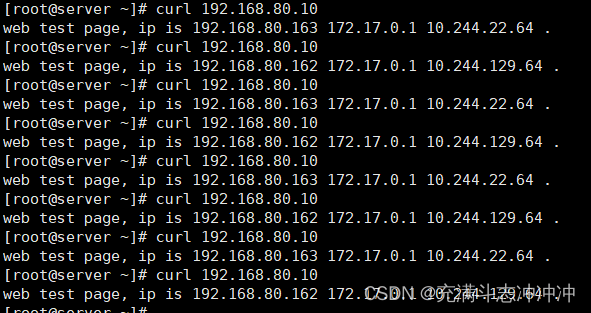
web集群-lvs-DR模式基本配置
目录 环境: 一、配置RS 1、安装常见软件 2、配置web服务 3、添加vip 4、arp抑制 二、配置LVS 1、添加vip 2、安装配置工具 3、配置DR 三、测试 四、脚本方式配置 1、LVS-DR 2、LVS-RS 环境: master lvs 192.168.80.161 no…...
基于深度学习的面部情绪识别算法仿真与分析
声明:以下内容均属于本人本科论文内容,禁止盗用,否则将追究相关责任 基于深度学习的面部情绪识别算法仿真与分析 摘要结果分析1、本次设计通过网络爬虫技术获取了七种面部情绪图片:吃惊、恐惧、厌恶、高兴、伤心、愤怒、自然各若…...
)
C语言经典面试题目(十六)
1、什么是C语言中的指针常量和指针变量?它们有什么区别? 在C语言中,指针常量和指针变量是指针的两种不同类型。它们的区别在于指针的指向和指针本身是否可以被修改。 指针常量:指针指向的内存地址不可变,但指针本身的…...
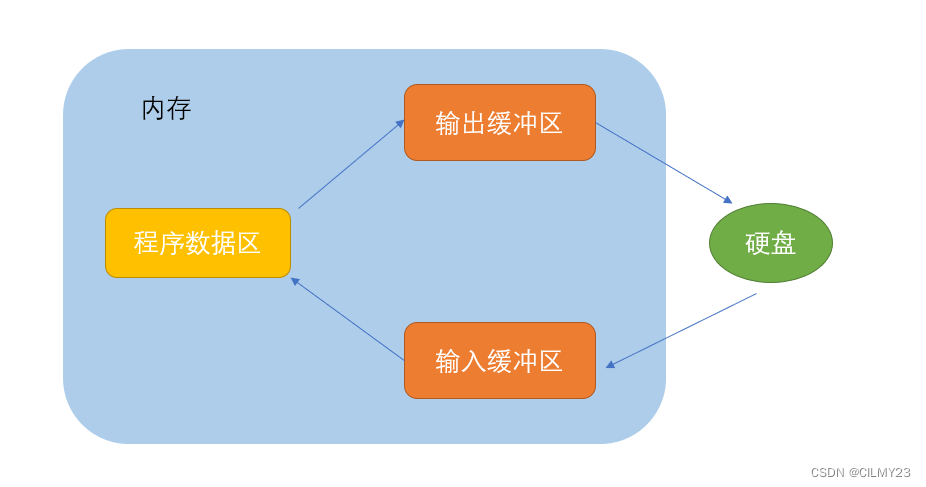
【C语言】文件操作揭秘:C语言中文件的顺序读写、随机读写、判断文件结束和文件缓冲区详细解析【图文详解】
欢迎来CILMY23的博客喔,本篇为【C语言】文件操作揭秘:C语言中文件的顺序读写、随机读写、判断文件结束和文件缓冲区详细解析【图文详解】,感谢观看,支持的可以给个一键三连,点赞关注收藏。 前言 欢迎来到本篇博客&…...

SwitchyOmega+Burp无感抓包实战:解决HTTPS拦截与流量路由难题
1. 为什么“无感抓包”是BurpSuite日常使用的分水岭刚接触Web安全测试的朋友常有个错觉:装上Burp Suite,配好代理,打开浏览器,点几下网页——流量就该自动进来了。结果现实是:首页打不开、登录态丢失、HTTPS报错满屏、…...

AI赋能5G核心网故障诊断:从PCAP解析到智能根因分析的工程实践
1. 项目概述:当AI遇见5G核心网故障诊断在5G核心网的运维与测试一线干了这么多年,最头疼的莫过于面对海量的PCAP抓包文件。一个复杂的信令流程下来,动辄几千甚至上万个数据包,工程师需要像侦探一样,逐帧审视协议交互&am…...
)
别再乱用npm install了!手把手教你用npx only-allow为项目指定包管理器(支持pnpm/yarn/npm)
用only-allow统一团队包管理器:从配置到CI的全流程指南 你是否曾经在拉取一个新项目后,面对npm install、yarn还是pnpm i的抉择感到困惑?或者更糟的是,团队成员混用不同包管理器导致node_modules结构不一致,引发各种诡…...

HFSS仿真结果怎么看?一文读懂S参数与电场图,让你的T型波导分析不再迷茫
HFSS仿真结果深度解析:从S参数到电场图的工程实践指南面对HFSS仿真生成的复杂数据图表,许多工程师常陷入"看得见数据却读不懂含义"的困境。本文将带您穿透数据表象,掌握T型波导性能分析的核心方法论。1. S参数:波导性能…...

Burp Suite深度解析:从流量抓包到业务逻辑漏洞挖掘
1. 这不是“学个插件”——Burp Suite 是渗透测试的呼吸系统 很多人第一次听说 Burp Suite,是在某篇“三步拿下登录框”的速成教程里:装好Java、拖进浏览器代理、点几下Repeater就弹出密码明文。结果真去测一个中型SaaS后台,不到十分钟就卡在…...

2026年LLM推理加速全景:量化、投机解码与KV Cache工程实战
大语言模型推理速度慢、成本高,是阻碍AI大规模落地的核心障碍之一。一个7B参数的模型,在标准配置下每秒只能生成约30个token,对于需要实时响应的应用来说几乎无法接受。但2026年,一系列推理加速技术的成熟,让这一局面发…...

解密高校教师必会的Gemini 3.1 Pro五大科研隐藏技能:从论文评估到创新点锁定
各位同仁好,我是七哥。一个在高校里从事人工智能相关领域研究,钻研用大模型AI实操的学术人。可以和七哥交流学术写作或Gemini、GPT、Claude等大模型学术实操相关问题,多多交流,相互成就,共同进步。 科研路上,有人发完顶刊顺利晋升,有人还在为创新点抓耳挠腮。 大多数教…...

百度深度学习研究院的“叛将“,带着一颗芯片改变了中国智能驾驶——地平线余凯,从ImageNet冠军到征程出货1000万
大家好,我是写代码的篮球球痴。这篇文章跟我自己有点关系——我开的是理想汽车。理想的智驾系统 AD Pro,搭载的就是地平线征程 5 芯片。2026 年 1 月理想 AD Pro 4.0 推送,基于单颗征程 6M 实现了城市 NOA——这是行业里第一个用单颗 128TOPS…...

零基础怎么学Agent?这个工程师考试内容拆给你看
站在 AI Agent(智能体)爆发的十字路口,很多既没有深厚算法背景、也没有丰富写代码经验的“小白”常常感到迷茫:动辄谈及的大模型交互、复杂的业务编排,零基础真的能学会吗? 事实上,智能体开发早…...

Burp抓包失败的五大隐形墙与HTTPS解密断裂点排查指南
1. 这不是Burp用得不对,是环境链路断在了你没看见的地方“Burp抓不到包”——这句话我过去三年里听开发、测试、刚转安全的新人说了不下两百遍。但真正打开Burp一看,Proxy标签页里空空如也,连个localhost:8080的请求都没有,十有八…...