Android 封装的工具类
文章目录
- 日志封装类-MyLog
- 线程封装类-LocalThreadPools
- 自定义进度条-LoadProgressbar
- 解压缩类-ZipUtils
- 本地数据库类-MySQLiteHelper
- 访问webservice封装-HttpUtils
- Toolbar封装类-MaterialToolbar
- 网络请求框架-OkGo
- 网络请求框架-OkHttp
日志封装类-MyLog
是对android log的封装,封装后 可以设置显示级别
/*** Log的封装类,方便开启和关闭log*/
public class MyLog {public static final int VERBOSE = 1;public static final int DEBUG = 2;public static final int INFO = 3;public static final int WARN = 4;public static final int ERROR = 5;public static final int NOTHING = 6;public static final int level = VERBOSE; //设置显示级别public static final String MYLOG_PATH_SDCARD_DIR = "/sdcard/ScanZbar/log";// 日志文件在sdcard中的路径public static final String MY_LOG_FILE_NAME = "Log.txt";// 本类输出的日志文件名称public static void v(String tag, String msg){if(level <= VERBOSE)Log.v(tag,msg);}public static void d(String tag, String msg){if(level <= DEBUG)Log.d(tag,msg);}public static void i(String tag, String msg){if(level <= INFO)Log.i(tag,msg);}public static void w(String tag, String msg){if(level <= WARN)Log.w(tag,msg);}public static void e(String tag, String msg){if(level <= ERROR)Log.e(tag,msg);}//调用该方法,可以将日志写入日志文件public static void Loge(String tag, String msg){if(LEVEL <= ERROR) {Log.e(tag, msg);writeLogtoFile("ERROR",tag,msg);}}/*** 打开日志文件并写入日志* @param mylogtype* @param tag* @param text*/private static void writeLogtoFile(String mylogtype, String tag, String text) {// 新建或打开日志文件Date nowtime = new Date();String needWriteFiel = new SimpleDateFormat(TimeUtil.SDF3).format(nowtime);String needWriteMessage = new SimpleDateFormat(TimeUtil.SDF1).format(nowtime) + " " + mylogtype + " " + tag + " " + text;File dirPath = Environment.getExternalStorageDirectory();File dirsFile = new File(MYLOG_PATH_SDCARD_DIR);if (!dirsFile.exists()){dirsFile.mkdirs();}//创建日志文件File file = new File(dirsFile.toString(), needWriteFiel +".txt");// MYLOG_PATH_SDCARD_DIRif (!file.exists()) {try {//在指定的文件夹中创建文件boolean creatB = file.createNewFile();if(!creatB)MyLog.e("mylog","创建日志文件失败!");} catch (Exception e) {e.printStackTrace();}}try(FileWriter filerWriter = new FileWriter(file, true);// 后面这个参数代表是不是要接上文件中原来的数据,不进行覆盖BufferedWriter bufWriter = new BufferedWriter(filerWriter)) {bufWriter.write(needWriteMessage);bufWriter.newLine();} catch (IOException e) {e.printStackTrace();}}}
使用
使用和正常log使用一样
MyLog.e("mylog","123");
MyLog.i("mylog","222");
...
线程封装类-LocalThreadPools
针对AsyncTask被弃用的替代
/*** @Description TODO(全局使用的线程池)*/
public class LocalThreadPools {private static int threadNum = 0;private static String TAG = LocalThreadPools.class.getSimpleName();private static ExecutorService THREAD_POOL_EXECUTOR;/*** CPU数量*/private static final int CPU_COUNT = Runtime.getRuntime().availableProcessors();/*** 线程池数量*/private static final int CORE_POOL_SIZE = Math.max(2, Math.min(CPU_COUNT-1,4));/*** 最大线程数量 = CPU数量*2+1*/private static final int MAXIMUM_POOL_SIZE = CPU_COUNT * 2+1;/*** 等待线程存活时间*/private static final int KEEP_ALIVE_SECONDS = 60;/*** 等待线程存活时间的单位*/private static final TimeUnit unit = TimeUnit.MINUTES;private static final BlockingQueue<Runnable> sPoolWorkQueue = new LinkedBlockingQueue<>(8);/*** 线程工厂*/private static final ThreadFactory sThreadFactory = new ThreadFactory() {private final AtomicInteger mCount = new AtomicInteger(1);public Thread newThread(Runnable r) {threadNum++;MyLog.e("mylog","线程工厂创建一个线程:"+threadNum+","+mCount.getAndIncrement());return new Thread(r, "MangoTask #" + mCount.getAndIncrement());}};private void initThreadPool() {MyLog.e("mylog","core_pool_size:"+CORE_POOL_SIZE+",maximum_pool_size:"+MAXIMUM_POOL_SIZE+"," +"KEEP_ALIVE_SECONDS:"+KEEP_ALIVE_SECONDS+",");ThreadPoolExecutor threadPoolExecutor = new ThreadPoolExecutor(CORE_POOL_SIZE, MAXIMUM_POOL_SIZE, KEEP_ALIVE_SECONDS, unit,sPoolWorkQueue, sThreadFactory,new RejectedHandler()){@Overridepublic void execute(Runnable command) {super.execute(command);MyLog.e("mylog","-----------ActiveCount="+getActiveCount());MyLog.e("mylog","-----------PoolSize="+getPoolSize());MyLog.e("mylog","-----------Queue="+getQueue().size());MyLog.e("mylog","-----------finish="+getCompletedTaskCount());}};//允许核心线程空闲超时时被回收threadPoolExecutor.allowCoreThreadTimeOut(true);THREAD_POOL_EXECUTOR = threadPoolExecutor;}private class RejectedHandler implements RejectedExecutionHandler {@Overridepublic void rejectedExecution(Runnable r, ThreadPoolExecutor executor) {//可在这里做一些提示用户的操作Tools.showToast(mContext.get(),"当前执行的任务过多,请稍后再试");}}private WeakReference<Context> mContext;private static LocalThreadPools instance;private LocalThreadPools(Context context){mContext = new WeakReference<>(context);initThreadPool();}public static LocalThreadPools getInstance(Context context){if (instance == null) {instance = new LocalThreadPools(context);}return instance;}public void execute(Runnable command){THREAD_POOL_EXECUTOR.execute(command);}/*** 通过interrupt方法尝试停止正在执行的任务,但是不保证真的终止正在执行的任务* 停止队列中处于等待的任务的执行* 不再接收新的任务* @return 等待执行的任务列表*/public static List<Runnable> shutdownNow(){return THREAD_POOL_EXECUTOR.shutdownNow();}/*** 停止队列中处于等待的任务* 不再接收新的任务* 已经执行的任务会继续执行* 如果任务已经执行完了没有必要再调用这个方法*/public void shutDown(){THREAD_POOL_EXECUTOR.shutdown();sPoolWorkQueue.clear();}}
使用
LocalThreadPools.getInstance((TestActivity) mView).execute(new Runnable() {@Overridepublic void run() {//异步操作}
});
自定义进度条-LoadProgressbar
自定义进度条
/*** 进度条*/
public class DownLoadProgressbar extends View {private Paint paint = new Paint(); // 绘制背景灰色线条画笔private Paint paintText = new Paint(); // 绘制下载进度画笔private float offset = 0f; // 下载偏移量private float maxvalue = 0f; // 进度的总大小private float currentValue = 0f; // 当前进度private Rect mBound = new Rect(); // 获取百分比数字的长宽private String percentValue = "0%"; // 要显示的现在百分比private float offsetRight = 0f; // 灰色线条距离右边的距离private int textSize = SizeUtils.sp2px(25); // 百分比的文字大小private float offsetTop = SizeUtils.dp2px(18); // 距离顶部的偏移量public DownLoadProgressbar(Context context) {this(context, null);}public DownLoadProgressbar(Context context, @Nullable AttributeSet attrs) {this(context, attrs, 0);}public DownLoadProgressbar(Context context, @Nullable AttributeSet attrs, int defStyleAttr) {super(context, attrs, defStyleAttr);getTextWidth();}@Overrideprotected void onDraw(Canvas canvas) {super.onDraw(canvas);// 绘制底色paint.setColor(Color.parseColor("#eeeeee"));paint.setStrokeWidth(SizeUtils.dp2px(10));canvas.drawLine(0, offsetTop, getWidth() - offsetRight, offsetTop, paint);// 绘制进度条颜色paint.setColor(Color.parseColor("#ff0000"));paint.setStrokeWidth(SizeUtils.dp2px(11));canvas.drawLine(0, offsetTop, offset, offsetTop, paint);paint.setColor(Color.parseColor("#ffffff"));paint.setStrokeWidth(SizeUtils.dp2px(1));paintText.setColor(Color.parseColor("#ffffff"));paintText.setTextSize(textSize);paintText.setAntiAlias(true);paintText.getTextBounds(percentValue, 0, percentValue.length(), mBound);canvas.drawLine(offset, offsetTop, offset + mBound.width() + SizeUtils.dp2px(4), offsetTop, paint);canvas.drawText(percentValue, offset, offsetTop + mBound.height() / 2 - SizeUtils.dp2px(2), paintText);}public void setCurrentValue(float currentValue) {this.currentValue = currentValue;int value = (int) (currentValue * 100 / maxvalue);if (value < 100 && value > 0) {percentValue = value + "%";} else if (value <= 0) {percentValue = "0%";} else {percentValue = "100%";}calc();invalidate();}private void calc() {if (currentValue < maxvalue) {offset = (getWidth() - offsetRight) * currentValue / maxvalue;} else {offset = getWidth() - offsetRight;}}/*** 设置最大值** @param maxValue*/public void setMaxvalue(int maxValue) {this.maxvalue = maxValue;}/*** 获取“100%”的宽度*/public void getTextWidth() {Paint paint = new Paint();Rect rect = new Rect();paint.setTextSize(textSize);paint.setAntiAlias(true);paint.getTextBounds("100%", 0, "100%".length(), rect);offsetRight = rect.width() + SizeUtils.dp2px(5);;}
}
解压缩类-ZipUtils
解压缩
/*** 解压缩zip文件*/
public class ZipUtils {public ZipUtils() {}/*** 根据byte数组,生成文件*/public static void getFile(byte[] bfile, String filePath, String fileName) {BufferedOutputStream bos = null;FileOutputStream fos = null;File file = null;try {File dir = new File(filePath);if (!dir.exists()) {//判断文件目录是否存在dir.mkdirs();}file = new File(filePath + fileName);fos = new FileOutputStream(file);bos = new BufferedOutputStream(fos);bos.write(bfile);} catch (Exception e) {e.printStackTrace();} finally {if (bos != null) {try {bos.close();} catch (IOException e1) {e1.printStackTrace();}}if (fos != null) {try {fos.close();} catch (IOException e1) {e1.printStackTrace();}}}}//  使用密码解压(图片不加密)public static boolean unZipFile1(String zipFileFullName, String filePath, String password) {try {ZipFile zipFile = new ZipFile(zipFileFullName);// 如果解压需要密码if (zipFile.isEncrypted()) {zipFile.setPassword(password);}File file = new File(filePath);if (!file.getParentFile().exists()) {file.getParentFile().mkdirs();}zipFile.extractAll(filePath);//提取所有文件return true;} catch (Exception e) {e.printStackTrace();return false;}}//  使用密码解压public static boolean unZipFile(String zipFileFullName, String filePath, String password) {try {ZipFile zipFile = new ZipFile(zipFileFullName);// 如果解压需要密码if (zipFile.isEncrypted()) {zipFile.setPassword(password);}File file = new File(filePath);if (!file.getParentFile().exists()) {file.getParentFile().mkdirs();}zipFile.extractAll(filePath);//提取所有文件
//            压缩ZipFolder(filePath, filePath + "01");
//            解压ZipUtils.UnZipFolder(filePath + "01", filePath);return true;} catch (Exception e) {e.printStackTrace();return false;}}/*** 解压zip到指定的路径** @param zipFileString ZIP的名称* @param outPathString 要解压缩路径* @throws Exception*/public static void UnZipFolder(String zipFileString, String outPathString)  {ZipInputStream inZip = null;OutputStream out = null;try{inZip = new ZipInputStream(new FileInputStream(zipFileString));ZipEntry zipEntry;String szName = "";List<File> fileList = new ArrayList<File>();while ((zipEntry = inZip.getNextEntry()) != null) {szName = zipEntry.getName();if (zipEntry.isDirectory()) {//获取部件的文件夹名szName = szName.substring(0, szName.length() - 1);File folder = new File(outPathString + File.separator + szName);folder.mkdirs();} else {File file = new File(outPathString + File.separator + szName);if (!file.exists()) {fileList.add(file);file.getParentFile().mkdirs();file.createNewFile();}// 获取文件的输出流
//                FileOutputStream out = new FileOutputStream(file);out = AesUtil.encrypt(file, AesUtil.toKey(MyApplication.getInstance().getAESKey().getBytes()));// 加密int len;byte[] buffer = new byte[1024];// 读取(字节)字节到缓冲区while ((len = inZip.read(buffer)) != -1) {// 从缓冲区(0)位置写入(字节)字节out.write(buffer, 0, len);out.flush();}out.close();}}inZip.close();
//        删除目录下多余文件夹File dirFile = new File(outPathString);File[] files = dirFile.listFiles();for (int i = 0; i < files.length; i++) {if (files[i].isDirectory()) {deleteDirectory(files[i].getAbsolutePath());}}}catch (Exception e){e.printStackTrace();}finally {if(inZip != null){safeClose(inZip);}if(out != null){safeClose(out);}}}public static void safeClose(OutputStream fis){if(fis != null){try{fis.close();}catch (IOException e){e.printStackTrace();}}}public static void safeClose(ZipInputStream fis){if(fis != null){try{fis.close();}catch (IOException e){e.printStackTrace();}}}/*** 压缩文件和文件夹** @param srcFileString 要压缩的文件或文件夹* @param zipFileString 解压完成的Zip路径* @throws Exception*/public static void ZipFolder(String srcFileString, String zipFileString) {FileOutputStream fis = null;ZipOutputStream outZip = null;try{fis = new FileOutputStream(zipFileString);//创建ZIPoutZip = new ZipOutputStream(fis);//创建文件File file = new File(srcFileString);//压缩ZipFiles(file.getParent() + File.separator, file.getName(), outZip);//完成和关闭outZip.finish();outZip.close();fis.close();}catch (Exception e){e.printStackTrace();}finally {if(fis != null){safeClose(fis);}if(outZip != null){safeClose1(outZip);}}}public static void safeClose(FileOutputStream fis){if(fis != null){try {fis.close();} catch (IOException e) {e.printStackTrace();}}}public static void safeClose1(ZipOutputStream fis){if(fis != null){try {fis.close();} catch (IOException e) {e.printStackTrace();}}}/*** 压缩文件** @param folderString* @param fileString* @param zipOutputSteam* @throws Exception*/private static void ZipFiles(String folderString, String fileString, ZipOutputStream zipOutputSteam) {FileInputStream inputStream = null;try{if (zipOutputSteam == null)return;File file = new File(folderString + fileString);if (file.isFile()) {ZipEntry zipEntry = new ZipEntry(fileString);inputStream = new FileInputStream(file);zipOutputSteam.putNextEntry(zipEntry);int len;byte[] buffer = new byte[4096];while ((len = inputStream.read(buffer)) != -1) {zipOutputSteam.write(buffer, 0, len);}zipOutputSteam.closeEntry();} else {//文件夹String fileList[] = file.list();//没有子文件和压缩if (fileList.length <= 0) {ZipEntry zipEntry = new ZipEntry(fileString + File.separator);zipOutputSteam.putNextEntry(zipEntry);zipOutputSteam.closeEntry();}//子文件和递归for (int i = 0; i < fileList.length; i++) {ZipFiles(folderString + fileString + "/", fileList[i], zipOutputSteam);}}}catch (Exception e){e.printStackTrace();}finally {if(inputStream != null){safeClose(inputStream);}}}public static Bitmap getBitmap(File photoFile) {InputStream fis = null;try {fis = AesUtil.decrypt(photoFile, AesUtil.toKey(MyApplication.getInstance().getAESKey().getBytes()));return BitmapFactory.decodeStream(fis);  ///把流转化为Bitmap图片} catch (FileNotFoundException e) {e.printStackTrace();MyLog.e("mylog", "e1:" + e.getMessage());return null;} catch (Exception e) {e.printStackTrace();MyLog.e("mylog", "e2:" + e.getMessage());return null;} finally {if(fis != null){safeClose(fis);}}}public static void safeClose(InputStream fis){if(fis != null){try{fis.close();}catch (IOException e){e.printStackTrace();}}}public static File getPhotoFile(String nonet, String fileAbsolutePath) {File file = new File(fileAbsolutePath);File[] subFile = file.listFiles();if (subFile != null) {for (int i = 0; i < subFile.length; i++) {// 判断是否为文件夹/*if (subFile[i].isDirectory()) {getPhotoFile(idNonet, subFile[i].getAbsolutePath());} else {*/String filename = subFile[i].getName();if (!TextUtils.isEmpty(filename) && filename.length() >= 13 && nonet != null) {String subFilename = filename.substring(filename.length() - 13, filename.length() - 4);
//                MyLog.e("mylog", "subFilename:" + subFilename + "  nonet:" + nonet);if (subFilename.equals(nonet)) {MyLog.e("mylog", "filename:" + filename);return subFile[i];}}}}return null;}/*** @param zipName  压缩文件的路径* @param filePath 被压缩文件的路径* @param password 加密* @description:压缩以及加密* @author: renbo* @date: 2021年5月19日 下午3:35:33*/public static void unZipPass(String zipName, String filePath, String password) throws ZipException {ZipFile zipFile = new ZipFile(zipName);ArrayList<File> filesToAdd = new ArrayList<File>();File root = new File(filePath);File[] files = root.listFiles();for (File file : files) {if (file.isDirectory()) {filesToAdd.add(new File(file.getAbsolutePath()));} else {filesToAdd.add(new File(file.getAbsolutePath()));}}ZipParameters parameters = new ZipParameters();parameters.setCompressionMethod(Zip4jConstants.COMP_DEFLATE); // setparameters.setCompressionLevel(Zip4jConstants.DEFLATE_LEVEL_NORMAL);parameters.setEncryptFiles(true);parameters.setEncryptionMethod(Zip4jConstants.ENC_METHOD_AES);parameters.setAesKeyStrength(Zip4jConstants.AES_STRENGTH_256);// Set passwordparameters.setPassword(password);zipFile.addFiles(filesToAdd, parameters);}/*** 删除单个文件** @param filePath 被删除文件的文件名* @return 文件删除成功返回true,否则返回false*/public static boolean deleteFile(String filePath) {File file = new File(filePath);if (file.isFile() && file.exists()) {return file.delete();}return false;}/*** 删除文件夹以及目录下的文件** @param filePath 被删除目录的文件路径* @return 目录删除成功返回true,否则返回false*/public static boolean deleteDirectory(String filePath) {boolean flag = false;//如果filePath不以文件分隔符结尾,自动添加文件分隔符if (!filePath.endsWith(File.separator)) {filePath = filePath + File.separator;}File dirFile = new File(filePath);if (!dirFile.exists() || !dirFile.isDirectory()) {return false;}flag = true;File[] files = dirFile.listFiles();//遍历删除文件夹下的所有文件(包括子目录)for (int i = 0; i < files.length; i++) {if (files[i].isFile()) {//删除子文件flag = deleteFile(files[i].getAbsolutePath());if (!flag) break;} else {//删除子目录flag = deleteDirectory(files[i].getAbsolutePath());if (!flag) break;}}if (!flag) return false;//删除当前空目录return dirFile.delete();}/*** 根据路径删除指定的目录或文件,无论存在与否** @param filePath 要删除的目录或文件* @return 删除成功返回 true,否则返回 false。*/public static boolean DeleteFolder(String filePath) {File file = new File(filePath);if (!file.exists()) {return false;} else {if (file.isFile()) {// 为文件时调用删除文件方法return deleteFile(filePath);} else {// 为目录时调用删除目录方法return deleteDirectory(filePath);}}}}
本地数据库类-MySQLiteHelper
Android 创建本地数据库
/*** 数据库帮助类*/
public class MySQLiteHelper extends SQLiteOpenHelper {private static String initSqlFile = Environment.getExternalStorageDirectory().getAbsolutePath();private static String REALPATH = initSqlFile+ File.separator+"XXXX"; //需要创建的路径private static String REALFILE = REALPATH + File.separator +"xxxx.db"; //需要创建的文件private static MySQLiteHelper db;private static final int DATEBASE_VERSION = 1;  //定义版本号public static String getRealPath(){return REALPATH;}public static String getRealFile(){return REALFILE;}public static void CloseDB(){db.close();}//自定义构造方法,简化自动生成的构造方法,path 是主要指定创建db文件的路径public MySQLiteHelper(Context context){this(context,REALFILE,null,DATEBASE_VERSION);MyLog.e("mylog","文件路径:"+REALFILE);}//实现接口必须实现的构造方法public MySQLiteHelper(Context context, String name, SQLiteDatabase.CursorFactory factory, int version){super(context, name, factory, version);}@Overridepublic void onCreate(SQLiteDatabase sqLiteDatabase) {//第一次创建数据库时,才会调用MyLog.e("mylog","创建数据库");sqLiteDatabase.execSQL(TableA.CREAT_TABLE(TableA.TABLE_NAME())); //创建表sqLiteDatabase.execSQL(TableB.CREAT_TABLE(TableB.TABLE_NAME())); //创建表}@Overridepublic void onUpgrade(SQLiteDatabase sqLiteDatabase, int i, int i1) {}
}
TableA对于的类
/*** 对应数据表的类*/
public class TableA {public static  String TABLE_NAME(){return "table_a";}public static final String id = "id"; //IDpublic static final String s1= "s1";//字段s1public static final String s1= "s2";//字段s2public static final String s1= "s3";//字段s3public static final String s1= "s4";//字段s4public static final String s1= "s5";//字段s5public static final String s1= "s6";//字段s6public static String CREAT_TABLE(String tableName){return new StringBuffer().append("CREATE TABLE IF NOT EXISTS ").append(tableName).append("(").append(id).append(" INTEGER PRIMARY KEY AUTOINCREMENT,").append(s1).append(" TEXT,").append(s2).append(" TEXT,").append(s3).append(" TEXT,").append(s4).append(" TEXT,").append(s5).append(" TEXT,").append(s6).append(" TEXT").append(");").toString();}
}
访问webservice封装-HttpUtils
对访问webservice 接口的请求封装
引入的包
implementation files('libs\\ksoap2-android-assembly-3.3.0-jar-with-dependencies.jar')
代码
import org.ksoap2.serialization.SoapObject;
import org.ksoap2.serialization.SoapSerializationEnvelope;
import org.ksoap2.transport.HttpTransportSE;
import org.xmlpull.v1.XmlPullParserException;
import java.io.IOException;
import java.util.Base64;public class HttpUtils {private static final String serviceNameSapce = "http://webservice.cps.xxx.com/";private static MyApplication myApplication = MyApplication.getInstance();private HttpUtils() {}//    登录public static String login(String METHODNAME, String username, String password,String pingid) {SoapObject request = new SoapObject(serviceNameSapce, METHODNAME);request.addProperty("username", jiami(username));request.addProperty("password", jiami(password));request.addProperty("pingid",jiami(pingid));request.addProperty("pingidly",null);return scop(request);}private static String scop(SoapObject request) {//创建SoapSerializationEnvelope 对象,同时指定soap版本号SoapSerializationEnvelope envelope = new SoapSerializationEnvelope(SoapSerializationEnvelope.VER10);envelope.bodyOut = request;//由于是发送请求,所以是设置bodyOutenvelope.dotNet = false;//由于是.net开发的webserviceenvelope.setOutputSoapObject(request);HttpTransportSE httpTransportSE = new HttpTransportSE(getURl(), 400000);try {httpTransportSE.call(null, envelope);//调用} catch (IOException e) {e.printStackTrace();return "{\"error\":\"" + e.getMessage() + "\"}";} catch (XmlPullParserException e) {e.printStackTrace();return "{\"error\":\"" + e.getMessage() + "\"}";}// 获取返回的数据SoapObject object = (SoapObject) envelope.bodyIn;return object.getProperty(0).toString();}public static String jiami(String str) { //加密return AesUtil.aesEncrypt(str, MyApplication.getInstance().getAESKey());}public static String jiemi(String str){ //解密return AesUtil.aesDecrypt(str,MyApplication.getInstance().getAESKey());}public static String getURl(){return myApplication.getIP()+myApplication.getIP_SUFFIX();}
}
Toolbar封装类-MaterialToolbar
布局文件
<com.google.android.material.appbar.MaterialToolbarandroid:theme="@style/ThemeOverlay.AppCompat.Dark.ActionBar"android:id="@+id/titlebar"android:background="@color/primary1"style="@style/Widget.MaterialComponents.Toolbar.Surface"app:layout_constraintTop_toTopOf="parent"app:layout_constraintLeft_toLeftOf="parent"app:layout_constraintRight_toRightOf="parent"android:layout_width="match_parent"android:layout_height="wrap_content"app:navigationIcon="@mipmap/back"app:title="XXXX"app:titleTextColor="@color/white"app:titleCentered="true"app:titleTextAppearance="@style/Text18wb"app:subtitle="xxxx年xx月xx日 星期x"app:subtitleTextColor="@color/white"app:subtitleCentered="true"app:subtitleTextAppearance="@style/Text12w"app:menu="@menu/scan_menu"/>
配置文件
1、input_menu.xml
<?xml version="1.0" encoding="utf-8"?>
<menu xmlns:android="http://schemas.android.com/apk/res/android"xmlns:app="http://schemas.android.com/apk/res-auto"><!--showAsAction的值always一直显示,ifRoom如果有地方就显示,没有则隐藏,never一直隐藏--><item android:id="@+id/owner"android:title="个人中心"android:icon="@mipmap/owner1"app:showAsAction="always"/>
</menu>
2、scan_menu.xml
<?xml version="1.0" encoding="utf-8"?>
<menu xmlns:android="http://schemas.android.com/apk/res/android"xmlns:app="http://schemas.android.com/apk/res-auto"><!--showAsAction的值always一直显示,ifRoom如果有地方就显示,没有则隐藏,never一直隐藏--><item android:id="@+id/clean"android:title="一键清空"android:icon="@mipmap/clean1"app:showAsAction="ifRoom"/><itemandroid:id="@+id/input"android:title="行李补录"android:icon="@mipmap/shoudong"app:showAsAction="ifRoom"/><!--    <item-->
<!--        android:id="@+id/setting"-->
<!--        android:title="Setting"-->
<!--        android:icon="@mipmap/ic_launcher"-->
<!--        app:showAsAction="never"/>-->
</menu>
初始化
private void initToolBar(){flightInputBinding.titlebar.setTitle("航班设置");flightInputBinding.titlebar.setSubtitle(myApplication.getDATE_WEEK());setSupportActionBar(flightInputBinding.titlebar);}
布局与按钮事件
@Overridepublic boolean onCreateOptionsMenu(Menu menu) {getMenuInflater().inflate(R.menu.input_menu, menu);return super.onCreateOptionsMenu(menu);}@Overridepublic boolean onOptionsItemSelected(@NonNull MenuItem item) {int id = item.getItemId();if(id == android.R.id.home){Dialog.showFinishDialog(this, "确定要退出APP么?",() -> myApplication.finishAllActivity());}else if(id == R.id.owner){Intent i = new Intent(FlightInputActivity.this,InfomationActivity.class);startActivityForResult(i,2001);}return super.onOptionsItemSelected(item);}
网络请求框架-OkGo
引入包
implementation 'com.lzy.net:okgo:3.0.4'
工具类
1、TrustAllCerts
此类用于绕过https验证
package com.kaiya.mvp.npm_ar.utils;
import java.security.SecureRandom;
import java.security.cert.CertificateException;
import java.security.cert.X509Certificate;import javax.net.ssl.HostnameVerifier;
import javax.net.ssl.SSLContext;
import javax.net.ssl.SSLSession;
import javax.net.ssl.SSLSocketFactory;
import javax.net.ssl.TrustManager;
import javax.net.ssl.X509TrustManager;/*** Created by gang.qin* Date:2024/3/19 15:05* 质量、速度、廉价,选择其中两个 --- 匿名*///public class TrustAllCerts implements X509TrustManager {
//    @Override
//    public void checkClientTrusted(X509Certificate[] chain, String authType) {}
//
//    @Override
//    public void checkServerTrusted(X509Certificate[] chain, String authType) {}
//
//    @Override
//    public X509Certificate[] getAcceptedIssuers() {return new X509Certificate[0];}
//}public class TrustAllCerts implements X509TrustManager {@Overridepublic void checkClientTrusted(X509Certificate[] chain, String authType) throws CertificateException {}@Overridepublic void checkServerTrusted(X509Certificate[] chain, String authType) throws CertificateException {if (chain == null) {throw new IllegalArgumentException(" Check Server x509Certificates is null");}}@Overridepublic X509Certificate[] getAcceptedIssuers() {return new X509Certificate[0];}public static SSLSocketFactory createSSLSocketFactory() {SSLSocketFactory ssfFactory = null;try {SSLContext sc = SSLContext.getInstance("TLS");sc.init(null, new TrustManager[]{new TrustAllCerts()}, new SecureRandom());ssfFactory = sc.getSocketFactory();} catch (Exception e) {}return ssfFactory;}public static class TrustAllHostnameVerifier implements HostnameVerifier {@Overridepublic boolean verify(String hostname, SSLSession session) {return true;}}}2、封装
package com.kaiya.mvp.npm_ar.utils;import android.app.Application;
import android.content.Context;
import android.transition.TransitionManager;import com.lzy.okgo.OkGo;
import com.lzy.okgo.cookie.CookieJarImpl;
import com.lzy.okgo.cookie.store.MemoryCookieStore;
import com.lzy.okgo.interceptor.HttpLoggingInterceptor;import java.security.KeyManagementException;
import java.security.NoSuchAlgorithmException;
import java.security.SecureRandom;
import java.security.cert.CertificateException;
import java.security.cert.X509Certificate;
import java.util.concurrent.TimeUnit;
import java.util.logging.Level;import javax.net.ssl.HostnameVerifier;
import javax.net.ssl.SSLContext;
import javax.net.ssl.SSLSession;
import javax.net.ssl.TrustManager;
import javax.net.ssl.X509TrustManager;import okhttp3.OkHttpClient;/*** Created by gang.qin* Date:2024/3/20 15:41* 质量、速度、廉价,选择其中两个 --- 匿名*/
public class OkGoUtils {public static X509TrustManager xtm;public static SSLContext sslContext;public static void initOkGo(Application application){xtm = new X509TrustManager() {@Overridepublic void checkClientTrusted(X509Certificate[] x509Certificates, String s) throws CertificateException {}@Overridepublic void checkServerTrusted(X509Certificate[] x509Certificates, String s) throws CertificateException {}@Overridepublic X509Certificate[] getAcceptedIssuers() {return new X509Certificate[0];}};try {sslContext = SSLContext.getInstance("SSL");sslContext.init(null, new TrustManager[]{xtm}, new SecureRandom());} catch (NoSuchAlgorithmException e) {e.printStackTrace();} catch (KeyManagementException e) {e.printStackTrace();}HostnameVerifier DO_NOT_VERIFY = (hostname, session) -> true;//        OkGo.getInstance().init(this); //最简单的配置 什么都不需要写 全部使用默认参数OkHttpClient.Builder builder = new OkHttpClient.Builder();
//可以使用OkGo内置的log拦截器打印log,如果你觉得不好用,也可以自己写个,这个没有限制。HttpLoggingInterceptor loggingInterceptor = new HttpLoggingInterceptor("OkGo");
//log打印级别loggingInterceptor.setPrintLevel(HttpLoggingInterceptor.Level.BODY);
//log颜色级别loggingInterceptor.setColorLevel(Level.ALL);builder.addInterceptor(loggingInterceptor);//全局的读取超时时间builder.readTimeout(OkGo.DEFAULT_MILLISECONDS, TimeUnit.MILLISECONDS);
//全局的写入超时时间builder.writeTimeout(OkGo.DEFAULT_MILLISECONDS, TimeUnit.MILLISECONDS);
//全局的连接超时时间builder.connectTimeout(OkGo.DEFAULT_MILLISECONDS, TimeUnit.MILLISECONDS);/**  connectTimeout:指客户端和服务器 建立通道 的时间writeTimeout:客户端把数据写出去需要的时间readTimeout:客户端等待服务器返回数据的时间* *///使用内存保持cookie,app退出后,cookie消失builder.cookieJar(new CookieJarImpl(new MemoryCookieStore()));if(sslContext != null){builder.sslSocketFactory(sslContext.getSocketFactory(),xtm).hostnameVerifier(DO_NOT_VERIFY).build();}else{MyLog.e("mylog","过滤器出错!");}OkGo.getInstance().init(application)//必须调用初始化.setOkHttpClient(builder.build())  //建议设置OkHttpClient,不设置将使用默认的.setRetryCount(1); //超时重连,本身1次,我这边设置1次,总共2次访问}public static OkHttpClient initOkhttp(){OkHttpClient client = new OkHttpClient.Builder().sslSocketFactory(TrustAllCerts.createSSLSocketFactory()).hostnameVerifier(new TrustAllCerts.TrustAllHostnameVerifier()).build();return client;}
}
POST请求
private static void okgoPost(String method, HashMap<String,String> hashMap, OkGoCallback callback){OkGo.<String>post(getIP()+method).params(hashMap).execute(new StringCallback() {@Overridepublic void onSuccess(Response<String> response) {callback.callback(response.body());}});}
下载
OkGo.<File>get(uploadUrl).tag(this)//.headers("header1", "headerValue1")////.params("param1", "paramValue1")//.execute(new FileCallback(saveFilePath,saveName) {@Overridepublic void onStart(com.lzy.okgo.request.base.Request<File, ? extends com.lzy.okgo.request.base.Request> request) {super.onStart(request);MyLog.e("mylog","开始下载");}@Overridepublic void onSuccess(com.lzy.okgo.model.Response<File> response) {progress.getProgress(100,"success");}@Overridepublic void onError(com.lzy.okgo.model.Response<File> response) {super.onError(response);progress.getProgress(-1,"下载出错!");}@Overridepublic void downloadProgress(com.lzy.okgo.model.Progress pp) {super.downloadProgress(pp);int ppi = (int)(pp.fraction * 100);MyLog.e("mylog","progress:"+ppi);progress.getProgress(ppi,"");}});
网络请求框架-OkHttp
引入包
implementation 'com.squareup.okhttp3:okhttp:4.10.0'
封装
TrustAllCerts类 在OkGo中 。
private static String okhttp(String method , String json){MyLog.e("mylog-url",getIP()+method);OkHttpClient client = new OkHttpClient.Builder().sslSocketFactory(TrustAllCerts.createSSLSocketFactory()) //绕过https.hostnameVerifier(new TrustAllCerts.TrustAllHostnameVerifier()) //绕过https.build();RequestBody body = RequestBody.create(json, JSON);Request request = new Request.Builder().url( getIP()+method ).post(body).build();try{Response response = client.newCall(request).execute();return Objects.requireNonNull(response.body()).string();}catch (Exception e){MyLog.e("mylog","error:\r\n"+e.getMessage());return "error:\r\n"+e.getMessage();}}
调用
GetList list = new GetList(flightDate,flightNo,sourceAirport, myApplication.getAppIp()); //参数类
//list.toString() 为 类转json字符串
String response = okhttp(GET_LIST,list.toString());
下载
/**** @param uploadUrl 下载路径* @param saveFilePath 保存路径* @param saveName 保存文件名 ,如 XXX.apk* @param progress 回调函数,获取下载进度*/public void downloadApk(String uploadUrl,String saveFilePath,String saveName,Progress progress) {// 创建OkHttpClient并配置自定义的TrustManagerOkHttpClient client = new OkHttpClient.Builder().sslSocketFactory(TrustAllCerts.createSSLSocketFactory()).hostnameVerifier(new TrustAllCerts.TrustAllHostnameVerifier()).build();Request request = new Request.Builder().url(uploadUrl).build();Call call = client.newCall(request);call.enqueue(new Callback() {@Overridepublic void onFailure(@NotNull Call call, @NotNull IOException e) {progress.getProgress(-1,e.getMessage());}@Overridepublic void onResponse(@NotNull Call call, @NotNull Response response) throws IOException {//3824043long fileMax = response.body().contentLength();InputStream inputStream = Objects.requireNonNull(response.body()).byteStream();File target = new File(saveFilePath,saveName);FileOutputStream fileOutputStream = new FileOutputStream(target);try {byte[] buffer = new byte[2048];int len;while ((len = inputStream.read(buffer)) != -1) {fileOutputStream.write(buffer, 0, len);int p = (int) ((target.length() * 100) / fileMax);progress.getProgress(p,"");}fileOutputStream.flush();} catch (IOException e) {e.printStackTrace();}}});}
相关文章:

Android 封装的工具类
文章目录 日志封装类-MyLog线程封装类-LocalThreadPools自定义进度条-LoadProgressbar解压缩类-ZipUtils本地数据库类-MySQLiteHelper访问webservice封装-HttpUtilsToolbar封装类-MaterialToolbar网络请求框架-OkGo网络请求框架-OkHttp 日志封装类-MyLog 是对android log的封装…...
linux下线程分离属性
linux下线程分离属性 一、线程的属性---分离属性二、线程属性设置2.1 线程创建前设置分离属性2.2 线程创建后设置分离属性 一、线程的属性—分离属性 什么是分离属性? 首先分离属性是线程的一个属性,有了分离属性的线程,不需要别的线程去接合…...
Leetcode 208. 实现 Trie (前缀树)
心路历程: 一道题干进去了一个下午,单纯从解题角度可以直接用python的集合就很简单地解决(不知道是不是因为python底层的set()类)。后来从网上看到这道题应该从前缀树的角度去做,于是花了半个多小时基于字典做了前缀树…...
蓝桥杯练习题——健身大调查
在浏览器中预览 index.html 页面效果如下: 目标 完成 js/index.js 中的 formSubmit 函数,用户填写表单信息后,点击蓝色提交按钮,表单项隐藏,页面显示用户提交的表单信息(在 id 为 result 的元素显示&#…...

React——组件通讯
组件通讯介绍 组件中的状态是私有的,组件的状态只能在组件内部使用,无法直接在组件外使用,但是我们在日常开发中,通常会把相似、功能完整的应用才分成组件(工厂模式)利于我们的开发,而不同组件直…...
php闭包应用
laravel 路由 bingTo 把路由URL映射到匿名回调函数上,框架会把匿名回调函数绑定到应用对象上,这样在匿名函数中就可以使用$this关键字引用重要的应用对象。Illuminate\Support\Traits\Macroable的__call方法。 自己写一个简单的demo: <?php <?…...

基于python+vue的OA公文发文管理系统flask-django-php-nodejs
系统根据现有的管理模块进行开发和扩展,采用面向对象的开发的思想和结构化的开发方法对OA公文发文管理的现状进行系统调查。采用结构化的分析设计,该方法要求结合一定的图表,在模块化的基础上进行系统的开发工作。在设计中采用“自下而上”的…...

脉冲变压器电感的工艺结构原理及选型参数总结
🏡《总目录》 目录 1,概述2,工作原理3,结构特点3.1,铁心结构3.2,铁心材料3.3,绕组4,工艺流程4.1,准备铁芯4.2,绕制线圈4.3,安装线圈4.4,固定线圈4.5,绝缘处理4.6,高压脉冲引出...

java中Arrays介绍及常用方法
在Java中,java.util.Arrays类是一个提供了各种操作数组的工具类。该类提供了一系列静态方法来对数组进行排序、搜索、填充、复制等操作。下面是对Arrays类的介绍以及常用方法的说明: toString()方法:将数组转换为字符串形式并返回,方便输出数…...

CTF题型 Http请求走私总结Burp靶场例题
CTF题型 Http请求走私总结&靶场例题 文章目录 CTF题型 Http请求走私总结&靶场例题HTTP请求走私HTTP请求走私漏洞原理分析为什么用前端服务器漏洞原理界定标准界定长度 重要!!!实验环境前提POST数据包结构必要结构快速判断Http请求走私类型时间延迟CL-TETE-CL 练习例题C…...
Nginx 的安装、启动和关闭
文章目录 一、背景说明二、Nginx 的安装2.1、依赖的安装2.2、Nginx 安装2.3、验证安装 三、启动 Nginx3.1、普通启动3.2、如何判断nginx已启动3.3、通过配置启动3.4、设置开机启动 四、关闭 Nginx4.1、优雅地关闭4.2、快速关闭4.3、只关闭主进程4.4、使用nginx关闭服务 五、重启…...
、excel操作封装)
python 操作excel(openpyxl.load_workbook)、excel操作封装
操作excel 其他的库: xlrd xlwt : 过时了,只能操作xls后缀的文件。pandas:大数据测试 数据分析项目会用。 openpyxl:第三方库 支持的格式有:.xlsx、.xlsm、.xltx、.xltm,l不支持.xls文件格式…...

MySQL系统参数配置实战:生产环境优化
引言: MySQL作为广泛应用的关系型数据库,其系统参数配置直接影响着数据库的性能、稳定性以及资源利用率。本文旨在深入探讨MySQL的核心系统参数,并提供一份面向生产环境的配置建议,以帮助运维人员更好地优化数据库性能࿰…...

判断列表中每一个元素的个数
1.使用循环 nums [1, 1, 1, 2, 2, 3]# 构建一个空字典来存储元素和它们出现的次数 count_dict {}# 遍历列表,更新字典中每个元素出现的次数 for num in nums:if num in count_dict:count_dict[num] 1else:count_dict[num] 1# 输出统计结果 for num, count in c…...
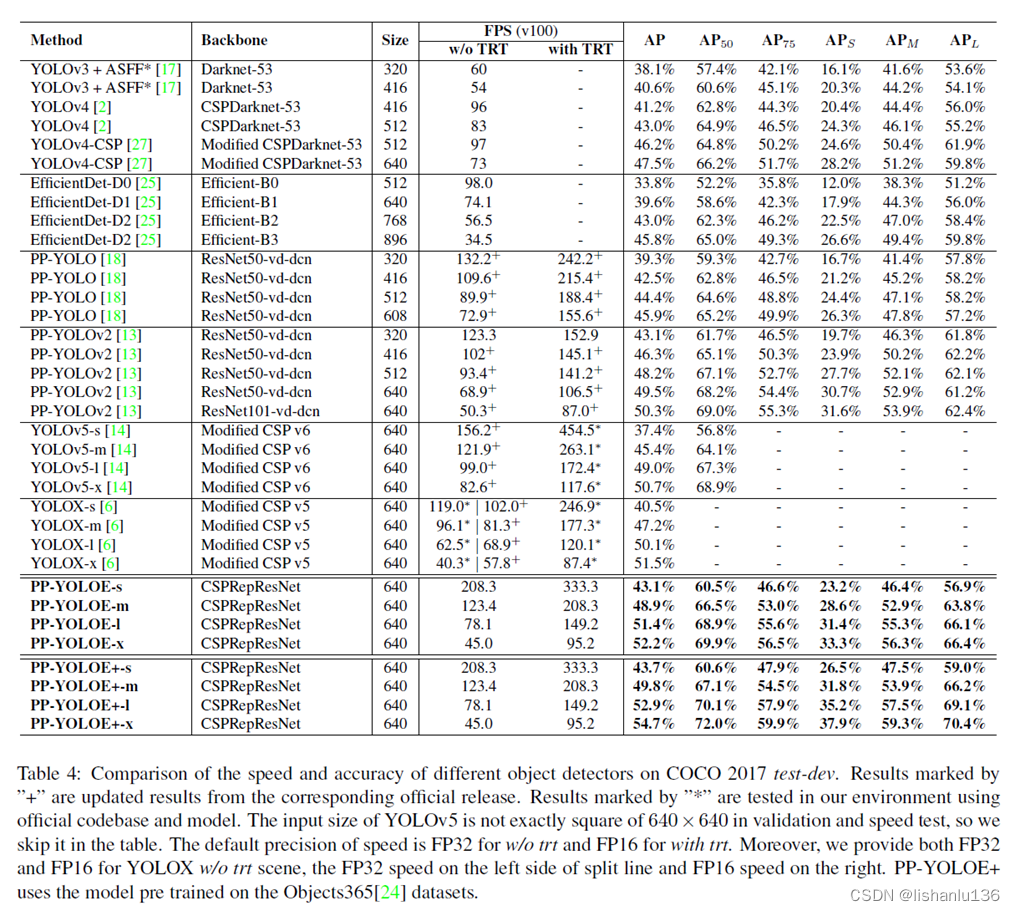
目标检测——PP-YOLOE算法解读
PP-YOLO系列,均是基于百度自研PaddlePaddle深度学习框架发布的算法,2020年基于YOLOv3改进发布PP-YOLO,2021年发布PP-YOLOv2和移动端检测算法PP-PicoDet,2022年发布PP-YOLOE和PP-YOLOE-R。由于均是一个系列,所以放一起解…...

每日一题 --- 螺旋矩阵 II[力扣][Go]
螺旋矩阵 II 题目:59. 螺旋矩阵 II - 力扣(LeetCode) 给你一个正整数 n ,生成一个包含 1 到 n2 所有元素,且元素按顺时针顺序螺旋排列的 n x n 正方形矩阵 matrix 。 示例 1: 输入:n 3 输出…...
C语言自定义类型结构体
variable adj.易变的,多变的;时好时坏的;可变的,可调节的; (数)(数字)变量的;(植,动)变异的,变型的࿱…...
【SpringBoot框架篇】37.使用gRPC实现远程服务调用
文章目录 RPC简介gPRC简介protobuf1.文件编写规范2.字段类型3.定义服务(Services) 在Spring Boot中使用grpc1.父工程pom配置2.grpc-api模块2.1.pom配置2.2.proto文件编写2.3.把proto文件编译成class文件 3.grpc-server模块3.1.pom文件和application.yaml3.2.实现grpc-api模块的…...

投资的三个匹配
许多人亏钱都是犯了同样错误,要么对投资的预期过高,要么是投资期限不匹配,要么是波动承受能力不匹配。投资想要赚钱,先解决匹配问题。 1.预期收益率要匹配 就是明确自己做投资,每年想赚多少钱。凡事都要有个目标&…...
[Netty实践] 请求响应同步实现
目录 一、介绍 二、依赖引入 三、公共部分实现 四、server端实现 五、client端实现 六、测试 一、介绍 本片文章将实现请求响应同步,什么是请求响应同步呢?就是当我们发起一个请求时,希望能够在一定时间内同步(线程阻塞&am…...

钱钟书《围城》第1-5章阅读笔记:一场关于人生困境的提前预演
前言 钱钟书先生的《围城》被誉为"新儒林外史",是中国现代文学史上风格独特的讽刺经典。这部创作于20世纪40年代的长篇小说,以抗战初期为背景,通过主人公方鸿渐的人生轨迹,深刻揭示了知识分子群体的精神困境与人性弱点。…...

为什么92%的团队用DeepSeek生成方案仍需人工重写?揭秘缺失的2个元认知层与1套校验协议
更多请点击: https://intelliparadigm.com 第一章:为什么92%的团队用DeepSeek生成方案仍需人工重写?揭秘缺失的2个元认知层与1套校验协议 当团队将DeepSeek-R1或DeepSeek-VL模型用于技术方案生成时,表面看响应迅速、逻辑连贯&…...

告别CAJ格式困扰:3分钟学会用开源工具将知网文献转为PDF
告别CAJ格式困扰:3分钟学会用开源工具将知网文献转为PDF 【免费下载链接】caj2pdf Convert CAJ (China Academic Journals) files to PDF. 转换中国知网 CAJ 格式文献为 PDF。佛系转换,成功与否,皆是玄学。 项目地址: https://gitcode.com/…...

厨房空调技术白皮书:从风冷到水冷,制冷系统在厨房场景中的工程化演进
厨房空调是暖通行业近三年技术迭代最密集的细分品类。从最初的"凉霸"(本质是风扇),到风冷分体式,再到水冷一体式,每代技术都在解决上一代没有覆盖的用户痛点。本文以工程技术视角,梳理四代厨房制…...

Web渗透测试能力成长地图:从工具使用到漏洞认知跃迁
1. 这不是工具清单,而是一张Web渗透测试的“能力成长地图”你刚点开这篇文章,大概率正站在两个路口之间:一边是网上铺天盖地的“十大免费扫描器推荐”,点进去全是截图下载链接一句“一键扫漏洞”,结果装完跑两下&#…...

同步带装配工艺要点与损伤防控策略
一、引言在工业精密传动系统中,盖茨同步带凭借高精度、高效率、无滑差的优势,成为自动化设备、精密机床、输送产线的核心传动部件。多数企业在运维中,普遍将同步带异常磨损、断齿、断带等故障归咎于工况恶劣或产品质量问题,却忽略…...
的原理、演进与未来)
车载诊断系统(OBD)的原理、演进与未来
本文约8,167字,建议收藏阅读 作者 | 北湾南巷 出品 | 汽车电子与软件 引 言 在现代汽车中,越来越多的故障不再表现为明显的机械损坏,而是以“亮灯”“报码”“性能异常”等电子信号的形式出现。发动机为什么亮起故障灯?排放是否达…...

告别Postman!用APIfox搞定接口测试+自动化,这份保姆级教程带你从环境配置到报告生成
从Postman到APIfox:接口测试自动化的高效迁移指南如果你还在为接口测试中的重复劳动和多环境切换头疼,是时候考虑从Postman迁移到APIfox了。作为一名经历过这个转型过程的开发者,我想分享一些实战经验,帮助你平滑过渡并最大化利用…...

终极免费音乐解锁工具:5步轻松解密你的加密音乐文件
终极免费音乐解锁工具:5步轻松解密你的加密音乐文件 【免费下载链接】unlock-music 在浏览器中解锁加密的音乐文件。原仓库: 1. https://github.com/unlock-music/unlock-music ;2. https://git.unlock-music.dev/um/web 项目地址: https:/…...

Nacos CVE-2021-29441漏洞深度解析:User-Agent绕过与鉴权失效
1. 这个漏洞不是“改个Header就能登录”,而是Nacos鉴权体系的一道裂缝CVE-2021-29441这个编号在Nacos社区里曾被轻描淡写地归为“低危”,直到我接手一个金融客户线上告警——他们的Nacos集群在凌晨三点被批量创建了37个高权限用户,所有操作日…...