UE5数字孪生系列笔记(三)
C++创建Pawn类玩家
- 创建一个GameMode蓝图用来加载我们自定义的游戏Mode
- 新建一个Pawn的C++,
MyCharacter类作为玩家,新建一个相机组件与相机臂组件,box组件作为根组件
// Fill out your copyright notice in the Description page of Project Settings.#pragma once#include "CoreMinimal.h"
#include "GameFramework/Pawn.h"
#include "MyCharacter.generated.h"UCLASS()
class CITYTWIN_API AMyCharacter : public APawn
{GENERATED_BODY()public:// Sets default values for this pawn's propertiesAMyCharacter();//box作为根组件UPROPERTY(EditAnywhere, BlueprintReadOnly, Category = "Camera")class UBoxComponent* CollisionBox;//相机组件UPROPERTY(EditAnywhere, BlueprintReadOnly, Category = "Camera")class UCameraComponent* FollowCamera;//相机臂组件UPROPERTY(EditAnywhere, BlueprintReadOnly, Category = "Camera")class USpringArmComponent* CameraBoom;protected:// Called when the game starts or when spawnedvirtual void BeginPlay() override;public: // Called every framevirtual void Tick(float DeltaTime) override;// Called to bind functionality to inputvirtual void SetupPlayerInputComponent(class UInputComponent* PlayerInputComponent) override;};- 声明创建组件,硬编码一些基本属性
// Fill out your copyright notice in the Description page of Project Settings.#include "MyCharacter.h"
#include "Components/BoxComponent.h"
#include "Camera/CameraComponent.h"
#include "GameFramework/SpringArmComponent.h"// Sets default values
AMyCharacter::AMyCharacter()
{// Set this pawn to call Tick() every frame.  You can turn this off to improve performance if you don't need it.PrimaryActorTick.bCanEverTick = true;CollisionBox = CreateDefaultSubobject<UBoxComponent>(TEXT("CollisionBox"));CollisionBox->SetupAttachment(GetRootComponent());CameraBoom = CreateDefaultSubobject<USpringArmComponent>(TEXT("CameraBoom"));CameraBoom->SetupAttachment(CollisionBox);CameraBoom->TargetArmLength = 1500.f;CameraBoom->bUsePawnControlRotation = false;CameraBoom->bEnableCameraLag = true;//摄像机臂平滑CameraBoom->bEnableCameraRotationLag = true;//启用相机旋转延迟CameraBoom->bDoCollisionTest = false;//关闭摄像机臂碰撞FollowCamera = CreateDefaultSubobject<UCameraComponent>(TEXT("FollowCamera"));FollowCamera->SetupAttachment(CameraBoom);FollowCamera->bUsePawnControlRotation = false;
}// Called when the game starts or when spawned
void AMyCharacter::BeginPlay()
{Super::BeginPlay();}// Called every frame
void AMyCharacter::Tick(float DeltaTime)
{Super::Tick(DeltaTime);}// Called to bind functionality to input
void AMyCharacter::SetupPlayerInputComponent(UInputComponent* PlayerInputComponent)
{Super::SetupPlayerInputComponent(PlayerInputComponent);}
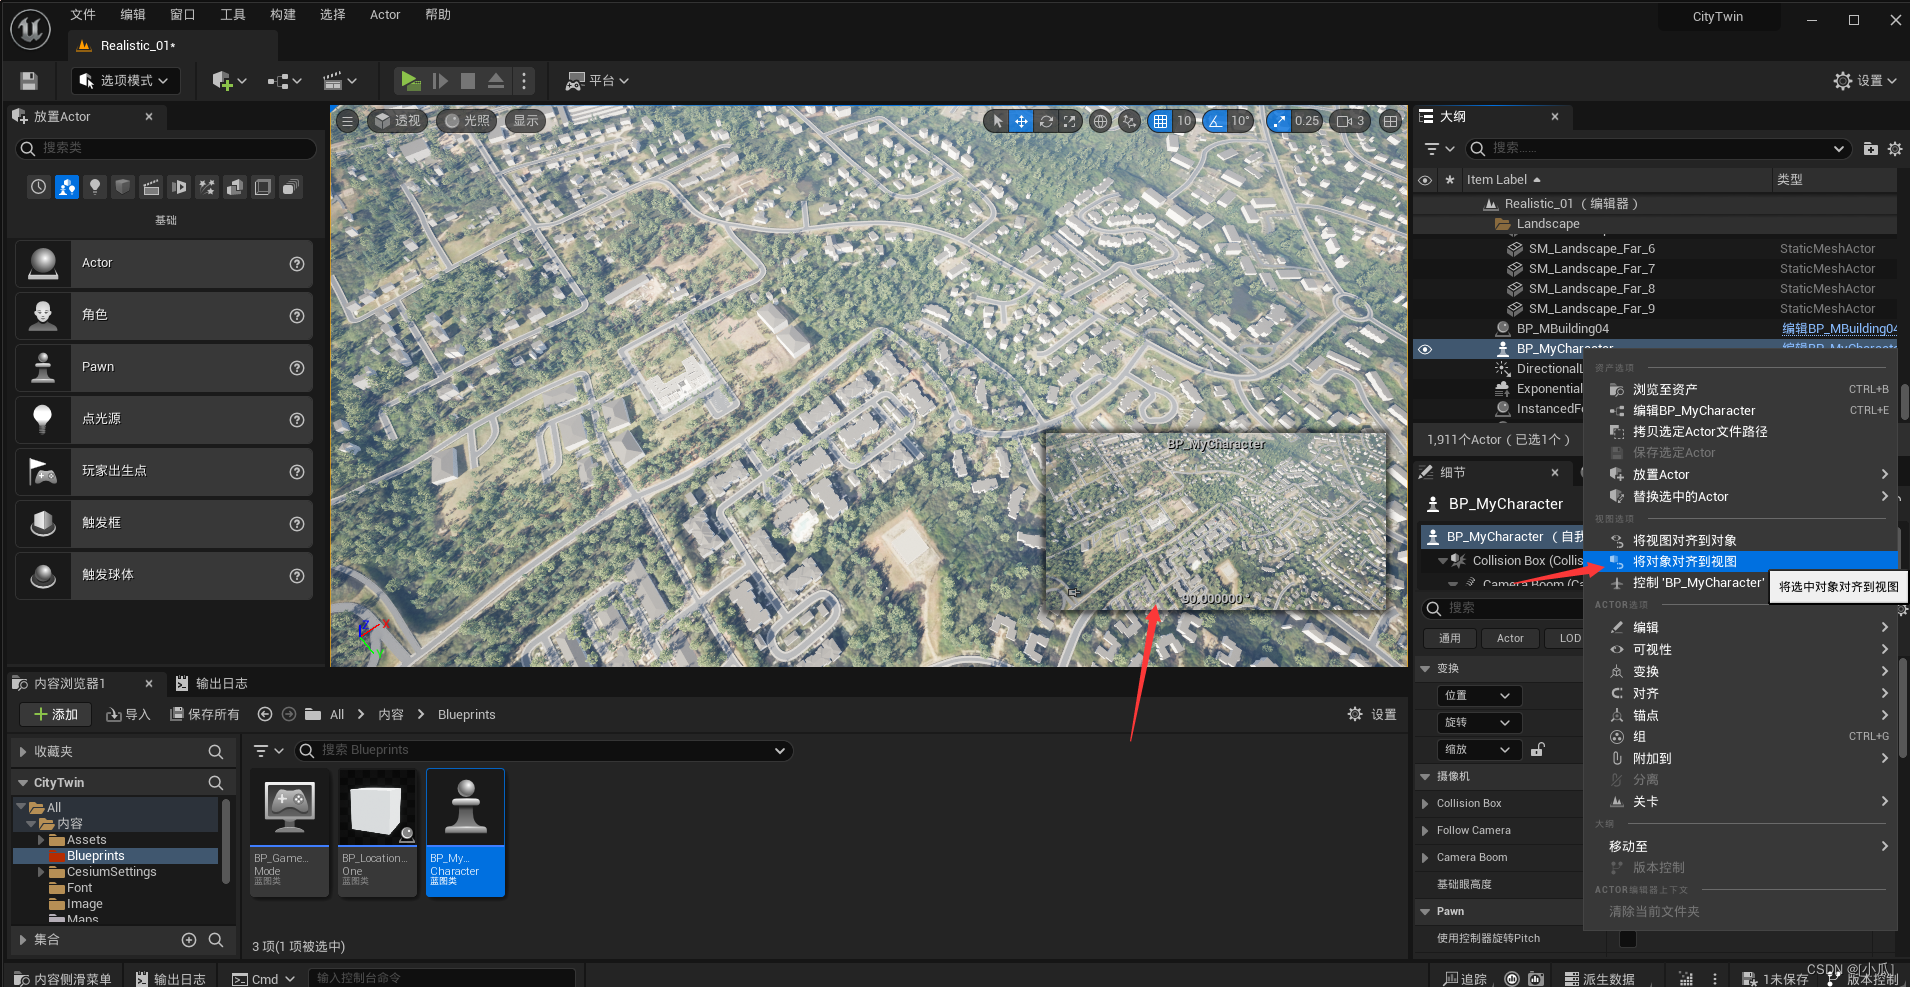
- 创建这个Pawn类的蓝图进行之前登录页面动画的视角旋转方向问题的解决
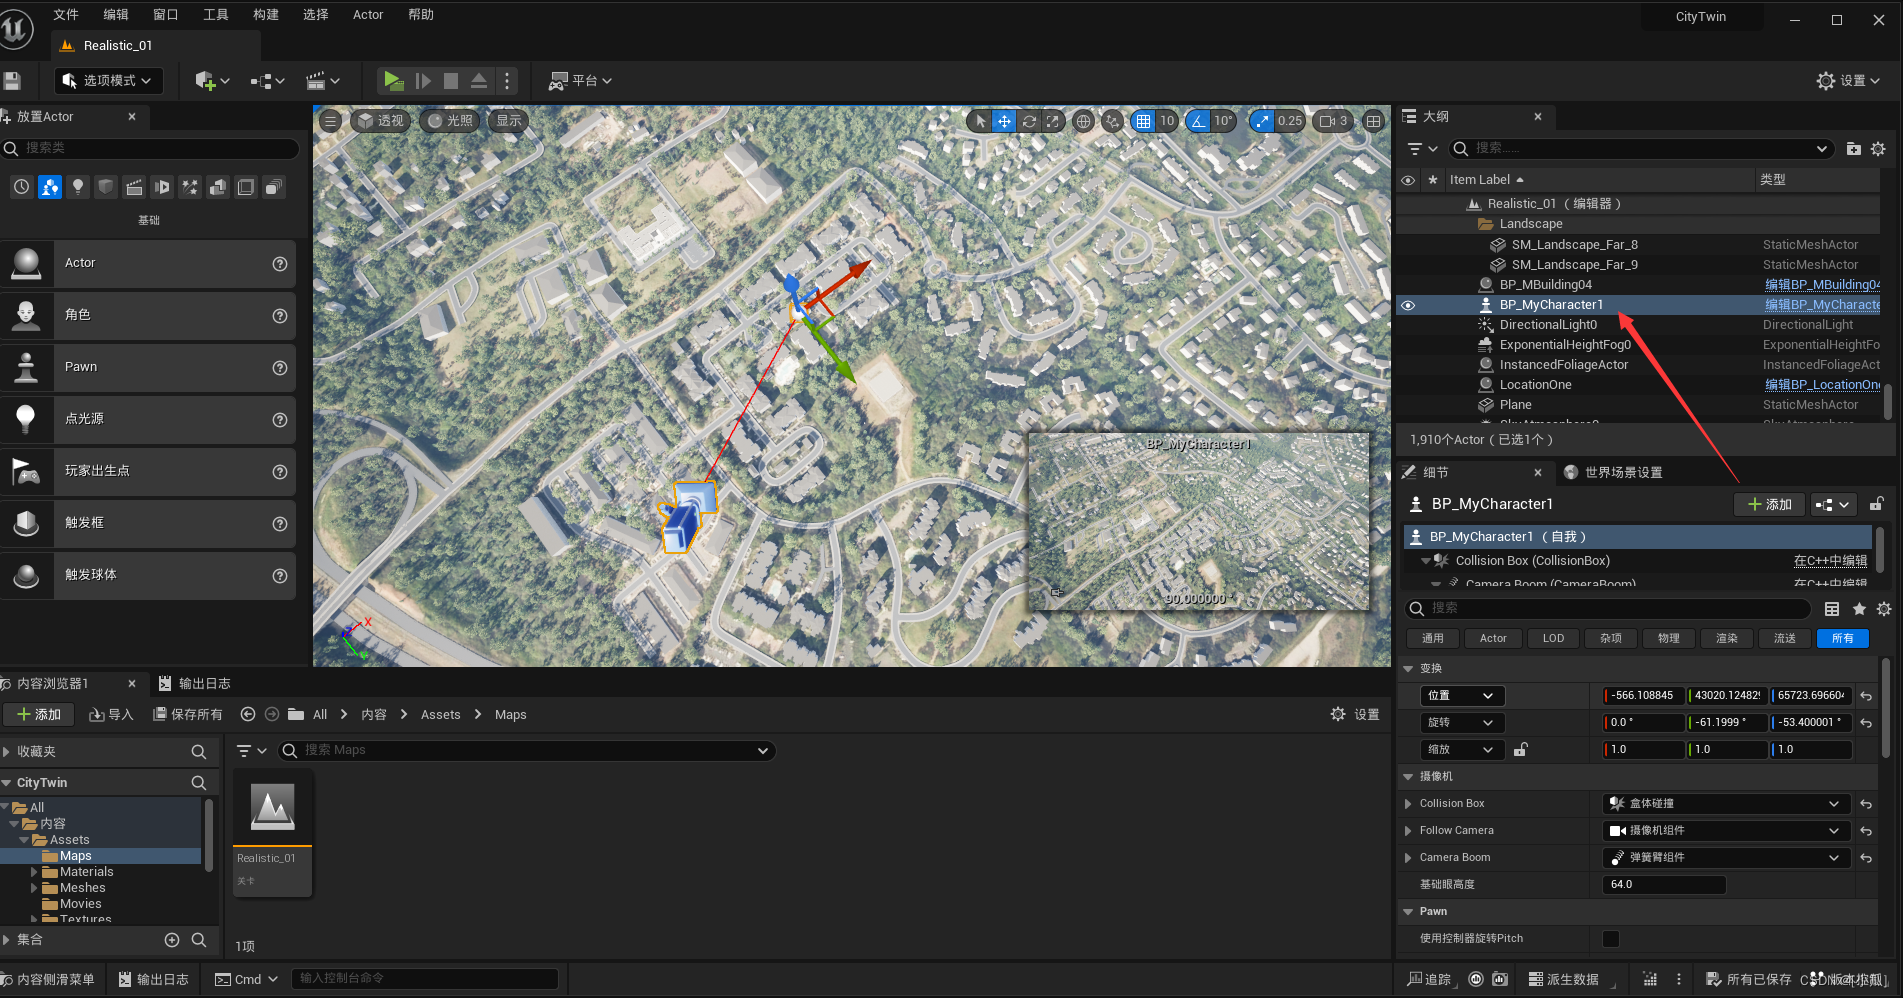
- 首先将蓝图生成对齐到视角
- 将Pawn类自动接收玩家0

- 然后删除PlayerStart
- 运行结果
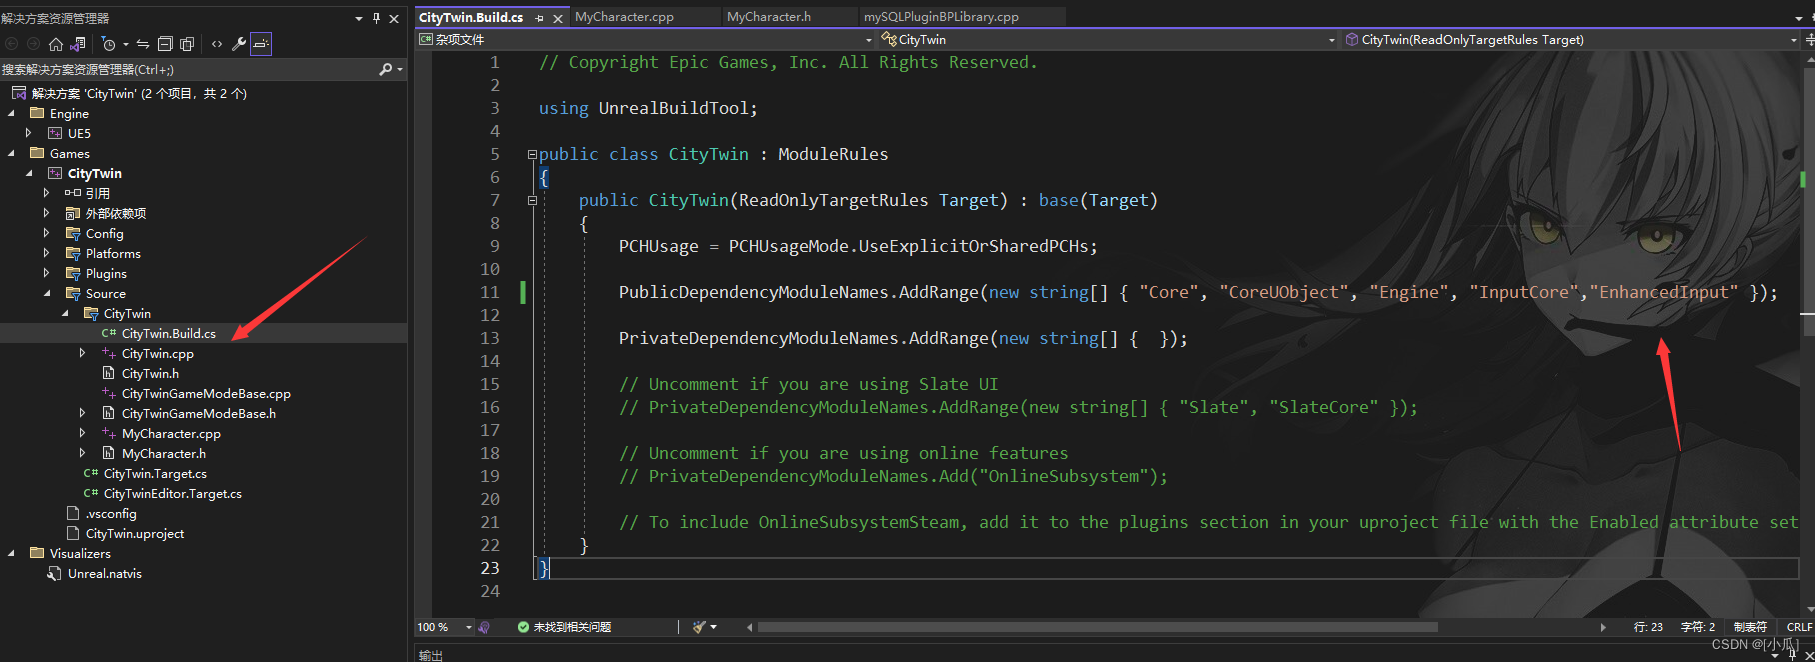
移动增强输入系统
- 在项目建立.cs文件中添加这个模块
- 绑定增强输入系统操作
MyCharacter.h
// Fill out your copyright notice in the Description page of Project Settings.#pragma once#include "CoreMinimal.h"
#include "GameFramework/Pawn.h"
#include "../../../../UE_5.2.1/UE_5.2/Engine/Plugins/EnhancedInput/Source/EnhancedInput/Public/InputActionValue.h"
#include "MyCharacter.generated.h"UCLASS()
class CITYTWIN_API AMyCharacter : public APawn
{GENERATED_BODY()public:// Sets default values for this pawn's propertiesAMyCharacter();//box作为根组件UPROPERTY(EditAnywhere, BlueprintReadOnly, Category = "Camera")class UBoxComponent* CollisionBox;//相机组件UPROPERTY(EditAnywhere, BlueprintReadOnly, Category = "Camera")class UCameraComponent* FollowCamera;//相机臂组件UPROPERTY(EditAnywhere, BlueprintReadOnly, Category = "Camera")class USpringArmComponent* CameraBoom;//绑定映射UPROPERTY(EditAnywhere, BlueprintReadOnly, Category = "Input")class UInputMappingContext* MappingContext;//移动绑定UPROPERTY(EditAnywhere, BlueprintReadOnly, Category = "Input")class UInputAction* LeftButtonAction;protected:// Called when the game starts or when spawnedvirtual void BeginPlay() override;//鼠标按下操作事件void LeftMouseDown(const FInputActionValue& value);void LeftMouseUp(const FInputActionValue& value);public:	// Called every framevirtual void Tick(float DeltaTime) override;// Called to bind functionality to inputvirtual void SetupPlayerInputComponent(class UInputComponent* PlayerInputComponent) override;};
MyCharacter.cpp
// Fill out your copyright notice in the Description page of Project Settings.
#include "MyCharacter.h"
#include "Components/BoxComponent.h"
#include "Camera/CameraComponent.h"
#include "GameFramework/SpringArmComponent.h"
#include "EnhancedInputSubsystems.h"
#include "EnhancedInputComponent.h"// Sets default values
AMyCharacter::AMyCharacter()
{// Set this pawn to call Tick() every frame.  You can turn this off to improve performance if you don't need it.PrimaryActorTick.bCanEverTick = true;CollisionBox = CreateDefaultSubobject<UBoxComponent>(TEXT("CollisionBox"));CollisionBox->SetupAttachment(GetRootComponent());CameraBoom = CreateDefaultSubobject<USpringArmComponent>(TEXT("CameraBoom"));CameraBoom->SetupAttachment(CollisionBox);CameraBoom->TargetArmLength = 1500.f;CameraBoom->bUsePawnControlRotation = false;CameraBoom->bEnableCameraLag = true;//摄像机臂平滑CameraBoom->bEnableCameraRotationLag = true;//启用相机旋转延迟CameraBoom->bDoCollisionTest = false;//关闭摄像机臂碰撞FollowCamera = CreateDefaultSubobject<UCameraComponent>(TEXT("FollowCamera"));FollowCamera->SetupAttachment(CameraBoom);FollowCamera->bUsePawnControlRotation = false;
}
// Called when the game starts or when spawned
void AMyCharacter::BeginPlay()
{Super::BeginPlay();APlayerController* PlayerController = Cast<APlayerController>(Controller);if (PlayerController){UEnhancedInputLocalPlayerSubsystem* Subsystem =ULocalPlayer::GetSubsystem<UEnhancedInputLocalPlayerSubsystem>(PlayerController->GetLocalPlayer());if (Subsystem){Subsystem->AddMappingContext(MappingContext, 0);}}
}
void AMyCharacter::LeftMouseDown(const FInputActionValue& value)
{
}void AMyCharacter::LeftMouseUp(const FInputActionValue& value)
{
}
// Called every frame
void AMyCharacter::Tick(float DeltaTime)
{Super::Tick(DeltaTime);}
// Called to bind functionality to input
void AMyCharacter::SetupPlayerInputComponent(UInputComponent* PlayerInputComponent)
{Super::SetupPlayerInputComponent(PlayerInputComponent);UEnhancedInputComponent* EnhancedInputConponent = Cast<UEnhancedInputComponent>(PlayerInputComponent);if (EnhancedInputConponent){EnhancedInputConponent->BindAction(LeftButtonAction, ETriggerEvent::Started, this, &AMyCharacter::LeftMouseDown);EnhancedInputConponent->BindAction(LeftButtonAction, ETriggerEvent::Completed, this, &AMyCharacter::LeftMouseUp);}
}
获取鼠标位置坐标与鼠标移动后的差量
- 使用
GetMousePosition函数来获取鼠标的坐标点 - 在
MyCharacter.h中新建一个函数专门用来获取鼠标的坐标点的函数
//鼠标的坐标点FVector2D MousePos = FVector2D::ZeroVector;void GetMousePosition();
- 在
MyCharacter.cpp中实现此方法
void AMyCharacter::GetMousePosition()
{GetWorld()->GetFirstPlayerController()->GetMousePosition(MousePos.X, MousePos.Y);//打印鼠标信息到屏幕GEngine->AddOnScreenDebugMessage(-1, 1, FColor::Red, FString::Printf(TEXT("%f,%f"), MousePos.X, MousePos.Y));
}- 获取鼠标变化差量,当我们鼠标变化时,我们要获取到这个变化的差量值,我们可以定义两个变量,一个变量存储
用来作为变化之前的绝对位置减去变化之后的当前绝对位置,然后另外两个变量来存储变化之后当前的绝对位置
	//鼠标的坐标点FVector2D MousePos = FVector2D::ZeroVector;//记录的鼠标变化差量FVector2D MouseVariationDifference = FVector2D::ZeroVector;//记录变化之后的鼠标坐标float MouseX = 0.f;float MouseY = 0.f;void AMyCharacter::GetMousePosition()
{//获取当前鼠标移动坐标GetWorld()->GetFirstPlayerController()->GetMousePosition(MousePos.X, MousePos.Y);//记录的鼠标变化差量MouseVariationDifference = MousePos - FVector2D(MouseX, MouseY);//记录变化后的鼠标位置MouseX = MousePos.X;MouseY = MousePos.Y;//打印鼠标信息到屏幕GEngine->AddOnScreenDebugMessage(1, 1, FColor::Red, FString::Printf(TEXT("%f,%f"), MousePos.X, MousePos.Y));GEngine->AddOnScreenDebugMessage(2, 1, FColor::Yellow, FString::Printf(TEXT("%f,%f"), MouseVariationDifference.X, MouseVariationDifference.Y));
}
设置滑动鼠标实现旋转视角效果
- 通过获取的移动的鼠标差量进行鼠标滑动移动视角
- 新建一个鼠标视角移动速度变量,用来控制鼠标实现视角旋转的移动速度
//鼠标视角移动速度float MouseSpeed = 0.1f;
- 新建一个鼠标视角移动函数,函数逻辑
ActorRotator.Pitch + (MouseVariationDifference.Y * MouseSpeed):Pitch是虚幻中的抬头与低头,在直角坐标系中用来Y来描述ActorRotator.Yaw + (MouseVariationDifference.X * MouseSpeed * -1.f):Yaw是摇头转向,在直角坐标系中用来X来描述,实践中得乘以-1使用,估计是因为虚幻默认以右方向为正方向的原因
	//鼠标移动视角移动事件void MouseMove();void AMyCharacter::MouseMove()
{FRotator ActorRotator = GetActorRotation();FRotator NewActorRotator = FRotator(ActorRotator.Pitch + (MouseVariationDifference.Y * MouseSpeed),ActorRotator.Yaw + (MouseVariationDifference.X * MouseSpeed * -1.f), ActorRotator.Roll);SetActorRotation(NewActorRotator);
}
- 调用函数
// Called every frame
void AMyCharacter::Tick(float DeltaTime)
{Super::Tick(DeltaTime);//获取鼠标坐标GetMousePosition();//鼠标移动视角MouseMove();}
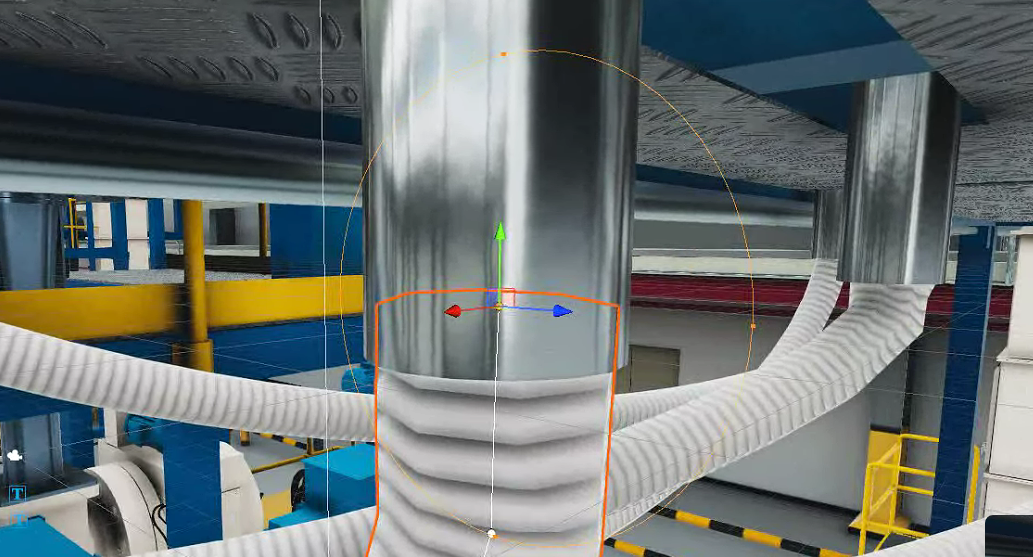
- 运行结果
鼠标左键视觉拖动效果
- 将滑动鼠标实现旋转视角效果设置为鼠标左键按下后才能实现
- 添加一个布尔变量用来标识是否要开启鼠标旋转视角事情
	//标识鼠标左键是否按下bool bIsMouseLeftDown = false;void AMyCharacter::MouseMove()
{if (bIsMouseLeftDown){FRotator ActorRotator = GetActorRotation();//限制一下视角度数带来的错误FRotator NewActorRotator = FRotator(FMath::Clamp((ActorRotator.Pitch + (MouseVariationDifference.Y * MouseSpeed)),-80.f,-10.f),ActorRotator.Yaw + (MouseVariationDifference.X * MouseSpeed * -1.f), ActorRotator.Roll);SetActorRotation(NewActorRotator);}
}void AMyCharacter::LeftMouseDown(const FInputActionValue& value)
{bIsMouseLeftDown = true;
}void AMyCharacter::LeftMouseUp(const FInputActionValue& value)
{bIsMouseLeftDown = false;
}
鼠标右键视角移动效果
- 添加右键的输入操作
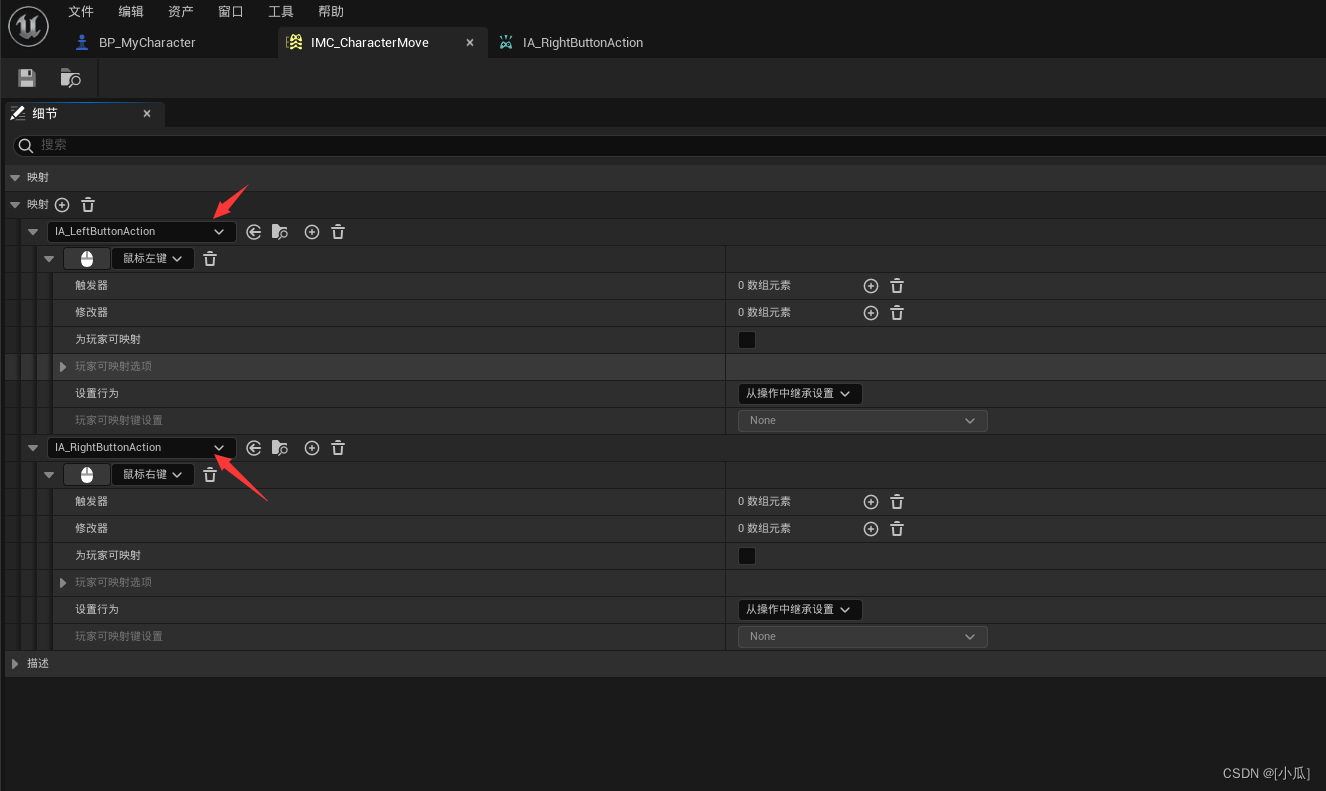
- 新建右键是否按下的标识布尔变量,创建右键操作的输入行为,即绑定函数
	//移动绑定UPROPERTY(EditAnywhere, BlueprintReadOnly, Category = "Input")class UInputAction* RightButtonAction;//标识鼠标右键是否按下bool bIsMouseRightDown = false;// Called to bind functionality to input
void AMyCharacter::SetupPlayerInputComponent(UInputComponent* PlayerInputComponent)
{Super::SetupPlayerInputComponent(PlayerInputComponent);UEnhancedInputComponent* EnhancedInputConponent = Cast<UEnhancedInputComponent>(PlayerInputComponent);if (EnhancedInputConponent){EnhancedInputConponent->BindAction(LeftButtonAction, ETriggerEvent::Started, this, &AMyCharacter::LeftMouseDown);EnhancedInputConponent->BindAction(LeftButtonAction, ETriggerEvent::Completed, this, &AMyCharacter::LeftMouseUp);EnhancedInputConponent->BindAction(RightButtonAction, ETriggerEvent::Started, this, &AMyCharacter::RightMouseDown);EnhancedInputConponent->BindAction(RightButtonAction, ETriggerEvent::Completed, this, &AMyCharacter::RightMouseUp);}
}void AMyCharacter::RightMouseDown(const FInputActionValue& value)
{bIsMouseRightDown = true;
}void AMyCharacter::RightMouseUp(const FInputActionValue& value)
{bIsMouseRightDown = false;
}- 新建鼠标右键移动速度变量,编写鼠标右键移动逻辑
	//鼠标右键移动速度float MouseRightSpeed = 100.f;void AMyCharacter::MouseMove()
{if (bIsMouseLeftDown){FRotator ActorRotator = GetActorRotation();//限制一下视角度数带来的错误FRotator NewActorRotator = FRotator(FMath::Clamp((ActorRotator.Pitch + (MouseVariationDifference.Y * MouseSpeed)),-80.f,-10.f),ActorRotator.Yaw + (MouseVariationDifference.X * MouseSpeed * -1.f), ActorRotator.Roll);SetActorRotation(NewActorRotator);}if (bIsMouseRightDown){FVector SpeedMove = FVector(MouseVariationDifference.Y * MouseRightSpeed,-1.0 * MouseRightSpeed * MouseVariationDifference.X, 0);AddActorLocalOffset(SpeedMove);//限制z轴FVector Location = GetActorLocation();FVector NewLocation = FVector(Location.X, Location.Y, 4520);SetActorLocation(NewLocation);}
}
鼠标中键控制摄像机臂长度,缩放地图效果
- 新建鼠标中键的操作行为,添加一个鼠标中键移动速度变量,然后在鼠标中键操作事件中完成逻辑,逻辑是获取相机臂的长度,用获取鼠标滚轮的量值乘以鼠标中键移动速度变量被获取的相机臂原长度减去
	//移动绑定UPROPERTY(EditAnywhere, BlueprintReadOnly, Category = "Input")class UInputAction* MiddleButtonAction;//鼠标中键移动速度float MouseMiddleSpeed = 1000.f;void AMyCharacter::MiddleMouseSlide(const FInputActionValue& value)
{float Axis = value.Get<float>();float CameraArm = CameraBoom->TargetArmLength;//限制相机臂长度CameraBoom->TargetArmLength = FMath::Clamp((CameraArm - Axis * MouseMiddleSpeed), 1000.f, 30000.f);
}
- 运行结果
源码
MyCharacter.h
// Fill out your copyright notice in the Description page of Project Settings.#pragma once#include "CoreMinimal.h"
#include "GameFramework/Pawn.h"
#include "../../../../UE_5.2.1/UE_5.2/Engine/Plugins/EnhancedInput/Source/EnhancedInput/Public/InputActionValue.h"
#include "MyCharacter.generated.h"UCLASS()
class CITYTWIN_API AMyCharacter : public APawn
{GENERATED_BODY()public:// Sets default values for this pawn's propertiesAMyCharacter();//box作为根组件UPROPERTY(EditAnywhere, BlueprintReadOnly, Category = "Camera")class UBoxComponent* CollisionBox;//相机组件UPROPERTY(EditAnywhere, BlueprintReadOnly, Category = "Camera")class UCameraComponent* FollowCamera;//相机臂组件UPROPERTY(EditAnywhere, BlueprintReadOnly, Category = "Camera")class USpringArmComponent* CameraBoom;//绑定映射UPROPERTY(EditAnywhere, BlueprintReadOnly, Category = "Input")class UInputMappingContext* MappingContext;//移动绑定UPROPERTY(EditAnywhere, BlueprintReadOnly, Category = "Input")class UInputAction* LeftButtonAction;//移动绑定UPROPERTY(EditAnywhere, BlueprintReadOnly, Category = "Input")class UInputAction* RightButtonAction;//移动绑定UPROPERTY(EditAnywhere, BlueprintReadOnly, Category = "Input")class UInputAction* MiddleButtonAction;//鼠标的坐标点FVector2D MousePos = FVector2D::ZeroVector;//记录的鼠标变化差量FVector2D MouseVariationDifference = FVector2D::ZeroVector;//记录变化之后的鼠标坐标float MouseX = 0.f;float MouseY = 0.f;//鼠标视角移动速度float MouseSpeed = 0.1f;//鼠标右键移动速度float MouseRightSpeed = 100.f;//鼠标中键移动速度float MouseMiddleSpeed = 1000.f;//标识鼠标左键是否按下bool bIsMouseLeftDown = false;//标识鼠标右键是否按下bool bIsMouseRightDown = false;protected:// Called when the game starts or when spawnedvirtual void BeginPlay() override;//鼠标按下操作事件void LeftMouseDown(const FInputActionValue& value);void LeftMouseUp(const FInputActionValue& value);void RightMouseDown(const FInputActionValue& value);void RightMouseUp(const FInputActionValue& value);void MiddleMouseSlide(const FInputActionValue& value);//鼠标移动视角移动事件void MouseMove();public:	// Called every framevirtual void Tick(float DeltaTime) override;// Called to bind functionality to inputvirtual void SetupPlayerInputComponent(class UInputComponent* PlayerInputComponent) override;void GetMousePosition();
};
MyCharacter.cpp
// Fill out your copyright notice in the Description page of Project Settings.#include "MyCharacter.h"
#include "Components/BoxComponent.h"
#include "Camera/CameraComponent.h"
#include "GameFramework/SpringArmComponent.h"
#include "EnhancedInputSubsystems.h"
#include "EnhancedInputComponent.h"
#include "Engine/Engine.h"// Sets default values
AMyCharacter::AMyCharacter()
{// Set this pawn to call Tick() every frame.  You can turn this off to improve performance if you don't need it.PrimaryActorTick.bCanEverTick = true;CollisionBox = CreateDefaultSubobject<UBoxComponent>(TEXT("CollisionBox"));CollisionBox->SetupAttachment(GetRootComponent());CameraBoom = CreateDefaultSubobject<USpringArmComponent>(TEXT("CameraBoom"));CameraBoom->SetupAttachment(CollisionBox);CameraBoom->TargetArmLength = 1500.f;CameraBoom->bUsePawnControlRotation = false;CameraBoom->bEnableCameraLag = true;//摄像机臂平滑CameraBoom->bEnableCameraRotationLag = true;//启用相机旋转延迟CameraBoom->bDoCollisionTest = false;//关闭摄像机臂碰撞FollowCamera = CreateDefaultSubobject<UCameraComponent>(TEXT("FollowCamera"));FollowCamera->SetupAttachment(CameraBoom);FollowCamera->bUsePawnControlRotation = false;
}// Called when the game starts or when spawned
void AMyCharacter::BeginPlay()
{Super::BeginPlay();APlayerController* PlayerController = Cast<APlayerController>(Controller);if (PlayerController){UEnhancedInputLocalPlayerSubsystem* Subsystem =ULocalPlayer::GetSubsystem<UEnhancedInputLocalPlayerSubsystem>(PlayerController->GetLocalPlayer());if (Subsystem){Subsystem->AddMappingContext(MappingContext, 0);}}
}void AMyCharacter::LeftMouseDown(const FInputActionValue& value)
{bIsMouseLeftDown = true;
}void AMyCharacter::LeftMouseUp(const FInputActionValue& value)
{bIsMouseLeftDown = false;
}void AMyCharacter::RightMouseDown(const FInputActionValue& value)
{bIsMouseRightDown = true;
}void AMyCharacter::RightMouseUp(const FInputActionValue& value)
{bIsMouseRightDown = false;
}void AMyCharacter::MiddleMouseSlide(const FInputActionValue& value)
{float Axis = value.Get<float>();float CameraArm = CameraBoom->TargetArmLength;//限制相机臂长度CameraBoom->TargetArmLength = FMath::Clamp((CameraArm - Axis * MouseMiddleSpeed), 1000.f, 30000.f);
}void AMyCharacter::MouseMove()
{if (bIsMouseLeftDown){FRotator ActorRotator = GetActorRotation();//限制一下视角度数带来的错误FRotator NewActorRotator = FRotator(FMath::Clamp((ActorRotator.Pitch + (MouseVariationDifference.Y * MouseSpeed)),-80.f,-10.f),ActorRotator.Yaw + (MouseVariationDifference.X * MouseSpeed * -1.f), ActorRotator.Roll);SetActorRotation(NewActorRotator);}if (bIsMouseRightDown){FVector SpeedMove = FVector(MouseVariationDifference.Y * MouseRightSpeed,-1.0 * MouseRightSpeed * MouseVariationDifference.X, 0);AddActorLocalOffset(SpeedMove);//限制z轴FVector Location = GetActorLocation();FVector NewLocation = FVector(Location.X, Location.Y, 4520);SetActorLocation(NewLocation);}
}// Called every frame
void AMyCharacter::Tick(float DeltaTime)
{Super::Tick(DeltaTime);//获取鼠标坐标GetMousePosition();//鼠标移动视角MouseMove();}// Called to bind functionality to input
void AMyCharacter::SetupPlayerInputComponent(UInputComponent* PlayerInputComponent)
{Super::SetupPlayerInputComponent(PlayerInputComponent);UEnhancedInputComponent* EnhancedInputConponent = Cast<UEnhancedInputComponent>(PlayerInputComponent);if (EnhancedInputConponent){EnhancedInputConponent->BindAction(LeftButtonAction, ETriggerEvent::Started, this, &AMyCharacter::LeftMouseDown);EnhancedInputConponent->BindAction(LeftButtonAction, ETriggerEvent::Completed, this, &AMyCharacter::LeftMouseUp);EnhancedInputConponent->BindAction(RightButtonAction, ETriggerEvent::Started, this, &AMyCharacter::RightMouseDown);EnhancedInputConponent->BindAction(RightButtonAction, ETriggerEvent::Completed, this, &AMyCharacter::RightMouseUp);EnhancedInputConponent->BindAction(MiddleButtonAction, ETriggerEvent::Triggered, this, &AMyCharacter::MiddleMouseSlide);}
}void AMyCharacter::GetMousePosition()
{//获取当前鼠标移动坐标GetWorld()->GetFirstPlayerController()->GetMousePosition(MousePos.X, MousePos.Y);//记录的鼠标变化差量MouseVariationDifference = MousePos - FVector2D(MouseX, MouseY);//记录变化后的鼠标位置MouseX = MousePos.X;MouseY = MousePos.Y;//打印鼠标信息到屏幕/*GEngine->AddOnScreenDebugMessage(1, 1, FColor::Red, FString::Printf(TEXT("%f,%f"), MousePos.X, MousePos.Y));GEngine->AddOnScreenDebugMessage(2, 1, FColor::Yellow, FString::Printf(TEXT("%f,%f"), MouseVariationDifference.X, MouseVariationDifference.Y));*/
}
相关文章:
UE5数字孪生系列笔记(三)
C创建Pawn类玩家 创建一个GameMode蓝图用来加载我们自定义的游戏Mode新建一个Pawn的C,MyCharacter类作为玩家,新建一个相机组件与相机臂组件,box组件作为根组件 // Fill out your copyright notice in the Description page of Project Set…...
ASR-LLM-TTS 大模型对话实现案例;语音识别、大模型对话、声音生成
参考:https://blog.csdn.net/weixin_42357472/article/details/136305123(llm+tts) https://blog.csdn.net/weixin_42357472/article/details/136411769 (asr+vad) 这里LLM用的是chatglm;电脑声音播报用的playsound 1、实时语音识别版本 注意:暂时这项目有个缺陷就是tts…...

主干网络篇 | YOLOv8更换主干网络之EfficientNet
前言:Hello大家好,我是小哥谈。EfficientNet是一种高效的卷积神经网络架构,由Mingxing Tan和Quoc V. Le在2019年提出,其设计思想是在不增加计算复杂度的情况下提高模型的准确性。它引入了一个称为"复合系数"的概念,该系数用于同时缩放网络的深度、宽度和分辨率。…...
Web开发-Django学习笔记
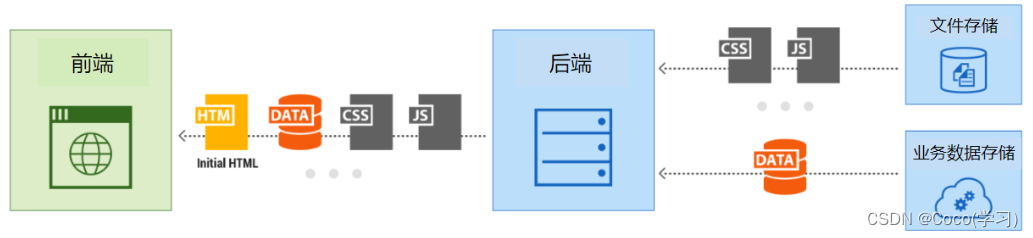
客户端如何获取服务端的数据信息? 通常 是 HTTP网络协议,通过网络传输数据信息。 客户端通过HTTP协议发送请求信息给服务端,并从服务端接收响应信息。 Web 前端开发: (HTML、CSS、JS)文件部署在后端服务…...
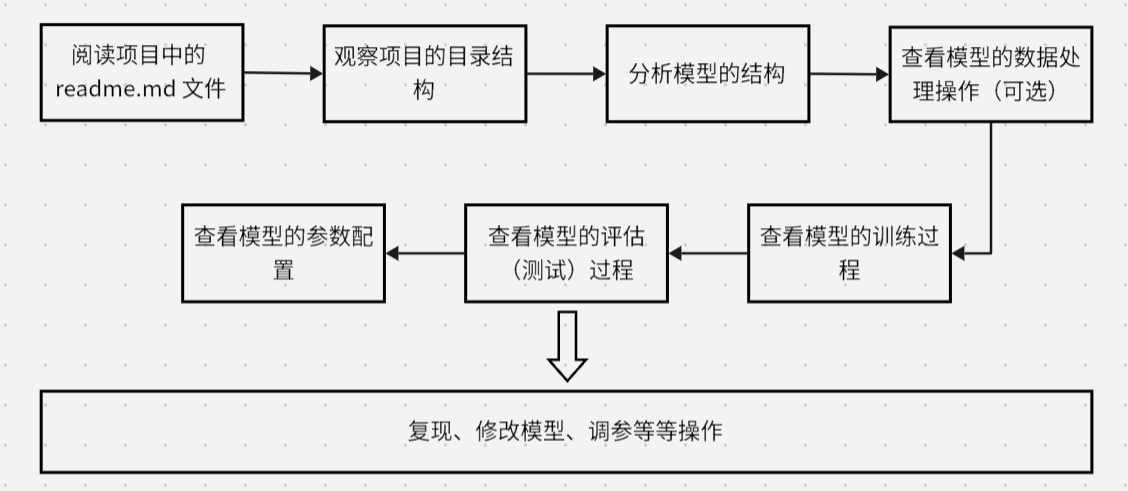
关于深度学习的 PyTorch 项目如何上手分析?从什么地方切入?
文章目录 PyTorch 项目分析1.背景2.分析流程 PyTorch 项目分析 1.背景 当我们拿到一个 PyTorch 的深度学习项目时,应该怎么入手?怎么去查看代码? 2.分析流程 首先阅读对应项目的 README.md 文件。通过阅读 README.md ,一般可以…...
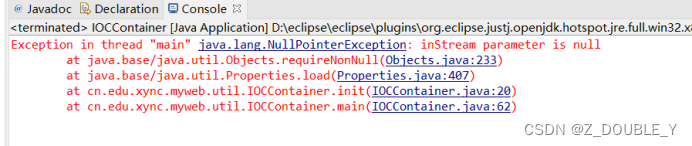
JavaEE企业开发新技术4
2.16 模拟Spring IOC容器功能-1 2.17 模拟Spring IOC容器功能-2 什么是IOC? 控制反转,把对象创建和对象之间的调用过程交给Spring框架进行管理使用IOC的目的:为了耦合度降低 解释: 模仿 IOC容器的功能,我们利用 Map…...

CSS使用JS变量
1. CSS变量 CSS 变量(也称为自定义属性)允许我们在 CSS 中定义可重复使用的值,并将其应用于不同的选择器。为了创建一个 CSS 变量,我们需要使用 -- 前缀,然后可以像常规属性一样使用它。 :root {--primary-color: bl…...
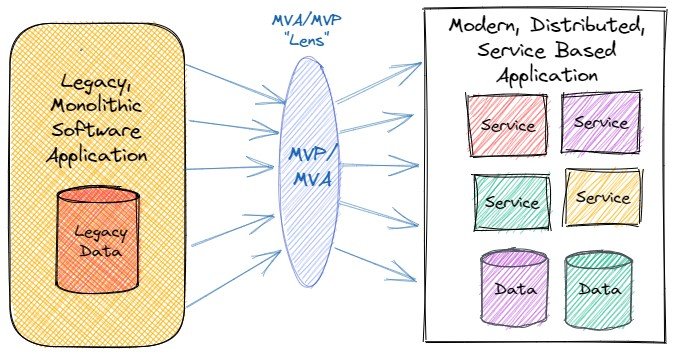
拆分巨石:将MVPS和MVAS应用于遗留应用程序——可持续架构(六)
前言 MVP 和 MVA 的概念不仅适用于新应用程序;它们提供了一种新颖的方式来审视对遗留系统的范围变更,以防止过快地承担过多的变化 - 参见图1。MVA 可以帮助组织评估和更新其技术标准,通过展示新技术如何真正对支持 MVP 至关重要。创建 MVA 可…...
)
Linux renice命令教程:如何优雅地调整进程优先级(附案例详解和注意事项)
Linux renice命令介绍 renice命令在Linux中用于修改已经运行的进程的优先级。这个命令允许你改变一个已经运行的进程的调度优先级。如果我们给一个进程设置了更高的优先级,那么内核将为该进程分配更多的CPU时间。 Linux renice命令适用的Linux版本 renice命令在所…...

Gitea 的详细介绍
什么是 Gitea? Gitea 是一个开源、轻量级的自托管 Git 服务,它允许用户搭建类似于 GitHub 或 GitLab 的代码托管平台。由于采用 Go 语言开发,Gitea 具有高效的性能和跨平台特性,适合个人开发者或小团队使用。 Gitea 的特点 轻量…...

Kotlin object
object 的三种用法 Kotlin 的 object 关键字有三种用法: 对象声明 ,一般用来实现单例伴生对象 ,类似 Java 的 static 关键字,也可以用于工厂方法模式对象表达式 ,一般用来代替 Java 的匿名内部类 对象声明 object 的语义是这样的: 定义一个类并创建一个实例 。不管是对象…...
【Redis】数据类型、事务执行、内存淘汰策略
目录 数据类型 Redis事务执行步骤 步骤: redis内存淘汰策略 设置内存淘汰策略 1.设置配置文件 2.通过命令设置 数据类型 官网解释 Understand Redis data types | Redis 首先,Redis 的所有键都是字符串,常用的数据类型有 5 种:Strin…...
Python Flask Web框架初步入门
前言 flask基础 搭建flask服务器 定义html 使用templates模板定义页面的html html页面编写 render_template传参变量 定义图片 创建static目录,存入图片 html编写 flask入门 网站多域名 网站之间超链接跳转 入门案例 将centos的rpm包下载链接集成到自…...

【设计模式】工厂方法模式详解
在java中,万物皆对象,这些对象都需要创建,如果创建的时候直接new该对象,就会对该对象耦合严重,假如我们要更换对象,所有new对象的地方都需要修改一遍,这显然违背了软件设计的开闭原则。如果我们…...
独立游戏《星尘异变》UE5 C++程序开发日志3——UEC++特供的数据类型
本篇日志将介绍FString,FText、FName的用法和相互转换,以及容器TMap,TArray的增删查改 一、字符串相关数据类型:FString、FText、FName FString是最接近std::string的类型,字符串本身可以看做一个存储char型的动态数…...
递归方法的理解
递归方法调用 :方法自己调用自己的现象就称为递归。 递归的分类 : 直接递归、间接递归。 直接递归:方法自身调用自己 public void methodA (){ methodA (); } 间接递归:可以理解为A()方法调用B()方法,B()方法调用C()方法&am…...

css之flex布局文本不换行不显示省略号的解决方法
文章目录 一、单行长文本显示省略号二、flex布局下的处理技巧 一、单行长文本显示省略号 先讲讲常规情况下长文本不跨行显示省略号的代码: overflow: hidden; //不允许内容超出盒子 white-space: nowrap; //不允许文本跨行 text-overflow: ellipsis; //文本超…...

华清远见STM32U5开发板助力2024嵌入式大赛ST赛道智能可穿戴设备及IOT选题项目开发
第七届(2024)全国大学生嵌入式芯片与系统设计竞赛(以下简称“大赛”)已经拉开帷幕,大赛的报名热潮正席卷而来,高校电子电气类相关专业(电子、信息、计算机、自动化、电气、仪科等)全…...
若依框架实现不同端用户登录(后台管理用户和前台会员登录——sping security多用户)
目录 需求背景 前期准备 实现UserDetailsService接口 改造loginUser 声明自定义AuthenticationManager 的bean 自定义登录接口 参考文章 效果如下 需求背景 用若依搭建的后台管理环境,但是前台用户系统(前端)并没有和若依的前端集成在一起。…...
【解決|三方工具】Obi Rope 编辑器运行即崩溃问题
开发平台:Unity 2021.3.7 三方工具:Unity资产工具 - Obi Rope 问题背景 使用Unity三方开发工具 - Obi Rope 模拟绳索效果。配置后运行 Unity 出现报错并崩溃。通过崩溃日志反馈得到如下图所示 这是一个序列化问题造成的崩溃,指向性为 Obi…...

机器学习在芯片电容提取中的应用与CapBench数据集
1. 电容提取与机器学习结合的背景与挑战在芯片设计流程中,电容提取是决定最终产品性能的关键环节。当设计进入物理实现阶段,工程师需要精确计算互连线之间的寄生电容,这些数据直接影响时序分析和功耗估算的准确性。传统基于场求解器的方法&am…...

C盘空间管理完全指南:从清理到预防,根治飘红
你的C盘是否在不知不觉中已经飘红?在清理文件的路上,你是否曾因误删系统文件而追悔莫及? C盘告急的普遍困境 每当Windows系统运行缓慢,或安装新软件时弹出磁盘空间不足的提示,用户的第一反应往往是查看C盘使用情况。…...

终极指南:如何在Windows上使用智能PPT计时器掌控演示时间
终极指南:如何在Windows上使用智能PPT计时器掌控演示时间 【免费下载链接】ppttimer 一个简易的 PPT 计时器 项目地址: https://gitcode.com/gh_mirrors/pp/ppttimer 您是否曾在重要演讲中因为超时而尴尬收场?是否在商务汇报中因为时间把控不准而…...

基于MCP协议与Google Apps Script的Google Workspace自动化集成实践
1. 项目概述:当Google Workspace遇上MCP如果你是一名开发者,或者负责企业内部的自动化流程,那么对Google Workspace(谷歌工作区)一定不陌生。从Gmail、Google Drive到Sheets、Docs和Calendar,它几乎构成了现…...

【人生底稿 23】新疆出差记・上篇:初入边疆,三个半小时的漫长飞行
2024 年的 6 月,刚在赣州、河北、湖南的项目里连轴转完,手里的需求设计还没完全收尾,一通临时电话,打破了我短暂的节奏 —— 任务突然下达:陪客户前往新疆乌鲁木齐的甲方现场。这不是我第一次出差,却是第一…...

C 语言开发一个简单的线程池函数
既然了解了为什么用线程池,那么就回到了怎么管理这些东西。在开发中肯定要设计怎么对齐进行管理。所有代码的开始都从设计结构开始。仔细想一下,我们的一个简单想法就是用链表保存一系列线程,然后用链表保存一系列处理线程的对象。所有我们就…...
文化:是创新工场,还是疲劳表演?)
黑客马拉松(Hackathon)文化:是创新工场,还是疲劳表演?
在软件工程的世界里,我们测试人常常站在产品交付的最后一道防线上,习惯了在严谨的流程、详尽的用例和稳定的环境中寻找缺陷。而黑客马拉松,这个充满激情、混乱与极限编程的代名词,对我们来说,既像是一个遥不可及的极客…...
)
Nature论文检索正在失效,Perplexity底层检索逻辑重构预警(仅限科研骨干内部流通的3条技术简报)
更多请点击: https://intelliparadigm.com 第一章:Nature论文检索正在失效,Perplexity底层检索逻辑重构预警(仅限科研骨干内部流通的3条技术简报) 检索信号衰减的实证观测 近期对Nature、Science主站及PubMed Centra…...

从0到1掌握Ansible:让自动化运维不再是梦想
最近在公司推进自动化运维的时候,发现很多同事对Ansible还是一知半解,要么就是简单用用,要么就是直接放弃。其实Ansible真的没那么复杂,我用了这么多年,今天就把我的实战经验分享给大家。 说实话,刚开始接…...

那些“假装很忙”的员工,正成为中小企业老板最大的管理黑洞
作为一名常年给企业做数字化诊断的顾问,我发现很多老板都有一个共同的“心病”:走进办公室,满屋子都是噼里啪啦的打字声,每个人看起来都在埋头苦干,但一到交付节点,进度总是莫名其妙地卡壳。这种“办公室伪…...