前端Vue小兔鲜儿电商项目实战Day04
一、二级分类 - 整体认识和路由配置
1. 配置二级路由
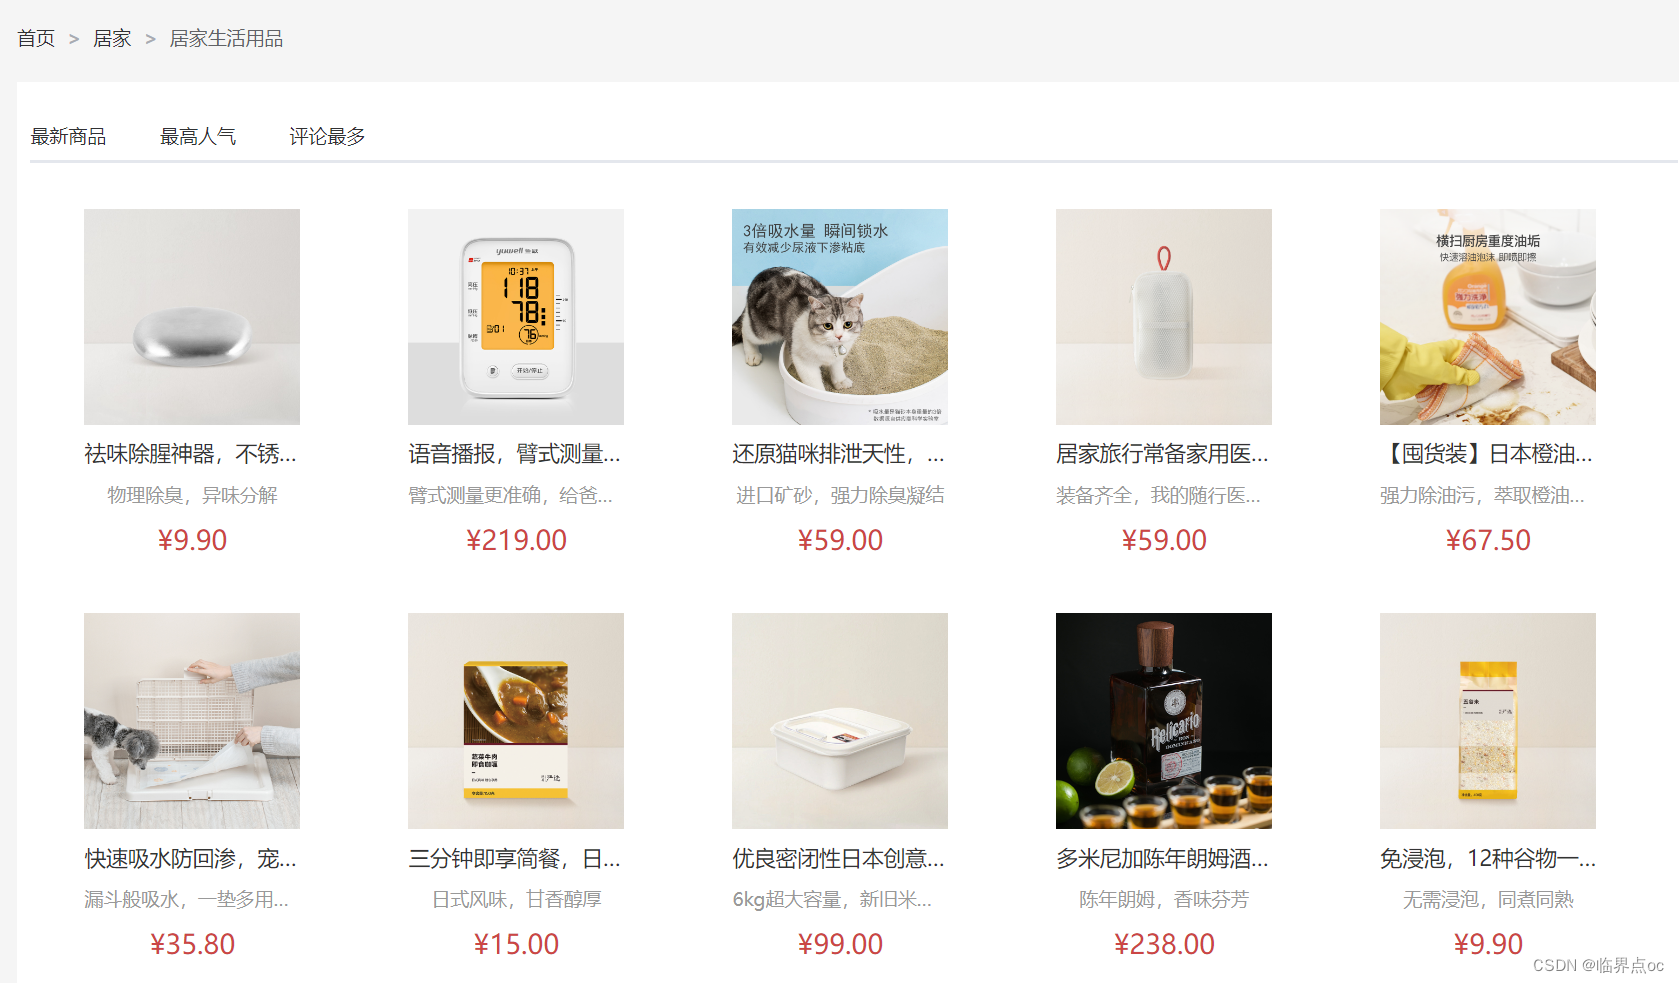
 ①准备组件模板 - src/views/SubCategory/index.vue
<script setup></script><template><div class="container"><!-- 面包屑 --><div class="bread-container"><el-breadcrumb separator=">"><el-breadcrumb-item :to="{ path: '/' }">首页</el-breadcrumb-item><el-breadcrumb-item :to="{ path: '/' }">居家 </el-breadcrumb-item><el-breadcrumb-item>居家生活用品</el-breadcrumb-item></el-breadcrumb></div><div class="sub-container"><el-tabs><el-tab-pane label="最新商品" name="publishTime"></el-tab-pane><el-tab-pane label="最高人气" name="orderNum"></el-tab-pane><el-tab-pane label="评论最多" name="evaluateNum"></el-tab-pane></el-tabs><div class="body"><!-- 商品列表--></div></div></div>
</template><style lang="scss" scoped>
.bread-container {padding: 25px 0;color: #666;
}.sub-container {padding: 20px 10px;background-color: #fff;.body {display: flex;flex-wrap: wrap;padding: 0 10px;}.goods-item {display: block;width: 220px;margin-right: 20px;padding: 20px 30px;text-align: center;img {width: 160px;height: 160px;}p {padding-top: 10px;}.name {font-size: 16px;}.desc {color: #999;height: 29px;}.price {color: $priceColor;font-size: 20px;}}.pagination-container {margin-top: 20px;display: flex;justify-content: center;}
}
</style>
②配置路由关系 - src/router.index.js
import { createRouter, createWebHistory } from 'vue-router'
import Login from '@/views/Login/index.vue'
import Layout from '@/views/Layout/index.vue'
import Home from '@/views/Home/index.vue'
import Category from '@/views/Category/index.vue'
import SubCategory from '@/views/SubCategory/index.vue'const router = createRouter({history: createWebHistory(import.meta.env.BASE_URL),routes: [{path: '/',component: Layout,children: [{path: '',component: Home},{path: 'category/:id',component: Category},{path: 'category/sub/:id',component: SubCategory}]},{path: '/login',component: Login}]
})export default router
③配置跳转 - src/views/Category/index.vue
<!-- 分类列表渲染 --><div class="sub-list"><h3>全部分类</h3><ul><li v-for="i in categoryData.children" :key="i.id"><RouterLink :to="`/category/sub/${i.id}`"><img :src="i.picture" /><p>{{ i.name }}</p></RouterLink></li></ul></div>二、面包屑导航实现

①准备接口 - src/apis/category.js
// 获取二级分类列表数据
export const getCategoryFilterAPI = (id) => {return instance({url: '/category/sub/filter',params: {id}})
}
②获取数据渲染模板 - src/views/SubCategory/index.vue
<script setup>
import { ref } from 'vue'
import { useRoute } from 'vue-router'
import { getCategoryFilterAPI } from '@/apis/category.js'const route = useRoute()// 获取面包屑导航数据
const filterData = ref([])
const getFilterData = async () => {const res = await getCategoryFilterAPI(route.params.id)filterData.value = res.result
}getFilterData()
</script><template><div class="container"><!-- 面包屑 --><div class="bread-container"><el-breadcrumb separator=">"><el-breadcrumb-item :to="{ path: '/' }">首页</el-breadcrumb-item><el-breadcrumb-item:to="{ path: `/category/${filterData.parentId}` }">{{ filterData.parentName }}</el-breadcrumb-item><el-breadcrumb-item>{{ filterData.name }}</el-breadcrumb-item></el-breadcrumb></div><div class="sub-container"><el-tabs><el-tab-pane label="最新商品" name="publishTime"></el-tab-pane><el-tab-pane label="最高人气" name="orderNum"></el-tab-pane><el-tab-pane label="评论最多" name="evaluateNum"></el-tab-pane></el-tabs><div class="body"><!-- 商品列表--></div></div></div>
</template>
三、二级分类 - 商品列表实现

1. 基础参数获取基础列表

①封装接口 - src/apis/category.js
// 获取导航数据
export const getSubCategoryAPI = (data) => {return instance({url: '/category/goods/temporary',method: 'POST',data})
}
②获取数据列表 - src/views/SubCategory/index.vue
<script setup>
import { ref } from 'vue'
import { useRoute } from 'vue-router'
import { getCategoryFilterAPI, getSubCategoryAPI } from '@/apis/category.js'
import GoodsItem from '../Home/components/GoodsItem.vue'const route = useRoute()// 获取面包屑导航数据
const filterData = ref([])
const getFilterData = async () => {const res = await getCategoryFilterAPI(route.params.id)filterData.value = res.result
}
getFilterData()// 获取基础列表数据
const goodsList = ref([])
const reqData = ref({categoryId: route.params.id,page: 1,pageSize: 20,sortField: 'publishTime'
})
const getGoodsList = async () => {const res = await getSubCategoryAPI(reqData.value)//   console.log(res)goodsList.value = res.result.items
}
getGoodsList()
</script><template><div class="container"><!-- 面包屑 --><div class="bread-container"><el-breadcrumb separator=">"><el-breadcrumb-item :to="{ path: '/' }">首页</el-breadcrumb-item><el-breadcrumb-item:to="{ path: `/category/${filterData.parentId}` }">{{ filterData.parentName }}</el-breadcrumb-item><el-breadcrumb-item>{{ filterData.name }}</el-breadcrumb-item></el-breadcrumb></div><div class="sub-container"><el-tabs><el-tab-pane label="最新商品" name="publishTime"></el-tab-pane><el-tab-pane label="最高人气" name="orderNum"></el-tab-pane><el-tab-pane label="评论最多" name="evaluateNum"></el-tab-pane></el-tabs><div class="body"><!-- 商品列表--><GoodsItem v-for="good in goodsList" :key="good.id" :good="good" /></div></div></div>
</template>
2. 添加额外参数实现筛选功能
Tabs 标签页 | Element Plus

核心思想:tab组件切换时修改reqData中的sortField字段,重新拉取接口列表
src/views/SubCategory/index.vue
<script setup>
// tab切换回调
const tabChange = () => {console.log('tab切换了', reqData.value.sortField)reqData.value.page = 1getGoodList()
}
</script><template><el-tabs v-model="reqData.sortField" @tab-change="tabChange"><el-tab-pane label="最新商品" name="publishTime"></el-tab-pane><el-tab-pane label="最高人气" name="orderNum"></el-tab-pane><el-tab-pane label="评论最多" name="evaluateNum"></el-tab-pane></el-tabs>
</template>
3. 列表无限加载功能实现
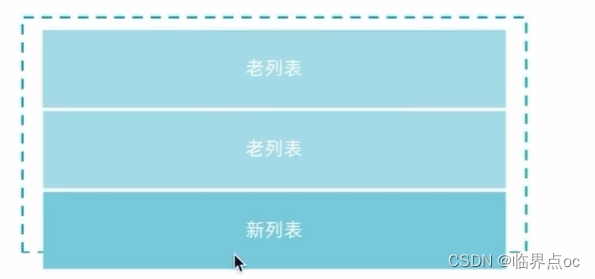
Infinite Scroll 无限滚动 | Element Plus
核心实现逻辑:使用elementPlus提供的 v-infinite-scroll指令 监听是否满足触底条件,满足加载条件时让页面参数加一获取下一页数据,做新老数据拼接渲染。

<script setup>
// 是否禁用
const disabled = ref(false)
// 加载更多
const load = async () => {// 获取下一页的送数据reqData.value.page += 1const res = await getSubCategoryAPI(reqData.value)// 新老数据拼接goodsList.value = [...goodsList.value, ...res.result.items]// 加载完毕 停止监听if (res.result.items.length === 0) {disabled.value = true}
}
</script><divclass="body"v-infinite-scroll="load"infinite-scroll-disabled="disabled"><!-- 商品列表--><GoodsItem v-for="good in goodsList" :key="good.id" :good="good" />
</div>
四、二级分类 - 定制路由scrollBehavior
1. 定制路由行文解决什么问题
接口:RouterScrollBehavior | Vue Router
在不同路由切换到时候,可以自动滚动到页面的顶部,而不是停留在原先的位置。
如何配置:vue-router支持scrollBehavior配置项,可以指定路由切换时的滚动位置
src/router/index.js
import { createRouter, createWebHistory } from 'vue-router'
import Login from '@/views/Login/index.vue'
import Layout from '@/views/Layout/index.vue'
import Home from '@/views/Home/index.vue'
import Category from '@/views/Category/index.vue'
import SubCategory from '@/views/SubCategory/index.vue'const router = createRouter({history: createWebHistory(import.meta.env.BASE_URL),routes: [// ......],// 路由滚动行为定制scrollBehavior() {return {top: 0}}
})export default router
五、详情页 - 整体认识和路由配置
1. 路由配置

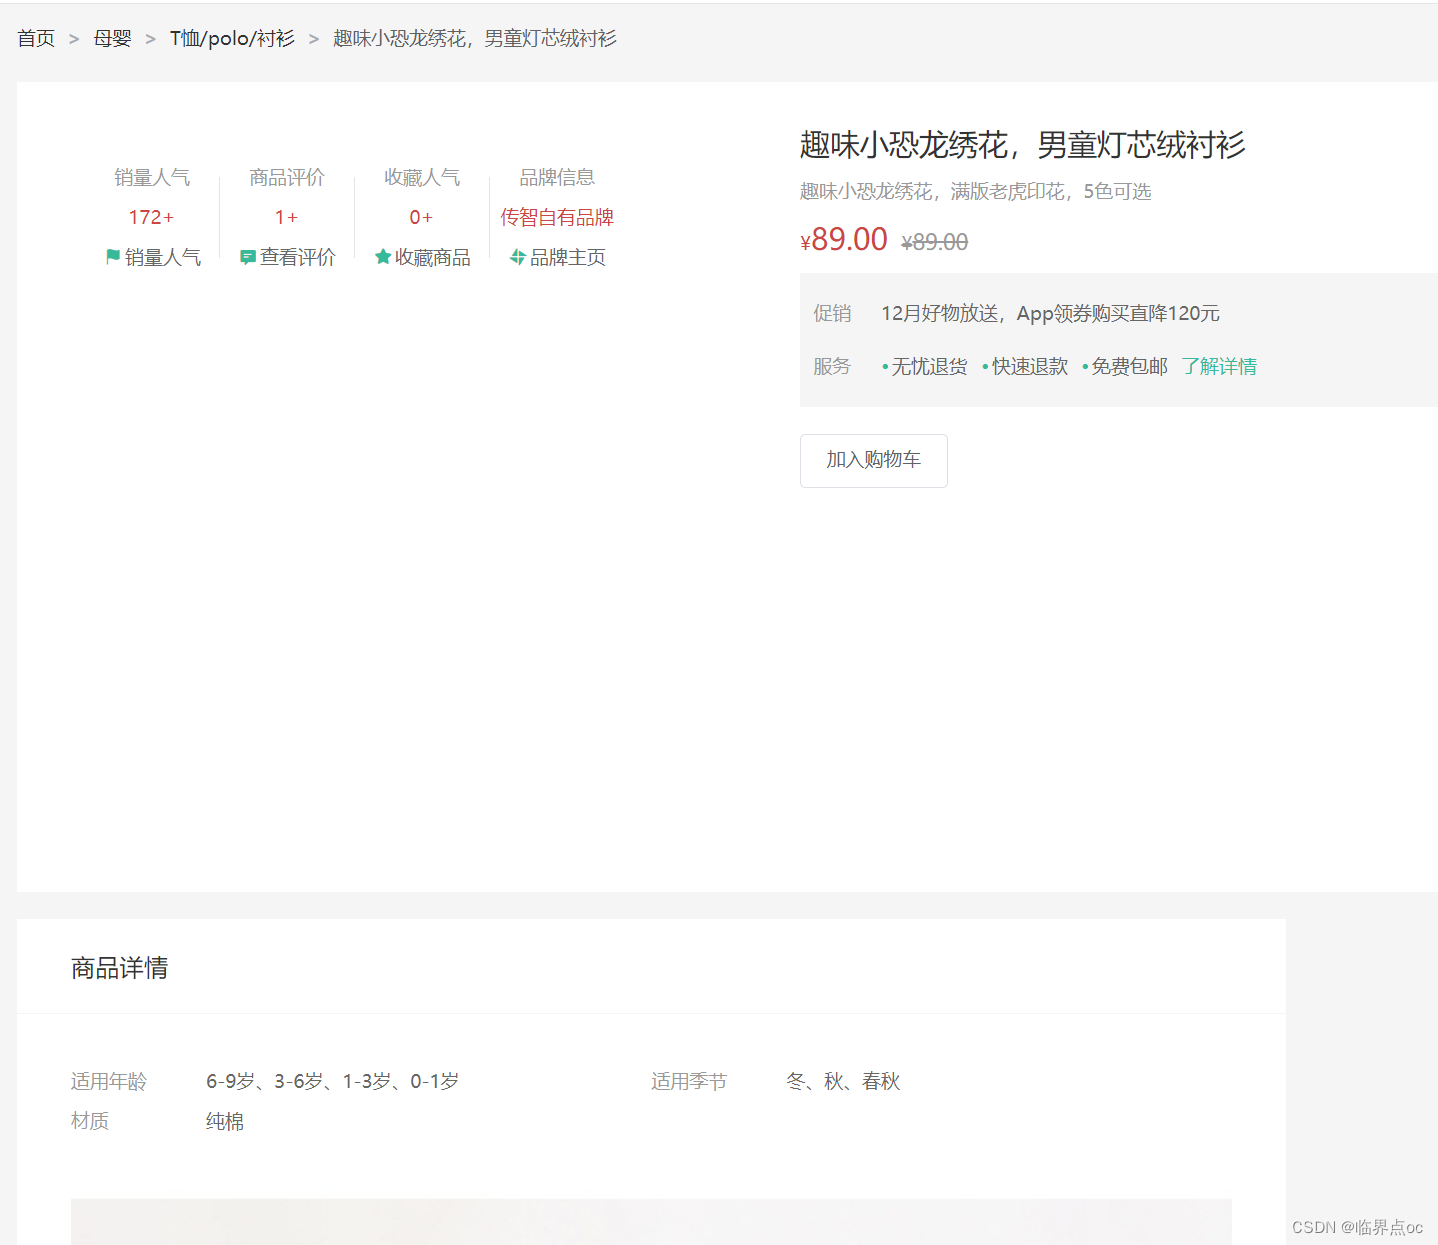
①创建详情组件 - src/views/Detail/index.vue
<script setup></script><template><div class="xtx-goods-page"><div class="container"><div class="bread-container"><el-breadcrumb separator=">"><el-breadcrumb-item :to="{ path: '/' }">首页</el-breadcrumb-item><el-breadcrumb-item :to="{ path: '/' }">母婴 </el-breadcrumb-item><el-breadcrumb-item :to="{ path: '/' }">跑步鞋 </el-breadcrumb-item><el-breadcrumb-item>抓绒保暖,毛毛虫子儿童运动鞋</el-breadcrumb-item></el-breadcrumb></div><!-- 商品信息 --><div class="info-container"><div><div class="goods-info"><div class="media"><!-- 图片预览区 --><!-- 统计数量 --><ul class="goods-sales"><li><p>销量人气</p><p>100+</p><p><i class="iconfont icon-task-filling"></i>销量人气</p></li><li><p>商品评价</p><p>200+</p><p><i class="iconfont icon-comment-filling"></i>查看评价</p></li><li><p>收藏人气</p><p>300+</p><p><i class="iconfont icon-favorite-filling"></i>收藏商品</p></li><li><p>品牌信息</p><p>400+</p><p><i class="iconfont icon-dynamic-filling"></i>品牌主页</p></li></ul></div><div class="spec"><!-- 商品信息区 --><p class="g-name">抓绒保暖,毛毛虫儿童鞋</p><p class="g-desc">好穿</p><p class="g-price"><span>200</span><span> 100</span></p><div class="g-service"><dl><dt>促销</dt><dd>12月好物放送,App领券购买直降120元</dd></dl><dl><dt>服务</dt><dd><span>无忧退货</span><span>快速退款</span><span>免费包邮</span><a href="javascript:;">了解详情</a></dd></dl></div><!-- sku组件 --><!-- 数据组件 --><!-- 按钮组件 --><div><el-button size="large" class="btn"> 加入购物车 </el-button></div></div></div><div class="goods-footer"><div class="goods-article"><!-- 商品详情 --><div class="goods-tabs"><nav><a>商品详情</a></nav><div class="goods-detail"><!-- 属性 --><ul class="attrs"><li v-for="item in 3" :key="item.value"><span class="dt">白色</span><span class="dd">纯棉</span></li></ul><!-- 图片 --></div></div></div><!-- 24热榜+专题推荐 --><div class="goods-aside"></div></div></div></div></div></div>
</template><style scoped lang="scss">
.xtx-goods-page {.goods-info {min-height: 600px;background: #fff;display: flex;.media {width: 580px;height: 600px;padding: 30px 50px;}.spec {flex: 1;padding: 30px 30px 30px 0;}}.goods-footer {display: flex;margin-top: 20px;.goods-article {width: 940px;margin-right: 20px;}.goods-aside {width: 280px;min-height: 1000px;}}.goods-tabs {min-height: 600px;background: #fff;}.goods-warn {min-height: 600px;background: #fff;margin-top: 20px;}.number-box {display: flex;align-items: center;.label {width: 60px;color: #999;padding-left: 10px;}}.g-name {font-size: 22px;}.g-desc {color: #999;margin-top: 10px;}.g-price {margin-top: 10px;span {&::before {content: '¥';font-size: 14px;}&:first-child {color: $priceColor;margin-right: 10px;font-size: 22px;}&:last-child {color: #999;text-decoration: line-through;font-size: 16px;}}}.g-service {background: #f5f5f5;width: 500px;padding: 20px 10px 0 10px;margin-top: 10px;dl {padding-bottom: 20px;display: flex;align-items: center;dt {width: 50px;color: #999;}dd {color: #666;&:last-child {span {margin-right: 10px;&::before {content: '•';color: $xtxColor;margin-right: 2px;}}a {color: $xtxColor;}}}}}.goods-sales {display: flex;width: 400px;align-items: center;text-align: center;height: 140px;li {flex: 1;position: relative;~ li::after {position: absolute;top: 10px;left: 0;height: 60px;border-left: 1px solid #e4e4e4;content: '';}p {&:first-child {color: #999;}&:nth-child(2) {color: $priceColor;margin-top: 10px;}&:last-child {color: #666;margin-top: 10px;i {color: $xtxColor;font-size: 14px;margin-right: 2px;}&:hover {color: $xtxColor;cursor: pointer;}}}}}
}.goods-tabs {min-height: 600px;background: #fff;nav {height: 70px;line-height: 70px;display: flex;border-bottom: 1px solid #f5f5f5;a {padding: 0 40px;font-size: 18px;position: relative;> span {color: $priceColor;font-size: 16px;margin-left: 10px;}}}
}.goods-detail {padding: 40px;.attrs {display: flex;flex-wrap: wrap;margin-bottom: 30px;li {display: flex;margin-bottom: 10px;width: 50%;.dt {width: 100px;color: #999;}.dd {flex: 1;color: #666;}}}> img {width: 100%;}
}.btn {margin-top: 20px;
}.bread-container {padding: 25px 0;
}
</style>
②配置路由 - src/router/index.js
import { createRouter, createWebHistory } from 'vue-router'
// ... ...
import Category from '@/views/Category/index.vue'
import SubCategory from '@/views/SubCategory/index.vue'
import Detail from '@/views/Detail/index.vue'const router = createRouter({history: createWebHistory(import.meta.env.BASE_URL),routes: [{path: '/',component: Layout,children: [// ... ... {path: 'category/sub/:id',component: SubCategory},{path: 'detail/:id',component: Detail}]},{path: '/login',component: Login}],// 路由滚动行为定制scrollBehavior() {return {top: 0}}
})export default router
③绑定模板测试跳转 - src/views/Home/components/HomeNew.vue
<RouterLink :to="`/detail/${item.id}`"><img :src="item.picture" alt="" /><p class="name">{{ item.name }}</p><p class="price">¥{{ item.price }}</p>
</RouterLink>六、详情页 - 基础数据渲染

1. 封装接口 - src/apis/detail.js
import instance from '@/utils/http.js'// 获取详情数据
export const getDetail = (id) => {return instance({url: '/goods',params: {id}})
}
2. 获取数据渲染模板 -src/views/Detail/index.vue
<script setup>
import { getDetail } from '@/apis/detail.js'
import { ref } from 'vue'
import { useRoute } from 'vue-router'const loading = ref(false)const goods = ref({})
const route = useRoute()
const getGoods = async () => {loading.value = trueconst res = await getDetail(route.params.id)goods.value = res.resultconsole.log(goods.value)loading.value = false
}
getGoods()
</script><template><div class="xtx-goods-page" v-loading="loading"><!-- 有数据时才渲染 --><div class="container" v-if="goods.details"><div class="bread-container"><el-breadcrumb separator=">"><el-breadcrumb-item :to="{ path: '/' }">首页</el-breadcrumb-item><el-breadcrumb-item:to="{ path: `/category/${goods.categories[1].id}` }">{{ goods.categories[1].name }}</el-breadcrumb-item><!-- 可选链写法:只有前面的有值才继续访问后面的 --><!-- <el-breadcrumb-item:to="{ path: `/category/${goods.categories?.[1].id}` }">{{ goods.categories?.[1].name }}</el-breadcrumb-item> --><el-breadcrumb-item:to="{ path: `/category/sub/${goods.categories[0].id}` }">{{ goods.categories[0].name }}</el-breadcrumb-item><el-breadcrumb-item>{{ goods.name }}</el-breadcrumb-item></el-breadcrumb></div><!-- 商品信息 --><div class="info-container"><div><div class="goods-info"><div class="media"><!-- 图片预览区 --><!-- 统计数量 --><ul class="goods-sales"><li><p>销量人气</p><p>{{ goods.salesCount }}+</p><p><i class="iconfont icon-task-filling"></i>销量人气</p></li><li><p>商品评价</p><p>{{ goods.commentCount }}+</p><p><i class="iconfont icon-comment-filling"></i>查看评价</p></li><li><p>收藏人气</p><p>{{ goods.collectCount }}+</p><p><i class="iconfont icon-favorite-filling"></i>收藏商品</p></li><li><p>品牌信息</p><p>{{ goods.brand.name }}</p><p><i class="iconfont icon-dynamic-filling"></i>品牌主页</p></li></ul></div><div class="spec"><!-- 商品信息区 --><p class="g-name">{{ goods.name }}</p><p class="g-desc">{{ goods.desc }}</p><p class="g-price"><span>{{ goods.price }}</span><span>{{ goods.oldPrice }}</span></p><div class="g-service"><dl><dt>促销</dt><dd>12月好物放送,App领券购买直降120元</dd></dl><dl><dt>服务</dt><dd><span>无忧退货</span><span>快速退款</span><span>免费包邮</span><a href="javascript:;">了解详情</a></dd></dl></div><!-- sku组件 --><!-- 数据组件 --><!-- 按钮组件 --><div><el-button size="large" class="btn"> 加入购物车 </el-button></div></div></div><div class="goods-footer"><div class="goods-article"><!-- 商品详情 --><div class="goods-tabs"><nav><a>商品详情</a></nav><div class="goods-detail"><!-- 属性 --><ul class="attrs"><liv-for="item in goods.details.properties":key="item.value"><span class="dt">{{ item.name }}</span><span class="dd">{{ item.value }}</span></li></ul><!-- 图片 --><imgv-for="img in goods.details.pictures":key="img"v-img-lazy="img":src="img"alt=""/></div></div></div><!-- 24热榜+专题推荐 --><div class="goods-aside"></div></div></div></div></div></div>
</template><style scoped lang="scss">
// ... ...
</style>

七、详情页 - 热榜区域实现
1. 模块实现整体分析

结论:两块热榜相比,结构一致,标题title和列表内容不同

①封装接口 - src/apis/detail.js
/*** 获取热榜商品* @param {Number} id - 商品id* @param {Number} type - 1代表24小时热销榜 2代表周热销榜* @param {Number} limit - 获取个数*/
export const getHotGoodsAPI = ({ id, type, limit = 3 }) => {return instance({url: '/goods/hot',params: {id,type,limit}})
}
②获取基础数据渲染模板 - src/views/Detail/components/DetailHot.vue
<script setup>
// 以24小时热榜获取数据渲染模板
// 1. 封装接口
// 2. 调用接口渲染模板
import { ref, computed } from 'vue'
import { useRoute } from 'vue-router'
import { getHotGoodsAPI } from '@/apis/detail.js'// 设计props参数 适配不同的title和数据
const props = defineProps({type: {type: Number,default: 1}
})const titleMap = {1: '24小时热榜',2: '周热榜'
}
const title = computed(() => titleMap[props.type])const goodList = ref([])
const route = useRoute()
const getHotList = async () => {const res = await getHotGoodsAPI({id: route.params.id,type: props.type})goodList.value = res.result
}
getHotList()
</script><template><div class="goods-hot"><h3>{{ title }}</h3><!-- 商品区块 --><RouterLink:to="`/detail/${item.id}`"class="goods-item"v-for="item in goodList":key="item.id"><img :src="item.picture" alt="" /><p class="name ellipsis">{{ item.name }}</p><p class="desc ellipsis">{{ item.desc }}</p><p class="price">¥{{ item.price }}</p></RouterLink></div>
</template><style scoped lang="scss">
.goods-hot {h3 {height: 70px;background: $helpColor;color: #fff;font-size: 18px;line-height: 70px;padding-left: 25px;margin-bottom: 10px;font-weight: normal;}.goods-item {display: block;padding: 20px 30px;text-align: center;background: #fff;img {width: 160px;height: 160px;}p {padding-top: 10px;}.name {font-size: 16px;}.desc {color: #999;height: 29px;}.price {color: $priceColor;font-size: 20px;}}
}
</style>
③src/views/Detail/index.vue
import DetailHot from './components/DetailHot.vue'<!-- 24热榜+专题推荐 --><div class="goods-aside"><!-- 24小时榜单 --><DetailHot :type="1"></DetailHot><!-- 周日榜单 -->DetailHot :type="2"></DetailHot>
</div>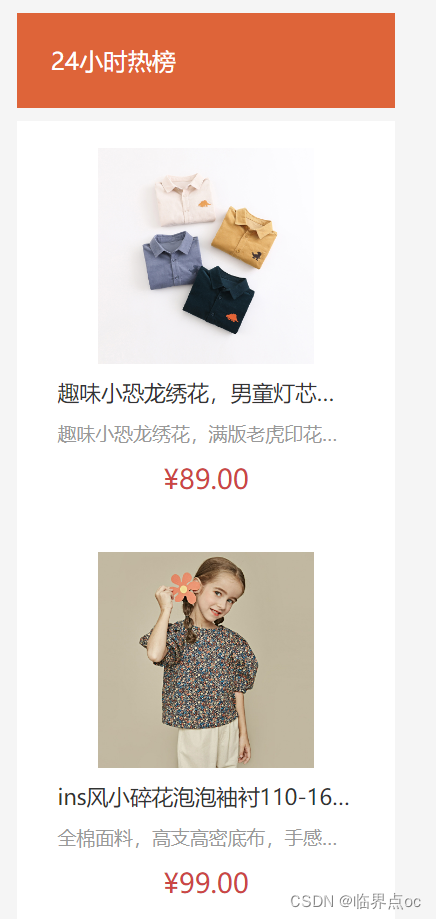
八、详情页 - 图片预览组件封装
1. 组件功能分析

2. 通关小图切换大图实现
思路:维护一个数组图片列表,鼠标划入小图记录当前小图标的下标值,通过下标值在数组中取对应图片,显示到大图位置。

src/components/ImageView/index.vue
<script setup>
import { ref } from 'vue'// 图片列表
const imageList = ['https://yanxuan-item.nosdn.127.net/d917c92e663c5ed0bb577c7ded73e4ec.png','https://yanxuan-item.nosdn.127.net/e801b9572f0b0c02a52952b01adab967.jpg','https://yanxuan-item.nosdn.127.net/b52c447ad472d51adbdde1a83f550ac2.jpg','https://yanxuan-item.nosdn.127.net/f93243224dc37674dfca5874fe089c60.jpg','https://yanxuan-item.nosdn.127.net/f881cfe7de9a576aaeea6ee0d1d24823.jpg'
]// 1. 小图切换大图显示
const activeIndex = ref(0)
const enterHandler = (index) => {activeIndex.value = index//   console.log(activeIndex.value)
}
</script><template><div class="goods-image"><!-- 左侧大图--><div class="middle" ref="target"><img :src="imageList[activeIndex]" alt="" /><!-- 蒙层小滑块 --><div class="layer" :style="{ left: `0px`, top: `0px` }"></div></div><!-- 小图列表 --><ul class="small"><liv-for="(img, i) in imageList":key="i"@mouseenter="enterHandler(i)":class="{ active: i === activeIndex }"><img :src="img" alt="" /></li></ul><!-- 放大镜大图 --><divclass="large":style="[{backgroundImage: `url(${imageList[0]})`,backgroundPositionX: `0px`,backgroundPositionY: `0px`}]"v-show="false"></div></div>
</template><style scoped lang="scss">
.goods-image {width: 480px;height: 400px;position: relative;display: flex;.middle {width: 400px;height: 400px;background: #f5f5f5;}.large {position: absolute;top: 0;left: 412px;width: 400px;height: 400px;z-index: 500;box-shadow: 0 0 10px rgba(0, 0, 0, 0.1);background-repeat: no-repeat;// 背景图:盒子的大小 = 2:1  将来控制背景图的移动来实现放大的效果查看 background-positionbackground-size: 800px 800px;background-color: #f8f8f8;}.layer {width: 200px;height: 200px;background: rgba(0, 0, 0, 0.2);// 绝对定位 然后跟随咱们鼠标控制left和top属性就可以让滑块移动起来left: 0;top: 0;position: absolute;}.small {width: 80px;li {width: 68px;height: 68px;margin-left: 12px;margin-bottom: 15px;cursor: pointer;&:hover,&.active {border: 2px solid $xtxColor;}}}
}
</style>
3. 放大镜效果实现
功能拆解:
- ①左侧滑块跟随鼠标移动
- ②右侧大图放大效果实现
- ③鼠标移入控制滑块和大图显示隐藏
①滑块跟随鼠标移动
思路:获取到当前的鼠标在盒子内的相对位置(useMouseInElement),控制滑块跟随鼠标移动(left/top)
useMouseInElement | VueUse

1. 有效移动范围内的计算逻辑
- 横向:100 < elementX < 300, left = elementX - 小滑块宽度一半
- 纵向:100 < elementY < 300, top = elementY - 小滑块高度一半
2. 边界距离控制
- 横向:elementY > 300 -> left = 200, elementX < 100 -> left = 0
- 纵向:elementY > 300 -> top = 200, elementY < 100 -> top = 0
②大图放大效果实现
效果:为实现放大效果,大图的宽度是小图的两倍
思路:大图的移动方向和滑块移动方向相反,且数值为2倍
③鼠标移入控制滑块和大图显示隐藏
思路:鼠标移入盒子(isOutsize),滑块和大图才显示(v-show)
src/components/ImageView/index.vue
<script setup>
import { ref, watch } from 'vue'
import { useMouseInElement } from '@vueuse/core'// 图片列表
const imageList = ['https://yanxuan-item.nosdn.127.net/d917c92e663c5ed0bb577c7ded73e4ec.png','https://yanxuan-item.nosdn.127.net/e801b9572f0b0c02a52952b01adab967.jpg','https://yanxuan-item.nosdn.127.net/b52c447ad472d51adbdde1a83f550ac2.jpg','https://yanxuan-item.nosdn.127.net/f93243224dc37674dfca5874fe089c60.jpg','https://yanxuan-item.nosdn.127.net/f881cfe7de9a576aaeea6ee0d1d24823.jpg'
]// 1. 小图切换大图显示
const activeIndex = ref(0)
const enterHandler = (index) => {activeIndex.value = index//   console.log(activeIndex.value)
}// 2. 获取鼠标相对位置
const target = ref(null)
const { elementX, elementY, isOutside } = useMouseInElement(target)// 3. 控制滑块跟随鼠标移动(监听elementX/Y变化,一旦变化,重新设置left/top)
const left = ref(0)
const top = ref(0)
const positionX = ref(0)
const positionY = ref(0)
watch([elementX, elementY, isOutside], () => {// 鼠标不在盒子边界内,直接不执行后面的逻辑if (isOutside.value) return// 有效范围内控制滑块距离// 横向if (elementX.value > 100 && elementX.value < 300) {left.value = elementX.value - 100}// 纵向if (elementY.value > 100 && elementY.value < 300) {top.value = elementY.value - 100}// 处理边界// 横向if (elementX.value > 300) {left.value = 200}if (elementX.value < 100) {left.value = 0}// 纵向if (elementY.value > 3000) {top.value = 200}if (elementY.value < 100) {top.value = 0}// 控制大图的显示positionX.value = -left.value * 2positionY.value = -top.value * 2
})
</script><template><!-- {{ elementX }} {{ elementY }} {{ isOutside }} --><div class="goods-image"><!-- 左侧大图--><div class="middle" ref="target"><img :src="imageList[activeIndex]" alt="" /><!-- 蒙层小滑块 --><divclass="layer"v-show="!isOutside":style="{ left: `${left}px`, top: `${top}px` }"></div></div><!-- 小图列表 --><ul class="small"><liv-for="(img, i) in imageList":key="i"@mouseenter="enterHandler(i)":class="{ active: i === activeIndex }"><img :src="img" alt="" /></li></ul><!-- 放大镜大图 --><divclass="large":style="[{backgroundImage: `url(${imageList[activeIndex]})`,backgroundPositionX: `${positionX}px`,backgroundPositionY: `${positionY}px`}]"v-show="!isOutside"></div></div>
</template><style scoped lang="scss">
.goods-image {width: 480px;height: 400px;position: relative;display: flex;.middle {width: 400px;height: 400px;background: #f5f5f5;}.large {position: absolute;top: 0;left: 412px;width: 400px;height: 400px;z-index: 500;box-shadow: 0 0 10px rgba(0, 0, 0, 0.1);background-repeat: no-repeat;// 背景图:盒子的大小 = 2:1  将来控制背景图的移动来实现放大的效果查看 background-positionbackground-size: 800px 800px;background-color: #f8f8f8;}.layer {width: 200px;height: 200px;background: rgba(0, 0, 0, 0.2);// 绝对定位 然后跟随咱们鼠标控制left和top属性就可以让滑块移动起来left: 0;top: 0;position: absolute;}.small {width: 80px;li {width: 68px;height: 68px;margin-left: 12px;margin-bottom: 15px;cursor: pointer;&:hover,&.active {border: 2px solid $xtxColor;}}}
}
</style>
src/views/Detail/index.vue
import ImageView from '@/components/ImageView/index.vue'
<div class="media"><!-- 图片预览区 --><ImageView></ImageView><!-- 统计数量 --><!-- ...... -->
</div>
4. 组件props适配
组件中的图片列表不能写死,需要通关props参数把接口数据传入
src/components/ImageView/index.vue
// props适配图片列表
defineProps({imageList: {type: Array,default: () => []}
})// 图片列表
/* const imageList = ['https://yanxuan-item.nosdn.127.net/d917c92e663c5ed0bb577c7ded73e4ec.png','https://yanxuan-item.nosdn.127.net/e801b9572f0b0c02a52952b01adab967.jpg','https://yanxuan-item.nosdn.127.net/b52c447ad472d51adbdde1a83f550ac2.jpg','https://yanxuan-item.nosdn.127.net/f93243224dc37674dfca5874fe089c60.jpg','https://yanxuan-item.nosdn.127.net/f881cfe7de9a576aaeea6ee0d1d24823.jpg'
] */
src/views/Detail/index.vue
<div class="media"><!-- 图片预览区 --><ImageView :imageList="goods.mainPictures"></ImageView><!-- 统计数量 --><!-- ... ... -->
</div>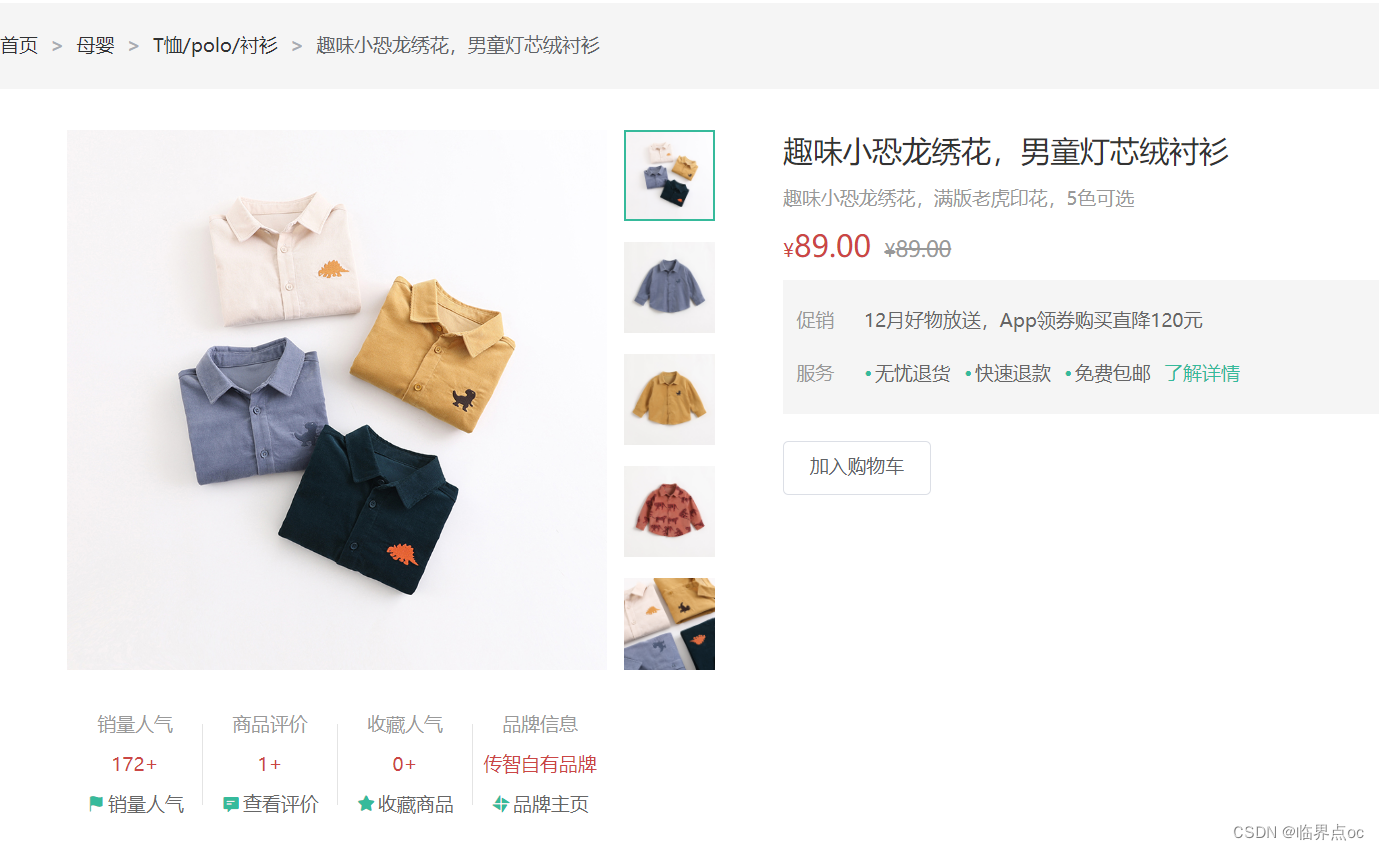
5. 总结
1. 封装复杂交互组件的通用思路

2. 图片预览组件的封装逻辑

九、详情页 - 认识SKU组件
1. SKU的概念
存货单位(stock keeping unit),也翻译为库存单元,是一个会计学名词,定义为库存管理中的最小可用单元,例如纺织品中一个SKU通常表示规格、颜色、款式,而在连锁零售门店中有时称单品为一个SKU。
SKU组件的作用:产出当前用户选择的商品规格,为加入购物车操作提供数据信息
2. SKU组件使用
问:在实际工作中,经常会遇到别人写好的组件,熟悉一个三方组件,首先重点看什么?
答:props和emit,props决定了当前组件接收什么数据,emit决定了会产出什么数据。
验证组件是否成功使用:

①src/components/XtxSku/index.vue
<template><div class="goods-sku"><dl v-for="item in goods.specs" :key="item.id"><dt>{{ item.name }}</dt><dd><template v-for="val in item.values" :key="val.name"><img:class="{ selected: val.selected, disabled: val.disabled }"@click="clickSpecs(item, val)"v-if="val.picture":src="val.picture"/><span:class="{ selected: val.selected, disabled: val.disabled }"@click="clickSpecs(item, val)"v-else>{{ val.name }}</span></template></dd></dl></div>
</template><script>
import { watchEffect } from 'vue'
import getPowerSet from './power-set'
const spliter = '★'
// 根据skus数据得到路径字典对象
const getPathMap = (skus) => {const pathMap = {}if (skus && skus.length > 0) {skus.forEach((sku) => {// 1. 过滤出有库存有效的skuif (sku.inventory) {// 2. 得到sku属性值数组const specs = sku.specs.map((spec) => spec.valueName)// 3. 得到sku属性值数组的子集const powerSet = getPowerSet(specs)// 4. 设置给路径字典对象powerSet.forEach((set) => {const key = set.join(spliter)// 如果没有就先初始化一个空数组if (!pathMap[key]) {pathMap[key] = []}pathMap[key].push(sku.id)})}})}return pathMap
}// 初始化禁用状态
function initDisabledStatus(specs, pathMap) {if (specs && specs.length > 0) {specs.forEach((spec) => {spec.values.forEach((val) => {// 设置禁用状态val.disabled = !pathMap[val.name]})})}
}// 得到当前选中规格集合
const getSelectedArr = (specs) => {const selectedArr = []specs.forEach((spec, index) => {const selectedVal = spec.values.find((val) => val.selected)if (selectedVal) {selectedArr[index] = selectedVal.name} else {selectedArr[index] = undefined}})return selectedArr
}// 更新按钮的禁用状态
const updateDisabledStatus = (specs, pathMap) => {// 遍历每一种规格specs.forEach((item, i) => {// 拿到当前选择的项目const selectedArr = getSelectedArr(specs)// 遍历每一个按钮item.values.forEach((val) => {if (!val.selected) {selectedArr[i] = val.name// 去掉undefined之后组合成keyconst key = selectedArr.filter((value) => value).join(spliter)val.disabled = !pathMap[key]}})})
}export default {name: 'XtxGoodSku',props: {// specs:所有的规格信息  skus:所有的sku组合goods: {type: Object,default: () => ({ specs: [], skus: [] })}},emits: ['change'],setup(props, { emit }) {let pathMap = {}watchEffect(() => {// 得到所有字典集合pathMap = getPathMap(props.goods.skus)// 组件初始化的时候更新禁用状态initDisabledStatus(props.goods.specs, pathMap)})const clickSpecs = (item, val) => {if (val.disabled) return false// 选中与取消选中逻辑if (val.selected) {val.selected = false} else {item.values.forEach((bv) => {bv.selected = false})val.selected = true}// 点击之后再次更新选中状态updateDisabledStatus(props.goods.specs, pathMap)// 把选择的sku信息传出去给父组件// 触发change事件将sku数据传递出去const selectedArr = getSelectedArr(props.goods.specs).filter((value) => value)// 如果选中得规格数量和传入得规格总数相等则传出完整信息(都选择了)// 否则传出空对象if (selectedArr.length === props.goods.specs.length) {// 从路径字典中得到skuIdconst skuId = pathMap[selectedArr.join(spliter)][0]const sku = props.goods.skus.find((sku) => sku.id === skuId)// 传递数据给父组件emit('change', {skuId: sku.id,price: sku.price,oldPrice: sku.oldPrice,inventory: sku.inventory,specsText: sku.specs.reduce((p, n) => `${p} ${n.name}:${n.valueName}`, '').trim()})} else {emit('change', {})}}return { clickSpecs }}
}
</script><style scoped lang="scss">
@mixin sku-state-mixin {border: 1px solid #e4e4e4;margin-right: 10px;cursor: pointer;&.selected {border-color: $xtxColor;}&.disabled {opacity: 0.6;border-style: dashed;cursor: not-allowed;}
}.goods-sku {padding-left: 10px;padding-top: 20px;dl {display: flex;padding-bottom: 20px;align-items: center;dt {width: 50px;color: #999;}dd {flex: 1;color: #666;> img {width: 50px;height: 50px;margin-bottom: 4px;@include sku-state-mixin;}> span {display: inline-block;height: 30px;line-height: 28px;padding: 0 20px;margin-bottom: 4px;@include sku-state-mixin;}}}
}
</style>
src/components/XtxSku/power-set.js
export default function bwPowerSet(originalSet) {const subSets = []// We will have 2^n possible combinations (where n is a length of original set).// It is because for every element of original set we will decide whether to include// it or not (2 options for each set element).const numberOfCombinations = 2 ** originalSet.length// Each number in binary representation in a range from 0 to 2^n does exactly what we need:// it shows by its bits (0 or 1) whether to include related element from the set or not.// For example, for the set {1, 2, 3} the binary number of 0b010 would mean that we need to// include only "2" to the current set.for (let combinationIndex = 0;combinationIndex < numberOfCombinations;combinationIndex += 1) {const subSet = []for (let setElementIndex = 0;setElementIndex < originalSet.length;setElementIndex += 1) {// Decide whether we need to include current element into the subset or not.if (combinationIndex & (1 << setElementIndex)) {subSet.push(originalSet[setElementIndex])}}// Add current subset to the list of all subsets.subSets.push(subSet)}return subSets
}
②src/views/Detail/index.vue
<script setup>
// sku规格被操作时
const skuChange = (sku) => {console.log(sku)
}
</script><template>
<!-- sku组件 -->
<XtxSku :goods="goods" @change="skuChange"></XtxSku>
</template>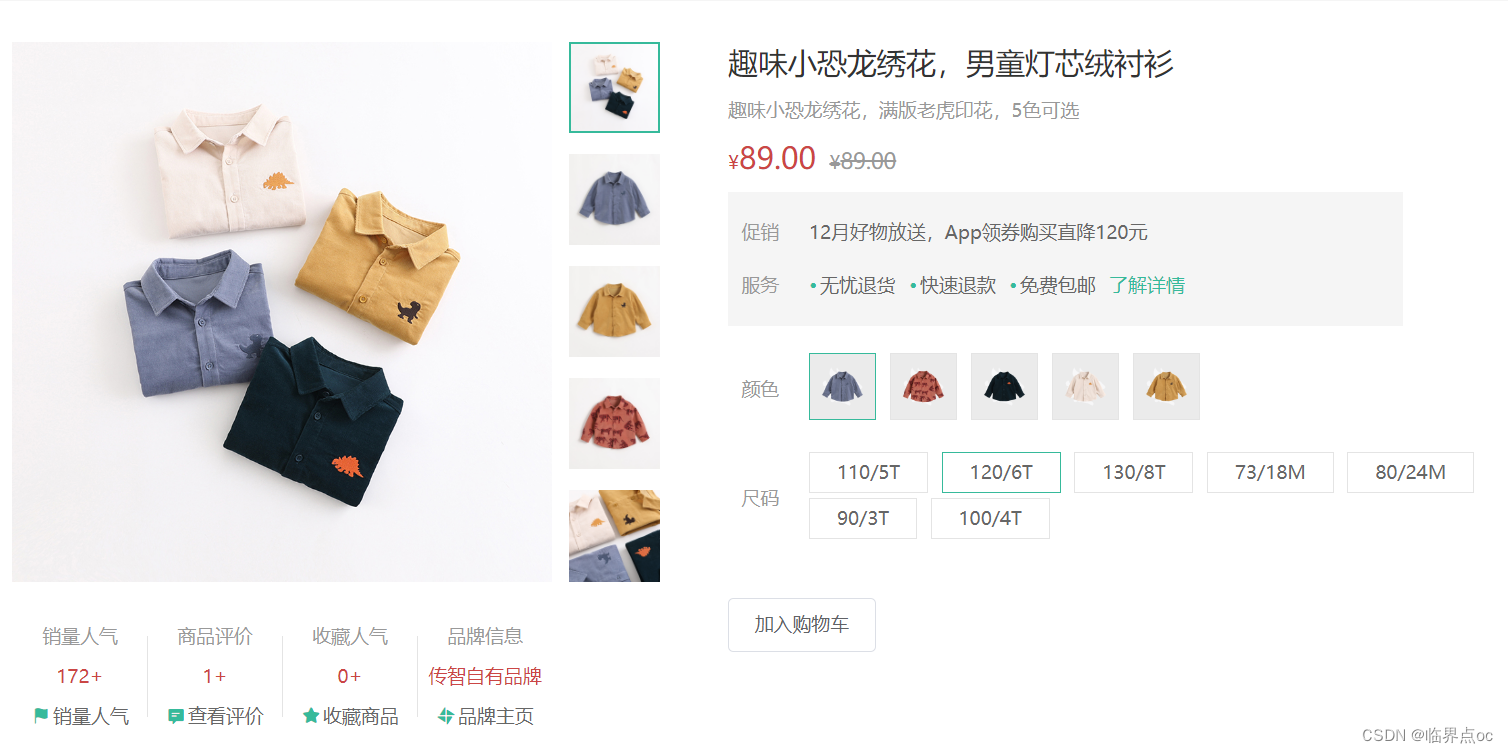
十、详情页 - 通用组件统一注册全局
1. 为什么要优化
背景:components目录下有可能还会有很多其他通用型组件,有可能在多个业务模块中共享,所有统一进行全局组件注册比较好。
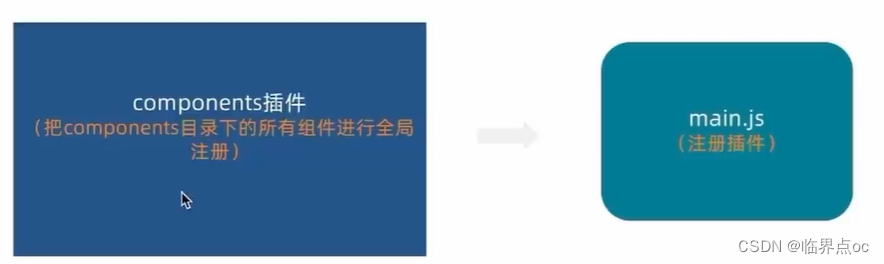
①src/components/index.js
// 把components中的所有组件进行全局化注册
// 通过插件的方式
import ImageView from './ImageView/index.vue'
import Sku from './XtxSku/index.vue'export const componentPlugin = {install(app) {// app.component('组件名字', 组件配置对象)app.component('XtxImageView', ImageView)app.component('XtxSku', Sku)}
}
②main.js
import { createApp } from 'vue'
import { createPinia } from 'pinia'import App from './App.vue'
import router from './router'
// 引入初始化样式文件
import '@/styles/common.scss'
// 引入懒加载指令插件并注册
import { lazyPlugin } from '@/direactives'
// 引入全局组件插件
import { componentPlugin } from '@/components/index.js'const app = createApp(App)app.use(createPinia())
app.use(router)
app.use(lazyPlugin)
app.use(componentPlugin)app.mount('#app')
③src/views/Detail/index.vue - 修改
// import ImageView from '@/components/ImageView/index.vue'
// import XtxSku from '@/components/XtxSku/index.vue'<!-- 图片预览区 -->
<XtxImageView :imageList="goods.mainPictures"></XtxImageView>
<!-- sku组件 -->
<XtxSku :goods="goods" @change="skuChange"></XtxSku>
相关文章:
前端Vue小兔鲜儿电商项目实战Day04
一、二级分类 - 整体认识和路由配置 1. 配置二级路由 ①准备组件模板 - src/views/SubCategory/index.vue <script setup></script><template><div class"container"><!-- 面包屑 --><div class"bread-container">…...

TypeScript的简单总结
TypeScript 深度总结 引言 TypeScript,作为JavaScript的一个强类型超集,由Microsoft在2012年推出并维护至今,它不仅继承了JavaScript的所有特性,还引入了静态类型系统和其他现代编程特性,为开发者提供了一个更安全、…...

I.MX6ULL UART 串口通信实验
系列文章目录 I.MX6ULL UART 串口通信实验 I.MX6ULL UART 串口通信实验 系列文章目录一、前言二、I.MX6U 串口简介2.1 UART 简介2.2 I.MX6U UART 简介 三、硬件原理分析四、实验程序编写五、编译下载验证5.1编写 Makefile 和链接脚本5.2 编译下载 一、前言 不管是单片机开发还…...

systemctlm-cosim-demo项目分析
概述 systemctlm-cosim-demo项目是Xilinx的systemc库的demo工程。 环境安装 qemu安装 cd xilinx_proj/Downloads git clone https://github.com/Xilinx/qemu.git cd qemu git checkout 74d70f8008# Configure and build # zynq7000 # ./configure --target-list"arm-s…...
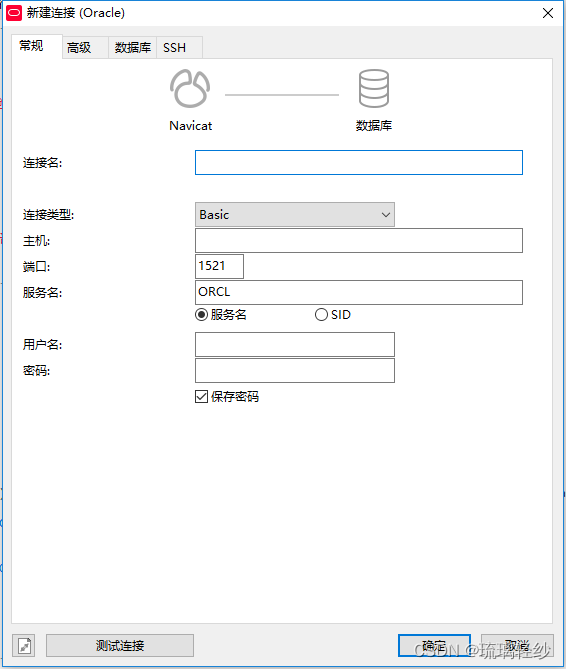
SQL学习小记(四)Navicat中连接Oracle数据库的详细步骤
五分钟解决Oracle连接问题:DPI-1047: Cannot locate a 64-bit Oracle Client library: “The specified module could not be SQL学习小记(四)Navicat中连接Oracle 1. 错误信息2. 解决过程2.1.版本查询2.2. 官网下载2.3. 设置Navicat的oci环…...

mysql聚簇索引
1.聚簇索引是物理索引,数据在表里是按顺序存储的,物理上是连续的,一般选主键id作为聚簇索引,且一张表里只能有一个聚簇索引。 2.只有InnoDB支持聚簇索引。 3.非聚簇索引是逻辑索引,将数据的某个字段抽取出来组成独立的…...

【云原生】Kubernetes----PersistentVolume(PV)与PersistentVolumeClaim(PVC)详解
目录 引言 一、存储卷 (一)存储卷定义 (二)存储卷的作用 1.数据持久化 2.数据共享 3.解耦 4.灵活性 (三)存储卷的分类 1.emptyDir存储卷 1.1 定义 1.2 特点 1.3 示例 2.hostPath存储卷 2.1 …...

Adobe Premiere 专业视频编辑软件资源下载安装!pr 2024最新版软件分享
Adobe Premiere,作为一款非线性视频编辑软件,它打破了传统线性编辑的限制,为用户提供了更加灵活和自由的创作空间。 在电影制作领域,Adobe Premiere的出色表现赢得了众多导演和剪辑师的青睐。其强大的编辑功能使得影片的剪辑过程更…...

c++------类和对象(下)包含了this指针、构造函数、析构函数、拷贝构造等
文章目录 前言一、this指针1.1、this指针的引出1.2、 this指针的特性 二、类的默认的六个构造函数2.1、构造函数简述2.2构造函数 三、析构函数3.1、析构函数引出3.2、特点: 四、拷贝构造4.1、引入4.2、特征:4.3、默认拷贝构造函数 总结 前言 在本节中&a…...

git版本控制工具常用命令
一、本地仓库管理 push 向远程推送代码 pulll 拉取代码 二、远程仓库管理 三、分支操作 本地主分支master 远程主分支main head指向当前分支 查看:git branch 创建分支: git branch 名字 切换分支:git checkout 名字 合并分支:git…...
展示广告多模态召回模型:混合模态专家模型
✍🏻 本文作者:俊广、卓立、凌潼、青萤 1. 背景 随着在搜索、推荐、广告技术上多年的迭代积累,业界逐步形成了召回(匹配)、粗排、精排这一多阶段的系统架构。其中,召回作为链路的最前端,决定了业…...

好的一些网安资源
镜像:https://msdn.itellyou.cn/ 编程学习{ 菜鸟教程:https://www.runoob.com/ w3school:https://www.w3school.com.cn/ https://www.dotcpp.com/ http://zh.cppreference.com/ https://beginnersbook.com/ https://www.ai8py.com/ }…...

Linux chmod 命令
Linux chmod 命令 在 Linux 操作系统中,chmod 命令是非常重要的。它可以用于修改文件和目录的访问权限,以及控制用户对系统资源的访问。在这篇博客中,我们将深入探讨 chmod 命令的使用方法,以及如何使用它来管理文件和目录的访问…...

SDL教程(二)——Qt+SDL播放器
前言 这篇文章主要是使用SDL来打开视频,显示视频。后续会再继续使用SDL来结合FFmpeg。来能够直接使用网上的demo进行学习。 正文 一、环境 Qt 5.15.2 MSVC2019 64bit Win11 二、Qt搭建SDL Qt搭建,我觉得相比用VS2019来说,更为方便&…...
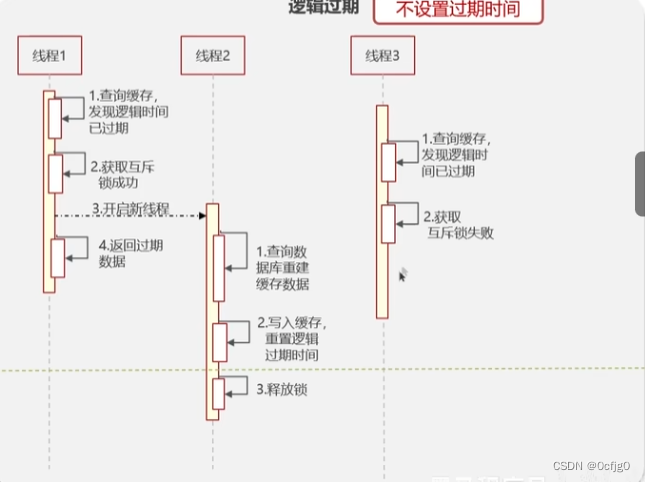
Java面试题:解决Redis缓存击穿问题
缓存击穿 当一个key过期时,需要对这个key进行数据重建 在重建的时间内如果有大量的并发请求进入,就会绕过缓存进入数据库,会瞬间击垮DB 重建时间可能因为数据是多个表的混合结果需要分头统计而延长,从而更容易出现缓存击穿问题 缓存击穿的解决方案 添加互斥锁 先查询缓存…...
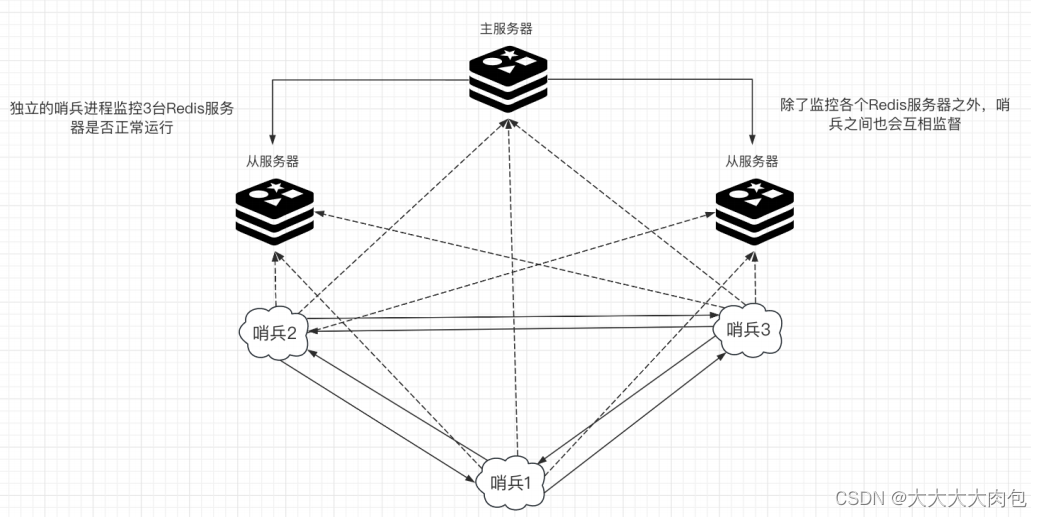
Redis的哨兵模式
什么是哨兵模式 Redis的哨兵模式( Sentinel mode )是⼀个⾼可⽤解决⽅案,当运⾏多个 Redis 实例并且需要⾃动故障转移时,哨兵模式⾮常有⽤。 在⼀个典型的哨兵模式下,⾄少需要3 个哨兵实例来避免 “ 脑裂 ” ÿ…...
Hadoop伪分布式安装教程
Hadoop伪分布式安装教程 一、安装背景1.1 软件列表1.2 系统软件列表 二、安装Hadoop2.1 安装 Java 环境2.1.1 前期准备2.1.2 文件传输2.1.3 解压文件2.1.4 配置 jdk 的环境变量2.1.5 输入 java、javac、java -version 命令检验 jdk 是否安装成功 2.2 Hadoop 下载地址[hadoop](h…...
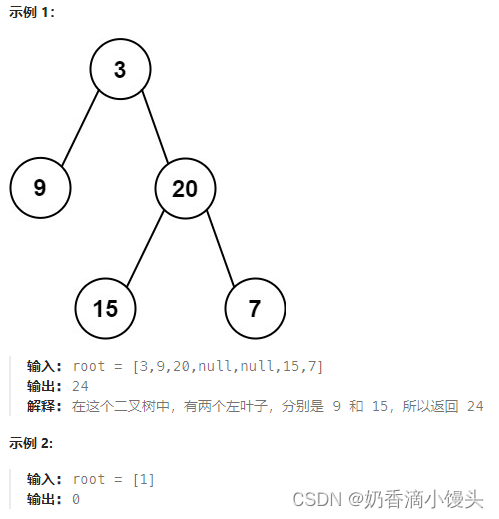
Day43 代码随想录打卡|二叉树篇---左叶子之和
题目(leecode T404): 给定二叉树的根节点 root ,返回所有左叶子之和。 方法: 迭代法:计算所有的左叶子节点,那我们就必然要找到所有的左叶子节点。那么怎么找呢?如何针对cur->l…...

微信小程序动画
微信小程序动画属性:提升用户体验的利器 引言 随着移动互联网技术的快速发展,微信小程序已经成为开发者和用户的热门选择。其轻便、快捷、即用即走的特点使得它在各种场景中都有广泛的应用。而动画作为一种重要的视觉元素,在增强用户体验方…...

js, ellipsis属性, 超出宽度自动省略... , 并且显示2行
overflow:hidden; display:-webkit-box; -webkit-line-clamp:2; -webkit-box-orient:vertical; text-overflow:ellipsis;...

学习笔记:敢管,会管,善管——学校行政管理的进阶
管理者角色理解一、管理者在组织结构中的位置校级:领导者管理者中层干部:管理者执行者学校教师:执行者(班主任对班级兼顾三者)二、从普通教师到中层干部的转变:1.工作职责的变化:从运动员向教练员转变运动员…...

突破8大平台限制:开源工具实现高速下载的3种创新方案
突破8大平台限制:开源工具实现高速下载的3种创新方案 【免费下载链接】Online-disk-direct-link-download-assistant 一个基于 JavaScript 的网盘文件下载地址获取工具。基于【网盘直链下载助手】修改 ,支持 百度网盘 / 阿里云盘 / 中国移动云盘 / 天翼云…...

Socket.IO-Client-Swift终极指南:构建实时iOS应用的第一步
Socket.IO-Client-Swift终极指南:构建实时iOS应用的第一步 【免费下载链接】socket.io-client-swift 项目地址: https://gitcode.com/gh_mirrors/so/socket.io-client-swift Socket.IO-Client-Swift是一个强大的开源库,为iOS开发者提供了简单高效…...

Go 网关模式:让业务逻辑和外部服务“保持距离“的艺术
🎬 场景小剧场 想象一下:你的电商系统要接支付功能。如果直接在 order 包里写 stripe.Charge(),明天老板说"换支付宝",你就要满世界改代码 😫 网关模式就是给业务逻辑装个"万能插座":不…...
:腾讯云、百度智能云免费算力实操)
11. 免费GPU资源汇总(三):腾讯云、百度智能云免费算力实操
调试卡在CUDA out of memory?聊聊免费GPU算力的门道 昨天帮同事调试一个目标检测模型,明明batch_size已经调到4了,还是爆显存。实验室的2080Ti卡被其他项目占着,自己笔记本的3060跑不动。这种时候才真切感受到——独立GPU资源对开发者来说,有时候比代码能力还关键。 免费…...

突破网盘下载瓶颈:开源工具如何重塑你的文件获取体验
突破网盘下载瓶颈:开源工具如何重塑你的文件获取体验 【免费下载链接】Online-disk-direct-link-download-assistant 一个基于 JavaScript 的网盘文件下载地址获取工具。基于【网盘直链下载助手】修改 ,支持 百度网盘 / 阿里云盘 / 中国移动云盘 / 天翼云…...

猫抓插件终极指南:5分钟快速掌握浏览器资源嗅探与高效下载
猫抓插件终极指南:5分钟快速掌握浏览器资源嗅探与高效下载 【免费下载链接】cat-catch 猫抓 浏览器资源嗅探扩展 / cat-catch Browser Resource Sniffing Extension 项目地址: https://gitcode.com/GitHub_Trending/ca/cat-catch 你是否曾经在浏览网页时&…...

安全自定义暗黑2体验:d2s-editor的无门槛存档编辑方案
安全自定义暗黑2体验:d2s-editor的无门槛存档编辑方案 【免费下载链接】d2s-editor 项目地址: https://gitcode.com/gh_mirrors/d2/d2s-editor 副标题:从零开始的本地化存档修改掌握之路 你是否曾因反复刷装备而失去对暗黑破坏神2的耐心&#x…...

终极指南:如何使用Orchestrator Raft模式构建无单点故障的MySQL高可用系统
终极指南:如何使用Orchestrator Raft模式构建无单点故障的MySQL高可用系统 【免费下载链接】orchestrator MySQL replication topology management and HA 项目地址: https://gitcode.com/gh_mirrors/or/orchestrator Orchestrator是一款强大的MySQL复制拓扑…...

ComfyUI-VideoHelperSuite全流程掌控:解锁10倍视频处理效率
ComfyUI-VideoHelperSuite全流程掌控:解锁10倍视频处理效率 【免费下载链接】ComfyUI-VideoHelperSuite Nodes related to video workflows 项目地址: https://gitcode.com/gh_mirrors/co/ComfyUI-VideoHelperSuite 构建高效视频工作流 环境部署与基础配置 …...