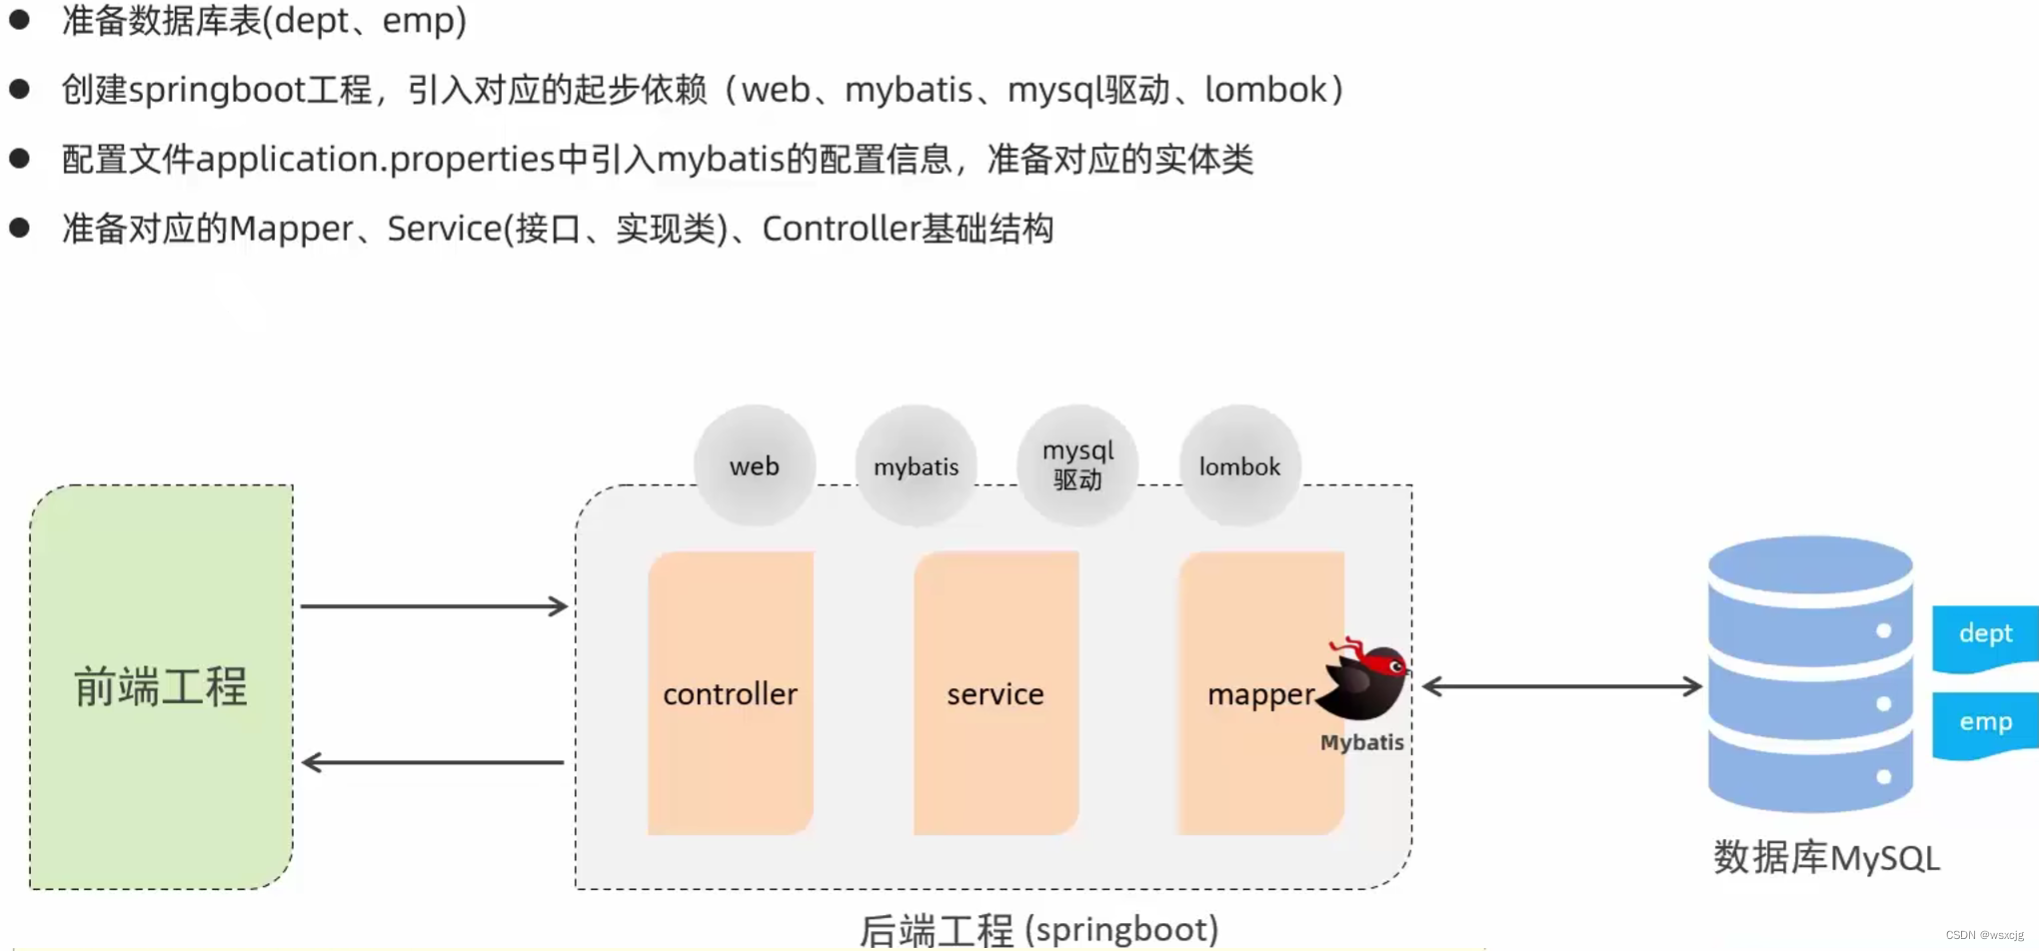
JavaWeb_SpringBootWeb案例
环境搭建:
开发规范
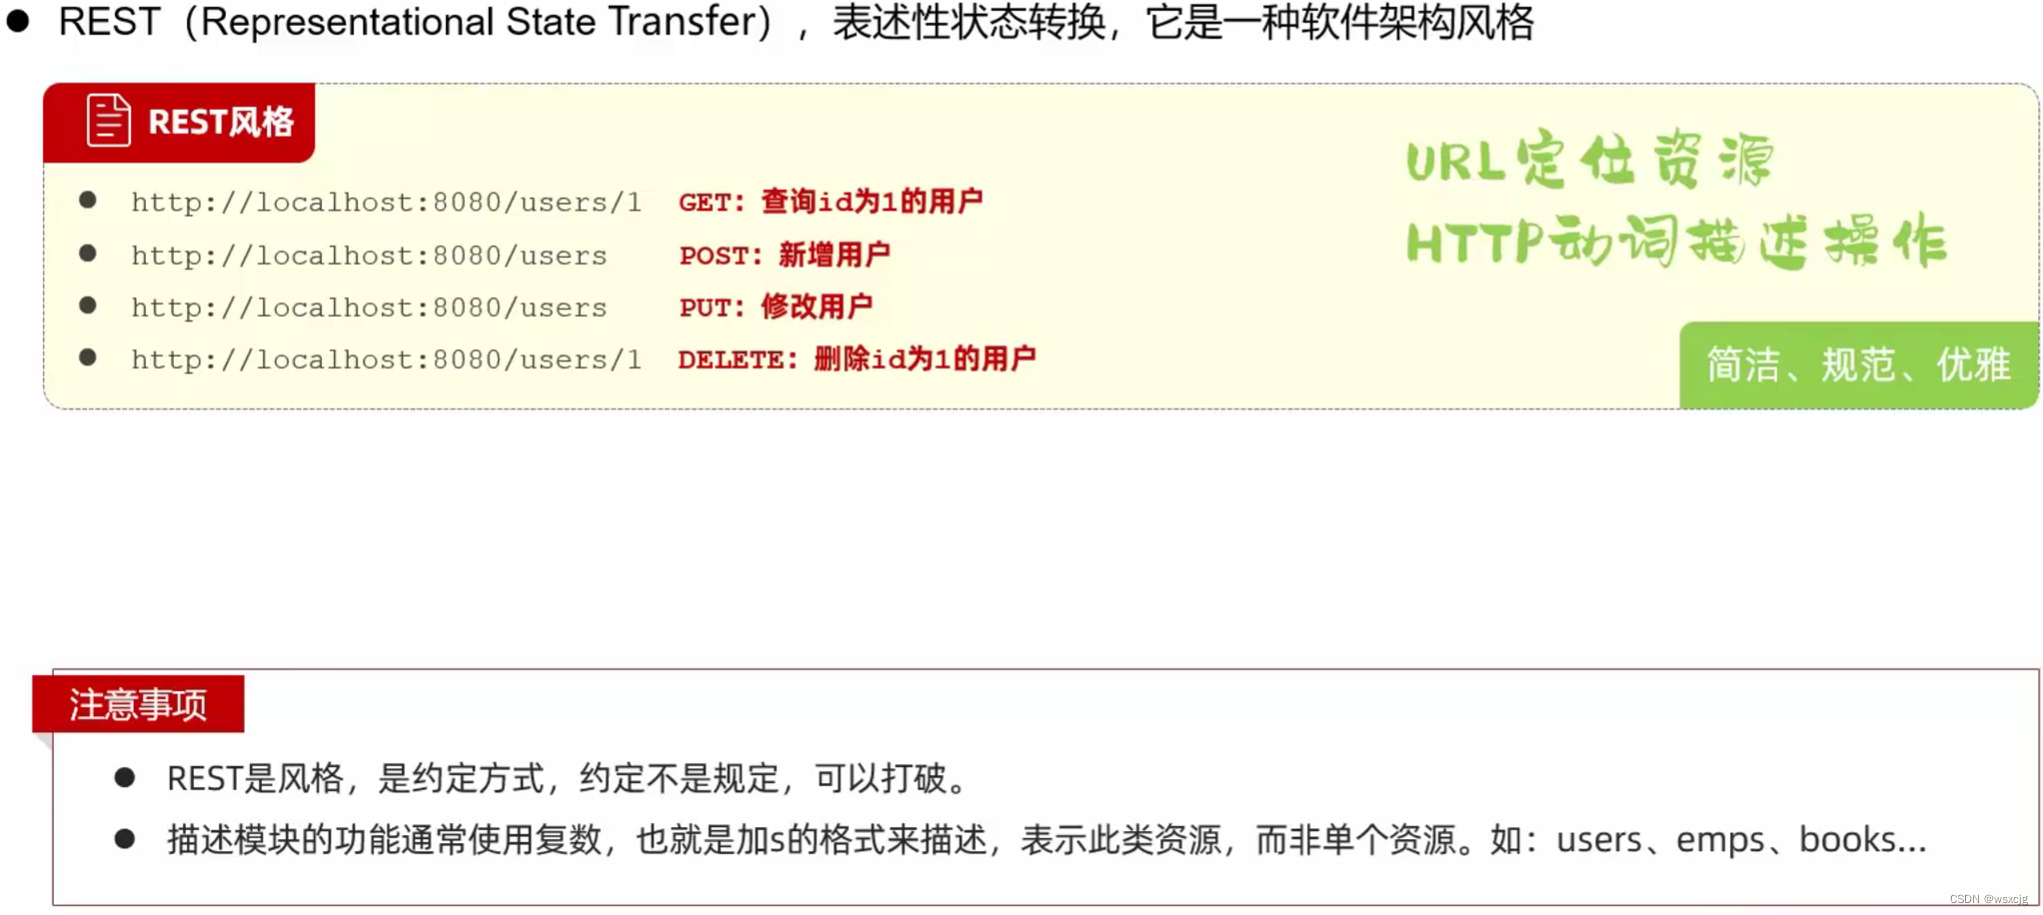
接口风格-Restful:
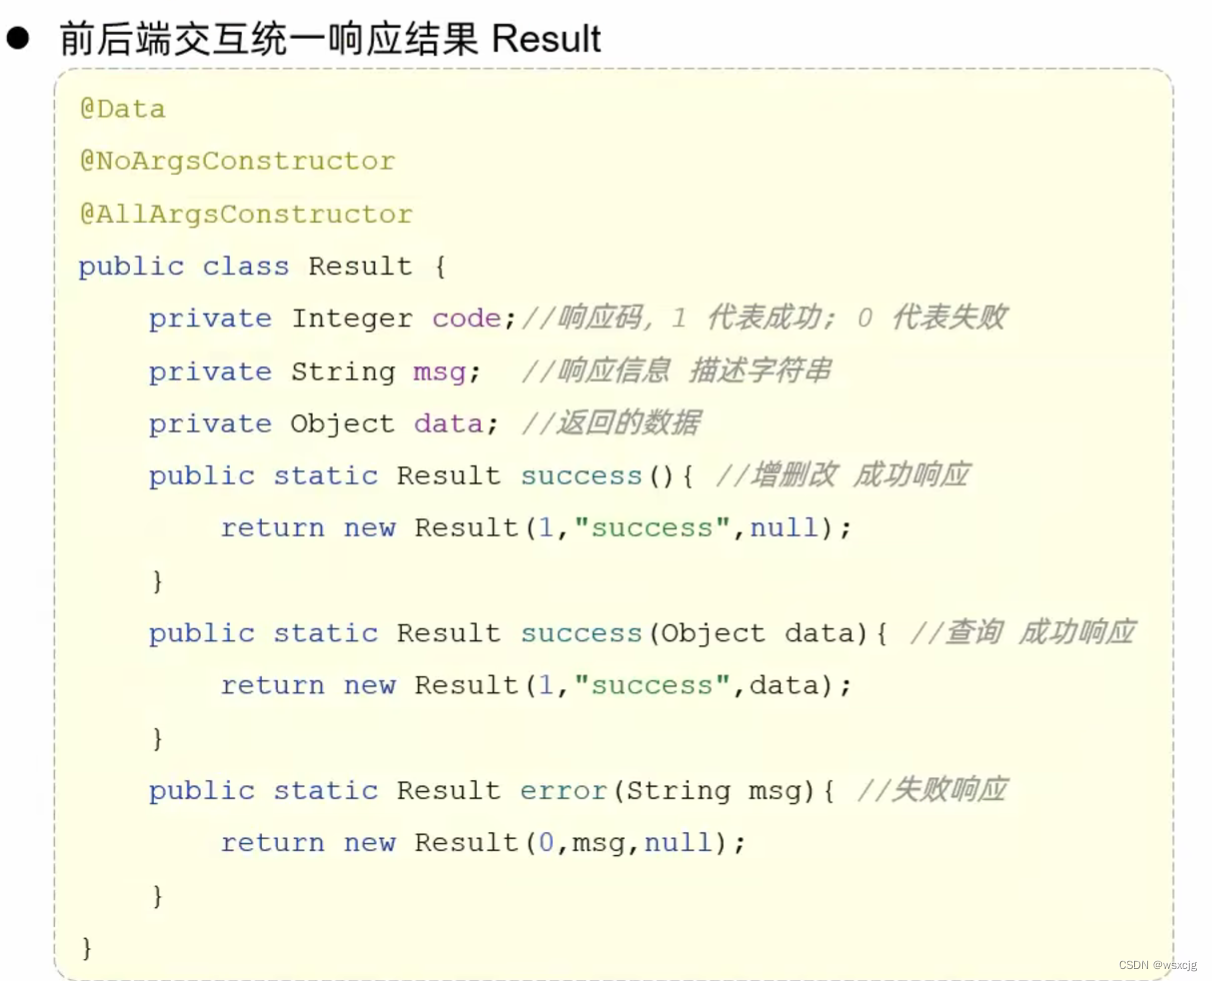
统一响应结果-Result:
开发流程:

第一步应该根据需求定义表结构和定义接口文档
注意:
本文代码从上往下一直添加功能,后面的模块下的代码包括前面的模块,并不是某个模块中的代码只有当前功能。
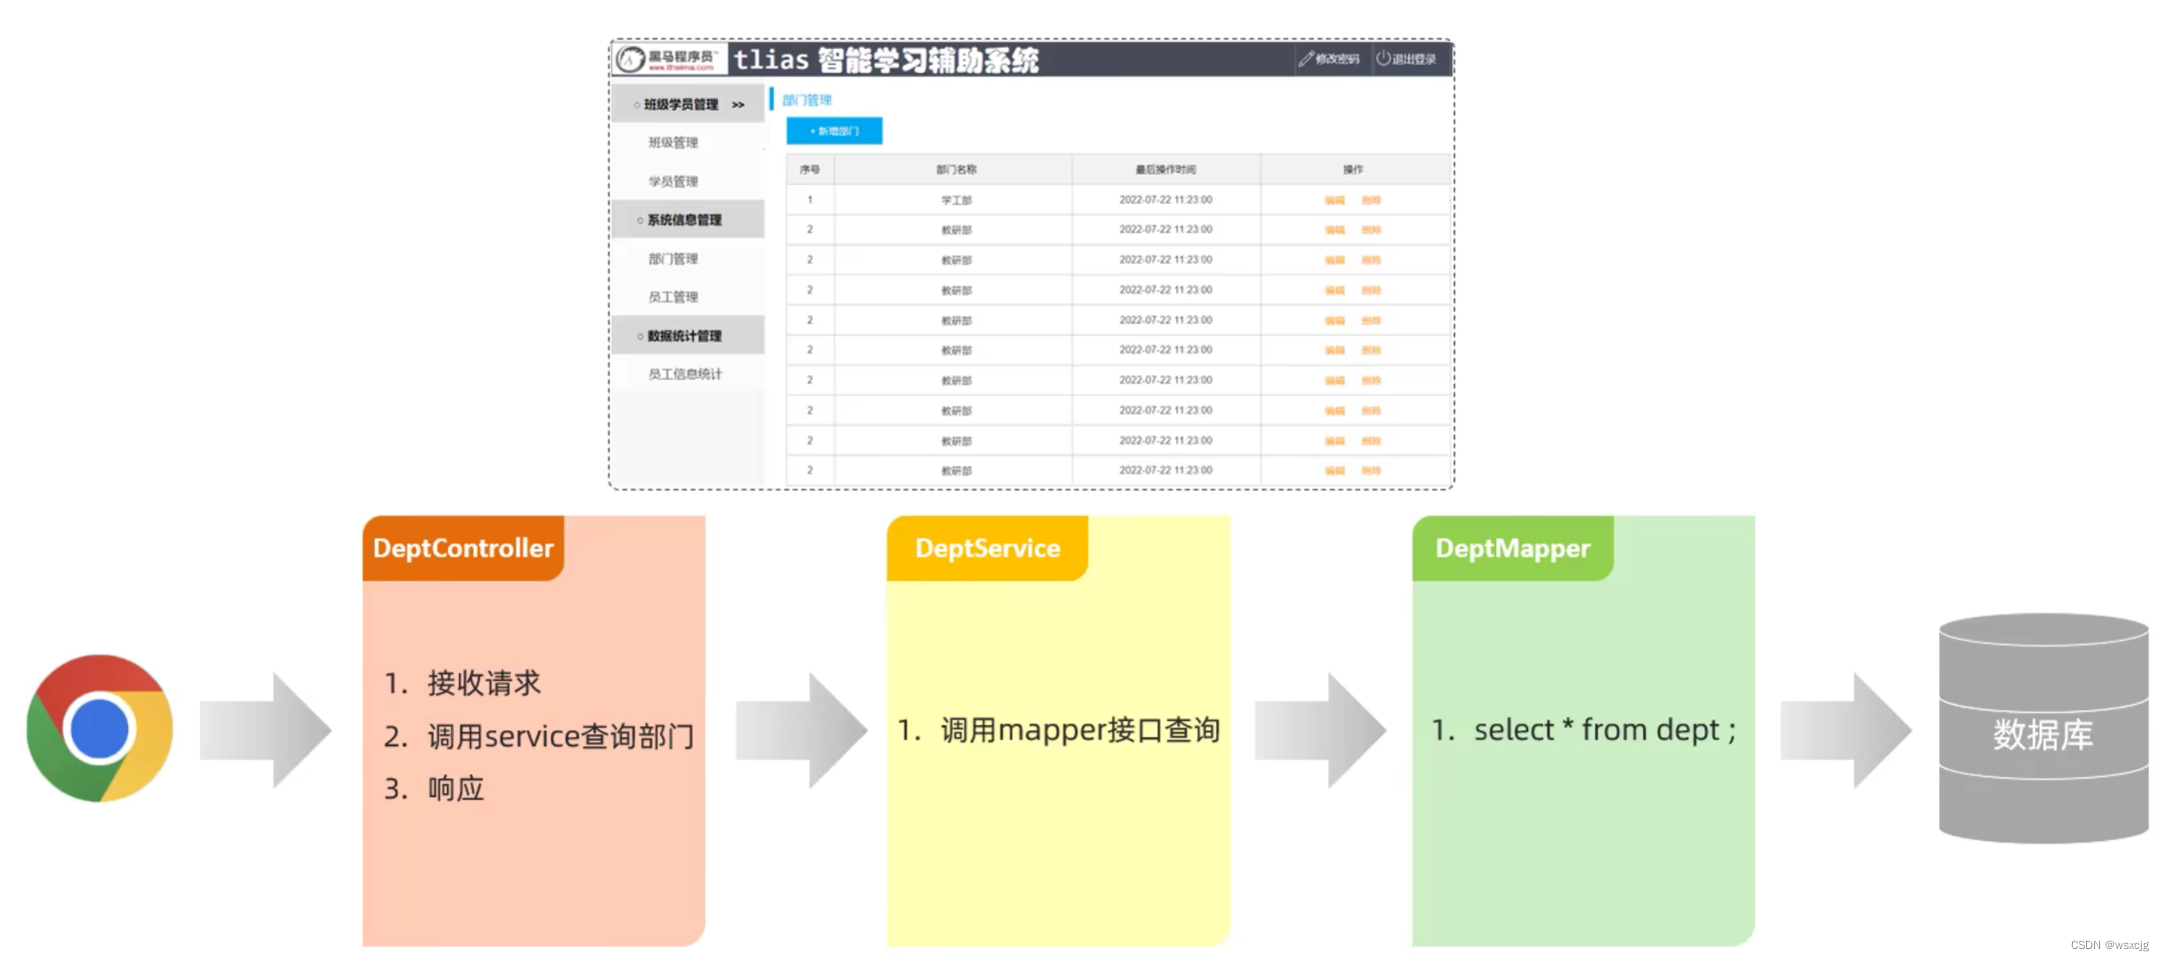
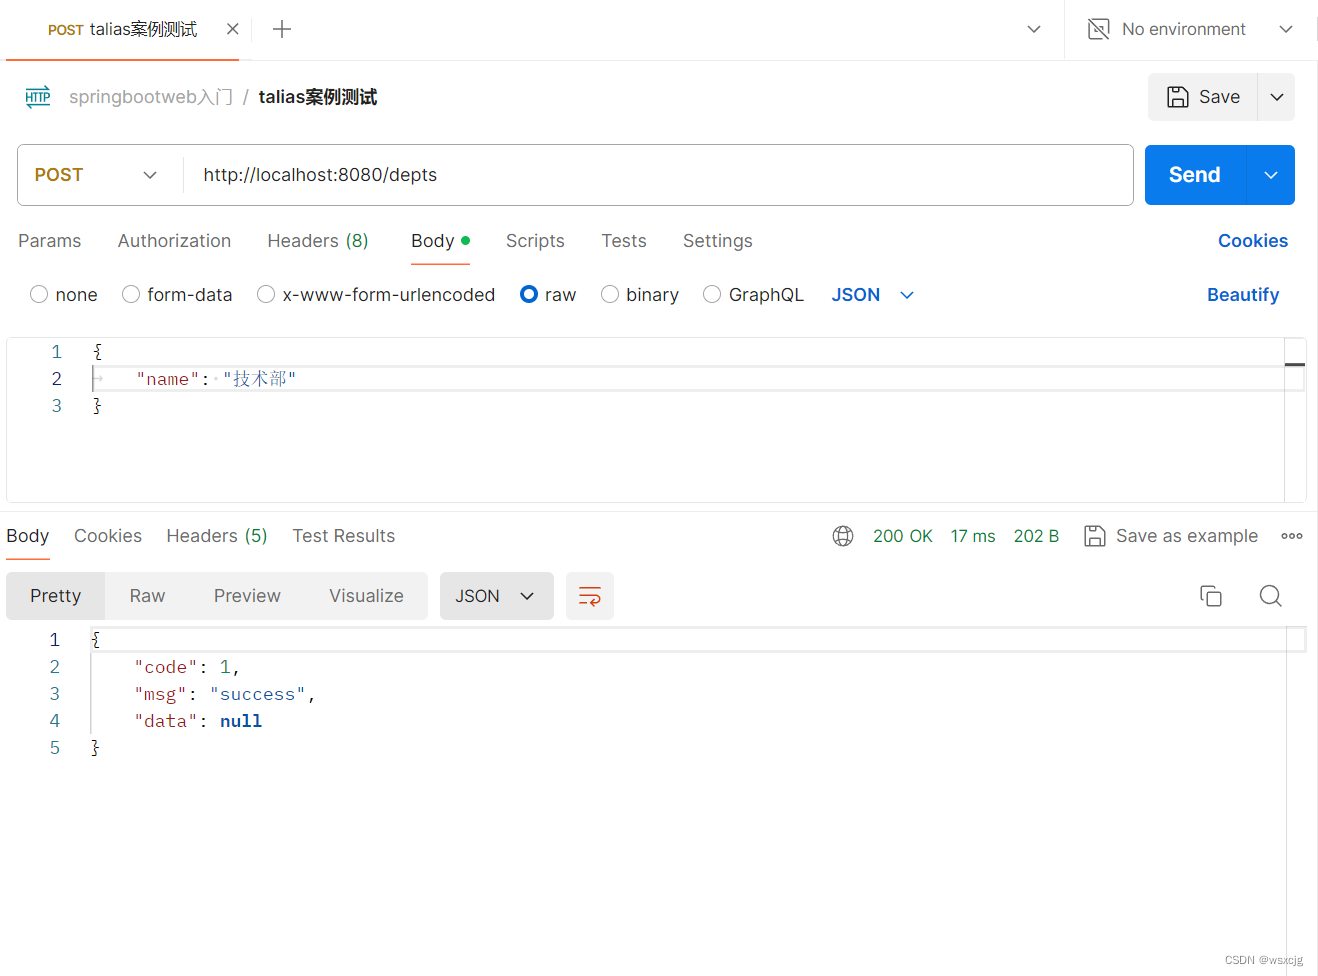
部门管理
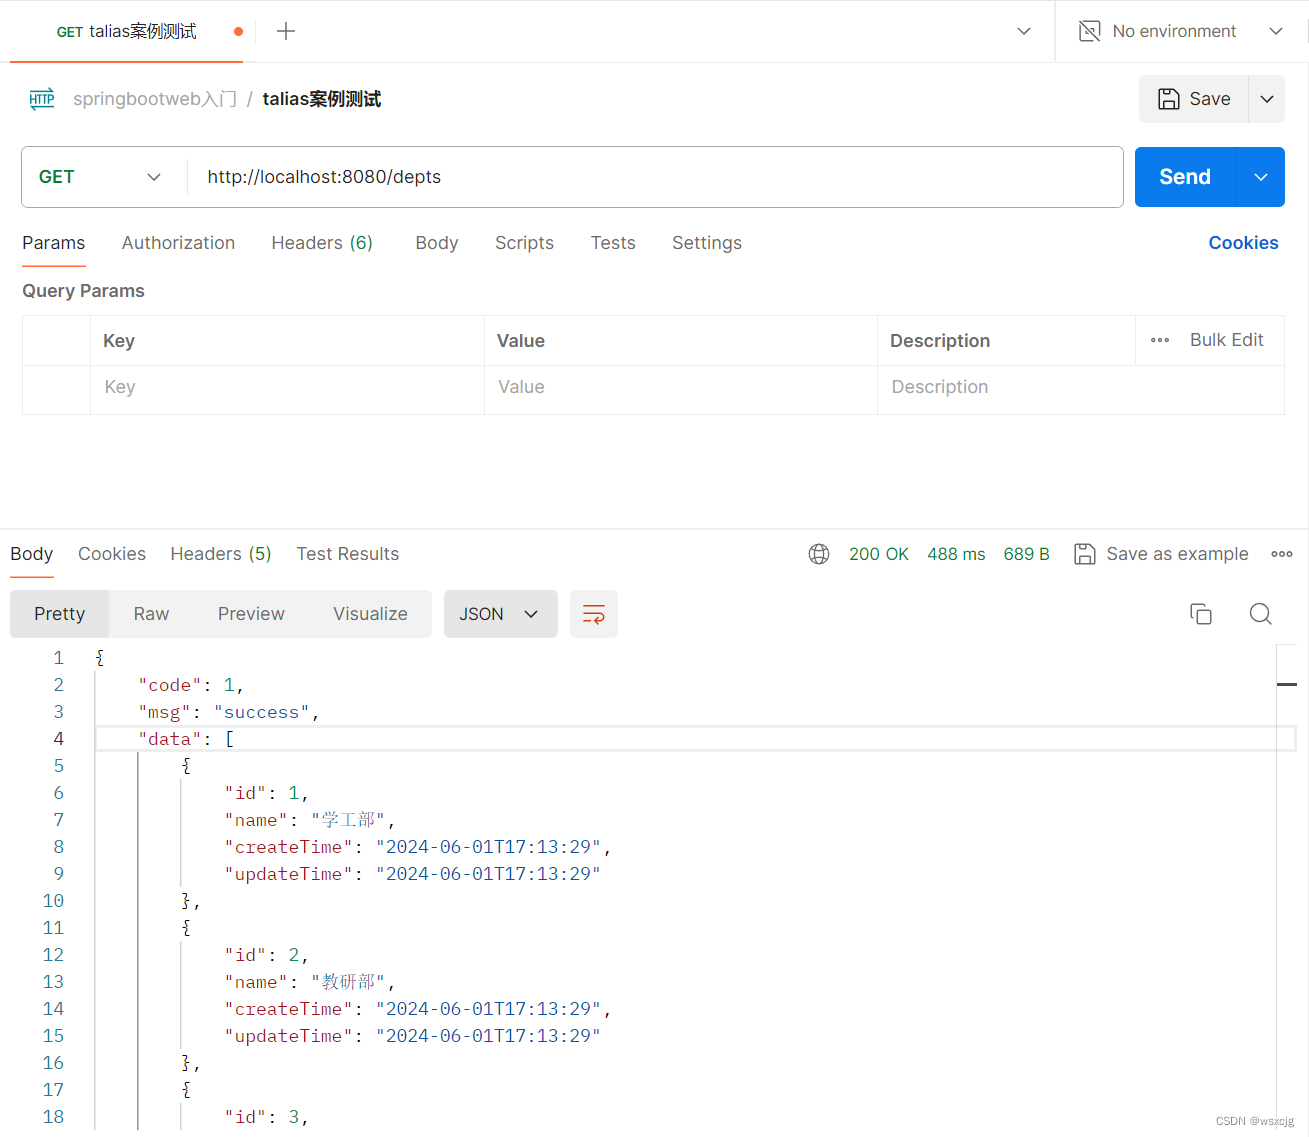
查询部门:
思路:
代码:
Dept实体类:
@Data
@NoArgsConstructor
@AllArgsConstructor
public class Dept {private int id;private String name;private LocalDateTime createTime;private LocalDateTime updateTime;
}
Controller层:
@Slf4j
@RestController
public class DeptController {@Autowiredprivate DeptService deptService;@GetMapping("/depts")public Result list() {log.info("查询全部部门信息");List<Dept> deptList = deptService.list();return Result.success(deptList);}}
(注解@Slf4j后可以直接使用log.info输出日志信息)
Service层:
接口:
public interface DeptService {List<Dept> list();}实现类:
@Service
public class DeptServiceImpl implements DeptService {@Autowiredprivate DeptMapper deptMapper;@Overridepublic List<Dept> list() {return deptMapper.list();}
}
Mapper层:
@Mapper
public interface DeptMapper {@Select("select * from dept")List<Dept> list();}
Postman测试结果:
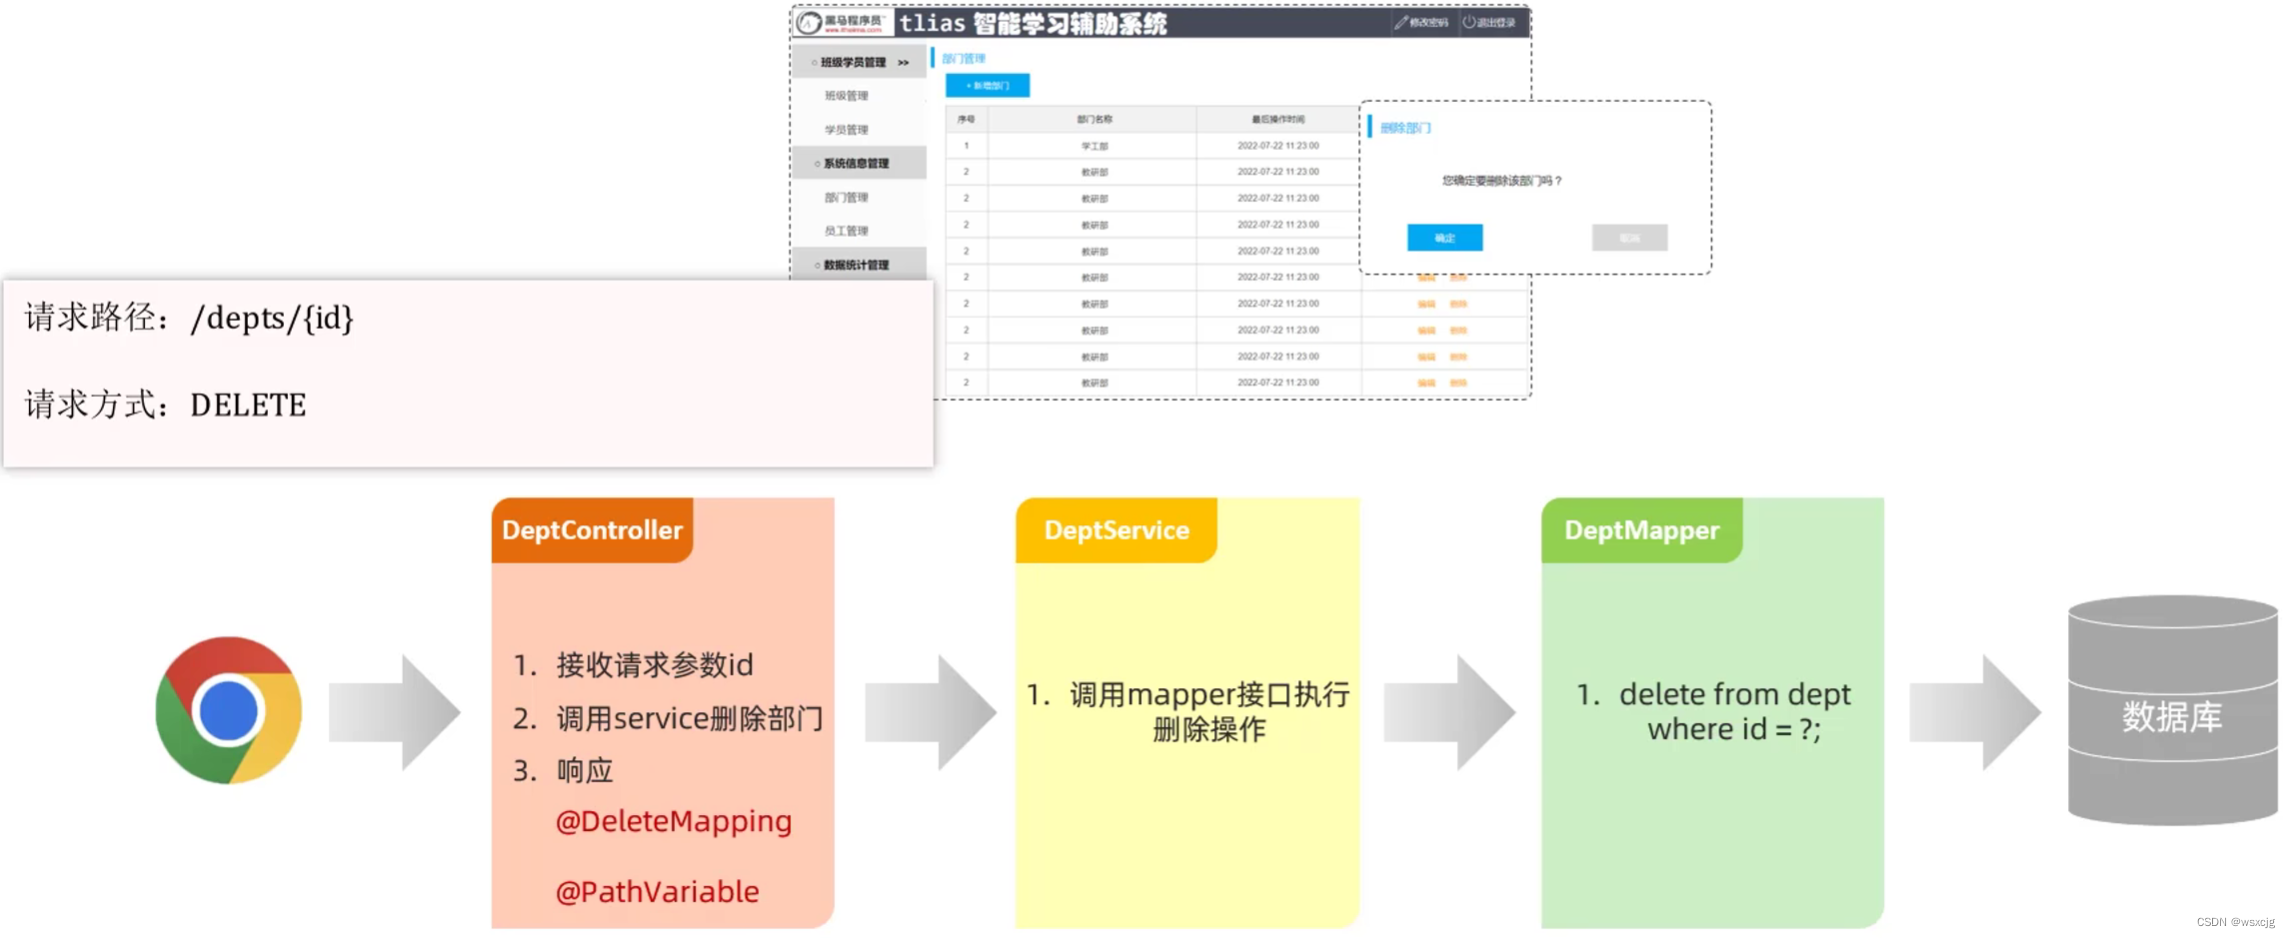
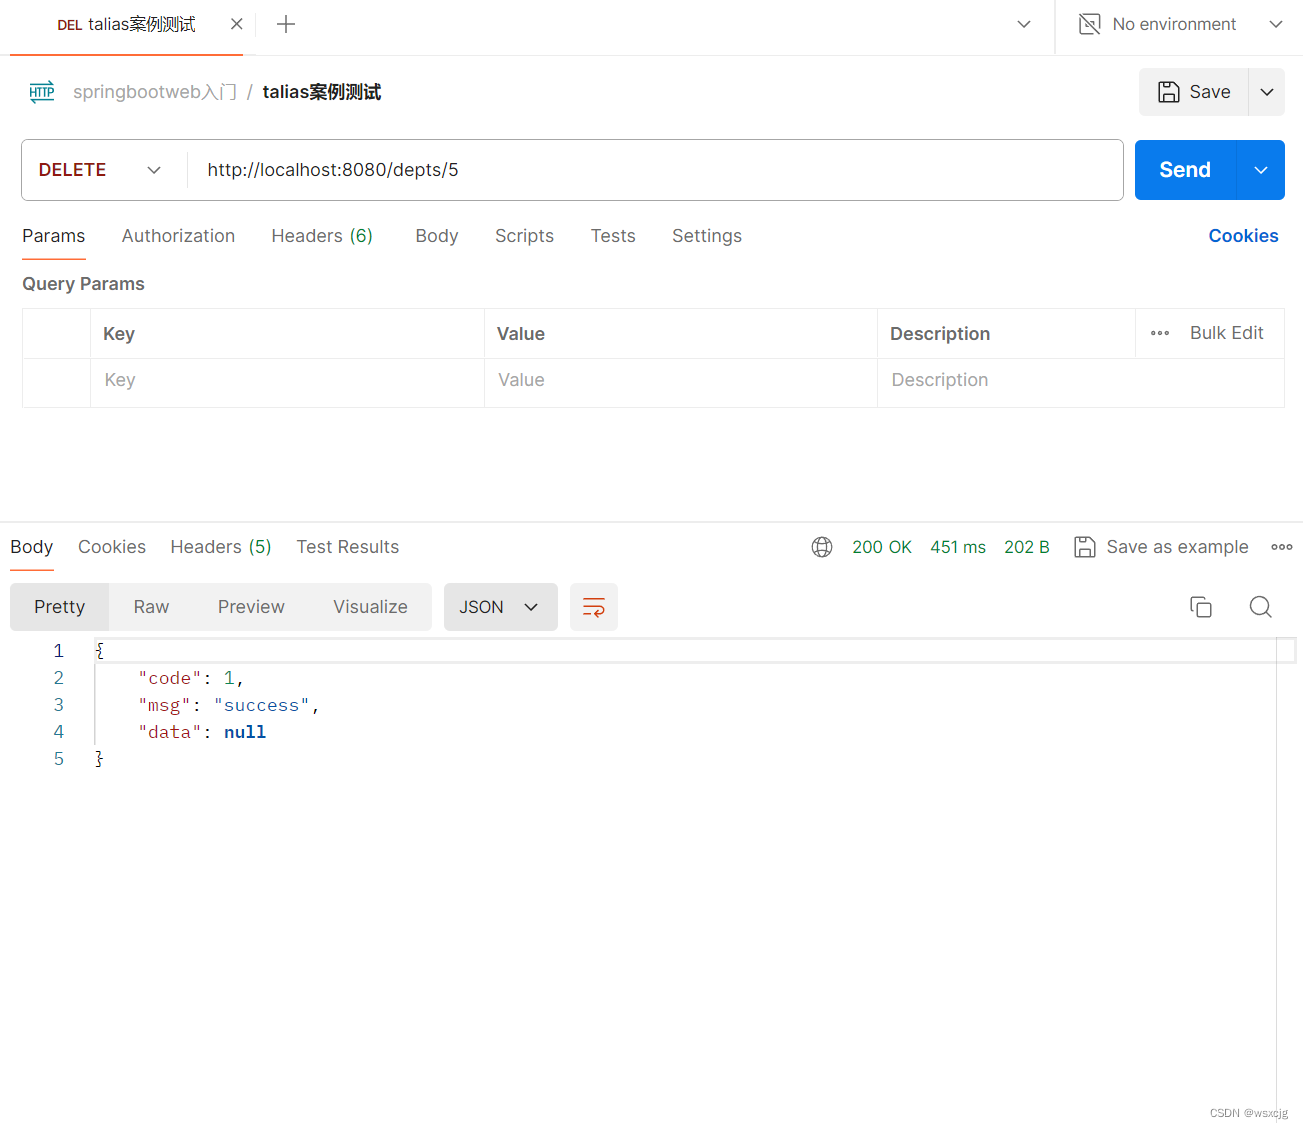
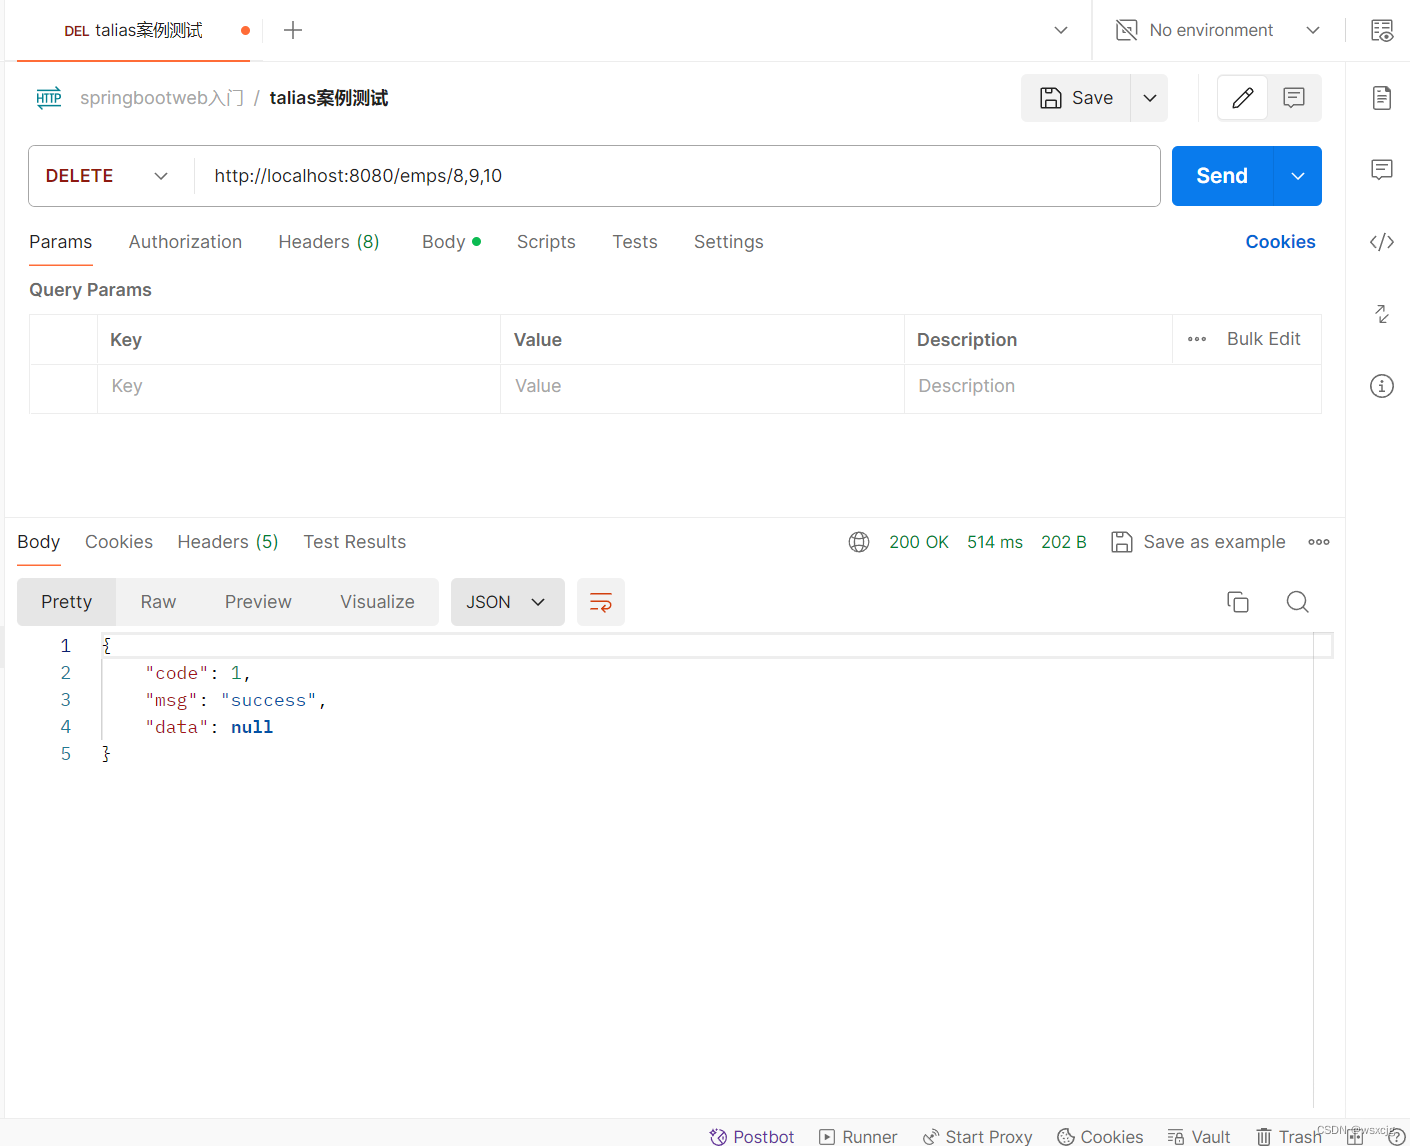
删除部门:
思路:
代码:
Controller层:
@Slf4j
@RestController
public class DeptController {@Autowiredprivate DeptService deptService;/*** 查询部门数据* @return*/@GetMapping("/depts")public Result list() {log.info("查询全部部门信息");List<Dept> deptList = deptService.list();return Result.success(deptList);}/*** 删除部门* @return*/@DeleteMapping("/depts/{id}")public Result delete(@PathVariable Integer id) {log.info("删除id为" + id +"的部门");deptService.delete(id);return Result.success();}}
Service层:
接口:
public interface DeptService {/*** 查询部门信息* @return*/List<Dept> list();/*** 根据id删除部门* @param id*/void delete(Integer id);}实现类:
@Service
public class DeptServiceImpl implements DeptService {@Autowiredprivate DeptMapper deptMapper;/*** 查询部门信息* @return*/@Overridepublic List<Dept> list() {return deptMapper.list();}/*** 根据id删除部门* @param id*/@Overridepublic void delete(Integer id) {deptMapper.deleteById(id);}
}
Mapper层:
@Mapper
public interface DeptMapper {/*** 查询部门信息* @return*/@Select("select * from dept")List<Dept> list();/*** 根据id删除部门* @param id*/@Delete("delete from dept where id = #{id}")void deleteById(Integer id);
}
Postman测试结果:
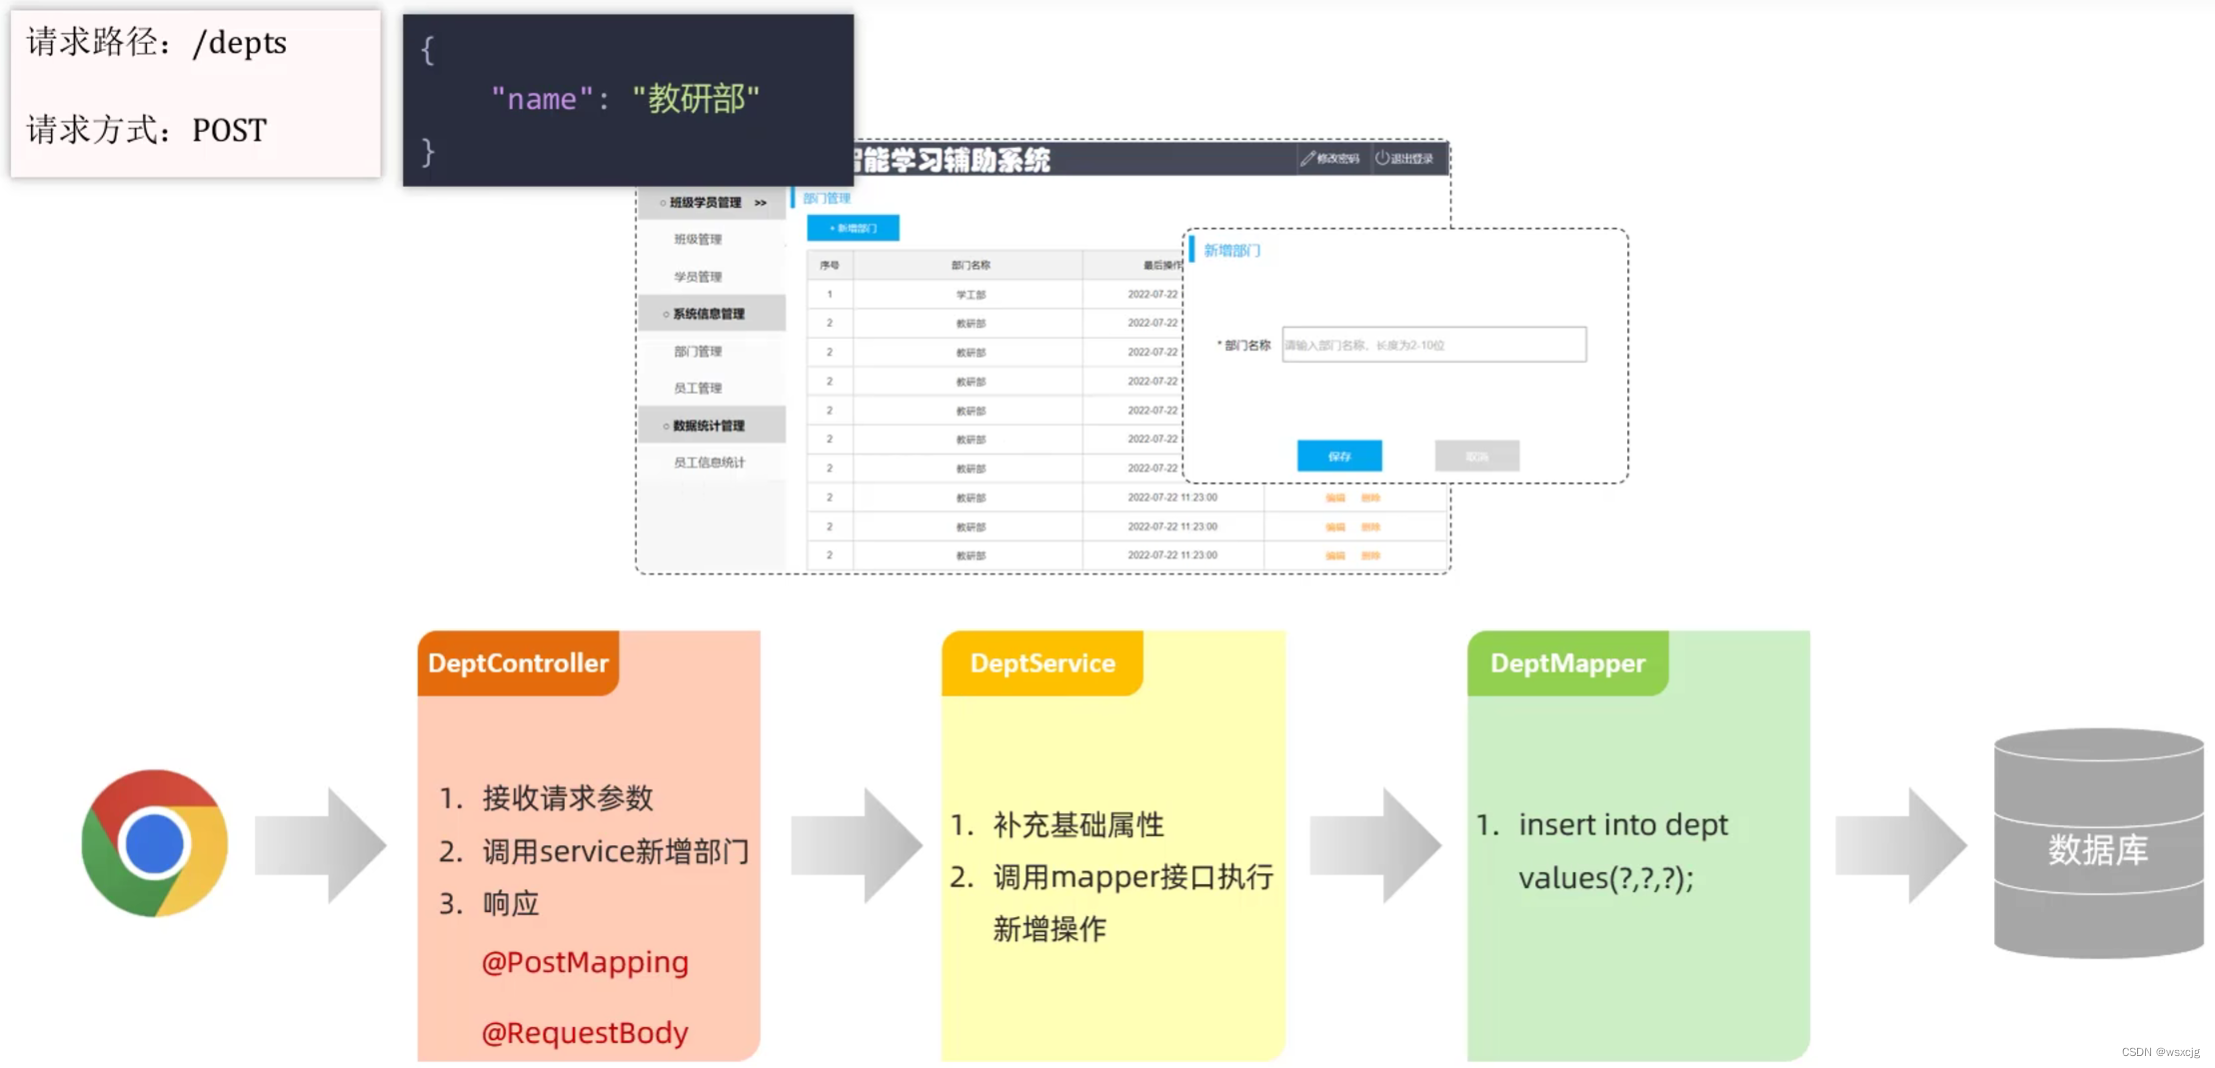
新增部门:
思路:
代码:
Controller层:
@Slf4j
@RestController
public class DeptController {@Autowiredprivate DeptService deptService;/*** 查询部门数据* @return*/@GetMapping("/depts")public Result list() {log.info("查询全部部门信息");List<Dept> deptList = deptService.list();return Result.success(deptList);}/*** 删除部门* @return*/@DeleteMapping("/depts/{id}")public Result delete(@PathVariable Integer id) {log.info("删除id为" + id +"的部门");deptService.delete(id);return Result.success();}/*** 新增部门* @param dept* @return*/@PostMapping("/depts")public Result insert(@RequestBody Dept dept) {log.info("添加部门:" + dept);deptService.add(dept);return Result.success();}}
Service层:
接口:
public interface DeptService {/*** 查询部门信息* @return*/List<Dept> list();/*** 根据id删除部门* @param id*/void delete(Integer id);/*** 新增部门* @param dept*/void add(Dept dept);
}
实现类:
@Service
public class DeptServiceImpl implements DeptService {@Autowiredprivate DeptMapper deptMapper;/*** 查询部门信息* @return*/@Overridepublic List<Dept> list() {return deptMapper.list();}/*** 根据id删除部门* @param id*/@Overridepublic void delete(Integer id) {deptMapper.deleteById(id);}/*** 新增部门* @param dept*/@Overridepublic void add(Dept dept) {dept.setCreateTime(LocalDateTime.now());dept.setUpdateTime(LocalDateTime.now());deptMapper.insert(dept);}
}
Mapper层:
@Mapper
public interface DeptMapper {/*** 查询部门信息* @return*/@Select("select * from dept")List<Dept> list();/*** 根据id删除部门* @param id*/@Delete("delete from dept where id = #{id}")void deleteById(Integer id);/*** 新增部门* @param dept*/@Insert("insert into dept(name,create_time,update_time) values (#{name},#{createTime}, #{updateTime})")void insert(Dept dept);
}
Postman测试结果:
优化代码:
Controller层优化:
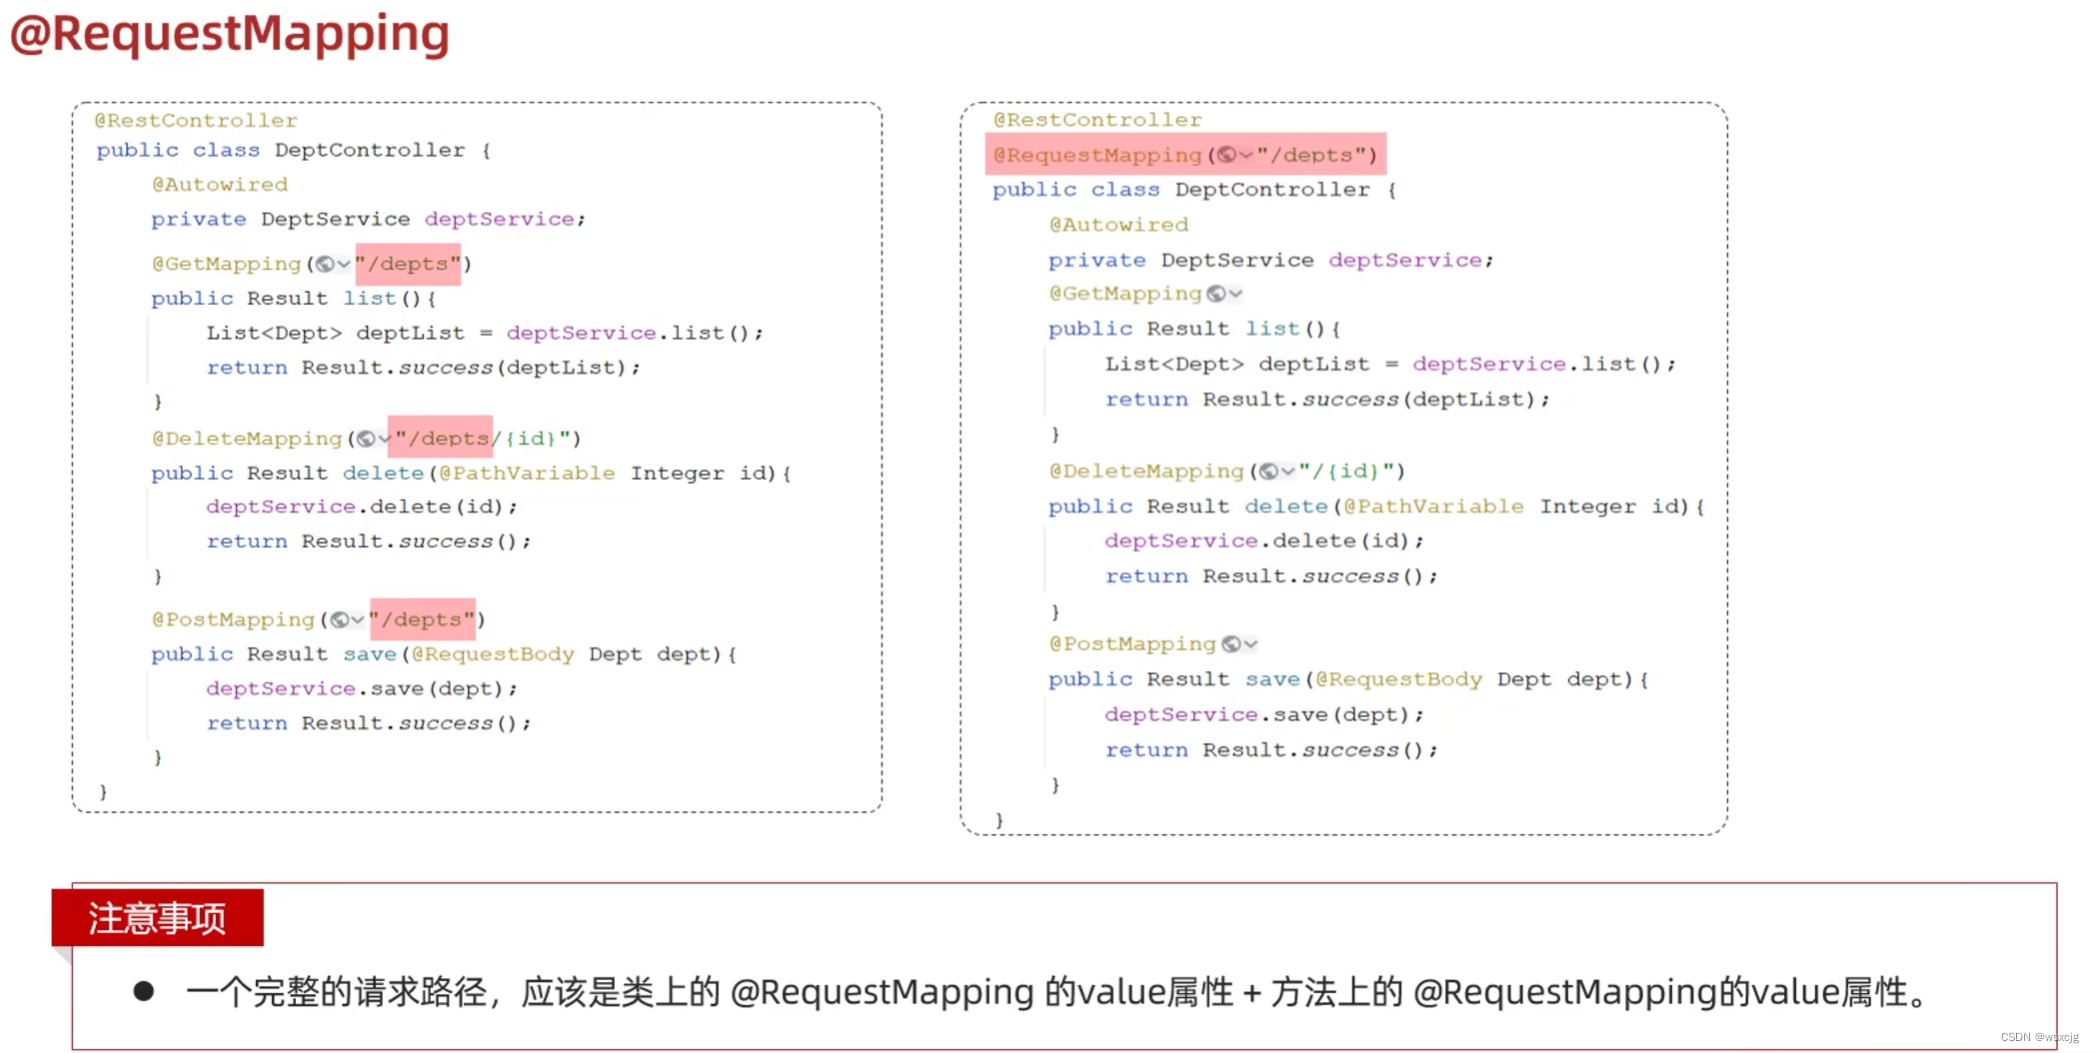
路径中/depts每次都出现,可以将它提取出来
优化后代码:
@Slf4j
@RequestMapping("/depts")
@RestController
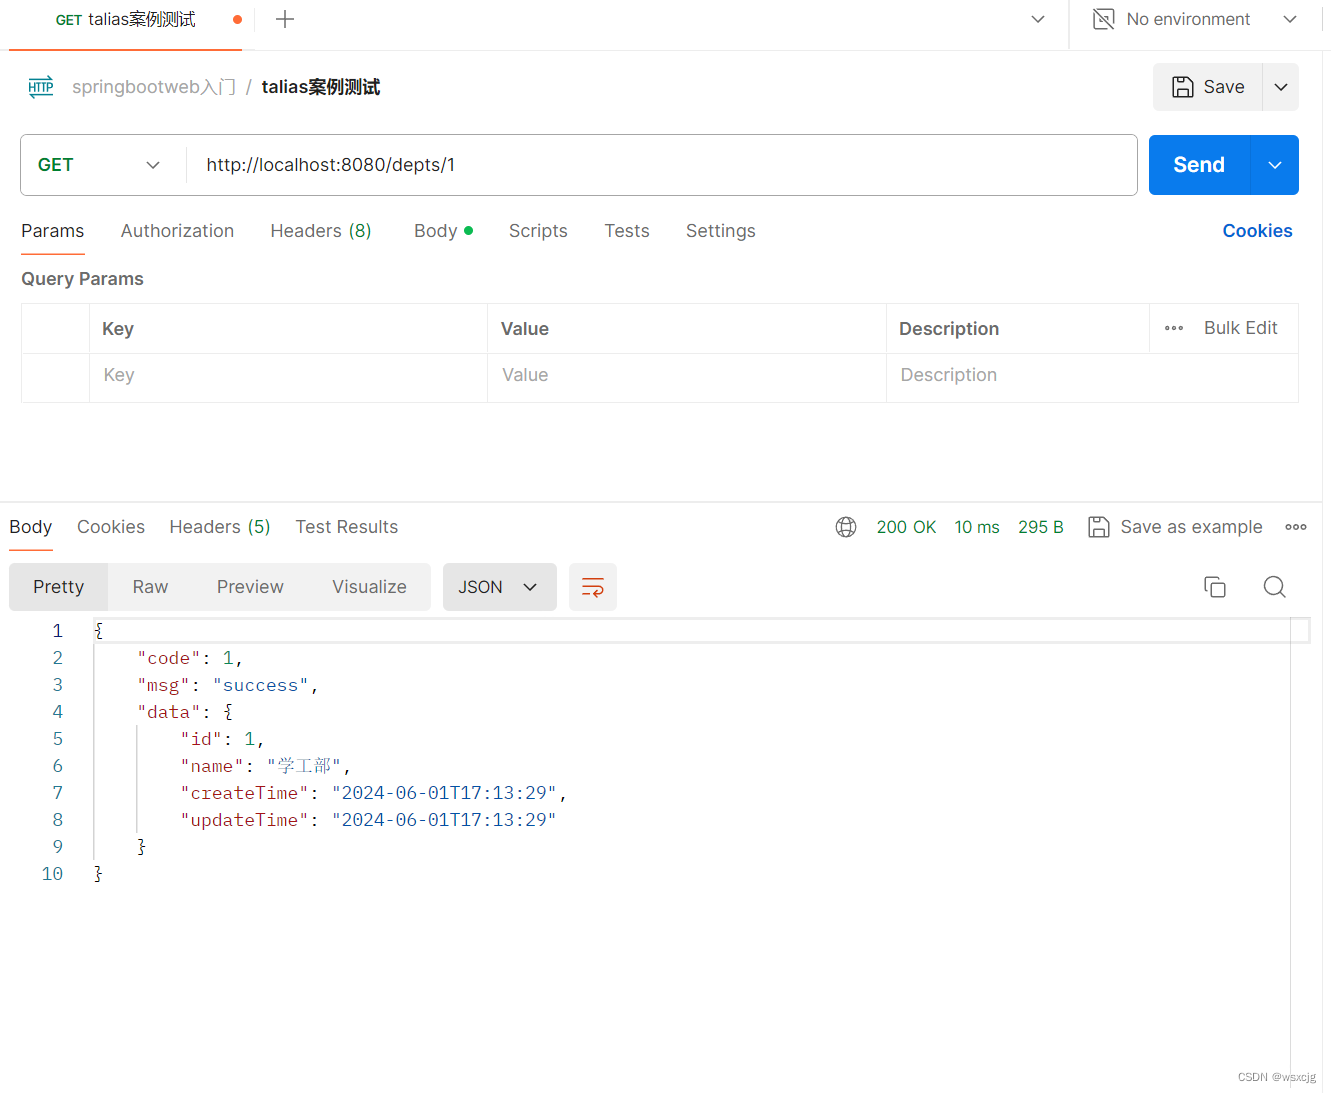
public class DeptController {@Autowiredprivate DeptService deptService;/*** 查询部门数据* @return*/@GetMappingpublic Result list() {log.info("查询全部部门信息");List<Dept> deptList = deptService.list();return Result.success(deptList);}/*** 删除部门* @return*/@DeleteMapping("/{id}")public Result delete(@PathVariable Integer id) {log.info("删除id为" + id +"的部门");deptService.delete(id);return Result.success();}/*** 新增部门* @param dept* @return*/@PostMappingpublic Result insert(@RequestBody Dept dept) {log.info("添加部门:" + dept);deptService.add(dept);return Result.success();}}根据id查找部门:
代码:
Controller层:
@Slf4j
@RequestMapping("/depts")
@RestController
public class DeptController {@Autowiredprivate DeptService deptService;/*** 查询部门数据* @return*/@GetMappingpublic Result list() {log.info("查询全部部门信息");List<Dept> deptList = deptService.list();return Result.success(deptList);}/*** 删除部门* @return*/@DeleteMapping("/{id}")public Result delete(@PathVariable Integer id) {log.info("删除id为" + id +"的部门");deptService.delete(id);return Result.success();}/*** 新增部门* @param dept* @return*/@PostMappingpublic Result insert(@RequestBody Dept dept) {log.info("添加部门:" + dept);deptService.add(dept);return Result.success();}/*** 根据id查找部门* @param id* @return*/@GetMapping("/{id}")public Result getById(@PathVariable Integer id) {log.info("查询id为"+ id + "的部门信息");Dept dept = deptService.get(id);return Result.success(dept);}}
Service层:
接口:
public interface DeptService {/*** 查询部门信息* @return*/List<Dept> list();/*** 根据id删除部门* @param id*/void delete(Integer id);/*** 新增部门* @param dept*/void add(Dept dept);/*** 根据id查找部门* @param id*/Dept get(Integer id);
}
实现类:
@Service
public class DeptServiceImpl implements DeptService {@Autowiredprivate DeptMapper deptMapper;/*** 查询部门信息* @return*/@Overridepublic List<Dept> list() {return deptMapper.list();}/*** 根据id删除部门* @param id*/@Overridepublic void delete(Integer id) {deptMapper.deleteById(id);}/*** 新增部门* @param dept*/@Overridepublic void add(Dept dept) {dept.setCreateTime(LocalDateTime.now());dept.setUpdateTime(LocalDateTime.now());deptMapper.insert(dept);}/*** 根据id查找部门* @param id*/@Overridepublic Dept get(Integer id) {return deptMapper.getById(id);}
}
Mapper层:
@Mapper
public interface DeptMapper {/*** 查询部门信息* @return*/@Select("select * from dept")List<Dept> list();/*** 根据id删除部门* @param id*/@Delete("delete from dept where id = #{id}")void deleteById(Integer id);/*** 新增部门* @param dept*/@Insert("insert into dept(name,create_time,update_time) values (#{name},#{createTime}, #{updateTime})")void insert(Dept dept);/*** 根据id查找部门* @param id* @return*/@Select("select * from dept where id = #{id}")Dept getById(Integer id);
}
Postman测试结果:
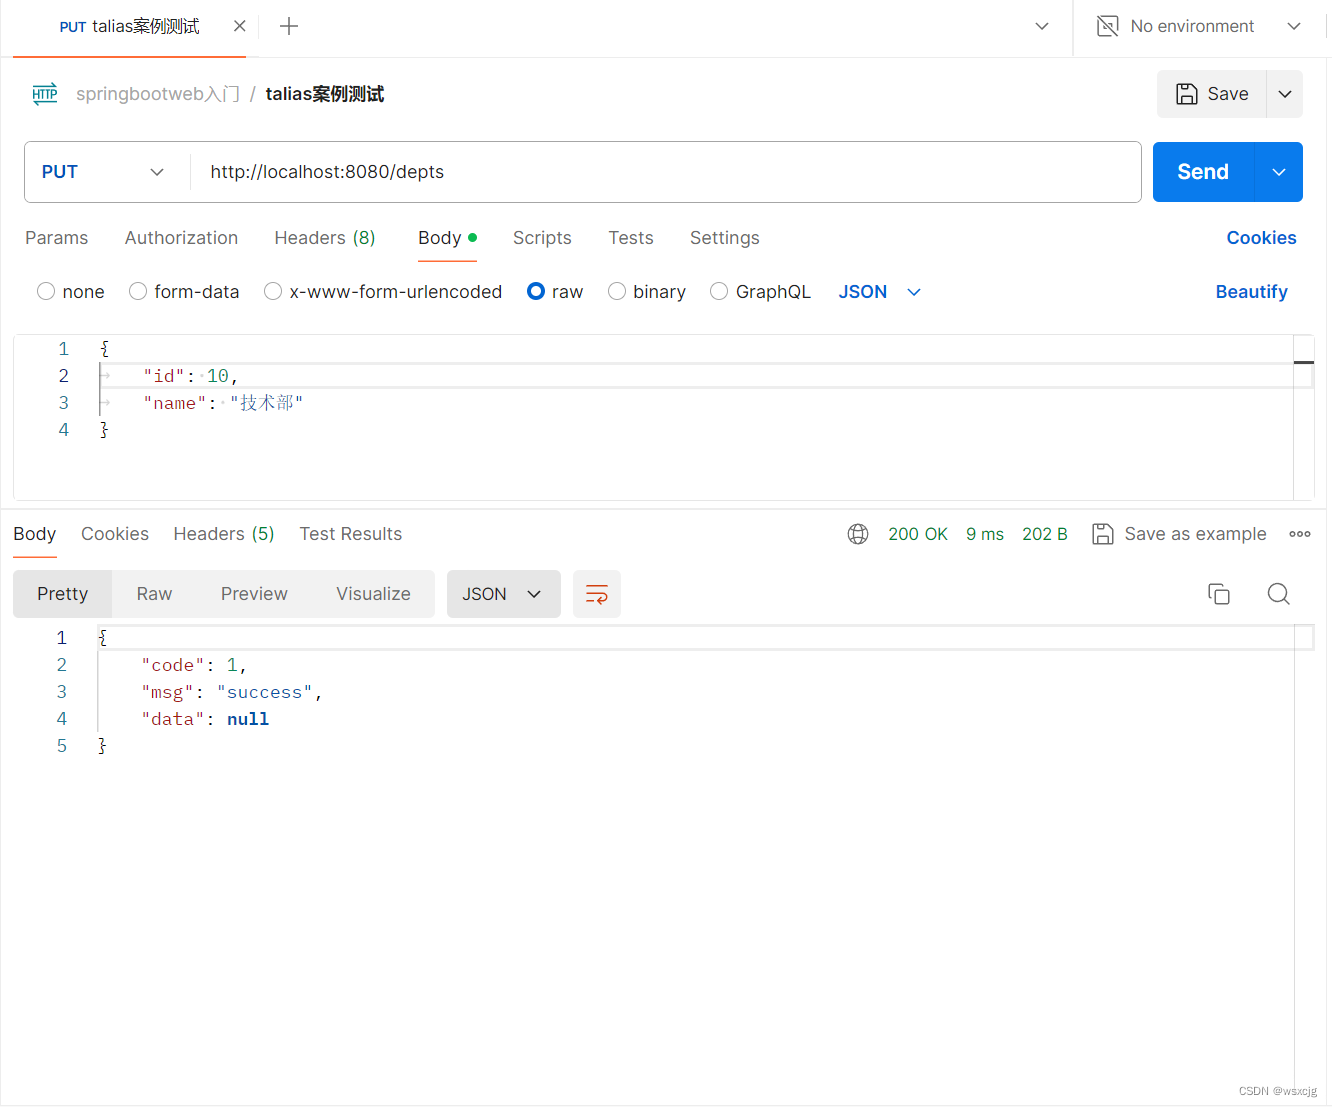
修改部门:
代码:
Controller层:
@Slf4j
@RequestMapping("/depts")
@RestController
public class DeptController {@Autowiredprivate DeptService deptService;/*** 查询部门数据* @return*/@GetMappingpublic Result list() {log.info("查询全部部门信息");List<Dept> deptList = deptService.list();return Result.success(deptList);}/*** 删除部门* @return*/@DeleteMapping("/{id}")public Result delete(@PathVariable Integer id) {log.info("删除id为" + id +"的部门");deptService.delete(id);return Result.success();}/*** 新增部门* @param dept* @return*/@PostMappingpublic Result insert(@RequestBody Dept dept) {log.info("添加部门:" + dept);deptService.add(dept);return Result.success();}/*** 根据id查找部门* @param id* @return*/@GetMapping("/{id}")public Result getById(@PathVariable Integer id) {log.info("查询id为"+ id + "的部门信息");Dept dept = deptService.get(id);return Result.success(dept);}/*** 修改部门* @param dept* @return*/@PutMappingpublic Result update(@RequestBody Dept dept) {log.info("修改部门:" + dept);deptService.update(dept);return Result.success();}}
Service层:
接口:
public interface DeptService {/*** 查询部门信息* @return*/List<Dept> list();/*** 根据id删除部门* @param id*/void delete(Integer id);/*** 新增部门* @param dept*/void add(Dept dept);/*** 根据id查找部门* @param id*/Dept get(Integer id);/*** 修改部门* @param dept*/void update(Dept dept);
}
实现类:
@Service
public class DeptServiceImpl implements DeptService {@Autowiredprivate DeptMapper deptMapper;/*** 查询部门信息* @return*/@Overridepublic List<Dept> list() {return deptMapper.list();}/*** 根据id删除部门* @param id*/@Overridepublic void delete(Integer id) {deptMapper.deleteById(id);}/*** 新增部门* @param dept*/@Overridepublic void add(Dept dept) {dept.setCreateTime(LocalDateTime.now());dept.setUpdateTime(LocalDateTime.now());deptMapper.insert(dept);}/*** 根据id查找部门* @param id*/@Overridepublic Dept get(Integer id) {return deptMapper.getById(id);}/*** 修改部门* @param dept*/@Overridepublic void update(Dept dept) {dept.setCreateTime(LocalDateTime.now());dept.setUpdateTime(LocalDateTime.now());deptMapper.update(dept);}
}
Mapper层:
@Mapper
public interface DeptMapper {/*** 查询部门信息* @return*/@Select("select * from dept")List<Dept> list();/*** 根据id删除部门* @param id*/@Delete("delete from dept where id = #{id}")void deleteById(Integer id);/*** 新增部门* @param dept*/@Insert("insert into dept(name,create_time,update_time) values (#{name},#{createTime}, #{updateTime})")void insert(Dept dept);/*** 根据id查找部门* @param id* @return*/@Select("select * from dept where id = #{id}")Dept getById(Integer id);/*** 修改部门* @param dept*/@Update("update dept set name = #{name},create_time = #{createTime},update_time = #{updateTime} where id = #{id}")void update(Dept dept);
}
Postman测试结果:
员工管理:
分页查询:
思路:
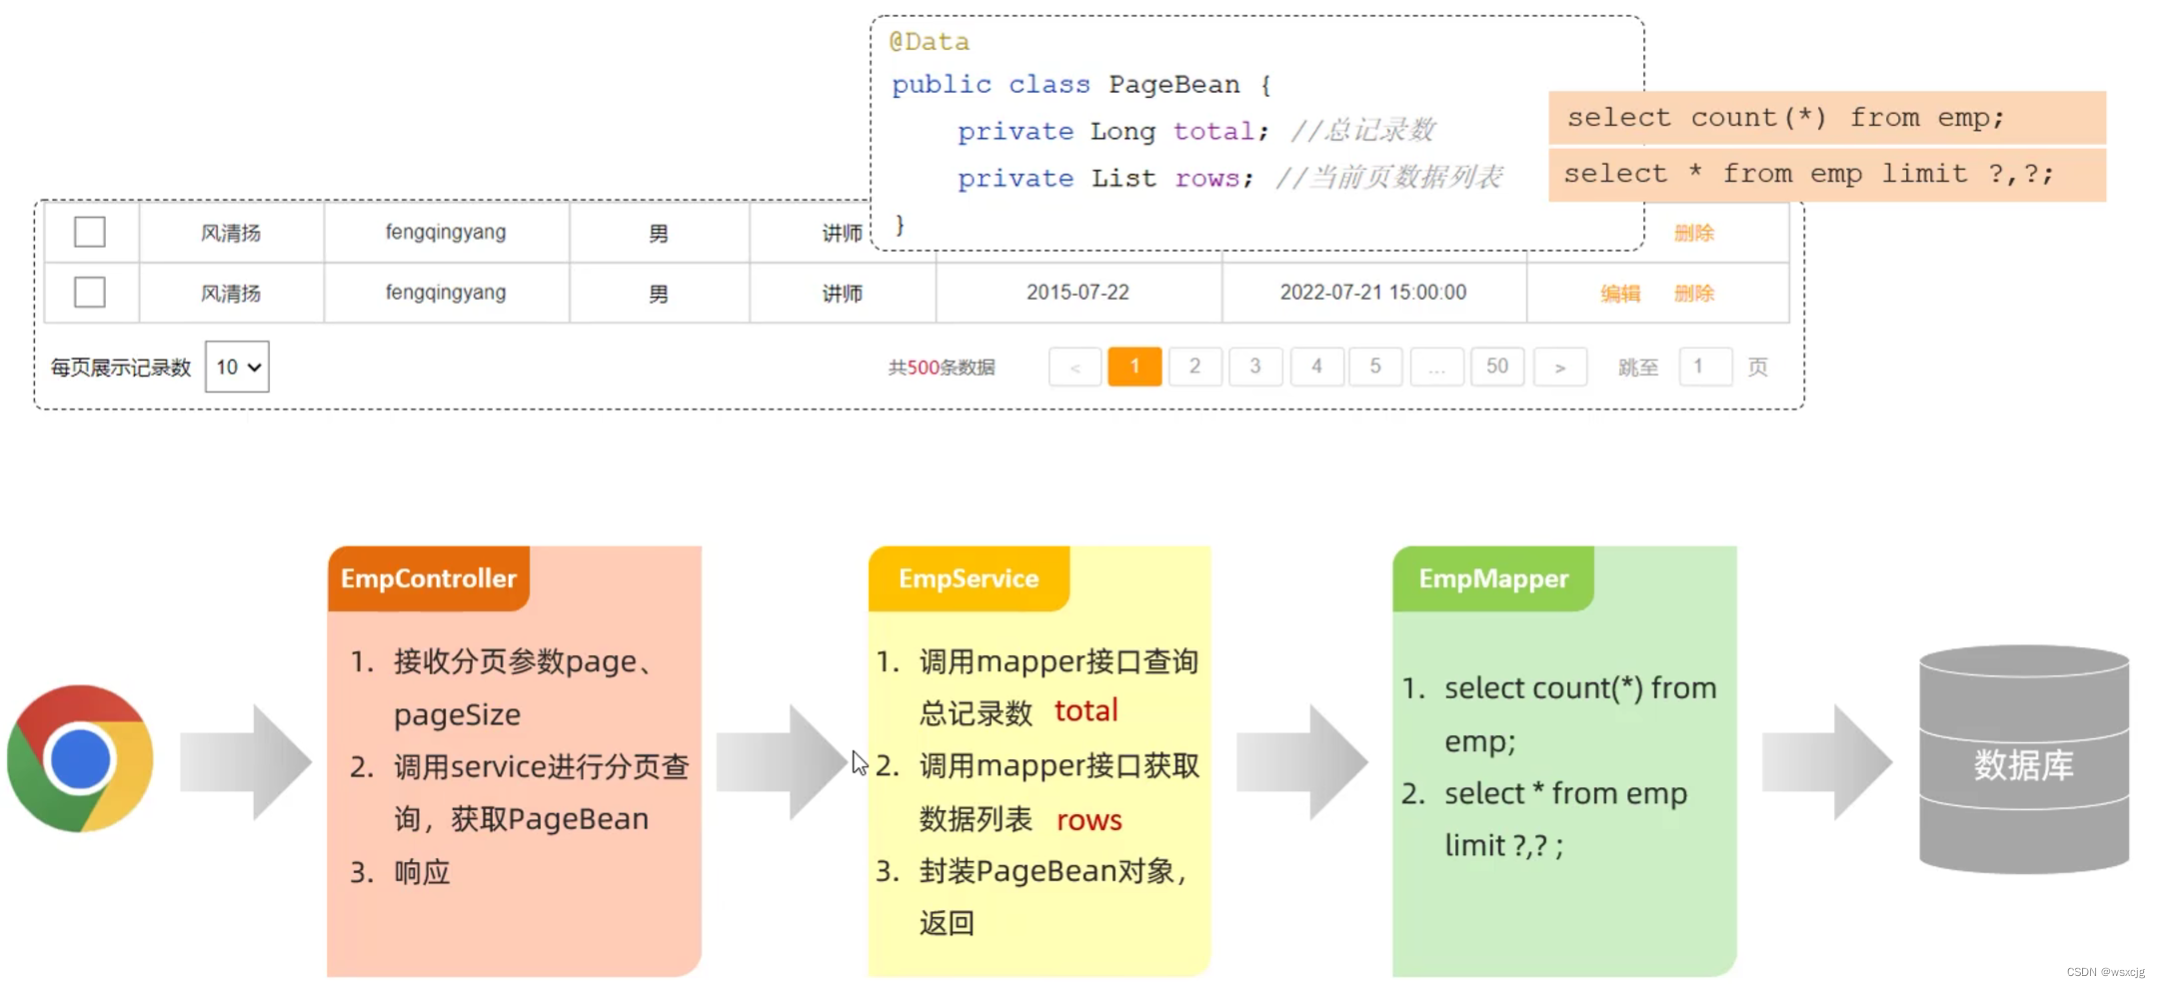
代码:
Emp实体类:
@Data
@NoArgsConstructor
@AllArgsConstructor
public class Emp {private Integer id;private String username;private String password;private String name;private Short gender;private String image;private Short job;private LocalDate entryDate;private Integer deptId;private LocalDateTime createTime;private LocalDateTime updateTime;
}
Controller层:
@Slf4j
@RequestMapping("/emps")
@RestController
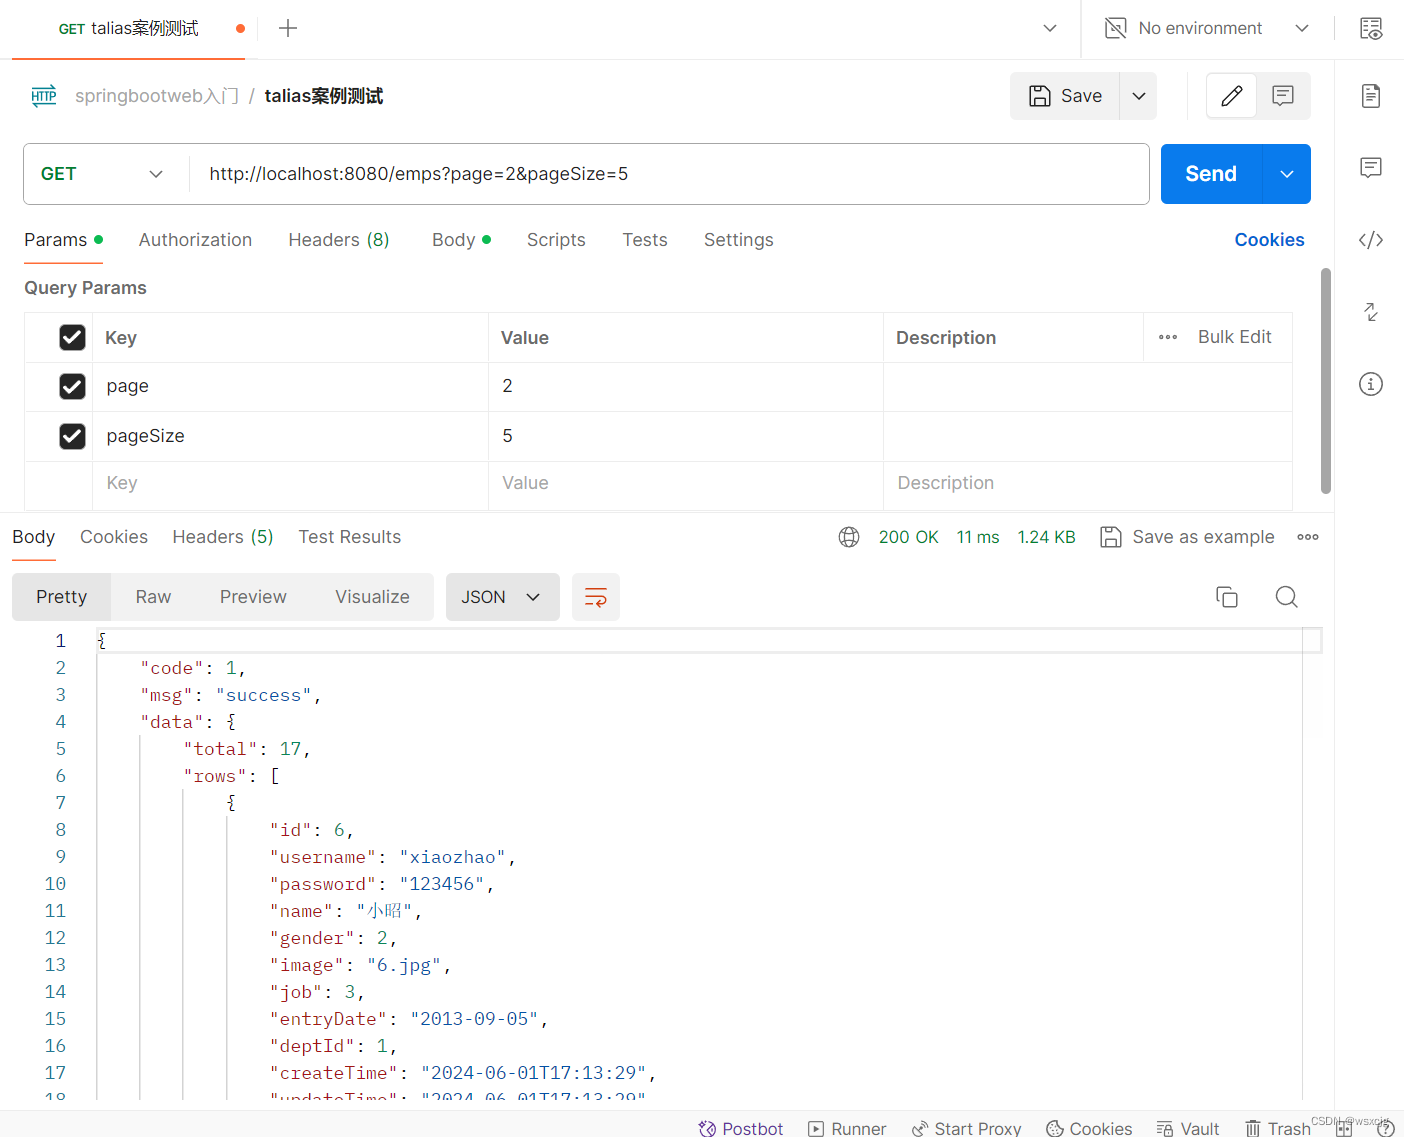
public class EmpController {@Autowiredprivate EmpService empService;/*** 根据每页记录数和页码获取页面实体类* @return*/@GetMappingpublic Result getPage(@RequestParam(defaultValue = "1") Integer page,@RequestParam(defaultValue = "10") Integer pageSize) {log.info("每页记录数:{},查询页码:{}",pageSize,page);PageBean pb = empService.getPage(page,pageSize);return Result.success(pb);}}Service层:
接口:
public interface EmpService {/*** 根据每页记录数和页码获取页面实体类* @return*/PageBean getPage(Integer page, Integer pageSize);}实现类:
@Service
public class EmpServiceImpl implements EmpService {@Autowiredprivate EmpMapper empMapper;/*** 分页查询,获取列表数据* @param page* @param pageSize* @return*/@Overridepublic PageBean getPage(Integer page, Integer pageSize) {Long total = empMapper.getTotal();Long start = (long) ((page - 1) * pageSize);List<Emp> rows = empMapper.getRows(start,pageSize);PageBean pageBean = new PageBean(total,rows);return pageBean;}
}
Mapper层:
@Mapper
public interface EmpMapper {/*** 获取总记录数* @return*/@Select("select count(*) from emp;")Long getTotal();/*** 分页查询,获取列表数据* @param start* @param pageSize* @return*/@Select("select id, username, password, name, gender, image, job, entrydate, dept_id, create_time, update_time\n" +"from emp limit #{start},#{pageSize}")List<Emp> getRows(Long start, Integer pageSize);}
Postman测试结果:
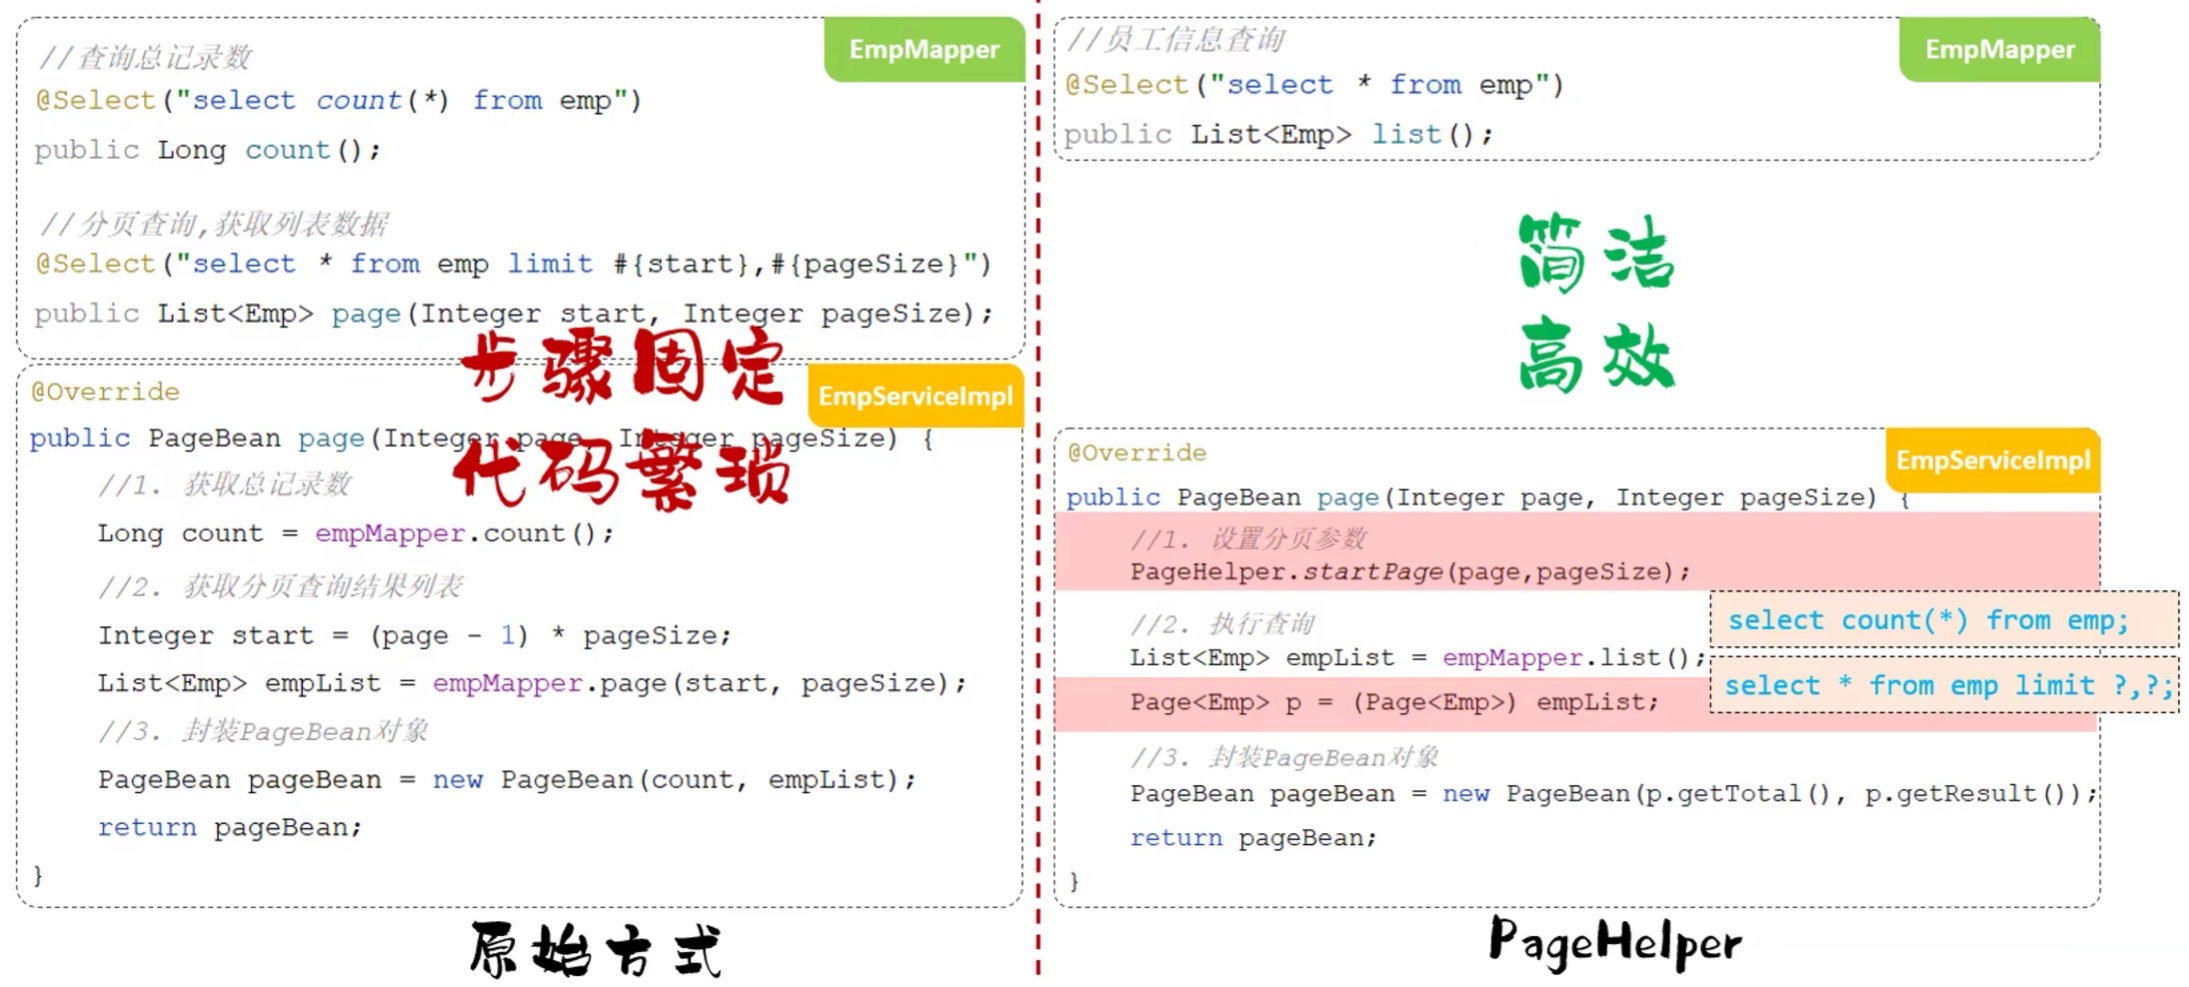
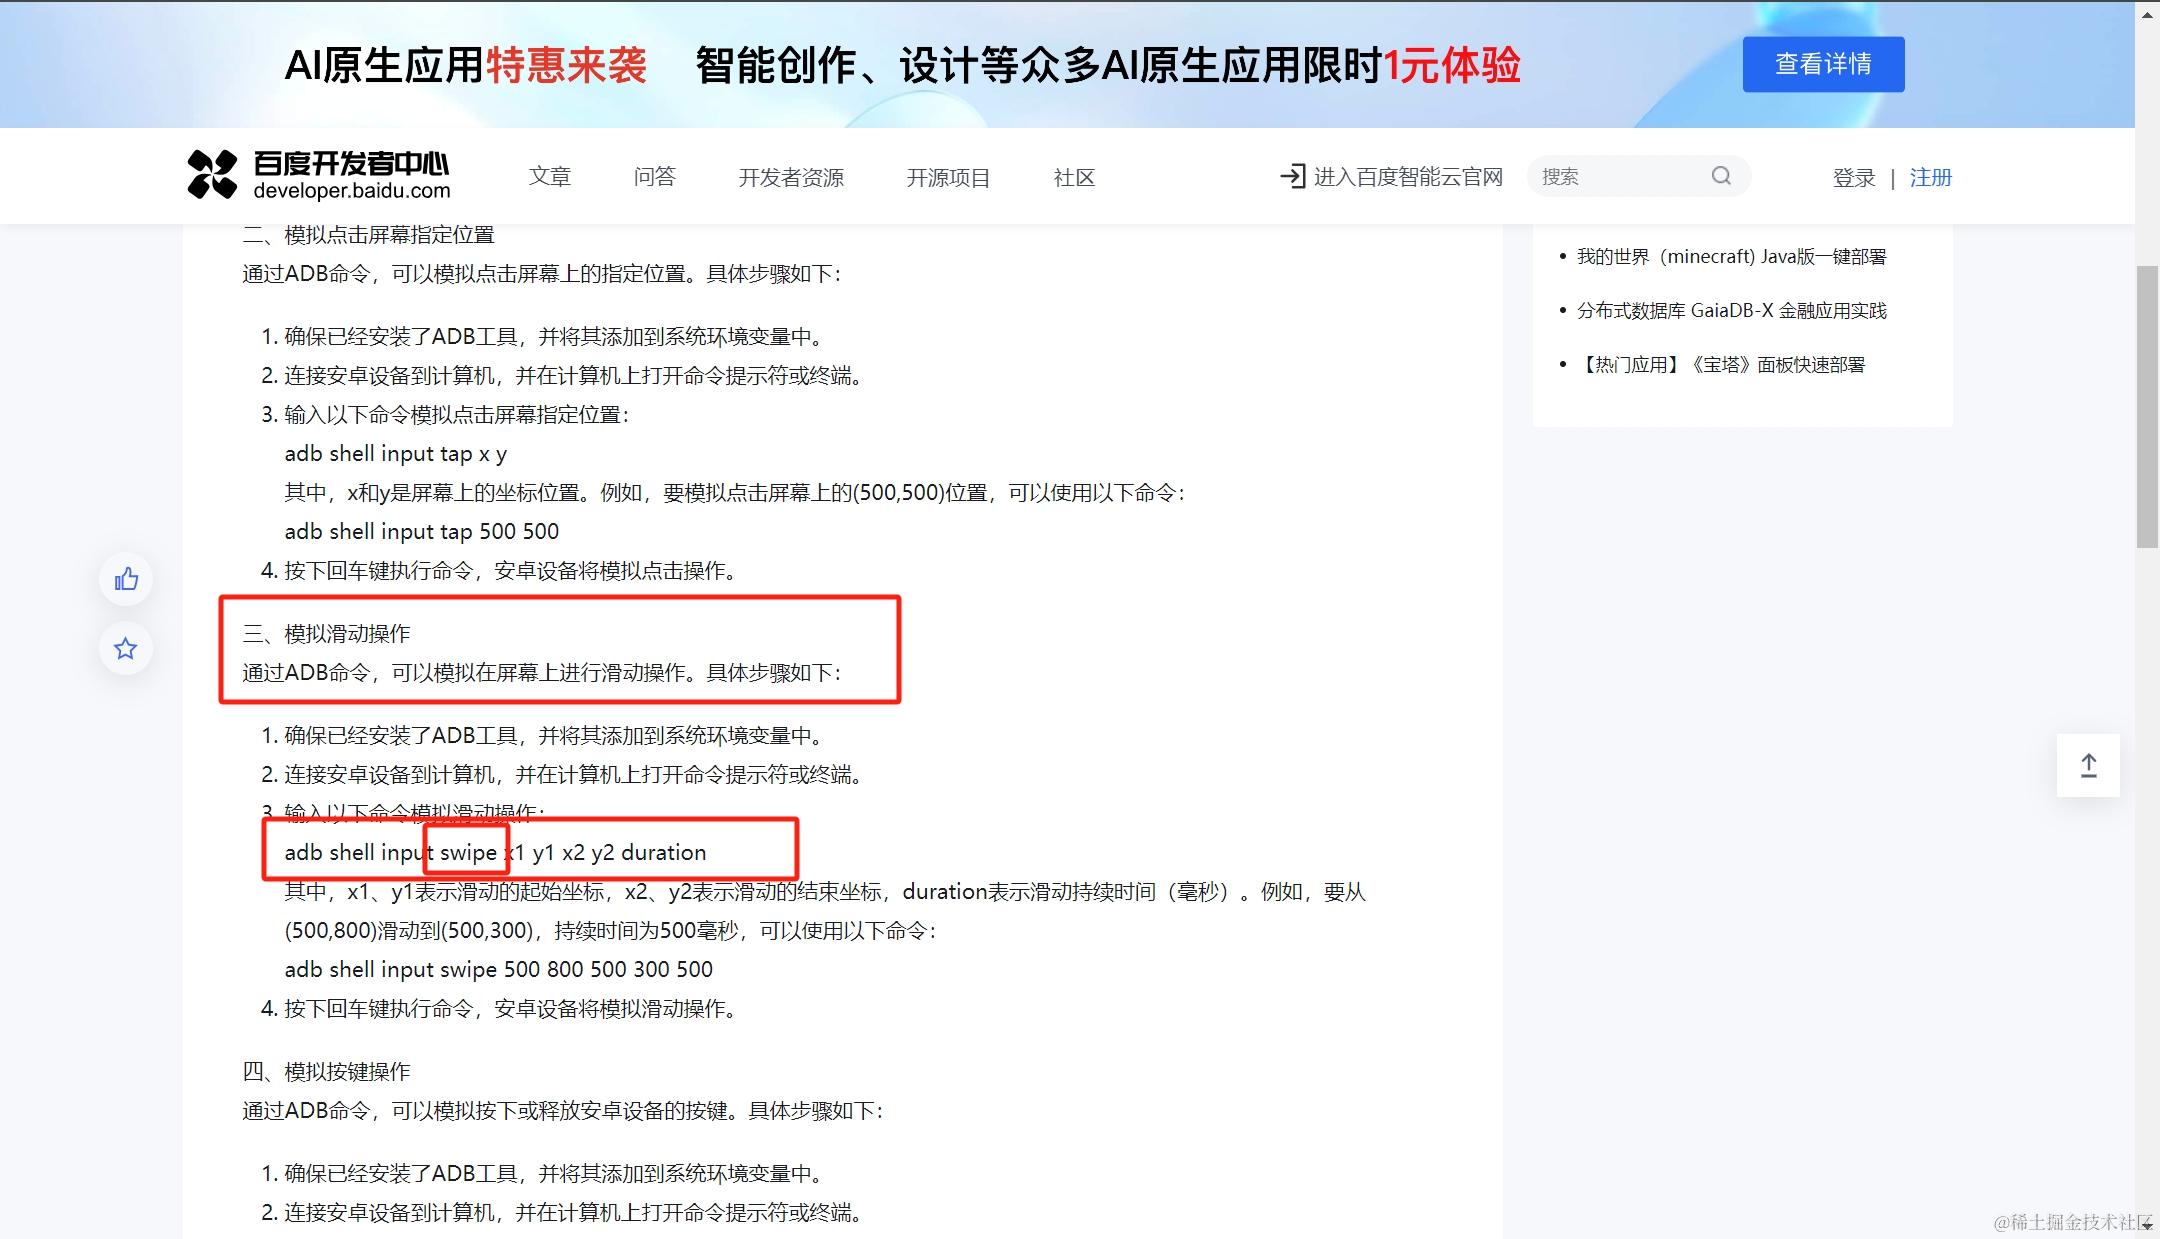
分页插件-PageHelper:
由下图可以看到原始方式分页查询步骤固定,而且代码繁琐,我们可以使用PageHelper插件简化代码。
代码演示:
导入依赖:
<!--PageHelper分页插件--><dependency><groupId>com.github.pagehelper</groupId><artifactId>pagehelper-spring-boot-starter</artifactId><version>1.4.6</version></dependency>修改代码:
Mapper层:
@Mapper
public interface EmpMapper {
//    /**
//     * 获取总记录数
//     * @return
//     */
//    @Select("select count(*) from emp")
//    Long getTotal();
//
//    /**
//     * 分页查询,获取列表数据
//     * @param start
//     * @param pageSize
//     * @return
//     */
//    @Select("select id, username, password, name, gender, image, job, entrydate, dept_id, create_time, update_time\n" +
//            "from emp limit #{start},#{pageSize}")
//    List<Emp> getRows(Long start, Integer pageSize);/*** 使用PageHelper插件来进行分页查询*/@Select("select * from emp")List<Emp> list();}
Service层:
实现类:
@Service
public class EmpServiceImpl implements EmpService {@Autowiredprivate EmpMapper empMapper;//    /**
//     * 分页查询,获取列表数据
//     * @param page
//     * @param pageSize
//     * @return
//     */
//    @Override
//    public PageBean getPage(Integer page, Integer pageSize) {
//        Long total = empMapper.getTotal();
//        Long start = (long) ((page - 1) * pageSize);
//        List<Emp> rows = empMapper.getRows(start,pageSize);
//        PageBean pageBean = new PageBean(total,rows);
//        return pageBean;
//    }/*** 使用PageHelper分页插件进行分页查询*/@Overridepublic PageBean getPage(Integer page, Integer pageSize) {//1.设置分页参数PageHelper.startPage(page, pageSize);//2.执行查询List<Emp> empList = empMapper.list();Page<Emp> p = (Page<Emp>) empList;//3.封装PageBean对象PageBean pageBean = new PageBean(p.getTotal(),p.getResult());return pageBean;}}
分页条件查询:
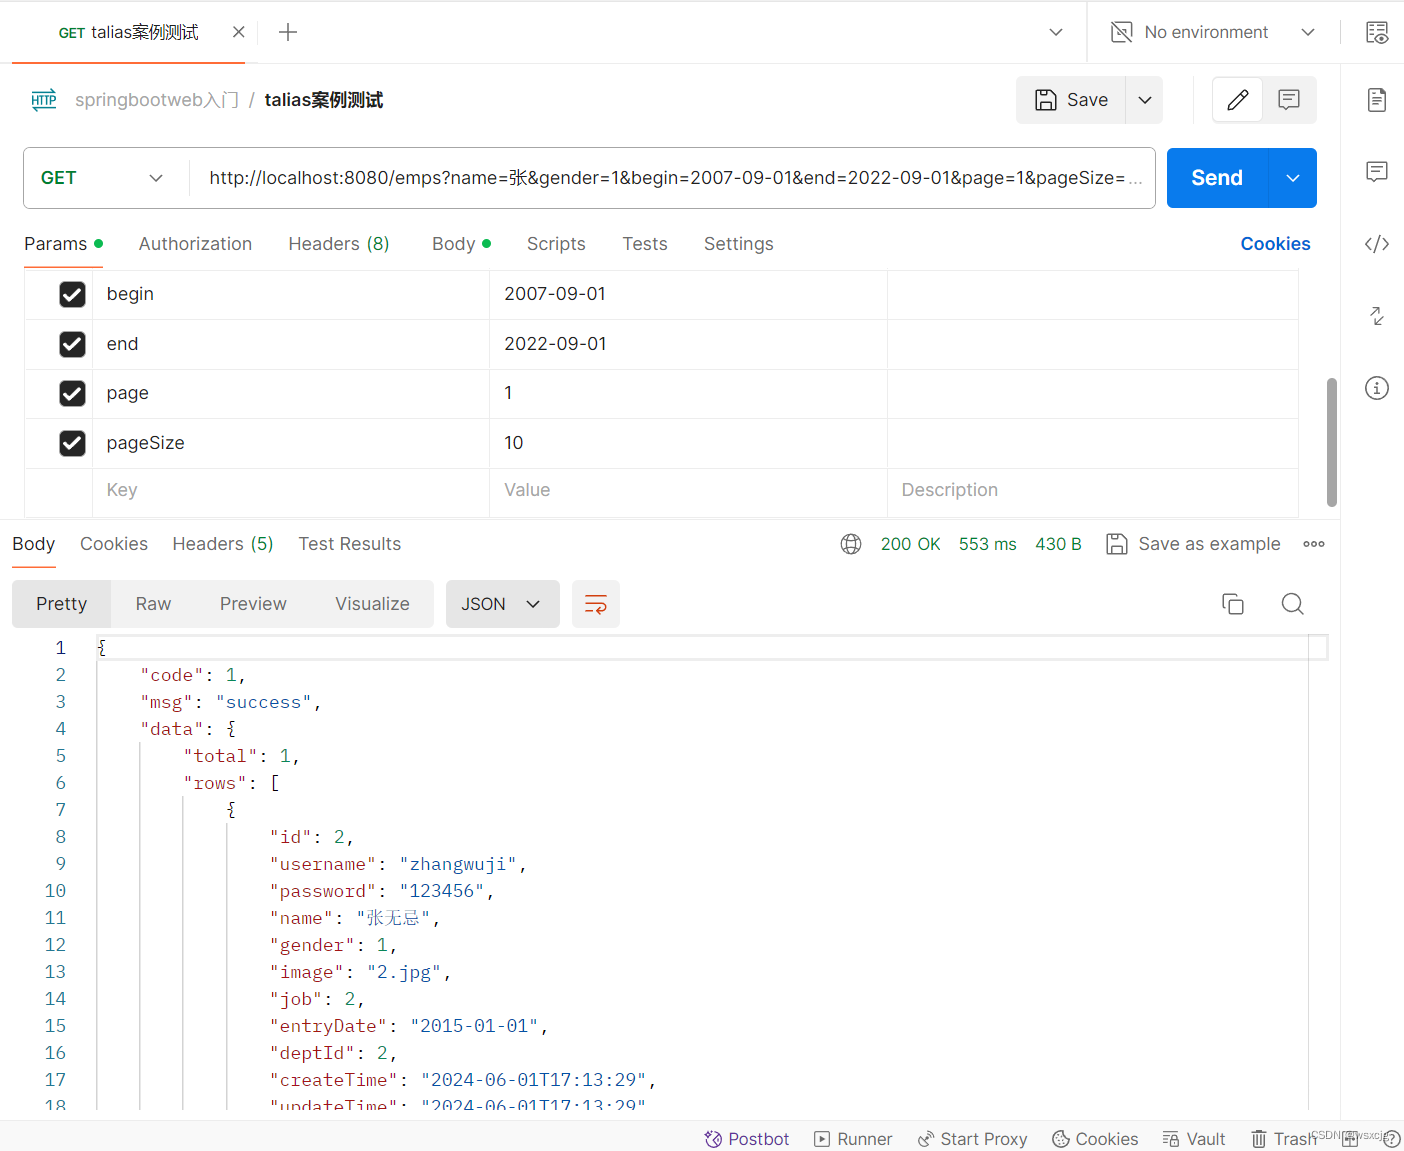
措施:

代码:
Controller层:
@Slf4j
@RequestMapping("/emps")
@RestController
public class EmpController {@Autowiredprivate EmpService empService;/*** 根据每页记录数和页码获取页面实体类* @return*/@GetMappingpublic Result getPage(@RequestParam(defaultValue = "1") Integer page,@RequestParam(defaultValue = "10") Integer pageSize,String name, Short gender,@DateTimeFormat(pattern = "yyyy-MM-dd") LocalDate begin,@DateTimeFormat(pattern = "yyyy-MM-dd") LocalDate end) {log.info("每页记录数:{},查询页码:{}",pageSize,page);PageBean pb = empService.getPage(page,pageSize,name,gender,begin,end);return Result.success(pb);}}
Service层:
接口:
public interface EmpService {/*** 根据每页记录数和页码获取页面实体类* @return*/PageBean getPage(Integer page, Integer pageSize, String name, Short gender, LocalDate begin, LocalDate end);}实现类:
@Service
public class EmpServiceImpl implements EmpService {@Autowiredprivate EmpMapper empMapper;//    /**
//     * 分页查询,获取列表数据
//     * @param page
//     * @param pageSize
//     * @return
//     */
//    @Override
//    public PageBean getPage(Integer page, Integer pageSize) {
//        Long total = empMapper.getTotal();
//        Long start = (long) ((page - 1) * pageSize);
//        List<Emp> rows = empMapper.getRows(start,pageSize);
//        PageBean pageBean = new PageBean(total,rows);
//        return pageBean;
//    }/*** 使用PageHelper分页插件进行分页查询*/@Overridepublic PageBean getPage(Integer page, Integer pageSize, String name, Short gender, LocalDate begin, LocalDate end) {//1.设置分页参数PageHelper.startPage(page, pageSize);//2.执行查询List<Emp> empList = empMapper.list(name,gender,begin,end);Page<Emp> p = (Page<Emp>) empList;//3.封装PageBean对象PageBean pageBean = new PageBean(p.getTotal(),p.getResult());return pageBean;}}
Mapper层:
@Mapper
public interface EmpMapper {
//    /**
//     * 获取总记录数
//     * @return
//     */
//    @Select("select count(*) from emp")
//    Long getTotal();
//
//    /**
//     * 分页查询,获取列表数据
//     * @param start
//     * @param pageSize
//     * @return
//     */
//    @Select("select id, username, password, name, gender, image, job, entrydate, dept_id, create_time, update_time\n" +
//            "from emp limit #{start},#{pageSize}")
//    List<Emp> getRows(Long start, Integer pageSize);/*** 使用PageHelper插件来进行分页查询*///动态SQLList<Emp> list(String name, Short gender, LocalDate begin, LocalDate end);}
动态SQL:
xml文件:
<?xml version="1.0" encoding="UTF-8" ?>
<!DOCTYPE mapperPUBLIC "-//mybatis.org//DTD Mapper 3.0//EN""http://mybatis.org/dtd/mybatis-3-mapper.dtd">
<mapper namespace="com.han.mapper.EmpMapper"><select id="list" resultType="com.han.pojo.Emp">select id,username,password,name,gender,image,job,entrydate,dept_id,create_time,update_timefrom emp<where><if test="name != null and name != ''">name like concat('%',#{name},'%')</if><if test="gender != null">and gender = #{gender}</if><if test="begin != null and end != null">and entrydate between #{begin} and #{end}</if></where>order by update_time DESC</select>
</mapper>
Postman测试结果:
删除员工:
代码:
Controller层:
@Slf4j
@RequestMapping("/emps")
@RestController
public class EmpController {@Autowiredprivate EmpService empService;/*** 根据每页记录数和页码获取页面实体类* @return*/@GetMappingpublic Result getPage(@RequestParam(defaultValue = "1") Integer page,@RequestParam(defaultValue = "10") Integer pageSize,String name, Short gender,@DateTimeFormat(pattern = "yyyy-MM-dd") LocalDate begin,@DateTimeFormat(pattern = "yyyy-MM-dd") LocalDate end) {log.info("每页记录数:{},查询页码:{}",pageSize,page);PageBean pb = empService.getPage(page,pageSize,name,gender,begin,end);return Result.success(pb);}/*** 批量删除员工* @param ids* @return*/@DeleteMapping("/{ids}")public Result delete(@PathVariable("ids") List<Short> ids) {log.info("批量删除操作ids:{}",ids);empService.delete(ids);return Result.success();}}
Service层:
接口:
public interface EmpService {/*** 根据每页记录数和页码获取页面实体类* @return*/PageBean getPage(Integer page, Integer pageSize, String name, Short gender, LocalDate begin, LocalDate end);/*** 批量删除员工* @param ids*/void delete(List<Short> ids);
}
实现类:
@Service
public class EmpServiceImpl implements EmpService {@Autowiredprivate EmpMapper empMapper;//    /**
//     * 分页查询,获取列表数据
//     * @param page
//     * @param pageSize
//     * @return
//     */
//    @Override
//    public PageBean getPage(Integer page, Integer pageSize) {
//        Long total = empMapper.getTotal();
//        Long start = (long) ((page - 1) * pageSize);
//        List<Emp> rows = empMapper.getRows(start,pageSize);
//        PageBean pageBean = new PageBean(total,rows);
//        return pageBean;
//    }/*** 使用PageHelper分页插件进行分页查询*/@Overridepublic PageBean getPage(Integer page, Integer pageSize, String name, Short gender, LocalDate begin, LocalDate end) {//1.设置分页参数PageHelper.startPage(page, pageSize);//2.执行查询List<Emp> empList = empMapper.list(name,gender,begin,end);Page<Emp> p = (Page<Emp>) empList;//3.封装PageBean对象PageBean pageBean = new PageBean(p.getTotal(),p.getResult());return pageBean;}/*** 批量删除员工* @param ids*/@Overridepublic void delete(List<Short> ids) {empMapper.delete(ids);}}
Mapper层:
@Mapper
public interface EmpMapper {
//    /**
//     * 获取总记录数
//     * @return
//     */
//    @Select("select count(*) from emp")
//    Long getTotal();
//
//    /**
//     * 分页查询,获取列表数据
//     * @param start
//     * @param pageSize
//     * @return
//     */
//    @Select("select id, username, password, name, gender, image, job, entrydate, dept_id, create_time, update_time\n" +
//            "from emp limit #{start},#{pageSize}")
//    List<Emp> getRows(Long start, Integer pageSize);//动态SQL/*** 使用PageHelper插件来进行分页查询*/List<Emp> list(String name, Short gender, LocalDate begin, LocalDate end);/*** 批量删除员工* @param ids*/void delete(List<Short> ids);}
动态SQL:
xml文件:
<?xml version="1.0" encoding="UTF-8" ?>
<!DOCTYPE mapperPUBLIC "-//mybatis.org//DTD Mapper 3.0//EN""http://mybatis.org/dtd/mybatis-3-mapper.dtd">
<mapper namespace="com.han.mapper.EmpMapper"><select id="list" resultType="com.han.pojo.Emp">select id,username,password,name,gender,image,job,entrydate,dept_id,create_time,update_timefrom emp<where><if test="name != null and name != ''">name like concat('%',#{name},'%')</if><if test="gender != null">and gender = #{gender}</if><if test="begin != null and end != null">and entrydate between #{begin} and #{end}</if></where>order by update_time DESC</select><delete id="delete">deletefrom empwhere id in<foreach collection="ids" item="id" separator="," open="(" close=")">#{id}</foreach></delete></mapper>
Postman测试结果:
文件上传:
本地存储(不推荐):
使用MultipartFile类型接收文件,再使用下面的方法

阿里云OSS存储(推荐):
用户上文中图像的上传
代码演示:
工具类:
/*** 阿里云 OSS 工具类*/
@RestController
public class AliOSSUtils {/*** 实现上传图片到OSS*/public String upload(MultipartFile file) throws ClientException, IOException {InputStream inputStream = file.getInputStream();// 以华东1(杭州)的外网Endpoint为例,其它Region请按实际情况填写。String endpoint = "https://oss-cn-beijing.aliyuncs.com";// 从环境变量中获取访问凭证。运行本代码示例之前,请确保已设置环境变量OSS_ACCESS_KEY_ID和OSS_ACCESS_KEY_SECRET。EnvironmentVariableCredentialsProvider credentialsProvider = CredentialsProviderFactory.newEnvironmentVariableCredentialsProvider();// 填写Bucket名称,例如examplebucket。String bucketName = "web-talias-test";// 填写Object完整路径,例如exampleobject.txt。Object完整路径中不能包含Bucket名称。String objectName = file.getOriginalFilename();String fileName = UUID.randomUUID().toString() + objectName.substring(objectName.lastIndexOf("."));// 填写本地文件的完整路径,例如D:\\localpath\\examplefile.txt。// 如果未指定本地路径,则默认从示例程序所属项目对应本地路径中上传文件。// 创建OSSClient实例OSS ossClient = new OSSClientBuilder().build(endpoint, credentialsProvider);// 创建PutObjectRequest对象。PutObjectRequest putObjectRequest = new PutObjectRequest(bucketName, fileName, inputStream);// 上传文件。PutObjectResult result = ossClient.putObject(putObjectRequest);// 设置请求头。Map<String, String> headers = new HashMap<String, String>();/*// 指定Object的存储类型。headers.put(OSSHeaders.STORAGE_CLASS, StorageClass.Standard.toString());// 指定ContentType。headers.put(OSSHeaders.CONTENT_TYPE, "text/txt");*/// 设置用户自定义元数据。Map<String, String> userMetadata = new HashMap<String, String>();/*userMetadata.put("key1","value1");userMetadata.put("key2","value2");*/URL signedUrl = null;// 指定生成的签名URL过期时间,单位为毫秒。本示例以设置过期时间为1小时为例。Date expiration = new Date(new Date().getTime() + 3600 * 1000L);// 生成签名URL。GeneratePresignedUrlRequest request = new GeneratePresignedUrlRequest(bucketName, fileName);// 设置过期时间。request.setExpiration(expiration);// 将请求头加入到request中。request.setHeaders(headers);// 添加用户自定义元数据。request.setUserMetadata(userMetadata);// 通过HTTP PUT请求生成签名URL。signedUrl = ossClient.generatePresignedUrl(request);// 返回签名URL。ossClient.shutdown();return signedUrl.toString().split("\\?")[0];}}
文件上传Controller层:
@Slf4j
@RestController
public class UploadController {@Autowiredprivate AliOSSUtils aliOSSUtils;@PostMapping("/upload")public Result upload(MultipartFile image) throws IOException, ClientException {log.info("接收到文件:{}",image.getOriginalFilename());String url = aliOSSUtils.upload(image);log.info("已将文件存储到阿里云OSS,url:{}",url);return Result.success(url);}}
修改员工
1.查询回显:
代码:
Controller层:
@Slf4j
@RequestMapping("/emps")
@RestController
public class EmpController {@Autowiredprivate EmpService empService;/*** 根据每页记录数和页码获取页面实体类* @return*/@GetMappingpublic Result getPage(@RequestParam(defaultValue = "1") Integer page,@RequestParam(defaultValue = "10") Integer pageSize,String name, Short gender,@DateTimeFormat(pattern = "yyyy-MM-dd") LocalDate begin,@DateTimeFormat(pattern = "yyyy-MM-dd") LocalDate end) {log.info("每页记录数:{},查询页码:{}",pageSize,page);PageBean pb = empService.getPage(page,pageSize,name,gender,begin,end);return Result.success(pb);}/*** 批量删除员工* @param ids* @return*/@DeleteMapping("/{ids}")public Result delete(@PathVariable("ids") List<Short> ids) {log.info("批量删除操作ids:{}",ids);empService.delete(ids);return Result.success();}/*** 新增员工* @param emp* @return*/@PostMappingpublic Result add(@RequestBody Emp emp) {log.info("新增员工:{}",emp);empService.add(emp);return Result.success();}/*** 根据id查询员工* @param id* @return*/@GetMapping("/{id}")public Result getById(@PathVariable Integer id) {log.info("查询id为:{}的员工",id);Emp emp = empService.getById(id);return Result.success(emp);}}
Service层:
接口:
public interface EmpService {/*** 根据每页记录数和页码获取页面实体类* @return*/PageBean getPage(Integer page, Integer pageSize, String name, Short gender, LocalDate begin, LocalDate end);/*** 批量删除员工* @param ids*/void delete(List<Short> ids);/*** 新增员工* @param emp*/void add(Emp emp);/*** 根据id查询员工* @return*/Emp getById(Integer id);
}
实现类:
@Service
public class EmpServiceImpl implements EmpService {@Autowiredprivate EmpMapper empMapper;//    /**
//     * 分页查询,获取列表数据
//     * @param page
//     * @param pageSize
//     * @return
//     */
//    @Override
//    public PageBean getPage(Integer page, Integer pageSize) {
//        Long total = empMapper.getTotal();
//        Long start = (long) ((page - 1) * pageSize);
//        List<Emp> rows = empMapper.getRows(start,pageSize);
//        PageBean pageBean = new PageBean(total,rows);
//        return pageBean;
//    }/*** 使用PageHelper分页插件进行分页查询*/@Overridepublic PageBean getPage(Integer page, Integer pageSize, String name, Short gender, LocalDate begin, LocalDate end) {//1.设置分页参数PageHelper.startPage(page, pageSize);//2.执行查询List<Emp> empList = empMapper.list(name,gender,begin,end);Page<Emp> p = (Page<Emp>) empList;//3.封装PageBean对象PageBean pageBean = new PageBean(p.getTotal(),p.getResult());return pageBean;}/*** 批量删除员工* @param ids*/@Overridepublic void delete(List<Short> ids) {empMapper.delete(ids);}/*** 新增员工* @param emp*/@Overridepublic void add(Emp emp) {emp.setUpdateTime(LocalDateTime.now());emp.setCreateTime(LocalDateTime.now());empMapper.add(emp);}/*** 根据id查询员工* @return*/@Overridepublic Emp getById(Integer id) {Emp emp = empMapper.get(id);return emp;}}
Mapper层:
@Mapper
public interface EmpMapper {
//    /**
//     * 获取总记录数
//     * @return
//     */
//    @Select("select count(*) from emp")
//    Long getTotal();
//
//    /**
//     * 分页查询,获取列表数据
//     * @param start
//     * @param pageSize
//     * @return
//     */
//    @Select("select id, username, password, name, gender, image, job, entrydate, dept_id, create_time, update_time\n" +
//            "from emp limit #{start},#{pageSize}")
//    List<Emp> getRows(Long start, Integer pageSize);//动态SQL/*** 使用PageHelper插件来进行分页查询*/List<Emp> list(String name, Short gender, LocalDate begin, LocalDate end);/*** 批量删除员工* @param ids*/void delete(List<Short> ids);/*** 新增员工* @param emp*/@Insert("insert into emp (username, name, gender, image, job, entrydate, dept_id, create_time, update_time)" +"values (#{username},#{name},#{gender},#{image},#{job},#{entryDate},#{deptId},#{createTime},#{updateTime})")void add(Emp emp);@Select("select id, username, password, name, gender, image, job, entrydate, dept_id, create_time, update_time " +"from emp where id = #{id}")Emp get(Integer id);
}
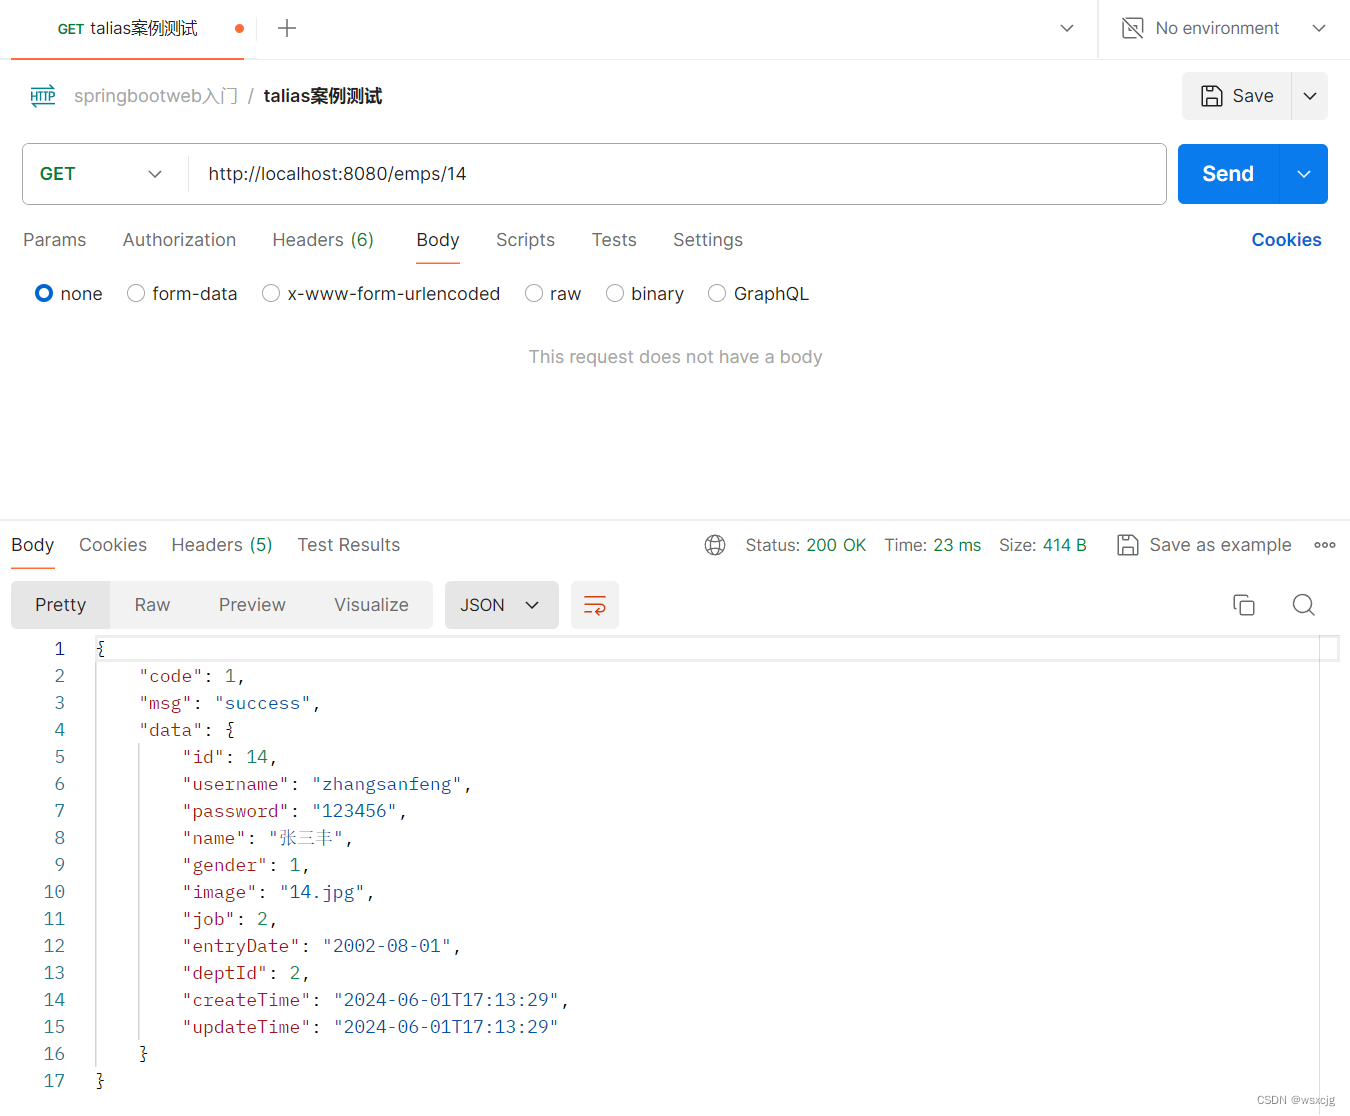
Postman测试结果:
2.修改员工:
代码:
Controller层:
@Slf4j
@RequestMapping("/emps")
@RestController
public class EmpController {@Autowiredprivate EmpService empService;/*** 根据每页记录数和页码获取页面实体类* @return*/@GetMappingpublic Result getPage(@RequestParam(defaultValue = "1") Integer page,@RequestParam(defaultValue = "10") Integer pageSize,String name, Short gender,@DateTimeFormat(pattern = "yyyy-MM-dd") LocalDate begin,@DateTimeFormat(pattern = "yyyy-MM-dd") LocalDate end) {log.info("每页记录数:{},查询页码:{}",pageSize,page);PageBean pb = empService.getPage(page,pageSize,name,gender,begin,end);return Result.success(pb);}/*** 批量删除员工* @param ids* @return*/@DeleteMapping("/{ids}")public Result delete(@PathVariable("ids") List<Short> ids) {log.info("批量删除操作ids:{}",ids);empService.delete(ids);return Result.success();}/*** 新增员工* @param emp* @return*/@PostMappingpublic Result add(@RequestBody Emp emp) {log.info("新增员工:{}",emp);empService.add(emp);return Result.success();}/*** 根据id查询员工* @param id* @return*/@GetMapping("/{id}")public Result getById(@PathVariable Integer id) {log.info("查询id为:{}的员工",id);Emp emp = empService.getById(id);return Result.success(emp);}/*** 修改员工* @param emp* @return*/@PutMappingpublic Result update(@RequestBody Emp emp) {log.info("修改员工:{}",emp);empService.update(emp);return Result.success();}}
Service层:
接口:
public interface EmpService {/*** 根据每页记录数和页码获取页面实体类* @return*/PageBean getPage(Integer page, Integer pageSize, String name, Short gender, LocalDate begin, LocalDate end);/*** 批量删除员工* @param ids*/void delete(List<Short> ids);/*** 新增员工* @param emp*/void add(Emp emp);/*** 根据id查询员工* @return*/Emp getById(Integer id);void update(Emp emp);
}
实现类:
@Service
public class EmpServiceImpl implements EmpService {@Autowiredprivate EmpMapper empMapper;//    /**
//     * 分页查询,获取列表数据
//     * @param page
//     * @param pageSize
//     * @return
//     */
//    @Override
//    public PageBean getPage(Integer page, Integer pageSize) {
//        Long total = empMapper.getTotal();
//        Long start = (long) ((page - 1) * pageSize);
//        List<Emp> rows = empMapper.getRows(start,pageSize);
//        PageBean pageBean = new PageBean(total,rows);
//        return pageBean;
//    }/*** 使用PageHelper分页插件进行分页查询*/@Overridepublic PageBean getPage(Integer page, Integer pageSize, String name, Short gender, LocalDate begin, LocalDate end) {//1.设置分页参数PageHelper.startPage(page, pageSize);//2.执行查询List<Emp> empList = empMapper.list(name,gender,begin,end);Page<Emp> p = (Page<Emp>) empList;//3.封装PageBean对象PageBean pageBean = new PageBean(p.getTotal(),p.getResult());return pageBean;}/*** 批量删除员工* @param ids*/@Overridepublic void delete(List<Short> ids) {empMapper.delete(ids);}/*** 新增员工* @param emp*/@Overridepublic void add(Emp emp) {emp.setUpdateTime(LocalDateTime.now());emp.setCreateTime(LocalDateTime.now());empMapper.add(emp);}/*** 根据id查询员工* @return*/@Overridepublic Emp getById(Integer id) {Emp emp = empMapper.get(id);return emp;}@Overridepublic void update(Emp emp) {emp.setUpdateTime(LocalDateTime.now());empMapper.update(emp);}}
Mapper层:
@Mapper
public interface EmpMapper {
//    /**
//     * 获取总记录数
//     * @return
//     */
//    @Select("select count(*) from emp")
//    Long getTotal();
//
//    /**
//     * 分页查询,获取列表数据
//     * @param start
//     * @param pageSize
//     * @return
//     */
//    @Select("select id, username, password, name, gender, image, job, entrydate, dept_id, create_time, update_time\n" +
//            "from emp limit #{start},#{pageSize}")
//    List<Emp> getRows(Long start, Integer pageSize);//动态SQL/*** 使用PageHelper插件来进行分页查询*/List<Emp> list(String name, Short gender, LocalDate begin, LocalDate end);/*** 批量删除员工* @param ids*/void delete(List<Short> ids);/*** 新增员工* @param emp*/@Insert("insert into emp (username, name, gender, image, job, entrydate, dept_id, create_time, update_time)" +"values (#{username},#{name},#{gender},#{image},#{job},#{entrydate},#{deptId},#{createTime},#{updateTime})")void add(Emp emp);/*** 根据id查询员工* @param id* @return*/@Select("select id, username, password, name, gender, image, job, entrydate, dept_id, create_time, update_time " +"from emp where id = #{id}")Emp get(Integer id);/*** 修改员工* @param emp*/void update(Emp emp);
}
动态SQL:
xml文件:
<?xml version="1.0" encoding="UTF-8" ?>
<!DOCTYPE mapperPUBLIC "-//mybatis.org//DTD Mapper 3.0//EN""http://mybatis.org/dtd/mybatis-3-mapper.dtd">
<mapper namespace="com.han.mapper.EmpMapper"><select id="list" resultType="com.han.pojo.Emp">select id,username,password,name,gender,image,job,entrydate,dept_id,create_time,update_timefrom emp<where><if test="name != null and name != ''">name like concat('%',#{name},'%')</if><if test="gender != null">and gender = #{gender}</if><if test="begin != null and end != null">and entrydate between #{begin} and #{end}</if></where>order by update_time DESC</select><delete id="delete">deletefrom empwhere id in<foreach collection="ids" item="id" separator="," open="(" close=")">#{id}</foreach></delete><update id="update">update emp<set><if test="image != null and image !=''">image = #{image},</if><if test="username != null and image !=''">username = #{username},</if><if test="name != null and image !=''">name = #{name},</if><if test="gender != null">gender = #{gender},</if><if test="job != null">job = #{job},</if><if test="entrydate != null">entrydate = #{entrydate},</if><if test="deptId != null">dept_id = #{deptId},</if>update_time = #{updateTime}</set>where id = #{id}</update></mapper>
Postman测试结果:
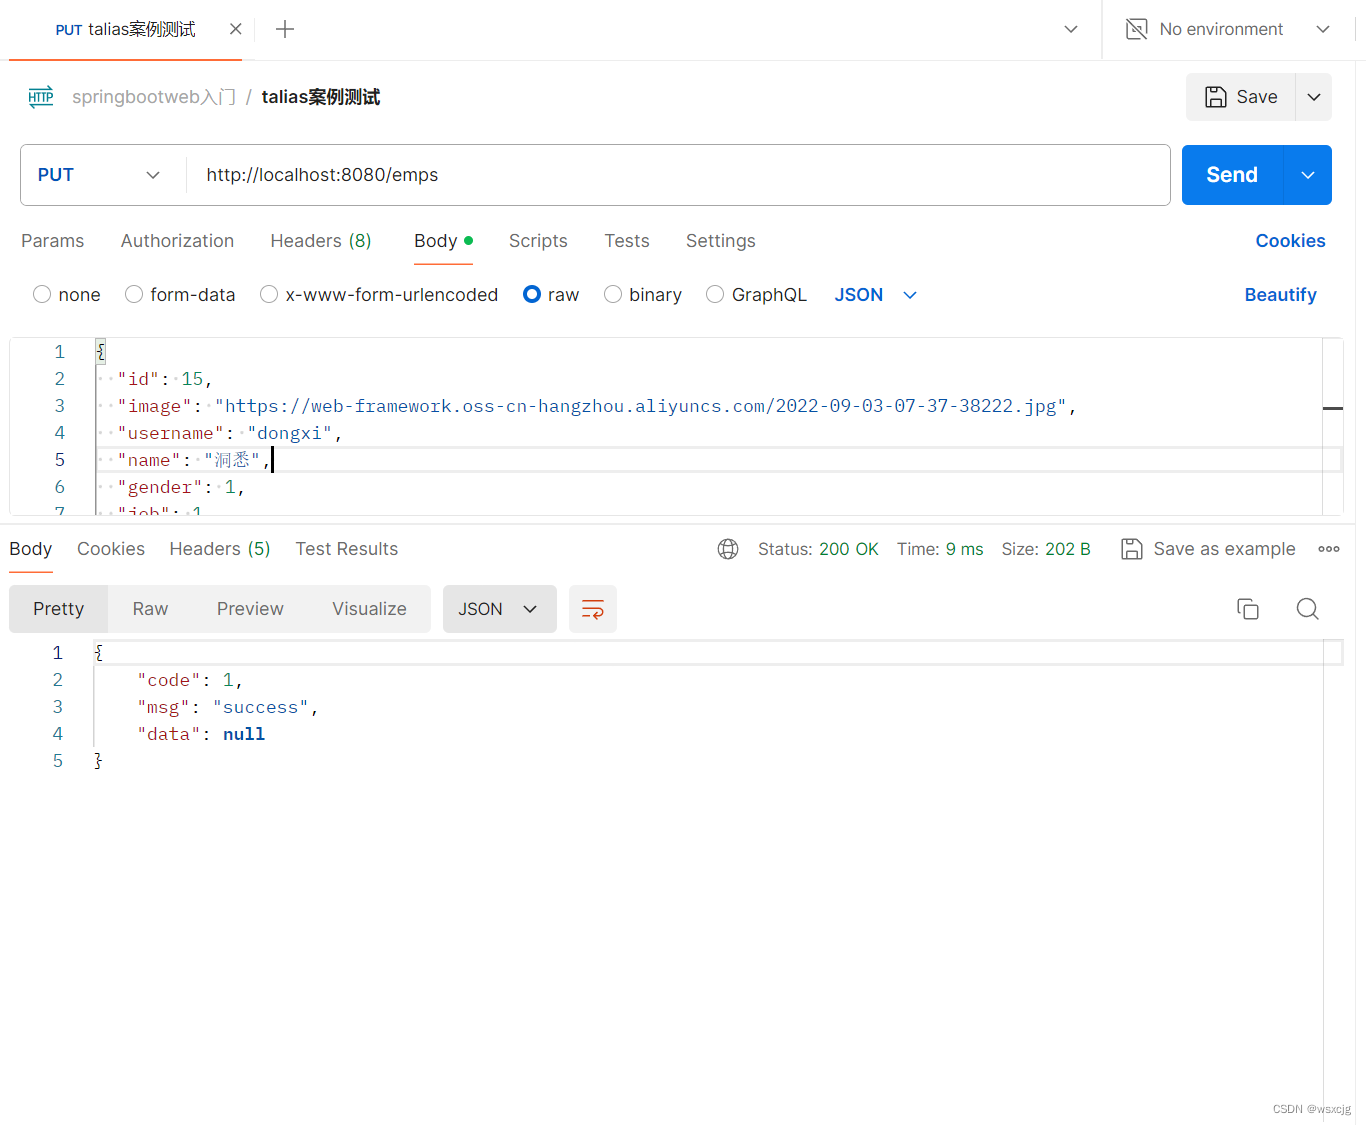
配置文件:
1.参数配置化
因为将文件上传阿里云OSS,总是需要endpoint和bucketName,但是这些还是固定的,所以直接将它们存储在配置文件中
代码演示:
配置文件applicat-properties:
#自定义的阿里云OSS配置信息
aliyun.oss.endpoint=https://oss-cn-beijing.aliyuncs.com
aliyun.oss.bucketName=web-talias-test
工具类:
/*** 阿里云 OSS 工具类*/
@RestController
public class AliOSSUtils {// 以华东1(杭州)的外网Endpoint为例,其它Region请按实际情况填写。@Value("${aliyun.oss.endpoint}")private String endpoint;// 填写Bucket名称,例如examplebucket。@Value("${aliyun.oss.bucketName}")private String bucketName;/*** 实现上传图片到OSS*/public String upload(MultipartFile file) throws ClientException, IOException {InputStream inputStream = file.getInputStream();// 从环境变量中获取访问凭证。运行本代码示例之前,请确保已设置环境变量OSS_ACCESS_KEY_ID和OSS_ACCESS_KEY_SECRET。EnvironmentVariableCredentialsProvider credentialsProvider = CredentialsProviderFactory.newEnvironmentVariableCredentialsProvider();// 填写Object完整路径,例如exampleobject.txt。Object完整路径中不能包含Bucket名称。String objectName = file.getOriginalFilename();String fileName = UUID.randomUUID().toString() + objectName.substring(objectName.lastIndexOf("."));// 填写本地文件的完整路径,例如D:\\localpath\\examplefile.txt。// 如果未指定本地路径,则默认从示例程序所属项目对应本地路径中上传文件。// 创建OSSClient实例OSS ossClient = new OSSClientBuilder().build(endpoint, credentialsProvider);// 创建PutObjectRequest对象。PutObjectRequest putObjectRequest = new PutObjectRequest(bucketName, fileName, inputStream);// 上传文件。PutObjectResult result = ossClient.putObject(putObjectRequest);// 设置请求头。Map<String, String> headers = new HashMap<String, String>();/*// 指定Object的存储类型。headers.put(OSSHeaders.STORAGE_CLASS, StorageClass.Standard.toString());// 指定ContentType。headers.put(OSSHeaders.CONTENT_TYPE, "text/txt");*/// 设置用户自定义元数据。Map<String, String> userMetadata = new HashMap<String, String>();/*userMetadata.put("key1","value1");userMetadata.put("key2","value2");*/URL signedUrl = null;// 指定生成的签名URL过期时间,单位为毫秒。本示例以设置过期时间为1小时为例。Date expiration = new Date(new Date().getTime() + 3600 * 1000L);// 生成签名URL。GeneratePresignedUrlRequest request = new GeneratePresignedUrlRequest(bucketName, fileName);// 设置过期时间。request.setExpiration(expiration);// 将请求头加入到request中。request.setHeaders(headers);// 添加用户自定义元数据。request.setUserMetadata(userMetadata);// 通过HTTP PUT请求生成签名URL。signedUrl = ossClient.generatePresignedUrl(request);// 返回签名URL。ossClient.shutdown();return signedUrl.toString().split("\\?")[0];}}
2.(推荐)yml(yaml)配置文件:

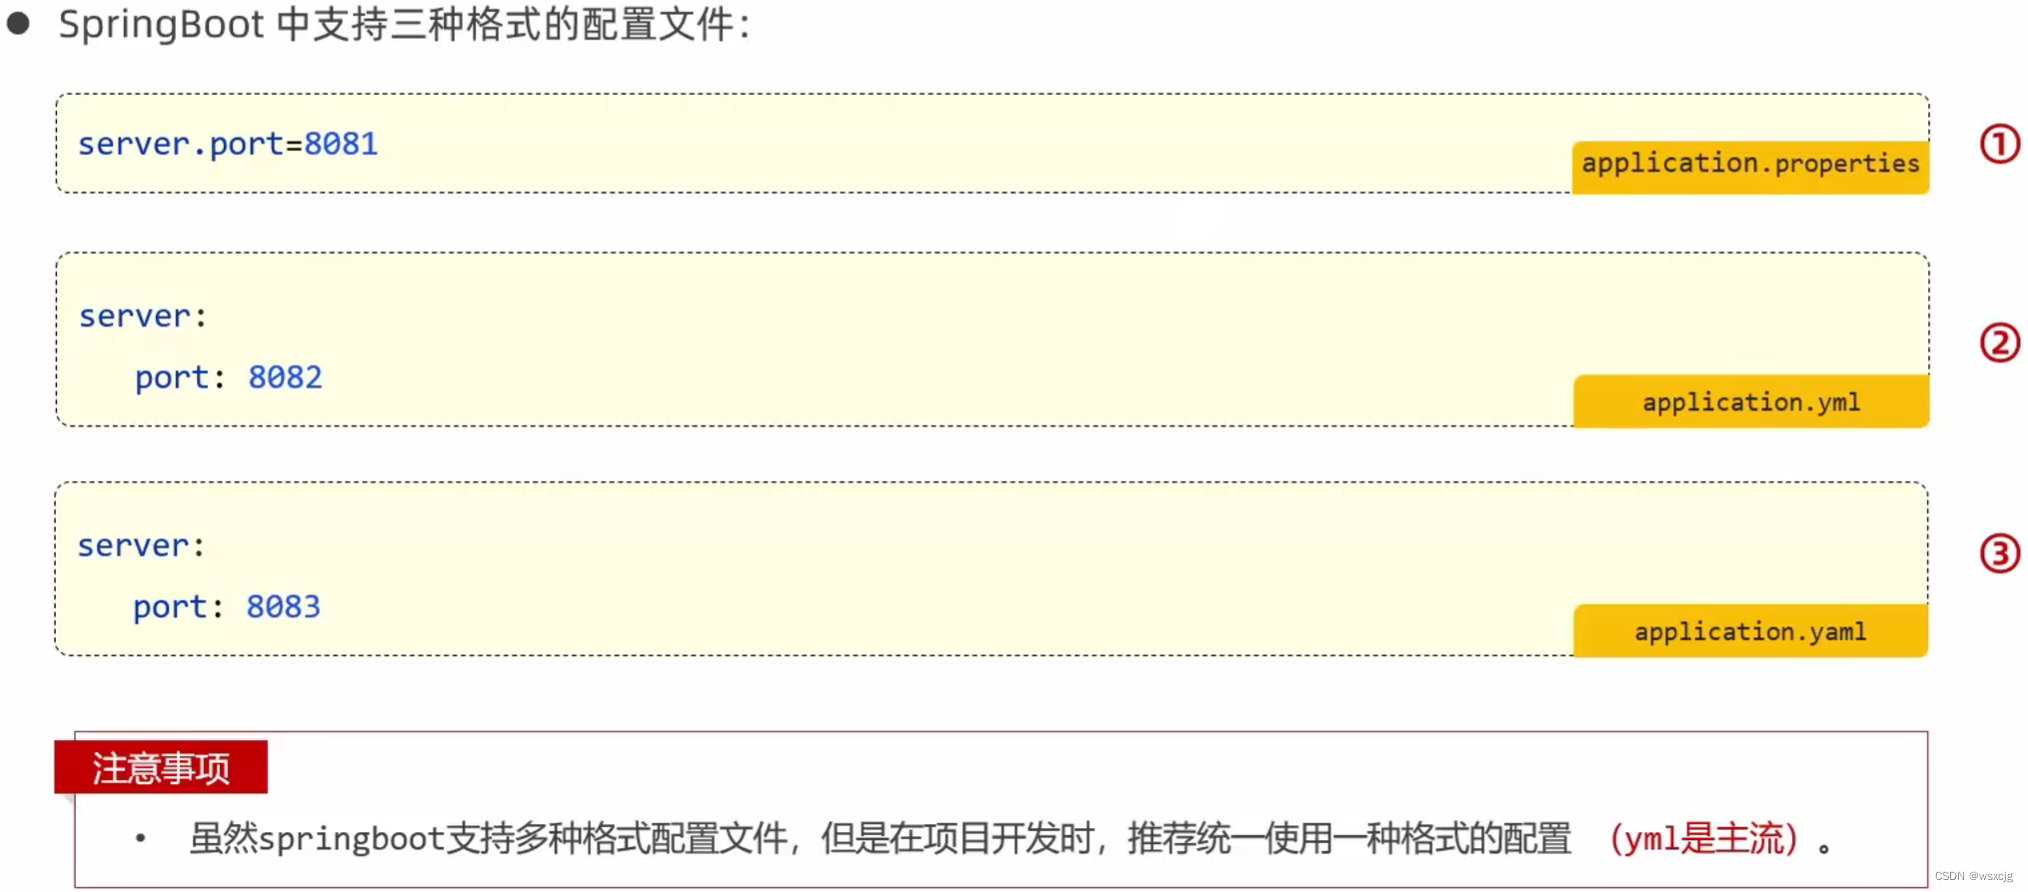
常见配置文件格式对比:
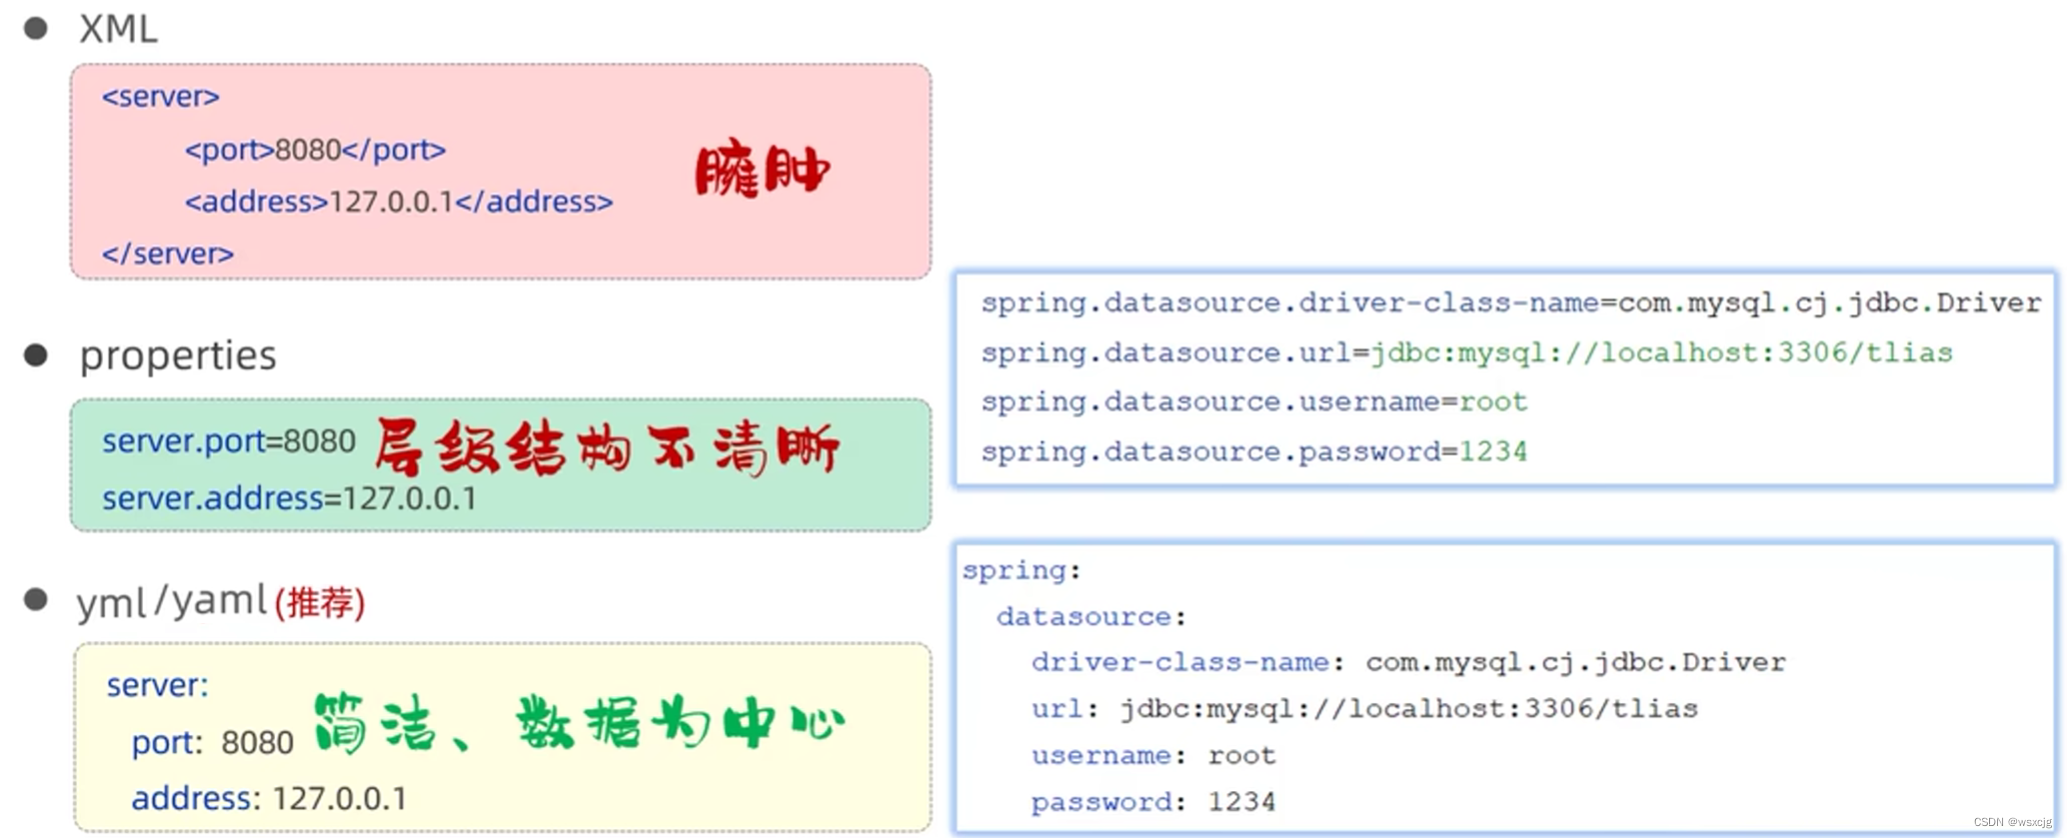
yml基本语法:
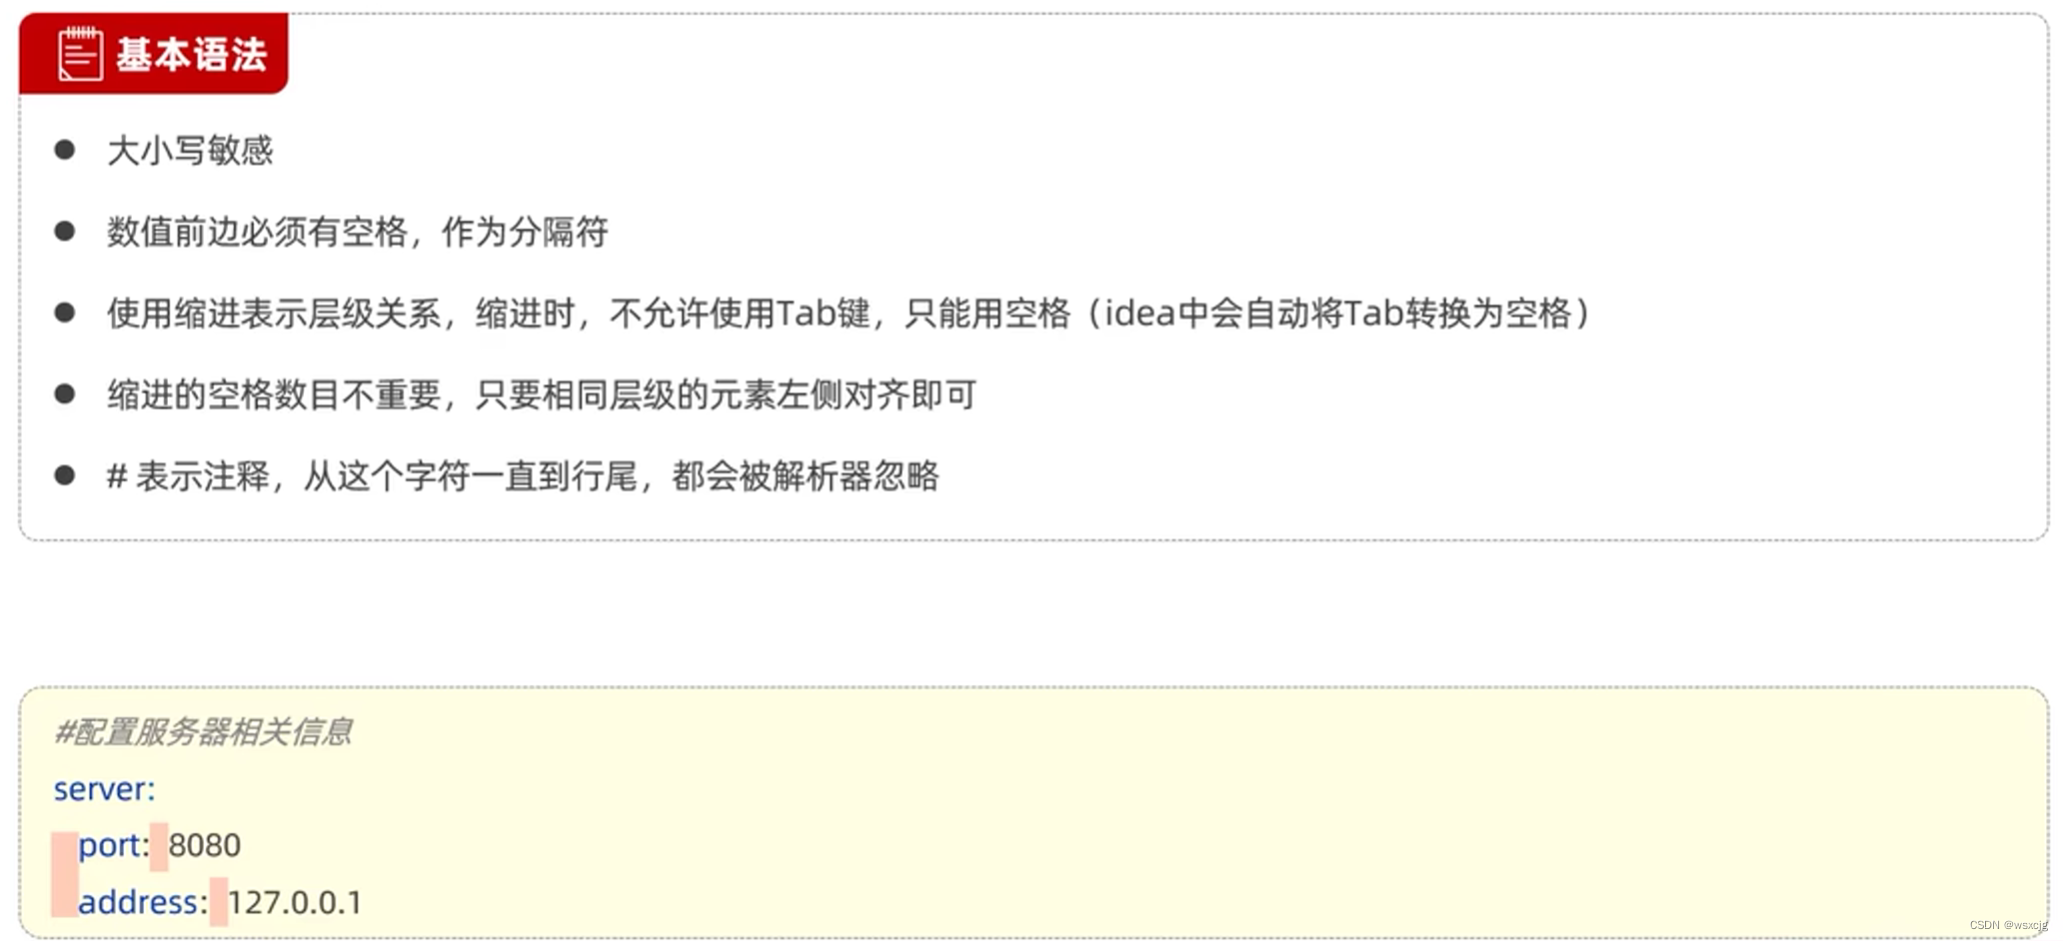
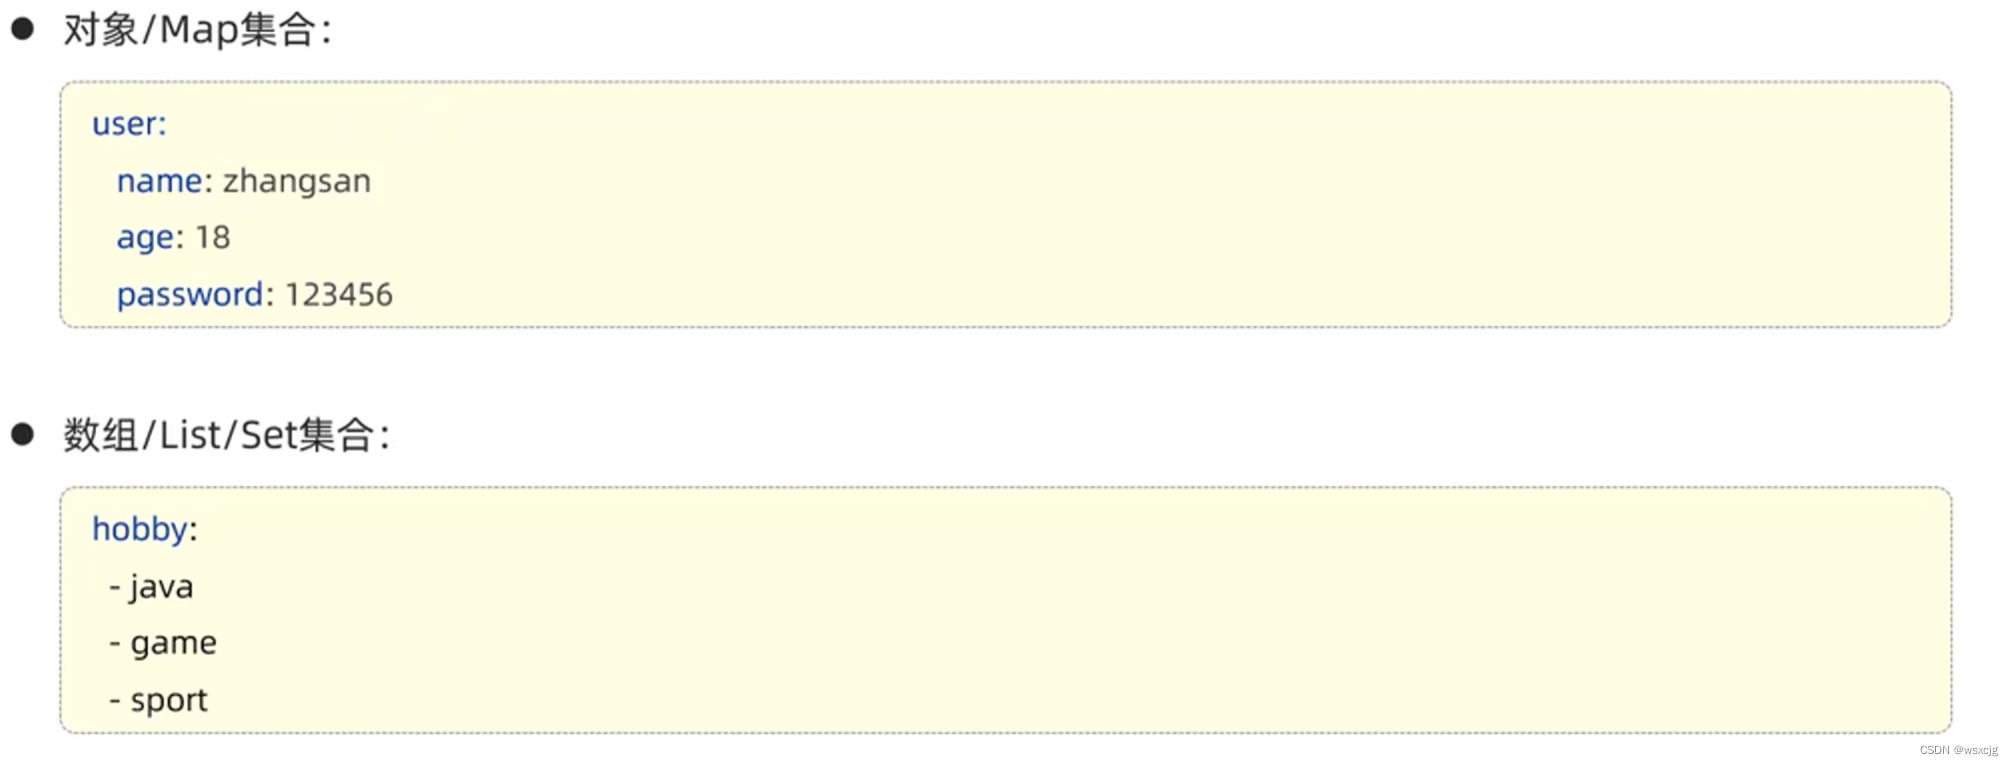
数据格式:
代码演示:
将下面application.properties文件改写成application.yml文件
application.properties:
spring.application.name=tlias
#驱动器名称
spring.datasource.driver-class-name=com.mysql.cj.jdbc.Driver
#数据库连接的url
spring.datasource.url=jdbc:mysql://localhost:3306/tlias
#连接数据库的用户名
spring.datasource.username=root
#连接数据库的密码
spring.datasource.password=123456#配置mybatis的日志,指定输出到控制台
mybatis.configuration.log-impl=org.apache.ibatis.logging.stdout.StdOutImpl
#开启mybatis的驼峰命名自动映射开关
mybatis.configuration.map-underscore-to-camel-case=true#自定义的阿里云OSS配置信息
aliyun.oss.endpoint=https://oss-cn-beijing.aliyuncs.com
aliyun.oss.bucketName=web-talias-test
application.yml:
spring:application:name: tlias#数据库连接信息datasource:driver-class-name: com.mysql.cj.jdbc.Driverurl: jdbc:mysql://localhost:3306/tliasusername: rootpassword: 123456#文件上传的配置servlet:multipart:max-file-size: 10MBmax-request-size: 100MB
#mybatis配置
mybatis:configuration:log-impl: org.apache.ibatis.logging.stdout.StdOutImplmap-underscore-to-camel-case: true#阿里云OSS配置
aliyun:oss:endpoint: https://oss-cn-beijing.aliyuncs.combucketName: web-talias-test
3.ConfigurationProperties
与@Value的区别:
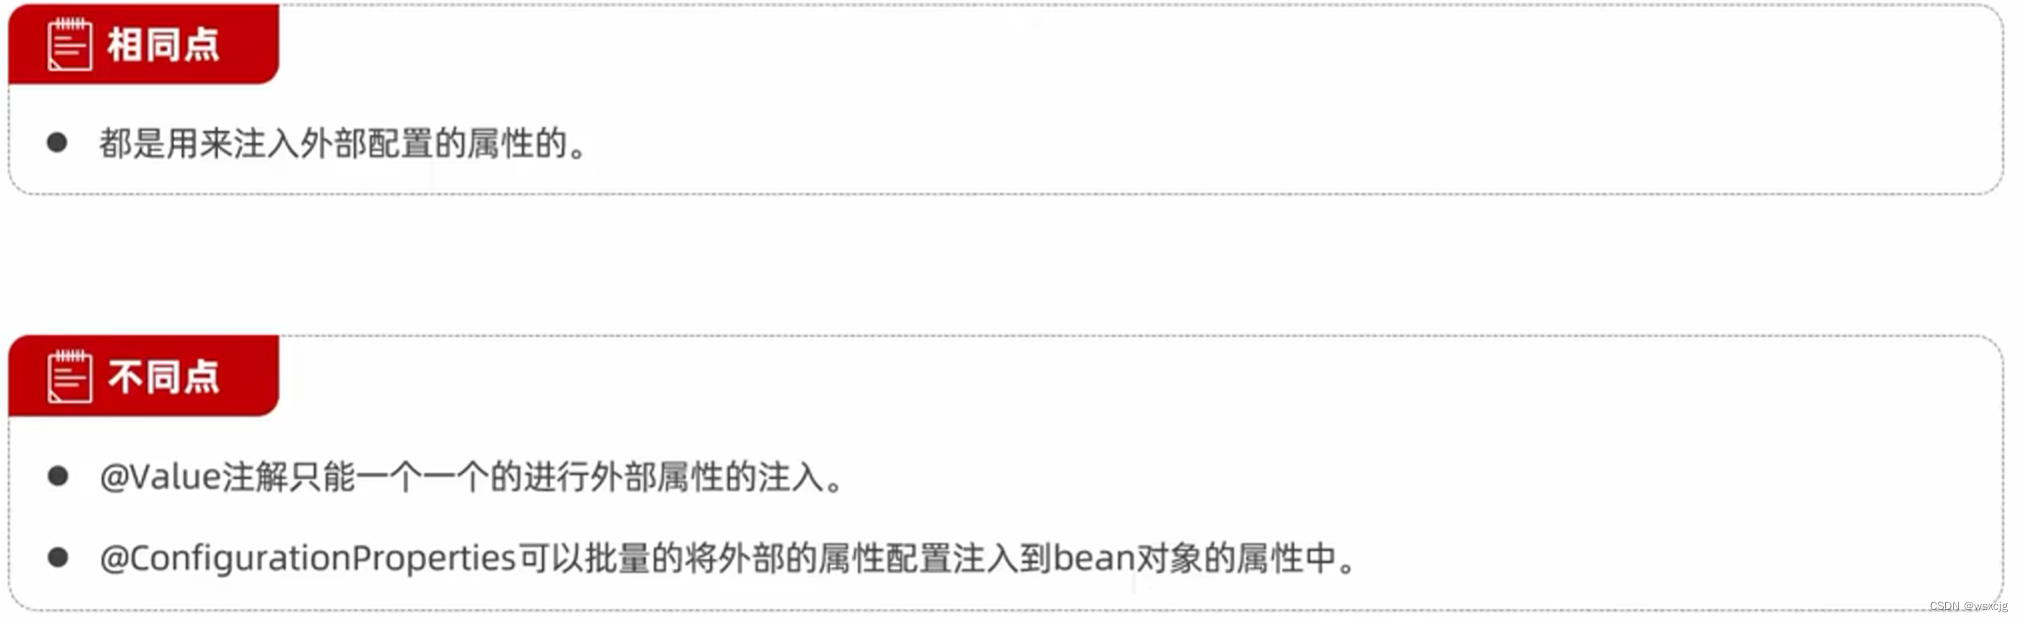
应用场景:
如果需要注解的属性只有一两个,而且只需要注解一次,那么使用@Value注解,如果需要注解的属性较多,而且需要多次注解,就使用@ConfigurationProperties注解。
代码演示:
AliOSSProperties:
@Data
@Component
@ConfigurationProperties(prefix = "aliyun.oss")
public class AliOSSProperties {private String endpoint;private String bucketName;
}
AliOSSUtils:
/*** 阿里云 OSS 工具类*/
@RestController
public class AliOSSUtils {//    // 以华东1(杭州)的外网Endpoint为例,其它Region请按实际情况填写。
//    @Value("${aliyun.oss.endpoint}")
//    private String endpoint;
//    // 填写Bucket名称,例如examplebucket。
//    @Value("${aliyun.oss.bucketName}")
//    private String bucketName;@Autowiredprivate AliOSSProperties aliOSSProperties;/*** 实现上传图片到OSS*/public String upload(MultipartFile file) throws ClientException, IOException {String endpoint = aliOSSProperties.getEndpoint();String bucketName = aliOSSProperties.getBucketName();InputStream inputStream = file.getInputStream();// 从环境变量中获取访问凭证。运行本代码示例之前,请确保已设置环境变量OSS_ACCESS_KEY_ID和OSS_ACCESS_KEY_SECRET。EnvironmentVariableCredentialsProvider credentialsProvider = CredentialsProviderFactory.newEnvironmentVariableCredentialsProvider();// 填写Object完整路径,例如exampleobject.txt。Object完整路径中不能包含Bucket名称。String objectName = file.getOriginalFilename();String fileName = UUID.randomUUID().toString() + objectName.substring(objectName.lastIndexOf("."));// 填写本地文件的完整路径,例如D:\\localpath\\examplefile.txt。// 如果未指定本地路径,则默认从示例程序所属项目对应本地路径中上传文件。// 创建OSSClient实例OSS ossClient = new OSSClientBuilder().build(endpoint, credentialsProvider);// 创建PutObjectRequest对象。PutObjectRequest putObjectRequest = new PutObjectRequest(bucketName, fileName, inputStream);// 上传文件。PutObjectResult result = ossClient.putObject(putObjectRequest);// 设置请求头。Map<String, String> headers = new HashMap<String, String>();/*// 指定Object的存储类型。headers.put(OSSHeaders.STORAGE_CLASS, StorageClass.Standard.toString());// 指定ContentType。headers.put(OSSHeaders.CONTENT_TYPE, "text/txt");*/// 设置用户自定义元数据。Map<String, String> userMetadata = new HashMap<String, String>();/*userMetadata.put("key1","value1");userMetadata.put("key2","value2");*/URL signedUrl = null;// 指定生成的签名URL过期时间,单位为毫秒。本示例以设置过期时间为1小时为例。Date expiration = new Date(new Date().getTime() + 3600 * 1000L);// 生成签名URL。GeneratePresignedUrlRequest request = new GeneratePresignedUrlRequest(bucketName, fileName);// 设置过期时间。request.setExpiration(expiration);// 将请求头加入到request中。request.setHeaders(headers);// 添加用户自定义元数据。request.setUserMetadata(userMetadata);// 通过HTTP PUT请求生成签名URL。signedUrl = ossClient.generatePresignedUrl(request);// 返回签名URL。ossClient.shutdown();return signedUrl.toString().split("\\?")[0];}}
登录功能:
基础登录功能代码:
Controller层:
@Slf4j
@RestController
public class LoginController {@AutowiredEmpService empService;@PostMapping("/login")public Result login(@RequestBody Emp emp) {log.info("用户尝试登录,登录信息:{}",emp);Boolean result = empService.login(emp);/*if(result){return Result.success();} else {return Result.error("用户名或密码错误!");}*/return result == true ? Result.success() : Result.error("用户名或密码错误!");}}
Service层:
接口:
public interface EmpService {/*** 根据每页记录数和页码获取页面实体类* @return*/PageBean getPage(Integer page, Integer pageSize, String name, Short gender, LocalDate begin, LocalDate end);/*** 批量删除员工* @param ids*/void delete(List<Short> ids);/*** 新增员工* @param emp*/void add(Emp emp);/*** 根据id查询员工* @return*/Emp getById(Integer id);void update(Emp emp);Boolean login(Emp emp);
}
实现类:
@Service
public class EmpServiceImpl implements EmpService {@Autowiredprivate EmpMapper empMapper;//    /**
//     * 分页查询,获取列表数据
//     * @param page
//     * @param pageSize
//     * @return
//     */
//    @Override
//    public PageBean getPage(Integer page, Integer pageSize) {
//        Long total = empMapper.getTotal();
//        Long start = (long) ((page - 1) * pageSize);
//        List<Emp> rows = empMapper.getRows(start,pageSize);
//        PageBean pageBean = new PageBean(total,rows);
//        return pageBean;
//    }/*** 使用PageHelper分页插件进行分页查询*/@Overridepublic PageBean getPage(Integer page, Integer pageSize, String name, Short gender, LocalDate begin, LocalDate end) {//1.设置分页参数PageHelper.startPage(page, pageSize);//2.执行查询List<Emp> empList = empMapper.list(name,gender,begin,end);Page<Emp> p = (Page<Emp>) empList;//3.封装PageBean对象PageBean pageBean = new PageBean(p.getTotal(),p.getResult());return pageBean;}/*** 批量删除员工* @param ids*/@Overridepublic void delete(List<Short> ids) {empMapper.delete(ids);}/*** 新增员工* @param emp*/@Overridepublic void add(Emp emp) {emp.setUpdateTime(LocalDateTime.now());emp.setCreateTime(LocalDateTime.now());empMapper.add(emp);}/*** 根据id查询员工* @return*/@Overridepublic Emp getById(Integer id) {Emp emp = empMapper.get(id);return emp;}@Overridepublic void update(Emp emp) {emp.setUpdateTime(LocalDateTime.now());empMapper.update(emp);}@Overridepublic Boolean login(Emp emp) {Short count = empMapper.getByUsernameAndPassword(emp);if(count == 1){return true;} else {return false;}}}
Mapper层:
@Mapper
public interface EmpMapper {
//    /**
//     * 获取总记录数
//     * @return
//     */
//    @Select("select count(*) from emp")
//    Long getTotal();
//
//    /**
//     * 分页查询,获取列表数据
//     * @param start
//     * @param pageSize
//     * @return
//     */
//    @Select("select id, username, password, name, gender, image, job, entrydate, dept_id, create_time, update_time\n" +
//            "from emp limit #{start},#{pageSize}")
//    List<Emp> getRows(Long start, Integer pageSize);//动态SQL/*** 使用PageHelper插件来进行分页查询*/List<Emp> list(String name, Short gender, LocalDate begin, LocalDate end);/*** 批量删除员工* @param ids*/void delete(List<Short> ids);/*** 新增员工* @param emp*/@Insert("insert into emp (username, name, gender, image, job, entrydate, dept_id, create_time, update_time)" +"values (#{username},#{name},#{gender},#{image},#{job},#{entrydate},#{deptId},#{createTime},#{updateTime})")void add(Emp emp);/*** 根据id查询员工* @param id* @return*/@Select("select id, username, password, name, gender, image, job, entrydate, dept_id, create_time, update_time " +"from emp where id = #{id}")Emp get(Integer id);/*** 修改员工* @param emp*/void update(Emp emp);@Select("select count(*) from emp where username = #{username} and password = #{password}")Short getByUsernameAndPassword(Emp emp);
}
Postman测试结果:
问题:
使用上面的基础登录功能代码运行程序会有一些问题,比如直接访问接口路径浏览器会直接跳到对应的接口网址页面,而不需要登录操作。为了解决这一问题我们需要进行登录校验
登录校验:
会话技术:
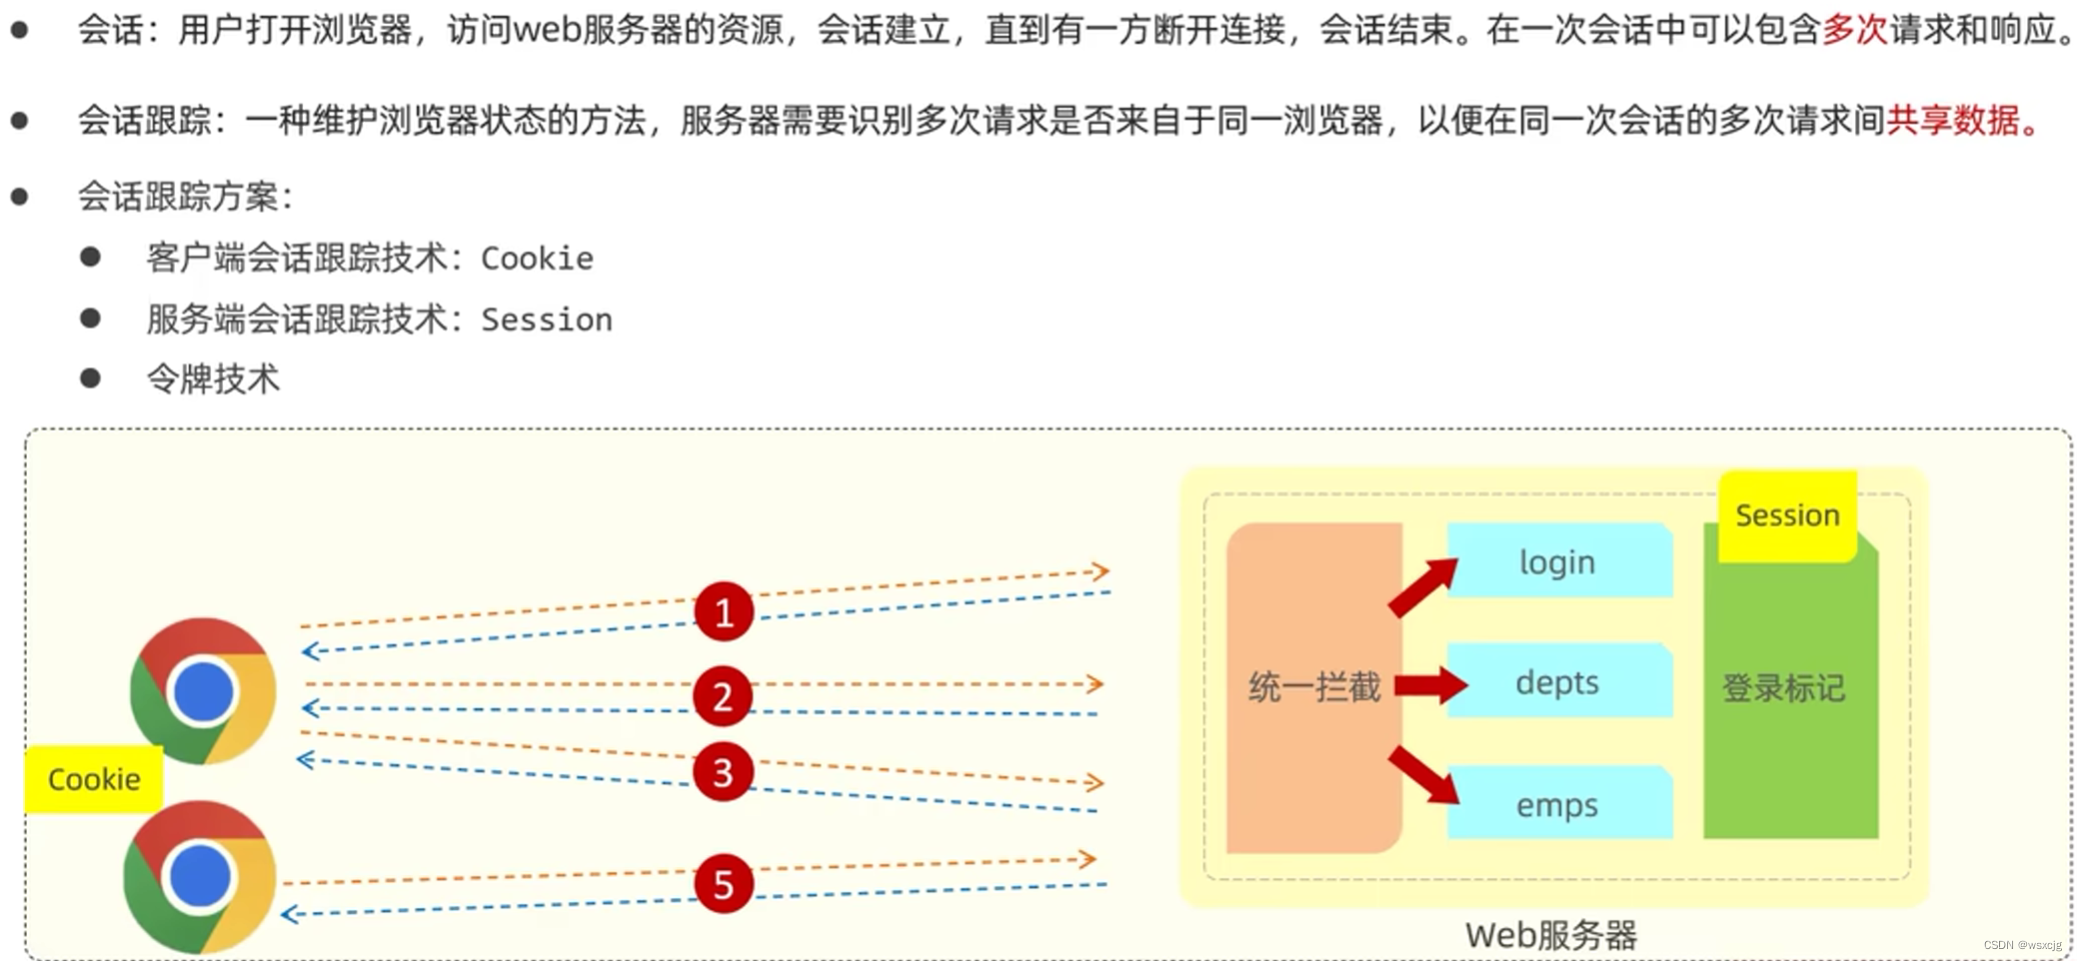
会话跟踪方案:
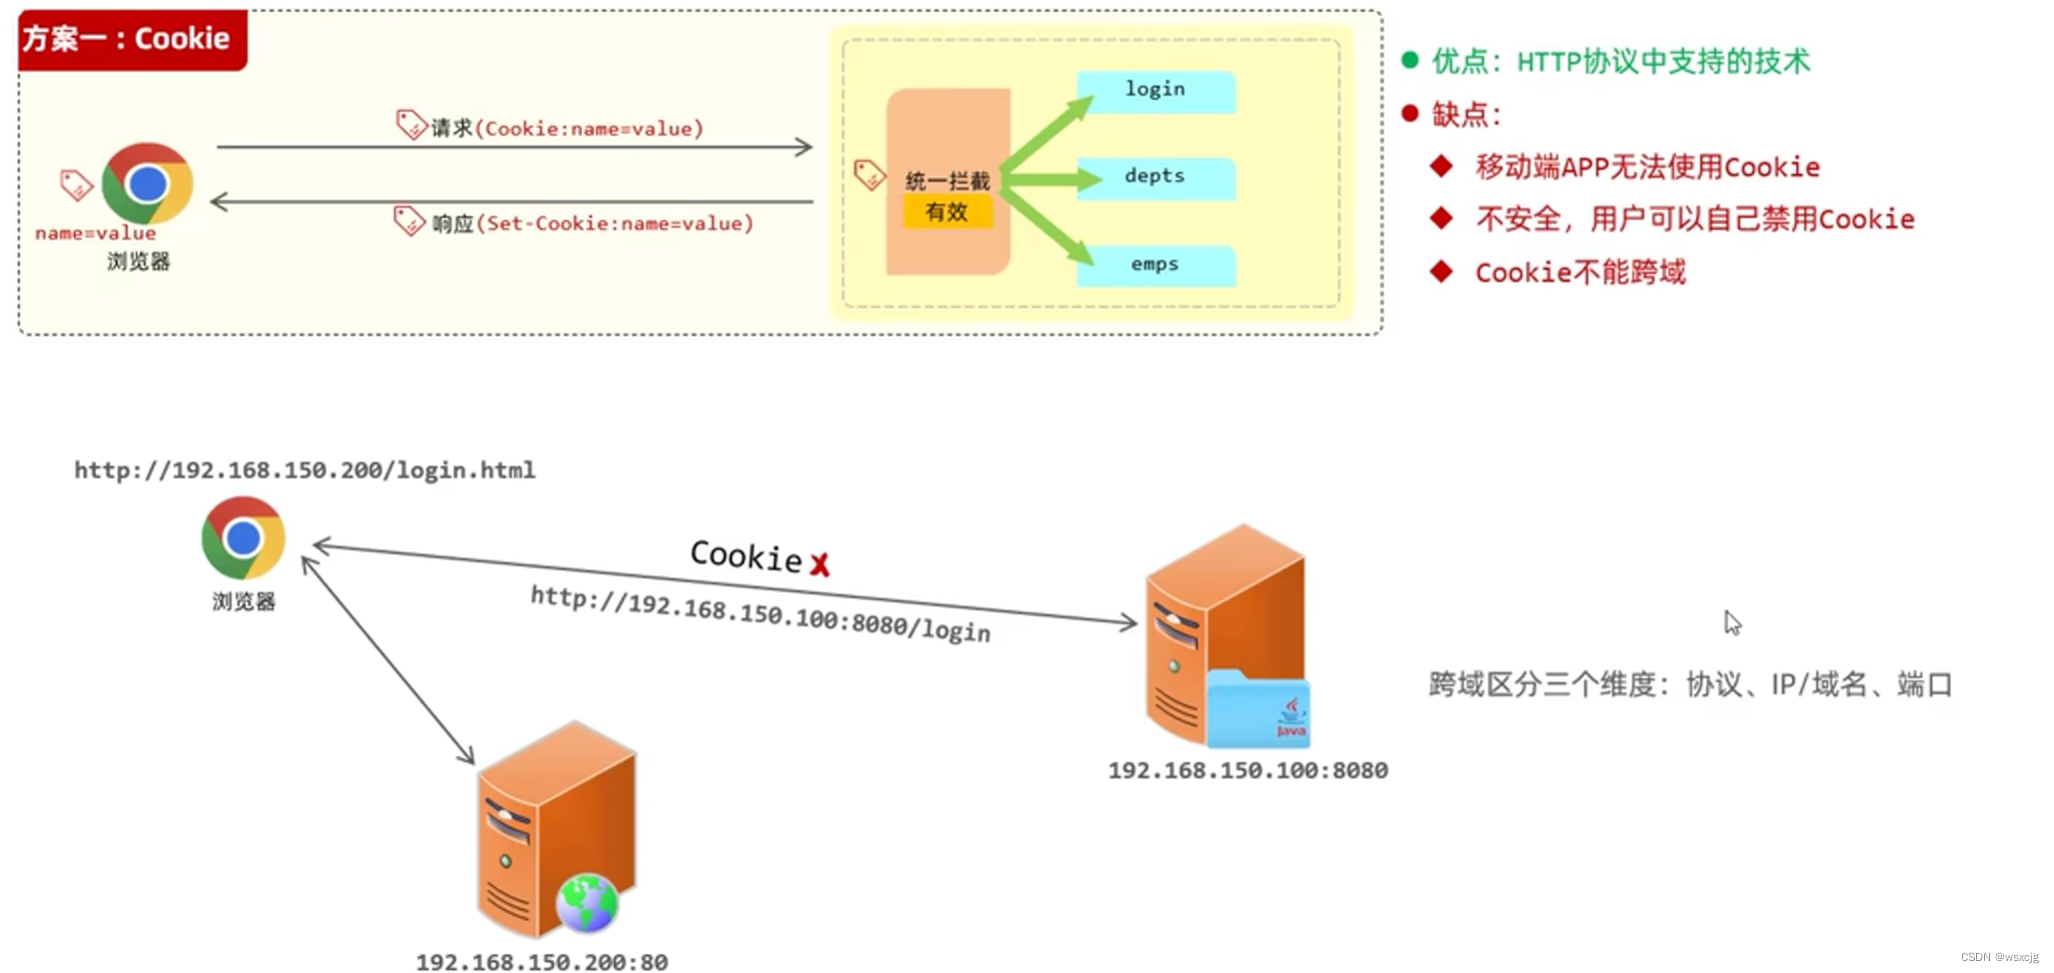
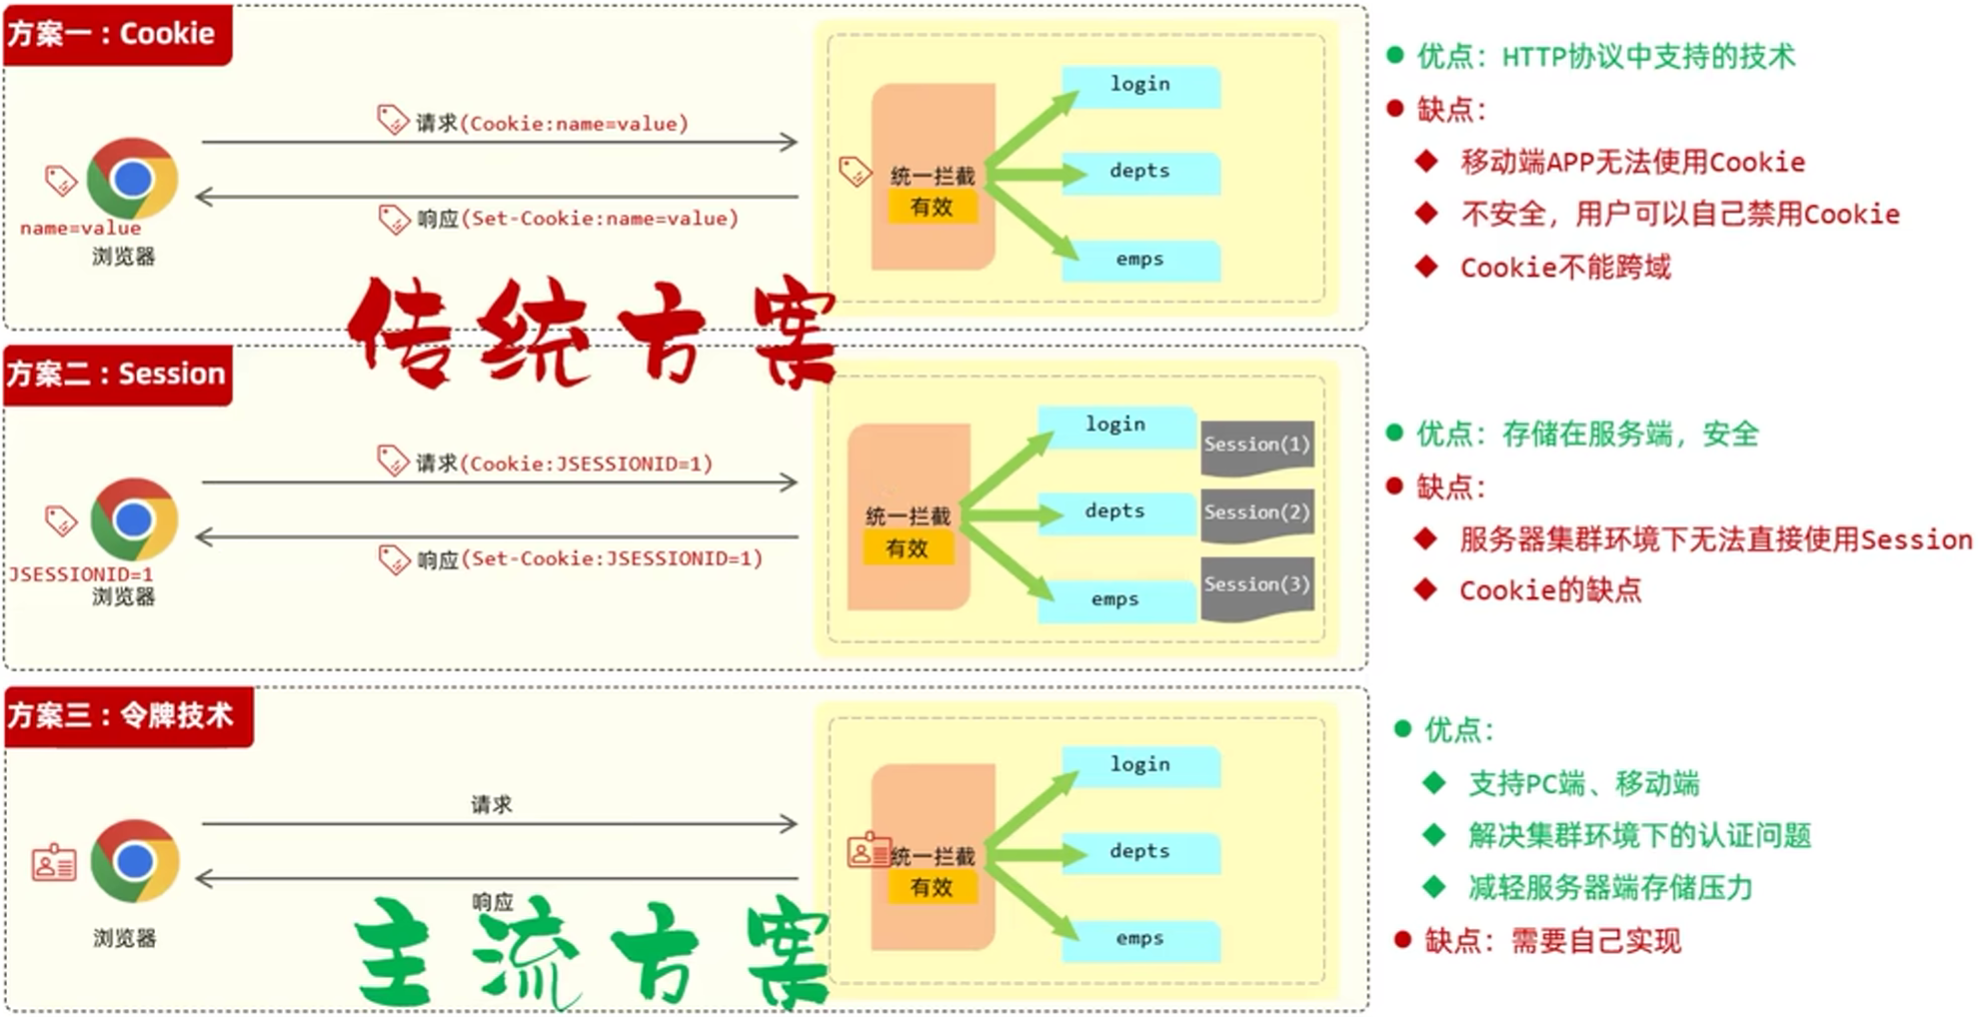
1.Cookie:
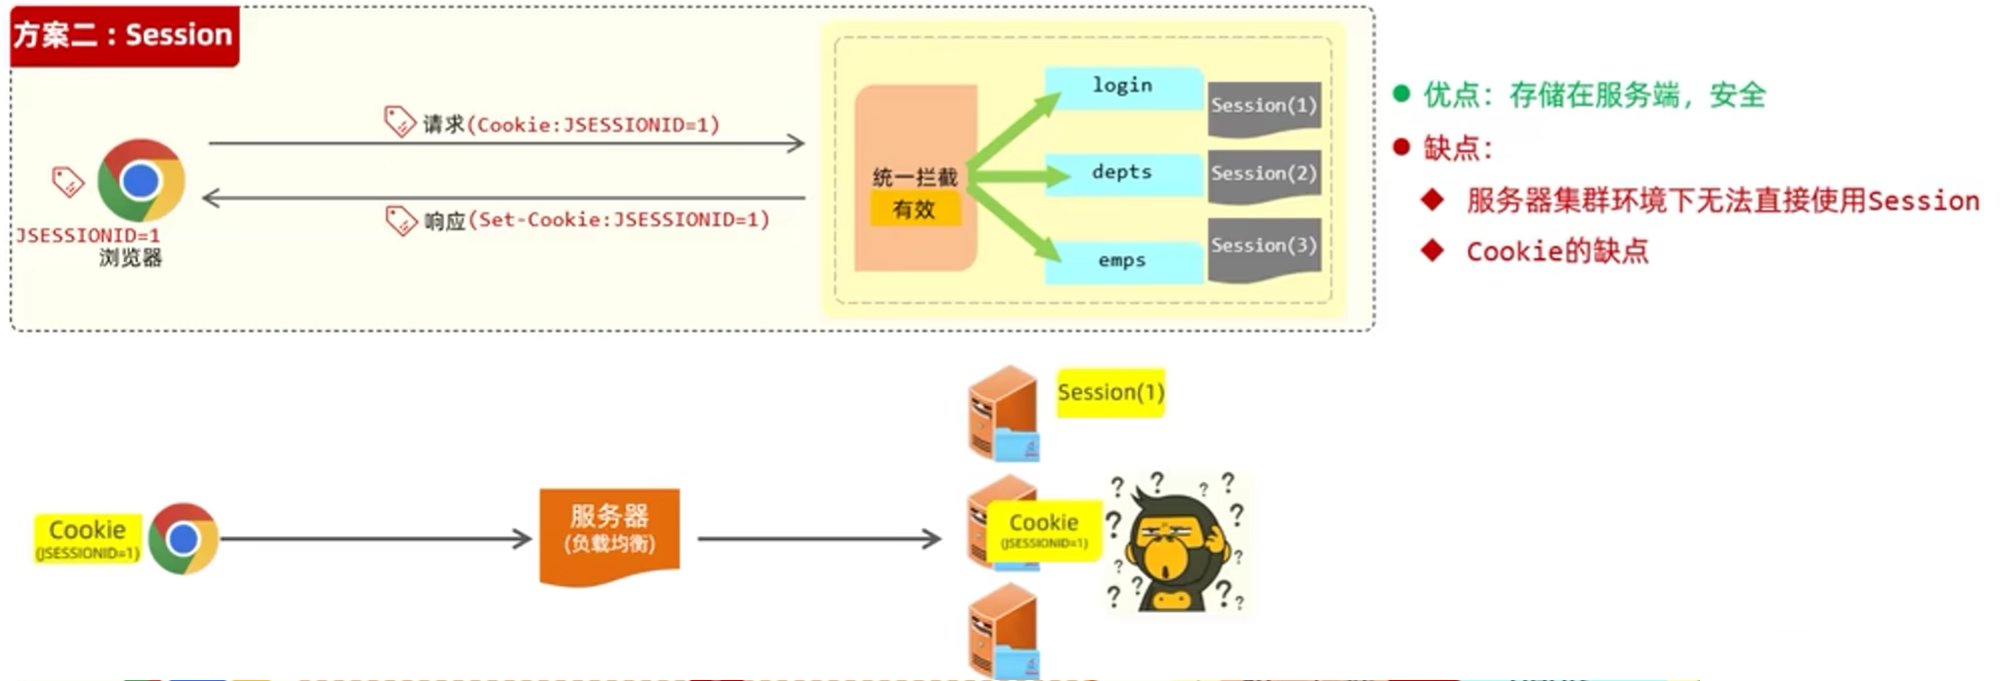
2.Session
3★.令牌技术(推荐)
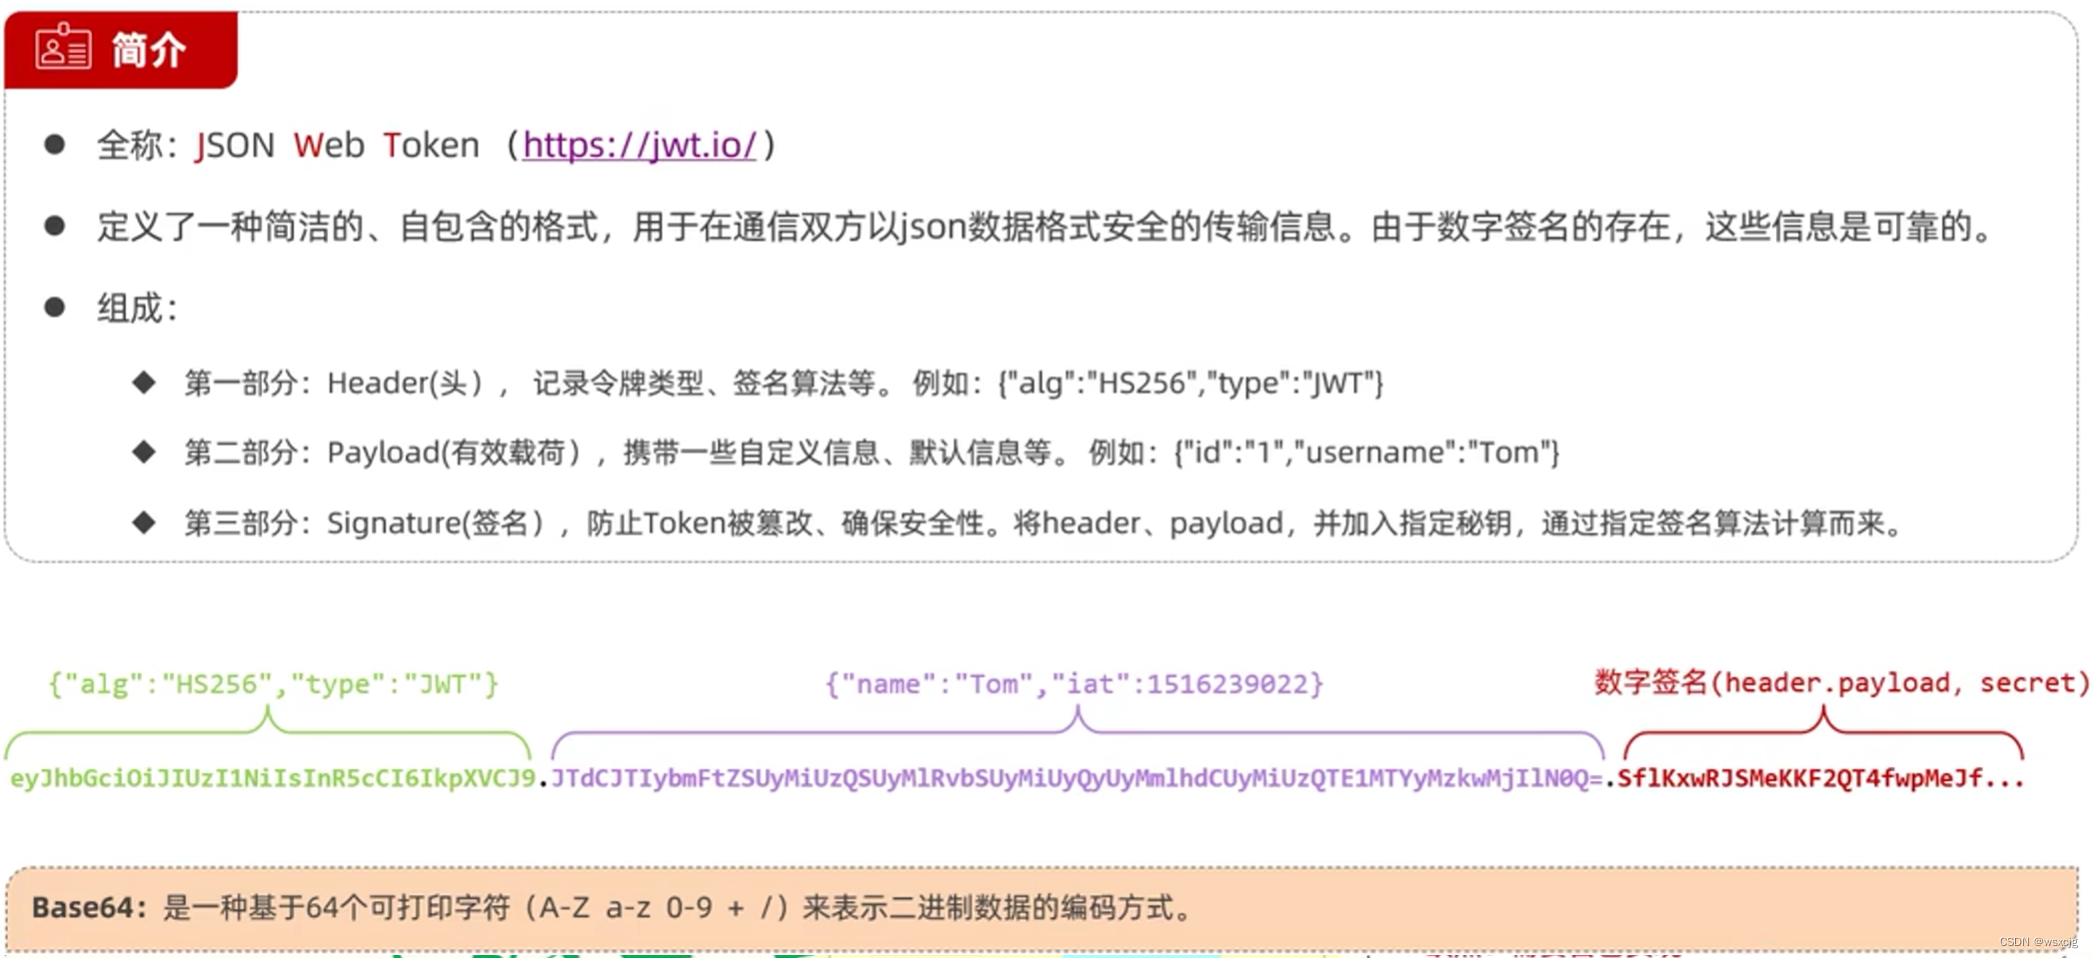
JWT令牌:
使用场景:
最广泛的使用场景:登录认证
JWT生成:
导入依赖:
<dependency><groupId>io.jsonwebtoken</groupId><artifactId>jjwt</artifactId><version>0.9.1</version></dependency>代码演示:
/*** 生成JWT令牌*/@Testvoid testJwt() {Map<String, Object> claims = new HashMap<>();claims.put("username", "admin");claims.put("password", "123456");String jwt = Jwts.builder().signWith(SignatureAlgorithm.HS256, "hann")//签名算法.setClaims(claims)//自定义内容(载荷).setExpiration(new Date(System.currentTimeMillis() + 3600 * 1000))//设置有效期1h.compact();System.out.println(jwt);}/*** 解析JWT令牌*/@Testvoid testParseJwt(){Claims claims = Jwts.parser().setSigningKey("hann")//指定签名密钥.parseClaimsJws("eyJhbGciOiJIUzI1NiJ9" +".eyJwYXNzd29yZCI6IjEyMzQ1NiIsImV4cCI6MTcxNzQwNTg3NywidXNlcm5hbWUiOiJhZG1pbiJ9" +".iup_46wg3STPq6Dffbt36IYKTbN8cwiRcOm_8uI_slY")//解析令牌.getBody();System.out.println(claims);}注意事项:

接下来通过jwt令牌进行登录校验。
改写登录功能:
思路:

1.生成JWT令牌
代码演示:
这里我发现之前基础的登录功能只返回一个布尔类型的值,是只能获取到用户名和密码的,但是在生成JWT令牌是自定义内容写用户名和密码是可以被解码的,这样信息就不安全,所以我把登录的一系列接口和方法返回的类型改成Emp实体类了
JWT令牌工具类:
public class JwtUtils {private static String signKey = "hann";private static Long expirationTime = 43200000L;/*** 获得JWT令牌*/public static String getJwt(Map<String, Object> claims) {String jwt = Jwts.builder().signWith(SignatureAlgorithm.HS256, signKey)//签名算法.setClaims(claims)//自定义内容(载荷).setExpiration(new Date(System.currentTimeMillis() + expirationTime))//设置有效期12h.compact();return jwt;}}Controller层:
@Slf4j
@RestController
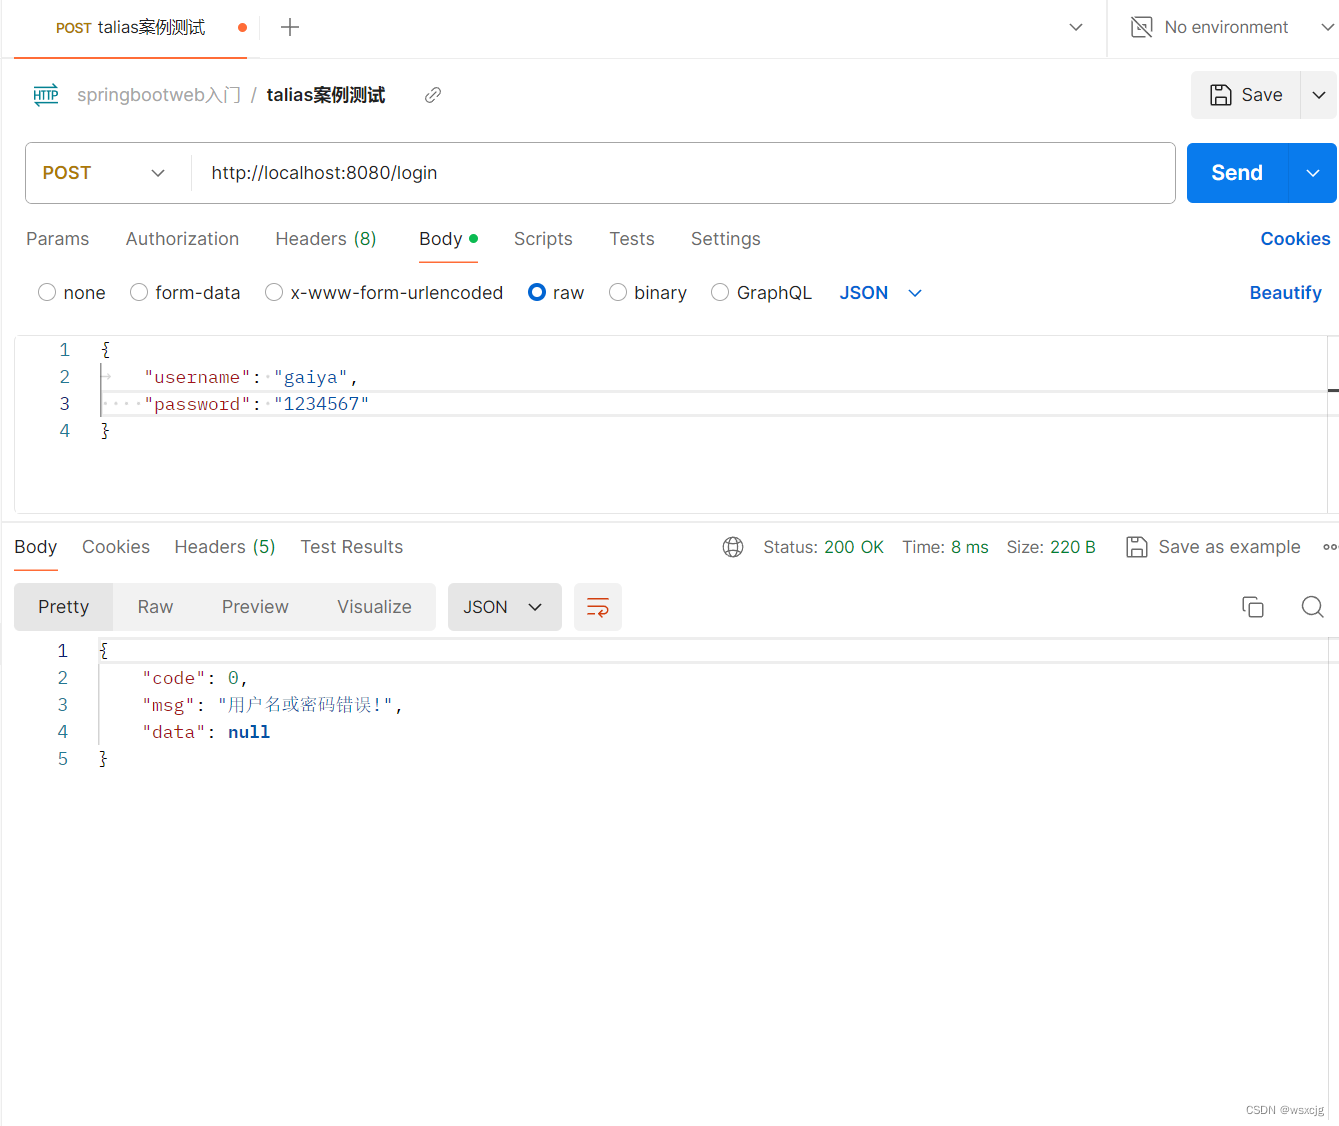
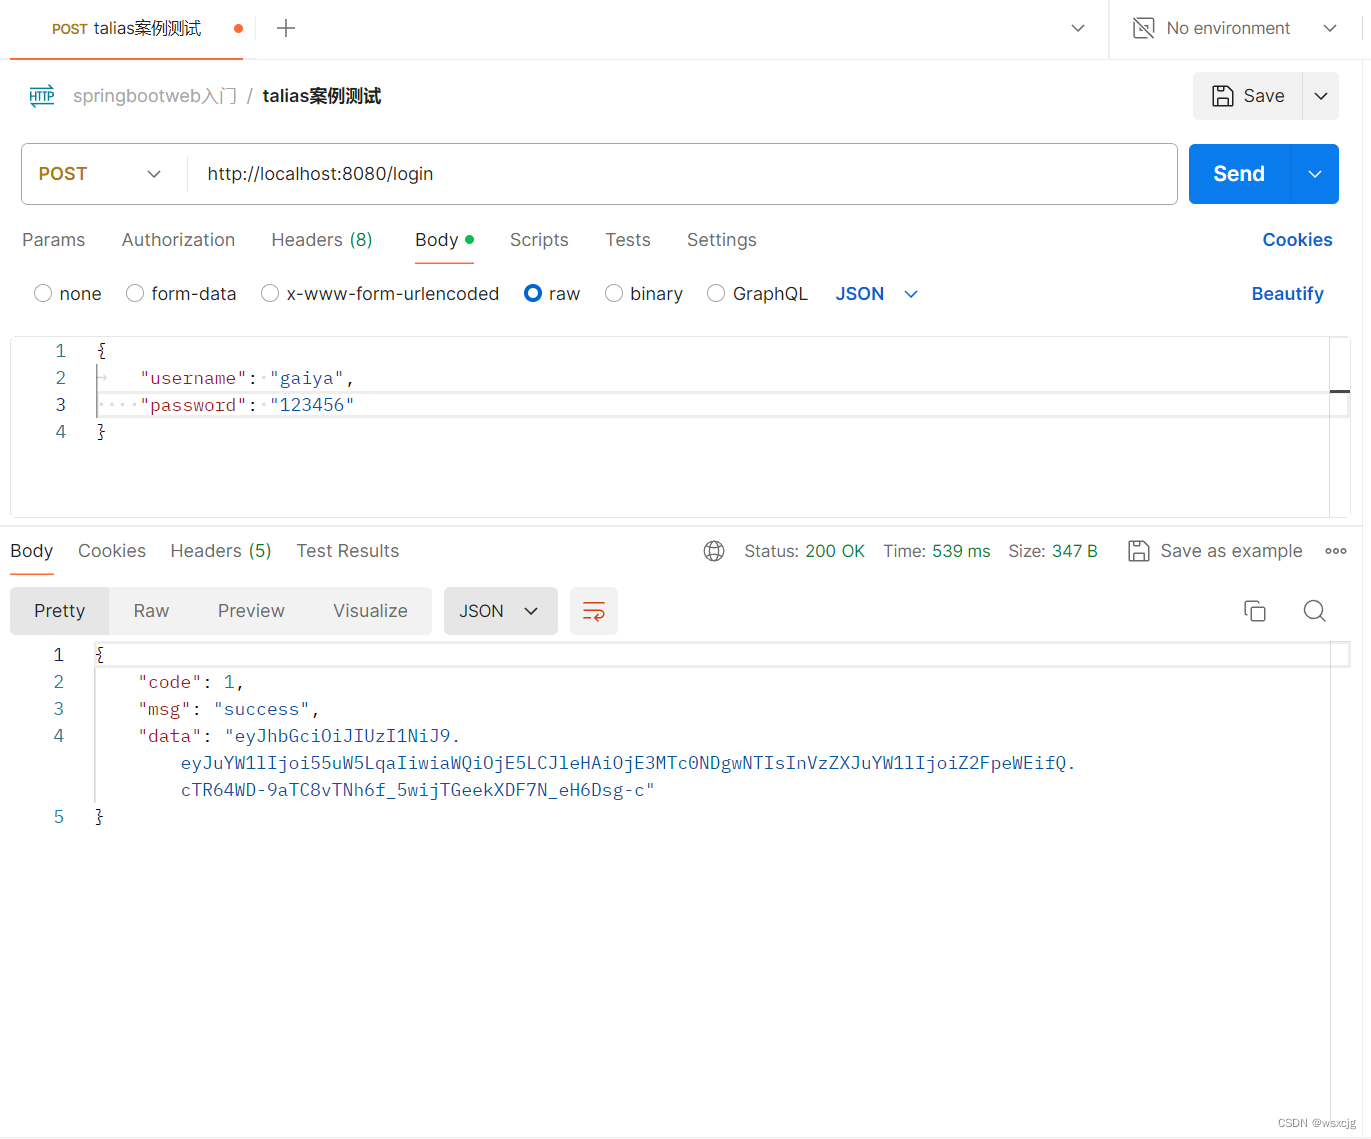
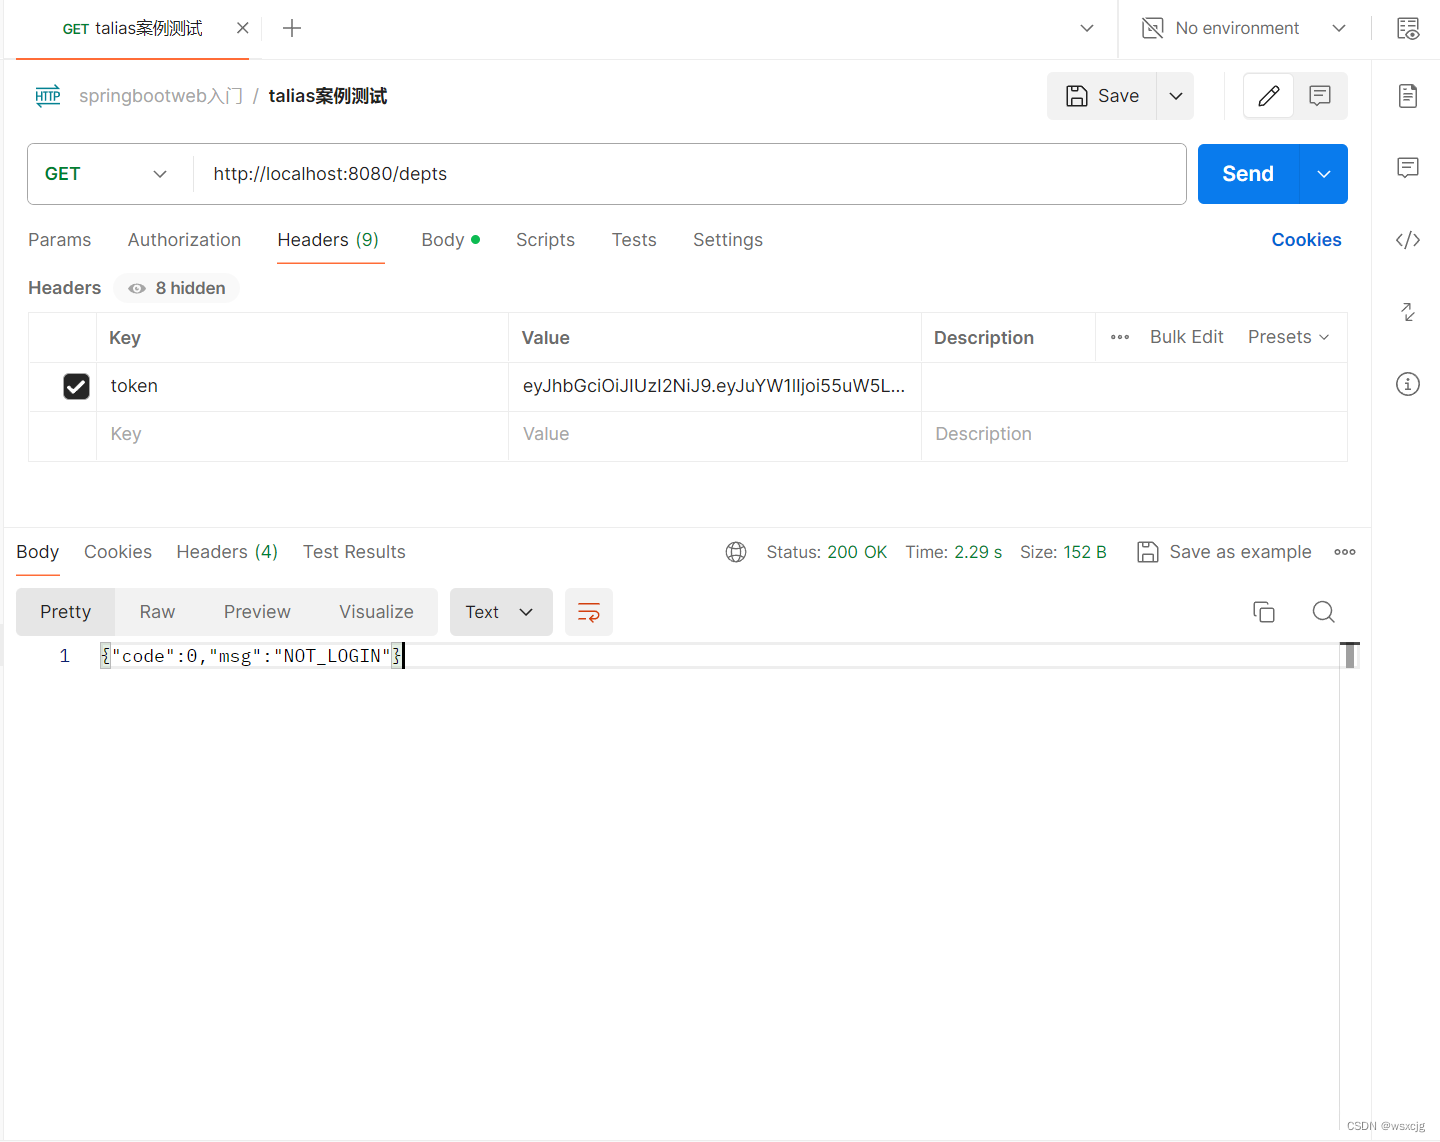
public class LoginController {@AutowiredEmpService empService;@PostMapping("/login")public Result login(@RequestBody Emp emp) {log.info("用户尝试登录,登录信息:{}",emp);Emp e = empService.login(emp);if(e != null){//登录成功Map<String, Object> map = new HashMap<>();map.put("id", e.getId());map.put("name", e.getName());map.put("username", e.getUsername());String jwt = JwtUtils.getJwt(map);return Result.success(jwt);} else {return Result.error("用户名或密码错误!");}}}Postman测试结果:
2.统一校验JWT令牌
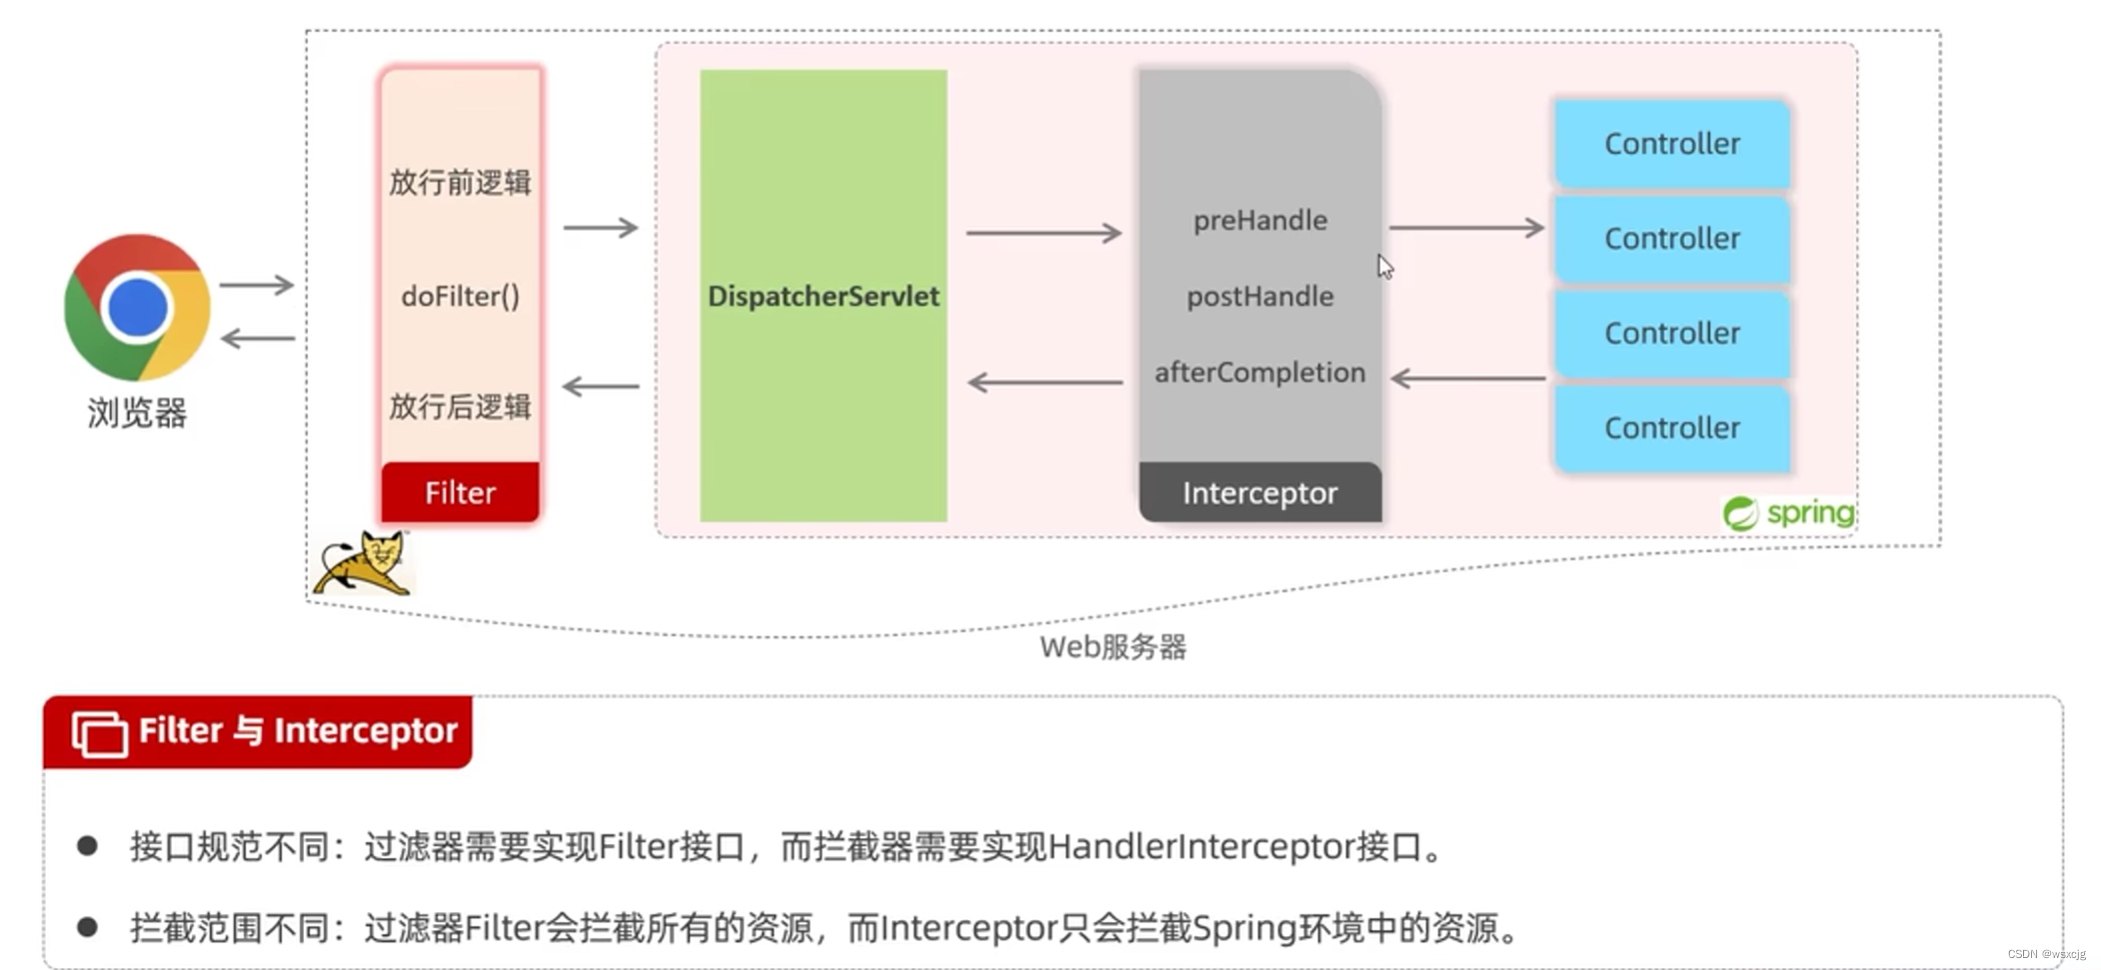
①过滤器Filter:
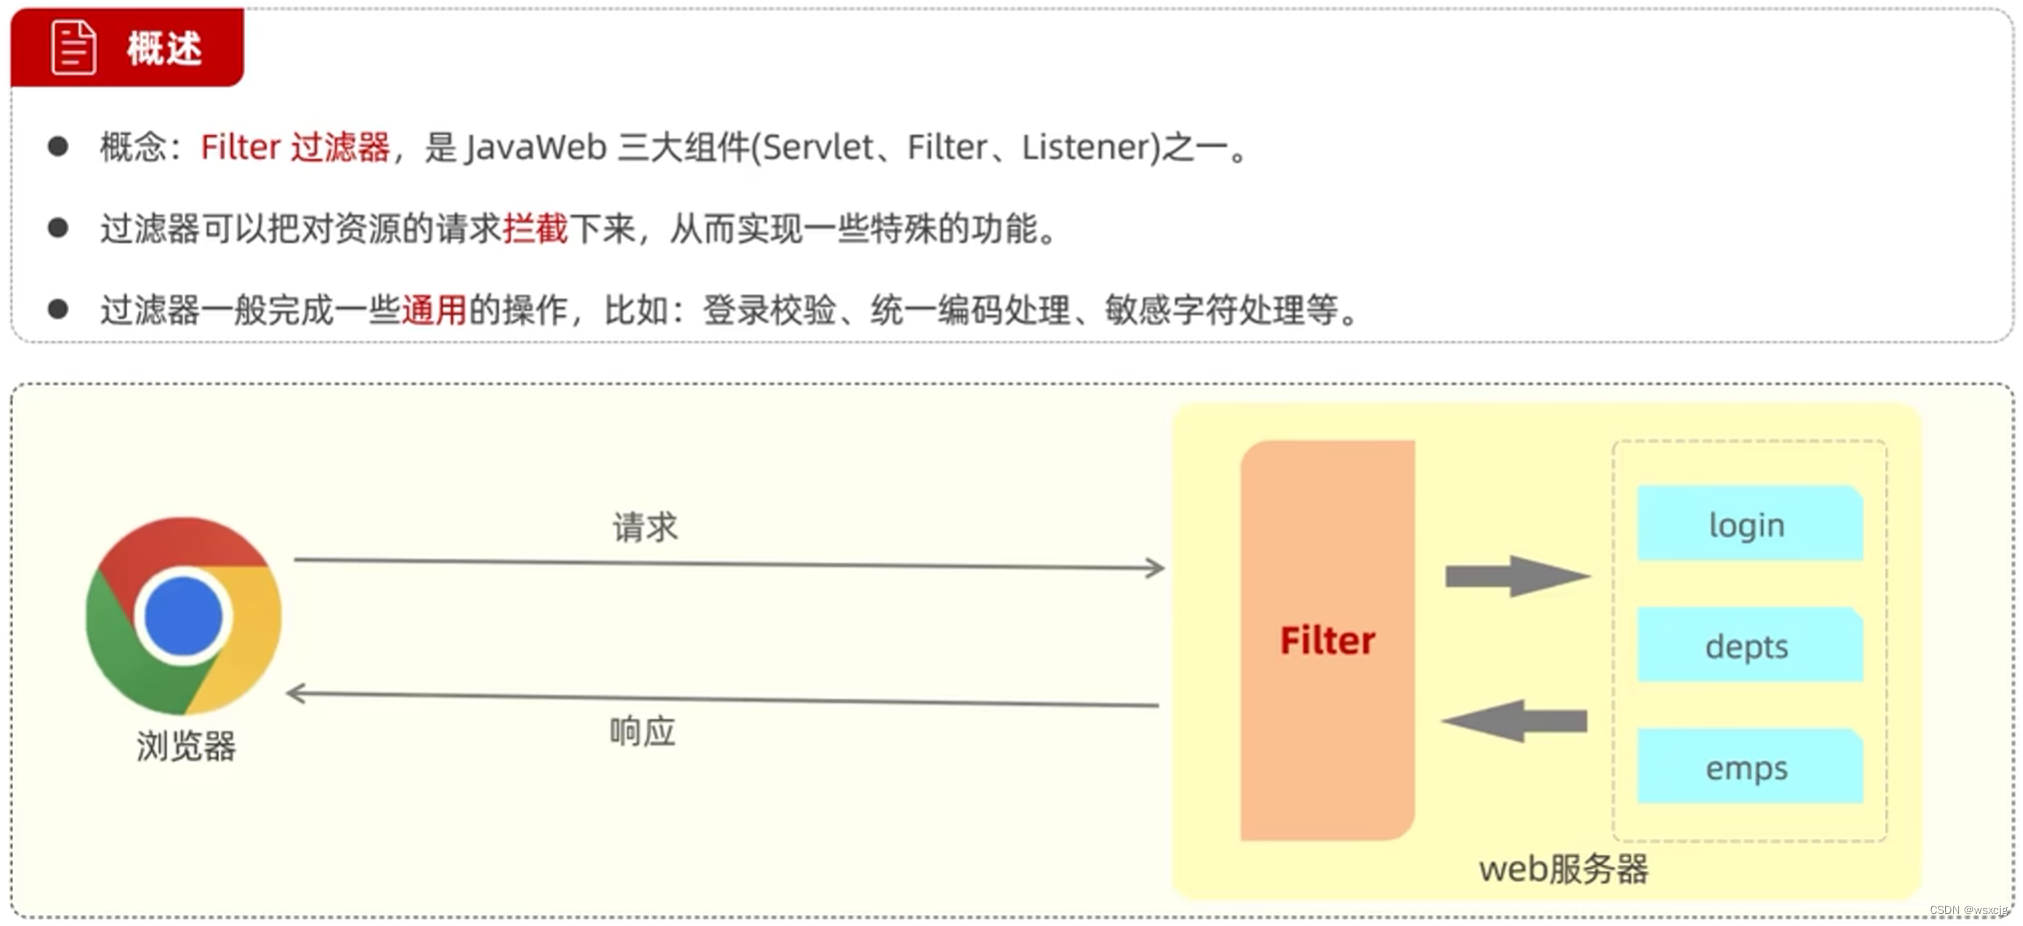
使用方法:
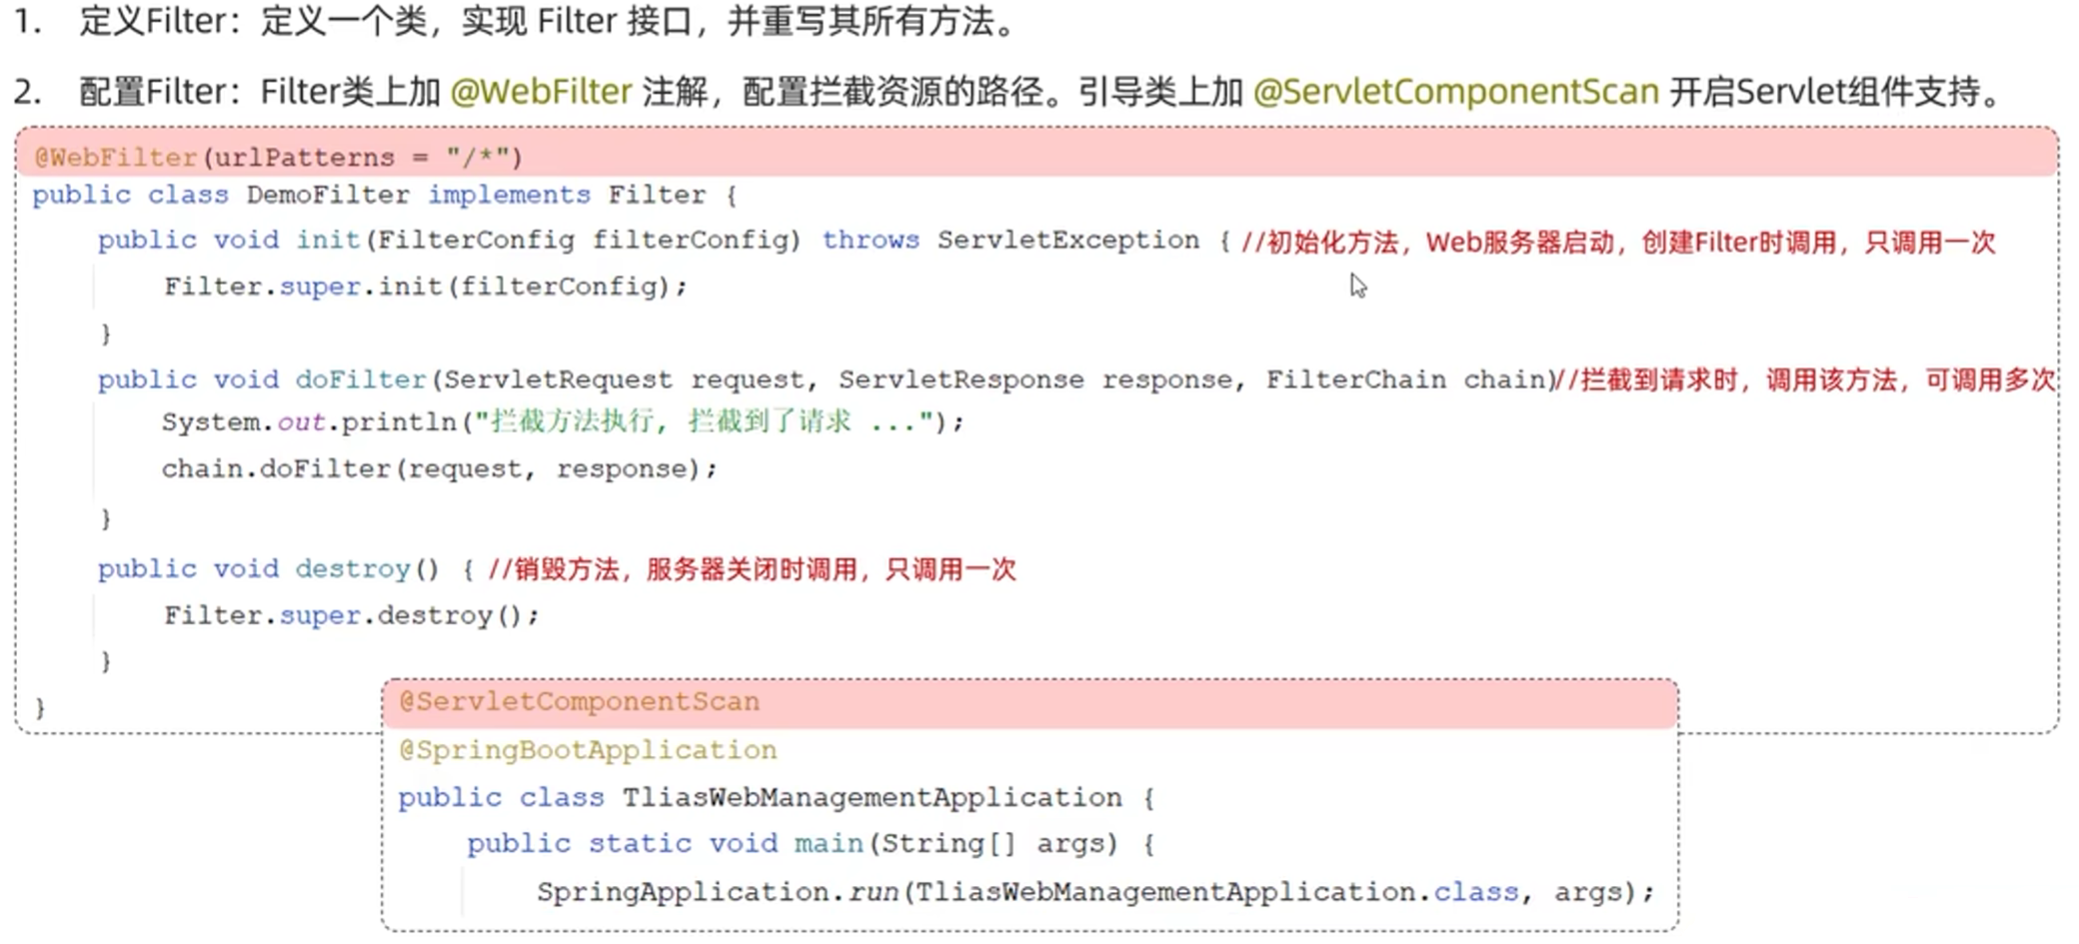
注解@WebFilter中urlPatterns = "/*"表示拦截所有路径。
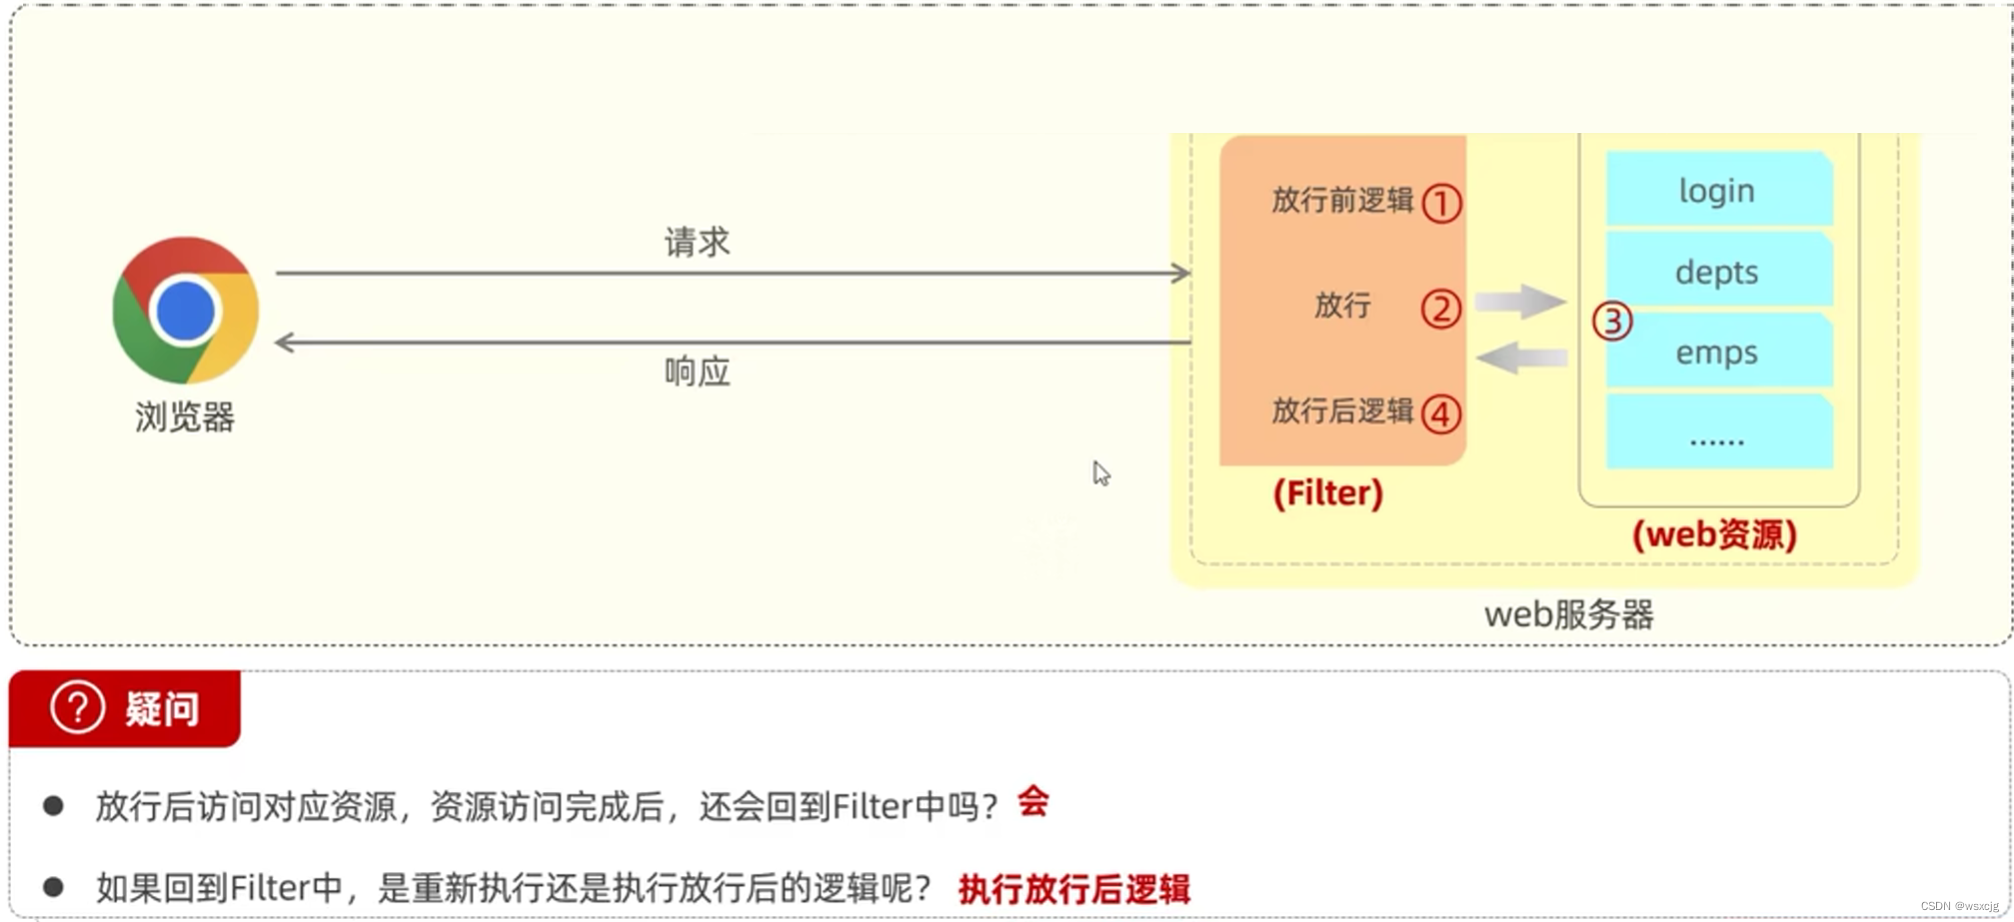
执行流程:
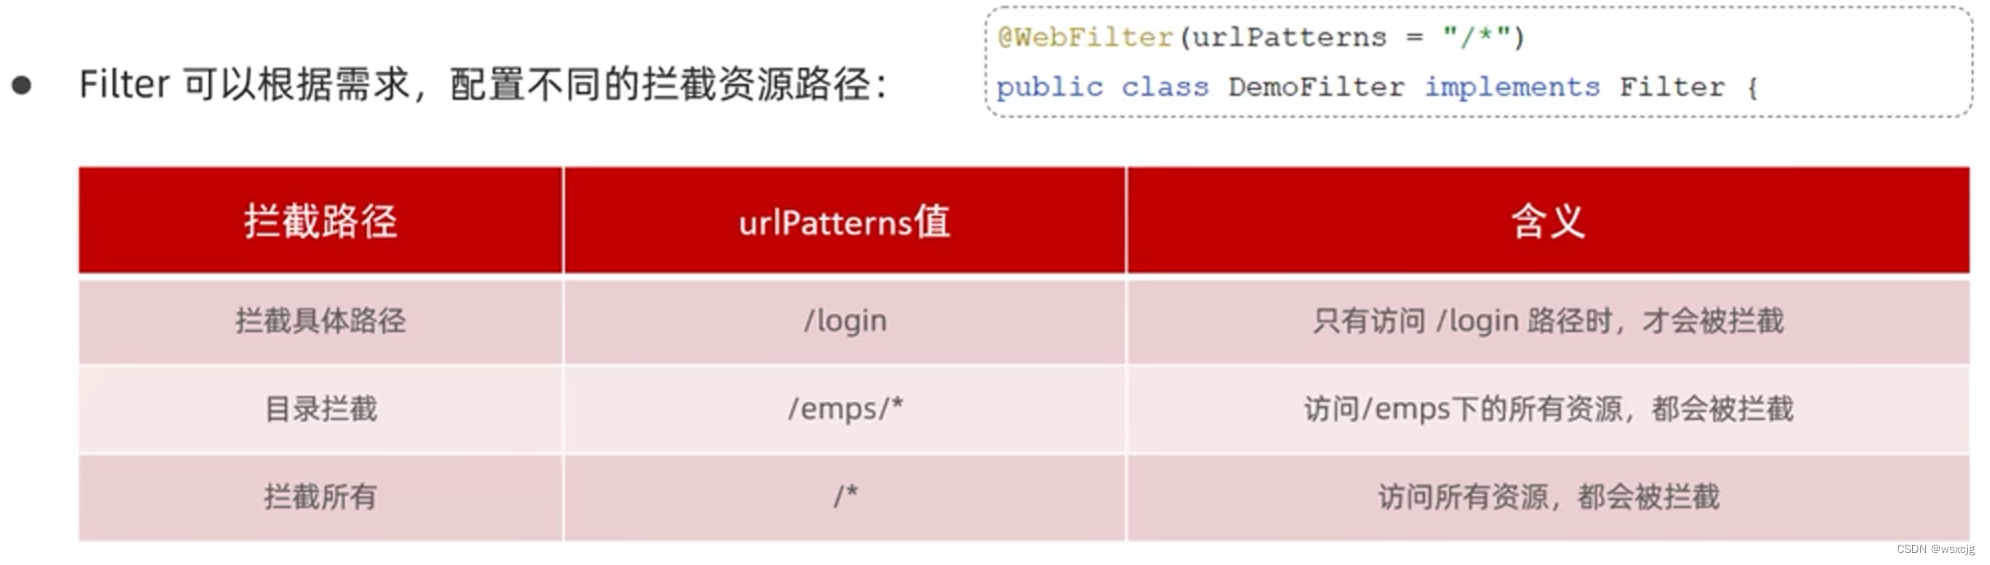
拦截路径:
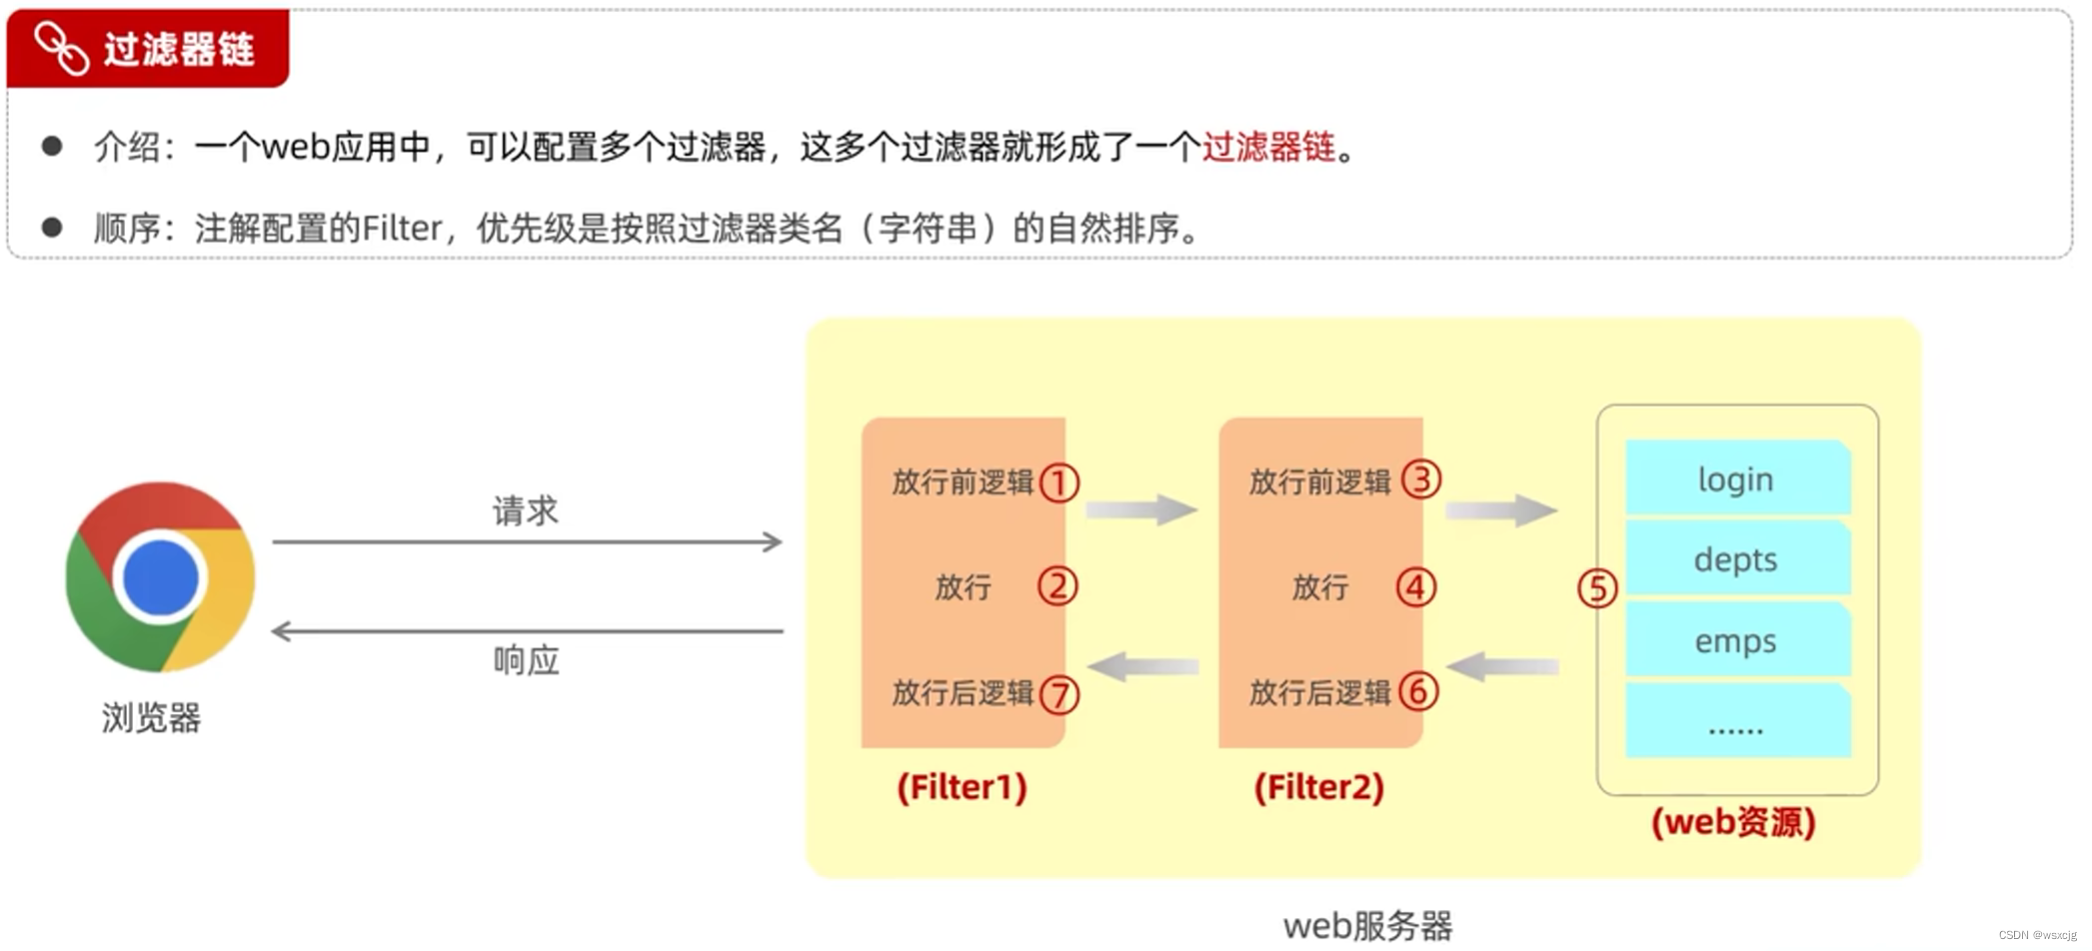
过滤器链:
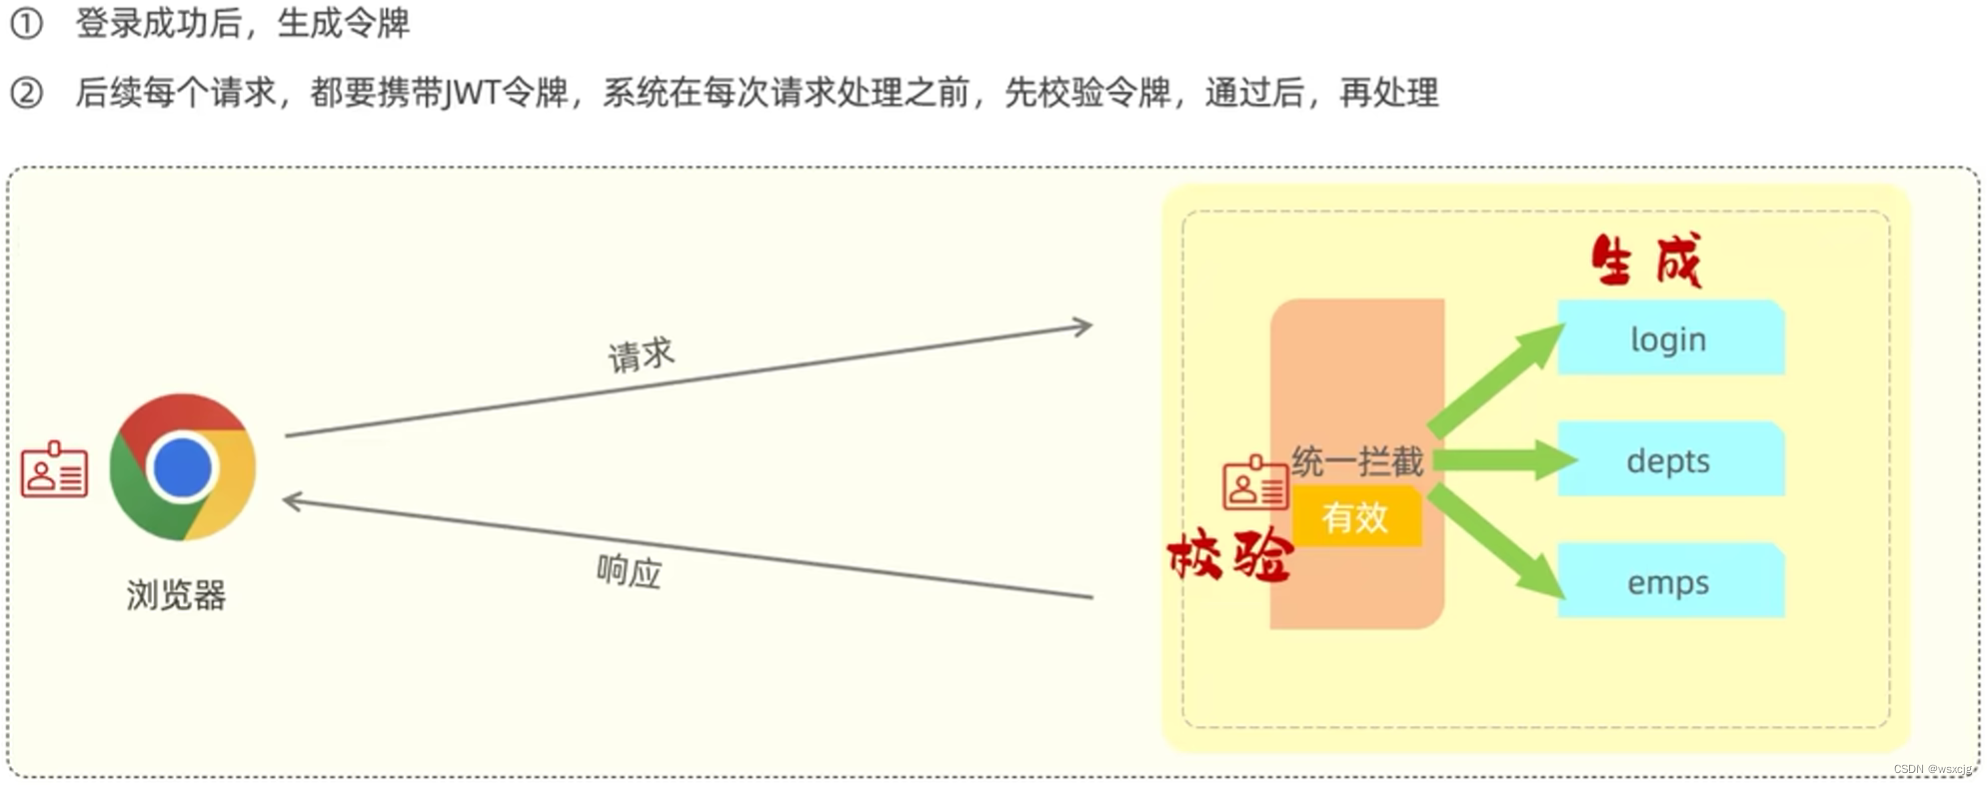
登录校验流程:
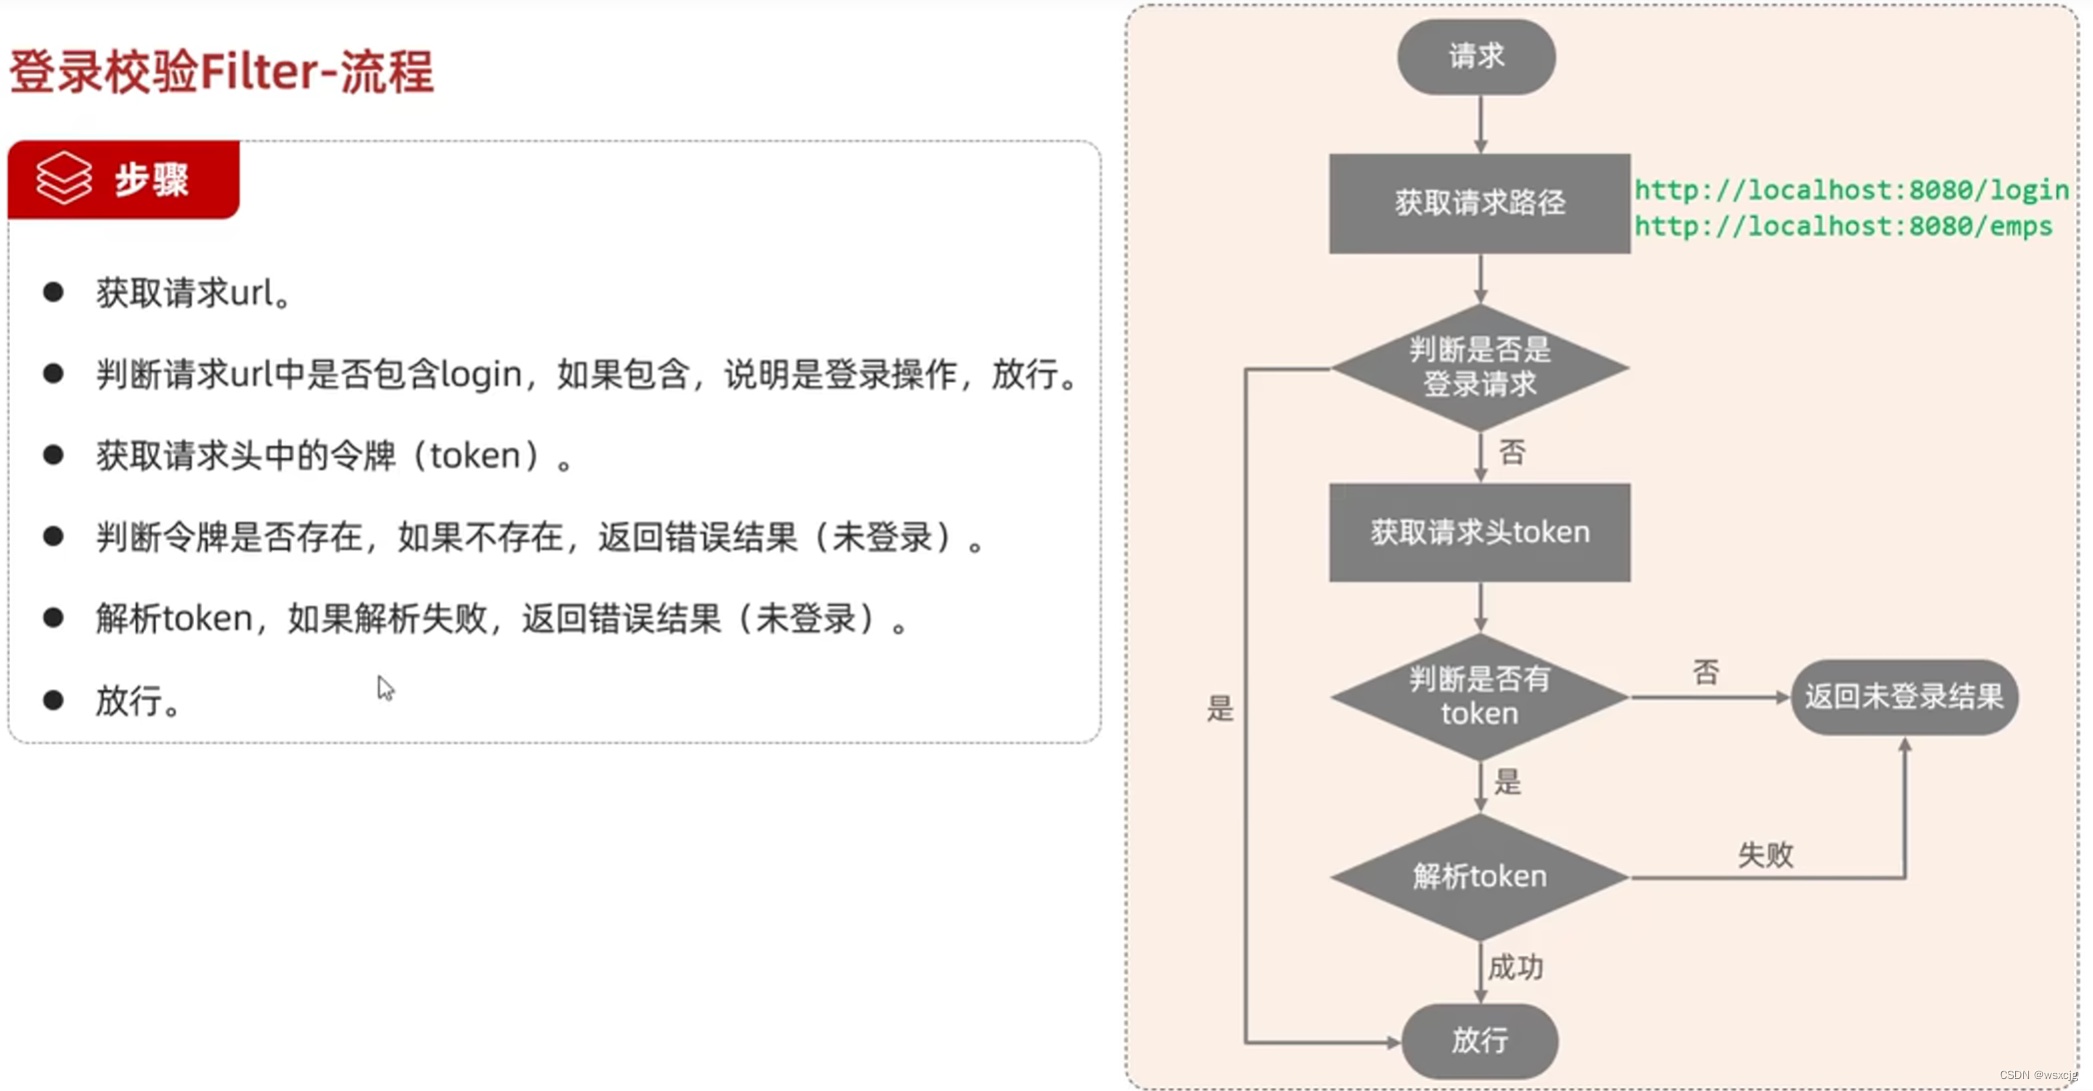 代码:
代码:
pom.xml:
引入依赖用于将Result对象转为JSON格式
<dependency><groupId>com.alibaba</groupId><artifactId>fastjson</artifactId><version>1.2.76</version></dependency>Filter:
@Slf4j
@WebFilter
public class LoginCheckFilter implements Filter {@Overridepublic void doFilter(ServletRequest servletRequest, ServletResponse servletResponse, FilterChain filterChain) throws IOException, ServletException {HttpServletRequest req = (HttpServletRequest) servletRequest;HttpServletResponse resp = (HttpServletResponse) servletResponse;//1.获取urlString url = req.getRequestURL().toString();//2.判断url中是否包含login,如果有直接放行,如果没有需要再判断if(url.contains("login")) {log.info("登录操作,放行");filterChain.doFilter(servletRequest, servletResponse);return;}//3.获取请求头中的令牌String jwt = req.getHeader("token");//4.判断令牌是否存在,若存在继续判断,不存在则返回未登录信息if(!StringUtils.hasLength(jwt)) {log.info("请求头token为空,返回未登录信息");Result error = Result.error("NOT_LOGIN");//手动转换 对象->JSON 格式 利用阿里巴巴fastJSONString notLogin = JSONObject.toJSONString(error);resp.getWriter().write(notLogin);return;}//令牌存在,判断令牌是否合法,不合法返回未登录信息try {JwtUtils.parseJwt(jwt);} catch (Exception e) {e.printStackTrace();log.info("解析令牌失败,返回未登录信息");Result error = Result.error("NOT_LOGIN");//手动转换 对象->JSON 格式 利用阿里巴巴fastJSONString notLogin = JSONObject.toJSONString(error);resp.getWriter().write(notLogin);return;}//放行log.info("令牌合法,放行,jwt:{}",jwt);filterChain.doFilter(servletRequest, servletResponse);}
}
Postman测试:
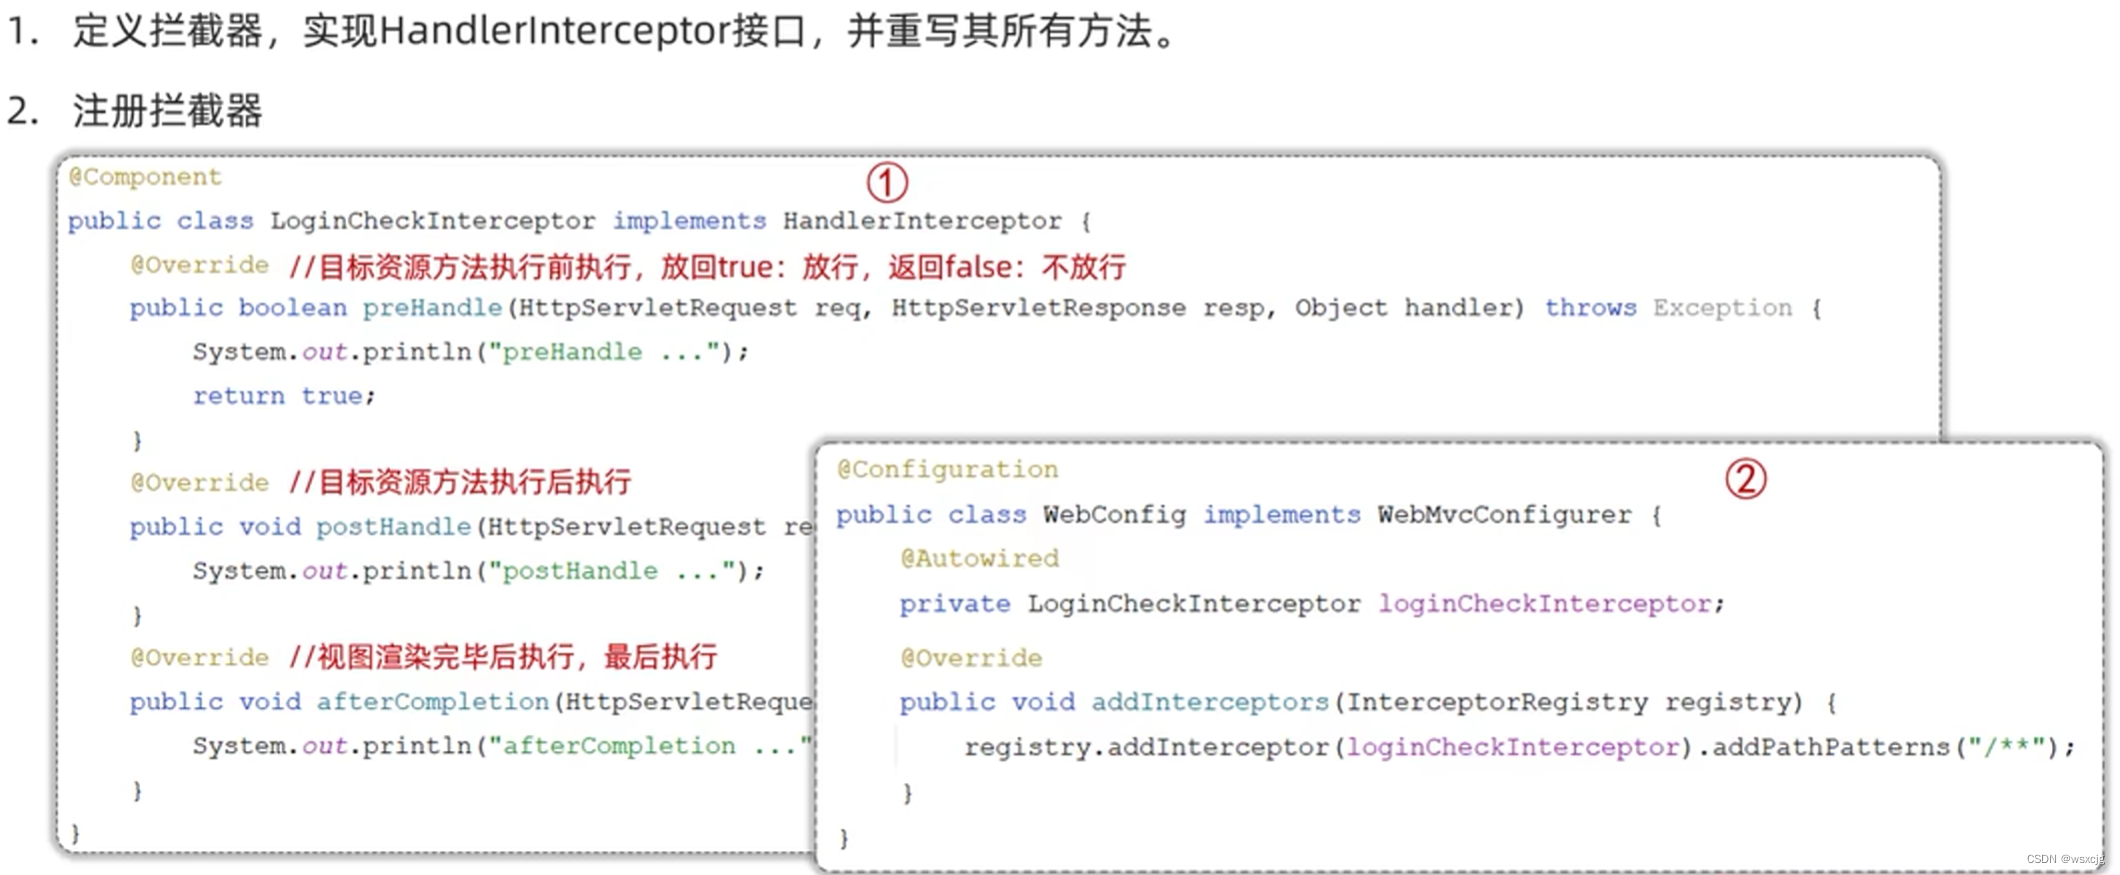
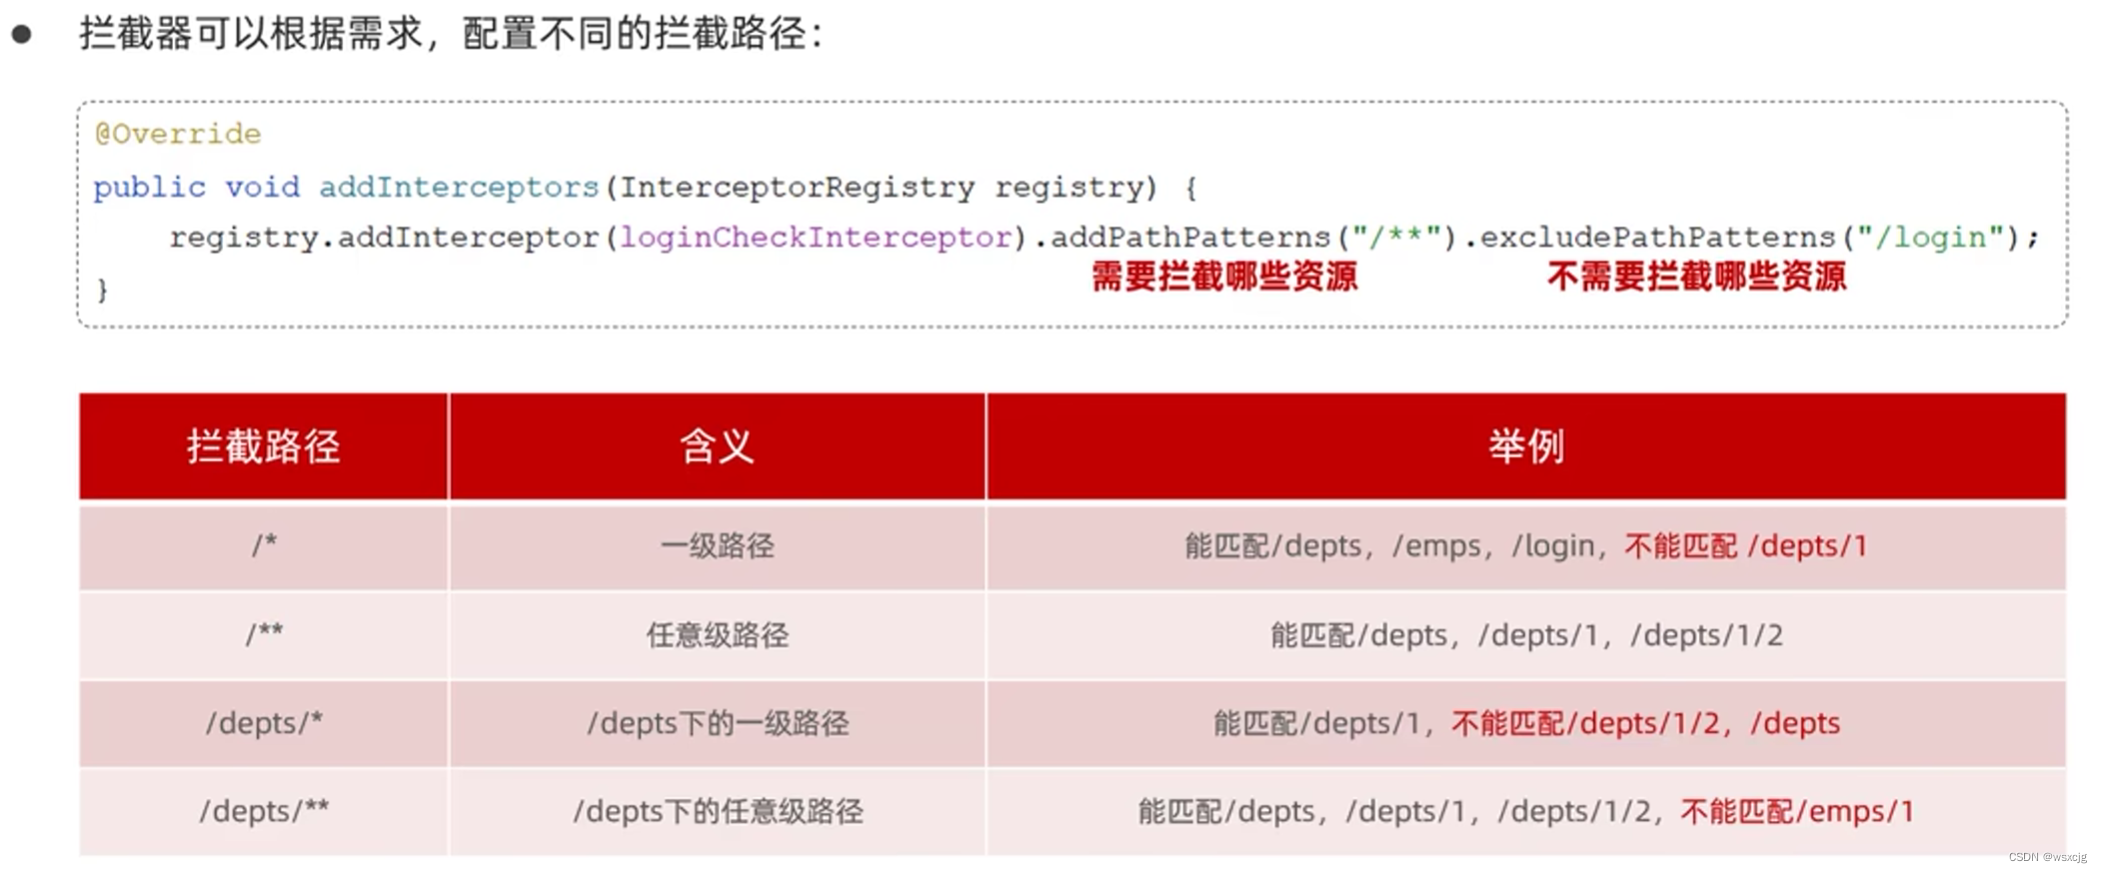
②拦截器Interceptor:
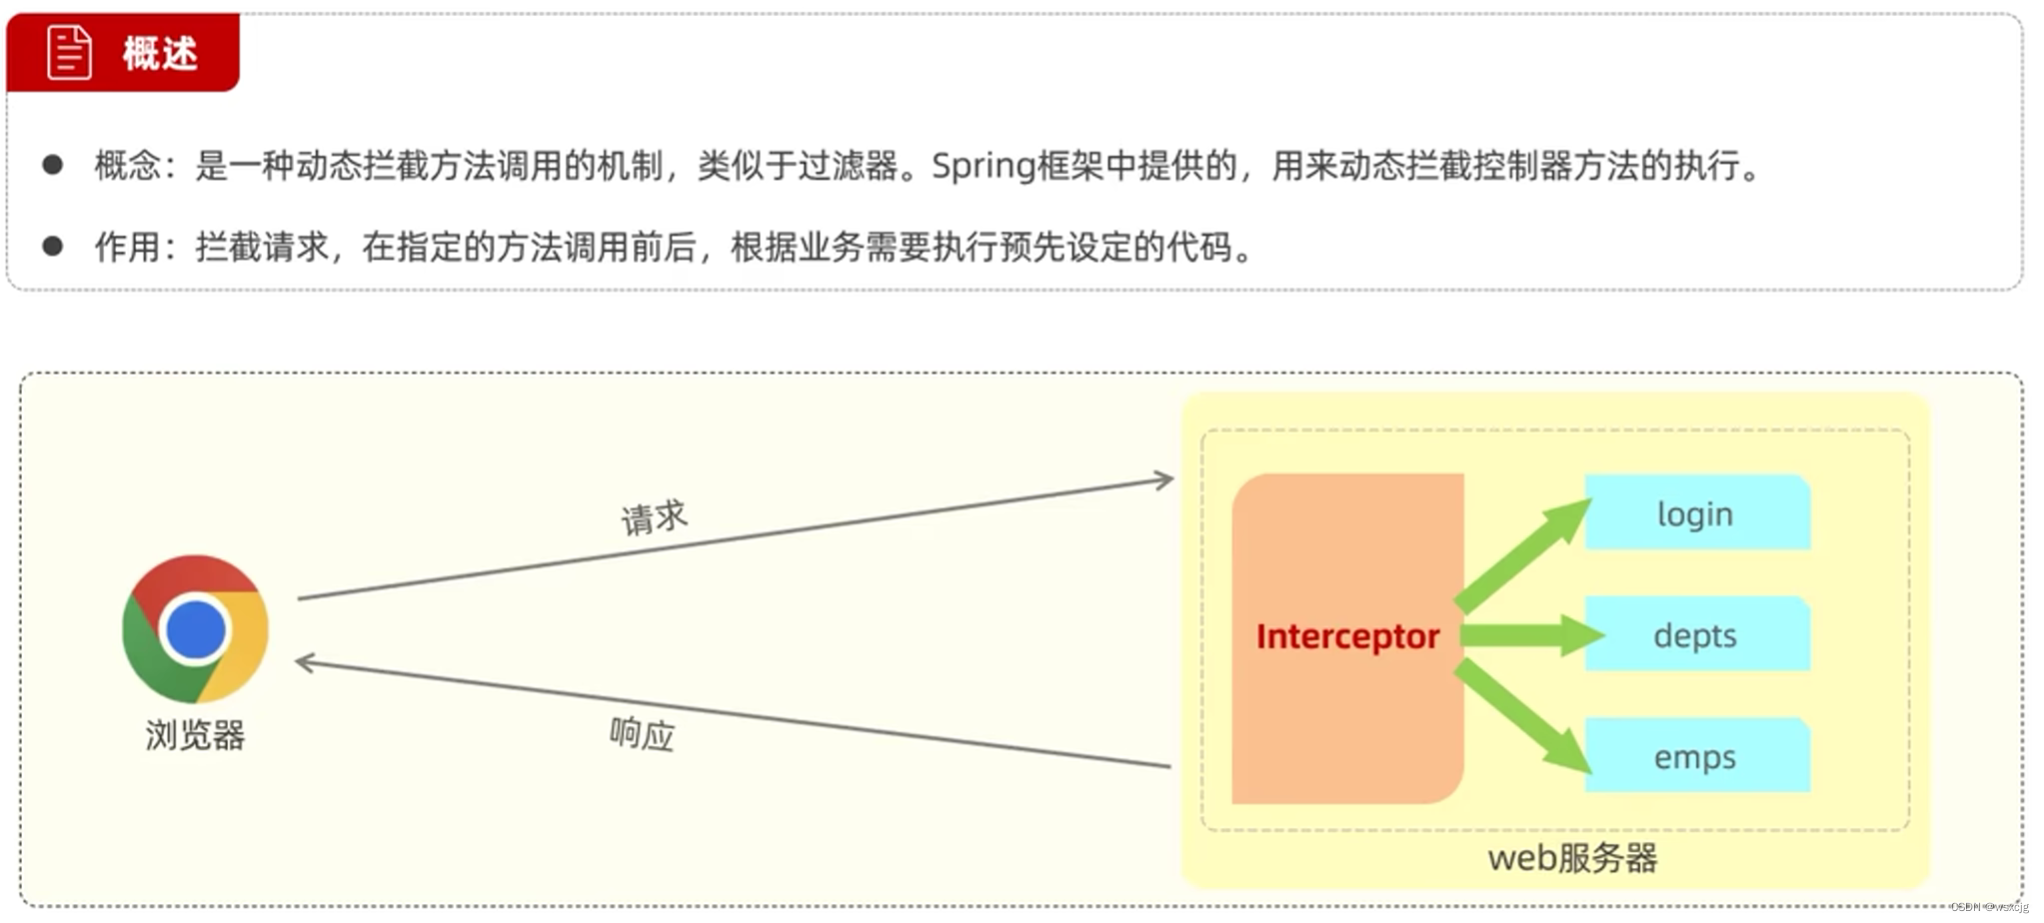
使用方法:
拦截路径:
与过滤器Filter的区别:
代码:
Interceptor:
@Slf4j
@Component
public class LoginCheckInterceptor implements HandlerInterceptor {@Override//目标资源方法执行前执行,返回true 放行,返回false 不放行public boolean preHandle(HttpServletRequest req, HttpServletResponse resp, Object handler) throws Exception {//1.获取urlString url = req.getRequestURL().toString();//2.判断url中是否包含login,如果有直接放行,如果没有需要再判断if(url.contains("login")) {log.info("登录操作,放行");return true;}//3.获取请求头中的令牌String jwt = req.getHeader("token");//4.判断令牌是否存在,若存在继续判断,不存在则返回未登录信息if(!StringUtils.hasLength(jwt)) {log.info("请求头token为空,返回未登录信息");Result error = Result.error("NOT_LOGIN");//手动转换 对象->JSON 格式 利用阿里巴巴fastJSONString notLogin = JSONObject.toJSONString(error);resp.getWriter().write(notLogin);return false;}//令牌存在,判断令牌是否合法,不合法返回未登录信息try {JwtUtils.parseJwt(jwt);} catch (Exception e) {e.printStackTrace();log.info("解析令牌失败,返回未登录信息");Result error = Result.error("NOT_LOGIN");//手动转换 对象->JSON 格式 利用阿里巴巴fastJSONString notLogin = JSONObject.toJSONString(error);resp.getWriter().write(notLogin);return false;}//放行log.info("令牌合法,放行,jwt:{}",jwt);return true;}@Override//目标资源方法执行后执行public void postHandle(HttpServletRequest request, HttpServletResponse response, Object handler, ModelAndView modelAndView) throws Exception {HandlerInterceptor.super.postHandle(request, response, handler, modelAndView);}@Override//视图渲染完毕后执行,最后执行public void afterCompletion(HttpServletRequest request, HttpServletResponse response, Object handler, Exception ex) throws Exception {HandlerInterceptor.super.afterCompletion(request, response, handler, ex);}
}
配置类:
@Configuration//配置类
public class WebConfig implements WebMvcConfigurer {@AutowiredLoginCheckInterceptor loginCheckInterceptor;@Overridepublic void addInterceptors(InterceptorRegistry registry) {registry.addInterceptor(loginCheckInterceptor).addPathPatterns("/**").excludePathPatterns("/login");}}
异常处理
全局异常处理器:
代码:
exception:
@RestControllerAdvice
public class GlobalExceptionHandler {@ExceptionHandler(Exception.class)public Result ex(Exception ex) {ex.printStackTrace();return Result.error("对不起,操作失败,请联系管理员");}}
到这里基础功能部分基本完成,下面是上面代码的一些注意事项。
注意事项:
1.参数及属性值都使用基本类型的包装类,比如int类型用Integer,short类型用Short,这样传递的值为空也不会报错
2.动态SQL中,查询语句后不能加分号
3.根据name查询时模糊匹配使用name like concat('%',#{name},'%') 字符串拼接,不然编译后#{...}变成问号出现在字符串中不起作用,并且<if>的test判断中不仅要添加非空判断,还要加上等于空值的判断and name != '',否则不输入内容点击查询会传递一个空值字符串。
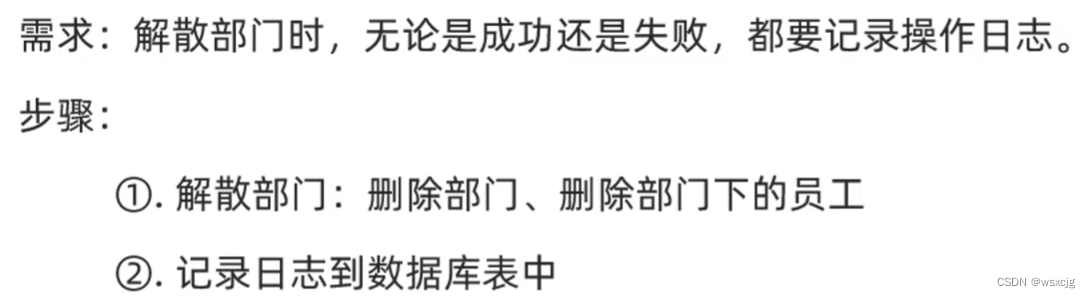
事务管理:
Spring事务管理:

代码演示:
empMapper:
添加代码
@Delete("delete from emp where dept_id = #{deptId}")void deleteByDeptId(Integer deptId);DeptService:
修改删除部门代码
/*** 根据id删除部门* @param id*/@Transactional@Overridepublic void delete(Integer id) {deptMapper.deleteById(id);//删除该部门下的员工empMapper.deleteByDeptId(id);}事务属性
1.回滚rollbackFor:
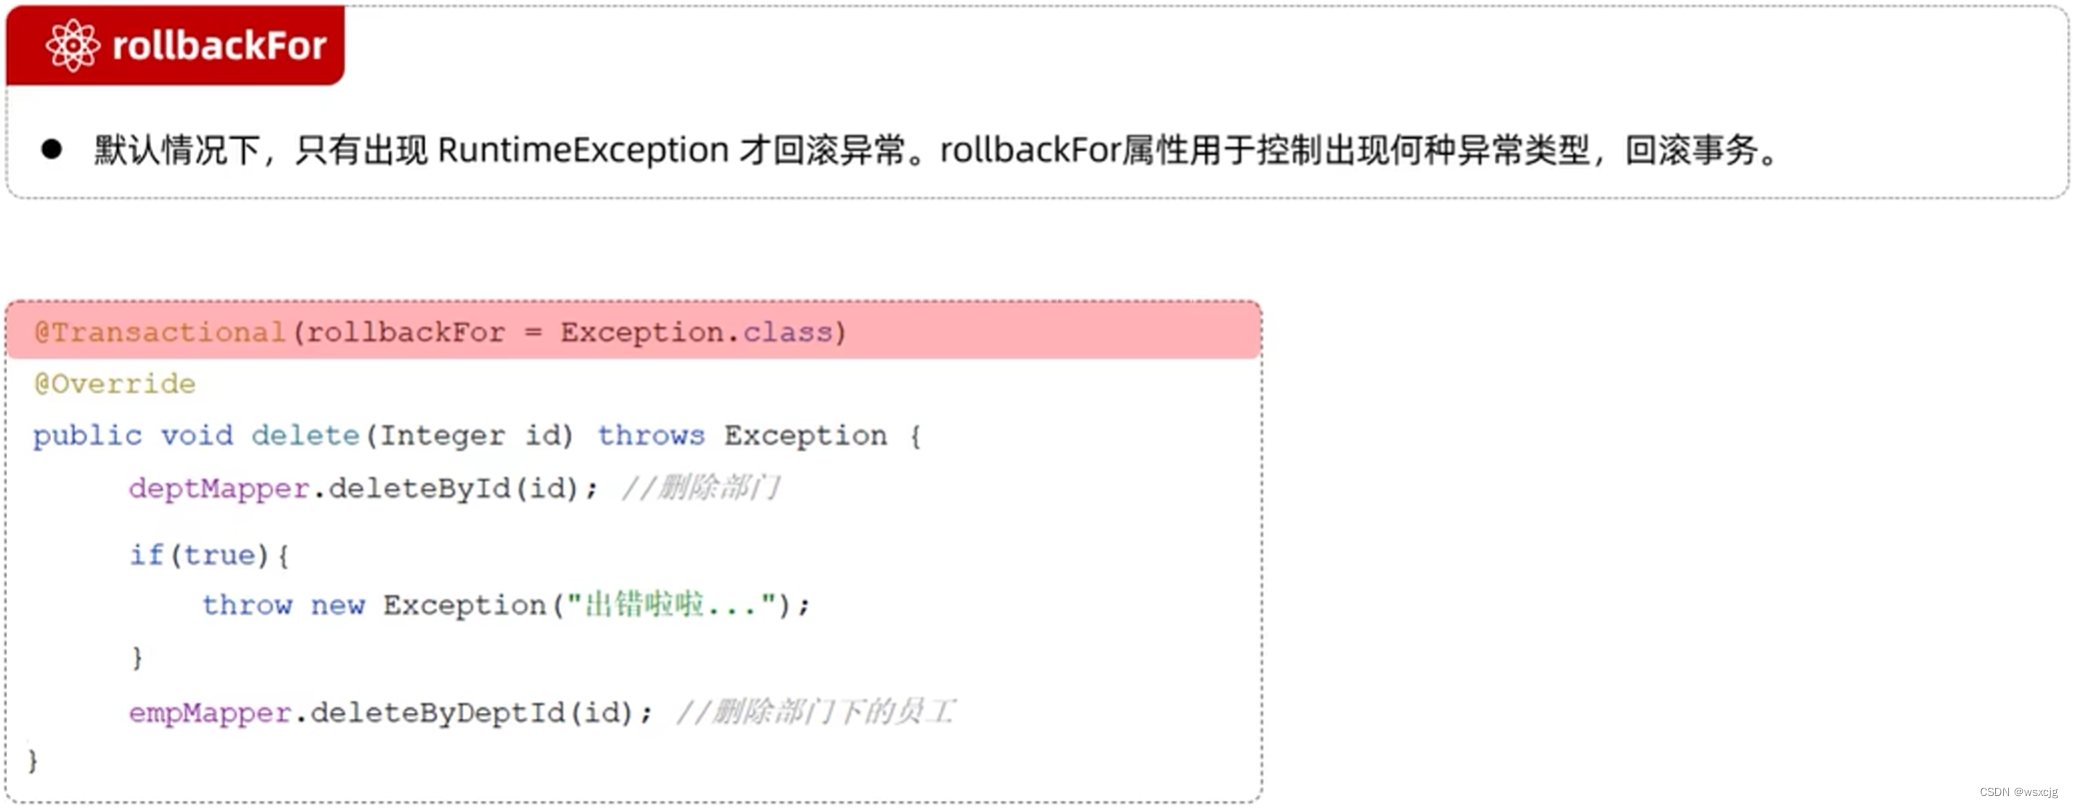
将回滚属性改为出现任何异常都回滚
代码演示:
/*** 根据id删除部门* @param id*/@Transactional(rollbackFor = Exception.class)@Overridepublic void delete(Integer id) {deptMapper.deleteById(id);//删除该部门下的员工empMapper.deleteByDeptId(id);}2.传播行为propagation:

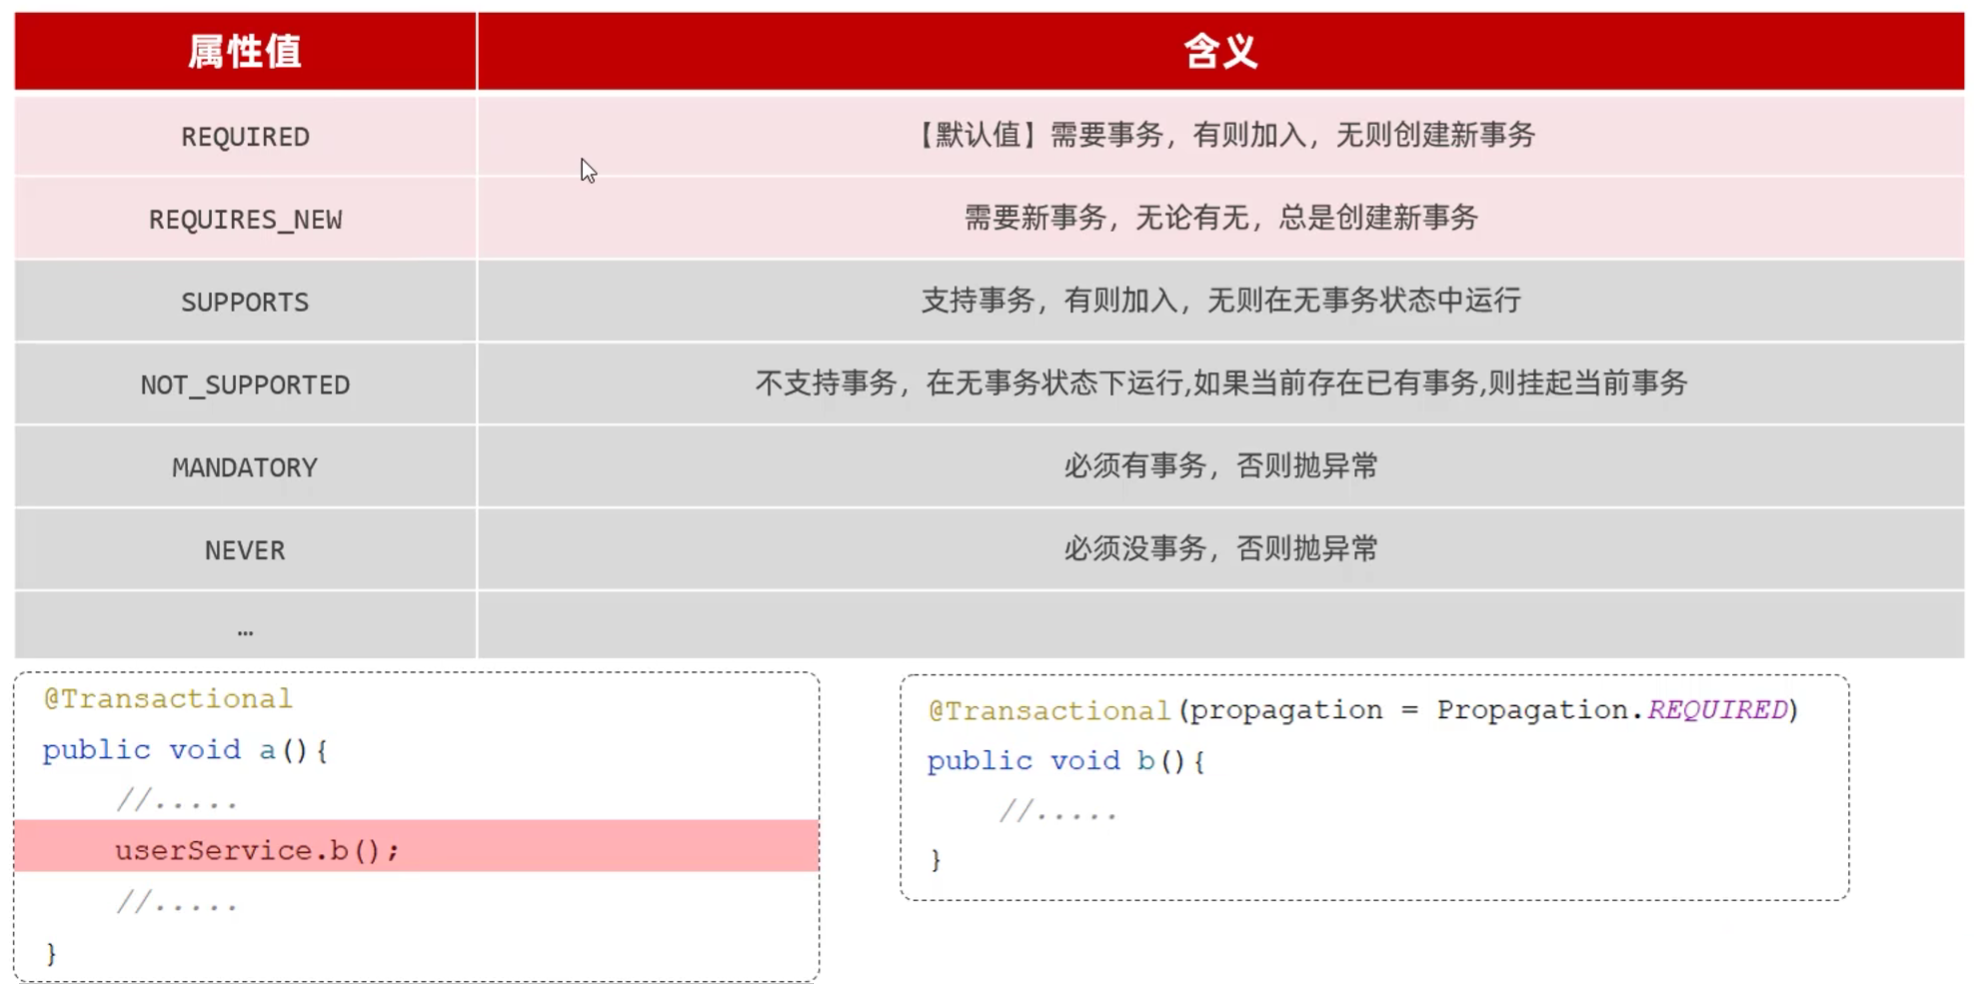
案例
代码:
建表SQL语句:
CREATE TABLE `dept_log` (`id` int unsigned NOT NULL AUTO_INCREMENT COMMENT 'ID',`create_time` datetime NOT NULL COMMENT '创建时间',`description` varchar(300) NOT NULL COMMENT '部分解散描述',PRIMARY KEY (`id`)
)
日志实体类:
@Data
@AllArgsConstructor
@NoArgsConstructor
public class DeptLog {private int id;private LocalDateTime createTime;private String description;
}
Controller层:
删除部门部分:
/*** 根据id删除部门* @param id*/@Transactional(rollbackFor = Exception.class)@Overridepublic void delete(Integer id) {try {deptMapper.deleteById(id);int i = 1/0;//删除该部门下的员工empMapper.deleteByDeptId(id);} finally {DeptLog deptLog = new DeptLog();deptLog.setCreateTime(LocalDateTime.now());deptLog.setDescription("删除部门,id为:" + id);deptLogService.insert(deptLog);}}Service层:
接口:
public interface DeptLogService {void insert(DeptLog log);}实现类:
@Service
public class DeptLogServiceImpl implements DeptLogService {@AutowiredDeptLogMapper deptLogMapper;@Transactional(propagation = Propagation.REQUIRES_NEW)@Overridepublic void insert(DeptLog log) {deptLogMapper.insert(log);}}
Mapper层:
@Mapper
public interface DeptLogMapper {@Insert("insert into dept_log(create_time,description) values (#{createTime},#{description})")void insert(DeptLog log);}
使用场景:

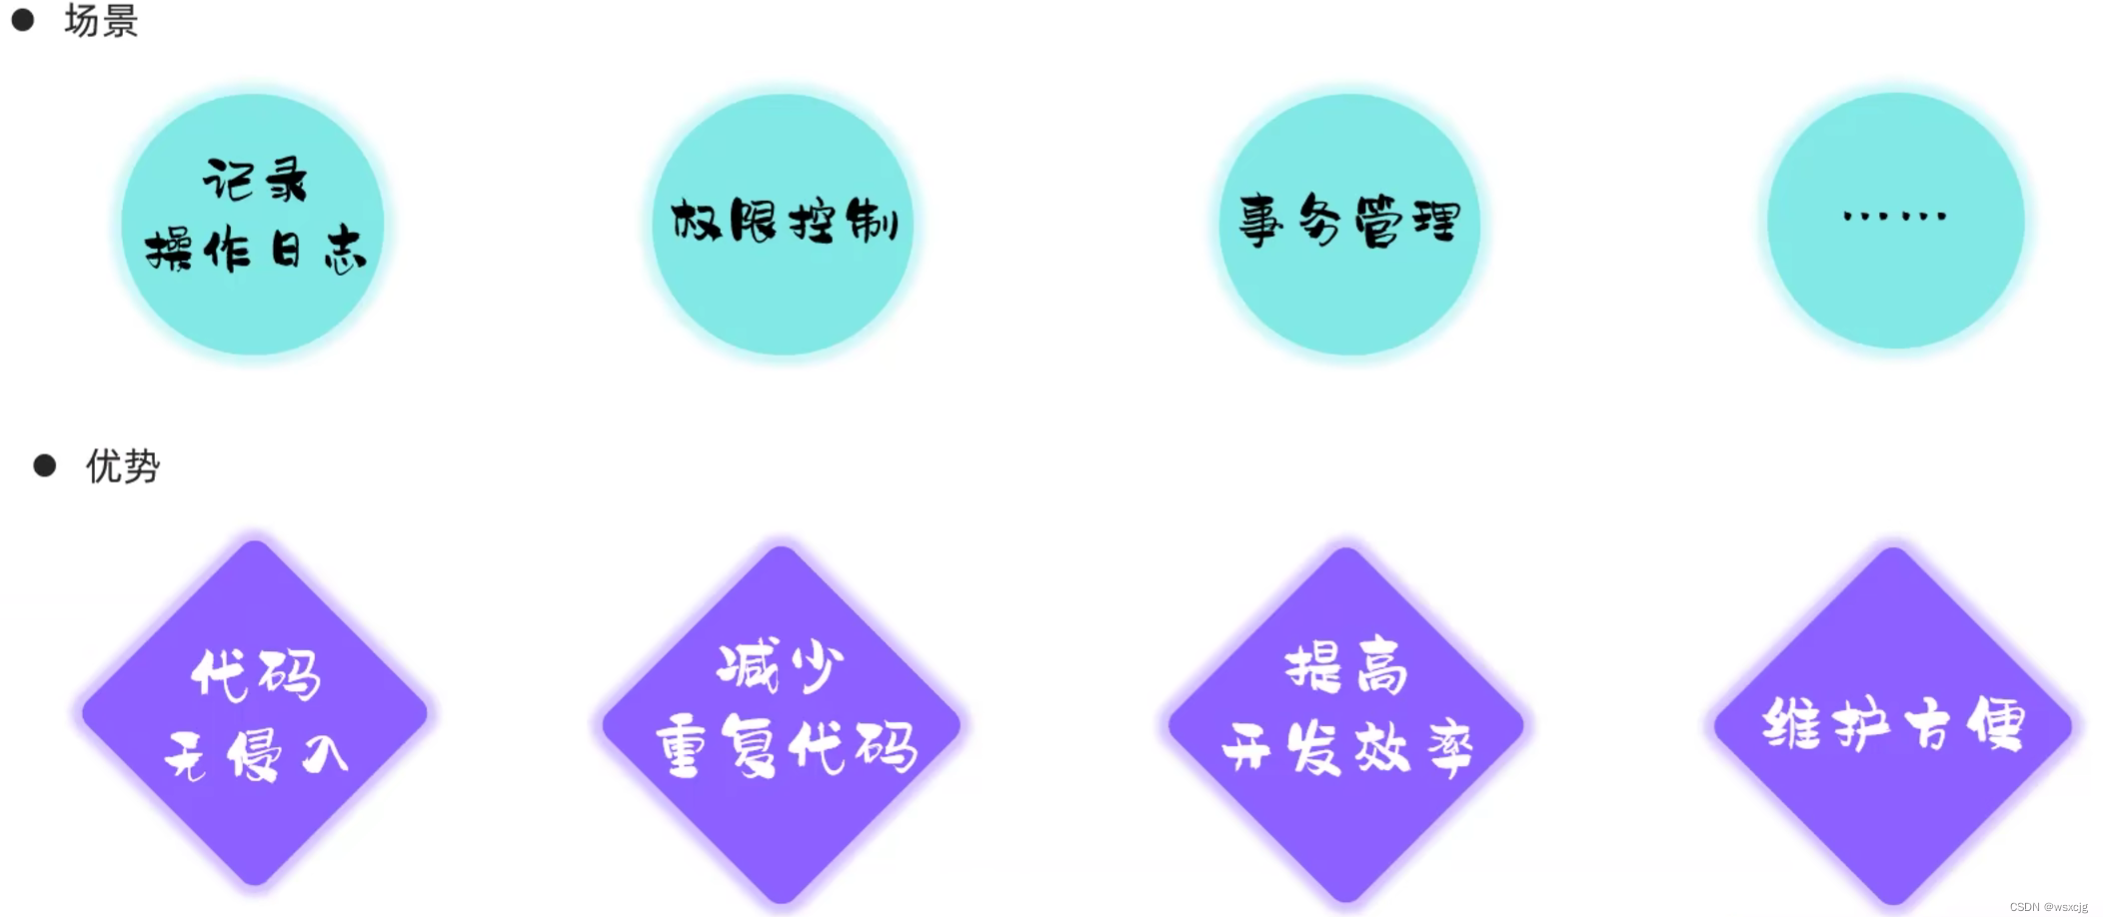
AOP(面向切面编程)

场景:
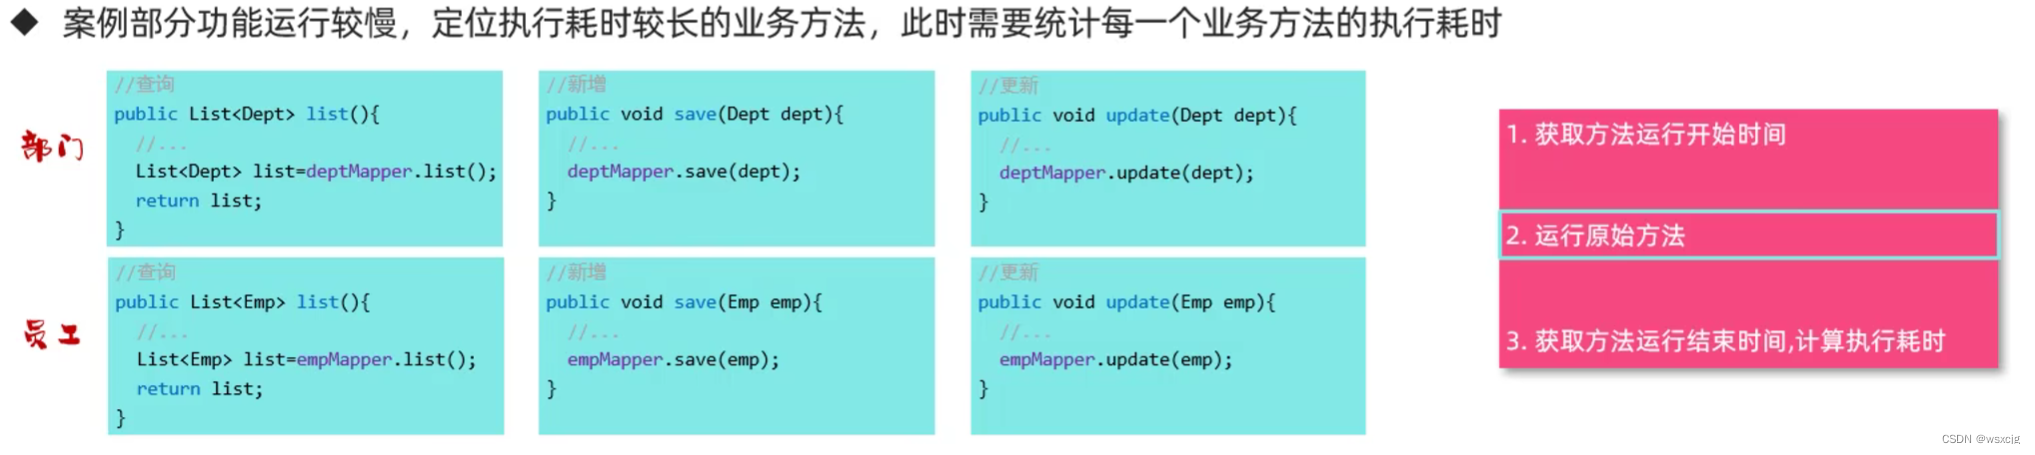
基于动态代理实现,最后运行的是基于目标对象代理的加强后的方法
代码:
在pom.xim文件中添加依赖:
<dependency><groupId>org.springframework.boot</groupId><artifactId>spring-boot-starter-aop</artifactId></dependency>编写AOP程序:
@Slf4j
@Component
@Aspect//AOP类
public class TimeAspect {@Around("execution(* com.han.service.*.*(..))")public Object recordTime(ProceedingJoinPoint joinPoint) throws Throwable {long begin = System.currentTimeMillis();Object result = joinPoint.proceed();long end = System.currentTimeMillis();log.info(joinPoint.getSignature() + "方法的执行时间为{}ms", end - begin);return result;}}
优势:
核心概念:

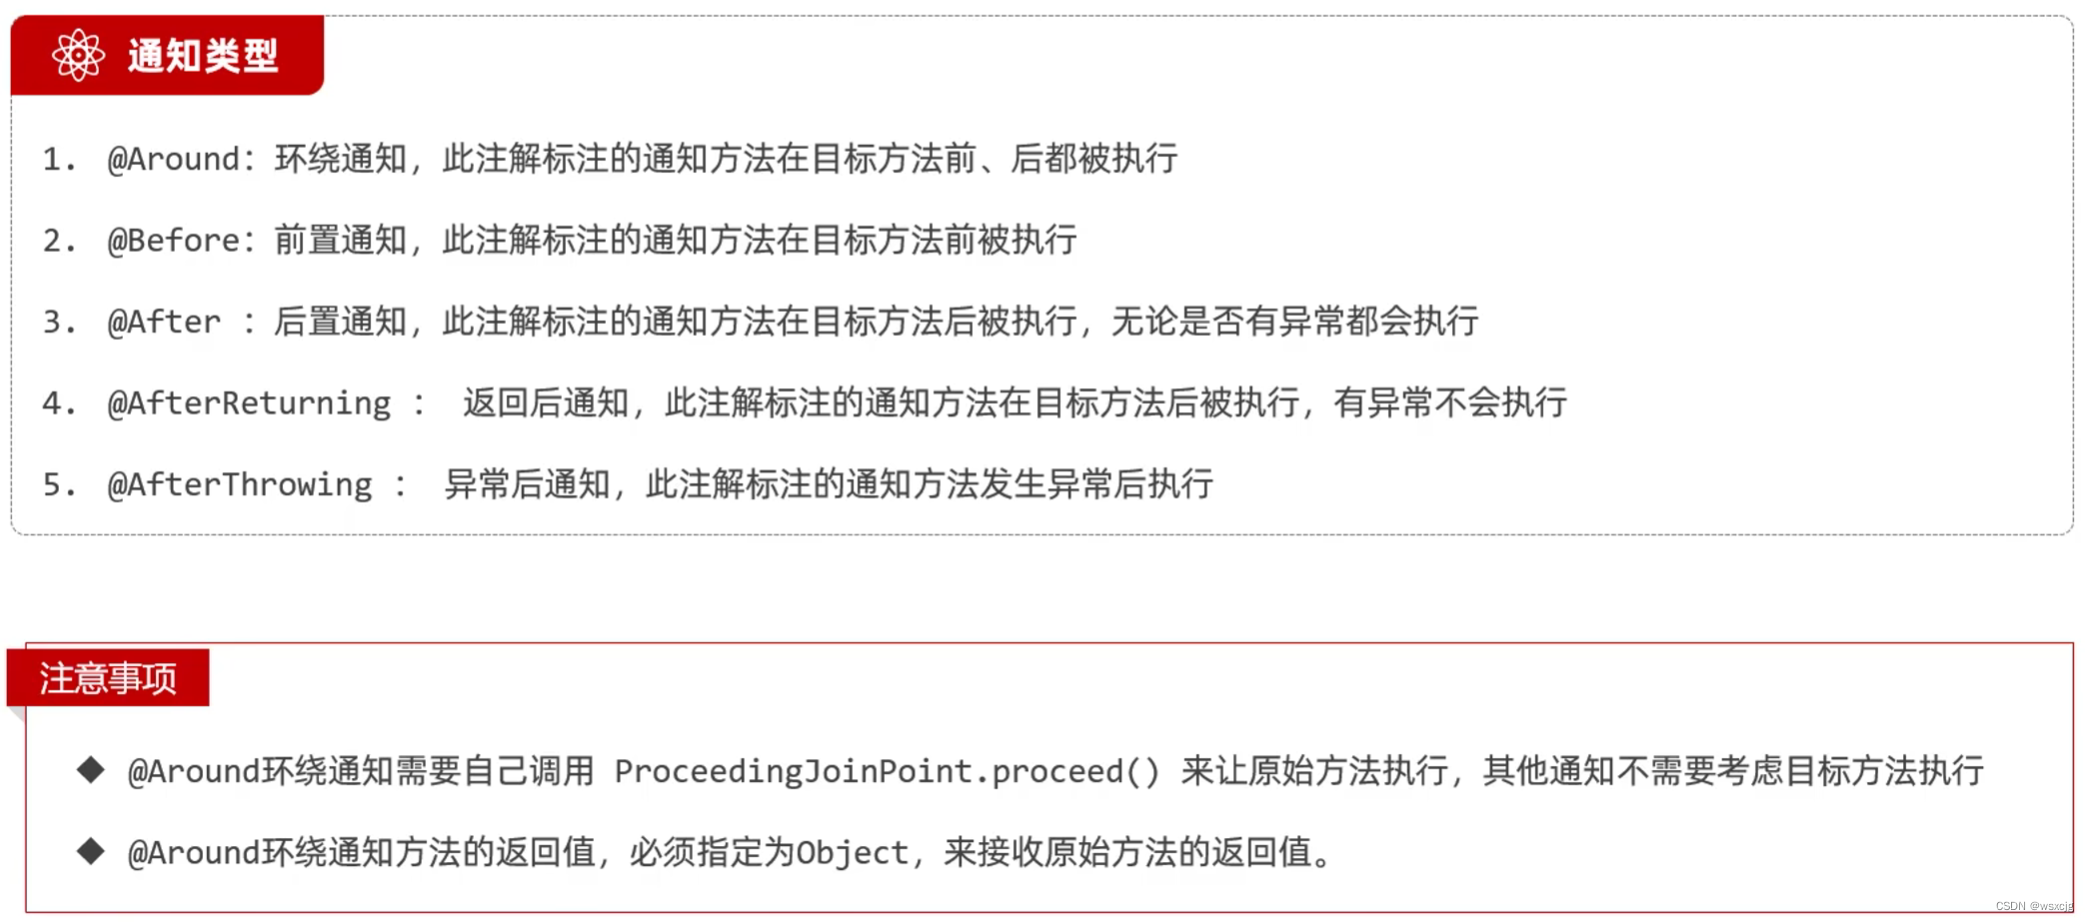
通知类型:
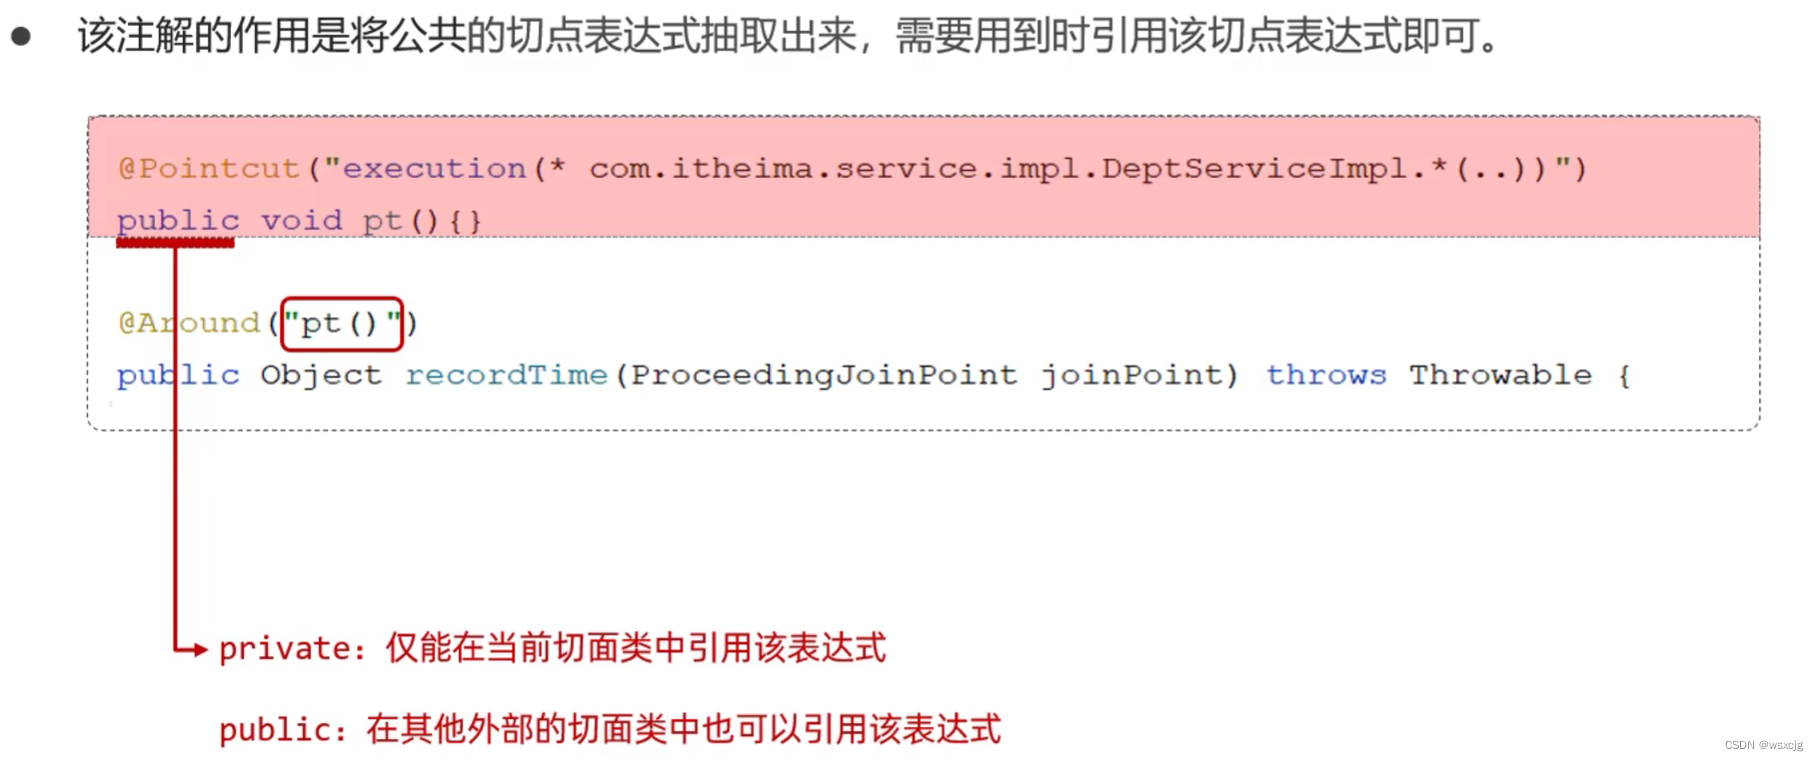
@PointCut:
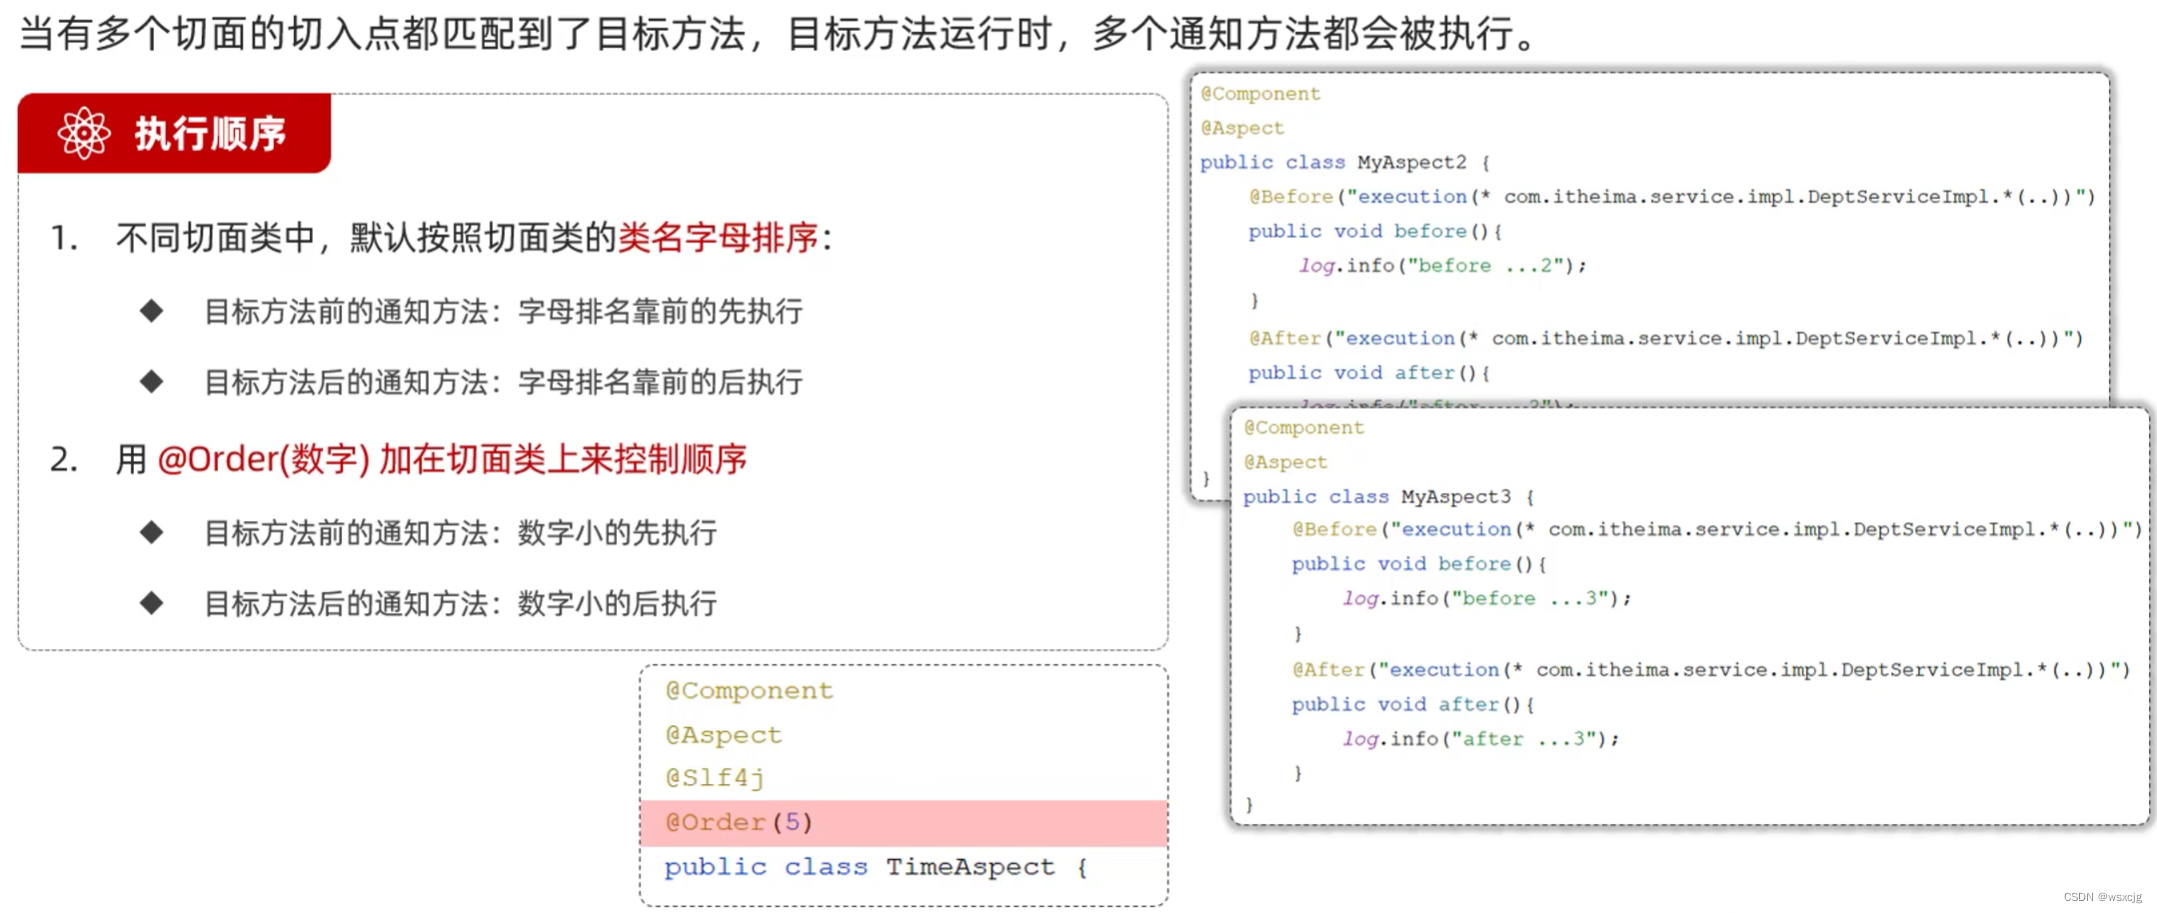
通知顺序:
切入点表达式:
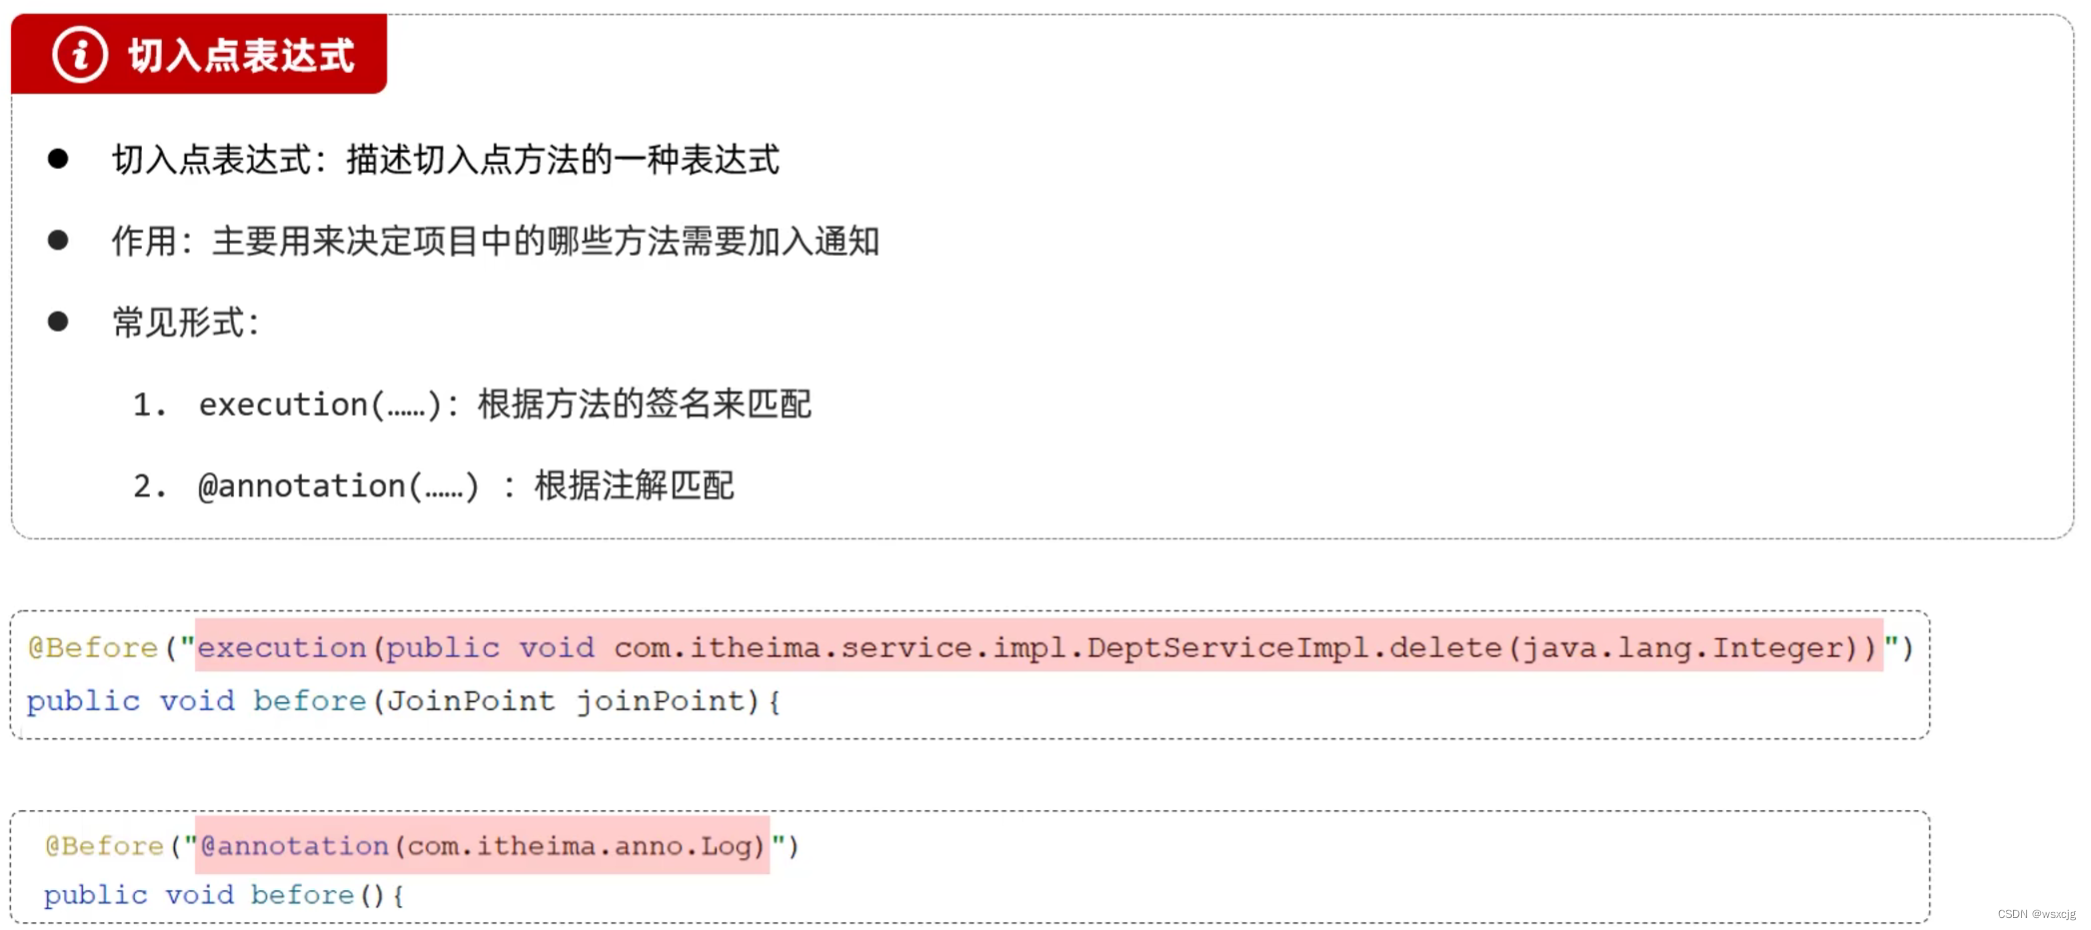
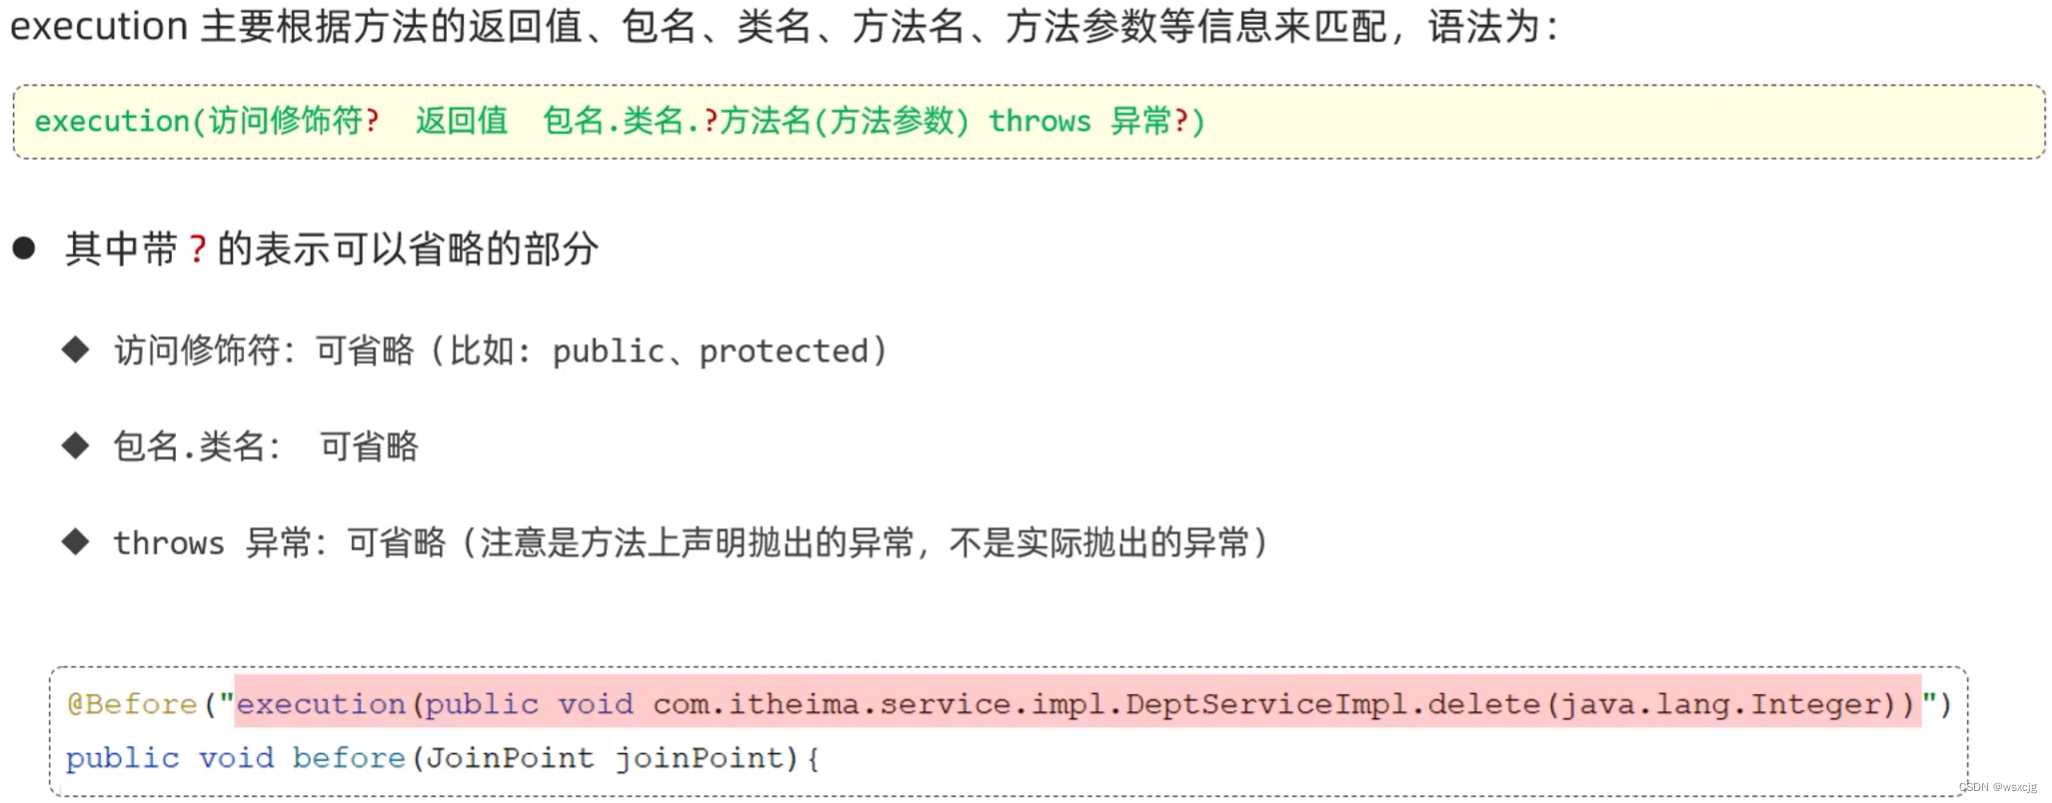
1.execution:
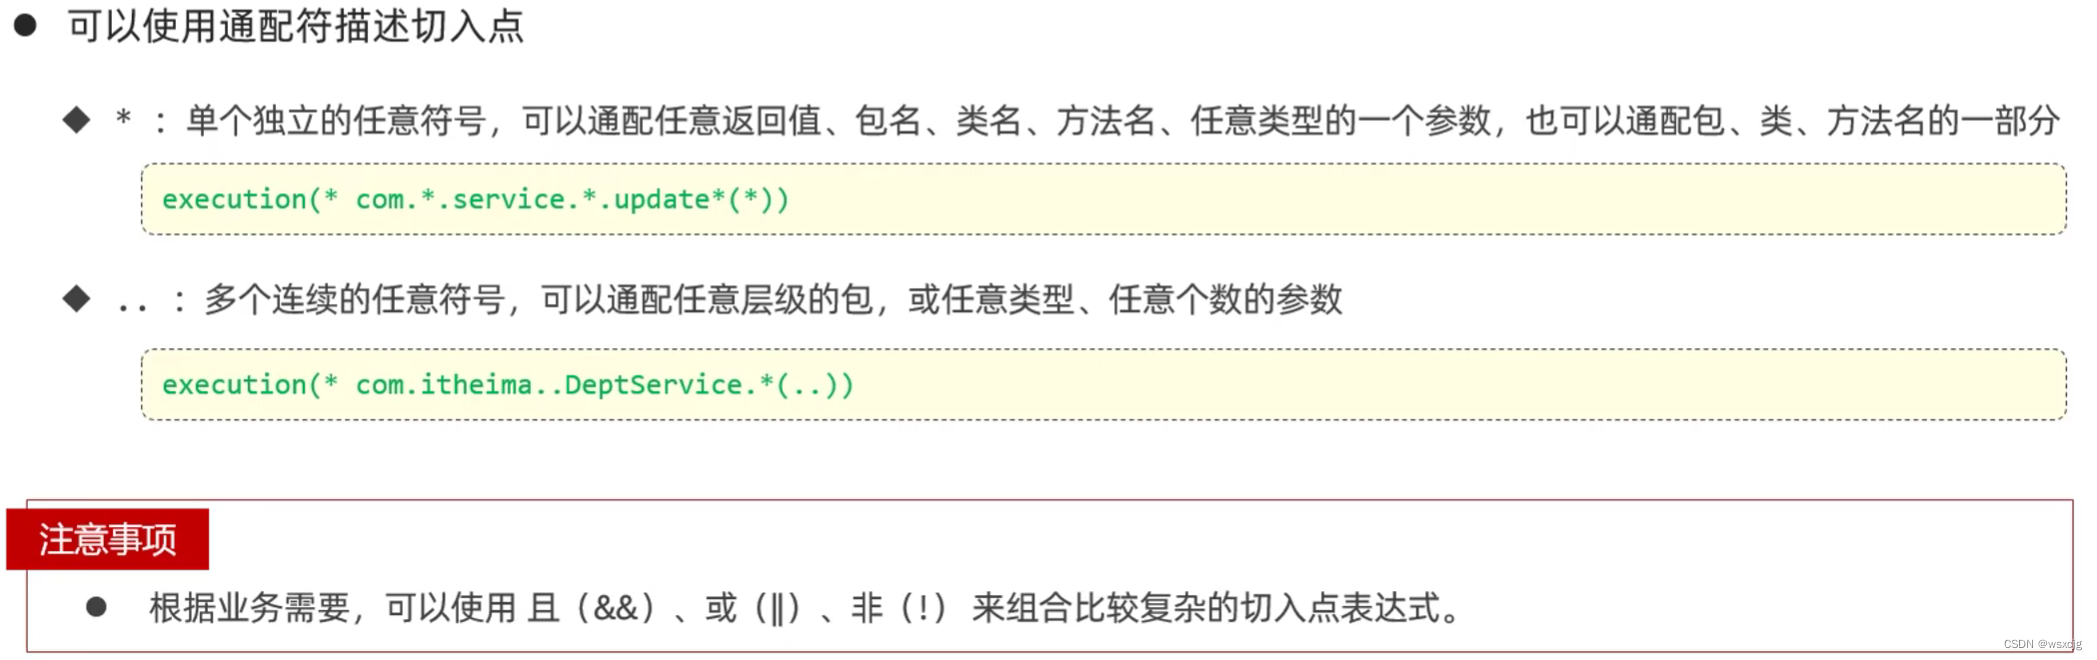
书写建议:

2.@annotation:
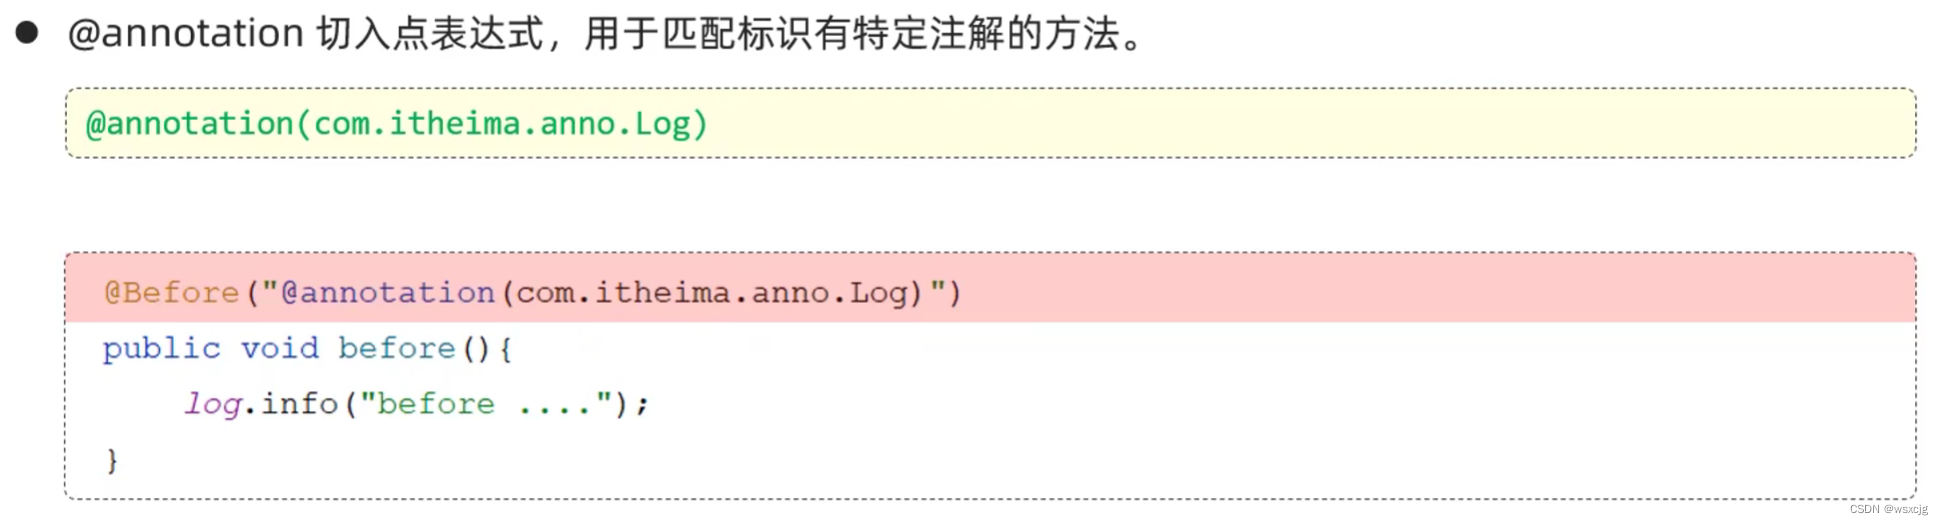
它可以通过自定义注解,然后在写切入点表达式时括号中写这个自定义注解的全类名,就可以把这个自定义注解注解的方法包含。
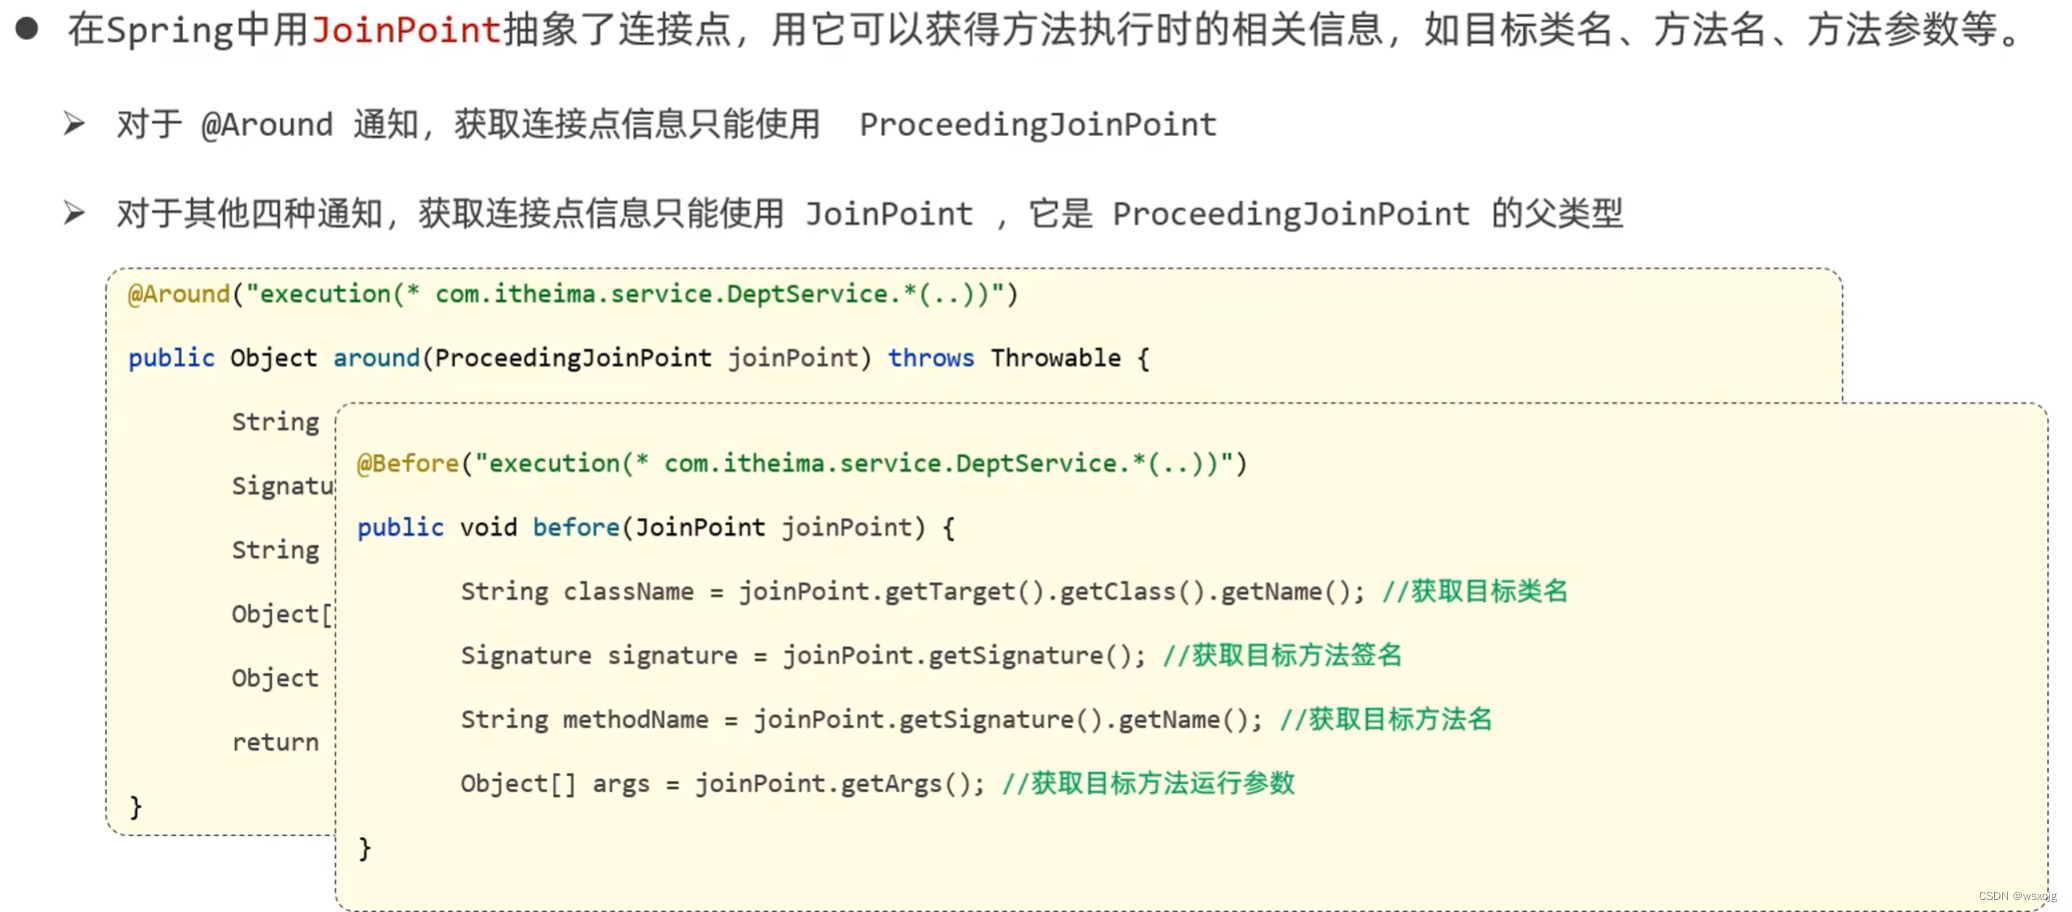
连接点:
案例:
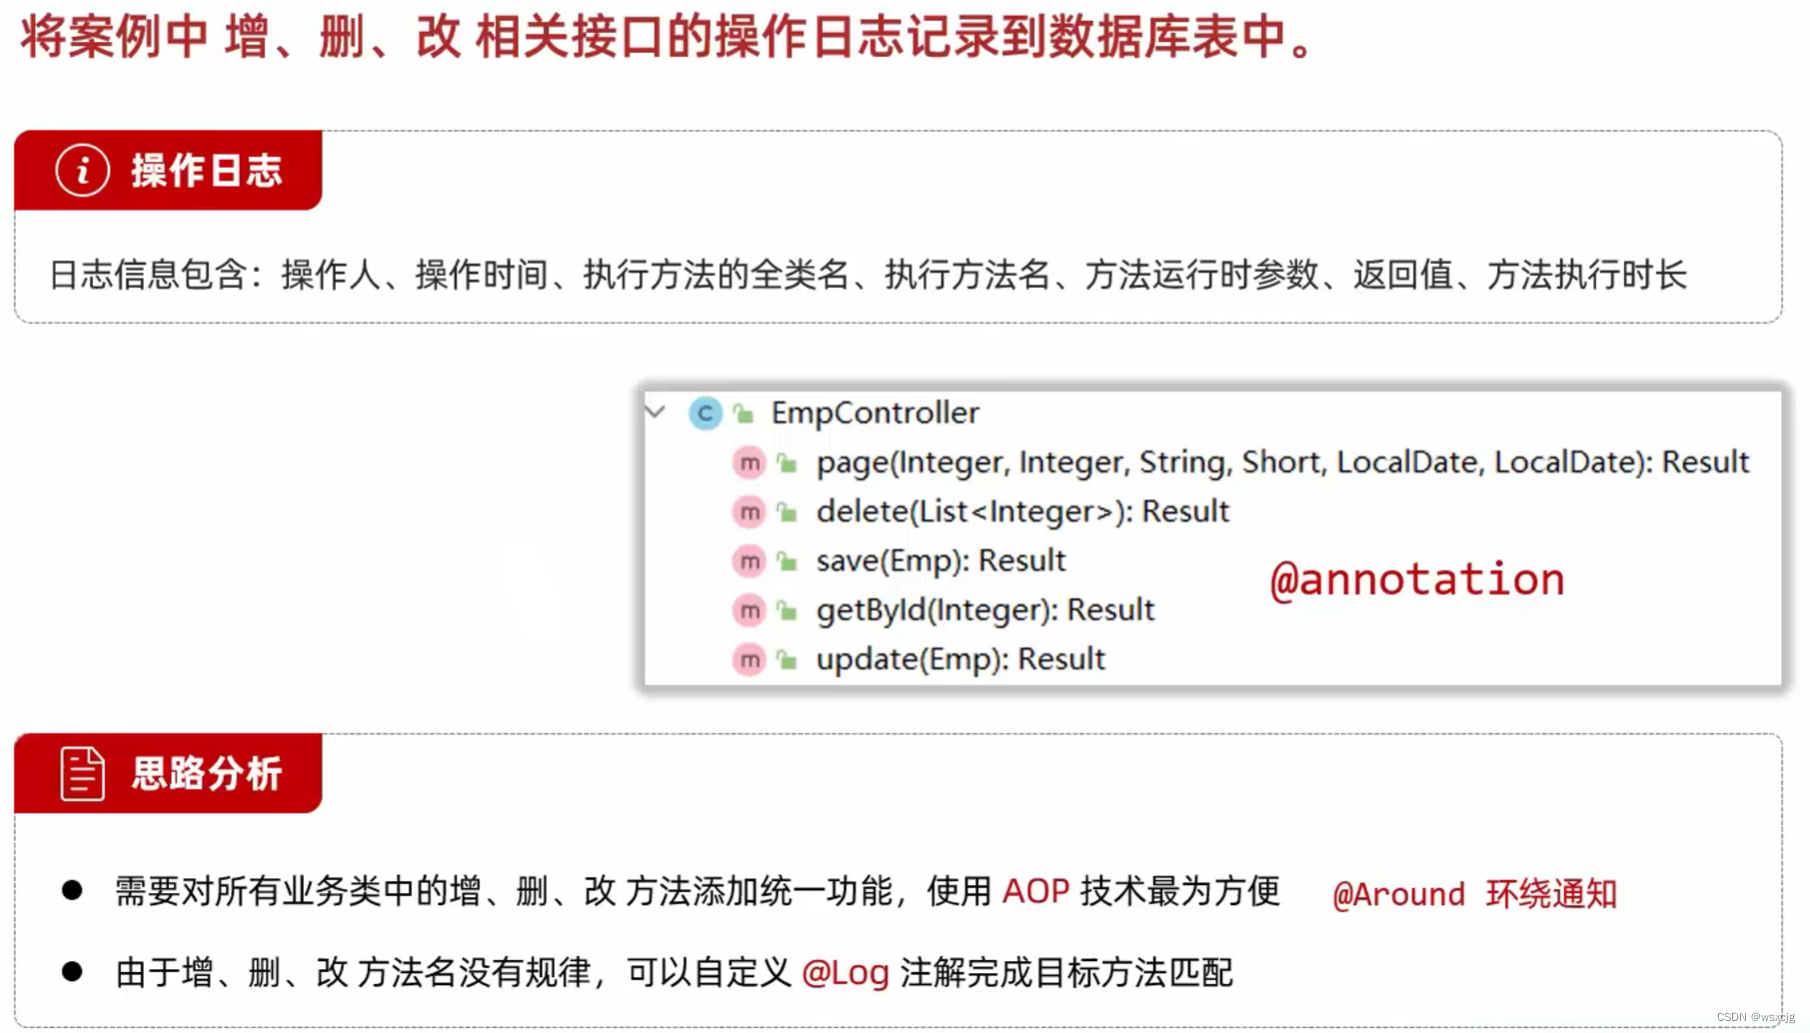
准备工作:
建表:
-- 操作日志表
create table operate_log(id int unsigned primary key auto_increment comment 'ID',operate_user int unsigned comment '操作人ID',operate_time datetime comment '操作时间',class_name varchar(100) comment '操作的类名',method_name varchar(100) comment '操作的方法名',method_params varchar(1000) comment '方法参数',return_value varchar(2000) comment '返回值',cost_time bigint comment '方法执行耗时, 单位:ms'
) comment '操作日志表';
创建实体类:
@Data
@AllArgsConstructor
@NoArgsConstructor
public class OperateLog {private Integer id;private Integer operateUser;private LocalDateTime operateTime;private String className;private String methodName;private String methodParams;private String returnValue;private Long costTime;
}
编码:
定义Mapper:
@Mapper
public interface OperateLodMapper {@Insert("insert into operate_log (operate_user,operate_time,class_name,method_name,method_params,return_value,cost_time)" +"values (#{operateUser},#{operateTime},#{className},#{methodName},#{methodParams},#{returnValue},#{costTime})")public void insert(OperateLog log);
}
定义注解:
@Retention(RetentionPolicy.RUNTIME)
@Target(ElementType.METHOD)
public @interface Log {
}
编写AOP代码:
@Slf4j
@Component
@Aspect
public class LogAspect {@Autowiredprivate HttpServletRequest request;@Autowiredprivate OperateLodMapper operateLodMapper;@Around("@annotation(com.han.anno.Log)")public Object recordLog(ProceedingJoinPoint joinPoint) throws Throwable {//获取操作用户idString jwt = request.getHeader("token");Map<String, Object> claims = JwtUtils.parseJwt(jwt);Integer operateUser = (Integer) claims.get("id");//获取操作时间LocalDateTime operateTime = LocalDateTime.now();//获取操作的类名String operateClass = joinPoint.getTarget().getClass().getName();//获取操作的方法名String operateMethod = joinPoint.getSignature().getName();//获取方法参数Object[] args = joinPoint.getArgs();String methodParams = Arrays.toString(args);//获取返回值(JSON字符串格式)long startTime = System.currentTimeMillis();Object result = joinPoint.proceed();long endTime = System.currentTimeMillis();String returnValue = JSONObject.toJSONString(result);//获取方法执行耗时Long costTime = endTime - startTime;OperateLog operateLog = new OperateLog(null,operateUser,operateTime,operateClass,operateMethod,methodParams,returnValue,costTime);operateLodMapper.insert(operateLog);log.info("AOP记录操作日志:{}",operateLog);return result;}}
在Controller中添加注解:
EmpController:
@Slf4j
@RequestMapping("/emps")
@RestController
public class EmpController {@Autowiredprivate EmpService empService;/*** 根据每页记录数和页码获取页面实体类* @return*/@GetMappingpublic Result getPage(@RequestParam(defaultValue = "1") Integer page,@RequestParam(defaultValue = "10") Integer pageSize,String name, Short gender,@DateTimeFormat(pattern = "yyyy-MM-dd") LocalDate begin,@DateTimeFormat(pattern = "yyyy-MM-dd") LocalDate end) {log.info("每页记录数:{},查询页码:{}",pageSize,page);PageBean pb = empService.getPage(page,pageSize,name,gender,begin,end);return Result.success(pb);}/*** 批量删除员工* @param ids* @return*/@Log@DeleteMapping("/{ids}")public Result delete(@PathVariable("ids") List<Short> ids) {log.info("批量删除操作ids:{}",ids);empService.delete(ids);return Result.success();}/*** 新增员工* @param emp* @return*/@Log@PostMappingpublic Result add(@RequestBody Emp emp) {log.info("新增员工:{}",emp);empService.add(emp);return Result.success();}/*** 根据id查询员工* @param id* @return*/@GetMapping("/{id}")public Result getById(@PathVariable Integer id) {log.info("查询id为:{}的员工",id);Emp emp = empService.getById(id);return Result.success(emp);}/*** 修改员工* @param emp* @return*/@Log@PutMappingpublic Result update(@RequestBody Emp emp) {log.info("修改员工:{}",emp);empService.update(emp);return Result.success();}}
DeptController:
@Slf4j
@RequestMapping("/depts")
@RestController
public class DeptController {@Autowiredprivate DeptService deptService;/*** 查询部门数据* @return*/@GetMappingpublic Result list() {log.info("查询全部部门信息");List<Dept> deptList = deptService.list();return Result.success(deptList);}/*** 删除部门* @return*/@Log@DeleteMapping("/{id}")public Result delete(@PathVariable Integer id) {log.info("删除id为" + id +"的部门");deptService.delete(id);return Result.success();}/*** 新增部门* @param dept* @return*/@Log@PostMappingpublic Result insert(@RequestBody Dept dept) {log.info("添加部门:" + dept);deptService.add(dept);return Result.success();}/*** 根据id查找部门* @param id* @return*/@GetMapping("/{id}")public Result getById(@PathVariable Integer id) {log.info("查询id为"+ id + "的部门信息");Dept dept = deptService.get(id);return Result.success(dept);}/*** 修改部门* @param dept* @return*/@Log@PutMappingpublic Result update(@RequestBody Dept dept) {log.info("修改部门:" + dept);deptService.update(dept);return Result.success();}}
注意点:
在获取操作用户id时要用到以下方法:

SpringBoot
配置优先级:
1.properties>yml>yaml
2.命令行参数>Java系统属性
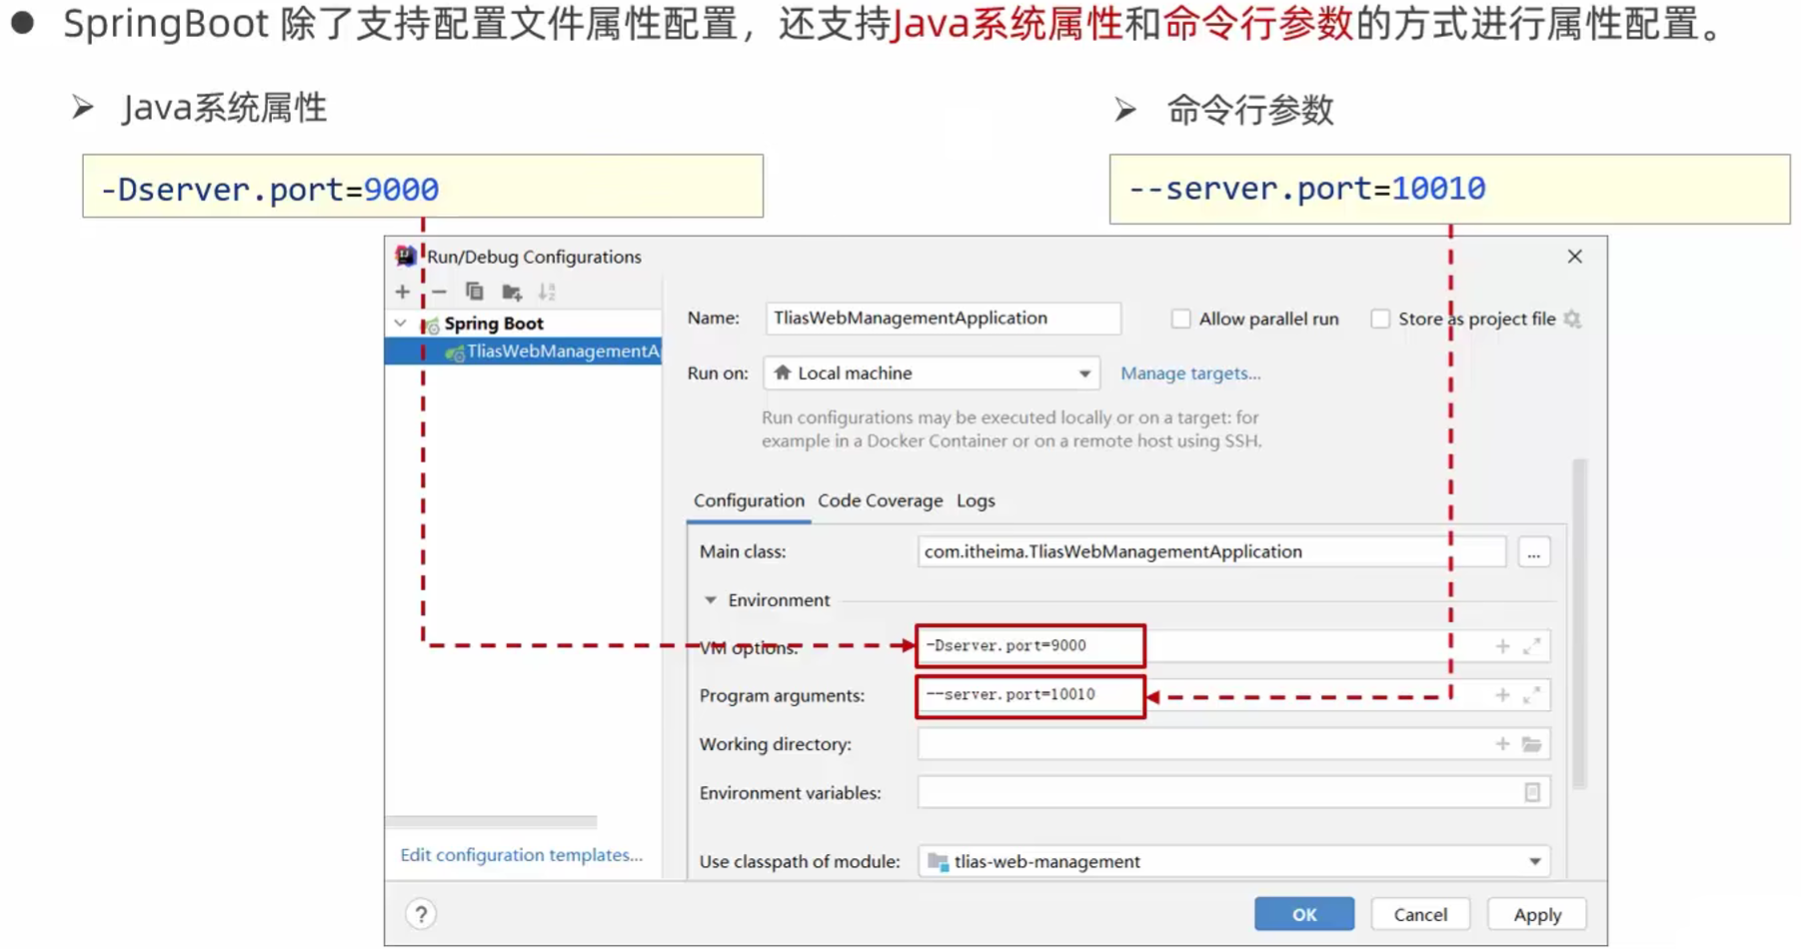
项目打包之后在cmd运行时设置属性或参数
3.命令行参数>Java系统属性
并且在SpringBoot中直接配置Java系统属性后,再使用配置文件配置,那么会根据Java系统属性的配置信息配置
总结:
优先级:命令行参数>Java系统属性>properties>yml>yaml
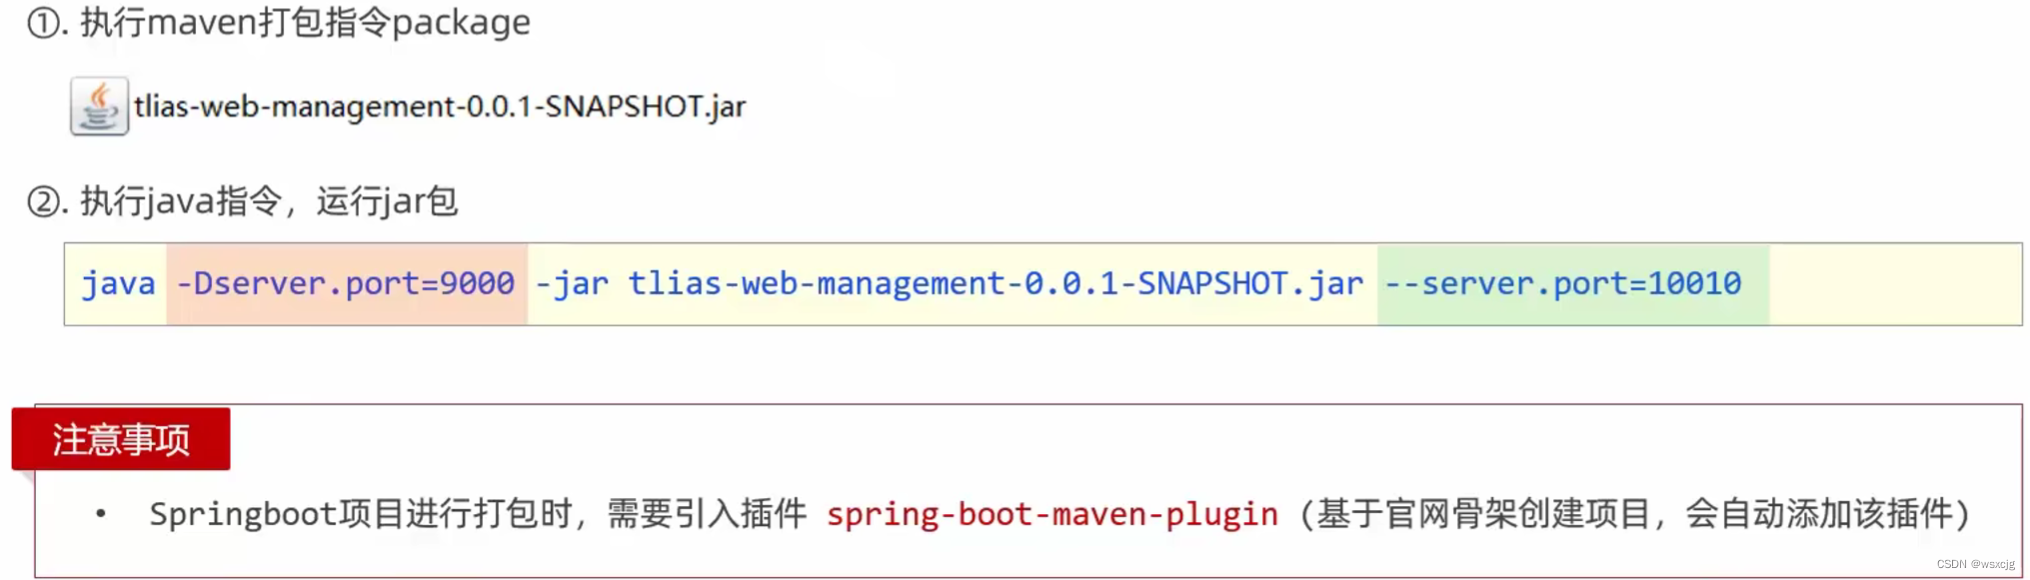
打包方式:

bean的管理:
获取bean:
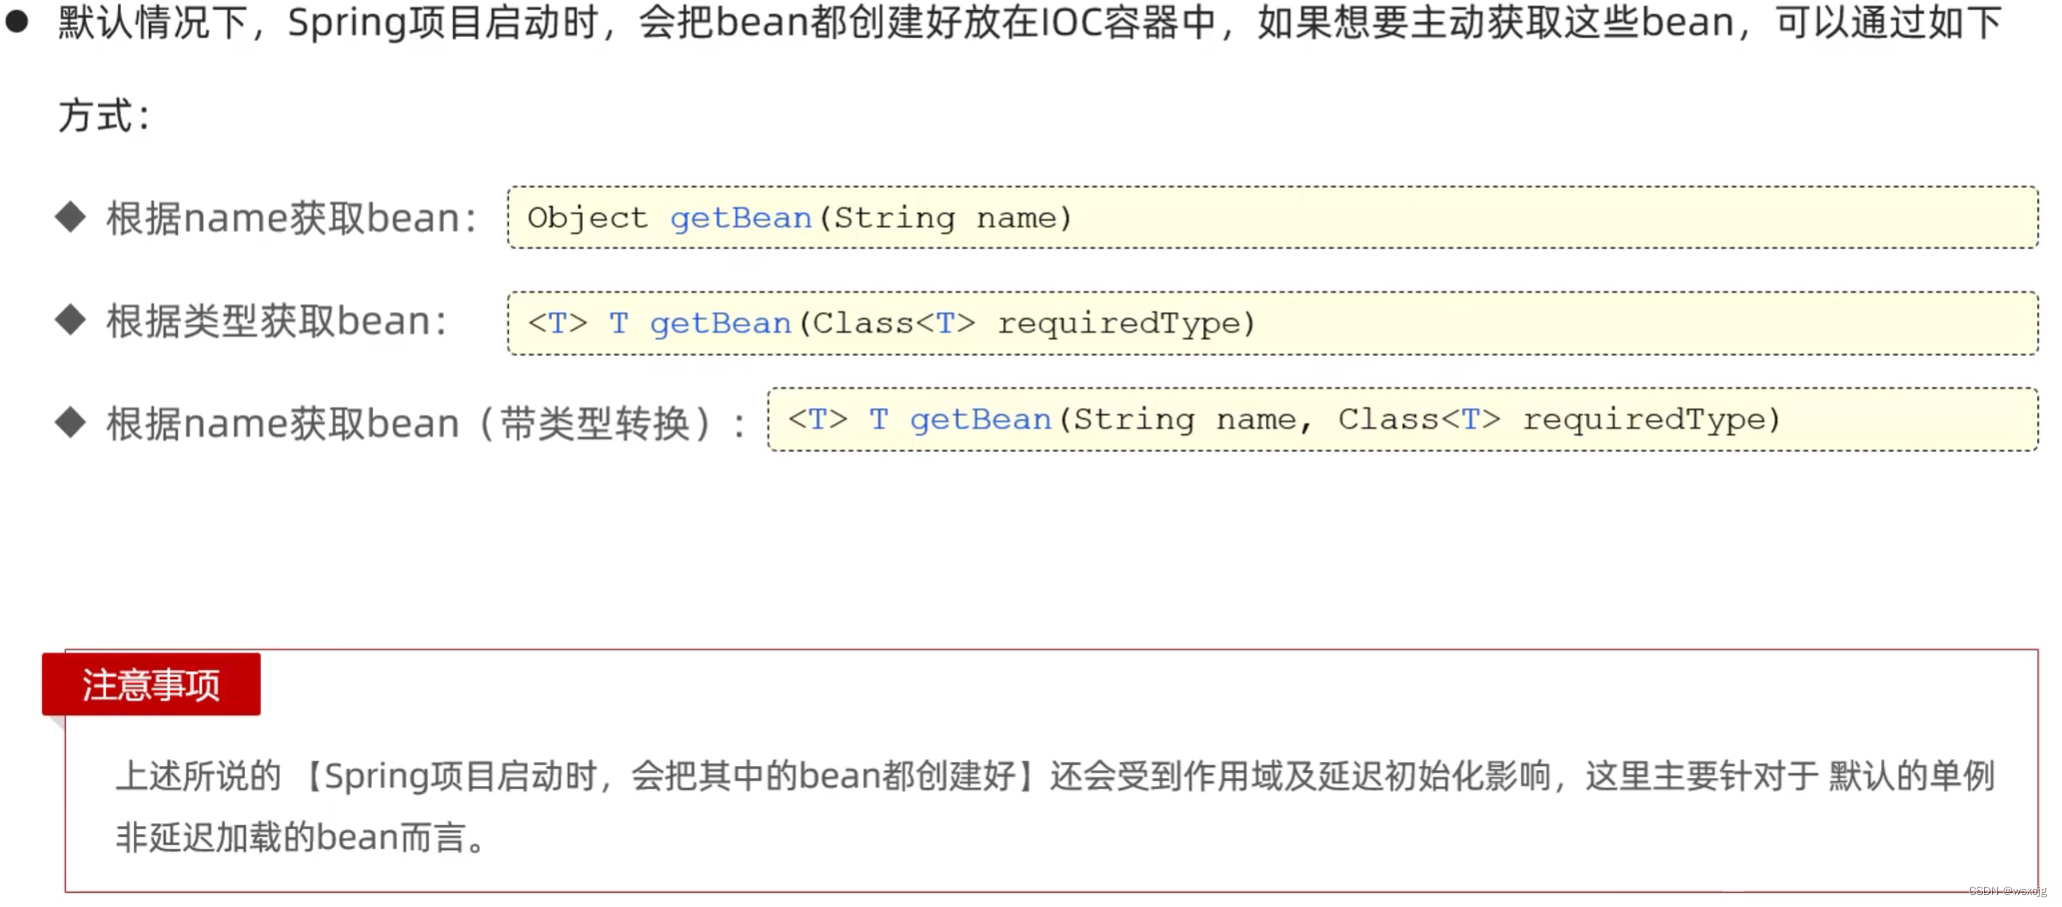
代码演示:
/*** 获得bean对象*/@Autowiredprivate ApplicationContext applicationContext;@Testvoid testGetBean(){//通过name获取beanDeptController bean1 = (DeptController) applicationContext.getBean("deptController");System.out.println(bean1);//通过类型获取beanDeptController bean2 = applicationContext.getBean(DeptController.class);System.out.println(bean2);//通过name获取bean(带类型转换)DeptController bean3 = applicationContext.getBean("deptController", DeptController.class);System.out.println(bean3);}}运行结果:

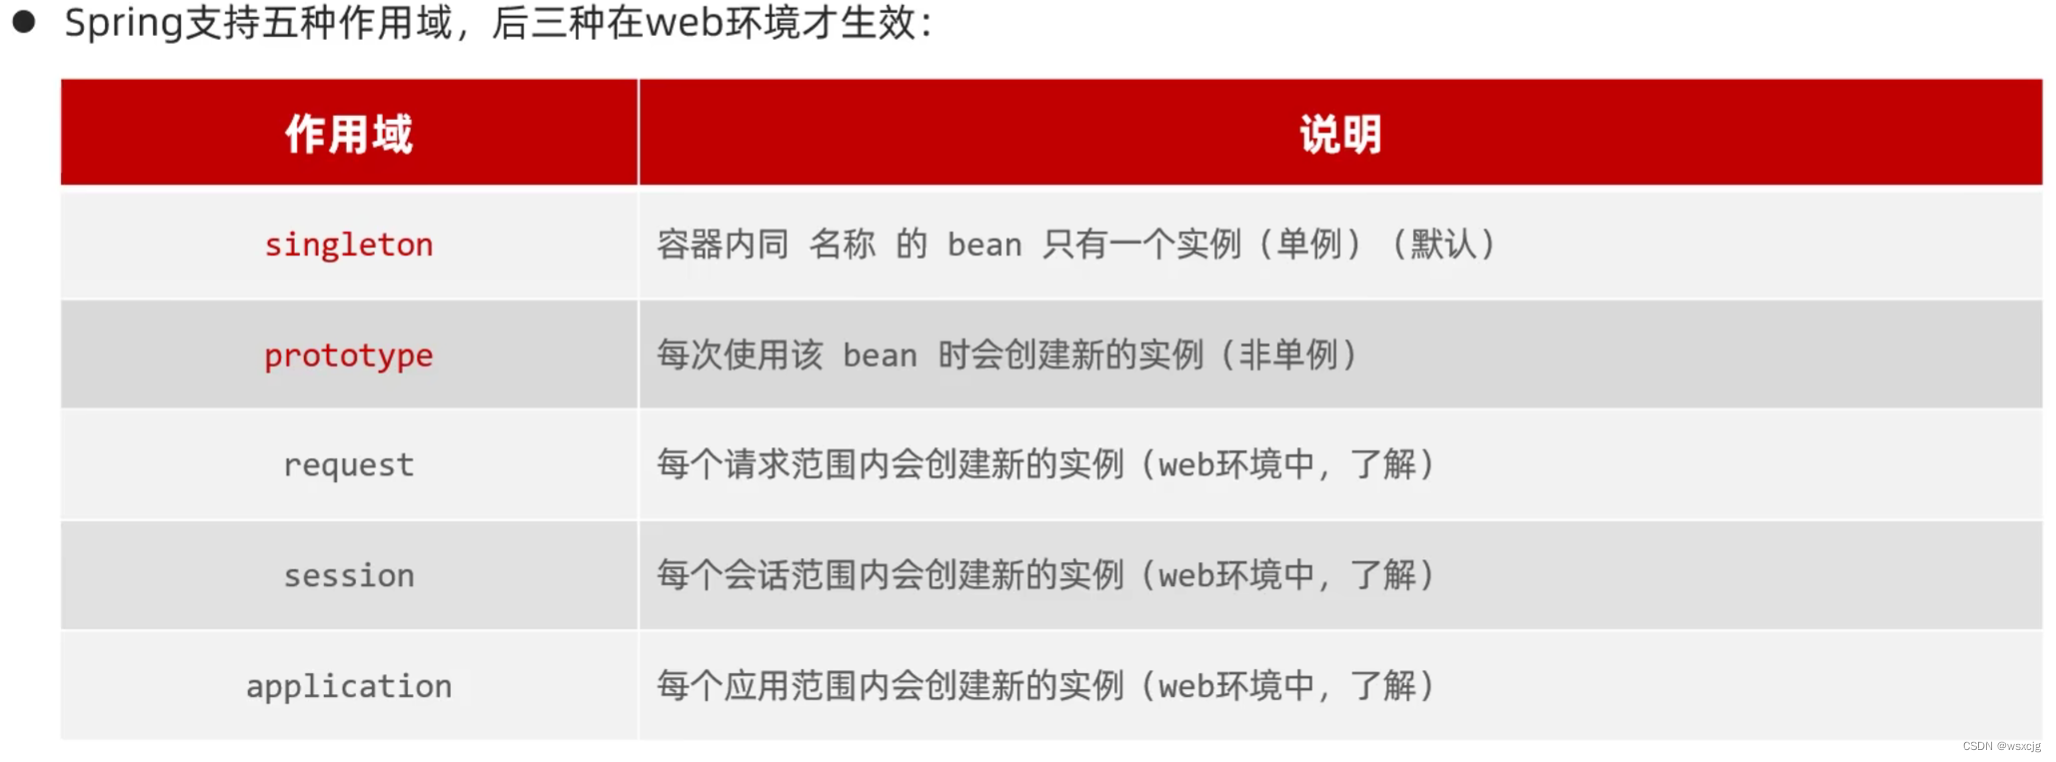
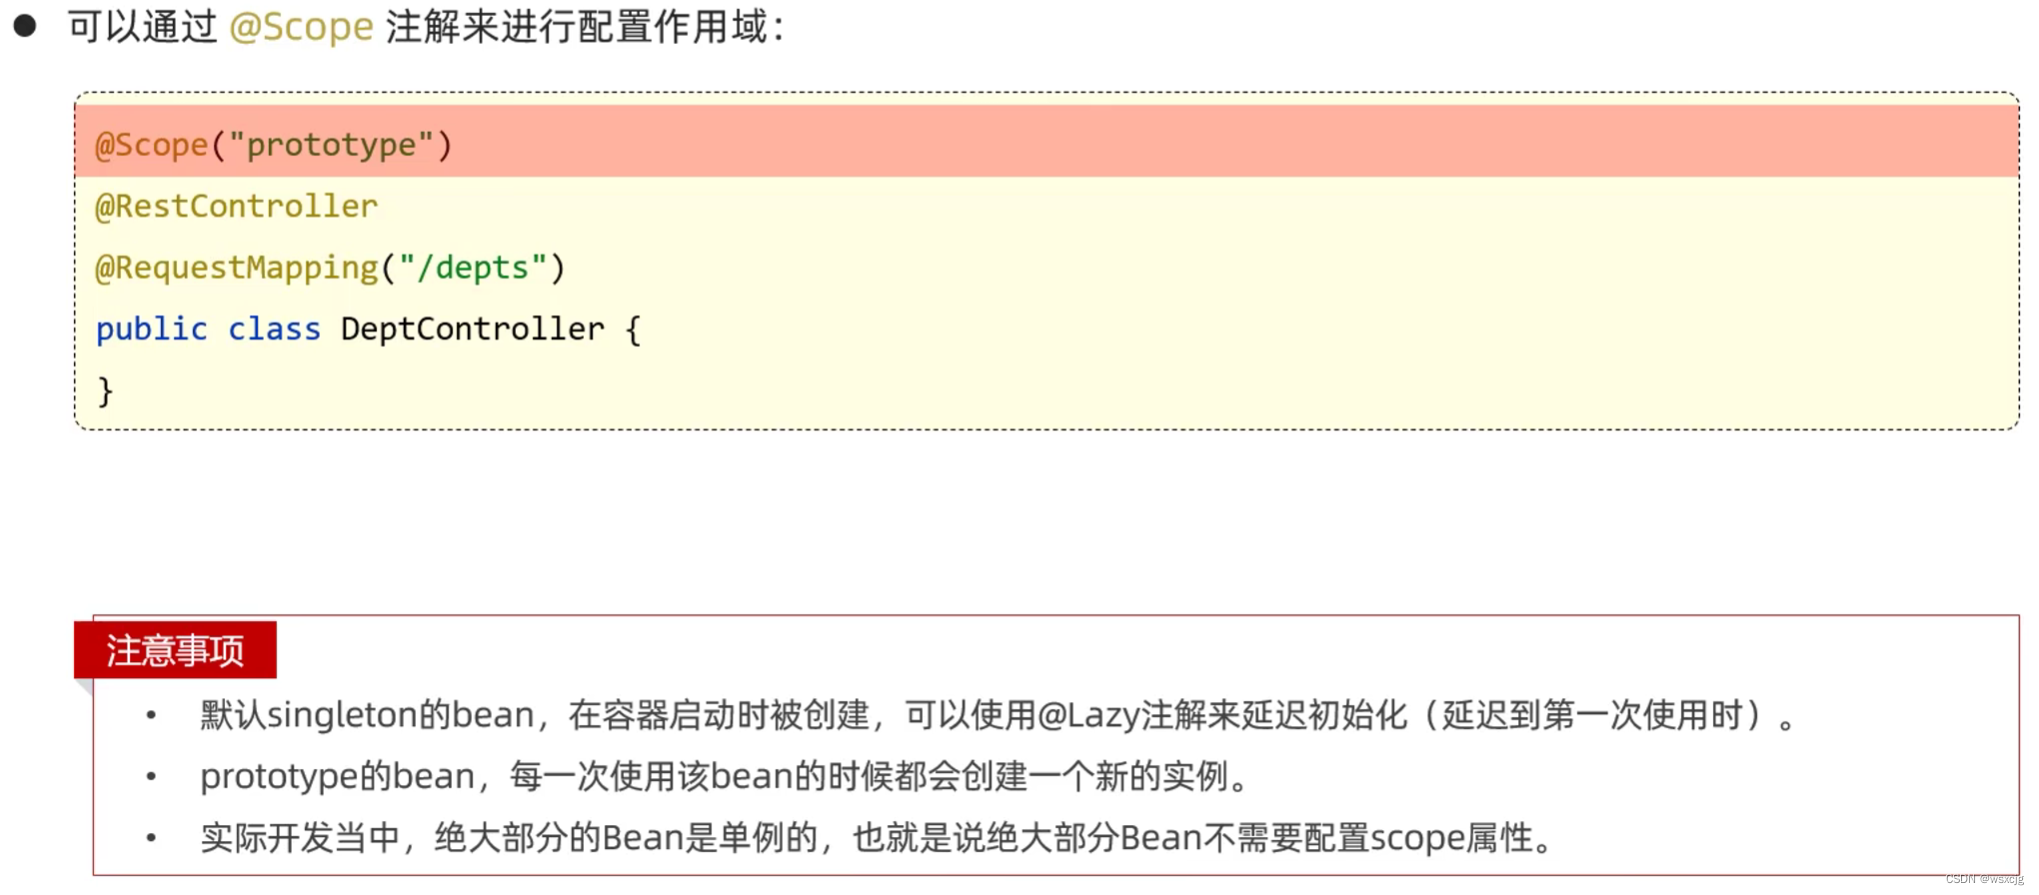
bean的作用域:
第三方bean:
(以xml解析类SAXReader举例)
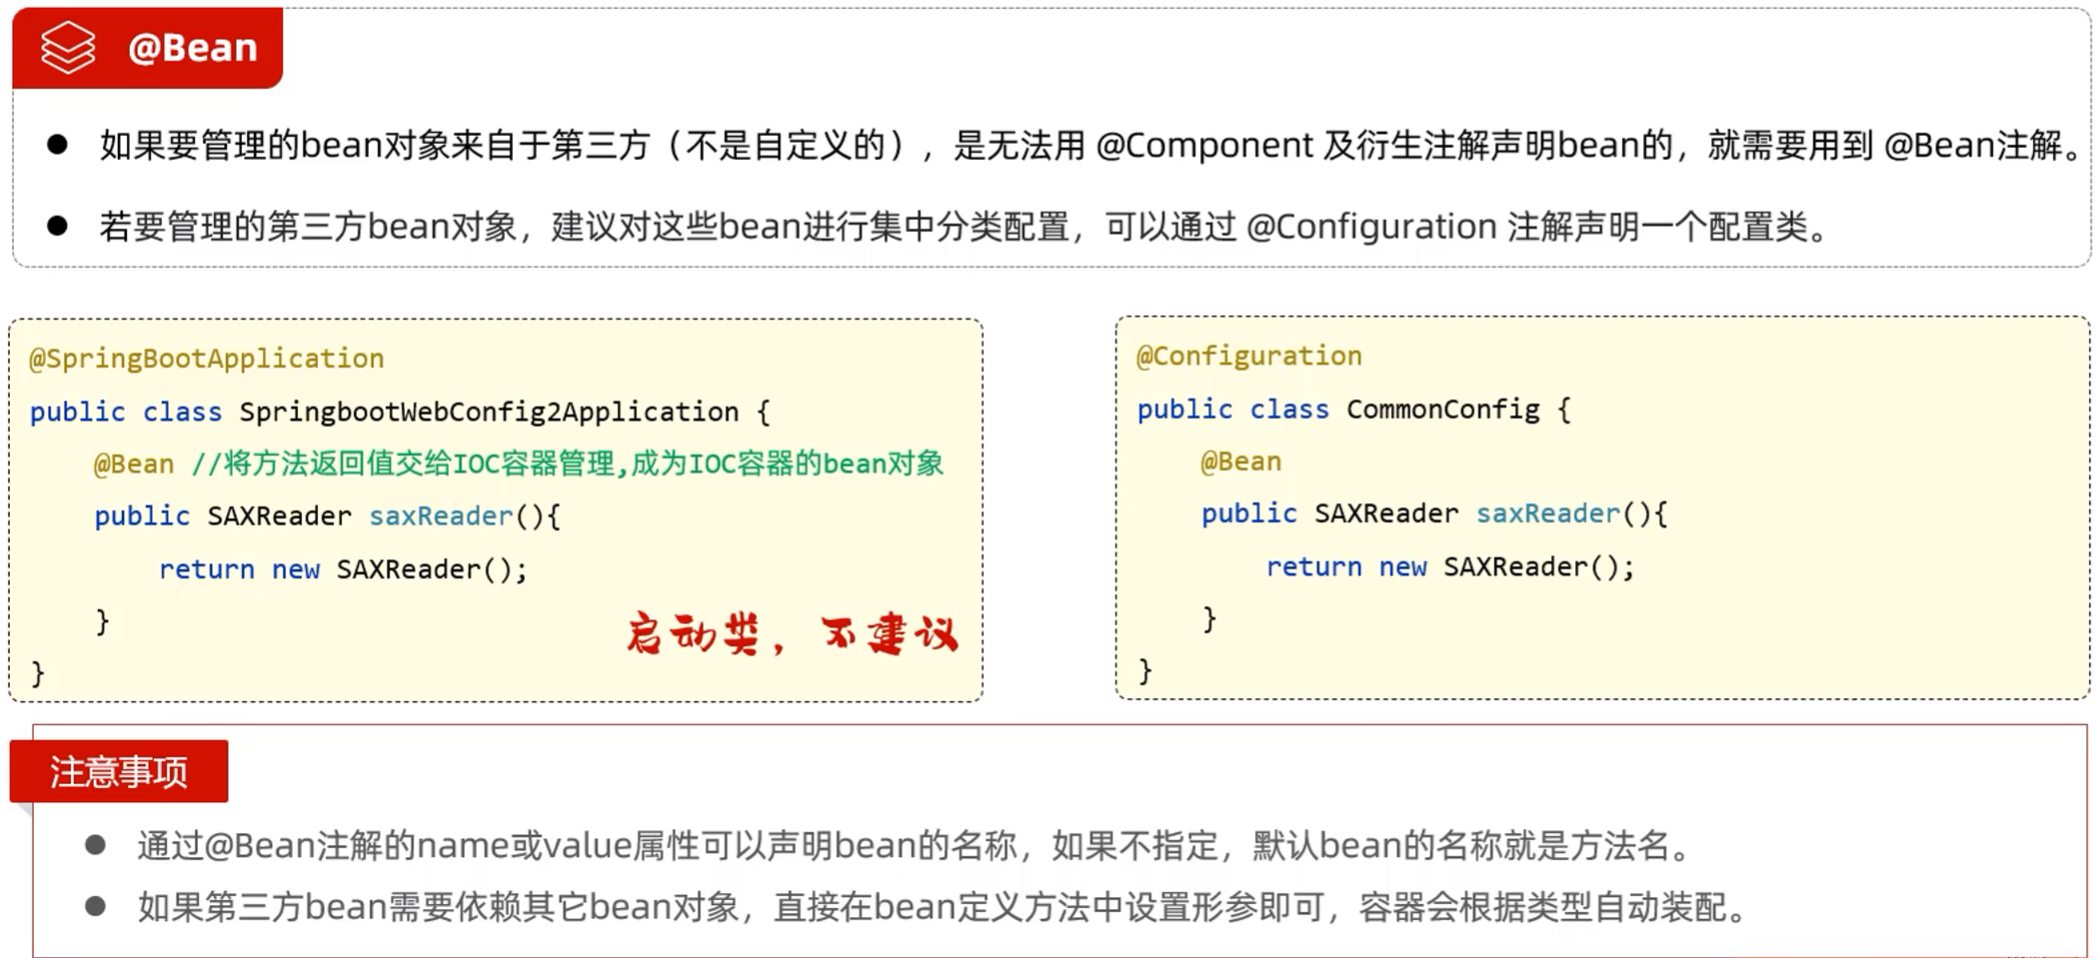
使用场景:

★SpringBoot原理:
起步依赖:
如果要使用web相关的依赖,只需要导入spring-boot-starter-web依赖,通过maven的依赖传递,关于web的所有依赖都会被导入,还不用担心版本兼容问题
自动配置:

自动配置的原理:
问题:
如果我们直接在pom.xml.文件中引入第三方依赖,第三方依赖中通过@Component、@Bean等注解定义了bean对象,这种情况第三方依赖中的bean对象也是不会出现在springboot程序中的,因为springboot程序通过启动类注解@SpringBootApplication扫描其所在包和子包中的bean对象,是扫描不到第三方依赖的。
解决方案一 @ComponentScan组件扫描:
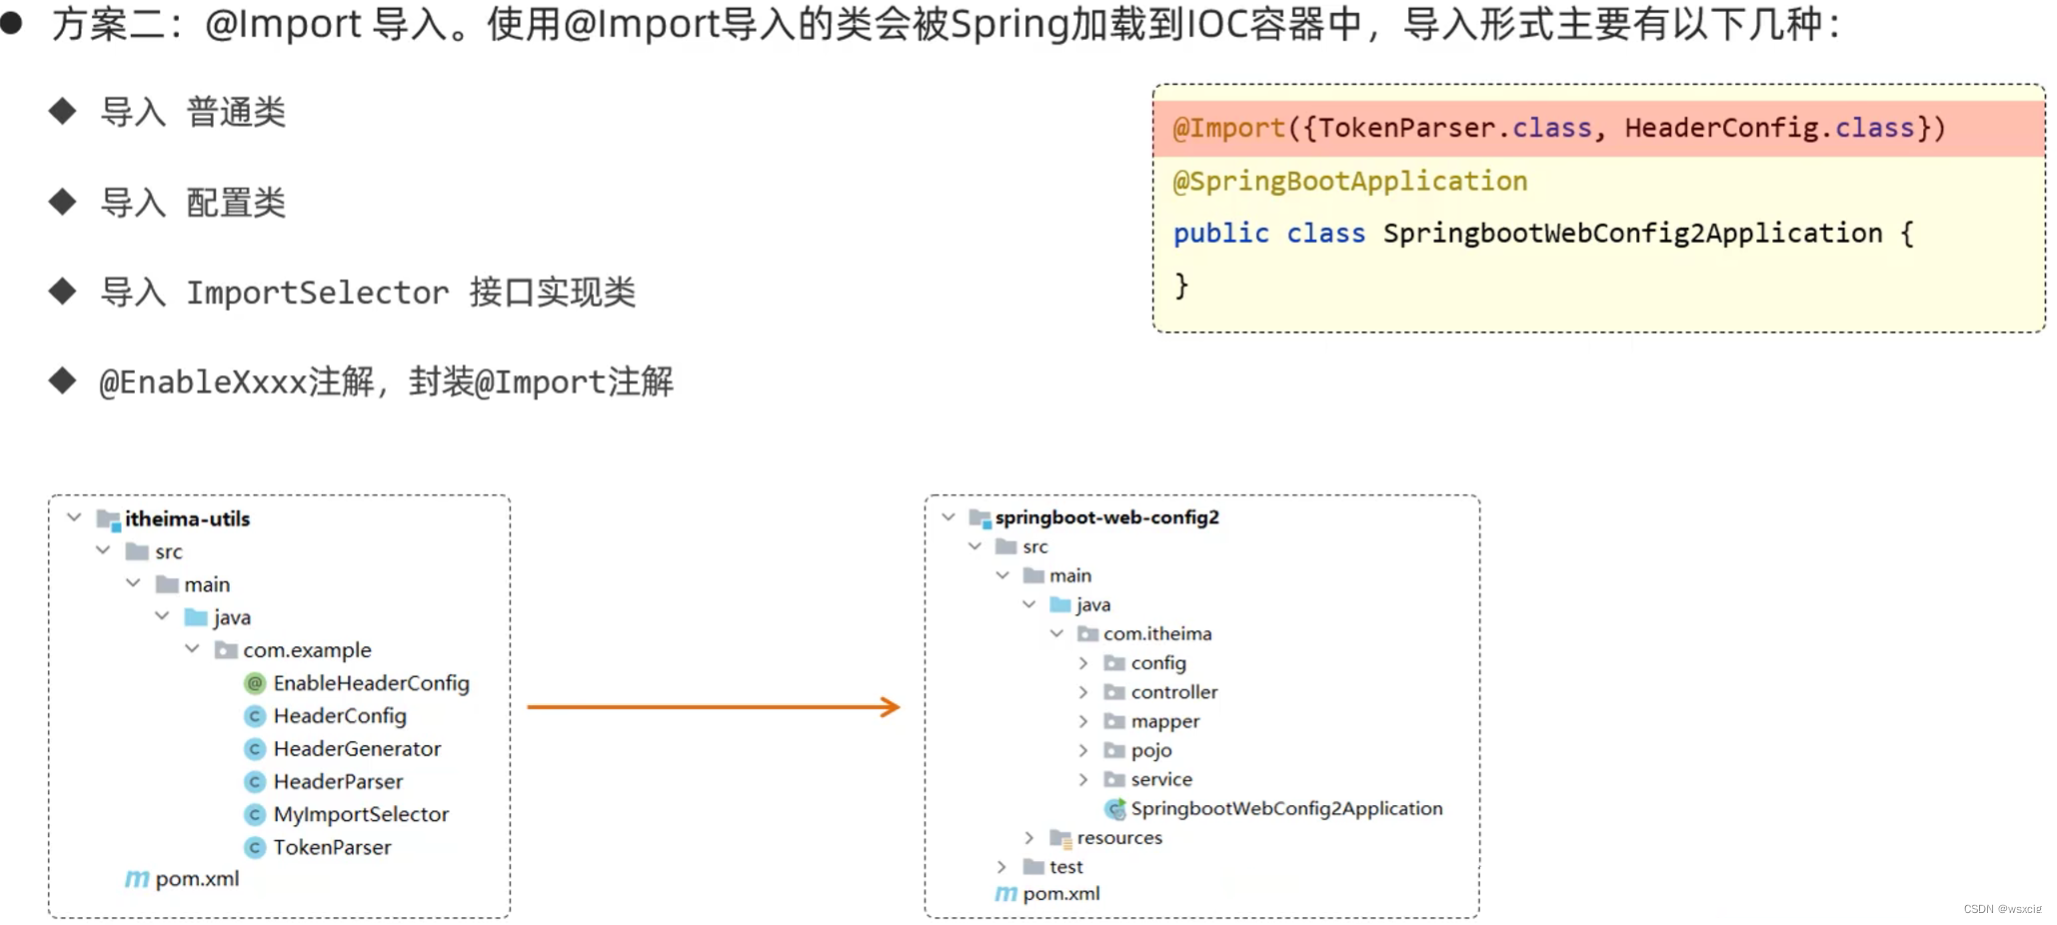
启动类:(com.han为当前启动类所在包,com.example为第三方依赖的包)
@ComponentScan({"com.han","com.example"})
@ServletComponentScan
@SpringBootApplication
public class TliasApplication {public static void main(String[] args) {SpringApplication.run(TliasApplication.class, args);}}
这种方式使用较繁琐,性能低。
解决方案二 @Import导入:
@EnableXxxx注解使用举例:
@SpringBootApplication源码跟踪:
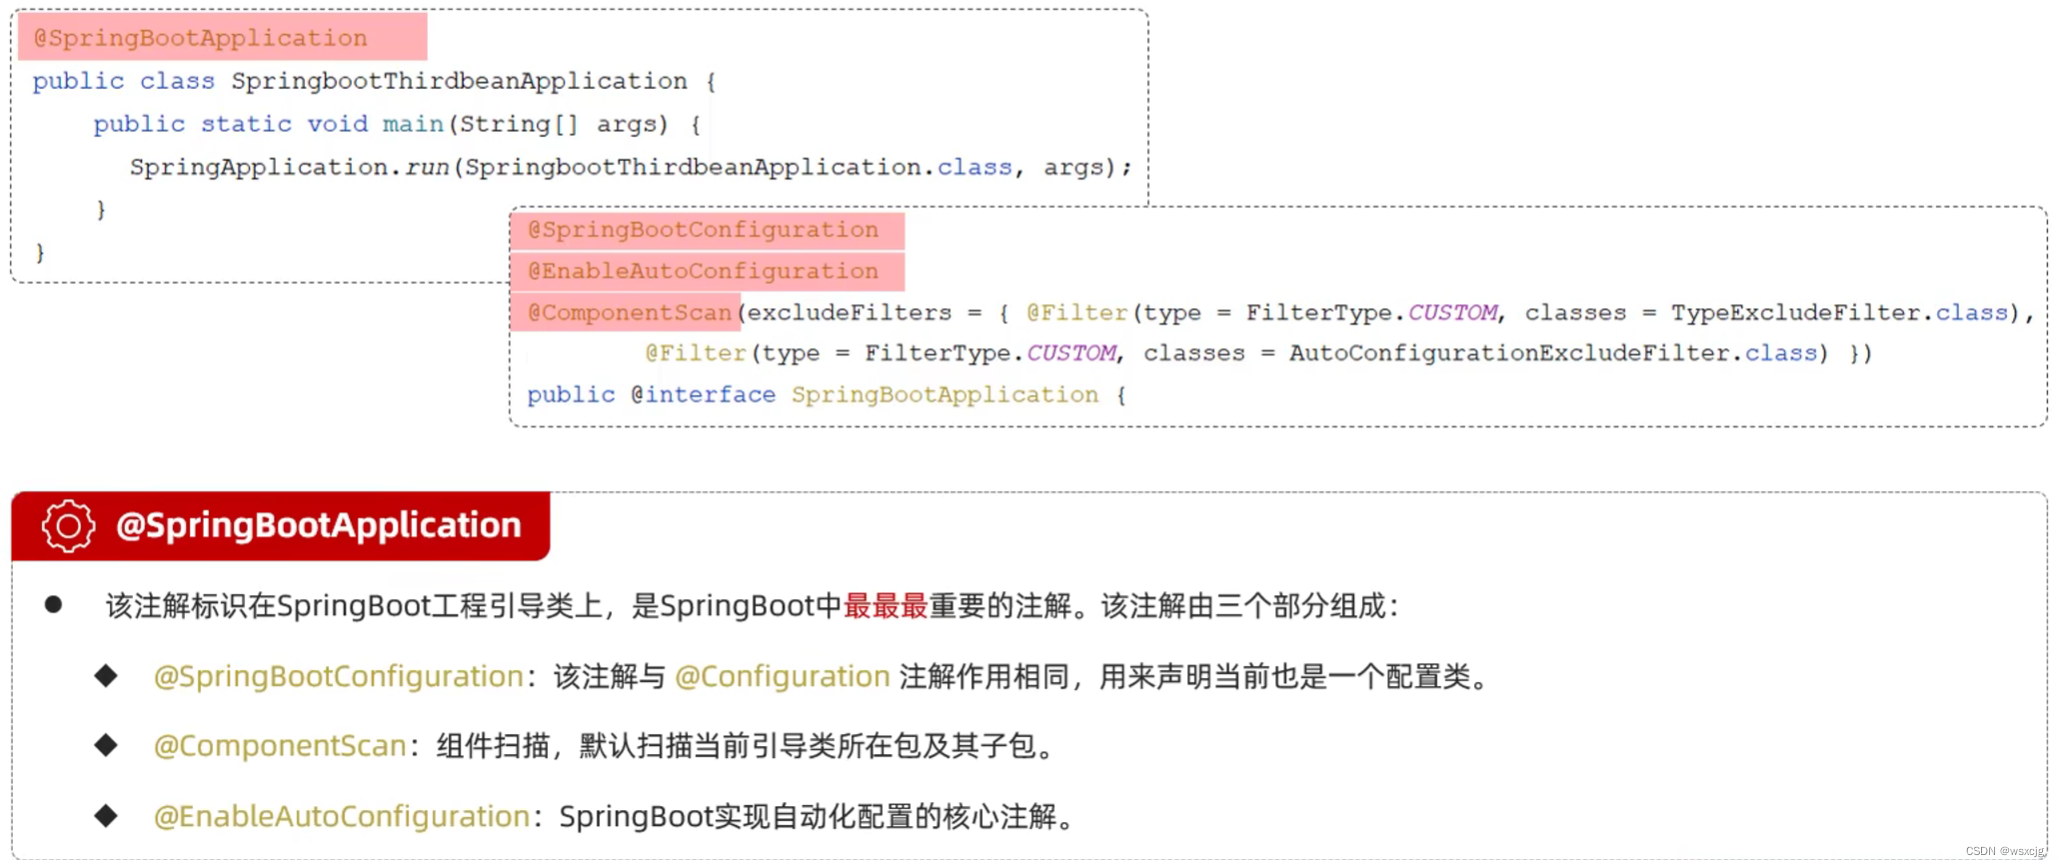
这里最重要的是@EnableAutoConfiguration注解。
@EnableAutoConfiguration:
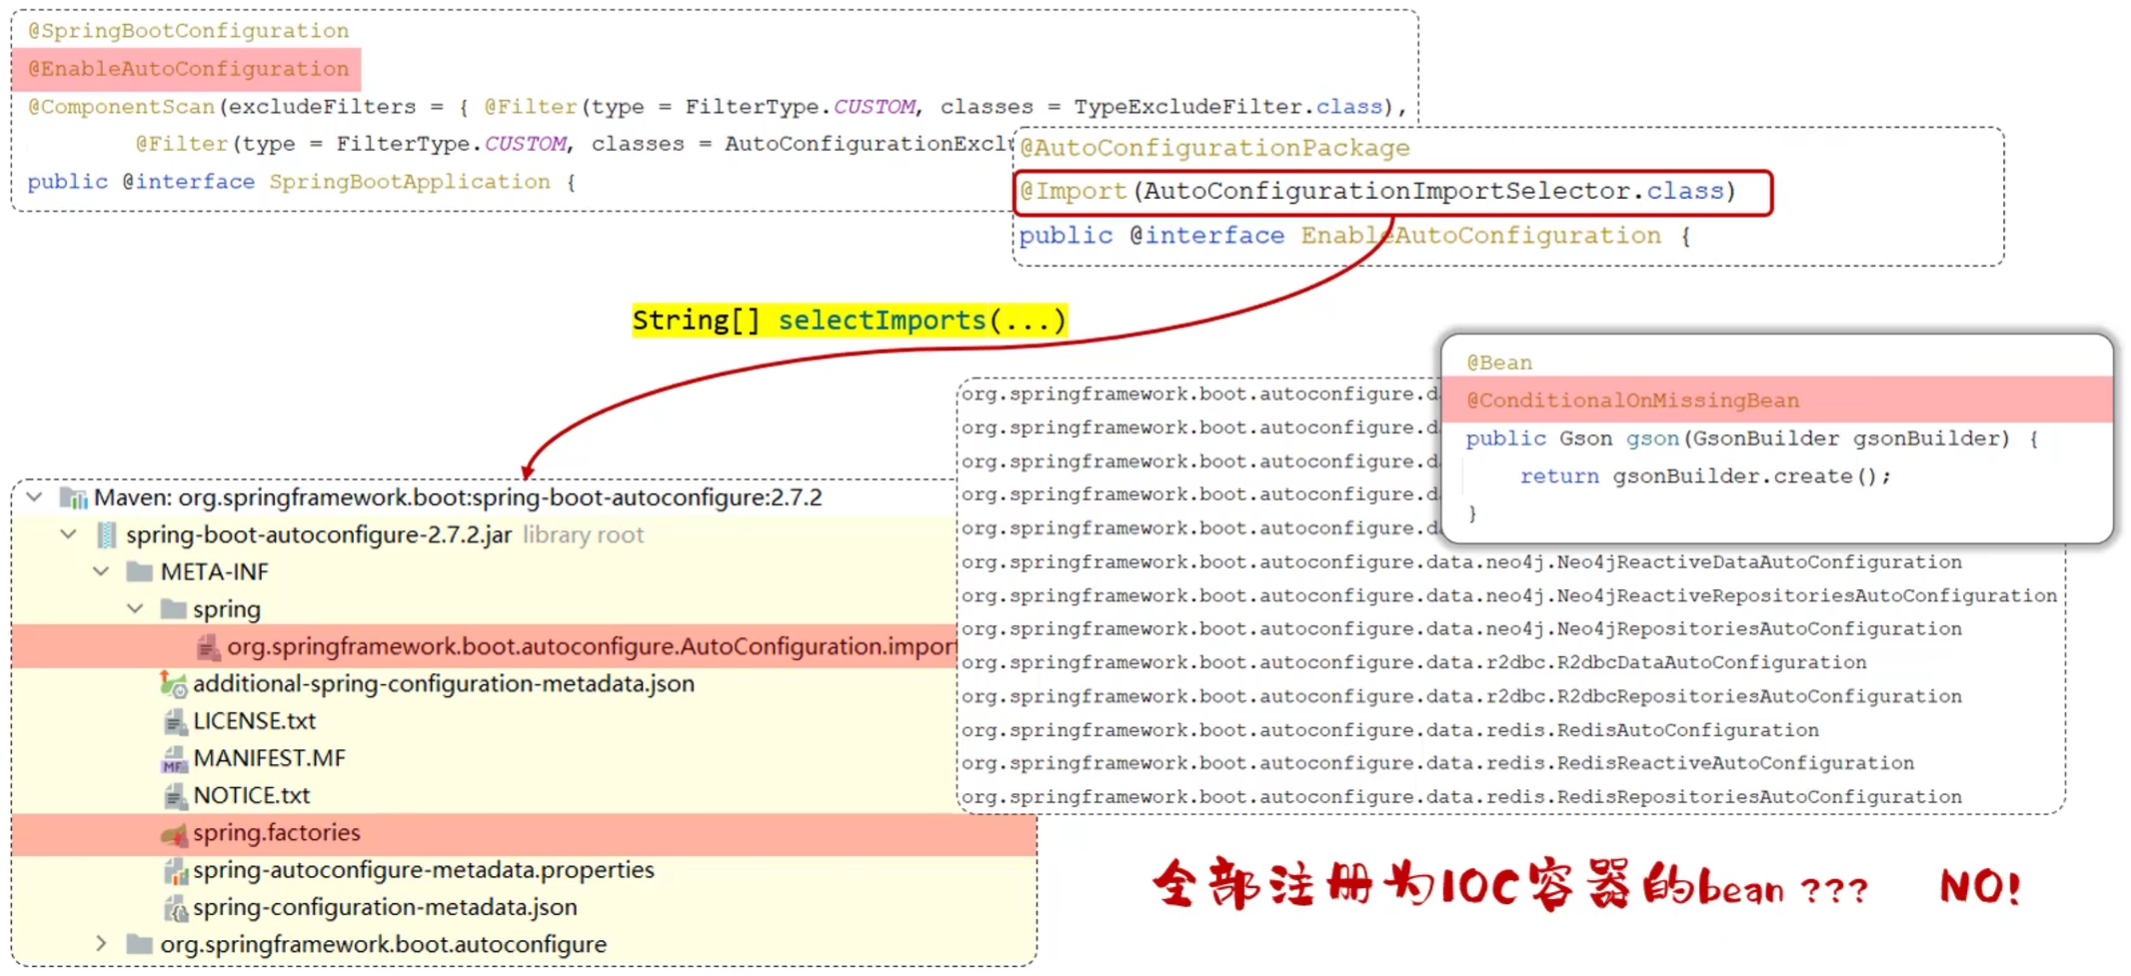
它通过封装@Import注解,将上图两个文件中的需要导入到IOC容器的类的全类名放入ImportSelector接口的实现类中的selectImports方法返回的字符数组,以自动配置。
但是这些类并不是全部注册为IOC容器的bean,SpringBoot会根据@Conditional注解条件装配。
条件装配注解@Conditional:
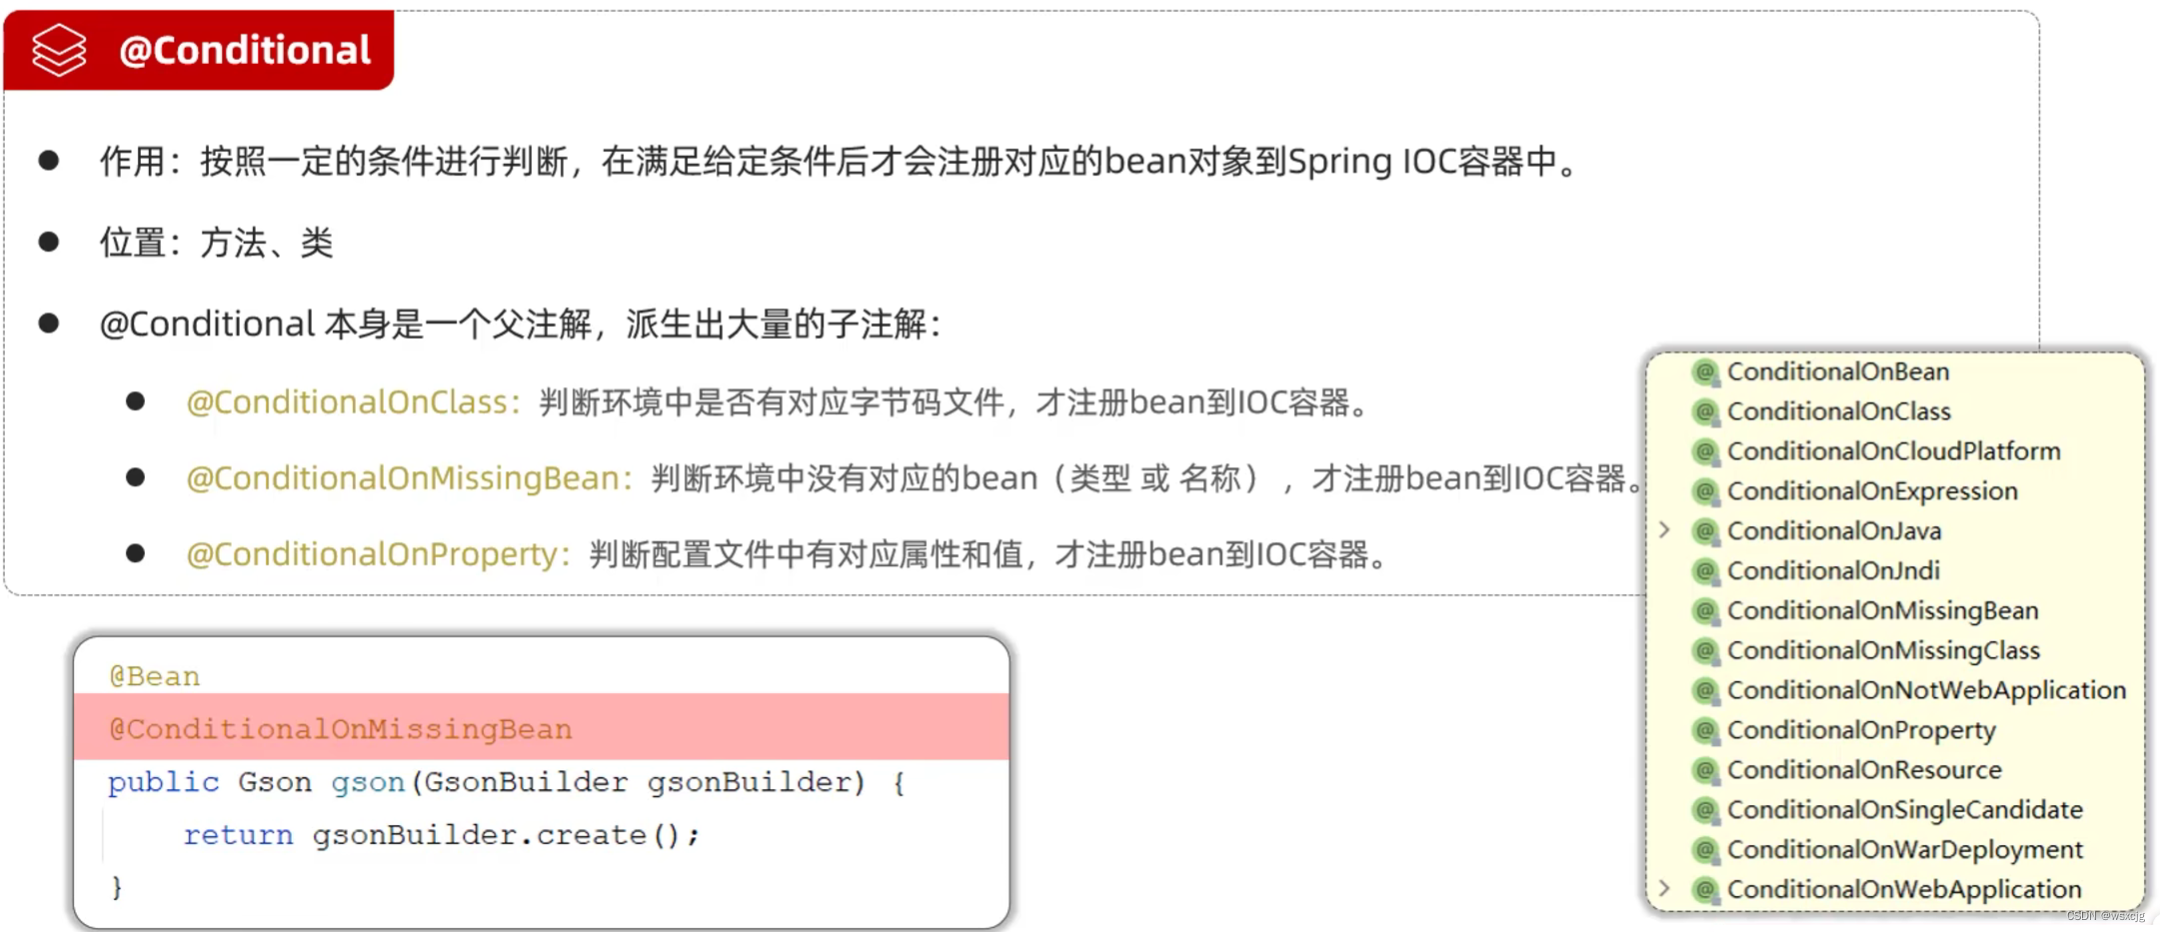
1.@ConditionalOnClass:

2.@ConditionalOnMissingBean:

不指定类型和名称时,默认类型指该方法返回值的类型。
使用场景:默认的bean,引入依赖后,用户如果自定义了这个类型的bean,则会导入用户自定义的,如果用户没有定义,就导入依赖中默认的。
3.@ConditionalOnProperty:

根据上述代码,若在配置文件application.yml中添加配置信息name: itheima,那么就会将该bean放入IOC容器中。
使用场景:引入第三方变量后,可以在配置文件中配置信息后,才将某个类加入IOC容器。
案例(自定义starter):
自定义starter场景:

案例需求:

步骤:
代码:
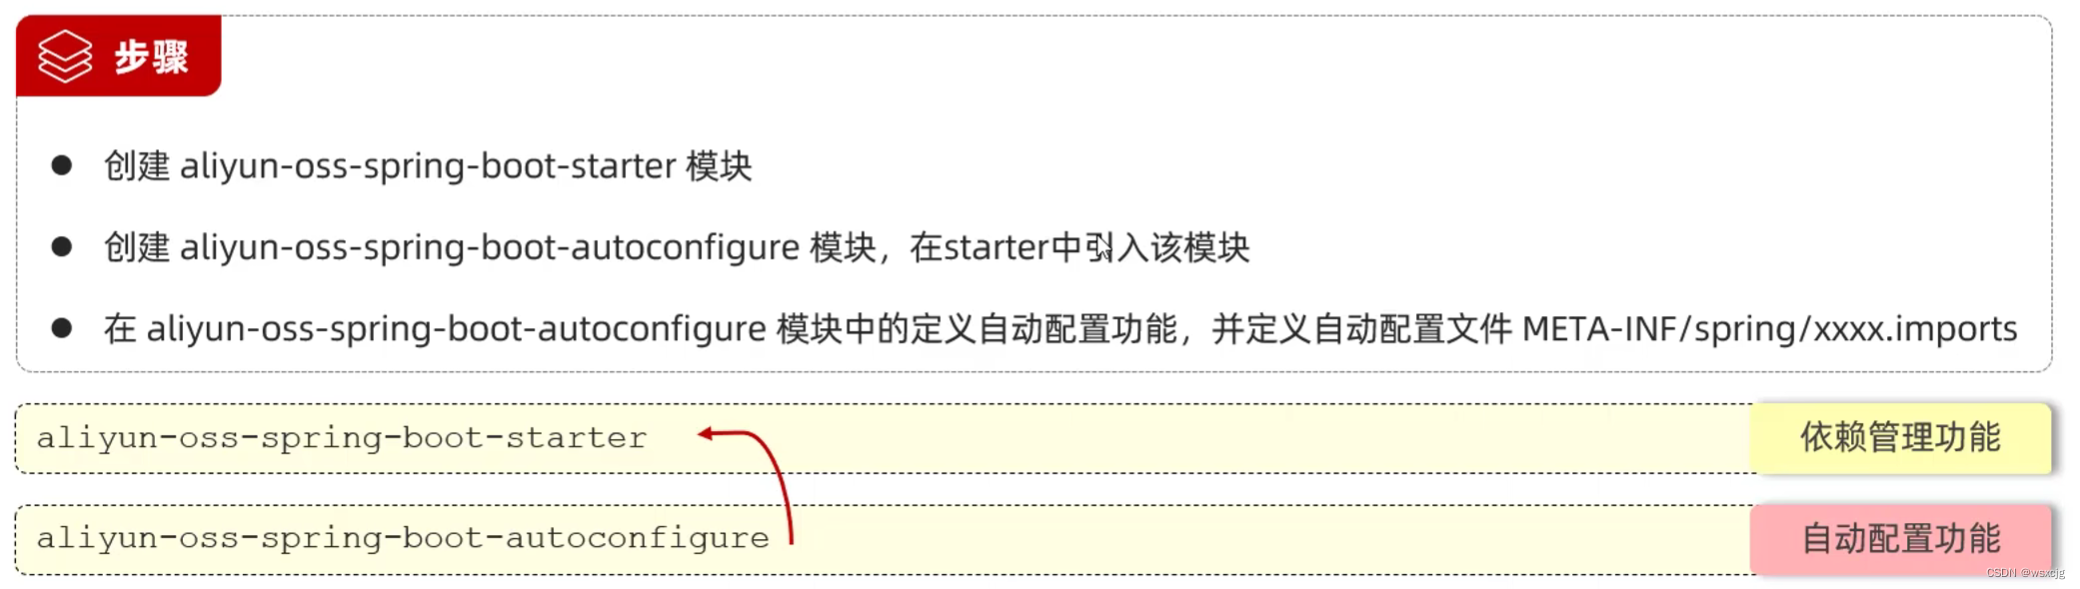
1.新建模块aliyun-oss-spring-boot-starter(只需要pom.xml文件),aliyun-oss-spring-boot-autoconfigure(只需要pom.xml文件和src文件夹,也不需要启动类),在aliyun-oss-spring-boot-starter中的pom.xml文件中引入aliyun-oss-spring-boot-autoconfigure的依赖。
aliyun-oss-spring-boot-starter:
<?xml version="1.0" encoding="UTF-8"?>
<project xmlns="http://maven.apache.org/POM/4.0.0" xmlns:xsi="http://www.w3.org/2001/XMLSchema-instance"xsi:schemaLocation="http://maven.apache.org/POM/4.0.0 https://maven.apache.org/xsd/maven-4.0.0.xsd"><modelVersion>4.0.0</modelVersion><parent><groupId>org.springframework.boot</groupId><artifactId>spring-boot-starter-parent</artifactId><version>3.2.6</version><relativePath/> <!-- lookup parent from repository --></parent><groupId>com.aliyun.oss</groupId><artifactId>aliyun-oss-spring-boot-starter</artifactId><version>0.0.1-SNAPSHOT</version><properties><java.version>17</java.version></properties><dependencies><dependency><groupId>org.springframework.boot</groupId><artifactId>spring-boot-starter</artifactId></dependency><dependency><groupId>com.aliyun.oss</groupId><artifactId>aliyun-oss-spring-boot-autoconfigure</artifactId><version>0.0.1-SNAPSHOT</version></dependency></dependencies></project>
2.在aliyun-oss-spring-boot-autoconfigure中的pom.xml文件中引入阿里云OSS的依赖
aliyun-oss-spring-boot-autoconfigure:
<?xml version="1.0" encoding="UTF-8"?>
<project xmlns="http://maven.apache.org/POM/4.0.0" xmlns:xsi="http://www.w3.org/2001/XMLSchema-instance"xsi:schemaLocation="http://maven.apache.org/POM/4.0.0 https://maven.apache.org/xsd/maven-4.0.0.xsd"><modelVersion>4.0.0</modelVersion><parent><groupId>org.springframework.boot</groupId><artifactId>spring-boot-starter-parent</artifactId><version>3.2.6</version><relativePath/> <!-- lookup parent from repository --></parent><groupId>com.aliyun.oss</groupId><artifactId>aliyun-oss-spring-boot-autoconfigure</artifactId><version>0.0.1-SNAPSHOT</version><properties><java.version>17</java.version></properties><dependencies><dependency><groupId>org.springframework.boot</groupId><artifactId>spring-boot-starter</artifactId></dependency><!--阿里云OSS依赖--><dependency><groupId>com.aliyun.oss</groupId><artifactId>aliyun-sdk-oss</artifactId><version>3.15.1</version></dependency><dependency><groupId>javax.xml.bind</groupId><artifactId>jaxb-api</artifactId><version>2.3.1</version></dependency><dependency><groupId>javax.activation</groupId><artifactId>activation</artifactId><version>1.1.1</version></dependency></dependencies></project>
3.在aliyun-oss-spring-boot-autoconfigure中编写能够使用阿里云OSS的代码
这里要使用MultipartFile还需要引入web开发的起步依赖
<?xml version="1.0" encoding="UTF-8"?>
<project xmlns="http://maven.apache.org/POM/4.0.0" xmlns:xsi="http://www.w3.org/2001/XMLSchema-instance"xsi:schemaLocation="http://maven.apache.org/POM/4.0.0 https://maven.apache.org/xsd/maven-4.0.0.xsd"><modelVersion>4.0.0</modelVersion><parent><groupId>org.springframework.boot</groupId><artifactId>spring-boot-starter-parent</artifactId><version>3.2.6</version><relativePath/> <!-- lookup parent from repository --></parent><groupId>com.aliyun.oss</groupId><artifactId>aliyun-oss-spring-boot-autoconfigure</artifactId><version>0.0.1-SNAPSHOT</version><properties><java.version>17</java.version></properties><dependencies><dependency><groupId>org.springframework.boot</groupId><artifactId>spring-boot-starter</artifactId></dependency><!--阿里云OSS依赖--><dependency><groupId>com.aliyun.oss</groupId><artifactId>aliyun-sdk-oss</artifactId><version>3.15.1</version></dependency><dependency><groupId>javax.xml.bind</groupId><artifactId>jaxb-api</artifactId><version>2.3.1</version></dependency><dependency><groupId>javax.activation</groupId><artifactId>activation</artifactId><version>1.1.1</version></dependency><dependency><groupId>org.springframework.boot</groupId><artifactId>spring-boot-starter-web</artifactId></dependency></dependencies></project>
工具类:
/*** 阿里云 OSS 工具类*/
public class AliOSSUtils {private AliOSSProperties aliOSSProperties;//不能依赖注入了但是后续方法要使用aliOSSProperties对象,所以定义get set方法public AliOSSProperties getAliOSSProperties() {return aliOSSProperties;}public void setAliOSSProperties(AliOSSProperties aliOSSProperties) {this.aliOSSProperties = aliOSSProperties;}/*** 实现上传图片到OSS*/public String upload(MultipartFile file) throws ClientException, IOException {String endpoint = aliOSSProperties.getEndpoint();String bucketName = aliOSSProperties.getBucketName();InputStream inputStream = file.getInputStream();// 从环境变量中获取访问凭证。运行本代码示例之前,请确保已设置环境变量OSS_ACCESS_KEY_ID和OSS_ACCESS_KEY_SECRET。EnvironmentVariableCredentialsProvider credentialsProvider = CredentialsProviderFactory.newEnvironmentVariableCredentialsProvider();// 填写Object完整路径,例如exampleobject.txt。Object完整路径中不能包含Bucket名称。String objectName = file.getOriginalFilename();String fileName = UUID.randomUUID().toString() + objectName.substring(objectName.lastIndexOf("."));// 填写本地文件的完整路径,例如D:\\localpath\\examplefile.txt。// 如果未指定本地路径,则默认从示例程序所属项目对应本地路径中上传文件。// 创建OSSClient实例OSS ossClient = new OSSClientBuilder().build(endpoint, credentialsProvider);// 创建PutObjectRequest对象。PutObjectRequest putObjectRequest = new PutObjectRequest(bucketName, fileName, inputStream);// 上传文件。PutObjectResult result = ossClient.putObject(putObjectRequest);// 设置请求头。Map<String, String> headers = new HashMap<String, String>();/*// 指定Object的存储类型。headers.put(OSSHeaders.STORAGE_CLASS, StorageClass.Standard.toString());// 指定ContentType。headers.put(OSSHeaders.CONTENT_TYPE, "text/txt");*/// 设置用户自定义元数据。Map<String, String> userMetadata = new HashMap<String, String>();/*userMetadata.put("key1","value1");userMetadata.put("key2","value2");*/URL signedUrl = null;// 指定生成的签名URL过期时间,单位为毫秒。本示例以设置过期时间为1小时为例。Date expiration = new Date(new Date().getTime() + 3600 * 1000L);// 生成签名URL。GeneratePresignedUrlRequest request = new GeneratePresignedUrlRequest(bucketName, fileName);// 设置过期时间。request.setExpiration(expiration);// 将请求头加入到request中。request.setHeaders(headers);// 添加用户自定义元数据。request.setUserMetadata(userMetadata);// 通过HTTP PUT请求生成签名URL。signedUrl = ossClient.generatePresignedUrl(request);// 返回签名URL。ossClient.shutdown();return signedUrl.toString().split("\\?")[0];}}
认证信息存储类:
@ConfigurationProperties(prefix = "aliyun.oss")//用于验证配置文件中以"aliyun.oss"为前缀的属性
public class AliOSSProperties {private String endpoint;private String bucketName;public String getEndpoint() {return endpoint;}public void setEndpoint(String endpoint) {this.endpoint = endpoint;}public String getBucketName() {return bucketName;}public void setBucketName(String bucketName) {this.bucketName = bucketName;}}
4.定义自动配置类AliOSSAutoConfiguration
@Configuration//配置类
@EnableConfigurationProperties(AliOSSProperties.class)//将AliOSSProperties类bean对象放入IOC容器
public class AliOSSAutoConfiguration {@Beanpublic AliOSSUtils aliOSSUtils(AliOSSProperties aliOSSProperties){//需要注入某个对象直接在方法形参中指定AliOSSUtils aliOSSUtils = new AliOSSUtils();aliOSSUtils.setAliOSSProperties(aliOSSProperties);return aliOSSUtils;}}
5.定义自动配置文件,在resource目录下创建文件夹META-INF/spring下的文件org.springframework.boot.autoconfigure.AutoConfiguration
并存入配置类的全类名
com.aliyun.oss.AliOSSAutoConfiguration测试案例:
新建模块,配置阿里云OSS信息
application.yml:
#阿里云OSS配置
aliyun:oss:endpoint: https://oss-cn-beijing.aliyuncs.combucketName: web-talias-test
引入自定义的依赖,只需要引入starter
pom.xml:
<?xml version="1.0" encoding="UTF-8"?>
<project xmlns="http://maven.apache.org/POM/4.0.0" xmlns:xsi="http://www.w3.org/2001/XMLSchema-instance"xsi:schemaLocation="http://maven.apache.org/POM/4.0.0 https://maven.apache.org/xsd/maven-4.0.0.xsd"><modelVersion>4.0.0</modelVersion><parent><groupId>org.springframework.boot</groupId><artifactId>spring-boot-starter-parent</artifactId><version>3.2.6</version><relativePath/> <!-- lookup parent from repository --></parent><groupId>com.han</groupId><artifactId>springboot-autoconfiguration-test</artifactId><version>0.0.1-SNAPSHOT</version><name>springboot-autoconfiguration-test</name><description>springboot-autoconfiguration-test</description><properties><java.version>17</java.version></properties><dependencies><dependency><groupId>org.springframework.boot</groupId><artifactId>spring-boot-starter</artifactId></dependency><dependency><groupId>org.springframework.boot</groupId><artifactId>spring-boot-starter-test</artifactId><scope>test</scope></dependency><dependency><groupId>org.springframework.boot</groupId><artifactId>spring-boot-starter-web</artifactId></dependency><dependency><groupId>com.aliyun.oss</groupId><artifactId>aliyun-oss-spring-boot-starter</artifactId><version>0.0.1-SNAPSHOT</version></dependency></dependencies><build><plugins><plugin><groupId>org.springframework.boot</groupId><artifactId>spring-boot-maven-plugin</artifactId></plugin></plugins></build></project>
编写Controller:
@RestController
public class UploadController {@Autowiredprivate AliOSSUtils aliOSSUtils;@PostMapping("/upload")public String upload(MultipartFile image) throws Exception {String url = aliOSSUtils.upload(image);return url;}}
Postman测试:

浏览器打开网址可正常下载显示。
框架总结:
SpringMVC + Spring framework(Spring) + Mybatis = SSM框架

SpringMVC属于Spring框架,是Spring框架当中提供的web开发模块,是用来简化原始的servelet程序的开发的。
基于传统的SSM框架开发进行整合开发是比较繁琐的,效率也较低,所以目前的企业项目开发当中,基本上都是基于SpringBoot进行项目开发的。
相关文章:
JavaWeb_SpringBootWeb案例
环境搭建: 开发规范 接口风格-Restful: 统一响应结果-Result: 开发流程: 第一步应该根据需求定义表结构和定义接口文档 注意: 本文代码从上往下一直添加功能,后面的模块下的代码包括前面的模块,…...

Linux中FTP安装
文章目录 一、FTP介绍1.1、FTP是什么1.2、FTP的工作原理1.3、FTP的传输模式1.4、FTP用户类别1.5、FTP的优点与缺点1.6、FTP数据传输格式 二、FTP客户端与服务端2.1、服务端2.2、客户端 三、FTP服务器软件介绍3.1、WU-FTPD3.2、ProFtpD3.3、vsftpd3.4、Pure-FTP3.5、FileZilla S…...

【Spring EL<二>✈️✈️ 】SL 表达式结合 AOP 注解实现鉴权
目录 🍻前言 🍸一、鉴权(Authorization) 🍺二、功能实现 2.1 环境准备 2.2 代码实现 2.3 测试接口 🍹三、测试功能 3.1 传递 admin 请求 3.2 传递普通 user 请求 🍻四、章末 &a…...

冯喜运:6.13美盘外汇黄金原油趋势分析及操作策略
【黄金消息面分析】:美国5月生产者价格指数(PPI)的意外下降,为市场带来了通胀可能见顶的积极信号。与此同时,初请失业金人数的上升,为劳动力市场的现状增添了一层不确定性。美国劳工统计局公布的数据显示&a…...
Lecture2——最优化问题建模
一,建模 1,重要性 实际上,我们并没有得到一个数学公式——通常问题是由某个领域的专家口头描述的。能够将问题转换成数学公式非常重要。建模并不是一件容易的事:有时,我们不仅想找到一个公式,还想找到一个…...
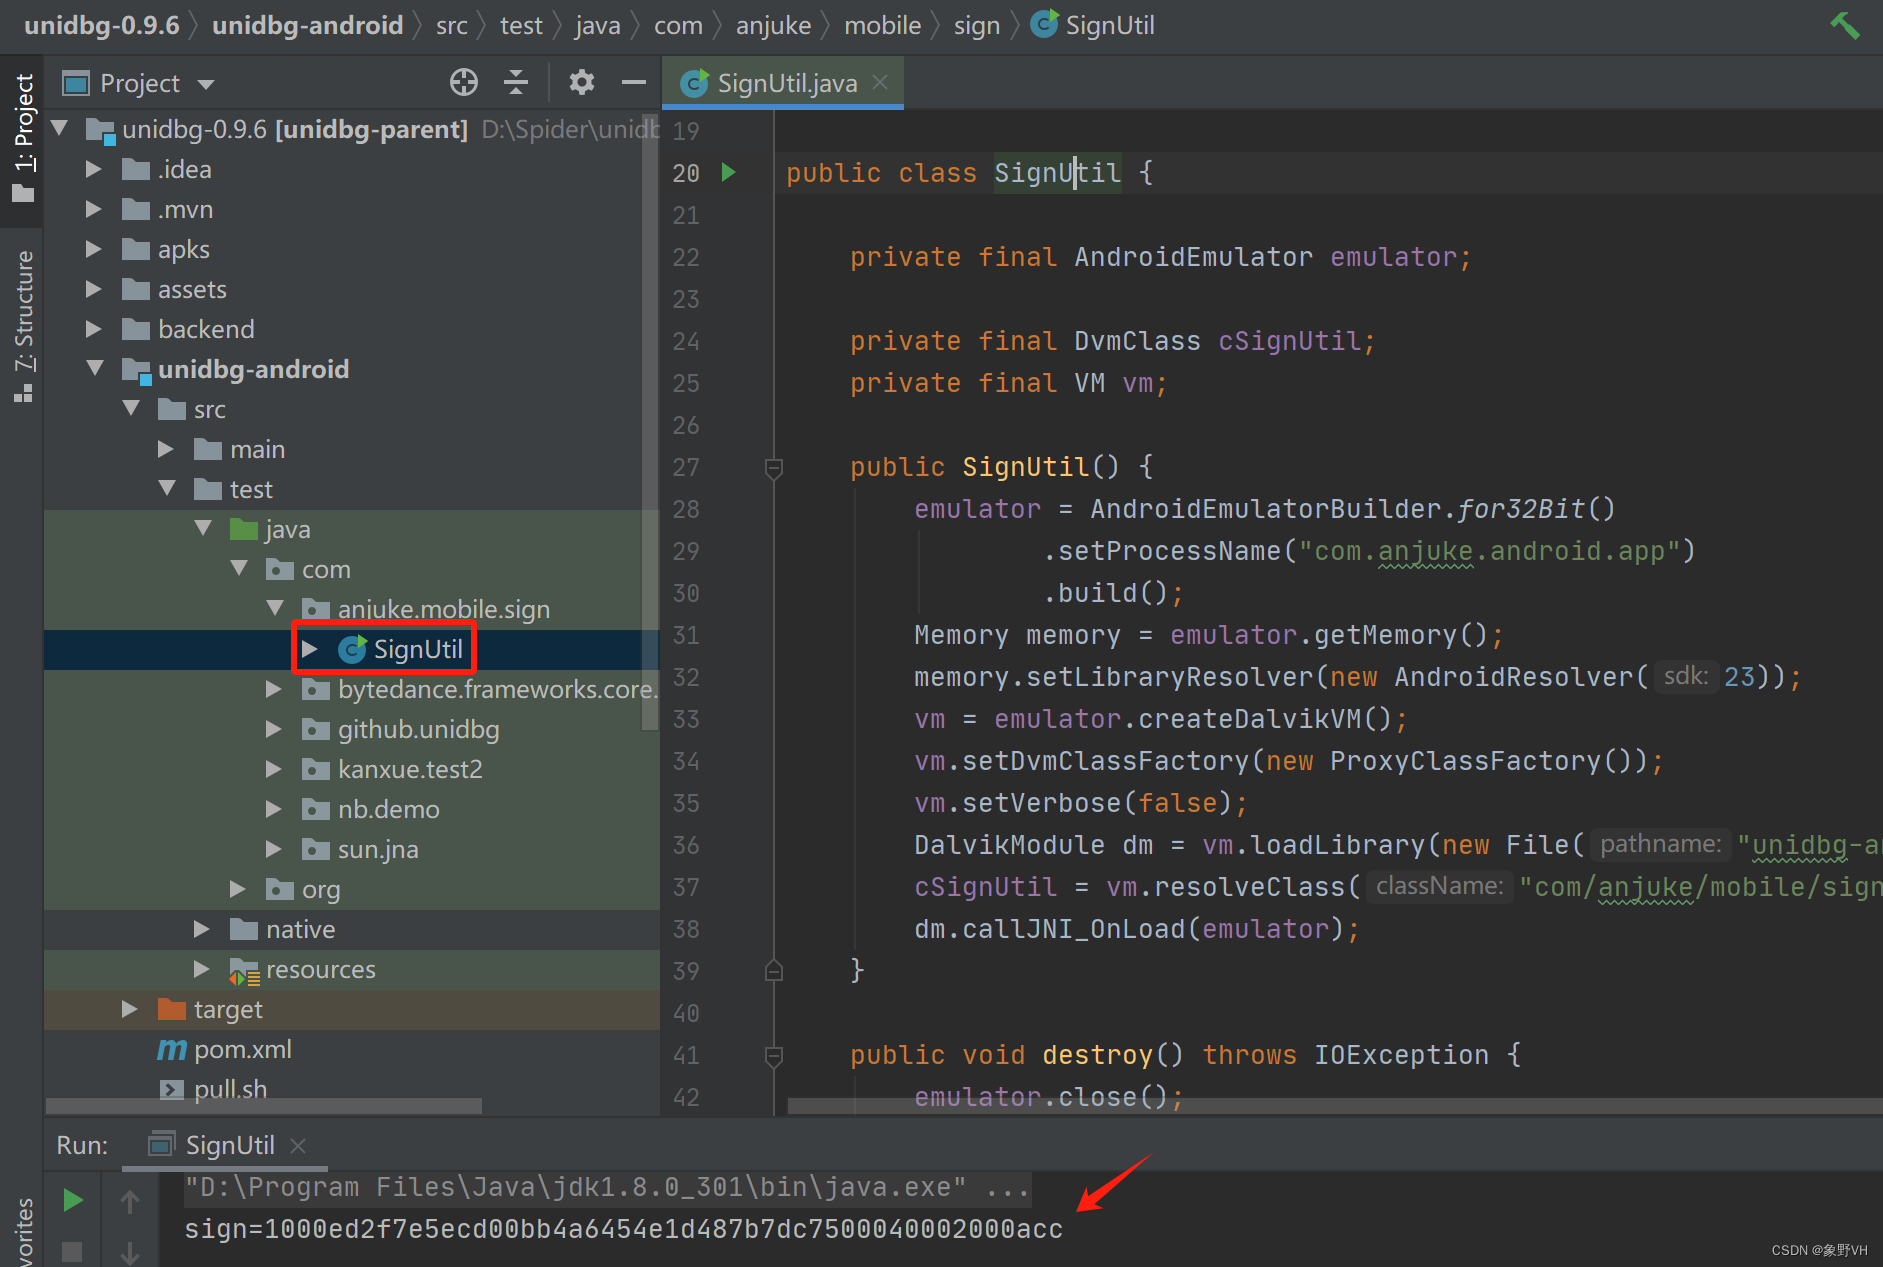
unidbg讲解V1
前言 unidbg是什么? unidbg是一个Java项目,可以帮助我们去模拟一个安卓或IOS设备,用于去执行so文件中的算法,从而不需要再去逆向他内部的算法。最终会产出一个jar包,可以被python进行调用。 如何使用unidbg? 下载github上开源的项目:https://github.com/zhkl0228/un…...

软设之敏捷方法
敏捷方法的总体目标是通过尽可能早地,持续地对有价值的软黏的交付,使客户满意 适用于:小步快跑的思想,适合小项目小团队 极限编程XP 4大价值观: 沟通 简单 反馈 勇气 5大原则 快速反馈 简单性假设 逐步修改…...

【设计模式深度剖析】【7】【行为型】【观察者模式】
👈️上一篇:中介者模式 设计模式-专栏👈️ 文章目录 观察者模式英文原文直译如何理解? 观察者模式的角色类图代码示例 观察者模式的应用观察者模式的优点观察者模式的缺点观察者模式的使用场景 观察者模式 观察者模式(Observer…...

列表的C++实
自动扩容 List item 扩容基数为2 可以设置扩容因子(这里我没有设置) 代码实现如下: // // Created by shaoxinHe on 2024/6/4. //#ifndef CPRIMER_MYLIST_H #define CPRIMER_MYLIST_H#include <stdexcept> #include <vector>namespace st…...

Chisel入门——在windows系统下部署Chisel环境并点亮FPGA小灯等实验
Chisel入门——在windows系统下部署Chisel环境并点亮FPGA小灯等实验 一、chisel简介二、vscode搭建scala开发环境2.1 安装Scala官方插件2.2 java版本(本人用的是jdk18)2.3 下载Scala Windows版本的二进制文件2.4 配置环境变量2.5 scala测试2.6 vscode运行…...

Python和C++赋值共享内存、Python函数传址传值、一些其他的遇到的bug
1、Numpy共享内存的情况: array1 np.array([1, 2, 3]) array2 array1 array2[0] 0 # array1也会跟着改变,就地操作 array2 array2 * 2 # array2不会跟着改变,属于非就地操作,会创建一个新的地址给array2array2 array1…...
深度解析ONLYOFFICE协作空间2.5版本新功能
深度解析ONLYOFFICE协作空间2.5版本新功能 上个月,4月份,ONLYOFFICE协作空间推出了V2.5版本,丰富了一些很实用的新功能,之前已经有文章介绍过了: ONLYOFFICE 协作空间 2.5 现已发布https://blog.csdn.net/m0_6827469…...
Java I/O模型
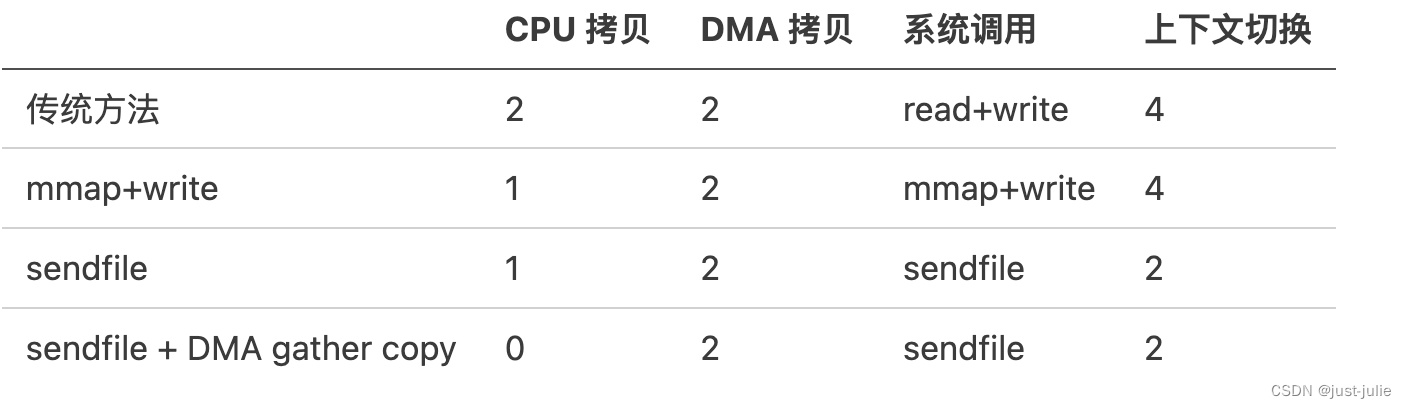
引言 根据冯.诺依曼结构,计算机结构分为5个部分:运算器、控制器、存储器、输入设备、输出设备。 输入设备和输出设备都属于外部设备。网卡、硬盘这种既可以属于输入设备,也可以属于输出设备。 从计算机结构的视角来看,I/O描述了…...

【简单介绍下Sass,什么是Sass?】
🎥博主:程序员不想YY啊 💫CSDN优质创作者,CSDN实力新星,CSDN博客专家 🤗点赞🎈收藏⭐再看💫养成习惯 ✨希望本文对您有所裨益,如有不足之处,欢迎在评论区提出…...

bat脚本—快速修改网络配置
一、bat编写前注意事项 windows桌面用文本文件打开把批命令输入在文本框中,保存采用ANSI编码,后缀用.bat 可参考博客——bat脚本简介学习原理以及具体创建方式 (文件扩展名位置) 语法准确性:严格遵循 BAT 脚本的语…...

node.js漏洞——
一.什么是node.js 简单的说 Node.js 就是运行在服务端的 JavaScript。 Node.js 是一个基于 Chrome JavaScript 运行时建立的一个平台。 Node.js 是一个事件驱动 I/O 服务端 JavaScript 环境,基于 Google 的 V8 引擎,V8 引擎执行 Javascript 的速度非常…...

Qt多线程之moveToThread()函数
文章目录 一、moveToThread()执行后,当前代码线程没有改变。二、对象执行moveToThread()后,哪些成员加入了子线程1、创建对象时不指定父对象2、对属性对象使用moveToThread加入子线程作用域3、将属性对象的创建放到子线程中执行 三、C内存模型 在使用“继…...
【WEB前端2024】智体OS:poplang编程控制成本小千元的长续航robot机器人底盘(开源)
【WEB前端2024】智体OS:poplang编程控制成本小千元的长续航robot机器人底盘(开源) 前言:dtns.network是一款主要由JavaScript编写的智体世界引擎(内嵌了three.js编辑器的定制版-支持以第一视角游览3D场馆)…...

动态规划法学习
当然,让我们用更生活化的语言和一个实际的例子来解释动态规划,以及如何在实践中应用它。 动态规划通俗理解 想象一下,你是个水果摊老板,每天要决定订购多少苹果,目标是最大化利润。但苹果的价格每天波动,…...

前端技术回顾系列 10|TS 泛型在类和接口中的应用
在微信中阅读,关注公众号:CodeFit。 创作不易,如果你觉得这篇文章对您有帮助,请不要忘了 点赞、分享 和 关注 我的公众号:CodeFit,为我的持续创作提供动力。 上文回顾:约束泛型(Generic Constraints) 上一篇文章我们回顾了 泛型 在 TypeScript 中的高级用法 —— 泛型…...

AI Agent在智能风控中的实战:多智能体欺诈检测与预警
AI Agent在智能风控中的实战:多智能体欺诈检测与预警 你有没有过明明是正常交易却被银行冻结账户的糟糕体验?或是听说过某电商平台上线新活动首日就被黑产团伙薅走数千万补贴的新闻?随着黑产欺诈向团伙化、专业化、动态化演进,传统依赖规则引擎、单模型机器学习的风控体系已…...

四旋翼变形控制:RL与MPC在混合动力学中的对比
1. 四旋翼变形控制的技术挑战与解决方案四旋翼变形控制(Quadrotor Morpho-Transition)是当前机器人领域最具挑战性的前沿技术之一。这项技术使机器人能够在空中完成形态变换,实现从飞行模式到地面模式的平滑切换。想象一下,一架四…...

从电磁炉到户外电源:拆解单相SVPWM如何让你的逆变器更安静、更高效
从电磁炉到户外电源:单相SVPWM如何实现静音与高效的双重突破当你深夜用电磁炉煮面时,是否曾被突然的蜂鸣声吓一跳?或是发现户外电源给设备充电时,散热风扇的噪音盖过了山林鸟鸣?这些常见问题背后,隐藏着一个…...

2026 西安 AI 问答曝光搭建技术解析:GEO 知识图谱 + 深度测评
随着大语言模型技术的快速普及,AI 搜索已经成为用户获取企业信息、商家服务的核心入口。根据中国互联网信息中心 2026 年发布的《中国人工智能搜索发展报告》显示,2025 年国内 AI 搜索用户规模突破 8.2 亿,日均搜索请求超过 20 亿次ÿ…...

WPF虚拟桌宠组件:可嵌入、高性能、工程化UI生命体
1. 这不是“桌面宠物”,而是一个可嵌入的WPF UI组件化生命体你可能在Windows XP时代见过那只晃着尾巴、偶尔打哈欠的3D小猫,也可能在Win10系统托盘里点开过一个会眨眼的像素狐狸——但那些是独立进程、是系统级小工具、是“看一眼就关掉”的轻量娱乐。而…...

百度深度学习研究院的“叛将“,带着一颗芯片改变了中国智能驾驶——地平线余凯,从ImageNet冠军到征程出货1000万
大家好,我是写代码的篮球球痴。这篇文章跟我自己有点关系——我开的是理想汽车。理想的智驾系统 AD Pro,搭载的就是地平线征程 5 芯片。2026 年 1 月理想 AD Pro 4.0 推送,基于单颗征程 6M 实现了城市 NOA——这是行业里第一个用单颗 128TOPS…...

3PEAK思瑞浦 TPA6531-S5TR SOT23-5 运算放大器
特性 供电电压:1.75V至5.5V 偏移电压:1.5mV(最大值) 最大可调工作频率:300kHz,斜率:0.15V/us 轨到轨输入和输出 0.1赫兹至10赫兹电压噪声:1伏峰值 开关电源时无显著输出抖动 低功耗:每通道最大25安培 工作温度范围:-40C至125C...

Windows 11终极优化指南:一键清理系统,释放51%性能潜力
Windows 11终极优化指南:一键清理系统,释放51%性能潜力 【免费下载链接】Win11Debloat A simple, lightweight PowerShell script that allows you to remove pre-installed apps, disable telemetry, as well as perform various other changes to decl…...

3大核心价值:Python通达信数据接口MOOTDX的完整应用指南
3大核心价值:Python通达信数据接口MOOTDX的完整应用指南 【免费下载链接】mootdx 通达信数据读取的一个简便使用封装 项目地址: https://gitcode.com/GitHub_Trending/mo/mootdx MOOTDX作为一款优秀的Python通达信数据接口封装库,为开发者提供了免…...

Wand-Enhancer:完全免费解锁WeMod专业版功能的终极指南
Wand-Enhancer:完全免费解锁WeMod专业版功能的终极指南 【免费下载链接】Wand-Enhancer Advanced UX and interoperability extension for Wand (WeMod) app 项目地址: https://gitcode.com/gh_mirrors/we/Wand-Enhancer 还在为WeMod专业版的高昂订阅费用而烦…...