NeRF从入门到放弃5: Neurad代码实现细节
Talk is cheap, show me the code。
CNN Decoder
如patch设置为32x32,patch_scale设置为3,则先在原图上采样96x96大小的像素块,然后每隔三个取一个像素,降采样成32x32的块。
用这32x32个像素render feature,再经过CNN反卷积预测出96x96的像素,与真值对比。
def _patches_from_centers(self,image: torch.Tensor,patch_center_indices: torch.Tensor,rgb_size: int,device: Union[torch.device, str] = "cpu",
):"""Convert patch center coordinates to the full set of ray indices and image patches."""offsets = torch.arange(-(rgb_size // 2), (rgb_size // 2) + rgb_size % 2, device=device)zeros = offsets.new_zeros((rgb_size, rgb_size))relative_indices = torch.stack((zeros, *torch.meshgrid(offsets, offsets, indexing="ij")), dim=-1)[None]  # 1xKxKx3,原图采样大小rgb_indices = patch_center_indices[:, None, None] + relative_indices  # NxKxKx3ray_indices = rgb_indices[:, self.patch_scale // 2 :: self.patch_scale, self.patch_scale // 2 :: self.patch_scale]  # NxKfxKfx3,降采样ray_indices = ray_indices.reshape(-1, 3)  # (N*Kf*Kf)x3img_patches = image[rgb_indices[..., 0], rgb_indices[..., 1], rgb_indices[..., 2]]return ray_indices, img_patches
相机位姿优化
参考nerfstudio/cameras/camera_optimizers.py
每迭代一次优化一次
- 初始化
self.pose_adjustment = torch.nn.Parameter(torch.zeros((num_cameras, 6), device=device)) # Nx6,前3维表示平移,后三维表示后3维表示切向量,再通过exp_map_SO3xR3,把6维变量映射为位姿和位移变量。相当于优化的是每个相机的标定参数
- 计算位姿偏移量
def forward(self,indices: Int[Tensor, "camera_indices"],) -> Float[Tensor, "camera_indices 3 4"]:correction_matrices = exp_map_SO3xR3(self._get_pose_adjustment()[indices, :])- 应用到相机的原始位姿上
def apply_to_raybundle(self, raybundle: RayBundle) -> None:"""Apply the pose correction to the raybundle"""if self.config.mode != "off":correction_matrices = self(raybundle.camera_indices.squeeze()) # type: ignoreraybundle.origins = raybundle.origins + correction_matrices[:, :3, 3]raybundle.directions = (torch.bmm(correction_matrices[:, :3, :3], raybundle.directions[..., None]).squeeze().to(raybundle.origins))
- 可学习的6维向量如何转成旋转矩阵
# nerfstudio/cameras/lie_groups.py
# We make an exception on snake case conventions because SO3 != so3.
def exp_map_SO3xR3(tangent_vector: Float[Tensor, "b 6"]) -> Float[Tensor, "b 3 4"]:"""Compute the exponential map of the direct product group `SO(3) x R^3`.This can be used for learning pose deltas on SE(3), and is generally faster than `exp_map_SE3`.Args:tangent_vector: Tangent vector; length-3 translations, followed by an `so(3)` tangent vector.Returns:[R|t] transformation matrices."""# code for SO3 map grabbed from pytorch3d and stripped down to bare-boneslog_rot = tangent_vector[:, 3:]nrms = (log_rot * log_rot).sum(1)rot_angles = torch.clamp(nrms, 1e-4).sqrt()rot_angles_inv = 1.0 / rot_anglesfac1 = rot_angles_inv * rot_angles.sin()fac2 = rot_angles_inv * rot_angles_inv * (1.0 - rot_angles.cos())skews = torch.zeros((log_rot.shape[0], 3, 3), dtype=log_rot.dtype, device=log_rot.device)skews[:, 0, 1] = -log_rot[:, 2]skews[:, 0, 2] = log_rot[:, 1]skews[:, 1, 0] = log_rot[:, 2]skews[:, 1, 2] = -log_rot[:, 0]skews[:, 2, 0] = -log_rot[:, 1]skews[:, 2, 1] = log_rot[:, 0]skews_square = torch.bmm(skews, skews)ret = torch.zeros(tangent_vector.shape[0], 3, 4, dtype=tangent_vector.dtype, device=tangent_vector.device)ret[:, :3, :3] = (fac1[:, None, None] * skews+ fac2[:, None, None] * skews_square+ torch.eye(3, dtype=log_rot.dtype, device=log_rot.device)[None])# Compute the translationret[:, :3, 3] = tangent_vector[:, :3]return ret
Apperance embedding
就是简单的使用torch.nn.Embedding(num_embeds, self.config.appearance_dim)
# Appearance embedding settings
# num_sensor指的是相机个数,如果配置temporal,则每一帧都有单独的embedding
if self.config.use_temporal_appearance:self._num_embeds_per_sensor = math.ceil(self._duration * self.config.temporal_appearance_freq)num_embeds = num_sensors * self._num_embeds_per_sensor
else:num_embeds = num_sensors# num_embeds=6,self.config.appearance_dim=16,表示6个相机,每个相机有16维的Embedding特征
self.appearance_embedding = torch.nn.Embedding(num_embeds, self.config.appearance_dim)def _get_appearance_embedding(self, ray_bundle, features):sensor_idx = ray_bundle.metadata.get("sensor_idxs")if sensor_idx is None:assert not self.training, "Sensor sensor_idx must be present in metadata during training"sensor_idx = torch.full_like(features[..., :1], self.fallback_sensor_idx.value, dtype=torch.long)if self.config.use_temporal_appearance:time_idx = ray_bundle.times / self._duration * (embd_per_sensor := self._num_embeds_per_sensor)before_idx = time_idx.floor().clamp(0, embd_per_sensor - 1)after_idx = (before_idx + 1).clamp(0, embd_per_sensor - 1)ratio = time_idx - before_idx# unwrap to true embedding indices, which also account for the sensor index, not just the time indexbefore_idx, after_idx = (x + sensor_idx * embd_per_sensor for x in (before_idx, after_idx))before_embed = self.appearance_embedding(before_idx.squeeze(-1).long())after_embed = self.appearance_embedding(after_idx.squeeze(-1).long())embed = before_embed * (1 - ratio) + after_embed * ratioelse:embed = self.appearance_embedding(sensor_idx.squeeze(-1))return embed
lidar建模和采样
lidar发射射线和camer类似,只需要根据世界坐标系下lidar原点的坐标和点云的坐标,就能确定一条射线了,沿这条射线采样点,真值是这条射线上真正扫描到的点。
采样时,根据每次迭代设置的采样点数N如16384,平均到每帧的每个点上。
采样方式是把全部帧的点云concate起来,每个点有个全局的序号和帧的idx,假设总点数为100万,采样时在0-100万之间随机生成N个随机数。
def get_lidar_batch_and_ray_bundle(self):if not len(self.lidar_dataset.lidars):return None, Nonebatch = self.point_sampler.sample(self.cached_points)ray_indices = batch.pop("indices") # Nx2, 0: lidar index, 1: point index,共采样16384个点,每帧采样点数一样ray_bundle: RayBundle = self.lidar_ray_generator(ray_indices, points=batch["lidar"]) #把所有的点都concate起来了return batch, ray_bundle # batch存储lidar原始点,ray_bundle存储采样的方向,原点信息
另外,pixel_area的作用没太看懂,有点像是MipNerf里面的用锥形体界面去积分,而不是直接的射线?
dx = self.horizontal_beam_divergence[lidar_indices.squeeze(-1)] # ("num_rays":...,)dy = self.vertical_beam_divergence[lidar_indices.squeeze(-1)] # ("num_rays":...,)pixel_area = dx * dy # ("num_rays":..., 1)
sdf实现
如果使用sdf,直接根据下面公式预测出不透明度α;否则便是先预测出密度density,再根据density积分得到不透明度。
因此两种render weight的方式是不同的。
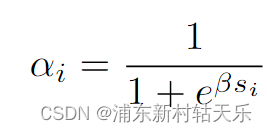
if self.config.use_sdf:signed_distance = geo_out  # 直接把mlp的输出当作signed distanceoutputs[FieldHeadNames.SDF] = signed_distanceoutputs[FieldHeadNames.ALPHA] = self.sdf_to_density(signed_distance)
else:outputs[FieldHeadNames.DENSITY] = trunc_exp(geo_out) # 调用了torch.exp(), 为什么不能直接用geo_out作为density?有两个原因:1.因为density的物理意义是大于0的,geo_out不保证大于0  2. 网络输出的值可能非常小,使用epx放大,可以保持数值稳定性self.sdf_to_density = SigmoidDensity(self.config.sdf_beta, learnable_beta=self.config.learnable_beta)
这个名字应该叫SigmoidAlpha,最后输出的被当做α,不是density了
class SigmoidDensity(nn.Module):"""Learnable sigmoid density"""def __init__(self, init_val, beta_min=0.0001, learnable_beta=False):super().__init__()self.register_buffer("beta_min", torch.tensor(beta_min))self.register_parameter("beta", nn.Parameter(init_val * torch.ones(1), requires_grad=learnable_beta))def forward(self, sdf: Tensor, beta: Union[Tensor, None] = None) -> Tensor:"""convert sdf value to density value with beta, if beta is missing, then use learable beta"""if beta is None:beta = self.get_beta()# negtive sdf will have large densityreturn torch.sigmoid(-sdf * beta) #这里就是上面的公式,这里叫α,和density不是一个东西def get_beta(self):"""return current beta value"""beta = self.beta.abs() + self.beta_minreturn beta
render_weight_from_alpha()直接处理不透明度,而[render_weight_from_density()]则需要先从密度计算不透明度。
def _render_weights(self, outputs, ray_samples):value = outputs[FieldHeadNames.ALPHA if self.config.field.use_sdf else FieldHeadNames.DENSITY].squeeze(-1)if self.device.type in ("cpu", "mps"):# Note: for debugging on devices without cudaweights = torch.zeros_like(value) + 0.5elif self.config.field.use_sdf:weights, _ = nerfacc.render_weight_from_alpha(value)else:weights, _, _ = nerfacc.render_weight_from_density(t_ends=ray_samples.frustums.ends.squeeze(-1),t_starts=ray_samples.frustums.starts.squeeze(-1),sigmas=value,)return weights
相关文章:
NeRF从入门到放弃5: Neurad代码实现细节
Talk is cheap, show me the code。 CNN Decoder 如patch设置为32x32,patch_scale设置为3,则先在原图上采样96x96大小的像素块,然后每隔三个取一个像素,降采样成32x32的块。 用这32x32个像素render feature,再经过CNN反卷积预测…...
【雷丰阳-谷粒商城 】【分布式高级篇-微服务架构篇】【11】ElasticSearch
持续学习&持续更新中… 守破离 【雷丰阳-谷粒商城 】【分布式高级篇-微服务架构篇】【11】ElasticSearch 简介基本概念ElasticSearch概念-倒排索引安装基本命令Mapping-映射ElasticSearch7-去掉type概念Es-数组(数组装着Object)的扁平化处理ik 分词…...

Pip换源详解
Pip换源是指将pip(Python的包管理工具)的默认源更改为其他源。以下是关于Pip换源的详细说明: 一、Pip换源的原因 访问被阻止的源:在某些地区或网络环境下,直接访问官方的Python Package Index (PyPI) 可能受到限制或…...

【Docker】——安装镜像和创建容器,详解镜像和Dockerfile
前言 在此记录一下docker的镜像和容器的相关注意事项 前提条件:已安装Docker、显卡驱动等基础配置 1. 安装镜像 网上有太多的教程,但是都没说如何下载官方的镜像,在这里记录一下,使用docker安装官方的镜像 Docker Hub的官方链…...
利用LinkedHashMap实现一个LRU缓存
一、什么是 LRU LRU是 Least Recently Used 的缩写,即最近最少使用,是一种常用的页面置换算法,选择最近最久未使用的页面予以淘汰。 简单的说就是,对于一组数据,例如:int[] a {1,2,3,4,5,6},…...

git-pull详解
NAME git-pull - Fetch from and integrate with another repository or a local branch SYNOPSIS git pull [<options>] [<repository> [<refspec>…]] DESCRIPTION Incorporates changes from a remote repository into the current branch. If the…...
、count(*) 与 count(列名) 的区别)
【SQL】count(1)、count(*) 与 count(列名) 的区别
在 SQL 中,COUNT 函数用于计算查询结果集中的行数。COUNT(1)、COUNT(*) 和 COUNT(列名) 都可以用来统计行数,但它们在实现细节和使用场景上有一些区别。以下是详细的解释: 1. COUNT(1) 定义: COUNT(1) 计算查询结果集中的行数。实现: 在执行…...

03-ES6新语法
1. ES6 函数 1.1 函数参数的扩展 1.1.1 默认参数 function fun(name,age17){console.log(name","age); } fn("张美丽",18); // "张美丽",18 fn("张美丽",""); // "张美丽" fn("张美丽"); // &…...

Linux中的文本编辑器vi与vim
摘要: 本文将深入探讨VI和VIM编辑器的基本概念、特点、使用方法以及它们在Linux环境中的重要性。通过对这两款强大的文本编辑器的详细分析,读者将能够更全面地理解它们的功能,并掌握如何有效地使用它们进行日常的文本编辑和处理任务。 引言&…...
)
MATLAB基础应用精讲-【数模应用】三因素方差(附R语言、MATLAB和python代码实现)
目录 几个高频面试题目 群体分布是否服从高斯分布? 数据是否不匹配? “误差”是否独立存在? 您是否真的想比较平均值? 是否存在三项因素? 这三项因素是否均属于“固定因素”,而非“随机因素”? 算法原理 EXCEL spss三因素方差分析步骤 一、spss三因素…...
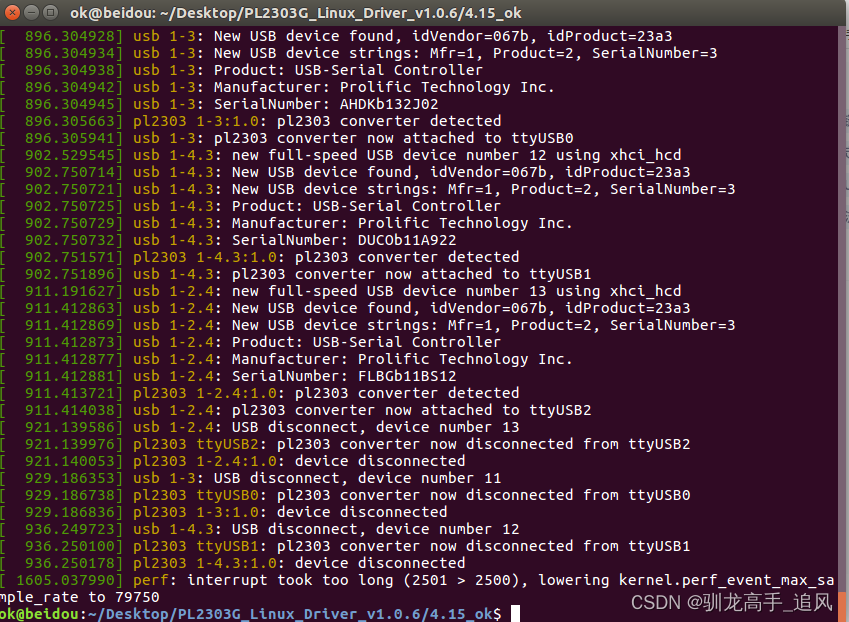
Linux ubuntu安装pl2303USB转串口驱动
文章目录 1.绿联PL2303串口驱动下载2.驱动安装3.验证方法 1.绿联PL2303串口驱动下载 下载地址:https://www.lulian.cn/download/16-cn.html 也可以直接通过CSDN下载:https://download.csdn.net/download/Axugo/89447539 2.驱动安装 下载后解压找到Lin…...
关于使用命令行打开wps word文件
前言 在学习python-docx时,想在完成运行时使用命令行打开生成的docx文件。 总结 在经过尝试后,得出以下代码: commandrstart "C:\Users\86136\AppData\Local\Kingsoft\WPS Office\12.1.0.16929\office6\wps.exe" "./result…...
将Vite添加到您现有的Web应用程序
Vite(发音为“veet”)是一个新的JavaScript绑定器。它包括电池,几乎不需要任何配置即可使用,并包括大量配置选项。哦——而且速度很快。速度快得令人难以置信。 本文将介绍将现有项目转换为Vite的过程。我们将介绍别名、填充webp…...

Apache Kafka与Spring整合应用详解
引言 Apache Kafka是一种高吞吐量的分布式消息系统,广泛应用于实时数据处理、日志聚合和事件驱动架构中。Spring作为Java开发的主流框架,通过Spring Kafka项目提供了对Kafka的集成支持。本文将深入探讨如何使用Spring Kafka整合Apache Kafka,…...
SpringBoot配置第三方专业缓存技术Redis
Redis缓存技术 Redis(Remote Dictionary Server)是一个开源的内存中数据结构存储系统,通常用作数据库、缓存和消息中间件。它支持多种数据结构,如字符串、哈希表、列表、集合、有序集合等,并提供了丰富的功能和灵活的…...
以及使用)
javascript的toFixed()以及使用
toFixed() 是 JavaScript 中数字类型(Number)的一个方法,用来将数字转换为指定小数位数的字符串表示形式。 使用方式和示例: let num 123.45678; let fixedNum num.toFixed(2); console.log(fixedNum); // 输出 "123.46&qu…...

软件功能测试和性能测试包括哪些测试内容?又有什么联系和区别?
软件功能测试和性能测试是保证软件质量和稳定性的重要手,无论是验证软件的功能正确性,还是评估软件在负载下的性能表现,这些测试都是必不可少的。 一、软件功能测试 软件功能测试是指对软件的各项功能进行验证和确认,确保软件…...
从工具产品体验对比spark、hadoop、flink
作为一名大数据开发,从工具产品的角度,对比一下大数据工具最常使用的框架spark、hadoop和flink。工具无关好坏,但人的喜欢有偏好。 目录 评价标准1 效率2 用户体验分析从用户的维度来看从市场的维度来看从产品的维度来看 3 用户体验的基本原则…...

【软件设计】详细设计说明书(word原件,项目直接套用)
软件详细设计说明书 1.系统总体设计 2.性能设计 3.系统功能模块详细设计 4.数据库设计 5.接口设计 6.系统出错处理设计 7.系统处理规定 软件全套资料:本文末个人名片直接获取或者进主页。...
优缺点,以及适用场景)
java本地缓存(map,Guava,echcache,caffeine)优缺点,以及适用场景
前言 在高并发系统环境下,jvm本地缓存扮演着至关重要的角色,合理的应用能够使系统响应迅速,提高用户体验感,而分布式缓存redis则存在着网络io,以及流量消耗问题,需要和本地缓存搭配使用,才能使…...

MATLAB许可排队严重?研发软件许可共享,不增购满足需求
我去年带着团队做自动驾驶算法验证,结果MATLAB许可证天天排队。每天早上团队成员像抢盲盒一样点开MATLAB,结果发现根本抢不到。我们项目组三人全用同一个许可证,项目延期三个月,研发效率直线下滑。这种乱象真的该结束了。问题本质…...

蓝桥杯备赛:那些教科书里没写的“潜规则”与实战优化
1. 那些容易被忽视的编译细节 参加过蓝桥杯的同学都知道,比赛中最让人崩溃的不是题目有多难,而是明明本地运行好好的代码,提交后却莫名其妙地编译失败。这些坑我在第一次参赛时几乎全踩过,现在回想起来都是血泪教训。 首先是main函…...

利用coze使用无代码平台搭建图片识别机器人
利用coze使用无代码平台搭建图片识别机器人 无代码平台允许用户通过可视化界面快速创建聊天机器人,无需编程基础。例如,扣子(Coze) 是一个由字节跳动开发的智能体应用开发平台,支持集成多种大语言模型(如 …...

WinFlexBison深度解析:Windows平台编译工具链的完整解决方案
WinFlexBison深度解析:Windows平台编译工具链的完整解决方案 【免费下载链接】winflexbison Main winflexbision repository 项目地址: https://gitcode.com/gh_mirrors/wi/winflexbison 在Windows平台上开发编译器、解释器或复杂文本解析器时,开…...

终极HiveWE魔兽地图编辑器:如何用现代化工具打造专业级游戏地图
终极HiveWE魔兽地图编辑器:如何用现代化工具打造专业级游戏地图 【免费下载链接】HiveWE A Warcraft III world editor. 项目地址: https://gitcode.com/gh_mirrors/hi/HiveWE 还在为传统魔兽争霸III地图编辑器缓慢的加载速度和繁琐的操作而烦恼吗࿱…...

告别Web Client:当ESXi主机SSH连不上时,我用这10条esxcli命令完成了紧急修复
告别Web Client:当ESXi主机SSH连不上时,我用这10条esxcli命令完成了紧急修复 凌晨三点,数据中心告警铃声刺破夜空。一台承载着核心业务的ESXi主机突然失联,vSphere Client和Web界面均无法访问,SSH连接也毫无响应。面对…...
)
遥感图像处理实战:用eCognition多尺度分割搞定地物分类(附样本点与特征提取全流程)
遥感图像智能解译实战:eCognition多尺度分割与地物分类全流程解析 清晨的阳光透过窗帘缝隙洒在桌面上,我打开最新接收的卫星影像——这是一片混合了城市建筑、绿地和农田的复杂区域。作为遥感分析师,我们每天面对的都是这样充满信息量的图像&…...

B站缓存视频转换全攻略:3分钟学会m4s转MP4无损转换
B站缓存视频转换全攻略:3分钟学会m4s转MP4无损转换 【免费下载链接】m4s-converter 一个跨平台小工具,将bilibili缓存的m4s格式音视频文件合并成mp4 项目地址: https://gitcode.com/gh_mirrors/m4/m4s-converter 你是否曾遇到过这样的情况&#x…...

企业内如何通过Taotoken实现大模型API的统一管理与审计
🚀 告别海外账号与网络限制!稳定直连全球优质大模型,限时半价接入中。 👉 点击领取海量免费额度 企业内如何通过Taotoken实现大模型API的统一管理与审计 对于需要将大模型能力集成到内部系统的企业而言,直接让各个团队…...
)
数据结构第7章图:课后习题全解析(选择题+综合题+算法设计题,含DFS/BFS遍历、拓扑排序、最小生成树)
第7章 图 课后习题一、单项选择题1. 设无向图的顶点个数为 n,则该图最多有(B )条边。A. n−1 B. n(n−1)/2 C. n(n1)/2 D. n(n−1)解析: 无向完全图边数最多,每对顶点之间有一条边,总边数为 n(n−1)/2。2. …...