SpringBoot学习04-[定制SpringMVC]
定制SpringMVC
- 定制SpringMvc的自动配置
- 定制springmvc-configurePathMatch配置
- 定制SpringMVC-拦截器Interceptor
- 定制SpringMVC-CORS配置
- 全局cors配置
- 针对某个方法加跨域解决
- WebMvcConfigurer原理
- 定制SpringMVC-JSON
- JSON开发
- jackson的使用
- 定制化json序列化和反序列化
- JSON国际化
- 添加国际化资源文件
- 配置messageResource设置国际化资源文件
- @Conditional
- 源码解读
- 配置国际化资源环境路径让MessageSourceAutoConfiguration 配置类生效
- 需要去解析请求头中的Accept-Language或者获取url参数中的?local=,来判断语言
- 源码解读
- 随意切换本地语言,进行缓存
- 通过messageResource获取国际化信息
- 在handler方法参数中加入Local参数,注入MessageSource 对象
- 使用自定义工具类
- 统一异常处理
- SpringBoot统一异常处理
- 源码解读-ErrorMvcAutoConfiguration配置类
- BasicErrorController
- errorHtml:怎么去定制它的返回页面?
- resolveErrorView源码解读
- 定制化页面
- error:看它是怎么返回json数据的,从而要定制自己的json数据
- SpringBoot定制浏览器请求和ajax请求,返回异常处理
- 自定义异常处理类(覆盖BasicErrorController)
定制SpringMvc的自动配置
SpringMvc的自动配置类:WebMvcAutoConfiguration
1、在大多数情况下,SpringBoot在自动配置中标记了很多@ConditionalOnMissingBean,我们只需要在自己的配置类中配置对应的bean,就可以覆盖原有的bean
定制springmvc-configurePathMatch配置
配置configurePathMatch的setUseTrailingSlashMatch
setUseTrailingSlashMatch:是否与 URL 匹配,而不考虑是否存在尾部斜杠。如果启用,映射到“users”的方法也与“users”匹配。默认值为 true。
- 自定义配置
@Configuration
public class CustomWebMvcConfig implements WebMvcConfigurer {/**** @param configurer*/@Overridepublic void configurePathMatch(PathMatchConfigurer configurer) {configurer.setUseTrailingSlashMatch(false);}
}
- 测试
此时访问:http://localhost:8080/person/14/,如果最后加上/ 则找不到
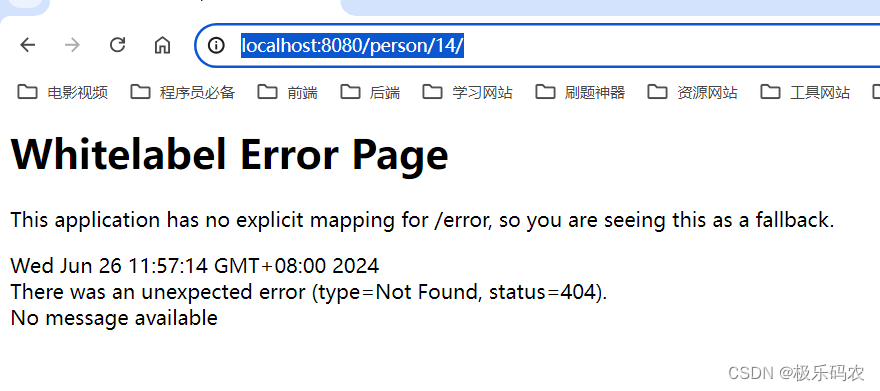
改为true,则可以找到

定制SpringMVC-拦截器Interceptor
自定义一个拦截器用来计算用户请求执行时间

preHandle:请求执行前,返回值设置为true,不然请求无法走下去
postHandle:请求执行后,执行的方法
- 自定义拦截器
public class CustormInterceptor implements HandlerInterceptor {LocalDateTime beginTime;Logger log=LoggerFactory.getLogger(CustormInterceptor.class);@Overridepublic boolean preHandle(HttpServletRequest request, HttpServletResponse response, Object handler) throws Exception {//开始时间beginTime = LocalDateTime.now();log.info("当前请求,{}+用户请求开始时间:{}",request.getRequestURI(),beginTime);return true;}@Overridepublic void postHandle(HttpServletRequest request, HttpServletResponse response, Object handler, ModelAndView modelAndView) throws Exception {//结束时间LocalDateTime endTime = LocalDateTime.now();//计算两个时间Duration between = Duration.between(beginTime, endTime);//获得相差毫秒long l = between.toMillis();log.info("当前请求,{}+用户请求时间:{}毫秒",request.getRequestURI(),l);}
}
- 在自定义配置中使用我们的自定义的拦截器
@Configuration
public class CustomWebMvcConfig implements WebMvcConfigurer {/**** @param configurer*/@Overridepublic void configurePathMatch(PathMatchConfigurer configurer) {configurer.setUseTrailingSlashMatch(true);}/*** 添加拦截器* @param registry*/@Overridepublic void addInterceptors(InterceptorRegistry registry) {registry.addInterceptor(new CustormInterceptor()) //添加拦截器.addPathPatterns("/**"); //拦截映射规则}
}
- 测试
可以看到控制台打印出了请求的开始时间和请求执行的耗时时间

定制SpringMVC-CORS配置
跨域

全局cors配置
@Overridepublic void addCorsMappings(CorsRegistry registry) {registry.addMapping("/**") //映射服务器中哪些http接口运行跨域访问.allowedOrigins("http://localhost:63343/") //配置哪些来源有权限跨域.allowedMethods("GET","POST","DELETE","PUT"); //允许访问的方法}
@Configuration
public class CustomWebMvcConfig implements WebMvcConfigurer {/**** @param configurer*/@Overridepublic void configurePathMatch(PathMatchConfigurer configurer) {configurer.setUseTrailingSlashMatch(true);}/*** 添加拦截器* @param registry*/@Overridepublic void addInterceptors(InterceptorRegistry registry) {registry.addInterceptor(new CustormInterceptor()) //添加拦截器.addPathPatterns("/**"); //拦截映射规则}@Overridepublic void addCorsMappings(CorsRegistry registry) {registry.addMapping("/**") //映射服务器中哪些http接口运行跨域访问.allowedOrigins("http://localhost:63343/") //配置哪些来源有权限跨域.allowedMethods("GET","POST","DELETE","PUT"); //允许访问的方法}
}
针对某个方法加跨域解决
添加@CrossOrigin注解
@GetMapping("/{id}")@ApiOperation("根据id获取用户")@CrossOriginpublic Result<Person> getPerson(@PathVariable("id") Integer id){Person person = personService.getPersoById(id);return new Result<>("200","查询成功",person);}
- 测试

WebMvcConfigurer原理
实现WebMvcConfigurer接口可以扩展MVC实现,又既保留SpringBoot的自动配置
1、在自动配置类WebMvcAutoConfiguration也有一个实现了WebMvcConfigurer接口的配置类WebMvcAutoConfigurationAdapter
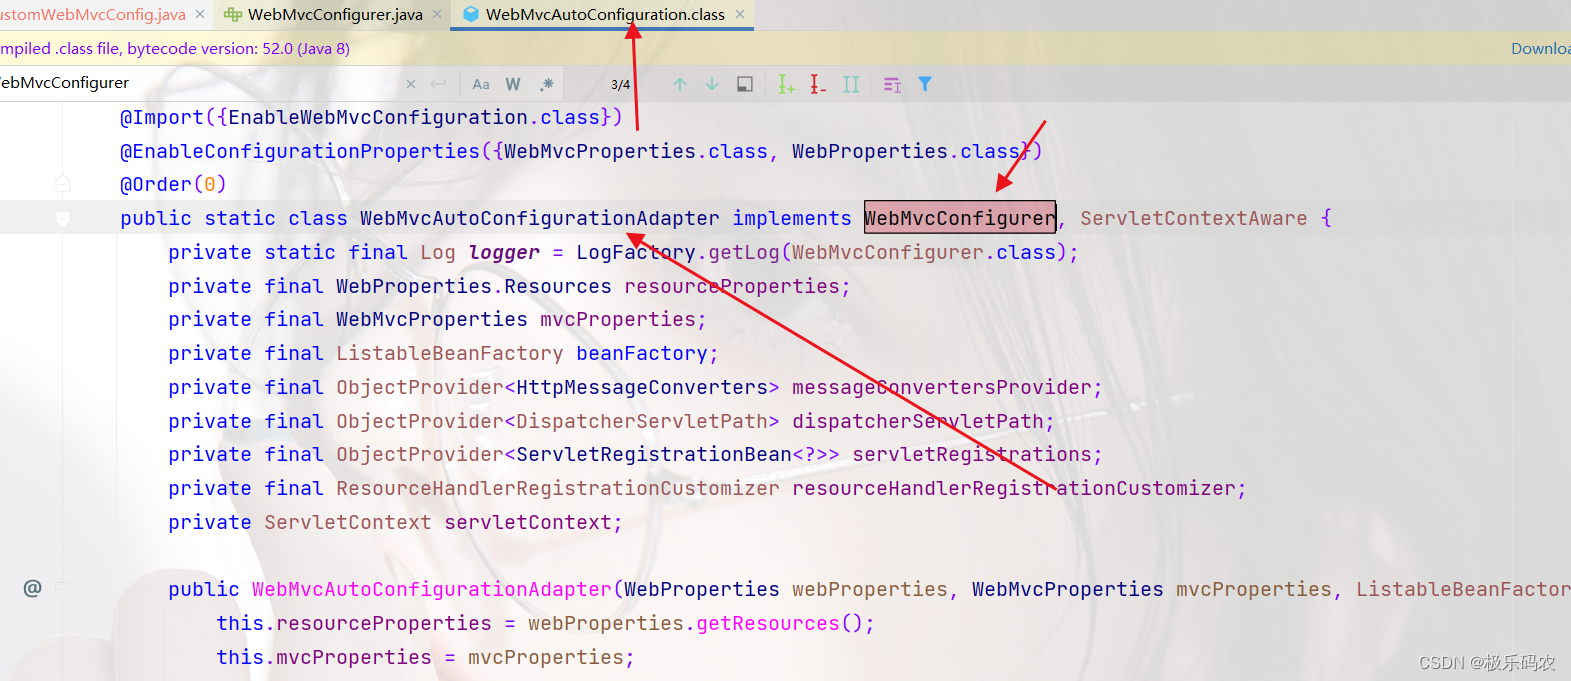
2、WebMvcAutoConfigurationAdapter也是通过重写了方法来自定义配置,帮助我们进行自动配置,我们只需定制(拦截器、视图控制器、CORS)等在开发中需要额外定制的功能。
3、导入了EnableWebMvcConfiguration
@Import({EnableWebMvcConfiguration.class})
4、EnableWebMvcConfiguration的父类上setConfigurers使用了@Autowired注解
- 它会去容器中将所有实现了WebMvcConfigurer接口的bean都自动注入进来,添加到configurers变量中
@Configuration(proxyBeanMethods = false)
public class DelegatingWebMvcConfiguration extends WebMvcConfigurationSupport {private final WebMvcConfigurerComposite configurers = new WebMvcConfigurerComposite();@Autowired(required = false)public void setConfigurers(List<WebMvcConfigurer> configurers) {if (!CollectionUtils.isEmpty(configurers)) {this.configurers.addWebMvcConfigurers(configurers);}}
- 添加到delegates委派器中
private final List<WebMvcConfigurer> delegates = new ArrayList<>();public void addWebMvcConfigurers(List<WebMvcConfigurer> configurers) {if (!CollectionUtils.isEmpty(configurers)) {this.delegates.addAll(configurers);}}
- 底层调用WebMvcConfigurer对应的方法时,就是去拿到之前添加到delegates中的 WebMvcConfigurer
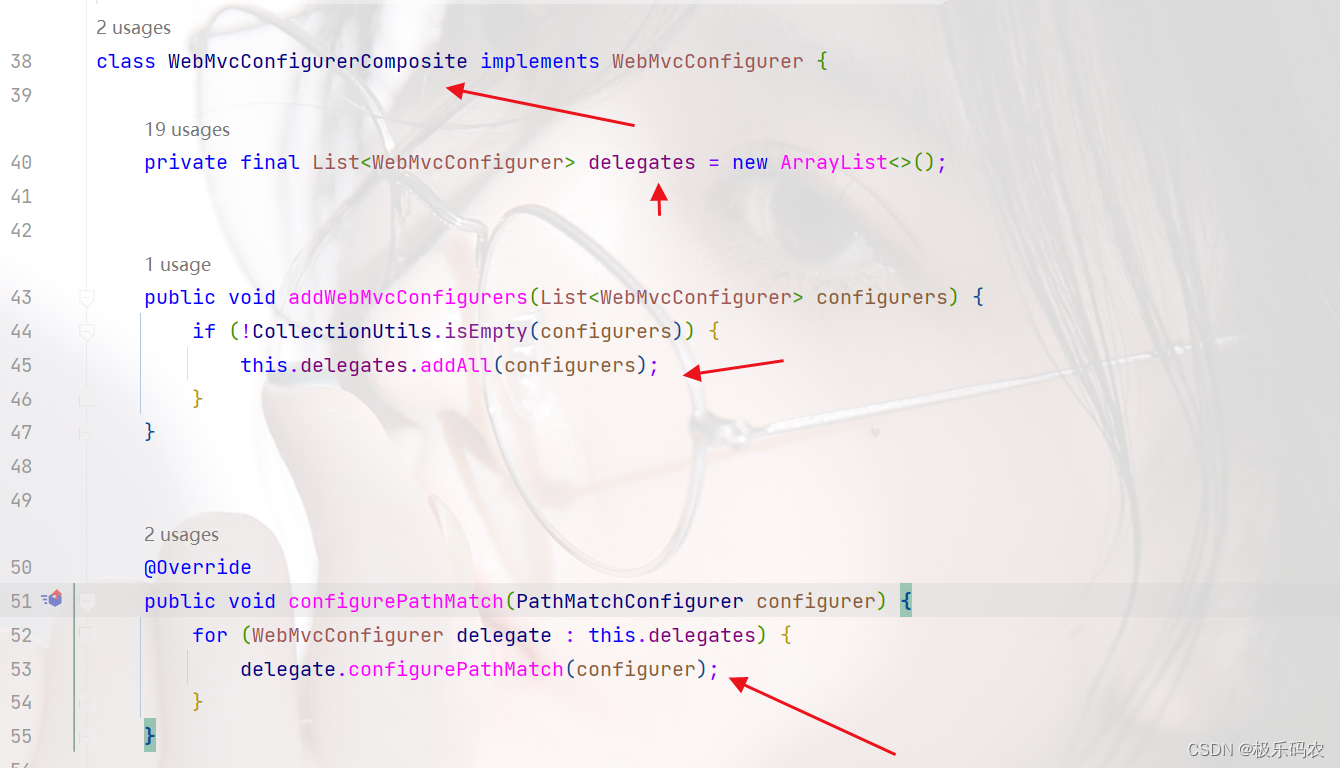
@Overridepublic void configurePathMatch(PathMatchConfigurer configurer) {for (WebMvcConfigurer delegate : this.delegates) {delegate.configurePathMatch(configurer);}}
- @EnableWebMvc
当自定义WebMvcConfigurer 添加了@EnableWebMvc就不会使用SpringMVC自动配置类的默认配置了,默认配置就失效了 - 为什么呢?原理
- 在@EnableWebMvc中导入了DelegatingWebMvcConfiguration.class

- DelegatingWebMvcConfiguration类又继承了WebMvcConfigurationSupport类
配置类继承某个类会把继承的这个类也装配进spring容器中所以WebMvcConfigurationSupport会被装配进spring容器中

- 我们在看WebMvcAutoConfiguration配置类(springMVC核心配置类)上有个条件注解@ConditionalOnMissingBean({WebMvcConfigurationSupport.class})
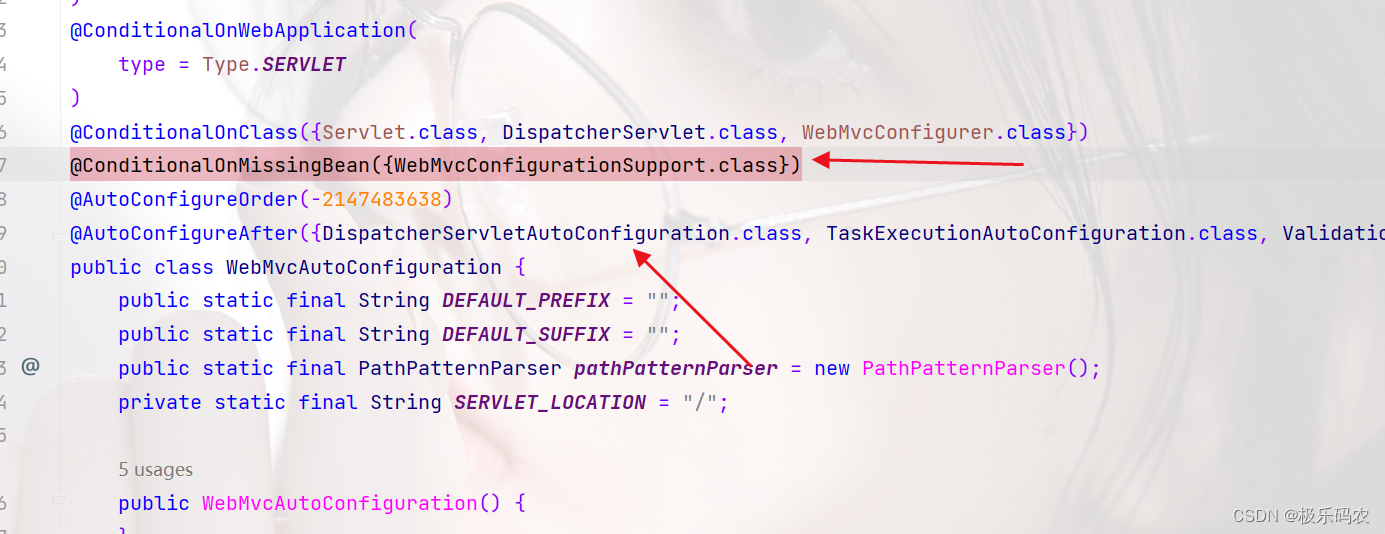
@ConditionalOnMissingBean({WebMvcConfigurationSupport.class}):如果容器中没有WebMvcConfigurationSupport. bean,该配置类才生效
复习:@ConditionalOnMissingBean(类.class):没有某个Bean的时候才会注册某个bean到spring容器中
定制SpringMVC-JSON
1、JSON开发
SpringBoot提供了与三个JSON映射库的集成
- Gson
- Jackson
- JSON-B
Jackson是SpringBoot的默认json库
2、国际化
3、统一异常处理
JSON开发
1、jackson的使用
2、根据自己的业务需求进行json的序列号和反序列化
jackson的使用
- @JsonIgnore
进行排除json序列化,将它标注在属性上 - @JsonFormat
数据库中birthday:date类型

实体类birthday:date类型

如果不加@JsonFormat输出为

@JsonFormat:进行日期格式化,添加在字段上
@ApiModelProperty("出生日期")@JsonFormat(pattern = "yyyy-MM-dd")private Date birthday;
测试

- @JsonInclude(JsonInclude.Include.NON_NULL)
字段不为空才包含在json中,为空就不包含
不设置的话,输出的json串字段为空
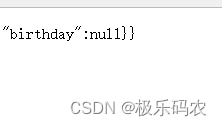
设置的话,就不进行输出,不显示
@ApiModelProperty("出生日期")@JsonFormat(pattern = "yyyy-MM-dd",locale = "zh")@JsonInclude(JsonInclude.Include.NON_NULL)private Date birthday;
- @JsonProperty
对字段属性名设置别名
@ApiModelProperty("姓名")@JsonProperty("u_name")private String name;

定制化json序列化和反序列化
SpringBoot还提供了@JsonComponent来根据自己的业务需求进行json的序列化和反序列化
@JsonComponent
public class CustomeJsonComponent {public static class Serializer extends JsonSerializer<Person>{@Overridepublic void serialize(Person person, JsonGenerator jsonGenerator, SerializerProvider serializerProvider) throws IOException {}}public static class DeSerializer extends JsonDeserializer<Person>{@Overridepublic Person deserialize(JsonParser jsonParser, DeserializationContext deserializationContext) throws IOException, JacksonException {return null;}}
}
SpringBoot还提供了JsonObjectSerializer和JsonObjectDeserializer基类,它们在序列对象时为标准JackJson版本提供了有用的替代方法。
- 序列化
@JsonComponent
public class CustomeJsonComponent {public static class Serializer extends JsonObjectSerializer<Person> {@Overrideprotected void serializeObject(Person value, JsonGenerator jgen, SerializerProvider provider) throws IOException {jgen.writeObjectField("id",value.getId());jgen.writeObjectField("uname","dgdg");//一次查不出完整的数据返回给前端,需要根据需求去做一些个性化调整//根据不同的权限给他返回不同的序列化数据}}public static class DeSerializer extends JsonObjectDeserializer<Person> {@Overrideprotected Person deserializeObject(JsonParser jsonParser, DeserializationContext context, ObjectCodec codec, JsonNode tree) throws IOException {return null;}}
}
可以看到输出是由我们自定义的json来进行输出

- 反序列化
@JsonComponent
public class CustomeJsonComponent {public static class Serializer extends JsonObjectSerializer<Person> {@Overrideprotected void serializeObject(Person value, JsonGenerator jgen, SerializerProvider provider) throws IOException {jgen.writeObjectField("id",value.getId());jgen.writeObjectField("uname","dgdg");//一次查不出完整的数据返回给前端,需要根据需求去做一些个性化调整//根据不同的权限给他返回不同的序列化数据}}public static class DeSerializer extends JsonObjectDeserializer<Person> {@Overrideprotected Person deserializeObject(JsonParser jsonParser, DeserializationContext context, ObjectCodec codec, JsonNode tree) throws IOException {Person person = new Person();person.setAge(tree.findValue("age").asInt());return person;}}
}
JSON国际化
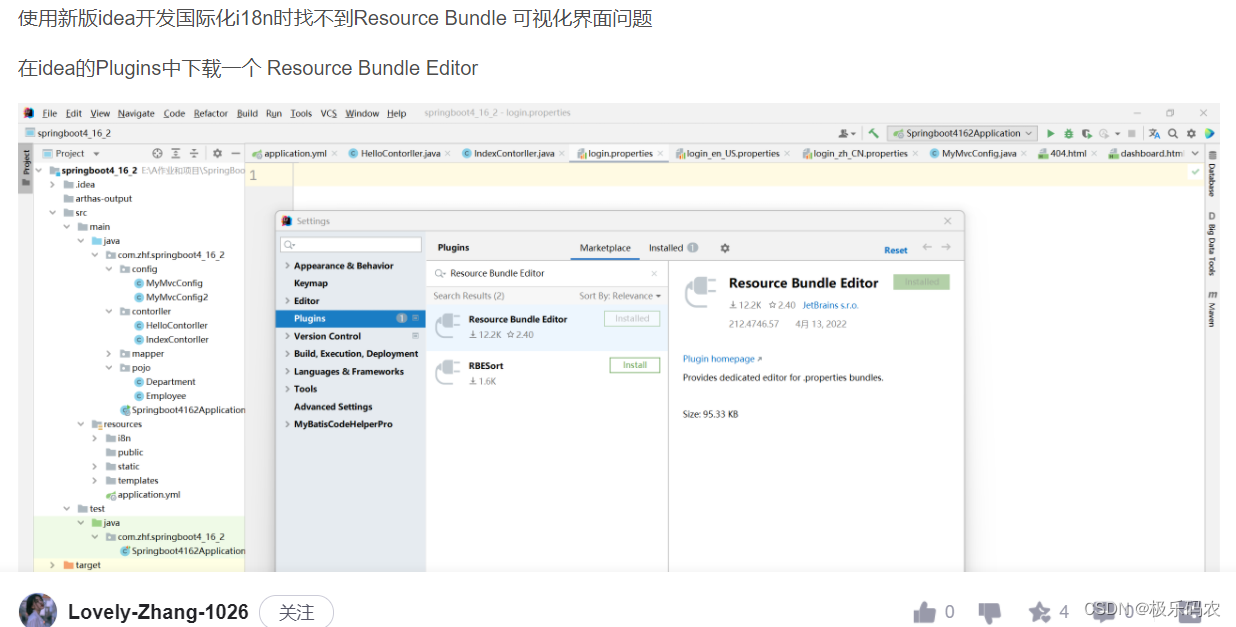
- 实现步骤
1、添加国际化资源文件
2、配置messageResource设置国际化资源文件
3、需要去解析请求头中的Accept-Language获取url参数中的?local= 来获取请求语言

3.1、随意切换本地语言进行缓存
4、通过messageResource获取国际化信息
添加国际化资源文件
在resources文件夹下新建i18n文件夹用了存放国际化资源文件

分别创建message.properties、message_en_US.properties文件和message_zh_CN.properties文件,名称是固定的(约定大于配置)
- 添加一个key person-query.success对统一返回result做国际化

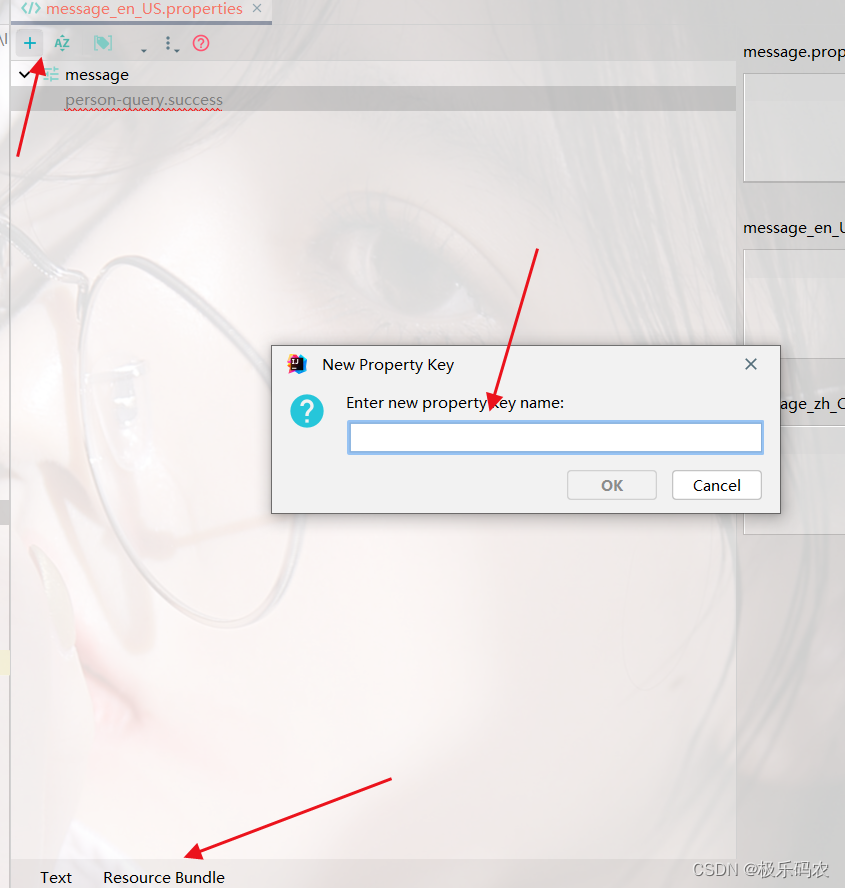

配置messageResource设置国际化资源文件
- 理解下面代码的前提是熟悉@Conditional注解
@Conditional
- 需要注册的bean
@Data
@Component
@Conditional(InjectTeacherCondition.class)
public class Teacher {private String name;private String job;
}
- 自定义条件
必须实现Condition 接口,并且重写matches方法,如果matches方法返回为true,则将teacher注册进spring容器中,返回为false则不注册到spring容器
public class InjectTeacherCondition implements Condition {public boolean matches(ConditionContext context, AnnotatedTypeMetadata metadata) {return false;}
}
源码解读
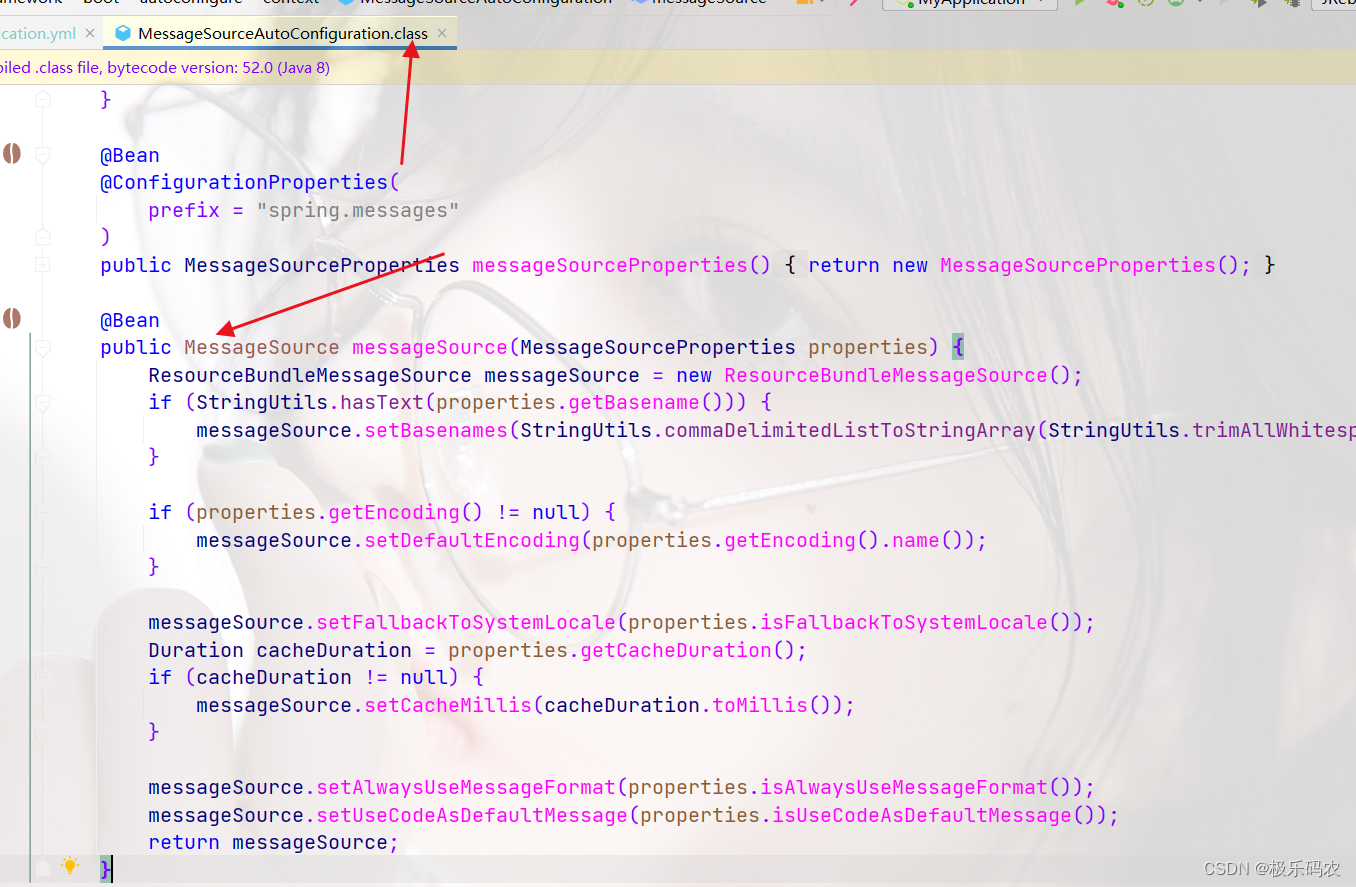
在springboot中提供了MessageSourceAutoConfiguration配置类,所以我们不需要去配置messageResource
@Configuration(proxyBeanMethods = false
)
//如何自己配置了@bean 名字叫messageSource的bean,就会用自定义的
@ConditionalOnMissingBean(name = {"messageSource"},search = SearchStrategy.CURRENT
)
@AutoConfigureOrder(Integer.MIN_VALUE)
//自定义条件匹配 会传入实现Condition接口的类ResourceBundleCondition,
//ResourceBundleCondition类会重写matches,自定义匹配规则,如果该方法返回为true,就匹配成功
@Conditional({ResourceBundleCondition.class})
@EnableConfigurationProperties
public class MessageSourceAutoConfiguration {
ResourceBundleCondition类会重写matches,自定义匹配规则,如果该方法返回为true,就匹配成功
public abstract class SpringBootCondition implements Condition {private final Log logger = LogFactory.getLog(getClass());@Overridepublic final boolean matches(ConditionContext context, AnnotatedTypeMetadata metadata) {String classOrMethodName = getClassOrMethodName(metadata);try {//getMatchOutcome:具体的匹配规则就在这个里面ConditionOutcome outcome = getMatchOutcome(context, metadata);logOutcome(classOrMethodName, outcome);recordEvaluation(context, classOrMethodName, outcome);return outcome.isMatch();}
- getMatchOutcome
- 只要在这个方法中将返回的ConditionOutcome .isMatch=true那就匹配成功了。
protected static class ResourceBundleCondition extends SpringBootCondition {private static ConcurrentReferenceHashMap<String, ConditionOutcome> cache = new ConcurrentReferenceHashMap<>();@Overridepublic ConditionOutcome getMatchOutcome(ConditionContext context, AnnotatedTypeMetadata metadata) {//获取配置文件中spring.message.basename,由于我们没有配置,默认值是:messageString basename = context.getEnvironment().getProperty("spring.messages.basename", "messages");ConditionOutcome outcome = cache.get(basename);if (outcome == null) {outcome = getMatchOutcomeForBasename(context, basename);cache.put(basename, outcome);}return outcome;}
- getMatchOutcomeForBasename
private ConditionOutcome getMatchOutcomeForBasename(ConditionContext context, String basename) {ConditionMessage.Builder message = ConditionMessage.forCondition("ResourceBundle");for (String name : StringUtils.commaDelimitedListToStringArray(StringUtils.trimAllWhitespace(basename))) {//根据message获取,该类路径下的所有的properties的资源文件for (Resource resource : getResources(context.getClassLoader(), name)) {if (resource.exists()) {//new 了一个ConditionOutcome并且将match设置为truereturn ConditionOutcome.match(message.found("bundle").items(resource));}}}return ConditionOutcome.noMatch(message.didNotFind("bundle with basename " + basename).atAll());}
配置国际化资源环境路径让MessageSourceAutoConfiguration 配置类生效
通过阅读以上源码我们可以知道,要么在配置文件加spring.messages.basename,要么在resources下新建messages文件夹,这个时候MessageSourceAutoConfiguration 才会生效
- 没有生效的原因
@Overridepublic ConditionOutcome getMatchOutcome(ConditionContext context, AnnotatedTypeMetadata metadata) {//获取配置文件中spring.message.basename,由于我们没有配置,默认值是:messageString basename = context.getEnvironment().getProperty("spring.messages.basename", "messages");ConditionOutcome outcome = cache.get(basename);if (outcome == null) {outcome = getMatchOutcomeForBasename(context, basename);cache.put(basename, outcome);}return outcome;}
添加配置文件让配置类MessageSourceAutoConfiguration 生效
spring
messages:
basename: i18n.message
- 配置文件设置
spring:datasource:driver-class-name: com.mysql.cj.jdbc.Driverurl: jdbc:mysql://localhost:3306/personaltestusername: rootpassword: 123456mvc:pathmatch:matching-strategy: ant_path_matchermessages:basename: i18n.messagemybatis:mapper-locations: classpath*:mapper/*.xml
- 测试
在配置文件加debug: true,启动项目后通过控制台可以看到该配置类已经生效

总结:如果要让配置类MessageSourceAutoConfiguration 生效 - 必须保证,在类路径下的message文件夹中有国际化的资源文件
- 或者自己配置spring.messages.basename 告诉它资源文件在哪里
sping:messages:basename: i18n.message
- 只要找到了国际化的资源文件那就会设置ConditionOutcome .isMatch=true
- 当ConditionOutcome .isMatch=true,那么@Conditional({ResourceBundleCondition.class}),就匹配成功
- 一旦匹配成功,那自动配置类就会生效,就会帮我们配置一个meessageSource
需要去解析请求头中的Accept-Language或者获取url参数中的?local=,来判断语言
源码解读
- 其实WebMvcAutoConfiguration 配置类也帮我们配置了一个解析请求头中Accept-Language的localResolver
@Bean@ConditionalOnMissingBean(name = {"localeResolver"})public LocaleResolver localeResolver() {// 当配置spring.mvc.locale-resolver=fixedif (this.webProperties.getLocaleResolver() == org.springframework.boot.autoconfigure.web.WebProperties.LocaleResolver.FIXED) {//就会使用配置文件中的本地化语言:spring.mvc.locale=en_US 就可以设死本地化语言return new FixedLocaleResolver(this.webProperties.getLocale());} else {// 默认就是使用AcceptHeaderLocaleResolver作为本地化解析器AcceptHeaderLocaleResolver localeResolver = new AcceptHeaderLocaleResolver();//spring.mvc.locale=en_US 作为默认的本地化语言 localeResolver.setDefaultLocale(this.webProperties.getLocale());return localeResolver;}}
- AcceptHeaderLocaleResolver
@Overridepublic Locale resolveLocale(HttpServletRequest request) {Locale defaultLocale = getDefaultLocale();//当Accept-Language为null 才会使用配置文件中设置的local:spring.mvc.localeif (defaultLocale != null && request.getHeader("Accept-Language") == null) {return defaultLocale;}Locale requestLocale = request.getLocale();List<Locale> supportedLocales = getSupportedLocales();if (supportedLocales.isEmpty() || supportedLocales.contains(requestLocale)) {return requestLocale;}Locale supportedLocale = findSupportedLocale(request, supportedLocales);if (supportedLocale != null) {return supportedLocale;}return (defaultLocale != null ? defaultLocale : requestLocale);}
随意切换本地语言,进行缓存
在mvc配置类中自定义一个LocaleResolver 来覆盖原有的LocaleResolver ,因为原来的LocaleResolver 只会从Accept-Language获取语言:
先不考虑分布式session的情况,用cookie进行缓存(因为cookie在同一个域是可以共享的)
- 自定义配置bean
@Configuration
public class CustomWebMvcConfig implements WebMvcConfigurer {@Beanpublic LocaleResolver localeResolver() {//先不考虑分布式session的情况,用cookie进行缓存(因为cookie在同一个域是可以共享的)CookieLocaleResolver cookie=new CookieLocaleResolver();cookie.setCookieMaxAge(60*60*24*30); //设置cookie过期时间cookie.setCookieName("local"); //设置cookie名称return cookie;}}
- 将LocaleChangeInterceptor添加到拦截器中
这个拦截器会默认把local=zh_CN的url进行拦截并存储到cookie中,然后我们自定义的localeResolver,就会解析cookie获取当前语言
@Configuration
public class CustomWebMvcConfig implements WebMvcConfigurer {/*** 添加拦截器* @param registry*/@Overridepublic void addInterceptors(InterceptorRegistry registry) {registry.addInterceptor(new CustormInterceptor()) //添加拦截器.addPathPatterns("/**"); //拦截映射规则registry.addInterceptor(new LocaleChangeInterceptor()).addPathPatterns("/**");}
- 测试
后缀必须加?en_US或者zh_CN

通过messageResource获取国际化信息
- 第一种方法:在handler方法参数中加入Local参数,注入MessageSource 对象
messageSource.getMessage
- 第二种方法:使用自定义工具类
在handler方法参数中加入Local参数,注入MessageSource 对象
- 注入MessageSource 对象
@Autowiredprivate MessageSource messageSource;
- 在handler中使用
String message=messageSource.getMessage("person-query.success",null, LocaleContextHolder.getLocale());
@GetMapping("/{id}")@ApiOperation("根据id获取用户")public Result<Person> getPerson(@PathVariable("id") Integer id){// LocaleContextHolder:就是一个Local的持有器 springmvc底层会自动将localeResolver中的语言设置进去String message=messageSource.getMessage("person-query.success",null, LocaleContextHolder.getLocale());Person person = personService.getPersoById(id);return new Result<>("200",message,person);}
- 测试
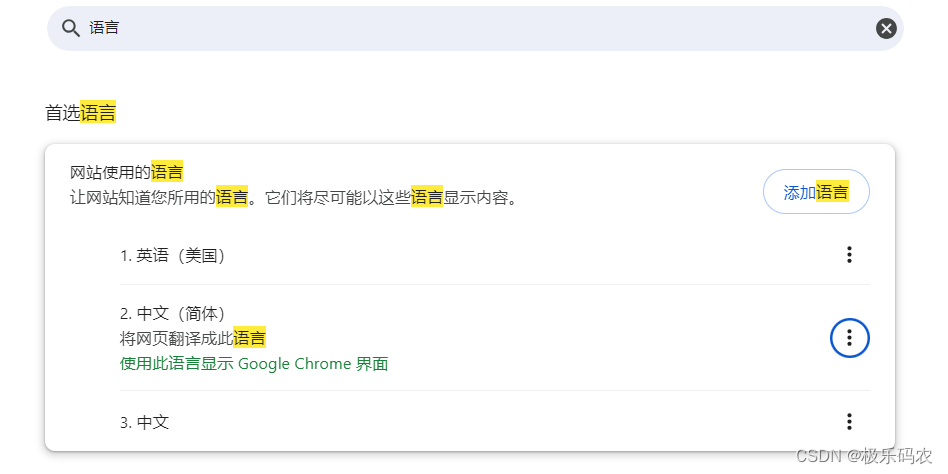
修改浏览器默认语言为en_US

使用自定义工具类
其实也是第一种方式
@Component
@Slf4j
public class I18nMessageUtil {@Autowiredprivate MessageSource messageSource;@Autowiredprivate HttpServletRequest request;/*** 根据code获取国际化信息* @param code code* @return*/public String getLocaleMessage(String code) {return  getLocaleMessage(code,null,null);}/*** 根据code获取国际化信息,如果没有则使用默认提示信息* @param code code* @param defaultMsg 默认提示信息* @return*/public String getLocaleMessage(String code, String defaultMsg) {return  getLocaleMessage(code,defaultMsg,null);}/*** 根据code获取国际化信息,并且替换占位符* @param code* @param params* @return*/public String getLocaleMessage(String code, String[] params) {return  getLocaleMessage(code,null,params);}/*** 根据code获取国际化信息,没有就使用默认值,并且替换占位符* @param code code* @param defaultMsg 默认提示信息* @param params 替换占位符的参数* @return*/public String getLocaleMessage(String code, String defaultMsg, Object[] params) {String language = request.getParameter("locale");Locale locale = Objects.nonNull(language) ? new Locale(language) : LocaleContextHolder.getLocale();try {return messageSource.getMessage(code, params, locale);} catch (Exception e) {e.printStackTrace();log.warn("本地化异常消息发生异常: {}, {}", code, params);return defaultMsg;}}
}
统一异常处理
@ControllerAdvice是Spring3.2提供的新注解,它是对Controller的增强,可对controller中被@RequestMapping注解的方法加一些逻辑处理:
- 1、全局异常处理
- 2、全局数据绑定
- 3、全局数据预处理
@ExceptionHandler
- @ExceptionHandler加在Controller中:只处理当前控制器的异常,优先级比全局高
- @ExceptionHandler,加在ControllerAdvice中:处理全局异常
SpringBoot统一异常处理
SpingBoot 有统一异常处理的自动配置类:ErrorMvcAutoConfiguration
源码解读-ErrorMvcAutoConfiguration配置类
重要组件:
- DefaultErrorAttributes
- BasicErrorController
- DefaultErrorViewResolver:用了解析错误视图页面
BasicErrorController
@Controller
@RequestMapping("${server.error.path:${error.path:/error}}")
public class BasicErrorController extends AbstractErrorController {
原理图
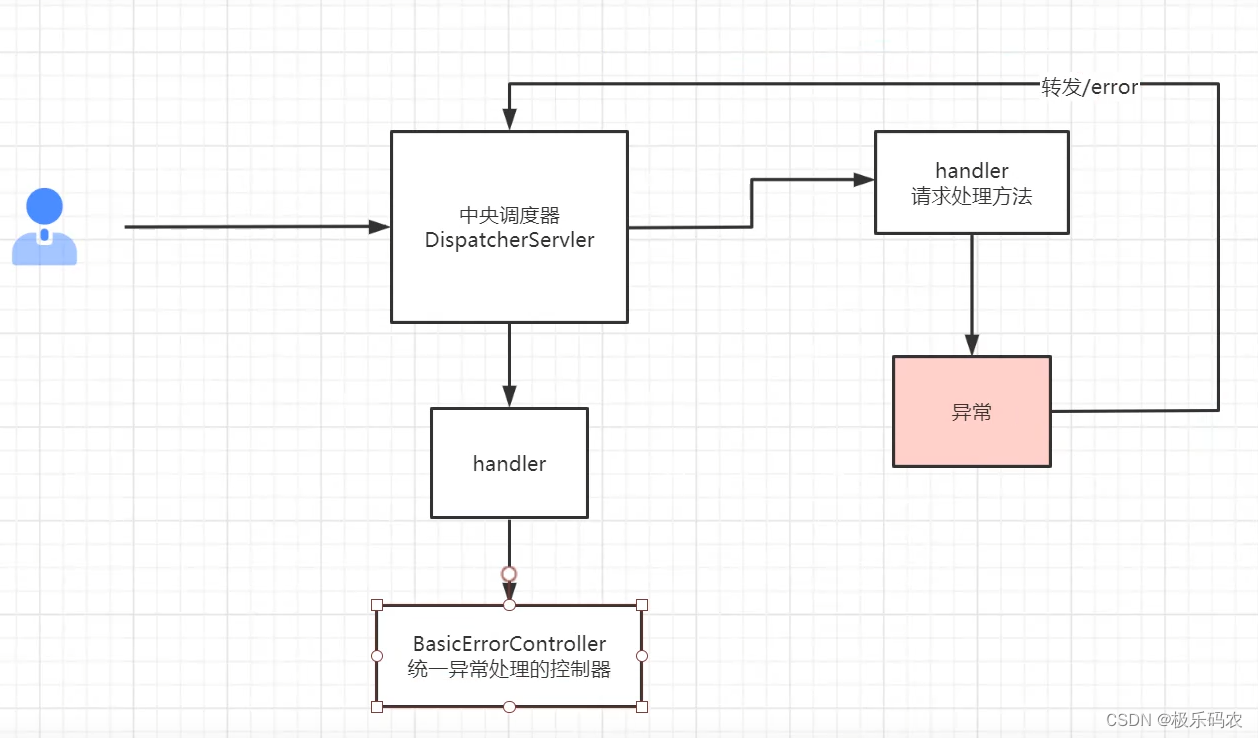
如果发生了异常,springmvc就会转发一个到一个/error,再由springmvc中央调度器去匹配,最终匹配到了BasicErrorController
- 怎么处理的-怎么判断交给那个handler方法呢?
@RequestMapping(produces = MediaType.TEXT_HTML_VALUE):produces 就是处理请求头中Accept的
如果@RequestMapping(produces = MediaType.TEXT_HTML_VALUE)能捕捉到Accept并且value中含有text/html 就说明是一个网页。

- 当使用浏览器发送请求时,请求头是Accept:text/html,就会交给errorHtml方法进行处理,返回一个modeAndView
- 除了text/html的其他请求都会交给error方法进行处理
@RequestMapping(produces = MediaType.TEXT_HTML_VALUE) //public static final String TEXT_HTML_VALUE = "text/html";public ModelAndView errorHtml(HttpServletRequest request, HttpServletResponse response) {HttpStatus status = getStatus(request);Map<String, Object> model = Collections.unmodifiableMap(getErrorAttributes(request, getErrorAttributeOptions(request, MediaType.TEXT_HTML)));response.setStatus(status.value());ModelAndView modelAndView = resolveErrorView(request, response, status, model);return (modelAndView != null) ? modelAndView : new ModelAndView("error", model);}@RequestMappingpublic ResponseEntity<Map<String, Object>> error(HttpServletRequest request) {HttpStatus status = getStatus(request);if (status == HttpStatus.NO_CONTENT) {return new ResponseEntity<>(status);}Map<String, Object> body = getErrorAttributes(request, getErrorAttributeOptions(request, MediaType.ALL));return new ResponseEntity<>(body, status);}
errorHtml:怎么去定制它的返回页面?
- getErrorAttributes()
- 用来获取所需要的异常信息
resolveErrorView源码解读
- resolveErrorView:解析视图
- 会调用DefaultErrorViewResolver的resolveErrorView方法来进行解析
@Overridepublic ModelAndView resolveErrorView(HttpServletRequest request, HttpStatus status, Map<String, Object> model) {ModelAndView modelAndView = resolve(String.valueOf(status.value()), model);if (modelAndView == null && SERIES_VIEWS.containsKey(status.series())) {modelAndView = resolve(SERIES_VIEWS.get(status.series()), model);}return modelAndView;}
- resolve:先从模版视图去解析(由于我们没有配置模版视图,所以并不解析出来),没有模版所以调resolveResource,进一步从自定义的包里查找
private ModelAndView resolve(String viewName, Map<String, Object> model) {String errorViewName = "error/" + viewName;TemplateAvailabilityProvider provider = this.templateAvailabilityProviders.getProvider(errorViewName,this.applicationContext);if (provider != null) {return new ModelAndView(errorViewName, model);}return resolveResource(errorViewName, model);}

- resolveResource:这个方法就是去下面的路径去找:classpath:/static/error/xxx.html

private ModelAndView resolveResource(String viewName, Map<String, Object> model) {for (String location : this.resources.getStaticLocations()) {try {Resource resource = this.applicationContext.getResource(location);resource = resource.createRelative(viewName + ".html");if (resource.exists()) {return new ModelAndView(new HtmlResourceView(resource), model);}}catch (Exception ex) {}}return null;}
定制化页面
由以上源码分析可知,springboot会从static/error/ 路径下去找
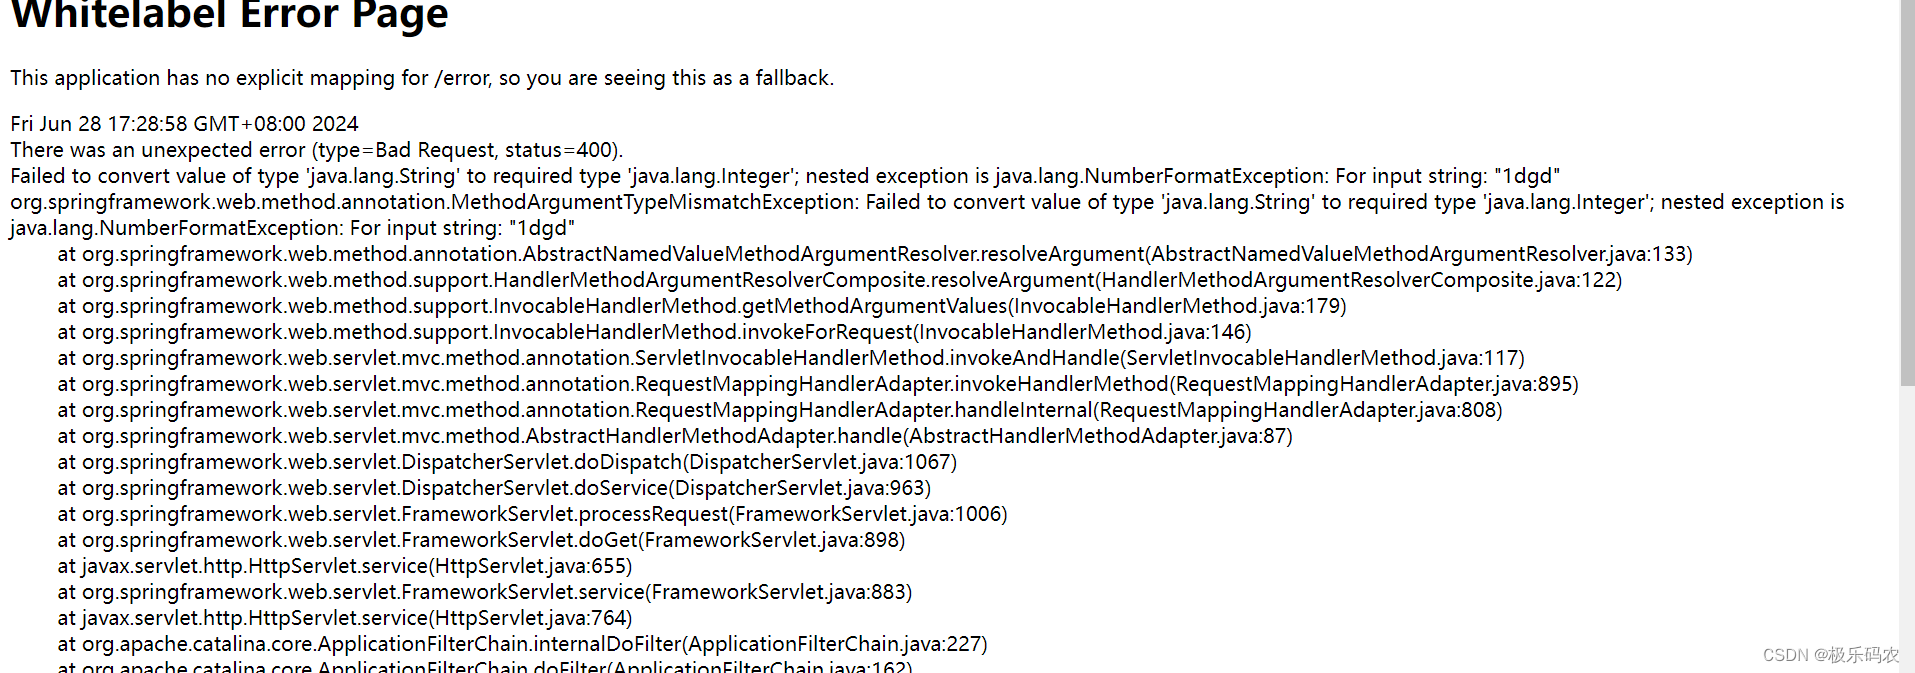
- 未配置定制化页面之前
- 配置定制化页面
在resources/static/error 文件夹下新建400.html页面

- 测试

总结: 从errorHtml方法可以得出结论:我们需要使用自定义的页面响应错误,只需要再对应的路径上创建对应错误代码的页面就行了,但是如果想记录日志的话就需要定制了。
error:看它是怎么返回json数据的,从而要定制自己的json数据
- error方法
@RequestMappingpublic ResponseEntity<Map<String, Object>> error(HttpServletRequest request) {HttpStatus status = getStatus(request);if (status == HttpStatus.NO_CONTENT) {return new ResponseEntity<>(status);}//就是调用getErrorAttributes获取了异常信息Map<String, Object> body = getErrorAttributes(request, getErrorAttributeOptions(request, MediaType.ALL));return new ResponseEntity<>(body, status);}
- getErrorAttributes如何获取错误信息呢?
就是获取errorAttributes来获取错误信息
那errorAttributes怎么来的呢?
在basicErrorController,被注册的时候,就已经注入进来了


SpringBoot定制浏览器请求和ajax请求,返回异常处理
- 对浏览器请求:扩展日志处理
- 对ajax请求:修改返回类型 加上日志处理
自定义异常处理类(覆盖BasicErrorController)

@Controller
@RequestMapping("/error")
public class CustomErrorController extends AbstractErrorController {public CustomErrorController(ErrorAttributes errorAttributes, List<ErrorViewResolver> errorViewResolvers) {super(errorAttributes, errorViewResolvers);}Logger log= LoggerFactory.getLogger(CustomException.class);/*** 处理浏览器请求的* 在这个基础上加上日志处理** @param request* @param response* @return*/@RequestMapping(produces = MediaType.TEXT_HTML_VALUE)public ModelAndView errorHtml(HttpServletRequest request, HttpServletResponse response) {HttpStatus status = getStatus(request);Map<String, Object> model = Collections.unmodifiableMap(getErrorAttributes(request, getErrorAttributeOptions()));response.setStatus(status.value());log.error(model.get("trace").toString());ModelAndView modelAndView = resolveErrorView(request, response, status, model);return (modelAndView != null) ? modelAndView : new ModelAndView("error", model);}/*** 处理ajax* 修改返回类型:Result 加上异常日志记录** @param request* @return*/@RequestMapping@ResponseBodypublic Result<String> error(HttpServletRequest request) {HttpStatus status = getStatus(request);if (status == HttpStatus.NO_CONTENT) {return new Result<String>("204", "No Content");}Map<String, Object> body = getErrorAttributes(request, getErrorAttributeOptions());String code = body.get("status").toString();String message = body.get("message").toString();log.error(message);return new Result<String>(code, message);}/*** 异常信息的选项* @return*/protected ErrorAttributeOptions getErrorAttributeOptions() {//添加需要的异常信息return ErrorAttributeOptions.of(ErrorAttributeOptions.Include.MESSAGE, ErrorAttributeOptions.Include.STACK_TRACE,ErrorAttributeOptions.Include.EXCEPTION);}}
相关文章:

SpringBoot学习04-[定制SpringMVC]
定制SpringMVC 定制SpringMvc的自动配置定制springmvc-configurePathMatch配置定制SpringMVC-拦截器Interceptor定制SpringMVC-CORS配置全局cors配置针对某个方法加跨域解决 WebMvcConfigurer原理定制SpringMVC-JSONJSON开发jackson的使用定制化json序列化和反序列化 JSON国际化…...

QT拖放事件之六:自定义MIME类型的存储及读取demo
1、MIME类型描述 MIME (Multipurpose Internet Mail Extensions) 是描述消息内容类型的标准,用来表示文档、文件或字节流的性质和格式。 MIME 消息能包含文本、图像、音频、视频以及其他应用程序专用的数据。 浏览器通常使用 MIME 类型(而不是文件扩展名)来确定如何处理URL…...

架构师必知的绝活-JVM调优
前言 为什么要学JVM? 首先:面试需要 了解JVM能帮助回答面试中的复杂问题。面试中涉及到的JVM相关问题层出不穷,难道每次面试都靠背几百上千条面试八股? 其次:基础知识决定上层建筑 自己写的代码都不知道是怎么回事&a…...

小米平板6系列对比
小米平板6系列目前有4款,分别为6、6 Pro、6 Max、6S Pro。具体对比如下表所示。 小米平板型号66 Pro6 Max6S Pro实物图发布时间2023年4月21日2023年4月21日2023年8月14日2024年2月22 日屏幕大小11英寸11英寸14英寸12.4英寸分辨率2.8K2.8K2.8K3K刷新率144Hz144Hz120…...

用 Rust 实现一个替代 WebSocket 的协议
很久之前我就对websocket颇有微词,它的确满足了很多情境下的需求,但是仍然有不少问题。对我来说,最大的一个问题是websocket的数据是明文传输的,这使得websocket的数据很容易遭到劫持和攻击。同时,WebSocket继承自HTTP…...

【docker】2. 编排容器技术发展史(了解)
该篇文章介绍的主要是编排以及容器技术的发展史(了解即可),如果想单纯学习docker命令操作可直接略过!!! 容器技术发展史 Jail 时代 容器不是一个新概念或者新技术,很早就有了,只是近几年遇到了云计算&am…...
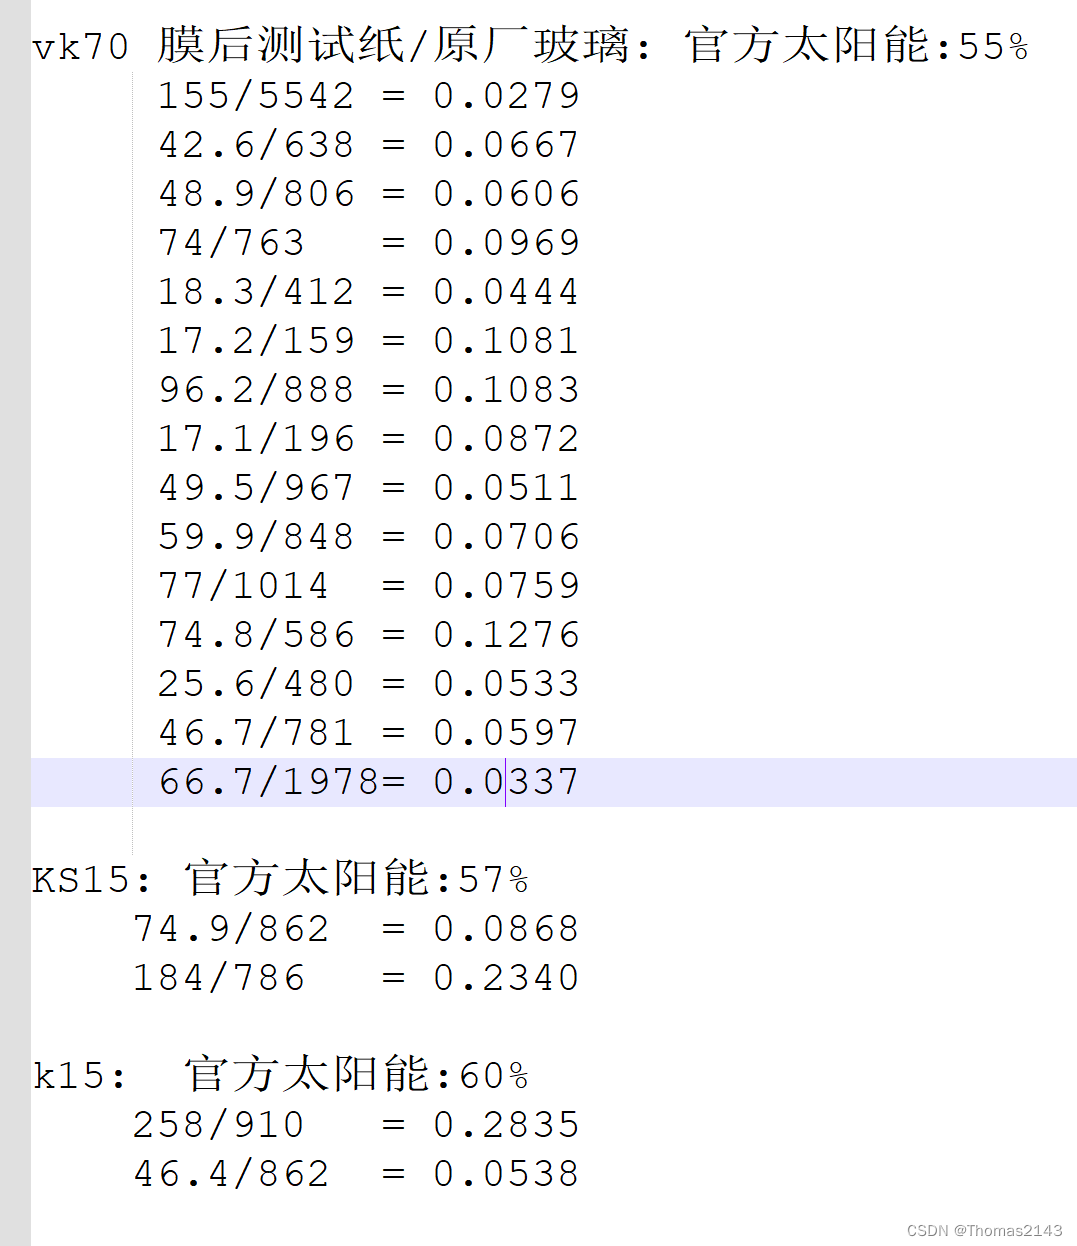
吉利银河L6(官方小订送的3M) 对比 威固vk70+ks15
吉利送的号称价值2000的3M效果 撕膜重贴 威固vk70ks15 之后的效果 // 忘记测反射的热量了 可以验证金属膜是反射热而不是吸热 金属膜 手机GPS还能用吗 亲测 能用 太阳能总阻隔率 3M貌似20%出头 威固前档55% 侧后挡高一点不超过60% 夏天真实太阳发热能量 即阻隔率55%到60% …...

three.js实现雪花场景效果
点击获取雪花图片素材 提取码:lywa // 雪花效果 import * as THREE from "three" export function getsnowEffect(th) {console.log(th, th) // this 场景var that th// 创建一个BufferGeometry对象,用于存储顶点数据 const geometry new THREE.Buffe…...
鸿蒙 HarmonyOS NEXT星河版APP应用开发-阶段一
一、鸿蒙开发环境搭建 DevEco Studio安装 下载 访问官网:https://developer.huawei.com/consumer/cn/deveco-studio/选择操作系统版本后并注册登录华为账号既可下载安装包 安装 建议:软件和依赖安装目录不要使用中文字符软件安装包下载完成后࿰…...

Elasticsearch优化索引映射和设置
在Elasticsearch的世界中,优化索引的映射(mapping)和设置(settings)对于提高搜索性能、存储效率和系统稳定性至关重要。本文将带您深入了解如何针对Elasticsearch的索引进行优化,帮助您构建更高效、更可靠的…...

boss直聘招聘数据可视化分析
boss直聘招聘数据可视化分析 一、数据预处理二、数据可视化三、完整代码一、数据预处理 在 上一篇博客中,笔者已经详细介绍了使用selenium爬取南昌市web前端工程师的招聘岗位数据,数据格式如下: 这里主要对薪水列进行处理,为方便处理,将日薪和周薪的数据删除,将带有13薪…...

小程序人脸分析
公司的业务需求是用户在使用某个功能前,必须使用人脸识别,确保当前使用人是用户本人,防止某些功能乱用。后端用的是腾讯的人脸识别方案,这里只是前端的识别代码,保证人脸剧中,大小合适,有一个人…...

UML建模笔记
5个视图 设计。类,接口,对象如何协作。实现。组件,运行程序,文档关系。用例。用户功能期望。进程。并发与同步相关进程,线程。部署。部署到计算机。 建模目的 和客户共创追踪需求变更协同开发进度控制持续迭代测试生…...

初见SpringCloud ing
Consul 服务注册与发现 服务注册与发现 服务注册:微服务在启动时,会将自己的信息(如 IP 地址、端口、服务名称等)注册到 Consul。 服务发现:其他微服务可以通过 Consul 查询到已注册的服务,并通过这些信息…...
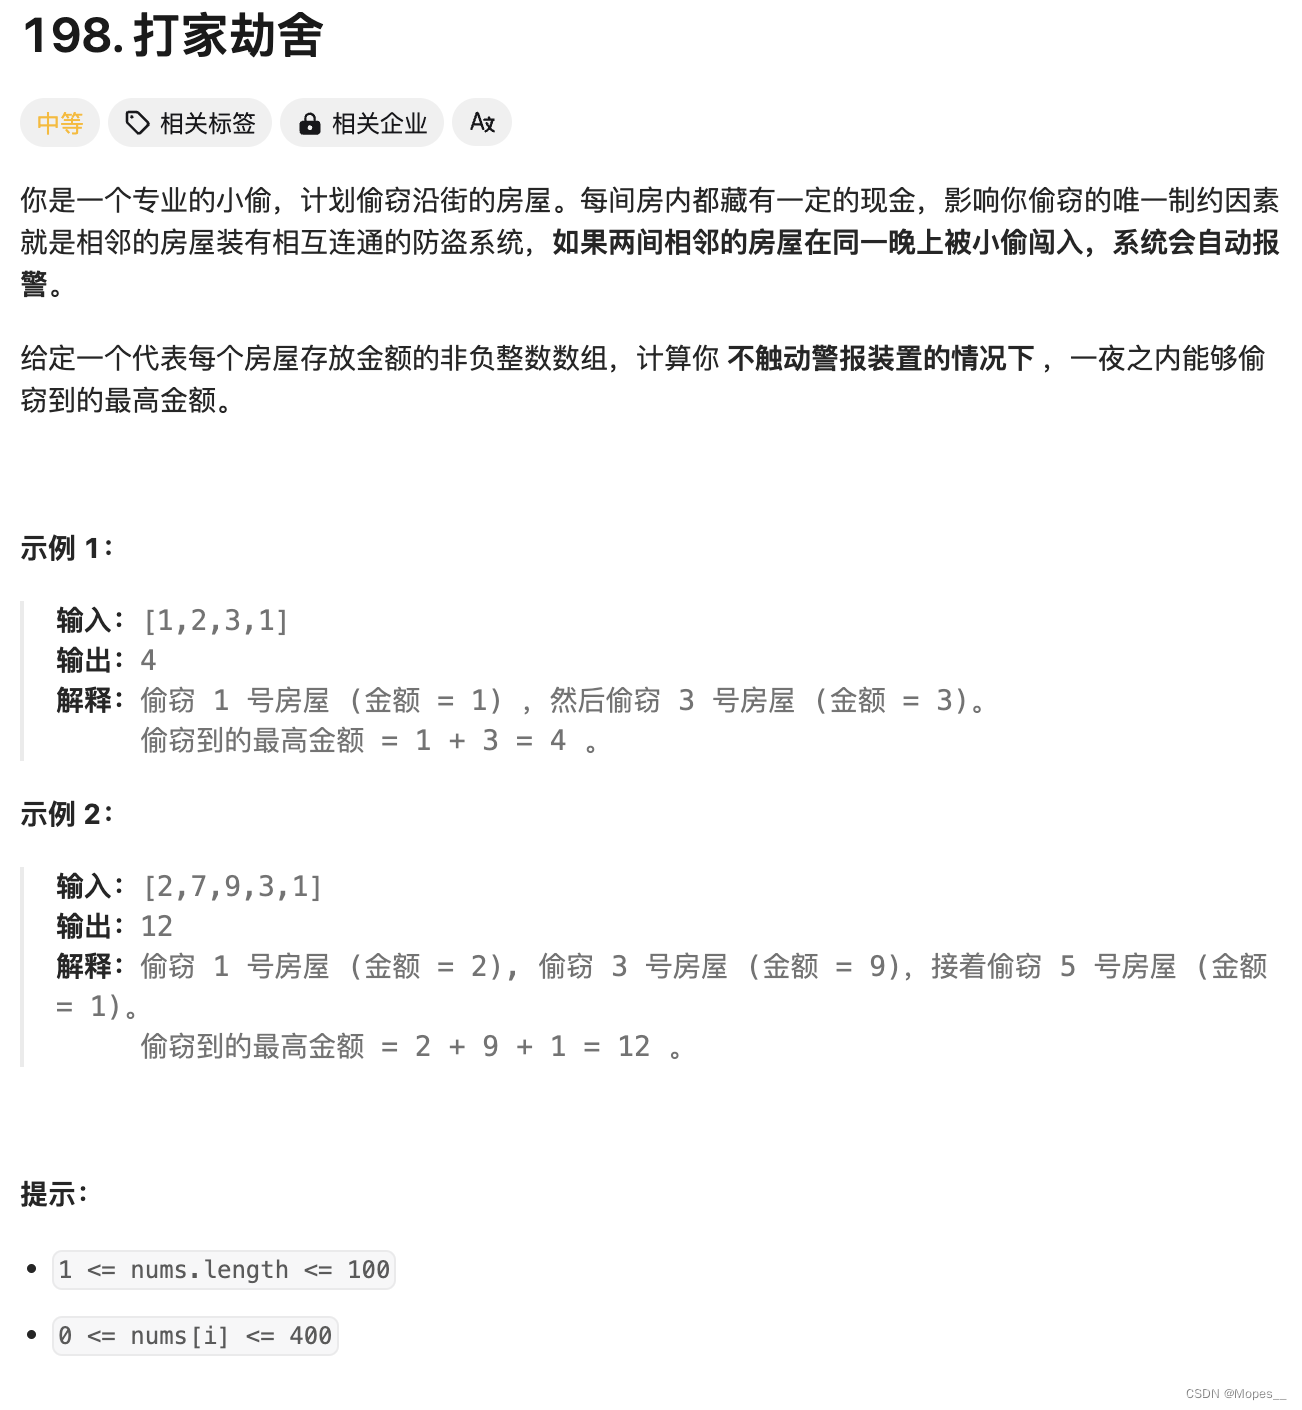
Python | Leetcode Python题解之第198题打家劫舍
题目: 题解: class Solution:def rob(self, nums: List[int]) -> int:if not nums:return 0size len(nums)if size 1:return nums[0]first, second nums[0], max(nums[0], nums[1])for i in range(2, size):first, second second, max(first nu…...
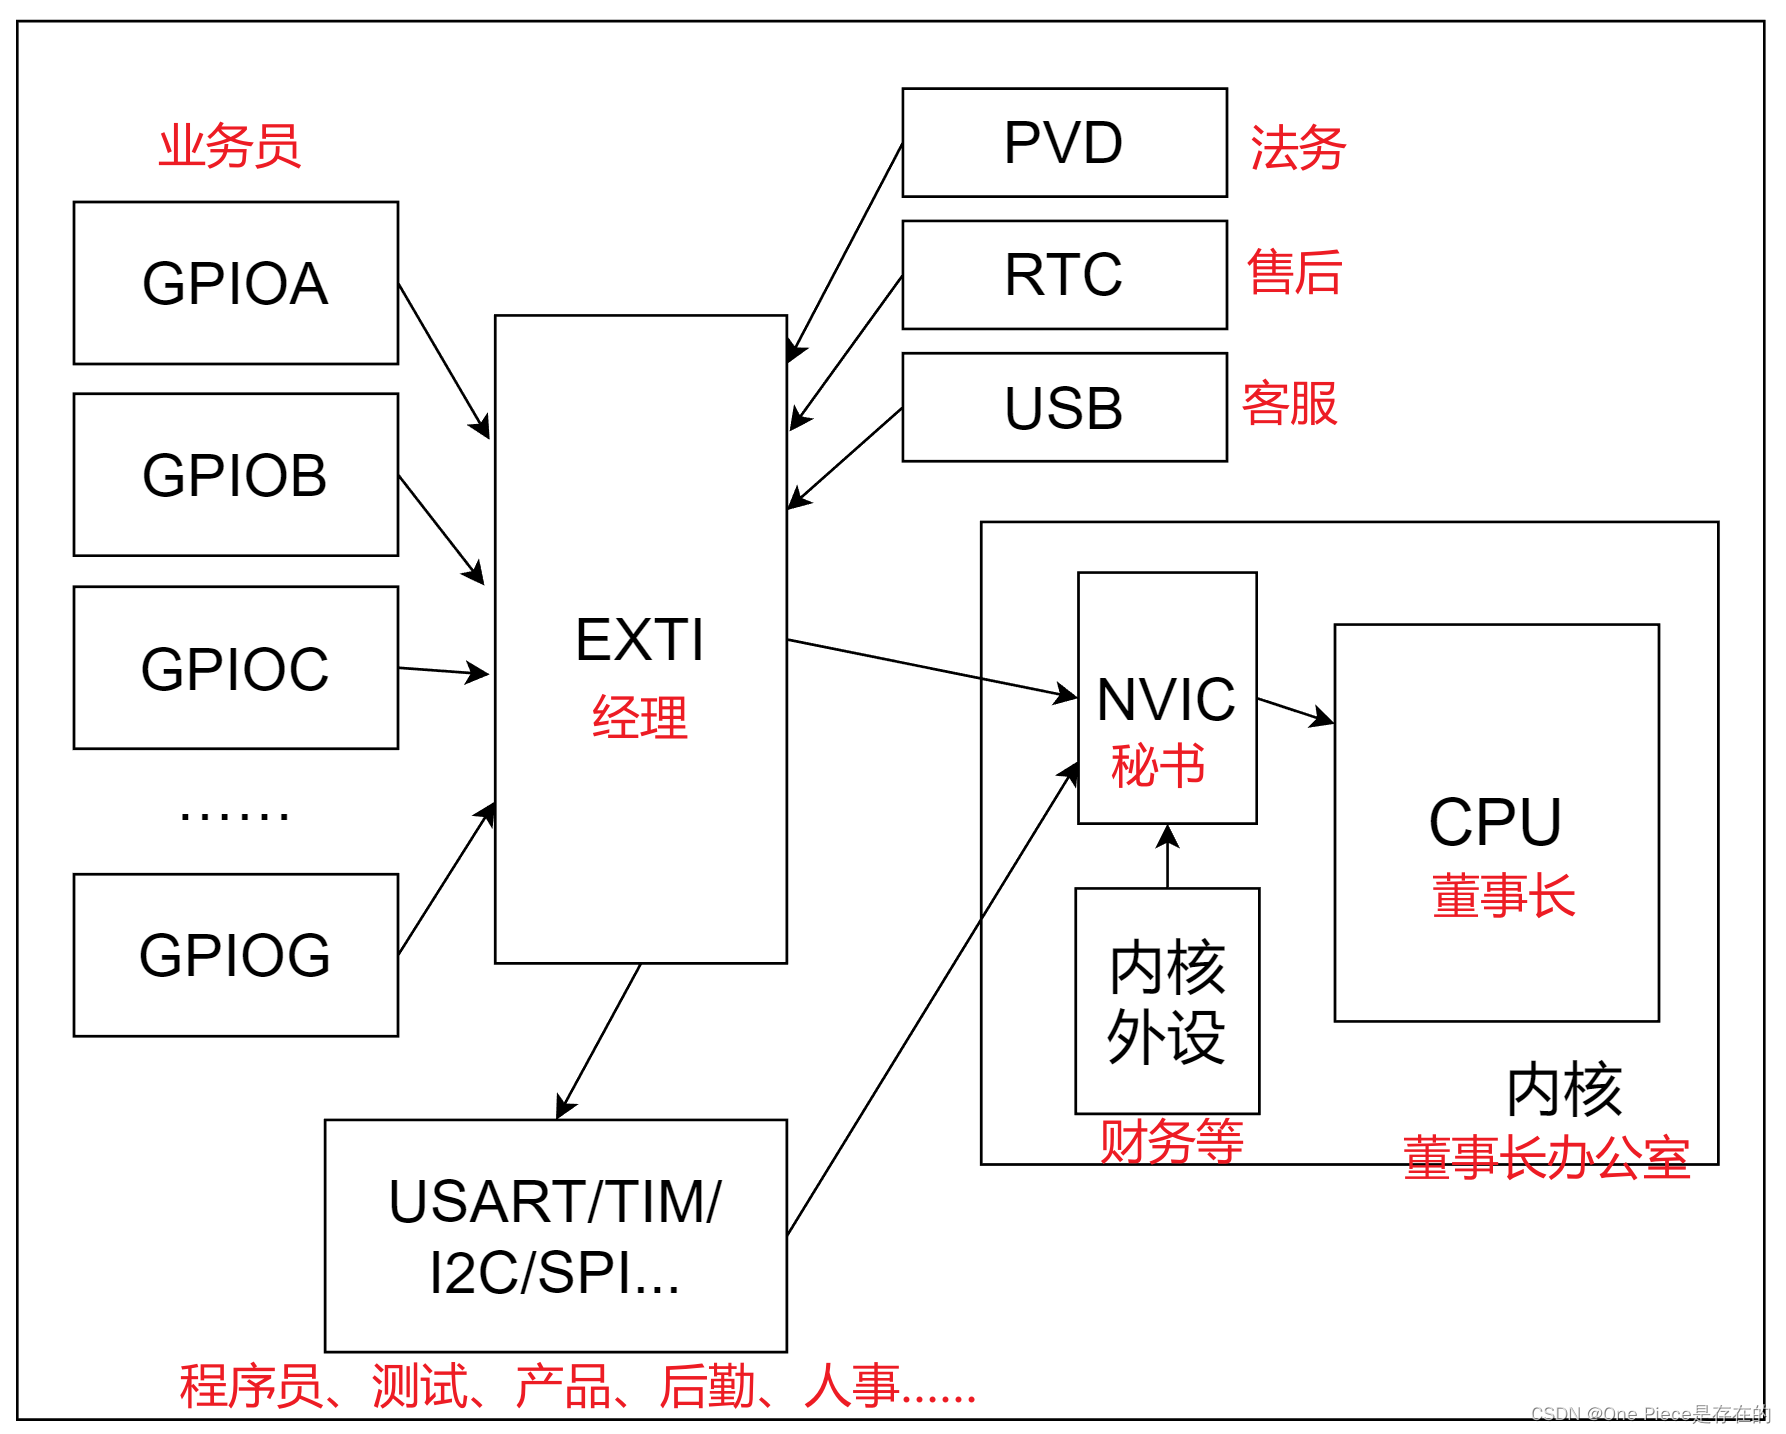
什么是中断?---STM32篇
目录 一,中断的概念 二,中断的意义 三,中断的优先级 四,中断的嵌套 如果一个高优先级的中断发生,它会立即打断当前正在处理的中断(如果其优先级较低),并首先处理这个高优…...
和_getkey()应用)
51单片机第1步_putchar()和_getkey()应用
没有开发板,没有烧录器,没有学习场所,如何学习写51单片机的程序?除了采用软件模拟仿真,没有更好的方法,因此,使用串口是学习的第一步。 1、_getkey ()函数 在C:\Keil\C51\LIB中有一个叫GETKEY…...

微信小程序中的地图的使用
微信小程序中的地图组件 是一个用于展示地图的组件,提供了丰富的功能和配置选项,可以实现定位、标记、路线规划等多种地图相关的交互。下面是对这个组件的详细介绍,包括属性、事件以及示例代码。 组件属性 基础属性 longitude: 地图中心的经…...

MySQL root密码丢失处理
没有记住MySQL数据库root用户默认密码(为初始化安装mysql时默认生成) 1)修改/etc/my.cnf文件,在[mysqld]的段中加上一句:skip-grant-tables 重启mysql服务 [root@localhost ~]# service mysqld restart 2)以无密码方式进入mysql: [root@localhost ~]# /usr/local/my…...
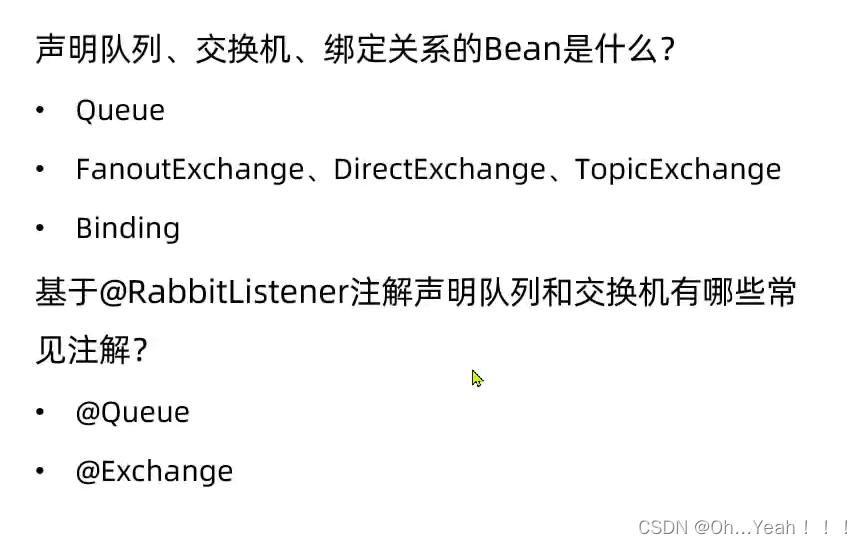
RabbitMQ中java实现队列和交换机的声明
java实现队列和交换机的声明 在之前我们都是基于RabbitMQ控制台来创建队列、交换机。但是在实际开发时,队列和交换机是程序员定义的,将来项目上线,又要交给运维去创建。那么程序员就需要把程序中运行的所有队列和交换机都写下来,…...

51c自动驾驶~合集58
我自己的原文哦~ https://blog.51cto.com/whaosoft/13967107 #CCA-Attention 全局池化局部保留,CCA-Attention为LLM长文本建模带来突破性进展 琶洲实验室、华南理工大学联合推出关键上下文感知注意力机制(CCA-Attention),…...
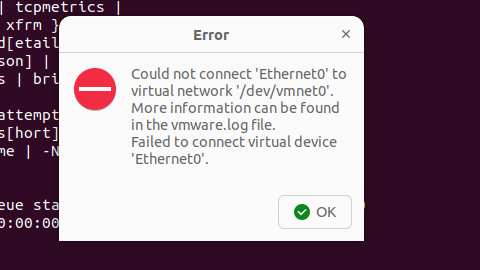
解决Ubuntu22.04 VMware失败的问题 ubuntu入门之二十八
现象1 打开VMware失败 Ubuntu升级之后打开VMware上报需要安装vmmon和vmnet,点击确认后如下提示 最终上报fail 解决方法 内核升级导致,需要在新内核下重新下载编译安装 查看版本 $ vmware -v VMware Workstation 17.5.1 build-23298084$ lsb_release…...
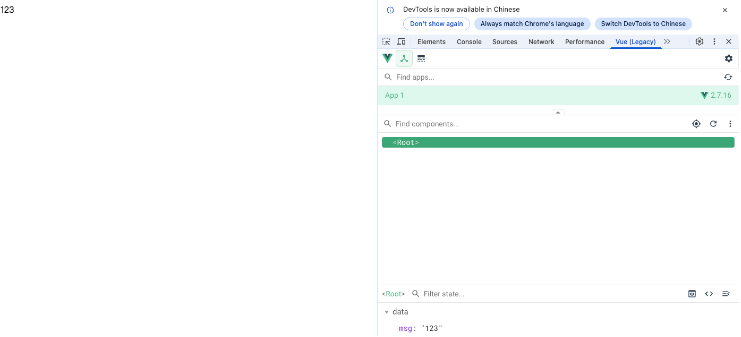
Vue2 第一节_Vue2上手_插值表达式{{}}_访问数据和修改数据_Vue开发者工具
文章目录 1.Vue2上手-如何创建一个Vue实例,进行初始化渲染2. 插值表达式{{}}3. 访问数据和修改数据4. vue响应式5. Vue开发者工具--方便调试 1.Vue2上手-如何创建一个Vue实例,进行初始化渲染 准备容器引包创建Vue实例 new Vue()指定配置项 ->渲染数据 准备一个容器,例如: …...

macOS多出来了:Google云端硬盘、YouTube、表格、幻灯片、Gmail、Google文档等应用
文章目录 问题现象问题原因解决办法 问题现象 macOS启动台(Launchpad)多出来了:Google云端硬盘、YouTube、表格、幻灯片、Gmail、Google文档等应用。 问题原因 很明显,都是Google家的办公全家桶。这些应用并不是通过独立安装的…...

[10-3]软件I2C读写MPU6050 江协科技学习笔记(16个知识点)
1 2 3 4 5 6 7 8 9 10 11 12 13 14 15 16...

Neo4j 集群管理:原理、技术与最佳实践深度解析
Neo4j 的集群技术是其企业级高可用性、可扩展性和容错能力的核心。通过深入分析官方文档,本文将系统阐述其集群管理的核心原理、关键技术、实用技巧和行业最佳实践。 Neo4j 的 Causal Clustering 架构提供了一个强大而灵活的基石,用于构建高可用、可扩展且一致的图数据库服务…...

VTK如何让部分单位不可见
最近遇到一个需求,需要让一个vtkDataSet中的部分单元不可见,查阅了一些资料大概有以下几种方式 1.通过颜色映射表来进行,是最正规的做法 vtkNew<vtkLookupTable> lut; //值为0不显示,主要是最后一个参数,透明度…...

学校时钟系统,标准考场时钟系统,AI亮相2025高考,赛思时钟系统为教育公平筑起“精准防线”
2025年#高考 将在近日拉开帷幕,#AI 监考一度冲上热搜。当AI深度融入高考,#时间同步 不再是辅助功能,而是决定AI监考系统成败的“生命线”。 AI亮相2025高考,40种异常行为0.5秒精准识别 2025年高考即将拉开帷幕,江西、…...
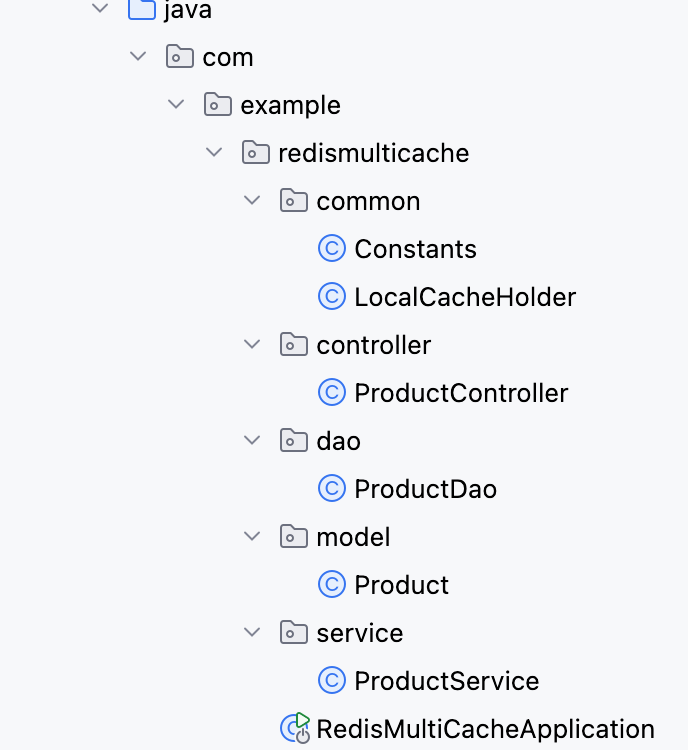
【Redis】笔记|第8节|大厂高并发缓存架构实战与优化
缓存架构 代码结构 代码详情 功能点: 多级缓存,先查本地缓存,再查Redis,最后才查数据库热点数据重建逻辑使用分布式锁,二次查询更新缓存采用读写锁提升性能采用Redis的发布订阅机制通知所有实例更新本地缓存适用读多…...

iview框架主题色的应用
1.下载 less要使用3.0.0以下的版本 npm install less2.7.3 npm install less-loader4.0.52./src/config/theme.js文件 module.exports {yellow: {theme-color: #FDCE04},blue: {theme-color: #547CE7} }在sass中使用theme配置的颜色主题,无需引入,直接可…...
