C动态数组
在实际项目中,我们经常与各式各样的数据打交道。
例如:我们处理的是学生的数据。
struct student {int id; // 学号char name[20]; // 姓名int gender; // 性别int mark; // 成绩
};
学生数据使用一个结构体表示,该结构体拥有4个成员。分别为:
- 学号
- 姓名
- 性别
- 成绩
大多数情况下,数据的数量是不确定的,可能随着时间流逝而增加或减少。
例如:一开始有5个学生,后来增加到8个,再后来增加到15个。最后,减少到3个学生。
我们可以使用数组来盛放这些学生的数据,但是,声明数组时,声明一个长度为多少的数组,是一个需要考虑的问题。
如果我们能预知学生数量最多为15个,我们可以声明一个元素数量为15的结构体数组。
struct student arrStudent[15];
但是,大多数情况下,我们是不能预知数据到底有多少的。因此,最好是能够让数组的长度根据数据的多少自动增长。一种常用的数组增长策略是:当数组已经装满时,将数组长度增长到原来的两倍。
例如,数组的初始长度为5,当数组需要继续添加数据时,数组的长度增长为原来的两倍,即10个元素。若数组再次被装满,将数组的长度再次增加为原来的两倍,即20个元素。
为了实现上述的特性,我们可以借助于malloc与realloc函数。
void* malloc(size_t size);
void* realloc(void* ptr, size_t new_size);
malloc函数可以向系统申请size字节大小的内存空间。若申请成功,则返回这段内存空间的首地址。
relloc函数可以用于增长或缩短之前申请的内存空间。relloc函数的第一个参数是之前申请的内存空间的首地址,它会根据第二个参数,长度new_size增长或缩短之前申请的内存空间,并返回调整长度后的内存空间的首地址。
实现动态数组
下面我们来实现这个动态数组对象,我们将这个对象命名为vector。
struct vector {bool (*append)(struct vector* pVec, struct student data);struct student(*get)(struct vector* pVec, int index);void (*clear)(struct vector* pVec);void (*remove)(struct vector* pVec, int index);struct student* pData;int size;int capacity;
};
成员
这个对象有3个成员,它们分别是:
- struct student* pData
- int size
- int capacity
pData用于记录数组的首元素指针。
size为数组中盛放的数据的长度。
capacity为整个数组拥有的元素个数,即数组的容量。
初始化
我们定义一个符号常量VECTOR_INIT_CAPACITY用来表示初始情况下,数组拥有的元素个数。为了方便测试,我们把这个数值定的小一点,暂时将数值设定为1。
#define VECTOR_INIT_CAPACITY 1
定义一个vectorInit函数,用于vector对象的初始化。初始情况下,使用malloc函数申请一个元素类型为struct student的数组,数组的元素数量为VECTOR_INIT_CAPACITY。保存这个数组的首元素指针到pData中。此时,数组拥有的元素个数为VECTOR_INIT_CAPACITY,盛放的数据长度为0。
void vectorInit(struct vector* pVec)
{pVec->pData = (struct student*)malloc(sizeof(struct student) * VECTOR_INIT_CAPACITY);pVec->size = 0;pVec->capacity = VECTOR_INIT_CAPACITY;
}
方法
接下来我们再来看vector对象的4个方法。
bool (*append)(struct vector* pVec, struct student data);
struct student(*get)(struct vector* pVec, int index);
void (*clear)(struct vector* pVec);
void (*remove)(struct vector* pVec, int index);
append方法用于向数组中添加一个struct student数据。如果添加成功返回true,否则返回false。
get方法用于从数组中获取一个struct student数据,index参数为需要获取的数组元素下标。
clear方法用于清除所有数组中盛放的数据,并将size复位为0,capacity复位为VECTOR_INIT_CAPACITY。
remove方法用于删除数组中下标为index的元素,并将size减1。
append方法
我们首先来实现append方法。
bool vectorAppend(struct vector* pVec, struct student data)
{// 是否超长if (pVec->size >= pVec->capacity){// 加长到两倍struct student* newData = (struct student*)realloc(pVec->pData, pVec->capacity * sizeof(struct student) * 2);if (newData == NULL){return false;}pVec->pData = newData;pVec->capacity = 2 * pVec->capacity;}pVec->pData[pVec->size] = data;pVec->size++;return true;
}
函数一开始检查数组中盛放的数据长度size是否已经大于或等于数组的容量capacity。如果数组已装满,那么把数组使用relloc增长为原来长度的两倍。若relloc函数成功将数组增长,那么它将返回增长后的数组首地址。若失败,那么它将返回NULL。如果失败,让函数返回fasle。成功之后,使用新的数组首元素指针newData更新pData。现在数组长度增加到了原来的2倍,capacity赋值
为2 * capacity。下面,可以将data放入数组了。并且,将数组中已盛放的数据长度size增加1。
get方法
我们再来实现get方法。
struct student vectorGet(struct vector* pVec, int index)
{return pVec->pData[index];
}
get方法很简单,就是返回下标为index的数组元素的数据。
remove方法
remove方法,用于删除数组中下标为index的元素。
void vectorRemove(struct vector* pVec, int index)
{for (int i = index; i < pVec->size - 1; i++)pVec->pData[i] = pVec->pData[i + 1];pVec->size -= 1;
}
删除数组元素是一个老生常谈的话题了,从index开始,依次使用后续元素覆盖前驱元素,直到覆盖完倒数第二个元素为止。若index已经是最后一个元素,那么不进行处理。最后,将数组已盛放的数据长度size减1。
clear方法
clear方法用于将所有数组中盛放的数据清空,并将数组的容量缩短为初始容量。
void vectorClear(struct vector* pVec)
{if (pVec->pData != NULL)free(pVec->pData);pVec->pData = (struct student*)malloc(sizeof(struct student) * VECTOR_INIT_CAPACITY);pVec->size = 0;pVec->capacity = VECTOR_INIT_CAPACITY;
}
若pData不为NULL就释放pData,并重新申请容量为VECTOR_INIT_CAPACITY的数组,并将首元素指针保存到pData。size重置为0,capacity重置为VECTOR_INIT_CAPACITY。
销毁数组
void vectorDestroy(struct vector* pVec)
{if (pVec->pData == NULL)return;free(pVec->pData);pVec->pData = NULL;pVec->size = 0;pVec->capacity = 0;
}
如果我们不再使用vector可以调用vectorDestroy将数组销毁。若pData不为空,则释放pData,并且把pData赋值为NULL。size与capacity设置为0。
初始化方法
别忘了初始化时,我们仅仅初始化了对象的成员,没有初始化对象的方法。现在,把初始化对象的方法的语句加入到函数vectorInit当中。
void vectorInit(struct vector* pVec)
{pVec->get = vectorGet;pVec->append = vectorAppend;pVec->remove = vectorRemove;pVec->clear = vectorClear;pVec->pData = (struct student*)malloc(sizeof(struct student) * VECTOR_INIT_CAPACITY);pVec->size = 0;pVec->capacity = VECTOR_INIT_CAPACITY;
}
使用数组
初始化及append方法
struct vector vec;
vectorInit(&vec);
struct student s1 = { 1, "小明", 1, 90 };
vec.append(&vec, s1);
for (int i = 0; i < vec.size; i++)
{struct student s = vec.get(&vec, i);printf("%d %s %d %d\n", s.id, s.name, s.gender, s.mark);
}
printf("size:%d\n", vec.size);
printf("capacity:%d\n", vec.capacity);
首先声明一个vector对象,调用函数vectorInit将其初始化。声明一个struct student结构体s1,将s1初始化为小明的数据。调用vector的append方法将小明的数据s1添加到数组当中。之后,使用循环遍历整个vector,循环的次数为vec.size。循环内部,调用vector的get方法,可以得到数组中的各个数据,并将其打印在控制台上。
打印vector的size与capacity,它们都为1。
测试append追加
接下来,向vector中再追加一个元素,小红的数据s2。遍历整个vector,可以得到小明和小红的数据。
打印vector的size与capacity,现在它们都增加为2了。
struct student s2 = { 2, "小红", 0, 95 };
vec.append(&vec, s2);
for (int i = 0; i < vec.size; i++)
{struct student s = vec.get(&vec, i);printf("%d %s %d %d\n", s.id, s.name, s.gender, s.mark);
}
printf("size:%d\n", vec.size);
printf("capacity:%d\n", vec.capacity);
测试remove
vec.remove(&vec, 0);
for (int i = 0; i < vec.size; i++)
{struct student s = vec.get(&vec, i);printf("%d %s %d %d\n", s.id, s.name, s.gender, s.mark);
}
printf("size:%d\n", vec.size);
printf("capacity:%d\n", vec.capacity);
调用remove方法,将下标为0的小明的数据删除。遍历整个vector,只能得到小红的数据。
打印vector的size与capacity,size为1,capacity为2。
测试clear
调用clear方法,清空所有数据,将size复位为0,将capacity复位为VECTOR_INIT_CAPACITY。遍历整个vector,已经没有数据了。
vec.clear(&vec);
for (int i = 0; i < vec.size; i++)
{struct student s = vec.get(&vec, i);printf("%d %s %d %d\n", s.id, s.name, s.gender, s.mark);
}
printf("size:%d\n", vec.size);
printf("capacity:%d\n", vec.capacity);
打印vector的size与capacity,size为1,capacity为1。
销毁数组
最后,别忘记调用vectorDestroy将vector销毁。
vectorDestroy(&vec);
现阶段代码
#include <stdlib.h>
#include <stdio.h>
struct student {int id; // 学号char name[20]; // 姓名int gender; // 性别int mark; // 成绩
};
#define VECTOR_INIT_CAPACITY 1
struct vector {bool (*append)(struct vector* pVec, struct student data);struct student(*get)(struct vector* pVec, int index);void (*clear)(struct vector* pVec);void (*remove)(struct vector* pVec, int index);struct student* pData;int size;int capacity;
};
bool vectorAppend(struct vector* pVec, struct student data)
{// 是否超长if (pVec->size >= pVec->capacity){// 加长到两倍struct student* newData = (struct student*)realloc(pVec->pData, pVec->capacity * sizeof(struct student) * 2);if (newData == NULL){return false;}pVec->pData = newData;pVec->capacity = 2 * pVec->capacity;}pVec->pData[pVec->size] = data;pVec->size++;return true;
}
struct student vectorGet(struct vector* pVec, int index)
{return pVec->pData[index];
}
void vectorRemove(struct vector* pVec, int index)
{for (int i = index; i < pVec->size - 1; i++)pVec->pData[i] = pVec->pData[i + 1];pVec->size -= 1;
}
void vectorClear(struct vector* pVec)
{if (pVec->pData != NULL)free(pVec->pData);pVec->pData = (struct student*)malloc(sizeof(struct student) * VECTOR_INIT_CAPACITY);pVec->size = 0;pVec->capacity = VECTOR_INIT_CAPACITY;
}
void vectorInit(struct vector* pVec)
{pVec->get = vectorGet;pVec->append = vectorAppend;pVec->remove = vectorRemove;pVec->clear = vectorClear;pVec->pData = (struct student*)malloc(sizeof(struct student) * VECTOR_INIT_CAPACITY);pVec->size = 0;pVec->capacity = VECTOR_INIT_CAPACITY;
}
void vectorDestroy(struct vector* pVec)
{if (pVec->pData == NULL)return;free(pVec->pData);pVec->pData = NULL;pVec->size = 0;pVec->capacity = 0;
}
int main()
{struct vector vec;vectorInit(&vec);struct student s1 = { 1, "小明", 1, 90 };vec.append(&vec, s1);for (int i = 0; i < vec.size; i++){struct student s = vec.get(&vec, i);printf("%d %s %d %d\n", s.id, s.name, s.gender, s.mark);}printf("size:%d\n", vec.size);printf("capacity:%d\n", vec.capacity);getchar();struct student s2 = { 2, "小红", 0, 95 };vec.append(&vec, s2);for (int i = 0; i < vec.size; i++){struct student s = vec.get(&vec, i);printf("%d %s %d %d\n", s.id, s.name, s.gender, s.mark);}printf("size:%d\n", vec.size);printf("capacity:%d\n", vec.capacity);getchar();vec.remove(&vec, 0);for (int i = 0; i < vec.size; i++){struct student s = vec.get(&vec, i);printf("%d %s %d %d\n", s.id, s.name, s.gender, s.mark);}printf("size:%d\n", vec.size);printf("capacity:%d\n", vec.capacity);getchar();vec.clear(&vec);for (int i = 0; i < vec.size; i++){struct student s = vec.get(&vec, i);printf("%d %s %d %d\n", s.id, s.name, s.gender, s.mark);}printf("size:%d\n", vec.size);printf("capacity:%d\n", vec.capacity);getchar();vectorDestroy(&vec);return 0;
}
通用数组元素
目前,vector对象只能用于盛放struct student类型的数据。我们可以将所有的struct student改为void *,让其可以盛放任意数据类型的指针。
此外,我们在函数中,再多做一些参数检查。
在append方法内,对参数指针进行判空检查。
在get方法内,检查index是否超出已盛放的数据size的大小。若超出大小,则返回NULL。
接下来,我们把vector对象的代码拆分成vector.h与vector.cpp两个文件。
vector.h中,有符号常量VECTOR_INIT_CAPACITY的定义,vector对象的声明。以及初始化函数和销毁函数的声明。
vector.h文件如下:
#pragma once
#define VECTOR_INIT_CAPACITY 10
struct vector {bool (*append)(vector* pVec, void* data);void* (*get)(vector* pVec, int index);void (*clear)(vector* pVec);void (*remove)(vector* pVec, int index);void** pData;int size;int capacity;
};
void vectorInit(vector*);
void vectorDestroy(vector* pVec);
vector.cpp文件如下:
#include "vector.h"
#include <stdlib.h>
bool vectorAppend(vector* pVec, void* data)
{if (pVec == NULL || data == NULL)return false;// 是否超长if (pVec->size >= pVec->capacity){// 加长到两倍void** newData = (void**)realloc(pVec->pData, pVec->capacity * sizeof(void*) * 2);if (newData == NULL){return false;}pVec->pData = newData;pVec->capacity = 2 * pVec->capacity;}pVec->pData[pVec->size] = data;pVec->size++;return true;
}
void* vectorGet(vector* pVec, int index)
{if (index >= pVec->size)return NULL;return pVec->pData[index];
}
void vectorRemove(vector* pVec, int index)
{for (int i = index; i < pVec->size - 1; i++)pVec->pData[i] = pVec->pData[i + 1];pVec->size -= 1;
}
void vectorClear(vector* pVec)
{if (pVec->pData != NULL)free(pVec->pData);pVec->pData = (void**)malloc(sizeof(void*) * VECTOR_INIT_CAPACITY);pVec->capacity = VECTOR_INIT_CAPACITY;pVec->size = 0;
}
void vectorInit(vector* pVec)
{pVec->get = vectorGet;pVec->append = vectorAppend;pVec->remove = vectorRemove;pVec->clear = vectorClear;// 初始情况下申请VECTOR_INIT_CAPACITY个elementpVec->pData = (void**)malloc(sizeof(void*) * VECTOR_INIT_CAPACITY);pVec->capacity = VECTOR_INIT_CAPACITY;pVec->size = 0;
}
void vectorDestroy(vector* pVec)
{if (pVec->pData == NULL)return;free(pVec->pData);pVec->pData = NULL;pVec->size = 0;pVec->capacity = 0;
}
测试通用数组
现在,vector数组可以用于盛放任意类型数据对象的指针。让我们使用它,用于盛放struct student *。
初始化与append
struct vector vec;
vectorInit(&vec);
struct student* s1 = (struct student*)malloc(sizeof(struct student));
s1->id = 1;
strcpy(s1->name, "小明");
s1->gender = 1;
s1->mark = 90;
vec.append(&vec, s1);
for (int i = 0; i < vec.size; i++)
{struct student* s = (struct student*)vec.get(&vec, i);printf("%d %s %d %d\n", s->id, s->name, s->gender, s->mark);
}
printf("size:%d\n", vec.size);
printf("capacity:%d\n", vec.capacity);
这里我们使用malloc申请一个struct student结构体,申请成功后,将其赋值为小明的数据。之后,将结构体struct student的指针s1,添加进入vector。遍历vector可以拿到我们之前放置进去的数据的指针,但是它是void*类型的,我们将其转换为struct student*类型,并赋值到s,使用这个指针,可以打印出小明数据的各项详情。
测试append追加
struct student* s2 = (struct student*)malloc(sizeof(struct student));
s2->id = 2;
strcpy(s2->name, "小红");
s2->gender = 0;
s2->mark = 95;
vec.append(&vec, s2);
for (int i = 0; i < vec.size; i++)
{struct student* s = (struct student*)vec.get(&vec, i);printf("%d %s %d %d\n", s->id, s->name, s->gender, s->mark);
}
printf("size:%d\n", vec.size);
printf("capacity:%d\n", vec.capacity);
再次使用malloc申请一个struct student结构体,申请成功后,将其赋值为小红的数据。之后,将结构体struct student的指针,追加进入vector。遍历vector可以拿到小明、小红数据的指针。
测试remove
// 别忘记销毁小明的数据
free(vec.get(&vec, 0));
vec.remove(&vec, 0);
for (int i = 0; i < vec.size; i++)
{struct student* s = vec.get(&vec, i);printf("%d %s %d %d\n", s->id, s->name, s->gender, s->mark);
}
printf("size:%d\n", vec.size);
printf("capacity:%d\n", vec.capacity);
现在,我们将小明的数据删除,注意一定要free掉小明的数据。仅仅remove小明数据的指针是不行的,小明的数据是由malloc申请的,必须调用free销毁。
测试clear
for (int i = 0; i < vec.size; i++)
{struct student* s = vec.get(&vec, i);free(s);
}
vec.clear(&vec);
for (int i = 0; i < vec.size; i++)
{struct student* s = vec.get(&vec, i);printf("%d %s %d %d\n", s->id, s->name, s->gender, s->mark);
}
printf("size:%d\n", vec.size);
printf("capacity:%d\n", vec.capacity);
使用循环,获取所有数据的指针,调用free将这些数据都销毁。其后,我们就可以安全地清空vector数组了。
销毁数组
最后别忘记销毁vector本身。
vectorDestroy(&vec);
刚刚我们为了测试把数组初始长度设置得很短,实际中,可以设置稍微长一点,比如初始数组长度为10。
#define VECTOR_INIT_CAPACITY 10
最后代码
vector.h
#pragma once#include <stdbool.h>#define VECTOR_INIT_CAPACITY 10struct vector {bool (*append)(struct vector* pVec, void* data);void* (*get)(struct vector* pVec, int index);void (*clear)(struct vector* pVec);void (*remove)(struct vector* pVec, int index);void** pData;int size;int capacity;
};void vectorInit(struct vector*);
void vectorDestroy(struct vector* pVec);
main.c
#define _CRT_SECURE_NO_WARNINGS#include "vector.h"
#include <stdio.h>
#include <stdlib.h>
#include <string.h>struct student {int id;         //  学号char name[20];  //  姓名int gender;     //  性别int mark;       //  成绩
};int main()
{struct vector vec;vectorInit(&vec);//  appendstruct student* s1 = (struct student*)malloc(sizeof(struct student));s1->id = 1;strcpy(s1->name, "小明");s1->gender = 1;s1->mark = 90;vec.append(&vec, s1);for (int i = 0; i < vec.size; i++){struct student* s = (struct student*)vec.get(&vec, i);printf("%d %s %d %d\n", s->id, s->name, s->gender, s->mark);}printf("size:%d\n", vec.size);printf("capacity:%d\n", vec.capacity);getchar();//  append追加struct student* s2 = (struct student*)malloc(sizeof(struct student));s2->id = 2;strcpy(s2->name, "小红");s2->gender = 0;s2->mark = 95;vec.append(&vec, s2);for (int i = 0; i < vec.size; i++){struct student* s = (struct student*)vec.get(&vec, i);printf("%d %s %d %d\n", s->id, s->name, s->gender, s->mark);}printf("size:%d\n", vec.size);printf("capacity:%d\n", vec.capacity);getchar();//  remove//  别忘记销毁小明的数据free(vec.get(&vec, 0));vec.remove(&vec, 0);for (int i = 0; i < vec.size; i++){struct student* s = vec.get(&vec, i);printf("%d %s %d %d\n", s->id, s->name, s->gender, s->mark);}printf("size:%d\n", vec.size);printf("capacity:%d\n", vec.capacity);for (int i = 0; i < vec.size; i++){struct student* s = vec.get(&vec, i);free(s);}getchar();//  clearvec.clear(&vec);for (int i = 0; i < vec.size; i++){struct student* s = vec.get(&vec, i);printf("%d %s %d %d\n", s->id, s->name, s->gender, s->mark);}printf("size:%d\n", vec.size);printf("capacity:%d\n", vec.capacity);getchar();//  销毁数组vectorDestroy(&vec);return 0;
}
vector.c
#include "vector.h"
#include <stdlib.h>bool vectorAppend(struct vector* pVec, void* data)
{if (pVec == NULL || data == NULL)return false;//  是否超长if (pVec->size >= pVec->capacity){//  加长到两倍void** newData = (void**)realloc(pVec->pData, pVec->capacity * sizeof(void*) * 2);if (newData == NULL){return false;}pVec->pData = newData;pVec->capacity = 2 * pVec->capacity;}pVec->pData[pVec->size] = data;pVec->size++;return true;
}void* vectorGet(struct vector* pVec, int index)
{if (index >= pVec->size)return NULL;return pVec->pData[index];
}void vectorRemove(struct vector* pVec, int index)
{for (int i = index; i < pVec->size - 1; i++)pVec->pData[i] = pVec->pData[i + 1];pVec->size -= 1;
}void vectorClear(struct vector* pVec)
{if (pVec->pData != NULL)free(pVec->pData);pVec->pData = (void**)malloc(sizeof(void*) * VECTOR_INIT_CAPACITY);pVec->capacity = VECTOR_INIT_CAPACITY;pVec->size = 0;
}void vectorInit(struct vector* pVec)
{pVec->get = vectorGet;pVec->append = vectorAppend;pVec->remove = vectorRemove;pVec->clear = vectorClear;//  初始情况下申请VECTOR_INIT_CAPACITY个elementpVec->pData = (void**)malloc(sizeof(void*) * VECTOR_INIT_CAPACITY);pVec->capacity = VECTOR_INIT_CAPACITY;pVec->size = 0;
}void vectorDestroy(struct vector* pVec)
{if (pVec->pData == NULL)return;free(pVec->pData);pVec->pData = NULL;pVec->size = 0;pVec->capacity = 0;
}
相关文章:

C动态数组
在实际项目中,我们经常与各式各样的数据打交道。 例如:我们处理的是学生的数据。 struct student {int id; // 学号char name[20]; // 姓名int gender; // 性别int mark; // 成绩 };学生数据使用一个结构体表示,该结构体拥有4个成员。分别为…...
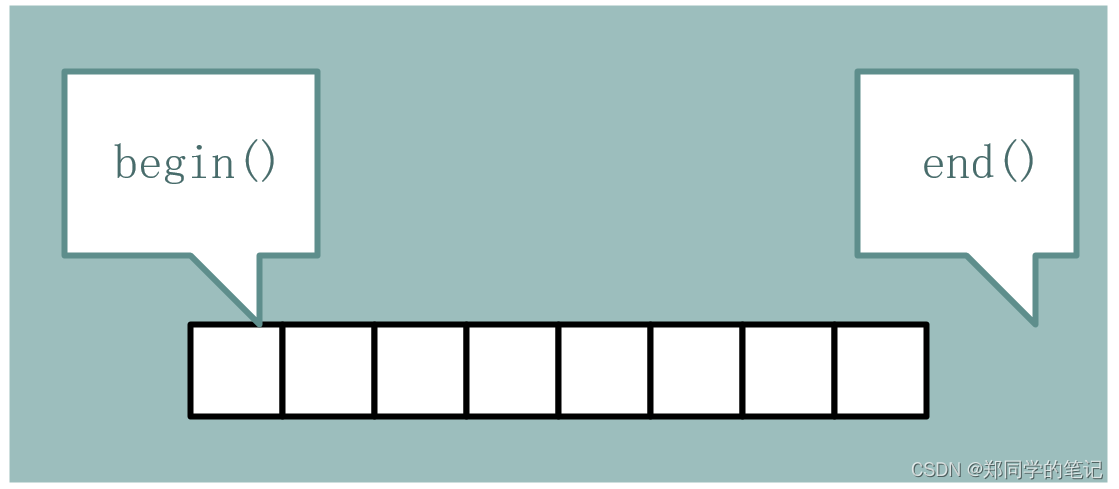
【STL一】STL组件(容器、迭代器、算法)
【STL一】STL组件(容器、迭代器、算法)一、STL二、STL组件(component)1、stl六大组件2、C STL的13个头文件3、stl所有头文件三、容器(container)1、序列容器(Sequence container)——顺序容器2、关联容器&a…...

Java每日一练(20230312)
目录 1. 两数之和 II ★ 2. 反转链表 ★★ 3. 二叉树的层序遍历 II ★★★ 🌟 每日一练刷题专栏 C/C 每日一练 专栏 Python 每日一练 专栏 Java 每日一练 专栏 1. 两数之和 II 给定一个已按照 非递减顺序排列 的整数数组 numbers ,请你从数…...

Linux中sudo,su与su -命令的区别
前言 su命令就是切换用户的工具,怎么理解呢?比如我们以普通用户tom登录的,但要添加用户任务,执行useradd ,tom用户没有这个权限,而这个权限恰恰由root所拥有。解决办法无法有两个,一是退出tom用…...

归并排序有多简单?一幅图教你看懂【C语言】
目录 归并排序的递归实现 代码实现 归并排序的非递归实现 代码实现 归并排序的思想很简单——分治法。简单地说,归并排序的是将序列拆分成几段子序列,将每一段子序列分别进行排序,排好之后再将有序的子序列归并(有点像合并两…...
)
C++-Z字扫描实现(Zigzag Scan)
Z字扫描(Zigzag Scan) 将二维矩阵压缩成行输出: int index0; for(int i0;i<rowscols-1;i){//i是第几条对角线if(i&1){//odd,向下扫描for(int jmax(0,i-cols1);j<min(i,row-1);j){res[index]mtx[j][i-j];}//}else{//偶数,向上扫描for(int jmi…...

【华为机试真题详解 Python实现】求最大数字【2023 Q1 | 100分】
文章目录 前言题目描述输入描述输出描述示例 1示例 2题目解析参考代码前言 《华为机试真题详解》专栏含牛客网华为专栏、华为面经试题、华为OD机试真题。 如果您在准备华为的面试,期间有想了解的可以私信我,我会尽可能帮您解答,也可以给您一些建议! 本文解法非最优解(即…...
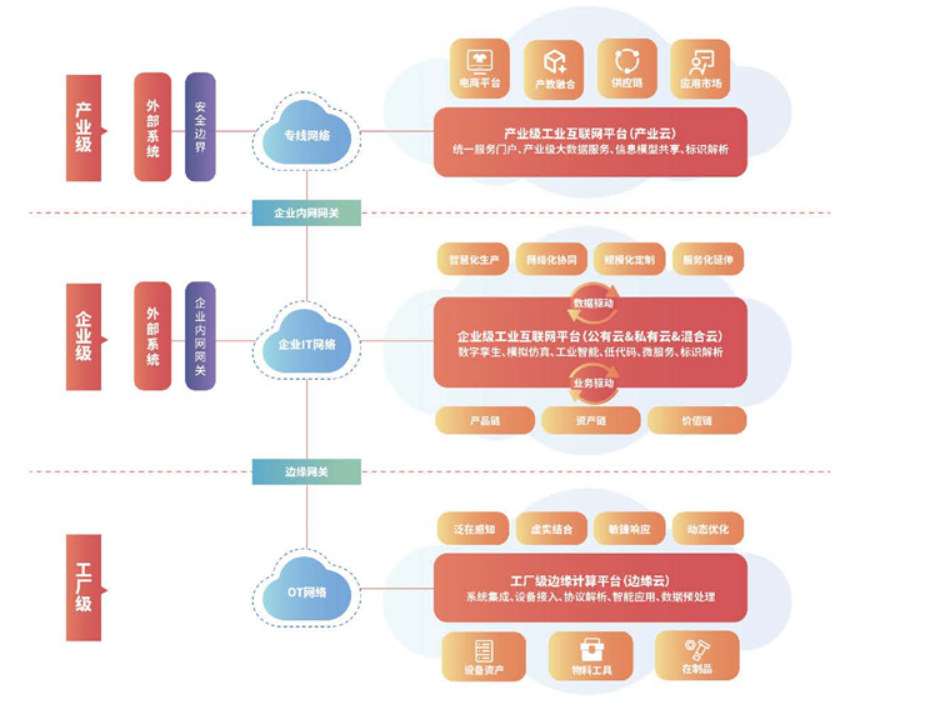
面对数万亿产业规模,如何掘金工业互联网?
近年来,加速工业互联网建设的声音越来越响亮。一方面,政策利好,持续驱动。从2017年的《国务院关于深化“互联网先进制造业” 发展工业互联网的指导意见》到《工业互联网创新发展三年行动计划(2021-2023年)》࿰…...
)
#ifdefine #define #endif (避免头文件被重复包含的真正含义)
宏定义 首先在谈论正式话题之前,需要先介绍一个基础概念,也是前提,那就是宏定义。 #define demo 1 #define PI 3.14我们都知道这样会将demo 在预处理阶段替换或者说展开为1,Pi 替换为3.14。 #define 宏定义一个标识符来表示一个…...

单片机能运行操作系统吗?
先直接上答案:可以!但是操作系统不是刚需,上操作系统比较占用单片机的资源,比如占用比较多的FLASH和RAM,间接增加了硬件成本,哪怕成本增加1毛钱,对于上量的产品,分分钟是一个工程师的…...
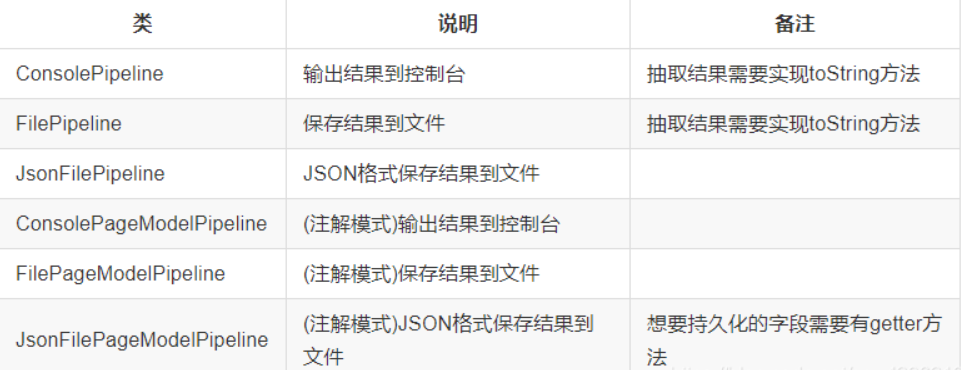
Python之webmagic爬虫优点与使用
一、webmagic的优点它更偏向于java的语法,对于熟悉java的工程师来说学习成本较低。提供多种选择器,如css选择器、xpath、正则等。有一个模块pipeline:可通过简单地配置,可以将爬虫抽取到的信息,持久化到文件、数据库等…...

代码随想录动态规划 || 121 122
Day42121. 买卖股票的最佳时机力扣题目链接给定一个数组 prices ,它的第 i 个元素 prices[i] 表示一支给定股票第 i 天的价格。你只能选择 某一天 买入这只股票,并选择在 未来的某一个不同的日子 卖出该股票。设计一个算法来计算你所能获取的最大利润。返…...
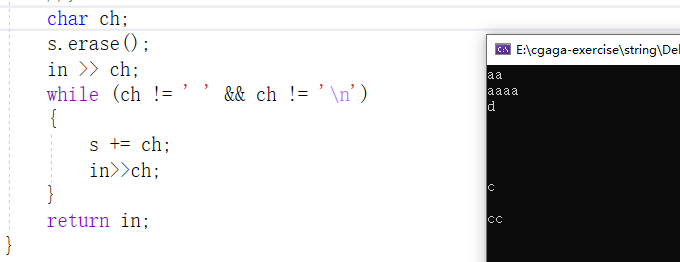
C++STL库中不可或缺的部分—string(模拟实现)
前文大家好,本篇文章主要是讲解一下string一些常用接口的模拟实现。众所周知,在日常生活中,字符串无处不在,如just do it,中国,一坤年等,想要在计算机上将这些字符展现出来就需要用到string类,而对我们C程序…...

MySQL复合查询
文章目录基本查询回顾多表查询自连接子查询单行子查询多行子查询多列子查询在from子句中使用子查询合并查询unionunion all基本查询回顾 查询的员工部门表结构: mysql> show tables; ----------------- | Tables_in_scott | ----------------- | dept …...

PCIe 资料收集2
文章目录感官认识PCIe的存储空间PCIe 在 linux 下的驱动PCIe 验证1.PCIe 传递裸数据2.PCIe 转其他设备PCIe转其他总线RS232USB从用户空间理解PCIe感官认识 总线协议接口 视频介绍PCIe 视频介绍及PCIe文字介绍 PCIe上可以接各种控制器硬盘控制器硬盘声卡控制器音响咪头/耳机显…...
)
Linux网络编程(使用VScode远程登录ubuntu)
文章目录 前言一、SSH插件的安装1.SSH简单介绍2.SSH插件安装和配置步骤二、安装C/C++插件总结前言 本篇文章将带大家进行网络编程的准备工作,使用vscode进行远程登录ubuntu。为什么要使用vscode进行远程登录ubantu呢?因为有些小伙伴的电脑可能性能不够开启虚拟机后会导致电脑…...

如何提高项目估算精准度?关键看5大影响因子
如何让项目估算工作更加精准,我们需要重点关注5大调整因子。 1、功能点调整因子 首先需要对功能点因子进行调整,区分不同类型的系统特征值。 因为不同的系统,对项目开发的影响程度不同,一般我们把系统特征值分为14种类型ÿ…...

论文阅读笔记《Nctr: Neighborhood Consensus Transformer for Feature Matching》
核心思想 本文提出一种融合邻域一致性的Transfomer结构来实现特征点的匹配(NCTR)。整个的实现流程和思想与SuperGlue相似,改进点在于考虑到了邻域一致性。邻域一致性在许多的传统图像匹配和图匹配任务中都有应用,他基于一个很重要…...

上位机系统Ubuntu 20.04与下位机arduino UNO通讯
目录一、安装arduino IDE1.1安装方法1.1.1终端里命令下载(不推荐)1.1.2官网下载(不推荐)1.1.3论坛下载(不推荐)1.1.4系统应用商店(推荐!)1.2配置项目文件位置1.3测试IDE功…...

hive面试题
1、什么是Hive Hive是基于Hadoop的一个数据仓库工具,可以将结构化的数据文件映射为一张数据库表,并提供类SQL查询功能(HQL) 2、Hive的意义(最初研发的原因) 避免了去写MapReduce,提供快速开发的…...

从Imagination董事会风波看半导体IP行业的地缘政治与商业模式挑战
1. 从一场董事会风波看全球半导体IP格局的变迁最近几年,半导体行业的朋友们茶余饭后除了聊制程、聊架构,也少不了聊各种资本并购的“大戏”。其中,英国GPU IP巨头Imagination Technologies的董事会风波,堪称一部集商业、资本与地缘…...

如何在手机上免费播放任何视频格式?VLC for Android给你答案!
如何在手机上免费播放任何视频格式?VLC for Android给你答案! 【免费下载链接】vlc-android VLC for Android, Android TV and ChromeOS 项目地址: https://gitcode.com/gh_mirrors/vl/vlc-android 你是否曾经遇到过这样的情况:下载了…...
)
STM32CubeMX实战:用高级定时器TIM1实现带刹车功能的互补PWM输出(F4系列)
STM32CubeMX实战:用高级定时器TIM1实现带刹车功能的互补PWM输出(F4系列) 在电机控制、电源管理等工业应用中,硬件级的保护机制往往比软件响应更加可靠。STM32F4系列的高级定时器TIM1提供的互补PWM输出与刹车功能,正是为…...

3步终极指南:用开源TCC-G15彻底解决Dell G15散热难题
3步终极指南:用开源TCC-G15彻底解决Dell G15散热难题 【免费下载链接】tcc-g15 Thermal Control Center for Dell G15 - open source alternative to AWCC 项目地址: https://gitcode.com/gh_mirrors/tc/tcc-g15 你是否正在为Dell G15笔记本的过热问题而烦恼…...

别再死记硬背了!用PyTorch和TensorFlow动手实现四种池化层,直观理解它的作用
用代码可视化理解深度学习中的池化层:PyTorch与TensorFlow实战指南 当你第一次听说"池化层"这个概念时,是否也感到困惑?为什么神经网络需要这样一个"缩小"图像的层?本文将通过PyTorch和TensorFlow两种框架的实…...

MTK平台Android 11定制:Settings里那些被“砍掉”的功能,到底怎么改的?
MTK平台Android 11深度定制:Settings功能裁剪的工程实践与源码解析 在移动设备系统定制领域,MTK平台因其高度集成的硬件方案和灵活的软件架构,成为众多厂商的首选。当我们基于MTK平台进行Android 11系统级定制时,Settings应用的模…...

WarcraftHelper 2024:魔兽争霸3终极优化指南
WarcraftHelper 2024:魔兽争霸3终极优化指南 【免费下载链接】WarcraftHelper Warcraft III Helper , support 1.20e, 1.24e, 1.26a, 1.27a, 1.27b 项目地址: https://gitcode.com/gh_mirrors/wa/WarcraftHelper 还在为《魔兽争霸3》在现代电脑上运行卡顿、画…...

解决ClaudeCode频繁封号与Token不足的Taotoken替代方案
🚀 告别海外账号与网络限制!稳定直连全球优质大模型,限时半价接入中。 👉 点击领取海量免费额度 解决ClaudeCode频繁封号与Token不足的Taotoken替代方案 对于依赖Claude Code这类编程助手工具的开发者而言,访问不稳定…...

放心API和4SAPI怎么选?从开发者选型角度看差异
很多开发者在选 Claude API 中转站时,都会遇到一个问题:**到底是选更偏个人友好的放心API,还是选更偏企业级的4SAPI?**这个问题没有标准答案,只有场景答案。---## 一、先给结论如果你的项目处于以下阶段:- …...

如何免费获取B站8K高清视频:哔哩下载姬完整使用教程
如何免费获取B站8K高清视频:哔哩下载姬完整使用教程 【免费下载链接】downkyi 哔哩下载姬downkyi,哔哩哔哩网站视频下载工具,支持批量下载,支持8K、HDR、杜比视界,提供工具箱(音视频提取、去水印等…...