【物联网设备端开发】ESP开发工具:QEMU如何模拟以太网口接入网络
以太网口支持
ESP-IDF中添加了对Opencores以太网MAC的支持。
- 运行以太网示例时,启用
CONFIG_EXAMPLE_CONNECT_ETHERNET和CONFIG_EXAMPLE_USE_OPENETH.。 - 运行自定义应用程序时,启用
CONFIG_ETH_USE_OPENETH并初始化以太网驱动程序,如示例 /common_components/protocol_example.common/connect.c 中所示(查找esp_eth_mac_new_openeth)。
启动QEMU时,使用open_eth网络设备。
用户模式网络
例如,要在用户模式下启动网络(仅TCP/UDP,模拟设备位于NAT之后),请在QEMU命令行中添加以下选项:
-nic user,model=open_eth
一些ESP项目(特别是运行TCP侦听器)可能需要设置端口转发,
-nic user,model=open_eth,id=lo0,hostfwd=tcp:127.0.0.1:PORT_HOST-:PORT_GUEST
(例如,asio-echo服务器默认在2222上设置服务器,因此hostfwd=tcp:127.0.0.1:22222-:2222 允许从主机访问 nc localhost 2222 )
指定引导模式
要指定所需的 strapping 模式, 在运行QEMU时需要添加以下参数:
-global driver=esp32.gpio,property=strap_mode,value=0x0f
这将设置 GPIO_STRAP 寄存器的值。
- 使用
0x12作为闪存启动模式(默认) - 将
0x0f用于仅UART下载模式(因为SDIO部分未实现)
Specifying eFuse storage
Add extra arguments to the command line:
-drive file=qemu_efuse.bin,if=none,format=raw,id=efuse
-global driver=nvram.esp32.efuse,property=drive,value=efuse
The first argument creates a block device backed by qemu_efuse.bin file, with identifier efuse. The second line configures nvram.esp32.efuse device to use this block device for storage.
The file must be created before starting QEMU:
dd if=/dev/zero bs=1 count=124 of=/tmp/qemu_efuse.bin
124 bytes is the total size of ESP32 eFuse blocks.
Note
Specifying eFuse storage is mandatory to test out any platform security features like “Secure Boot” or “Flash Encryption”.
Emulating ESP32 ECO3
For the application to detect the emulated chip as ESP32 ECO3, the following virtual efuses must be set:
- CHIP_VER_REV1
- CHIP_VER_REV2
Here is the corresponding efuse file (in hexadecimal, produced using xxd -p):
000000000000000000000000008000000000000000001000000000000000
000000000000000000000000000000000000000000000000000000000000
000000000000000000000000000000000000000000000000000000000000
000000000000000000000000000000000000000000000000000000000000
00000000
To convert this (efuse.hex) back to binary, run xxd -r -p efuse.hex qemu_efuse.bin.
Alternatively, these bits can be set using espefuse:
espefuse.py --port=socket://localhost:5555 burn_efuse CHIP_VER_REV1
espefuse.py --port=socket://localhost:5555 burn_efuse CHIP_VER_REV2
Disabling the watchdogs
By default, Timer Group watchdog timers are emulated, and TG0 WDT is enabled at reset. It is sometimes useful to disable these watchdog timers. This can be done by adding the following to the command line:
-global driver=timer.esp32.timg,property=wdt_disable,value=true
This disables the emulation of TG watchdog timers. Even if the application configures them, they will not fire.
The RTC watchdog timer is not emulated yet, so it doesn’t need to be disabled.
Using esptool.py and espefuse.py to interact with QEMU
-
Start QEMU:
build/qemu-system-xtensa -nographic \-machine esp32 \-drive file=flash_image.bin,if=mtd,format=raw \-global driver=esp32.gpio,property=strap_mode,value=0x0f \-drive file=qemu_efuse.bin,if=none,format=raw,id=efuse \-global driver=nvram.esp32.efuse,property=drive,value=efuse \-serial tcp::5555,server,nowaitThe final line redirects the emulated UART to TCP port 5555 (QEMU acts as a server).
Type q and press Enter at any time to quit.
-
Run esptool.py:
esptool.py -p socket://localhost:5555 flash_idFlashing with
idf.pyalso works:export ESPPORT=socket://localhost:5555 idf.py flash -
Or, run espefuse.py:
espefuse.py --port socket://localhost:5555 --do-not-confirm burn_custom_mac 00:11:22:33:44:55
Note: esptool can not reset the emulated chip using the RTS signal, because the state of RTS is not transmitted over TCP to QEMU. To reset the emulated chip, run system_reset command in QEMU console (started at step 1).
Specifying ROM ELF file
If -kernel and -bios arguments are not given, ESP32 (rev. 3) ROM code will be loaded. This ROM code binary is included in the repository. To specify the ROM code ELF file to load, pass the filename with a -bios <filename> argument.
Using flash encryption
Self-encryption workflow
- In the IDF application, enable
CONFIG_SECURE_FLASH_ENC_ENABLEDthroughmenuconfig, and build it - Build the flash image as per the instructions from the Compiling the ESP-IDF program to emulate section.
- Create
qemu_efuse.binas highlighted in the Specifying eFuse storage section. - Execute
qemu-system-xtensausing the following command:build/qemu-system-xtensa -nographic -machine esp32 \-drive file=/path/to/qemu_efuse.bin,if=none,format=raw,id=efuse \-global driver=nvram.esp32.efuse,property=drive,value=efuse \-drive file=/path/to/flash_image.bin,if=mtd,format=raw \-global driver=timer.esp32.timg,property=wdt_disable,value=true
Adding PSRAM
QEMU “memory size” option can be used to enable PSRAM emulation. By default, no PSRAM is added to the machine. You can add 2MB or 4MB PSRAM using -m 2M or -m 4M command line options, respectively.
Note that PSRAM MMU is not emulated yet, so things like bank switching (himem in IDF) do not work.
Using SD cards
QEMU emulates SD/MMC host controller used in ESP32. To add an SD card to the system, create an image and pass it to QEMU.
-
Create a raw image file, for example, 64 MB:
$ dd if=/dev/zero bs=$((1024*1024)) count=64 of=sd_image.bin -
Add the following argument when running QEMU:
-drive file=sd_image.bin,if=sd,format=raw
If you need to create a large SD card image, it is recommended to use sparse cqow2 images instead of raw ones. Consult QEMU manual about qemu-img tool for details.
Only one SD card is supported at a time. You can use either slot 0 or slot 1 of the SD/MMC controller in the application code.
Enabling graphical user interface (GUI)
The ESP32 QEMU implementation implements a virtual RGB panel, absent on the real hardware, that can be used to show graphical interface. It is associated to a virtual frame buffer that can be used to populate the pixels to show. It is also possible to use the target internal RAM as a frame buffer.
To enable the graphical interface, while keeping the serial output in the console, use the following command line:
build/qemu-system-xtensa \-machine esp32 \-drive file=flash_image.bin,if=mtd,format=raw-display sdl \-serial stdio
If gtk backend was enabled when compiling QEMU, it is possible to replace -display sdl with -display gtk
相关文章:

【物联网设备端开发】ESP开发工具:QEMU如何模拟以太网口接入网络
以太网口支持 ESP-IDF中添加了对Opencores以太网MAC的支持。 运行以太网示例时,启用CONFIG_EXAMPLE_CONNECT_ETHERNET和 CONFIG_EXAMPLE_USE_OPENETH.。运行自定义应用程序时,启用CONFIG_ETH_USE_OPENETH 并初始化以太网驱动程序,如示例 /c…...
)
Python学习笔记(四)
# 数据容器分为5类,分别是:列表(list)、元组(tuple)、字符串(str)、集合(set)、字典(dict)""" 演示数据容器之:list列表 语法:[元素ÿ…...

跨域:安全分步实施指南
什么是跨域问题? 跨域(Cross-Origin Resource Sharing,CORS)问题发生在浏览器的同源策略(Same-Origin Policy)限制下。当一个域上的网页试图访问另一个域上的资源时,浏览器会阻止这些操作以保护…...

【iOS】AutoreleasePool自动释放池的实现原理
目录 ARC与MRC项目中的main函数自动释放池autoreleasepool {}实现原理AutoreleasePoolPage总结 objc_autoreleasePoolPush的源码分析autoreleaseNewPageautoreleaseFullPageautoreleaseNoPage autoreleaseFast总结 autorelease方法源码分析objc_autoreleasePoolPop的源码分析po…...

stm32—GPIO
0. 引入 在单片机产品中,我们常常可以见到三种模块:LCD灯、KEY按键、BEEP蜂鸣器 LED灯: 一个比较常见的LED电路LED0 ---------- 通过控制LED0引脚(电线) 给它一个低电平(低电压),LED灯就会亮 给它一个高电平(高电压),LED灯就会灭 …...

CocosCreator使用 ProtoBuf WebSocket与服务器对接方法
在 Cocos Creator 中使用 .proto 文件和转换成 TypeScript(TS)两者各有其优缺点,具体选择取决于你的项目需求和团队的开发习惯。以下是两者的一些比较: 1、使用 .proto 文件的优点: 跨语言支持:Protocol B…...

【python基础】while循环语句练习
明显可以感觉到循环比判断要更加难以理解一些,这个就只能通过练习来提高理解和思维能力了。 学习视频:第一阶段-第四章-05-while循环案例-九九乘法表_哔哩哔哩_bilibili 练习一:计算1-10的和 i1#循环的起始值 sum0 while i&l…...

【SpringBoot系列】WebMvcConfigurer配置
💝💝💝欢迎来到我的博客,很高兴能够在这里和您见面!希望您在这里可以感受到一份轻松愉快的氛围,不仅可以获得有趣的内容和知识,也可以畅所欲言、分享您的想法和见解。 推荐:kwan 的首页,持续学…...
:高级教程——深入详解C++信号处理)
学懂C++ (十九):高级教程——深入详解C++信号处理
目录 C中的信号处理 1. 信号处理的本质 2. 主要信号类型 3. 核心关键点 4. 经典实例 代码分析 5. 进阶:信号屏蔽与多线程 例子:使用sigaction() 6. Windows中的信号处理 7. 比较与总结 示例:Windows控制台事件处理 总结 C中的信号…...
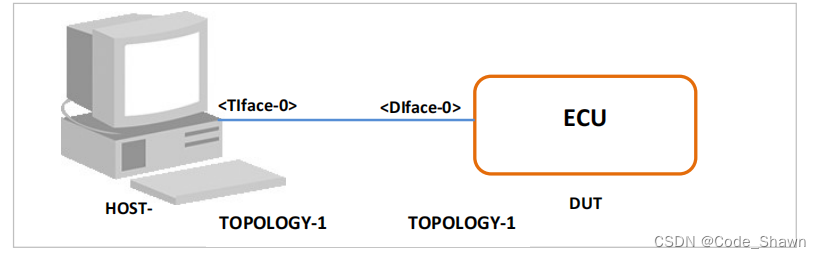
SOMEIP_ETS_032:echoUINT8ArrayMinSize
测试目的: 确保DUT能够正确处理最小尺寸的UINT8数组参数,并且在发送和接收过程中保持参数值和顺序不变。 描述 本测试用例旨在验证DUT在处理包含最小尺寸UINT8数组参数的SOME/IP消息时,是否能够准确地发送和接收这些参数,确保返…...

JS+CSS案例:可适应上下布局和左右布局的菜单(含二级菜单)
今天,我给大家分享一个原创的CSS菜单,整个菜单全由CSS写成,仅在切换布局时使用JS。合不合意,先看看效果图。 本例图片 接下来,我来详细给大家分享它的制作方法。 文件夹结构 因为涉及到了样式表切换,所以,你需要借鉴一下我的文件夹结构。 CSS文件夹: reset.css 用于…...

【数据结构】线性表,顺序表
一. 线性表 1. 线性表(linear list)是n个具有相同特性的数据元素的有限序列。 2. 线性表是一种在实际中广泛使用的数据结构,常见的线性表:顺序表、链表、栈、队列、字符串... 3. 线性表在逻辑上是线性结构,也就说是连续的一条直线。但是在物理…...

Spring之最基础的创建与Bean的存储与获取(还有Maven加载jar包报错的解决方法)
目录 创建Spring项目 如何解决Maven加载jar包报错 存储Bean和取Bean 在Java中对象也称为Bean。所以后面我提到Bean,大家要知道我说的是什么。 创建Spring项目 我的idea是2022版本的,如果大家和我一样可以参考我的。 1.创建一个Maven项目。图片上忘了…...

RabbitMQ应用问题 - 消息顺序性保证、消息积压问题
文章目录 MQ 消息顺序性保证概述原因分析解决方案基于 spring-cloud-stream 实现分区消费 消息挤压问题概述原因分析解决方案 MQ 消息顺序性保证 概述 a)消息顺序性:消费者消费的消息的顺序 和 生产者发送消息的顺序是一致的. 例如 生产者 发送消息顺序…...

linux tcp通讯demo
linux tcp通讯demo代码。通过用chatgpt生成的代码。做一个代码记录。 一、基本的通讯demo server.c #include <stdio.h> #include <stdlib.h> #include <string.h> #include <unistd.h> #include <sys/types.h> #include <sys/socket.h>…...

在 MongoDB 中,如何配置副本集以实现读写分离?
在 MongoDB 中,配置副本集以实现读写分离主要涉及以下几个步骤: 初始化副本集: 创建副本集时,需要在所有参与节点上运行 rs.initiate() 命令。这将初始化一个新的副本集。 添加成员到副本集: 使用 rs.add() 命令将所有…...

虚拟dom-Diff算法
虚拟dom-Diff算法 vue2 diff算法在vue2中就是patch,通过新旧虚拟dom对比,找到最小变化然后进行dom操作 在页面首次渲染的时候会调用一次patch并创建新的vnode,不会进行深层次的比较,然后再组件中数据发生变化的时候,…...

01创建型设计模式——单例模式
一、单例模式简介 单例模式(Singleton Pattern)是一种创建型设计模式(GoF书中解释创建型设计模式:一种用来处理对象的创建过程的模式),单例模式是其中的一种,它确保一个类只有一个实例ÿ…...

图像分割(一)
一、概述 语义分割:是把每个像素都打上标签(这个像素点是人、树、背景等) 实例分割:不光要区别类别,还要区分类别中的每一个个体 损失函数:逐像素的交叉熵;样本均衡问题 MIOU指标:…...
)
C++ 新经典:设计模式 目录(先留框架,慢慢来~)
C 新经典:设计模式 C 新经典:设计模式 C 新经典:设计模式第1章 设计模式与软件开发思想、编程环境介绍第2章 模板方法模式第3章 工厂模式、原型模式、建造者模式第4章 策略模式第5章 观察者模式第6章 装饰模式第7章 单件模式第8章 外观模式第…...

政企数据安全:危机与出路
随着数字化转型的浪潮席卷全球,公共部门积累的数据量呈爆炸式增长。从公民个人信息到公共服务记录,从财政预算到基础设施管理数据——这些宝贵资源在提升政府治理效率的同时,也悄然成为网络犯罪分子的“新猎物”。当公共数据逐渐成为数字时代…...

基于Netburner NANO54415构建工业级嵌入式Web服务器:从硬件选型到广域监控实战
1. 项目概述:一个为广域与本地监控而生的嵌入式Web服务器如果你正在寻找一个能部署在野外、工厂角落或者任何需要远程数据采集与控制场景下的嵌入式Web服务器方案,并且对市面上那些要么性能孱弱、要么开发门槛极高的开发板感到厌倦,那么这个基…...

艾尔登法环存档迁移终极指南:3分钟解决角色转移难题
艾尔登法环存档迁移终极指南:3分钟解决角色转移难题 【免费下载链接】EldenRingSaveCopier 项目地址: https://gitcode.com/gh_mirrors/el/EldenRingSaveCopier 还在为《艾尔登法环》存档版本不兼容而烦恼吗?EldenRingSaveCopier 是你的终极解决…...

别再只用递归了!用C语言栈实现非递归快速排序,内存效率提升实战
从递归到迭代:C语言栈实现非递归快速排序的工程实践 在嵌入式开发和大规模数据处理场景中,递归实现的快速排序常常面临栈溢出风险。当排序10万个元素的数组时,递归深度可能达到log₂100000≈17层,在仅有2KB栈空间的STM32F103上极易…...
【php语法学习,iscc校赛wp】)
学习日志(三)【php语法学习,iscc校赛wp】
1. 任务 1.1.1.1.1.1. 知识部分 rce看【之前的笔记?】php的知识点学习继续jwt token好像是比赛的题目考察内容,我看看php伪协议 1.1.1.1.1.2. 题目 参加iscc比赛【五一】rce题目 1.1.1.1.1.3. 环境配置 把vscode搞好,上学期没有把Php配…...

京东自动购物终极指南:告别缺货烦恼,智能抢购神器
京东自动购物终极指南:告别缺货烦恼,智能抢购神器 【免费下载链接】Jd-Auto-Shopping 京东商品补货监控及自动下单 项目地址: https://gitcode.com/gh_mirrors/jd/Jd-Auto-Shopping 还在为心仪商品瞬间售罄而苦恼吗?还在熬夜等待补货却…...

5分钟免费搞定HS2汉化:Honey Select 2完整中文补丁终极教程
5分钟免费搞定HS2汉化:Honey Select 2完整中文补丁终极教程 【免费下载链接】HS2-HF_Patch Automatically translate, uncensor and update HoneySelect2! 项目地址: https://gitcode.com/gh_mirrors/hs/HS2-HF_Patch 还在为Honey Select 2的日文界面而烦恼吗…...

终极音乐解锁指南:3步让加密音乐在任何设备自由播放
终极音乐解锁指南:3步让加密音乐在任何设备自由播放 【免费下载链接】unlock-music 在浏览器中解锁加密的音乐文件。原仓库: 1. https://github.com/unlock-music/unlock-music ;2. https://git.unlock-music.dev/um/web 项目地址: https:/…...

免费解锁AMD Ryzen隐藏性能:SMUDebugTool终极指南
免费解锁AMD Ryzen隐藏性能:SMUDebugTool终极指南 【免费下载链接】SMUDebugTool A dedicated tool to help write/read various parameters of Ryzen-based systems, such as manual overclock, SMU, PCI, CPUID, MSR and Power Table. 项目地址: https://gitcod…...

终极艾尔登法环存档迁移指南:3分钟学会角色无损转移
终极艾尔登法环存档迁移指南:3分钟学会角色无损转移 【免费下载链接】EldenRingSaveCopier 项目地址: https://gitcode.com/gh_mirrors/el/EldenRingSaveCopier 还在为《艾尔登法环》存档迁移而烦恼吗?当游戏版本更新后,你辛辛苦苦培…...