【RDMA】mlxlink检查和调试连接状态及相关问题--驱动工具
简介
mlxlink工具用于检查和调试连接状态及相关问题。该工具可以用于不同的链路和电缆(包括被动、电动、收发器和背板)。
属于mft工具套件的一个工具,固件工具 Firmware Tools (MFT):https://blog.csdn.net/bandaoyu/article/details/142427579
警告
为了确保mlxlink正常工作,请确保将固件版本更新到最新版本。
mlxlink是为具备适当技术背景的高级用户设计的。
请不要使用mlxlink通过(“--port_state dn”)标志来禁用主机与无管理交换机之间的端口连接。
mlxlink的错误、警告和说明将打印在标准错误控制台上。
为新设备(NVIDIA ConnectX-6及以上,NVIDIA Quantum交换机及以上)设置速率(50GbE、100GbE和200GbE),需要指定通道数量:mlxlink -d <dev> --speeds [50G_2X | 50G_1X | 100G_2X | 100G_4X | 200G_4X ]。
官网说明:https://docs.nvidia.com/networking/display/mftv421/mlxlink+utility
功能
-
监控功能:
- 错误计数器和比特错误率信息
- 链路等级
- 前向纠错信息
- 一般端口信息
- SerDes 参数
- 设备信息
- PCIe
-
配置功能:
- 重置端口
- 速度
- SerDes 参数
- 前向纠错
- 循环回路
示例
获取 <设备>,<端口编号> 的信息:状态,带宽,固件版本,mft版本等
mlxlink -d <device> -p <port_number>
mlxlink -d mlx5_bond_0 -p 1 /mlxlink -d 81:00.0 -p 1
获取 <设备>,<端口编号> 和比特错误率计数器的信息。
mlxlink -d <device> -p <port_number> -c
mlxlink -d mlx5_bond_0 -p 1 /mlxlink -d 81:00.0 -p 1
(编辑中.....)
mlxlink 用法
语法:
mlxlink [OPTIONS]
选项:
| -h |--help | Display help message. |
| -v |--version | Display version info. |
| -d |--device <device> | Perform operation for a specified mst device |
| -p |--port <port_number> | Port Number |
| --port_type <port_type> | Port Type [NETWORK(Default)/PCIE/OOB] |
| --depth <depth> | Depth level of the DUT of some hierarchy (valid for PCIe port type only) |
| --pcie_index <pcie_index> | PCIe index number (Internal domain index) (valid for PCIe port type only) |
| --node <node> | The node within each depth (valid for PCIe port type only) |
| --json | Print the output in JSON format |
Queries:
| --show_links | Show valid PCIe links (valid for PCIe port type only) |
| -m |--show_module | Show Module Info |
| -c |--show_counters | Show Physical Counters and BER Info |
| -e |--show_eye | Show Eye Opening Info |
| --show_fec | Show FEC Capabilities |
| --show_serdes_tx | Show Transmitter Info |
| --show_tx_group_map <group_num> | Display all label ports mapped to group <group_num> (for NVIDIA Spectrum-2 and NVIDIA Quantum devices). |
| --show_device | General Device Info |
| --show_ber_monitor | Show BER Monitor Info. Note: The flag is not supported in HCAs. |
| --show_external_phy | Show External PHY Info Note: The flag is supported in NVIDIA Spectrum switch systems only. |
Commands:
| -a |--port_state <port_state> | Configure Port State [UP(up)/DN(down)/TG(toggle)] | |||
| -s |--speeds <speeds> | Configure Speeds [speed1,speed2,...] | |||
| --link_mode_force | Configure Link Mode Force (Disable AN) | |||
| -l |--loopback <loopback> | Configure Loopback Mode [NO(no loopback)/RM(phy remote Rx-to-Tx loopback)/PH(internal phy Tx-to-Rx loopback)/EX(external loopback connector needed)] | |||
| -k |--fec <fec_override> | Configure FEC [AU(Auto)/NF(No-FEC)/FC(FireCode FEC)/ RS(RS-FEC)]/LL(LL-RS-FEC)/DF-RS(Interleaved_RS-FEC)/DF-LL(Interleaved_LL_RS-FEC)] | |||
| --fec_speed <fec_speed> | Speed to Configure FEC [100G/50G/25G/...] (Default is Active Speed) | |||
| --serdes_tx <params> | Configure Transmitter Parameters [polarity,ob_tap0,...] | |||
| --serdes_tx_lane <transmitter_lane> | Transmitter Lane to Set (Optional - Default All Lanes) | |||
| --database | Save Transmitter Configuration for Current Speed Permanently (Optional) | |||
| --tx_params_override | Set the parameters according to Data Base only, otherwise it will be set according to the best possible configuration chosen by the system (e.g. KR-startup) (Optional) | |||
| --tx_group_map <group_num> | Map ports to group <group_num> (for NVIDIA Spectrum-2 and NVIDIA Quantum devices) | |||
| --ports <ports> | Ports to be mapped [1,2,3,4..] | |||
| --test_mode <prbs_mode> | Physical Test Mode Configuration [EN(enable)/DS(disable)/TU(perform tuning)] | |||
| --rx_prbs <rx_prbs_mode> | RX PRBS Mode [PRBS31(Default)/PRBS7/...] (Optional - Default PRBS31) | |||
| --tx_prbs <tx_prbs_mode> | TX PRBS Mode [PRBS31(Default)/PRBS7/...] (Optional - Default PRBS31) | |||
| --rx_rate <rx_lane_rate> | RX Lane Rate [EDR(Default)/25G/10G/...] (Optional - Default 25G) | |||
| --tx_rate <tx_lane_rate> | TX Lane Rate [EDR(Default)/25G/10G/...] (Optional - Default 25G) | |||
| --invert_tx_polarity | PRBS TX polarity inversion (Optional - Default No Inversion) | |||
| --invert_rx_polarity | PRBS RX polarity inversion (Optional - Default No Inversion) | |||
| --lanes | PRBS lanes to set (one or more lane separated by comma)[0,1,2,...] Optional: Default all lanes | |||
| -b |--ber_collect <csv_file> | Port Extended Information Collection [CSV File] | |||
| --amber_collect <csv_file> | AmBER Port Extended Information Collection For 16nm Products and Later [CSV File] | |||
| --ber_limit <limit_criteria> | BER Limit Criteria [Nominal(Default)/Corner/Drift] (Optional - Default Nominal) | |||
| --iteration <iteration> | Iteration Number of BER Collection | |||
| --pc | Clear Counters | |||
| --set_external_phy | Set External PHY Note: The flag is supported in NVIDIA Spectrum switch systems only. | |||
| --twisted_pair_force_mode <twisted_pair_force_mode> | Twisted Pair Force Mode [MA(Master)/SL(Slave)] | |||
| --cable | Perform operations on the cables | |||
| --dump | Dump cable pages in raw format | |||
| --ddm | Get cable Digital Diagnostic Monitoring information | |||
| --read | Perform read operation from specific page | |||
| --length <length> | Length of data to read in bytes (Optional - Default 1 byte) | |||
| --page <pageNum> | Specific page number to read/write | |||
| --offset <offset> | Specific page offset to read/write | |||
| --write <bytes> | Perform write operation with specific data (list of bytes, separated by ',') | |||
| --prbs_select <side> | Module PRBS test mode side selector [MEDIA, HOST] | |||
| --prbs_mode <cmd> | Perform PRBS test mode on the Module [EN(Enable),DS(Disable)] | |||
| --generator_pattern <pattern> | Set PRBS generator pattern [PRBS31(default),PRBS23,PRBS7,PRBS11,PRBS9,PRBS13,SSPR,SSPRQ] | |||
| --swap_generator | Enable PAM4 MSB <-> LSB generator swapping (Optional) | |||
| --invert_generator | Enable PRBS generator inversion (Optional) | |||
| --generator_lanes <lanes> | PRBS generator lanes to set (one or more lane separated by comma)[0,1,2,3,4,5,6,7] (Optional - Default all lanes) | |||
| --checker_pattern <pattern> | Set PRBS checker pattern [PRBS31(default),PRBS23,PRBS7,PRBS11,PRBS9,PRBS13,SSPR,SSPRQ] | |||
| --swap_checker | Enable PAM4 MSB <-> LSB checker swapping (Optional) | |||
| --invert_checker | Enable PRBS checker inversion (Optional) | |||
| --checker_lanes <lanes> | PRBS checker lanes to set (one or more lane separated by comma)[0,1,2,3,4,5,6,7] (Optional - Default all lanes) | |||
| --lane_rate <rate> | Set PRBS checker and generator lane rate [HDR(50G)(default),1.25G,SDR(2.5G),10.3125G,FDR(14G),EDR(25G),NDR(100G)] | |||
| --show_diagnostic_info | Show PRBS diagnostic counters information | |||
| --clear_diagnostic_info | Clear PRBS diagnostic counters | |||
| --control_parameters | Show Module Control Parameters | |||
| --tx_equalization <value> | Set Module Tx Input Equalization in dB [NE(No Equalization),1,2,3,4,5,6,7,8, 9,10,11,12] | |||
| --rx_emphasis <value> | Set Module RX Output Emphasis in dB. for CMIS, pre-emphasis value will be set [NE(No Equalization),0.5,1,1.5,2,2.5,3,3.5,4,5,6,7] | |||
| --rx_post_emphasis <value> | Set Module Rx Post Emphasis in dB [NE(No Equalization),1,2,3,4,5,6,7] | |||
| --rx_amplitude <value> | Set Module Rx Output Amplitude [0(100-400mV),1(300-600mV),2(400-800mV),3(600-1200mV)] | |||
| --margin | Read the SerDes eye margins per lane | |||
| --measure_time <time> | Measure time in seconds for single eye [10, 30, 60, 90, 120, 240, 480, 600 and 900] (Optional - Default 60 for PCIe and 30 for Network ports) | |||
| --eye_select <eye_sel> | Eye selection for PAM4 [UP, MID, DOWN, ALL] (Default ALL) | |||
| --lane <lane_index> | Run eye for specific lane index (Default all lanes) | |||
| --rx_error_injection | Enable the RX link deterioration | |||
| --mixer_offset0 <value> | Fine change to the center of the eye [0x0 to 0x7ff] | |||
| --mixer_offset1 <value> | Coarse change to the center of the eye [0x0 to 0x3ff] | |||
| --show_mixers_offset | Show mixer offset 0 and mixer offset 1 | |||
| --rx_fec_histogram | Provide histogram of FEC errors. The result is divided to bins. Each bin is holding different number of errored bit within FEC protected block | |||
| --show_histogram | Show FEC errors histogram | |||
| --clear_histogram | Clears FEC errors histograms | |||
| --yes | Non-interactive mode, answer yes to all questions | |||
Examples:
Get info of <device>, <port_number>:
mlxlink -d <device> -p <port_number>
Get info of <device>, <port_number> and BER Counters:
mlxlink -d <device> -p <port_number> -c
Get info of <device>, <port_number> and Transmitter Parameters:
mlxlink -d <device> -p <port_number> --show_serdes_tx
Configure Port State:
mlxlink -d <device> -p <port_number> --port_state UP
Configure Port Speeds:
mlxlink -d <device> -p <port_number> --speeds 25G,50G,100G
Configure FEC:
mlxlink -d <device> -p <port_number> --fec RS
Configure Port for Physical Test Mode:
mlxlink -d <device> -p <port_number> --test_mode EN (--rx_prbs PRBS31 --rx_rate 25G --tx_prbs PRBS7 --tx_rate 10G --invert_rx_polarity --invert_tx_polarity)
Perform PRBS Tuning:
mlxlink -d <device> -p <port_number> --test_mode TU
Warning
RX and TX lane rates for new devices includes the PAM4 speeds (50G_1X and 100G_2X)eg: mlxlink -d <device> --test_mode EN --rx_rate [normal speeds | 50G_1X | 100G_2X] --tx_rate [normal speeds | 50G_1X | 100G_2X]
Warning
The PRBS pattern that is configured in PAM4 rates is PRBSQ.
Cable operations:
mlxlink -d <device> --cable [Options]
Dump cable EEPROM pages:
mlxlink -d <device> --cable --dump
Get cable DDM info:
mlxlink -d <device> --cable --ddm
Read from cable:
mlxlink -d <device> --cable --read --page <page number> --offset <bytes offset> --length <number of bytes>
Write to cable:
mlxlink -d <device> --cable --write <bytes separated by comma> --page <page number> --offset <bytes offset>
Configure Transmitter Parameters (on lane, to database):
mlxlink -d <device> -p <port_number> --serdes_tx <polar- ity>,<ob_tap0>,<ob_tap1>,<ob_tap2>,<ob_bias>,<ob_preemp_mode>,<ob_reg>,<ob_leva> (--serdes_tx_lane <lane number>) (--database)
Configure Transmitter Parameters for 16nm devices:
mlxlink -d <device> -p <port_number> --serdes_tx <pre_2_tap>,<pre_tap>,<main_tap>,<post_tap>,<ob_m2lp>,<ob_amp>
Getting PCIe links info:
mlxlink -d /dev/mst/mt41682_pciconf0 --port_type PCIE --show_links Valid PCIe Links ---------------- : depth, pcie_index, node, port Link 1 : 3, 0, 0, 60 Link 2 : 3, 0, 1, 61 Link 3 : 3, 0, 2, 62 ..
To query information for a specific link, the depth, pcie_index and node for the link must be specified:
mlxlink -d /dev/mst/mt41682_pciconf0 --port_type PCIE --depth 3 --pcie_index 0 --node 1 --show_serdes_tx --show_eye PCIe Operational (Enabled) Info ------------------------------- Depth, pcie index, node : 3, 0, 1 Link Speed Active (Enabled) : 8G-Gen 3 (16G-Gen 4) Link Width Active (Enabled) : 2X (16X) EYE Opening Info (PCIe) ----------------------- Physical Grade : 84, 84 Height Eye Opening [mV] : 1194, 1194 Phase Eye Opening [psec] : 84, 84 Serdes Tuning Transmitter Info (PCIe) ------------------------------------- Serdes TX parameters : Pol ,tap0 ,tap1 ,tap2 ,bias ,preemp_mode ,reg ,leva Lane 0 : 0 ,21 ,92 ,7 ,15 ,1 ,10 ,9 Lane 1 : 1 ,21 ,92 ,7 ,15 ,1 ,10 ,9 Lane 2 : 0 ,21 ,92 ,7 ,15 ,1 ,10 ,9 Lane 3 : 1 ,21 ,92 ,7 ,15 ,1 ,10 ,9 Lane 4 : 0 ,21 ,92 ,7 ,15 ,1 ,10 ,9 Lane 5 : 1 ,21 ,92 ,7 ,15 ,1 ,10 ,9 Lane 6 : 0 ,21 ,92 ,7 ,15 ,1 ,10 ,9 Lane 7 : 1 ,21 ,92 ,7 ,15 ,1 ,10 ,9
To print the output in JSON format:
mlxlink -d <device> --show_module --json
To show ports group map (for NVIDIA Quantum and NVIDIA Spectrum-2):
mlxlink –d<device> --show_tx_group_map 0
To assign ports to a specific group on NVIDIA Quantum and NVIDIA Spectrum-2
mlxlink –d <device> --tx_group_map 1 –ports 1,2,3,5,4,8,7,8,9,10,11
To show histogram of FEC errors:
mlxlink -d /dev/mst/mt4125_pciconf0 --rx_fec_histogram --show_histogram
To clear histogram:
mlxlink -d /dev/mst/mt4125_pciconf0 --rx_fec_histogram --clear_histogram
Margin Scan Tool
The margin scan tool is used for scanning PCIe or Network ports [EDR\25G or HDR\PAM4 speeds].
Warning
If the margin scan fails with this message (Eye scan not completed), perform a reboot and run the scan again.
To enable the margin scan with measure time 10 seconds:
mlxlink –d <device> --port_type PCIE –margin –measure_time 10
To enable the margin scan for Multi-host or Socket Direct systems through:
-
depth, pcie_index and node:
Mlxlink –d <device> --port_type PCIE –depth0–pcie_index1–node0–margin –measure_time30 -
The local port (it can be shown by the –show_links command):
Mlxlink –d <device> --port_type PCIE –port1–margin –measure_time10
RX Error Injection
Allows modifying the Eye Center capability by changing the mixer_offset0 (fine change) and mixer_offset1 (coarse change) flags for 28nm products to produce RX errors.
Flags Usage
-
To change the values of mixers:
mlxlink -d /dev/mst/mt4117_pciconf0 --rx_error_injection --mixer_offset00x200--mixer_offset10x305Warning
Modifying mixer_offset0 and mixer_offset1 flags can change the Eye Center and might cause link degradation.
-
To query the mixers values:
mlxlink -d /dev/mst/mt4117_pciconf0 --rx_erro r_injection --show_mixers_offset
Module PRBS Test Mode
The module PRBS test mode can be performed by using the new flags under the --cable command.
Note
-
This feature supports Active/Optical CMIS modules only
-
Either the media or host side can run with PRBS mode
-
To enable the PRBS test mode, the module should be plugged in and active
Enabling\Disabling The Module PRBS Test Mode
To enable the module PRBS test mode, the side of the module should be selected using --prbs_select flag after providing the --cable flag, it can be either the HOST or the MEDIA side, then the --prbs_mode <EN\DS> can be used to enable or disable the PRBS test mode process.
E.g: the following command will enable the PRBS test mode on the HOST side of the module:
mlxlink -d /dev/mst/mt53104_pciconf0 --port 3 --cable --prbs_select HOST --prbs_mode EN
The command above will put the HOST side of the module in PRBS test mode with default Checker and Generator parameters.
The Checker and Generator parameters can be overridden while enabling the PRBS test mode according to their related flags in the help menu:
mlxlink -d /dev/mst/mt53104_pciconf0 --port 3 --cable --prbs_select HOST --prbs_mode EN --checker_pattern PRBS13 --invert_checker --generator_pattern PRBS31 --swap_generator --lane_rate HDR
To disable the PRBS test mode, the following command can be executed:
mlxlink -d /dev/mst/mt53104_pciconf0 --port 3 --cable --prbs_select HOST --prbs_mode DS
PRBS Diagnostic Counters Information
After performing the PRBS test mode, the module counters can be quired by using the following command:
mlxlink -d /dev/mst/mt53104_pciconf0 --port 3 --cable --prbs_select HOST --show_diagnostic_info
The module PRBS test mode counters can be cleared by using the following command, which will clear the diagnostic counters on the HOST side only:
mlxlink -d /dev/mst/mt53104_pciconf0 --port 3 --cable --prbs_select HOST --clear_diagnostic_info
Module Control Parameters
Some of the module parameters can be controlled by mlxlink after providing the --control_paramenter flag, which can be executed under --cable flag.
The possible parameters can be controlled as follows:
-
Reading and configuring Tx Equalization
-
Reading and configuring Rx Emphasis (PreCursor & PostCursor)
-
Reading and configuring Rx Amplitude
Note
-
To apply the changes, the link should be disabled first
-
After configuring a new parameter, the link should be raised again to allow the firmware to load the new configuration
-
Cable control parameters are valid for active\optical modules only
Query, Configure The Module Control Parameters
To query the currently configured module control parameters, the --control_parameters flag can be used under --cable flag as follows:
mlxlink -d /dev/mst/mt53104_pciconf0 --cable --control_parameters ... Module Control Parameters ------------------------- TX Equalization : 1dB RX Emphasis (pre) : 2.5dB RX Post Emphasis : No Equalization RX Amplitude : 600-1200 mV (P-P)
To configure the module control parameters, the following command can be executed:
mlxlink -d /dev/mst/mt53104_pciconf0 --cable --control_parameters --tx_equalization 2 --rx_amplitude 1
Tool Usage with NIC vs. Switch (-p Flag)
When using mlxlink tool with NIC, notice that the "label_port" flag -p should not be used. To address different ports please use different mst devices.
For example:
To address port 1 in ConnectX-4 use:
mlxlink -d /dev/mst/mt4115_pciconf0
To address port 2 use:
mlxlink -d /dev/mst/mt4115_pciconf0.1
Warning
-
Any mlxlink command for switch should include the "-p" flag to address the specific port in the switch.
-
When working with the NIC, if an MTUSB is used for communication with the NVIDIA NIC, to address port 2, use mlxlink -d /dev/mst/mt4115_pciconf0 --gvmi_address<0xAddress>.
Tool Usage on NVIDIA Quantum HDR Switch Systems with Split Ports
Using mlxlink on NVIDIA Quantum HDR based switch systems split ports if the split port number is not provided by the ibdiagnet tool:
mlxlink -d lid-<LID> -p <formula>
Formula:
In case of 2X port:
-
1- port_num = round_down[(Iblinkinfo_port_num + 1)*0.5]
-
2- if (Iblinkinfo_port_num + 1) modulo 2 =1 then append ‘/2’ to port_num
In case of 4X port, use only item #1 above
Example:
43 23[ ] ==( 2X 53.125 Gbps Active/ LinkUp)==> mlxlink -d lid-43 -p 12 43 24[ ] ==( 2X 53.125 Gbps Active/ LinkUp)==> mlxlink -d lid-43 -p 12/2
Tool Usage on NVIDIA Quantum-2 NDR Switch Systems
In NVIDIA Quantum-2 NDR switch generation there are 32-OSFP cages (8x), where each one holds 2 (4x) ports instead of 1, and each port can be accessed by providing the cage number and the port in the cage “Cage/Port”.
mlxlink -d <mst deivce> -p <Cage>/<Port>
If the split profile is ready, then we can access the split ports by providing the number of split to the port flag, e.g.:
-
To access the main port of 15/2
mlxlink -d <mst deivce> -p15/2 -
To access the split port of 15/2
mlxlink -d <mst deivce> -p15/2/2
PCIe
Link Speed and Width
For PCIe link speed and width use the following flag: --port_type PCIE
PCIe Operational (Enabled) Info ------------------------------- Depth, pcie index, node : [Depth, pcie index, node] Link Speed Active (Enabled) : [Freq – Gen] Link Width Active (Enabled) : [Width]
PCIe Switch
For NVIDIA ConnectX-5 and newer devices, the PCIe interface can be configured for PCIe switch. When the PCIe switch is enabled, the Depth, pcie_index and node parameters are needed to specify the PCIe port where the requested information (such as counters or eye info) is gathered from.
| Parameters | Description |
| Depth | This defines the number of layers from the Root Complex to the specific port.
|
| Pcie_index | This defines the root complex ID or host index.
|
| Node | This defines the specific pcie port.
Note: For NVIDIA BlueField/BlueField-2 SmartNIC mode, the PCIe link information can only be gathered from the external host. The PCIe interface status cannot be retrieved from the Arm side. When retrieving the PCIe link information from the external host, there is no need to specify the depth, pcie_index and node. |
Example: NVIDIA BlueField JBoF Mode
# mlxlink -d /dev/mst/mt41682_pciconf0 --port_type pcie --depth 3 --pcie_index 0 --node 4 -c PCIe Operational (Enabled) Info ------------------------------- Depth, pcie index, node : 3, 0, 4 Link Speed Active (Enabled) : 8G-Gen 3 (16G-Gen 4) Link Width Active (Enabled) : 2X (2X) Management PCIe Timers Counters Info ------------------------------------ dl down : 0 Management PCIe Performance Counters Info ----------------------------------------- RX Errors : 0 TX Errors : 0 CRC Error dllp : 0 CRC Error tlp : 0
Link Counters
For PCIe counters information use the following flag: --port_type PCIE –c
Management PCIe Timers Counters Info ------------------------------------ dl down : [link down counter] Management PCIe Performance Counters Info ----------------------------------------- RX Errors : [Rx Errors] TX Errors : [Tx Errors] CRC Error dllp : [CRC Errors dllp] CRC Error tlp : [CRC Errors tlp]
-
RX errors: indicate number of transitions to recovery due to Framing errors and CRC (dlp and tlp) errors.
-
TX errors: indicate number of transitions to recovery due to EIEOS and TS errors.
-
CRC Error dllp: indicate CRC error in Data Link Layer Packets
-
CRC Error tlp: indicate CRC error in Transaction Layer Packet
Example:
# mlxlink -d /dev/mst/mt4123_pciconf0 --port_type PCIE -c PCIe Operational (Enabled) Info ------------------------------- Depth, pcie index, node : 0, 0, 0 Link Speed Active (Enabled) : 16G-Gen 4 (16G-Gen 4) Link Width Active (Enabled) : 16X (16X) Management PCIe Timers Counters Info ------------------------------------ dl down : 3 Management PCIe Performance Counters Info ----------------------------------------- RX Errors : 0 TX Errors : 16 CRC Error dllp : 0 CRC Error tlp : 0
Link Eye Opening and Grade
For PCIe link physical grade and eye opening information use the following flag: --port_type PCIE –e
EYE Opening Info (PCIE) ------------------------ Physical Grade : [Grade0, Grade1, Grade2, Grade3, Grade4, Grade5, Grade6, Grade7, Grade8, Grade9, Grade10, Grade11, Grade12, Grade13, Grade14, Grade15] Height Eye Opening [mV] : [Height0, Height1, Height2, Height3, Height4, Height5, Height6, Height7, Height8, Height9, Height10, Height11, Height12, Height13, Height14, Height15] Phase Eye Opening [psec] : [Phase0, Phase1, Phase2, Phase3, Phase4, Phase5, Phase6, Phase7, Phase8, Phase9, Phase10, Phase11, Phase12, Phase13, Phase14, Phase15]
Example:
# mlxlink -d /dev/mst/mt4123_pciconf0 --port_type PCIE -e PCIe Operational (Enabled) Info ------------------------------- Depth, pcie index, node : 0, 0, 0 Link Speed Active (Enabled) : 16G-Gen 4 (16G-Gen 4) Link Width Active (Enabled) : 16X (16X) EYE Opening Info (PCIe) ----------------------- Physical Grade : 57279, 56340, 59340, 61824, 55140, 60501, 61530, 57392, 61573, 58930, 62752, 60421, 57188, 59796, 60066, 60847 Height Eye Opening [mV] : 292, 288, 314, 325, 278, 310, 319, 299, 316, 318, 343, 323, 310, 311, 335, 318 Phase Eye Opening [psec] : 30, 30, 30, 30, 30, 30, 30, 30, 30, 28, 28, 28, 28, 30, 28, 30
Pass / Fail Criteria
SLRED (ConnectX-6/ConnectX-6 Dx/ConnectX-6 Lx)
mlxlink -d [device] --port_type PCIE --margin
Gen3
| Gen3 | |
| Eye Grade | Figure of Merit (FOM) |
| 0 < Eye Grade < 700 | FAIL |
| 700 < Eye Grade < 2300 | gray area |
| 2300 < Eye Grade | PASS |
Gen4
| Gen4 | |
| Eye Margin | FOM |
| 0 < Eye Grade < 150 | FAIL |
| 150 < Eye Grade < 400 | gray area |
| 400 < Eye Grade | PASS |
© Copyright 2023, NVIDIA. Last updated on Oct 11, 2023.
相关文章:

【RDMA】mlxlink检查和调试连接状态及相关问题--驱动工具
简介 mlxlink工具用于检查和调试连接状态及相关问题。该工具可以用于不同的链路和电缆(包括被动、电动、收发器和背板)。 属于mft工具套件的一个工具,固件工具 Firmware Tools (MFT):https://blog.csdn.net/bandaoyu/article/details/14242…...
QT For Android开发-打开PPT文件
一、前言 需求: Qt开发Android程序过程中,点击按钮就打开一个PPT文件。 Qt在Windows上要打开PPT文件或者其他文件很容易。可以使用QDesktopServices打开文件,非常方便。QDesktopServices提供了静态接口调用系统级别的功能。 这里用的QDesk…...
SpringBoot教程(三十) | SpringBoot集成Shiro权限框架
SpringBoot教程(三十) | SpringBoot集成Shiro权限框架 一、 什么是Shiro二、Shiro 组件核心组件其他组件 三、流程说明shiro的运行流程 四、SpringBoot 集成 Shiro (shiro-spring-boot-web-starter方式)1. 添加 Shiro 相关 maven2…...

[ffmpeg] 视频格式转换
本文主要梳理 ffmpeg 中的视频格式转换。由于上屏的数据是 rgba,编码使用的是 yuv数据,所以经常会使用到视频格式的转换。 除了使用 ffmpeg进行转换,还可以通过 libyuv 和 directX 写 shader 进行转换。 之前看到文章说 libyuv 之前是 ffmpeg…...
 git-repo https证书认证问题)
git-repo系列教程(3) git-repo https证书认证问题
文章目录 问题描述解决步骤1.下载证书2.测试证书是否正常3.设置环境变量 总结 问题描述 在使用git repo 同步仓库时,发现不能同步,出现如下提示错误: % Total % Received % Xferd Average Speed Time Time Time CurrentDload Upload Total Spent Left …...

中序遍历二叉树全过程图解
文章目录 中序遍历图解总结拓展:回归与回溯 中序遍历图解 首先看下中序遍历的代码,其接受一个根结点root作为参数,判断根节点是否为nil,不为nil则先递归遍历左子树。 func traversal(root *TreeNode,res *[]int) {if root nil …...
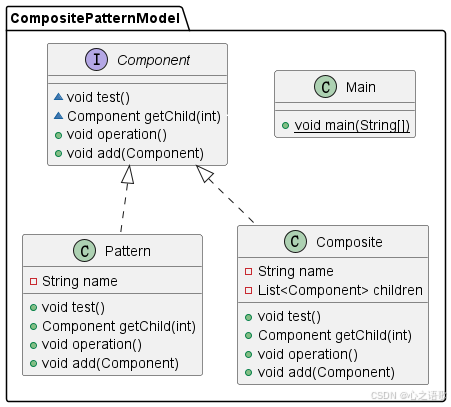
设计模式 组合模式(Composite Pattern)
组合模式简绍 组合模式(Composite Pattern)是一种结构型设计模式,它允许你将对象组合成树形结构来表示“部分-整体”的层次结构。组合模式使得客户端可以用一致的方式处理单个对象和组合对象。这样,可以在不知道对象具体类型的条…...

在vue中嵌入vitepress,基于markdown文件生成静态网页从而嵌入社团周报系统的一些想法和思路
什么是vitepress vitepress是一种将markdown文件渲染成静态网页的技术 其使用仅需几行命令即可 //在根目录安装vitepress npm add -D vitepress //初始化vitepress,添加相关配置文件,选择主题,描述,框架等 npx vitepress init //…...
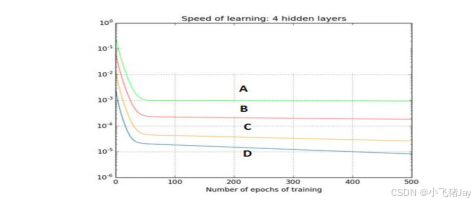
神经网络面试题目
1. 批规范化(Batch Normalization)的好处都有啥?、 A. 让每一层的输入的范围都大致固定 B. 它将权重的归一化平均值和标准差 C. 它是一种非常有效的反向传播(BP)方法 D. 这些均不是 正确答案是:A 解析: batch normalization 就…...
C语言题目之单身狗2
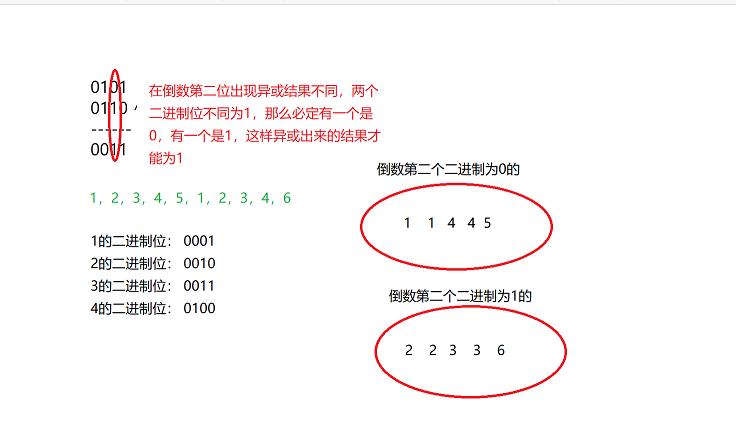
文章目录 一、题目二、思路三、代码实现 提示:以下是本篇文章正文内容,下面案例可供参考 一、题目 二、思路 第一步 在c语言题目之打印单身狗我们已经讲解了在一组数据中出现一个单身狗的情况,而本道题是出现两个单身狗的情况。根据一个数…...
)
Vue2学习笔记(03关于VueComponent)
1.school组件本质是一个名为Vuecomponent的构造函数,且不是程序员定义的,是Vue.extend生成的。 2.我们只需要写<school/>或<school></school>,Vue解析时会帮我们创建school组件的实例对象,即Vue帮我们执行的:new Vuecompo…...

微服务架构中常用技术框架
认证授权 Spring Security OAuth 2.0 JWT Keycloak Istio Apache Shiro 日志监控 ELK Prometheus Grafana Fluentd CI/CD Jenkins GitLab CI CircleCI ArgoCD 服务通信 gRPC REST API Apache Thrift Apache Avro Apache Dubbo OpenFegin 断路器 Hystr…...
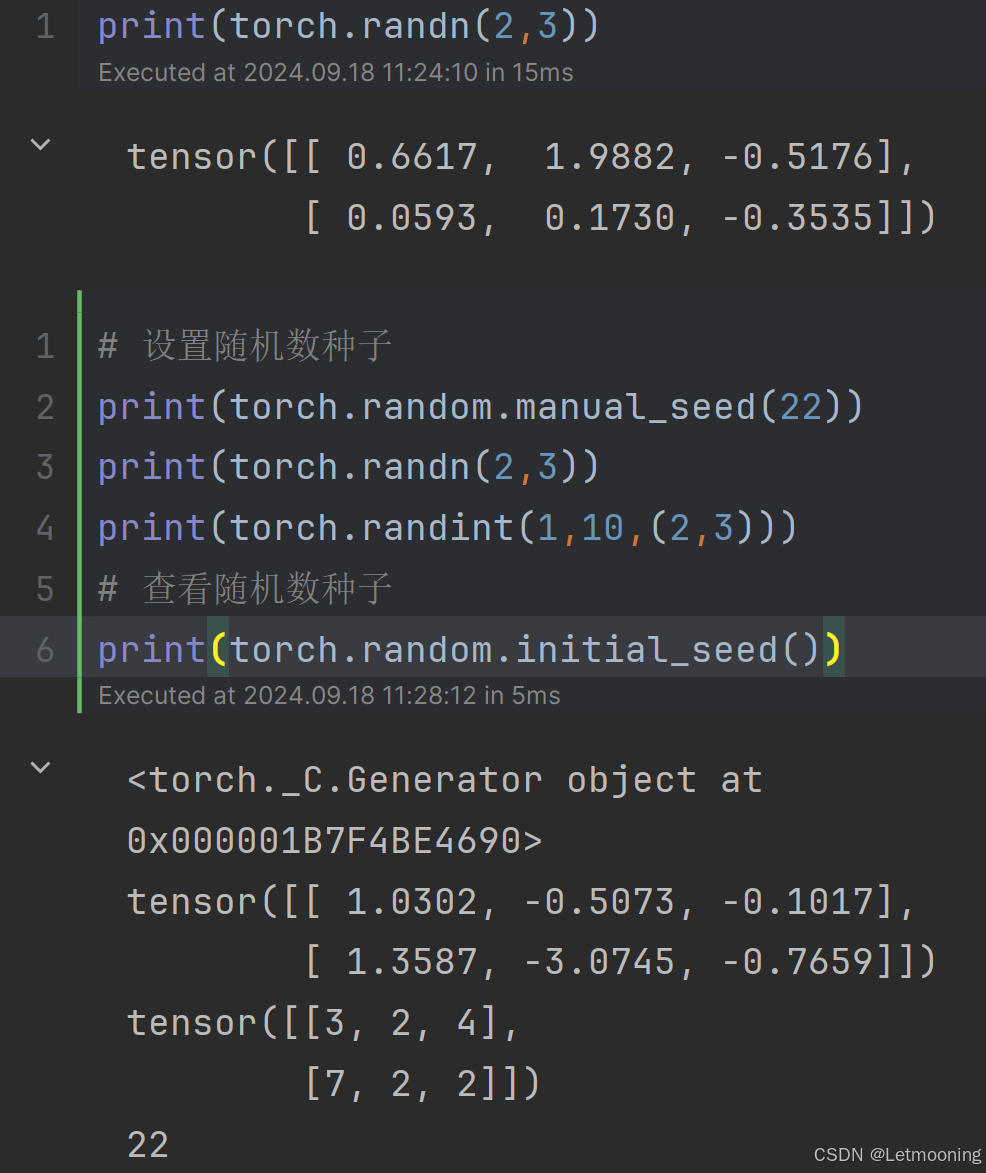
[深度学习]Pytorch框架
1 深度学习简介 应用领域:语音交互、文本处理、计算机视觉、深度学习、人机交互、知识图谱、分析处理、问题求解2 发展历史 1956年人工智能元年2016年国内开始关注深度学习2017年出现Transformer框架2018年Bert和GPT出现2022年,chatGPT出现,进入AIGC发展阶段3 PyTorch框架简…...

华为HarmonyOS灵活高效的消息推送服务(Push Kit) - 5 发送通知消息
场景介绍 通知消息通过Push Kit通道直接下发,可在终端设备的通知中心、锁屏、横幅等展示,用户点击后拉起应用。您可以通过设置通知消息样式来吸引用户。 开通权益 Push Kit根据消息内容,将通知消息分类为服务与通讯、资讯营销两大类别&…...
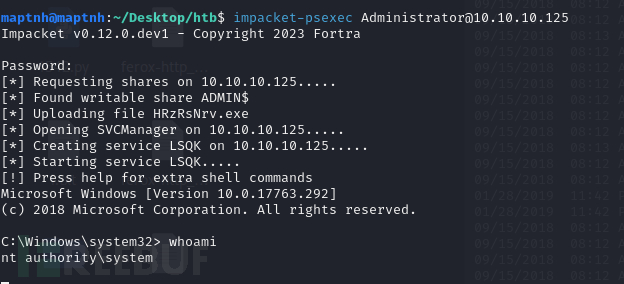
[Meachines] [Medium] Querier XLSM宏+MSSQL NTLM哈希窃取(xp_dirtree)+GPP凭据泄露
信息收集 IP AddressOpening Ports10.10.10.125TCP:135, 139, 445, 1433, 5985, 47001, 49664, 49665, 49666, 49667, 49668, 49669, 49670, 49671 $ nmap -p- 10.10.10.125 --min-rate 1000 -sC -sV -Pn PORT STATE SERVICE VERSION 135/tcp open msrp…...

新版ssh客户端无法连接旧版服务器sshd的方法
新安装完的windows 版本,连Linux服务器直接报错 C:\Users\wang>ssh root192.168.110.50 Unable to negotiate with 192.168.110.50 port 22: no matching key exchange method found. Their offer: diffie-hellman-group14-sha1,diffie-hellman-group1-sha1,kex…...
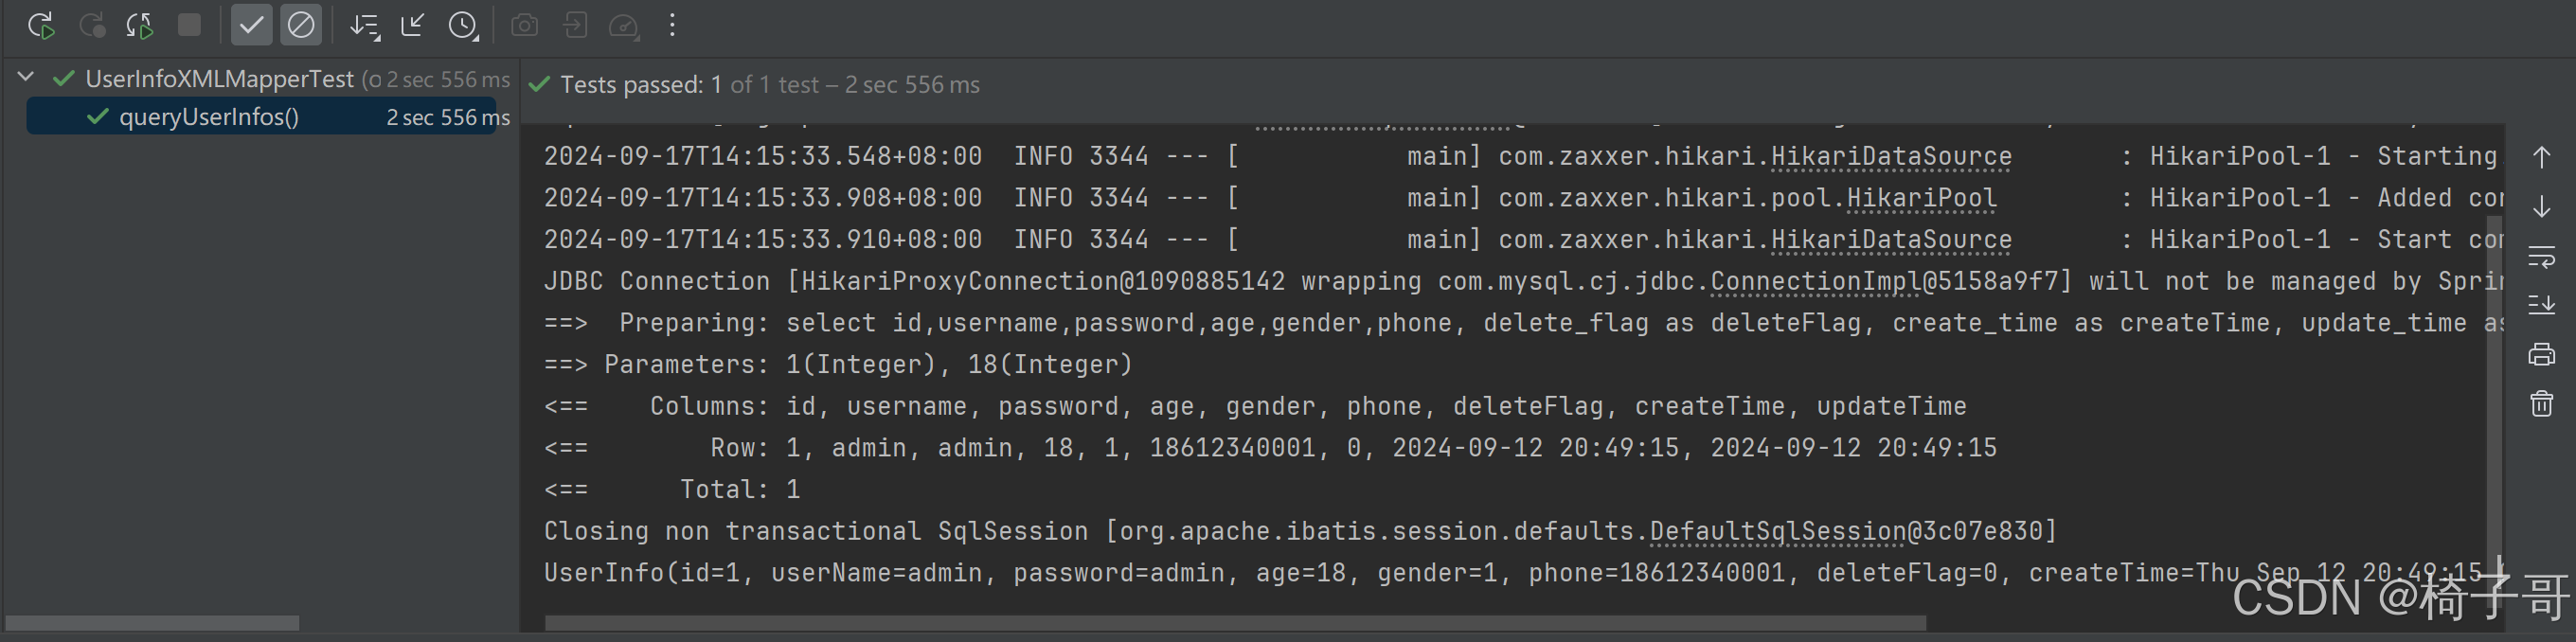
MyBatis操作数据库-XML实现
目录 1.MyBatis的简单介绍 2.MyBatis操作数据库的步骤 2.1 添加依赖 2.2 配置文件 2.3 写持久层代码 2.4 方法测试 3.MyBatis操作数据库(增删查改) 3.1 CRUD标签 3.2 参数传递 3.3 Insert-新增 3.4 Delete-删除 3.5 Update-修改 3.6 Select-查询(映射问题) 1.MyB…...

华为HarmonyOS地图服务 5 - 利用UI控件和手势进行地图交互
场景介绍 本章节将向您介绍如何使用地图的手势。 Map Kit提供了多种手势供用户与地图之间进行交互,如缩放、滚动、旋转和倾斜。这些手势默认开启,如果想要关闭某些手势,可以通过MapComponentController类提供的接口来控制手势的开关。 接口…...
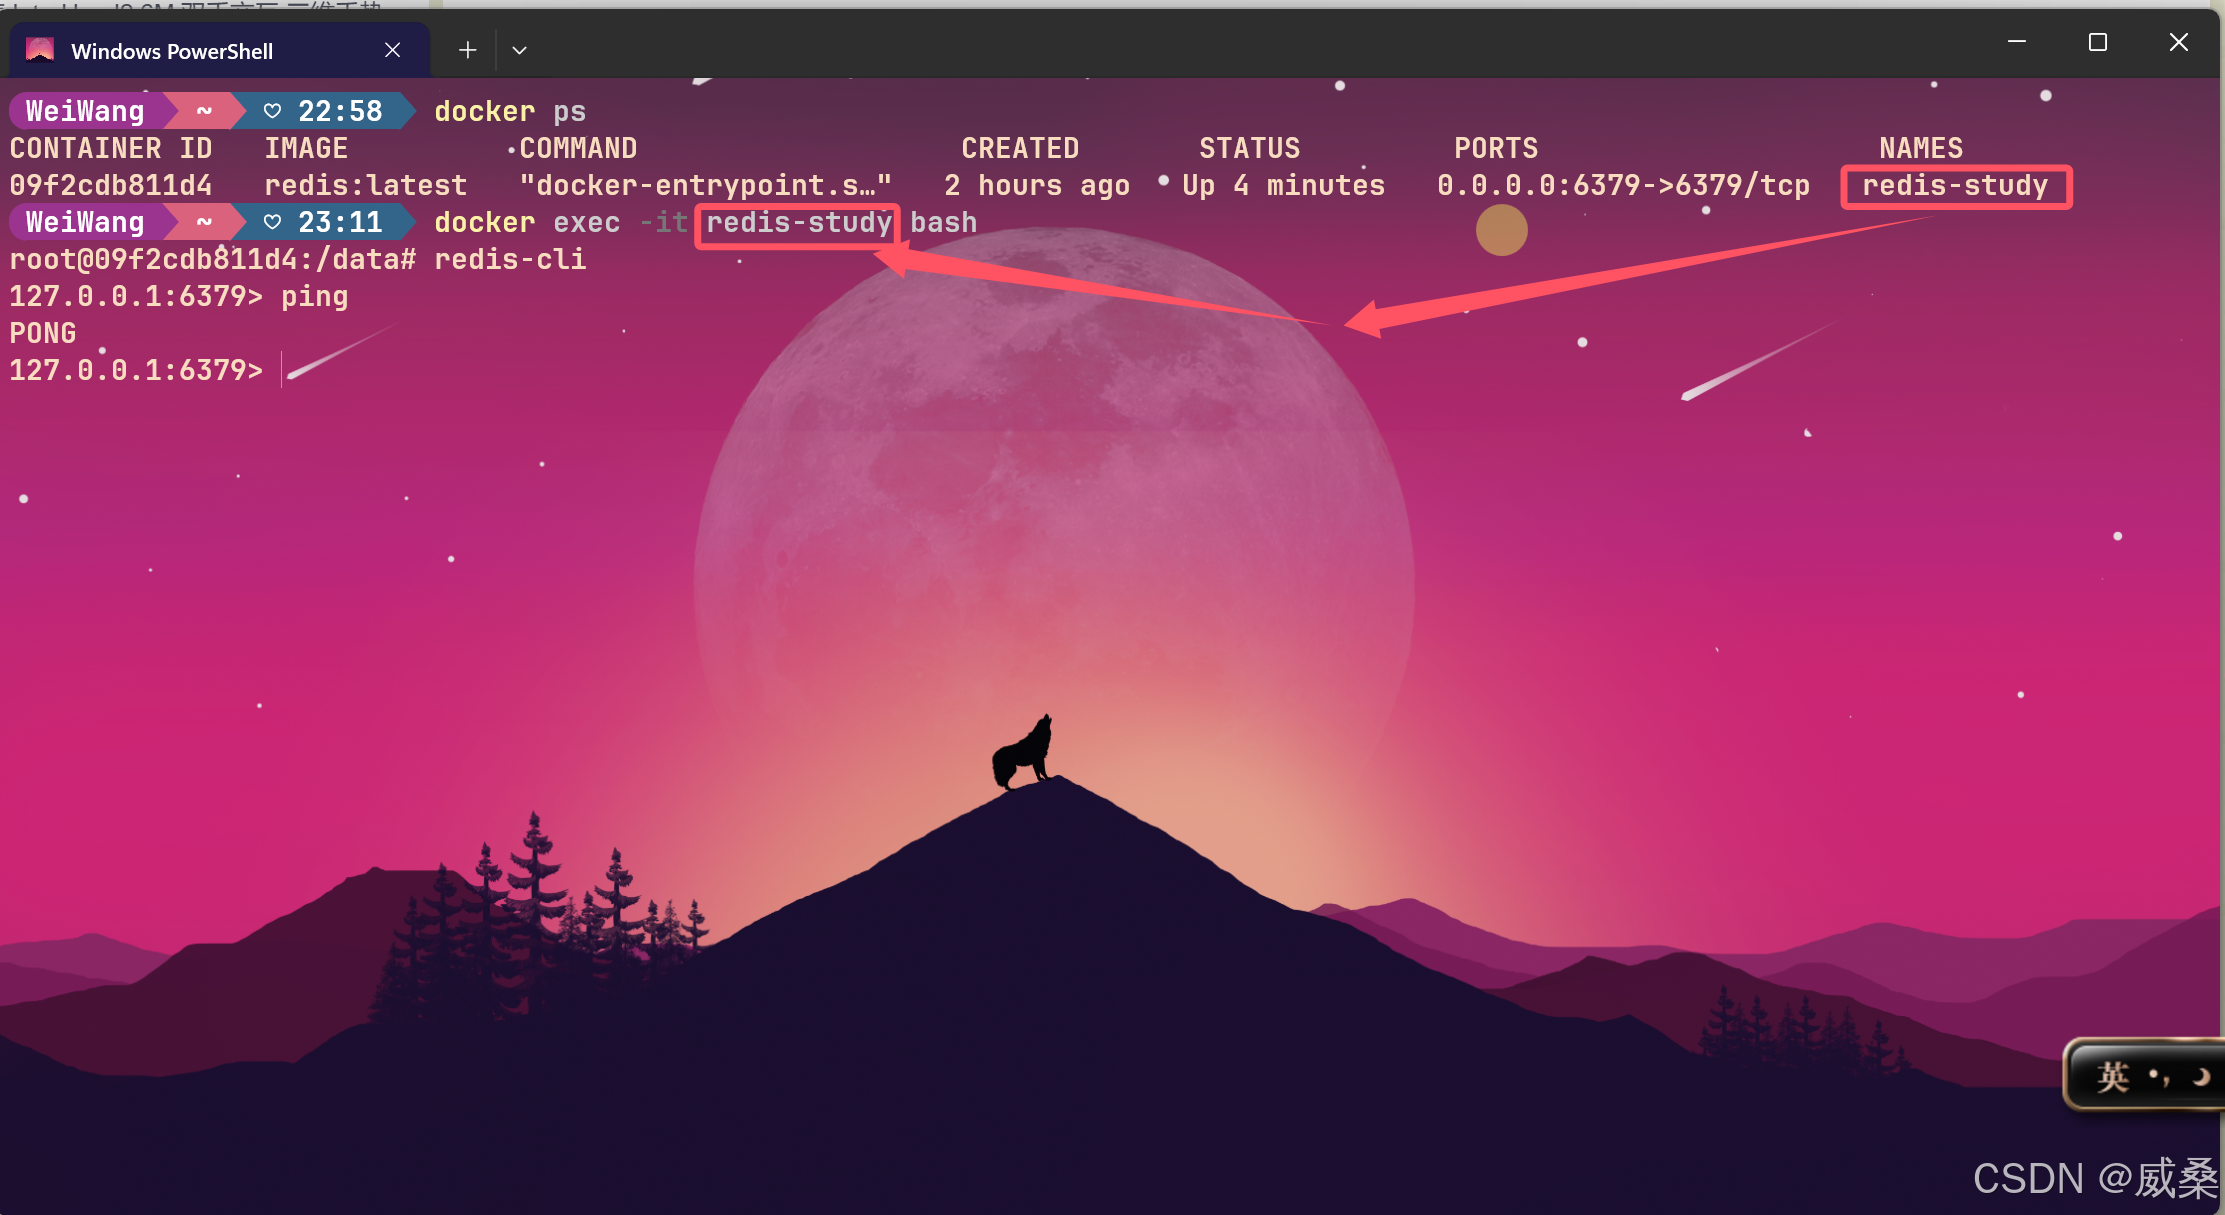
解决DockerDesktop启动redis后采用PowerShell终端操作
如图: 在启动redis容器后,会计入以下界面 : 在进入执行界面后如图: 是否会觉得界面过于单调,于是想到使用PowerShell来操作。 步骤如下: 这样就能使用PowerShell愉快地敲命令了(颜值是第一生…...
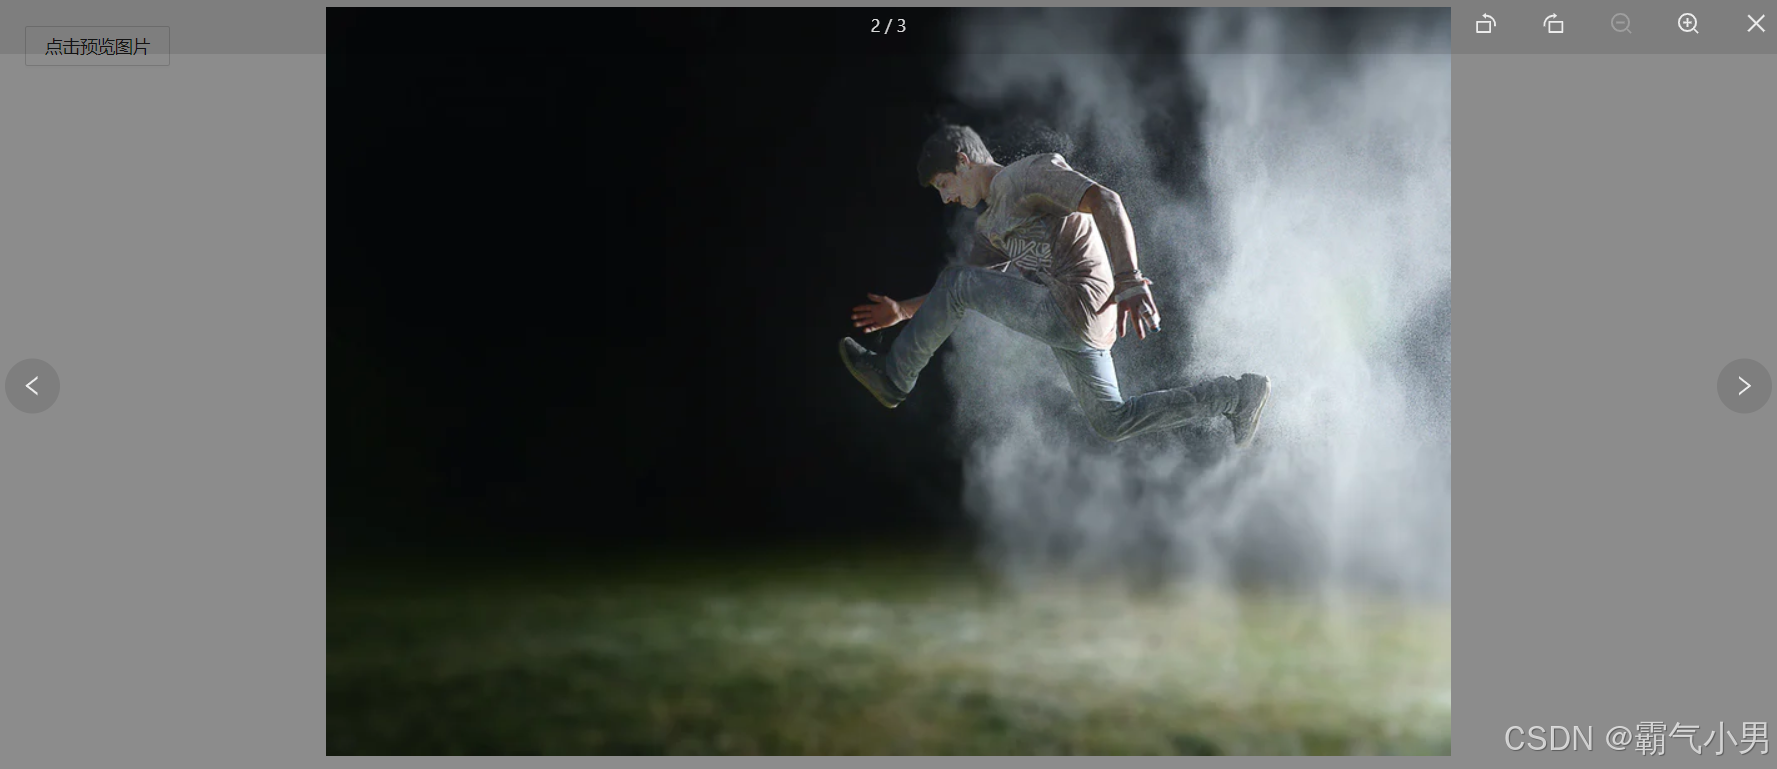
react + antDesign封装图片预览组件(支持多张图片)
需求场景:最近在开发后台系统时经常遇到图片预览问题,如果一个一个的引用antDesign的图片预览组件就有点繁琐了,于是在antDesign图片预览组件的基础上二次封装了一下,避免重复无用代码的出现 效果 公共预览组件代码 import React…...

VMPDump终极指南:如何轻松破解VMProtect 3.X x64代码保护
VMPDump终极指南:如何轻松破解VMProtect 3.X x64代码保护 【免费下载链接】vmpdump A dynamic VMP dumper and import fixer, powered by VTIL. 项目地址: https://gitcode.com/gh_mirrors/vm/vmpdump 你是否曾面对被VMProtect保护的软件感到束手无策&#x…...

SpringbootWeb【入门】+Mysql【安装】
今天这个是很重要的先从认识spring开始后面认识springboot 这是www.spring.io官网 这就是创说中的spring全家桶 打开idea创建一个Sringboot工程出来 这就创建好了 现在开始装Mysql【安装】 MySQL :: Download MySQL Community Serverhttps://dev.mysql.com/downloads/m…...
 函数详解】)
【Python range() 函数详解】
文章目录Python range() 函数详解 ✨什么是range()函数? 🤔range()的参数和用法 📊单参数形式:range(stop)双参数形式:range(start, stop)三参数形式:range(start, stop, step)range()对象的特点 …...

5步彻底解决显卡驱动问题:Display Driver Uninstaller完整指南
5步彻底解决显卡驱动问题:Display Driver Uninstaller完整指南 【免费下载链接】display-drivers-uninstaller Display Driver Uninstaller (DDU) a driver removal utility / cleaner utility 项目地址: https://gitcode.com/gh_mirrors/di/display-drivers-unin…...

终极macOS Windows启动盘制作工具:WinDiskWriter完整指南
终极macOS Windows启动盘制作工具:WinDiskWriter完整指南 【免费下载链接】windiskwriter 🖥 Windows Bootable USB creator for macOS. 🛠 Patches Windows 11 to bypass TPM and Secure Boot requirements. 👾 UEFI & Legac…...

从怀疑到真香!2026我整理直播内容总结只留下这一款好用工具
上周刚开完3小时的季度评审会,老板散会前说“下班前把整理好的纪要发我”,我抱着电脑坐在位置上,对着三小时录音头都大——逐句听改错别字一下午就没了;之前做用户访谈,受访者一口西南官话,换了三个工具识别…...

python代码编译成库
一、项目结构如下:your_project/ ├── match/ │ ├── __init__.py # 空文件,声明为包 │ └── matcher.py # 包含 compete_image 类 ├── stitch/ │ ├── __init__.py # 空文件,声明为包 │ └── total…...

从零实现一个电商图片下载器:技术方案与核心代码
引言如果你想自己开发一款电商图片下载工具,本文提供完整的技术方案和核心代码参考。一、技术选型组件推荐方案备选方案浏览器内核CEFElectron下载库libcurlrequests界面框架QtElectron跨平台CEF QtElectron二、核心代码实现2.1 浏览器初始化cppCefRefPtr<CefBr…...

Honey Select 2终极增强补丁:100+插件一键安装完整指南
Honey Select 2终极增强补丁:100插件一键安装完整指南 【免费下载链接】HS2-HF_Patch Automatically translate, uncensor and update HoneySelect2! 项目地址: https://gitcode.com/gh_mirrors/hs/HS2-HF_Patch 还在为《Honey Select 2》的语言障碍和功能限…...
)
别再手动敲命令了!用Kuboard-Spray v1.2.4图形化搞定K8s集群(附CentOS 7.9避坑实录)
图形化利器Kuboard-Spray v1.2.4:三分钟搭建生产级K8s集群的避坑指南 当你在凌晨三点盯着满屏的kubeadm init报错信息时,是否想过Kubernetes集群部署还能更简单?去年我们团队在客户现场部署一套生产环境时,传统命令行方式让我们在…...