使用Assimp加载glb/gltf文件,然后使用Qt3D来渲染
文章目录
- 1.代码
- 2.说明
- 2.1.调用
- 2.2.关于贴图
1.代码
ModelLoader.h
#ifndef MODELLOADER_H
#define MODELLOADER_H#include <QObject>
#include <Qt3DRender>
#include <QVector3D>
#include <QGeometry>#include <assimp/Importer.hpp>
#include <assimp/scene.h>
#include <assimp/postprocess.h>struct Triangle
{int vertexIndex1 { 0 };int vertexIndex2 { 0 };int vertexIndex3 { 0 };bool operator==(const Triangle &rhs) const {return vertexIndex1 == rhs.vertexIndex1 &&vertexIndex2 == rhs.vertexIndex2 &&vertexIndex3 == rhs.vertexIndex3;}
};namespace RenderAttributes
{
Qt3DRender::QAttribute *create(const QVector<Triangle> &triangles, Qt3DRender::QGeometry *parent);
Qt3DRender::QAttribute *create(const QVector<QVector3D> &vertices, const QString &name, Qt3DRender::QGeometry *parent);
Qt3DRender::QAttribute *clone(Qt3DRender::QAttribute *from, Qt3DRender::QGeometry *parent);
}class ModelLoader
{
public:ModelLoader();// 加载模型static int loadModelFromFile(Qt3DCore::QEntity *rootEntity, QString filePath);private:static int processNode(aiNode *node, const aiScene *scene, Qt3DCore::QEntity *entity);static int processMesh(aiMesh *mesh, const aiScene *scene, Qt3DCore::QEntity *entity);
};class MyQPaintedTextureImage : public Qt3DRender::QPaintedTextureImage
{
public:void setImage(QImage &i){image = i;setSize(i.size());}virtual void paint(QPainter *painter) override{painter->drawImage(0, 0, image);}private:QImage image;
};
#endif // MODELLOADER_H
ModelLoader.cpp
#include "modelloader.h"
#include <Qt3DExtras>
#include <Qt3DRender>
#include <QPaintedTextureImage>Qt3DRender::QAttribute *RenderAttributes::create(const QVector<Triangle> &triangles, Qt3DRender::QGeometry *parent)
{auto attribute = new Qt3DRender::QAttribute(parent);QVector<uint> indices;indices.reserve(triangles.size() * 3);for (const Triangle &triangle : triangles) {indices << static_cast<uint>(triangle.vertexIndex1)<< static_cast<uint>(triangle.vertexIndex2)<< static_cast<uint>(triangle.vertexIndex3);}Qt3DRender::QBuffer *dataBuffer = new Qt3DRender::QBuffer(attribute);const int rawSize = indices.size() * static_cast<int>(sizeof(uint));auto rawData = QByteArray::fromRawData(reinterpret_cast<const char*>(indices.constData()), rawSize);rawData.detach();dataBuffer->setData(rawData);attribute->setAttributeType(Qt3DRender::QAttribute::IndexAttribute);attribute->setBuffer(dataBuffer);attribute->setVertexBaseType(Qt3DRender::QAttribute::UnsignedInt);attribute->setVertexSize(1);attribute->setByteOffset(0);attribute->setByteStride(sizeof(uint));attribute->setCount(static_cast<uint>(indices.size()));return attribute;
}
Qt3DRender::QAttribute *RenderAttributes::create(const QVector<QVector3D> &vertices, const QString &name, Qt3DRender::QGeometry *parent)
{auto attribute = new Qt3DRender::QAttribute(parent);QVector<float> values;values.reserve(vertices.size() * 3);for (const QVector3D &v : vertices) {values << v.x() << v.y() << v.z();}Qt3DRender::QBuffer *dataBuffer = new Qt3DRender::QBuffer(attribute);const int rawSize = values.size() * static_cast<int>(sizeof(float));auto rawData = QByteArray::fromRawData(reinterpret_cast<const char*>(values.constData()), rawSize);rawData.detach();dataBuffer->setData(rawData);attribute->setAttributeType(Qt3DRender::QAttribute::VertexAttribute);attribute->setBuffer(dataBuffer);attribute->setVertexBaseType(Qt3DRender::QAttribute::Float);attribute->setVertexSize(3);attribute->setByteOffset(0);attribute->setByteStride(3 * sizeof(float));attribute->setName(name);attribute->setCount(static_cast<uint>(vertices.size()));return attribute;
}uint qHash(const QVector3D &key, uint seed = 0)
{if (key.isNull()){return seed;}else{float array[3] = {key.x(), key.y(), key.z()};return qHashBits(array, 3 * sizeof(int), seed);}
}Qt3DRender::QAttribute *RenderAttributes::clone(Qt3DRender::QAttribute *from, Qt3DRender::QGeometry *parent)
{auto attribute = new Qt3DRender::QAttribute(parent);Qt3DRender::QBuffer *dataBuffer = new Qt3DRender::QBuffer(attribute);auto dataCopy = from->buffer()->data();dataCopy.detach();dataBuffer->setData(dataCopy);attribute->setAttributeType(from->attributeType());attribute->setBuffer(dataBuffer);attribute->setVertexBaseType(from->vertexBaseType());attribute->setVertexSize(from->vertexSize());attribute->setByteOffset(from->byteOffset());attribute->setByteStride(from->byteStride());attribute->setName(from->name());attribute->setCount(from->count());return attribute;
}ModelLoader::ModelLoader() {}int ModelLoader::loadModelFromFile(Qt3DCore::QEntity *rootEntity, QString filePath)
{Assimp::Importer importer;std::string modelPath = filePath.toStdString();const aiScene* sceneObjPtr = importer.ReadFile(modelPath,aiProcess_Triangulate | aiProcess_FlipUVs);// const aiScene* sceneObjPtr = importer.ReadFile(filePath,//                                                aiProcess_FlipUVs);if (!sceneObjPtr|| sceneObjPtr->mFlags == AI_SCENE_FLAGS_INCOMPLETE|| !sceneObjPtr->mRootNode){// 加载模型失败qDebug() << "Error:Model::loadModel, description: "<< importer.GetErrorString();return -1;}qDebug() << "load object:" << sceneObjPtr->mNumMeshes << sceneObjPtr->mNumAnimations;// 是否存在动画if(sceneObjPtr->HasAnimations()){aiAnimation* animation = sceneObjPtr->mAnimations[0];qDebug() << animation->mDuration << animation->mTicksPerSecond << animation->mName.C_Str();}// 是否存在材质if(sceneObjPtr->HasMaterials()){qDebug() << sceneObjPtr->mMaterials[0]->GetName().C_Str();}// 是否存在网格模型if(sceneObjPtr->HasMeshes()){qDebug() << sceneObjPtr->mMeshes[0]->mName.C_Str();}Qt3DCore::QEntity *modelEntity = new Qt3DCore::QEntity(rootEntity);// 修正一下坐标系Qt3DCore::QTransform *mTransform = new Qt3DCore::QTransform();mTransform->setRotationX(-90);modelEntity->addComponent(mTransform);return processNode(sceneObjPtr->mRootNode, sceneObjPtr, modelEntity);
}int ModelLoader::processNode(aiNode *node, const aiScene *scene, Qt3DCore::QEntity *entity)
{qDebug() << "node:" << node->mName.C_Str() << node->mNumMeshes << node->mNumChildren;Qt3DCore::QEntity *partModel = new Qt3DCore::QEntity(entity);Qt3DCore::QTransform *partTransform = new Qt3DCore::QTransform;aiMatrix4x4 mat = node->mTransformation;QMatrix4x4 qMat = QMatrix4x4(mat.a1, mat.a2, mat.a3, mat.a4,mat.b1, mat.b2, mat.b3, mat.b4,mat.c1, mat.c2, mat.c3, mat.c4,mat.d1, mat.d2, mat.d3, mat.d4);partTransform->setMatrix(qMat);partModel->addComponent(partTransform);partModel->setObjectName(node->mName.C_Str()); // 这个很有用,可以用来后期对节点进行查找// qDebug() << partTransform->rotationX()//          << partTransform->rotationY()//          << partTransform->rotationZ();// process each mesh located at the current nodefor (unsigned int i = 0; i < node->mNumMeshes; i++){// the node object only contains indices to index the actual objects in the scene.// the scene contains all the data, node is just to keep stuff organized (like relations between nodes).aiMesh* mesh = scene->mMeshes[node->mMeshes[i]];processMesh(mesh, scene, partModel);}// after we've processed all of the meshes (if any) we then recursively process each of the children nodesfor (unsigned int i = 0; i < node->mNumChildren; i++){processNode(node->mChildren[i], scene, partModel);}return 0;
}int ModelLoader::processMesh(aiMesh *mesh, const aiScene *scene, Qt3DCore::QEntity *entity)
{qDebug() << "---> mesh:" << mesh->mName.C_Str();;Qt3DRender::QGeometry *geometry = new Qt3DRender::QGeometry(entity);Qt3DRender::QGeometryRenderer *geoRen = new Qt3DRender::QGeometryRenderer(entity);geoRen->setGeometry(geometry);geoRen->setPrimitiveType(Qt3DRender::QGeometryRenderer::Triangles);// 如果网格包含法线,则添加法线节点if(mesh->HasNormals()){// qDebug() << "has normal:" << mesh->mNumVertices;// 法线数据QVector<QVector3D> normals;for (unsigned int i = 0; i < mesh->mNumVertices; i++){aiVector3D normal = mesh->mNormals[i];normals << QVector3D(normal.x, normal.y, normal.z);}auto attr = RenderAttributes::create(normals, "vertexNormal", geometry);geometry->addAttribute(attr);}// 如果网格包含纹理坐标,则添加纹理坐标节点if(mesh->HasTextureCoords(0)){// qDebug() << "NumUVComponents :" << mesh->mNumUVComponents;// if(mesh->mNumUVComponents > 0)// {//     qDebug() << "has texture"//              << mesh->mTextureCoordsNames[0]->C_Str()//         ;// }QVector<QVector3D> textureCoordinates;for (unsigned int i = 0; i < mesh->mNumVertices; i++){aiVector3D texCoord = mesh->mTextureCoords[0][i];textureCoordinates << QVector3D(texCoord.x, texCoord.y, texCoord.z);}auto attrTC = RenderAttributes::create(textureCoordinates, Qt3DRender::QAttribute::defaultTextureCoordinateAttributeName(), geometry);geometry->addAttribute(attrTC);}// 将Assimp网格的顶点坐标添加到坐标节点// qDebug() << "vertices:" << mesh->mNumVertices;QVector<QVector3D> vertices;for (unsigned int i = 0; i < mesh->mNumVertices; i++){aiVector3D vertice = mesh->mVertices[i];vertices << QVector3D(vertice.x, vertice.y, vertice.z);}auto attrVeti = RenderAttributes::create(vertices, Qt3DRender::QAttribute::defaultPositionAttributeName(), geometry);geometry->addAttribute(attrVeti);geometry->setBoundingVolumePositionAttribute(attrVeti);// 将Assimp网格的面索引添加到面索引// qDebug() << "faces:" << mesh->mNumFaces;QVector<Triangle> faces;for (unsigned int i = 0; i < mesh->mNumFaces; i++){Triangle triFace;aiFace face = mesh->mFaces[i];triFace.vertexIndex1 = face.mIndices[0];triFace.vertexIndex2 = face.mIndices[1];triFace.vertexIndex3 = face.mIndices[2];faces << triFace;// for (unsigned int j = 0; j < face.mNumIndices; j++) // 填充面的索引// {//     faceSet->coordIndex.set1Value(faceSet->coordIndex.getNum(), face.mIndices[j]);// }}auto attrFace = RenderAttributes::create(faces, geometry);geometry->addAttribute(attrFace);// 设置材质if(mesh->mMaterialIndex >= 0){qDebug() << "set material";aiMaterial* material = scene->mMaterials[mesh->mMaterialIndex];// 创建材质节点// // 使用QMetalRoughMaterial时,貌似亮度有点不对// Qt3DExtras::QMetalRoughMaterial *qMaterial = new Qt3DExtras::QMetalRoughMaterial();// qMaterial->setMetalness(0.4);// qMaterial->setRoughness(0.55);Qt3DExtras::QDiffuseMapMaterial *qMaterial = new Qt3DExtras::QDiffuseMapMaterial();// 设置材质漫反射度float shiness;if (AI_SUCCESS == material->Get(AI_MATKEY_SHININESS, shiness)) {qDebug() << "shiness:" << shiness;// 使用 shiness 值qMaterial->setShininess(shiness);}// 设置材质漫反射颜色aiColor4D diffuseColor;if(AI_SUCCESS == material->Get(AI_MATKEY_COLOR_DIFFUSE, diffuseColor)){qDebug() << "rgb:" << diffuseColor.r << diffuseColor.g << diffuseColor.b;QColor tmpColor = QColor(diffuseColor.r * 255.0,diffuseColor.g * 255.0,diffuseColor.b * 255.0);qDebug() << tmpColor << QColor(255, 255, 255);// qMaterial->setBaseColor(tmpColor);QImage img(100, 100, QImage::Format_ARGB32);img.fill(tmpColor);MyQPaintedTextureImage *txtImg = new MyQPaintedTextureImage();txtImg->setImage(img);Qt3DRender::QTexture2D *txt2d = new Qt3DRender::QTexture2D();txt2d->addTextureImage(txtImg);// qMaterial->setBaseColor(QVariant::fromValue(txt2d));qMaterial->setDiffuse(txt2d);}// 设置环境颜色aiColor4D ambientColor;if(AI_SUCCESS == material->Get(AI_MATKEY_COLOR_AMBIENT, ambientColor)){QColor tmpColor = QColor(ambientColor.r, ambientColor.g, ambientColor.b, ambientColor.a);qDebug() << "ambient color:" << tmpColor;qMaterial->setAmbient(tmpColor);}else{qMaterial->setAmbient(QColor(128, 128, 128));}// 如果材质包含纹理,则创建纹理节点aiString texturePath; //Assimp texture file pathif(AI_SUCCESS == material->GetTexture(aiTextureType_DIFFUSE, 0, &texturePath)){qDebug() << "texture file:" << texturePath.C_Str();const aiTexture *embTexture = scene->GetEmbeddedTexture(texturePath.C_Str());if(embTexture) // 假如内嵌的纹理{qDebug() << "has embed img:"<< (char*)embTexture->achFormatHint<< embTexture->mFilename.C_Str()<< embTexture->mWidth << embTexture->mHeight;// 利用QPaintedTextureImage可以实现加载内存中的图片const unsigned char* data = reinterpret_cast<const unsigned char*>(embTexture->pcData);const size_t size = embTexture->mWidth;QByteArray imageData((char*)data, size);QImage img;if(img.loadFromData(imageData)){qDebug() << img;MyQPaintedTextureImage *txtImg = new MyQPaintedTextureImage();txtImg->setImage(img);Qt3DRender::QTexture2D *txt2d = new Qt3DRender::QTexture2D();txt2d->addTextureImage(txtImg);// qMaterial->setBaseColor(QVariant::fromValue(txt2d));qMaterial->setDiffuse(txt2d);}}else{qDebug() << "-----no embed img";}}else{qDebug() << "get texture fail" << material->GetTextureCount(aiTextureType_DIFFUSE);}entity->addComponent(qMaterial);}entity->addComponent(geoRen);return 0;
}
2.说明
2.1.调用
Qt3DExtras::Qt3DWindow *view = new Qt3DExtras::Qt3DWindow();
view->defaultFrameGraph()->setClearColor(QColor(QRgb(0x2b2b2b)));QString filePath = "myModel.glb";
Qt3DCore::QEntity *rootEntity = new Qt3DCore::QEntity();
ModelLoader::loadModelFromFile(rootEntity, filePath);view->setRootEntity(rootEntity);// 灯光及其他设置
2.2.关于贴图
假如使用QTextureImage的话,只能加载本地图片,但是参考【How can I load a QPaintedTextureImage into a QTextureMaterial?】,可以使用QPaintedTextureImage来加载内存中的图片。而glb/gltf文件本身包含了图片内容,读取glb文件时,图片内容已经加载到内存中了,因此QPaintedTextureImage更加适合。
参考
【Qt3DExample】
【How can I load a QPaintedTextureImage into a QTextureMaterial?】
相关文章:

使用Assimp加载glb/gltf文件,然后使用Qt3D来渲染
文章目录 1.代码2.说明2.1.调用2.2.关于贴图 1.代码 ModelLoader.h #ifndef MODELLOADER_H #define MODELLOADER_H#include <QObject> #include <Qt3DRender> #include <QVector3D> #include <QGeometry>#include <assimp/Importer.hpp> #incl…...

vue实现左侧数据拖拽到右侧区域,且左侧数据保留且左侧数据不能互相拖拽改变顺序
一、案例效果 二、案例代码 封装左侧抽屉 DrawerSearch.vue<template><div><mtd-form :model="formDrawerSearch" ref="formCustom" inline><mtd-form-item><mtd-inputtype="text"v-model="formDrawerSearch.ho…...

人工智能与机器学习原理精解【21】
文章目录 SVM求两线段上距离最近的两个点问题描述:距离函数:解法:具体步骤:特别注意:示例代码 SVM思想的介入1. **SVM 的基本思想**超平面: 2. **分类间隔(Margin)**1. **分类间隔的…...
【MySQL 01】数据库基础
目录 1.数据库是什么 2.基本操作 数据库服务器连接操作 数据库和数据库表的创建 服务器,数据库,表关系 数据逻辑存储 3.MySQL架构 4.SQL分类 5.存储引擎 1.数据库是什么 mysql&&mysqld: mysql:这通常指的是 MySQL …...

C语言字符学习中级使用库解决问题
学习C语言中的字符处理,对于初学者来说,理解字符的基本概念以及如何进行操作是非常重要的。字符处理是指对单个字符或一组字符(字符串)的操作。为了更好地理解,下面从基础开始介绍,并结合一些常用的函数和示…...

网络管理:网络故障排查指南
在现代IT环境中,网络故障是不可避免的。快速、有效地排查和解决网络故障是确保业务连续性和用户满意度的关键。本文将详细介绍网络故障排查的基本方法和步骤,确保内容通俗易懂,并配以代码示例和必要的图片说明。 一、网络故障排查的基本步骤 确认故障现象 确认用户报告的故…...
Springboot常见问题(bean找不到)
如图错误显示userMapper bean没有找到。 解决方案: mapper包位置有问题:因为SpringBoot默认的包扫描机制会扫描启动类所在的包同级文件和子包下的文件。注解问题: 比如没有加mapper注解 然而无论是UserMapper所在的包位置还是Mapper注解都是…...
架构设计笔记-5-软件工程基础知识
知识要点 按软件过程活动,将软件工具分为软件开发工具、软件维护工具、软件管理和软件支持工具。 软件开发工具:需求分析工具、设计工具、编码与排错工具。 软件维护工具:版本控制工具、文档分析工具、开发信息库工具、逆向工程工具、再工…...

Solidity——抽象合约和接口详解
🚀本系列文章为个人学习笔记,目的是巩固知识并记录我的学习过程及理解。文笔和排版可能拙劣,望见谅。 Solidity中的抽象合约和接口详解 目录 什么是抽象合约?抽象合约的语法接口(Interface)的定义接口的语…...
Fyne ( go跨平台GUI )中文文档-入门(一)
本文档注意参考官网(developer.fyne.io/) 编写, 只保留基本用法go代码展示为Go 1.16 及更高版本, ide为goland2021.2 这是一个系列文章: Fyne ( go跨平台GUI )中文文档-入门(一)-CSDN博客 Fyne ( go跨平台GUI )中文文档-Fyne总览(二)-CSDN博客 Fyne ( go跨平台GUI )…...

Google 扩展 Chrome 安全和隐私功能
过去一周,谷歌一直在推出新特性和功能,旨在让用户在 Chrome 上的桌面体验更加安全,最新的举措是扩展在多个设备上保存密钥的功能。 到目前为止,Chrome 网络用户只能将密钥保存到 Android 上的 Google 密码管理器,然后…...

css 缩放会变动的需要使用转换
position: fixed;top: 170px;left: 50%;transform: translate(-50%, -50%);...
数据库neo4j数据备份)
(17)数据库neo4j数据备份
图数据库备份 假设图数据库安装位置:/root/shuzihua/neo4j-community-3.5.8 1.数据导出 进入/root/shuzihua/neo4j-community-3.5.8/bin目录;执行 neo4j stop 停止服务;/root/shuzihua/neo4j-community-3.5.8/data/databases/graph.db&#…...

从零开始学习Python
目录 从零开始学习Python 引言 环境搭建 安装Python解释器 选择IDE 基础语法 注释 变量和数据类型 变量命名规则 数据类型 运算符 算术运算符 比较运算符 逻辑运算符 输入和输出 控制流 条件语句 循环语句 for循环 while循环 循环控制语句 函数和模块 定…...

前端框架的对比和选择
在当今的前端开发领域,有多种流行的前端框架可供选择,如 Vue、React 和 Angular。以下是这些框架的对比以及 Vue 的优势: 一、React 特点: 声明式编程:使用 JSX 语法,使得组件的结构和行为更加清晰。虚拟…...
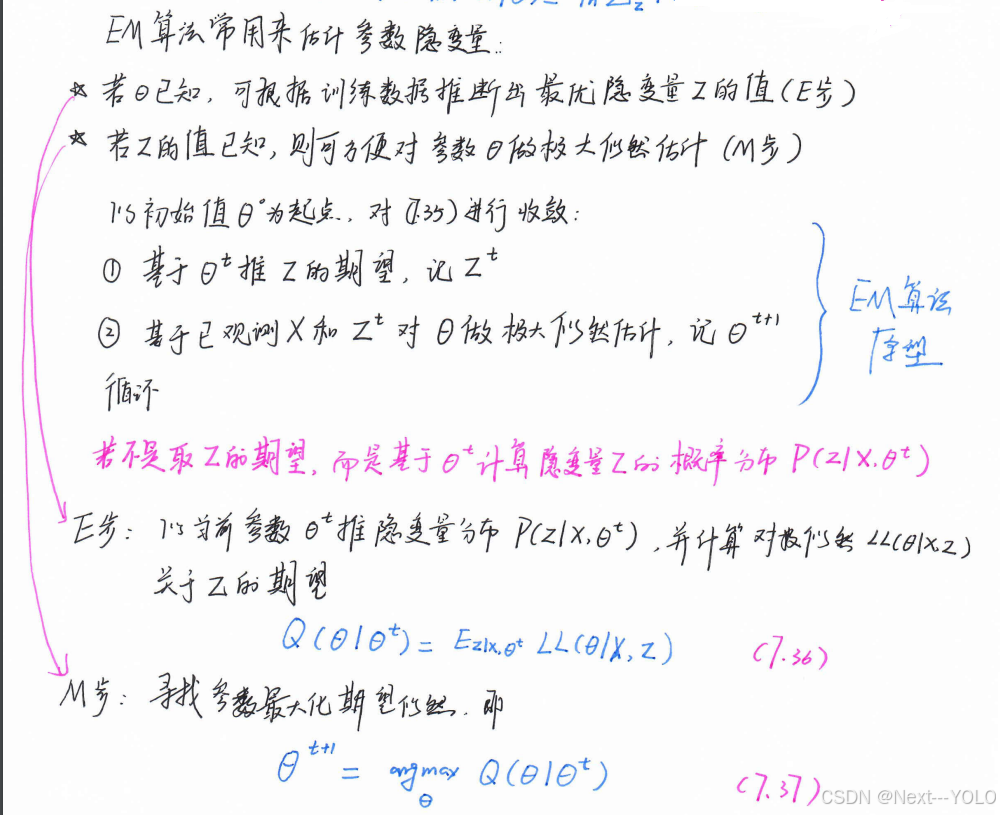
《机器学习》周志华-CH7(贝叶斯分类)
7.1贝叶斯决策论 对分类任务而言,在所有相关概率已知的理想情形下,贝叶斯决策论考虑如何基于这些概率核误判损失来选择最优的类别标记。 R ( x i ∣ x ) ∑ j 1 N λ i j P ( c j ∣ x ) \begin{equation} R(x_{i}|x)\sum_{j1}^{N}\lambda_{ij}P(c_{j}…...
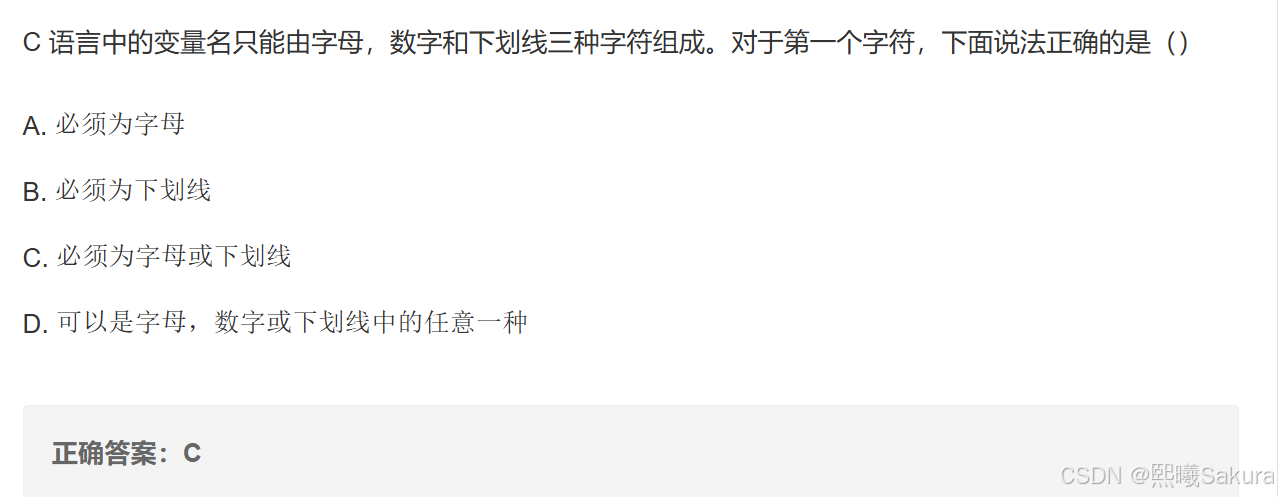
【C/C++】错题记录(一)
题目一 这道题主要考查了用户对标准库函数的使用规则的理解。 选项 A,一般情况下用户调用标准库函数前不需要重新定义,该项说法错误。 选项 B,即使包含了标准库头文件及相关命名空间,也不允许用户重新定义标准库函数,…...
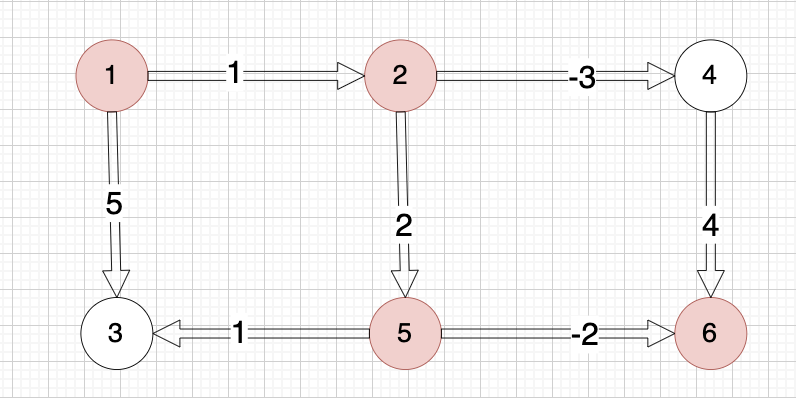
【代码随想录训练营第42期 Day60打卡 - 图论Part10 - Bellman_ford算法系列运用
目录 一、Bellman_ford算法的应用 二、题目与题解 题目一:卡码网 94. 城市间货物运输 I 题目链接 题解:队列优化Bellman-Ford算法(SPFA) 题目二:卡码网 95. 城市间货物运输 II 题目链接 题解: 队列优…...

vue复制信息到粘贴框
npm install vue-clipboard2main.js文件引入 import VueClipboard from vue-clipboard2 Vue.use(VueClipboard)页面应用 copyInfo(info){let that thislet copyData 项目名称:${info.projectName}\n 用户名:${info.username}\n 初始密码:${…...
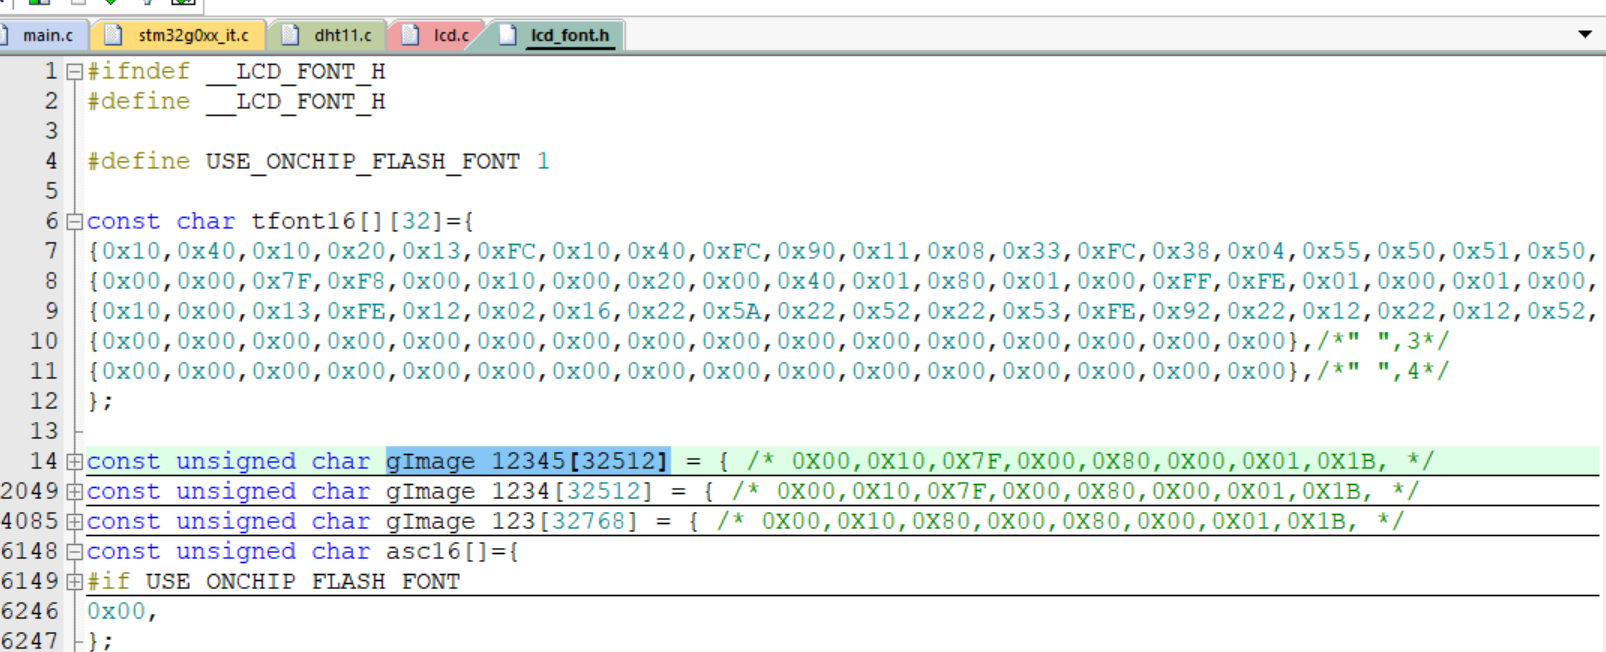
STM32基础笔记
第一章、STM32基本介绍 总内容 计算机技术简介环境安装、项目流程搭建最小系统时钟系统启动相关:启动文件、启动流程、启动方式GPIOUSARTNVIC: 外部中断_串口中断( DMA )TIMERADCDHT11: 单总线协议SPI : LCD屏 ## **1、计算机技术简介** 1.通用计算机/专用计算机…...

美国不断自我革新的历史,为这个国家面对充满巨大机遇却又充满不确定性的未来提供了引人深思的经验教训
https://www.mckinsey.com/mgi/our-research/At-250-sustaining-Americas-competitive-edge 美国不断自我革新的历史,为这个国家面对充满巨大机遇却又充满不确定性的未来提供了引人深思的经验教训 这一切始于一场惊天动地的反抗行动。 1776年7月,来自13…...

从日志到环境变量:根治 Android Studio AVD 启动报错“The emulator process has terminated”
1. 从错误弹窗到日志分析:定位问题的第一步 当你兴冲冲地打开Android Studio准备启动AVD(Android Virtual Device)时,突然弹出一个冰冷的提示框:"The emulator process has terminated",这感觉就…...

终极CoreCycler教程:简单三步完成CPU稳定性测试与优化
终极CoreCycler教程:简单三步完成CPU稳定性测试与优化 【免费下载链接】corecycler Script to test single core stability, e.g. for PBO & Curve Optimizer on AMD Ryzen or overclocking/undervolting on Intel processors 项目地址: https://gitcode.com/…...
深入Transformer内部:LoRA到底改动了哪部分权重才让模型“学会”新任务?
深入Transformer内部:LoRA如何通过低秩更新重塑大模型能力 在自然语言处理领域,大型预训练模型的微调一直是个计算密集型任务。传统全参数微调需要更新数十亿甚至数千亿参数,这对大多数研究者和企业来说都是难以承受的负担。低秩适应(LoRA)技…...

Wand-Enhancer:零成本解锁WeMod高级功能的完整指南
Wand-Enhancer:零成本解锁WeMod高级功能的完整指南 【免费下载链接】Wand-Enhancer Advanced UX and interoperability extension for Wand (WeMod) app 项目地址: https://gitcode.com/gh_mirrors/we/Wand-Enhancer 还在为WeMod专业版的订阅费用而犹豫不决吗…...

时空镜像立体成像楼宇全态透明智慧管控技术解析方案
时空镜像立体成像楼宇全态透明智慧管控技术解析方案一、方案概述当前传统楼宇管控普遍存在二维监控信息碎片化、空间感知能力薄弱、人员定位依赖外设、跨镜头轨迹断裂、身份核验存在漏洞、设备运维滞后、区域管控存在盲区等行业共性痛点,多数系统仅实现视频录像与基…...
)
【仅剩217份】《Midjourney后印象派风格白皮书》V2.3——含17位艺术家专属LoRA适配建议、32组跨文化色彩映射表及实时风格强度校准工具(2024.06内部封测版)
更多请点击: https://intelliparadigm.com 第一章:后印象派风格的视觉基因与Midjourney语义解码 后印象派并非对自然的模仿,而是对色彩、结构与主观情绪的系统性重构——梵高旋转的星云、塞尚凝固的苹果、高更平面化的塔希提图腾,…...
)
ElevenLabs葡语语音私密训练技巧(仅限白名单客户使用的SSML扩展语法+方言权重微调指令集)
更多请点击: https://intelliparadigm.com 第一章:ElevenLabs葡语语音私密训练的核心价值与白名单准入机制 ElevenLabs 的葡语语音私密训练(Private Voice Fine-tuning for Portuguese)专为高合规性场景设计,面向金融…...

gwadd:轻量级Git仓库组管理工具,提升多项目开发效率
1. 项目概述:一个被低估的Git仓库管理利器如果你和我一样,日常工作中需要频繁地在多个Git仓库之间穿梭,处理各种依赖、子模块,或者仅仅是同步一堆相关的项目代码,那么你一定对那种重复、繁琐的切换和操作感到头疼。今天…...

基于React的记忆管理UI组件库:openclaw-memory-ui实战指南
1. 项目概述:一个为记忆管理而生的开源UI组件库最近在折腾一个需要处理大量结构化记忆数据的项目,比如知识库、笔记应用或者智能助手的历史对话管理。这类应用的核心痛点在于,数据本身是复杂的、多维的,但传统的列表或表格展示方式…...