十七,Spring Boot 整合 MyBatis 的详细步骤(两种方式)
十七,Spring Boot 整合 MyBatis 的详细步骤(两种方式)
文章目录
- 十七,Spring Boot 整合 MyBatis 的详细步骤(两种方式)
- 1. Spring Boot 配置 MyBatis 的详细步骤
- 2. 最后:
MyBatis 的官方文档:https://mybatis.p2hp.com/

关于 MyBatis 的学习的详细内容,大家可以移步至:✏️✏️✏️ MyBatis_ChinaRainbowSea的博客-CSDN博客 。
1. Spring Boot 配置 MyBatis 的详细步骤
- 首先,我们创建相关测试的数据库,数据表。如下:

CREATE DATABASE `springboot_mybatis`
USE `springboot_mybatis`CREATE TABLE `monster` (
`id` int not null auto_increment,
`age` int not null,
`birthday` DATE DEFAULT NULL,
`email` VARCHAR(255) DEFAULT NULL,
`gender` CHAR(1) DEFAULT null,
`name` VARCHAR(255) DEFAULT NULL,
`salary` DOUBLE not NULL,
PRIMARY KEY(`id`)
)SELECT * from monsterINSERT INTO  `monster` (`id`,`age` ,`birthday`,`email`,`gender`,`name`,`salary`)
VALUES (1,20,'2000-10-10','nmw@sohu.com','男','牛魔王',9000.99)
INSERT INTO  `monster` (`id`,`age` ,`birthday`,`email`,`gender`,`name`,`salary`)
VALUES (2,10,'2000-12-12','bgj@sohu.com','女','白骨精',9999.99)- 导入相关的
jar依赖。这里我们使用 Druid 数据库连接池,同时我们还需要导入mybatis.spring.boot的。

<!-- 引入 mybatis starter--><!-- https://mvnrepository.com/artifact/org.mybatis.spring.boot/mybatis-spring-boot-starter --><dependency><groupId>org.mybatis.spring.boot</groupId><artifactId>mybatis-spring-boot-starter</artifactId><version>2.2.2</version></dependency>
引入 Druid 数据库的 jar 依赖。

<!-- 引入 druid 依赖--><dependency><groupId>com.alibaba</groupId><artifactId>druid</artifactId><version>1.1.17</version></dependency>
所有的 pom.xml 文件当中的 jar 依赖
<?xml version="1.0" encoding="UTF-8"?>
<project xmlns="http://maven.apache.org/POM/4.0.0"xmlns:xsi="http://www.w3.org/2001/XMLSchema-instance"xsi:schemaLocation="http://maven.apache.org/POM/4.0.0 http://maven.apache.org/xsd/maven-4.0.0.xsd"><modelVersion>4.0.0</modelVersion><groupId>com.rainbowsea</groupId><artifactId>springboot_mybaits</artifactId><version>1.0-SNAPSHOT</version><!--    导入SpringBoot 父工程-规定写法--><parent><groupId>org.springframework.boot</groupId><artifactId>spring-boot-starter-parent</artifactId><version>2.5.3</version></parent><!--    导入web项目场景启动器:会自动导入和web开发相关的jar包所有依赖【库/jar】--><!--    后面还会在说明spring-boot-starter-web 到底引入哪些相关依赖--><dependencies>
<!--        引入 web starter 依赖--><dependency><groupId>org.springframework.boot</groupId><artifactId>spring-boot-starter-web</artifactId></dependency><!--        引入 mybatis starter--><!-- https://mvnrepository.com/artifact/org.mybatis.spring.boot/mybatis-spring-boot-starter --><dependency><groupId>org.mybatis.spring.boot</groupId><artifactId>mybatis-spring-boot-starter</artifactId><version>2.2.2</version></dependency><!--        引入 mysql 驱动: 这里老师使用版本仲裁 8.0.26--><dependency><groupId>mysql</groupId><artifactId>mysql-connector-java</artifactId></dependency><!--        引入配置处理器--><dependency><groupId>org.springframework.boot</groupId><artifactId>spring-boot-configuration-processor</artifactId></dependency><!--引入lombok--><dependency><groupId>org.projectlombok</groupId><artifactId>lombok</artifactId></dependency><!--        引入 test stater --><dependency><groupId>org.springframework.boot</groupId><artifactId>spring-boot-starter-test</artifactId></dependency><!--        引入 druid 依赖--><dependency><groupId>com.alibaba</groupId><artifactId>druid</artifactId><version>1.1.17</version></dependency></dependencies></project>
- 编写对应 数据表的在Java当中对应的 Bean 对象。

特殊说明:
这里使用
@JsonFormat(pattern = "yyyy-MM-dd",timezone = "GMT+8")注解。来设置数据表当中的时间赋值到该 Bean 对象上的时间属性的一个时间格式。
pattern = "yyyy-MM-dd"是设置时间显示的格式样式timezone = "GMT+8"是设置时区差。这里我们中国是东半球,时差为 + 8 个小时。需要注意的是:这个注解只对前端显示,有效果,后端,控制台显示无效。

- 将Spring Boot 默认的 HikariCP 数据库连接池,切换为我们想要的
Druid数据库连接池。
这里我们通过配置类的方式,进行切换。

package com.rainbowsea.springboot.mybatis.config;import com.alibaba.druid.pool.DruidDataSource;
import org.springframework.boot.context.properties.ConfigurationProperties;
import org.springframework.context.annotation.Bean;
import org.springframework.context.annotation.Configuration;import javax.sql.DataSource;@Configuration
public class DruidDataSourceConfig {@ConfigurationProperties(value = "spring.datasource")  // 读取 类路径下的application.yaml// 的信息,并为下面的 对应的 setXX 进行赋值操作@Beanpublic DataSource dataSource() {DruidDataSource druidDataSource = new DruidDataSource();return druidDataSource;}}
在 resource 类路径下创建一个,名为 applicaiton.yaml 文件,配置编写,相关对于,Druid 数据库连接池的信息。如下:

server:port: 9090 # 注意:使用空格spring:datasource:driver-class-name: com.mysql.cj.jdbc.Driverusername: rootpassword: MySQL123url: jdbc:mysql://localhost:3306/springboot_mybatis?useSSL=true&useUnicode=true&characterEncoding=UTF-8
- 编写项目的场景启动器

package com.rainbowsea.springboot.mybatis;import org.springframework.boot.SpringApplication;
import org.springframework.boot.autoconfigure.SpringBootApplication;
import org.springframework.context.ConfigurableApplicationContext;@SpringBootApplication
public class Application {public static void main(String[] args) {ConfigurableApplicationContext ioc = SpringApplication.run(Application.class, args);}}- 运行测试,我们是否成功切换为了,我们想要的 Duird 数据连接池,因为在 Spring Boot 当中测试的话,必须要编写好对应的项目启动器,不然,是无法测试的,会报错。


package com.rainbowsea.springboot.mybatis;import com.rainbowsea.springboot.mybatis.bean.Monster;
import com.rainbowsea.springboot.mybatis.mapper.MonsterMapper;
import com.rainbowsea.springboot.mybatis.service.MonsterService;
import org.junit.jupiter.api.Test;
import org.springframework.boot.test.context.SpringBootTest;
import org.springframework.jdbc.core.JdbcTemplate;import javax.annotation.Resource;@SpringBootTest(classes = Application.class)  // 与 main 不同的需要指明 测试的是哪个Class类
public class ApplicationTest {@Resourceprivate JdbcTemplate jdbcTemplate;@Testpublic void t1() {// 输出看看当前的数据源是什么System.out.println(jdbcTemplate.getDataSource().getClass());}}- 创建一个mapper/dao 的包,在该包下创建一个名为
MonsterMapper的接口,通过代理类的方式,在该接口下,编写我们要执行业务的 SQL 语句的方法。

package com.rainbowsea.springboot.mybatis.mapper;import com.rainbowsea.springboot.mybatis.bean.Monster;
import org.apache.ibatis.annotations.Mapper;/*** 在Mapper接口使用 @Mapper 就会扫描,并将Mapper接口对象注入*/
@Mapper // 包扫描,加上了这个注解的话,那么
public interface MonsterMapper {// 方法 根据id 返回 Monster 对象public Monster getMonsterById(Integer id);}
特别说明:
这里我们在该 接口类当中,使用了
@Mapper注解。该注解的作用就是,让Spring Boot 加载的时候,会扫描这个类。从而找到这个类。这样我们就不需要额外的配置,包扫描了 。
- 在相应的对应的包,下创建对应的包,创建对应 SQl 语句的
xml文件。如下

<?xml version="1.0" encoding="UTF-8"?>
<!DOCTYPE mapper PUBLIC "-//mybatis.org//DTD Mapper 3.0//EN""http://mybatis.org/dtd/mybatis-3-mapper.dtd"><mapper namespace="com.rainbowsea.springboot.mybatis.mapper.MonsterMapper">
<!--1. 扫描所有的dao接口的实现,加入到ioc容器中2. 这里dao接口,就是mapper接口
--><!--    配置 getMonsterById--><select id="getMonsterById" resultType="com.rainbowsea.springboot.mybatis.bean.Monster">select * from monster where id = #{id}</select>
<!--  elect * from `monster` where id = #{id} 注意: 不是单引号处理 -->
</mapper>
同时需要在,application.yaml 文件当中配置,Mybatis 的包扫描路径:如下;

mybatis:# 指定要扫描的 Xxxmapper.xmlmapper-locations: classpath:mapper/*.xml
server:port: 9090  # 注意:使用空格spring:datasource:driver-class-name: com.mysql.cj.jdbc.Driverusername: rootpassword: MySQL123url: jdbc:mysql://localhost:3306/springboot_mybatis?useSSL=true&useUnicode=true&characterEncoding=UTF-8mybatis:# 指定要扫描的 Xxxmapper.xmlmapper-locations: classpath:mapper/*.xml# 通过config-location 可以指定mybatis-config.xml 可以以传统的方式来配置mybatis
#  config-location:
# 我们可以直接在 application.yaml 进行配置
# 举例说明1,比如配置原来的 typeAliases# 还有很多配置,等我们用到再说
#  type-aliases-package: com.rainbowsea.springboot.mybatis.bean
#  configuration:
#    log-impl: org.apache.ibatis.logging.stdout.StdOutImpl
#    map-underscore-to-camel-case: true# 老师说明: 配置mybatis的两种方式的选择: 如果配置比较简单,就直接在application.yaml配置
# 如配置内部比较多,可以考虑单独的做一个mybatis-config.xml
运行测试:

package com.rainbowsea.springboot.mybatis;import com.rainbowsea.springboot.mybatis.bean.Monster;
import com.rainbowsea.springboot.mybatis.mapper.MonsterMapper;
import com.rainbowsea.springboot.mybatis.service.MonsterService;
import org.junit.jupiter.api.Test;
import org.springframework.boot.test.context.SpringBootTest;
import org.springframework.jdbc.core.JdbcTemplate;import javax.annotation.Resource;@SpringBootTest(classes = Application.class)  // 与 main 不同的需要指明 测试的是哪个Class类
public class ApplicationTest {@Resourceprivate MonsterMapper monsterMapper;@Testpublic void getMonsterById() {Monster monsterById = monsterMapper.getMonsterById(1);System.out.println(monsterById);}}
- 编写对应的 Severl 业务处理
首先,编写其接口:

package com.rainbowsea.springboot.mybatis.service;import com.rainbowsea.springboot.mybatis.bean.Monster;public interface MonsterService {// 根据id 返回 Monster 对象public Monster getMonsterById(Integer id);
}
在编写其接口的实现类,

package com.rainbowsea.springboot.mybatis.service.impl;import com.rainbowsea.springboot.mybatis.bean.Monster;
import com.rainbowsea.springboot.mybatis.mapper.MonsterMapper;
import com.rainbowsea.springboot.mybatis.service.MonsterService;
import org.springframework.stereotype.Service;import javax.annotation.Resource;@Service
public class MonsterServiceImpl implements MonsterService {// 装配MonsterMapper@Resourceprivate MonsterMapper monsterMapper;@Overridepublic Monster getMonsterById(Integer id) {return monsterMapper.getMonsterById(id);}
}
运行测试:

package com.rainbowsea.springboot.mybatis;import com.rainbowsea.springboot.mybatis.bean.Monster;
import com.rainbowsea.springboot.mybatis.mapper.MonsterMapper;
import com.rainbowsea.springboot.mybatis.service.MonsterService;
import org.junit.jupiter.api.Test;
import org.springframework.boot.test.context.SpringBootTest;
import org.springframework.jdbc.core.JdbcTemplate;import javax.annotation.Resource;@SpringBootTest(classes = Application.class)  // 与 main 不同的需要指明 测试的是哪个Class类
public class ApplicationTest {// 装配到MonsterService@Resourceprivate MonsterService monsterService;// 测试 MonsterService@Testpublic void getMonsterById2() {Monster monster = monsterService.getMonsterById(2);System.out.println(monster);}}
- 编写对应的 Controller 控制器,在前端处理显示。

package com.rainbowsea.springboot.mybatis.controller;import com.rainbowsea.springboot.mybatis.bean.Monster;
import com.rainbowsea.springboot.mybatis.service.MonsterService;
import org.springframework.stereotype.Controller;
import org.springframework.web.bind.annotation.GetMapping;
import org.springframework.web.bind.annotation.RequestParam;
import org.springframework.web.bind.annotation.ResponseBody;import javax.annotation.Resource;@Controller
public class MonsterController {// 装配MonsterService@Resourceprivate MonsterService monsterService;@ResponseBody@GetMapping("/monster")public Monster getMonsterById( @RequestParam(value = "id") Integer id) {return monsterService.getMonsterById(id);}
}
运行测试:注意:我们这里配置的端口是9090,并不是8080。

2. 最后:
“在这个最后的篇章中,我要表达我对每一位读者的感激之情。你们的关注和回复是我创作的动力源泉,我从你们身上吸取了无尽的灵感与勇气。我会将你们的鼓励留在心底,继续在其他的领域奋斗。感谢你们,我们总会在某个时刻再次相遇。”
相关文章:

十七,Spring Boot 整合 MyBatis 的详细步骤(两种方式)
十七,Spring Boot 整合 MyBatis 的详细步骤(两种方式) 文章目录 十七,Spring Boot 整合 MyBatis 的详细步骤(两种方式)1. Spring Boot 配置 MyBatis 的详细步骤2. 最后: MyBatis 的官方文档:https://mybatis.p2hp.com/ 关于 MyBa…...

DNS协议解析
DNS协议解析 什么是DNS协议 IP地址:一长串唯一标识网络上的计算机的数字 域名:一串由点分割的字符串名字 网址包含了域名 DNS:域名解析协议 IP>域名 --反向解析 域名>IP --正向解析 域名 由ICANN管理,有级别…...

每日一题——第一百零八题
题目: 写几个函数, ①输入10个职工的姓名和职工号 ②按照职工号由小到大排列, 姓名顺序也随之调整 ③要求输入一个职工号, 用折半查找找出该职工的姓名 #include<stdio.h> #include<string.h> #define MAX_EMPOLYEES…...

使用Python免费将pdf转为docx
刚刚想将pdf转换为docx文档时,居然要收费 还好我学过编程,这不得露两手 将pdf 转换为 docx 文档 的操作步骤 我这里使用的是Python语言 (1)在终端上安装 pdf2docx 是一个 Python 库,它可以将 PDF 文件转换为 Word (…...

树莓派4B+UBUNTU20.04+静态ip+ssh配置
树莓派4B+UBUNTU20.04+静态ip+ssh配置 1.烧录Ubuntu镜像1.1选择pi 4b1.2选择ubuntu server (服务器版,无桌面)20.041.3选择sd卡1.4 点击右下角 NEXT ,编辑设置,输入密码,wifi选CN, 开启ssh1.5 烧录,依次点击“是”,等待完成2 烧录完成后装入树莓派,上电,等待系统完成配…...

C#实现指南:将文件夹与exe合并为一个exe
在软件开发过程中,有时需要将多个文件(如资源文件、配置文件等)与可执行文件(exe)打包在一起,以便于分发和部署。在C#中,我们可以利用ILMerge或Costura.Fody等工具来实现这一目标。本文将介绍如…...

linux信号 | 学习信号三步走 | 全解析信号的产生方式
前言:本节内容是信号, 主要讲解的是信号的产生。信号的产生是我们学习信号的第二个阶段。 我们已经学习过第一个阶段——信号的概念与预备知识(没有学过的友友可以查看我的前一篇文章)。 以及我们还没有学习信号的第三个阶段——信…...

C++ 刷题 使用到的一些有用的容器和函数
优先队列 c优先队列priority_queue(自定义比较函数)_c优先队列自定义比较-CSDN博客 373. 查找和最小的 K 对数字 - 力扣(LeetCode) 官方题解: class Solution { public:vector<vector<int>> kSmallestP…...
)
【Kubernetes】常见面试题汇总(三十四)
目录 86. K8s 每个 Pod 中有一个特殊的 Pause 容器能否去除,简述原因。 特别说明: 题目 1-68 属于【Kubernetes】的常规概念题,即 “ 汇总(一)~(二十二)” 。 题目 69-113 属于【Kuberne…...

C++标准库双向链表 list 中的insert函数实现。
CPrimer中文版(第五版): //运行时错误:迭代器表示要拷贝的范围,不能指向与目的位置相同的容器 slist.insert(slist.begin(),slist.begin(),slist.end()); 如果我们传递给insert一对迭代器,它们不能…...
)
华为机考练习(golang)
输入 第一行输入一个正整数N,表示整数个数。(0<N<100000) 第二行输入N个整数,整数的取值范围为[-100,100]。 第三行输入一个正整数M,M代表窗口的大小,M<100000,且M<N。 输出 窗口…...
51单片机快速入门之按键应用拓展
51单片机快速入门之按键应用拓展 LED的点动控制: 循环检测,当key 为0 时 led 亮 反之为熄灭 while(1){ if(key!1) { led0; }else { led1; } } LED的锁定控制: 当按钮按下,led取反值 while(1) { if(key!1) { led!led; } } LED的4路抢答控制: bz默认为0 !bz 取反值,循环启动…...

数据库 - MySQL的事务
目录 前言 一、事务的特性 (一)原子性 (二)一致性 (三)隔离性 (四)持久性 二、事务的控制语句 三、事务隔离级别 (一)读未提交 (二&…...

【Python机器学习】NLP信息提取——提取人物/事物关系
目录 词性标注 实体名称标准化 实体关系标准化和提取 单词模式 文本分割 断句 断句的方式 使用正则表达式进行断句 词性标注 词性(POS)标注可以使用语言模型来完成,这个语言模型包含词及其所有可能词性组成的字典。然后,该…...

vector类
一、STL库 vector 1.1 vector的介绍 vector英文意思为向量:向量是表示大小可以改变的数组的序列容器。 指向其元素的常规指针上的偏移量来访问其元素,并且与数组中的效率一样高。但与数组不同,它们的大小可以动态变化,其存储由容…...

python常见的魔术方法
什么是魔术方法 Python类的内置方法,各自有各自的特殊功能,被称之为魔术方法 常见的魔术方法有以下: __init__:构造方法 __str__:字符串方法 __lt__:小于、大于符号比较 __le__:小于等于、大于等于符合比较 __eq__:等于符合比较__init__ c…...
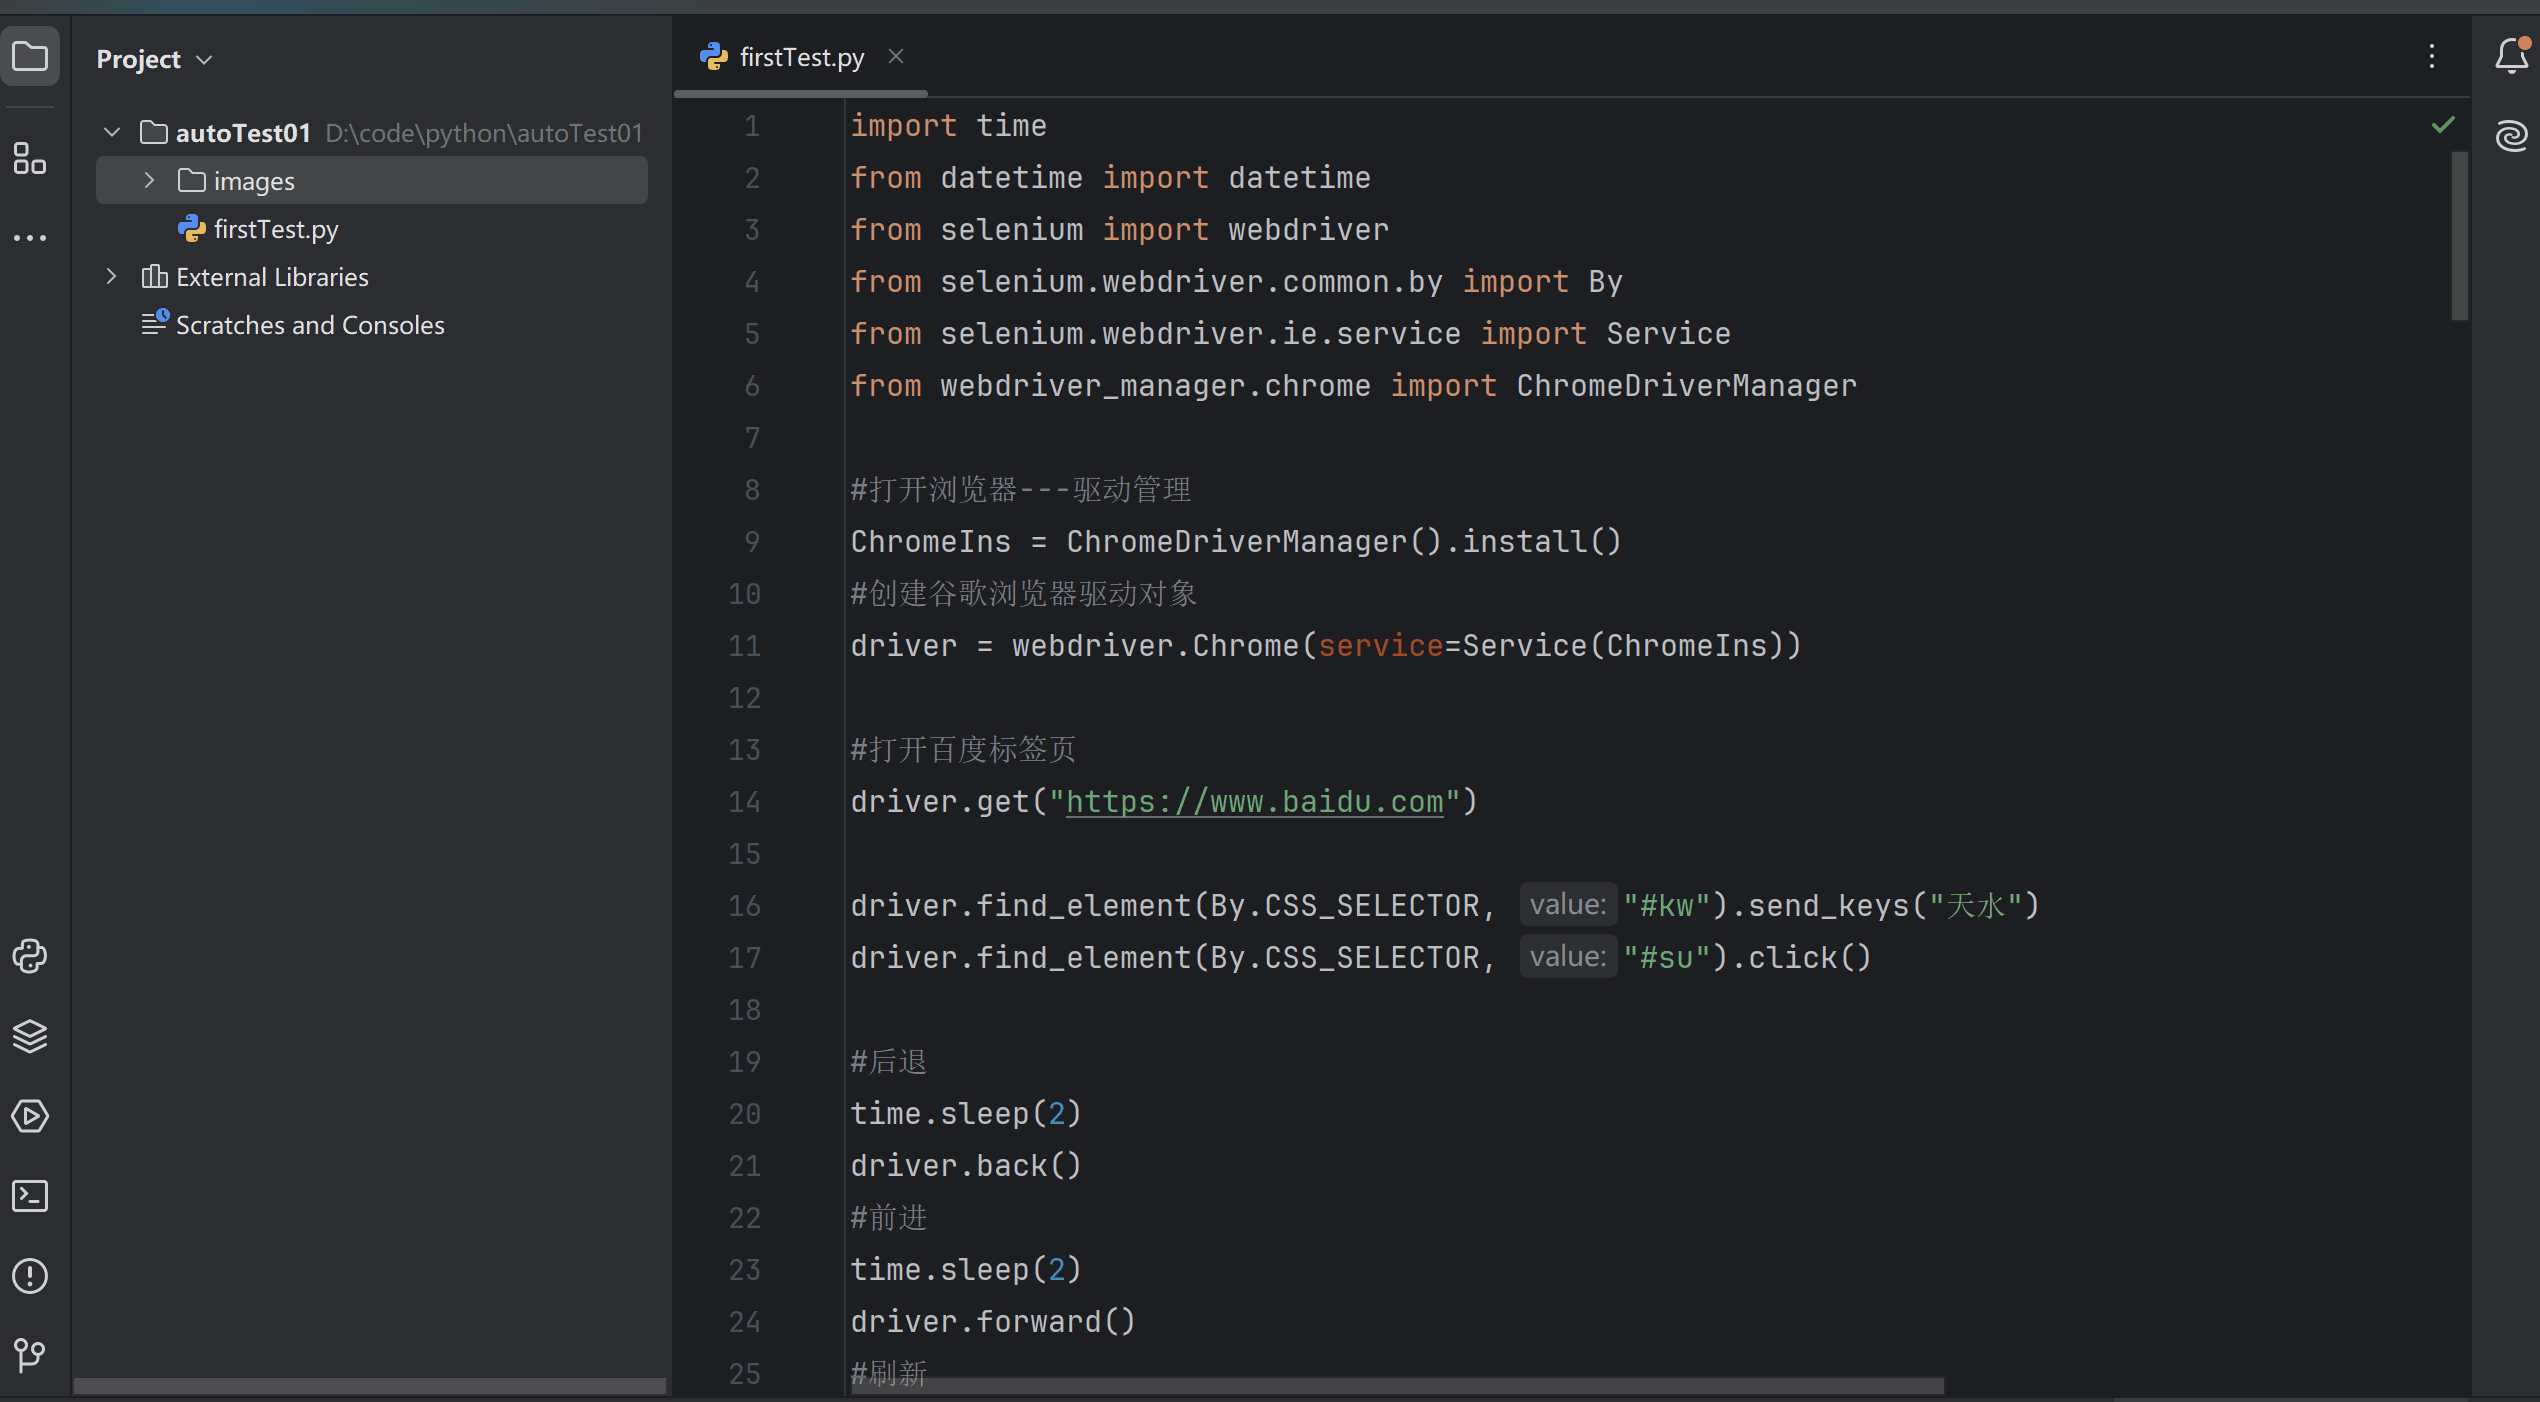
自动化测试常用函数:弹窗、等待、导航、上传与参数设置
目录 一、弹窗 1. 警告弹窗确认弹窗 2. 提示弹窗 二、等待 1. 强制等待 2. 隐式等待 3. 显示等待 三、浏览器导航 1. 打开网站 2. 浏览器的前进、后退、刷新 四、文件上传 五、浏览器参数设置 1. 设置无头模式 2. 页面加载策略 一、弹窗 弹窗是在页面是找不到任何…...

【必看】2024国赛选题分布情况分析及数模国赛答辩指南~答辩不走弯路
↑↑↑↑↑↑↑↑↑↑↑↑↑↑↑↑↑↑↑↑↑↑↑↑↑↑↑↑↑↑↑↑↑↑↑↑↑↑↑↑↑↑↑↑↑↑↑↑↑↑↑↑↑↑↑↑↑↑↑↑↑↑↑↑↑↑↑↑↑↑↑↑↑↑↑↑↑↑↑↑↑↑↑↑↑↑↑↑↑↑↑ 紧张刺激的数模国赛已经过去一段时间,各赛区的成绩发布也在陆续进…...
微服务注册中⼼1
1. 微服务的注册中⼼ 注册中⼼可以说是微服务架构中的”通讯录“ ,它记录了服务和服务地址的映射关系。在分布式架构中, 服务会注册到这⾥,当服务需要调⽤其它服务时,就这⾥找到服务的地址,进⾏调⽤。 1.1 注册中⼼的…...

我设置了路由器自动切换ip,这会让我的账号登录地址经常改变吗
是的,路由器设置自动切换IP可能会导致你的账号登录地址经常改变。 这是因为当路由器切换IP时,外部网络所看到的你的设备IP地址也会随之改变。对于很多跨境电商、社交媒体或者银行账户等需要较高安全性的系统来说,经常变动的IP地址可能会被视…...

【ZYNQ】AXI4总线协议实战:从握手时序到PS-PL高效通信
1. AXI4总线协议基础:从握手信号到通道架构 第一次接触ZYNQ的PS-PL通信时,我被AXI4协议里那些VALID/READY信号搞得头晕眼花。直到在示波器上抓到真实的握手波形,才突然理解这个看似复杂的协议其实像极了我们日常的对话机制——只有当说话方准…...

百度网盘直链解析工具:突破下载限速的Python解决方案
百度网盘直链解析工具:突破下载限速的Python解决方案 【免费下载链接】baidu-wangpan-parse 获取百度网盘分享文件的下载地址 项目地址: https://gitcode.com/gh_mirrors/ba/baidu-wangpan-parse 你是否曾经为百度网盘的下载速度而烦恼?作为国内最…...

Sketchfab数据提取终极指南:打破在线3D模型下载壁垒的完整解决方案
Sketchfab数据提取终极指南:打破在线3D模型下载壁垒的完整解决方案 【免费下载链接】sketchfab sketchfab download userscipt for Tampermonkey by firefox only 项目地址: https://gitcode.com/gh_mirrors/sk/sketchfab 你是否曾在Sketchfab上发现完美的3D…...

构建动态技能图谱:从数据模型到自动化可视化的完整实践
1. 项目概述:一个技能图谱的诞生最近在GitHub上看到一个挺有意思的项目,叫dortort/skills。乍一看,这只是一个个人仓库,但点进去你会发现,它远不止是一个简单的代码集合。它更像是一张动态的、可视化的个人技能地图&am…...

品牌声音技能化:从模糊概念到可执行AI内容策略
1. 项目概述:品牌声音的“技能化”构建最近在和一些做品牌营销、内容运营的朋友聊天,发现一个挺普遍的现象:大家手里都有一堆品牌手册、VI规范,但一到具体执行,比如写一篇公众号推文、拍一条短视频,或者回复…...
Pixel Framebuf库:图形化编程驱动LED矩阵,告别底层坐标换算
1. 项目概述:告别点灯,拥抱图形化LED矩阵编程如果你玩过Arduino或者树莓派,大概率接触过WS2812B这类可寻址LED,也就是大家常说的NeoPixel。单个灯珠的控制很简单,setPixelColor一下就能亮。但当你面对一个8x8、16x16甚…...
)
Tea印相失效诊断清单:从--v 6.2到--v 6.6,6个版本兼容性断点及降级回滚方案(含JSON config快照备份包)
更多请点击: https://intelliparadigm.com 第一章:Tea印相失效诊断清单:从--v 6.2到--v 6.6,6个版本兼容性断点及降级回滚方案(含JSON config快照备份包) Tea印相(TeaYinXiang)在 v…...
:构建智能体与工具交互的通用语言)
AI控制协议标准(ACPS):构建智能体与工具交互的通用语言
1. 项目概述与核心价值最近在开源社区里,一个名为“AI-Control-Protocol-Standard”的项目引起了我的注意。这个由DaibinThink发起的项目,名字听起来就很有分量——“AI控制协议标准”。乍一看,你可能觉得这又是一个关于AI模型如何被调用的技…...

基于Electron的ChatGPT桌面客户端开发:架构、功能与进阶实践
1. 项目概述:一个开源桌面客户端的诞生与价值如果你和我一样,在日常开发、写作或者处理一些需要深度思考的任务时,经常需要和ChatGPT这样的AI助手对话,那你一定对在浏览器里反复切换标签页、刷新页面、管理冗长的对话历史感到厌烦…...

Claude API封装项目深度解析:从安全评估到自主构建代码助手
1. 项目概述与核心价值 最近在GitHub上看到一个挺有意思的项目,叫 ashish200729/claude-code-source-code 。光看这个标题,很多开发者朋友可能会心头一热,以为这是某个AI模型的源代码被开源了。但作为一个在开源社区混迹多年的老码农&…...