Spring Security in Action 第十一章 SpringSecurity前后端分离实战
本专栏将从基础开始,循序渐进,以实战为线索,逐步深入SpringSecurity相关知识相关知识,打造完整的SpringSecurity学习步骤,提升工程化编码能力和思维能力,写出高质量代码。希望大家都能够从中有所收获,也请大家多多支持。
专栏地址:SpringSecurity专栏
本文涉及的代码都已放在gitee上:gitee地址
如果文章知识点有错误的地方,请指正!大家一起学习,一起进步。
专栏汇总:专栏汇总
文章目录
- 11.1 示例的情景和要求
- 11.2 实现和使用token
- 11.2.1 什么是token?
- 11.2.2 什么是JSON Web Token?
- 11.3 实现认证端
- 11.4 实现业务逻辑端
- 11.4.1 实现Authentication objects
- 11.4.2 实现对认证端的代理
- 11.4.3 实现AuthenticationProvider接口
- 11.4.4 实现过滤器
- 11.4.5 编写安全配置类
- 11.4.6 测试整个系统
本章包括
- 实现和使用token
- 使用JSON Web token
- 在多个应用程序中分离认证和授权
- 实现多因素认证方案
- 使用多个自定义过滤器和多个AuthenticationProvider对象
现在又到了将你所学到的东西付诸行动的时候了,这个练习向你展示了整个画面。系好你的安全带,打开你的IDE,准备好迎接一场冒险吧!
在本章中,我们将设计一个由三个角色组成的系统:客户端、认证端和业务逻辑端。从这三个角色中,我们将实现认证端的后端部分和一个业务逻辑端。正如你所看到的,我们的例子更加复杂,表明我们越来越接近真实世界的场景了。
这个练习也是一个很好的机会来回顾、应用和更好地理解你已经学过的东西,并触及新的主题,如JSON Web Tokens(JWT)。你还可以看到在一个系统中分离认证和授权责任的演示。
11.1 示例的情景和要求
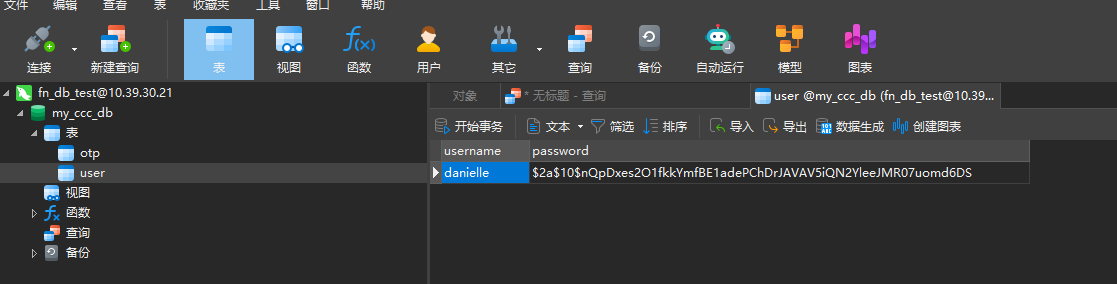
在这一节中,我们讨论了本章中我们共同开发的应用程序的要求。一旦你理解了必须要做的事情,我们就会在第11.2节中讨论如何实现这个系统,以及哪些是我们的最佳选择。然后,我们在第11.3节和第11.4节中用Spring Security动手,实现这个方案。该系统的架构有三个组成部分。你会发现这些组件在图11.1中得到了说明。这三个组件是
- 客户端-这可以是一个移动应用程序或使用Angular、ReactJS或Vue.js等框架开发的Web应用程序的前端。我们不实现系统的客户端部分,但要记住,它存在于现实世界的应用中。我们不使用客户端来调用api,而是使用cURL。
- 认证端-这个应用程序的目的是根据用户的凭证(用户名和密码)进行认证,并通过短信向他们发送一次性密码(OTP)。因为在这个例子中我们不会实际发送短信,我们将直接从数据库中读取OTP的值。在本章中,我们在不发送短信的情况下实现了整个应用。以后,你也可以扩展它,使用你选择的服务来发送消息,比如阿里云,腾讯云等等。
- 业务端-这是一个提供api访问的应用程序,是我们的客户所消费的。在调用一个api之前,用户必须用他们的用户名和密码进行认证,然后发送一个OTP。
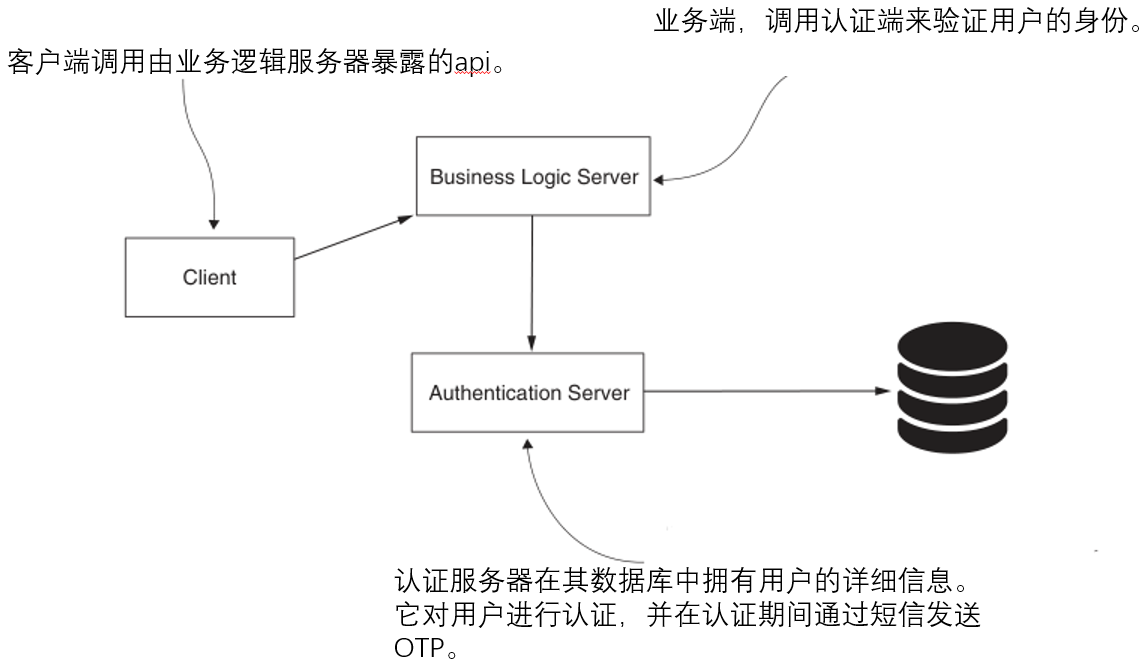
图11.1 客户端调用业务端,业务端调用认证端验证用户的身份,认证端在其数据库中存储用户的证书。
要调用业务端上的任何api,客户必须遵循三个步骤。
- 通过调用业务逻辑端的/login api认证用户名和密码,以获得随机生成的OTP。
- 使用用户名和OTP调用/login api。
- 通过将步骤2中收到的令牌添加到HTTP请求的Authorization头中,调用任何api。
当客户验证了用户名和密码后,业务逻辑服务器会向认证服务器发送一个OTP请求。认证成功后,认证服务器通过短信向客户发送一个随机生成的OTP(图11.2)。这种识别用户的方式被称为多因素认证(MFA),现在已经相当普遍。我们通常需要用户通过使用他们的证书和另一种识别手段(例如,他们拥有一个特定的移动设备)来证明他们是谁。
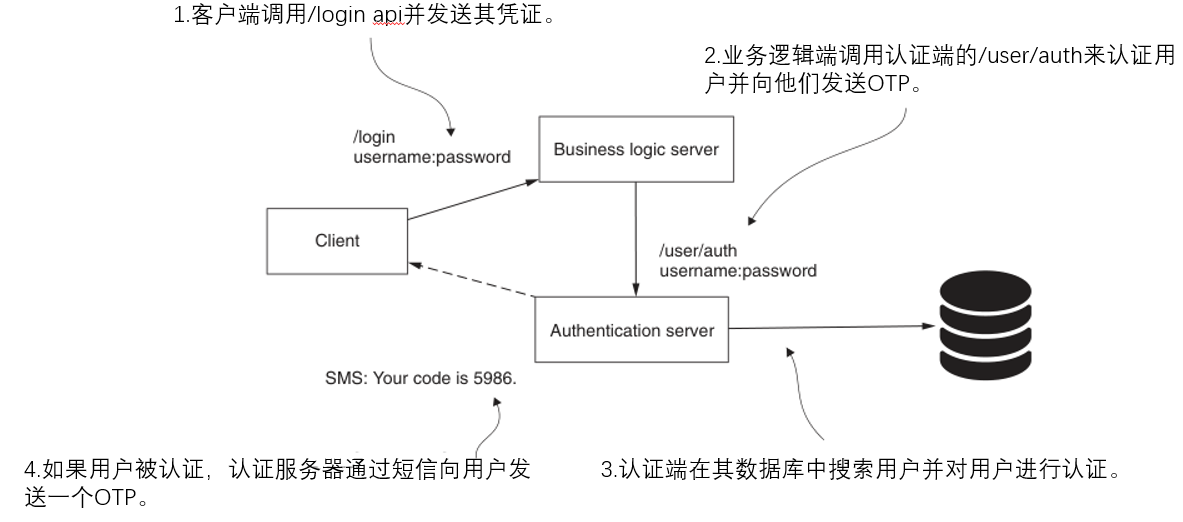
图11.2 第一个认证步骤包括用用户的用户名和密码识别用户,认证端为第二个认证步骤返回一个OTP。
在第二个认证步骤中,一旦客户端从收到的SMS中获得了代码,用户就可以再次用用户名和代码调用/login api。 业务逻辑服务器用认证服务器验证该代码。如果代码有效,客户端会收到一个令牌,它可以用来调用业务逻辑服务器上的任何api(图11.3)。在第11.2节中,我们将详细讨论这个token是什么,我们如何实现它,以及为什么我们要使用它。
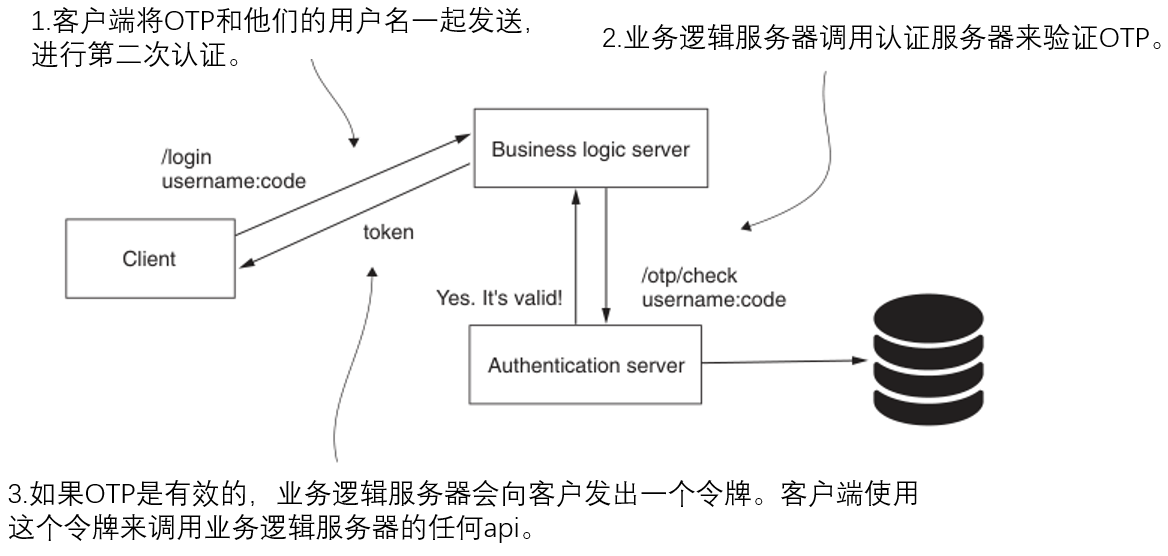
图11.3 第二个认证步骤。客户端发送他们通过SMS消息收到的代码,以及他们的用户名。业务逻辑服务器调用认证服务器来验证OTP。如果OTP是有效的,业务逻辑服务器会向客户发出一个令牌。客户端使用这个令牌来调用业务逻辑服务器上的任何其他api。
在第三个认证步骤中,客户端现在可以通过将其在步骤2中收到的令牌添加到HTTP请求的授权头中来调用任何api。图11.4说明了这个步骤。

图11.4 第三个认证步骤。为了调用由业务逻辑服务器暴露的任何api,客户端在授权HTTP请求头中添加一个有效的令牌。
这个例子允许我们在一个更大的应用程序上工作,其中包括更多我们在以前章节中讨论的概念。为了让你专注于我想包含在应用程序中的Spring Security概念,我简化了系统的架构。有人可能会说,这种架构使用的方法不好,因为客户端只应该与认证服务器共享密码,而绝不应该与业务逻辑服务器共享。这是正确的!在我们的案例中,这只是一个简化。在现实世界的场景中,一般来说,我们努力让系统中尽可能少的组件知道凭证。另外,有人会说,MFA方案本身可以通过使用第三方管理系统如Okta或类似的东西更容易实现。这个例子的部分目的是教你如何定义自定义过滤器。
11.2 实现和使用token
token类似于门禁卡。一个应用程序获得一个token作为认证过程的结果,用来访问资源。api代表网络应用中的资源。对于一个网络应用,token是一个字符串,通常由想要访问特定端点的客户通过HTTP头发送。这个字符串可以是普通的,就像一个纯粹的通用唯一标识符(UUID),或者它可能有一个更复杂的形状,如JSON网络令牌(JWT)。
今天,token经常被用于认证和授权架构中,这就是为什么你需要了解它们。
11.2.1 什么是token?
令牌提供了一种方法,应用程序用它来证明它已经验证了一个用户,这允许用户访问应用程序的资源。在第11.2.2节中,我们将介绍目前最常用的令牌实现之一:JWT。
什么是token?从理论上讲,token只是一张出入卡。当你访问一栋办公楼时,你首先去接待台。在那里,你表明自己的身份(认证),然后你收到一张门禁卡(令牌)。你可以用门禁卡来打开一些门,但不一定是所有的门。这样,令牌授权你的访问,并决定你是否被允许做某事,如打开某扇门。图11.5展示了这个概念。

图11.5 为了访问飞船(业务逻辑端),Zglorb需要一张访问卡(token)。在被确认身份后,Zglorb得到一张访问卡。这个访问卡(令牌)只允许他进入他的房间和他的办公室(资源)。
在实现层面上,令牌甚至可以是普通字符串。最重要的是,在你发出这些东西后,要能识别它们。你可以生成UUID,并将其存储在内存或数据库中。让我们假设以下情况。
-
客户端用其证书向服务端证明其身份。
-
服务器向客户发出一个UUID格式的令牌。这个令牌,现在与客户端相关联,被服务器存储在内存中(图11.6)。
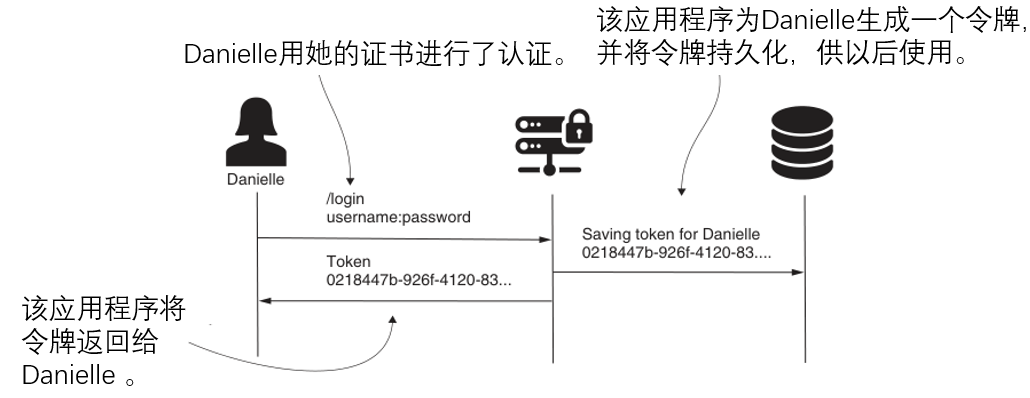
图11.6 当客户端进行认证时,服务器会生成一个令牌并将其返回给客户端。然后客户端使用这个令牌来访问服务端的资源。
- 当客户端调用一个api时,客户端提供令牌并获得授权。图11.7展示了这个步骤。
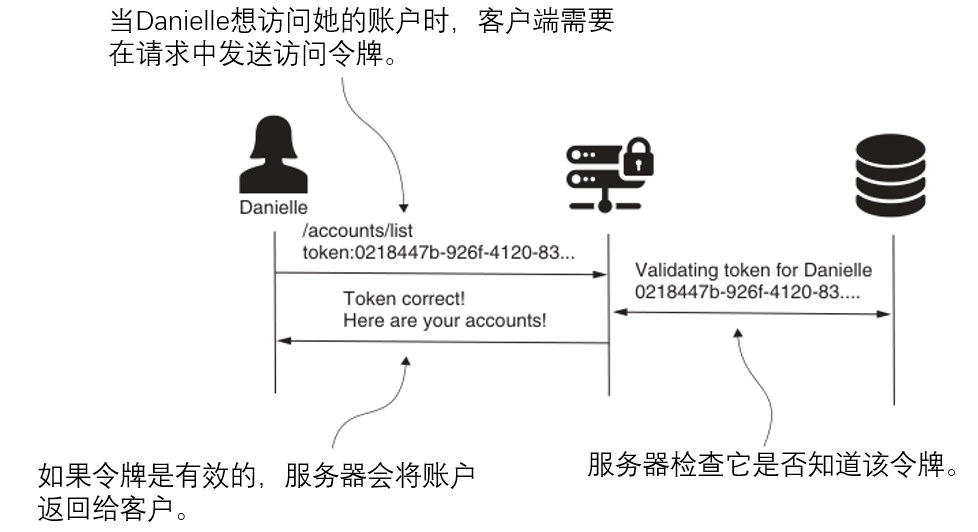
图11.7 当客户端需要访问一个用户资源时,他们必须在请求中提供一个有效的令牌。一个有效的令牌是先前由服务器在用户认证时发出的。
这就是与在认证和授权过程中使用令牌相关的流程。它的主要优点是什么?你为什么要使用这样的流程呢? 难道它不比简单的登录增加更多的复杂性吗?(你可能会想,反正你只能依靠用户和密码。)但令牌带来了更多的优势,所以让我们列举一下,然后逐一讨论。
- token帮助你避免在所有请求中共享凭证。
- 你可以定义具有失效时间的token。
- 你可以使令牌失效而不使凭证失效。
- 令牌还可以存储客户需要在请求中发送的用户权限等细节。
- 令牌可以帮助你将认证责任委托给系统中的另一个组件。
token可以帮助你避免在所有的请求中共享凭证。在第2章到第10章,我们用HTTP Basic作为所有请求的认证方法。正如你所了解的那样,这种方法假定你为每个请求发送凭证。在每个请求中发送凭证是不对的,因为这往往意味着你暴露了它们。你越频繁地暴露凭证,就越有可能被别人截获。有了令牌,我们改变了策略。我们只在第一次请求认证时发送凭证。一旦通过认证,我们就会得到一个令牌,我们可以用它来获得调用资源的授权。这样,我们只需要发送一次凭证就能获得令牌。
你可以定义具有较短生命周期的token。如果一个骗子偷了token,他们将不能永远使用它。最有可能的是,在他们发现如何使用它来入侵你的系统之前,令牌可能会过期。你也可以使令牌失效。这样一来,它就不能再被任何人使用了。
token也可以存储请求中需要的细节。我们可以使用令牌来存储用户的权限和角色等细节。这样,我们就可以用客户端的会话代替服务器端的会话,这为我们提供了更好的横向扩展的灵活性。在第12章到第15章讨论OAuth 2的流程时,你会看到更多关于这种方法的内容。
token可以帮助你将认证责任分离给系统中的另一个组件。 我们可能会发现自己实现的系统并不管理自己的用户,而是允许用户使用他们在其他平台(如GitHub、Twitter等)上的账户的凭证来进行认证。即使我们也选择实现认证的组件,我们可以把实现分开,这对我们是有利的。
11.2.2 什么是JSON Web Token?
在本节中,我们将讨论一种更具体的令牌实现–JSON Web Token(JWT)。这就是我们在本节中讨论它的原因,这也是我选择在本章的实践例子中应用它的原因。你也会在第12章到第15章中找到它,我们将在那里讨论OAuth 2。
你已经在第11.2.1节中了解到,令牌是服务器以后可以识别的任何东西:UUID、访问卡,甚至是你在博物馆买票时收到的贴纸。让我们来看看JWT是什么样子的,以及为什么JWT很特别。从实现本身的名称上很容易理解很多关于JWT的内容。
- JSON-它使用JSON来格式化它包含的数据。
- Web-用于网络请求。
- Token-这是一个Token的实现。
JWT有三个部分,每个部分用一个点(句号)与其他部分分开。代码示例如下所示:

前两部分是header和body。header(从令牌的开始到第一个点)和body(在第一个点和第二个点之间)是以JSON的形式进行的,然后进行Base64编码。我们使用header和body来存储=细节。下一个代码片断显示了heade和body在进行Base64编码之前的样子。
{
"alg": "HS256"
}
{
"username": "danielle"
}
在header中存储与令牌有关的元数据。在这种情况下,header中包含了生成签名的算法的名称(HS256)。在正文中,你可以包括以后授权所需的细节。在这个例子中,我们只有用户名。我建议你尽可能地保持令牌的长度,并且不要在body中添加大量的数据。即使在技术上没有限制,你会发现
- 如果令牌很长,就会减慢请求的速度。
- 令牌越长,加密算法需要的时间就越多。
token的最后一部分(从第二个点到最后)是数字签名,但这部分可以缺失。签名的作用是确定有人在网络上传输令牌时没有拦截令牌并改变其内容。
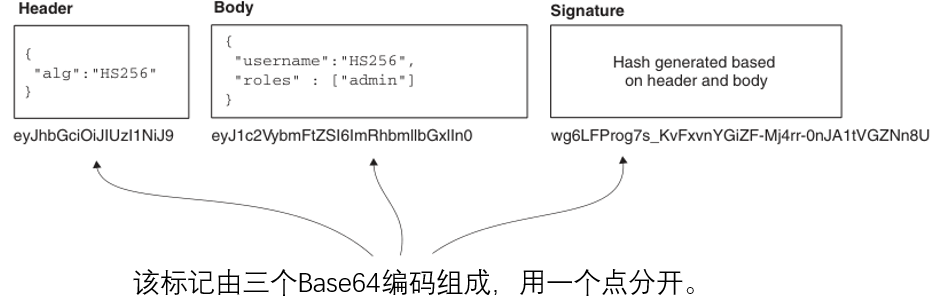
图11.8 JWT由三部分组成:头、主体和签名。头部和主体是存储在令牌中的数据的JSON表示。为了使这些数据易于在请求头中发送,它们被Base64编码。令牌的最后部分是签名。这些部分是用点连接的。
在本章中,我们将使用Java JSON Web Token(JJWT)作为创建和解析JWT的库。这是一个最经常使用的库,用于在Java应用程序中生成和解析JWT令牌。
11.3 实现认证端
在这一节中,我们开始编写代码。我们的第一个依赖项是认证端。
在我们的方案中,认证端连接到数据库,在那里存储用户凭证和请求认证事件中产生的OTP。 我们需要这个应用程序暴露三个api(图11.9)。
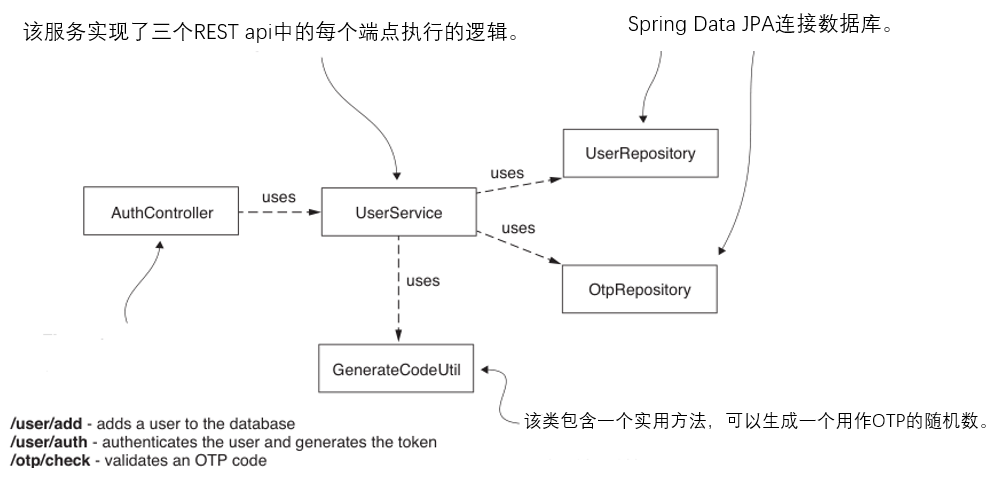
图11.9 认证端的类设计。控制器暴露了REST api,调用服务类中定义的逻辑。我们还写了一个实用类来分离生成OTP的代码,通过SMS发送。
- /user/add-添加一个用户,我们以后用它来测试我们的实现。
- /user/auth-通过用户的证书来认证用户,并发送带有OTP的短信。
- /otp/check-验证一个OTP值是否是认证服务器先前为特定用户生成的。
我们创建一个新的项目,并添加所需的依赖项,如下面的代码所示。
<dependency><groupId>org.springframework.boot</groupId><artifactId>spring-boot-starter-web</artifactId>
</dependency><dependency><groupId>org.springframework.boot</groupId><artifactId>spring-boot-starter-security</artifactId>
</dependency><dependency><groupId>org.springframework.boot</groupId><artifactId>spring-boot-starter-data-jpa</artifactId>
</dependency><dependency><groupId>mysql</groupId><artifactId>mysql-connector-java</artifactId><scope>runtime</scope>
</dependency>
我们还需要确保为该应用程序创建数据库。因为我们要存储用户凭证(用户名和密码),我们需要一个表。我们还需要第二个表来存储与认证用户相关的OTP值(图11.10)。
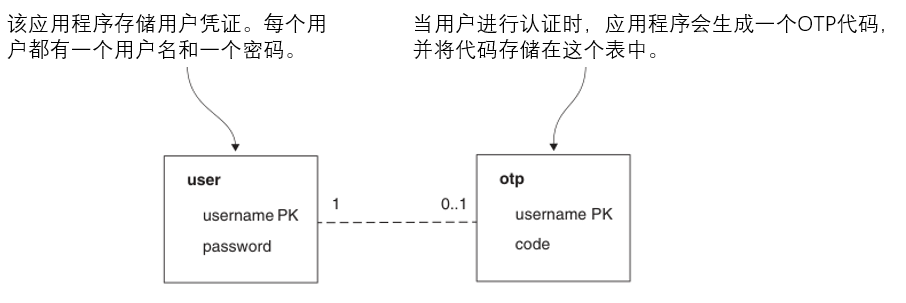
图11.10 应用程序数据库有两个表。在其中一个表中,应用程序存储用户凭证,而在第二个表中,应用程序存储生成的OTP代码。
数据库创建脚本如下:
CREATE TABLE IF NOT EXISTS `user` (
`username` VARCHAR(45) NOT NULL,
`password` TEXT NULL,
PRIMARY KEY (`username`));CREATE TABLE IF NOT EXISTS `otp` (
`username` VARCHAR(45) NOT NULL,
`code` VARCHAR(45) NULL,
PRIMARY KEY (`username`));
在application.properties文件中,我们提供Spring Boot创建数据源所需的参数。下一个代码片断显示了applica- tion.properties文件的内容。
spring.datasource.url=jdbc:mysql://localhost/spring
spring.datasource.username=root
spring.datasource.password=
我把Spring Security也加到了这个应用的依赖项中。我为认证端这样做的唯一原因是为了拥有BCryptPasswordEncoder,当用户的密码存储在数据库中时,我喜欢用它来进行编码。
代码清单11.1 认证服务器的配置类
package com.hashnode.proj0001firstspringsecurity.config;import org.springframework.context.annotation.Bean;
import org.springframework.context.annotation.Configuration;
import org.springframework.security.config.annotation.web.builders.HttpSecurity;
import org.springframework.security.config.annotation.web.configuration.WebSecurityConfigurerAdapter;
import org.springframework.security.crypto.bcrypt.BCryptPasswordEncoder;
import org.springframework.security.crypto.password.PasswordEncoder;/*** @author Guowei Chi* @date 2023/1/19* @description:**/
@Configuration
public class ProjectConfig extends WebSecurityConfigurerAdapter {//定义了一个密码编码器,用于对存储在数据库中的密码进行散列。@Beanpublic PasswordEncoder passwordEncoder() {return new BCryptPasswordEncoder();}@Overrideprotected void configure(HttpSecurity http) throws Exception {//禁用CSRF,所以我们可以直接调用应用程序的所有端点http.csrf().disable();//允许所有无需认证的访问http.authorizeRequests().anyRequest().permitAll();}
}
有了配置类,我们可以继续定义与数据库的连接。因为我们使用了Spring Data JPA,所以我们需要编写JPA实体,然后是存储库,因为我们有两个表,所以我们定义了两个JPA实体和两个存储库接口。下面的列表显示了User实体的定义。它代表了我们存储用户凭证的用户表。
代码清单11.2 User 实体
package com.hashnode.proj0001firstspringsecurity.entities;import javax.persistence.Entity;
import javax.persistence.Id;@Entity
public class User {@Idprivate String username;private String password;public String getUsername() {return username;}public void setUsername(String username) {this.username = username;}public String getPassword() {return password;}public void setPassword(String password) {this.password = password;}
}
接下来列出了第二个实体,Otp。这个实体代表了OTP表,应用程序在这里为认证的用户存储生成的OTP。
代码清单11.3 Opt 实体
package com.hashnode.proj0001firstspringsecurity.entities;import javax.persistence.Entity;
import javax.persistence.Id;@Entity
public class Otp {@Idprivate String username;private String code;public String getUsername() {return username;}public void setUsername(String username) {this.username = username;}public String getCode() {return code;}public void setCode(String code) {this.code = code;}
}
代码清单11.4展示了Spring Data JPA资源库中的用户实体。在这个界面中,我们定义了一个方法,通过用户的用户名来检索用户。我们需要这个方法来进行第一步的验证,即验证用户名和密码。
代码清单11.4 UserRepository接口
package com.hashnode.proj0001firstspringsecurity.repositories;import com.hashnode.proj0001firstspringsecurity.entities.User;
import org.springframework.data.jpa.repository.JpaRepository;import java.util.Optional;public interface UserRepository extends JpaRepository<User, String> {Optional<User> findUserByUsername(String username);
}
代码清单11.5展示了Otp实体的Spring Data JPA资源库。在这个界面中,我们定义了一个按用户名检索OTP的方法。我们需要这个方法来完成第二个认证步骤,即验证用户的OTP。
代码清单11.5 OtpRepository接口
package com.hashnode.proj0001firstspringsecurity.repositories;import com.hashnode.proj0001firstspringsecurity.entities.Otp;
import org.springframework.data.jpa.repository.JpaRepository;import java.util.Optional;public interface OtpRepository extends JpaRepository<Otp, String> {Optional<Otp> findOtpByUsername(String username);
}
有了数据库操作类和实体,我们就可以进行应用程序的逻辑工作了。为此,我创建了一个服务类,称为UserService。如代码清单11.6所示,该服务依赖于存储库和密码编码器。
清单11.6 在UserService类中自动注入的类
@Service
@Transactional
public class UserService {@Autowiredprivate PasswordEncoder passwordEncoder;@Autowiredprivate UserRepository userRepository;@Autowiredprivate OtpRepository otpRepository;
}
接下来,我们需要定义一个方法来添加一个用户。你可以在下面的列表中找到这个方法的定义。
@Service
@Transactional
public class UserService {@Autowiredprivate PasswordEncoder passwordEncoder;@Autowiredprivate UserRepository userRepository;@Autowiredprivate OtpRepository otpRepository;public void addUser(User user) {user.setPassword(passwordEncoder.encode(user.getPassword()));userRepository.save(user);}
}
业务逻辑服务器需要什么?它需要一种方法来发送用户名和密码以进行认证。在用户被认证后,认证服务器为用户生成一个OTP并通过SMS发送。下面的列表显示了auth()方法的定义,它实现了这个逻辑。
代码清单11.8 实现第一个认证步骤
package com.hashnode.proj0001firstspringsecurity.services;import com.hashnode.proj0001firstspringsecurity.entities.Otp;
import com.hashnode.proj0001firstspringsecurity.entities.User;
import com.hashnode.proj0001firstspringsecurity.repositories.OtpRepository;
import com.hashnode.proj0001firstspringsecurity.repositories.UserRepository;
import com.hashnode.proj0001firstspringsecurity.utils.GenerateCodeUtil;
import org.springframework.beans.factory.annotation.Autowired;
import org.springframework.security.authentication.BadCredentialsException;
import org.springframework.security.crypto.password.PasswordEncoder;
import org.springframework.stereotype.Service;
import org.springframework.transaction.annotation.Transactional;import java.util.Optional;@Service
@Transactional
public class UserService {//Omitted codepublic void auth(User user) {//在数据库中搜索用户Optional<User> o =userRepository.findUserByUsername(user.getUsername());//如果该用户存在,则验证其密码if(o.isPresent()) {User u = o.get();if (passwordEncoder.matches(user.getPassword(), u.getPassword())) {//如果密码正确,生成一个新的OTPrenewOtp(u);} else {//如果密码不正确或者用户名不存在,则抛出一个异常。throw new BadCredentialsException("Bad credentials.");}} else {//如果密码不正确或者用户名不存在,则抛出一个异常。throw new BadCredentialsException("Bad credentials.");}}private void renewOtp(User u) {//为OTP生成一个随机值String code = GenerateCodeUtil.generateCode();//按用户名搜索OTPOptional<Otp> userOtp = otpRepository.findOtpByUsername(u.getUsername());//如果此用户名存在OTP,更新其值if (userOtp.isPresent()) {Otp otp = userOtp.get();otp.setCode(code);} else {//如果这个用户名不存在OTP,就用生成的值创建一个新的记录。Otp otp = new Otp();otp.setUsername(u.getUsername());otp.setCode(code);otpRepository.save(otp);}}}
下一个清单介绍了GenerateCodeUtil类。我们在代码清单11.8中使用这个类来生成新的OTP值。
package com.hashnode.proj0001firstspringsecurity.utils;import java.security.NoSuchAlgorithmException;
import java.security.SecureRandom;public final class GenerateCodeUtil {private GenerateCodeUtil() {}public static String generateCode() {String code;try {//创建一个SecureRandom的实例,生成一个随机的int值SecureRandom random = SecureRandom.getInstanceStrong();//生成我们得到1,000到9,999之间的随机数(4位数的随机码),并将int转换为字符串并返回code = String.valueOf(random.nextInt(9000) + 1000);} catch (NoSuchAlgorithmException e) {throw new RuntimeException("Problem when generating the random code.");}return code;}
}
我们在UserService中需要的最后一个方法是验证用户的OTP。你可以在下面的代码清单中找到这个方法。
代码清单11.10 验证一个OTP
package com.hashnode.proj0001firstspringsecurity.services;import com.hashnode.proj0001firstspringsecurity.entities.Otp;
import com.hashnode.proj0001firstspringsecurity.entities.User;
import com.hashnode.proj0001firstspringsecurity.repositories.OtpRepository;
import com.hashnode.proj0001firstspringsecurity.repositories.UserRepository;
import com.hashnode.proj0001firstspringsecurity.utils.GenerateCodeUtil;
import org.springframework.beans.factory.annotation.Autowired;
import org.springframework.security.authentication.BadCredentialsException;
import org.springframework.security.crypto.password.PasswordEncoder;
import org.springframework.stereotype.Service;
import org.springframework.transaction.annotation.Transactional;import java.util.Optional;@Service
@Transactional
public class UserService {//omitted codepublic boolean check(Otp otpToValidate) {//按用户名搜索OTPOptional<Otp> userOtp = otpRepository.findOtpByUsername(otpToValidate.getUsername());//如果数据库中存在OTP,并且与从业务逻辑服务器收到的OTP相同,则返回true。if (userOtp.isPresent()) {Otp otp = userOtp.get();if (otpToValidate.getCode().equals(otp.getCode())) {return true;}}//否则,就会返回false。return false;}//omitted code}
最后,在这个应用中,我们用一个controller暴露了逻辑。下面的代码清单定义了这个controller。
代码清单11.11 AuthController类的定义
package com.hashnode.proj0001firstspringsecurity.controller;import com.hashnode.proj0001firstspringsecurity.entities.Otp;
import com.hashnode.proj0001firstspringsecurity.entities.User;
import com.hashnode.proj0001firstspringsecurity.services.UserService;
import org.springframework.beans.factory.annotation.Autowired;
import org.springframework.web.bind.annotation.PostMapping;
import org.springframework.web.bind.annotation.RequestBody;
import org.springframework.web.bind.annotation.RestController;import javax.servlet.http.HttpServletResponse;@RestController
public class AuthController {@Autowiredprivate UserService userService;@PostMapping("/user/add")public void addUser(@RequestBody User user) {userService.addUser(user);}//使用用户名和密码进行验证,如果验证通过,则生成验证码@PostMapping("/user/auth")public void auth(@RequestBody User user) {userService.auth(user);}//如果验证码(OTP)是有效的,HTTP响应返回状态200 OK;否则,状态值为403 Forbidden。@PostMapping("/otp/check")public void check(@RequestBody Otp otp, HttpServletResponse response) {if (userService.check(otp)) {response.setStatus(HttpServletResponse.SC_OK);} else {response.setStatus(HttpServletResponse.SC_FORBIDDEN);}}
}
通过这些设置,我们现在有了认证端。让我们启动它,确保api以我们期望的方式工作。为了测试认证服务器的功能,我们需要
- 通过调用/user/add端点向数据库添加一个新用户
- 通过检查数据库中的用户表,验证用户是否被正确添加。
- 为步骤1中添加的用户调用/user/auth端点
- 验证应用程序生成并在otp表中存储OTP。
- 使用在步骤3中生成的OTP来验证/otp/check端点是否按预期工作
我们首先在认证服务器的数据库中添加一个用户。我们需要至少一个用户用于认证。我们可以通过调用我们在认证服务器中创建的/user/add端点来添加用户。因为我们没有在认证服务器应用程序中配置端口,所以我们使用默认的端口,也就是8080。 下面是调用过程。
curl -XPOST -H "content-type: application/json" -d "{\"username\":\"danielle\",\"password\":\"12345\"}" http://localhost:8080/user/add
在添加用户后,我们检查数据库以验证记录是否被正确添加。在我的案例中,我可以看到以下细节。
应用程序在将密码存储到数据库之前对其进行了hash,这是预期的行为。记住,我们在认证端中专门为此目的使用了BCryptPasswordEncoder。
注意 记住,在我们第四章的讨论中,BCryptPassword- Encoder使用bcrypt作为hash算法。在bcrypt中,输出是根据salt生成的,这意味着相同的输入会得到不同的输出。
我们有一个用户,所以让我们通过调用/user/auth端点为该用户生成一个OTP。接下来的代码片段提供了你可以使用的cURL命令。
curl -XPOST -H "content-type: application/json" -d "{\"username\":\"danielle\",\"password\":\"12345\"}" http://localhost:8080/user/auth
在我们数据库的otp表中,应用程序生成并存储一个随机的四位数代码。在我的例子中,它的值是9165。
测试我们的认证端的最后一步是调用/otp/check api,并验证当OTP正确时,它在响应中返回HTTP 200 OK状态代码,如果OTP错误则返回403 Forbidden。下面的代码片段向你展示了对正确的OTP值的测试,以及对错误的OTP值的测试。 如果OTP值是正确的。
Note: Unnecessary use of -X or --request, POST is already inferred.
*   Trying 127.0.0.1:8080...
* Connected to localhost (127.0.0.1) port 8080 (#0)
> POST /otp/check HTTP/1.1
> Host: localhost:8080
> User-Agent: curl/7.83.1
> Accept: */*
> content-type: application/json
> Content-Length: 37
>
* Mark bundle as not supporting multiuse
< HTTP/1.1 200
< X-Content-Type-Options: nosniff
< X-XSS-Protection: 1; mode=block
< Cache-Control: no-cache, no-store, max-age=0, must-revalidate
< Pragma: no-cache
< Expires: 0
< X-Frame-Options: DENY
< Content-Length: 0
< Date: Sat, 28 Jan 2023 09:17:08 GMT
<
* Connection #0 to host localhost left intact
如果OTP值是错误的。
curl -v -XPOST -H "content-type: application/json" -d "{\"username\":\"danielle\",\"code\":\"8173\"}" http://localhost:8080/otp/checkNote: Unnecessary use of -X or --request, POST is already inferred.
*   Trying 127.0.0.1:8080...
* Connected to localhost (127.0.0.1) port 8080 (#0)
> POST /otp/check HTTP/1.1
> Host: localhost:8080
> User-Agent: curl/7.83.1
> Accept: */*
> content-type: application/json
> Content-Length: 37
>
* Mark bundle as not supporting multiuse
< HTTP/1.1 403
< X-Content-Type-Options: nosniff
< X-XSS-Protection: 1; mode=block
< Cache-Control: no-cache, no-store, max-age=0, must-revalidate
< Pragma: no-cache
< Expires: 0
< X-Frame-Options: DENY
< Content-Length: 0
< Date: Sat, 28 Jan 2023 09:14:05 GMT
<
* Connection #0 to host localhost left intact
我们刚刚证明了认证服务器端的工作原理!现在我们可以深入到下一个模块,也就是我们在当前的实战例子中编写的大部分业务逻辑端。
11.4 实现业务逻辑端
在本节中,我们实现了业务逻辑服务器。通过这个应用程序,你会认识到很多我们在书中讨论过的东西,到此为止。在系统的这一部分,你将学习如何实现和使用JWTs进行认证和授权。同时,我们实现了业务逻辑服务器和认证服务器之间的通信,以在你的应用程序中建立MFA。为了完成我们的任务,在一个高层次上,我们需要
- 创建一个代表我们要保护的资源的api。
- 实现第一个认证步骤,在该步骤中,客户端将用户证书(用户名和密码)发送给业务逻辑服务器,以便登录。
- 实现第二个认证步骤,客户端将用户从认证端收到的OTP发送到业务逻辑端。 一旦通过OTP认证,客户端就会得到一个JWT,它可以用来访问用户的资源。
- 实现基于JWT的授权。业务逻辑端验证从客户端收到的JWT,如果有效,允许客户端访问该资源。
从技术上讲,为了实现这四个高层次的要点,我们需要
- 创建业务逻辑端项目。
- 实现Authentication,其作用是代表两个认证步骤。
- 实现一个代理,在认证服务器和业务逻辑服务器之间建立通信。
- 定义AuthenticationProvider对象,使用步骤2中定义的Authentication对象实现两个认证步骤的认证逻辑。
- 定义自定义过滤器对象,拦截HTTP请求并应用由AuthenticationProvider对象实现的认证逻辑。
- 编写授权配置。
我们从依赖性开始。下一个代码清单中显示了需要添加到pom.xml文件中的依赖项。
代码清单11.12 业务逻辑端需要的依赖
<dependency><groupId>org.springframework.boot</groupId><artifactId>spring-boot-starter-web</artifactId>
</dependency><dependency><groupId>org.springframework.boot</groupId><artifactId>spring-boot-starter-security</artifactId>
</dependency><!--        添加jjwt依赖项,用于生成和解析JWTs。 begin-->
<dependency><groupId>io.jsonwebtoken</groupId><artifactId>jjwt-api</artifactId><version>0.11.1</version>
</dependency>
<dependency><groupId>io.jsonwebtoken</groupId><artifactId>jjwt-impl</artifactId><version>0.11.1</version><scope>runtime</scope>
</dependency>
<dependency><groupId>io.jsonwebtoken</groupId><artifactId>jjwt-jackson</artifactId><version>0.11.1</version><scope>runtime</scope>
</dependency><!--        如果你使用Java 10或以上版本,需要如下。-->
<!--        <dependency>-->
<!--            <groupId>jakarta.xml.bind</groupId>-->
<!--            <artifactId>jakarta.xml.bind-api</artifactId>-->
<!--            <version>2.3.2</version>-->
<!--        </dependency>-->
<!--        <dependency>-->
<!--            <groupId>org.glassfish.jaxb</groupId>-->
<!--            <artifactId>jaxb-runtime</artifactId>-->
<!--            <version>2.3.2</version>-->
<!--        </dependency>-->
<!--        添加jjwt依赖项,用于生成和解析JWTs。 end-->
在这个应用程序中,我们只定义了一个/test端点。我们在这个项目中写的其他东西都是为了保证这个api的安全。/test端点是由TestController类暴露的,它在下面的代码清单中呈现。
清单11.13 TestController类
package com.hashnode.proj0001firstspringsecurity.controller;import org.springframework.web.bind.annotation.GetMapping;
import org.springframework.web.bind.annotation.RestController;@RestController
public class TestController {@GetMapping("/test")public String test() {return "Test";}
}
为了保证应用程序的安全,我们现在必须定义三个认证级别。
- 用用户名和密码进行认证,接收OTP(图11.11)。
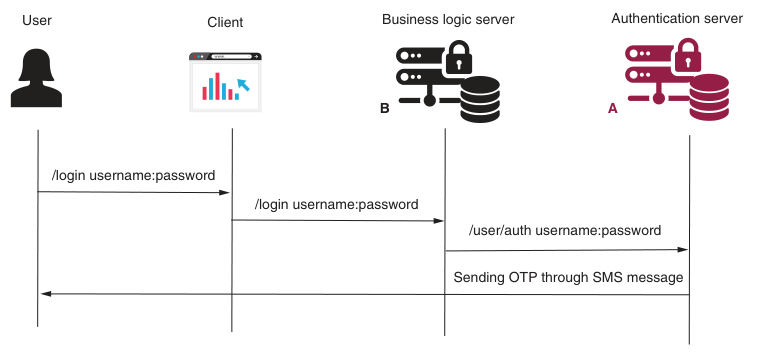
图11.11 第一个认证步骤。用户发送他们的凭证进行认证。认证服务器对用户进行认证,并发送一条包含OTP代码的SMS信息。
用OTP进行认证,以获得令牌(图11.12)。
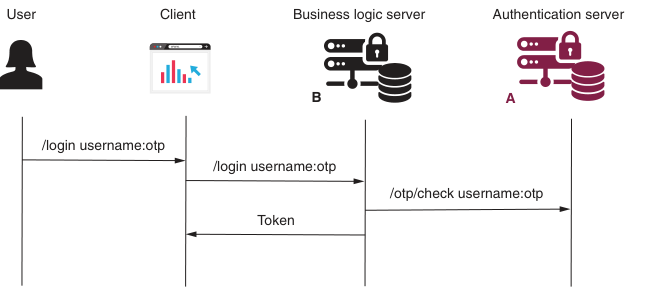
图11.12 第二个认证步骤。用户发送他们在第一个认证步骤中收到的OTP代码。认证服务器验证OTP代码并向客户发送一个令牌。客户端使用该令牌来访问用户的资源。
用令牌进行认证,以访问api(图11.13)。
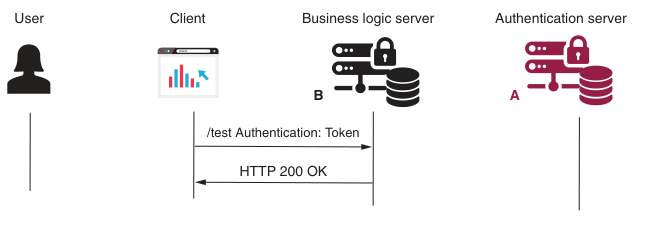
图11.13 最后一个认证步骤。客户端使用在步骤2中获得的令牌来访问由业务逻辑服务器暴露的资源。
由于这个例子的要求比较复杂,并假定有多个认证步骤,HTTP Basic认证不能再帮助我们了。我们需要实现特殊的过滤器和认证提供者来为我们的场景定制认证逻辑。幸运的是,你在第9章中学习了如何定义自定义过滤器,所以让我们回顾一下Spring Security的认证架构(图11.14)。
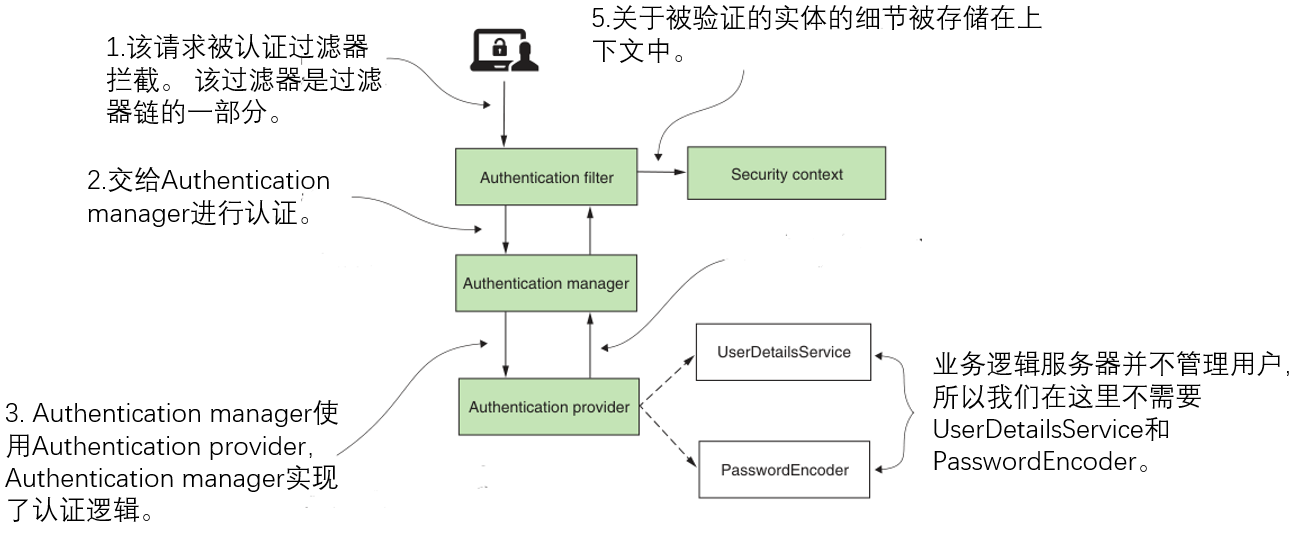
图11.14 Spring Security中的认证架构。authentication filter是过滤器链的一部分,它拦截请求并将认证责任委托给authentication manager。 authentication manager使用一个authentication provider来认证请求。
通常,在开发一个应用程序时,有不止一个好的解决方案。在设计一个架构时,你应该始终考虑所有可能的实现方式,并选择最适合你的方案。如果有一个以上的方案适用,而你又不能决定哪个是最好的实现,你应该为每个方案写一个概念验证,以帮助你决定选择哪个方案。对于我们的方案,我预设了两个选项,然后我们用其中一个继续进行实现。
我们的第一个选择是定义三个自定义的Authentication对象,三个自定义的AuthenticationProvider对象,以及一个自定义的过滤器,通过利用AuthenticationManager(图11.15)委托给这些对象。我们在第5章中学习了如何实现Authentication和AuthenticationProvider接口。
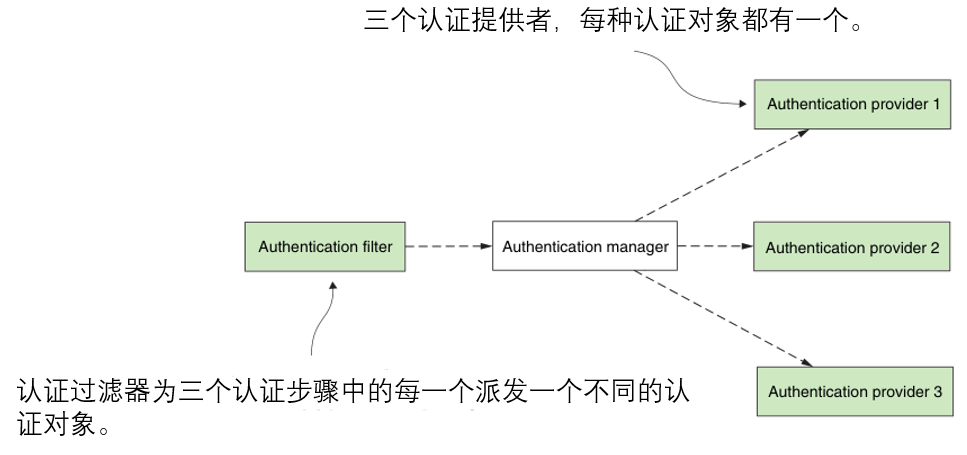
图11.15 实现我们应用程序的第一个选项。AuthenticationFilter拦截请求。根据认证步骤,它创建一个特定的认证对象并将其分派给AuthenticationManager。一个认证对象代表每个认证步骤。对于每个认证步骤,都有一个认证提供者来实现其逻辑。在图中,我对我们需要实现的组件做了阴影处理。
第二个选择,也就是我在这个例子中选择实现的,是有两个自定义的Authentication对象和两个自定义的AuthenticationProvider对象。 这些对象可以帮助我们应用与/login端点有关的逻辑。这些对象将
- 用一个用户名和密码来认证用户
- 用OTP认证用户
然后,我们用第二个过滤器来实现对token的验证。图11.16展示了这种方法。
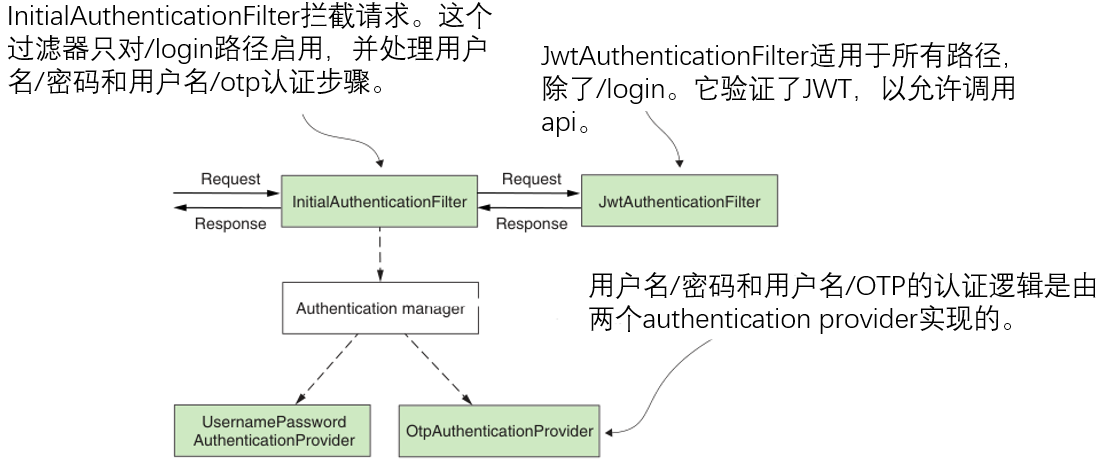
图11.16 实现我们程序的第二个方案。在这个方案中,认证过程用两个过滤器来分担责任。第一个过滤器处理/login路径上的请求,并负责两个初始认证步骤。另一个负责处理其余需要验证JWT令牌的端点。
这两种方法都是同样好的。我描述这两种方法只是为了说明,你可以找到有多种方法来开发同一场景的情况,尤其是因为Spring Security提供了相当灵活的架构。我选择了第二种,因为它为我提供了重述更多事情的可能性,比如拥有多个自定义过滤器,并使用OncePerRequestFilter类的shouldNotFilter()方法。我们在第9.5节中简要地讨论了这个类,但我没有机会通过一个例子来应用shouldNotFilter()方法。我们现在利用这个机会。
11.4.1 实现Authentication objects
在这一节中,我们实现了我们的解决方案所需的两个认证对象,以开发业务逻辑端。在第11.4节的开头,我们创建了项目并添加了所需的依赖项。我们还创建了一个我们要保护的api,并对我们的例子实现类进行了设计。我们需要两种类型的认证对象,一种表示通过用户名和密码的认证,另一种表示通过OTP的认证。正如你在第5章中所学到的,Authentication接口代表了一个请求的认证过程。它可以是一个正在进行的过程,也可以是完成后的过程。我们需要为应用程序用用户名和密码认证用户的两种情况以及OTP认证实现认证接口。
在代码清单11.14中,你可以找到UsernamePasswordAuthentication类,它实现了使用用户名和密码进行认证。为了使类更短,我扩展了 UsernamePasswordAuthenticationToken 类,并间接地扩展了 Authentication 接口。在第5章我们看到了UsernamePasswordAuthenticationToken类,在那里我们讨论了应用自定义认证逻辑。
代码清单11.14 UsernamePasswordAuthentication类
package com.hashnode.proj0001firstspringsecurity.authentication;import org.springframework.security.authentication.UsernamePasswordAuthenticationToken;
import org.springframework.security.core.GrantedAuthority;import java.util.Collection;public class UsernamePasswordAuthentication extends UsernamePasswordAuthenticationToken {public UsernamePasswordAuthentication(Object principal, Object credentials, Collection<? extends GrantedAuthority> authorities) {super(principal, credentials, authorities);}public UsernamePasswordAuthentication(Object principal, Object credentials) {super(principal, credentials);}
}
请注意,我在这个类中定义了两个构造函数。这两者之间有很大的区别:当你调用有两个参数的构造函数时,认证实例仍然是未认证的,而有三个参数的构造函数则将认证对象设置为已认证。正如你在第5章中学到的,当认证实例被认证时,意味着认证过程结束。如果Authentication对象没有被设置为已认证,并且在这个过程中没有抛出异常,AuthenticationManager会尝试找到一个合适的AuthenticationProvider对象来认证该请求。
当我们最初建立Authentication对象时,我们使用了带有两个参数的构造函数,而且它还没有被认证。当AuthenticationProvider对象对请求进行认证时,它使用带有三个参数的构造函数创建了一个Authentication实例,从而创建了一个认证对象。 第三个参数是授予权限的集合,这对于已经结束的认证过程是强制性的。
与UsernamePasswordAuthentication类似,我们为OTP的第二个认证步骤实现第二个认证对象。我把这个类命名为OtpAuthentication。代码清单11.15展示了该类对UsernamePasswordAuthenticationToken的扩展。我们可以使用同一个类,因为我们把OTP当作密码。因为它很相似,所以我们使用同样的方法来节省一些代码行。
代码清单11.15 OtpAuthentication类
package com.hashnode.proj0001firstspringsecurity.authentication;import org.springframework.security.authentication.UsernamePasswordAuthenticationToken;
import org.springframework.security.core.GrantedAuthority;import java.util.Collection;public class OtpAuthentication extends UsernamePasswordAuthenticationToken {public OtpAuthentication(Object principal, Object credentials) {super(principal, credentials);}public OtpAuthentication(Object principal,Object credentials,Collection<? extends GrantedAuthority> authorities) {super(principal, credentials, authorities);}
}
11.4.2 实现对认证端的代理
在这一节中,我们建立了一种调用认证服务器所暴露的REST api的方法。在定义了认证对象后,我们通常会立即实现AuthenticationProvider对象(图11.17)。我们知道,为了完成认证,我们需要一种方法来调用认证端。 现在我继续在实现AuthenticationProvider对象之前实现一个认证服务器的代理。

图11.17 由认证提供者实现的认证逻辑使用AuthenticationServerProxy来调用认证服务器。
为了实现这一目标,我们需要
- 定义一个模型类User,我们用它来调用认证服务器所提供的REST服务。
- 声明一个RestTemplate类型的Bean,我们用它来调用认证端提供的REST服务。
- 实现代理类,该类定义了两个方法:一个用于用户名/密码认证,另一个用于用户名/otp认证。
下面列出了用户模型类。
代码清单11.16 用户模型类
package com.hashnode.proj0001firstspringsecurity.authentication.model;public class User {private String username;private String password;private String code;public String getUsername() {return username;}public void setUsername(String username) {this.username = username;}public String getPassword() {return password;}public void setPassword(String password) {this.password = password;}public String getCode() {return code;}public void setCode(String code) {this.code = code;}
}
下一个代码清单介绍了应程序的配置类。我把这个类命名为ProjectConfig,并为我们接下来开发的代理类定义了一个RestTemplate bean。
package com.hashnode.proj0001firstspringsecurity.config;import org.springframework.context.annotation.Bean;
import org.springframework.context.annotation.Configuration;
import org.springframework.security.config.annotation.web.configuration.WebSecurityConfigurerAdapter;
import org.springframework.web.client.RestTemplate;/*** @author Guowei Chi* @date 2023/1/19* @description:**/
@Configuration
public class ProjectConfig extends WebSecurityConfigurerAdapter {@Beanpublic RestTemplate restTemplate() {return new RestTemplate();}
}
我们现在可以编写AuthenticationServerProxy类,用来调用认证端应用程序暴露的两个REST api。下面的列表介绍了这个类。
package com.hashnode.proj0001firstspringsecurity.authentication.proxy;import com.hashnode.proj0001firstspringsecurity.authentication.model.User;
import org.springframework.beans.factory.annotation.Autowired;
import org.springframework.beans.factory.annotation.Value;
import org.springframework.http.HttpEntity;
import org.springframework.http.HttpStatus;
import org.springframework.http.ResponseEntity;
import org.springframework.stereotype.Component;
import org.springframework.web.client.RestTemplate;@Component
public class AuthenticationServerProxy {@Autowiredprivate RestTemplate rest;//从application.properties文件中获取基本URL。@Value("${auth.server.base.url}")private String baseUrl;public void sendAuth(String username, String password) {String url = baseUrl + "/user/auth";//HTTP请求体需要为这次调用提供用户名和密码。User body = new User();body.setUsername(username);body.setPassword(password);HttpEntity request = new HttpEntity<>(body);rest.postForEntity(url, request, Void.class);}public boolean sendOTP(String username, String code) {String url = baseUrl + "/otp/check";//HTTP请求体需要用户名和本次调用的验证码。User body = new User();body.setUsername(username);body.setCode(code);HttpEntity request = new HttpEntity<>(body);ResponseEntity<Void> response = rest.postForEntity(url, request, Void.class);//如果HTTP响应状态是200 OK,返回true,否则返回false。return response.getStatusCode().equals(HttpStatus.OK);}
}
记得在你的application.properties文件中添加认证端的基本URL。我也在这里改变了当前应用程序的端口,因为我希望在同一系统上运行这两个服务器应用程序来进行测试。我将认证端保持在默认端口,即8080,并将当前应用程序(业务逻辑服务器)的端口改为9090。接下来的代码片段显示了application.properties文件的内容。
server.port=9090
auth.server.base.url=http://localhost:8080
11.4.3 实现AuthenticationProvider接口
在这一部分,我们实现了AuthenticationProvider类。现在我们有了开始处理AuthenticationProvider类的一切需要。我们需要这些,因为这就是我们编写自定义认证逻辑的地方。
我们创建了一个名为UsernamePasswordAuthenticationProvider的类,为UsernamePasswordAuthentication类的认证服务,如代码清单11.19所述。因为我们设计的流程有两个认证步骤,而且我们有一个过滤器来处理这两个步骤,所以我们知道认证并没有在这个提供者那里完成。
我们使用带两个参数的构造函数来建立认证对象:new UsernamePasswordAuthenticationToken(用户名,密码)。请记住,我们在第11.4.1节中讨论过,有两个参数的构造函数并不标志着该对象是被认证的。
代码清单11.19 UsernamePasswordAuthentication类
package com.hashnode.proj0001firstspringsecurity.authentication.providers;import com.hashnode.proj0001firstspringsecurity.authentication.UsernamePasswordAuthentication;
import com.hashnode.proj0001firstspringsecurity.authentication.proxy.AuthenticationServerProxy;
import org.springframework.beans.factory.annotation.Autowired;
import org.springframework.security.authentication.AuthenticationProvider;
import org.springframework.security.authentication.UsernamePasswordAuthenticationToken;
import org.springframework.security.core.Authentication;
import org.springframework.security.core.AuthenticationException;
import org.springframework.stereotype.Component;@Component
public class UsernamePasswordAuthenticationProvider implements AuthenticationProvider {@Autowiredprivate AuthenticationServerProxy proxy;@Overridepublic Authentication authenticate(Authentication authentication) throws AuthenticationException {String username = authentication.getName();String password = String.valueOf(authentication.getCredentials());//使用代理来调用认证服务器。它通过短信向客户发送OTP。proxy.sendAuth(username, password);return new UsernamePasswordAuthenticationToken(username, password);}@Overridepublic boolean supports(Class<?> aClass) {//为UsernamePasswordAuthentication类型的Authentication设计这个AuthenticationProvider。return UsernamePasswordAuthentication.class.isAssignableFrom(aClass);}
}
代码清单11.20介绍了为OtpAuthentication类型的认证设计的认证提供者。这个认证提供者实现的逻辑很简单。它调用认证服务器以找出OTP是否有效。如果OTP是正确和有效的,它将返回一个Authentication的实例。过滤器在HTTP响应中送回令牌。如果OTP不正确,认证提供者会抛出一个异常。
package com.hashnode.proj0001firstspringsecurity.authentication.providers;import com.hashnode.proj0001firstspringsecurity.authentication.OtpAuthentication;
import com.hashnode.proj0001firstspringsecurity.authentication.proxy.AuthenticationServerProxy;
import org.springframework.beans.factory.annotation.Autowired;
import org.springframework.security.authentication.AuthenticationProvider;
import org.springframework.security.authentication.BadCredentialsException;
import org.springframework.security.core.Authentication;
import org.springframework.security.core.AuthenticationException;
import org.springframework.stereotype.Component;@Component
public class OtpAuthenticationProvider implements AuthenticationProvider {@Autowiredprivate AuthenticationServerProxy proxy;@Overridepublic Authentication authenticate(Authentication authentication) throws AuthenticationException {String username = authentication.getName();String code = String.valueOf(authentication.getCredentials());boolean result = proxy.sendOTP(username, code);if (result) {return new OtpAuthentication(username, code);} else {throw new BadCredentialsException("Bad credentials.");}}@Overridepublic boolean supports(Class<?> aClass) {return OtpAuthentication.class.isAssignableFrom(aClass);}
}
11.4.4 实现过滤器
在本节中,我们将实现添加到过滤器链中的自定义过滤器。它们的目的是拦截请求并应用认证逻辑。我们选择实现一个过滤器来处理由认证端完成的认证,另一个用于基于JWT的认证。我们实现了一个InitialAuthenticationFilter类,它处理使用认证服务器完成的第一个认证步骤。
在第一步,用户用他们的用户名和密码进行认证,以接收OTP(图11.18)。你在图11.11和11.12中也看到了这些图形,但我再次添加这些图形,这样你就不需要再翻阅页面和搜索它们了。
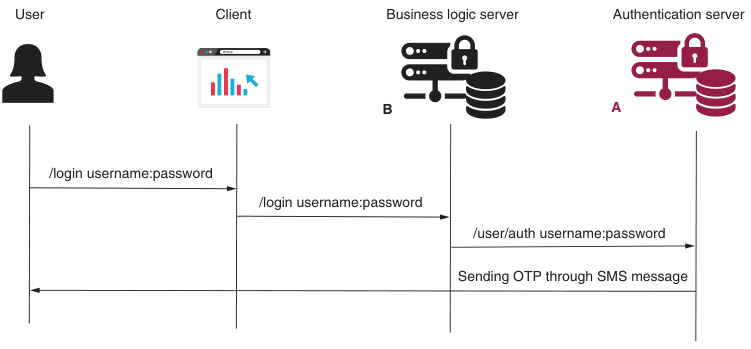
图11.18 首先,客户端需要使用用户的凭证对其进行认证。如果成功,认证服务器会向用户发送一条带有代码的短信。
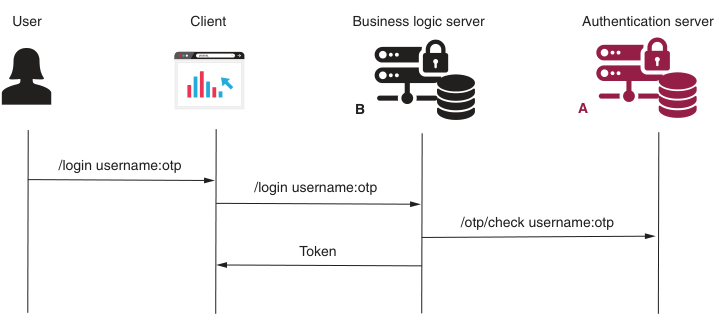
图11.19 第二个认证步骤。用户发送他们在第一个认证步骤中收到的OTP代码。认证服务器验证OTP代码并向客户发送一个令牌。客户端使用该令牌来访问用户资源。
在第二步中,用户发送OTP以证明他们确实是经过认证的用户,在成功认证后,应用程序为他们提供一个令牌,以调用由业务逻辑服务器暴露的任何api(图11.19)。
代码清单11.21展示了InitialAuthenticationFilter类的定义。我们首先注入AuthenticationManager,将认证责任委托给它,覆盖doFilterInternal()方法,当请求到达过滤器链中的这个过滤器时,就会调用该方法,并覆盖shouldNotFilter()方法。正如我们在第9章所讨论的,shouldNotFilter()方法是我们选择扩展OncePerRequest- Filter类而不是直接实现Filter接口的原因之一。当我们覆盖这个方法时,我们定义了过滤器执行时的特定条件。在我们的例子中,我们希望只执行/login路径上的任何请求,而跳过所有其他的请求。
代码清单11.21 InitialAuthenticationFilter类
package com.hashnode.proj0001firstspringsecurity.authentication.filters;import com.google.common.collect.Maps;
import com.hashnode.proj0001firstspringsecurity.authentication.OtpAuthentication;
import com.hashnode.proj0001firstspringsecurity.authentication.UsernamePasswordAuthentication;
import io.jsonwebtoken.Jwts;
import io.jsonwebtoken.security.Keys;
import org.springframework.beans.factory.annotation.Autowired;
import org.springframework.beans.factory.annotation.Value;
import org.springframework.security.authentication.AuthenticationManager;
import org.springframework.security.core.Authentication;
import org.springframework.stereotype.Component;
import org.springframework.web.filter.OncePerRequestFilter;import javax.crypto.SecretKey;
import javax.servlet.FilterChain;
import javax.servlet.ServletException;
import javax.servlet.http.HttpServletRequest;
import javax.servlet.http.HttpServletResponse;
import java.io.IOException;
import java.nio.charset.StandardCharsets;
import java.util.HashMap;
import java.util.Map;@Component
public class InitialAuthenticationFilter extends OncePerRequestFilter {//自动注入AuthenticationManager,由它应用正确的认证逻辑@Autowiredprivate AuthenticationManager manager;@Value("${jwt.signing.key}")private String signingKey;//重写doFilterInternal(),根据请求进行正确的认证。@Overrideprotected void doFilterInternal(HttpServletRequest request, HttpServletResponse response, FilterChain filterChain) throws ServletException, IOException {//omitted code}@Overrideprotected boolean shouldNotFilter(HttpServletRequest request) {//该过滤器只适用于/login路径。return !request.getServletPath().equals("/login");}
}
我们继续编写InitialAuthenticationFilter类的第一个认证步骤,即客户端发送用户名和密码以获得OTP。我们假设,如果用户没有发送OTP(验证码),我们就必须基于用户名和密码进行认证。我们从HTTP请求头中获取我们期望的所有值,如果没有发送验证码,我们通过创建一个UsernamePasswordAuthentication(列表11.22)的实例来调用第一个认证步骤,并将责任转交给AuthenticationManager。
package com.hashnode.proj0001firstspringsecurity.authentication.filters;import com.google.common.collect.Maps;
import com.hashnode.proj0001firstspringsecurity.authentication.OtpAuthentication;
import com.hashnode.proj0001firstspringsecurity.authentication.UsernamePasswordAuthentication;
import io.jsonwebtoken.Jwts;
import io.jsonwebtoken.security.Keys;
import org.springframework.beans.factory.annotation.Autowired;
import org.springframework.beans.factory.annotation.Value;
import org.springframework.security.authentication.AuthenticationManager;
import org.springframework.security.core.Authentication;
import org.springframework.stereotype.Component;
import org.springframework.web.filter.OncePerRequestFilter;import javax.crypto.SecretKey;
import javax.servlet.FilterChain;
import javax.servlet.ServletException;
import javax.servlet.http.HttpServletRequest;
import javax.servlet.http.HttpServletResponse;
import java.io.IOException;
import java.nio.charset.StandardCharsets;
import java.util.HashMap;
import java.util.Map;@Component
public class InitialAuthenticationFilter extends OncePerRequestFilter {//omitted code//重写doFilterInternal(),根据请求进行正确的认证。@Overrideprotected void doFilterInternal(HttpServletRequest request, HttpServletResponse response, FilterChain filterChain) throws ServletException, IOException {String username = request.getHeader("username");String password = request.getHeader("password");String code = request.getHeader("code");//如果HTTP请求不包含验证码(OTP),我们就认为我们必须基于用户名和密码进行认证。if (code == null) {//用UsernamePasswordAuthentication的一个实例调用AuthenticationManager。Authentication a = new UsernamePasswordAuthentication(username, password);manager.authenticate(a);} else {//Omitted code}}//omitted code
}
然而,如果在请求中发送了一个验证码,我们认为这是第二个认证步骤。在这种情况下,我们创建一个OtpAuthentication对象来调用AuthenticationManager(代码清单 11.23)。我们从代码清单11.20中的OtpAuthenticationProvider类的实现中知道,如果认证失败,会抛出一个异常。这意味着只有当OTP有效时,JWT令牌才会被生成并附加到HTTP响应头中。
代码清单11.23 实现OtpAuthentication的逻辑
package com.hashnode.proj0001firstspringsecurity.authentication.filters;import com.google.common.collect.Maps;
import com.hashnode.proj0001firstspringsecurity.authentication.OtpAuthentication;
import com.hashnode.proj0001firstspringsecurity.authentication.UsernamePasswordAuthentication;
import io.jsonwebtoken.Jwts;
import io.jsonwebtoken.security.Keys;
import org.springframework.beans.factory.annotation.Autowired;
import org.springframework.beans.factory.annotation.Value;
import org.springframework.security.authentication.AuthenticationManager;
import org.springframework.security.core.Authentication;
import org.springframework.stereotype.Component;
import org.springframework.web.filter.OncePerRequestFilter;import javax.crypto.SecretKey;
import javax.servlet.FilterChain;
import javax.servlet.ServletException;
import javax.servlet.http.HttpServletRequest;
import javax.servlet.http.HttpServletResponse;
import java.io.IOException;
import java.nio.charset.StandardCharsets;
import java.util.HashMap;
import java.util.Map;@Component
public class InitialAuthenticationFilter extends OncePerRequestFilter {//自动注入AuthenticationManager,由它应用正确的认证逻辑@Autowiredprivate AuthenticationManager manager;//从配置文件中获取用于签署JWT令牌的密钥值。@Value("${jwt.signing.key}")private String signingKey;//重写doFilterInternal(),根据请求进行正确的认证。@Overrideprotected void doFilterInternal(HttpServletRequest request, HttpServletResponse response, FilterChain filterChain) throws ServletException, IOException {String username = request.getHeader("username");String password = request.getHeader("password");String code = request.getHeader("code");if (code == null) {Authentication a = new UsernamePasswordAuthentication(username, password);manager.authenticate(a);}//为OTP代码不为空的情况添加分支。在这种情况下,我们认为客户端为第二个认证步骤发送了一个OTP。else {//对于第二个认证步骤,创建一个OtpAuthentication类型的实例,并将其发送给AuthenticationManager,后者为其找到一个合适的提供者。Authentication a = new OtpAuthentication(username, code);manager.authenticate(a);HashMap<String, String> claimMap = new HashMap<>();claimMap.put("username", username);SecretKey key = Keys.hmacShaKeyFor(signingKey.getBytes(StandardCharsets.UTF_8));//构建一个JWT,并将认证用户的用户名作为主体之一。我们使用密钥来签署该token。String jwt = Jwts.builder().setClaims(claimMap).signWith(key).compact();//将令牌添加到HTTP响应的授权标头中。response.setHeader("Authorization", jwt);}}@Overrideprotected boolean shouldNotFilter(HttpServletRequest request) {//该过滤器只适用于/login路径。return !request.getServletPath().equals("/login");}
}
我为我们的例子写了一个最小的实现,我跳过了一些细节,比如处理异常和记录事件。这些方面对于我们现在的例子来说并不重要,我只要求你关注Spring Security组件和架构。在现实开发中,你也应该实现所有这些细节。
下面的代码片断建立了JWT。我使用setClaims()方法在JWT主体中添加一个值,并使用signWith()方法在令牌上附加一个签名。对于我们的例子,我使用一个对称密钥来生成签名。
SecretKey key = Keys.hmacShaKeyFor(signingKey.getBytes(StandardCharsets.UTF_8));//构建一个JWT,并将认证用户的用户名作为主体之一。我们使用密钥来签署该token。
String jwt = Jwts.builder().setClaims(claimMap).signWith(key).compact();
这个密钥只被业务逻辑服务器知道。业务逻辑服务器对令牌进行签名,并可以在客户端调用终端时使用相同的密钥来验证令牌的有效性。为了简单起见,我在这里为所有用户使用一个密钥。然而,在现实开发 中,我会为每个用户使用不同的密钥。为用户使用单独的密钥的好处是,如果你需要使某个用户的所有令牌失效,你只需要改变其密钥。
因为我们从配置文件中注入用于签署JWT的密钥的值,所以我们需要修改application.properties文件来定义这个值。我的application.properties文件现在看起来像下一个代码片断中的文件。
server.port=9090auth.server.base.url=http://localhost:8080
jwt.signing.key=ymLTU8rq83j4fmJZj60wh4OrMNuntIj4fmJ#因为SecurityConfig与InitialAuthenticationFilter互相引用,所以添加此配置
spring.main.allow-circular-references=true
我们还需要添加一个过滤器来处理除/login以外的所有路径上的请求。我把这个过滤器命名为JwtAuthenticationFilter。这个过滤器期望在请求的授权HTTP头中存在一个JWT。这个过滤器通过检查签名来验证JWT,创建一个认证的Authentication对象,并将其添加到SecurityContext中。下面列出了JwtAuthenticationFilter的实现。
代码清单11.24 JwtAuthenticationFilter类
package com.hashnode.proj0001firstspringsecurity.authentication.filters;import com.google.common.collect.Lists;
import com.hashnode.proj0001firstspringsecurity.authentication.UsernamePasswordAuthentication;
import io.jsonwebtoken.Claims;
import io.jsonwebtoken.Jwts;
import io.jsonwebtoken.security.Keys;
import org.springframework.beans.factory.annotation.Value;
import org.springframework.security.core.GrantedAuthority;
import org.springframework.security.core.authority.SimpleGrantedAuthority;
import org.springframework.security.core.context.SecurityContextHolder;
import org.springframework.stereotype.Component;
import org.springframework.web.filter.OncePerRequestFilter;import javax.crypto.SecretKey;
import javax.servlet.FilterChain;
import javax.servlet.ServletException;
import javax.servlet.http.HttpServletRequest;
import javax.servlet.http.HttpServletResponse;
import java.io.IOException;
import java.nio.charset.StandardCharsets;
import java.util.List;@Component
public class JwtAuthenticationFilter extends OncePerRequestFilter {@Value("${jwt.signing.key}")private String signingKey;@Overrideprotected void doFilterInternal(HttpServletRequest request, HttpServletResponse response, FilterChain filterChain) throws ServletException, IOException {String jwt = request.getHeader("Authorization");SecretKey key = Keys.hmacShaKeyFor(signingKey.getBytes(StandardCharsets.UTF_8));//解析令牌以获得claim,并验证签名。 如果签名无效,则抛出一个异常。Claims claims = Jwts.parserBuilder().setSigningKey(key).build().parseClaimsJws(jwt).getBody();String username = String.valueOf(claims.get("username"));//创建我们添加到SecurityContext的认证实例。GrantedAuthority a = new SimpleGrantedAuthority("user");UsernamePasswordAuthentication auth = new UsernamePasswordAuthentication(username, null, Lists.newArrayList(a));//在SecurityContext中添加认证对象。SecurityContextHolder.getContext().setAuthentication(auth);//调用过滤器链中的下一个过滤器filterChain.doFilter(request, response);}@Overrideprotected boolean shouldNotFilter(HttpServletRequest request) {//配置该过滤器,使其在对/login路径的请求中不被触发。return request.getServletPath().equals("/login");}
}
经过签名的JWT也被称为JWS(JSON Web Token Signed)。这就是为什么我们使用的方法的名字是parseClaimsJws()。
11.4.5 编写安全配置类
在这一节中,我们通过定义安全配置类(代码清单 11.25)最终完成应用程序的编写。我们必须做一些配置,以使我们的整个程序是连贯的。
- 按照你在第9章学到的方法,将过滤器添加到过滤器链中。
- 禁用CSRF保护,因为正如你在第10章中所学到的,这在使用不同的源码时并不适用。在这里,使用JWT代替了用CSRF令牌进行的验证。
- 添加AuthenticationProvider对象,使AuthenticationManager知道它们。
- 使用匹配器方法来配置所有需要被授权的请求,正如你在第8章中学到的那样。
- 在Spring上下文中添加AuthenticationManager Bean,这样我们就可以从InitialAuthenticationFilter类中注入它,正如你在代码清单11.23中看到的那样。
代码清单11.25 SecurityConfig类
package com.hashnode.proj0001firstspringsecurity.config;import com.hashnode.proj0001firstspringsecurity.authentication.filters.InitialAuthenticationFilter;
import com.hashnode.proj0001firstspringsecurity.authentication.filters.JwtAuthenticationFilter;
import com.hashnode.proj0001firstspringsecurity.authentication.providers.OtpAuthenticationProvider;
import com.hashnode.proj0001firstspringsecurity.authentication.providers.UsernamePasswordAuthenticationProvider;
import org.springframework.beans.factory.annotation.Autowired;
import org.springframework.context.annotation.Bean;
import org.springframework.context.annotation.Configuration;
import org.springframework.security.authentication.AuthenticationManager;
import org.springframework.security.config.annotation.authentication.builders.AuthenticationManagerBuilder;
import org.springframework.security.config.annotation.web.builders.HttpSecurity;
import org.springframework.security.config.annotation.web.configuration.WebSecurityConfigurerAdapter;
import org.springframework.security.web.authentication.www.BasicAuthenticationFilter;@Configuration
//扩展了WebSecurityConfigurerAdapter,以覆盖SecurityConfigurer的configure()方法。
public class SecurityConfig extends WebSecurityConfigurerAdapter {//自动注入过滤器和我们在配置中设置的认证提供者。@Autowiredprivate InitialAuthenticationFilter initialAuthenticationFilter;@Autowiredprivate JwtAuthenticationFilter jwtAuthenticationFilter;@Autowiredprivate OtpAuthenticationProvider otpAuthenticationProvider;@Autowiredprivate UsernamePasswordAuthenticationProvider usernamePasswordAuthenticationProvider;@Overrideprotected void configure(AuthenticationManagerBuilder auth) {//向认证管理器配置两个认证提供者auth.authenticationProvider(otpAuthenticationProvider).authenticationProvider(usernamePasswordAuthenticationProvider);}@Overrideprotected void configure(HttpSecurity http) throws Exception {//禁用CSRF保护http.csrf().disable();//将两个自定义过滤器添加到过滤器链中http.addFilterAt(initialAuthenticationFilter,BasicAuthenticationFilter.class).addFilterAfter(jwtAuthenticationFilter,BasicAuthenticationFilter.class);//确保所有请求都经过认证http.authorizeRequests().anyRequest().authenticated();}//将AuthenticationManager添加到Spring上下文中,这样我们就可以从过滤器类中自动注入它。@Override@Beanprotected AuthenticationManager authenticationManager() throws Exception {return super.authenticationManager();}
}
11.4.6 测试整个系统
在本节中,我们测试业务逻辑服务器的实现。现在所有的东西都到位了,是时候运行我们系统的两个组件了,即认证服务器和业务逻辑服务器,并检查我们的自定义认证和授权,看看这是否像我们想象的那样运行。
在我们的例子中,我们添加了一个用户,并在11.3节中检查了认证服务器是否正常工作。我们可以通过使用我们在第11.3节中添加的用户访问由业务逻辑服务器暴露的api来尝试验证的第一步。认证端打开8080端口,业务逻辑服务器使用9090端口,这是我们早先在business逻辑端的application.properties文件中配置的。下面是cURL调用。
curl -H "username:danielle" -H "password:12345" http://localhost:9090/login
一旦我们调用/login端点,提供正确的用户名和密码,我们就检查数据库中生成的OTP值。这应该是OTP表中的一条记录,其中用户名字段的值是Danielle。在我的例子中,我有如下记录。
Username: danielle
Code: 4586
我们假设这个OTP是在短信中发送的,并且用户收到了它。我们把它用于第二个认证步骤。下一段代码中的cURL命令向你展示了如何为第二个认证步骤调用/login端点。我还添加了-v选项,以查看我期望找到JWT的响应头信息。
curl -v -H "username:danielle" -H "code:4586" http://localhost:9090/login
响应是
   Trying 127.0.0.1:9090...
* Connected to localhost (127.0.0.1) port 9090 (#0)
> GET /login HTTP/1.1
> Host: localhost:9090
> User-Agent: curl/7.83.1
> Accept: */*
> username:danielle
> code:4586
>
* Mark bundle as not supporting multiuse
< HTTP/1.1 200
< Authorization: eyJhbGciOiJIUzI1NiJ9.eyJ1c2VybmFtZSI6ImRhbmllbGxlIn0.umxQ98tgEq8GKa7J2njjF7RMNtlWjIDfmwHQtAHGFmc
< X-Content-Type-Options: nosniff
< X-XSS-Protection: 1; mode=block
< Cache-Control: no-cache, no-store, max-age=0, must-revalidate
< Pragma: no-cache
< Expires: 0
< X-Frame-Options: DENY
< Content-Length: 0
< Date: Sun, 29 Jan 2023 03:06:14 GMT
<
* Connection #0 to host localhost left intact
JWT就在我们预期的地方:授权响应头中。接下来,我们使用我们获得的令牌来调用/test端点。
curl -H "Authorization:eyJhbGciOiJIUzI1NiJ9.eyJ1c2VybmFtZSI6ImRhbmllbGxlIn0.umxQ98tgEq8GKa7J2njjF7RMNtlWjIDfmwHQtAHGFmc" http://localhost:9090/test
响应为
Test
到此我们完成了整个后端系统,并通过编写自定义认证和授权来确保其资源安全。你甚至为此使用了JWTs,这使你向前迈进了一大步,并为下一章的内容–OAuth 2流程做好了准备。
总结
- 在实现自定义认证和授权时,要始终依靠Spring Security提供的接口。这种方法可以帮助你实现一个更容易理解的架构,使你的应用程序不容易出错。
- token是用户的一个标识符。它可以有任何实现方式,只要服务器在它生成后能识别它。现实世界场景中的令牌的例子是门禁卡、门票或你在博物馆门口收到的贴纸。
- 虽然应用程序可以使用一个简单的通用唯一标识符(UUID)作为token实现,但你更经常发现令牌以JSON Web令牌(JWTs)的形式实现。JWTs有多种好处:它们可以存储在请求中交换的数据,而且你可以对它们进行签名,以确保它们在传输时没有被改变。
- JWT token可以是签名的,也可以是完全加密的。有签名的JWT令牌被称为JSON Web令牌签名(JWS),而对其细节进行加密的JWT令牌被称为JSON Web令牌加密(JWE)。
- 避免在你的JWT中存储太多的细节。当签名或加密时,令牌越长,签名或加密所需的时间就越长。此外,请记住,我们在HTTP请求的头中发送令牌。令牌越长,你在每个请求中添加的数据就越多,这可能会影响你的应用程序的性能。
- 我们倾向于在一个系统中解耦责任,使其更容易维护和扩展。出于这个原因,在实践的例子中,我们将认证分离在一个不同的应用程序中,我们称之为认证服务器。为客户提供服务的后端应用程序(我们称之为业务逻辑服务器)在需要认证客户时使用独立的认证服务器。
- 多因素认证(MFA)是一种认证策略,在这种策略中,为了访问一个资源,用户被要求以不同方式进行多次认证。在我们的例子中,用户必须使用他们的用户名和密码,然后通过验证通过短信收到的OTP来证明他们可以访问一个特定的电话号码。这样一来,用户的资源就能得到更好的保护,防止凭证被盗。
- 在许多情况下,你会发现解决一个问题的好办法不止一个。 始终考虑所有可能的解决方案,如果时间允许,对所有选项进行概念验证,以了解哪个方案更适合你的情况。
相关文章:
Spring Security in Action 第十一章 SpringSecurity前后端分离实战
本专栏将从基础开始,循序渐进,以实战为线索,逐步深入SpringSecurity相关知识相关知识,打造完整的SpringSecurity学习步骤,提升工程化编码能力和思维能力,写出高质量代码。希望大家都能够从中有所收获&#…...
高级前端二面vue面试题(持续更新中)
action 与 mutation 的区别 mutation 是同步更新, $watch 严格模式下会报错 action 是异步操作,可以获取数据后调用 mutation 提交最终数据 MVVM的优缺点? 优点: 分离视图(View)和模型(Model)ÿ…...
七大设计原则之依赖倒置原则应用
目录1 依赖倒置原则2 依赖倒置应用1 依赖倒置原则 依赖倒置原则(Dependence Inversion Principle,DIP)是指设计代码结构时,高层模块不应该依赖底层模块,二者都应该依赖其抽象。抽象不应该依赖细节;细节应该依赖抽象。…...

Dubbo面试题2023
1、为什么要用Dubbo 随着服务化的进一步发展,服务越来越多,服务之间的调用和依赖关系也越来越复杂,诞生了面向服务 的架构体系(SOA),也因此衍生出了一系列相应的技术,如对服务提供、服务调用、连接处理、通信协议、 …...
Swift(5)
目录 集合类型 数组 编辑 合集 合集操作 字典 Where 集合类型 Swift提供了三种主要的集合类型:组合,合集,字典。 数组是有序的值的集合。 合集是唯一值的无序集合。 字典是无序的键值对集合。 数组 Swift数组的类型的完整写法是…...
[Java 进阶面试题] CAS 和 Synchronized 优化过程
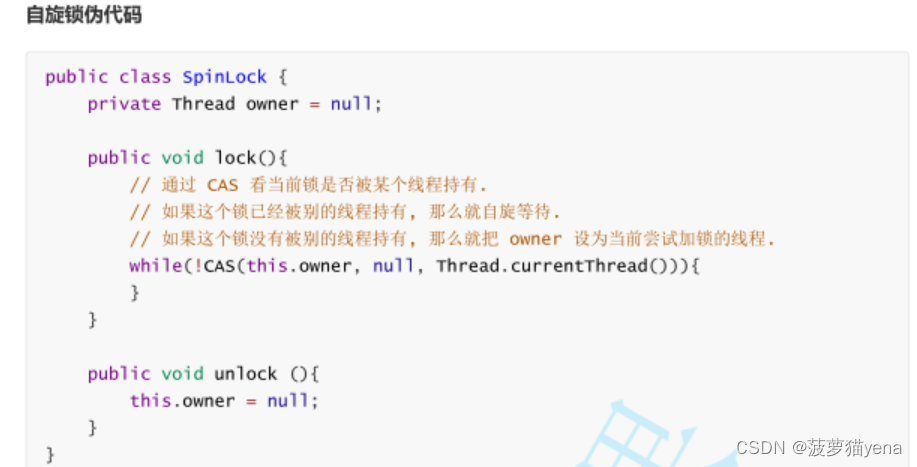
最有用的东西,是你手里的钱,有钱就有底气,还不快去挣钱~ 文章目录CAS 和 Synchronized 优化过程1. CAS1.1 CAS的原理1.2 CAS实现自增自减的原子性1.3 CAS实现自旋锁1.4 CAS针对ABA问题的优化2. synchronized2.1 synchronized加锁阶段分析2.2 synchronized优化CAS 和 Synchroniz…...

算法思想 - 贪心算法
本文主要介绍算法中贪心算法的思想: 保证每次操作都是局部最优的,并且最后得到的结果是全局最优的。贪心思想相关题目分配饼干455. Assign Cookies (Easy)Input: [1,2], [1,2,3] Output: 2Explanation: You have 2 children and 3 cookies. The greed factors of 2 …...
解决需求变更难题的8大方案
需求变更8大原因为什么会出现需求变更,这是由于需求约束、规则有了新的变化、由于政策发生变化,客户、沟通方式、流程化、标准化的问题等导致。这里在在过去的项目经验中,提出了常见的8大需求变更的原因。政策发生变化:指由于国家…...
NSSROUND#8[Basic]
文章目录一、[NSSRound#8 Basic]MyDoor二、[NSSRound#8 Basic]Upload_gogoggo三、[NSSRound#8 Basic]MyPage四、[NSSRound#8 Basic]ez_node一、[NSSRound#8 Basic]MyDoor <?php error_reporting(0);if (isset($_GET[N_S.S])) {eval($_GET[N_S.S]); }if(!isset($_GET[file])…...
Vue3代码初体验找不同
文章目录🌟 写在前面🌟 代码分析🌟 写在最后🌟 写在前面 专栏介绍: 凉哥作为 Vue 的忠实 粉丝输出过大量的 Vue 文章,应粉丝要求开始更新 Vue3 的相关技术文章,Vue 框架目前的地位大家应该都晓…...

opencv调取摄像头录制
大家好,我是csdn的博主:lqj_本人 这是我的个人博客主页: lqj_本人的博客_CSDN博客-微信小程序,前端,python领域博主lqj_本人擅长微信小程序,前端,python,等方面的知识https://blog.csdn.net/lbcyllqj?spm1011.2415.3001.5343哔哩哔哩欢迎关注…...
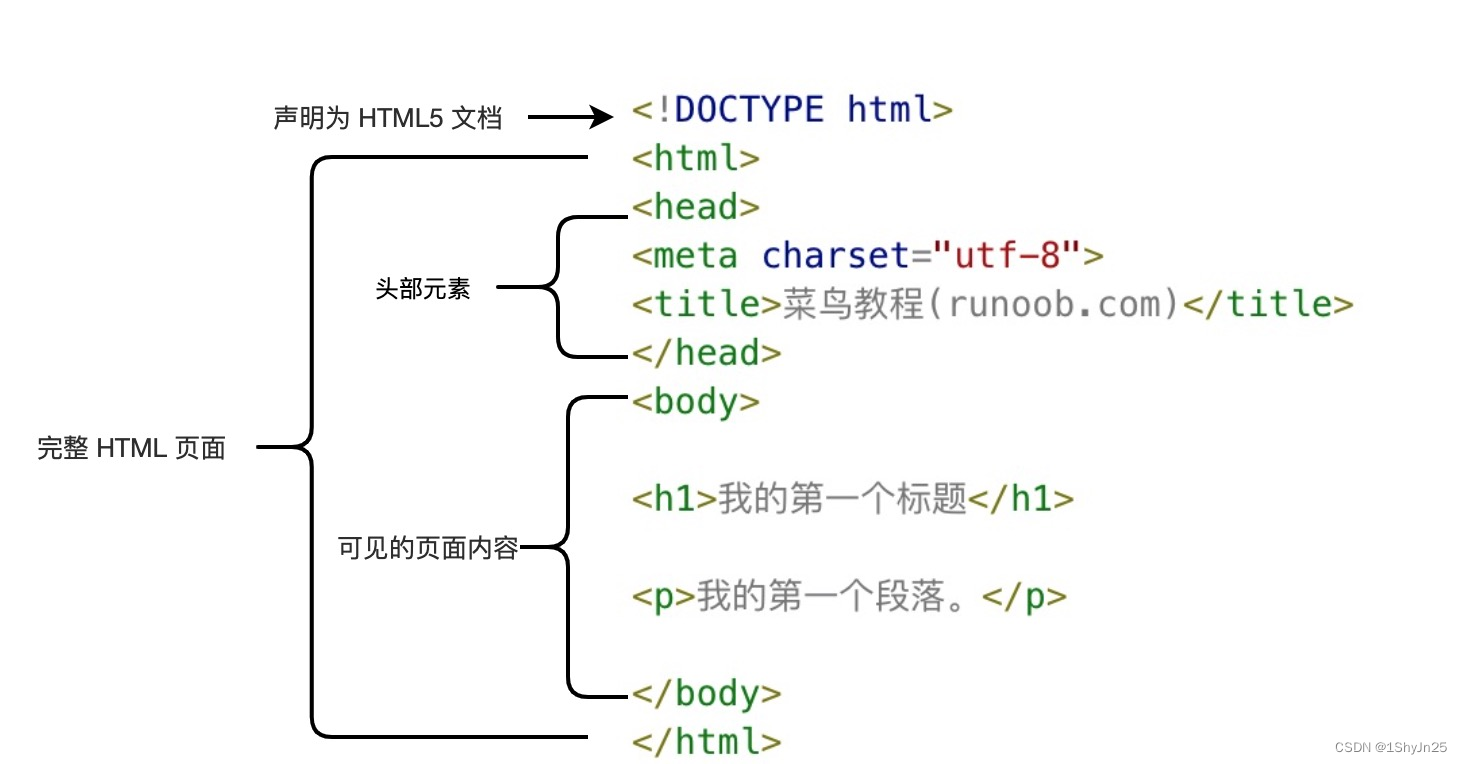
html标签手册
完整的HTML页面📑 ①基础标签📑📑📑 HTML <!DOCTYPE> 声明 !DOCTYPE声明必须是 HTML 文档的第一行,位于 html标签之前。 !DOCTYPE 声明不是 HTML 标签;它是指示 web 浏览器关于页面使用哪个 HTML 版…...
SpringMVC--视图、RESTful案例、处理AJAX请求
SpringMVC的视图 SpringMVC中的视图是View接口,视图的作用渲染数据,将模型Model中的数据展示给用户 SpringMVC视图的种类很多,默认有转发视图和重定向视图 当工程引入jstl的依赖,转发视图会自动转换为JstlView 若使用的视图技术为…...

一个同学升了leader,今年活还没干,他就已经想好组里成员的两次绩效考核怎么打了,还说:leader都是这样的!...
绩效是大家都比较关注的事情,那么作为领导,一般是怎么打绩效的呢?一位网友爆料:一个大学同学升了leader,前段时间跟他吃饭,他说他已经想好了今年组里成员的两次绩效考核怎么打了。该网友有点吃惊࿰…...

Docker 面试知识点
Docker 是什么? 是实现容器技术的一种工具是一个开源的应用容器引擎使用 C/S 架构模式,通过远程API 来管理 (我们本机是 C,docker 引擎是 S,实际的构建过程是在 docker 引擎下完成的)可以打包一个应用及依赖包到一个轻量级、可移植的容器中 …...
C++高级篇学习笔记
文章目录 前言 本文记录C一些面试难点问题剖析。 1. 左右值和右值引用的作用 左值:可以在左边,表达式结束后依然存在的持久对象,一般有名字,可以取地址。 提示: 前置自加/自减 可以做左值; 右值在右边&a…...

gentoo基本安装过程
该文章是本人在gentoo官方安装文档的基础上简单总结的,也是本人自己实践过的,目前本人用的就是gentoo,对于真的需要安装gentoo的朋友,建议还是参考官方文档,说的比较详细,这个可以简单看看,可以…...

【LeetCode】1234. 替换子串得到平衡字符串
1234. 替换子串得到平衡字符串 题目描述 有一个只含有 ‘Q’, ‘W’, ‘E’, ‘R’ 四种字符,且长度为 n 的字符串。 假如在该字符串中,这四个字符都恰好出现 n/4 次,那么它就是一个「平衡字符串」。 给你一个这样的字符串 s,…...

[动手写操作系统]-01-开机运行系统
文章目录 **概念和目标**概念目标理论源码概念和目标 概念 assembler: 汇编程序BIOS: BIOS(Basic Input Output System,基本输入输出系统)是个可编程的微型操作系统,用于管理计算机中的软硬件,它控制着系统的启动,系统是如何连接外部设备,怎样响应,调整相应操作,都是…...

最长回文子序列问题
最长回文子序列问题 问题描述:给你一个字符串 s ,找出其中最长的回文子序列,并返回该序列的长度。 子序列定义为:不改变剩余字符顺序的情况下,删除某些字符或者不删除任何字符形成的一个序列。 注意是子序列而不是子…...

AI Agent自动化修复GitHub Issue:从问题定位到PR提交全流程解析
1. 项目概述:一个能自动修复GitHub Issue并提交PR的AI技能 最近在折腾AI编程助手的时候,发现了一个挺有意思的东西,叫 issue-to-pr 。简单来说,这玩意儿是一个AI Agent的“技能包”,你把它装在你的AI编程工具&#…...

vue3-vant-mobile项目部署指南:Netlify零配置发布终极教程
vue3-vant-mobile项目部署指南:Netlify零配置发布终极教程 【免费下载链接】vue3-vant-mobile An mobile web apps template based on the Vue 3 ecosystem。一个基于 Vue 3 生态系统的移动 web 应用模板,帮助你快速完成业务开发。 项目地址: https://…...

MarkdownReader:重构浏览器文档阅读体验的渐进式渲染引擎
MarkdownReader:重构浏览器文档阅读体验的渐进式渲染引擎 【免费下载链接】markdownReader markdownReader is a extention for chrome, used for reading markdown file. 项目地址: https://gitcode.com/gh_mirrors/ma/markdownReader 在当今技术文档创作与…...

别再乱用STOP模式了!STM32L4三种STOP模式深度对比与选型实战
STM32L4低功耗设计实战:STOP模式选型与能效优化全解析 在物联网终端设备与便携式仪器开发中,每微安电流的节省都直接关系到产品的市场竞争力。最近为一个农业传感器项目做方案评审时,发现团队在STOP模式选择上存在严重误区——工程师们习惯性…...

腾讯云主机部署Kali Linux:从零自制镜像到一键重装实战
1. 为什么要在腾讯云上部署Kali Linux? Kali Linux作为安全测试领域的瑞士军刀,集成了600渗透测试工具,从Wireshark到Metasploit应有尽有。但直接在物理机安装会面临驱动兼容性、系统稳定性等问题,而云主机部署既能保留完整功能&…...

sndcpy:Android设备音频转发终极指南
sndcpy:Android设备音频转发终极指南 【免费下载链接】sndcpy Android audio forwarding PoC (scrcpy, but for audio) 项目地址: https://gitcode.com/gh_mirrors/sn/sndcpy 想要在电脑上享受Android设备的音频体验吗?sndcpy音频转发工具正是您需…...

从零搭建Modbus通信测试环境:TCP与串口双模式实战
1. 为什么需要搭建Modbus测试环境? 刚接触工业通信协议时,我最头疼的就是找不到合适的设备做测试。真实PLC动辄上万元,而Modbus作为工业领域最常用的通信协议之一,其实完全可以用软件模拟。搭建本地测试环境的好处很明显ÿ…...
)
背包九讲(C++)
目录 背包问题 1.0/1背包 2.完全背包 3.多重背包 4.分组背包 5.混合背包问题 6.背包问题求具体方案 7.背包问题求方案数 8.二维费用的背包问题 9.有依赖的背包问题 背包问题 任何背包问题都有01背包的影子,甚至均可以化为01背包的问题(特殊性)࿰…...

解码Voron 2.4:开源高速CoreXY 3D打印机的架构哲学与工程实践
解码Voron 2.4:开源高速CoreXY 3D打印机的架构哲学与工程实践 【免费下载链接】Voron-2 Voron 2 CoreXY 3D Printer design 项目地址: https://gitcode.com/gh_mirrors/vo/Voron-2 Voron 2.4作为开源3D打印机领域的标杆产品,代表了CoreXY架构在高…...

从量子自旋到量子比特:原理、应用与工程实践全解析
1. 从“旋转的电子”到“内禀角动量”:自旋概念的祛魅如果你在大学里上过量子力学课,大概率在某个时刻被“自旋”这个概念迎面撞上。我记得当时教授在黑板上写下“电子自旋为1/2”,然后试图用一个小球绕自身轴旋转的经典图像来解释࿰…...