Monorepo pnpm 模式管理多个 web 项目
Monorepo pnpm 模式管理多个 web 项目
- Monorepo pnpm 模式管理多个 web 项目
- 项目地址
- git flow 工作流程
- pnpm workspace
- .npmrc
- 初始化项目架构
- 引入Husky规范git提交
- 配置eslint和prettier
- eslint 配置
- prettier 配置
- 配置lint-staged
- 创建项目
- 创建shared
- 项目全局安装 vue
- 在 packages 项目下创建 vue 项目
- 配置全局指令
- 引用 shared 内容
- 建立关联
- 打包插件
- 配置单命令启动多项目
Monorepo pnpm 模式管理多个 web 项目
项目地址
- Vue: Monorepo pnpm 模式管理多个 web 项目(Vue3)
- Nuxt:Monorepo pnpm 模式管理多个 web 项目(Nuxt)
git flow 工作流程
-
参考链接:[https://danielkummer.github.io/git-flow-cheatsheet/index.zh_CN.html]
-
新建功能
- 新建feature分支
git checkout -b feature/MYFEATURE git flow feature start MYFEATURE- 完成新功能开发,将feature分支合并到develop分支
- 现在已写成文件,直接执行命令 yarn feature即可
git flow feature finish MYFEATURE- 基于最新的develop分支,切出release分支,此版本为预发布版本,分支为版本号
git checkout -b release/1.0.0 git flow release start release/1.0.0- 测试无问题, 执行git flow release finish 1.0.0 ,输出提交日志,合并到develop分支和mian/master分支,输入版本信息
# -m tag提交信息 # 参数参考:https://github.com/nvie/gitflow/wiki/Command-Line-Arguments#hotfix git flow release finish 1.0.0 -m ""- 在develop分支,并推送develop分支到远程
git push origin develop- 切换到main/master 分支, 推送到远程,推送最新的tag到远程
git push origin main git push origin v1.0.0 -
bug修改
- 新增一个hotfix分支
git checkout -b hotfix/1.0.1 git flow hotfix start 1.0.1- 修改完成后的操作与release一样
pnpm workspace
- 创建 pnpm-workspace.yaml 文件
touch pnpm-workspace.yaml
- pnpm-workspace.yaml
packages:- 'packages/*' # 代表所有项目都放在packages文件夹之下
.npmrc
# 注释:三方依赖也有依赖,要是项目中使用了第三方的依赖,
# 要是哪天第三方卸载不在该包了,那就找不到了,称之为“幽灵依赖” ,
# 所以需要“羞耻提升”,暴露到外层中,即在根目录下的node_modules内,而非在.pnpm文件夹中。shamefully-hoist = true# 根目录下的node_modules里,vue安装到了与.pnpm同层级位置当中了,
# 这就是shamefully-hoist = true的效果,把vue从.pnpm内提到node_modules中,
# 并且vue的相关依赖,也拍平到了该层级文件夹中。
初始化项目架构
- Conventional Changelog 生态探索: https://zhuanlan.zhihu.com/p/392303778
# 初始化package.json
pnpm init
# 初始化项目
pnpm run init
# git flow init 前需要 执行 git init
# 每修改一次filter-flow-hotfix-finish-tag-message.sh,filter-flow-release-finish-tag-message.sh 需要重新init
- package.json
{"script": {"init": "sh ./scripts/shell/init.sh --all"}
}
- init.sh
# 项目初始化# 初始化项目配置
SCRIPTPATH=$(pwd -P)# 初始化git设置
git config core.filemode false
git config tag.sort version:refname
git config pull.rebase trueif [ $1 ]; then# 安装 editorconfig 扩展command -v code && code --install-extension editorconfig.editorconfig || echo "Make sure your IDEs support for \`EditorConfig\`. You can check by https://editorconfig.org/"# 设置git filter-flow-hotfix-finish-tag-message hook 软连接rm -f ./.git/hooks/filter-flow-hotfix-finish-tag-messagechmod +x $SCRIPTPATH/scripts/shell/filter-flow-hotfix-finish-tag-message.shln -s $SCRIPTPATH/scripts/shell/filter-flow-hotfix-finish-tag-message.sh ./.git/hooks/filter-flow-hotfix-finish-tag-message# 设置git filter-flow-release-finish-tag-message hook 软连接rm -f ./.git/hooks/filter-flow-release-finish-tag-messagechmod +x $SCRIPTPATH/scripts/shell/filter-flow-release-finish-tag-message.shln -s $SCRIPTPATH/scripts/shell/filter-flow-release-finish-tag-message.sh ./.git/hooks/filter-flow-release-finish-tag-message# 初始化git-flow设置git config gitflow.branch.master mastergit config gitflow.branch.develop developgit config gitflow.prefix.versiontag vgit config gitflow.path.hooks $SCRIPTPATH/.git/hooksgit flow init
fiif [ $? -eq 0 ]; thenecho 'init finish'
elseecho 'init failed'
fi-
filter-flow-hotfix-finish-tag-message.sh,filter-flow-release-finish-tag-message.sh
- git flow 工作流钩子,用于release,hotfix 打版,自定义两个命令增加中途写入CHANGELOG的功能
- 执行git flow release finish 和 git flow hotfix finish 工作流时,会执行hooks中的filter-flow-hotfix-finish-tag-message.sh,filter-flow-release-finish-tag-message.sh
- 具体参考:https://github.com/jaspernbrouwer/git-flow-hooks/blob/master/filter-flow-hotfix-finish-tag-message
-
filter-flow-hotfix-finish-tag-message.sh, filter-flow-release-finish-tag-message.sh
-
为保证CHANGELOG正常写入,release的命名格式为xxx-tagname,tagname和提交时的scope保持一致
#!/usr/bin/env bash# Runs during git flow release finish and a tag message is given
#
# Positional arguments:
# $1 Message
# $2 Full version
#
# Return MESSAGE
#
# The following variables are available as they are exported by git-flow:
#
# MASTER_BRANCH - The branch defined as Master
# DEVELOP_BRANCH - The branch defined as DevelopMESSAGE=$1
VERSION=$2
# 同步远程tag,防止本地打版写入多个版本changelog-needed
git fetch --tagsBEHIND_COMMIT=$(git rev-list --count ..origin/develop)
ROOT_DIR=$PWD
# 根据tag来截取需要写入日志的package
PACKAGE=${VERSION#*-}
# 获取需要写入日志的package最近的一个tag
PREVIOUSTAG=$(git tag -l | grep $PACKAGE | tail -n 1)
# 获取semver格式的版本号
PACKAGE_VERSION=${VERSION%%-*}# 获取两个tag之间的changelog信息
CHANGELOG_MESSAGE=`pnpm cross-env PACKAGE=$PACKAGE PREVIOUS_TAG=$PREVIOUSTAG CURRENT_TAG=$VERSION  conventional-changelog -p custom-config -i -n ./scripts/changelog/changelog-option.cjs | tail -n +4 | sed '$d' | sed 's/(changelog-needed)/ /g'`# 判断是否需要rebase,落后于target branch合并会失败
[ $BEHIND_COMMIT -ne 0 ] && { echo 'Please rebase develop before finishing this branch'; exit 1; }isMono=$(echo $VERSION | grep "mono")# 判断是否为mono的更新,是的话changelog会更新到changelogs目录的mono.md内
if [[ "$isMono" != "" ]]; then# 更新版本号pnpm version --new-version ${PACKAGE_VERSION/v/} --no-git-tag-version > /dev/nullTEMP_CHANGELOG_MESSAGE=$(echo "### $PACKAGE_VERSION";git log -1 --pretty="#### %ci";printf "\n";echo "${CHANGELOG_MESSAGE}";printf "\n---\n\n";cat ./changelogs/mono.md)echo "$TEMP_CHANGELOG_MESSAGE" > ./changelogs/mono.md
# 否则更新到changelogs目录对应package的package.md内
elseTEMP_CHANGELOG_MESSAGE=$(echo "### $PACKAGE_VERSION";git log -1 --pretty="#### %ci";printf "\n";echo "${CHANGELOG_MESSAGE}";printf "\n---\n\n";cat ./changelogs/$PACKAGE.md)echo "$TEMP_CHANGELOG_MESSAGE" > ./changelogs/$PACKAGE.md
fi
git add . > /dev/null
git commit --amend --no-edit --no-verify > /dev/nullecho $MESSAGEexit 0
- 配置commit规范以及自动生成CHNAGELOG并自定义需要的依赖包
# conventional-changelog-cli 要配合conventional-changelog-custom-config使用,指定版本为@^2
# conventional-changelog-custom-config参考:https://itxiaohao.github.io/passages/git-commit/#%E6%B7%B1%E5%85%A5-conventional-changelog-%E6%BA%90%E7%A0%81
# lerna 要配合 cz-lerna-changelog 使用,指定版本为@^3.22.1
#  cz-lerna-changelog参考:https://www.npmjs.com/package/cz-lerna-changelog# -w 有工作区的时候使用
pnpm add @commitlint/cli @commitlint/config-conventional commitizen conventional-changelog-cli@^2.2.2 conventional-changelog-custom-config cz-lerna-changelog lerna@^3.22.1 -D -wpnpm add cross-env -w
- 添加comitizen相应配置,创建commitlint.config.js
touch commitlint.config.js
const fs = require('fs')
const path = require('path')module.exports = {extends: ['monorepo'],rules: {'header-max-length': [0, 'always'],// scope 不允许为空,保证CHANGELOG正常写入,release的命名格式为xxx-tagname,tagname和scope保持一致'scope-empty': [2, 'never'],'scope-enum': [2, 'always', [...fs.readdirSync(path.join(__dirname, 'packages')), 'mono']],'type-enum': [2, 'always', ['build', 'ci', 'chore', 'feat', 'fix', 'refactor', 'style', 'test', 'config', 'docs']],'close-issue-needed': [2, 'always'],},plugins: [{rules: {'close-issue-needed': (msg) => {const ISSUES_CLOSED = 'ISSUES CLOSED:'return [msg.raw.includes(ISSUES_CLOSED), 'Your commit message must contain ISSUES message']},},},],
}
- 自定定义CHANGELOG配置 changelog-option.cjs
const path = require('path')
const compareFunc = require('compare-func')// 自定义配置
let pkgJson = {}
try {pkgJson = require(path.join(__dirname, '../../package.json'))
} catch (err) {console.error('no root package.json found')
}const { changelog } = pkgJson
let bugsUrl = changelog ? changelog.bugsUrl || false : false
if (typeof bugsUrl !== 'string') bugsUrl = false
const authorName = changelog ? changelog.authorName || false : false
const authorEmail = changelog ? changelog.authorEmail || false : falselet gitUserInfo = ''
if (authorName && authorEmail) {gitUserInfo = 'by: **{{authorName}}** ({{authorEmail}})'
}
if (authorName && authorEmail === false) {gitUserInfo = 'by: **{{authorName}}**'
}
if (authorName === false && authorEmail) {gitUserInfo = 'by: ({{authorEmail}})'
}const getWriterOpts = () => {return {transform: (commit, context) => {let discard = trueconst issues = []commit.notes.forEach((note) => {note.title = 'BREAKING CHANGES'discard = false})if (commit.type === 'feat') {commit.type = 'Features'} else if (commit.type === 'fix') {commit.type = 'Bug Fixes'} else if (commit.type === 'perf') {commit.type = 'Performance Improvements'} else if (commit.type === 'revert') {commit.type = 'Reverts'} else if (commit.type === 'docs') {commit.type = 'Documentation'} else if (commit.type === 'style') {commit.type = 'Styles'} else if (commit.type === 'refactor') {commit.type = 'Code Refactoring'} else if (commit.type === 'test') {commit.type = 'Tests'} else if (commit.type === 'build') {commit.type = 'Build System'} else if (commit.type === 'ci') {commit.type = 'Continuous Integration'} else if (commit.type === 'chore') {commit.type = 'Chores'} else if (discard) {return}if (commit.scope === '*') {commit.scope = ''}if (typeof commit.hash === 'string') {commit.hash = commit.hash.substring(0, 7)}if (typeof commit.subject === 'string') {let url = context.repository ? `${context.host}/${context.owner}/${context.repository}` : context.repoUrlif (url) {url = `${url}/issues/`// Issue URLs.commit.subject = commit.subject.replace(/#([0-9]+)/g, (_, issue) => {issues.push(issue)return `[#${issue}](${url}${issue})`})}if (context.host) {// User URLs.commit.subject = commit.subject.replace(/\B@([a-z0-9](?:-?[a-z0-9/]){0,38})/g, (_, username) => {if (username.includes('/')) {return `@${username}`}return `[@${username}](${context.host}/${username})`})}}// remove references that already appear in the subjectcommit.references = commit.references.filter((reference) => {if (!issues.includes(reference.issue)) {return true}return false})if (bugsUrl) {commit.references = commit.references.map((ref) => {return {...ref,bugsUrl,}})}const needChangelog = commit.header.includes('(changelog-needed)') && commit.header.includes(`(${process.env.PACKAGE}):`)// 可在此过滤所需要的commit信息if (needChangelog) {commit.header = commit.header.replace(/\(changelog-needed\)/g, '')}return needChangelog ? commit : null},groupBy: 'type',commitGroupsSort: 'title',commitsSort: ['scope', 'subject'],noteGroupsSort: 'title',notesSort: compareFunc,finalizeContext: (context) => {return Object.assign(context, {version: process.env.CURRENT_TAG,linkCompare: false,})},}
}module.exports = {gitRawCommitsOpts: {from: process.env.PREVIOUS_TAG,to: process.env.CURRENT_TAG,},writerOpts: getWriterOpts(),
}
{"repository": {"type": "git","url": "https://github.com/example.git"},"changelog": {"bugsUrl": "https://github.com/","authorName": true,"authorEmail": false}
}
- 配置 cz-lerna-changlog,支持选择packages
const czLernaChangelog = require('cz-lerna-changelog')function makePrompter() {return function (cz, commit) {cz.prompt([{type: 'confirm',name: 'addChangeLog',message: 'Auto add `(changelog-needed)` to subject line?\n',},]).then((answer) => {let customQuestion = [{type: 'input',name: 'subject',message: 'Write a short, imperative tense description of the change:\n',filter: function (value) {const mark = (answer.addChangeLog && '(changelog-needed)') || ''return value.charAt(0).toLowerCase() + value.slice(1) + mark},validate: function (value) {return !!value},},]return czLernaChangelog.makePrompter(() => customQuestion)(cz, commit)})}
}module.exports = {prompter: makePrompter(),makePrompter: makePrompter,
}
{"config": {"commitizen": {"path": "./scripts/changelog/cz-lerna-changelog.cjs"}},"workspaces": ["packages/*"]
}
引入Husky规范git提交
- 安装 husky
pnpm add husky -D -w
- 在 package.json 中 scripts 中设置 prepare 钩子:husky install,在使用pnpm install的时候就会自动执行husky,以便于别人拉取完我们代码进行pnpm insall的时候直接进行husky install(版本8操作,版本9直接执行 init)
pnpm pkg set scripts.prepare="husky install"
或者
{"scripts": {"prepare": "husky install"}
}
- 执行install, 生成.husky文件夹
# 版本 8
npx husky install#版本9
npx husky init
- 添加一个 commit 钩子文件
# 版本8
npx husky add .husky/pre-commit
# 版本8 .husky/commit-msg 中添加npx --no -- commitlint --edit "$1"
npx --no -- commitlint --edit "$1"
# 版本9
echo 'npx --no -- commitlint --edit "$1"' > .husky/commit-msg
# .husky/pre-commit中写入以下命令,配合eslint使用
pnpm run lint-staged
配置eslint和prettier
eslint 配置
- 安装依赖包
# eslint eslint依赖包
# eslint-config-standard JavaScript标准样式的ESLint可配置,基础配置,比较流行的有 airbnb、standard、prettier等
# eslint-plugin-import 支持ES6以上的导入/导出语法,并防止文件路径和导入名称拼写错误的问题
# eslint-plugin-node 为node准备的eslint规则配置
# eslint-plugin-promise es语法promise的eslint最佳配置
# eslint-plugin-vue vue项目的的配置,vue项目必须
# @typescript-eslint/parser 解析器
# @typescript-eslint/eslint-plugin  ts语法的配置
# eslint-define-config eslint-define-config可以帮助我们做语法提示
pnpm add eslint eslint-config-standard eslint-plugin-import eslint-plugin-node eslint-plugin-promise eslint-plugin-vue @typescript-eslint/parser @typescript-eslint/eslint-plugin eslint-define-config -D -w
- 根目录下创建.eslintrc.cjs、.eslintignore文件
// .eslinttrc.cjs
// eslint-define-config可以帮助我们做语法提示
const { defineConfig } = require('eslint-define-config')module.exports = defineConfig({// ESLint 一旦发现配置文件中有 "root": true,它就会停止在父级目录中寻找。root: true,// 解析器parser: 'vue-eslint-parser',parserOptions: {// 解析器parser: '@typescript-eslint/parser',// js的版本ecmaVersion: 2020,// 模块化方案sourceType: 'module',ecmaFeatures: {jsx: true,},},// 启用的规则extends: ['plugin:vue/vue3-recommended', 'plugin:@typescript-eslint/recommended', 'standard'],rules: {quotes: ['error', 'single'],'@typescript-eslint/ban-ts-ignore': 'off','@typescript-eslint/explicit-function-return-type': 'off','@typescript-eslint/no-explicit-any': 'off','@typescript-eslint/no-var-requires': 'off','@typescript-eslint/no-empty-function': 'off','@typescript-eslint/no-use-before-define': 'off','@typescript-eslint/ban-ts-comment': 'off','@typescript-eslint/ban-types': 'off','@typescript-eslint/no-non-null-assertion': 'off','@typescript-eslint/explicit-module-boundary-types': 'off','@typescript-eslint/no-unused-vars': ['error',{argsIgnorePattern: '^h$',varsIgnorePattern: '^h$',},],'no-use-before-define': 'off','no-unused-vars': ['error',{argsIgnorePattern: '^h$',varsIgnorePattern: '^h$',},],'no-tabs': 'off',indent: 'off','vue/custom-event-name-casing': 'off','vue/html-indent': 'off','vue/max-attributes-per-line': 'off','vue/html-self-closing': 'off','vue/singleline-html-element-content-newline': 'off','vue/multi-word-component-names': 'off','space-before-function-paren': 'off','comma-dangle': 'off',},
})
.eslintignore
node_modules
.vscode
.idea
dist
.eslintrc.cjs
prettier 配置
- 安装依赖
# eslint-config-prettier&eslint-plugin-prettier  用于解决eslint和prettier的冲突问题
pnpm add prettier eslint-config-prettier eslint-plugin-prettier -D -w
- 根目录创建.prettierrc文件
{"printWidth": 150,"tabWidth": 2,"useTabs": true,"semi": false,"singleQuote": true,"quoteProps": "as-needed","jsxSingleQuote": false,"trailingComma": "es5","bracketSpacing": true,"jsxBracketSameLine": false,"arrowParens": "always","rangeStart": 0,"requirePragma": false,"insertPragma": false,"proseWrap": "preserve","htmlWhitespaceSensitivity": "css","vueIndentScriptAndStyle": false,"endOfLine": "auto"
}
-
根目录创建.prettierignore文件用于忽略prewitter格式化
-
安装 VSCode 插件 Prettier - Code formatter
- 安装该插件以实现在保存的时候自动完成格式化
-
在 .vscode/settings.json 中添加一下规则
{// 保存的时候自动格式化"editor.formatOnSave": true,// 默认格式化工具选择prettier"editor.defaultFormatter": "esbenp.prettier-vscode"
}
配置lint-staged
- 提交前在pre-commit中应该做一次lint 校验,在package.json添加
{"scripts": {"lint:script": "eslint --ext .js,.jsx,.vue,.ts,.tsx --fix --quiet ./"}
}
-
在pre-commit 中添加命令 npm lint:script
-
根据上面的配置是可以实现我们想要的效果的,但是我们会发现每次提交代码的时候 ESlint 或 Stylelint 都会检查所有文件,而我们需要的是只让它们检测新增的文件,因此我们可以使用lint-staged来解决这个问题
-
安装lint-staged
pnpm add lint-staged -D -w
- 在package.json中添加配置,更改pre-commit的命令 pnpm run lint-staged
{"lint-staged": {"src/**/*.{js,jsx,ts,tsx,vue}": ["eslint --ext .js,.jsx,.vue,.ts,.tsx --fix --quiet ./"]},"scripts": {"lint-staged": "lint-staged"}
}
创建项目
创建shared
- shared项目用来服务其他多个web项目,提供公共方法、组件、样式等等
项目全局安装 vue
# -w的意思是,workspace-root把依赖包安装到工作目录的根路径下,# 则根目录下会生成node_modules文件夹。可以共用,后续每个项目需要用到vue的# 都直接从根目录node_modules里取。pnpm add vue -w
在 packages 项目下创建 vue 项目
- 执行创建命令,根据提示选择
pnpm create vite
- 删除 vue @vitejs/plugin-vue vite vue-tsc typescript 等依赖,安装到全局中
# 子项目下执行pnpm remove vuepnpm remove @vitejs/plugin-vue vite vue-tsc typescript -D# 根目录下执行pnpm add @vitejs/plugin-vue vite vue-tsc typescript -D -w
- 运行项目
# 子项目下运行pnpm dev
配置全局指令
{"script": {"dev:project": "cd packages/vite-project & pnpm dev"// pnpm -C packages/vue-config-1 & pnpm dev 亦可}
}
引用 shared 内容
- 加入 tsconfig.json 来配置路径
# 根目录下
pnpm add typescript -D -w
pnpm tsc --init
- 配置
{"compilerOptions": {"outDir": "dist", // 输出的目录"sourceMap": true, //采用sourcemap"target": "es2016", // 目标语法"module": "esnext", // 模块格式"moduleResolution": "node", // 模块解析"strict": false, // 严格模式"resolveJsonModule": true, // 解析json模块"esModuleInterop": true, // 允许通过es6语法引入commonjs模块"jsx": "preserve", // jsx不转义"lib": ["esnext", "dom"], // 支持的类库esnext及dom"baseUrl": ".", // 当前是以该路径进行查找"paths": {"@monorepo/shared/components": ["packages/shared/components"],"@monorepo/shared/utils": ["packages/shared/utils"],"@monorepo/shared/fetch": ["packages/shared/fetch"],"@monorepo/shared/styles": ["packages/shared/styles"],// 或者用*号处理匹配"@monorepo/shared/*": ["packages/shared/*"]}}
}
建立关联
# 指定版本号
pnpm add @monorepo/shared@workspace --filter @monorepo/vite-project
打包插件
- 安装 minimist esbuild
pnpm add minimist esbuild -D -w
- 新增 打包脚本
// minimist 可以解析命令行参数,非常好用,功能简单
import minimist from 'minimist'
// 打包模块
import { build } from 'esbuild'
// node 中的内置模块
import path from 'path'
import fs from 'fs'
const __dirname = path.resolve()
const args = minimist(process.argv.slice(2))
const target = args._[0]
const format = args.f || 'global'
const entry = path.resolve(__dirname, `./packages/plugins/${target}/src/index.ts`)
/*  iife 立即执行函数(function(){})()cjs node中的模块 module.exportsesm 浏览器中的esModule模块 import */
const outputFormat = format.startsWith('global') ? 'iife' : format === 'cjs' ? 'cjs' : 'esm'
const outfile = path.resolve(__dirname, `./packages/plugins/${target}/dist/${target}.${format}.js`)
const pkaPath = path.resolve(__dirname, `./packages/plugins/${target}/package.json`)
const pkaOps = JSON.parse(fs.readFileSync(pkaPath, 'utf8'))
const packageName = pkaOps.buildOptions?.name
build({entryPoints: [entry],outfile,bundle: true,sourcemap: true,format: outputFormat,globalName: packageName,platform: format === 'cjs' ? 'node' : 'browser',
}).then(() => {console.log('watching~~~')
})
- 配置 plugins package.json
{"name": "@monorepo/common","version": "1.0.0","description": "","main": "index.js","scripts": {"test": "echo \"Error: no test specified\" && exit 1"},// 打包会用到, 用于定义全局变量"buildOptions": {"name": "common"},"keywords": [],"author": "","license": "ISC","dependencies": {"@monorepo/shared": "workspace:^"}
}
- 配置并执行打包命令
{"scripts": {"dev:common": "node scripts/dev-plugins.js common -f global"}
}
pnpm dev:common
- 测试使用
<!doctype html>
<html lang="en"><head><meta charset="UTF-8" /><meta name="viewport" content="width=device-width, initial-scale=1.0" /><title>Document</title></head><body><script src="./common.global.js"></script><script>const { testFunc } = commonconsole.log(testFunc())</script></body>
</html>
配置单命令启动多项目
{"scripts": {"serve": "node ./scripts/build/build.cjs","build": "node ./scripts/build/build.cjs --production"}
}
- build.cjs
const { spawn } = require('child_process')
const core = require('./core.cjs')
const path = require('path')class BuildCore extends core {constructor(optionArray = []) {super()this.initOption(optionArray)this.start()}/*** @description 执行构建流程*/start() {this.getPackages().then(async () => {this._argument = this._program.parse(process.argv).argstry {const answer = await this.selectPackage()answer && this._argument.unshift(answer)this.initBuildSpawn()} catch (error) {console.error('the application must be selected!')}})}/*** @description 初始化本地开发或者构建build过程*/initBuildSpawn() {if (!this.validatePackage()) return falseconst isProduction = this._program.parse(process.argv).productionprocess.env.PACKAGE = this._argument[0]process.env.NODE_ENV = isProduction ? 'production' : 'development'const args = isProduction ? ['build'] : ['dev']const clinetPath = path.resolve(__dirname, `../../packages/${process.env.PACKAGE}/`)try {const clientSpawnInstance = spawn('pnpm', ['-C', clinetPath, args], {stdio: 'inherit',shell: true, // 兼容部分win10系统Error: spawn yarn ENOENT报错})this.registErrorHandle(clientSpawnInstance)} catch (error) {console.log(error)}}
}new BuildCore([{short: '-p',long: '--production',description: 'build package in production mode',},
])
- core.js
/*** 操作终端面板,选择项目启动* 思路:读取packages下的文件,获取每个项目的名称,存到项目数组中(this._packageArray) getPackages* 根据项目数组构建命令行选择器,选择对应的项目 selectPackage*/const process = require('process')
const fs = require('fs')
const path = require('path')
const { Command } = require('commander')
const { Select } = require('enquirer')class Core {constructor() {// 项目数组this._packageArray = []// 命令实例this._program = new Command()}/*** @description 选择应用* @return Promise*/selectPackage() {// 深拷贝应用数组const packages = JSON.parse(JSON.stringify(this._packageArray))// 判断选择的包是否包含在应用数组中,包含则返回Promise成功状态if (this._argument && packages.includes(this._argument[0])) return Promise.resolve()// 终端命令行选择const prompt = new Select({name: 'apps',message: 'Please select the application to run',choices: packages,})return prompt.run()}/*** @description 初始化自定义command参数* @param {Object[]} optionArray 自定义参数数组* @param {String} optionArray[].short 自定义参数缩写,如 -p* @param {String} optionArray[].long 自定义参数全称, 如 --production* @param {String} optionArray[].description 自定义参数作用的描述*/initOption(optionArray) {optionArray.forEach((obj) => {this._program.option(`${obj.short}, ${obj.long}`, obj.description)})}/*** @description 检测自定义的package参数是否匹配packages目录下的项目*/validatePackage() {let pass = trueif (!this._packageArray.includes(this._argument[0])) {console.error(`package param should be one of [${this._packageArray.join(',')}]`)console.log('eg: yarn <script> auth-overseas')pass = false}return pass}/*** @description 获取packages目录下的项目*/getPackages() {return new Promise((resolve, reject) => {// 读取packages下的文件fs.readdir(path.join(__dirname, '../../packages'), { withFileTypes: true }, (err, dir) => {if (err) reject(err)// 将目录的文件名筛选读取,添加到应用数组中this._packageArray = dir.filter((i) => {const typeKey = Object.getOwnPropertySymbols(i)[0]return i.name !== 'plugins' && i.name !== 'shared' && i[typeKey] === 2}).map((j) => j.name)resolve()})})}/*** @description 注册对子进程错误进行异常处理* @param {Object} spawnInstance 子进程* @param {Function} callback 子进程执行完成后回调* @param {Function} errorCallback 子进程执行报错后回调*/registErrorHandle(spawnInstance, callback, errorCallback) {spawnInstance.on('error', (err) => {console.log(err)errorCallback && errorCallback(err)process.exit(1)})spawnInstance.on('exit', (code) => {callback && callback()// code = 0表示流程正常if (code !== 0) {process.exit(1)}})}
}module.exports = Core
相关文章:

Monorepo pnpm 模式管理多个 web 项目
Monorepo pnpm 模式管理多个 web 项目 Monorepo pnpm 模式管理多个 web 项目项目地址git flow 工作流程pnpm workspace.npmrc初始化项目架构引入Husky规范git提交配置eslint和prettiereslint 配置prettier 配置 配置lint-staged创建项目创建shared项目全局安装 vue在 packages …...

2024年诺贝尔物理学奖颁发给了机器学习与神经网络领域的研究者,看是有点意料之外,其实也在情理之中。
近日,2024年诺贝尔物理学奖颁发给了机器学习与神经网络领域的研究者,这是历史上首次出现这样的情况。这项奖项原本只授予对自然现象和物质的物理学研究作出重大贡献的科学家,如今却将全球范围内对机器学习和神经网络的研究和开发作为了一种能…...

《深入理解 C++策略模式的变体:编程灵活性的新维度》
在 C编程的广阔领域中,设计模式起着至关重要的作用,它们为软件架构提供了可复用的解决方案。其中,策略模式是一种非常强大的设计模式,它允许算法的行为在运行时根据不同的策略进行改变。而策略模式的变体则进一步扩展了其灵活性和…...

一起体验AI动手实验,OceanBase 2024 年度发布会精彩预告
2024年OceanBase年度发布会将于10月23日在北京望京凯悦酒店举行。此次大会围绕“不止于记录”的主题,共同探讨当前数据库领域的前沿话题,包含主论坛、分论坛、AI 动手实训营、开源技术交流会等多个环节,诚邀全国各地的企业和开发者共同参与&a…...
)
Download Vmware Fusion (free for person)
1. web link ProductFiles - Support Portal - Broadcom support portal 2. Register user (Required) use your email to register a account 3. login and download note: the username is the email name....

【Java数据结构】二叉树
【本节目标】 1. 掌握树的基本概念 2. 掌握二叉树概念及特性 3. 掌握二叉树的基本操作 4. 完成二叉树相关的面试题练习 一. 树型结构 1 概念★ 树是一种 非线性 的数据结构,它是由 n ( n>0 )个有限结点组成一个具有层次关系的集…...

虎牙Android面试题及参考答案
给个数组,找出数组中第 k 大的数(利用快排思想 / 用小顶堆,他说可以用大顶堆?) 利用快排思想:快速排序的核心思想是分治和分区。在找数组中第 k 大的数时,每次选择一个基准元素,将数组分为两部分,左边部分小于基准元素,右边部分大于基准元素。如果基准元素最终的下标…...

C++:错误代码分析<2>
🌏主页:R6bandito_ 🚀所属专栏:C/C错误代码收集整理 源码 考虑以下代码: void do_some_work() {std::cout << "Do some work" << std::endl; }int main(int argc, const char* argv[]) {std::…...

怎么ping网络ip地址通不通
怎么Ping网络IP地址通不通?要检查网络中的IP地址是否连通,可以使用Ping命令。Ping命令通过发送ICMP(Internet Control Message Protocol,因特网控制消息协议)Echo请求报文并等待回应,来判断目标主机是否可…...

前端新机部署
编辑器:vscode 下载地址 vscode常用插件 显示代码修改历史、作者等信息 GitLens Nodejs版本 Node版本管理工具 Nvm下载地址 nvm常用命令: nvm ls // 查看安装的所有node.js的版本nvm list available //查看可以安装的所有node.js版本nvm install 版本…...

对比 Babel、SWC 和 Oxc:JavaScript 和 TypeScript 工具的未来
随着现代前端开发的快速演变,JavaScript 和 TypeScript 的工具链不断更新,以满足开发者对性能和效率的需求。我们将对比三款流行的工具:Babel、SWC 和 Oxc,重点分析它们的特点、性能、应用场景以及适用性。 1. Babel:…...

MySQL SELECT 查询(三):查询常用函数大全
MySQL SELECT 查询(三):查询常用函数大全 1. 单行函数 单行函数是 SQL 中一类重要的函数,它们可以对单行数据进行处理,并返回单个结果。单行函数可以嵌套使用,并提供灵活的数据处理能力。 1.1 定义 只对单…...

axios 的 get 请求传参数
在使用 Axios 发起 GET 请求时,参数通常是通过 URL 的查询字符串来传递的。Axios 提供了一个简洁的接口来构建这样的请求,并自动将参数附加到 URL 上。 以下是一个使用 Axios 发起 GET 请求并传递参数的示例: const axios require(axios);…...

用C++编写信息管理系统(歌单信息管理)
C语言是面向过程的编程语言,而C是面向对象的编程语言,在书写代码时风格有所不同(也存在很多共性)。 程序说明 本次系统程序使用的是C语言进行编写,主要考虑怎么实现面向对象的问题。 因为本次程序属于小型系统程序&…...
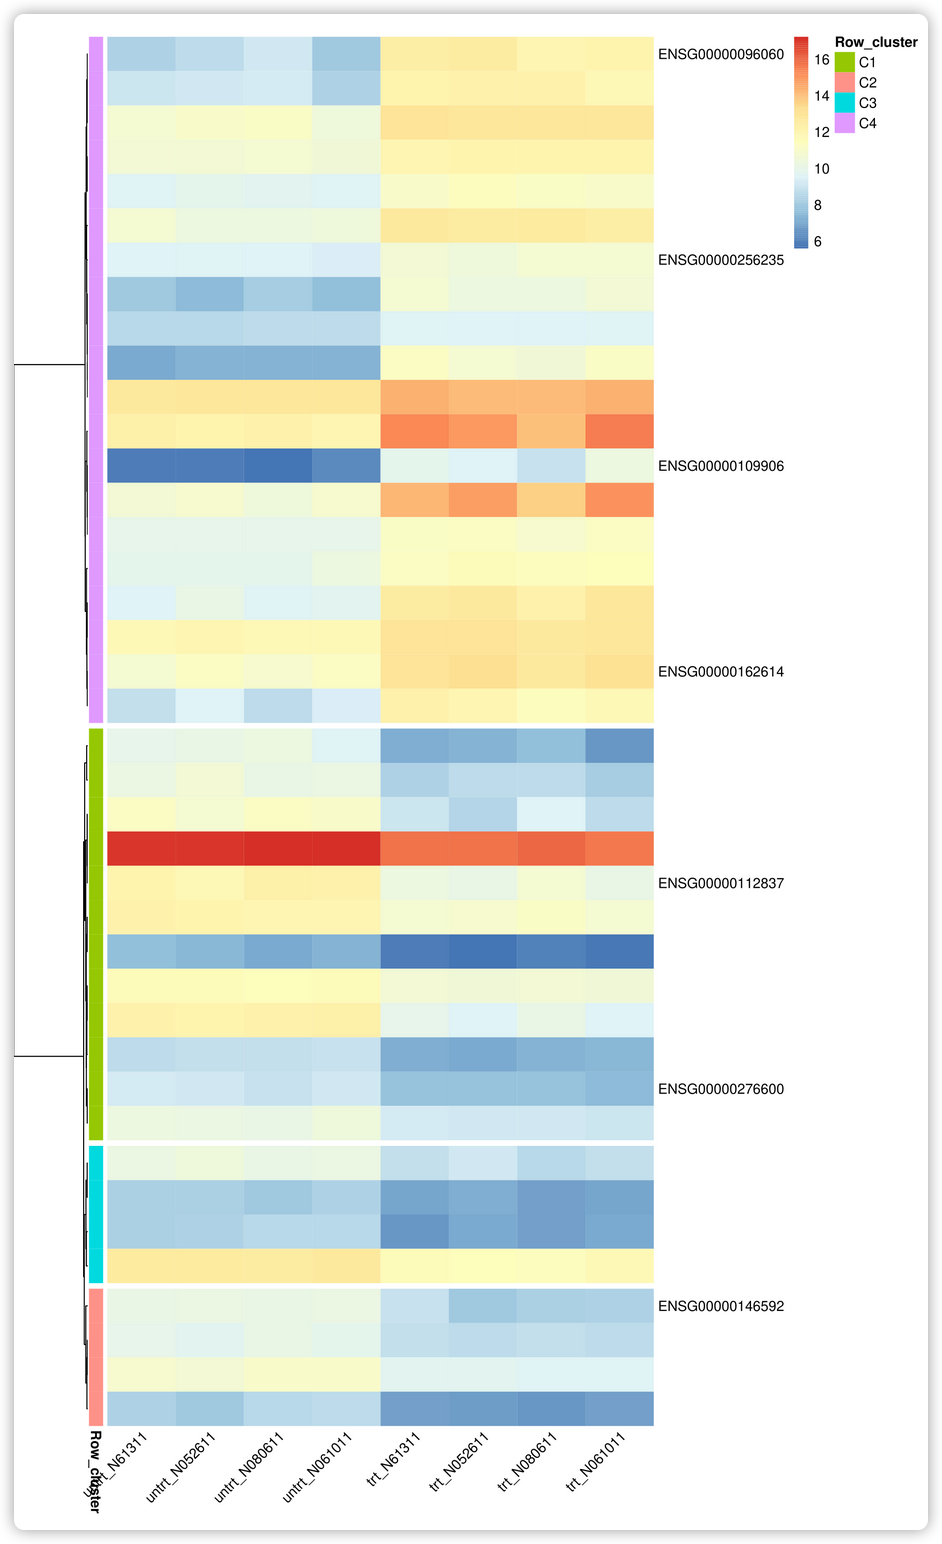
对层级聚类树进行模块分割,定位基因在哪个模块中
拷贝数据到 ImageGP (http://www.ehbio.com/Cloud_Platform/front/#/analysis?pageb%27Ng%3D%3D%27),并设置参数. ID untrt_N61311 untrt_N052611 untrt_N080611 untrt_N061011 trt_N61311 trt_N052611 trt_N080611 trt_N061011 ENSG000…...

机器学习【金融风险与风口评估及其应用】
机器学习【金融风险与风口评估及其应用】 一、机器学习在金融风险评估中的应用1.提升评估准确性2.实现自动化和智能化3.增强风险管理能力4.信用评估5.风险模型6.交易策略7.欺诈检测 二、机器学习在金融风口评估中的应用1.识别市场趋势2.评估创新潜力3.优化投资策略4. 自然语言处…...

【计算机网络 - 基础问题】每日 3 题(三十八)
✍个人博客:https://blog.csdn.net/Newin2020?typeblog 📣专栏地址:http://t.csdnimg.cn/fYaBd 📚专栏简介:在这个专栏中,我将会分享 C 面试中常见的面试题给大家~ ❤️如果有收获的话,欢迎点赞…...
)
深入浅出MongoDB(五)
深入浅出MongoDB(五) 文章目录 深入浅出MongoDB(五)可重试读取可重试写入读关注readConcern支持写关注 可重试读取 可重试读取允许mongodb驱动程序在遇到某些网络或服务器错误时,自动重试某些读取操作一次。只有连接到…...

【conda】创建、激活、删除虚拟环境
前言一、创建虚拟环境二、删除虚拟环境总结 前言 主要是记录一下步骤 一、创建虚拟环境 地址栏输入cmd,唤起命令符栏目,就可以在指定目录下创建虚拟环境了。 这样方便日后在pycharm直接配置虚拟环境。 conda create -n yolo5-lite python3.9 -y简单来说…...

关于int*的*号归属权问题
再根据函数指针定义:int (*int) (int a)。我们发现*和后面的标识符才是一体的 所以int *a,b;的写法更好,说明a是指针类型,b是int类型...

KubeSphere 容器平台高可用:环境搭建与可视化操作指南
Linux_k8s篇 欢迎来到Linux的世界,看笔记好好学多敲多打,每个人都是大神! 题目:KubeSphere 容器平台高可用:环境搭建与可视化操作指南 版本号: 1.0,0 作者: 老王要学习 日期: 2025.06.05 适用环境: Ubuntu22 文档说…...
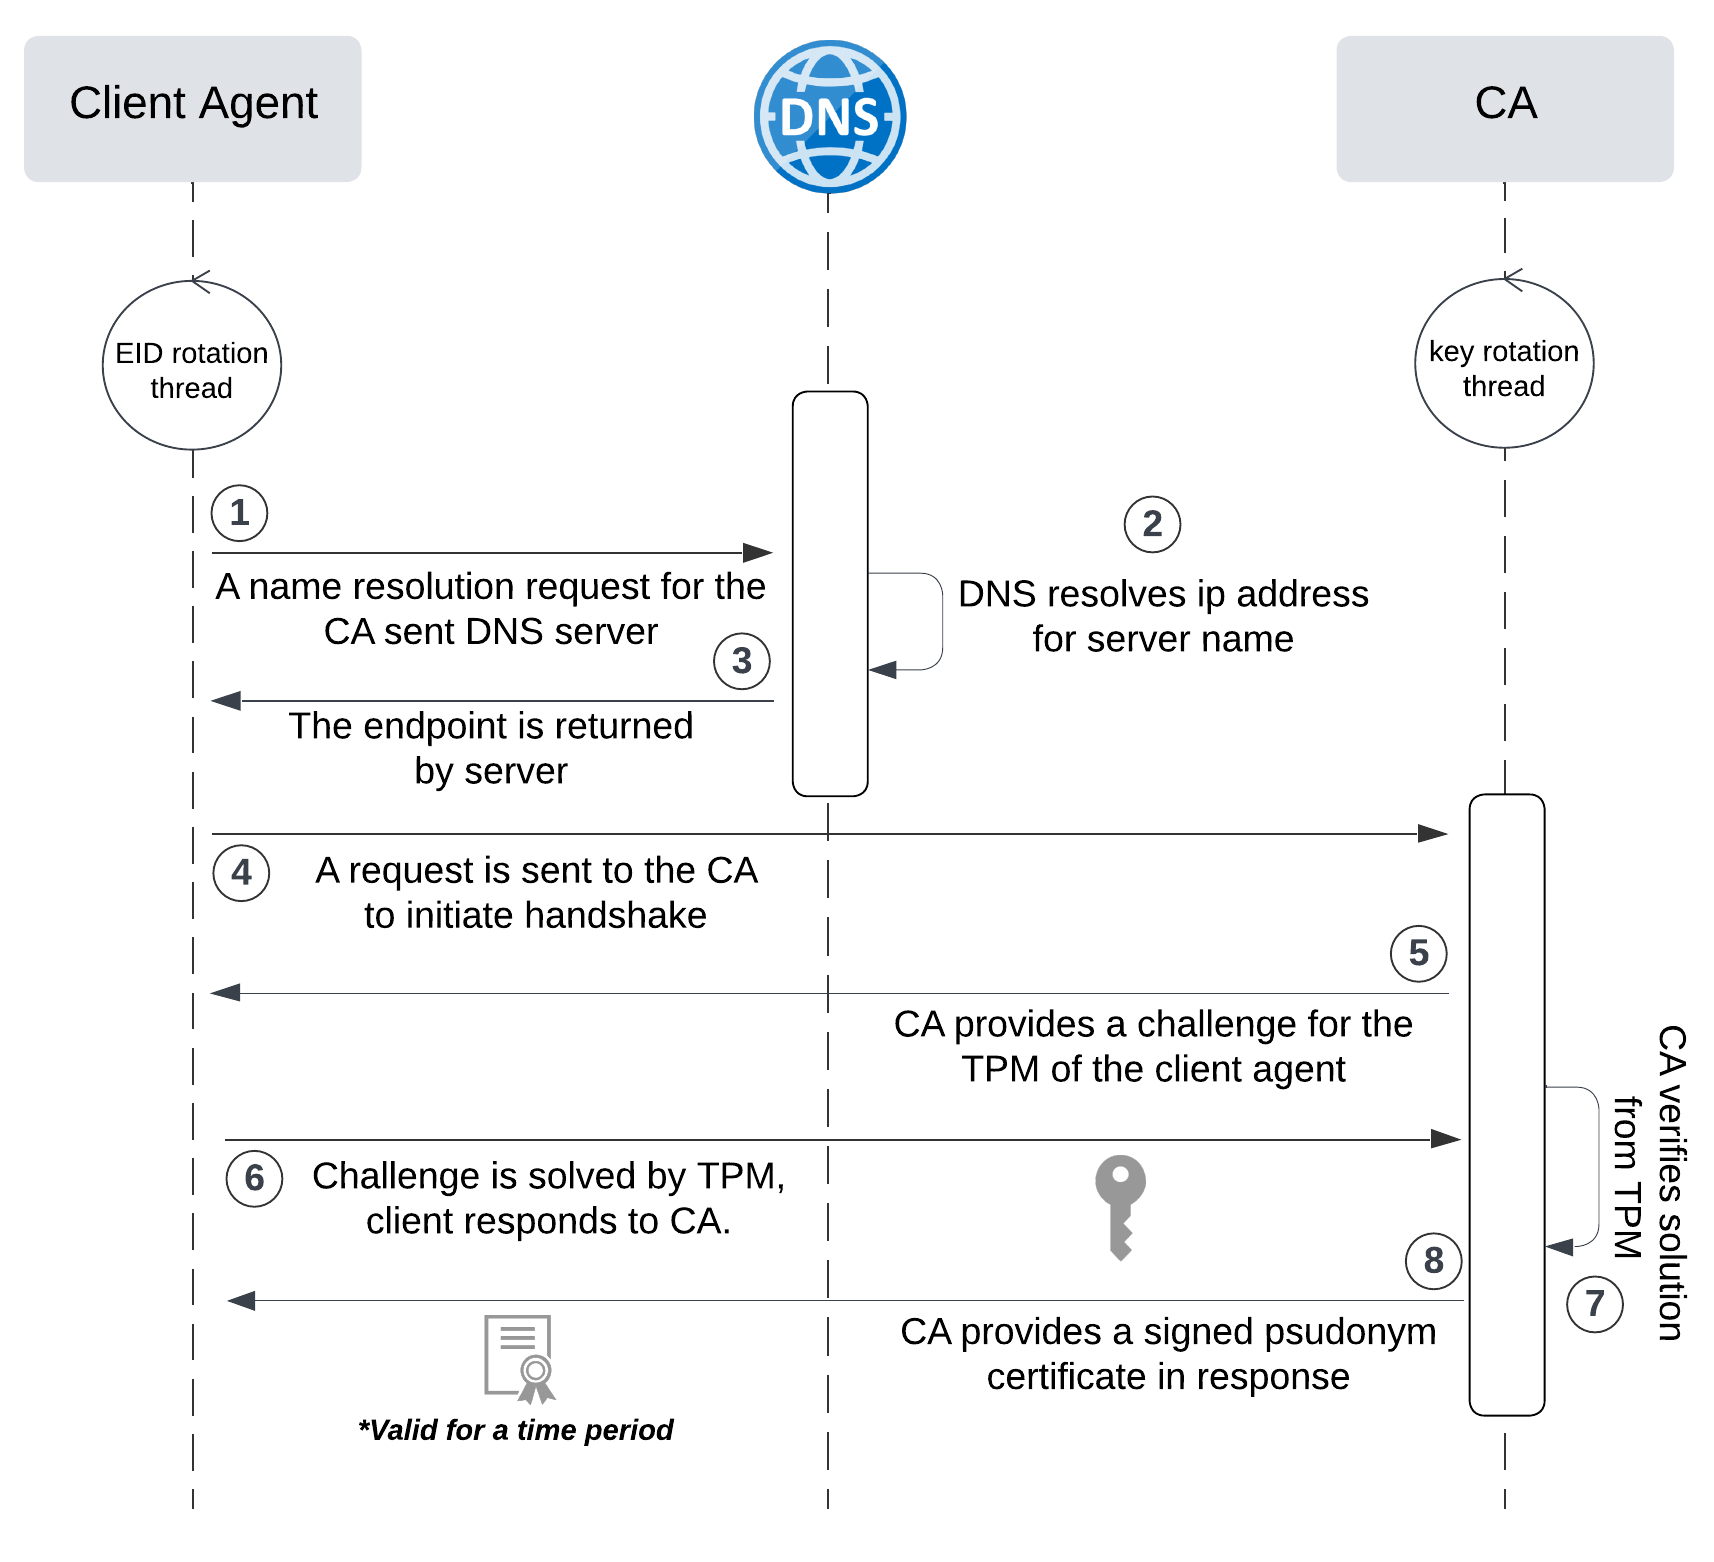
网络六边形受到攻击
大家读完觉得有帮助记得关注和点赞!!! 抽象 现代智能交通系统 (ITS) 的一个关键要求是能够以安全、可靠和匿名的方式从互联车辆和移动设备收集地理参考数据。Nexagon 协议建立在 IETF 定位器/ID 分离协议 (…...
` 方法)
深入浅出:JavaScript 中的 `window.crypto.getRandomValues()` 方法
深入浅出:JavaScript 中的 window.crypto.getRandomValues() 方法 在现代 Web 开发中,随机数的生成看似简单,却隐藏着许多玄机。无论是生成密码、加密密钥,还是创建安全令牌,随机数的质量直接关系到系统的安全性。Jav…...

《Playwright:微软的自动化测试工具详解》
Playwright 简介:声明内容来自网络,将内容拼接整理出来的文档 Playwright 是微软开发的自动化测试工具,支持 Chrome、Firefox、Safari 等主流浏览器,提供多语言 API(Python、JavaScript、Java、.NET)。它的特点包括&a…...

【磁盘】每天掌握一个Linux命令 - iostat
目录 【磁盘】每天掌握一个Linux命令 - iostat工具概述安装方式核心功能基础用法进阶操作实战案例面试题场景生产场景 注意事项 【磁盘】每天掌握一个Linux命令 - iostat 工具概述 iostat(I/O Statistics)是Linux系统下用于监视系统输入输出设备和CPU使…...
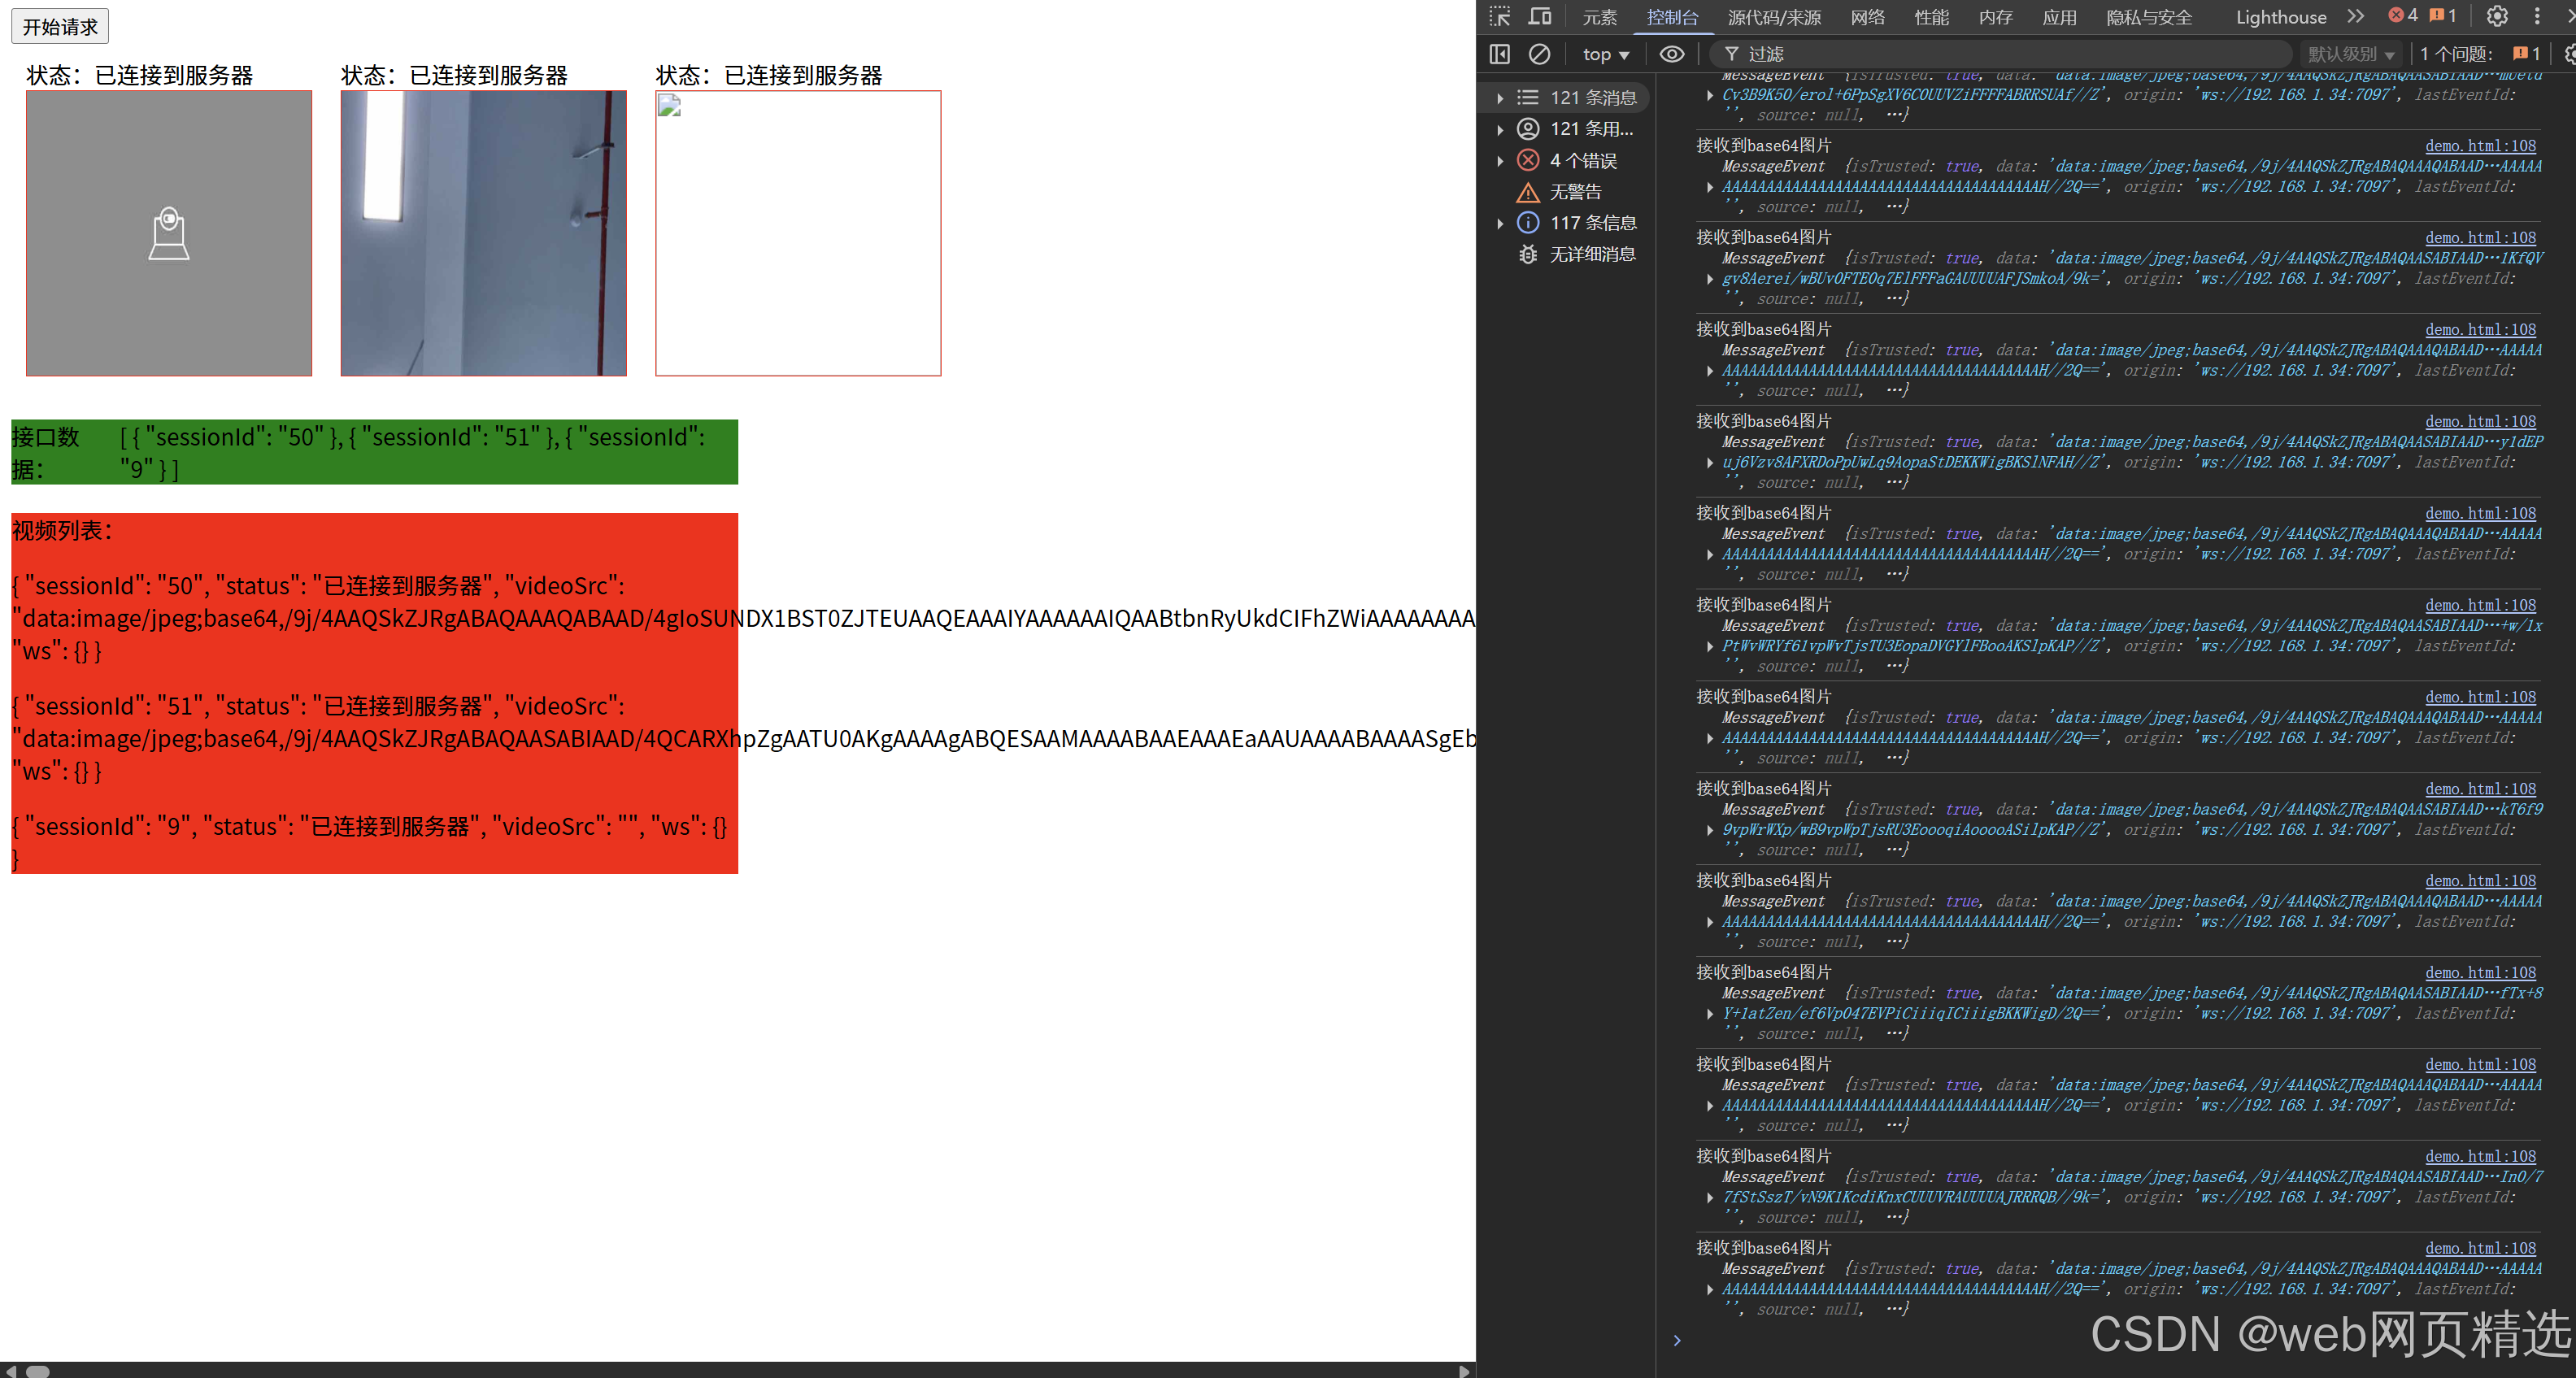
uniapp微信小程序视频实时流+pc端预览方案
方案类型技术实现是否免费优点缺点适用场景延迟范围开发复杂度WebSocket图片帧定时拍照Base64传输✅ 完全免费无需服务器 纯前端实现高延迟高流量 帧率极低个人demo测试 超低频监控500ms-2s⭐⭐RTMP推流TRTC/即构SDK推流❌ 付费方案 (部分有免费额度&#x…...
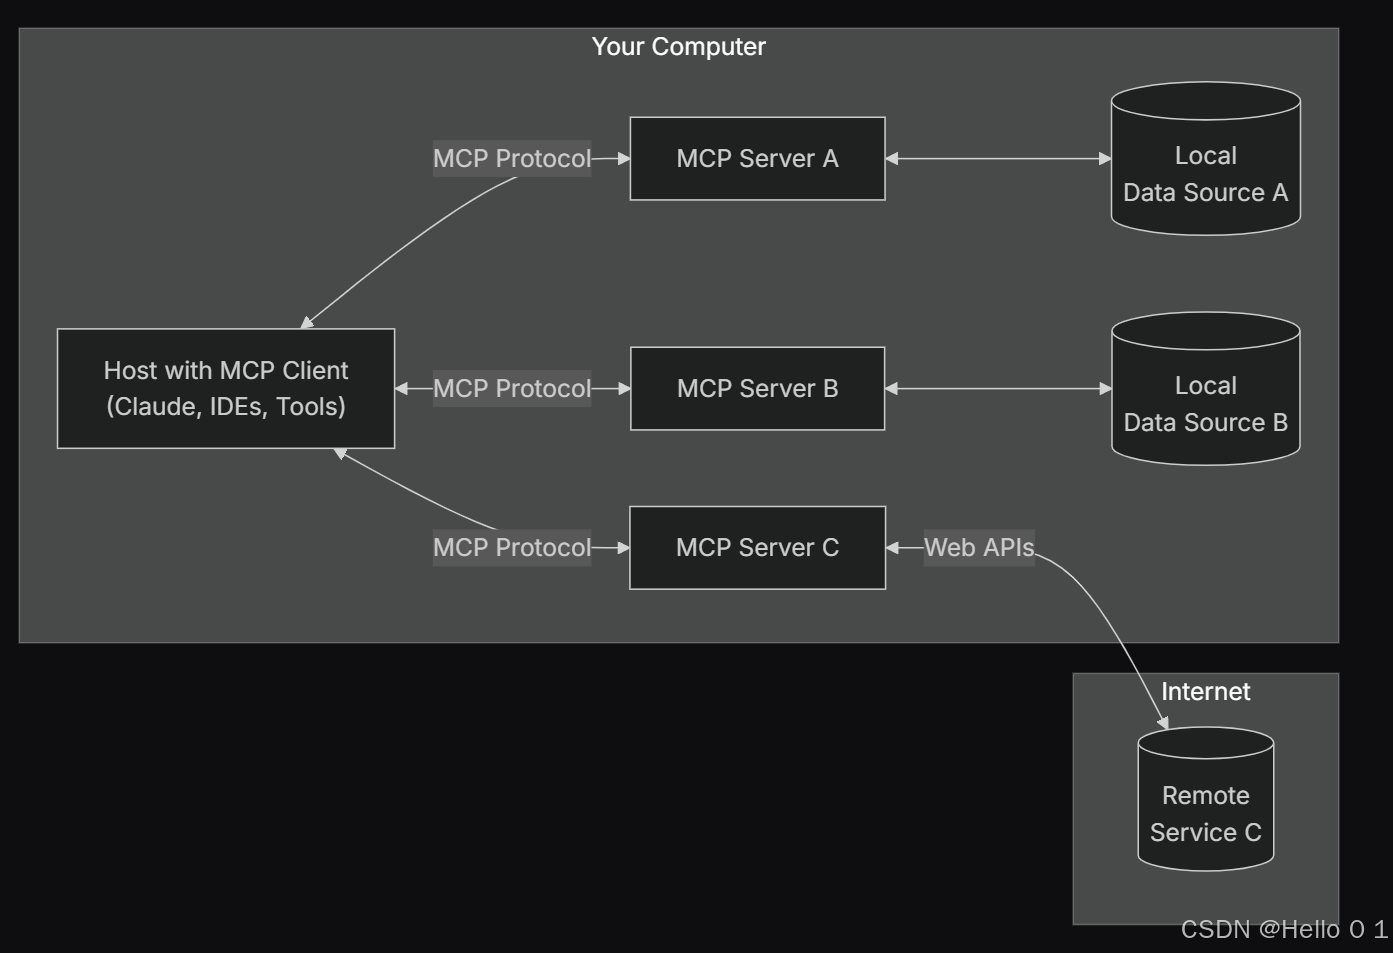
让AI看见世界:MCP协议与服务器的工作原理
让AI看见世界:MCP协议与服务器的工作原理 MCP(Model Context Protocol)是一种创新的通信协议,旨在让大型语言模型能够安全、高效地与外部资源进行交互。在AI技术快速发展的今天,MCP正成为连接AI与现实世界的重要桥梁。…...
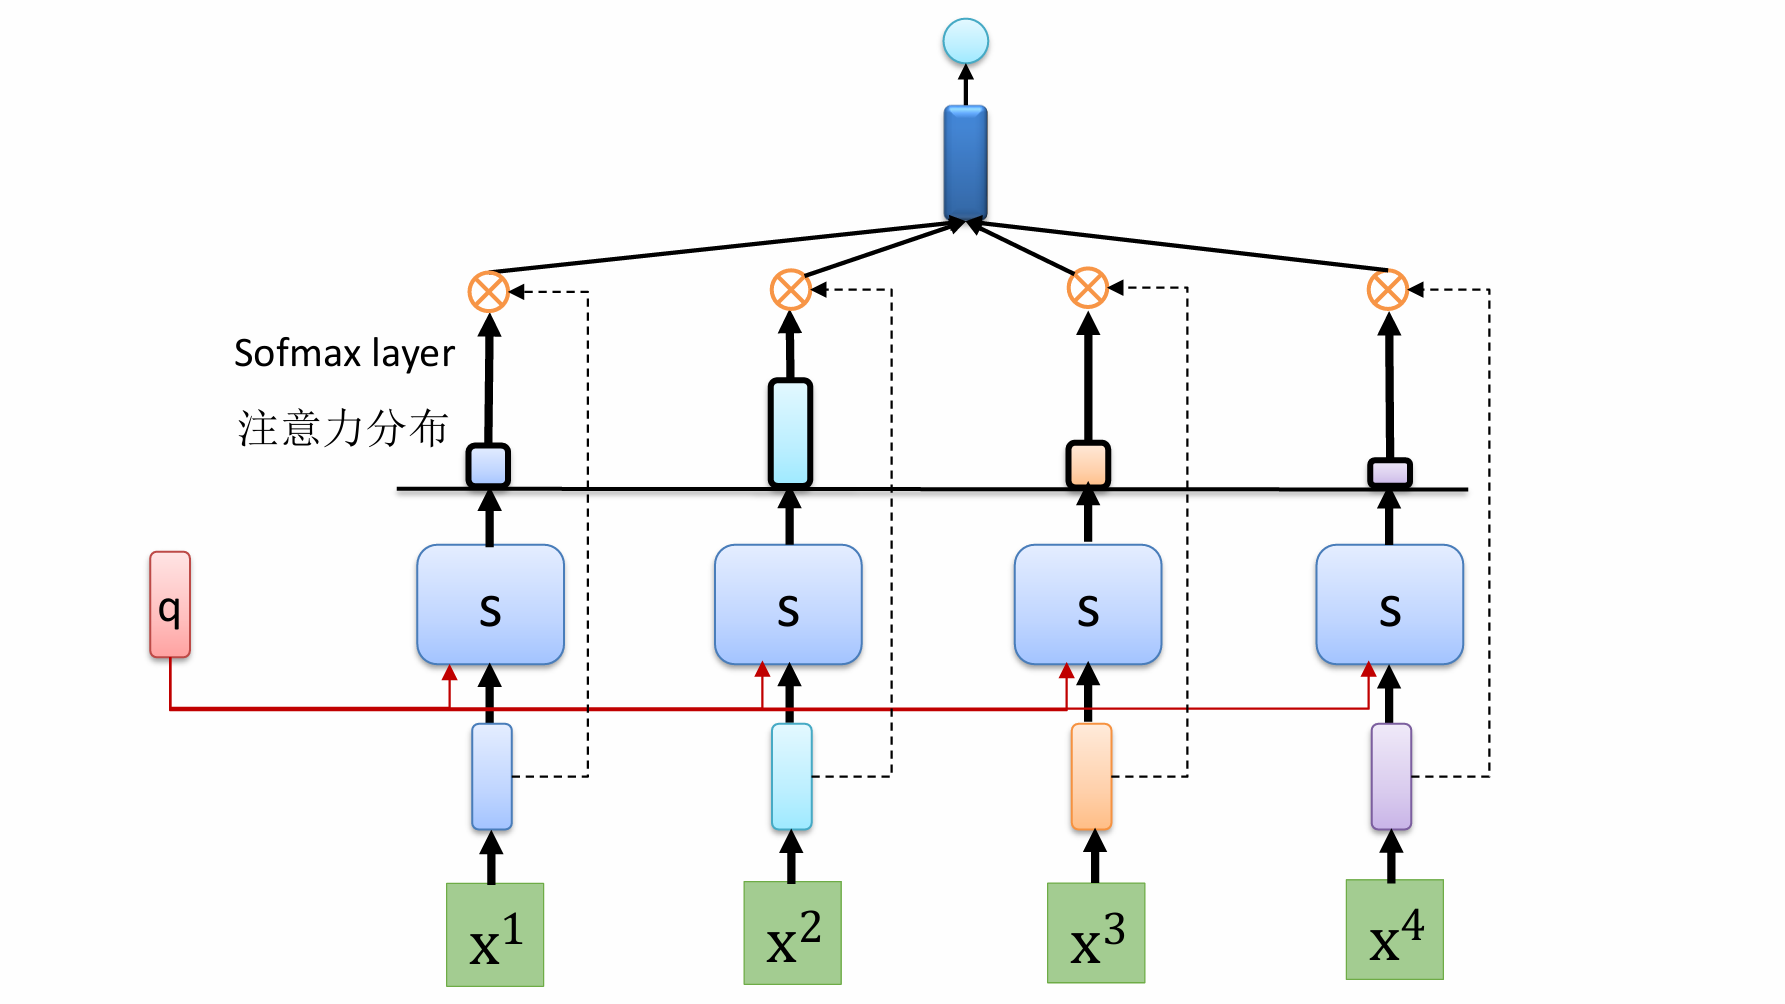
自然语言处理——循环神经网络
自然语言处理——循环神经网络 循环神经网络应用到基于机器学习的自然语言处理任务序列到类别同步的序列到序列模式异步的序列到序列模式 参数学习和长程依赖问题基于门控的循环神经网络门控循环单元(GRU)长短期记忆神经网络(LSTM)…...

MySQL账号权限管理指南:安全创建账户与精细授权技巧
在MySQL数据库管理中,合理创建用户账号并分配精确权限是保障数据安全的核心环节。直接使用root账号进行所有操作不仅危险且难以审计操作行为。今天我们来全面解析MySQL账号创建与权限分配的专业方法。 一、为何需要创建独立账号? 最小权限原则…...

动态 Web 开发技术入门篇
一、HTTP 协议核心 1.1 HTTP 基础 协议全称 :HyperText Transfer Protocol(超文本传输协议) 默认端口 :HTTP 使用 80 端口,HTTPS 使用 443 端口。 请求方法 : GET :用于获取资源,…...
