React源码03 - React 中的更新
03 - React 中的更新
React 中创建更新的方式:
初次渲染:ReactDOM.render、ReactDOM.hydrate
后续更新:setState、forceUpdate
1. ReactDOM.render()
- 先创建 ReactRoot 顶点对象
- 然后创建 FiberRoot 和 RootFiber
- 创建更新,使应用进入更新调度过程
这个部分,只要了解流程即可,不要陷入各种旁支末节,否则很难再 “return”出来,划不来,先点到为止。
写 JSX 的时候,只是调用了 createElement 创建了 element 树,还需要 render 进一步进行渲染和处理。
ReactDOM 源码在 react-dom/src/client 下面,而 server 对应的是服务端,这里只研究客户端。
const ReactDOM: Object = {    render(element: React$Element<any>,container: DOMContainer,callback: ?Function,) {return legacyRenderSubtreeIntoContainer(null, // 没有父组件element,container,false, // 不调和callback,);},// hydrate 和 render 唯一区别就是是否会调和 DOM 节点,是否会复用节点,服务端的时候会用到,暂且不表hydrate(element: React$Node, container: DOMContainer, callback: ?Function) {return legacyRenderSubtreeIntoContainer(null,element,container,true,callback,);},// ... 其他方法略
}
渲染子树到 container 中:
function legacyRenderSubtreeIntoContainer(parentComponent: ?React$Component<any, any>,children: ReactNodeList,container: DOMContainer,forceHydrate: boolean,callback: ?Function,
) {let root: Root = (container._reactRootContainer: any); if (!root) {// Initial mount 首次挂载时 container 上自然没有绑定过 _reactRootContainer// 接着就是根据传入的 container 创建 ReactRoot 并顺便绑定到 container 上,// 这个 ReactRoot 对象中的 _internalRoot 是一个 FiberRoot。root = container._reactRootContainer = legacyCreateRootFromDOMContainer(container,forceHydrate,);if (typeof callback === 'function') {const originalCallback = callback;callback = function() {const instance = DOMRenderer.getPublicRootInstance(root._internalRoot);originalCallback.call(instance);};}// Initial mount should not be batched.// 首次渲染不需要所谓的批量更新DOMRenderer.unbatchedUpdates(() => {if (parentComponent != null) {root.legacy_renderSubtreeIntoContainer(parentComponent,children,callback,);} else {// 一般来说 parentComponnent 就是 null,所以会走到这里提交更新root.render(children, callback); // 具体见后面的代码块}});} else {// 下次更新,除了不再放入 DOMRenderer.unbatchedUpdates 回调中执行,其他和首次渲染一样// 略}return DOMRenderer.getPublicRootInstance(root._internalRoot);
}
function legacyCreateRootFromDOMContainer(container: DOMContainer,forceHydrate: boolean,
): Root {// 内部通过判断传入的 root 节点是否有子节点来决定是否进行调和。// 非服务端的话,不涉及 hydrate 调和,接下来就是清空传入的 root dom 下面的子节点,因为接来下 react 要挂载自己的 dom 到 root 上。const shouldHydrate =forceHydrate || shouldHydrateDueToLegacyHeuristic(container);// First clear any existing content. // 清空 container dom 下的子节点if (!shouldHydrate) {let warned = false;let rootSibling;while ((rootSibling = container.lastChild)) {container.removeChild(rootSibling);}}// Legacy roots are not async by default.const isConcurrent = false;// return new ReactRoot(container, isConcurrent, shouldHydrate);
}
ReactRoot 是外层包裹,里面的 _internalRoot 才是 FiberRoot:
function ReactRoot(container: Container,isConcurrent: boolean,hydrate: boolean,
) {const root = DOMRenderer.createContainer(container, isConcurrent, hydrate);this._internalRoot = root;
}
react-reconciler 包下,创建 FiberRoot:
export function createContainer(containerInfo: Container,isConcurrent: boolean,hydrate: boolean,
): OpaqueRoot {return createFiberRoot(containerInfo, isConcurrent, hydrate);
}
在前面的 legacyRenderSubtreeIntoContainer 中的 root.render(children, callback):
ReactRoot.prototype.render = function(children: ReactNodeList,callback: ?() => mixed,
): Work {const root = this._internalRoot;const work = new ReactWork();callback = callback === undefined ? null : callback;if (callback !== null) {work.then(callback);}DOMRenderer.updateContainer(children, root, null, work._onCommit);return work;
};
DOMRenderer.updateContainer 内部的深层调用。createUpdate() 创建 update 对象,把要更新的 element 添加到 update 上,然后 update 进入更新队列,然后开始调度更新的工作:
function scheduleRootUpdate(current: Fiber,element: ReactNodeList,expirationTime: ExpirationTime,callback: ?Function,
) {const update = createUpdate(expirationTime);// Caution: React DevTools currently depends on this property// being called "element".// 被调用的 element 作为 update 对象的载荷update.payload = {element};callback = callback === undefined ? null : callback;if (callback !== null) {warningWithoutStack(typeof callback === 'function','render(...): Expected the last optional `callback` argument to be a ' +'function. Instead received: %s.',callback,);update.callback = callback;}// 把 update 加入更新队列enqueueUpdate(current, update);// 开始调用更新scheduleWork(current, expirationTime);return expirationTime;
}
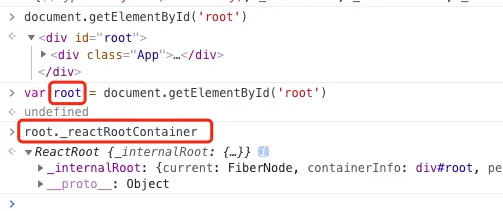
在 ReactRoot 中会创建 FiberRoot 然后赋值到 this._internalRoot ,this 就是指 ReactRoot 实例。然后顺便把内部创建出来的 ReactRoot 对象绑定到最初传入的 root dom 节点(通常是个div)的 _reactRootContainer 属性上,见下图:
在 React 17中 ReactDOM.render() 不再能够用来 hydrate 调和服务端渲染的 container,会被废弃。有此需求应直接使用 ReactDOM.hydrate() 。
Using ReactDOM.render() to hydrate a server-rendered container is deprecated and will be removed in React 17. Use hydrate() instead.
2. FiberRoot
Fiber 解决了单线程计算量过大时交互、动画卡顿的问题,常说的 “虚拟DOM” 就是指 Fiber 树。
FiberRoot:
- 整个应用的起点
- 包含应用挂载的目标节点
- 记录整个应用更新过程的各种信息
React.createElement() 创建出 ReactElement 节点,组成 element 树, 每一个的 element 也都有对应的 Fiber 节点,组成 Fiber 树。
**FiberRoot **中的一些属性:
- containerInfo: root 节点,即 ReactDOM.render() 方法接收到的第二个参数。
- current:记录了当前入口 dom 节点所对应的 Fiber 节点,即 RootFiber(涉及到双缓存/双buff/double-buff 机制)。
- finishedWork:一次更新渲染过程中完成了的那个更新任务。更新完成之后读取该属性,渲染至 dom 上。
- nextExpirationTimeToWorkOn:下次更新时要执行的那个任务,react 会遍历 fiber 树,读取每个 fiber 节点上的 ExpirationTIme,在 FiberRoot 上用该属性记录最高优先级的那个任务。
- expirationTime: 当前更新对应的过期时间。
- nextScheduledRoot 存在多个 root 挂载点时,会有多个 FiberRoot,而这些 FiberRoot 会组成单向链表,因此该属性就是指向链表中下一个 root 节点的“指针”。这个属性,也体现了,为什么在入口 dom 节点所对应的 Fiber 节点上,还需要一层结构,即 FiberRoot。
3. Fiber
- 每一个 ReactElement 对应一个 Fiber 对象。
- Fiber 对象上记录了节点的各种状态,包括 state 和 props。Fiber 更新完成之后,state 和 props 才被更新到 class 组件的 this 上,也为 hooks 的实现提供了根基,因为状态并不是靠 function 函数本身来维持的。
- 串联整个应用形成树结构。
Fiber 树遍历时根据 child、sibling、return(parent),Fiber 部分属性如下:
- tag: 标记不同的组件类型
- elementType: ReactElement.type,也就是我们调用
createElement()的第一个参数。 - stateNode:记录组件实例,如 class 组件的实例、原生 dom 实例,而 function 组件没有实例,因此该属性是空。如 state、props 等状态完成更新任务后,react 会通过该属性,更新组件实例。需要强调的是,RootFiber 的
stateNode属性指向 FiberRoot,和 FiberRoot 上的current属性相呼应。 - penndingProps: 新的 props
- memorizedProps: 老的 props(上次渲染完成之后的 props)
- memorizedState:老的 state(上次渲染完成之后的 state)
- updateQueue: 该 Fiber 对应的组件产生的 update 会存放于该队列(类似于单向链表)中。该过程产出的新的 state 会用来更新 memorizedState。
- expirationTime: 代表任务在未来的哪个时间点应该被完成,不包括他的子树产生的任务。
- childExpirationTime: 子树中优先级最高的过期时间,即最先的过期时间,用于快速确定子树中是否有不在等待的变化。
- alternate: 在 Fiber 树每次更新时,每个 FIber 都会有一个与其对应的 Fiber,称为“current <--> workInProgress”。React 应用的根节点(FiberRoot)通过 current 指针在不同 Fiber 树间进行切换,从而两个 Fiber 树轮流复用(双缓存机制),而不是每次更新都创建新的 Fiber 树。其中很多 workInProgress fiber 的创建可以复用 current Fiber 树对应的节点数据(因为每个 Fiber 节点都有 alternate 指向对应的节点),这个决定是否复用 current Fiber 树对应节点数据的过程就是 Diff 算法。
- mode: 用来描述当前 Fiber 和其子树的模式(后面会提到)
// Effect 系列
- effectTag: SideEffectTag。用来记录 SideEffect。
- nextEffect: Fiber | null。单链表用来快速查找下一个side effect。
- firstEffect: Fiber | null。 子树中第一个side effect。
- lastEffect: Fiber | null。子树中最后一个side effect。
TODO: 补一张 Fiber 树图。
Fiber.tag
export type WorkTag =| 0| 1| 2| 3| 4| 5| 6| 7| 8| 9| 10| 11| 12| 13| 14| 15| 16| 17| 18;export const FunctionComponent = 0;
export const ClassComponent = 1;
export const IndeterminateComponent = 2; // Before we know whether it is function or class
export const HostRoot = 3; // Root of a host tree. Could be nested inside another node.
export const HostPortal = 4; // A subtree. Could be an entry point to a different renderer.
export const HostComponent = 5;
export const HostText = 6;
export const Fragment = 7;
export const Mode = 8;
export const ContextConsumer = 9;
export const ContextProvider = 10;
export const ForwardRef = 11;
export const Profiler = 12;
export const SuspenseComponent = 13;
export const MemoComponent = 14;
export const SimpleMemoComponent = 15;
export const LazyComponent = 16;
export const IncompleteClassComponent = 17;
4. update 和 updateQueue
Update:
- 用于记录组件状态的改变
- 存放于 UpdateQueue 中
- 多个 Update 可以同时存在(因为放在队列中)
export type Update<State> = {// 更新的过期时间expirationTime: ExpirationTime,// export const UpdateState = 0;// export const ReplaceState = 1;// export const ForceUpdate = 2;// export const CaptureUpdate = 3;// 指定更新的类型,值为以上几种tag: 0 | 1 | 2 | 3,// 更新内容,比如`setState`接收的第一个参数payload: any,// 对应的回调,`setState`,`render`都有callback: (() => mixed) | null,// 指向下一个更新next: Update<State> | null,// 指向下一个`side effect`nextEffect: Update<State> | null,
};export type UpdateQueue<State> = {// 每次操作完更新之后的`state`baseState: State,// 队列中的第一个`Update`firstUpdate: Update<State> | null,// 队列中的最后一个`Update`lastUpdate: Update<State> | null,// 第一个捕获类型的`Update`firstCapturedUpdate: Update<State> | null,// 最后一个捕获类型的`Update`lastCapturedUpdate: Update<State> | null,// 第一个`side effect`firstEffect: Update<State> | null,// 最后一个`side effect`lastEffect: Update<State> | null,// 第一个和最后一个捕获产生的`side effect`firstCapturedEffect: Update<State> | null,lastCapturedEffect: Update<State> | null,
};
Update:
- expirationTime: 更新的过期时间。
- payload:首次渲染 payload 是整个 element 树,而后续如 setState 触发更新,则 payload 是 setState 传入的参数,即 state 对象或者函数。
- tag: 0 | 1 | 2 | 3 指定更新的类型,值为:UpdateState | ReplaceState | ForceUpdate | CaptureUpdate)
- callback: 对应的回调,
setState或者render都有。 - next: 指向下一个更新。
- nextEffect: 指向下一个 side effect。
UpdateQueue:
- baseState:每次操作完更新之后的 state,作为下次更新 state 时的计算依据。
- firstUpdate: 更新队列中第一个 Update
- lastUpdate: 更新队列中最后一个 Update
- firstCapturedUpdate
- lastCapturedUpdate
- firstEffect
- lastEffect
- firstCapturedEffect
- lastCapturedEffect
上面说过 ReatDOM.render() 时创建 Update 并添加到 UpdateQueue 中。enqueueUpdate() (位于 react-reconciler/ReactUpdateQueue.js)用于初始化 Fiber 对象上的 updateQueue,以及如果已经存在时则更新这个队列。在此过程中,保持双 Fiber 的 updateQueue 的首尾 queue 一致。
enqueueUpdate() :
export function enqueueUpdate<State>(fiber: Fiber, update: Update<State>) {// Update queues are created lazily.const alternate = fiber.alternate;let queue1;let queue2;// 创建或更新队列,若两个队列都不存在,则各自创建一个队列;// 若其中一个队列存在时,则 clone 出另一个队列,会共享三个属性:baseState、firstUpdate、lastUpdateif (alternate === null) {// There's only one fiber.queue1 = fiber.updateQueue;queue2 = null;if (queue1 === null) {queue1 = fiber.updateQueue = createUpdateQueue(fiber.memoizedState);}} else {// There are two owners.queue1 = fiber.updateQueue;queue2 = alternate.updateQueue;if (queue1 === null) {if (queue2 === null) {// Neither fiber has an update queue. Create new ones.queue1 = fiber.updateQueue = createUpdateQueue(fiber.memoizedState);queue2 = alternate.updateQueue = createUpdateQueue(alternate.memoizedState,);} else {// Only one fiber has an update queue. Clone to create a new one.queue1 = fiber.updateQueue = cloneUpdateQueue(queue2);}} else {if (queue2 === null) {// Only one fiber has an update queue. Clone to create a new one.queue2 = alternate.updateQueue = cloneUpdateQueue(queue1);} else {// Both owners have an update queue.}}}// 2. 调用 appendUpdateToQueue() 将 update 添加到队列链表中if (queue2 === null || queue1 === queue2) {// There's only a single queue.appendUpdateToQueue(queue1, update);} else {// There are two queues. We need to append the update to both queues,// while accounting for the persistent structure of the list — we don't// want the same update to be added multiple times.if (queue1.lastUpdate === null || queue2.lastUpdate === null) {// One of the queues is not empty. We must add the update to both queues.appendUpdateToQueue(queue1, update);appendUpdateToQueue(queue2, update);} else {// Both queues are non-empty. The last update is the same in both lists,// because of structural sharing. So, only append to one of the lists.appendUpdateToQueue(queue1, update);// But we still need to update the `lastUpdate` pointer of queue2.queue2.lastUpdate = update;}}
}
appendUpdateToQueue() ,UpdateQueue 显然是一个基于链表的队列,看情况更新首尾指针即可:
function appendUpdateToQueue<State>(queue: UpdateQueue<State>,update: Update<State>,
) {// Append the update to the end of the list.if (queue.lastUpdate === null) {// Queue is emptyqueue.firstUpdate = queue.lastUpdate = update;} else {queue.lastUpdate.next = update;queue.lastUpdate = update;}
}
cloneUpdateQueue :
function cloneUpdateQueue<State>(currentQueue: UpdateQueue<State>,
): UpdateQueue<State> {const queue: UpdateQueue<State> = {// 克隆队列时这三个属性是共享的baseState: currentQueue.baseState,firstUpdate: currentQueue.firstUpdate,lastUpdate: currentQueue.lastUpdate,// TODO: With resuming, if we bail out and resuse the child tree, we should// keep these effects.firstCapturedUpdate: null,lastCapturedUpdate: null,firstEffect: null,lastEffect: null,firstCapturedEffect: null,lastCapturedEffect: null,};return queue;
}
5. ExpirationTime
尤其对于异步任务来说,过期时间是某个更新任务告诉 react 在过期时间未到之前,自己可以被打断。但如果过期时间已经到了,而更新任务依旧未得到执行,则会被强制执行。
- currentTime:简单理解当前时间距 JS 加载完成时的时间
- 在一次渲染中产生的更新需要使用相同的时间
- 一次批处理的更新应该得到相同的时间
- 挂起任务用于记录的时候应该相同
- expirationTime:过期时间
react-reconciler/ReactFiberReconciler.js
updateContainer() :
export function updateContainer(element: ReactNodeList,container: OpaqueRoot,parentComponent: ?React$Component<any, any>,callback: ?Function,
): ExpirationTime {const current = container.current;// 获取 currentTimeconst currentTime = requestCurrentTime();// 根据 currentTime 计算过期时间(其实并不是直接计算,而是先调用)const expirationTime = computeExpirationForFiber(currentTime, current);// 然后就是上面刚刚说过的创建 update 和 updateQueue 的过程return updateContainerAtExpirationTime(element,container,parentComponent,expirationTime,callback,);
}
requestCurrentTime() :
同一事件中的两个更新计划应被处理为同时发生,即使它们的时钟时间必然有先有后。因为 expirationTime 决定了如何处理批量更新,所以这里出于性能考虑,在同一事件中,类似优先级的更新任务会得到相同的 currentTime,从而后面计算出相同的 expirationTime,这些任务在某一时刻同时更新,避免短期内多次频繁更新崩溃:
function requestCurrentTime() {// requestCurrentTime is called by the scheduler to compute an expiration// time.//// Expiration times are computed by adding to the current time (the start// time). However, if two updates are scheduled within the same event, we// should treat their start times as simultaneous, even if the actual clock// time has advanced between the first and second call.// In other words, because expiration times determine how updates are batched,// we want all updates of like priority that occur within the same event to// receive the same expiration time. Otherwise we get tearing.//// We keep track of two separate times: the current "renderer" time and the// current "scheduler" time. The renderer time can be updated whenever; it// only exists to minimize the calls performance.now.//// But the scheduler time can only be updated if there's no pending work, or// if we know for certain that we're not in the middle of an event.if (isRendering) {// We're already rendering. Return the most recently read time.return currentSchedulerTime;}// Check if there's pending work.findHighestPriorityRoot();if (nextFlushedExpirationTime === NoWork ||nextFlushedExpirationTime === Never) {// If there's no pending work, or if the pending work is offscreen, we can// read the current time without risk of tearing.recomputeCurrentRendererTime();currentSchedulerTime = currentRendererTime;return currentSchedulerTime;}// There's already pending work. We might be in the middle of a browser// event. If we were to read the current time, it could cause multiple updates// within the same event to receive different expiration times, leading to// tearing. Return the last read time. During the next idle callback, the// time will be updated.return currentSchedulerTime;
}
computeExpirationForFiber() 方法更多信息下一小节再说,其中涉及到的 expirationTime 计算过程:
/*** Copyright (c) Facebook, Inc. and its affiliates.** This source code is licensed under the MIT license found in the* LICENSE file in the root directory of this source tree.** @flow*/import MAX_SIGNED_31_BIT_INT from './maxSigned31BitInt';export type ExpirationTime = number;export const NoWork = 0;
export const Sync = 1;
export const Never = MAX_SIGNED_31_BIT_INT;const UNIT_SIZE = 10;
const MAGIC_NUMBER_OFFSET = 2;// 1 unit of expiration time represents 10ms.
export function msToExpirationTime(ms: number): ExpirationTime {// Always add an offset so that we don't clash with the magic number for NoWork.return ((ms / UNIT_SIZE) | 0) + MAGIC_NUMBER_OFFSET;
}export function expirationTimeToMs(expirationTime: ExpirationTime): number {return (expirationTime - MAGIC_NUMBER_OFFSET) * UNIT_SIZE;
}function ceiling(num: number, precision: number): number {return (((num / precision) | 0) + 1) * precision;
}function computeExpirationBucket(currentTime,expirationInMs,bucketSizeMs,
): ExpirationTime {return (MAGIC_NUMBER_OFFSET +ceiling(currentTime - MAGIC_NUMBER_OFFSET + expirationInMs / UNIT_SIZE,bucketSizeMs / UNIT_SIZE,));
}export const LOW_PRIORITY_EXPIRATION = 5000;
export const LOW_PRIORITY_BATCH_SIZE = 250;export function computeAsyncExpiration(currentTime: ExpirationTime,
): ExpirationTime {return computeExpirationBucket(currentTime,LOW_PRIORITY_EXPIRATION,LOW_PRIORITY_BATCH_SIZE,);
}// We intentionally set a higher expiration time for interactive updates in
// dev than in production.
//
// If the main thread is being blocked so long that you hit the expiration,
// it's a problem that could be solved with better scheduling.
//
// People will be more likely to notice this and fix it with the long
// expiration time in development.
//
// In production we opt for better UX at the risk of masking scheduling
// problems, by expiring fast.
export const HIGH_PRIORITY_EXPIRATION = __DEV__ ? 500 : 150;
export const HIGH_PRIORITY_BATCH_SIZE = 100;export function computeInteractiveExpiration(currentTime: ExpirationTime) {return computeExpirationBucket(currentTime,HIGH_PRIORITY_EXPIRATION,HIGH_PRIORITY_BATCH_SIZE,);
}
过期时间 = 当前时间 + 延迟
延迟的时间长度如下(ms):
export const HIGH_PRIORITY_EXPIRATION = __DEV__ ? 500 : 150; // 高优先级任务的过期时间基础偏移量
export const HIGH_PRIORITY_BATCH_SIZE = 100;export const LOW_PRIORITY_EXPIRATION = 5000; // 高优先级任务的过期时间基础偏移量
export const LOW_PRIORITY_BATCH_SIZE = 250;
最终计算出的 expirationTime 的精度是 10ms(高优先级) 或者 25ms(低优先级),即 expirationTime 会是 10 或者 25 的整数倍。
bucketSIzeMs / UNIT_SIZE 精度在这里的意义:
如果在一个操作内多次调用了 setState,即便前后调用的时间差距可能很小,但毫秒级别还是有差距,那么计算出的 expirationTime 也就不一样,任务优先级也就不一样,导致 react 更新多次,导致整个应用性能下降。
而有了 精度/粒度 的控制,使得非常详尽的两次更新,即使具有微小的 currentTime 差异,也会得到相同的 expirationTime,从而到时候在一次更新中一起完成(批量更新)。
currentTime 和 expirationTime 在各自计算过程中,为了性能都在**保证在一个批量更新中产生的同类型的更新,应具有相同的过期时间。 **否则全部用当前时间加上固定的延迟作为未来的过期时间就用不着计算这么麻烦了。
6. 不同的 ExpirationTime
-
NoWork: 代表没有更新 -
Sync: 代表同步执行,不会被调度也不会被打断 -
async: 异步模式下计算出来的过期时间,一个时间戳,会被调度,同时还可能被打断
export const NoWork = 0;
export const Sync = 1;
export const Never = MAX_SIGNED_31_BIT_INT;
上一小节中提到,得到 currentTime 后,会调用 computeExpirationForFiber() 然后返回 expirationTime,还涉及到过期时间的复杂的计算公式,但有些过期时间的计算其实不需要调用计算公式:
比如后面提到的 flushSync 中把 expirationContext 改为 Sync,直接进入下面第一个条件判断,最终得到的过期时间直接就是 Sync,也就是 0ms:
function computeExpirationForFiber(currentTime: ExpirationTime, fiber: Fiber) {let expirationTime;if (expirationContext !== NoWork) {// An explicit expiration context was set;expirationTime = expirationContext;} else if (isWorking) {if (isCommitting) {// Updates that occur during the commit phase should have sync priority// by default.expirationTime = Sync;} else {// Updates during the render phase should expire at the same time as// the work that is being rendered.expirationTime = nextRenderExpirationTime;}} else {// No explicit expiration context was set, and we're not currently// performing work. Calculate a new expiration time.if (fiber.mode & ConcurrentMode) {if (isBatchingInteractiveUpdates) {// This is an interactive updateexpirationTime = computeInteractiveExpiration(currentTime);} else {// This is an async updateexpirationTime = computeAsyncExpiration(currentTime);}// If we're in the middle of rendering a tree, do not update at the same// expiration time that is already rendering.if (nextRoot !== null && expirationTime === nextRenderExpirationTime) {expirationTime += 1;}} else {// This is a sync updateexpirationTime = Sync;}}if (isBatchingInteractiveUpdates) {// This is an interactive update. Keep track of the lowest pending// interactive expiration time. This allows us to synchronously flush// all interactive updates when needed.if (expirationTime > lowestPriorityPendingInteractiveExpirationTime) {lowestPriorityPendingInteractiveExpirationTime = expirationTime;}}return expirationTime;
}
- 通过外部来强制某一个更新必须使用哪一种 expirationTime(指定 expirationContext):
比如使用 ReactDOM.flushSync() (该方法实际存在于 react-reconciler/ReactFiberScheduler.js 中) 可以指定 expirationTime 为 1ms,意味着同步更新:
import { flushSync } from 'react-dom';
// ...handleClick = () => {flushSync(() => {this.setState({ text: '666' });});};
// ...
let expirationContext: ExpirationTime = NoWork;// ...function flushSync<A, R>(fn: (a: A) => R, a: A): R {const previousIsBatchingUpdates = isBatchingUpdates;isBatchingUpdates = true;try {return syncUpdates(fn, a);} finally {isBatchingUpdates = previousIsBatchingUpdates;performSyncWork();}
}function syncUpdates<A, B, C0, D, R>(fn: (A, B, C0, D) => R,a: A,b: B,c: C0,d: D,
): R {const previousExpirationContext = expirationContext;expirationContext = Sync; // 设置为 1try {return fn(a, b, c, d); // 传入 flushSync 的回调函数在这里被执行} finally {expirationContext = previousExpirationContext; // 把 expirationContext 恢复成 NoWork}
}
- isWorking/isCommitting,即有任务更新的时候:
同样也不需要什么计算公式。具体留待后面涉及更新的时候再说。
- 处于 ConcurrentMode 模式下才需要异步更新,即需要用到计算公式:
对于大部分的 react 事件系统产生的更新,这里的 isBatchingInteractiveUpdates 会是 true ,也就是高优先级的任务,过期时间会更短。
if (fiber.mode & ConcurrentMode) {// 大部分的 react 事件产生的更新中 isBatchingInteractiveUpdates 会是 true ,// 也就是高优先级的任务,过期时间会更短。if (isBatchingInteractiveUpdates) {expirationTime = computeInteractiveExpiration(currentTime);} else {expirationTime = computeAsyncExpiration(currentTime);}// 正在渲染树时,新加入的更新的过期时间+1 以遍不会和当前更新一起更新。后续讲更新时再细说if (nextRoot !== null && expirationTime === nextRenderExpirationTime) {expirationTime += 1;}} else {expirationTime = Sync;}
至于 fiber.mode & ConcurrentMode 这种按位操作的表达式,其实就是使用位运算进行属性的读写。
使用一个若干位的二进制数表达(存储)若干个布尔属性,设置属性使用按位异或 ^ ,查询属性使用按位与 & 。
Fiber 上的 mode:
export type TypeOfMode = number;export const NoContext = 0b000;
export const ConcurrentMode = 0b001;
export const StrictMode = 0b010;
export const ProfileMode = 0b100;
7. setState 和 forceUpdate
在 react 中能合理产生更新的方式,同时也是 react 推崇的方式有以下几种:
- ReactDOM.render() 首次渲染
- setState(class 组件)
- forceUpdate (class 组件)这个其实也很少使用
- useState (函数式组件中的 hooks)
ReactDOM.render 创建的更新是放在 RootFiber 上面,是整体的初始化渲染。
是针对setState 和 forceUpdate 是为节点的 Fiber 创建更新,是针对某一个 class component 而言。
和之前的 ReactDOM.render() 内部会调用的 updateContaine() 方法很像,在 enqueueSetState() 和 enqueueForceUpdate() 中:
- 拿到 fiber,得到 currentTime,一起作为
computeExpirationForFibe()的参数算出 expirationTime。 - 然后创建 update 对象,然后
enqueueUpdate()时看情况创建或更新队列,然后进行调度。
如之前说的,update 对象上的 payload 载荷在 ReactDOM.render 时是 element 树,而在 setState 或 forceUpdate 时是传入的新的 state 对象(可能是局部的 state 对象)。
forceUpdate 和 setState 进行 enqueue 时唯一不同点在于 forceUpdate 所创建的 update 对象上的 tag 会是 ForceUpdate 而不是默认的 UpdateState 。
react-reconciler/src/ReactFiberClassComponent.js 中:
const classComponentUpdater = {isMounted,enqueueSetState(inst, payload, callback) {const fiber = ReactInstanceMap.get(inst);const currentTime = requestCurrentTime();const expirationTime = computeExpirationForFiber(currentTime, fiber);const update = createUpdate(expirationTime);update.payload = payload;if (callback !== undefined && callback !== null) {if (__DEV__) {warnOnInvalidCallback(callback, 'setState');}update.callback = callback;}enqueueUpdate(fiber, update);scheduleWork(fiber, expirationTime);},enqueueReplaceState(inst, payload, callback) {const fiber = ReactInstanceMap.get(inst);const currentTime = requestCurrentTime();const expirationTime = computeExpirationForFiber(currentTime, fiber);const update = createUpdate(expirationTime);update.tag = ReplaceState;update.payload = payload;if (callback !== undefined && callback !== null) {if (__DEV__) {warnOnInvalidCallback(callback, 'replaceState');}update.callback = callback;}enqueueUpdate(fiber, update);scheduleWork(fiber, expirationTime);},enqueueForceUpdate(inst, callback) {const fiber = ReactInstanceMap.get(inst);const currentTime = requestCurrentTime();const expirationTime = computeExpirationForFiber(currentTime, fiber);const update = createUpdate(expirationTime);update.tag = ForceUpdate;if (callback !== undefined && callback !== null) {if (__DEV__) {warnOnInvalidCallback(callback, 'forceUpdate');}update.callback = callback;}enqueueUpdate(fiber, update);scheduleWork(fiber, expirationTime);},
};
可见,在 react 中创建更新的过程基本一样,。而更多的技术细节会在整体的 Scheduler 调度方面。
ReactDOM.render/setState/forceUpdate 最终都会创建 update 对象,挂载 payload 载荷,并添加到各自 Fiber 节点上的 updateQueue 中,然后即将进入下一环节,开始 scheduleWork 即调度工作。
下一篇就来分析创建更新队列之后,react 如何进行统一调度。

喜欢的朋友记得点赞、收藏、关注哦!!!
相关文章:
React源码03 - React 中的更新
03 - React 中的更新 React 中创建更新的方式: 初次渲染:ReactDOM.render、ReactDOM.hydrate 后续更新:setState、forceUpdate 1. ReactDOM.render() 先创建 ReactRoot 顶点对象然后创建 FiberRoot 和 RootFiber创建更新,使应用进…...
)
【Hive实战】Hive MetaStore升级调研(Mysql)
Hive MetaStore升级调研(Mysql库) 文章目录 Hive MetaStore升级调研(Mysql库)升级步骤脚本说明原文 MetaStore升级的主要部分是对存储媒介mysql进行schema进行升级。 升级步骤 关闭MetaStore实例并限制对MetaStore MySQL数据库的访…...

优化漏洞扫描流程以保障企业数字化业务安全
漏洞扫描技术历经二十余年发展,已从人工搜索演进至开源及商业扫描平台,其应用紧随IT环境与数字业务变迁而不断革新。为有效提升漏洞检测效果,确保企业数字化业务安全运行,安全专家建议遵循以下关键步骤实施漏洞扫描: …...

【大数据算法】一文掌握大数据算法之:大数据算法分析技术。
大数据算法分析技术 1、引言2、 大数据分析技术2.1 时间/空间复杂度2.2 I/O 复杂度2.3 结果质量2.4 通信复杂度 3、总结 1、引言 小屌丝:鱼哥,最近更文有些不频繁了哈。 小鱼:这一个月不见,你这说话方式也变了。 小屌丝ÿ…...

使用AITemplate和AMD GPU的高效图像生成:结合Stable Diffusion模型
Efficient image generation with Stable Diffusion models and AITemplate using AMD GPUs 2024年1月24日,作者是[Douglas Jia] Stable Diffusion 已成为图像生成领域的突破性进展,帮助用户将文本描述转化为引人入胜的视觉输出。 Stable Diffusion 的…...

基于yolov10的驾驶员抽烟打电话安全带检测系统python源码+pytorch模型+评估指标曲线+精美GUI界面
【算法介绍】 基于YOLOv10的驾驶员抽烟、打电话、安全带检测系统是一种先进的驾驶行为监测系统。该系统利用YOLOv10算法的高效性和准确性,实现对驾驶员行为的实时检测与识别。 YOLOv10是一种最新的实时物体检测模型,其通过深度学习技术,如卷…...

虚拟机网络设置为桥接模式
1、打开VMware Workstation Pro,点击“虚拟机—设置”,进入虚拟机设置页面 2、点击“网络适配器”,网络连接选择桥接模式 3、点击“编辑—虚拟网络编辑器”,进入虚拟网络编辑器页面 4、选择桥接模式,并选择要桥接到的…...

Numpy基础02
目录 1.数组操作 1.1改变维度 1.2遍历数组 1.2.1nditer(array,order) 1.2.1.1flags 参数 1.2.1.2op_flags 参数 1.3平展数组 1.3.1flatten(orderC) 1.3.2ravel() 1.4数组转置 1.4.1transpose() 1.4.2T 1.5分割数组 1.5.1hsplit(arr,indices_or_section) 1.5.2vsp…...

Elasticsearch是做什么的?
初识elasticsearch 官方网站:Elasticsearch:官方分布式搜索和分析引擎 | Elastic Elasticsearch是做什么的? Elasticsearch 是一个分布式搜索和分析引擎,专门用于处理大规模数据的实时搜索、分析和存储。它基于 Apache Lucene …...

Java中消息队列
MQ是Message Queue的缩写,也就是消息队列的意思,它是一种应用程序对应用程序的通信方法,使得应用程序能够通过读写出入列队的消息来进行通信,而无需要使用专用的连接来链接它们。消息队列中间件是分布式系统中重要的组件ÿ…...

高频面试手撕
手撕高频结构 前言 以下内容,都是博主在秋招面试中,遇到的面试手撕代码题目,不同于算法题目,更多考察的是基础知识,包含常见的数据结构比如线性表、哈希表、优先级队列等,还有多线程以及数据库连接池等内…...

Spring Boot 3.3 【八】整合实现高可用 Redis 集群
一、引言 在当今快速发展的软件开发领域,系统的性能和可靠性至关重要。Springboot 3 整合 Redis 7 集群具有多方面的重大意义。 首先,随着业务的不断发展,数据量呈爆炸式增长,单个 Redis 服务器往往难以满足存储和处理需求。Red…...

循环控制结构穷举 同构数
说明 同构数是会出现在它的平方的右边的数。例如,5就是1个同构数。5的平方是25,25最右边的这个数是5自己。25也是一个同构数,比如25的平方是625,而625右边的数是25. 请编程输出1000以内正整数中所有的同构数。每行一个答案。 输…...

主机本地IP与公网IP以及虚拟机的适配器和WSL发行版的IP
在局域网内,如果你想要连接到同一网络中的另一台设备,建议使用 本地 IP 地址(也称为局域网 IP 地址)。这是因为本地 IP 地址是在局域网内分配给设备的,用于在同一网络中的设备之间进行通信。 使用本地 IP 地址的好处 …...

@MassageMapping和@SendTo注解详解
MessageMapping注解是Spring Framework中用于WebSocket消息处理的注解,它用于将特定的消息路径映射到处理器方法上。SendTo注解指定了相应消息应该被发送到的目的地路径。 一、WebSocket配置类: Configuration EnableWebSocketMessageBroker public cl…...

2.1_Linux发展与基础
Linux基础知识 Shell 命令执行环境: 命令提示符的组成:(用户名主机名)-[当前路径]权限提示符,例:(kali㉿kali)-[~]$ ~ 表示所在目录为家目录:其中root用户的家目录是/root,普通用户的家目录在/home下 # 表示用户的权…...

c#子控件拖动父控件方法及父控件限在窗体内拖动
一、效果 拖放位置不超过窗体四边,超出后自动靠边停靠支持多子控件拖动指定控件拖放(含父控件或窗体)点击左上角logo弹出消息窗口(默认位置右下角)1.1 效果展示 1.2 关于MQTTnet(最新版v4.3.7.1207)实现在线客服功能,见下篇博文 https://github.com/dotnet/MQTTnet 网上…...

Redis --- 第八讲 --- 关于主从复制哨兵
主从复制的补充问题 从节点和主节点之间断开连接,有两种情况: 1、从节点和主节点断开连接 slaveof no one 命令。这个时候,从节点就能能够晋升成主节点。意味着我们程序员要主动修改redis的组成结构。, 2、主节点挂了 这个时…...
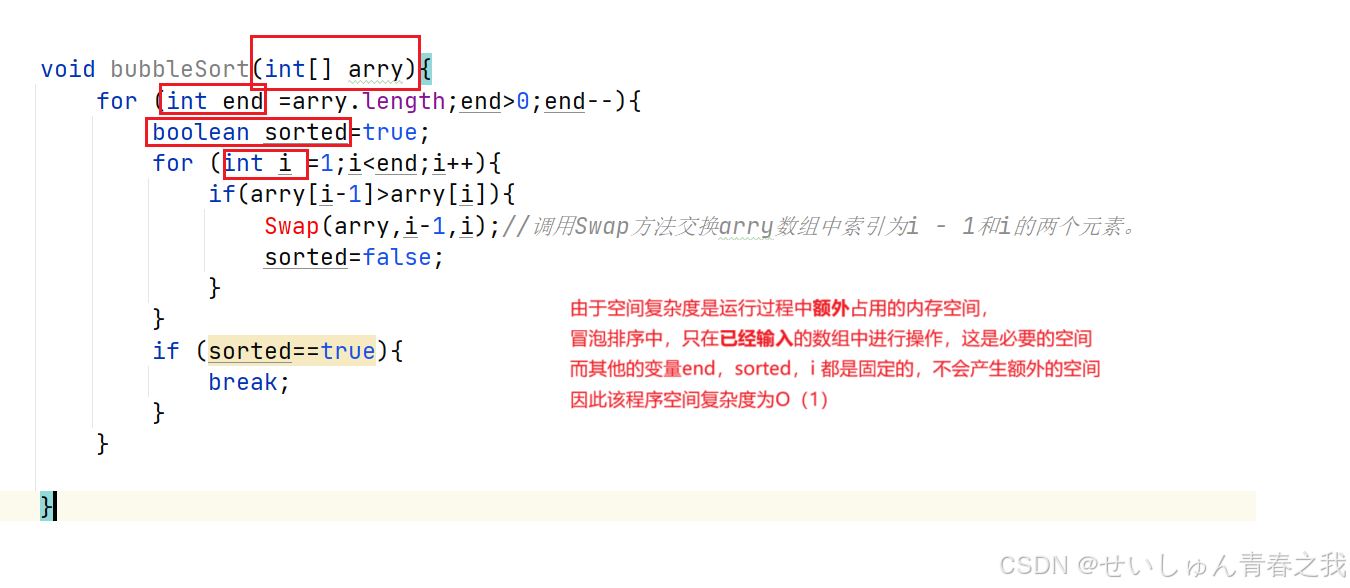
【数据结构】时间和空间复杂度-Java
如何衡量算法的好坏 根据时间复杂度和空间复杂度来判断 比较项目时间复杂度空间复杂度定义衡量算法执行时间与问题规模之间的关系衡量算法在运行过程中所占用的额外存储空间与问题规模之间的关系表达方式通常用大O符号表示,如O(n)、O(n^2&am…...

tensorRT安装详解(linux与windows)
目录 tensorRT介绍 前置准备 安装cuda与cudnn linux windows cuda版本查看 下载安装包 linux安装 安装 安装验证 windows安装 安装 环境变量配置 安装验证 tensorRT介绍 有关tensorRT的介绍见 TensorRT简介-CSDN博客 前置准备 安装cuda与cudnn linux Linux下…...
)
第二周(第12周)
1.单电源供电的二阶低通滤波器2.功率放大电路...
)
从零到上机:我的第一个Quest 3空间锚点应用是如何跑起来的(附完整Unity工程)
从零到上机:我的第一个Quest 3空间锚点应用是如何跑起来的(附完整Unity工程)第一次戴上Meta Quest 3时,那种虚拟与现实交织的震撼感至今难忘。但作为开发者,更让我着迷的是如何让虚拟物体在真实空间中"记住"…...

打造XBEE封装BLE112蓝牙模块:硬件设计、射频布局与调试全攻略
1. 项目概述:为什么我们需要一个“XBEE格式”的蓝牙模块?在嵌入式开发和物联网项目中,无线通信模块的选择往往决定了项目的成败。对于很多工程师和创客来说,Silicon Labs(芯科科技)的BLE112/113模块是蓝牙4…...

Codex使用API Key授权无法使用插件?
小伙伴们,大家好,我是小溪,见字如面。对于没有ChatGPT账号的小伙伴来说,虽然可以通过API Key授权的方式使用Codex桌面端,但是会有一些限制。比如无法使用插件功能,无法使用Codex移动端进行远程控制等。为了…...

3步快速部署:智能茅台抢购平台的终极自动化解决方案
3步快速部署:智能茅台抢购平台的终极自动化解决方案 【免费下载链接】campus-imaotai i茅台app自动预约,每日自动预约,支持docker一键部署(本项目不提供成品,使用的是已淘汰的算法) 项目地址: https://gi…...

如何快速实现U盘文件自动备份:USBCopyer终极指南
如何快速实现U盘文件自动备份:USBCopyer终极指南 【免费下载链接】USBCopyer 😉 用于在插上U盘后自动按需复制该U盘的文件。”备份&偷U盘文件的神器”(写作USBCopyer,读作USBCopier) 项目地址: https://gitcode.…...

抖音批量下载助手:一键构建你的专属视频素材库
抖音批量下载助手:一键构建你的专属视频素材库 【免费下载链接】douyinhelper 抖音批量下载助手 项目地址: https://gitcode.com/gh_mirrors/do/douyinhelper 还在为手动保存抖音视频而烦恼吗?想要批量获取心仪创作者的精彩内容却无从下手&#x…...

终极Windows风扇控制指南:FanControl让你的电脑安静又高效
终极Windows风扇控制指南:FanControl让你的电脑安静又高效 【免费下载链接】FanControl.Releases This is the release repository for Fan Control, a highly customizable fan controlling software for Windows. 项目地址: https://gitcode.com/GitHub_Trendin…...

Diablo Edit2:3步掌握暗黑破坏神2存档修改的终极秘籍
Diablo Edit2:3步掌握暗黑破坏神2存档修改的终极秘籍 【免费下载链接】diablo_edit Diablo II Character editor. 项目地址: https://gitcode.com/gh_mirrors/di/diablo_edit 还在为暗黑破坏神2中刷装备的漫长过程感到疲惫吗?Diablo Edit2这款免费…...

关于软件版本升级的故事
起因在群里有网友说软件的版本升级比较简单,俺就回了四个字母“PACS”,并补上了一个表情 然后看见开始细说了:一、PACS 属于哪一类?PACS 软件 第二类医疗器械(独立软件)国家药监局分类:Ⅱ 类 2…...