openGauss 6.0.0主备部署(企业版)
openGauss 6.0.0主备部署(企业版)
文章目录
- openGauss 6.0.0主备部署(企业版)
- 一、环境准备
- 1.操作系统环境
- 2.修改主机名
- 3.设置字符集编码
- 4.修改openEuler默认yum源
- 5.安装所需工具
- 6.同步网络时间
- 7.关闭防火墙
- 二、安装openGauss数据库
- 1.创建安装目录并修改其权限为755
- 2.下载安装包到本地
- 3.创建XML配置文件
- 4.预安装
- 5. 安装openGauss
- 三、安装验证
- 1.检查数据库状态
- 2.登录postgres数据库
- 2.1 登录数据库
- 2.2 退出数据库
- 3.启停openGauss
- 3.1 启动openGauss
- 3.2 停止openGauss
一、环境准备
1.操作系统环境
| 项目 | 配置描述 |
|---|---|
| 主节点 | 主机名为primary |
| 备节点 | 主机名为standby |
| CPU | 2核 (主备配置相同) |
| 内存 | 4G ( 主备配置相同) |
| 操作系统 | x86架构 openEuler22.03 ( 主备配置相同) |
2.修改主机名
主节点执行
hostnamectl set-hostname primary# 修改完成后退出重新连接
备节点执行
hostnamectl set-hostname standby# 修改完成后退出重新连接
3.设置字符集编码
主备节点都执行
# 往环境变量配置文件/etc/profile最后添加字符集编码export LANG=en_US.UTF-8
echo -e  "\nexport LANG=en_US.UTF-8" >> /etc/profile# 激活环境变量
source /etc/profile
4.修改openEuler默认yum源
主备节点都执行
# 复制原始yum源文件更名为.copy
cp /etc/yum.repos.d/openEuler.repo /etc/yum.repos.d/openEuler.repo.copy# 将路径更换为华为镜像源
echo "
[osrepo]
name=osrepo
baseurl=https://mirrors.huaweicloud.com/openeuler/openEuler-22.03-LTS-SP2/OS/x86_64/
enabled=1gpgcheck=1
gpgkey=https://mirrors.huaweicloud.com/openeuler/openEuler-22.03-LTS-SP2/OS/x86_64/RPM-GPG-KEY-openEuler
" > /etc/yum.repos.d/openEuler.repo# 去除原有 yum 缓存
yum clean all# 生成新的缓存
yum makecache
5.安装所需工具
主备节点都执行
yum install tar -yyum install libaio* -yyum install expect -yyum install ntpdate -y
6.同步网络时间
主备节点都执行
时间不同步会导致后续预安装报错
如果是虚拟机恢复快照后执行的安装,此处可以直接关机再重启,可以无需执行下述代码
同时可以防止虚拟机IP地址发生变化,在后续执行预安装时报错
ntpdate pool.ntp.org# 同步后使用date命令查看primary和standby时间是否一致,若不一致则再次执行上述同步网络时间命令
date
7.关闭防火墙
主备节点都执行
systemctl disable --now firewalld
二、安装openGauss数据库
1.创建安装目录并修改其权限为755
主备节点都执行
mkdir -p /opt/software/openGausschmod 755 -R /opt/software
2.下载安装包到本地
在主节点执行
# 切换到安装路径
cd /opt/software/openGauss# 下载openGauss安装包到本地
wget https://opengauss.obs.cn-south-1.myhuaweicloud.com/6.0.0/openEuler22.03/x86/openGauss-All-6.0.0-openEuler22.03-x86_64.tar.gz# 解压到当前路径
tar -zxf ./openGauss-All-6.0.0-openEuler22.03-x86_64.tar.gz
# 继续解压OM安装包
tar -zxf ./openGauss-OM-6.0.0-openEuler22.03-x86_64.tar.gz
# 解压后会在/opt/software/openGauss路径下自动生成script子目录,并且在script目录下生成gs_preinstall等各种OM工具脚本
3.创建XML配置文件
在主节点执行
# 切换到存放安装包的目录
cd /opt/software/openGauss# 创建XML配置文件,用于数据库安装
vi cluster_config.xml
往其中输入以下内容
注意:需要将IP地址替换为自己本地的IP地址,IP地址可以使用命令ip a命令查看
<?xml version="1.0" encoding="UTF-8"?>
<ROOT><!-- openGauss整体信息 --><CLUSTER><!-- 数据库名称 --><PARAM name="clusterName" value="dbCluster" /><!-- 数据库节点名称(hostname) --><PARAM name="nodeNames" value="primary,standby" /><!-- 数据库安装目录--><PARAM name="gaussdbAppPath" value="/opt/openGauss/install/app" /><!-- 日志目录--><PARAM name="gaussdbLogPath" value="/var/log/omm" /><!-- 临时文件目录--><PARAM name="tmpMppdbPath" value="/opt/openGauss/tmp"/><!-- 数据库工具目录--><PARAM name="gaussdbToolPath" value="/opt/openGauss/install/om" /><!-- 数据库core文件目录--><PARAM name="corePath" value="/opt/openGauss/corefile"/><!-- 节点IP,与数据库节点名称列表一一对应 --><PARAM name="backIp1s" value="192.168.217.130,192.168.217.131"/></CLUSTER><!-- 每台服务器上的节点部署信息 --><DEVICELIST><!-- 节点1上的部署信息 --><DEVICE sn="primary"><!-- 节点1的主机名称 --><PARAM name="name" value="primary"/><!-- 节点1所在的AZ及AZ优先级 --><PARAM name="azName" value="AZ1"/><PARAM name="azPriority" value="1"/><!-- 节点1的IP,如果服务器只有一个网卡可用,将backIP1和sshIP1配置成同一个IP --><PARAM name="backIp1" value="192.168.217.130"/><PARAM name="sshIp1" value="192.168.217.130"/><!--dn--><PARAM name="dataNum" value="1"/><PARAM name="dataPortBase" value="8000"/><PARAM name="dataNode1" value="/opt/openGauss/install/data/dn,standby,/opt/openGauss/install/data/dn"/><PARAM name="dataNode1_syncNum" value="0"/></DEVICE><!-- 节点2上的节点部署信息,其中“name”的值配置为主机名称 --><DEVICE sn="standby"><!-- 节点2的主机名称 --><PARAM name="name" value="standby"/><!-- 节点2所在的AZ及AZ优先级 --><PARAM name="azName" value="AZ1"/><PARAM name="azPriority" value="1"/><!-- 节点2的IP,如果服务器只有一个网卡可用,将backIP1和sshIP1配置成同一个IP --><PARAM name="backIp1" value="192.168.217.131"/><PARAM name="sshIp1" value="192.168.217.131"/></DEVICE></DEVICELIST>
</ROOT>
4.预安装
在主节点执行
预安装在执行过程中自动创建操作系统root用户互信和omm用户互信
如果预安装失败,请着重检查cluster_config.xml配置文件中是否正确
python3 /opt/software/openGauss/script/gs_preinstall -U omm -G dbgrp -X /opt/software/openGauss/cluster_config.xml
# -U omm 指定用户名
# -G dbgrp 指定组名
# -X /opt/software/openGauss/cluster_config.xml 指定openGauss配置文件路径# ----------- 以下是执行后输出的内容 -----------
Parsing the configuration file.
Successfully parsed the configuration file.
Installing the tools on the local node.
Successfully installed the tools on the local node.
# 下述语句为询问是否为root创建信任,输入yes后回车
Are you sure you want to create trust for root (yes/no)?yes
Please enter password for root
Please enter password for current user[root].
# 输入当前root用户的密码,然后回车
Password:
Checking network information.
All nodes in the network are Normal.
Successfully checked network information.
Creating SSH trust.
Creating the local key file.
Successfully created the local key files.
Appending local ID to authorized_keys.
Successfully appended local ID to authorized_keys.
Updating the known_hosts file.
Successfully updated the known_hosts file.
Appending authorized_key on the remote node.
Successfully appended authorized_key on all remote node.
Checking common authentication file content.
Successfully checked common authentication content.
Distributing SSH trust file to all node.
Distributing trust keys file to all node successfully.
Successfully distributed SSH trust file to all node.
Verifying SSH trust on all hosts.
Verifying SSH trust on all hosts by ip.
Successfully verified SSH trust on all hosts by ip.
Verifying SSH trust on all hosts by hostname.
Successfully verified SSH trust on all hosts by hostname.
Successfully verified SSH trust on all hosts.
Start set cron for root
Successfully to set cron for root
Successfully created SSH trust.
Successfully created SSH trust for the root permission user.
Setting host ip env
Successfully set host ip env.
Distributing package.
Begin to distribute package to tool path.
Successfully distribute package to tool path.
Begin to distribute package to package path.
Successfully distribute package to package path.
Successfully distributed package.
# 下述语句为询问是否创建omm用户并与root互信,输入yes后回车
Are you sure you want to create the user[omm] and create trust for it (yes/no)? yes
Please enter password for cluster user.
# 创建omm密码,然后回车
Password:
Please enter password for cluster user again.
# 再次输入密码,然后回车
Password:
Generate cluster user password files successfully.
Successfully created [omm] user on all nodes.
Preparing SSH service.
Successfully prepared SSH service.
Installing the tools in the cluster.
Successfully installed the tools in the cluster.
Checking hostname mapping.
Successfully checked hostname mapping.
Creating SSH trust for [omm] user.
Please enter password for current user[omm].
# 输入刚刚创建的omm用户的密码
Password:
Checking network information.
All nodes in the network are Normal.
Successfully checked network information.
Creating SSH trust.
Creating the local key file.
Successfully created the local key files.
Appending local ID to authorized_keys.
Successfully appended local ID to authorized_keys.
Updating the known_hosts file.
Successfully updated the known_hosts file.
Appending authorized_key on the remote node.
Successfully appended authorized_key on all remote node.
Checking common authentication file content.
Successfully checked common authentication content.
Distributing SSH trust file to all node.
Distributing trust keys file to all node successfully.
Successfully distributed SSH trust file to all node.
Verifying SSH trust on all hosts.
Verifying SSH trust on all hosts by ip.
Successfully verified SSH trust on all hosts by ip.
Successfully verified SSH trust on all hosts.
Successfully created SSH trust.
Successfully created SSH trust for [omm] user.
Checking OS software.
Successfully check OS software.
Checking OS version.
Successfully checked OS version.
Checking cpu instructions.
Successfully checked cpu instructions.
Creating cluster's path.
Successfully created cluster's path.
Set and check OS parameter.
Setting OS parameters.
Successfully set OS parameters.
Warning: Installation environment contains some warning messages.
Please get more details by "/opt/software/openGauss/script/gs_checkos -i A -h primary,standby -X /opt/software/openGauss/cluster_config.xml --detail".
Set and check OS parameter completed.
Preparing CRON service.
Successfully prepared CRON service.
Setting user environmental variables.
Successfully set user environmental variables.
Setting the dynamic link library.
Successfully set the dynamic link library.
Setting Core file
Successfully set core path.
Setting pssh path
Successfully set pssh path.
Setting Cgroup.
Successfully set Cgroup.
Set ARM Optimization.
No need to set ARM Optimization.
Fixing server package owner.
Setting finish flag.
Successfully set finish flag.
Preinstallation succeeded.
# ----------- 输出结束 -----------# 出现下述内容则预安装成功
Preinstallation succeeded.00:0c:29:6a:66:b5
00:0c:29:6a:66:b5
5. 安装openGauss
在主节点执行
切换为omm用户
su - omm
执行安装
gs_install -X /opt/software/openGauss/cluster_config.xml
# -X /opt/software/openGauss/cluster_config.xml 指定安装所使用的配置文件# ----------- 以下是执行后输出的内容 -----------
Parsing the configuration file.
Successfully checked gs_uninstall on every node.
Check preinstall on every node.
Successfully checked preinstall on every node.
Creating the backup directory.
Successfully created the backup directory.
begin deploy..
Installing the cluster.
begin prepare Install Cluster..
Checking the installation environment on all nodes.
begin install Cluster..
Installing applications on all nodes.
Successfully installed APP.
begin init Instance..
encrypt cipher and rand files for database.
# 加密数据库,需要输入密码,密码需要满足大小写+数字,且不小于8位
Please enter password for database:
# 再次输入密码
Please repeat for database:
begin to create CA cert files
The sslcert will be generated in /opt/openGauss/install/app/share/sslcert
NO cm_server instance, no need to create CA for CM.
Non-dss_ssl_enable, no need to create CA for DSS
Cluster installation is completed.
Configuring.
Deleting instances from all nodes.
Successfully deleted instances from all nodes.
Checking node configuration on all nodes.
Initializing instances on all nodes.
Updating instance configuration on all nodes.
Check consistence of memCheck and coresCheck on database nodes.
Successfully check consistence of memCheck and coresCheck on all nodes.
Configuring pg_hba on all nodes.
Configuration is completed.
The cluster status is Normal.
Successfully started cluster.
Successfully installed application.
end deploy..
# ----------- 输出结束 -----------# 出现下述内容则安装成功
Configuration is completed.
The cluster status is Normal.
Successfully started cluster.
Successfully installed application.
end deploy..
三、安装验证
1.检查数据库状态
在主节点执行
在omm用户下执行下述命令
gs_om -t status --detail
# -t 指定gs_om命令的类型# start 启动openGauss数据库服务# stop  停止openGauss数据库服务# status 查看openGauss数据库服务状态
# --detail 显示详细信息。如果不指定,只提示该服务器是否正常
以下是执行后输出的内容
[   Cluster State   ]cluster_state   : Normal
redistributing  : No
current_az      : AZ_ALL[  Datanode State   ]node node_ip port instance state
-----------------------------------------------------------------------------------------
1  primary 192.168.217.129 8000  6001 /opt/openGauss/install/data/dn  P Primary Normal
2  standby 192.168.217.131 8000  6002 /opt/openGauss/install/data/dn  S Standby Normal# cluster_state 集群状态# Normal 表示openGauss正常# Unavailable 表示openGauss不可用# Degraded 表示openGauss可用,但存在故障的数据库节点、数据库主节点实例# redistributing 数据重分布状态# Yes 表示openGauss处于数据重分布状态# No  表示openGauss未处于数据重分步状态# [  Datanode State   ] 节点状态
# node 节点编号
# node_ip 节点所在IP
# port 端口号
# instance  instance 实例ID
# state 实例角色# Normal:表示单主机实例。# P Primary:表示实例为主实例。# S Standby:表示实例为备实例。# Cascade Standby:表示实例为级联备实例。# Pending:表示该实例在仲裁阶段。# Unknown:表示实例状态未知。# Down:表示实例处于宕机状态。# Abnormal:表示节点处于异常状态。# Manually stopped:表示节点已经被手动停止。
2.登录postgres数据库
2.1 登录数据库
数据库安装完成后,默认生成名称为postgres的数据库。第一次连接数据库时可以连接到此数据库
**注意:**端口号需要使用cluster_config.xml配置文件中的dataPortBase的值
# 登录postgres数据
gsql -d postgres -p 8000# -d postgres 指定登录的数据库名为postgres# -p 指定连接的端口号为8000
2.2 退出数据库
使用元命令\q或者快捷键Ctrl + D 退出openGauss命令行
# 退出openGauss命令行
\q
3.启停openGauss
3.1 启动openGauss
第一次安装后openGauss默认是启动的,可以不用执行这一步
# 启动openGauss数据库服务
gs_om -t start# 出现Successfully started.即启动成功
以下是执行后输出的内容
# ----------- 以下是执行后输出的内容 --------
Starting cluster.
=========================================
[SUCCESS] openEuler
2024-11-18 16:23:04.271 673af968.1 [unknown] 140525502319040 [unknown] 0 dn_6001 01000  0 [BACKEND] WARNING:  could not create any HA TCP/IP sockets
2024-11-18 16:23:04.271 673af968.1 [unknown] 140525502319040 [unknown] 0 dn_6001 01000  0 [BACKEND] WARNING:  could not create any HA TCP/IP sockets
2024-11-18 16:23:04.273 673af968.1 [unknown] 140525502319040 [unknown] 0 dn_6001 01000  0 [BACKEND] WARNING:  Failed to initialize the memory protect for g_instance.attr.attr_storage.cstore_buffers (1024 Mbytes) or shared memory (4482 Mbytes) is larger.
=========================================
Successfully started.
3.2 停止openGauss
# 停止openGauss数据库服务
gs_om -t stop
以下是执行后输出的内容
# ----------- 以下是执行后输出的内容 -----------
Stopping cluster.
=========================================
Successfully stopped cluster.
=========================================
End stop cluster.
相关文章:
)
openGauss 6.0.0主备部署(企业版)
openGauss 6.0.0主备部署(企业版) 文章目录 openGauss 6.0.0主备部署(企业版)一、环境准备1.操作系统环境2.修改主机名3.设置字符集编码4.修改openEuler默认yum源5.安装所需工具6.同步网络时间7.关闭防火墙 二、安装openGauss数据…...

【机器学习】聚类算法原理详解
聚类算法 性能度量: 外部指标 jaccard系数(简称JC)FM指数(简称FMI)Rand指数(简称RI) 内部指标 DB指数(简称DBI)Dunn指数(简称DI) 距离计算&am…...
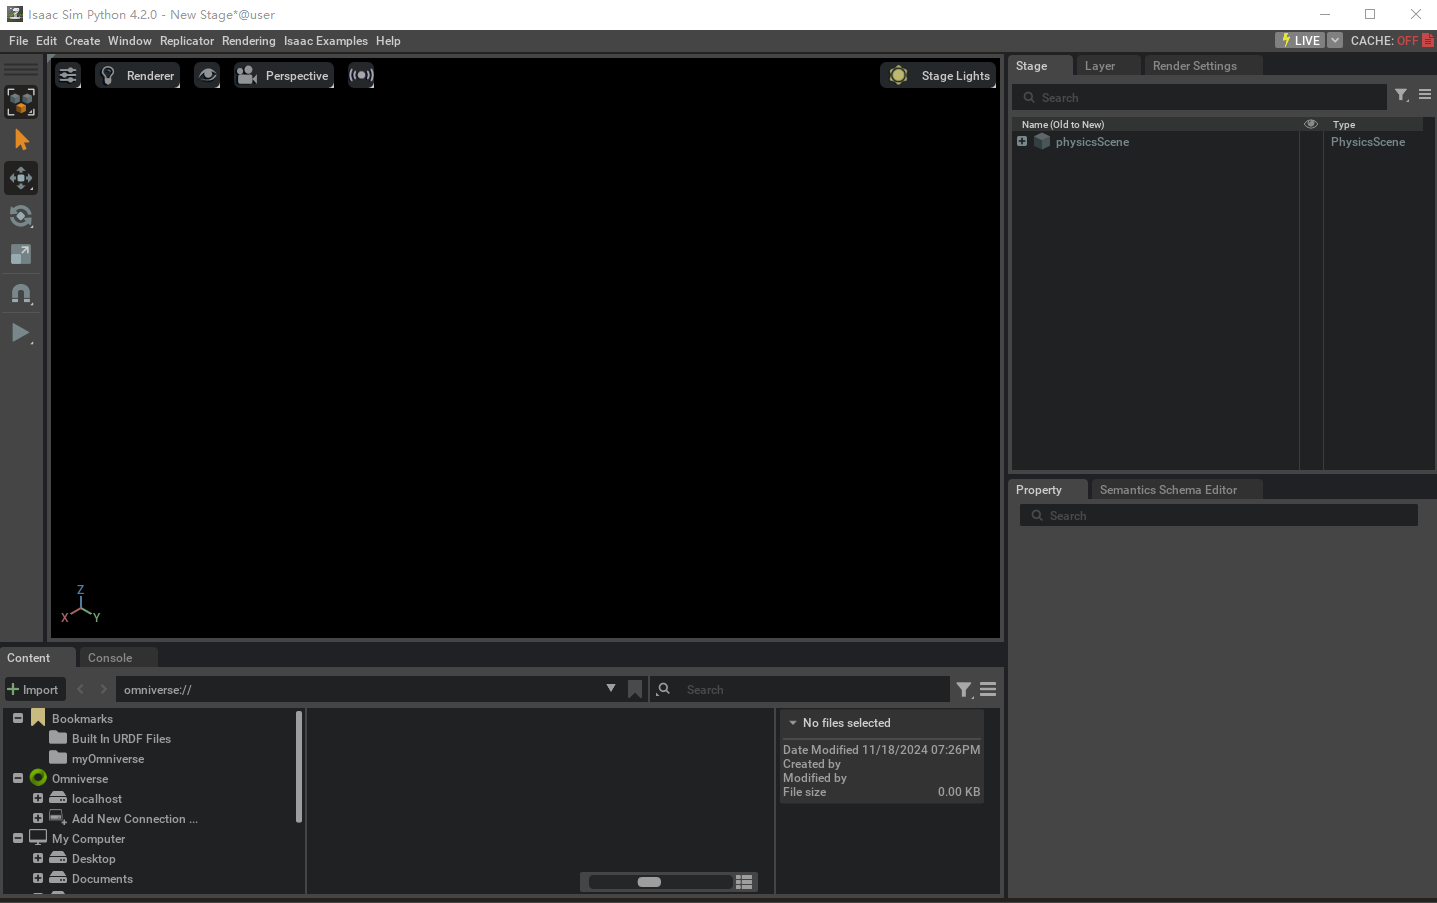
Ubuntu20.04从零安装IsaacSim/IsaacLab
Ubuntu20.04从零安装IsaacSim/IsaacLab 电脑硬件配置:安装Isaac sim方案一:pip安装方案二:预构建二进制文件安装1、安装ominiverse2、在ominiverse中安装isaac sim,下载最新的4.2版本 安装Isaac Lab1、IsaacLab环境克隆2、创建con…...
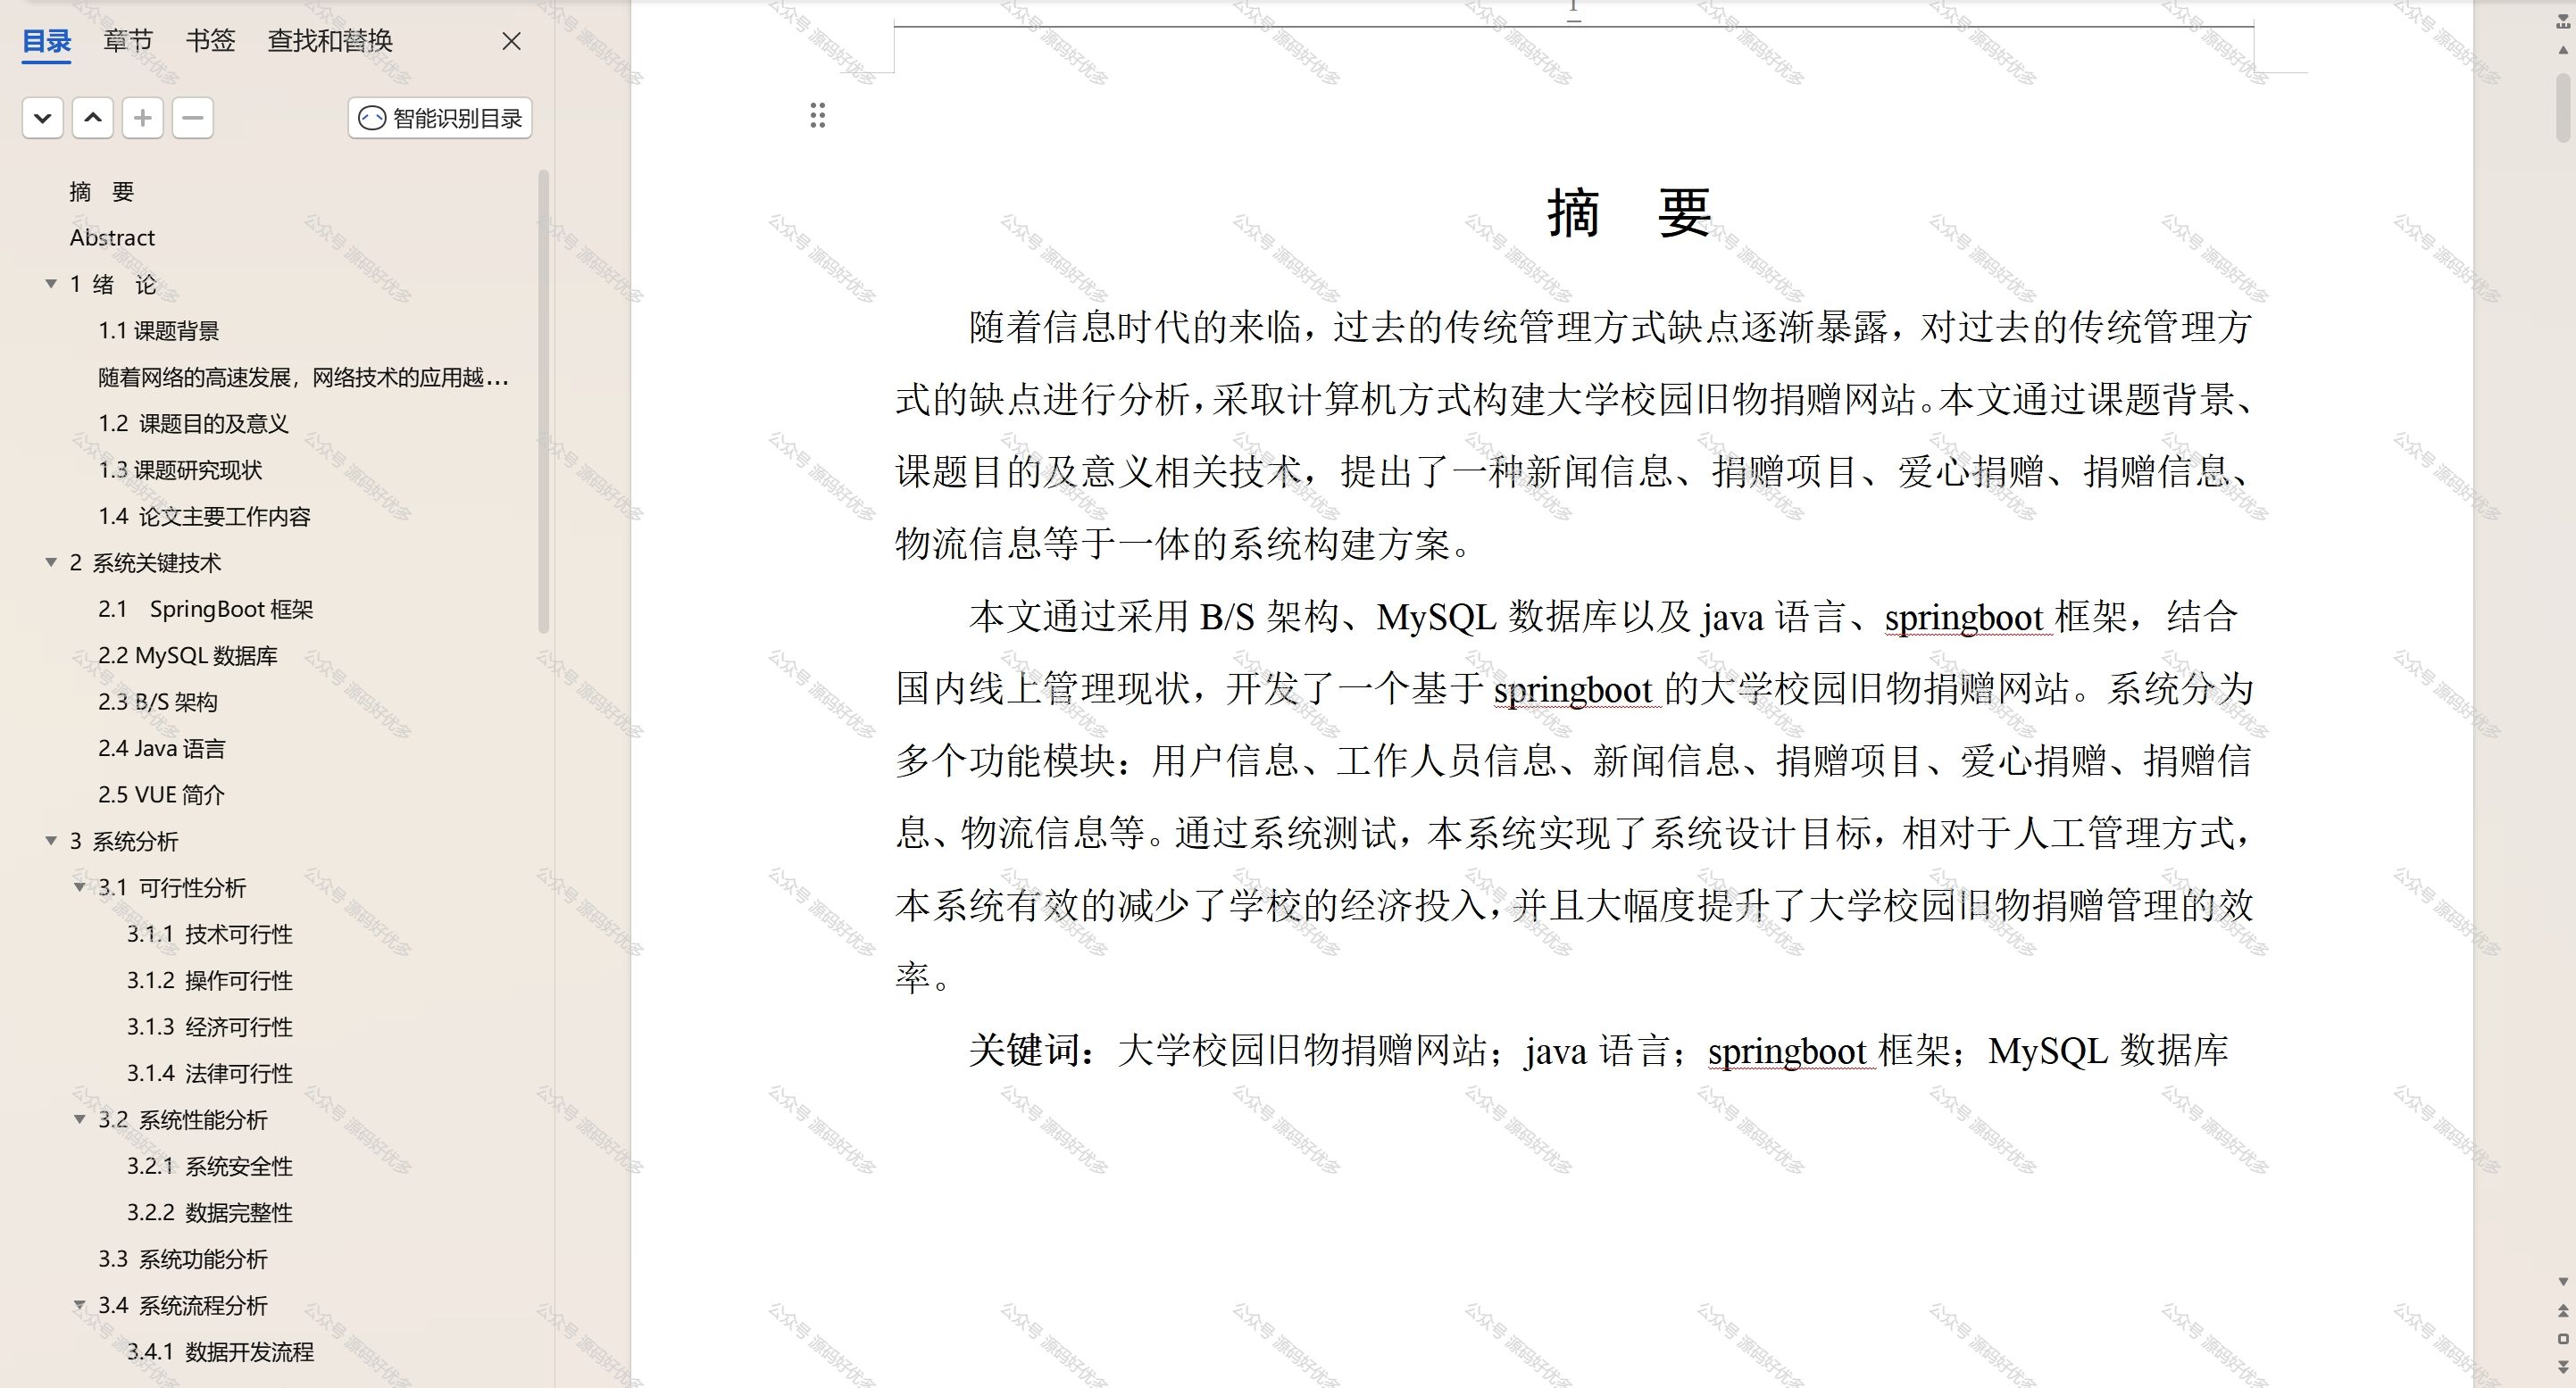
基于Java Springboot大学校园旧物捐赠网站
一、作品包含 源码数据库设计文档万字PPT全套环境和工具资源部署教程 二、项目技术 前端技术:Html、Css、Js、Vue、Element-ui 数据库:MySQL 后端技术:Java、Spring Boot、MyBatis 三、运行环境 开发工具:IDEA/eclipse 数据…...

【Java 集合】Collections 空列表细节处理
问题 如下代码,虽然定义为非空 NonNull,但依然会返回空对象,导致调用侧被检测为空引用。 实际上不是Collections的问题是三目运算符返回了null对象。 import java.util.Collections;NonNullprivate List<String> getInfo() {IccReco…...
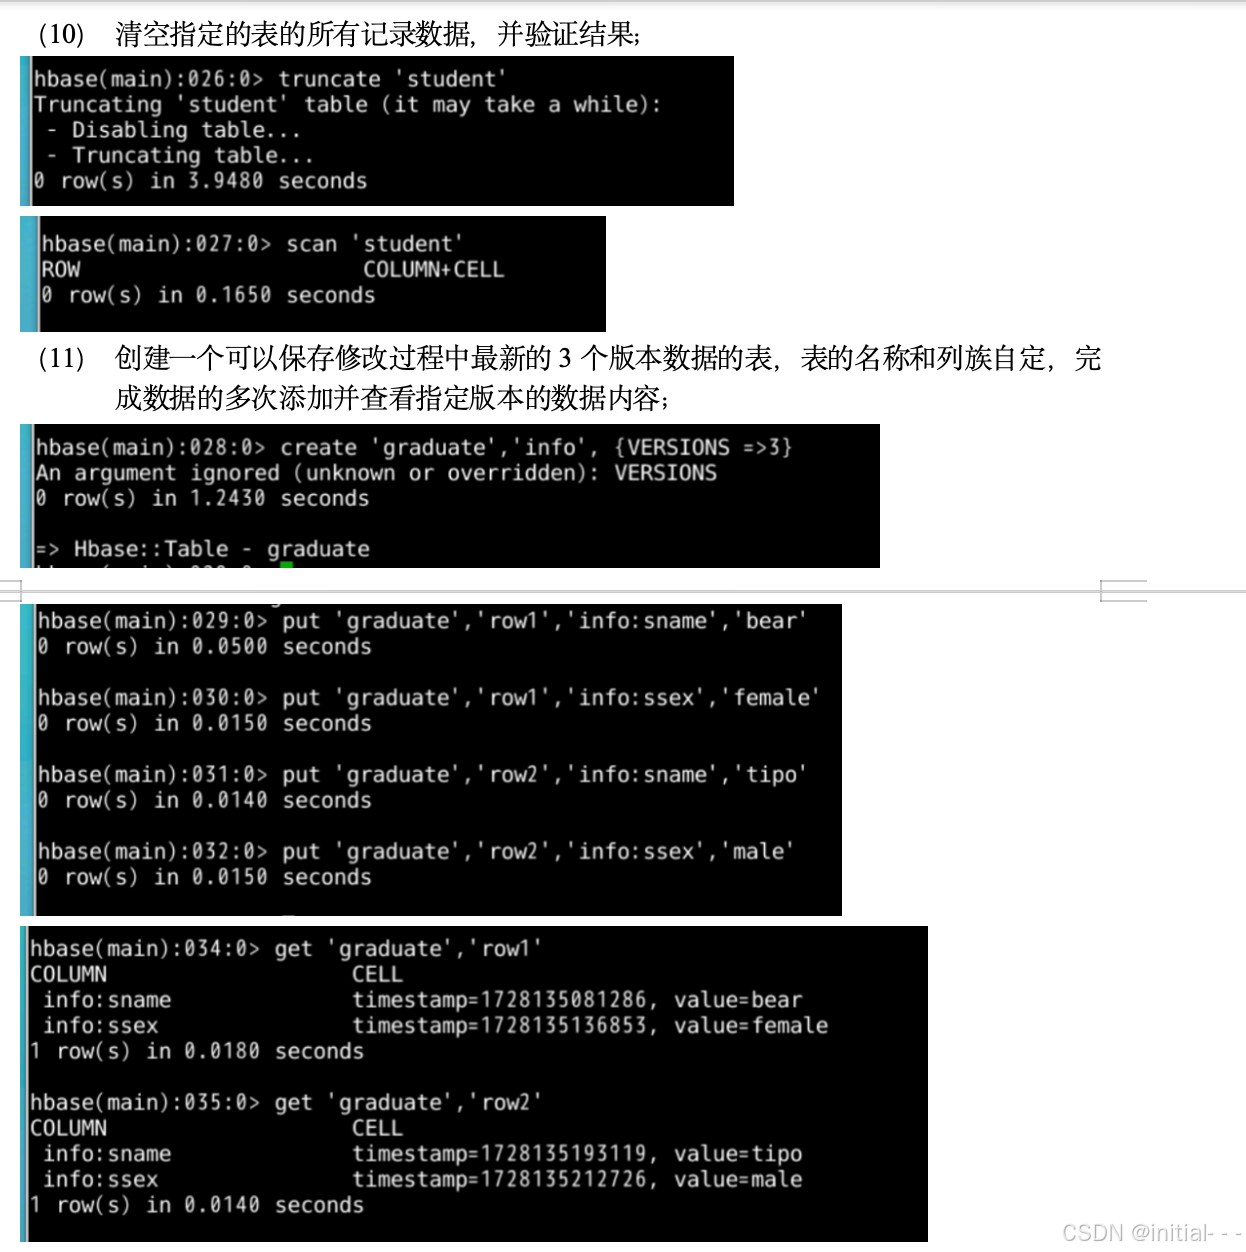
大数据实验4-HBase
一、实验目的 阐述HBase在Hadoop体系结构中的角色;能够掌握HBase的安装和配置方法熟练使用HBase操作常用的Shell命令; 二、实验要求 学习HBase的安装步骤,并掌握HBase的基本操作命令的使用; 三、实验平台 操作系统࿱…...

deepin系统下载pnpm cnpm等报错
deepin系统下载pnpm cnpm等报错 npm ERR! request to https://registry.npm.taobao.org/pnpm failed, reason: certificate has expired 报错提示证书过期,执行以下命令 npm config set registry https://registry.npmmirror.com下载pnpm npm install pnpm -g查…...

#Js篇:JSON.stringify 和 JSON.parse用法和传参
JSON.stringify 和 JSON.parse 1. JSON.stringify JSON.stringify 方法将一个 JavaScript 对象或数组转换为 JSON 字符串。 基本用法 const obj { name: "Alice", age: 25 }; const jsonString JSON.stringify(obj); console.log(jsonString); // 输出: {"…...

c#通过网上AI大模型实现对话功能
目录 基础使用给大模型额外提供函数能力用Microsoft.Extensions.AI库实现用json格式回答 基础使用 https://siliconflow.cn/网站有些免费的大模型可以使用,去注册个账户,拿到apikey 引用 nuget Microsoft.Extensions.AI.OpenAI using Microsoft.Extensi…...
pymysql模块
1.pymysql基本使用 打开数据库连接,使用cursor()方法获取操作游标执行SQL语句 获取命令执行的查询结果 1.1 打开数据库连接 # 打开数据库连接 db pymysql.connect(host127.0.0.1,userroot,port3306,password"123",databasedb5) 1.2 使用cursor()方法获取操作游…...
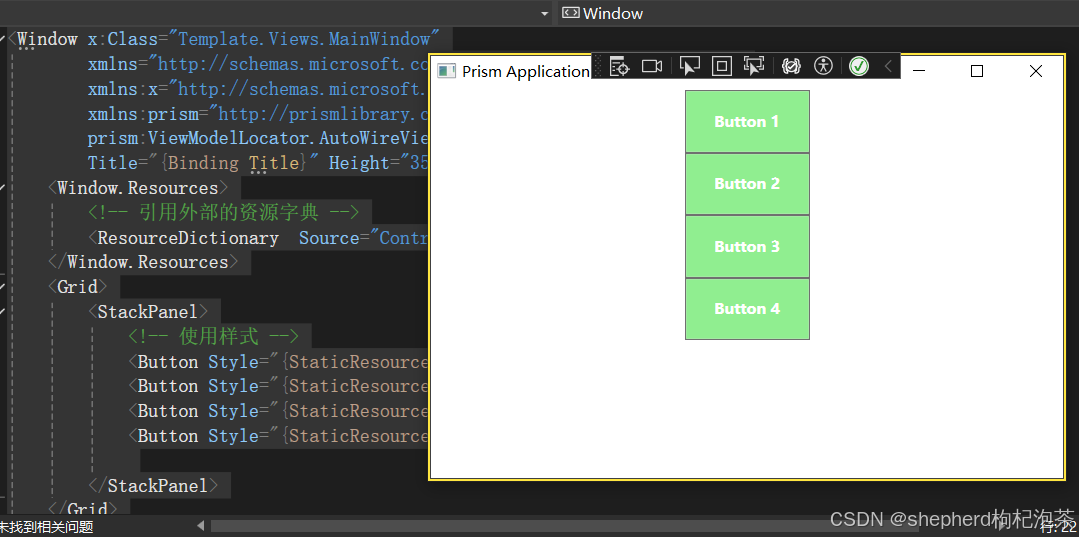
WPF-模板和样式
在 WPF(Windows Presentation Foundation)中,模板是一种强大的机制,用于定义控件的外观。它允许你将控件的逻辑(功能)和外观(UI)分离开来。例如,一个按钮控件,…...
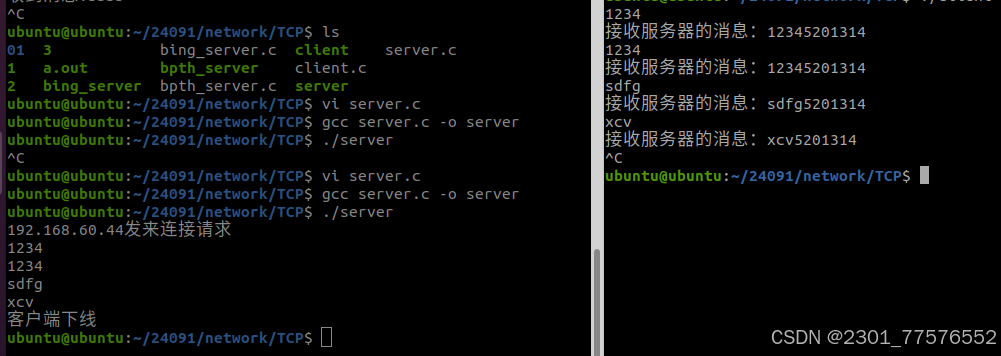
网络编程 day1.2~day2——TCP和UDP的通信基础(TCP)
笔记脑图 作业: 1、将虚拟机调整到桥接模式联网。 2、TCP客户端服务器实现一遍。 服务器 #include <stdio.h> #include <string.h> #include <myhead.h> #define IP "192.168.60.44" #define PORT 6666 #define BACKLOG 20 int mai…...

element ui table 每行不同状态
table 每行定义值 tableData: [ { name: ,type:,location:, ziduan:,createtype:,ziduanvalue:,checkAll:true,checkedCities: [空, null, str随机, int随机],isIndeterminate: true,table_id:single,downloaddisabled:true,deldisabled:true} ], table c…...

力扣--LRC 142.训练计划IV
题目 给定两个以 有序链表 形式记录的训练计划 l1、l2,分别记录了两套核心肌群训练项目编号,请合并这两个训练计划,按训练项目编号 升序 记录于链表并返回。 注意:新链表是通过拼接给定的两个链表的所有节点组成的。 示例 1&am…...
windows下,用CMake编译qt项目,出现错误By not providing “FindQt5.cmake“...
开发环境:windows10 qt5.14, 编译器msvc2017x64,CMake3.30; 现象: CMakeList文件里,如有find_package(Qt5 COMPONENTS Widgets REQUIRED) target_link_libraries(dis_lib PRIVATE Qt5::Widgets) 用CMak…...

【element-tiptap】Tiptap编辑器核心概念----结构篇
core-concepts 前言:这篇文章来介绍一下 Tiptap 编辑器的一些核心概念 (一)结构 1、 Schemas 定义文档组成方式。一个文档就是标题、段落以及其他的节点组成的一棵树。 每一个 ProseMirror 的文档都有一个与之相关联的 schema,…...

半导体工艺与制造篇3 离子注入
离子注入工艺 一般掺杂的杂质类别,包括:提供载流子的施主杂质和受主杂质;产生复合中心的重金属杂质 离子注入往往需要生成井well,其中井的定义:晶圆与杂质之间形成的扩散层或杂质与杂质之间形成的扩散层 离子注入的目的:用掺杂改…...
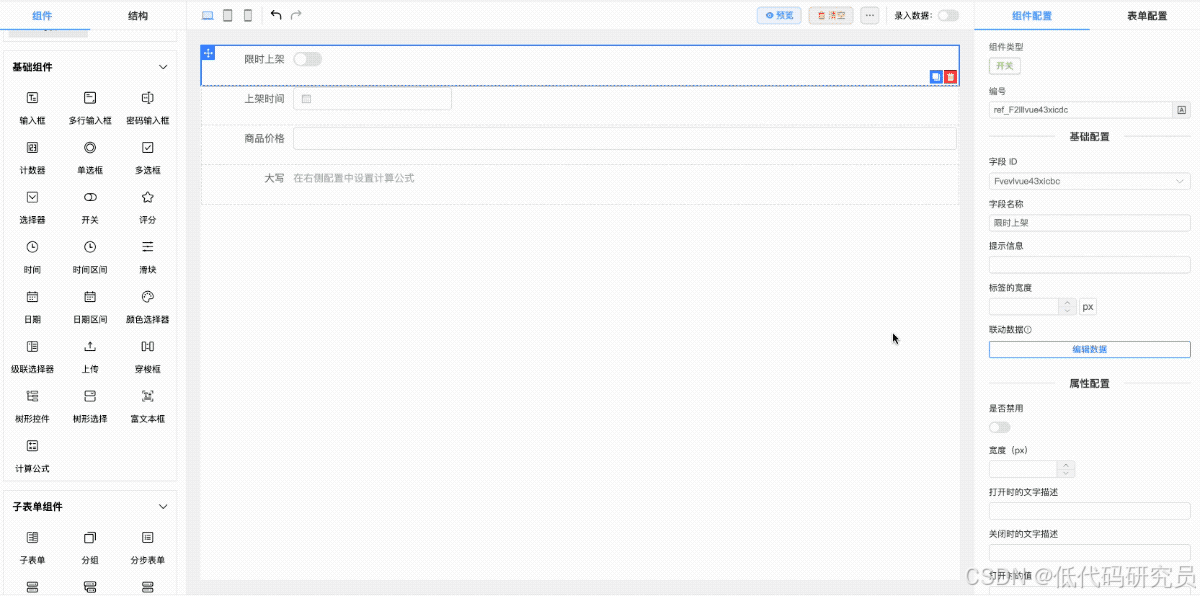
利用开源的低代码表单设计器FcDesigner高效管理和渲染复杂表单结构
FcDesigner 是一个强大的开源低代码表单设计器组件,支持快速拖拽生成表单。提供丰富的自定义及扩展功能,FcDesigner支持多语言环境,并允许开发者进行二次开发。通过将表单设计输出为JSON格式,再通过渲染器进行加载,实现…...

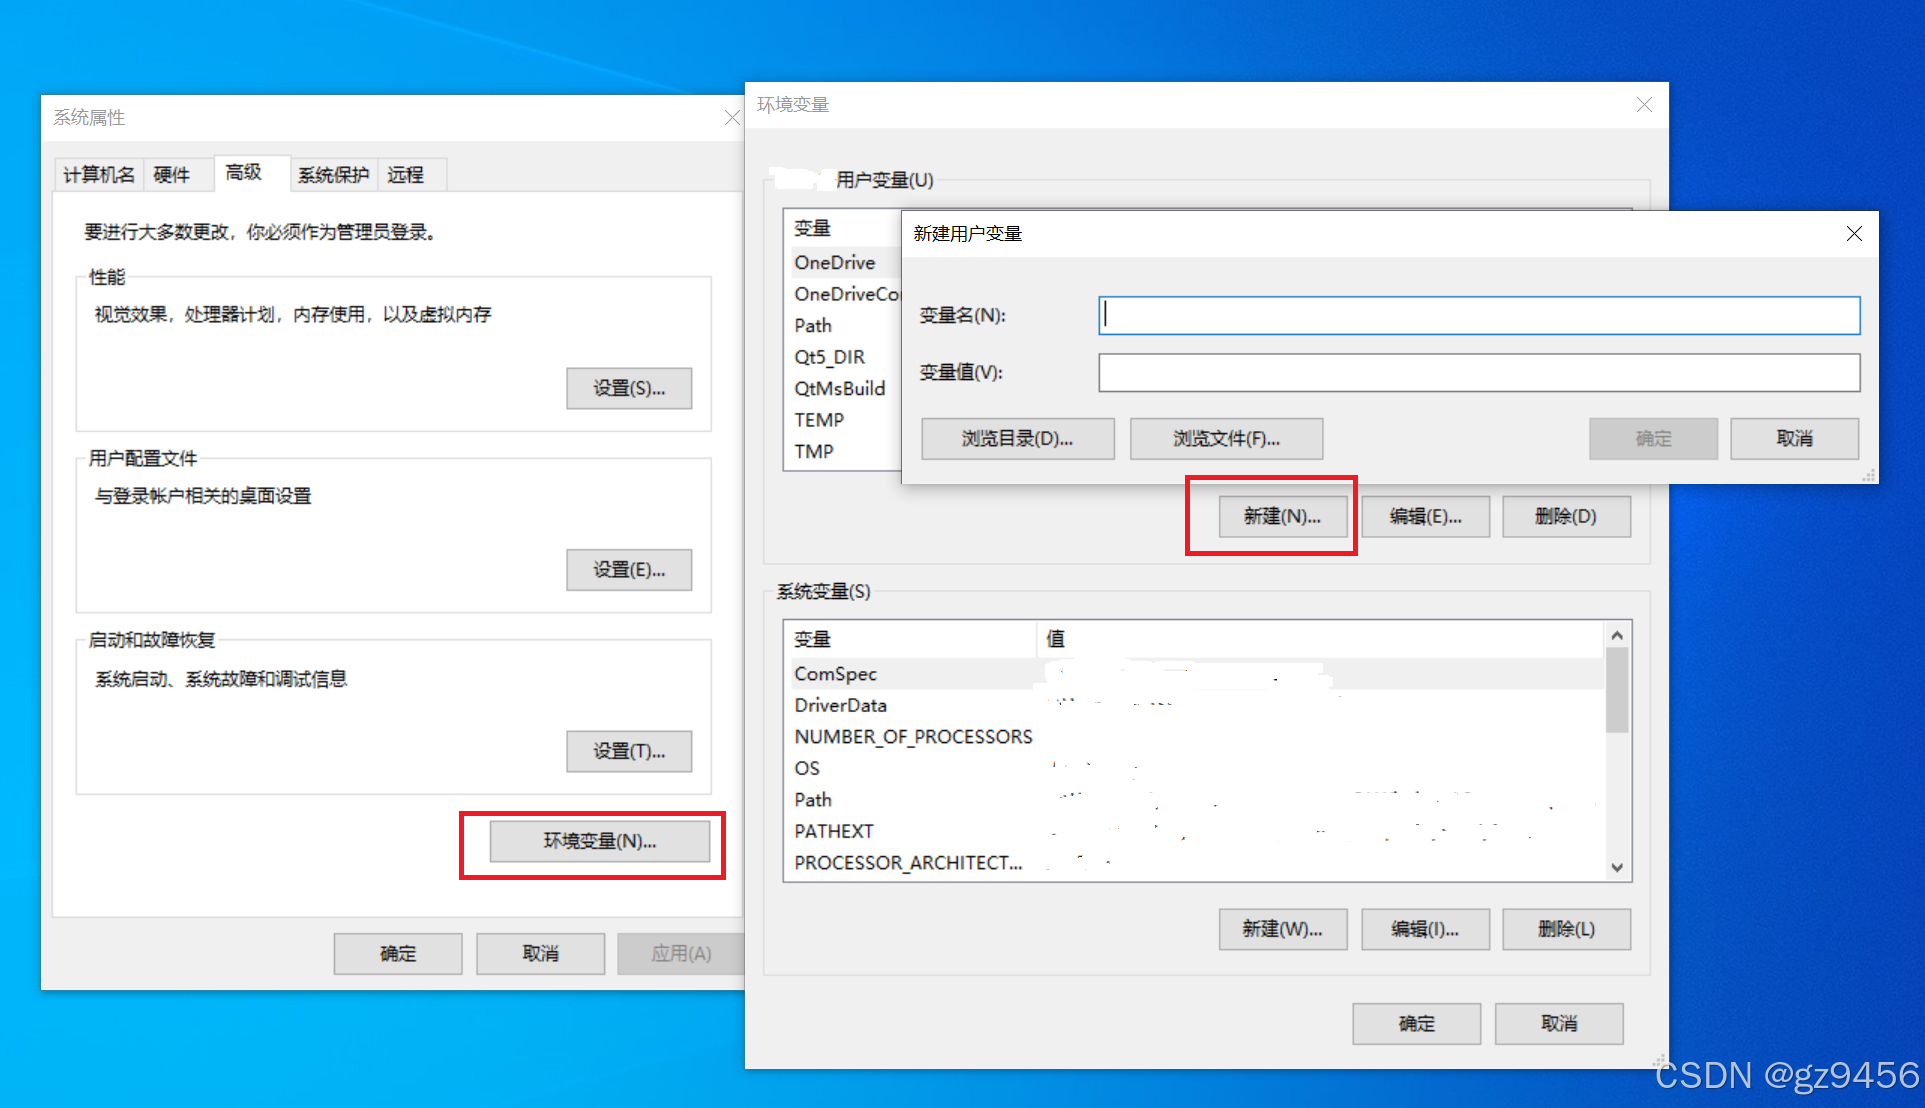
淘宝 NPM 镜像源
npm i vant/weapp -S --production npm config set registry https://registry.npmmirror.com 要在淘宝 NPM 镜像站下载项目或依赖,你可以按照以下步骤操作: 1. 设置淘宝 NPM 镜像源 首先,你需要设置淘宝 NPM 镜像源以加速下载。可以通过…...

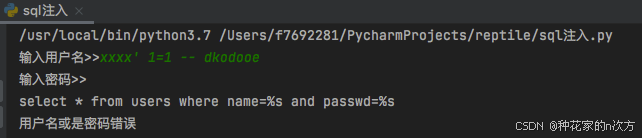
i春秋-GetFlag(md5加密,字符串比较绕过)
练习平台地址 竞赛中心 题目描述 题目内容 你好,单身狗,这是一个迷你文件管理器,你可以登录和下载文件,甚至得到旗帜 点击登录 发现capture需要满足条件substr(md5(captcha), 0, 6)xxxxxx 编写python脚本破解验证码 import has…...
)
2026实测|5款AI论文写作软件深度对比(含降重/AIGC检测/价格)
根据2026年最新的实测数据,我为你整理了一份好用的AI论文写作软件清单,按适用场景分类,你可以根据自己的需求快速匹配。 📊 核心工具速览对比 工具名称核心优势最佳适用场景价格参考推荐指数PaperRed中文全流程、降重合规、文献真…...

动物森友会存档编辑神器:NHSE新手完全入门指南
动物森友会存档编辑神器:NHSE新手完全入门指南 【免费下载链接】NHSE Animal Crossing: New Horizons save editor 项目地址: https://gitcode.com/gh_mirrors/nh/NHSE 你是否曾经梦想过在《集合啦!动物森友会》中拥有无限铃钱、稀有家具…...

终极指南:如何使用NifSkope轻松编辑游戏3D模型文件
终极指南:如何使用NifSkope轻松编辑游戏3D模型文件 【免费下载链接】nifskope A git repository for nifskope. 项目地址: https://gitcode.com/gh_mirrors/ni/nifskope NifSkope是一款专为游戏开发者设计的开源3D模型编辑器,专注于NetImmerse文件…...

终极KMS激活解决方案:Windows与Office一体化智能激活工具
终极KMS激活解决方案:Windows与Office一体化智能激活工具 【免费下载链接】KMS_VL_ALL_AIO Smart Activation Script 项目地址: https://gitcode.com/gh_mirrors/km/KMS_VL_ALL_AIO KMS_VL_ALL_AIO是一款功能强大的Windows系统和Microsoft Office套件的智能激…...

当 ABAP 代码想走出 SAP 系统:一个标准化文件格式的故事
当 ABAP 代码想走出 SAP 系统:一个标准化文件格式的故事 当我第一次用 abapGit 时,我有个困惑。 把一个 ABAP class 序列化成 XML 文件,推到 GitHub,再从另一个 ABAP 系统 pull 回来,重建 class 对象。 这个流程挺顺的。 但我当时不太理解。 为什么 abapGit 选择这种…...
)
手把手教你用USB ISP下载器给Arduino Nano烧写Bootloader(含ProgISP软件详细配置)
手把手教你用USB ISP下载器为Arduino Nano烧录Bootloader 当你拿到一块全新的Arduino Nano开发板,或是遇到程序无法上传的"变砖"情况时,很可能需要重新烧写Bootloader。Bootloader是存储在微控制器中的一小段特殊程序,它负责与Ard…...

DLSS版本管理器:5分钟掌握游戏性能优化终极指南
DLSS版本管理器:5分钟掌握游戏性能优化终极指南 【免费下载链接】dlss-swapper 项目地址: https://gitcode.com/GitHub_Trending/dl/dlss-swapper 你是否曾因游戏帧数不稳定而烦恼?是否想体验最新DLSS技术带来的性能提升却不知从何入手ÿ…...

AI模型的持续优化:从A/B测试到在线学习
AI模型的持续优化:从A/B测试到在线学习 前言 我们的 AI 产品上线后,我以为模型训练一次就能一直用。但现实告诉我:AI 模型需要持续优化,就像养孩子一样,需要不断培养。 从最初的版本到现在,我们的模型经…...

抖音视频批量下载工具:免费保存去水印内容完整指南
抖音视频批量下载工具:免费保存去水印内容完整指南 【免费下载链接】douyin-downloader A practical Douyin downloader for both single-item and profile batch downloads, with progress display, retries, SQLite deduplication, and browser fallback support.…...

新手入门使用 Python 快速接入 Taotoken 调用大模型
🚀 告别海外账号与网络限制!稳定直连全球优质大模型,限时半价接入中。 👉 点击领取海量免费额度 新手入门使用 Python 快速接入 Taotoken 调用大模型 对于刚开始接触大模型 API 调用的开发者而言,如何快速、正确地接入…...