使用CNN模型训练图片识别(键盘,椅子,眼镜,水杯,鼠标)
首先是环境:
我是在Anaconda3中的Jupyter Notebook (tensorflow)中进行训练,环境各位自行安装
数据集:
本次数据集五个类型(键盘,椅子,眼镜,水杯,鼠标)我收集了每个接近两千张的图片共11091张
这个可以不用这么多因为cnn模型训练也用不上这么多的图片,可以自行减少,这个是我这边的要求,所以我索性就直接训练了。
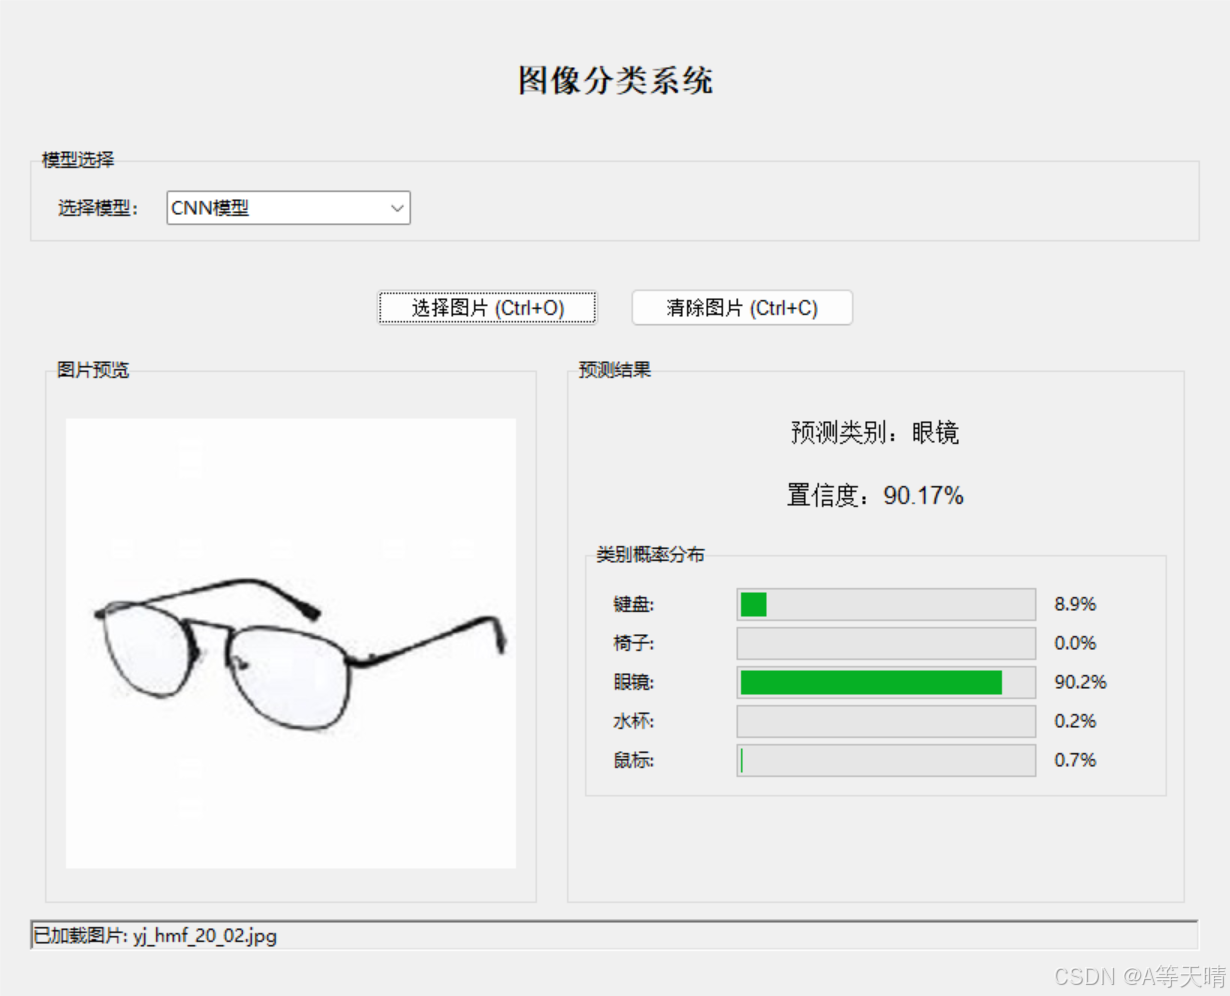
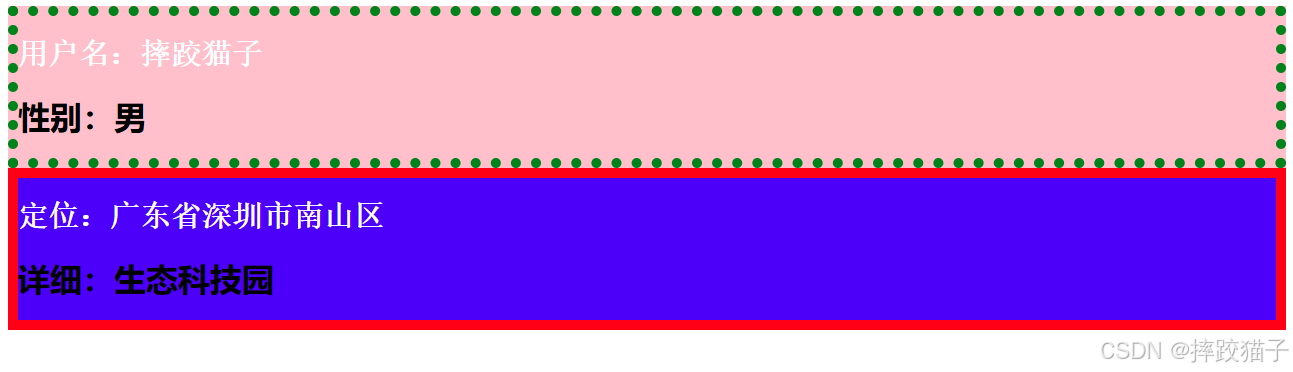
预测结果如下:


代码如下:
相关库:
import os
import numpy as np
from PIL import Image
from sklearn.model_selection import train_test_split
import matplotlib.pyplot as plt
import tensorflow as tf
from tensorflow.keras import models, layers
图片数据处理:
# 首先导入必要的库并设置PIL的限制
import os
import numpy as np
from PIL import Image
Image.MAX_IMAGE_PIXELS = None # 解除PIL的图片大小限制
from sklearn.model_selection import train_test_split
import matplotlib.pyplot as plt
import tensorflow as tf
from tensorflow.keras import models, layers
import warnings
warnings.filterwarnings('ignore') # 忽略警告信息def load_and_preprocess_data(base_path, img_size=(300, 300), batch_size=32):# 初始化列表存储图片路径和标签image_paths = []labels = []# 类别映射class_mapping = {'jp': 0, # 键盘'yz': 1, # 椅子'yj': 2, # 眼镜'bz': 3, # 水杯'sb': 4 # 鼠标}# 首先检查并收集有效的图片路径和标签print("正在检查图片文件...")for filename in os.listdir(base_path):if filename.endswith(('.jpg', '.png')):prefix = filename[:2]if prefix in class_mapping:try:img_path = os.path.join(base_path, filename)# 尝试打开图片验证其有效性with Image.open(img_path) as img:image_paths.append(img_path)labels.append(class_mapping[prefix])print(f"成功验证图片: {filename}")except Exception as e:print(f"跳过无效图片 {filename}: {str(e)}")continueif not image_paths:raise ValueError("没有找到有效的图片文件!")# 转换标签为numpy数组labels = np.array(labels)# 创建数据生成器class ImageDataGenerator:def __init__(self, image_paths, labels, img_size, batch_size):self.image_paths = image_pathsself.labels = labelsself.img_size = img_sizeself.batch_size = batch_sizeself.n = len(image_paths)self.indexes = np.arange(self.n)np.random.shuffle(self.indexes)self.i = 0def __len__(self):return (self.n + self.batch_size - 1) // self.batch_sizedef __iter__(self):return selfdef __next__(self):if self.i >= self.n:self.i = 0np.random.shuffle(self.indexes)raise StopIterationbatch_indexes = self.indexes[self.i:min(self.i + self.batch_size, self.n)]batch_paths = [self.image_paths[i] for i in batch_indexes]batch_labels = self.labels[batch_indexes]batch_images = []valid_labels = []for path, label in zip(batch_paths, batch_labels):try:with Image.open(path) as img:# 转换为RGB模式if img.mode != 'RGB':img = img.convert('RGB')# 调整图片大小if img.size[0] > 1000 or img.size[1] > 1000:img.thumbnail((1000, 1000), Image.Resampling.LANCZOS)img = img.resize(self.img_size, Image.Resampling.LANCZOS)# 转换为numpy数组img_array = np.array(img, dtype=np.float32) / 255.0batch_images.append(img_array)valid_labels.append(label)except Exception as e:print(f"处理图片 {path} 时出错: {str(e)}")continueself.i += self.batch_sizeif not batch_images: # 如果这个批次没有有效图片return self.__next__() # 尝试下一个批次return np.array(batch_images), np.array(valid_labels)# 打印数据集信息print(f"\n总共找到 {len(image_paths)} 张有效图片")for label in set(labels):count = np.sum(labels == label)print(f"类别 {label}: {count} 张图片")# 划分训练集和测试集的索引n_samples = len(image_paths)n_train = int(0.8 * n_samples)indices = np.random.permutation(n_samples)train_idx, test_idx = indices[:n_train], indices[n_train:]# 创建训练集和测试集的生成器train_generator = ImageDataGenerator([image_paths[i] for i in train_idx],labels[train_idx],img_size,batch_size)test_generator = ImageDataGenerator([image_paths[i] for i in test_idx],labels[test_idx],img_size,batch_size)return train_generator, test_generator# 修改训练函数中的训练循环
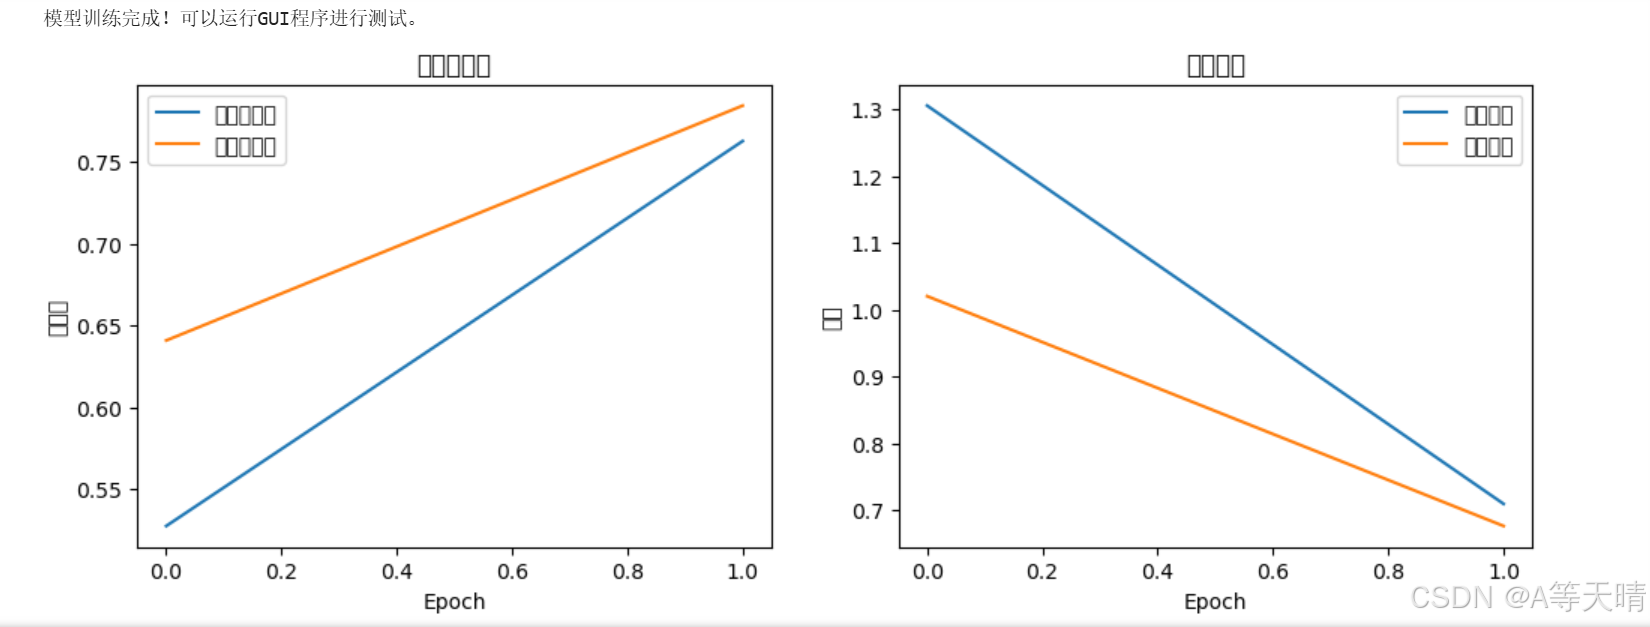
def train_and_save_model(model, train_generator, test_generator, model_name, epochs=10):# 编译模型model.compile(optimizer='adam',loss='sparse_categorical_crossentropy',metrics=['accuracy'])# 训练模型history = {'accuracy': [], 'val_accuracy': [], 'loss': [], 'val_loss': []}for epoch in range(epochs):print(f'\nEpoch {epoch+1}/{epochs}')# 训练阶段train_loss = []train_acc = []for i, (batch_images, batch_labels) in enumerate(train_generator):if len(batch_images) == 0:continuemetrics = model.train_on_batch(batch_images, batch_labels)train_loss.append(metrics[0])train_acc.append(metrics[1])print(f'\rBatch {i+1} - loss: {metrics[0]:.4f} - accuracy: {metrics[1]:.4f}', end='')# 验证阶段val_loss = []val_acc = []for batch_images, batch_labels in test_generator:if len(batch_images) == 0:continuemetrics = model.test_on_batch(batch_images, batch_labels)val_loss.append(metrics[0])val_acc.append(metrics[1])# 记录历史epoch_train_loss = np.mean(train_loss) if train_loss else 0epoch_train_acc = np.mean(train_acc) if train_acc else 0epoch_val_loss = np.mean(val_loss) if val_loss else 0epoch_val_acc = np.mean(val_acc) if val_acc else 0history['accuracy'].append(epoch_train_acc)history['val_accuracy'].append(epoch_val_acc)history['loss'].append(epoch_train_loss)history['val_loss'].append(epoch_val_loss)print(f'\nEpoch {epoch+1} - loss: {epoch_train_loss:.4f} - accuracy: {epoch_train_acc:.4f} - 'f'val_loss: {epoch_val_loss:.4f} - val_accuracy: {epoch_val_acc:.4f}')# 绘制训练历史plt.figure(figsize=(12, 4))plt.subplot(1, 2, 1)plt.plot(history['accuracy'], label='训练准确率')plt.plot(history['val_accuracy'], label='验证准确率')plt.title('模型准确率')plt.xlabel('Epoch')plt.ylabel('准确率')plt.legend()plt.subplot(1, 2, 2)plt.plot(history['loss'], label='训练损失')plt.plot(history['val_loss'], label='验证损失')plt.title('模型损失')plt.xlabel('Epoch')plt.ylabel('损失')plt.legend()plt.savefig(f'{model_name}_training_history.png')# 保存模型model.save(f'{model_name}.h5')模型训练:
#这里的epochs的数值为2,代表训练2次,各位可以自行更改
def train_and_save_model(model, train_generator, test_generator, model_name, epochs=2):# 编译模型model.compile(optimizer='adam',loss='sparse_categorical_crossentropy',metrics=['accuracy'])# 训练模型history = {'accuracy': [], 'val_accuracy': [], 'loss': [], 'val_loss': []}for epoch in range(epochs):print(f'\nEpoch {epoch+1}/{epochs}')# 训练阶段train_loss = []train_acc = []for batch_images, batch_labels in train_generator:metrics = model.train_on_batch(batch_images, batch_labels)train_loss.append(metrics[0])train_acc.append(metrics[1])# 验证阶段val_loss = []val_acc = []for batch_images, batch_labels in test_generator:metrics = model.test_on_batch(batch_images, batch_labels)val_loss.append(metrics[0])val_acc.append(metrics[1])# 记录历史history['accuracy'].append(np.mean(train_acc))history['val_accuracy'].append(np.mean(val_acc))history['loss'].append(np.mean(train_loss))history['val_loss'].append(np.mean(val_loss))print(f'loss: {np.mean(train_loss):.4f} - accuracy: {np.mean(train_acc):.4f} - 'f'val_loss: {np.mean(val_loss):.4f} - val_accuracy: {np.mean(val_acc):.4f}')# 绘制训练历史plt.figure(figsize=(12, 4))plt.subplot(1, 2, 1)plt.plot(history['accuracy'], label='训练准确率')plt.plot(history['val_accuracy'], label='验证准确率')plt.title('模型准确率')plt.xlabel('Epoch')plt.ylabel('准确率')plt.legend()plt.subplot(1, 2, 2)plt.plot(history['loss'], label='训练损失')plt.plot(history['val_loss'], label='验证损失')plt.title('模型损失')plt.xlabel('Epoch')plt.ylabel('损失')plt.legend()plt.savefig(f'{model_name}_training_history.png')# 保存模型model.save(f'{model_name}.h5')
主程序:
# 设置数据集路径
base_path = 'E:/modol'try:# 检查路径是否存在if not os.path.exists(base_path):raise FileNotFoundError(f"找不到指定路径:{base_path}")# 数据预处理print("正在加载和预处理数据...")train_generator, test_generator = load_and_preprocess_data(base_path, batch_size=32)# 训练CNN模型print("\n正在训练CNN模型...")cnn_model = create_cnn_model()train_and_save_model(cnn_model, train_generator, test_generator, 'cnn_model')print("\n模型训练完成!可以运行GUI程序进行测试。")except Exception as e:print(f"\n程序出错:{str(e)}")
然后是GUI界面:
#单cnn模型gui界面
import tkinter as tk
from tkinter import filedialog, ttk
from PIL import Image, ImageTk
import numpy as np
import tensorflow as tfclass ObjectClassifierGUI:def __init__(self, root):self.root = rootself.root.title("物体分类器")self.root.geometry("800x600")  # 设置窗口大小# 加载模型self.model = tf.keras.models.load_model('cnn_model.h5')# 类别标签self.classes = ['键盘', '椅子', '眼镜', '水杯', '鼠标']# 创建GUI组件self.create_widgets()def create_widgets(self):# 创建主框架main_frame = ttk.Frame(self.root, padding="10")main_frame.grid(row=0, column=0, sticky=(tk.W, tk.E, tk.N, tk.S))# 创建按钮框架button_frame = ttk.Frame(main_frame)button_frame.grid(row=0, column=0, columnspan=2, pady=10)# 选择图片按钮self.select_btn = ttk.Button(button_frame, text="选择图片", command=self.select_image)self.select_btn.pack(side=tk.LEFT, padx=5)# 清除图片按钮self.clear_btn = ttk.Button(button_frame,text="清除图片",command=self.clear_image,state='disabled'  # 初始状态为禁用)self.clear_btn.pack(side=tk.LEFT, padx=5)# 创建左右分栏left_frame = ttk.Frame(main_frame)left_frame.grid(row=1, column=0, padx=10)right_frame = ttk.Frame(main_frame)right_frame.grid(row=1, column=1, padx=10)# 图片显示区域(左侧)ttk.Label(left_frame, text="选择的图片:").pack(pady=5)self.image_label = ttk.Label(left_frame)self.image_label.pack(pady=5)# 预测结果显示(右侧)ttk.Label(right_frame, text="预测结果:").pack(pady=5)self.result_frame = ttk.Frame(right_frame)self.result_frame.pack(pady=5)# 预测结果详细信息self.pred_class_label = ttk.Label(self.result_frame,text="预测类别:-",font=('Arial', 12))self.pred_class_label.pack(pady=5)self.confidence_label = ttk.Label(self.result_frame,text="置信度:-",font=('Arial', 12))self.confidence_label.pack(pady=5)# 所有类别的概率分布self.prob_frame = ttk.Frame(self.result_frame)self.prob_frame.pack(pady=10)self.prob_bars = []for i in range(len(self.classes)):ttk.Label(self.prob_frame, text=f"{self.classes[i]}:").grid(row=i, column=0, padx=5)prob_bar = ttk.Progressbar(self.prob_frame, length=200, mode='determinate')prob_bar.grid(row=i, column=1, padx=5)prob_value = ttk.Label(self.prob_frame, text="0%")prob_value.grid(row=i, column=2, padx=5)self.prob_bars.append((prob_bar, prob_value))def select_image(self):# 打开文件选择对话框file_path = filedialog.askopenfilename()if file_path:# 处理并显示图片image = Image.open(file_path)# 保持原始宽高比例缩放图片用于显示display_size = (300, 300)image.thumbnail(display_size, Image.Resampling.LANCZOS)# 显示图片photo = ImageTk.PhotoImage(image)self.image_label.configure(image=photo)self.image_label.image = photo# 预处理图片用于预测image_for_pred = image.resize((300, 300))img_array = np.array(image_for_pred) / 255.0self.current_image_array = np.expand_dims(img_array, axis=0)# 进行预测self.predict_image(self.current_image_array)# 启用清除按钮self.clear_btn['state'] = 'normal'def predict_image(self, img_array):# 使用模型预测predictions = self.model.predict(img_array)# 获取预测结果pred_class_idx = np.argmax(predictions[0])pred_class = self.classes[pred_class_idx]confidence = predictions[0][pred_class_idx] * 100# 更新预测类别和置信度self.pred_class_label.config(text=f"预测类别:{pred_class}")self.confidence_label.config(text=f"置信度:{confidence:.2f}%")# 更新所有类别的概率条for i, ((bar, value_label), prob) in enumerate(zip(self.prob_bars, predictions[0])):percentage = prob * 100bar['value'] = percentagevalue_label.config(text=f"{percentage:.1f}%")def clear_image(self):# 清除图片显示self.image_label.configure(image='')self.image_label.image = None# 重置预测结果self.pred_class_label.config(text="预测类别:-")self.confidence_label.config(text="置信度:-")# 重置概率条for bar, value_label in self.prob_bars:bar['value'] = 0value_label.config(text="0%")# 禁用清除按钮self.clear_btn['state'] = 'disabled'# 清除存储的图像数组if hasattr(self, 'current_image_array'):del self.current_image_array# 主程序
if __name__ == "__main__":root = tk.Tk()app = ObjectClassifierGUI(root)root.mainloop()
另外是一个调取摄像头实时识别的页面,但是这个精度不是很高可能是摄像头的画面太杂了就不分享了。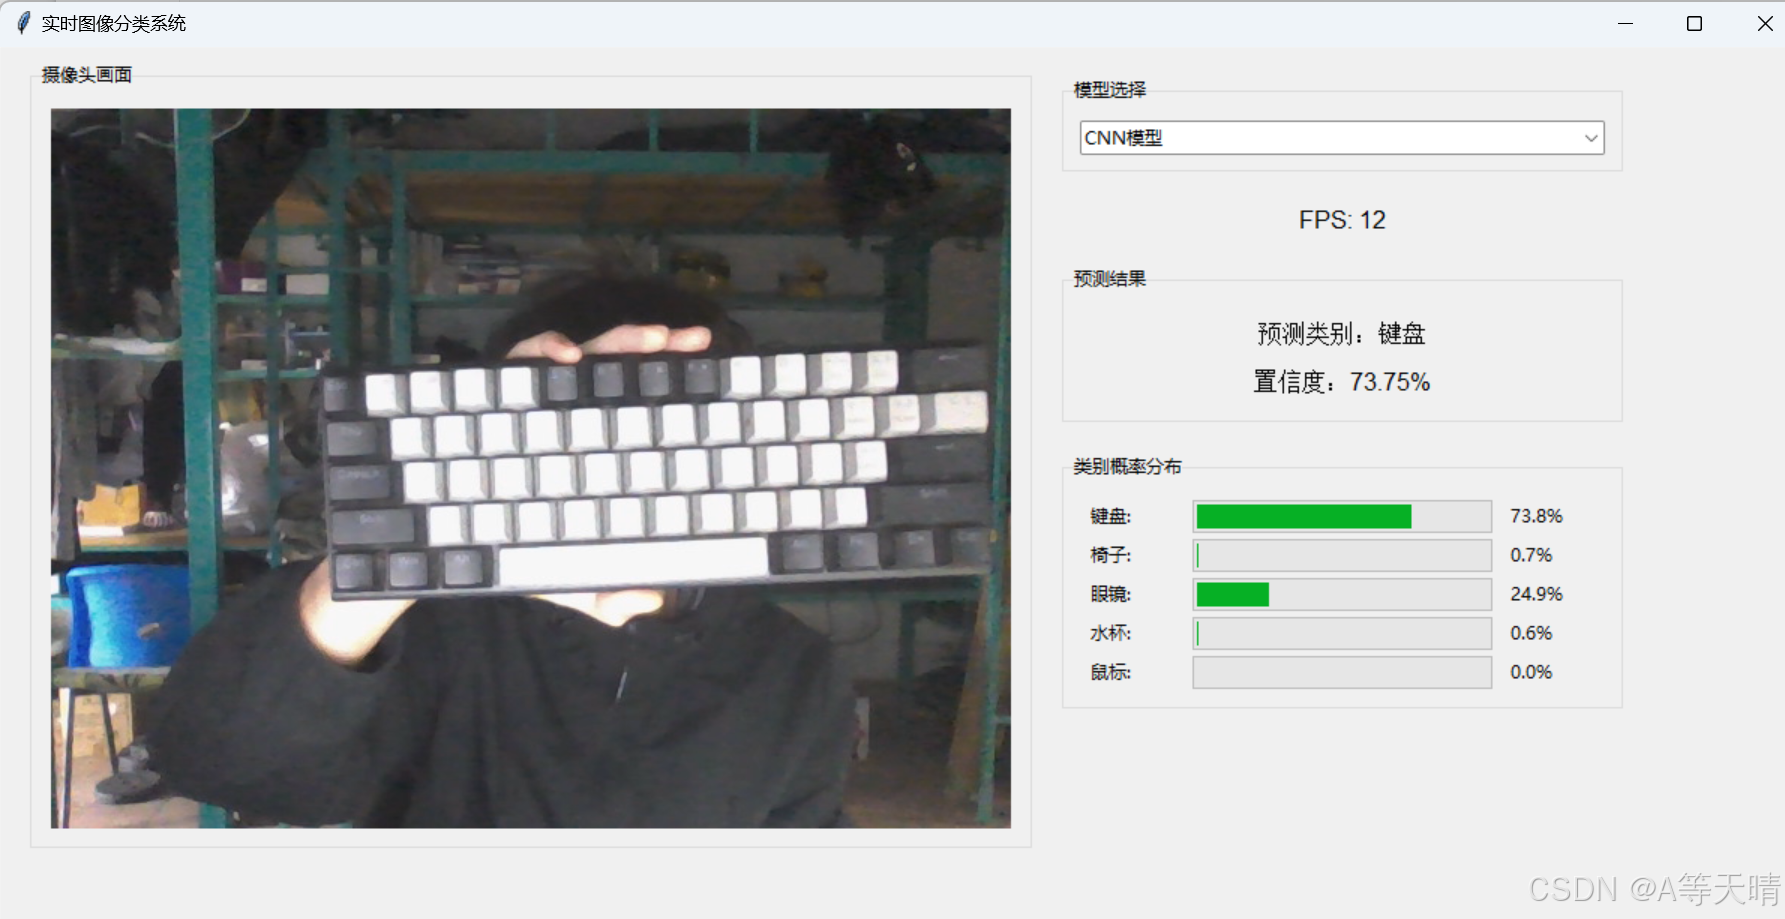
相关文章:
使用CNN模型训练图片识别(键盘,椅子,眼镜,水杯,鼠标)
首先是环境: 我是在Anaconda3中的Jupyter Notebook (tensorflow)中进行训练,环境各位自行安装 数据集: 本次数据集五个类型(键盘,椅子,眼镜,水杯,鼠标)我收集了每个接近两…...
Gitlab 数据备份全攻略:命令、方法与注意事项
文章目录 1、备份命令2、备份目录名称说明3、手工备份配置文件3.1 备份配置文件3.2 备份ssh文件 4、备份注意事项4.1 停止puma和sicdekiq组件4.2 copy策略需要更多磁盘空间 5、数据备份方法5.1 docker命令备份5.2 kubectl命令备份5.3 参数说明5.4、选择性备份5.5、非tar备份5.6…...
Vue|scoped样式
在 Vue.js 中,scoped 是一个非常有用的特性,允许你将样式限制在当前组件的作用域内,避免样式泄漏到其他组件。它是通过 Vue 的单文件组件(.vue 文件)中的 <style> 标签实现的。 目录 案例演示创建多个vue文件如何…...
)
eBPF试一下(TODO)
eBPF程序跟踪linux内核软中断 eBPF (Extended Berkeley Packet Filter) 是一种强大的 Linux 内核技术,最初用于网络数据包过滤,但现在它已经扩展到了多个领域,如性能监控、安全性、跟踪等。eBPF 允许用户在内核中执行代码(以一种安…...

【数据安全】如何保证其安全
数据安全风险 数字经济时代,数据已成为重要的生产要素。智慧城市、智慧政务的建设,正以数据为核心,推动城市管理的智能化和公共服务的优化。然而,公共数据开放共享与隐私保护之间的矛盾日益凸显,如何在确保数据安全的…...

[创业之路-196]:华为成功经验的总结与教训简单总结
目录 前言: 成功经验 教训归纳 前言: 华为作为世界领先的通信设备制造商,其成功经验与教训值得深入探讨。 以下是对华为成功经验的总结与教训的归纳: 成功经验 战略定位明确: 华为始终坚持“死死抓住核心技术”…...

使用 NVIDIA DALI 计算视频的光流
引言 光流(Optical Flow)是计算机视觉中的一种技术,主要用于估计视频中连续帧之间的运动信息。它通过分析像素在时间维度上的移动来预测运动场,广泛应用于目标跟踪、动作识别、视频稳定等领域。 光流的计算传统上依赖 CPU 或 GP…...
【UE5】pmx导入UE5,套动作。(防止“气球人”现象。
参考视频:UE5Animation 16: MMD模型與動作導入 (繁中自動字幕) 问题所在: 做法记录(自用) 1.导入pmx,删除这两个。 2.转换给blender,清理节点。 3.导出时,内嵌贴图,选“复制”。 …...
vue预览和下载 pdf、ppt、word、excel文档,文件类型为链接或者base64格式或者文件流,
** 方法1:word、xls、ppt、pdf 这些文件, 如果预览的文件是链接可以直接打开,可用微软官方的预览地址 ** <iframe width"100%" :src"textVisibleURl " id"myFramePPT" style"border: none;backgroun…...

前端如何实现大文件上传
在前端实现大文件上传的主要方法包括分片上传、断点续传、WebSocket上传和通过第三方服务上传。 分片上传:将大文件切割成多个小片段,然后分别上传。可以使用HTML5的File API和Blob对象,通过FileReader读取文件内容,然后使…...

如何评估并持续优化AI呼入机器人的使用效果
如何评估并持续优化AI呼入机器人的使用效果 作者:开源呼叫中心FreeIPCC 随着人工智能技术的快速发展,AI呼入机器人在客户服务、技术支持等多个领域得到了广泛应用。这些智能系统不仅提高了工作效率,降低了运营成本,还显著改善了…...

找不同,找原因
Yes, you can use “by the time I get back to it” instead of “get around to it,” but there’s a slight difference in tone and meaning: • “Get around to it” implies finally finding the time or motivation to do something after delaying or procrastina…...
OpenCV 学习记录:首篇
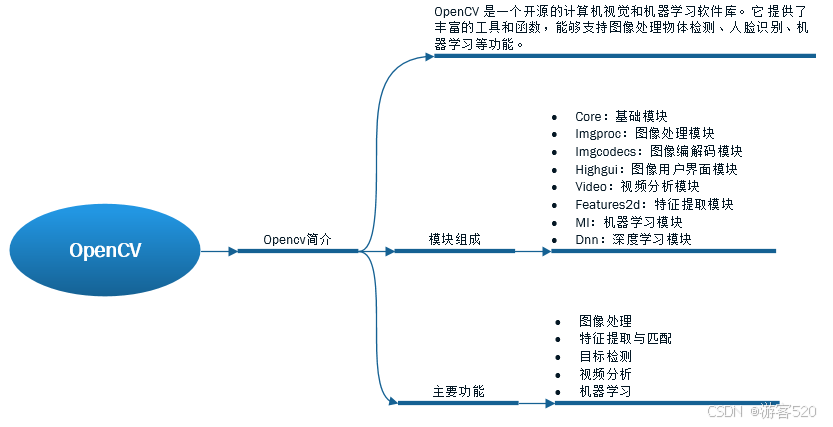
最近在学习机器视觉,希望能通过记录博客的形式来鞭策自己坚持学完,同时也把重要的知识点记录下来供参考学习。 1. OpenCV 介绍与模块组成 什么是 OpenCV? OpenCV (Open Source Computer Vision Library) 是一个开源的计算机视觉和机器学习软…...

Java项目常见基础问题汇总
在 Feign 的实现下,我们只需创建一个接口并使用注解的方式来配置它RESTful API 与 SOAP、GraphQL 等其他 API 设计方式各有优劣,发者应根据具体业务需求选择合适的架构Dubbo开始于电商系统,大公司在OSI网络通信模型中,RPC跨越了传…...
git 删除鉴权缓存及账号信息
在Windows系统下 清除凭证管理器中的Git凭据 按下Win R键,打开“运行”对话框,输入control,然后回车,打开控制面板。在控制面板中找到“用户账户”,然后点击“凭据管理器”。在凭据管理器中,找到“Windows…...
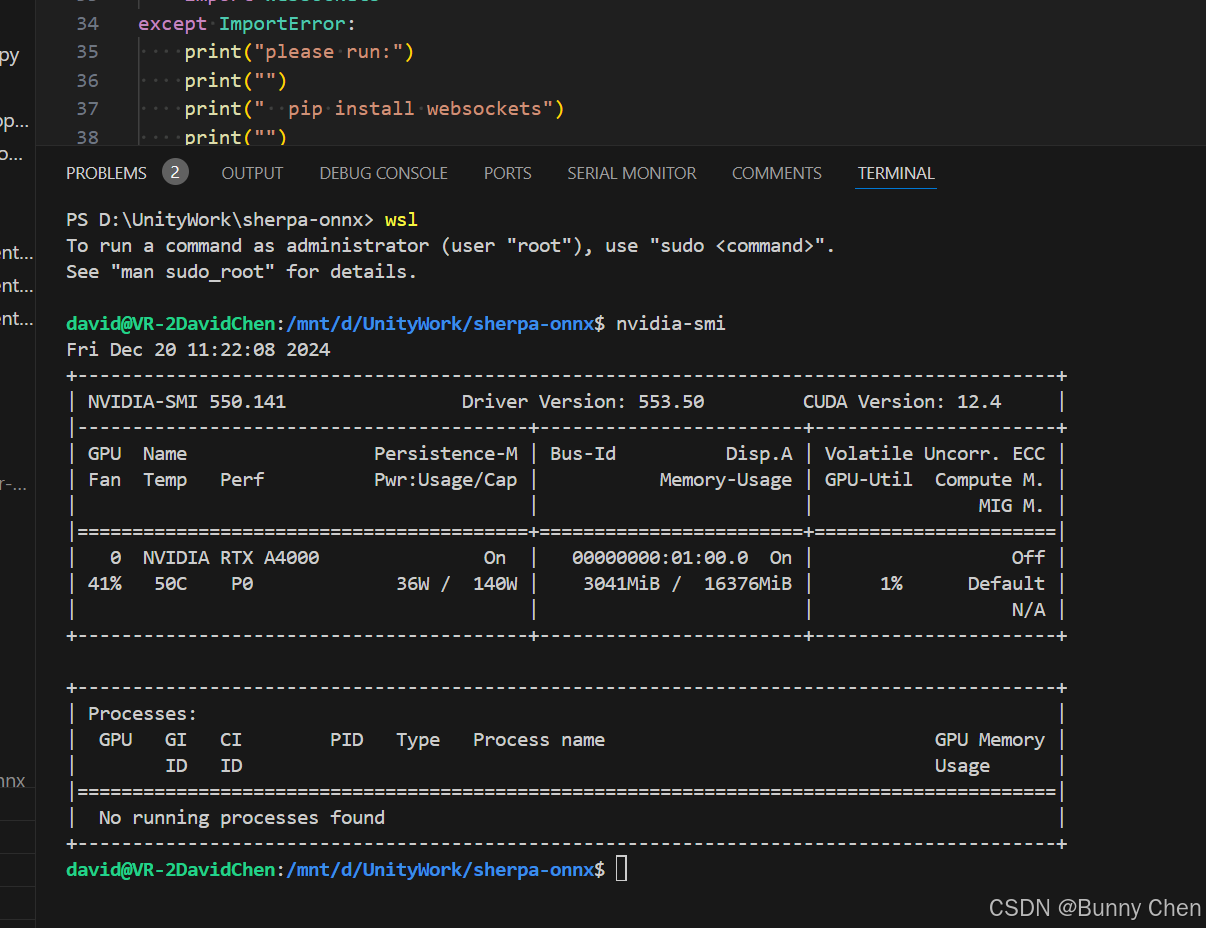
Windows中运行Linux(WSL)
Windows Subsystem for Linux(WSL)是一个在Windows 10和更高版本上运行Linux二进制可执行文件(ELF格式)的兼容层。它允许你在Windows上直接运行Linux环境,包括大多数命令行工具、实用程序和应用程序,无需修…...
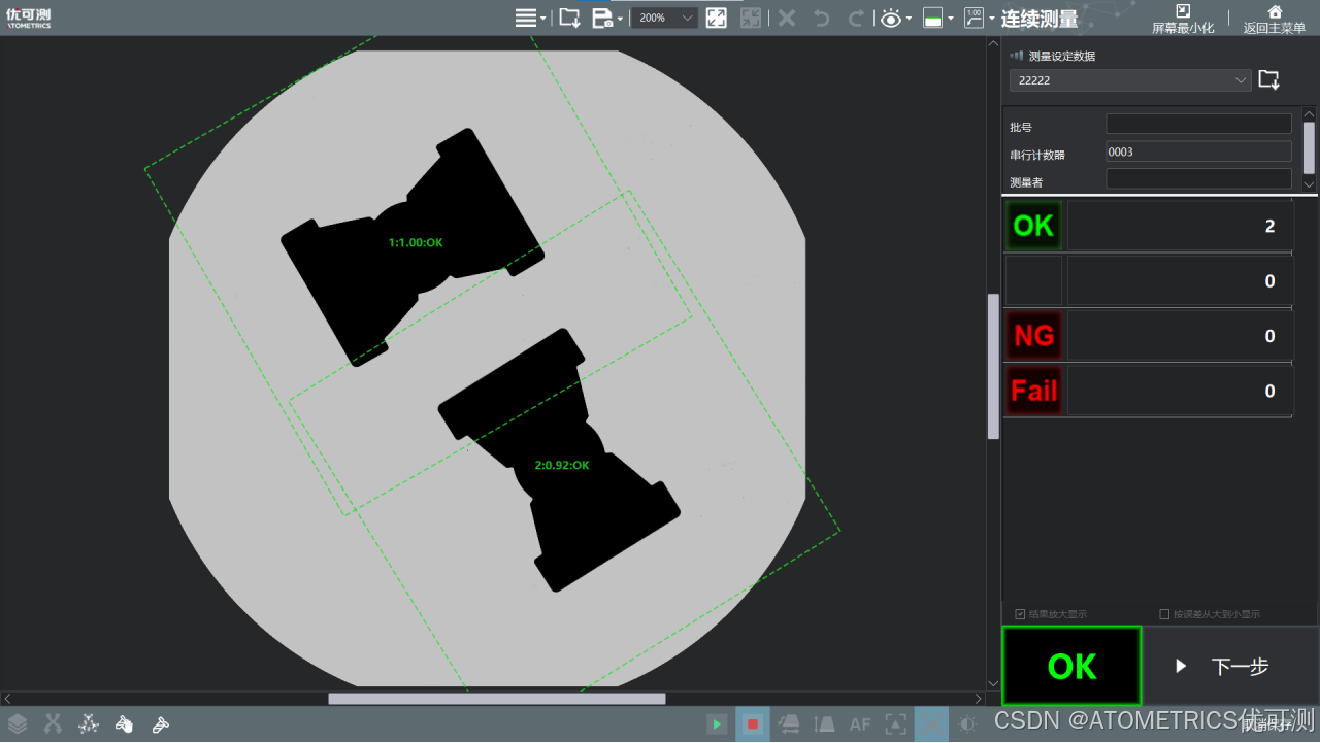
一键尺寸测量仪:磁芯尺寸测量的优选方案
由于风电、新能源汽车、机器人、工业自动化和无线充电等下游应用领域的快速发展,磁性材料行业近年来产值不断扩大,全球磁性材料市场规模在2022年突破了350亿美元,中国市场规模达800亿元人民币。特别是电子行业,无线充电技术、电感…...

[创业之路-197]:华为的发展路径启示
目录 前言: 一、由小公司走向大公司: 二、由农村包围城市: 三、由国内走向国际: 四、由代理商走向设备商,再到系统方案商,再到生态系统的搭建: 五、由随性到跟随,到赶超&#…...

【计算机网络】lab2 Ethernet(链路层Ethernet frame结构细节)
🌈 个人主页:十二月的猫-CSDN博客 🔥 系列专栏: 🏀计算机网络_十二月的猫的博客-CSDN博客 💪🏻 十二月的寒冬阻挡不了春天的脚步,十二点的黑夜遮蔽不住黎明的曙光 目录 1. 前言 2.…...
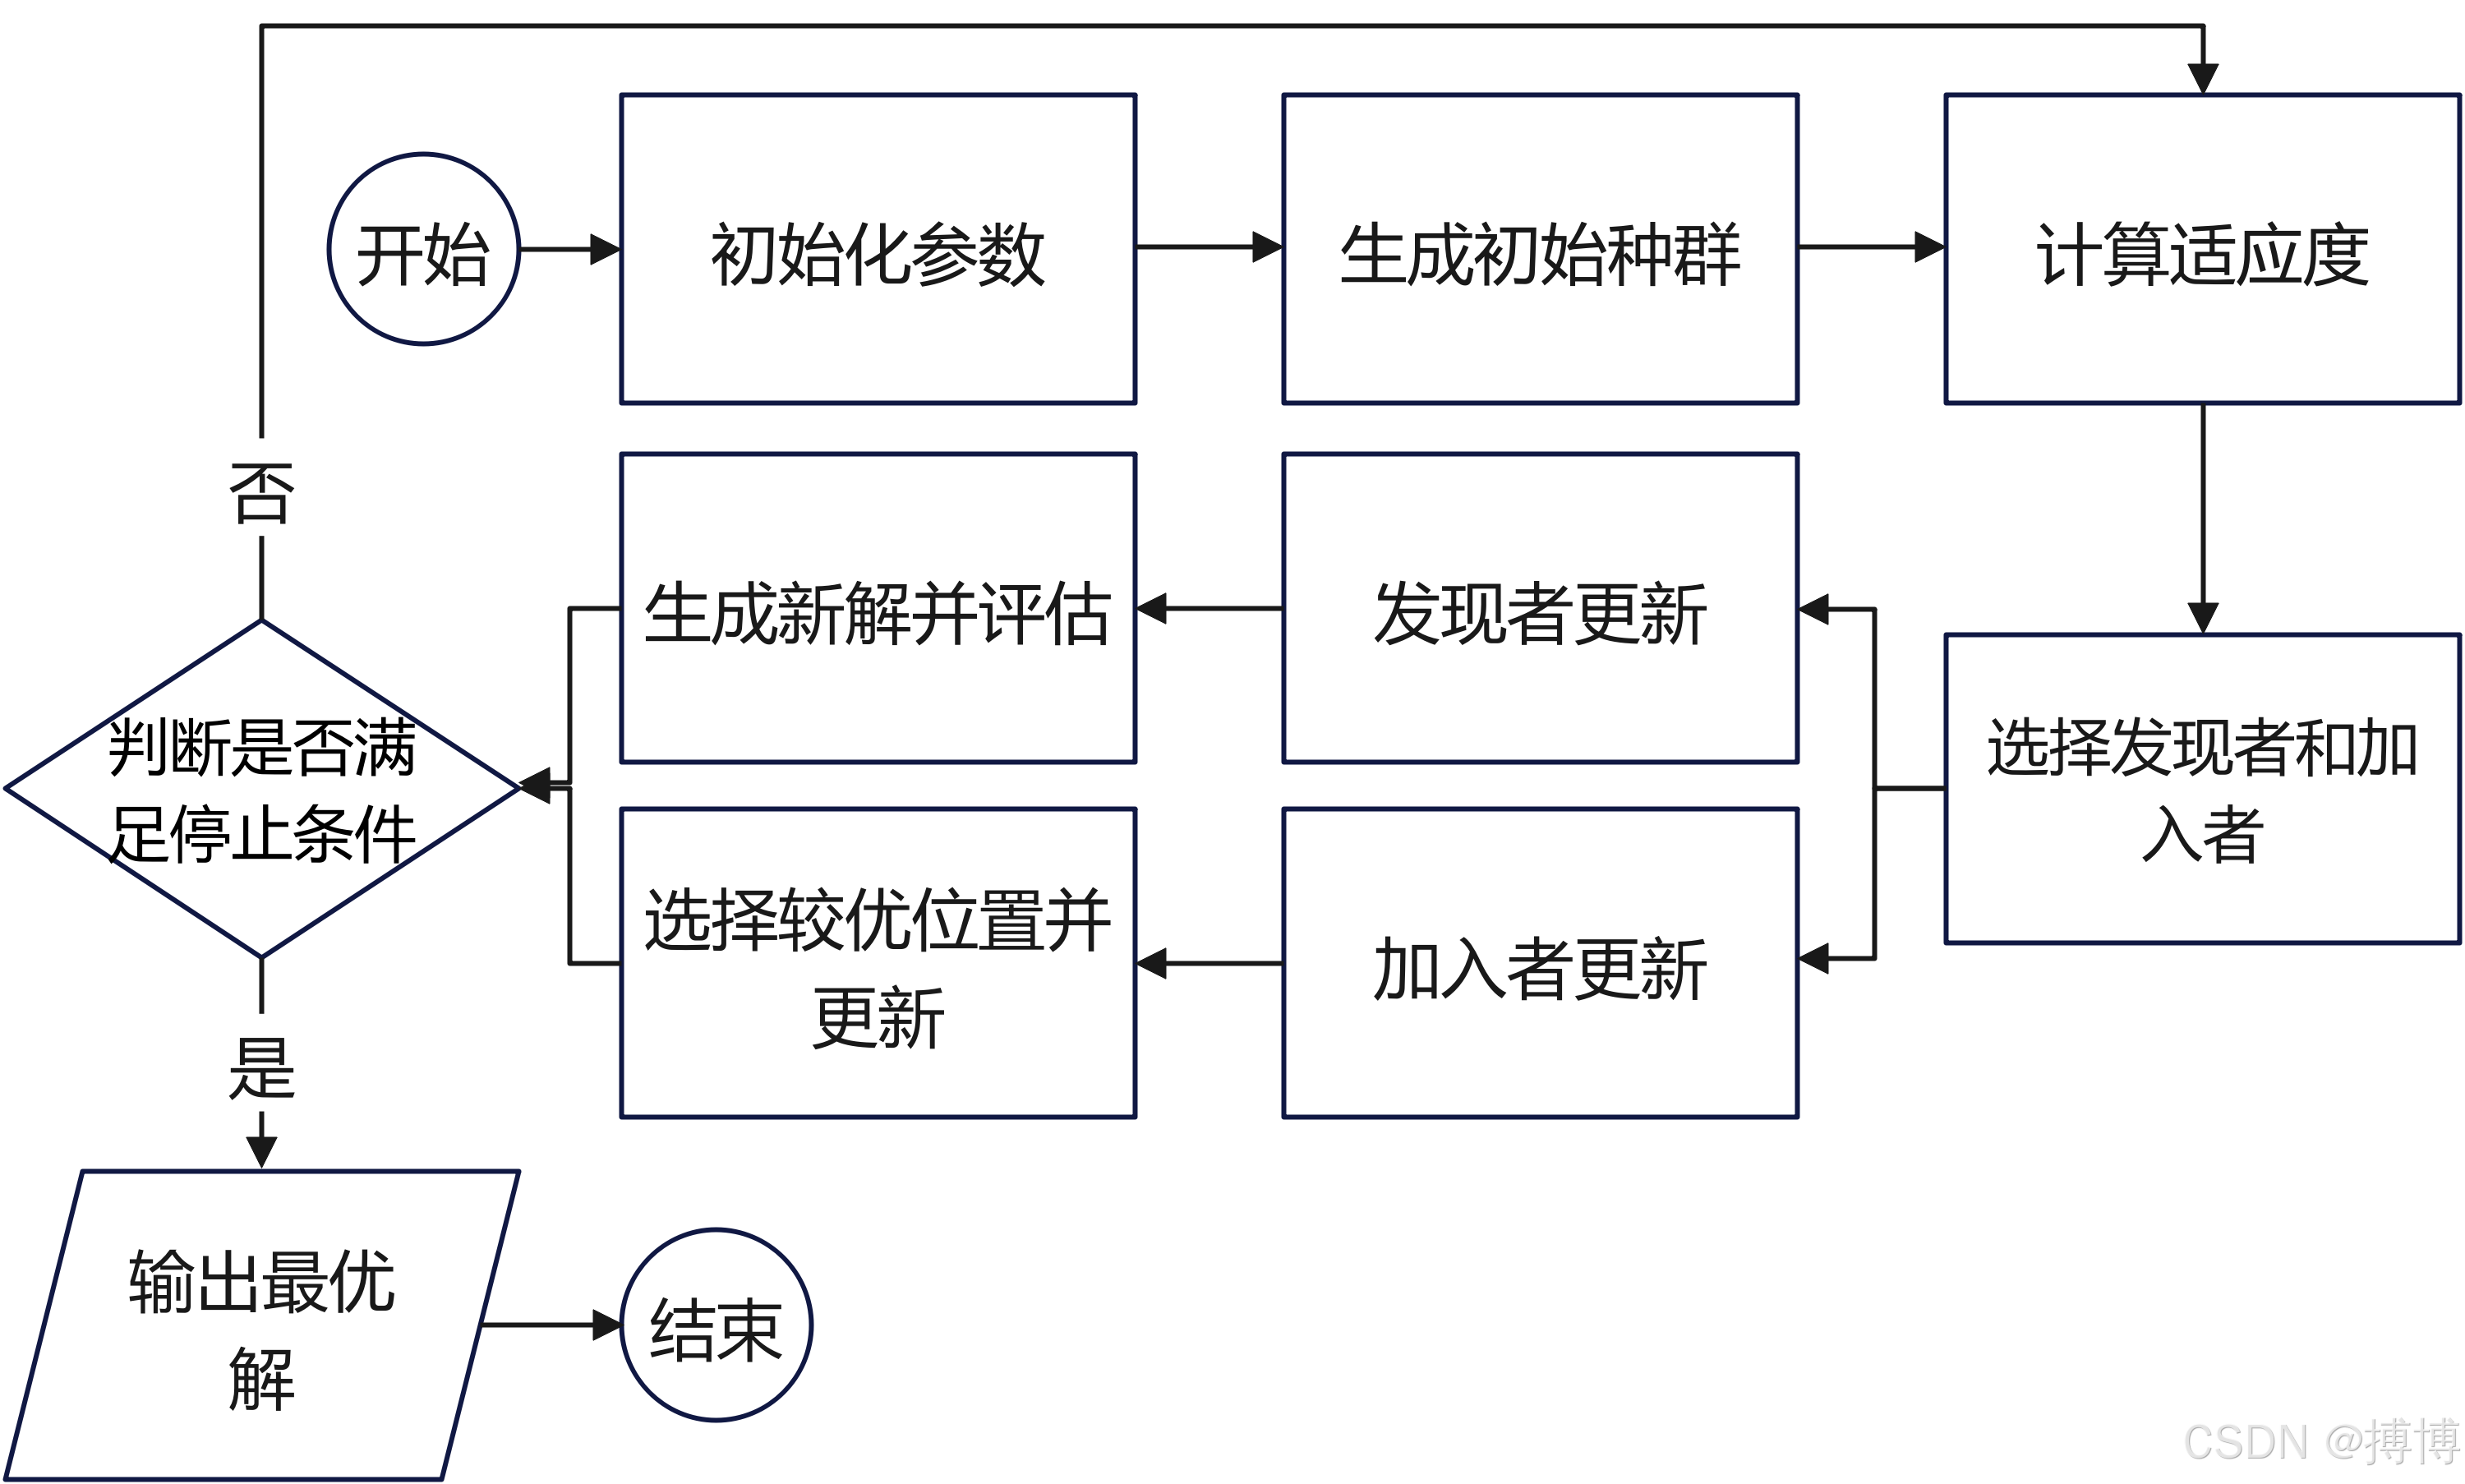
路径规划之启发式算法之二十:麻雀搜索算法(Sparrow Search Algorithm,SSA)
麻雀搜索算法(Sparrow Search Algorithm,SSA)是一种受麻雀觅食和反捕食行为启发的新型的群智能优化算法,它模拟了麻雀种群的觅食行为和反捕食行为的生物学群体特征。该算法由薛建凯在2020年首次提出,旨在解决全局优化问题,具有求解精度高、效率高等特点。 一、算法原理 S…...

从怀疑到真香!2026我日常办公离不开的这款在线文字转换器太好用了
刚入职那半年我踩过太多坑:一周三次新人培训,怕漏记知识点全程录音,下课手动整理1小时录音要熬3小时,知识点散得根本没法复习;部门周会做完记录,散会就要我出整理好的纪要,赶工赶得饭都吃不上&a…...

告别命令行!用Python脚本批量管理Docker容器,效率提升不止一点点
告别命令行!用Python脚本批量管理Docker容器,效率提升不止一点点每次在终端敲入docker ps、docker stop、docker rm时,你是否想过——当容器数量超过两位数,这种重复劳动是否在消耗你的生命?去年我们团队在迁移微服务架…...

SwitchyOmega+Burp无感抓包实战:解决HTTPS拦截与流量路由难题
1. 为什么“无感抓包”是BurpSuite日常使用的分水岭刚接触Web安全测试的朋友常有个错觉:装上Burp Suite,配好代理,打开浏览器,点几下网页——流量就该自动进来了。结果现实是:首页打不开、登录态丢失、HTTPS报错满屏、…...

HFSS仿真结果怎么看?一文读懂S参数与电场图,让你的T型波导分析不再迷茫
HFSS仿真结果深度解析:从S参数到电场图的工程实践指南面对HFSS仿真生成的复杂数据图表,许多工程师常陷入"看得见数据却读不懂含义"的困境。本文将带您穿透数据表象,掌握T型波导性能分析的核心方法论。1. S参数:波导性能…...

告别道路预测老套路:用ParkPredict+模型思路,解决停车场里的‘鬼探头’难题
破解泊车场景预测困局:ParkPredict模型的技术革新与实践停车场里的每一次转向、倒车和避让,都是对自动驾驶系统预测能力的极限挑战。与开放道路的规则明确不同,这里没有清晰的车道线指引,没有统一的行驶方向,只有随时可…...
)
Windows 10/11系统下,SecureCRT 8.7.2保姆级安装与激活图文指南(含Keygen使用避坑点)
Windows平台SecureCRT 8.7.2全流程部署与安全配置指南在当今远程运维与网络管理的日常工作中,一款可靠的终端仿真工具如同工程师的瑞士军刀。作为行业标杆的SecureCRT,其8.7.2版本在Windows 10/11环境下的部署却常让新手陷入各种技术陷阱——从安装路径选…...

2026年,揭秘那些真正安全的原生态食材厂家你不可不知的秘密
随着人们生活水平的提升以及对健康的日益重视,选择真正安全的原生态食材已经成为许多人购买食物的标准。但市场的繁杂使得甄别真正安全的食材厂家变得愈加困难。今天,我将通过几个关键角度,为大家揭秘那些真正安全的原生态食材厂家的秘密&…...
)
ROS Noetic实战:从bag包里‘抠’出雷达点云和IMU数据的保姆级教程(Ubuntu 20.04)
ROS Noetic实战:从bag包里提取雷达点云和IMU数据的完整指南(Ubuntu 20.04)在机器人开发中,ROS bag文件就像是一个装满珍贵数据的宝箱,而雷达点云和IMU数据则是其中最闪亮的宝石。作为一名长期与ROS打交道的开发者&…...

Graphin高级应用:结合GISDK构建配置化图分析模块的完整指南
Graphin高级应用:结合GISDK构建配置化图分析模块的完整指南 【免费下载链接】Graphin 🌌 A React toolkit for graph visualization based on G6. 项目地址: https://gitcode.com/gh_mirrors/gr/Graphin 在当今数据驱动的时代,图可视化…...

多模型聚合平台如何助力网站AIB测试与选型
🚀 告别海外账号与网络限制!稳定直连全球优质大模型,限时半价接入中。 👉 点击领取海量免费额度 多模型聚合平台如何助力网站AIB测试与选型 对于网站产品经理而言,首页文案的生成质量直接影响用户的第一印象和转化率。…...