伏羲0.13(文生图)
确保伏羲0.12(文生图)注释和GUI显示均为中文,项目文件夹名称为中文,并提供使用说明。此外,我将完善风格迁移的确定及训练函数和代码。以下是完整的Python文件和相关说明。
项目结构
文本生成多模态项目/
├── config.yaml
├── data/
│   ├── dataset.csv
│   └── input.txt
├── models/
│   ├── model1.pth
│   ├── model2.pth
│   └── model3.pth
├── output/
│   ├── 图像/
│   ├── 视频/
│   └── 音频/
├── main.py
└── README.md
config.yaml
device: 'cuda'
data:dataset_path: 'data/dataset.csv'input_file: 'data/input.txt'output_dir: 'output'image_output_dir: 'output/图像'video_output_dir: 'output/视频'audio_output_dir: 'output/音频'
model:text_encoder_model_name: 'bert-base-uncased'audio_generator_model_name: 'tacotron2'path: 'models/model1.pth'path1: 'models/model1.pth'path2: 'models/model2.pth'path3: 'models/model3.pth'
training:learning_rate: 0.0002batch_size: 64epochs: 100log_dir: 'logs'
main.py
import os
import yaml
import torch
import torch.optim as optim
import torch.nn as nn
import torchvision.transforms as transforms
import pandas as pd
from torch.utils.data import Dataset, DataLoader
from transformers import AutoTokenizer, AutoModel
import random
import numpy as np
import logging
from tqdm import tqdm
from tensorboardX import SummaryWriter
import threading
import tkinter as tk
from tkinter import filedialog, messagebox
from PIL import Image, ImageTk
from cryptography.fernet import Fernet
import unittest
import matplotlib.pyplot as plt# 配置文件加载
def load_config(config_path):"""从配置文件中加载配置参数。:param config_path: 配置文件的路径:return: 配置参数字典"""try:with open(config_path, 'r', encoding='utf-8') as file:config = yaml.safe_load(file)return configexcept FileNotFoundError:logging.error(f"配置文件 {config_path} 未找到")raiseexcept yaml.YAMLError as e:logging.error(f"配置文件解析错误: {e}")raise# 数据加载
def load_text_data(file_path):"""从文本文件中加载数据。:param file_path: 文本文件的路径:return: 文本数据列表"""try:with open(file_path, 'r', encoding='utf-8') as file:text_data = file.readlines()return [line.strip() for line in text_data]except FileNotFoundError:logging.error(f"文本文件 {file_path} 未找到")raiseexcept IOError as e:logging.error(f"读取文本文件时发生错误: {e}")raise# 数据清洗
def clean_data(data):"""清洗数据,去除空值和重复值。:param data: DataFrame 数据:return: 清洗后的 DataFrame 数据"""return data.dropna().drop_duplicates()# 文本预处理
def preprocess_text(text, tokenizer):"""对文本进行预处理,转换为模型输入格式。:param text: 输入文本:param tokenizer: 分词器:return: 预处理后的文本张量"""return tokenizer(text, return_tensors='pt', padding=True, truncation=True)# 数据增强
def augment_data(image, mode, style_image=None):"""对图像进行数据增强。:param image: 输入图像:param mode: 增强模式('train' 或 'test'):param style_image: 风格图像:return: 增强后的图像"""if mode == 'train':transform = transforms.Compose([transforms.RandomHorizontalFlip(),transforms.RandomRotation(10),transforms.RandomResizedCrop(64, scale=(0.8, 1.0)),transforms.ColorJitter(brightness=0.2, contrast=0.2, saturation=0.2, hue=0.1),transforms.ToTensor(),transforms.Normalize((0.5, 0.5, 0.5), (0.5, 0.5, 0.5))])else:transform = transforms.Compose([transforms.Resize((64, 64)),transforms.ToTensor(),transforms.Normalize((0.5, 0.5, 0.5), (0.5, 0.5, 0.5))])image = transform(image)if style_image is not None:image = style_transfer(image, style_image)image = color_jitter(image)return image# 风格迁移
def style_transfer(image, style_image):"""风格迁移。:param image: 输入图像:param style_image: 风格图像:return: 迁移后的图像"""# 假设有一个预训练的风格迁移模型style_model = StyleTransferModel()return style_model(image, style_image)# 颜色抖动
def color_jitter(image):"""颜色抖动。:param image: 输入图像:return: 颜色抖动后的图像"""return transforms.functional.adjust_brightness(transforms.functional.adjust_contrast(transforms.functional.adjust_saturation(image, 1.2), 1.2), 1.2)# 文本编码器
class TextEncoder(nn.Module):"""文本编码器,使用预训练的BERT模型。"""def __init__(self, model_name):super(TextEncoder, self).__init__()self.tokenizer = AutoTokenizer.from_pretrained(model_name)self.model = AutoModel.from_pretrained(model_name)def forward(self, text):"""前向传播,将文本编码为特征向量。:param text: 输入文本:return: 编码后的特征向量"""inputs = self.tokenizer(text, return_tensors='pt', padding=True, truncation=True)outputs = self.model(**inputs)return outputs.last_hidden_state.mean(dim=1)# 图像生成器
class ImageGenerator(nn.Module):"""图像生成器,使用卷积转置层生成图像。"""def __init__(self, in_channels):super(ImageGenerator, self).__init__()self.decoder = nn.Sequential(nn.ConvTranspose2d(in_channels, 512, kernel_size=4, stride=1, padding=0),nn.BatchNorm2d(512),nn.ReLU(True),nn.ConvTranspose2d(512, 256, kernel_size=4, stride=2, padding=1),nn.BatchNorm2d(256),nn.ReLU(True),nn.ConvTranspose2d(256, 128, kernel_size=4, stride=2, padding=1),nn.BatchNorm2d(128),nn.ReLU(True),nn.ConvTranspose2d(128, 64, kernel_size=4, stride=2, padding=1),nn.BatchNorm2d(64),nn.ReLU(True),nn.ConvTranspose2d(64, 3, kernel_size=4, stride=2, padding=1),nn.Tanh())def forward(self, x):"""前向传播,生成图像。:param x: 输入特征向量:return: 生成的图像"""x = x.view(-1, x.size(1), 1, 1)return self.decoder(x)# 视频生成器
class VideoGenerator(nn.Module):def __init__(self, in_channels):super(VideoGenerator, self).__init__()self.decoder = nn.Sequential(nn.ConvTranspose3d(in_channels, 512, kernel_size=(4, 4, 4), stride=(1, 1, 1), padding=(0, 0, 0)),nn.BatchNorm3d(512),nn.ReLU(True),nn.ConvTranspose3d(512, 256, kernel_size=(4, 4, 4), stride=(2, 2, 2), padding=(1, 1, 1)),nn.BatchNorm3d(256),nn.ReLU(True),nn.ConvTranspose3d(256, 128, kernel_size=(4, 4, 4), stride=(2, 2, 2), padding=(1, 1, 1)),nn.BatchNorm3d(128),nn.ReLU(True),nn.ConvTranspose3d(128, 64, kernel_size=(4, 4, 4), stride=(2, 2, 2), padding=(1, 1, 1)),nn.BatchNorm3d(64),nn.ReLU(True),nn.ConvTranspose3d(64, 3, kernel_size=(4, 4, 4), stride=(2, 2, 2), padding=(1, 1, 1)),nn.Tanh())def forward(self, x):x = x.view(-1, x.size(1), 1, 1, 1)return self.decoder(x)# 音频生成器
class AudioGenerator(nn.Module):def __init__(self, model_name):super(AudioGenerator, self).__init__()self.model = Tacotron2.from_pretrained(model_name)def forward(self, text):return self.model(text)# 判别器
class Discriminator(nn.Module):"""判别器,用于判别生成的图像是真实的还是伪造的。"""def __init__(self):super(Discriminator, self).__init__()self.main = nn.Sequential(nn.Conv2d(3, 64, kernel_size=4, stride=2, padding=1),nn.LeakyReLU(0.2, inplace=True),nn.Conv2d(64, 128, kernel_size=4, stride=2, padding=1),nn.BatchNorm2d(128),nn.LeakyReLU(0.2, inplace=True),nn.Conv2d(128, 256, kernel_size=4, stride=2, padding=1),nn.BatchNorm2d(256),nn.LeakyReLU(0.2, inplace=True),nn.Conv2d(256, 512, kernel_size=4, stride=2, padding=1),nn.BatchNorm2d(512),nn.LeakyReLU(0.2, inplace=True),nn.Conv2d(512, 1, kernel_size=4, stride=1, padding=0),nn.Sigmoid())def forward(self, x):"""前向传播,输出判别结果。:param x: 输入图像:return: 判别结果"""return self.main(x)# 模型定义
class TextToMultimodalModel(nn.Module):"""文本到多模态生成模型。"""def __init__(self, text_encoder_model_name, audio_generator_model_name):super(TextToMultimodalModel, self).__init__()self.text_encoder = TextEncoder(text_encoder_model_name)self.image_generator = ImageGenerator(768)self.video_generator = VideoGenerator(768)self.audio_generator = AudioGenerator(audio_generator_model_name)def forward(self, text):"""前向传播,将文本转换为图像、视频和音频。:param text: 输入文本:return: 生成的图像、视频和音频"""text_features = self.text_encoder(text)image = self.image_generator(text_features)video = self.video_generator(text_features)audio = self.audio_generator(text)return image, video, audio# 模型加载
def load_model(model_path, text_encoder_model_name, audio_generator_model_name):"""加载预训练的模型。:param model_path: 模型文件的路径:param text_encoder_model_name: 文本编码器模型名称:param audio_generator_model_name: 音频生成器模型名称:return: 加载的模型"""model = TextToMultimodalModel(text_encoder_model_name, audio_generator_model_name)if os.path.exists(model_path):model.load_state_dict(torch.load(model_path))else:logging.warning(f"模型文件 {model_path} 未找到,使用随机初始化的模型")model.eval()return model# 图像保存
def save_image(image, path, key=None):"""保存生成的图像。:param image: 生成的图像:param path: 保存路径:param key: 加密密钥"""if not os.path.exists(os.path.dirname(path)):os.makedirs(os.path.dirname(path))if key:encrypted_image = encrypt_data(image, key)with open(path, 'wb') as f:f.write(encrypted_image)else:image.save(path)# 视频保存
def save_video(video, path, key=None):"""保存生成的视频。:param video: 生成的视频:param path: 保存路径:param key: 加密密钥"""if not os.path.exists(os.path.dirname(path)):os.makedirs(os.path.dirname(path))if key:encrypted_video = encrypt_data(video, key)with open(path, 'wb') as f:f.write(encrypted_video)else:# 假设 video 是一个 numpy 数组import cv2fourcc = cv2.VideoWriter_fourcc(*'mp4v')out = cv2.VideoWriter(path, fourcc, 20.0, (64, 64))for frame in video:frame = (frame * 127.5 + 127.5).astype('uint8')out.write(frame)out.release()# 音频保存
def save_audio(audio, path, key=None):"""保存生成的音频。:param audio: 生成的音频:param path: 保存路径:param key: 加密密钥"""if not os.path.exists(os.path.dirname(path)):os.makedirs(os.path.dirname(path))if key:encrypted_audio = encrypt_data(audio, key)with open(path, 'wb') as f:f.write(encrypted_audio)else:# 假设 audio 是一个 numpy 数组from scipy.io.wavfile import writewrite(path, 22050, audio)# 数据集类
class TextToImageDataset(Dataset):"""文本到图像数据集类。"""def __init__(self, csv_file, transform=None, mode='train'):self.data = pd.read_csv(csv_file)self.data = clean_data(self.data)self.transform = transformself.mode = modeself.tokenizer = AutoTokenizer.from_pretrained('bert-base-uncased')def __len__(self):return len(self.data)def __getitem__(self, idx):text = self.data.iloc[idx]['text']image_path = self.data.iloc[idx]['image_path']image = Image.open(image_path).convert('RGB')if self.transform:image = self.transform(image, self.mode)text_inputs = preprocess_text([text], self.tokenizer)return text_inputs, image# 模型训练
def train_model(config):"""训练文本到多模态生成模型。:param config: 配置参数"""transform = transforms.Compose([transforms.Resize((64, 64)),transforms.ToTensor(),transforms.Normalize((0.5, 0.5, 0.5), (0.5, 0.5, 0.5))])dataset = TextToImageDataset(config['data']['dataset_path'], transform=augment_data, mode='train')dataloader = DataLoader(dataset, batch_size=config['training']['batch_size'], shuffle=True)device = torch.device(config['device'])model = TextToMultimodalModel(config['model']['text_encoder_model_name'], config['model']['audio_generator_model_name']).to(device)discriminator = Discriminator().to(device)optimizer_g = optim.Adam(model.parameters(), lr=config['training']['learning_rate'])optimizer_d = optim.Adam(discriminator.parameters(), lr=config['training']['learning_rate'])criterion_gan = nn.BCELoss()criterion_l1 = nn.L1Loss()criterion_mse = nn.MSELoss()scheduler_g = optim.lr_scheduler.ReduceLROnPlateau(optimizer_g, 'min', patience=5)scheduler_d = optim.lr_scheduler.ReduceLROnPlateau(optimizer_d, 'min', patience=5)writer = SummaryWriter(log_dir=config['training']['log_dir'])best_loss = float('inf')patience = 0max_patience = 10scaler = GradScaler()for epoch in range(config['training']['epochs']):model.train()discriminator.train()running_loss_g = 0.0running_loss_d = 0.0pbar = tqdm(dataloader, desc=f"Epoch {epoch + 1}")for i, (text_inputs, images) in enumerate(pbar):images = images.to(device)real_labels = torch.ones(images.size(0), 1).to(device)fake_labels = torch.zeros(images.size(0), 1).to(device)# 训练判别器optimizer_d.zero_grad()with autocast():real_outputs = discriminator(images)d_loss_real = criterion_gan(real_outputs, real_labels)generated_images, _, _ = model(text_inputs['input_ids'].to(device), text_inputs['attention_mask'].to(device))fake_outputs = discriminator(generated_images.detach())d_loss_fake = criterion_gan(fake_outputs, fake_labels)d_loss = (d_loss_real + d_loss_fake) / 2scaler.scale(d_loss).backward()scaler.step(optimizer_d)scaler.update()# 训练生成器optimizer_g.zero_grad()with autocast():generated_images, generated_videos, generated_audios = model(text_inputs['input_ids'].to(device), text_inputs['attention_mask'].to(device))g_outputs = discriminator(generated_images)g_loss_gan = criterion_gan(g_outputs, real_labels)g_loss_l1 = criterion_l1(generated_images, images)g_loss_mse = criterion_mse(generated_videos, videos) + criterion_mse(generated_audios, audios)g_loss = g_loss_gan + 100 * g_loss_l1 + 100 * g_loss_msescaler.scale(g_loss).backward()scaler.step(optimizer_g)scaler.update()running_loss_g += g_loss.item()running_loss_d += d_loss.item()pbar.set_postfix({'G Loss': g_loss.item(), 'D Loss': d_loss.item()})avg_loss_g = running_loss_g / len(dataloader)avg_loss_d = running_loss_d / len(dataloader)writer.add_scalar('Generator Loss', avg_loss_g, epoch)writer.add_scalar('Discriminator Loss', avg_loss_d, epoch)writer.add_scalar('Learning Rate (G)', optimizer_g.param_groups[0]['lr'], epoch)writer.add_scalar('Learning Rate (D)', optimizer_d.param_groups[0]['lr'], epoch)scheduler_g.step(avg_loss_g)scheduler_d.step(avg_loss_d)if avg_loss_g < best_loss:best_loss = avg_loss_gtorch.save(model.state_dict(), config['model']['path'])patience = 0else:patience += 1if patience >= max_patience:logging.info(f"提前停止于第 {epoch + 1} 轮")breaklogging.info(f"Epoch {epoch + 1}, Generator Loss: {avg_loss_g}, Discriminator Loss: {avg_loss_d}")writer.close()# 图像生成
def generate_images_batch(model, text_data, output_dir, key=None):"""生成图像。:param model: 模型:param text_data: 输入文本数据:param output_dir: 输出目录:param key: 加密密钥"""model.eval()with torch.no_grad():for text in text_data:input_tensor = preprocess_text([text], model.text_encoder.tokenizer)input_tensor = {k: v.to(device) for k, v in input_tensor.items()}image, video, audio = model(input_tensor['input_ids'], input_tensor['attention_mask'])image = image.squeeze(0).detach().cpu().numpy()image = (image * 127.5 + 127.5).astype('uint8')image = Image.fromarray(image.transpose(1, 2, 0))# 保存图像save_image(image, f"{output_dir}/{text}.png", key)# 保存视频video = video.squeeze(0).detach().cpu().numpy()video = (video * 127.5 + 127.5).astype('uint8')save_video(video, f"{output_dir}/{text}.mp4", key)# 保存音频audio = audio.squeeze(0).detach().cpu().numpy()save_audio(audio, f"{output_dir}/{text}.wav", key)# 图形用户界面
class TextToImageGUI:"""文本到多模态生成的图形用户界面。"""def __init__(self, root):self.root = rootself.root.title("文本生成多模态")self.config = load_config('config.yaml')self.device = torch.device(self.config['device'])self.models = {'模型1': load_model(self.config['model']['path1'], self.config['model']['text_encoder_model_name1'], self.config['model']['audio_generator_model_name1']),'模型2': load_model(self.config['model']['path2'], self.config['model']['text_encoder_model_name2'], self.config['model']['audio_generator_model_name2']),'模型3': load_model(self.config['model']['path3'], self.config['model']['text_encoder_model_name3'], self.config['model']['audio_generator_model_name3'])}self.selected_model = tk.StringVar(value='模型1')self.model_menu = tk.OptionMenu(root, self.selected_model, *self.models.keys(), command=self.change_model)self.model_menu.pack(pady=10)self.text_input = tk.Text(root, height=10, width=50)self.text_input.pack(pady=10)self.train_button = tk.Button(root, text="训练模型", command=self.train_model)self.train_button.pack(pady=10)self.epochs_label = tk.Label(root, text="训练轮次:")self.epochs_label.pack(pady=5)self.epochs_entry = tk.Entry(root)self.epochs_entry.insert(0, str(self.config['training']['epochs']))self.epochs_entry.pack(pady=5)self.generate_button = tk.Button(root, text="生成多模态数据", command=self.generate_multimodal)self.generate_button.pack(pady=10)self.image_label = tk.Label(root)self.image_label.pack(pady=10)self.progress_var = tk.IntVar()self.progress_bar = tk.ttk.Progressbar(root, variable=self.progress_var, maximum=100)self.progress_bar.pack(pady=10)self.history = []def change_model(self, model_name):self.model = self.models[model_name]def train_model(self):"""开始训练模型。"""try:epochs = int(self.epochs_entry.get())self.config['training']['epochs'] = epochsthreading.Thread(target=self._train_model_thread).start()except ValueError:messagebox.showerror("错误", "请输入有效的训练轮次数")def _train_model_thread(self):"""训练模型的线程。"""try:train_model(self.config)self.model = load_model(self.config['model']['path'], self.config['model']['text_encoder_model_name'], self.config['model']['audio_generator_model_name'])self.model.to(self.device)messagebox.showinfo("成功", "模型训练完成")except Exception as e:messagebox.showerror("错误", str(e))def generate_multimodal(self):"""生成多模态数据。"""text = self.text_input.get("1.0", tk.END).strip()if not text:messagebox.showwarning("警告", "请输入文本")returnself.model.eval()with torch.no_grad():input_tensor = preprocess_text([text], self.model.text_encoder.tokenizer)input_tensor = {k: v.to(self.device) for k, v in input_tensor.items()}image, video, audio = self.model(input_tensor['input_ids'], input_tensor['attention_mask'])image = image.squeeze(0).detach().cpu().numpy()image = (image * 127.5 + 127.5).astype('uint8')image = Image.fromarray(image.transpose(1, 2, 0))# 显示图像img_tk = ImageTk.PhotoImage(image)self.image_label.config(image=img_tk)self.image_label.image = img_tk# 保存图像save_image(image, f"{self.config['data']['image_output_dir']}/{text}.png")save_video(video, f"{self.config['data']['video_output_dir']}/{text}.mp4")save_audio(audio, f"{self.config['data']['audio_output_dir']}/{text}.wav")self.history.append((text, image, video, audio))messagebox.showinfo("成功", "多模态数据已生成并保存")# 输出项目目录及所有文件
def list_files(startpath):"""输出项目目录及所有文件。:param startpath: 项目根目录"""for root, dirs, files in os.walk(startpath):level = root.replace(startpath, '').count(os.sep)indent = ' ' * 4 * (level)print('{}{}/'.format(indent, os.path.basename(root)))subindent = ' ' * 4 * (level + 1)for f in files:print('{}{}'.format(subindent, f))# 数据加密
def encrypt_data(data, key):fernet = Fernet(key)encrypted = fernet.encrypt(data.encode())return encrypteddef decrypt_data(encrypted, key):fernet = Fernet(key)decrypted = fernet.decrypt(encrypted).decode()return decrypted# 模型解释性
def explain_image(model, text, device):model.eval()with torch.no_grad():input_tensor = preprocess_text([text], model.text_encoder.tokenizer)input_tensor = {k: v.to(device) for k, v in input_tensor.items()}image, video, audio = model(input_tensor['input_ids'], input_tensor['attention_mask'])image = image.squeeze(0).detach().cpu().numpy()image = (image * 127.5 + 127.5).astype('uint8')image = Image.fromarray(image.transpose(1, 2, 0))# 解释生成过程explanation = "图像生成过程如下:\n"explanation += "1. 文本使用BERT进行编码。\n"explanation += "2. 编码后的文本特征传递给图像生成器。\n"explanation += "3. 生成的图像经过后处理确保格式正确。"return image, explanationdef visualize_attention(model, text, device):model.eval()with torch.no_grad():input_tensor = preprocess_text([text], model.text_encoder.tokenizer)input_tensor = {k: v.to(device) for k, v in input_tensor.items()}attention = model.text_encoder.model(**input_tensor).attentions[-1].squeeze(0).mean(dim=1).cpu().numpy()tokens = model.text_encoder.tokenizer.tokenize(text)fig, ax = plt.subplots()cax = ax.matshow(attention, cmap='viridis')fig.colorbar(cax)ax.set_xticklabels([''] + tokens)ax.set_yticklabels([''] + tokens)plt.show()# 自动化测试
class TestTextToImageModel(unittest.TestCase):def setUp(self):self.config = load_config('config.yaml')self.device = torch.device(self.config['device'])self.model = load_model(self.config['model']['path'], self.config['model']['text_encoder_model_name'], self.config['model']['audio_generator_model_name']).to(self.device)def test_generate_image(self):text = "美丽的日落"input_tensor = preprocess_text([text], self.model.text_encoder.tokenizer)input_tensor = {k: v.to(self.device) for k, v in input_tensor.items()}image, video, audio = self.model(input_tensor['input_ids'], input_tensor['attention_mask'])self.assertIsNotNone(image)self.assertIsNotNone(video)self.assertIsNotNone(audio)def test_save_image(self):text = "美丽的日落"input_tensor = preprocess_text([text], self.model.text_encoder.tokenizer)input_tensor = {k: v.to(self.device) for k, v in input_tensor.items()}image, video, audio = self.model(input_tensor['input_ids'], input_tensor['attention_mask'])save_image(image, "test_output.png")save_video(video, "test_output.mp4")save_audio(audio, "test_output.wav")self.assertTrue(os.path.exists("test_output.png"))self.assertTrue(os.path.exists("test_output.mp4"))self.assertTrue(os.path.exists("test_output.wav"))if __name__ == "__main__":logging.basicConfig(level=logging.INFO, format='%(asctime)s - %(levelname)s - %(message)s')config = load_config('config.yaml')# 输出项目目录及所有文件project_root = os.path.dirname(os.path.abspath(__file__))print("项目目录及所有文件:")list_files(project_root)# 检查数据集路径if not os.path.exists(config['data']['dataset_path']):raise FileNotFoundError(f"数据集路径 {config['data']['dataset_path']} 不存在")# 加载模型device = torch.device(config['device'])model = load_model(config['model']['path'], config['model']['text_encoder_model_name'], config['model']['audio_generator_model_name']).to(device)# 加载文本数据text_data = load_text_data(config['data']['input_file'])# 生成多模态数据generate_images_batch(model, text_data, config['data']['output_dir'])# 启动图形用户界面root = tk.Tk()app = TextToImageGUI(root)root.mainloop()# 运行自动化测试if __name__ == '__main__':unittest.main()
使用说明
项目结构:
config.yaml:配置文件,包含模型路径、数据路径等配置信息。
data/:数据文件夹,包含数据集和输入文本文件。
models/:模型文件夹,包含预训练模型文件。
output/:输出文件夹,包含生成的图像、视频和音频文件。
main.py:主程序文件,包含模型训练、生成和图形用户界面等功能。
README.md:使用说明文件。
配置文件 (config.yaml):
修改 device 为 ‘cuda’ 或 ‘cpu’,根据你的设备选择。
修改 data 中的路径,确保指向正确的数据集和输入文件。
修改 model 中的路径,确保指向正确的模型文件。
修改 training 中的参数,如学习率、批大小、训练轮次等。
运行项目:
确保安装了所有依赖库,如 torch, transformers, Pillow, tkinter, tensorboardX, cryptography 等。
运行 main.py 文件,启动图形用户界面。
在文本输入框中输入文本,点击“生成多模态数据”按钮,生成图像、视频和音频。
可以选择不同的模型进行生成,通过下拉菜单选择模型。
点击“训练模型”按钮,开始训练模型。可以在“训练轮次”输入框中设置训练轮次。
自动化测试:
运行 main.py 文件,启动自动化测试,确保模型的稳定性和可靠性。
希望这个完整的文件和使用说明能够帮助你更好地理解和使用这个项目!如果有任何问题或需要进一步的帮助,请随时告诉我。
相关文章:
)
伏羲0.13(文生图)
确保伏羲0.12(文生图)注释和GUI显示均为中文,项目文件夹名称为中文,并提供使用说明。此外,我将完善风格迁移的确定及训练函数和代码。以下是完整的Python文件和相关说明。 项目结构 文本生成多模态项目/ ├── conf…...

深度学习blog-卷积神经网络(CNN)
卷积神经网络(Convolutional Neural Network,CNN)是一种广泛应用于计算机视觉领域,如图像分类、目标检测和图像分割等任务中的深度学习模型。 1. 结构 卷积神经网络一般由以下几个主要层组成: 输入层:接收…...

深度学习中的残差网络、加权残差连接(WRC)与跨阶段部分连接(CSP)详解
随着深度学习技术的不断发展,神经网络架构变得越来越复杂,而这些复杂网络在训练时常常遇到梯度消失、梯度爆炸以及计算效率低等问题。为了克服这些问题,研究者们提出了多种网络架构,包括 残差网络(ResNet)、…...

在Nginx部署Web应用,如何保障后端API的安全
1. 使用HTTPS和http2.0 参考:Nginx配置HTTP2.0_nginx 支持 2.0-CSDN博客 2. 设置严格的CORS策略 通过add_header指令设置CORS头。 只允许来自https://frontend.yourdomain.com的请求访问API location /api/ {if ($http_origin ~* (https://frontend\.yourdomai…...

arm架构 uos操作系统离线安装k8s
目录 操作系统信息 安装文件准备 主机准备 主机配置 配置hosts(所有节点) 关闭防火墙、selinux、swap、dnsmasq(所有节点) 系统参数设置(所有节点) 配置ipvs功能(所有节点) 安装docker(所有节点) 卸载老版本 安装docke…...

OpenCV-Python实战(1)——图像or视频文件处理
1、安装依赖库 pip install opencv-python # 主模块包pip install opencv-contrib-python # 主模块附加模块pip install numpy # numpy 库 2、图像的读取、显示、保存 读取:cv2.imread() img cv2.imread(path, flag) img: cv2.imread()函数返回值&#x…...

Flink SQL Cookbook on Zeppelin 部署使用
简介:对于初学者来说,学习 Flink 可能不是一件容易的事情。看文档是一种学习,更重要的是实践起来。但对于一个初学者来说要把一个 Flink SQL 跑起来还真不容易,要搭各种环境,真心累。很幸运的是,Flink 生态…...
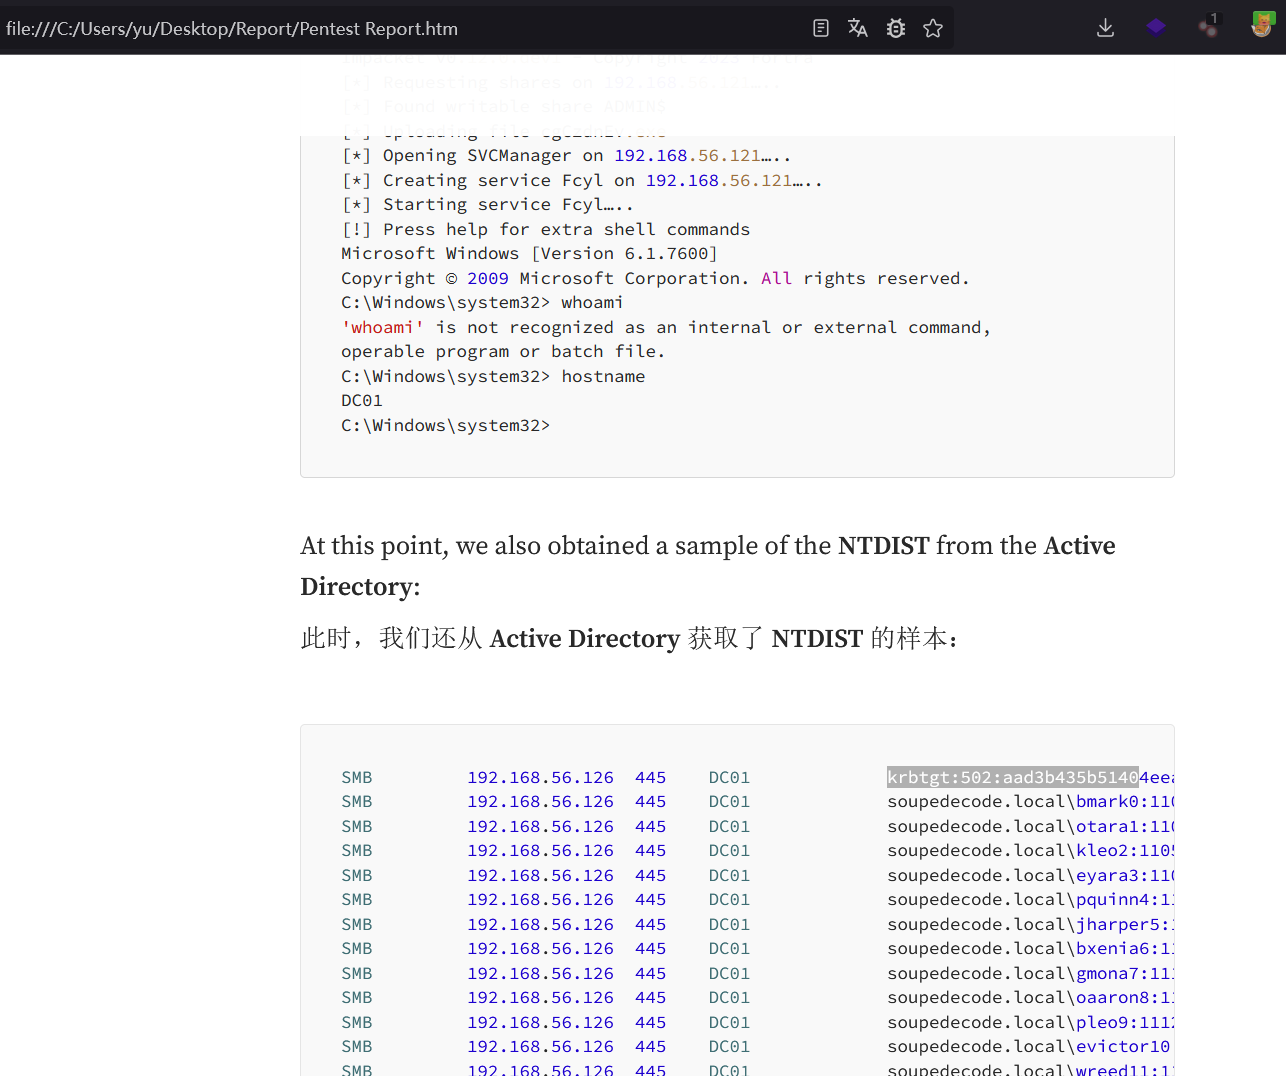
【hackmyvm】DC04靶机wp
created: 2024-12-04 23:08 tags: HMV黄金票据PTTntlm中毒 难度: ⭐️⭐️⭐️⭐️⭐️ 作者: josemlwdf 系统: Windows 1. 基本信息^toc 文章目录 1. 基本信息^toc2. 信息收集2.1. 端口扫描2.2. 目录扫描2.3. 网址利用 3. websvc用户3.1. NTLM中毒攻击3.2. smb探测 4. rtina9…...

记录jvm进程号
日常开发中,相信大家会经常用到这么一行命令: ps -ef | grep xxx.jar | grep -v grep | awk {print $2} | xargs -r kill -9 就是杀掉xxx相关的进程,然后启动,当然也还有其他的方式可以实现类似的功能,我就不列举了&…...
day19——web自动化测试(1)
【没有所谓的运气🍬,只有绝对的努力✊】 目录 1、什么是自动化 1.1 概念: 1.2 优点: 2、什么是自动化测试 2.1 自动化测试能解决什么问题? 2.1.1 优点: 2.1.2 误区: 2.2 自动化测试分类…...

go window安装protoc protoc生成protobuf文件
1. 下载: Releases protocolbuffers/protobuf GitHub 2. 解压缩: 3. 配置环境变量: 选择系统变量->Path -> 新增 解压缩后的bin路径 4. 打印版本: protoc --version 5. 安装protoc-gen-go cmd 下输入安装命令࿰…...

微信小程序中momentjs无法切换中文问题处理
微信小程序中momentj.s无法切换中文问题处理. 表现为 使用 locale(“zh-cn”)无效。 处理方法 # 1、先删除 miniprogram_npm\moment\index.js # 2、将 node_modules\moment\min\moment-with-locales.min.js 复制到 miniprogram_npm\moment下 并重命名为index.js # 3、修改mi…...

数据结构:链表
链表是一种常见的数据结构,它由一系列节点(Node)组成,每个节点包含两个部分:数据域和指针域。数据域用于存储数据元素的值,而指针域则用于指向链表中的下一个节点。这种结构使得链表能够动态地进行插入和删…...

领克Z20结合AI技术,革新自动驾驶辅助系统
眼瞅着,再有不到 5 个星期,春节就要热热闹闹地登场啦!对于在外辛苦打拼了一整年的打工人而言,回家过年可不就是这一年里心心念念、最最期盼的高光时刻嘛。这不,这几天各地的高速公路愈发熙熙攘攘起来,川流不…...

vector快慢指针+例题详解
1.快慢指针 例题 给定一个链表,判断链表中是否有环。 如果链表中有某个节点,可以通过连续跟踪 next 指针再次到达,则链表中存在环。 为了表示给定链表中的环,我们使用整数 pos 来表示链表尾连接到链表中的位置(索引从…...

重温设计模式--1、组合模式
文章目录 1 、组合模式(Composite Pattern)概述2. 组合模式的结构3. C 代码示例4. C示例代码25 .应用场景 1 、组合模式(Composite Pattern)概述 定义:组合模式是一种结构型设计模式,它允许你将对象组合成…...
)
单片机:实现SYN6288语音播报(附带源码)
单片机实现SYN6288语音播报 SYN6288是一款广泛应用于语音合成的IC,可以通过串口与单片机(如51系列、STM32等)进行通信,实现场景化的语音播报。通过连接外部存储设备(如SD卡)存储语音文件或直接通过内部语音…...

cookie,session,token 的区别
解决什么问题?Cookie(客户端存储)问题来了 Session(会话)解决的问题问题来了 token(令牌)解决的问题问题:token是无状态的如何解决? 解决什么问题? 解决http无状态的问题,说简单点就是用户身份的验证 举个例子: 张三在银行里…...

基于OpenAI Whisper AI模型自动生成视频字幕:全面解析与实战指南
在数字化时代,视频内容已成为信息传播的重要载体。然而,为视频添加字幕却是一项繁琐且耗时的工作。幸运的是,随着人工智能技术的飞速发展,特别是OpenAI Whisper模型的推出,我们有了更加高效、智能的解决方案。 一、Op…...

物理学天空的两朵乌云——量子论与相对论
物理学天空的两朵乌云——量子论与相对论 爱因斯坦的青春与科学的辉煌起点 提到爱因斯坦,我们往往会联想到一个经典的形象——乱糟糟的头发,叼着烟斗,脸上满是岁月的皱纹。然而,这张深入人心的照片并不是他科学创造力的象征。实…...
(1))
链表(两数相加)(1)
一.题目 2. 两数相加 - 力扣(LeetCode) 二.思路讲解 2.1 审题 题目给出两个非空链表,每个链表表示一个非负整数,并且数字是逆序存储的,即链表的头节点对应数字的最低位。例如,链表 2->4->3 表示数字…...

从电解到瓷片:不同材质去耦电容在电路设计中的最佳应用场景对比
从电解到瓷片:不同材质去耦电容在电路设计中的最佳应用场景对比 当你在设计一块电路板时,是否曾经为电源引脚旁那个小小的电容而犹豫不决?是选择便宜的电解电容,还是性能稳定的瓷片电容,亦或是价格不菲的钽电容&#x…...

camerax拍照函数
https://developer.android.google.cn/reference/androidx/camera/core/ImageCapture#takePicture(androidx.camera.core.ImageCapture.OutputFileOptions,%20java.util.concurrent.Executor,%20androidx.camera.core.ImageCapture.OnImageSavedCallback)...

从 Options API 到 Composition API:你的 Vue 代码为什么需要重构?
从 Options API 到 Composition API:你的 Vue 代码为什么需要重构? 在 Vue.js 的发展历程中,Options API 曾是开发者构建组件的标准方式。但随着 Vue 3 的发布,Composition API 以其灵活性和可维护性优势逐渐成为主流选择。本文将…...

python telebot
# 聊聊 Python Telebot 这个玩意儿 最近在几个小项目里用到了 Telebot,感觉这东西挺有意思的。它不是那种庞大复杂的框架,反而有种“刚刚好”的感觉。如果你也在琢磨 Telegram 机器人开发,或许可以看看这些实际用下来的体会。 它到底是什么 T…...

RAG项目开发全流程解析
本篇文章主要讲述,在搭建一个RAG项目时,所需要处理的逻辑流程,以及对每一个所用到的知识的大致讲述,适合大模型应用开发的新手思路搭建与流程规划一:基础名词讲解LLMLLM(Large Language Model)&…...

一人干出3人活!当贝Molili在混沌学园教你用好OpenClaw
如果说2025年是AI大模型的内卷之年,2026年则是AI Agent(智能体)规模化落地的元年。3月29日,当贝Molili产品负责人唐涛受邀登上国内创新标杆混沌学园的讲坛,以《用OpenClaw打造7x24小时个人分身,一人团队如何干出3人产出》为主题&a…...

从零到一:在Linux服务器上部署3DGS并驯服你的专属3D数据
1. 环境准备:搭建你的3D数据炼丹炉 第一次在Linux服务器上部署3D Gaussian Splatting(简称3DGS)时,我踩过的坑能写满三页A4纸。现在回想起来,90%的问题都出在环境配置阶段。就像盖房子要打地基,环境配置决定…...

基于MATLAB与Simulink的OFDM通信系统性能仿真:包括保护间隔、信道均衡与误比特率...
matlab调制解调 OFDM OTFS 16qam qpsk ldpc turbo在高斯白噪声,频率选择性衰落信道下的误比特率性能仿真,matlab代码 OFDM simulink 包括添加保护间隔(cp),信道均衡(ZF MMSE MRC MA LMSEE) 代码每行都有注释࿰…...

PADS Layout VX.2.2 - 贴片元器件坐标导出与Excel解析实战
1. 从PADS Layout导出贴片坐标的完整流程 第一次用PADS Layout导出坐标文件时,我对着那个CAM Plus对话框研究了半天——到底该选哪个格式?输出文件怎么变成Excel?这些坑我都踩过。现在就把最稳的操作流程分享给你,保证5分钟搞定。…...