UE(虚幻)学习(四) 第一个C++类来控制小球移动来理解蓝图和脚本如何工作
UE5视频看了不少,但基本都是蓝图如何搞,或者改一下属性,理解UE系统现有组件使用的。一直对C++脚本和蓝图之间的关系不是很理解,看到一个视频讲的很好,我也做笔记记录一下。
我的环境是UE5.3.2.
创建UE空项目
我们创建一个空项目

创建类MyPlayer
进入项目后,我们直接创建一个C++类。

因为是从基础理解,所以就选择更基础的Pawn类,不使用Character类。

我起名字MyPlayer类。确定后就提示会

之前创建的是蓝图项目,创建类后就包含源码了,需要关闭UE重新进入。
进入后我们就可以看到自己建立的类了。

如果你看不到C++Classes,请掉右边的Settings,并勾选Show C++ Classes。

这里我重新创建了类名BallPlayer,不喜欢之前的MyPlayer的名字,就不附上截图了。
查看新生成的文件
我们用VS打开项目,可以看到.h和.cpp文件,内容如下:
BallPlayer.h
// Fill out your copyright notice in the Description page of Project Settings.#pragma once#include "CoreMinimal.h"
#include "GameFramework/Pawn.h"
#include "BallPlayer.generated.h"UCLASS()
class MYPROJECT4_API ABallPlayer : public APawn
{GENERATED_BODY()public:// Sets default values for this pawn's propertiesABallPlayer();protected:// Called when the game starts or when spawnedvirtual void BeginPlay() override;public:	// Called every framevirtual void Tick(float DeltaTime) override;// Called to bind functionality to inputvirtual void SetupPlayerInputComponent(class UInputComponent* PlayerInputComponent) override;};
BallPlayer.cpp
// Fill out your copyright notice in the Description page of Project Settings.#include "BallPlayer.h"// Sets default values
ABallPlayer::ABallPlayer()
{// Set this pawn to call Tick() every frame.  You can turn this off to improve performance if you don't need it.PrimaryActorTick.bCanEverTick = true;}// Called when the game starts or when spawned
void ABallPlayer::BeginPlay()
{Super::BeginPlay();}// Called every frame
void ABallPlayer::Tick(float DeltaTime)
{Super::Tick(DeltaTime);}// Called to bind functionality to input
void ABallPlayer::SetupPlayerInputComponent(UInputComponent* PlayerInputComponent)
{Super::SetupPlayerInputComponent(PlayerInputComponent);}
UE的类前面自动添加了A字母。继承于APawn。
修改代码
下面我们添加一些代码:
BallPlayer.h文件中添加了三个组件:模型Mesh,弹簧,相机。
Mesh就是我们控制看到的小球(UStaticMeshComponent),弹簧(USpringArmComponent)就是用来控制相机和小球之间的距离,相机(UCameraComponent)就是我们的画面视角。
然后MoveForce和JumpForce是控制的物理力大小。
方法:
MoveRight是用来处理左右移动的
MoveForward是用来处理前后移动的
Jump是跳跃
这里注意下头文件,引用的文件要写在#include "BallPlayer.generated.h"的前面。
// Fill out your copyright notice in the Description page of Project Settings.#pragma once#include "CoreMinimal.h"
#include "GameFramework/Pawn.h"
#include "Camera/CameraComponent.h"
#include "GameFramework/SpringArmComponent.h"#include "BallPlayer.generated.h"UCLASS()
class MYPROJECT4_API ABallPlayer : public APawn
{GENERATED_BODY()public:// Sets default values for this pawn's propertiesABallPlayer();protected:// Called when the game starts or when spawnedvirtual void BeginPlay() override;UPROPERTY(VisibleAnywhere, BlueprintReadOnly, Category = "Components")UStaticMeshComponent* MeshMain;UPROPERTY(VisibleAnywhere, BlueprintReadOnly, Category = "Components")USpringArmComponent* SpringArmMain;UPROPERTY(VisibleAnywhere, BlueprintReadOnly, Category = "Components")UCameraComponent* CameraMain;UPROPERTY(EditAnywhere,BlueprintReadWrite)float MoveForce = 500.00f;UPROPERTY(EditAnywhere, BlueprintReadWrite)float JumpForce = 500.00f;public:	// Called every frame//virtual void Tick(float DeltaTime) override;// Called to bind functionality to inputvirtual void SetupPlayerInputComponent(class UInputComponent* PlayerInputComponent) override;void MoveRight(float value);void MoveForward(float value);void Jump();
};
我们再来看CPP文件
构造函数中我们看到创建了Mesh,SpringArm和Camera。
SetupAttachment的作用是设置父对象,例如SprintArm的父对象是Mesh。相机是最子层。
SetupPlayerInputComponent函数中绑定了按键,我们后面再截图上来。
BindAction,BindAxis 分别对应了不同的操作。
当键盘按下的时候,就进入(MoveRight,MoveForward,Jump)3个函数进行前后左右跳跃处理。
// Fill out your copyright notice in the Description page of Project Settings.#include "BallPlayer.h"
#include "Camera/CameraComponent.h"
#include "GameFramework/SpringArmComponent.h"// Sets default values
ABallPlayer::ABallPlayer()
{// Set this pawn to call Tick() every frame.  You can turn this off to improve performance if you don't need it.PrimaryActorTick.bCanEverTick = false;MeshMain = CreateDefaultSubobject<UStaticMeshComponent>("Mesh");SpringArmMain = CreateDefaultSubobject<USpringArmComponent>("SpringArm");CameraMain = CreateDefaultSubobject<UCameraComponent>("Camera");RootComponent = MeshMain;SpringArmMain->SetupAttachment(MeshMain);CameraMain->SetupAttachment(SpringArmMain);MeshMain->SetSimulatePhysics(true);SpringArmMain->bUsePawnControlRotation = true;
}// Called when the game starts or when spawned
void ABallPlayer::BeginPlay()
{Super::BeginPlay();MoveForce *= MeshMain->GetMass();JumpForce *= MeshMain->GetMass();
} Called every frame
//void ABallPlayer::Tick(float DeltaTime)
//{
//	Super::Tick(DeltaTime);
//
//}// Called to bind functionality to input
void ABallPlayer::SetupPlayerInputComponent(UInputComponent* PlayerInputComponent)
{Super::SetupPlayerInputComponent(PlayerInputComponent);//映射按键InputComponent->BindAction("Jump", IE_Pressed, this, &ABallPlayer::Jump);InputComponent->BindAxis("MoveForward", this,  &ABallPlayer::MoveForward);InputComponent->BindAxis("MoveRight", this,  &ABallPlayer::MoveRight);
}void ABallPlayer::MoveRight(float value)
{const FVector right = CameraMain->GetRightVector() * MoveForce * value;MeshMain->AddForce(right);
}void ABallPlayer::MoveForward(float value)
{const FVector forward = CameraMain->GetForwardVector() * MoveForce * value;MeshMain->AddForce(forward);
}void ABallPlayer::Jump()
{MeshMain->AddImpulse(FVector(0, 0, JumpForce));
}
键盘的设置
我们打开菜单的编辑Edit 、项目设置Project Settings

代码编写好后可以按下Ctrl+Alt+F11,进行快速编译。
创建蓝图
我们的代码编译完成后,可以再脚本上右键创建蓝图。

或者可以再文件夹力点击右键创建蓝图:

在弹出界面上搜索ballplayer选择确定。

双击建立好的蓝图BP_BallPlayer,会进入蓝图界面,我们就看到Mesh弹簧和相机的层次结构了。

设置小球
蓝图里我们点击小球选择一个Mesh

这里选择的小球Mesh是100*100的。
设置弹簧

我们关闭几个参数inheritPitch等,按E切换到旋转,然后让相机有一些高度,这样视角舒服一些。
保存蓝图
最后保存蓝图,并点击Compile编译。

设置玩家
在场景中拖入BP_BallPlayer蓝图,并且设置Pawn里的AutoPossessPlayer的属性选择Player 0。

运行游戏

参考:
https://www.youtube.com/watch?v=KQgOqyYoHAs
相关文章:

UE(虚幻)学习(四) 第一个C++类来控制小球移动来理解蓝图和脚本如何工作
UE5视频看了不少,但基本都是蓝图如何搞,或者改一下属性,理解UE系统现有组件使用的。一直对C脚本和蓝图之间的关系不是很理解,看到一个视频讲的很好,我也做笔记记录一下。 我的环境是UE5.3.2. 创建UE空项目 我们创建…...

使用FreeNAS软件部署ISCSI的SAN架构存储(IP-SAN)练习题
一,实验用到工具分别为: VMware虚拟机,安装教程:VMware Workstation Pro 17 安装图文教程 FreeNAS系统,安装教程:FreeNAS-11.2-U4.1安装教程2024(图文教程) 二,新建虚…...

Sql Sqserver 相关知识总结
Sql Sqserver 相关知识总结 文章目录 Sql Sqserver 相关知识总结前言优化语句查询(select)条件过滤(Where)分组处理(GROUP BY)模糊查询(like)包含(in)合集&am…...

面试题整理17----K8s中request和limit资源限制是如何实现的
面试题整理17----K8s中request和limit资源限制是如何实现的 1. 资源请求(Resource Requests)2. 资源限制(Resource Limits)3. 总结 在Kubernetes(K8s)中,Pod的资源限制(Resource Lim…...

Spring Boot @Conditional注解
在Spring Boot中,Conditional 注解用于条件性地注册bean。这意味着它可以根据某些条件来决定是否应该创建一个特定的bean。这个注解可以放在配置类或方法上,并且它会根据提供的一组条件来判断是否应该实例化对应的组件。 要使用 Conditional注解时&#…...

jpeg文件学习
相关最全的一篇文章链接:https://www.cnblogs.com/wtysos11/p/14089482.html YUV基础知识 Y表示亮度分量:如果只显示Y的话,图像看起来会是一张黑白照。 U(Cb)表示色度分量:是照片蓝色部分去掉亮度&#x…...

c++基于过程
前言: 笔记基于C黑马程序员网课视频:黑马程序员匠心之作|C教程从0到1入门编程,学习编程不再难_哔哩哔哩_bilibili 在此发布笔记,只是为方便学习,不做其他用途,原作者为黑马程序员。 1. C基础 1.1 用Visual Studio写C程…...

FOC软件 STM32CubeMX 使用
1、安装-及相关软件版本 展示版本注意事项:keil MDK和STM32CubeMX版本至少要大于等于图中版本。 2、 Motor Profiler 5.2.0使用方法...

leetcode hot 100 全排列
46. 全排列 已解答 中等 相关标签 相关企业 给定一个不含重复数字的数组 nums ,返回其 所有可能的全排列 。你可以 按任意顺序 返回答案。 class Solution(object): def permute(self, nums): """ :type nums: List[int] :rtype: List[List[int…...

使用qrcode.vue生成当前网页的二维码(H5)
使用npm: npm install qrcode.vue 使用yarn: yarn add qrcode.vue package.json: 实现: <template><div class"code"><qrcode-vue :value"currentUrl" :size"size" render-as&…...

0055. shell命令--useradd
目录 55. shell命令--useradd 功能说明 语法格式 选项说明 选项 退出值 相关文件 /etc/passwd /etc/shadow /etc/group /etc/gshadow /etc/skel/ /etc/login.defs /etc/default/useradd 实践操作 注意事项 55. shell命令--useradd 功能说明 useradd 命令是 Lin…...

blender中合并的模型,在threejs中显示多个mesh;blender多材质烘培成一个材质
描述:在blender中合并的模型导出为glb,在threejs中导入仍显示多个mesh,并不是统一的整体,导致需要整体高亮或者使用DragControls等不能统一控制。 原因:模型有多个材质,在blender中合并的时候,…...

vue 本地自测iframe通讯
使用 postMessage API 来实现跨窗口(跨域)的消息传递。postMessage 允许你安全地发送消息到其他窗口,包括嵌套的 iframe,而不需要担心同源策略的问题。 发送消息(父应用) 1. 父应用:发送消息给…...

C++:单例模式
创建自己的对象,同时确保对象的唯一性。 单例类只能有一个实例☞静态成员static☞静态成员 必须类外初始化 单例类必须自己创建自己的唯一实例 单例类必须给所有其他对象提供这一实例 静态成员类内部可以访问 构造函数私有化☞构造函数私有外部不能创建&#x…...

SOME/IP 协议详解——信息格式
文章目录 1. 头部格式1.1 消息 ID(Message ID)1.2 长度(Length)1.3 请求 ID(Request ID)1.4 协议版本(Protocol Version):1.5 接口版本(Interface Version&am…...
C# GDI+数码管数字控件
调用方法 int zhi 15;private void button1_Click(object sender, EventArgs e){if (zhi > 19){zhi 0;}lcdDisplayControl1.DisplayText zhi.ToString();} 运行效果 控件代码 using System; using System.Collections.Generic; using System.Drawing.Drawing2D; using …...

在交叉编译中,常见的ELF(elf)到底是什么意思?
ELF 是 Executable and Linkable Format 的缩写,中文翻译为“可执行与可链接格式”。它是一种通用的文件格式,主要用于存储可执行文件、目标文件(编译后的中间文件)、动态库(.so 文件)以及内存转储文件&…...

Unity开发AR之Vuforia-MultiTarget笔记
前言 在增强现实(AR)技术蓬勃发展的今天,越来越多的开发者开始探索如何将AR应用于各种场景中。Vuforia作为一个领先的AR开发平台,为开发者提供了强大的工具和功能,使得创建AR体验变得更加简单和直观。本文将为您介绍Vuforia的基本概念、特点,以及如何配置和使用MultiTar…...

深入解析 Oracle 的聚合函数 ROLLUP
目录 深入解析 Oracle 的聚合函数 ROLLUP一、ROLLUP 函数概述二、ROLLUP 函数语法三、ROLLUP 实例详解(一)基础分组聚合(二)引入 ROLLUP 函数(三)ROLLUP 与 NULL 值(四)多列复杂分组…...

Wend看源码-Java-集合学习(List)
摘要 本篇文章深入探讨了基于JDK 21版本的Java.util包中提供的多样化集合类型。在Java中集合共分类为三种数据结构:List、Set和Queue。本文将详细阐述这些数据类型的各自实现,并按照线程安全性进行分类,分别介绍非线程安全与线程安全的实现方…...
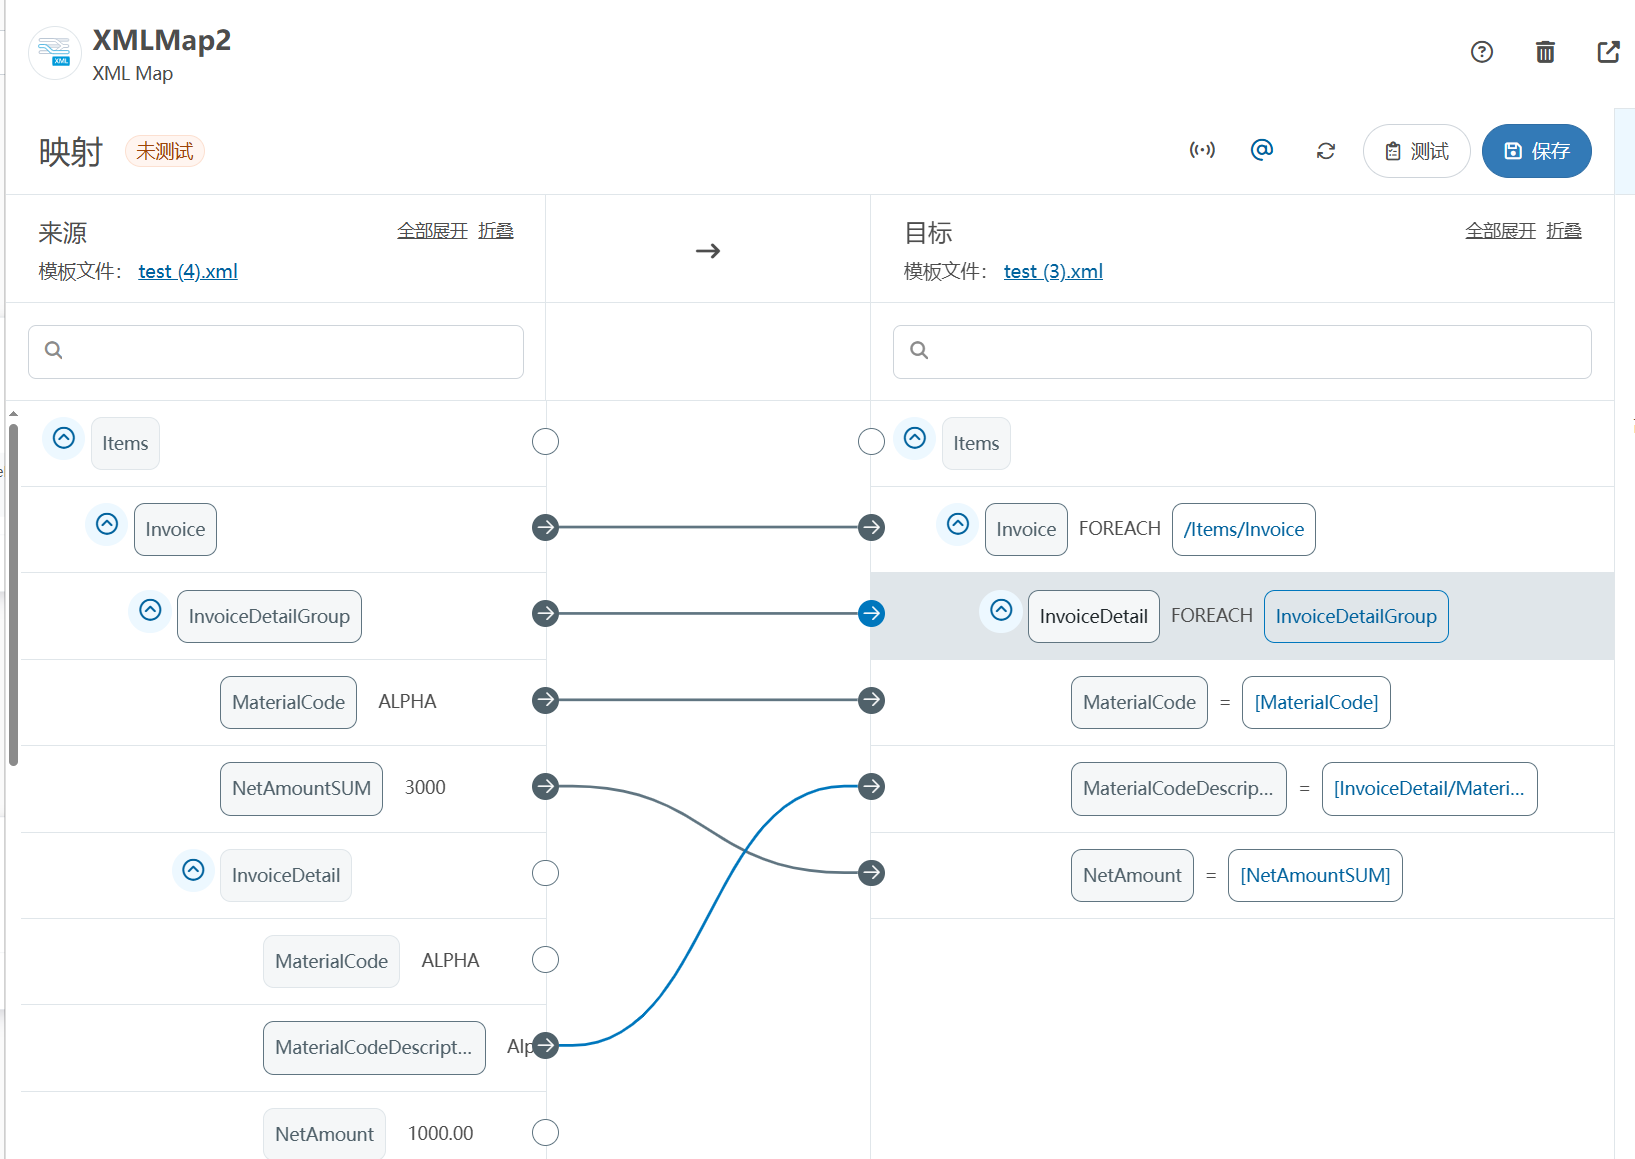
XML Group端口详解
在XML数据映射过程中,经常需要对数据进行分组聚合操作。例如,当处理包含多个物料明细的XML文件时,可能需要将相同物料号的明细归为一组,或对相同物料号的数量进行求和计算。传统实现方式通常需要编写脚本代码,增加了开…...
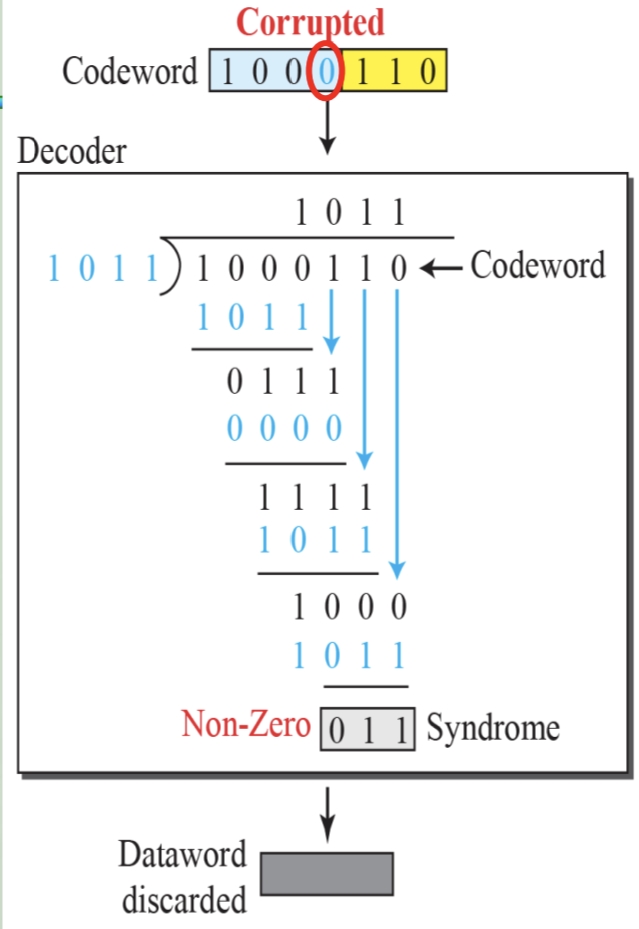
循环冗余码校验CRC码 算法步骤+详细实例计算
通信过程:(白话解释) 我们将原始待发送的消息称为 M M M,依据发送接收消息双方约定的生成多项式 G ( x ) G(x) G(x)(意思就是 G ( x ) G(x) G(x) 是已知的)࿰…...

uni-app学习笔记二十二---使用vite.config.js全局导入常用依赖
在前面的练习中,每个页面需要使用ref,onShow等生命周期钩子函数时都需要像下面这样导入 import {onMounted, ref} from "vue" 如果不想每个页面都导入,需要使用node.js命令npm安装unplugin-auto-import npm install unplugin-au…...

Java - Mysql数据类型对应
Mysql数据类型java数据类型备注整型INT/INTEGERint / java.lang.Integer–BIGINTlong/java.lang.Long–––浮点型FLOATfloat/java.lang.FloatDOUBLEdouble/java.lang.Double–DECIMAL/NUMERICjava.math.BigDecimal字符串型CHARjava.lang.String固定长度字符串VARCHARjava.lang…...

【算法训练营Day07】字符串part1
文章目录 反转字符串反转字符串II替换数字 反转字符串 题目链接:344. 反转字符串 双指针法,两个指针的元素直接调转即可 class Solution {public void reverseString(char[] s) {int head 0;int end s.length - 1;while(head < end) {char temp …...
苍穹外卖--缓存菜品
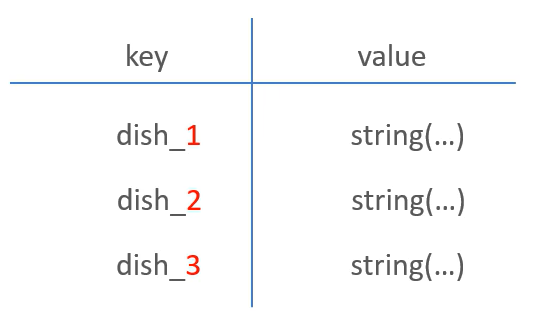
1.问题说明 用户端小程序展示的菜品数据都是通过查询数据库获得,如果用户端访问量比较大,数据库访问压力随之增大 2.实现思路 通过Redis来缓存菜品数据,减少数据库查询操作。 缓存逻辑分析: ①每个分类下的菜品保持一份缓存数据…...
指令的指南)
在Ubuntu中设置开机自动运行(sudo)指令的指南
在Ubuntu系统中,有时需要在系统启动时自动执行某些命令,特别是需要 sudo权限的指令。为了实现这一功能,可以使用多种方法,包括编写Systemd服务、配置 rc.local文件或使用 cron任务计划。本文将详细介绍这些方法,并提供…...
【单片机期末】单片机系统设计
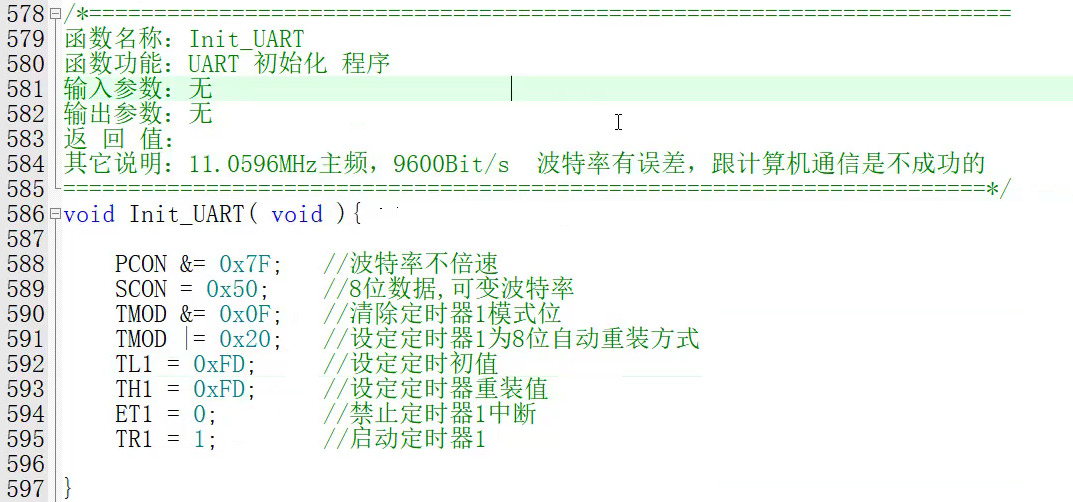
主要内容:系统状态机,系统时基,系统需求分析,系统构建,系统状态流图 一、题目要求 二、绘制系统状态流图 题目:根据上述描述绘制系统状态流图,注明状态转移条件及方向。 三、利用定时器产生时…...

unix/linux,sudo,其发展历程详细时间线、由来、历史背景
sudo 的诞生和演化,本身就是一部 Unix/Linux 系统管理哲学变迁的微缩史。来,让我们拨开时间的迷雾,一同探寻 sudo 那波澜壮阔(也颇为实用主义)的发展历程。 历史背景:su的时代与困境 ( 20 世纪 70 年代 - 80 年代初) 在 sudo 出现之前,Unix 系统管理员和需要特权操作的…...
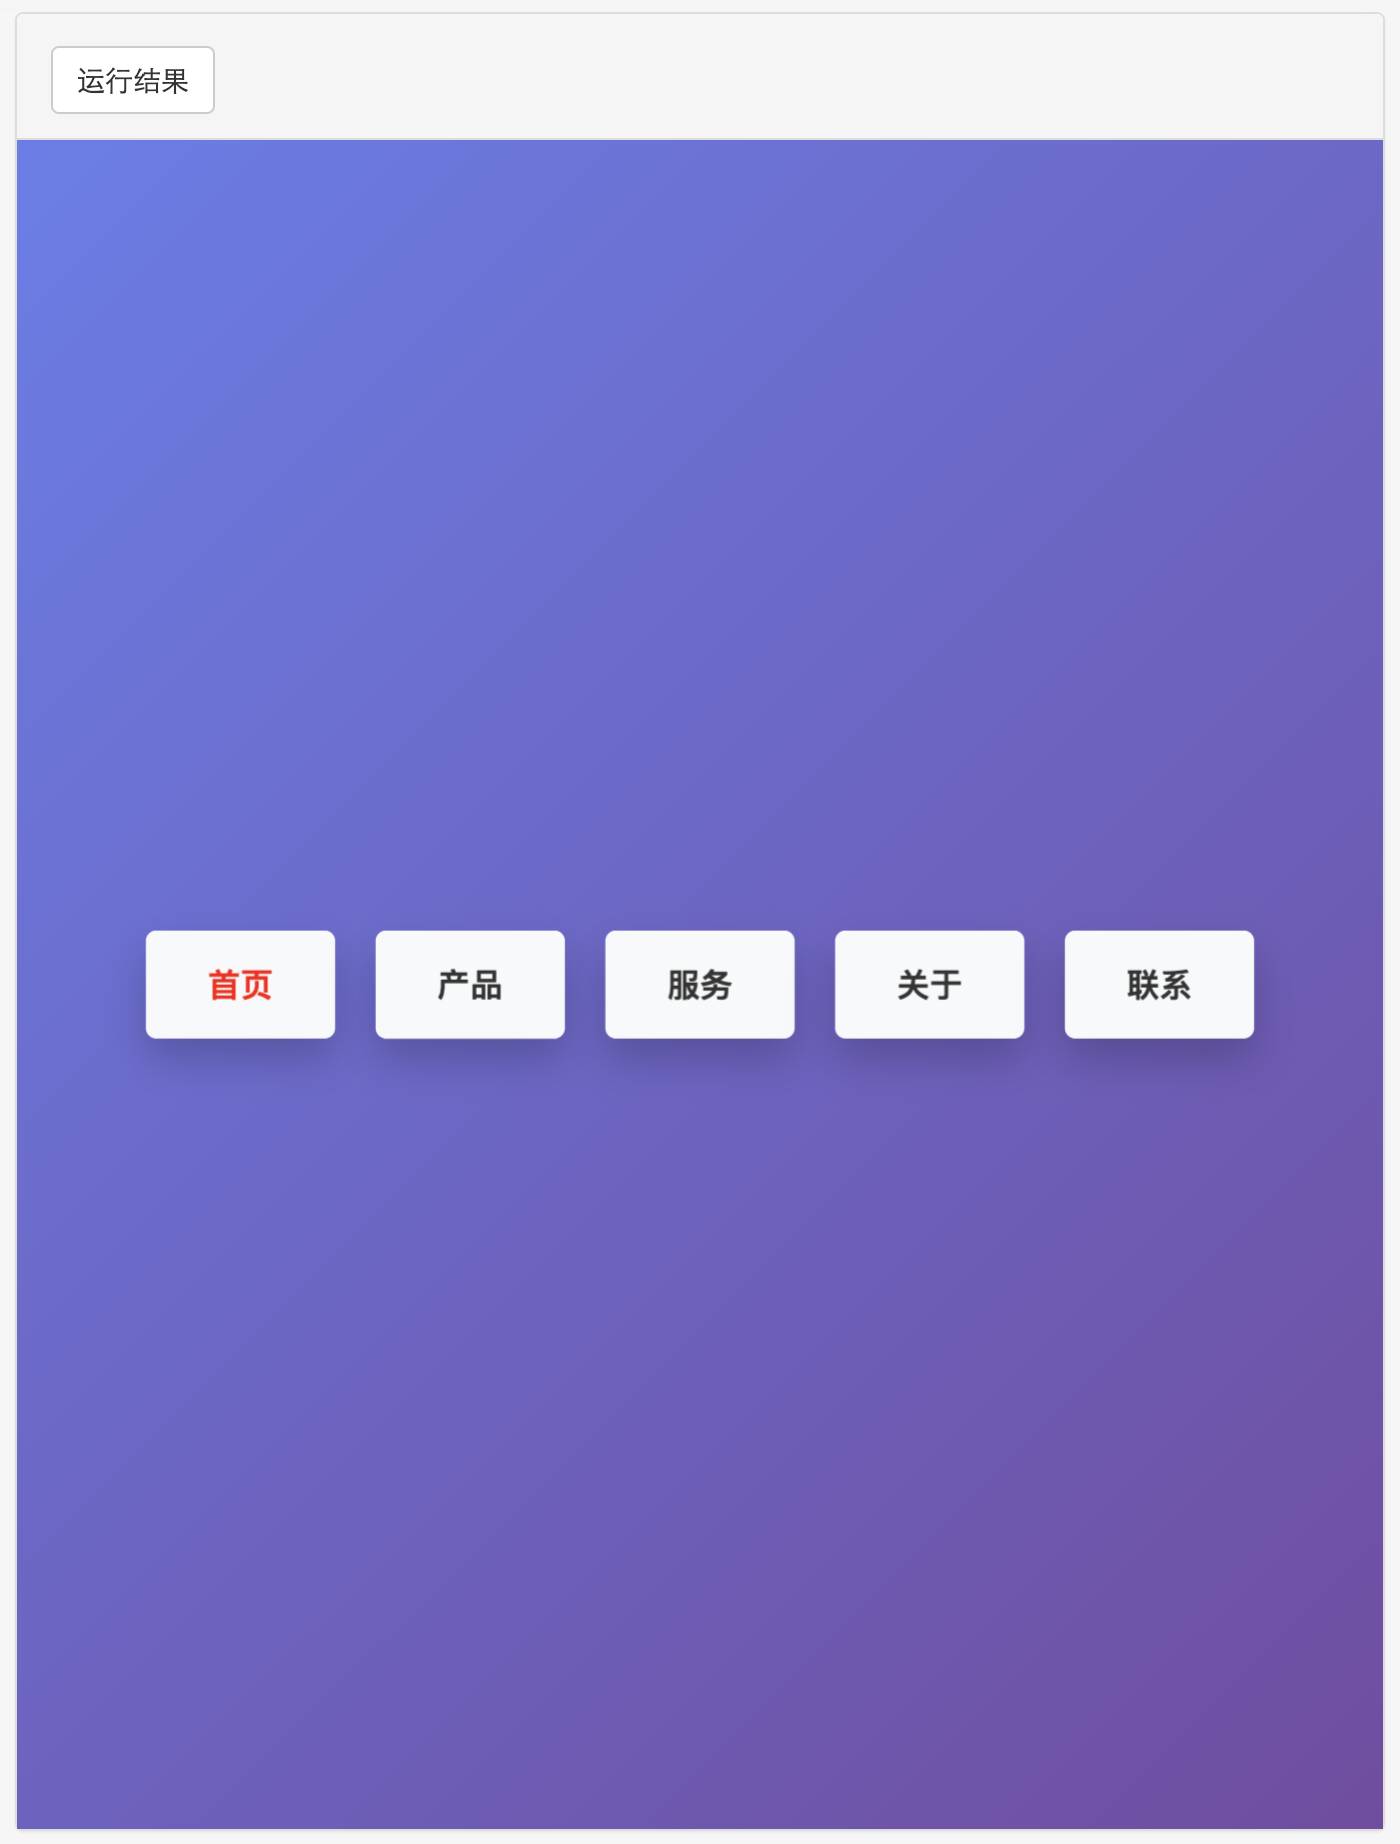
多种风格导航菜单 HTML 实现(附源码)
下面我将为您展示 6 种不同风格的导航菜单实现,每种都包含完整 HTML、CSS 和 JavaScript 代码。 1. 简约水平导航栏 <!DOCTYPE html> <html lang"zh-CN"> <head><meta charset"UTF-8"><meta name"viewport&qu…...
