Unity 2d描边基于SpriteRender,高性能的描边解决方案
目标
以Unity默认渲染管线为例,打造不需要图片内边距,描边平滑,高性能的描边解决方案
前言
在2d游戏中经常需要给2d对象添加描边,来突出强调2d对象
当你去网上查找2d描边shader,移植到项目里面,大概率会得到这个情况
如果描边的基本原理不清楚的可以看我之前的文章 文本描边

①出现了边缘看起来像是被截断了,这个是因为使用在超过的范围,三角形没有覆盖到,这里没有片元着色器进行渲染,所以我们要扩展三角形的顶点,同时扩展uv
图片如果有内边距,并且描边宽度较小,可能不会出现。有时即使图片内边距足够了也会出现这个情况,这是因为生成的三角形的原因(同上),在图片的导入设置MeshType设置为FullRect可以解决,如下图,但是这会增加片元着色器的负担,会有更多的片元需要渲染,唯一的好处是可以减少顶点数据的内存。这里我们为性能考虑,使用三角形渲染,扩展多边形的顶点和uv
但是如果所以要描边的物体加内边距,会增加内存消耗
②不该有描边的区域出现了描边,

要解决的问题
- 边缘被截断了=>扩展多边形的顶点和uv
- 描边有锯齿感=>采样次数不足,只沿着4个或8个方向采样,在outlineWidth较大时会出现问题,增多采样次数,在实际测试中,权衡效果和性能,12次最佳
- 描边和图片过渡处不平滑=>在原图片边缘,边缘aphla为0-1,lerp(outlineCol,col,a),a为0,显示描边,a为1显示原来的图片
- 不该有描边的区域出现了描边
①tex2D得到的a,a>0认为是描边,图片在透明部分a不完全为0导致,提高阈值即可a>0.2
②当outlineWidth过大导致,uv可能会偏移到1.1,即采样uv为0.1的像素,该像素a为1导致的=>C#传入原始的uv范围,超过这个范围的不采样
最终效果演示

代码讲解
Shader部分
tex2D这个采样函数十分消耗性能,可以说,shader性能大部分由tex2D采样次数决定,在本shader中要想尽办法减少tex2D的采样
for会极大消耗性能,不使用for循环
half4 frag(g2f i) : SV_Target
{float4 col = tex2D(_MainTex, i.uv);col *= i.color;//乘以顶点颜色_ShowBound = float4(0, 0, 1, 1);col.a *= isInRange(i.uv);//扩展的uv不在原始uv范围,a设置为0float sum_a = 0;int iteration = 12;//当第一次采样a>0.9,说明片元为正常的像素,直接渲染,不采样邻近像素for (int ii = 0; ii < iteration; ++ii)//为了代码可读性,使用for,最终代码不使用for{if(sum_a<0.5)//如果采样结果累计>0.5,不进行采样,这样能减少tex采样{sum_a += SampleTex(i, ii, iteration);}}sum_a=step(0.5,sum_a)+sum_a;//a>0.5的部分认为1sum_a = saturate(sum_a);float4 outLineColor = float4(_OutlineColor.rgb, sum_a);//如果_OutlineWidth为0时,显示原来图片的颜色float a = step(_OutlineWidth, 0.001);//为0,描边区域;1,原始图片;0-1,图片边缘,用图片颜色和描边颜色插值过渡float4 finalCol = lerp(outLineColor, col,saturate(a+col.a));return finalCol;
}
float isInRange(float2 uv)
{float2 rs = step(_ShowBound.xy, uv) * step(uv, _ShowBound.zw);return rs.x * rs.y;
}
float SampleTex(g2f i, float ii, int sum)
{//使用预先计算好的结果,减少sincos的计算,将上下左右优先放在最前面,因为绝大部分描边由上下左右偏移得到,//可以大幅度减少在描边区域的采样次数,一旦上下左右采样得到a>threshold,就不会进行采样了const float OffsetX[12] = {1, 0, -1, 0, 0.866, 0.5, -0.5, -0.866, -0.866, -0.5, 0.5, 0.866};const float OffsetY[12] = {0, 1, 0, -1, 0.5, 0.866, 0.866, 0.5, -0.5, -0.866, -0.866, -0.5};float2 offset_uv = i.uv + float2(OffsetX[ii], OffsetY[ii]) * _MainTex_TexelSize.xy * _OutlineWidth;float sample_a=0;if(isInRange(offset_uv)>0)//如果偏移后的uv不在原始uv范围不进行采样,a为1{sample_a = tex2D(_MainTex, offset_uv).a;}float a = sample_a;a = step(0.2, a) * a;//采样结果<0.2时,不认为是描边return a;
}
C#部分
在解决上面的问题后,C#要解决最后的一个问题, 边缘看起来被截断了
如果使用的是FullRect渲染Sprite,是扩展矩形的顶点,问题会简单得多。可以在几何着色器geometry中扩展顶点和uv,但是苹果的Metal不支持几何着色器,而且FullRect渲染性能差,所以方案不行。
要扩展多边形的顶点,
首先要知道SpriteRender.sprite的vertices和uvs是只能读不可以修改的。
在网上找了一圈后,幸好unity提供了sprite.SetVertexAttribute这个扩展方法可以修改顶点
在Start时,设置原始的uv范围和描边宽度
ppu即n个像素对应1个单位长度m
扩展多边形得顶点,通过v[i-1]-v[i]和v[i+1]-v[i]得到PA和PB,(PA+PB).normalized得到PC,判断OP和PC方向夹角是否小于90,否则,PC取反,将点P沿PC方向偏移即可

因为使用sprite.SetVertexAttribute修改顶点,会自动计算修改后得uv,所以这里不需要修改uv了
void Start()
{// 获取SpriteRenderer组件和SpritespriteRenderer = GetComponent<SpriteRenderer>();sprite = spriteRenderer.sprite;spriteRenderer.material.SetVector("_ShowBound",bound);spriteRenderer.material.SetFloat("_OutlineWidth",outlineWidth);// 获取原始的顶点、三角形和UV数据originalVertices = sprite.vertices;ppu = 1/sprite.pixelsPerUnit;// 扩展顶点Vector2[] expandedVertices = ExpandVertices(originalVertices, outlineWidth);Vector3[] vertices = System.Array.ConvertAll(expandedVertices, v => (Vector3)v);NativeArray<Vector3> array = new NativeArray<Vector3>(vertices, Allocator.Temp);//将Vector3转换到NativeArray<Vector3>类型sprite.SetVertexAttribute(VertexAttribute.Position,array);
}
private void OnDestroy()//在销毁时还原到之前的顶点
{Vector3[] vertices = System.Array.ConvertAll(originalVertices, v => (Vector3)v);NativeArray<Vector3> array = new NativeArray<Vector3>(vertices, Allocator.Temp);sprite.SetVertexAttribute(VertexAttribute.Position,array);
}
sprite.vertices顶点不是按逆时针排列的,先得到一个按角度排列的顶点
private int CompareByAngle(Vector2 a, Vector2 b)
{float angleA = Mathf.Atan2(a.y, a.x);float angleB = Mathf.Atan2(b.y, b.x);return angleA.CompareTo(angleB);
}
Vector2[] ExpandVertices(Vector2[] vertices, float len)
{Vector2[] expandedVertices = new Vector2[vertices.Length];Vector2[] sortVertices = new Vector2[vertices.Length];for (int i = 0; i < sortVertices.Length; i++){sortVertices[i] = vertices[i];}//将顶点按逆时针排列Array.Sort(sortVertices, (a, b) => CompareByAngle(a, b));for (int i = 0; i < sortVertices.Length; i++){Vector2 vector2= sortVertices[i];int index = -1;for (int j = 0; j < vertices.Length; j++){Vector2 v= vertices[j];if (Vector2.Distance(v,vector2)<0.01f){index = j;//得到原来在vertices对应的索引break;}}Vector2 dir1 = sortVertices[(i + 1)% sortVertices.Length] - sortVertices[i];int index2 = (i - 1) % sortVertices.Length;if (index2 < 0){index2 = sortVertices.Length + index2;}Vector2 dir2 = sortVertices[index2] - sortVertices[i];dir1 = dir1.normalized;//得到P为原点的2个向量AP,BP,将其相加得到PC,结果和PO点乘,大于90度结果取反dir2 = dir2.normalized;Vector2 dir = (dir1 + dir2).normalized;int rs = Vector2.Dot(dir, vector2.normalized)>0 ? 1: -1;dir *= rs;//沿得到的dir偏移expandedVertices[index] = sortVertices[i] + dir * len * ppu;}return expandedVertices;
}
完整代码
Shader
Shader "Custom/SpriteOutline"
{Properties{[PerRendererData]_MainTex ("Sprite Texture", 2D) = "white" {}_OutlineWidth ("Outline Width", Range(0,30)) = 5_OutlineColor ("Outline Color", Color) = (1,1,1,1)_ShowBound("Show Bound" ,Vector)=(0,0,1,1)}SubShader{Tags{"Queue"="Transparent" "IgnoreProjector"="true" "RenderType"="Transparent"}Cull OffLighting OffZWrite OffBlend SrcAlpha OneMinusSrcAlphaPass{CGPROGRAM#pragma vertex vert#pragma fragment frag#include "UnityCG.cginc"struct appdata{float4 vertex : POSITION;float4 color : COLOR;float4 uv : TEXCOORD0;float4 uv2 : TEXCOORD1;float4 tangent : TANGENT;};struct g2f{float2 uv : TEXCOORD0;half4 color : COLOR;float4 vertex : SV_POSITION;float2 lightingUV:TEXCOORD1;float2 uv2 : TEXCOORD2;float4 tangent : TANGENT;};sampler2D _MainTex;float4 _MainTex_ST;float4 _MainTex_TexelSize;float _OutlineWidth;float4 _OutlineColor;float4 _ShowBound;g2f vert(appdata v){g2f o;o.vertex = UnityObjectToClipPos(v.vertex);o.uv = TRANSFORM_TEX(v.uv, _MainTex);o.color = v.color;o.tangent = v.tangent;o.uv2=v.uv2;o.lightingUV = half2(ComputeScreenPos(o.vertex / o.vertex.w).xy);return o;}float isInRange(float2 uv){float2 rs = step(_ShowBound.xy, uv) * step(uv, _ShowBound.zw);return rs.x * rs.y;}float SampleTex(g2f i, float ii){const float OffsetX[12] = {1, 0, -1, 0, 0.866, 0.5, -0.5, -0.866, -0.866, -0.5, 0.5, 0.866};const float OffsetY[12] = {0, 1, 0, -1, 0.5, 0.866, 0.866, 0.5, -0.5, -0.866, -0.866, -0.5};float2 offset_uv = i.uv + float2(OffsetX[ii], OffsetY[ii]) * _MainTex_TexelSize.xy * _OutlineWidth;float sample_a=0;if(isInRange(offset_uv)>0){sample_a = tex2D(_MainTex, offset_uv).a;}float a = sample_a;a = step(0.2, a) * a;return a;}half4 frag(g2f i) : SV_Target{float4 col = tex2D(_MainTex, i.uv);col *= i.color;//_ShowBound = float4(0, 0, 1, 1);_ShowBound = i.tangent;_OutlineWidth=i.uv2.x;col.a *= isInRange(i.uv);float sum_a = 0;float threshold=0.5;if(col.a<threshold){sum_a += SampleTex(i, 0);if (sum_a < threshold){sum_a += SampleTex(i, 1);if (sum_a < threshold){sum_a += SampleTex(i, 2);if (sum_a < threshold){sum_a += SampleTex(i, 3);if (sum_a < threshold){sum_a += SampleTex(i, 4);if (sum_a < threshold){sum_a += SampleTex(i, 5);if (sum_a < threshold){sum_a += SampleTex(i, 6);if (sum_a < threshold){sum_a += SampleTex(i, 7);if (sum_a < threshold){sum_a += SampleTex(i, 8);if (sum_a < threshold){sum_a += SampleTex(i, 9);if (sum_a < threshold){sum_a += SampleTex(i, 10);if (sum_a < threshold){sum_a += SampleTex(i, 11);}}}}}}}}}}}}sum_a=step(threshold,sum_a)+sum_a;sum_a = saturate(sum_a);float4 outLineColor = float4(_OutlineColor.rgb, sum_a);float a = step(_OutlineWidth, 0.001);float4 finalCol = lerp(outLineColor, col,saturate(a+col.a));return finalCol;}ENDCG}}Fallback "Sprites/Default"
}
C#
public class SpriteOutline : MonoBehaviour
{private SpriteRenderer spriteRenderer;private Sprite sprite;private Vector2[] originalVertices;public float outlineWidth = 0f;private float ppu;void Start(){// 获取SpriteRenderer组件和SpritespriteRenderer = GetComponent<SpriteRenderer>();sprite = spriteRenderer.sprite;Vector4 bound = new Vector4();Vector2[] uvs= sprite.uv;bound =new Vector4(1, 1, 0, 0);for (int i = 0; i < uvs.Length; i++){var uv = uvs[i];bound.x = Mathf.Min(bound.x, uv.x);bound.y = Mathf.Min(bound.y, uv.y);bound.z = Mathf.Max(bound.z, uv.x);bound.w = Mathf.Max(bound.w, uv.y);}//spriteRenderer.material.SetVector("_ShowBound",bound);//spriteRenderer.material.SetFloat("_OutlineWidth",outlineWidth);// 获取原始的顶点、三角形和UV数据originalVertices = sprite.vertices;ppu = 1/sprite.pixelsPerUnit;// 扩展顶点Vector2[] expandedVertices = ExpandVertices(originalVertices, outlineWidth);Vector3[] vertices = System.Array.ConvertAll(expandedVertices, v => (Vector3)v);NativeArray<Vector3> array = new NativeArray<Vector3>(vertices, Allocator.Temp);sprite.SetVertexAttribute(VertexAttribute.Position,array);Vector2[] uv2Vector4s=new Vector2[vertices.Length];for (int i = 0; i < uv2Vector4s.Length; i++){uv2Vector4s[i] =new Vector2(outlineWidth, 0);}NativeArray<Vector2> uv2s_array = new NativeArray<Vector2>(uv2Vector4s, Allocator.Temp);sprite.SetVertexAttribute(VertexAttribute.TexCoord1,uv2s_array);Vector4[] tangents=new Vector4[vertices.Length];for (int i = 0; i < tangents.Length; i++){tangents[i] = bound;}NativeArray<Vector4> tangent_array = new NativeArray<Vector4>(tangents, Allocator.Temp);sprite.SetVertexAttribute(VertexAttribute.Tangent,tangent_array);}private void OnDestroy(){Vector3[] vertices = System.Array.ConvertAll(originalVertices, v => (Vector3)v);NativeArray<Vector3> array = new NativeArray<Vector3>(vertices, Allocator.Temp);sprite.SetVertexAttribute(VertexAttribute.Position,array);}private int CompareByAngle(Vector2 a, Vector2 b){float angleA = Mathf.Atan2(a.y, a.x);float angleB = Mathf.Atan2(b.y, b.x);return angleA.CompareTo(angleB);}Vector2[] ExpandVertices(Vector2[] vertices, float len){Vector2[] expandedVertices = new Vector2[vertices.Length];Vector2[] sortVertices = new Vector2[vertices.Length];for (int i = 0; i < sortVertices.Length; i++){sortVertices[i] = vertices[i];}Array.Sort(sortVertices, (a, b) => CompareByAngle(a, b));for (int i = 0; i < sortVertices.Length; i++){Vector2 vector2= sortVertices[i];int index = -1;for (int j = 0; j < vertices.Length; j++){Vector2 v= vertices[j];if (Vector2.Distance(v,vector2)<0.01f){index = j;break;}}Vector2 dir1 = sortVertices[(i + 1)% sortVertices.Length] - sortVertices[i];int index2 = (i - 1) % sortVertices.Length;if (index2 < 0){index2 = sortVertices.Length + index2;}Vector2 dir2 = sortVertices[index2] - sortVertices[i];dir1 = dir1.normalized;dir2 = dir2.normalized;Vector2 dir = (dir1 + dir2).normalized;int rs = Vector2.Dot(dir, vector2.normalized)>0 ? 1: -1;dir *= rs;expandedVertices[index] = sortVertices[i] + dir * len * ppu;}return expandedVertices;}
}
相关文章:
Unity 2d描边基于SpriteRender,高性能的描边解决方案
目标 以Unity默认渲染管线为例,打造不需要图片内边距,描边平滑,高性能的描边解决方案 前言 在2d游戏中经常需要给2d对象添加描边,来突出强调2d对象 当你去网上查找2d描边shader,移植到项目里面,大概率会…...

信凯科技业绩波动明显:毛利率远弱行业,资产负债率偏高
《港湾商业观察》施子夫 1月8日,深交所官网显示,浙江信凯科技集团股份有限公司(以下简称“信凯科技”)主板IPO提交注册。 自2022年递交上市申请,信凯科技的IPO之路已走过两年光景,尽管提交注册࿰…...

js基础---var与let的区别以及const的使用
js基础—var与let的区别以及const的使用 var与let的区别 在较旧的JavaScript,使用关键字var来声明变量,而不是let。var现在开发中一般不再使用它,只是我们可能再老版程序中看到它。let的出现为了解决var的一些问题。 var 声明存在以下三种问…...

用css和html制作太极图
目录 css相关参数介绍 边距 边框 伪元素选择器 太极图案例实现、 代码 效果 css相关参数介绍 边距 <!DOCTYPE html> <html><head><meta charset"utf-8"><title></title><style>*{margin: 0;padding: 0;}div{width: …...

OJ12:160. 相交链表
目录 题目思路分析代码展示 题目 给你两个单链表的头节点 headA 和 headB ,请你找出并返回两个单链表相交的起始节点。如果两个链表不存在相交节点,返回 null 。 示例 1: 输入:intersectVal 8, listA [4,1,8,4,5], listB [5,…...

软件工程和项目管理领域 - CMMI 极简理解
CMMI 概述 CMMI 全称为 Capability Maturity Model Integration,即能力成熟度模型集成 CMMI 是由美国卡内基梅隆大学软件工程研究所(SEI)开发的一套综合性管理模型 CMMI 是一种用于评估和改进组织在软件开发和维护方面过程能力的国际标准 …...

C# 线程基础之 线程同步
线程同步的手段很多 lock 是通过内存索引块 0 1 切换 进行互斥的实现 互斥量 信号量 事件消息 其实意思就是 一个 标记量 通过这个标记 来进行类似的互斥手段 具体方式的分析 代码在后 1.互斥量 Mutex 作用 非常类似lock 一个Mutex 名称来代替 lock的引用对象 2.信号量 Semaph…...

[c语言日寄]c语言也有“回”字的多种写法——整数交换的三种方式
大家好啊,在今天的快乐刷题中,我们遇到了这样一道题目: 题目 写出 三种不同方式的 交换两个整数变量的 函数 交换变量的三种解法 常规方式 想要交换两个变量很简单,第一种方式就是新建一个临时变量,具体流程如下&…...

RocketMQ 知识速览
文章目录 一、消息队列对比二、RocketMQ 基础1. 消息模型2. 技术架构3. 消息类型4. 消费者类型5. 消费者分组和生产者分组 三、RocketMQ 高级1. 如何解决顺序消费和重复消费2. 如何实现分布式事务3. 如何解决消息堆积问题4. 如何保证高性能读写5. 刷盘机制 (topic 模…...

优化 Azure Synapse Dedicated SQL Pool中的 SQL 执行性能的经验方法
在 Azure Synapse Dedicated SQL Pool中优化 SQL 执行涉及了解底层体系结构(例如分布和分区)、查询优化(例如避免不必要的子查询和联接),以及利用具体化视图和 PolyBase 等工具进行高效数据加载。 1.有效使用分布和分…...
)
详解英语单词“pro bono”:公益服务的表达(中英双语)
中文版 详解英语单词“pro bono”:公益服务的表达 一、词义解释 “Pro bono” 是一个源自拉丁语的短语,完整表达为 “pro bono publico”,意思是“为了公众利益”(for the public good)。在现代英语中,它…...

16. C语言 字符串详解
本章目录: 前言C 字符串的基础概念字符串的定义字符串的内存表示 常见的字符串操作函数示例代码 深入探讨字符串长度计算strlen 与 sizeof 的区别 字符串操作的注意事项**1. 字符数组的大小**2. 字符数组和字符指针的区别3. 使用安全函数 字符串的遍历与格式化输出**遍历字符串…...
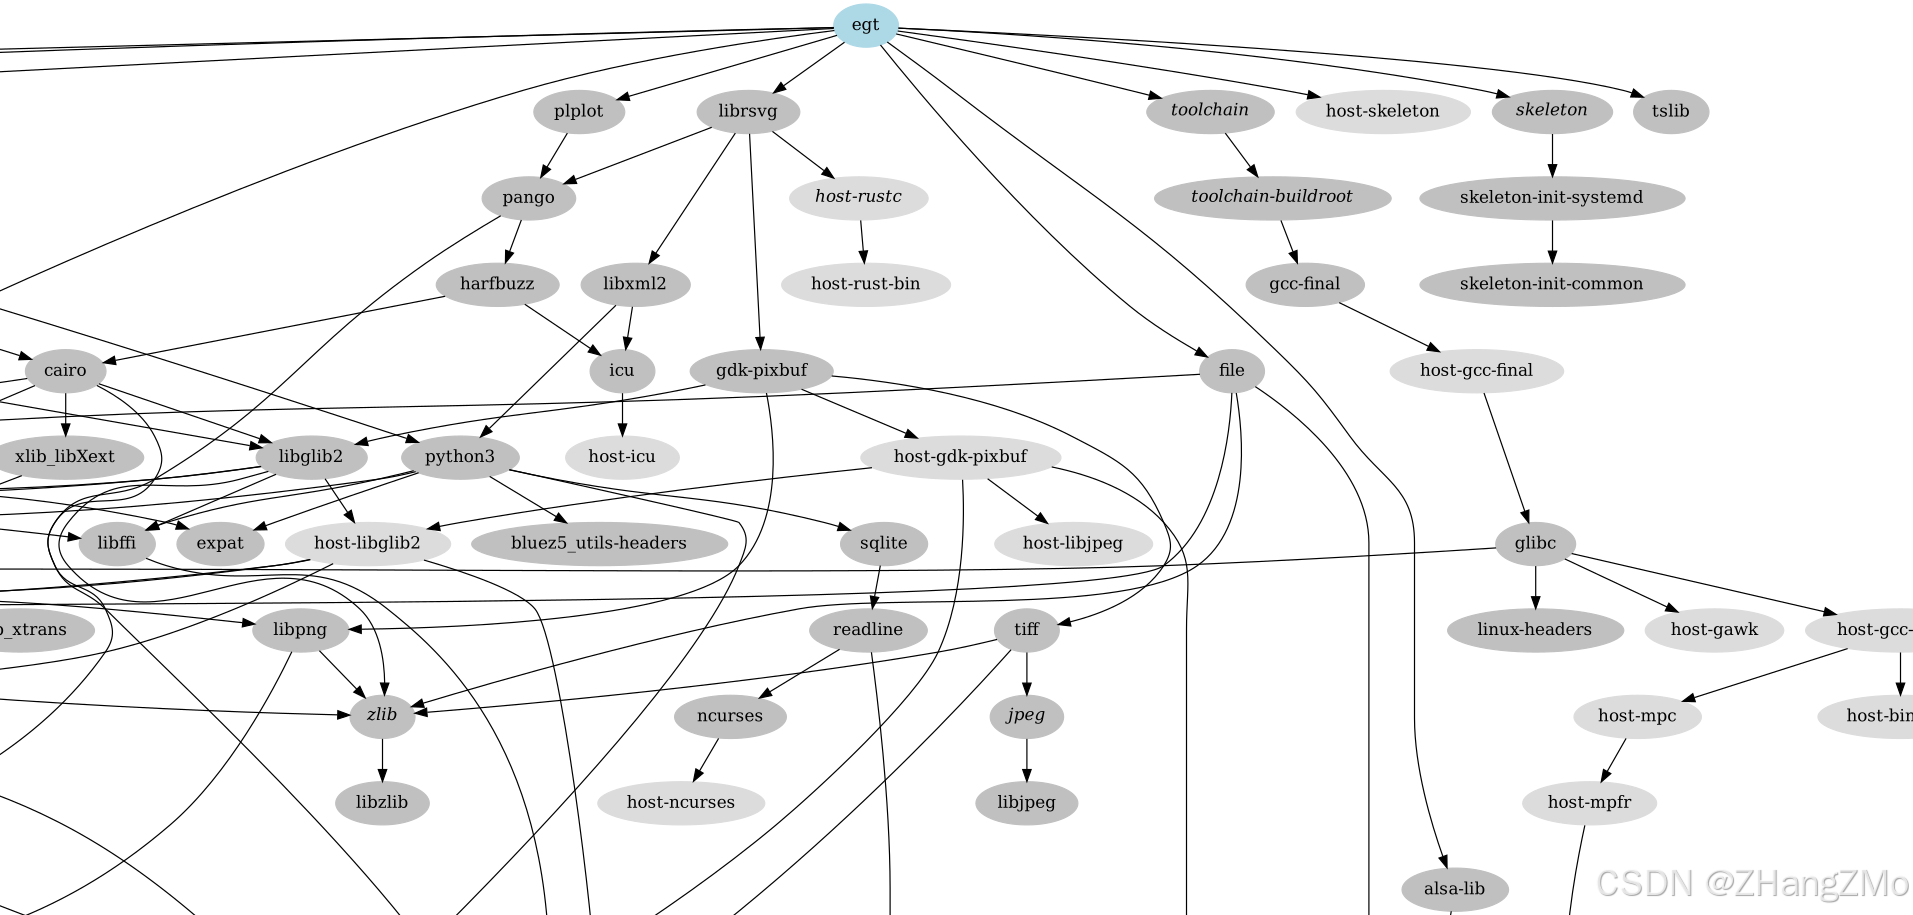
使用Buildroot开始嵌入式Linux系统之旅-3
文章目录 at91bootstrap操作教程修改at91bootstrap具体配置重新编译at91bootstrap U-Boot操作教程修改U-Boot具体配置重新编译U-Boot Linux Kernel操作教程修改Linux Kernel具体配置重新编译Linux Kernel buildroot操作进阶生成图形化软件模块依赖关系查看具体软件模块依赖关系…...

[免费]SpringBoot+Vue新能源汽车充电桩管理系统【论文+源码+SQL脚本】
大家好,我是java1234_小锋老师,看到一个不错的SpringBootVue新能源汽车充电桩管理系统,分享下哈。 项目视频演示 【免费】SpringBootVue新能源汽车充电桩管理系统 Java毕业设计_哔哩哔哩_bilibili 项目介绍 随着信息化时代的到来࿰…...

【已解决】【记录】2AI大模型web UI使用tips 本地
docker desktop使用 互动 如果需要发送网页链接,就在链接上加上【#】号 如果要上传文件就点击这个➕号 中文回复 命令它只用中文回复,在右上角打开【对话高级设置】 输入提示词(提示词使用英文会更好) Must reply to the us…...

44.ComboBox的数据绑定 C#例子 WPF例子
固定最简步骤,包括 XAML: 题头里引入命名空间 标题下面引入类 combobox绑定资源属性和选择属性,block则绑定和combobox一样的选择属性 C#: 通知的类,及对应固定的任务 引入字段 引入属性 其中资源是只读的 选…...

物联网之传感器技术
引言 在数字化浪潮席卷全球的今天,物联网(IoT)已成为推动各行各业变革的重要力量。而物联网传感器,作为物联网感知层的核心技术,更是扮演着不可或缺的角色。它们如同人类的五官,能够感知物理世界中的各种信…...

QTreeWidget QTreeWidgetItem
QTreeWidgetItem 是 Qt 框架中用于在 QTreeWidget 中表示树形结构中每个节点的类。它是 QTreeWidget 的一部分,允许您创建和管理层次结构的数据展示。 QTreeWidgetItem 用于表示树形结构中的单个节点。 添加子节点: 可以通过 addChild() 方法向节点添加…...

torch.einsum计算张量的外积
torch.einsum 是一种强大的张量操作工具,可以通过爱因斯坦求和约定(Einstein summation convention)来简洁地表示复杂的张量运算。通过它,我们可以高效地计算矩阵乘法、转置、点积、外积等操作。 以下是关于如何使用 torch.einsum 计算两个四维张量在第三维度上的外积的解…...

PostgreSQL 超级管理员详解
1. 什么是 PostgreSQL 超级管理员 PostgreSQL 超级管理员(superuser)是拥有数据库系统最高权限的用户。他们可以执行任何数据库操作,包括但不限于创建和删除数据库、用户、表空间、模式等。超级管理员权限是 PostgreSQL 中权限的最高级别。 …...

AI Agent在智能风控中的实战:多智能体欺诈检测与预警
AI Agent在智能风控中的实战:多智能体欺诈检测与预警 你有没有过明明是正常交易却被银行冻结账户的糟糕体验?或是听说过某电商平台上线新活动首日就被黑产团伙薅走数千万补贴的新闻?随着黑产欺诈向团伙化、专业化、动态化演进,传统依赖规则引擎、单模型机器学习的风控体系已…...

Android 11开发避坑:为什么你的App获取的Wifi MAC地址总是变?手把手教你配置固定MAC
Android 11开发实战:彻底解决Wifi MAC地址随机化问题最近在开发一个设备管理系统时,遇到了一个棘手的问题:我们的App在Android 11设备上获取的Wifi MAC地址每次都不一样,导致基于MAC地址的设备识别功能完全失效。经过一周的深入研…...

智慧无人机巡检-无人机可见光红外数据集 无人机多模态检测数据集 红外与可见光检测数据集
智慧无人机巡检-无人机可见光红外数据集,已完成标注,可导出各种常用数据集,yolo,voc,coco等格式。可见光33000张,红外16100张,目标一张一个 无人机可见光红外目标数据集项目详细信息数据集名称无…...

Python PIL 画矩形框
基础代码 from PIL import Image, ImageDraw# 打开图片 img Image.open(your_image.jpg)# 创建绘图对象 draw ImageDraw.Draw(img)# 矩形坐标 (x1, y1, x2, y2) coords (23, 21, 69, 76)# 画矩形框(红色,线宽2) draw.rectangle(coords, ou…...
到panic:深入Linux 5.4内核,看异常处理如何层层递进)
从BUG()到panic:深入Linux 5.4内核,看异常处理如何层层递进
从BUG()到panic:Linux内核异常处理的防御体系全解析当你在深夜调试一个内核模块时,突然屏幕刷出一串红色警告——这可能是每个Linux内核开发者都经历过的噩梦时刻。但你是否想过,从第一行警告出现到系统完全崩溃,内核究竟经历了怎…...
)
CentOS 8.5最小化安装后,这5个必做的安全与效率优化设置(附一键脚本)
CentOS 8.5最小化安装后的5个必做安全与效率优化刚完成CentOS 8.5最小化安装的系统就像一张白纸——干净但缺乏生产力。作为运维老手,我见过太多人跳过基础优化直接部署应用,结果在后续使用中频繁遇到权限混乱、软件安装慢、SSH爆破等问题。本文将分享我…...
)
微信聊天图片丢了别慌!保姆级教程:找回并解密DAT文件(支持新旧版微信路径)
微信DAT图片恢复实战:从文件定位到批量解密的完整指南 微信聊天记录中的图片突然消失?别急着放弃!那些看似无法打开的DAT文件里,可能藏着您的重要回忆或工作资料。本文将带您深入微信存储机制,手把手完成从文件定位到…...

服务器数据下载安全:实时加密与动态访问控制实战
1. 这不是又一个“加个密码”的方案,而是服务器数据流动的实时安检闸机IP-guard安全网关——这个名字在企业IT运维圈里,常被误读为“桌面端U盘管控工具”或“员工上网行为审计系统”。但真正用过它来守服务器的人,会立刻意识到:它…...

XZ9971,60V,5A,NMOS 封装:SOT223
封装:SOT223类型:NVDS:60V VGS: 20V ID:5ARDS(ON):10V <50mΩRDS(ON):4.5V <60mΩ型号: XZ9971 封装:SOT223类型&…...

C51对Maxim 390远内存绝对地址访问的三种方案
1. 深入解析C51对Maxim 390远内存的绝对地址访问 在嵌入式开发中,对特定内存地址的直接操作是底层控制的关键技术。以Maxim(原Dallas Semiconductor)DS80C390为代表的增强型8051架构,其24位地址空间的远内存(Far Memor…...