【前端】CSS实战之音乐播放器
目录
- 播放器背景
- 旋转音乐封面
- 按钮
- 进度条
- 音量调节
- 音乐信息
- 按钮的效果
- JavaScript部分
- 播放和暂停
- 音乐切换
- 音乐信息
- 进度条
- 音量调节
- 避免拖拽时的杂音
- 音量调节条
- 静音和解除静音
- 自动下一首
- 实现一个小效果
- 最终效果
播放器背景
<div class="play_box"></div>
设置居中,圆角,阴影等参数
.play_box {position: absolute;top: 50%;left: 50%;transform: translate(-50%, -50%);width: 800px;height: 80px;display: flex;border-radius: 5px;box-shadow: 0 0 15px #666565;
}
用专辑封面作为播放器的背景填充,通过设置模糊做出一种毛玻璃效果
.play_box {background-image: url(./1.png);background-size: 100% 100%;filter: blur(10px);
}
我尝试加上了这三行代码,把背景图片填充后再用filter属性进行模糊,产生了如下的效果

可以看到,整个播放器都变模糊了,并不是我们所希望的毛玻璃效果,为了不让边缘模糊,可以采用下面的办法。
.play_box {position: absolute;top: 43%;left: 18%;width: 800px;height: 80px;display: flex;border-radius: 5px;overflow: hidden;background-image: url(./1.png);background-size: cover;box-shadow: 0 0 15px #666565;
}
.play_box::after{position: absolute;width: 101%;height: 100%;content: "";backdrop-filter: blur(20px);z-index: 1;
}
在播放器上覆盖了一个伪元素,并将内容设为了空,然后给这个伪元素添加模糊效果

这样就好看多了。
而由于后续需要在其上面添加其他元素,所以说必须设置这个"毛玻璃"的定位和z-index。
至于为什么width设成了101%是因为一个小细节,当设成100%的时候仔细观察发现右边存在瑕疵,所以拉长一点点毛玻璃的宽度就能避免这个情况了。

旋转音乐封面
<div class="album_cover"></div>
.album_cover{width: 80px;height: 80px;border-radius: 360px;background-image: url(./1.png);background-size: contain;z-index: 2;box-shadow: 0 0 10px #ffffffa2;animation: rotate 5s linear infinite;
}
@keyframes rotate {0% {transform: rotate(0deg);}100% {transform: rotate(360deg);}
}

按钮
加入一些字体图标作为按钮

<span class="iconfont icon-pause pause_icon"></span>
<span class="iconfont icon-icon-test play_icon"></span>
<span class="iconfont icon-icon-test1 pre_song"></span>
<span class="iconfont icon-icon-test1 next_song"></span>
对于这些图标的样式就全部写在html文件的head里面了
<link rel="stylesheet" href="./font/iconfont.css">
<style>.iconfont{position: absolute;top: 50%;font-size: 25px;color: #f99f50;transform: translateY(50%);z-index: 2;text-shadow: 0 0 10px #eecc7d;}.pause_icon{left: 25px;transform: translateY(-50%);font-size: 30px;cursor: pointer;}.play_icon{left: 25px;transform: translateY(-50%);font-size: 30px;display:none;cursor: pointer;}.pre_song{left: 100px;rotate: 180deg;cursor: pointer;}.next_song{left: 160px;transform: translateY(-50%);cursor: pointer;}.louder_icon,.turn_of_icon,.quieter_icon{right: 25px;transform: translateY(-50%);color:white;cursor: pointer;text-shadow: 0 0 5px white;display: none;
}
.louder_icon{display: block;
}
</style>

效果如上
进度条
<div class="progress-bar"><div class="progress-fill"><div class="progress-thumb"></div></div>
</div>
.progress-bar {position:absolute;z-index: 3;top: 50%;left: 60%;transform: translate(-50%, -50%);width: 400px;height: 12px;background-color: white;border-radius: 50px;box-shadow: 0 0 15px #edebeb;
}
.progress-fill {position:absolute;z-index: 3;width: 50%;height: 12px;background: linear-gradient(to right, #fdd162,#faab35,#f94f47);border-radius: 50px;
}
.progress-thumb{position: absolute;top: 50%;left: 100%;transform: translate(-50%, -50%);width: 20px;height: 20px;border-radius: 50%;background-color: white;cursor: pointer;box-shadow: 0 0 5px #939393;
}
用两个<div>来展示进度条的外壳和填充条,在填充条的最右侧再用一个<div>显示可拖拽的进度条圆点。

效果如上
音量调节
通过设置overflow:visible可以让超出盒子的部分显示出来,所以我们可以把音量图标专门放进一个<div>中然后在里面放上一个滑动条,以及显示百分比的<p>标签。这样子就不用担心缩放页面导致音量条的位置错位了。当鼠标悬停在音量图标上的时候,通过一些衔接动画来改变透明度并设置display属性,从而让音量调节条能够显示出来。通过:active可以实现当鼠标按下后即使离开了hover的区域,依然能让音量调节框显示出来。
<div class="volume-button"><span class="iconfont icon-louder louder_icon"></span><span class="iconfont icon-turn_of turn_of_icon"></span><span class="iconfont icon-quieter quieter_icon"></span><div class="volume-box"><div class="volume-bar"><div class="volume-fill"><div class="volume-thumb"></div></div></div><p class="volume-percent">50%</p></div>
</div>
.volume-button{position: absolute;top: 0;right: 0;width: 80px;height: 80px;cursor: pointer;z-index:4;
}.volume-box{position: absolute;bottom: 90%;right:20%;width:40px;height: 0px;z-index: 4;background-color: white;border-radius: 15px;box-shadow: 0 0 10px #818080;border: solid 1px #ffffff;display:none;opacity: 1;
}.volume-button:hover,.volume-button:active{transform: scale(1.5);transition: all 0.3s ease;
}.volume-button:hover .volume-box{height: 140px;display: block;animation: show_volume_bar.5s ease forwards;
}
.volume-button:active .volume-box{height: 140px;display: block;
}@keyframes show_volume_bar {0% {opacity: 0;transform: scale(0);transform-origin: bottom;}100% {opacity: 1;transform: scale(1);transform-origin: bottom;}
}
.volume-bar {position:absolute;top: 55%;left: 50%;transform: translate(-50%, -55%);width: 10px;height: 100px;background-color: white;border-radius: 50px;box-shadow: 0 0 15px #edebeb;
}
.volume-fill {position:absolute;bottom: 0;width: 12px;height: 50%;background: linear-gradient(to top, #fdd162,#faab35,#f94f47);border-radius: 50px;
}
.volume-thumb{position: absolute;top:0;left:50%;width: 13px;transform: translateX(-50%);height: 13px;border-radius: 50%;background-color: white;cursor: pointer;box-shadow: 0 0 5px #939393;
}.volume-thumb:hover{border: 0.5px solid #f1b04e;box-shadow: 0 0 5px #f1b04e;
}.volume-percent{position: absolute;bottom:2%;width: 20px;left: 50%; transform: translateX(-60%); font-size: 11px;color:#464545;
}

音乐信息
<div class="song-info"><p class="song-name">歌曲名</p><p class="song-time">1:30/3:00</p>
</div>
.song-info{position: absolute;top: 50%;left: 50%;transform: translate(-32%, -50%);width: 400px;height: 70px;z-index:2;color:#464545;
}
.song-name{position: absolute;top:0;left:50%;transform: translateX(-50%);text-shadow: 2px 2px 5px #ffffff, -2px -2px 5px #f1f1f1;
}
.song-time{position: absolute;bottom: 0px;left: 50%;transform: translateX(-50%);text-shadow: 2px 2px 5px #ffffff, -2px -2px 5px #f1f1f1;
}

按钮的效果
给两个滑动点加一些效果
.progress-thumb:hover{border: 1px solid #f1b04e;box-shadow: 0 0 5px #f1b04e;
}
.volume-thumb:hover{border: 0.5px solid #f1b04e;box-shadow: 0 0 5px #f1b04e;
}

通过:not()伪类选择器,把出了音量图标以外的图标鼠标悬停时设置成下面的样式
.iconfont:hover:not(.louder_icon,.turn_of_icon,.quieter_icon){color: #f38524;text-shadow: 0 0 10px #e28e44;
}

给音量滑动条显示出来时加一个动画
.volume-button:hover .volume-box{height: 140px;display: block;animation: show_volume_bar .5s ease forwards;
}
@keyframes show_volume_bar {0% {opacity: 0;transform: scale(0);transform-origin: bottom;}100% {opacity: 1;transform-origin: bottom;transform: scale(1);}
}

JavaScript部分
引入js代码
<script src="./script.js"></script>
播放和暂停
默认显示三角形播放图标,暂停图标则隐藏
.pause_icon{left: 25px;transform: translateY(-50%);font-size: 30px;cursor: pointer;display:none;
}.play_icon{left: 25px;transform: translateY(-50%);font-size: 30px;cursor: pointer;
}
默认图片是不旋转的
.album_cover{animation: rotate 5s linear infinite;animation-play-state: paused;
}
对于两个图标,分别设置相应的点击事件
const pauseIcon = document.querySelector('.pause_icon');
const playIcon = document.querySelector('.play_icon');
const albumCover = document.querySelector('.album_cover');
pauseIcon.addEventListener('click', function() {pauseIcon.style.display = 'none';playIcon.style.display = 'block';albumCover.style.animationPlayState = 'paused';
});
playIcon.addEventListener('click', function() {pauseIcon.style.display = 'block';playIcon.style.display = 'none';albumCover.style.animationPlayState = 'running';
});

加入一个用于播放音乐的标签<audio>在<body>的开头
<audio id="audioPlayer"></audio>
优化一下代码结构
const pauseIcon = document.querySelector('.pause_icon');
const playIcon = document.querySelector('.play_icon');
const albumCover = document.querySelector('.album_cover');
const audioPlayer = document.getElementById('audioPlayer');pauseIcon.addEventListener('click', pauseSong);
playIcon.addEventListener('click', playSong);// 播放歌曲
function playSong() {audioPlayer.play();pauseIcon.style.display = 'block';playIcon.style.display = 'none';albumCover.style.animationPlayState = 'running';
}// 暂停歌曲
function pauseSong() {audioPlayer.pause();pauseIcon.style.display = 'none';playIcon.style.display = 'block';albumCover.style.animationPlayState = 'paused';
}
音乐切换
通过一个加载歌曲的函数,就可以实现歌曲切换了,用一个列表存放一下所有的歌曲名,然后用一个变量作为这个列表的索引传入加载歌曲的函数,在点击切歌按钮的时候就可以加载对应的歌曲,通过取模运算避免索引越界。
const songList = ["花月","honey"];// 歌曲列表
let currentIndex = 0;// 当前歌曲索引const playBox = document.querySelector('.play_box');
// 加载歌曲
function loadSong(index) {const songName = songList[index];audioPlayer.src="./music/"+songName+".m4a";playBox.style.backgroundImage = `url('./music/${songName}.png')`;albumCover.style.backgroundImage = `url('./music/${songName}.png')`;
}const nextIcon = document.querySelector('.next_song');
const preIcon = document.querySelector('.pre_song');
// 为 pre_song 和 next_song元素添加点击事件监听器
preIcon.addEventListener('click', preSong);
nextIcon.addEventListener('click', nextSong);// 下一首歌曲
function nextSong() {currentIndex = (currentIndex + 1) % songList.length;loadSong(currentIndex);playSong();
}
// 上一首歌曲
function preSong() {currentIndex = (currentIndex - 1 + songList.length) % songList.length;loadSong(currentIndex);playSong();
}

音乐信息
通过audioPlayer.currentTime, audioPlayer.duration这两个参数就能轻松获得音乐的当前时长和总时长了。可以加一个特判避免没有获取到数据的时候就显示出Na。
const songTime = document.querySelector('.song-time');
const songNameLabel = document.querySelector('.song-name');// 加载歌曲
function loadSong(index) {const songName = songList[index];audioPlayer.src="./music/"+songName+".m4a";playBox.style.backgroundImage = `url('./music/${songName}.png')`;albumCover.style.backgroundImage = `url('./music/${songName}.png')`;updateTimeDisplay(0, audioPlayer.duration);songNameLabel.textContent = songName;
}
// 格式化时间为分钟:秒的形式
function formatTime(time) {const minutes = Math.floor(time / 60);const seconds = Math.floor(time % 60);return `${minutes}:${seconds < 10? '0' + seconds : seconds}`;
}// 更新时间显示
function updateTimeDisplay(currentTime, totalTime) {if (isNaN(currentTime) || isNaN(totalTime)) {return;}songTime.textContent = `${formatTime(currentTime)}/${formatTime(totalTime)}`;
}// 监听音频播放进度更新
audioPlayer.ontimeupdate = function() {updateTimeDisplay(audioPlayer.currentTime, audioPlayer.duration);
};

进度条
由于之前在css中设置了小圆点的定位一定在进度条fill的最右侧,所以只需要更新fill的长度就行了,而这个长度需要实时更新,所以在音频监听的部分加上一条
audioPlayer.ontimeupdate = function() {updateTimeDisplay(audioPlayer.currentTime, audioPlayer.duration);updateProgressBar();
};
操控小圆点移动的部分主要通过获取鼠标点下和松开时的坐标以及相应的播放进度从而改变fill的长度,具体看下面的代码。
const progressBar = document.querySelector('.progress-bar');
const progressFill = document.querySelector('.progress-fill');
const progressThumb = document.querySelector('.progress-thumb');// 更新进度条
function updateProgressBar() {const progress = (audioPlayer.currentTime / audioPlayer.duration) * 100;progressFill.style.width = `${progress}%`;
}// 处理进度条控点的拖动
let isDragging = false;
let startX;
let startProgress;progressThumb.addEventListener('mousedown', function(e) {isDragging = true;startX = e.clientX;// 鼠标按下时的坐标startProgress = audioPlayer.currentTime;// 鼠标按下时的进度document.body.style.userSelect = 'none';// 禁止选中文本
});document.addEventListener('mousemove', function(e) {if (isDragging) {const dx = e.clientX - startX;// 鼠标移动的距离const progressBarWidth = progressBar.offsetWidth - progressThumb.offsetWidth;// 进度条宽度const progress = (startProgress + (dx / progressBarWidth) * audioPlayer.duration*0.95);// 新的进度audioPlayer.currentTime = progress;// 更新播放进度}
});document.addEventListener('mouseup', function() {isDragging = false;document.body.style.userSelect = 'auto';// 允许选中文本
});

音量调节
避免拖拽时的杂音
通过audioPlayer.volume即可获取音乐当前的音量
为了避免拖拽进度条的时候产生声音,可以做如下调整:
新建一个变量let volumeBeforeMute;
当鼠标按到进度条控点上时记录下当前音量
volumeBeforeMute = audioPlayer.volume;
拖拽过程中音量设为0
audioPlayer.volume = 0;
鼠标松开后重新社会一开始的音量
audioPlayer.volume = volumeBeforeMute;
音量调节条
和进度条类似的做法
const volumeButton = document.querySelector('.volume-button');
const volumeBar = document.querySelector('.volume-bar');
const volumeFill = document.querySelector('.volume-fill');
const volumeThumb = document.querySelector('.volume-thumb');
const volumePercent = document.querySelector('.volume-percent');
// 更新音量条
function updateVolumeBar() {curVolume = audioPlayer.volume;volumeFill.style.height = (curVolume*volumeBar.offsetHeight+volumeThumb.offsetHeight)+'px';volumePercent.textContent = `${Math.round(curVolume * 100)}%`;
}// 处理音量条控点的拖动
let isDraggingVolume = false;
let startY;
let startVolume;volumeThumb.addEventListener('mousedown', function(e) {isDraggingVolume = true;startY = e.clientY;startVolume = audioPlayer.volume;document.body.style.userSelect = 'none';
});document.addEventListener('mousemove', function(e) {if (isDraggingVolume) {const dy = e.clientY - startY;// 鼠标移动的距离const volumeBarHeight = volumeBar.offsetHeight;let volume = startVolume - (dy / volumeBarHeight*0.7);volume = Math.max(0, Math.min(1, volume)); // 确保音量在 0 到 1 之间audioPlayer.volume = volume;curVolume = volume;if (volume == 0){mute()}else if(volume < 0.5){muteIcon.style.display = 'none';louderIcon.style.display = 'none';quieterIcon.style.display = 'block';}else{muteIcon.style.display = 'none';louderIcon.style.display = 'block';quieterIcon.style.display = 'none';}}updateVolumeBar();
});document.addEventListener('mouseup', function() {isDraggingVolume = false;document.body.style.userSelect = 'auto';
});
静音和解除静音
const louderIcon = document.querySelector('.louder_icon');
const muteIcon = document.querySelector('.turn_of_icon');
// 为 louder 和 turn_of_icon 元素添加点击事件监听器louderIcon.addEventListener('click', mute);
muteIcon.addEventListener('click', louder);
let volumeAfterMute;
//静音
function mute() {muteIcon.style.display = 'block';louderIcon.style.display = 'none';quieterIcon.style.display = 'none';volumeBeforeMute = audioPlayer.volume;audioPlayer.volume = 0;updateVolumeBar();
}
//解除静音
function louder() {if (volumeBeforeMute == 0){mute()}else if(volumeBeforeMute < 0.5){muteIcon.style.display = 'none';louderIcon.style.display = 'none';quieterIcon.style.display = 'block';}else{muteIcon.style.display = 'none';louderIcon.style.display = 'block';quieterIcon.style.display = 'none';}audioPlayer.volume =volumeBeforeMute;updateVolumeBar();
}
自动下一首
在监听函数中加上一个判断语句就行了
// 监听音频播放进度更新
audioPlayer.ontimeupdate = function() {updateTimeDisplay(audioPlayer.currentTime, audioPlayer.duration);updateProgressBar();if (audioPlayer.ended) {nextSong();}
};

实现一个小效果
我想实现将鼠标放到播放或暂停键上时,音乐图片角度归零,放大, 并停止旋转。
搞了很久一直不起作用,最后只能用!important来提升属性的优先级从而在CSS中实现。
.play_icon:hover ~.album_cover,.pause_icon:hover ~.album_cover {width: 100px;height: 100px;margin-left: -10px;margin-top: -10px;border-radius: 5%;rotate: 0deg;animation-play-state: paused!important;transform: rotate(0deg)!important;
}

最终效果
至此整个项目就完成啦!
相关文章:
【前端】CSS实战之音乐播放器
目录 播放器背景旋转音乐封面按钮进度条音量调节音乐信息按钮的效果JavaScript部分播放和暂停音乐切换音乐信息进度条 音量调节避免拖拽时的杂音音量调节条静音和解除静音 自动下一首实现一个小效果最终效果 播放器背景 <div class"play_box"></div>设置…...
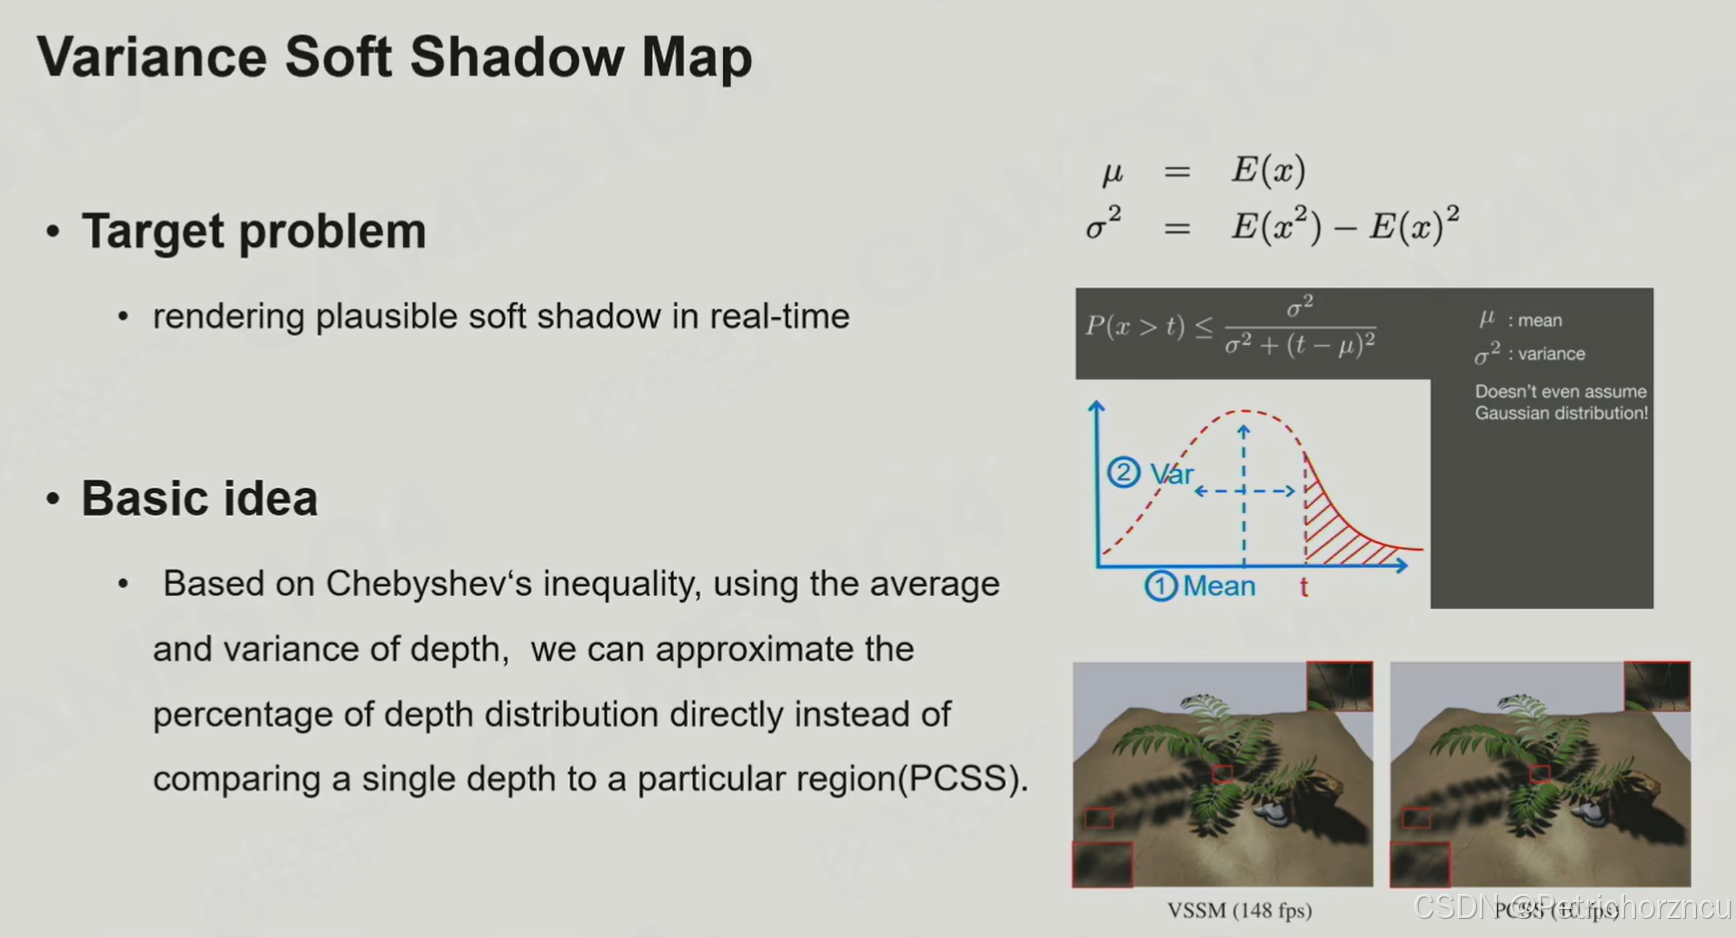
Games104——渲染中光和材质的数学魔法
原文链接 渲染方程及挑战 挑战 对于任一给定方向如何获得radiance–阴影 对于光源和表面shading的积分运算(蒙特卡洛积分) 对于反射光多Bounce的无限递归计算 基础光照解决方案 Blinn-Phong模型: 简化阴影 最常见的处理方式就是Shadow M…...

impala增加字段,hsql查不到数据
impala增加字段,插入数据后直接查看文件有值,impala查询是有值的,但是hsq查出来就没有值! Parquet格式的表,在重命名表的列名,或新增列名后,查询重名的列数据时显示当前列所有值为NULL。 原因&a…...

SpringBoot项目中的异常处理
定义错误页面 SpringBoot 默认的处理异常的机制:SpringBoot 默认的已经提供了一套处理异常的机制。一旦程序中出现了异常 SpringBoot 会像/error 的 url 发送请求。在 springBoot 中提供了一个叫 BasicExceptionController 来处理/error 请求,然后跳转到…...
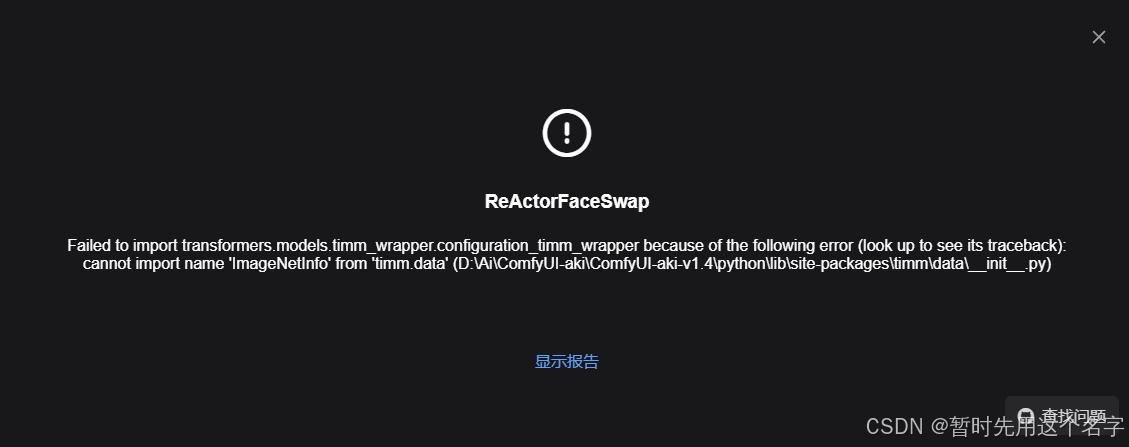
ComfyUI实现老照片修复——AI修复老照片(ComfyUI-ReActor / ReSwapper)尚待完善
AI修复老照片,试试吧,不一定好~~哈哈 2023年4月曾用过ComfyUI,当时就感慨这个工具和虚幻的蓝图很像,以后肯定是专业人玩的。 2024年我写代码去了,AI做图没太关注,没想到,现在ComfyUI真的变成了工…...
)
NLTK命名实体识别(NER)
命名实体识别(Named Entity Recognition, NER)是自然语言处理(NLP)中的一项核心技术,旨在从文本中识别出具有特定意义的实体,如人名、地名、组织名等。通过对文本的自动化处理,NER能够帮助计算机理解和组织大量的非结构化数据,为信息抽取、搜索引擎优化、数据分析等领域…...
【游戏设计原理】78 - 持续注意力
这个原理指出,人类的注意力通常只能维持7至10分钟,因此游戏设计需要根据这一规律进行优化。具体建议包括: 短时间段设计:将游戏体验分解成7到10分钟的任务或场景,以符合玩家的注意力节奏。引入新刺激:在注…...

Android设备:Linux远程lldb调试
更多内容:XiaoJ的知识星球 目录 一、环境准备1.1 安装llvm/NDK1.2 开启lldb-server服务1.3 lldb连接lldb-server 二、使用lldb调试Android native源码2.1 运行调试2.2 .lldbinit文件 下面介绍Android设备(Android手机为例),在Linu…...

多层 RNN原理以及实现
数学原理 多层 RNN 的核心思想是堆叠多个 RNN 层,每一层的输出作为下一层的输入,从而逐层提取更高层次的抽象特征。 1. 单层 RNN 的数学表示 首先,单层 RNN 的计算过程如下。对于一个时间步 t t t,单层 RNN 的隐藏状态 h t h_t…...
[Computer Vision]实验三:图像拼接
目录 一、实验内容 二、实验过程及结果 2.1 单应性变换 2.2 RANSAC算法 三、实验小结 一、实验内容 理解单应性变换中各种变换的原理(自由度),并实现图像平移、旋转、仿射变换等操作,输出对应的单应性矩阵。利用RANSAC算法优…...
)
【Vim Masterclass 笔记22】S09L40 + L41:同步练习11:Vim 的配置与 vimrc 文件的相关操作(含点评课内容)
文章目录 S09L40 Exercise 11 - Vim Settings and the Vimrc File1 训练目标2 操作指令2.1. 打开 vimrc-sample 文件2.2. 尝试各种选项与设置2.3. 将更改内容保存到 vimrc-sample 文件2.4. 将文件 vimrc-sample 的内容复制到寄存器2.5. 创建专属 vimrc 文件2.6. 对于 Mac、Linu…...
模块的 “时光记录仪”)
5.9 洞察 OpenAI - Translator:日志(Logger)模块的 “时光记录仪”
洞察 OpenAI - Translator:日志(Logger)模块的 “时光记录仪” 在开发和生产环境中,日志记录是确保应用程序正常运行和快速调试的核心机制之一。日志模块(Logger)用于记录应用程序的运行信息,包括错误、警告、调试信息、信息性事件等。通过日志,开发者可以实时监控程序…...

客户案例:电商平台对帐-账单管理(亚马逊amazon)
账单管理: 功能定义: 账单管理用于上传亚马逊(amazon)平台下载的原始账单数据,美国站、日本站、墨西哥站等账单模板直接进行数据上传,做到0调整,下载下来的账单数据无缝上传至对账平台-账单管…...

IP协议特性
在网络层中,最重要的协议就是IP协议,IP协议也有两个特性,即地址管理和路由选择。 1、地址管理 由于IPv4地址为4个字节,所以最多可以支持42亿个地址,但在现在,42亿明显不够用了。这就衍生出下面几个机制。…...
Kubernetes入门学习
kubernetes技术架构模型 一、kubernetes的Label标签 1.标签是以keyvalue的格式通过用户自定义指定,目的是将其加入到各种资源对象上来实现多维度的资源分组管理使其更方便的进行资源分配、调度、配置和部署管理工作。 2.标签可以结合Label Selector(标签选择器)查询…...
支持向量机SVM的应用案例
支持向量机(Support Vector Machine,SVM)是一种强大的监督学习算法,广泛应用于分类和回归任务。 基本原理 SVM的主要目标是周到一个最优的超平面,该超平面能够将不同类别的数据点尽可能分开,并且使离该超平面最近的数…...
Chrome 132 版本新特性
Chrome 132 版本新特性 一、Chrome 132 版本浏览器更新 1. 在 iOS 上使用 Google Lens 搜索 在 Chrome 132 版本中,开始在所有平台上推出这一功能。 1.1. 更新版本: Chrome 126 在 ChromeOS、Linux、Mac、Windows 上:在 1% 的稳定版用户…...
(5)STM32 USB设备开发-USB键盘
讲解视频:2、USB键盘-下_哔哩哔哩_bilibili 例程:STM32USBdevice: 基于STM32的USB设备例子程序 - Gitee.com 本篇为使用使用STM32模拟USB键盘的例程,没有知识,全是实操,按照步骤就能获得一个STM32的USB键盘。本例子是…...

Linux 系统服务开机自启动指导手册
一、引言 在 Linux 系统中,设置服务开机自启动是常见的系统配置任务。本文档详细介绍了多种实现服务开机自启动的方法,包括 systemctl 方式、通用脚本方式、crontab 方案等,并提供了生产环境下的方案建议和开机启动脚本示例。 二、systemct…...

分布式多卡训练(DDP)踩坑
多卡训练最近在跑yolov10版本的RT-DETR,用来进行目标检测。 单卡训练语句(正常运行): python main.py多卡训练语句: 需要通过torch.distributed.launch来启动,一般是单节点,其中CUDA_VISIBLE…...

AI Agent在智能风控中的实战:多智能体欺诈检测与预警
AI Agent在智能风控中的实战:多智能体欺诈检测与预警 你有没有过明明是正常交易却被银行冻结账户的糟糕体验?或是听说过某电商平台上线新活动首日就被黑产团伙薅走数千万补贴的新闻?随着黑产欺诈向团伙化、专业化、动态化演进,传统依赖规则引擎、单模型机器学习的风控体系已…...

Kerberos身份认证原理与实战排错指南
1. 为什么今天还要花时间搞懂 Kerberos?——一个被低估的“老协议”正在悄悄支撑着你的日常你每天登录公司内网查邮件、访问财务系统提交报销、用 Jenkins 构建代码、甚至在 Windows 域环境中打开一台同事的共享文件夹……这些看似顺滑的操作背后,大概率…...

微信小程序3D开发框架技术对比:XR-Frame与threejs-miniprogram
随着微信小程序逐步支持3D渲染与AR能力,开发者面临两个主要官方方案:自研的XR-Frame和适配Three.js的threejs-miniprogram。本文将从架构设计、渲染机制、功能集成、开发模式及适用场景等维度进行技术分析,为技术选型提供参考。一、XR-Frame&…...

解决Claude Code Token不足问题并享受Taotoken活动价
🚀 告别海外账号与网络限制!稳定直连全球优质大模型,限时半价接入中。 👉 点击领取海量免费额度 解决Claude Code Token不足问题并享受Taotoken活动价 应用场景类,聚焦于使用Claude Code时遇到Token配额紧张的开发者&…...

Graphin高级应用:结合GISDK构建配置化图分析模块的完整指南
Graphin高级应用:结合GISDK构建配置化图分析模块的完整指南 【免费下载链接】Graphin 🌌 A React toolkit for graph visualization based on G6. 项目地址: https://gitcode.com/gh_mirrors/gr/Graphin 在当今数据驱动的时代,图可视化…...

ZMJS,把 JavaScript 解释器放进 SAP ABAP 应用服务器之后,很多扩展思路会变得不一样
我今天看这个 oisee/zmjs 仓库时,最吸引人的不是它把 JavaScript 语法做进了 ABAP,而是它选择了一条非常 SAP 的路线,纯 ABAP、无外部依赖、无 Kernel Module、以类和接口的形式运行在 SAP 应用服务器内部。仓库自己的定位很直接,ZMJS 是一个面向 SAP ABAP 的 Mini JavaScr…...

在数据预处理与分析流水线中集成大模型API进行智能标注与摘要
🚀 告别海外账号与网络限制!稳定直连全球优质大模型,限时半价接入中。 👉 点击领取海量免费额度 在数据预处理与分析流水线中集成大模型API进行智能标注与摘要 对于数据工程师而言,处理海量非结构化文本数据是一项常见…...

手机也能玩转无人机仿真:用安卓QGC App连接同一WiFi下的PX4 JMAVSim模拟器
手机也能玩转无人机仿真:用安卓QGC App连接同一WiFi下的PX4 JMAVSim模拟器 无人机开发者和爱好者们,是否曾想过用手机就能完成整个无人机仿真测试流程?告别笨重的电脑束缚,只需一部安卓设备,就能在沙发上调试飞控算法。…...

LeagueAkari:基于LCU接口的英雄联盟客户端自动化工具深度解析
LeagueAkari:基于LCU接口的英雄联盟客户端自动化工具深度解析 【免费下载链接】League-Toolkit An all-in-one toolkit for LeagueClient. Gathering power 🚀. 项目地址: https://gitcode.com/gh_mirrors/le/League-Toolkit 功能模块架构与核心技…...

LSTM、GRU与注意力机制在股票预测中的性能对比与实战指南
1. 项目概述与核心价值在量化金融和算法交易这个行当里,预测股票价格走势一直是个充满诱惑又极具挑战的“圣杯”问题。传统的技术分析和基本面分析,虽然各有拥趸,但在面对市场的高噪声、非线性和突发性事件时,往往显得力不从心。我…...