为什么要用springboot进行开发呢?
文章目录
- 前言
- 1、那么Springboot是怎么实现自动配置的
- 1.1 启动类
- 1.2 @SpringBootApplication
- 1.3 @Configuration
- 1.4 @ComponentScan
- 1.5 @EnableAutoConfiguration
- 1.6 两个重要注解
- 1.7 AutoConfigurationPackage注解
- 1.8 Import(AutoConfigurationImportSelector.class)注解
- 1.9自动配置幕后英雄:SpringFactoriesLoader详解
- 1.10 深入探索SpringApplication执行流程
- 总结
前言
学习了一段时间springboot,一般都可以在项目中使用springboot开发了。因为springboot的东西并不多,或者说,springboot根本就没有新东西。
好了,现在问一句,我们为什么要用springboot?
我听过的回答:
A:Spring Boot 最主要是不用 XML 配置,可以用 Java 来配置 bean,省去了许多配置文件。
我又问:Spring 本身就可以用 Java 配置代替 XML 配置,和 Spring Boot 有什么关系呢?
A:。。。
B:Spring Boot 我们用来做 Spring Cloud 微服务。
我又问:微服务和 Spring Boot 有什么关系?不用 Spring Boot 行不行?
B:。。。
C:Spring Boot 可以打 jar 包部署,内部集成了Tomcat。
这个确实是 Spring Boot 的特色,但是我还是觉得没有答到关键点上。
然后我继续问,如果不考虑打 jar 包部署呢?
C:。。。
显然,这些答案都没有回答到点子上。以我的理解,springboot是什么?它只是对spring Framework做了二次封装。以便简化开发,让程序员将更多的精力和时间放到业务上去。规避了繁琐的配置操作。而且还减少了遭遇bug的数量。说直白一点:自动配置。
1、那么Springboot是怎么实现自动配置的
1.1 启动类
@SpringBootApplication
public class Application {public static void main(String[] args) {SpringApplication.run(Application.class, args);}
}
还是要从springboot的启动类说起。就这个类而言,最神秘的还是Annotation定义(@SpringBootApplication)和类定义(SpringApplication.run)。
1.2 @SpringBootApplication
这个注解之前没见过,可以说它是springboot自己的新注解,我们点进去看下。
@Target(ElementType.TYPE)
@Retention(RetentionPolicy.RUNTIME)
@Documented
@Inherited
@SpringBootConfiguration
@EnableAutoConfiguration
@ComponentScan(excludeFilters = {@Filter(type = FilterType.CUSTOM, classes = TypeExcludeFilter.class),@Filter(type = FilterType.CUSTOM, classes = AutoConfigurationExcludeFilter.class) })
public @interface SpringBootApplication {...
}
可以看到,这是一个组合注解
虽然定义使用了多个Annotation进行了原信息标注,但实际上重要的只有三个Annotation
- @Configuration(@SpringBootConfiguration点开查看发现里面还是应用了@Configuration)
- @EnableAutoConfiguration
- @ComponentScan
1.3 @Configuration
这里的@Configuration对我们来说不陌生,它就是JavaConfig形式的Spring Ioc容器的配置类使用的那个@Configuration,SpringBoot社区推荐使用基于JavaConfig的配置形式,所以,这里的启动类标注了@Configuration之后,本身其实也是一个IoC容器的配置类。
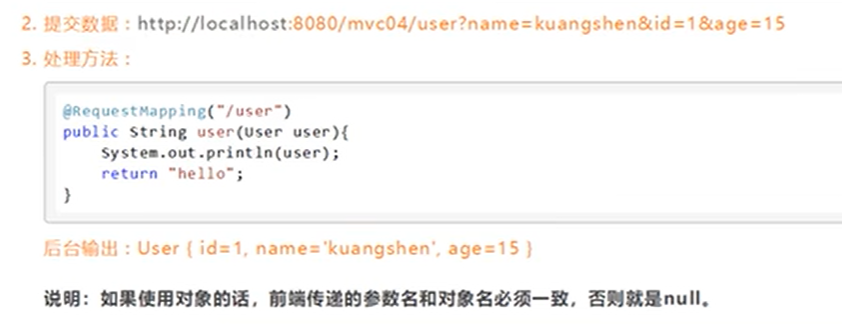
1.4 @ComponentScan
@ComponentScan这个注解在Spring中很重要,它对应XML配置中的元素,@ComponentScan的功能其实就是自动扫描并加载符合条件的组件(比如@Component和@Repository等)或者bean定义,最终将这些bean定义加载到IoC容器中。
我们可以通过basePackages等属性来细粒度的定制@ComponentScan自动扫描的范围,如果不指定,则默认Spring框架实现会从声明@ComponentScan所在类的package进行扫描。
注:所以SpringBoot的启动类最好是放在root package下,因为默认不指定basePackages。
1.5 @EnableAutoConfiguration
这厮才是springboot的核心!
大家是否还熟悉Spring框架提供的各种名字为@Enable开头的Annotation定义?比如@EnableScheduling、@EnableCaching、@EnableMBeanExport等,@EnableAutoConfiguration的理念和做事方式其实一脉相承,简单概括一下就是,借助@Import的支持,收集和注册特定场景相关的bean定义。
而@EnableAutoConfiguration也是借助@Import的帮助,将所有符合自动配置条件的bean定义加载到IoC容器,仅此而已!
@EnableAutoConfiguration作为一个复合Annotation,点进去,信息如下:
@Target(ElementType.TYPE)
@Retention(RetentionPolicy.RUNTIME)
@Documented
@Inherited
@AutoConfigurationPackage
@Import(AutoConfigurationImportSelector.class)
public @interface EnableAutoConfiguration {...
}
这是springboot2.0的配置,如果你用的版本是1.5或以下的,是这样:
@Target(ElementType.TYPE)
@Retention(RetentionPolicy.RUNTIME)
@Documented
@Inherited
@AutoConfigurationPackage
@Import(EnableAutoConfigurationImportSelector.class)
public @interface EnableAutoConfiguration {...
}
当然,EnableAutoConfigurationImportSelector这个类也是继承了AutoConfigurationImportSelector类的,这个没关系,无所谓啦!
1.6 两个重要注解
- @AutoConfigurationPackage:自动配置包
- @Import: 导入自动配置的组件
1.7 AutoConfigurationPackage注解
你一步一步点进去,一直点到Registrar类中:
/*** {@link ImportBeanDefinitionRegistrar} to store the base package from the importing* configuration.*/static class Registrar implements ImportBeanDefinitionRegistrar, DeterminableImports {@Overridepublic void registerBeanDefinitions(AnnotationMetadata metadata,BeanDefinitionRegistry registry) {register(registry, new PackageImport(metadata).getPackageName());}@Overridepublic Set<Object> determineImports(AnnotationMetadata metadata) {return Collections.singleton(new PackageImport(metadata));}
它其实是注册了一个Bean的定义。
new PackageImport(metadata).getPackageName(),它其实返回了当前主程序类的 同级以及子级 的包组件。
1.8 Import(AutoConfigurationImportSelector.class)注解

可以从图中看出 AutoConfigurationImportSelector 继承了 DeferredImportSelector 继承了 ImportSelector
ImportSelector有一个方法为:selectImports。
@Overridepublic String[] selectImports(AnnotationMetadata annotationMetadata) {if (!isEnabled(annotationMetadata)) {return NO_IMPORTS;}AutoConfigurationMetadata autoConfigurationMetadata = AutoConfigurationMetadataLoader.loadMetadata(this.beanClassLoader);AnnotationAttributes attributes = getAttributes(annotationMetadata);List<String> configurations = getCandidateConfigurations(annotationMetadata,attributes);configurations = removeDuplicates(configurations);Set<String> exclusions = getExclusions(annotationMetadata, attributes);checkExcludedClasses(configurations, exclusions);configurations.removeAll(exclusions);configurations = filter(configurations, autoConfigurationMetadata);fireAutoConfigurationImportEvents(configurations, exclusions);return StringUtils.toStringArray(configurations);}
它其实是去加载 public static final String FACTORIES_RESOURCE_LOCATION = "META-INF/spring.factories";外部文件。这个外部文件,有很多自动配置的类。如下:
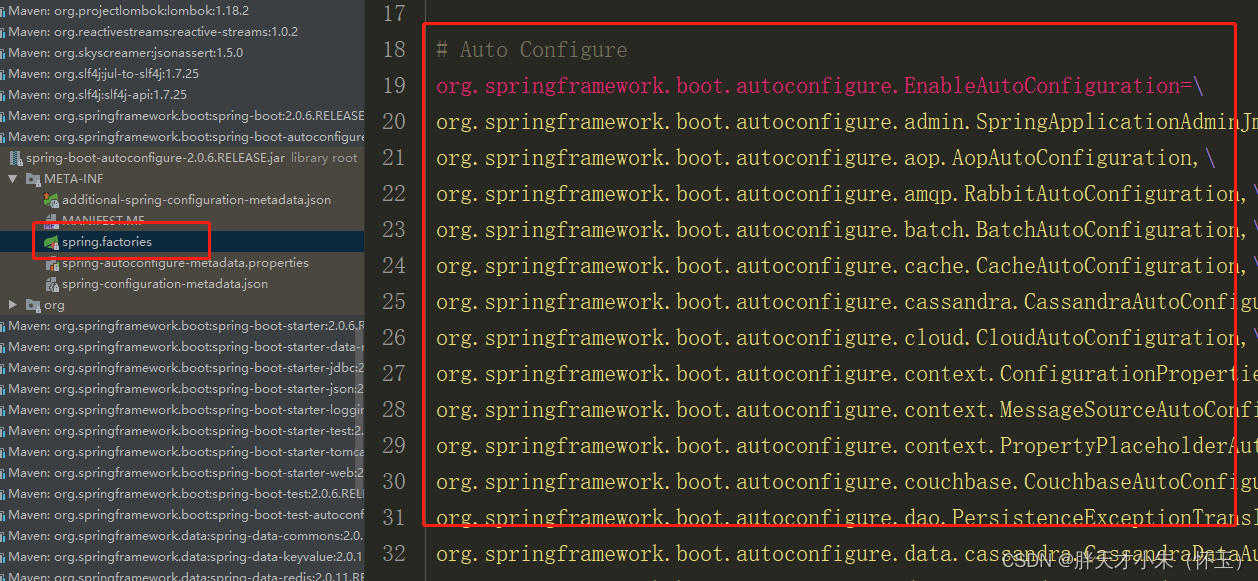
其中,最关键的要属@Import(EnableAutoConfigurationImportSelector.class),借助EnableAutoConfigurationImportSelector,@EnableAutoConfiguration可以帮助SpringBoot应用将所有符合条件的@Configuration配置都加载到当前SpringBoot创建并使用的IoC容器。
1.9自动配置幕后英雄:SpringFactoriesLoader详解
public abstract class SpringFactoriesLoader {//...public static <T> List<T> loadFactories(Class<T> factoryClass, ClassLoader classLoader) {...}public static List<String> loadFactoryNames(Class<?> factoryClass, ClassLoader classLoader) {....}
}
配合@EnableAutoConfiguration使用的话,它更多是提供一种配置查找的功能支持,即根据@EnableAutoConfiguration的完整类名org.springframework.boot.autoconfigure.EnableAutoConfiguration作为查找的Key,获取对应的一组@Configuration类
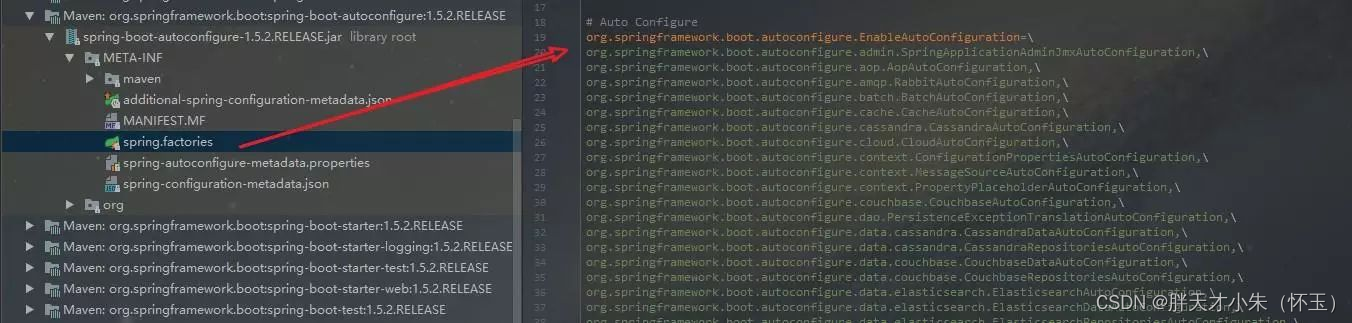
上图就是从SpringBoot的autoconfigure依赖包中的META-INF/spring.factories配置文件中摘录的一段内容,可以很好地说明问题。
所以,@EnableAutoConfiguration自动配置的魔法骑士就变成了:从classpath中搜寻所有的META-INF/spring.factories配置文件,并将其中org.springframework.boot.autoconfigure.EnableutoConfiguration对应的配置项通过反射(Java Refletion)实例化为对应的标注了@Configuration的JavaConfig形式的IoC容器配置类,然后汇总为一个并加载到IoC容器。
1.10 深入探索SpringApplication执行流程
SpringApplication的run方法的实现是我们本次旅程的主要线路,该方法的主要流程大体可以归纳如下:
1) 如果我们使用的是SpringApplication的静态run方法,那么,这个方法里面首先要创建一个SpringApplication对象实例,然后调用这个创建好的SpringApplication的实例方法。在SpringApplication实例初始化的时候,它会提前做几件事情:
public static ConfigurableApplicationContext run(Object[] sources, String[] args) {return new SpringApplication(sources).run(args);}
- 根据classpath里面是否存在某个特征(org.springframework.web.context.ConfigurableWebApplicationContext)来决定是否应该创建一个为Web应用使用的ApplicationContext类型。
- 使用SpringFactoriesLoader在应用的classpath中查找并加载所有可用的ApplicationContextInitializer。
- 使用SpringFactoriesLoader在应用的classpath中查找并加载所有可用的ApplicationListener。
- 推断并设置main方法的定义类
@SuppressWarnings({ "unchecked", "rawtypes" })private void initialize(Object[] sources) {if (sources != null && sources.length > 0) {this.sources.addAll(Arrays.asList(sources));}this.webEnvironment = deduceWebEnvironment();setInitializers((Collection) getSpringFactoriesInstances(ApplicationContextInitializer.class));setListeners((Collection) getSpringFactoriesInstances(ApplicationListener.class));this.mainApplicationClass = deduceMainApplicationClass();}
2) SpringApplication实例初始化完成并且完成设置后,就开始执行run方法的逻辑了,方法执行伊始,首先遍历执行所有通过SpringFactoriesLoader可以查找到并加载的SpringApplicationRunListener。调用它们的started()方法,告诉这些SpringApplicationRunListener,“嘿,SpringBoot应用要开始执行咯!”。
public ConfigurableApplicationContext run(String... args) {StopWatch stopWatch = new StopWatch();stopWatch.start();ConfigurableApplicationContext context = null;FailureAnalyzers analyzers = null;configureHeadlessProperty();SpringApplicationRunListeners listeners = getRunListeners(args);listeners.starting();try {ApplicationArguments applicationArguments = new DefaultApplicationArguments(args);ConfigurableEnvironment environment = prepareEnvironment(listeners,applicationArguments);Banner printedBanner = printBanner(environment);context = createApplicationContext();analyzers = new FailureAnalyzers(context);prepareContext(context, environment, listeners, applicationArguments,printedBanner);// 核心点:会打印springboot的启动标志,直到server.port端口启动refreshContext(context);afterRefresh(context, applicationArguments);listeners.finished(context, null);stopWatch.stop();if (this.logStartupInfo) {new StartupInfoLogger(this.mainApplicationClass).logStarted(getApplicationLog(), stopWatch);}return context;}catch (Throwable ex) {handleRunFailure(context, listeners, analyzers, ex);throw new IllegalStateException(ex);}}
3) 创建并配置当前Spring Boot应用将要使用的Environment(包括配置要使用的PropertySource以及Profile)。
private ConfigurableEnvironment prepareEnvironment(SpringApplicationRunListeners listeners,ApplicationArguments applicationArguments) {// Create and configure the environmentConfigurableEnvironment environment = getOrCreateEnvironment();configureEnvironment(environment, applicationArguments.getSourceArgs());listeners.environmentPrepared(environment);if (!this.webEnvironment) {environment = new EnvironmentConverter(getClassLoader()).convertToStandardEnvironmentIfNecessary(environment);}return environment;}
4) 遍历调用所有SpringApplicationRunListener的environmentPrepared()的方法,告诉他们:“当前SpringBoot应用使用的Environment准备好了咯!”。
public void environmentPrepared(ConfigurableEnvironment environment) {for (SpringApplicationRunListener listener : this.listeners) {listener.environmentPrepared(environment);}}
5) 如果SpringApplication的showBanner属性被设置为true,则打印banner。
private Banner printBanner(ConfigurableEnvironment environment) {if (this.bannerMode == Banner.Mode.OFF) {return null;}ResourceLoader resourceLoader = this.resourceLoader != null ? this.resourceLoader: new DefaultResourceLoader(getClassLoader());SpringApplicationBannerPrinter bannerPrinter = new SpringApplicationBannerPrinter(resourceLoader, this.banner);if (this.bannerMode == Mode.LOG) {return bannerPrinter.print(environment, this.mainApplicationClass, logger);}return bannerPrinter.print(environment, this.mainApplicationClass, System.out);}
6) 根据用户是否明确设置了applicationContextClass类型以及初始化阶段的推断结果,决定该为当前SpringBoot应用创建什么类型的ApplicationContext并创建完成,然后根据条件决定是否添加ShutdownHook,决定是否使用自定义的BeanNameGenerator,决定是否使用自定义的ResourceLoader,当然,最重要的,将之前准备好的Environment设置给创建好的ApplicationContext使用。
7) ApplicationContext创建好之后,SpringApplication会再次借助Spring-FactoriesLoader,查找并加载classpath中所有可用的ApplicationContext-Initializer,然后遍历调用这些ApplicationContextInitializer的initialize(applicationContext)方法来对已经创建好的ApplicationContext进行进一步的处理。
@SuppressWarnings({ "rawtypes", "unchecked" })protected void applyInitializers(ConfigurableApplicationContext context) {for (ApplicationContextInitializer initializer : getInitializers()) {Class<?> requiredType = GenericTypeResolver.resolveTypeArgument(initializer.getClass(), ApplicationContextInitializer.class);Assert.isInstanceOf(requiredType, context, "Unable to call initializer.");initializer.initialize(context);}}
8) 遍历调用所有SpringApplicationRunListener的contextPrepared()方法。
private void prepareContext(ConfigurableApplicationContext context,ConfigurableEnvironment environment, SpringApplicationRunListeners listeners,ApplicationArguments applicationArguments, Banner printedBanner) {context.setEnvironment(environment);postProcessApplicationContext(context);applyInitializers(context);listeners.contextPrepared(context);if (this.logStartupInfo) {logStartupInfo(context.getParent() == null);logStartupProfileInfo(context);}// Add boot specific singleton beanscontext.getBeanFactory().registerSingleton("springApplicationArguments",applicationArguments);if (printedBanner != null) {context.getBeanFactory().registerSingleton("springBootBanner", printedBanner);}// Load the sourcesSet<Object> sources = getSources();Assert.notEmpty(sources, "Sources must not be empty");load(context, sources.toArray(new Object[sources.size()]));listeners.contextLoaded(context);}
9) 最核心的一步,将之前通过@EnableAutoConfiguration获取的所有配置以及其他形式的IoC容器配置加载到已经准备完毕的ApplicationContext。
private void prepareAnalyzer(ConfigurableApplicationContext context,
FailureAnalyzer analyzer) {
if (analyzer instanceof BeanFactoryAware) {
((BeanFactoryAware) analyzer).setBeanFactory(context.getBeanFactory());
}
}
10) 遍历调用所有SpringApplicationRunListener的contextLoaded()方法。
public void contextLoaded(ConfigurableApplicationContext context) {for (SpringApplicationRunListener listener : this.listeners) {listener.contextLoaded(context);}}
11) 调用ApplicationContext的refresh()方法,完成IoC容器可用的最后一道工序。
private void refreshContext(ConfigurableApplicationContext context) {refresh(context);if (this.registerShutdownHook) {try {context.registerShutdownHook();}catch (AccessControlException ex) {// Not allowed in some environments.}}}
12) 查找当前ApplicationContext中是否注册有CommandLineRunner,如果有,则遍历执行它们。
private void callRunners(ApplicationContext context, ApplicationArguments args) {List<Object> runners = new ArrayList<Object>();runners.addAll(context.getBeansOfType(ApplicationRunner.class).values());runners.addAll(context.getBeansOfType(CommandLineRunner.class).values());AnnotationAwareOrderComparator.sort(runners);for (Object runner : new LinkedHashSet<Object>(runners)) {if (runner instanceof ApplicationRunner) {callRunner((ApplicationRunner) runner, args);}if (runner instanceof CommandLineRunner) {callRunner((CommandLineRunner) runner, args);}}}
13) 正常情况下,遍历执行SpringApplicationRunListener的finished()方法、(如果整个过程出现异常,则依然调用所有SpringApplicationRunListener的finished()方法,只不过这种情况下会将异常信息一并传入处理)
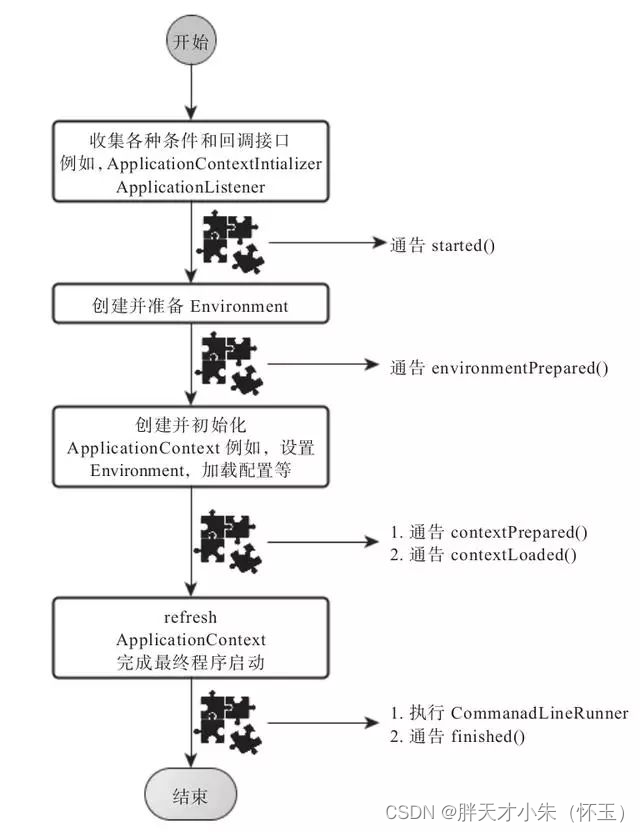
去除事件通知点后,整个流程如下:
public void finished(ConfigurableApplicationContext context, Throwable exception) {for (SpringApplicationRunListener listener : this.listeners) {callFinishedListener(listener, context, exception);}}
总结
到此,SpringBoot的核心组件完成了基本的解析,综合来看,大部分都是Spring框架背后的一些概念和实践方式,SpringBoot只是在这些概念和实践上对特定的场景事先进行了固化和升华,而也恰恰是这些固化让我们开发基于Sping框架的应用更加方便高效。
相关文章:
为什么要用springboot进行开发呢?
文章目录前言1、那么Springboot是怎么实现自动配置的1.1 启动类1.2 SpringBootApplication1.3 Configuration1.4 ComponentScan1.5 EnableAutoConfiguration1.6 两个重要注解1.7 AutoConfigurationPackage注解1.8 Import(AutoConfigurationImportSelector.class)注解1.9自动配置…...

设备树信息解析相关函数
一。可以通过三种不同的方式解析设备树节点: 1.根据设备树节点的名字解析设备树节点 struct device_node *of_find_node_by_name(struct device_node *from, const char *name); 参数: from:当前节点父节点首地址 name:设备树节点名字 …...

LeetCode-1124. 表现良好的最长时间段【哈希表,前缀和,单调栈】
LeetCode-1124. 表现良好的最长时间段【哈希表,前缀和,单调栈】题目描述:解题思路一:查字典。cur是当前的前缀和(劳累与不劳累天数之差),向前遍历。有两种情况。情况一,若cur大于0则是[0,i]的劳累与不劳累天…...

vue-router路由配置
介绍:路由配置主要是用来确定网站访问路径对应哪个文件代码显示的,这里主要描述路由的配置、子路由、动态路由(运行中添加删除路由) 1、npm添加 npm install vue-router // 执行完后会自动在package.json中添加 "vue-router…...

中国计算机设计大赛来啦!用飞桨驱动智慧救援机器狗
中国大学生计算机设计大赛是我国高校面向本科生最早的赛事之一,自2008年开赛至今,一直由教育部高校与计算机相关教指委等或独立或联合主办。大赛的目的是以赛促学、以赛促教、以赛促创,为国家培养德智体美劳全面发展的创新型、复合型、应…...

嘉定区2022年高新技术企业认定资助申报指南
各镇人民政府,街道办事处,嘉定工业区、菊园新区管委会,各相关企业: 为推进实施创新驱动发展战略,加快建设具有全球影响力的科技创新中心,根据《嘉定区关于加快本区高新技术企业发展的实施方案(…...
【C++】关键字、命名空间、输入和输出、缺省参数、函数重载
C关键字(C98)命名空间产生背景命名空间定义命名空间使用输入&输出缺省参数什么叫缺省参数缺省参数分类函数重载函数重载概念C支持函数重载的原理--名字修饰C关键字(C98) C总计63个关键字,C语言32个关键字。 下面我们先看一下C有多少关键字,不对关键…...

【一道面试题】关于HashMap的一系列问题
HashMap底层数据结构在1.7与1.8的变化 1.7是基于数组链表实现的,1.8是基于数组链表红黑树实现的,链表长度达到8时会树化 使用哈希表的好处 使用hash表是为了提升查找效率,比如我现在要在数组中查找一个A对象,在这种情况下是无法…...

论文笔记: Monocular Depth Estimation: a Review of the 2022 State of the Art
中文标题:单目深度估计:回顾2022年最先进技术 本文对比了物种最近的基于深度学习的单目深度估计方法: GPLDepth(2022)[15]: Global-Local Path Networks for Monocular Depth Estimation with Vertical CutDepthAdabins(2021)[1]: Adabins:…...
Springmvc补充配置
Controller配置总结 控制器通常通过接口定义或注解定义两种方法实现 在用接口定义写控制器时,需要去Spring配置文件中注册请求的bean;name对应请求路径,class对应处理请求的类。 <bean id"/hello" class"com.demo.Controller.HelloCo…...

MySQL 的 datetime等日期和时间处理SQL函数及格式化显示
MySQL 的 datetime等日期和时间处理SQL函数及格式化显示MySQL 时间相关的SQL函数:MySQL的SQL DATE_FORMAT函数:用于以不同的格式显示日期/时间数据。DATE_FORMAT(date, format) 根据格式串 format 格式化日期或日期和时间值 date,返回结果串。…...

基于微信云开发的防诈反诈宣传教育答题小程序
基于微信云开发的防诈反诈宣传教育答题小程序一、前言介绍作为当代大学生,诈骗事件的发生屡见不鲜,但却未能引起大家的重视。高校以线上宣传、阵地展示为主,线下学习、实地送法为辅,从而构筑立体化反诈骗防线。在线答题考试是一种…...
Map和Set
Map和set是一种专门用来进行搜索的容器或者数据结构,其搜索的效率与其具体的实例化子类有关。数据的一般查找方式有两种:直接遍历和二分查找。但这两种查找方式都有很大的局限性,也不便于对数据进行增删查改等操作。对于这一类数据的查找&…...
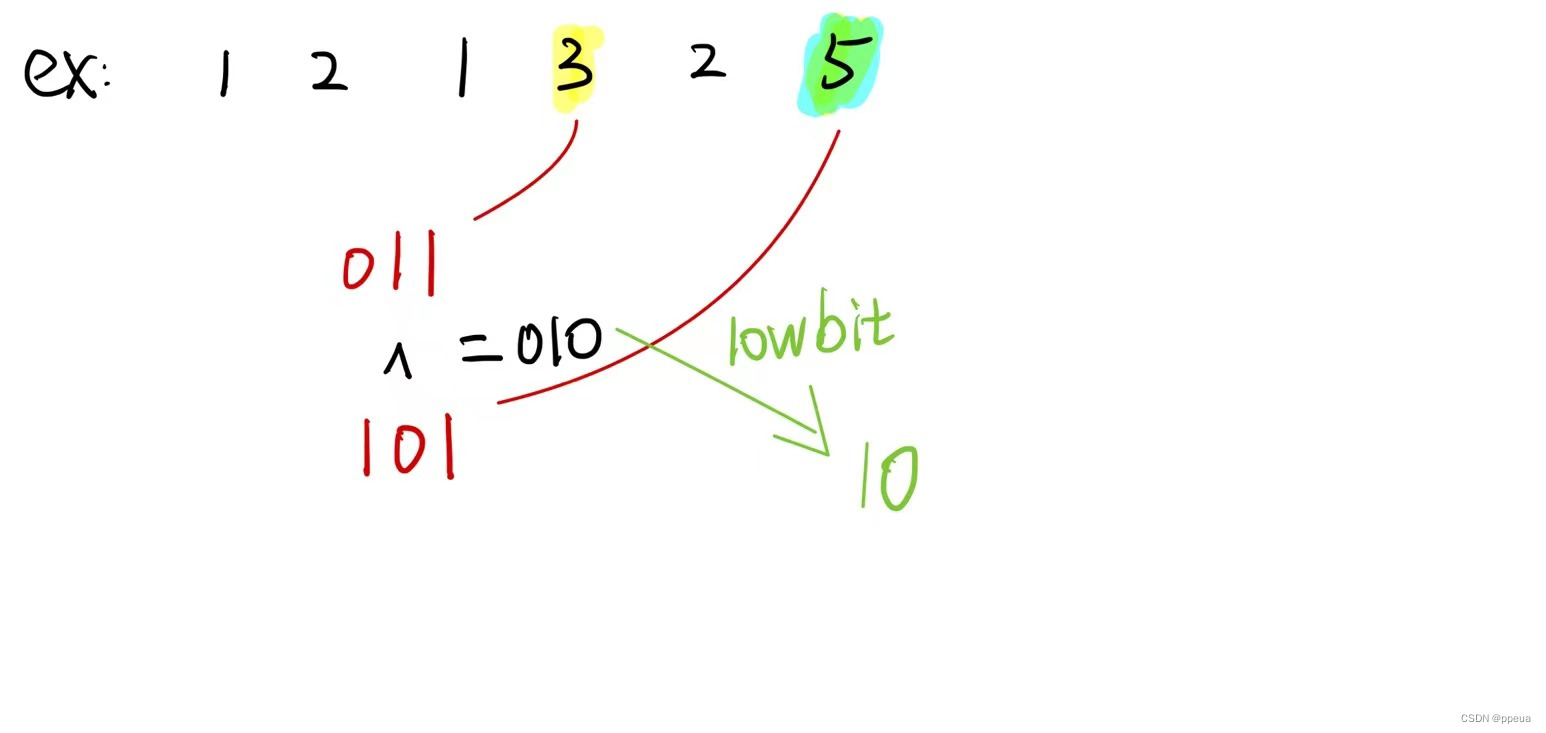
【位运算问题】Leetcode 136、137、260问题详解及代码实现
Halo,这里是Ppeua。平时主要更新C语言,C,数据结构算法......感兴趣就关注我吧!你定不会失望。 🌈个人主页:主页链接 🌈算法专栏:专栏链接 我会一直往里填充内容哒! &…...

同花顺2023届春招内推
同花顺2023届春招开始啦! 同花顺是国内首家上市的互联网金融信息服务平台,如果你对互联网金融感兴趣,如果你有志向在人工智能方向发挥所长,如果你也是一个激情澎湃的小伙伴,欢迎加入我们!岗位类别…...
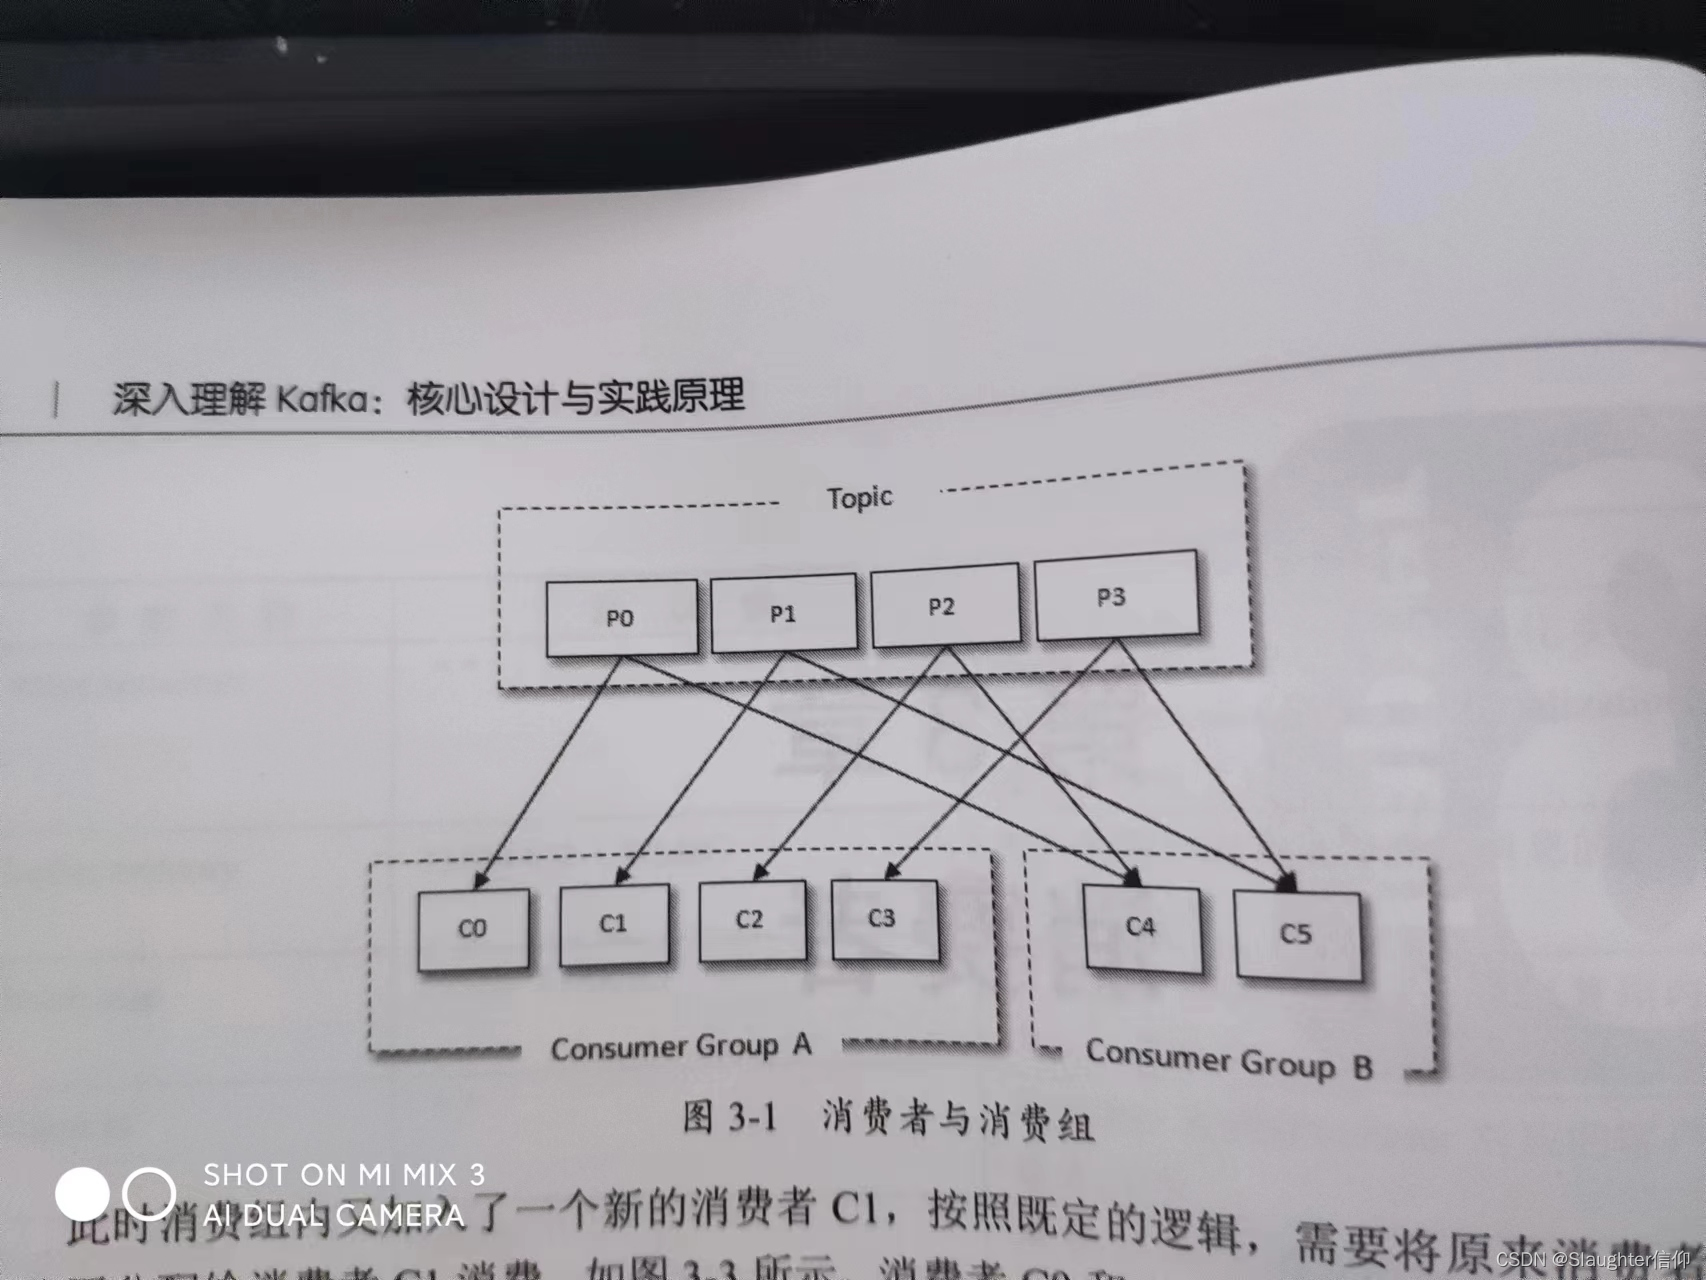
深入Kafka核心设计与实践原理读书笔记第三章消费者
消费者 消费者与消费组 消费者Consumer负责定于kafka中的主题Topic,并且从订阅的主题上拉取消息。与其他消息中间件不同的在于它有一个消费组。每个消费者对应一个消费组,当消息发布到主题后,只会被投递给订阅它的消费组的一个消费者。 如…...

IDEA 中使用 Git 图文教程详解
✅作者简介:2022年博客新星 第八。热爱国学的Java后端开发者,修心和技术同步精进。 🍎个人主页:Java Fans的博客 🍊个人信条:不迁怒,不贰过。小知识,大智慧。 💞当前专栏…...

【Linux系统】进程概念
目录 1 冯诺依曼体系结构 2 操作系统(Operator System) 概念 设计OS的目的 定位 总结 系统调用和库函数概念 3 进程 3.1 基本概念 3.2 描述进程-PCB 3.2 组织进程 3.3 查看进程 3.4 通过系统调用获取进程标示符 3.5 进程状态 在了解进程概念前我们还得了解下冯诺…...
)
上课睡觉(2023寒假每日一题 4)
有 NNN 堆石子,每堆的石子数量分别为 a1,a2,…,aNa_1,a_2,…,a_Na1,a2,…,aN。 你可以对石子堆进行合并操作,将两个相邻的石子堆合并为一个石子堆,例如,如果 a[1,2,3,4,5]a[1,2,3,4,5]a[1,2,3,4,5],合并第 2,32…...

【Selenium学习】Selenium 中常用的基本方法
1.send_keys 方法模拟键盘键入此方法类似于模拟键盘键入。以在百度首页搜索框输入“Selenium”为例,代码如下:# _*_ coding:utf-8 _*_ """ name:zhangxingzai date:2023/2/13 form:《Selenium 3Python 3自动化测试项目实战》 …...

OpenIPC固件构建与君正T31平台刷机实战指南
OpenIPC固件构建与君正T31平台刷机实战指南 【免费下载链接】firmware Alternative IP Camera firmware from an open community 项目地址: https://gitcode.com/gh_mirrors/fir/firmware OpenIPC是一个基于Buildroot的开源IP摄像头固件项目,为海思、君正、全…...

CAN总线终端电阻:从120Ω与0.25W的选型,看信号完整性与系统鲁棒性设计
1. 为什么CAN总线需要终端电阻? 第一次接触CAN总线设计时,我也曾疑惑:为什么要在总线两端各加一个120Ω的电阻?直接连线不行吗?直到亲眼目睹不加电阻时总线上的信号振荡,才真正理解终端电阻的重要性。 CAN总…...
)
别再为PPT发愁了!用LaTeX的Beamer模板,5分钟搞定一份专业学术报告(附Overleaf/TeXstudio中文配置)
用LaTeX Beamer打造学术级演示文稿:从零开始的中文解决方案 第一次参加学术会议时,我看着自己用传统幻灯片工具制作的演示文稿,突然意识到那些花哨的过渡动画和艺术字体在严肃的学术场合显得格格不入。周围的教授们展示的都是简洁优雅的数学…...

拆解、对比与优化:LLM工具智能体的五种任务规划与执行模式
大语言模型(LLM)驱动的 AI 智能体,特别是在借助Tools(工具)来完成复杂任务执行的过程中展现出了巨大的潜力。然而,让智能体能够合理规划任务步骤与执行、避免盲目行动是确保其高效可靠完成目标的关键。本篇…...

VideoDownloadHelper深度解析:破解主流视频平台下载限制的技术实战
VideoDownloadHelper深度解析:破解主流视频平台下载限制的技术实战 【免费下载链接】VideoDownloadHelper Chrome Extension to Help Download Video for Some Video Sites. 项目地址: https://gitcode.com/gh_mirrors/vi/VideoDownloadHelper 还在为无法保存…...

Go语言Envoy实战:高性能代理与负载均衡
Go语言Envoy实战:高性能代理与负载均衡 1. Envoy概述 Envoy是Lyft开源的高性能代理,常作为服务网格的数据平面,提供负载均衡、熔断、重试等功能。 2. Go控制平面实现 package envoyimport ("api/envoy/api/v2/core""api/envoy…...

41.ShadCN 是什么?它如何和 Tailwind CSS 集成,从而更容易构建可访问且可自定义的 React 组件?
shadcn/ui 不是传统意义上“装一个 npm 包就能用的组件库”。它更像一个组件代码生成/分发方案:你通过 shadcn CLI 把组件的 TypeScript 源码直接拷贝进你的项目目录,组件样式用 Tailwind CSS 写好,组件交互与无障碍能力通常基于 Radix UI pr…...

GitHub中文化插件终极实战指南:5分钟实现高效中文开发体验
GitHub中文化插件终极实战指南:5分钟实现高效中文开发体验 【免费下载链接】github-chinese GitHub 汉化插件,GitHub 中文化界面。 (GitHub Translation To Chinese) 项目地址: https://gitcode.com/gh_mirrors/gi/github-chinese GitHub作为全球…...

openwrt--by--myself
1. 完全清理配置make distclean // 清理所有配置make clean:最基础的清理,仅删除编译生成的固件、内核和软件包等产物(即 bin/ 和 build_dir/ 目录)。make dirclean:在 clean 的基础上,还会清除交叉编译工…...

指标漂移、用户冷启动、LLM幻觉干扰——大模型A/B测试三大盲区全解析,SITS大会实证数据支撑
更多请点击: https://intelliparadigm.com 第一章:指标漂移、用户冷启动、LLM幻觉干扰——大模型A/B测试三大盲区全解析,SITS大会实证数据支撑 在2024年SITS(Scalable Intelligence Testing Summit)大会上,…...