Vue基础入门(上)
<script src="https://unpkg.com/vue@next"></script>从面向dom编程到面向数据编程
输入显示列表
const app=Vue.createApp({data(){return{inputValue:'',list:[]}},methods:{handleAddItem(){this.list.push(this.inputValue);this.inputValue='';}},template:`<div><input v-model="inputValue" /><buttonv-on:click="handleAddItem"v-bind:title="inputValue">增加</button><ul><todo-item v-for="(item,index) of list" v-bind:content="item" v-bind:index="index"/> <ul> </div>`});app.component('todo-item',{props:['content','index'],template:'<li>{{index}}--{{content}}</li>'});app.mount('#root');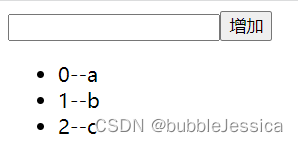
反转字符串
Vue.createApp({data(){return{str:'hello world'}},methods:{handleReverse(){this.str=this.str.split('').reverse().join('');}},template:`<div>{{str}}<button v-on:click="handleReverse">反转字符串</button> </div>`}).mount('#root');createApp表示创建一个Vue应用,存储到app变量中
传入的参数表示,这个应用最外层的组件,应该如何展示
MVVM设计模式,M->Model 数据,V->View 视图,VM-> ViewModel视图数据连接
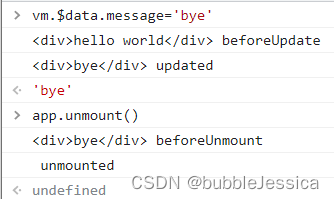
生命周期函数(8个)
// 生命周期函数 在某一时刻自动执行的函数const app = Vue.createApp({data() {return {message: 'hello world'}},beforeCreate(){// 在实例生成之前自动执行的函数console.log('beforeCreate');},created(){// 在实例生成之后自动执行的函数console.log('created');},beforeMount(){// 在组件内容被渲染到页面之前自动执行的函数console.log(document.getElementById('root').innerHTML,'beforeMounted');},mounted(){// 在组件内容被渲染到页面之后自动执行的函数 console.log(document.getElementById('root').innerHTML,'mounted');},beforeUpdate(){// 在data中数据发生变化时,自动执行的函数console.log(document.getElementById('root').innerHTML,'beforeUpdate');},updated(){// 在data中数据发生变化时,且重新渲染页面后,自动执行的函数console.log(document.getElementById('root').innerHTML,'updated');},beforeUnmount(){// 当Vue应用(实例)失效时,自动执行的函数console.log(document.getElementById('root').innerHTML,'beforeUnmount');},unmounted(){// 当Vue应用(实例)失效时,且DOM完全销毁之后,自动执行的函数console.log(document.getElementById('root').innerHTML,'unmounted');},template: `<div>{{message}}</div>`});const vm=app.mount('#root');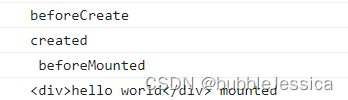
插值表达式{{}}
const app = Vue.createApp({data() {return {message: '<strong>hello world</strong>'}},template: `<div>{{message}}</div>`});const vm=app.mount('#root');![]() 结果却显示包含html标签的变量,这时想要显示加粗的变量,我们需要在模板里加上v-html指令即可
结果却显示包含html标签的变量,这时想要显示加粗的变量,我们需要在模板里加上v-html指令即可
const app = Vue.createApp({data() {return {message: '<strong>hello world</strong>'}},template: `<div v-html="message"></div>`});const vm=app.mount('#root'); ![]()
添加title属性需要添加v-bind指令,此时页面上鼠标悬停在hello world时会出现hello world标题
v-bind:title简写成:title
const app = Vue.createApp({data() {return {message: 'hello world'}},template: `<div v-bind:title="message">hello world</div>`});const vm=app.mount('#root');v-bind我们还可以结合输入框使用
const app = Vue.createApp({data() {return {disable:false}},template: `<input v-bind:disabled="disable"/>`});const vm=app.mount('#root');![]()
注意:模板可以使用v-once指令使变量只渲染第一次时的值,之后修改变量的值不会跟随变化
事件绑定v-on:click() 简写@click
结合动态属性:[变量]
const app = Vue.createApp({data() {return {message:'hello world',name:'title',event:'click'}},methods:{handleClick(){alert('click');}},template: `<div :[name]="message" @[event]="handleClick">{{message}}</div>`});const vm=app.mount('#root');阻止默认行为@click.prevent="handleClick"
const app = Vue.createApp({data() {return {message:'hello world'}},methods:{handleClick(){alert('click');//e.preventDefault();}},template: `<form action="http://www.baidu.com" @click.prevent="handleClick"><button type="submit">提交</button></form>`});const vm=app.mount('#root');computed计算属性
const app = Vue.createApp({data() {return {message:'hello world'}},computed:{// 当计算属性依赖的内容发生变化时,方法才会重新执行计算total(){return Date.now();}},methods:{// 只要页面重新渲染,方法就会执行formatString(string){return string.toUpperCase();},getTotal(){return Date.now();}},template: `<div>{{formatString(message)}} {{total}}</div><div>{{formatString(message)}} {{getTotal()}}</div>`});const vm=app.mount('#root');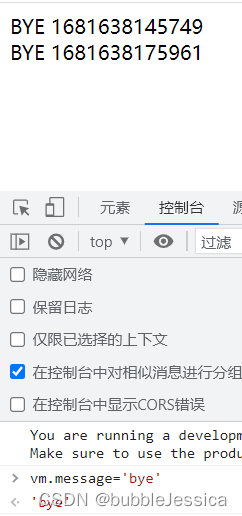
侦听器watch(通常异步操作使用)(监听对应属性)
const app = Vue.createApp({data() {return {message:'hello world',count:2,price:5,newTotal:10}},// 监听器watch:{// 当价格发生变化才会执行的函数price(current,prev){this.newTotal= current*this.count;}},computed:{// 当计算属性依赖的内容发生变化时,方法才会重新执行计算 建议使用因为有缓存、简洁total(){return this.price*this.count;}},methods:{// 只要页面重新渲染,方法就会执行formatString(string){return string.toUpperCase();},getTotal(){return this.price*this.count;}},template: `<div>{{formatString(message)}} {{total}}</div><div>{{formatString(message)}} {{getTotal()}}</div><div>{{formatString(message)}} {{newTotal}}</div>`});const vm=app.mount('#root');改变字符串样式
<!DOCTYPE html>
<html lang="en">
<head><meta charset="UTF-8"><meta http-equiv="X-UA-Compatible" content="IE=edge"><meta name="viewport" content="width=device-width, initial-scale=1.0"><title>lesson 5</title><script src="https://unpkg.com/vue@next"></script><style>.red{color: red;}.green{color: green;}.blue{color: blue;}.brown{color: brown;}</style>
</head>
<body><div id="root"></div>
</body>
<script>// 改变样式// 1字符串/2对象/3数组const app = Vue.createApp({data(){return{classString:'green',classObject:{'red':true,'green':true,'blue':true},classArray:['red','blue','green',{brown:true}]}},template: `<div :class="classString">Hello World</div><div :class="classArray">Hello World</div><div :class="classObject">Hello World</div>`});const vm=app.mount('#root');
</script></html>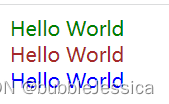
父元素包括多个子元素注意:$attrs.class使用
<!DOCTYPE html>
<html lang="en">
<head><meta charset="UTF-8"><meta http-equiv="X-UA-Compatible" content="IE=edge"><meta name="viewport" content="width=device-width, initial-scale=1.0"><title>lesson 5</title><script src="https://unpkg.com/vue@next"></script><style>.red{color: red;}.green{color: green;}.blue{color: blue;}.brown{color: brown;}</style>
</head>
<body><div id="root"></div>
</body>
<script>// 改变样式// 1字符串/2对象/3数组const app = Vue.createApp({data(){return{classString:'red',classObject:{'red':true,'green':true,'blue':true},classArray:['red','blue','green',{brown:false}]}},template: `<div :class="classString">Hello World<demo class="green" /></div>`});app.component('demo',{template:`<div :class="$attrs.class">one</div><div>two</div>`});const vm=app.mount('#root');
</script></html>
行内样式使用
<!DOCTYPE html>
<html lang="en">
<head><meta charset="UTF-8"><meta http-equiv="X-UA-Compatible" content="IE=edge"><meta name="viewport" content="width=device-width, initial-scale=1.0"><title>lesson 5</title><script src="https://unpkg.com/vue@next"></script><style>.red{color: red;}.green{color: green;}.blue{color: blue;}.brown{color: brown;}</style>
</head>
<body><div id="root"></div>
</body>
<script>// 改变样式// 1字符串/2对象/3数组const app = Vue.createApp({data(){return{classString:'red',classObject:{'red':true,'green':true,'blue':true},classArray:['red','blue','green',{brown:false}],styleString:'color:yellow;background:orange',// 行内样式我们使用对象存储可读性更高styleObject:{color:'orange',background:'purple'}}},template: `<div :style="styleObject">Hello World</div>`});app.component('demo',{template:`<div :class="$attrs.class">one</div><div>two</div>`});const vm=app.mount('#root');
</script></html>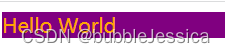
v-if和v-show区别
const app = Vue.createApp({data(){return{show:false}},template: `<div v-if="show">Hello World</div><div v-show="show">Bye World</div>`});const vm=app.mount('#root');
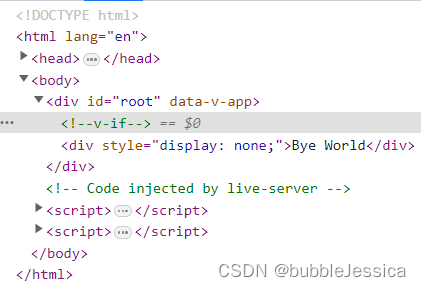
频繁需要修改元素的话我们建议使用v-show,因为不会把元素销毁掉
const app = Vue.createApp({data(){return{conditionOne:false,conditionTwo:true}},template: `<div v-if="conditionOne">if</div><div v-else-if="conditionTwo">else if</div><div v-else>else</div>`});const vm=app.mount('#root');v-for用法
数组和对象使用 注意:v-for优先级比v-if优先级高,所以如果要判断的话需要嵌套标签但是我们发现此时多了个div标签,这里我们使用小技巧将外面的div标签替换为template标签相当于占位符
const app = Vue.createApp({data(){return{listArray:['dell','lee','teacher'],listObject:{firstName:'dell',lastName:'lee',job:'teacher'}}},methods:{handleAddBtnClick(){// 1使用数组的变更函数//this.listArray.push('hello');结尾增加//this.listArray.pop();结尾删除//this.listArray.shift();开头删除//this.listArray.unshift('hello');//开头增加// this.listArray.reverse();// 2直接替换数组// this.listArray=['bye','world'];// this.listArray=['bye','world'].filter(item=>item==='bye');// 3更新数组内容// this.listArray[1]='bye';this.listObject.age=100;this.listObject.sex='male';}},template: `<div><template v-for="(value,key,index) in listObject" :key="index"><div v-if="key!=='lastName'">{{value}}--{{key}}--{{index}}</div></template><div v-for="item in 10">{{item}}</div><button @click="handleAddBtnClick">新增</button> </div>`});const vm=app.mount('#root');事件
当调用多个函数的时候,我们不能像以前一样直接写引用名,而是需要再加上()逗号分开才生效
const app = Vue.createApp({data(){return{counter: 0}},methods:{handleBtnClick(num,event){console.log(event.target);this.counter+=num;}},template: `<div>{{counter}}<button @click="handleBtnClick(2,$event)">新增</button> </div>`});const vm=app.mount('#root');![]()
const app = Vue.createApp({data(){return{counter: 0}},methods:{handleBtnClick(){alert('1');},handleBtnClick1(){alert('2');},},template: `<div>{{counter}}<button @click="handleBtnClick(),handleBtnClick1()">新增</button> </div>`});const vm=app.mount('#root');阻止冒泡(向外传播)@click.stop
const app = Vue.createApp({data(){return{counter: 0}},methods:{handleBtnClick(){this.counter+=1;},handleDivClick(){alert('div click');}},template: `<div>{{counter}}<div @click="handleDivClick"><button @click.stop="handleBtnClick">新增</button> </div></div>`});const vm=app.mount('#root');点击自己标签才显示@click.self
const app = Vue.createApp({data(){return{counter: 0}},methods:{handleBtnClick(){this.counter+=1;},handleDivClick(){alert('div click');}},template: `<div><div @click.self="handleDivClick">{{counter}}<button @click="handleBtnClick">新增</button> </div></div>`});const vm=app.mount('#root');事件修饰符:注意标签@click.prevent阻止默认行为发生、@click.capture捕获阶段(从外到内)默认是冒泡阶段(从内到外) 、@click.once只能点击一次
按键和鼠标修饰符
按键:enter,tab,delete,esc,up,down,left,right
鼠标:left,right,middle
const app = Vue.createApp({data(){return{counter: 0}},methods:{handleKeyDown(){console.log('keydown');}},template: `<div><input @keydown.delete="handleKeyDown"/></div>`});const vm=app.mount('#root');const app = Vue.createApp({data(){return{counter: 0}},methods:{handleClick(){console.log('click');}},template: `<div><div @click="handleClick">123</div></div>`});const vm=app.mount('#root');双向绑定
复选框checkbox和单选框radio
// input,textarea,checkbox,radioconst app = Vue.createApp({data(){return{message:[]}},template: `<div>{{message}}jack <input type="checkbox" value="jack" v-model="message"/>jessica <input type="checkbox" value="jessica" v-model="message"/>karry <input type="checkbox" value="karry" v-model="message"/></div>`});const vm=app.mount('#root');![]()
// input,textarea,checkbox,radioconst app = Vue.createApp({data(){return{message:''}},template: `<div>{{message}}jack <input type="radio" value="jack" v-model="message"/>jessica <input type="radio" value="jessica" v-model="message"/>karry <input type="radio" value="karry" v-model="message"/></div>`});const vm=app.mount('#root');![]()
列表框
const app = Vue.createApp({data(){return{message:[],options:[{text:'A',value:{value:'A'}},{text:'B',value:{value:'B'} },{text:'C',value:{value:'C'}}]}},template: `<div>{{message}}<select v-model="message" multiple><option v-for="item in options" :value="item.value">{{item.text}}</option></select></div>`});const vm=app.mount('#root');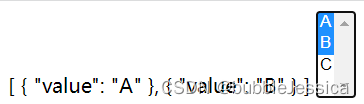
const app = Vue.createApp({data(){return{message:'world',}},template: `<div>{{message}}<input type="checkbox" v-model="message" true-value="hello" false-value="world"/></div>`});const vm=app.mount('#root');![]() world表示没选上的值
world表示没选上的值
注意:v-model.lazy等鼠标移开输入框点击外面一下才会双向绑定 v-model-trim去除字符串首尾空格
相关文章:
Vue基础入门(上)
<script src"https://unpkg.com/vuenext"></script> 从面向dom编程到面向数据编程 输入显示列表 const appVue.createApp({data(){return{inputValue:,list:[]}},methods:{handleAddItem(){this.list.push(this.inputValue);this.inputValue;}},templ…...
字符串匹配—KMP算法
字符串匹配的应用非常广泛,例如在搜索引擎中,我们通过键入一些关键字就可以得到相关的搜索结果,搜索引擎在这个过程中就使用字符串匹配算法,它通过在资源中匹配关键字,最后给出符合条件的搜索结果。并且我们在使用计算…...
【微信小程序】 权限接口梳理以及代码实现
1、权限接口说明 官方权限说明 部分接口需要经过用户授权统一才能调用。我们把这些接口按使用范围分成多个scope,用户选择对scope进行授权,当授权给一个scope之后,其对应的所有接口都可以直接使用。 此类接口调用时: 如…...

【每日一词】leit-motif
1、释义 leit-motif: n. 主乐调;主题;主旨。 复数:leit-motifs 2、例句 Hence the ‘ancient’ rhyme that appears as the leit-motif of The Lord of the Rings, Three Rings for the Elven-Kings under the sky, Seven for the Dwarf-lor…...

windows 环境修改 Docker 存储目录
windows 环境修改存储目录 docker 安装时不提供指定安装路径和数据存储路径的选项,且默认是安装在C盘的。C盘比较小的,等docker运行久了,一大堆的东西放在上面容易导致磁盘爆掉。所以安装前可以做些准备,让安装的实际路径不在C盘&…...

上海市青少年算法月赛丙组—目录汇总
上海市青少年算法2023年3月月赛(丙组) T1 神奇的字母序列 T2 约数的分类 T3 循环播放 T4 数对的个数 T5 选取子段 上海市青少年算法2023年2月月赛(丙组) T1 格式改写 T2 倍数统计 T3 区间的并 T4 平分数字(一…...

手动实现promise.all
手动实现promise.all function promiseAll(promises) {return new Promise((resolve, reject) > {const results [];let count 0;promises.forEach((promise, index) > {Promise.resolve(promise).then(result > {results[index] result;count;if (count promise…...
如何搭建关键字驱动自动化测试框架?这绝对是全网天花板的教程
目录 1. 关键字驱动自动化测试介绍 2. 搭建关键字驱动自动化测试框架 步骤1:选择测试工具 步骤2:定义测试用例 步骤3:编写测试驱动引擎 步骤4:实现测试关键字库 步骤5:执行测试 3. 实现关键字驱动自动化测试的关…...

字符串反转操作
1:将字符串反转 给定一句英语,要求你编写程序,将句中所有单词的顺序颠倒输出。 输入格式: 测试输入包含一个测试用例,在一行内给出总长度不超过 80 的字符串。字符串由若干单词和若干空格组成,其中单词是由英文字母…...

TensorFlow 智能移动项目:1~5
原文:Intelligent mobile projects with TensorFlow 协议:CC BY-NC-SA 4.0 译者:飞龙 本文来自【ApacheCN 深度学习 译文集】,采用译后编辑(MTPE)流程来尽可能提升效率。 不要担心自己的形象,只…...

[MAUI 项目实战] 手势控制音乐播放器(四):圆形进度条
文章目录 关于图形绘制创建自定义控件使用控件创建专辑封面项目地址 我们将绘制一个圆形的音乐播放控件,它包含一个圆形的进度条、专辑页面和播放按钮。 关于图形绘制 使用MAUI的绘制功能,需要Microsoft.Maui.Graphics库。 Microsoft.Maui.Graphics 是…...
web路径专题+会话技术
目录 自定义快捷键 1. 工程路径问题及解决方案1.1 相对路径1.2 相对路径缺点1.3 base标签1.4 作业11.5 作业21.6注意细节1.7 重定向作业1.8 web工程路径优化 2. Cookie技术2.1 Cookie简单示意图2.2 Cookie常用方法2.2 Cookie创建2.3 Cookie读取2.3.1 JSESSIONID2.3.2 读取指定C…...
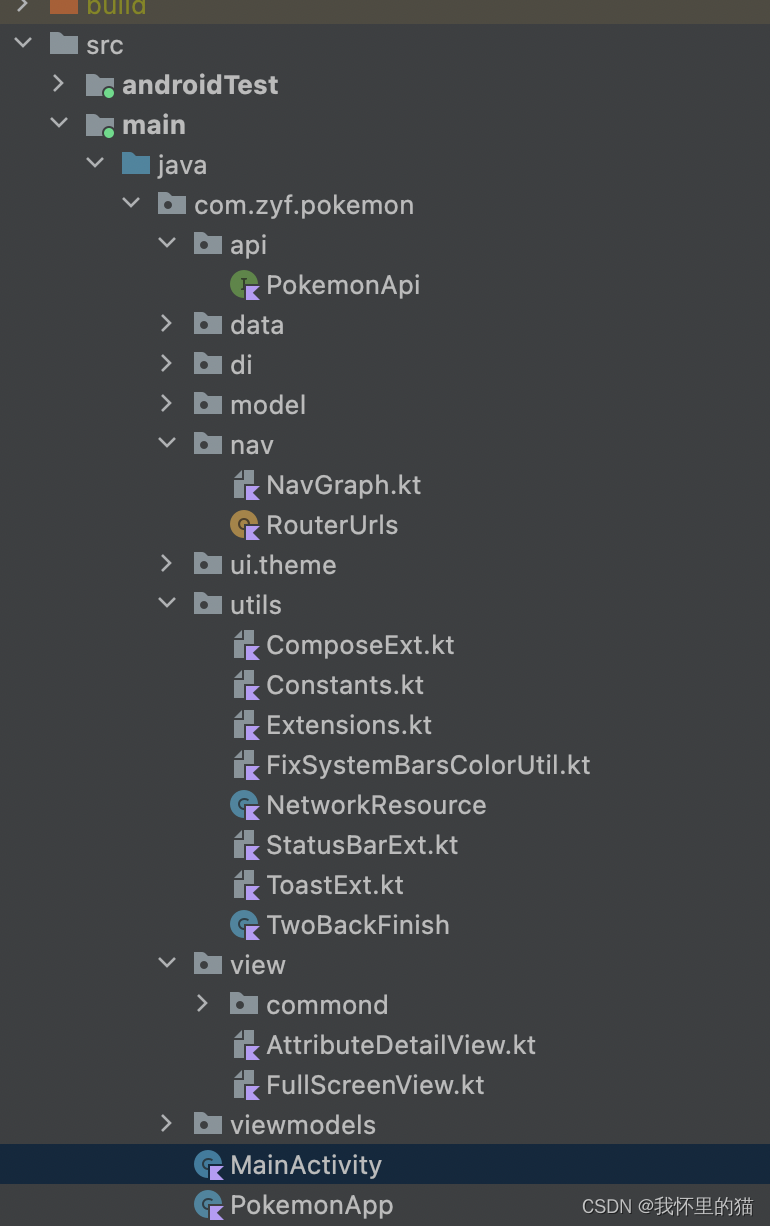
Jetpack Compose 实战 宝可梦图鉴
文章目录 前言实现效果一、架构介绍二、一些的功能点的介绍加载图片并获取主色,再讲主色设置为背景一个进度缓慢增加的圆形进度条单Activity使用navigation跳转Compose可组合项返回时页面重组的问题hiltViewModel() 主要参考项目总结 前言 阅读本文需要一定compose基础&#x…...

高效时间管理日历 DHTMLX Event Calendar 2.0.3 Crack
DHTMLX Event Calendar用于高效时间管理的轻量级 JavaScript 事件日历 DHTMLX 可帮助您开发类似 Google 的 JavaScript 事件日历,以高效地组织约会。 用户可以通过拖放来管理事件,并以六种不同的模式显示它们。 JavaScript 事件日历功能 轻的简单的 Java…...

ASIC-WORLD Verilog(2)FPGA的设计流程
写在前面 在自己准备写一些简单的verilog教程之前,参考了许多资料----asic-world网站的这套verilog教程即是其一。这套教程写得极好,奈何没有中文,在下只好斗胆翻译过来(加了自己的理解)分享给大家。 这是网站原文&…...

数字化体验时代,企业如何做好内部知识数字化管理
随着数字化时代的到来,企业内部的知识管理也面临着新的挑战和机遇。数字化技术的应用,可以极大地提高企业内部知识的数字化管理效率和质量,从而提升企业内部的工作效率、员工满意度和企业竞争力。本文将从数字化时代的背景出发,探…...
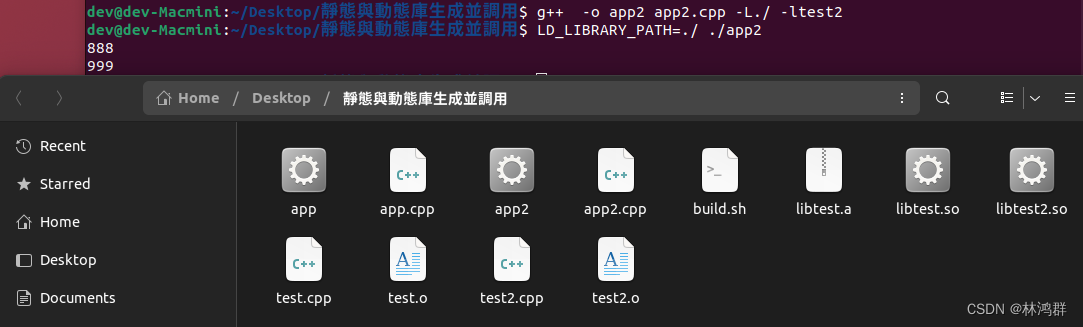
Qt5.12實戰之Linux靜態庫與動態庫多文件生成a與so文件並調用
1.編輯並輸入內容到test.cpp與test2.cpp test.cpp #include <stdio.h> int func() {return 888; } test2.cpp #include <stdio.h> int func2() {return 999; } 將test.cpp與test2.cpp編譯成目標文件: g -c test.cpp test2.cpp 一次性生成目標文件…...

Spring 之初始化前中后详解
Spring 框架是一个非常流行的 Java 框架,它提供了一种轻量级的、可扩展的方式来构建企业级应用程序。在 Spring 的生命周期中,有三个重要的阶段,即初始化前、初始化、初始化后。这篇文章将详细介绍这些阶段,并提供相应的源代码示例…...

企业数字化转型路上的陷阱有哪些
近年来,随着科技的快速发展,越来越多的企业开始了数字化转型的征程,希望通过数字化技术来提高企业的效率、降低成本、提升竞争力。然而,数字化转型也存在许多陷阱,如果不注意,可能会导致企业陷入困境。下面…...
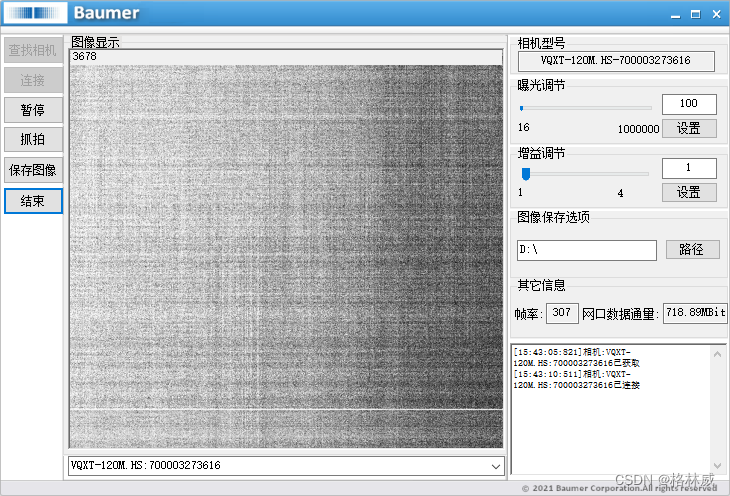
Baumer工业相机堡盟工业相机如何联合BGAPISDK和OpenCV实现图像的直方图算法增强(C++)
Baumer工业相机堡盟工业相机如何联合BGAPISDK和OpenCV实现图像的直方图算法增强(C) Baumer工业相机Baumer工业相机使用图像算法增加图像的技术背景Baumer工业相机通过BGAPI SDK联合OpenCV使用图像增强算法1.引用合适的类文件2.BGAPI SDK在图像回调中引用…...

从直流平衡到时钟恢复:深入剖析8B10B编码在高速串行链路中的核心作用
1. 8B10B编码:高速串行通信的"交通警察" 第一次接触PCIe调试时,我拿着示波器看到波形图上那些密集的跳变信号完全摸不着头脑。直到前辈指着屏幕说:"看见这些有规律的0/1跳变了吗?这就是8B10B在指挥交通。"这个…...
的完整避坑指南:从SPI配置到LVGL局部刷新修复)
ESP32S3驱动1.3寸圆形AMOLED屏(RM67162芯片)的完整避坑指南:从SPI配置到LVGL局部刷新修复
ESP32S3驱动1.3寸圆形AMOLED屏(RM67162芯片)全流程实战:从SPI配置到LVGL优化 这块1.3寸圆形AMOLED屏幕以其出色的显示效果和独特的外形设计,在智能穿戴设备和小型嵌入式项目中越来越受欢迎。然而,当它与ESP32S3开发板结…...

【免费下载】 慧荣SM2258XT开卡工具集合
慧荣SM2258XT开卡工具集合 【下载地址】慧荣SM2258XT开卡工具集合 本仓库提供了一套专门针对慧荣SM2258XT主控的固态硬盘、移动硬盘及SSDM.2硬盘的开卡工具集合。该工具集合旨在解决因主控问题导致的设备无法识别、不识别或容量显示错误等问题。通过使用本工具包,您…...

2026年AI工程化的5大发展趋势:从模型到产品的必经之路
2026年AI工程化的5大发展趋势:从模型到产品的必经之路 导读: AI模型越来越强大,但如何将其稳定、高效地部署到生产环境?本文结合我过去3年的MLOps实战经验,深度剖析2026年AI工程化的核心趋势,助你从“会调参…...

STM32F103C8T6多通道ADC轮询与DMA高效数据搬运实战
1. STM32F103C8T6多通道ADC采集基础 STM32F103C8T6这款性价比极高的Cortex-M3芯片内置了3个12位ADC模块,单个ADC最多支持16个外部通道和2个内部通道(温度传感器和VREFINT)。在实际项目中,比如需要同时监测多个传感器数据…...


RV1126平台GC2053摄像头驱动移植与VLC视频流调试实战
1. RV1126与GC2053摄像头驱动移植实战 最近在一个人脸识别项目中遇到了一个有趣的技术挑战:需要在RV1126开发板上为GC2053红外摄像头添加驱动支持。这个看似简单的任务实际上涉及硬件连接、内核配置、设备树修改等多个环节。作为嵌入式开发者,我花了三天…...
)
NotebookLM赋能社科研究(从文献综述到理论建模的闭环实践)
更多请点击: https://intelliparadigm.com 第一章:NotebookLM赋能社科研究(从文献综述到理论建模的闭环实践) NotebookLM 是 Google 推出的面向研究者的 AI 原生笔记工具,其核心能力在于对用户上传的 PDF、TXT 等本地…...
:仅向高校科研组开放72小时)
【限时开放】NotebookLM气候专项Prompt Library(含AR6 WGII章节级语义索引模板):仅向高校科研组开放72小时
更多请点击: https://codechina.net 第一章:NotebookLM气候研究辅助概述 NotebookLM 是 Google 推出的基于人工智能的文档理解与推理工具,专为研究人员设计,支持上传 PDF、TXT 等格式的学术文献、观测报告及政策文件,…...

Obsidian Quiz Generator:用AI与间隔重复打造动态知识库
1. 项目概述:当笔记遇上主动回忆如果你和我一样,是 Obsidian 的用户,并且对知识管理、学习效率有追求,那么你一定遇到过这个困境:笔记越记越多,知识库越来越庞大,但真正能“记住”并“调用”的知…...