iOS 吸顶效果
项目中,在列表向上滚动时,有时需要将某个控件置顶,这就是我们常见的吸顶效果。
1. UITableView 吸顶效果
UITableView是自带吸顶效果,我们把需要置顶的控件设置为SectionHeaderView,这样在滚动时,该控件会自动置顶。
- (UITableView *)tableView {if (!_tableView) {_tableView = [[UKNestedTableView alloc] init];_tableView.bounces = NO;_tableView.showsVerticalScrollIndicator = NO;_tableView.delegate = self;_tableView.dataSource = self;[_tableView registerClass:[UITableViewCell class] forCellReuseIdentifier:@"CellId"];}return _tableView;
}#pragma mark - UITableViewDataSource -
- (NSInteger)numberOfSectionsInTableView:(UITableView *)tableView {return 2;
}- (NSInteger)tableView:(UITableView *)tableView numberOfRowsInSection:(NSInteger)section {if (section == 0) {return 1;}return 20;
}- (CGFloat)tableView:(UITableView *)tableView heightForRowAtIndexPath:(NSIndexPath *)indexPath {if (indexPath.section == 0) {return 150;}return 60;
}- (UIView *)tableView:(UITableView *)tableView viewForHeaderInSection:(NSInteger)section {if (section == 1) {UIView *headerView = [[UIView alloc] initWithFrame:CGRectMake(0, 0, kScreenWidth, 50)];headerView.backgroundColor = [UIColor blueColor];return headerView;}return nil;
}- (CGFloat)tableView:(UITableView *)tableView heightForHeaderInSection:(NSInteger)section {if (section == 1) {return 50;}return 0;
}- (UITableViewCell *)tableView:(UITableView *)tableView cellForRowAtIndexPath:(NSIndexPath *)indexPath {UITableViewCell *cell = [tableView dequeueReusableCellWithIdentifier:@"CellId" forIndexPath:indexPath];if (indexPath.section == 0) {cell.backgroundColor = [UIColor yellowColor];cell.textLabel.text = @"section 0";} else {if (indexPath.row % 2 == 0) {cell.backgroundColor = [UIColor grayColor];} else {cell.backgroundColor = [UIColor whiteColor];}cell.textLabel.text = [NSString stringWithFormat:@"item - %ld", indexPath.row];}return cell;
}
自定义UKNestedTableView
@implementation UKNestedTableView- (instancetype)init {self = [super initWithFrame:CGRectZero style:UITableViewStylePlain];if (self) {self.backgroundColor = [UIColor whiteColor];self.separatorColor = [UIColor clearColor];self.separatorStyle = UITableViewCellSeparatorStyleNone;if (@available(iOS 11.0, *)) {self.contentInsetAdjustmentBehavior = UIScrollViewContentInsetAdjustmentNever;}self.estimatedRowHeight = 0.000;self.estimatedSectionHeaderHeight = 0.000;self.estimatedSectionFooterHeight = 0.000;if (@available(iOS 13.0,*)) {self.automaticallyAdjustsScrollIndicatorInsets = NO;}if (@available(iOS 15.0,*)) { // 去除表格头留白self.sectionHeaderTopPadding = YES;}}return self;
}@end
效果如下
2. 带TabView的吸顶效果
UITableView的吸顶效果能满足部分的要求,但在实际应用中,需要置顶的往往是一些标签页,对应的也是多个列表。
我们用UKTabView作为置顶的控件,并对应多个内容。
- (UKTabView *)tabView {if (!_tabView) {_tabView = [[UKTabView alloc] initWithFrame:CGRectMake(0, 0, kScreenWidth, 50)];[_tabView setIndicatorWidth:80 height:2 radius:1 color:[UIColor blueColor]];UKCustomTabItemView *tabItemView1 = [[UKCustomTabItemView alloc] init];[tabItemView1 setText:@"选项1"];[_tabView addItemView:tabItemView1];UKCustomTabItemView *tabItemView2 = [[UKCustomTabItemView alloc] init];[tabItemView2 setText:@"选项2"];[_tabView addItemView:tabItemView2];_tabView.delegate = self;[_tabView setSelection:0];}return _tabView;
}- (UIView *)tableView:(UITableView *)tableView viewForHeaderInSection:(NSInteger)section {if (section == 1) {return self.tabView;}return nil;
}- (UITableViewCell *)tableView:(UITableView *)tableView cellForRowAtIndexPath:(NSIndexPath *)indexPath {UITableViewCell *cell = [tableView dequeueReusableCellWithIdentifier:@"CellId" forIndexPath:indexPath];if (indexPath.section == 0) {cell.backgroundColor = [UIColor yellowColor];cell.textLabel.text = @"section 0";} else {if (indexPath.row % 2 == 0) {if (self.selection == 0) {cell.backgroundColor = [UIColor grayColor];} else {cell.backgroundColor = [UIColor darkGrayColor];}} else {cell.backgroundColor = [UIColor whiteColor];}cell.textLabel.text = [NSString stringWithFormat:@"item %ld - %ld", self.selection, indexPath.row];}return cell;
}#pragma mark - UKTabViewDelegate -
- (void)onTabViewSelected:(UKTabView *)tabView position:(NSInteger)position {self.selection = position;[self.tableView reloadData];
}
效果如下
上述的方法简单地实现了标签页置顶和选项卡切换功能,但由于我们只能共用一个列表,所以会发生两个标签页都滚动的现象。
为此,我们需要优化滚动的偏移,首先在滚动结束时记录偏移量,然后在切换标签页时设置原有的偏移量。
@property(nonatomic, assign) NSInteger selection;
@property(nonatomic, assign) CGFloat tab1Offset;
@property(nonatomic, assign) CGFloat tab2Offset;// 拖动结束
- (void)scrollViewDidEndDragging:(UIScrollView *)scrollView willDecelerate:(BOOL)decelerate {NSLog(@"scrollViewDidEndDragging");[self recordOffset:scrollView];
}// 滚动结束
- (void)scrollViewDidEndDecelerating:(UIScrollView *)scrollView {NSLog(@"scrollViewDidEndDecelerating");[self recordOffset:scrollView];
}- (void)recordOffset:(UIScrollView *)scrollView {if (self.selection == 0) {self.tab1Offset = scrollView.contentOffset.y;NSLog(@"tab1Offset = %.2f", self.tab1Offset);} else if (self.selection == 1) {self.tab2Offset = scrollView.contentOffset.y;NSLog(@"tab2Offset = %.2f", self.tab2Offset);}
}
在切换标签页时,设置实际的偏移量
- (void)onTabViewSelected:(UKTabView *)tabView position:(NSInteger)position {self.selection = position;[self.tableView reloadData];// 有时设置tableView.contentOffset无效,需要提前刷新[self.tableView layoutIfNeeded];if (position == 0) {self.tableView.contentOffset = CGPointMake(0, self.tab1Offset);} else if (position == 1) {self.tableView.contentOffset = CGPointMake(0, self.tab2Offset);}
}
效果如下
虽然我们记录了原有的偏移量,但从实际的效果来看,切换时TabView会在同样的位置,闪烁比较严重。为此,我们需要尽量保持TabView的位置。
- (void)onTabViewSelected:(UKTabView *)tabView position:(NSInteger)position {self.selection = position;[self.tableView reloadData];[self.tableView layoutIfNeeded];if (position == 0) {self.tab1Offset = [self getDestOffset:self.tab1Offset originOffset:self.tab2Offset];self.tableView.contentOffset = CGPointMake(0, self.tab1Offset);} else if (position == 1) {self.tab2Offset = [self getDestOffset:self.tab2Offset originOffset:self.tab1Offset];self.tableView.contentOffset = CGPointMake(0, self.tab2Offset);}
}// 如果TabView已经置顶,切换时保持置顶。
// 1、如果切换后的内容已经置顶,保持原有效果
// 2、如果切换后的内容没有置顶,修改切换后的内容为置顶
// 如果TabView没有制度,切换后保持一致
- (CGFloat)getDestOffset:(CGFloat)destOffset originOffset:(CGFloat)originOffset {if (originOffset >= 150) {if (destOffset >= 150) {return destOffset;} else {return 150;}} else {return originOffset;}
}
效果如下
虽然现在的方案已经解决了大部分的需求,但还是留下了一点瑕疵,
- 内容只能用
UIScrollView显示 - 为了保持
UKTableView保持位置不变,不能完全保证内容的偏移位置。 - 如果一个内容较短的情况下,依然会有偏移量的问题,虽然我们可以通过填充空白内容来改善这个问题,但又增加了很多工作量。
- 内容切换时没有平顺的效果。
3. UITableView+UICollectionView嵌套
为了尽可能的完善我们的吸顶效果,我们尝试用UITableView+UICollectionView的组合来实现吸顶和左右滑动二种效果。
我们自定义UKNestedScrollView
@interface UKNestedScrollView()@property(nonatomic, strong) NSMutableArray <UITableView *> *contentViewArray;
@property(nonatomic, assign) BOOL dragging;@end@implementation UKNestedScrollView- (instancetype)initWithFrame:(CGRect)frame {self = [super initWithFrame:frame];if (self) {[self setupInitialUI];}return self;
}// 设置表头
- (void)setHeaderView:(UIView *)headerView {self.tableView.tableHeaderView = headerView;self.headerHeight = headerView.frame.size.height;
}// 添加标签页和内容
- (void)addTabView:(UKTabItemView *)itemView contentView:(UITableView *)contentView {[self.tabView addItemView:itemView];[self.contentViewArray addObject:contentView];[self.collectionView reloadData];
}- (void)setupInitialUI {// UKNestedScrollView包含一个UITableView[self addSubview:self.tableView];[self.tableView mas_makeConstraints:^(MASConstraintMaker *make) {make.left.right.top.bottom.equalTo(self);}];
}- (UITableView *)tableView {if (!_tableView) {_tableView = [[UKNestedTableView alloc] init];_tableView.bounces = NO;_tableView.showsVerticalScrollIndicator = NO;_tableView.delegate = self;_tableView.dataSource = self;[_tableView registerClass:[UITableViewCell class] forCellReuseIdentifier:@"CellId"];}return _tableView;
}- (UITableView *)tableView {if (!_tableView) {_tableView = [[UKNestedTableView alloc] init];_tableView.bounces = NO;_tableView.showsVerticalScrollIndicator = NO;_tableView.delegate = self;_tableView.dataSource = self;[_tableView registerClass:[UITableViewCell class] forCellReuseIdentifier:@"CellId"];}return _tableView;
}// SectionHeaderView包含UKTabView和UICollectionView
- (UIView *)sectionHeaderView {if (!_sectionHeaderView) {_sectionHeaderView = [[UIView alloc] initWithFrame:self.frame];[_sectionHeaderView addSubview:self.tabView];[_sectionHeaderView addSubview:self.collectionView];}return _sectionHeaderView;
}- (UKTabView *)tabView {if (!_tabView) {_tabView = [[UKTabView alloc] initWithFrame:CGRectMake(0, 0, self.frame.size.width, 50)];[_tabView setIndicatorWidth:80 height:2 radius:1 color:[UIColor blueColor]];_tabView.delegate = self;}return _tabView;
}- (UICollectionView *)collectionView {if (!_collectionView) {UICollectionViewFlowLayout *layout = [[UICollectionViewFlowLayout alloc] init];layout.scrollDirection = UICollectionViewScrollDirectionHorizontal;layout.itemSize = CGSizeMake(self.frame.size.width, self.frame.size.height - 50);layout.minimumLineSpacing = CGFLOAT_MIN;layout.minimumInteritemSpacing = CGFLOAT_MIN;_collectionView = [[UICollectionView alloc] initWithFrame:CGRectMake(0, 50, self.frame.size.width, self.frame.size.height - 50) collectionViewLayout:layout];_collectionView.pagingEnabled = YES;_collectionView.bounces = NO;_collectionView.showsHorizontalScrollIndicator = NO;_collectionView.dataSource = self;_collectionView.delegate = self;[_collectionView registerClass:[UICollectionViewCell class] forCellWithReuseIdentifier:@"CellId"];}return _collectionView;
}#pragma mark - UITableViewDataSource -
- (CGFloat)tableView:(UITableView *)tableView heightForHeaderInSection:(NSInteger)section {return self.frame.size.height;
}- (UIView *)tableView:(UITableView *)tableView viewForHeaderInSection:(NSInteger)section {return self.sectionHeaderView;
}- (NSInteger)tableView:(UITableView *)tableView numberOfRowsInSection:(NSInteger)section {return 0;
}- (UITableViewCell *)tableView:(UITableView *)tableView cellForRowAtIndexPath:(NSIndexPath *)indexPath {return [[UITableViewCell alloc] init];
}#pragma mark - UICollectionViewDataSource -
- (NSInteger)collectionView:(UICollectionView *)collectionView numberOfItemsInSection:(NSInteger)section {return self.contentViewArray.count;
}- (__kindof UICollectionViewCell *)collectionView:(UICollectionView *)collectionView cellForItemAtIndexPath:(NSIndexPath *)indexPath {UICollectionViewCell *cell = [collectionView dequeueReusableCellWithReuseIdentifier:@"CellId" forIndexPath:indexPath];UITableView *contentView = self.contentViewArray[indexPath.row];[contentView removeFromSuperview];[cell.contentView addSubview:contentView];[contentView mas_makeConstraints:^(MASConstraintMaker *make) {make.left.right.top.bottom.equalTo(cell.contentView);}];return cell;
}#pragma mark - UIScrollViewDelegate -
- (void)scrollViewWillBeginDragging:(UIScrollView *)scrollView {if (scrollView == self.collectionView) {self.dragging = YES;}
}- (void)scrollViewDidScroll:(UIScrollView *)scrollView {if (scrollView == self.collectionView) {if (self.dragging) {CGFloat width = scrollView.contentOffset.x;NSInteger page = width/self.frame.size.width + 0.5;[self.tabView setSelection:page offsetRatio:(width/self.frame.size.width - page)];}}
}- (void)scrollViewDidEndDecelerating:(UIScrollView *)scrollView {if (scrollView == self.collectionView) {CGFloat width = scrollView.contentOffset.x;NSInteger page = width/self.frame.size.width + 0.5;[self.tabView setSelection:page];self.dragging = NO;}
}- (void)scrollViewDidEndDragging:(UIScrollView *)scrollView willDecelerate:(BOOL)decelerate {if (scrollView == self.collectionView && !decelerate) {CGFloat width = scrollView.contentOffset.x;NSInteger page = width/self.frame.size.width + 0.5;[self.tabView setSelection:page];self.dragging = NO;}
}#pragma mark - UKTabViewDelegate -
- (void)onTabViewSelected:(UKTabView *)tabView position:(NSInteger)position {[self collectionViewScrollToPosition:position];
}
为了让UICollectionView内的手势能被UITableView接收,需要在UKNestedTableView里面加上
- (BOOL)gestureRecognizer:(UIGestureRecognizer *)gestureRecognizer shouldRecognizeSimultaneouslyWithGestureRecognizer:(UIGestureRecognizer *)otherGestureRecognizer {return YES;
}
显示如下
我们可以看到当列表滑动时,两个列表都在滑动,而且里面的内容的滑动更快。这主要是因为例外两个列表都在滑动,所以里面的列表其实是两个滑动距离相加,所有我们需要在外面列表滑动时,禁止里面列表的滑动。
if (scrollView == self.tableView) {self.offset = self.tableView.contentOffset.y;// changed表示外面列表在滑动self.changed = YES;
} else {NSInteger position = 0;for (UIScrollView *contentView in self.contentViewArray) {if (contentView == scrollView) {// 如果外面列表滑动,禁止里面列表滑动事件if (self.changed) {scrollView.contentOffset = CGPointMake(0, [self.offsetArray[position] floatValue]);self.changed = NO;} else {// 记录当前页面偏移量,方便后面禁止事件self.offsetArray[position] = [NSNumber numberWithFloat:scrollView.contentOffset.y];}           break;}position++;}
}
效果如下
现在的效果已经基本满足了我们的需求,有吸顶效果、能左右滑动、能记录列表偏移量,内容滑动时也比较平顺了。
最后我们尝试了一下下拉时控制内容先下拉,也许后面有用
if (scrollView == self.tableView) {self.originOffset = self.offset;self.offset = self.tableView.contentOffset.y;self.changed = YES;
} else {NSInteger position = 0;for (UIScrollView *contentView in self.contentViewArray) {if (contentView == scrollView) {                CGFloat scrollViewOffset = scrollView.contentOffset.y - [self.offsetArray[position] floatValue];if (scrollViewOffset > 0) {if (self.changed) {scrollView.contentOffset = CGPointMake(0, [self.offsetArray[position] floatValue]);self.changed = NO;} else {self.offsetArray[position] = [NSNumber numberWithFloat:scrollView.contentOffset.y];}} else if (scrollViewOffset < 0) {if (self.changed) {self.offset = self.originOffset;self.tableView.delegate = nil;self.tableView.contentOffset = CGPointMake(0, self.offset);self.tableView.delegate = self;self.changed = NO;}self.offsetArray[position] = [NSNumber numberWithFloat:scrollView.contentOffset.y];}break;}position++;}
}
相关文章:
iOS 吸顶效果
项目中,在列表向上滚动时,有时需要将某个控件置顶,这就是我们常见的吸顶效果。 1. UITableView 吸顶效果 UITableView是自带吸顶效果,我们把需要置顶的控件设置为SectionHeaderView,这样在滚动时,该控件会…...

文本翻译免费软件-word免费翻译软件
好用的翻译文件软件应该具备以下几个方面的特点:支持多种文件格式,翻译结果准确可靠,界面操作简便易用,价格实惠,用户体验舒适。以下是几个好用的翻译文件软件: 1.147cgpt翻译软件 翻译软件特点࿱…...
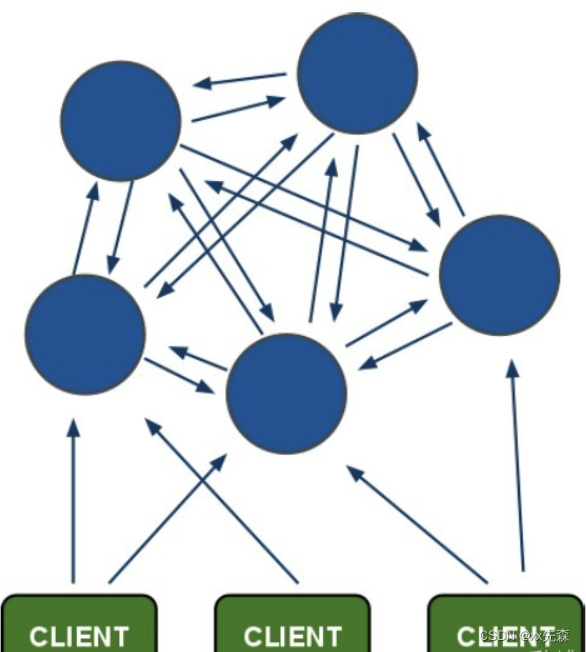
redis 主从模式、哨兵模式、cluster模式的区别
参考: https://blog.csdn.net/qq_41071876/category_11284995.html https://blog.csdn.net/weixin_45821811/article/details/119421774 https://blog.csdn.net/weixin_43001336/article/details/122816402 Redis有三种模式,分别是:主…...
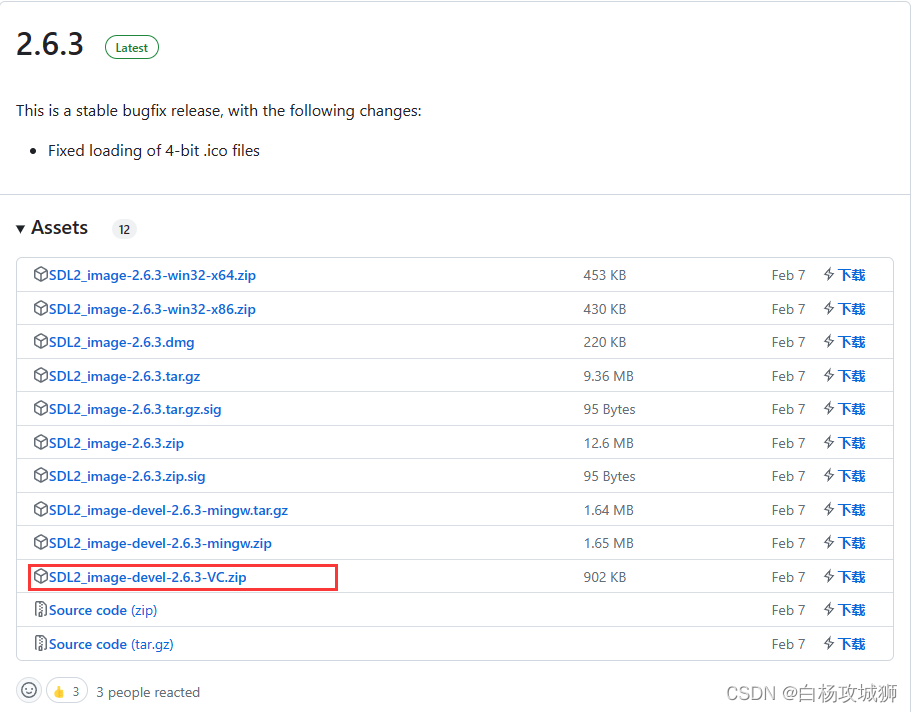
SDL(2)-加载图片
加载BMP 1.使用SDL_init初始化SDL库 2.使用SDL_CreateWindow创建一个窗口 3.使用SDL_GetWindowSurface获取创建窗口的surface 4.使用SDL_LoadBMP加载一张BMP图片 5.使用SDL_BlitSurface将加载的bmp surface拷贝到窗口的surface 6.使用SDL_UpdateWindowSurface更新到窗口 …...

指针数组和数组指针
指针和数组都是C语言中非常重要的概念。它们各自有其用途和应用场景。本文将介绍指针数组和数组指针,两者的区别和用法。 指针数组 指针数组是指一个数组,其中的每个元素都是一个指针类型。例如,下面这个定义了3个字符型指针的数组…...

程序员最常见的谎言
小伙伴们大家好,我是阿秀。 上周看到知乎上有位网友总结了自己的10年程序员生涯中最常说的一些谎言,一共有15条,看完我直呼内行!! 全中!每一枪都中了!每一条我都说过。 我基本都说过他说过的那些…...
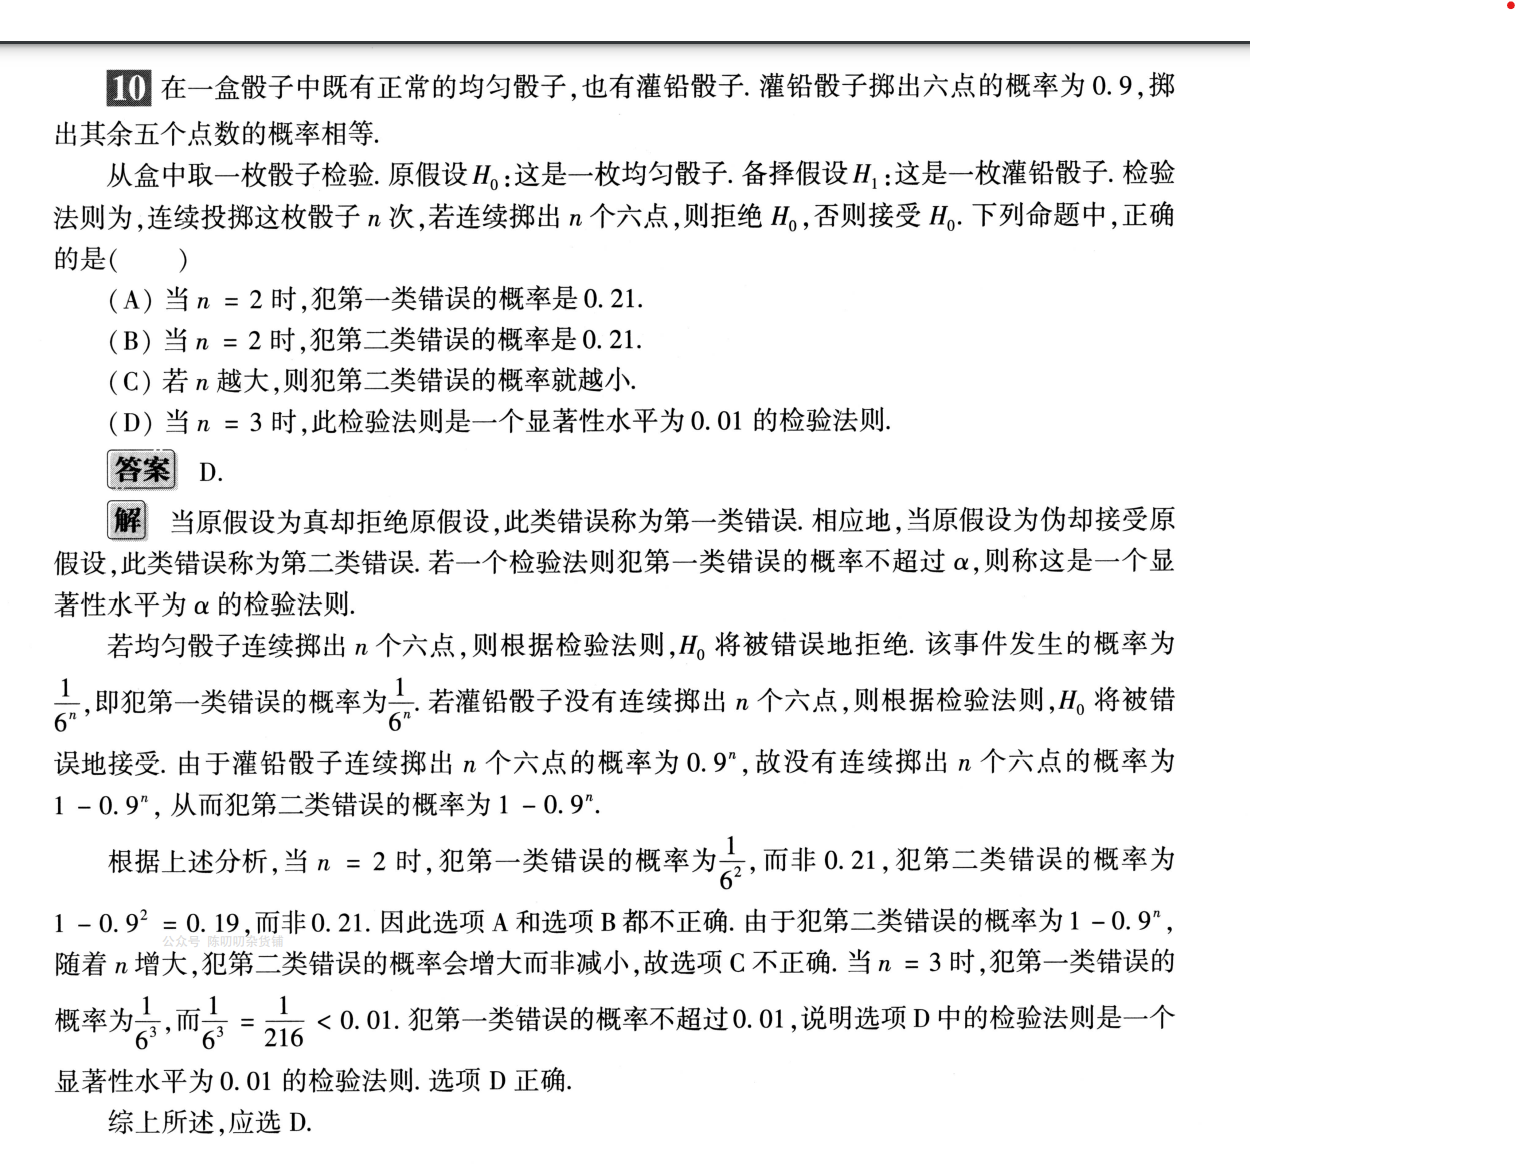
hypothesis testing假设检验
假设检验是什么 比如一家巧克力工厂生产的巧克力每个1g,一个工人说,机器在维修之后生产的巧克力不是1g,为了验证工人说的是否正确,需进行假设检验。 随机挑选50个巧克力,计算平均重量。 H0:每个巧克力1g H…...
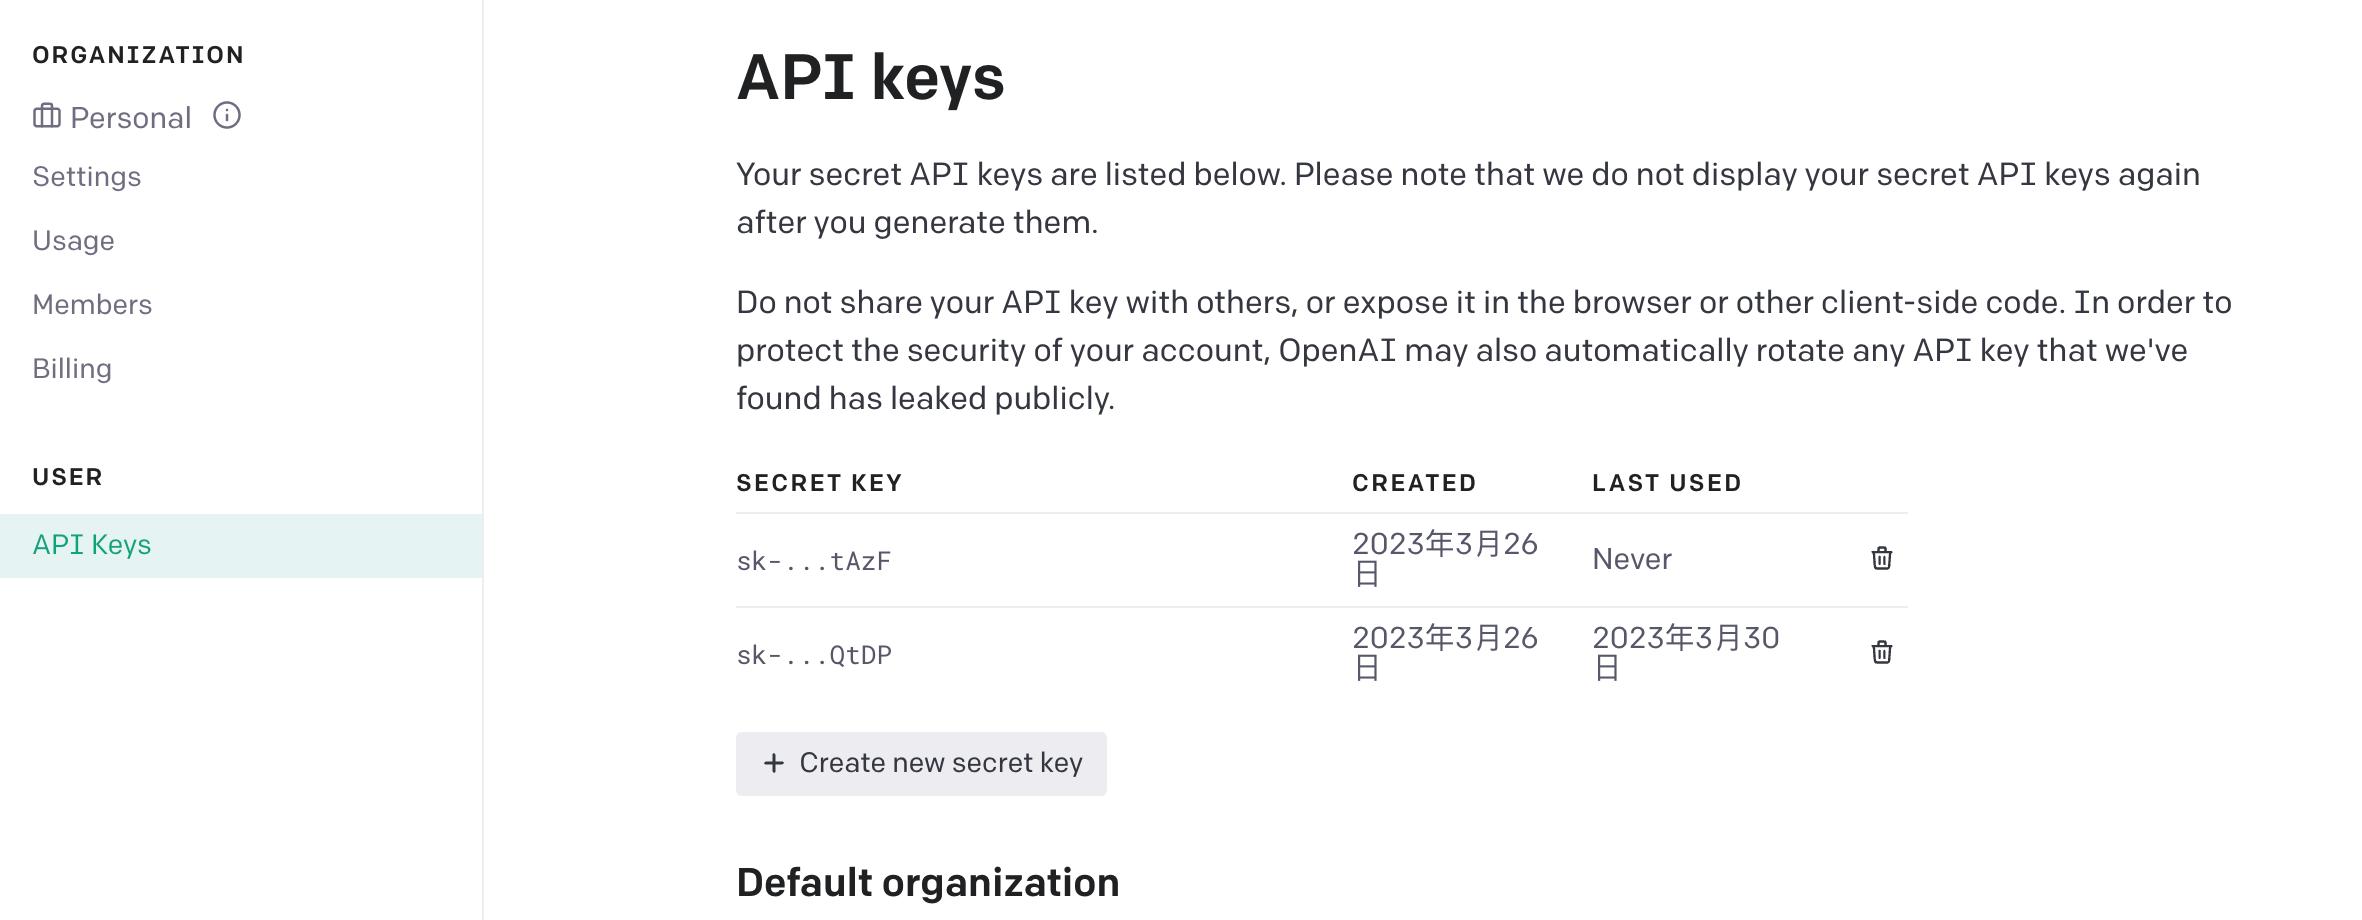
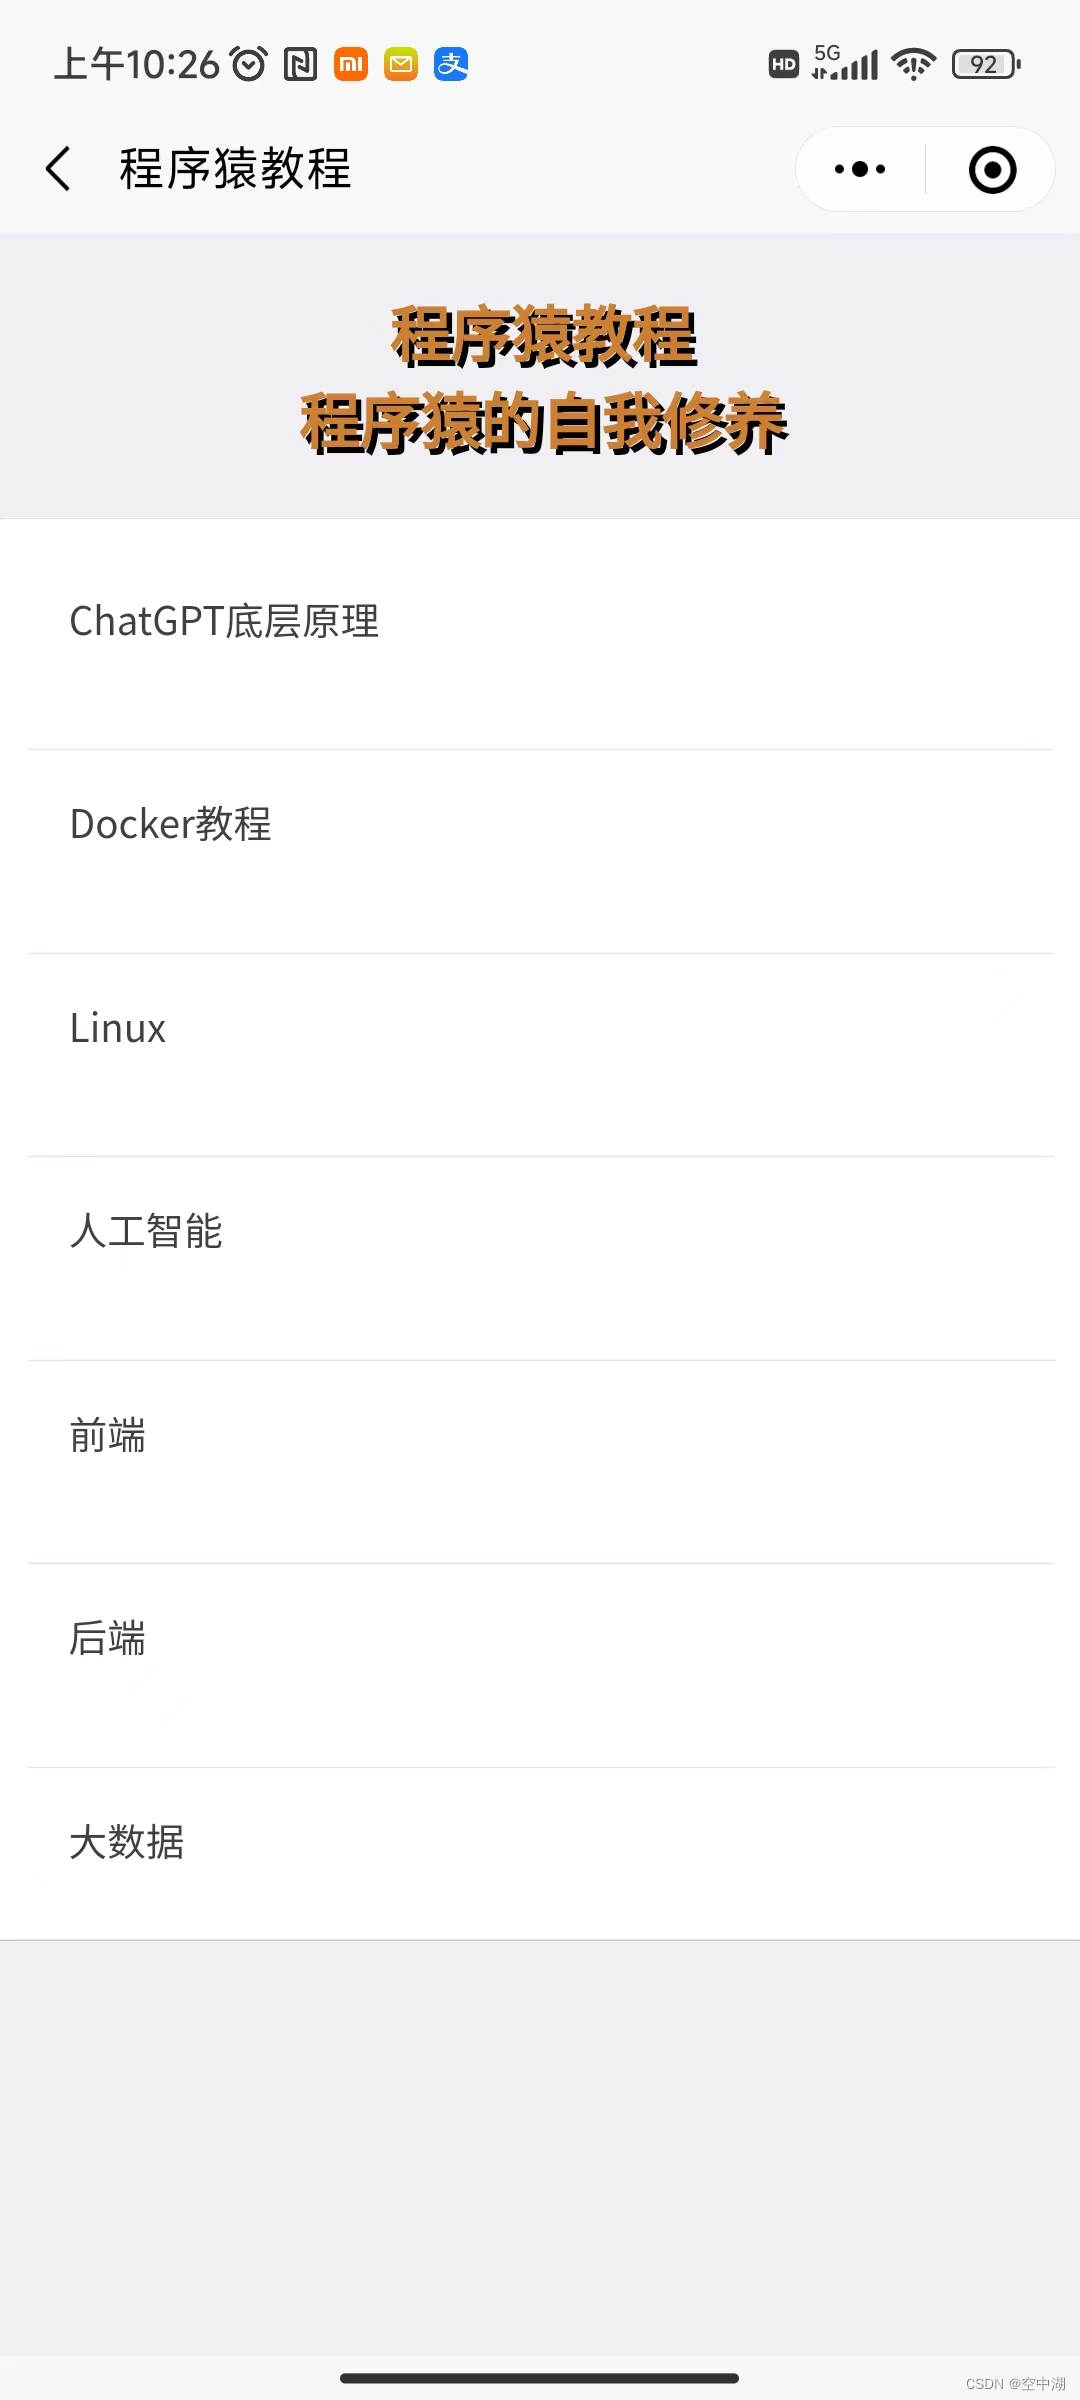
ChatGPT扩展系列之解决ChatGPT 被大面积封号的终极方案
ChatGPT扩展系列之解决ChatGPT 被大面积封号的终极方案 本节介绍了一个解决ChatGPT在中国大陆无法使用和担心被封号的问题的方法。近期有很多亚洲用户被封号,原因是有人滥用API接口或者批量注册账号,不符合官方规定。对于这个问题,提出了一个解决方法,可以在中国大陆无需翻…...
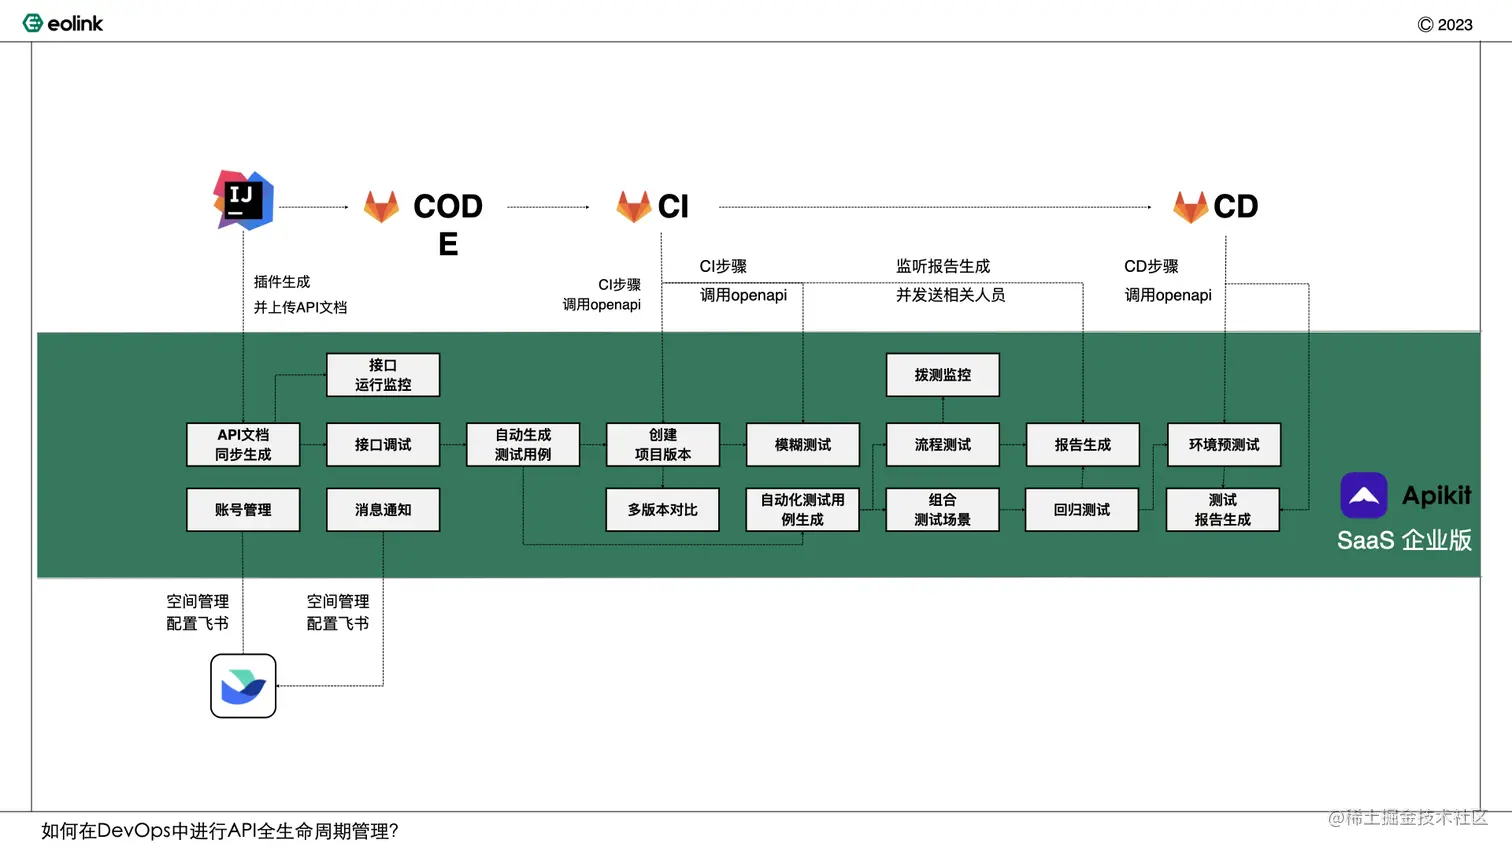
如何在DevOps中进行API生命周期管理?
引言 随着DevOps理念在中国企业当中的普及和发展,中国企业DevOps落地成熟度不断提升,根据中国信通院的数据已有近6成企业向全生命周期管理迈进。而在研发全生命周期管理之中,API管理的地位愈发显得重要。随着API数量的大幅增长,也…...
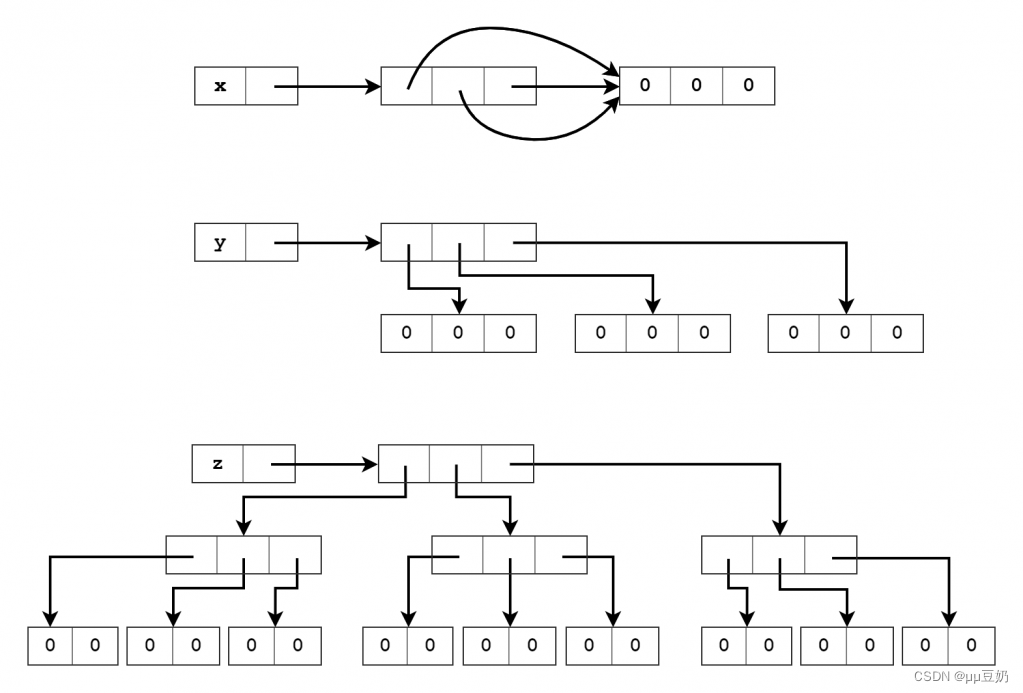
嵌套列表,与摩尔投票进阶
title: “Python fishC 22” author: “hou wei” date: “2023-04-16” output: html_document knitr::opts_chunk$set(echo TRUE)问答题 0.请问 运算符和 is 运算符有什么区别呢? 在Python中运算符用于比较两个变量的值是否相等,而is运算符用于判断…...
ChatGPT原理解释
写了一本介绍ChatGPT原理的课程 结构如下 01、介绍ChatGPT及其原理 1.1 ChatGPT的概述 1.2 什么是自然语言处理(NLP) 1.3 深度学习与NLP的关系 1.4 GPT模型的介绍 02、GPT原理探讨 2.1 GPT模型的输入与输出 2.2 GPT模型的结构 2.3 GPT模型的预训练方法…...
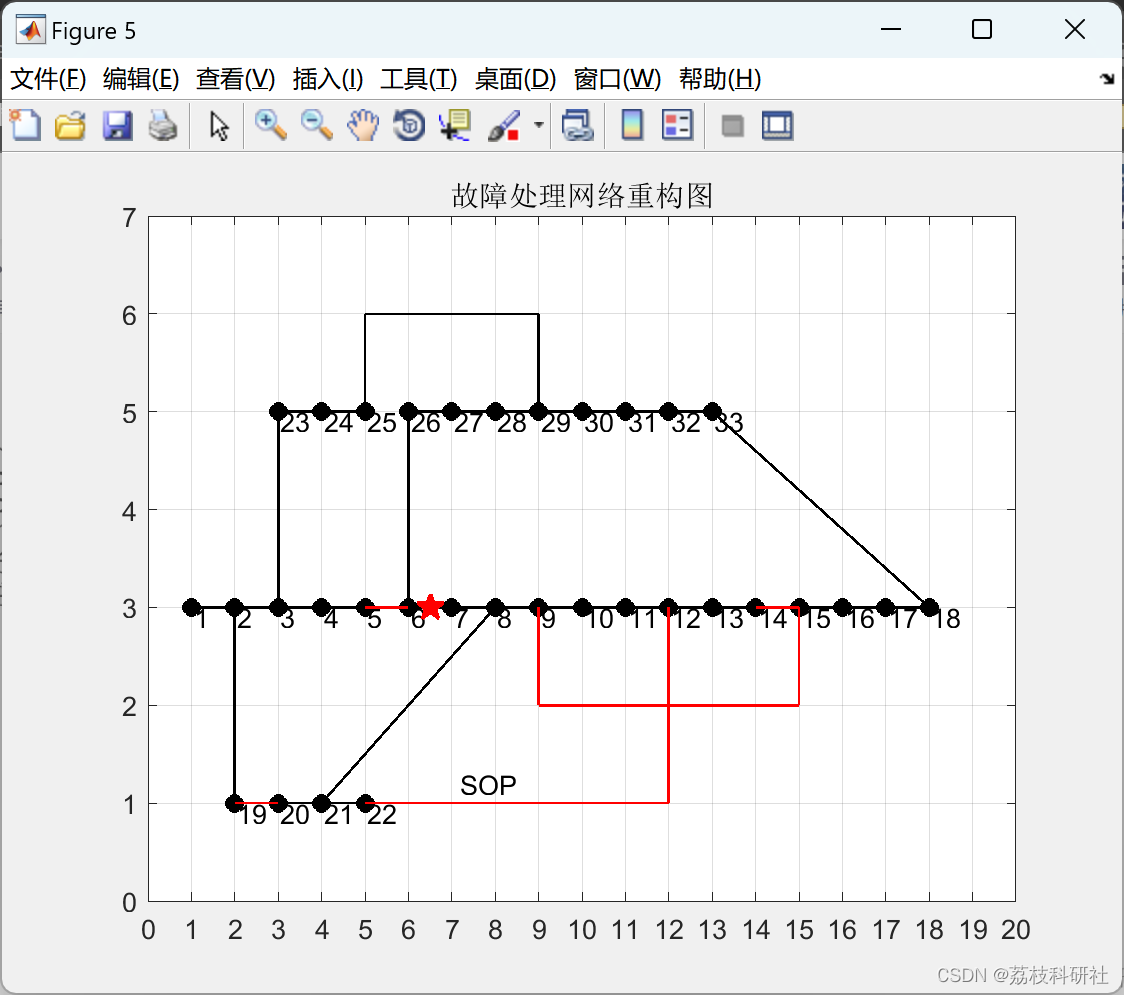
【配电网故障重构SOP】基于二阶锥松弛的加光伏风机储能进行的配电网故障处理和重构【考虑最优潮流】(Matlab代码实现)
💥💥💞💞欢迎来到本博客❤️❤️💥💥 🏆博主优势:🌞🌞🌞博客内容尽量做到思维缜密,逻辑清晰,为了方便读者。 ⛳️座右铭&a…...

ajax 的入门案例
一、ajax ajax,Asynchronous JavaScript And XML,异步的JavaScript和XML 同步:伴随着页面的刷新或跳转,即全局刷新;同步请求会阻塞代码的执行,即同步请求会一个一个的执行 异步:在不刷新页面…...
Flutter TextField 交互实例 —— 新手礼包
大家好,我是 17。 新手礼包一共 3 篇文章,每篇都是描述尽量详细,实例讲解,包会! Flutter Row 实例 —— 新手礼包Flutter TextField UI 实例 —— 新手礼包Flutter TextField 交互实例 —— 新手礼包 本篇包含所有常…...

折叠屏:手机厂商的「续命良药」
【潮汐商业评论/文】 作为办公室的“时尚达人”,Wendy又为自己添置了一款新时尚单品——折叠手机。 “没有哪个女孩子能拒绝一款小巧又时尚的折叠手机吧,我心动了好久,终于狠狠心买了一部。”提起自己的折叠手机,Wendy的眼里满是…...

RabbitMQ 保证消息不丢失的几种手段
文章目录 1.RabbitMQ消息丢失的三种情况2.RabbitMQ消息丢失解决方案2.1 针对生产者2.1.1 方案1 :开启RabbitMQ事务2.1.2 方案2:使用confirm机制 2.2 Exchange路由到队列失败2.3 RabbitMq自身问题导致的消息丢失问题解决方案2.3.1 消息持久化2.3.2 设置集…...

nginx配置
单线程应用 稳定性高 系统资源消耗低 线程切换消耗小 对HTTP并发连接处理能力高 单台服务器可支持2w个并发请求 nginx与apache区别 Nginx相对于Apache的优点: 轻量级,同样是 web 服务,比Apache 占用更少的内存及资源,高并发࿰…...
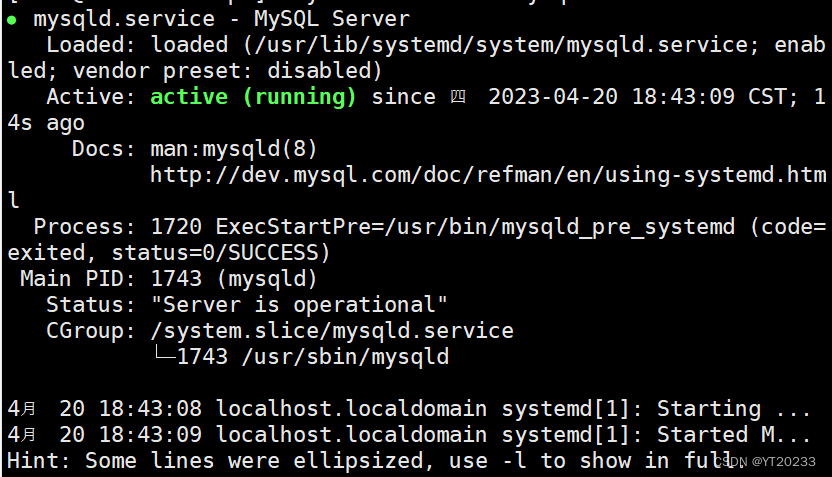
linux从入门到精通 第一章centos7里tomcat,jdk,httpd,mysql57,mysql80的安装
配置centos运行环境 一 安装httpd,tomcat,jdk,mysql1 安装httpd2 安装tomcat3 安装jdk 三 MySql的安装1 克隆出来两台虚拟机2 配置虚拟机3 链接xhsell4 链接xftp5 mysql8的安装6 mysql5.7的安装 一 安装httpd,tomcat,jdk,mysql 1 安装httpd 下载httpd yum -y install httpd关…...
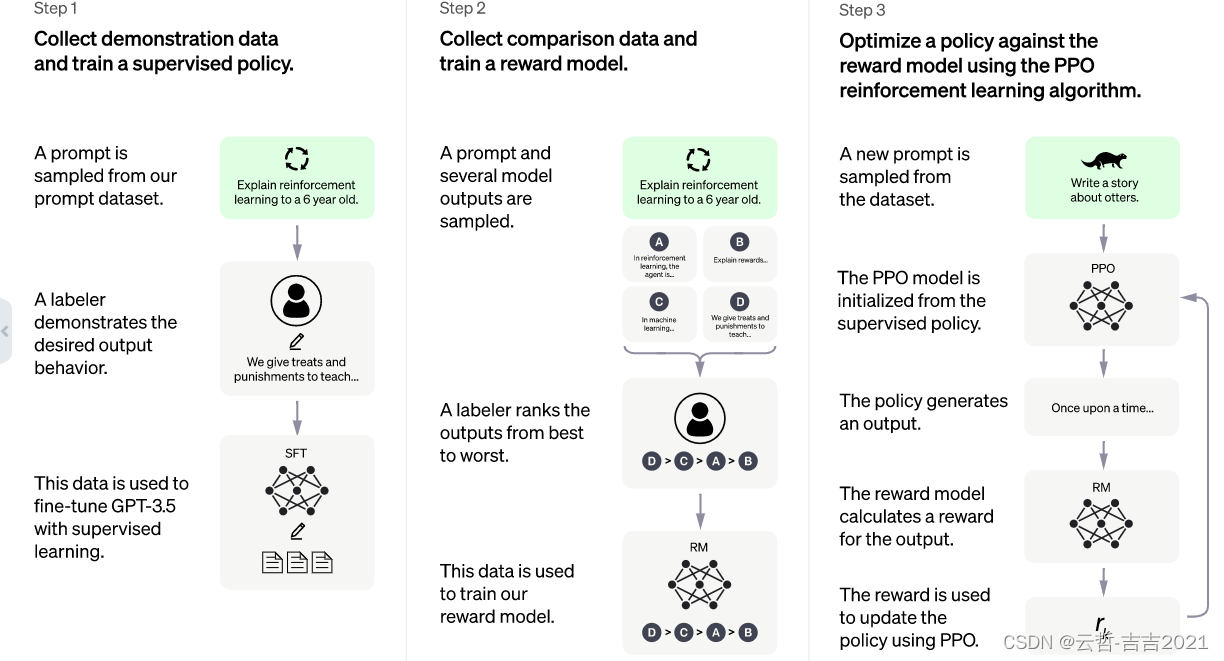
ChatGPT 速通手册——开源社区的进展
开源社区的进展 在 ChatGPT 以外,谷歌、脸书等互联网巨头,也都发布过千亿级参数的大语言模型,但在交谈问答方面表现相对 ChatGPT 来说都显得一般。根据科学人员推测,很重要的一部分原因是缺失了RLHF(Reinforcement Learning with…...
string类
string - C Reference (cplusplus.com) 引入: ASCII码表------>Unicode 其中又进行了分类: (UTF--8兼容ASCII码表) 等等等等 (不但迭代和更新) 例: 目录 正文开始!࿰…...

科研实战:三种高效获取ERA5再分析数据的路径解析
1. ERA5再分析数据基础认知 第一次接触ERA5数据时,我和大多数科研新手一样被各种专业术语搞得晕头转向。简单来说,ERA5就像给地球做CT扫描生成的全球气象体检报告,它能提供从1950年到现在,每小时更新的气温、降水、风速等上百种气…...

如何用opendbc解决汽车CAN总线解码难题:一份完整的实践指南
如何用opendbc解决汽车CAN总线解码难题:一份完整的实践指南 【免费下载链接】opendbc a Python API for your car 项目地址: https://gitcode.com/gh_mirrors/op/opendbc 面对现代汽车复杂的电子控制系统,你是否曾经困惑于如何理解车辆内部的数据…...

Cairo高级特性解析:泛型、Trait系统和元编程的深度应用
Cairo高级特性解析:泛型、Trait系统和元编程的深度应用 【免费下载链接】cairo Cairo is the first Turing-complete language for creating provable programs for general computation. 项目地址: https://gitcode.com/gh_mirrors/ca/cairo Cairo作为首个支…...

基于Agent Deck构建多智能体系统:从原理到工程实践
1. 项目概述:从“Agent Deck”看智能体协作平台的构建最近在GitHub上看到一个挺有意思的项目,叫asheshgoplani/agent-deck。光看这个名字,你可能会联想到一副“牌”,或者一个“控制台”。没错,这个项目的核心思想&…...

Adafruit IO物联网平台:从零构建环境监测与报警系统
1. 项目概述:为什么你需要一个像Adafruit IO这样的物联网平台?如果你玩过Arduino、树莓派或者任何单片机,肯定遇到过这样的场景:费了老大劲写代码让传感器读出数据,结果这些数据要么在串口监视器里一闪而过,…...

4.4 Spark SQL数据源 - JSON
Spark SQL JSON数据源实战涵盖:自动Schema推断读取JSON文件、spark.read.json()方法应用、文件格式规范(每行独立JSON)、HDFS文件操作及Spark Shell交互式查询。核心实践包括:从HDFS读取用户与成绩JSON文件创建DataFrame并关联分析…...

MATLAB找峰值进阶:用findpeaks函数5个鲜为人知的技巧,让你的科研图表更专业
MATLAB找峰值进阶:用findpeaks函数5个鲜为人知的技巧,让你的科研图表更专业 在科研数据分析中,峰值检测是最基础却又最关键的步骤之一。无论是光谱分析、色谱检测还是振动信号处理,准确识别和量化峰值特征直接影响着研究结论的可信…...

ThinkPad风扇控制深度指南:TPFanCtrl2架构解析与高级配置
ThinkPad风扇控制深度指南:TPFanCtrl2架构解析与高级配置 【免费下载链接】TPFanCtrl2 ThinkPad Fan Control 2 (Dual Fan) for Windows 10 and 11 项目地址: https://gitcode.com/gh_mirrors/tp/TPFanCtrl2 TPFanCtrl2是一款专为ThinkPad笔记本电脑设计的Wi…...

SoC设计全流程解析:从架构到流片的核心步骤与挑战
1. 项目概述:从“黑盒子”到“城市蓝图”每次拿起手机,我们都在与一个极其复杂的微型“城市”互动。这个城市,就是SoC。对于很多刚入行的朋友,甚至是一些有经验的软件工程师来说,SoC常常像一个“黑盒子”——我们知道它…...

如何快速掌握PyInstaller Extractor:5步提取可执行文件的完整指南
如何快速掌握PyInstaller Extractor:5步提取可执行文件的完整指南 【免费下载链接】pyinstxtractor PyInstaller Extractor 项目地址: https://gitcode.com/gh_mirrors/py/pyinstxtractor PyInstaller Extractor是一款专为提取PyInstaller生成的可执行文件内…...