使用tunasync部署企业内部开源软件镜像站-Centos Stream 9
使用tunasync部署企业内部开源软件镜像站
tunasync 是清华大学 TUNA 镜像源目前使用的镜像方案,本文将介绍如何使用 tunasync 部署企业内部开源软件镜像站。
基于tunasync + mirror-web + nginx进行镜像站点搭建。
1. tunasync设计
tunasync架构如下:
# Architecture- Manager: Central instance for status and job management
- Worker: Runs mirror jobs+------------+ +---+                  +---+
| Client API | |   |    Job Status    |   |    +----------+     +----------+
+------------+ |   +----------------->|   |--->|  mirror  +---->|  mirror  |
+------------+ |   |                  | w |    |  config  |     | provider |
| Worker API | | H |                  | o |    +----------+     +----+-----+
+------------+ | T |   Job Control    | r |                          |
+------------+ | T +----------------->| k |       +------------+     |
| Job/Status | | P |   Start/Stop/... | e |       | mirror job |<----+
| Management | | S |                  | r |       +------^-----+
+------------+ |   |   Update Status  |   |    +---------+---------+
+------------+ |   <------------------+   |    |     Scheduler     |
|   BoltDB   | |   |                  |   |    +-------------------+
+------------+ +---+                  +---+# Job Run ProcessPreSyncing                           Syncing                               Success
+-----------+     +----------+    +-----------+    +-------------+     +--------------+
|  pre-job  +--+->| pre-exec +--->|  job run  +--->|  post-exec  +-+-->| post-success |
+-----------+  ^  +----------+    +-----------+    +-------------+ |   +--------------+|                                                   ||                +-----------------+                | Failed+----------------+    post-fail    |<---------------++-----------------+
2. 准备工作
2.1 机器配置
- 操作系统:centos stream 9,采用最小化安装。
- 配置:4c8g15T硬盘
说明
- 清华镜镜像源站点目前总计占用了约150T+的磁盘空间,镜像源磁盘空间占用的详细情况情况可以查看:
https://mirrors.tuna.tsinghua.edu.cn/status/#syncing-status。- 在搭建镜像站点时根据自己的需求确认需要同步的镜像源,合理规划磁盘空间。本文部署内网镜像站点,仅同步ubuntu、centos-stream、centos-vault、epel等源,截止2024.12月为止,这几个仓库总计需要11TB的空间。以下是部分常用软件仓库的总大小统计。
Name Upsteam(清华源的上游仓库) Size ubuntu rsync://rsync.archive.ubuntu.com/ubuntu/ 2.74T centos-stream rsync://rsync.stream.centos.org/CentOS-Stream-All/ 3.38T centos-vault rsync://rsync-linuxsoft.cern.ch/centos-vault/ 4.15T epel rsync://download-ib01.fedoraproject.org/fedora-epel/ 467.67G pypi https://pypi.org 21.0T docker-ce https://download.docker.com/ 699G
- 配置挂载数据盘
[root@localhost ~]# mkfs.ext4 /dev/vdb
[root@localhost ~]# mkdir /data/mirrors -p
[root@localhost ~]# blkid /dev/vdb
/dev/vdb: UUID="77d16d0f-65f4-4e7d-9a34-38c1af829b05" TYPE="ext4"
[root@localhost ~]# cat /etc/fstab #
# /etc/fstab
# Created by anaconda on Mon Dec  9 02:12:58 2024
#
# Accessible filesystems, by reference, are maintained under '/dev/disk/'.
# See man pages fstab(5), findfs(8), mount(8) and/or blkid(8) for more info.
#
# After editing this file, run 'systemctl daemon-reload' to update systemd
# units generated from this file.
#
UUID=2267d21b-de78-483d-a546-b6da76e15e66 /                       xfs     defaults        0 0
UUID=a6dd6b39-e9d6-4b69-9cb2-a748a47b2e8e /boot                   xfs     defaults        0 0
[root@localhost ~]# echo "UUID=77d16d0f-65f4-4e7d-9a34-38c1af829b05 /data/mirrors ext4 defaults 0 0" >> /etc/fstab
[root@localhost ~]#
[root@localhost ~]# mount -a
mount: (hint) your fstab has been modified, but systemd still usesthe old version; use 'systemctl daemon-reload' to reload.
[root@localhost ~]# systemctl daemon-reload
[root@localhost ~]# mount -a
2.2 centos stream 9基础配置
- 配置主机名
hostnamectl set-hostname mirrors
如果需要域名解析,配置FQDN名称。
- 配置允许root进行ssh登录
$ vi /etc/ssh/sshd_config# 40行左右,配置改为yes
#PermitRootLogin prohibit-password
PermitRootLogin yes# 重启生效
$ systemctl restart ssh
- 配置镜像源
备份原有的文件,配置阿里云镜像源:
centos.repo内容如下:
[baseos]
name=CentOS Stream $releasever - BaseOS
baseurl=https://mirrors.aliyun.com/centos-stream/$stream/BaseOS/$basearch/os/
gpgkey=file:///etc/pki/rpm-gpg/RPM-GPG-KEY-centosofficial
gpgcheck=1
repo_gpgcheck=0
metadata_expire=6h
countme=1
enabled=1[baseos-debug]
name=CentOS Stream $releasever - BaseOS - Debug
baseurl=https://mirrors.aliyun.com/centos-stream/$stream/BaseOS/$basearch/debug/tree/
gpgkey=file:///etc/pki/rpm-gpg/RPM-GPG-KEY-centosofficial
gpgcheck=1
repo_gpgcheck=0
metadata_expire=6h
enabled=0[baseos-source]
name=CentOS Stream $releasever - BaseOS - Source
baseurl=https://mirrors.aliyun.com/centos-stream/$stream/BaseOS/source/tree/
gpgkey=file:///etc/pki/rpm-gpg/RPM-GPG-KEY-centosofficial
gpgcheck=1
repo_gpgcheck=0
metadata_expire=6h
enabled=0[appstream]
name=CentOS Stream $releasever - AppStream
baseurl=https://mirrors.aliyun.com/centos-stream/$stream/AppStream/$basearch/os/
gpgkey=file:///etc/pki/rpm-gpg/RPM-GPG-KEY-centosofficial
gpgcheck=1
repo_gpgcheck=0
metadata_expire=6h
countme=1
enabled=1[appstream-debug]
name=CentOS Stream $releasever - AppStream - Debug
baseurl=https://mirrors.aliyun.com/centos-stream/$stream/AppStream/$basearch/debug/tree/
gpgkey=file:///etc/pki/rpm-gpg/RPM-GPG-KEY-centosofficial
gpgcheck=1
repo_gpgcheck=0
metadata_expire=6h
enabled=0[appstream-source]
name=CentOS Stream $releasever - AppStream - Source
baseurl=https://mirrors.aliyun.com/centos-stream/$stream/AppStream/$basearch/debug/tree/
gpgkey=file:///etc/pki/rpm-gpg/RPM-GPG-KEY-centosofficial
gpgcheck=1
repo_gpgcheck=0
metadata_expire=6h
enabled=0[crb]
name=CentOS Stream $releasever - CRB
baseurl=https://mirrors.aliyun.com/centos-stream/$stream/CRB/$basearch/os/
gpgkey=file:///etc/pki/rpm-gpg/RPM-GPG-KEY-centosofficial
gpgcheck=1
repo_gpgcheck=0
metadata_expire=6h
countme=1
enabled=0[crb-debug]
name=CentOS Stream $releasever - CRB - Debug
baseurl=https://mirrors.aliyun.com/centos-stream/$stream/CRB/$basearch/debug/tree/
gpgkey=file:///etc/pki/rpm-gpg/RPM-GPG-KEY-centosofficial
gpgcheck=1
repo_gpgcheck=0
metadata_expire=6h
enabled=0[crb-source]
name=CentOS Stream $releasever - CRB - Source
baseurl=https://mirrors.aliyun.com/centos-stream/$stream/CRB/source/tree/
gpgkey=file:///etc/pki/rpm-gpg/RPM-GPG-KEY-centosofficial
gpgcheck=1
repo_gpgcheck=0
metadata_expire=6h
enabled=0
centos-addons.repo内容如下:
[highavailability]
name=CentOS Stream $releasever - HighAvailability
baseurl=http://mirrors.aliyun.com/centos-stream/$stream/HighAvailability/$basearch/os/
gpgkey=file:///etc/pki/rpm-gpg/RPM-GPG-KEY-centosofficial
gpgcheck=1
repo_gpgcheck=0
metadata_expire=6h
countme=1
enabled=0[highavailability-debug]
name=CentOS Stream $releasever - HighAvailability - Debug
baseurl=http://mirrors.aliyun.com/centos-stream/$stream/HighAvailability/$basearch/debug/tree/
gpgkey=file:///etc/pki/rpm-gpg/RPM-GPG-KEY-centosofficial
gpgcheck=1
repo_gpgcheck=0
metadata_expire=6h
enabled=0[highavailability-source]
name=CentOS Stream $releasever - HighAvailability - Source
baseurl=http://mirrors.aliyun.com/centos-stream/$stream/HighAvailability/source/tree/
gpgkey=file:///etc/pki/rpm-gpg/RPM-GPG-KEY-centosofficial
gpgcheck=1
repo_gpgcheck=0
metadata_expire=6h
enabled=0[nfv]
name=CentOS Stream $releasever - NFV
baseurl=http://mirrors.aliyun.com/centos-stream/$stream/NFV/$basearch/os/
gpgkey=file:///etc/pki/rpm-gpg/RPM-GPG-KEY-centosofficial
gpgcheck=1
repo_gpgcheck=0
metadata_expire=6h
countme=1
enabled=0[nfv-debug]
name=CentOS Stream $releasever - NFV - Debug
baseurl=http://mirrors.aliyun.com/centos-stream/$stream/NFV/$basearch/debug/tree/
gpgkey=file:///etc/pki/rpm-gpg/RPM-GPG-KEY-centosofficial
gpgcheck=1
repo_gpgcheck=0
metadata_expire=6h
enabled=0[nfv-source]
name=CentOS Stream $releasever - NFV - Source
baseurl=http://mirrors.aliyun.com/centos-stream/$stream/NFV/source/tree/
gpgkey=file:///etc/pki/rpm-gpg/RPM-GPG-KEY-centosofficial
gpgcheck=1
repo_gpgcheck=0
metadata_expire=6h
enabled=0[rt]
name=CentOS Stream $releasever - RT
baseurl=http://mirrors.aliyun.com/centos-stream/$stream/RT/$basearch/os/
gpgkey=file:///etc/pki/rpm-gpg/RPM-GPG-KEY-centosofficial
gpgcheck=1
repo_gpgcheck=0
metadata_expire=6h
countme=1
enabled=0[rt-debug]
name=CentOS Stream $releasever - RT - Debug
baseurl=http://mirrors.aliyun.com/centos-stream/$stream/RT/$basearch/debug/tree/
gpgkey=file:///etc/pki/rpm-gpg/RPM-GPG-KEY-centosofficial
gpgcheck=1
repo_gpgcheck=0
metadata_expire=6h
enabled=0[rt-source]
name=CentOS Stream $releasever - RT - Source
baseurl=http://mirrors.aliyun.com/centos-stream/$stream/RT/source/tree/
gpgkey=file:///etc/pki/rpm-gpg/RPM-GPG-KEY-centosofficial
gpgcheck=1
repo_gpgcheck=0
metadata_expire=6h
enabled=0[resilientstorage]
name=CentOS Stream $releasever - ResilientStorage
baseurl=http://mirrors.aliyun.com/centos-stream/$stream/ResilientStorage/$basearch/os/
gpgkey=file:///etc/pki/rpm-gpg/RPM-GPG-KEY-centosofficial
gpgcheck=1
repo_gpgcheck=0
metadata_expire=6h
countme=1
enabled=0[resilientstorage-debug]
name=CentOS Stream $releasever - ResilientStorage - Debug
baseurl=http://mirrors.aliyun.com/centos-stream/$stream/ResilientStorage/$basearch/debug/tree/
gpgkey=file:///etc/pki/rpm-gpg/RPM-GPG-KEY-centosofficial
gpgcheck=1
repo_gpgcheck=0
metadata_expire=6h
enabled=0[resilientstorage-source]
name=CentOS Stream $releasever - ResilientStorage - Source
baseurl=http://mirrors.aliyun.com/centos-stream/$stream/ResilientStorage/source/tree/
gpgkey=file:///etc/pki/rpm-gpg/RPM-GPG-KEY-centosofficial
gpgcheck=1
repo_gpgcheck=0
metadata_expire=6h
enabled=0[extras-common]
name=CentOS Stream $releasever - Extras packages
baseurl=http://mirrors.aliyun.com/centos-stream/SIGs/$stream/extras/$basearch/extras-common/
gpgkey=file:///etc/pki/rpm-gpg/RPM-GPG-KEY-CentOS-SIG-Extras-SHA512
gpgcheck=1
repo_gpgcheck=0
metadata_expire=6h
countme=1
enabled=1[extras-common-source]
name=CentOS Stream $releasever - Extras packages - Source
baseurl=http://mirrors.aliyun.com/centos-stream/SIGs/$stream/extras/source/extras-common/
gpgkey=file:///etc/pki/rpm-gpg/RPM-GPG-KEY-CentOS-SIG-Extras-SHA512
gpgcheck=1
repo_gpgcheck=0
metadata_expire=6h
enabled=0
- 关闭防火墙
systemctl stop firewalld
systemctl disable firewalld
2.3 基础软件安装
安装下面会用到的一些软件,其他软件根据自己需求安装。
yum install openssh-server vim wget git tar -y
yum groupinstall -y "Development Tools"
3. 部署后端服务
3.1 安装tunasync
- 安装go语言和rsync
yum install golang rsync -y
- 安装tunasync
- 编译安装
git clone https://github.com/tuna/tunasync.git
go env -w GOPROXY=https://goproxy.cn	# 设置go代理,方便国内网络访问
cd tunasync
make
编译成功后在同层目录build-linux-amd64下生成二进制文件,拷贝到系统path路径下。
[root@mirrors tunasync]# cd build-linux-amd64/
[root@mirrors build-linux-amd64]# ls
tunasync  tunasynctl
[root@mirrors build-linux-amd64]# cp * /usr/local/bin
- 二进制安装:
wget https://github.com/tuna/tunasync/releases/download/v0.8.0/tunasync-linux-amd64-bin.tar.gz
tar -zxvf tunasync-linux-amd64-bin.tar.gz -C /usr/local/bin
3.2 配置tunasync
- 创建仓库目录
mkdir -p /data/mirrors
- 创建日志目录
mkdir -p /var/log/tunasync
- 创建配置文件
mkdir /etc/tunasync
- 创建Manager配置文件
vim /etc/tunasync/manager.conf
内容如下:
debug = false[server]
addr = "127.0.0.1"
port = 14242
ssl_cert = ""
ssl_key = ""[files]
db_type = "bolt"
db_file = "/etc/tunasync/manager.db"
ca_cert = ""
除了 bolt 以外,还支持 badger、leveldb 和 redis 的数据库后端。对于 badger 和 leveldb,只需要修改 db_type。如果使用 redis 作为数据库后端,把 db_type 改为 redis,并把下面的 db_file 设为 redis 服务器的地址: redis://user:password@host:port/db_number。
- 创建worker配置文件
vim /etc/tunasync/worker.conf
内容如下:
[root@mirrors ~]# cat /etc/tunasync/worker.conf
[global]
name = "worker"
log_dir = "/var/log/tunasync/{{.Name}}"
mirror_dir = "/data/mirrors"
concurrent = 10
interval = 120[manager]
api_base = "http://localhost:14242"
token = ""
ca_cert = ""[cgroup]
enable = false
base_path = "/sys/fs/cgroup"
group = "tunasync"[server]
hostname = "localhost"
listen_addr = "127.0.0.1"
listen_port = 6000
ssl_cert = ""
ssl_key = ""[[mirrors]]
name = "ubuntu"
interval = 30
provider = "two-stage-rsync"
stage1_profile = "debian"
upstream = "rsync://rsync.mirrors.ustc.edu.cn/ubuntu/"
rsync_options = [ "--delete-excluded" ]
memory_limit = "256M"
use_ipv6 = false[[mirrors]]
name = "centos-vault"
interval = 30
provider = "rsync"
upstream = "rsync://rsync.mirrors.ustc.edu.cn/centos-vault/"
rsync_options = [ "--delete-excluded" ]
memory_limit = "256M"
use_ipv6 = false[[mirrors]]
name = "epel"
interval = 30
provider = "rsync"
upstream = "rsync://rsync.mirrors.ustc.edu.cn/epel/"
rsync_options = [ "--delete-excluded" ]
memory_limit = "256M"
use_ipv6 = false[[mirrors]]
name = "centos-stream"
interval = 30
provider = "rsync"
upstream = "rsync://rsync.mirrors.ustc.edu.cn/centos-stream/"
rsync_options = [ "--delete-excluded" ]
memory_limit = "256M"
说明:
- log_dir:tunasync日志路径
- mirror_dir:镜像的路径
- concurrent:线程数
- interval:同步周期,单位分钟
- api_base:manager地址
- name:镜像名称
- upstream:upstream同步地址
如果需要配置其他软件的同步地址,按照上面的规则添加即可。
worker示例文件:tunasync/docs/zh_CN/workers.conf at master · tuna/tunasync
不是所有的源都支持rsync;
上游源可以改为国内支持同步的镜像站点,中科大rsync专用域名为
rsync.mirrors.ustc.edu.cn。
3.3 配置为Systemd服务
源码仓库中在目录systemd下给出了示例文件,可以参考。
- 创建tunasync.service文件
vim /usr/lib/systemd/system/tunasync-manager.service
内容如下:
[Unit]
Description = TUNA mirrors sync manager
After=network.target
Requires=network.target[Service]
Type=simple
User=root
ExecStart = /usr/local/bin/tunasync manager -c /etc/tunasync/manager.conf --with-systemd[Install]
WantedBy=multi-user.target
- 创建tunasync-worker.service文件
vim /usr/lib/systemd/system/tunasync-worker.service
内容如下:
[Unit]
Description = TUNA mirrors sync worker
After=network.target[Service]
Type=simple
User=root
PermissionsStartOnly=true
#ExecStartPre=/usr/bin/cgcreate -t tunasync -a tunasync -g memory:tunasync
ExecStart=/usr/local/bin/tunasync worker -c /etc/tunasync/worker.conf --with-systemd
ExecReload=/bin/kill -SIGHUP $MAINPID
#ExecStopPost=/usr/bin/cgdelete memory:tunasync[Install]
WantedBy=multi-user.target
- 使能服务
systemctl enable --now tunasync-worker
systemctl enable --now tunasync-manager
- 查看同步状态
tunasynctl list --all
tunasynctl 也支持配置文件。配置文件可以放在 /etc/tunasync/ctl.conf 或者 ~/.config/tunasync/ctl.conf 两个位置,后者可以覆盖前者的配置值。
配置文件内容为:
manager_addr = "127.0.0.1"
manager_port = 14242
ca_cert = ""
- 排错
服务状态:systemctl status tunasync-worker和systemctl status tunasync-manager
日志路径:/var/log/tunasync/xxx/latest
3.4 安全加密(可选)
worker 和 manager 之间用 http(s) 通信,如果你 worker 和 manager 都是在本机,那么没必要使用 https。此时 manager 就不指定 ssl_key 和 ssl_cert,留空;worker 的 ca_cert 留空,api_base 以 http:// 开头。
如果需要加密的通信,manager 需要指定 ssl_key 和 ssl_cert,worker 要指定 ca_cert,并且 api_base 应该是 https:// 开头。
完成后端服务部署之后,tunasync服务即可将上游镜像站点的软件包同步到当前服务器。为了能提供http服务,我们需要配置web站点,以下两种方案任意选一种即可,最终的站点效果可以参见4.9和5.2章节部分。
4. 配置web站点(方案1:nginx+mirror-web)
方案1,通过nginx + mirror-web作为web站点。
4.1 安装Nodejs与nginx
- 安装 nodejs、gcc、g++、make
yum install nodejs gcc g++ make -y
- 安装pcre
wget https://jaist.dl.sourceforge.net/project/pcre/pcre/8.45/pcre-8.45.tar.gz
tar zxvf pcre-8.45.tar.gz
cd pcre-8.45
./configure
make && make install
- 安装openssl
系统自带3.2.2版本的openssl
[root@mirrors ~]# openssl version
OpenSSL 3.2.2 4 Jun 2024 (Library: OpenSSL 3.2.2 4 Jun 2024)
- 安装zlib
wget https://zlib.net/zlib-1.3.1.tar.gz
tar zxvf zlib-1.3.1.tar.gz
cd zlib-1.3.1
./configure
make && make install
- 安装 Nginx,编译安装 fancy-index 和 njs 模块
[root@mirrors ~]# yum install nginx -y
[root@mirrors ~]# nginx -V
nginx version: nginx/1.20.1
built by gcc 11.4.1 20231218 (Red Hat 11.4.1-3) (GCC)
built with OpenSSL 3.2.2 4 Jun 2024
TLS SNI support enabled
configure arguments: --prefix=/usr/share/nginx --sbin-path=/usr/sbin/nginx --modules-path=/usr/lib64/nginx/modules --conf-path=/etc/nginx/nginx.conf --error-log-path=/var/log/nginx/error.log --http-log-path=/var/log/nginx/access.log --http-client-body-temp-path=/var/lib/nginx/tmp/client_body --http-proxy-temp-path=/var/lib/nginx/tmp/proxy --http-fastcgi-temp-path=/var/lib/nginx/tmp/fastcgi --http-uwsgi-temp-path=/var/lib/nginx/tmp/uwsgi --http-scgi-temp-path=/var/lib/nginx/tmp/scgi --pid-path=/run/nginx.pid --lock-path=/run/lock/subsys/nginx --user=nginx --group=nginx --with-compat --with-debug --with-file-aio --with-http_addition_module --with-http_auth_request_module --with-http_dav_module --with-http_degradation_module --with-http_flv_module --with-http_gunzip_module --with-http_gzip_static_module --with-http_image_filter_module=dynamic --with-http_mp4_module --with-http_perl_module=dynamic --with-http_random_index_module --with-http_realip_module --with-http_secure_link_module --with-http_slice_module --with-http_ssl_module --with-http_stub_status_module --with-http_sub_module --with-http_v2_module --with-http_xslt_module=dynamic --with-mail=dynamic --with-mail_ssl_module --with-pcre --with-pcre-jit --with-stream=dynamic --with-stream_ssl_module --with-stream_ssl_preread_module --with-threads --with-cc-opt='-O2 -flto=auto -ffat-lto-objects -fexceptions -g -grecord-gcc-switches -pipe -Wall -Werror=format-security -Wp,-D_FORTIFY_SOURCE=2 -Wp,-D_GLIBCXX_ASSERTIONS -specs=/usr/lib/rpm/redhat/redhat-hardened-cc1 -fstack-protector-strong -specs=/usr/lib/rpm/redhat/redhat-annobin-cc1 -m64 -march=x86-64-v2 -mtune=generic -fasynchronous-unwind-tables -fstack-clash-protection -fcf-protection' --with-ld-opt='-Wl,-z,relro -Wl,--as-needed -Wl,-z,now -specs=/usr/lib/rpm/redhat/redhat-hardened-ld -specs=/usr/lib/rpm/redhat/redhat-annobin-cc1 -Wl,-E'
记录上面的configure arguments:,用于编译使用。 下载同版本的源码重新编译安装,添加--add-module=./ngx-fancyindex-0.5.2 --add-dynamic-module=./njs-22feb56938e7/nginx,注意路径:
wget https://nginx.org/download/nginx-1.20.1.tar.gz
tar zxvf nginx-1.20.1.tar.gz
cd nginx-1.20.1wget https://githubproxy.chentech.asia/https://github.com/aperezdc/ngx-fancyindex/releases/download/v0.5.2/ngx-fancyindex-0.5.2.tar.xz
tar xvf ngx-fancyindex-0.5.2.tar.xzwget https://hg.nginx.org/njs/archive/tip.tar.gz
tar zxvf tip.tar.gz./configure --prefix=/usr/share/nginx --sbin-path=/usr/sbin/nginx --modules-path=/usr/lib64/nginx/modules --conf-path=/etc/nginx/nginx.conf --error-log-path=/var/log/nginx/error.log --http-log-path=/var/log/nginx/access.log --http-client-body-temp-path=/var/lib/nginx/tmp/client_body --http-proxy-temp-path=/var/lib/nginx/tmp/proxy --http-fastcgi-temp-path=/var/lib/nginx/tmp/fastcgi --http-uwsgi-temp-path=/var/lib/nginx/tmp/uwsgi --http-scgi-temp-path=/var/lib/nginx/tmp/scgi --pid-path=/run/nginx.pid --lock-path=/run/lock/subsys/nginx --user=nginx --group=nginx --with-compat --with-debug --with-file-aio --with-http_addition_module --with-http_auth_request_module --with-http_dav_module --with-http_degradation_module --with-http_flv_module --with-http_gunzip_module --with-http_gzip_static_module --with-http_image_filter_module=dynamic --with-http_mp4_module --with-http_perl_module=dynamic --with-http_random_index_module --with-http_realip_module --with-http_secure_link_module --with-http_slice_module --with-http_ssl_module --with-http_stub_status_module --with-http_sub_module --with-http_v2_module --with-http_xslt_module=dynamic --with-mail=dynamic --with-mail_ssl_module --with-pcre --with-pcre-jit --with-stream=dynamic --with-stream_ssl_module --with-stream_ssl_preread_module --with-threads --with-cc-opt='-O2 -flto=auto -ffat-lto-objects -fexceptions -g -grecord-gcc-switches -pipe -Wall -Werror=format-security -Wp,-D_FORTIFY_SOURCE=2 -Wp,-D_GLIBCXX_ASSERTIONS -specs=/usr/lib/rpm/redhat/redhat-hardened-cc1 -fstack-protector-strong -specs=/usr/lib/rpm/redhat/redhat-annobin-cc1 -m64 -march=x86-64-v2 -mtune=generic -fasynchronous-unwind-tables -fstack-clash-protection -fcf-protection' --with-ld-opt='-Wl,-z,relro -Wl,--as-needed -Wl,-z,now -specs=/usr/lib/rpm/redhat/redhat-hardened-ld -specs=/usr/lib/rpm/redhat/redhat-annobin-cc1 -Wl,-E -Wno-error -Wno-deprecated-declarations' --add-module=./ngx-fancyindex-0.5.2 --add-dynamic-module=./njs-22feb56938e7/nginx...
creating objs/MakefileConfiguration summary+ using threads+ using system PCRE library+ using system OpenSSL library+ using system zlib librarynginx path prefix: "/usr/share/nginx"nginx binary file: "/usr/sbin/nginx"nginx modules path: "/usr/lib64/nginx/modules"nginx configuration prefix: "/etc/nginx"nginx configuration file: "/etc/nginx/nginx.conf"nginx pid file: "/run/nginx.pid"nginx error log file: "/var/log/nginx/error.log"nginx http access log file: "/var/log/nginx/access.log"nginx http client request body temporary files: "/var/lib/nginx/tmp/client_body"nginx http proxy temporary files: "/var/lib/nginx/tmp/proxy"nginx http fastcgi temporary files: "/var/lib/nginx/tmp/fastcgi"nginx http uwsgi temporary files: "/var/lib/nginx/tmp/uwsgi"nginx http scgi temporary files: "/var/lib/nginx/tmp/scgi"
...make -j4 && make install
如果是严格按照本文档操作,提前可以安装下面的几个依赖包,确保一次性编译通过。
报错1:
./configure: error: the HTTP XSLT module requires the libxml2/libxslt
libraries. You can either do not enable the module or install the libraries.
解决方式:安装 libxslt-dev
yum install libxslt-devel -y
报错2:
./configure: error: the HTTP image filter module requires the GD library.
You can either do not enable the module or install the libraries.
解决方式:安装gd-devel
yum install gd-devel -y
报错3:
 + perl version: This is perl 5, version 32, subversion 1 (v5.32.1) built for x86_64-linux-thread-multi
Can't locate ExtUtils/Embed.pm in @INC (you may need to install the ExtUtils::Embed module) (@INC contains: /usr/local/lib64/perl5/5.32 /usr/local/share/perl5/5.32 /usr/lib64/perl5/vendor_perl /usr/share/perl5/vendor_perl /usr/lib64/perl5 /usr/share/perl5).
BEGIN failed--compilation aborted../configure: error: perl module ExtUtils::Embed is required
解决方式:
yum -y install perl-ExtUtils-Embed
报错4:
make && make install 执行安装报错如下:
error: ‘ENGINE_free’ is deprecated: Since OpenSSL 3.0 [-Werror=deprecated-declarations]或者cc1: all warnings being treated as errors make[1]: *** [objs/Makefile:979: objs/src/event/ngx_event_openssl.o] Error 1
解决方式:
./configure 参数--with-cc-opt部分添加如下内容:
-Wno-error -Wno-deprecated-declarations
在make && make install安装之前,修改objs/Makefile文件,将下面这行(第3行)内容中的-Werror去掉:
CFLAGS = -pipe -O -W -Wall -Wpointer-arith -Wno-unused-parameter -g -O2 -flto=auto -ffat-lto-objects -fexceptions -g -grecord-gcc-switches -pipe -Wall -Werror=format-security -Wp,-D_FORTIFY_SOURCE=2 -Wp,-D_GLIBCXX_ASSERTIONS -specs=/usr/lib/rpm/redhat/redhat-hardened-cc1 -fstack-protector-strong -specs=/usr/lib/rpm/redhat/redhat-annobin-cc1 -m64 -march=x86-64-v2 -mtune=generic -fasynchronous-unwind-tables -fstack-clash-protection -fcf-protection
最终确保安装编译成功:
....'/etc/nginx/scgi_params.default'
test -f '/etc/nginx/nginx.conf' \|| cp conf/nginx.conf '/etc/nginx/nginx.conf'
cp conf/nginx.conf '/etc/nginx/nginx.conf.default'
test -d '/run' \|| mkdir -p '/run'
test -d '/var/log/nginx' \|| mkdir -p '/var/log/nginx'
test -d '/usr/share/nginx/html' \|| cp -R html '/usr/share/nginx'
test -d '/var/log/nginx' \|| mkdir -p '/var/log/nginx'
test -d '/usr/lib64/nginx/modules' \|| mkdir -p '/usr/lib64/nginx/modules'
test ! -f '/usr/lib64/nginx/modules/ngx_http_xslt_filter_module.so' \|| mv '/usr/lib64/nginx/modules/ngx_http_xslt_filter_module.so' \'/usr/lib64/nginx/modules/ngx_http_xslt_filter_module.so.old'
cp objs/ngx_http_xslt_filter_module.so '/usr/lib64/nginx/modules/ngx_http_xslt_filter_module.so'
test ! -f '/usr/lib64/nginx/modules/ngx_http_image_filter_module.so' \|| mv '/usr/lib64/nginx/modules/ngx_http_image_filter_module.so' \'/usr/lib64/nginx/modules/ngx_http_image_filter_module.so.old'
cp objs/ngx_http_image_filter_module.so '/usr/lib64/nginx/modules/ngx_http_image_filter_module.so'
test ! -f '/usr/lib64/nginx/modules/ngx_http_perl_module.so' \|| mv '/usr/lib64/nginx/modules/ngx_http_perl_module.so' \'/usr/lib64/nginx/modules/ngx_http_perl_module.so.old'
cp objs/ngx_http_perl_module.so '/usr/lib64/nginx/modules/ngx_http_perl_module.so'
test ! -f '/usr/lib64/nginx/modules/ngx_http_js_module.so' \|| mv '/usr/lib64/nginx/modules/ngx_http_js_module.so' \'/usr/lib64/nginx/modules/ngx_http_js_module.so.old'
cp objs/ngx_http_js_module.so '/usr/lib64/nginx/modules/ngx_http_js_module.so'
test ! -f '/usr/lib64/nginx/modules/ngx_stream_js_module.so' \|| mv '/usr/lib64/nginx/modules/ngx_stream_js_module.so' \'/usr/lib64/nginx/modules/ngx_stream_js_module.so.old'
cp objs/ngx_stream_js_module.so '/usr/lib64/nginx/modules/ngx_stream_js_module.so'
test ! -f '/usr/lib64/nginx/modules/ngx_mail_module.so' \|| mv '/usr/lib64/nginx/modules/ngx_mail_module.so' \'/usr/lib64/nginx/modules/ngx_mail_module.so.old'
cp objs/ngx_mail_module.so '/usr/lib64/nginx/modules/ngx_mail_module.so'
test ! -f '/usr/lib64/nginx/modules/ngx_stream_module.so' \|| mv '/usr/lib64/nginx/modules/ngx_stream_module.so' \'/usr/lib64/nginx/modules/ngx_stream_module.so.old'
cp objs/ngx_stream_module.so '/usr/lib64/nginx/modules/ngx_stream_module.so'
make[1]: Leaving directory '/root/nginx-1.20.1'
- 启动 Nginx
systemctl start nginx
启用开机运行
systemctl enable nginx
上面两步可以合并为
systemctl enable --now nginx
此时,在关闭系统防火墙或者放行端口的情况下,访问机器ip可以看到nginx首页。
4.2 安装ruby并配置Gem国内源
yum install patch autoconf automake bison bzip2 libtool readline-devel ruby-devel sqlite-devel -y
gem sources --add https://mirrors.ustc.edu.cn/rubygems/ --remove https://rubygems.org/
gem sources -l
4.3 安装bundle和build并配置bundel源
gem install bundle
gem install build
gem install jekyll bundler
bundle config mirror.https://rubygems.org https://mirrors.ustc.edu.cn/rubygems
4.4 拉取前端源码
git clone https://githubproxy.chentech.asia/https://github.com/tuna/mirror-web.git
4.5 下载动态数据文件
cd mirror-web
mkdir -p static/status
wget https://mirrors.tuna.tsinghua.edu.cn/static/tunasync.json -O static/tunasync.json
wget https://mirrors.tuna.tsinghua.edu.cn/static/tunet.json -O static/tunet.json
wget https://mirrors.tuna.tsinghua.edu.cn/static/status/isoinfo.json -O static/status/isoinfo.json
4.6 安装依赖
bundle install
root用户操作时会提示如下,忽略即可:
[root@localhost mirror-web]# bundle install
Don't run Bundler as root. Bundler can ask for sudo if it is needed, and
installing your bundle as root will break this application for all non-root
users on this machine.
4.7 修改项目文件
在下面文件中移除所有与清华大学和 TUNA 相关的内容,包括且不限于站名、logo 和各种文档中出现的所有相关文本和图形。
- 配置文件:
- _config.yaml
- _data/opentions.yml
- 网页文件:
- _includes/
- _layouts/
- fancy-index/
4.8 生成静态网页
方法1
生成静态网页到Nginx网站目录下:
bundle exec jekyll build --destination /usr/share/nginx/html
此处遇到如下问题:
Configuration file: /root/mirror-web/_config.ymlSource: /root/mirror-webDestination: /usr/share/nginx/htmlIncremental build: disabled. Enable with --incrementalGenerating...
Building with Vite ⚡️ ------------------------------------------------Jekyll 4.3.3   Please append `--trace` to the `build` command for any additional information or backtrace. ------------------------------------------------
/usr/share/gems/gems/vite_ruby-3.5.0/lib/vite_ruby/runner.rb:19:in `rescue in run': ❌ The vite binary is not available. Have you installed the npm packages? (ViteRuby::MissingExecutableError)Visit the Troubleshooting guide for more information:https://vite-ruby.netlify.app/guide/troubleshooting.html#troubleshootingNo such file or directory - /root/mirror-web/node_modules/.bin/vitefrom /usr/share/gems/gems/vite_ruby-3.5.0/lib/vite_ruby/runner.rb:10:in `run'from /usr/share/gems/gems/vite_ruby-3.5.0/lib/vite_ruby.rb:118:in `run'from /usr/share/ruby/forwardable.rb:238:in `run'from /usr/share/gems/gems/vite_ruby-3.5.0/lib/vite_ruby/builder.rb:69:in `build_with_vite'from /usr/share/gems/gems/vite_ruby-3.5.0/lib/vite_ruby/builder.rb:17:in `build'from /usr/share/gems/gems/vite_ruby-3.5.0/lib/vite_ruby/commands.rb:21:in `build'from /root/mirror-web/_plugins/jekyll-vite.rb:93:in `generate_vite_build'from /root/mirror-web/_plugins/jekyll-vite.rb:76:in `generate'from /usr/share/gems/gems/jekyll-4.3.3/lib/jekyll/site.rb:193:in `block in generate'from /usr/share/gems/gems/jekyll-4.3.3/lib/jekyll/site.rb:191:in `each'from /usr/share/gems/gems/jekyll-4.3.3/lib/jekyll/site.rb:191:in `generate'from /usr/share/gems/gems/jekyll-4.3.3/lib/jekyll/site.rb:79:in `process'from /usr/share/gems/gems/jekyll-4.3.3/lib/jekyll/command.rb:28:in `process_site'from /usr/share/gems/gems/jekyll-4.3.3/lib/jekyll/commands/build.rb:65:in `build'from /usr/share/gems/gems/jekyll-4.3.3/lib/jekyll/commands/build.rb:36:in `process'from /usr/share/gems/gems/jekyll-4.3.3/lib/jekyll/command.rb:91:in `block in process_with_graceful_fail'from /usr/share/gems/gems/jekyll-4.3.3/lib/jekyll/command.rb:91:in `each'from /usr/share/gems/gems/jekyll-4.3.3/lib/jekyll/command.rb:91:in `process_with_graceful_fail'from /usr/share/gems/gems/jekyll-4.3.3/lib/jekyll/commands/build.rb:18:in `block (2 levels) in init_with_program'from /usr/local/share/gems/gems/mercenary-0.4.0/lib/mercenary/command.rb:221:in `block in execute'from /usr/local/share/gems/gems/mercenary-0.4.0/lib/mercenary/command.rb:221:in `each'from /usr/local/share/gems/gems/mercenary-0.4.0/lib/mercenary/command.rb:221:in `execute'from /usr/local/share/gems/gems/mercenary-0.4.0/lib/mercenary/program.rb:44:in `go'from /usr/local/share/gems/gems/mercenary-0.4.0/lib/mercenary.rb:21:in `program'from /usr/share/gems/gems/jekyll-4.3.3/exe/jekyll:15:in `<top (required)>'from /usr/local/bin/jekyll:25:in `load'from /usr/local/bin/jekyll:25:in `<top (required)>'from /usr/local/share/gems/gems/bundler-2.5.23/lib/bundler/cli/exec.rb:58:in `load'from /usr/local/share/gems/gems/bundler-2.5.23/lib/bundler/cli/exec.rb:58:in `kernel_load'from /usr/local/share/gems/gems/bundler-2.5.23/lib/bundler/cli/exec.rb:23:in `run'from /usr/local/share/gems/gems/bundler-2.5.23/lib/bundler/cli.rb:456:in `exec'from /usr/local/share/gems/gems/bundler-2.5.23/lib/bundler/vendor/thor/lib/thor/command.rb:28:in `run'from /usr/local/share/gems/gems/bundler-2.5.23/lib/bundler/vendor/thor/lib/thor/invocation.rb:127:in `invoke_command'from /usr/local/share/gems/gems/bundler-2.5.23/lib/bundler/vendor/thor/lib/thor.rb:527:in `dispatch'from /usr/local/share/gems/gems/bundler-2.5.23/lib/bundler/cli.rb:35:in `dispatch'from /usr/local/share/gems/gems/bundler-2.5.23/lib/bundler/vendor/thor/lib/thor/base.rb:584:in `start'from /usr/local/share/gems/gems/bundler-2.5.23/lib/bundler/cli.rb:29:in `start'from /usr/local/share/gems/gems/bundler-2.5.23/exe/bundle:28:in `block in <top (required)>'from /usr/local/share/gems/gems/bundler-2.5.23/lib/bundler/friendly_errors.rb:117:in `with_friendly_errors'from /usr/local/share/gems/gems/bundler-2.5.23/exe/bundle:20:in `<top (required)>'from /usr/local/bin/bundle:23:in `load'from /usr/local/bin/bundle:23:in `<main>'
/usr/share/ruby/open3.rb:221:in `spawn': No such file or directory - /root/mirror-web/node_modules/.bin/vite (Errno::ENOENT)from /usr/share/ruby/open3.rb:221:in `popen_run'from /usr/share/ruby/open3.rb:102:in `popen3'from /usr/share/gems/gems/vite_ruby-3.5.0/lib/vite_ruby/io.rb:13:in `capture'from /usr/share/gems/gems/vite_ruby-3.5.0/lib/vite_ruby/runner.rb:16:in `block in run'from /usr/share/gems/gems/vite_ruby-3.5.0/lib/vite_ruby/config.rb:89:in `chdir'from /usr/share/gems/gems/vite_ruby-3.5.0/lib/vite_ruby/config.rb:89:in `within_root'from /usr/share/gems/gems/vite_ruby-3.5.0/lib/vite_ruby/runner.rb:11:in `run'from /usr/share/gems/gems/vite_ruby-3.5.0/lib/vite_ruby.rb:118:in `run'from /usr/share/ruby/forwardable.rb:238:in `run'from /usr/share/gems/gems/vite_ruby-3.5.0/lib/vite_ruby/builder.rb:69:in `build_with_vite'from /usr/share/gems/gems/vite_ruby-3.5.0/lib/vite_ruby/builder.rb:17:in `build'from /usr/share/gems/gems/vite_ruby-3.5.0/lib/vite_ruby/commands.rb:21:in `build'from /root/mirror-web/_plugins/jekyll-vite.rb:93:in `generate_vite_build'from /root/mirror-web/_plugins/jekyll-vite.rb:76:in `generate'from /usr/share/gems/gems/jekyll-4.3.3/lib/jekyll/site.rb:193:in `block in generate'from /usr/share/gems/gems/jekyll-4.3.3/lib/jekyll/site.rb:191:in `each'from /usr/share/gems/gems/jekyll-4.3.3/lib/jekyll/site.rb:191:in `generate'from /usr/share/gems/gems/jekyll-4.3.3/lib/jekyll/site.rb:79:in `process'from /usr/share/gems/gems/jekyll-4.3.3/lib/jekyll/command.rb:28:in `process_site'from /usr/share/gems/gems/jekyll-4.3.3/lib/jekyll/commands/build.rb:65:in `build'from /usr/share/gems/gems/jekyll-4.3.3/lib/jekyll/commands/build.rb:36:in `process'from /usr/share/gems/gems/jekyll-4.3.3/lib/jekyll/command.rb:91:in `block in process_with_graceful_fail'from /usr/share/gems/gems/jekyll-4.3.3/lib/jekyll/command.rb:91:in `each'from /usr/share/gems/gems/jekyll-4.3.3/lib/jekyll/command.rb:91:in `process_with_graceful_fail'from /usr/share/gems/gems/jekyll-4.3.3/lib/jekyll/commands/build.rb:18:in `block (2 levels) in init_with_program'from /usr/local/share/gems/gems/mercenary-0.4.0/lib/mercenary/command.rb:221:in `block in execute'from /usr/local/share/gems/gems/mercenary-0.4.0/lib/mercenary/command.rb:221:in `each'from /usr/local/share/gems/gems/mercenary-0.4.0/lib/mercenary/command.rb:221:in `execute'from /usr/local/share/gems/gems/mercenary-0.4.0/lib/mercenary/program.rb:44:in `go'from /usr/local/share/gems/gems/mercenary-0.4.0/lib/mercenary.rb:21:in `program'from /usr/share/gems/gems/jekyll-4.3.3/exe/jekyll:15:in `<top (required)>'from /usr/local/bin/jekyll:25:in `load'from /usr/local/bin/jekyll:25:in `<top (required)>'from /usr/local/share/gems/gems/bundler-2.5.23/lib/bundler/cli/exec.rb:58:in `load'from /usr/local/share/gems/gems/bundler-2.5.23/lib/bundler/cli/exec.rb:58:in `kernel_load'from /usr/local/share/gems/gems/bundler-2.5.23/lib/bundler/cli/exec.rb:23:in `run'from /usr/local/share/gems/gems/bundler-2.5.23/lib/bundler/cli.rb:456:in `exec'from /usr/local/share/gems/gems/bundler-2.5.23/lib/bundler/vendor/thor/lib/thor/command.rb:28:in `run'from /usr/local/share/gems/gems/bundler-2.5.23/lib/bundler/vendor/thor/lib/thor/invocation.rb:127:in `invoke_command'from /usr/local/share/gems/gems/bundler-2.5.23/lib/bundler/vendor/thor/lib/thor.rb:527:in `dispatch'from /usr/local/share/gems/gems/bundler-2.5.23/lib/bundler/cli.rb:35:in `dispatch'from /usr/local/share/gems/gems/bundler-2.5.23/lib/bundler/vendor/thor/lib/thor/base.rb:584:in `start'from /usr/local/share/gems/gems/bundler-2.5.23/lib/bundler/cli.rb:29:in `start'from /usr/local/share/gems/gems/bundler-2.5.23/exe/bundle:28:in `block in <top (required)>'from /usr/local/share/gems/gems/bundler-2.5.23/lib/bundler/friendly_errors.rb:117:in `with_friendly_errors'from /usr/local/share/gems/gems/bundler-2.5.23/exe/bundle:20:in `<top (required)>'from /usr/local/bin/bundle:23:in `load'from /usr/local/bin/bundle:23:in `<main>'
使用npm安装依赖:
[root@mirrors mirror-web]# npm config set registry http://registry.npmmirror.com
[root@mirrors mirror-web]# npm install
软连接到仓库目录下:
ln -s /usr/share/nginx/html/fancy-index /data/mirrors
ln -s /usr/share/nginx/html/help /data/mirrors
ln -s /usr/share/nginx/html/news /data/mirrors
ln -s /usr/share/nginx/html/static /data/mirrors
ln -s /usr/share/nginx/html/status /data/mirrors
ln -s /usr/share/nginx/html/404.html /data/mirrors
ln -s /usr/share/nginx/html/feed.xml /data/mirrors
ln -s /usr/share/nginx/html/index.html /data/mirrors
ln -s /usr/share/nginx/html/legacy_index.html /data/mirrors
ln -s /usr/share/nginx/html/robots.txt /data/mirrors
ln -s /usr/share/nginx/html/sitemap.xml /data/mirrors
方法2
这里也使用官方打包的mirror-web容器进行编译:
docker pull tunathu/mirror-web docker run --rm -v /root/mirror-web:/data tunathu/mirror-web
编译完成后即可在/root/mirror-web/_site中得到编译结果。将/root/mirror-web/_site下的文件拷贝到/usr/share/nginx/html,
[root@mirrors /]# cd /usr/share/nginx/
[root@mirrors nginx]# mv html/ html.bak/
[root@mirrors nginx]# ls
html.bak  modules
[root@mirrors nginx]# mkdir html[root@mirrors mirror-web]# cp -r _site/* /usr/share/nginx/html
[root@mirrors mirror-web]# ls -alh /usr/share/nginx/html
total 116K
drwxr-xr-x.  8 root root 4.0K Dec  9 14:31 .
drwxr-xr-x.  5 root root   49 Dec  9 14:31 ..
-rw-r--r--.  1 root root  13K Dec  9 14:31 404.html
drwxr-xr-x.  2 root root 4.0K Dec  9 14:31 assets
drwxr-xr-x.  2 root root   43 Dec  9 14:31 fancy-index
-rw-r--r--.  1 root root  27K Dec  9 14:31 feed.xml
drwxr-xr-x.  5 root root   82 Dec  9 14:31 help
-rw-r--r--.  1 root root  21K Dec  9 14:31 index.html
-rw-r--r--.  1 root root  19K Dec  9 14:31 legacy_index.html
drwxr-xr-x. 61 root root 4.0K Dec  9 14:31 news
-rw-r--r--.  1 root root   57 Dec  9 14:31 robots.txt
-rw-r--r--.  1 root root 8.7K Dec  9 14:31 sitemap.xml
drwxr-xr-x.  6 root root   49 Dec  9 14:31 static
drwxr-xr-x.  2 root root   24 Dec  9 14:31 status
然后使用软链接到/data/mirrors目录:
ln -s /usr/share/nginx/html/fancy-index /data/mirrors
ln -s /usr/share/nginx/html/assets /data/mirrors
ln -s /usr/share/nginx/html/help /data/mirrors
ln -s /usr/share/nginx/html/news /data/mirrors
ln -s /usr/share/nginx/html/static /data/mirrors
ln -s /usr/share/nginx/html/status /data/mirrors
ln -s /usr/share/nginx/html/404.html /data/mirrors
ln -s /usr/share/nginx/html/feed.xml /data/mirrors
ln -s /usr/share/nginx/html/index.html /data/mirrors
ln -s /usr/share/nginx/html/legacy_index.html /data/mirrors
ln -s /usr/share/nginx/html/robots.txt /data/mirrors
ln -s /usr/share/nginx/html/sitemap.xml /data/mirrors
4.9 修改ningx配置文件
备份原有文件: mv nginx.conf nginx.conf.bak
新建/etc/nginx/nginx.conf文件,内容如下:
# For more information on configuration, see:
#   * Official English Documentation: http://nginx.org/en/docs/
#   * Official Russian Documentation: http://nginx.org/ru/docs/user nginx;
worker_processes auto;
error_log /var/log/nginx/error.log notice;
pid /run/nginx.pid;# Load dynamic modules. See /usr/share/doc/nginx/README.dynamic.
include /usr/share/nginx/modules/*.conf;load_module /usr/lib64/nginx/modules/ngx_http_js_module.so;events {worker_connections 1024;
}http {log_format  main  '$remote_addr - $remote_user [$time_local] "$request" ''$status $body_bytes_sent "$http_referer" ''"$http_user_agent" "$http_x_forwarded_for"';access_log  /var/log/nginx/access.log  main;sendfile            on;tcp_nopush          on;keepalive_timeout   65;types_hash_max_size 4096;include             /etc/nginx/mime.types;default_type        application/octet-stream;# Load modular configuration files from the /etc/nginx/conf.d directory.# See http://nginx.org/en/docs/ngx_core_module.html#include# for more information.include /etc/nginx/conf.d/*.conf;server {listen       80;listen       [::]:80;server_name  _;root         /data/mirrors;# Load configuration files for the default server block.include /etc/nginx/default.d/*.conf;error_page 404 /404.html;location = /404.html {}error_page 500 502 503 504 /50x.html;location = /50x.html {}location /static/tunasync.json {proxy_pass http://localhost:14242/jobs;}fancyindex_header /fancy-index/before;fancyindex_footer /fancy-index/after;fancyindex_exact_size off;fancyindex_time_format "%Y-%m-%d %H:%M";fancyindex_name_length 256;js_path /data/mirrors/static/njs;js_import fancyIndexRender from /data/mirrors/static/njs/fancy_index.njs;location /fancy-index {internal;root /data/mirrors;subrequest_output_buffer_size 100k;location = /fancy-index/before {js_content fancyIndexRender.fancyIndexBeforeRender;}location = /fancy-index/after {js_content fancyIndexRender.fancyIndexAfterRender;}}location /{fancyindex on;}}# Settings for a TLS enabled server.
#
#    server {
#        listen       443 ssl http2;
#        listen       [::]:443 ssl http2;
#        server_name  _;
#        root         /usr/share/nginx/html;
#
#        ssl_certificate "/etc/pki/nginx/server.crt";
#        ssl_certificate_key "/etc/pki/nginx/private/server.key";
#        ssl_session_cache shared:SSL:1m;
#        ssl_session_timeout  10m;
#        ssl_ciphers PROFILE=SYSTEM;
#        ssl_prefer_server_ciphers on;
#
#        # Load configuration files for the default server block.
#        include /etc/nginx/default.d/*.conf;
#
#        error_page 404 /404.html;
#        location = /404.html {
#        }
#
#        error_page 500 502 503 504 /50x.html;
#        location = /50x.html {
#        }
#    }}
重启nginx服务:
systemctl restart nginx
访问浏览器,查看站点效果:

4.10 配置getisoinfo服务
- 关闭 SElinux
不然通过 Systemd 进行管理时会报无权限。
sed -i "s/SELINUX=enforcing/SELINUX=disabled/g" /etc/selinux/config
重启系统生效。
- 复制
/root/mirror-web/geninfo至/etc/tunasync/geninfo
cp -r /root/mirror-web/geninfo /etc/tunasync/geninfo
修改 /etc/tunasync/geninfo/genisolist.ini
#root = /data/
root = /data/mirrors/
新建 /etc/tunasync/geninfo/genisoinfo.sh
#!/bin/bashweb=/usr/share/nginx/html
disks="/ /data/mirrors"while true; dopython3 /etc/tunasync/geninfo/genisolist.py 2>/dev/null > $web/static/status/isoinfo.jsonecho -n "[" > $web/static/status/disk.jsondf -B 1k --output="size,used" $disks  | awk '{if (FNR==1) ; else {if (FNR>2) printf ","; printf "{\"total_kb\":%s,\"used_kb\":%s}", $1, $2;}}' >> $web/static/status/disk.jsonecho -n "]" >> $web/static/status/disk.jsonsleep 15m
done
设置可执行
chmod +x /etc/tunasync/geninfo/genisoinfo.sh
- 通过 Systemd 管理
vim /usr/lib/systemd/system/2. [weyo/mirrors: A simple opensource mirror site based on tunasync.](https://github.com/weyo/mirrors).service# 内容如下
[Unit]
Description = TUNA mirrors genisoinfo
After=network.target[Service]
Type=simple
User=root
ExecStart=/etc/tunasync/geninfo/genisoinfo.sh[Install]
WantedBy=multi-user.target# 配置服务自启动
systemctl enable --now tunasync-geninfo
5. 配置web站点(方案2:httpd+mirrors)
方案2,通过httpd + mirrors作为web站点。
5.1 安装apache httpd
[root@mirrors ~]# yum install httpd[root@mirrors ~]# systemctl start httpd
[root@mirrors ~]# systemctl enable httpd
5.2 配置httpd
编辑 /etc/httpd/conf/httpd.conf 文件,将web目录指向提供的镜像目录(/data/mirrors),添加目录访问权限:
DocumentRoot "/data/mirrors-httpd"
...
<Directory "/data/mirrors-httpd">Options Indexes FollowSymLinksAllowOverride NoneRequire all granted
</Directory>
并根据需要补充 index.html 和配置的 web 文件到 /data/mirrors-httpd 目录。
[root@mirrors web]# git clone https://github.com/weyo/mirrors
# 将mirrors目录下的web文件夹中的文件复制到/data/mirrors-httpd目录,包括隐藏文件
[root@mirrors web]# cd /data/mirrors-httpd/
[root@mirrors mirrors-httpd]# ls -alh
total 4.0K
drwxr-xr-x  4 root root   88 Dec  9 17:01 .
drwxr-xr-x. 4 root root   42 Dec  9 16:53 ..
lrwxrwxrwx  1 root root   27 Dec  9 16:54 centos-vault -> /data/mirrors/centos-vault/
drwxr-xr-x  2 root root  153 Dec  9 17:01 .help
-rw-r--r--  1 root root 2.8K Dec  9 17:00 index.html
drwxr-xr-x  5 root root   38 Dec  9 17:01 .resource
lrwxrwxrwx  1 root root   20 Dec  9 16:54 ubuntu -> /data/mirrors/ubuntu
根据内部环境地址修改帮助信息:
[root@mirrors mirrors-httpd]# ls .help/
CentOS6-Base.repo  CentOS7-Base.repo  centos.html  epel.html  pypi.html  ubuntu.html  UpgradePython.pdf[root@mirrors .help]# grep mymirr *.repo
CentOS6-Base.repo:baseurl=http://mymirrorsite/centos/6/os/$basearch/
CentOS6-Base.repo:gpgkey=http://mymirrorsite/centos/RPM-GPG-KEY-CentOS-6
CentOS6-Base.repo:baseurl=http://mymirrorsite/centos/6/updates/$basearch/
CentOS6-Base.repo:gpgkey=http://mymirrorsite/centos/RPM-GPG-KEY-CentOS-6
CentOS6-Base.repo:baseurl=http://mymirrorsite/centos/6/extras/$basearch/
CentOS6-Base.repo:gpgkey=http://mymirrorsite/centos/RPM-GPG-KEY-CentOS-6
CentOS6-Base.repo:baseurl=http://mymirrorsite/centos/6/centosplus/$basearch/
CentOS6-Base.repo:gpgkey=http://mymirrorsite/centos/RPM-GPG-KEY-CentOS-6
CentOS6-Base.repo:baseurl=http://mymirrorsite/centos/6/contrib/$basearch/
CentOS6-Base.repo:gpgkey=http://mymirrorsite/centos/RPM-GPG-KEY-CentOS-6
CentOS7-Base.repo:baseurl=http://mymirrorsite/centos/7/os/$basearch/
CentOS7-Base.repo:gpgkey=http://mymirrorsite/centos/RPM-GPG-KEY-CentOS-7
CentOS7-Base.repo:baseurl=http://mymirrorsite/centos/7/updates/$basearch/
CentOS7-Base.repo:gpgkey=http://mymirrorsite/centos/RPM-GPG-KEY-CentOS-7
CentOS7-Base.repo:baseurl=http://mymirrorsite/centos/7/extras/$basearch/
CentOS7-Base.repo:gpgkey=http://mymirrorsite/centos/RPM-GPG-KEY-CentOS-7
CentOS7-Base.repo:baseurl=http://mymirrorsite/centos/7/centosplus/$basearch/
CentOS7-Base.repo:gpgkey=http://mymirrorsite/centos/RPM-GPG-KEY-CentOS-7
CentOS7-Base.repo:baseurl=http://mymirrorsite/centos/7/contrib/$basearch/
CentOS7-Base.repo:gpgkey=http://mymirrorsite/centos/RPM-GPG-KEY-CentOS-7# 这里替换为机器的内部域名地址
[root@mirrors .help]# sed -i "s/mymirrorsite/mirrors.jdzx.local/g" *.repo
[root@mirrors .help]# sed -i "s/mymirrorsite/mirrors.jdzx.local/g" *.html
默认首页显示ubuntu,centos,epel,pypi等几个仓库,我这里不需要pypi将pypi注释:
<!--<tr class="even"><td><a href="/pypi/">pypi/</a></td><td class="pypi update-time">N/A</td><td class="pypi upstream">N/A</td><td class="pypi sync-status">N/A</td><td class="pypi mirror-size">N/A</td><td><a href="/.help/pypi.html">PyPI 使用帮助</a></td></tr>-->
将centos改为centos-vault:
<tr class="odd"><td><a href="/centos-vault/">centos-vault/</a></td><td class="centos update-time">N/A</td><td class="centos upstream">N/A</td><td class="centos sync-status">N/A</td><td class="centos mirror-size">N/A</td><td><a href="/.help/centos.html">Centos/Redhat 使用帮助</a></td></tr>
浏览站点,查看站点效果:

6. 参考资料
- tunasync:https://github.com/tuna/tunasync/tree/master
- mirror-web:https://github.com/tuna/mirror-web
- 科大源同步方法与注意事项 - USTC Mirror Help
- 使用Tunasync部署一个开源软件镜像站-CSDN博客
- weyo/mirrors: A simple opensource mirror site based on tunasync.
相关文章:
使用tunasync部署企业内部开源软件镜像站-Centos Stream 9
使用tunasync部署企业内部开源软件镜像站 tunasync 是清华大学 TUNA 镜像源目前使用的镜像方案,本文将介绍如何使用 tunasync 部署企业内部开源软件镜像站。 基于tunasync mirror-web nginx进行镜像站点搭建。 1. tunasync设计 tunasync架构如下: …...

c/c++的opencv像素级操作二值化
图像级操作:使用 C/C 进行二值化 在数字图像处理中,图像级操作 (Image-Level Operations) 是指直接在图像的像素级别上进行处理,以改变图像的视觉特性或提取有用信息。这些操作通常不依赖于图像的全局结构,而是关注每个像素及其邻…...
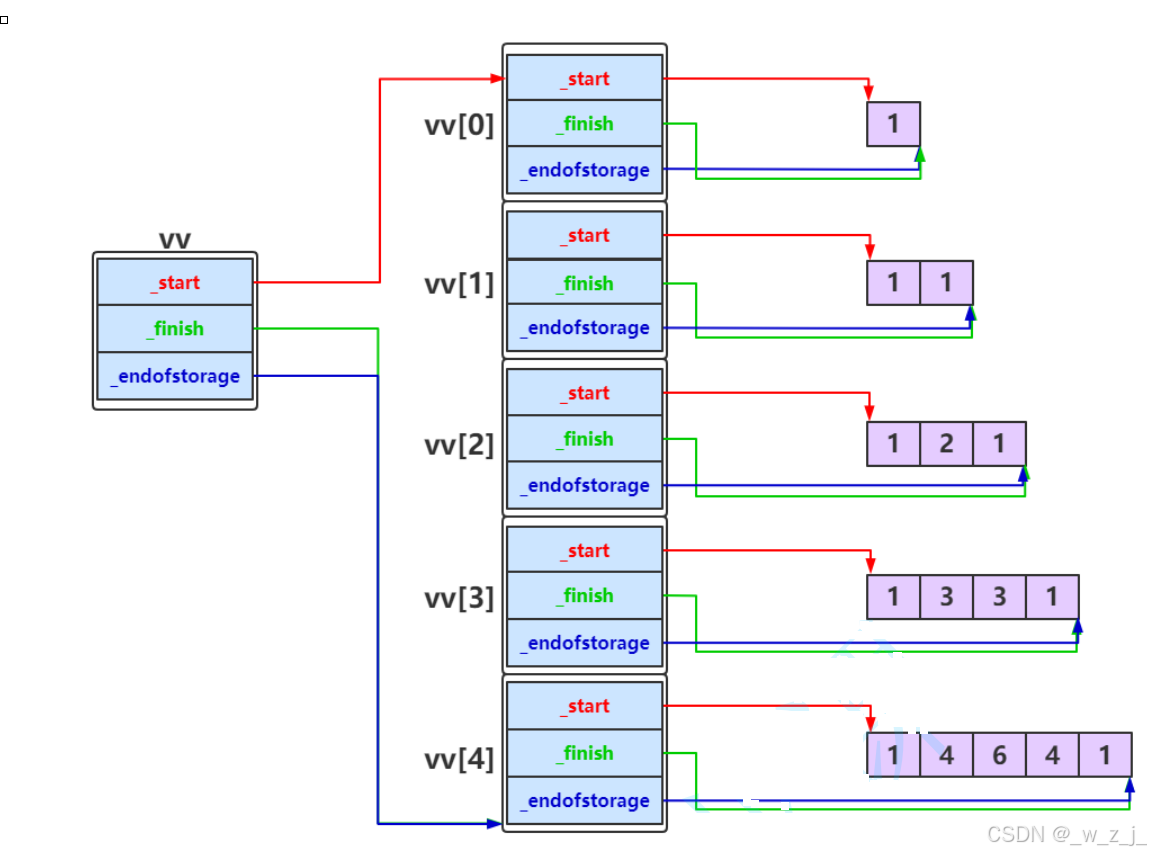
C++----Vector的模拟实现
上一节讲了string的模拟实现,string的出现时间比vector靠前,所以一些函数给的也比较冗余,而后来的vector、list等在此基础上做了优化。这节讲一讲vector的模拟实现,vector与模板具有联系,而string的底层就是vector的一…...

Mac redis下载和安装
目录 1、官网:https://redis.io/ 2、滑到最底下 3、下载资源 4、安装: 5、输入 sudo make test 进行编译测试 会提示 编辑 6、sudo make install 继续 7、输入 src/redis-server 启动服务器 8、输入 src/redis-cli 启动测试端 1、官网ÿ…...
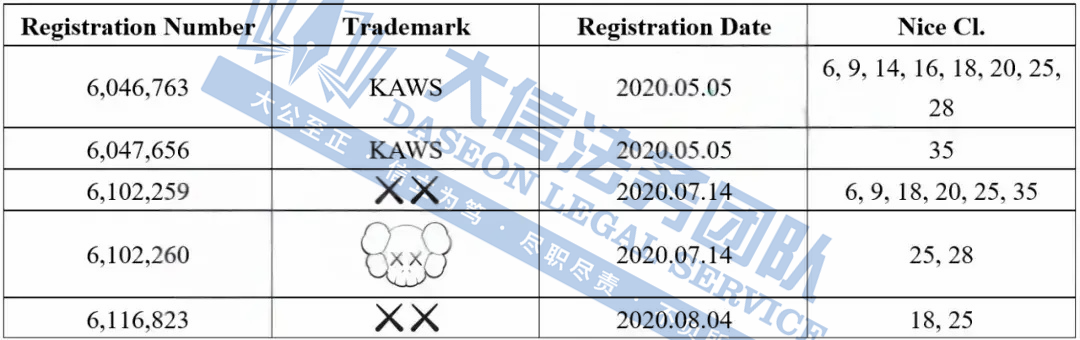
[25-cv-05718]BSF律所代理潮流品牌KAWS公仔(商标+版权)
潮流品牌KAWS公仔 案件号:25-cv-05718 立案时间:2025年5月21日 原告:KAWS, INC. 代理律所:Boies Schiller Flexner LLP 原告介绍 原告是一家由美国街头艺术家Brian Donnelly创立的公司,成立于2002年2月25日&…...
)
【PhysUnits】9 取负重载(negation.rs)
一、源码 这段代码是类型级二进制数(包括正数和负数)的取反和取负操作。它使用了类型系统来表示二进制数,并通过特质(trait)和泛型来实现递归操作。 use super::basic::{B0, B1, Z0, N1}; use core::ops::Neg;// 反…...

深度思考、弹性实施,业务流程自动化的实践指南
随着市场环境愈发复杂化,各类型企业的业务步伐为了跟得上市场节奏也逐步变得紧张,似乎只有保持极强的竞争力、削减成本、提升抗压能力才能在市场洪流中博得一席之位。此刻企业需要制定更明智的解决方案,以更快、更准确地优化决策流程。与简单…...
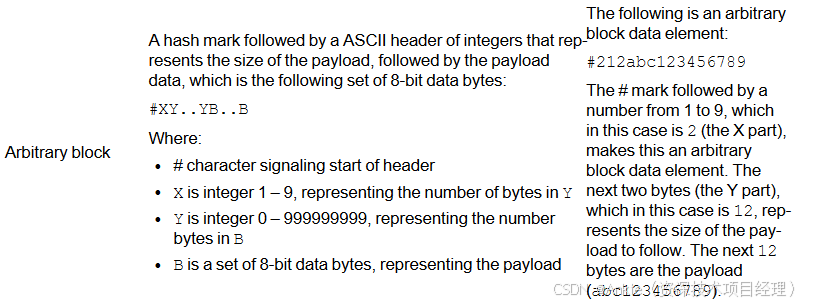
UWB:litepoint获取txquality里面的NRMSE
在使用litepoint测试UWB,获取txquality里面的NRMSE时,网页端可以正常获取NRMSE。但是通过SCPI 命令来获取NRMSE一直出错。 NRMSE数据类型和pyvisa问题: 参考了user guide,发现NRMSE的数值是ARBITRARY_BLOCK FLOAT,非string。 pyvisa无法解析会返回错误。 查询了各种办法…...
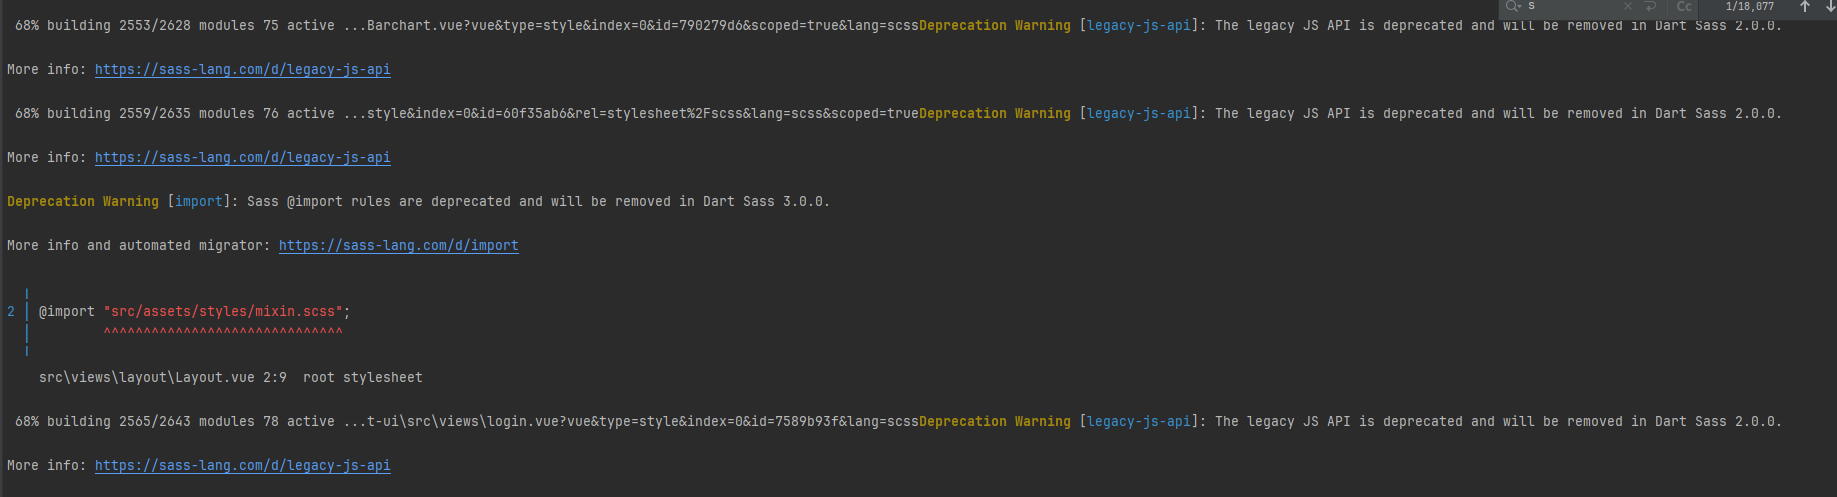
VUE npm ERR! code ERESOLVE, npm ERR! ERESOLVE could not resolve, 错误有效解决
VUE : npm ERR! code ERESOLVE npm ERR! ERESOLVE could not resolve 错误有效解决 npm install 安装组件的时候出现以上问题,npm版本问题报错解决方法:用上述方法安装完成之后又出现其他的问题 npm install 安装组件的时候出现以上问题&…...
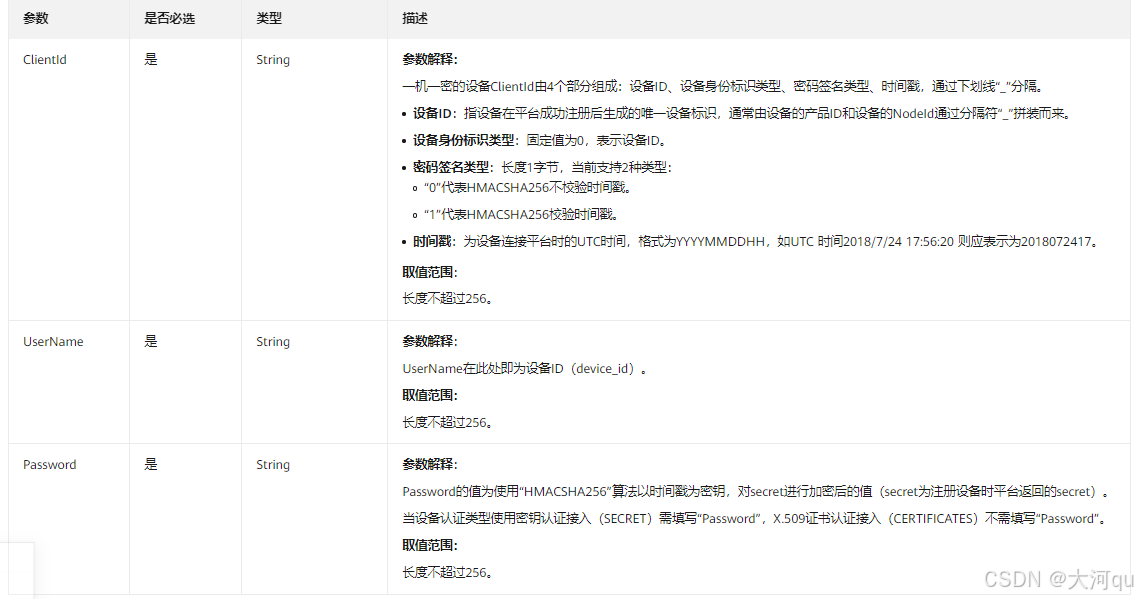
IoT/HCIP实验-1/物联网开发平台实验Part1(快速入门,MQTT.fx对接IoTDA)
文章目录 实验介绍设备接入IoTDA进入IoTDA平台什么是IoTDA 开通服务创建产品和设备定义产品模型(Profile)设备注册简思(实例-产品-设备) 模拟.与平台通信虚拟设备/MQTT.fx应用 Web 控制台QA用户或密码错误QA证书导致的连接失败设备与平台连接成功 上报数…...
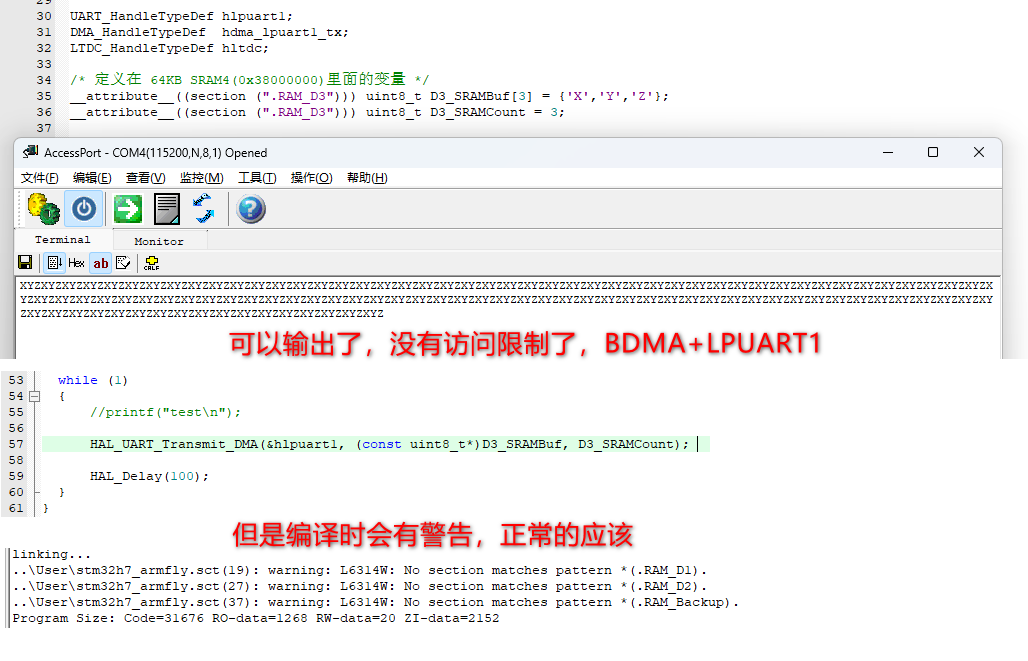
DMA STM32H7 Domains and space distrubution
DMA这个数据搬运工,对谁都好,任劳任怨,接受雇主设备的数据搬运业务。每天都忙碌着!哈哈哈。 1. DMA 不可能单独工作,必须接收其他雇主的业务,所以数据搬运业务的参与者是DMA本身和业务需求发起者。 2. 一…...

洪水危险性评价与风险防控全攻略:从HEC-RAS数值模拟到ArcGIS水文分析,一键式自动化工具实战,助力防洪减灾与应急管理
🔍 洪水淹没危险性是洪水损失评估、风险评估及洪水应急和管理规划等工作的重要基础。当前,我国正在开展的自然灾害风险普查工作,对洪水灾害给予了重点关注,提出了对洪水灾害危险性及风险评估的明确要求。洪水危险性及风险评估通常…...

Gemini Pro 2.5 输出
好的,我已经按照您的要求,将顶部横幅提示消息修改为右下角的 Toast 样式通知。 以下是涉及更改的文件及其内容: 1. my/src/html-ui.js 移除了旧的 #message-area div。在 <body> 底部添加了新的 #toast-container div 用于存放 Toas…...

SQL Server 和 MySQL 对比
下面是 SQL Server 和 MySQL 的详细对比,从功能、性能、成本、生态等多个维度展开,帮助你判断在什么情况下该选择哪一个。 ✅ 总览对比表 维度SQL ServerMySQL开发公司微软(Microsoft)Oracle(2008年起)是否…...
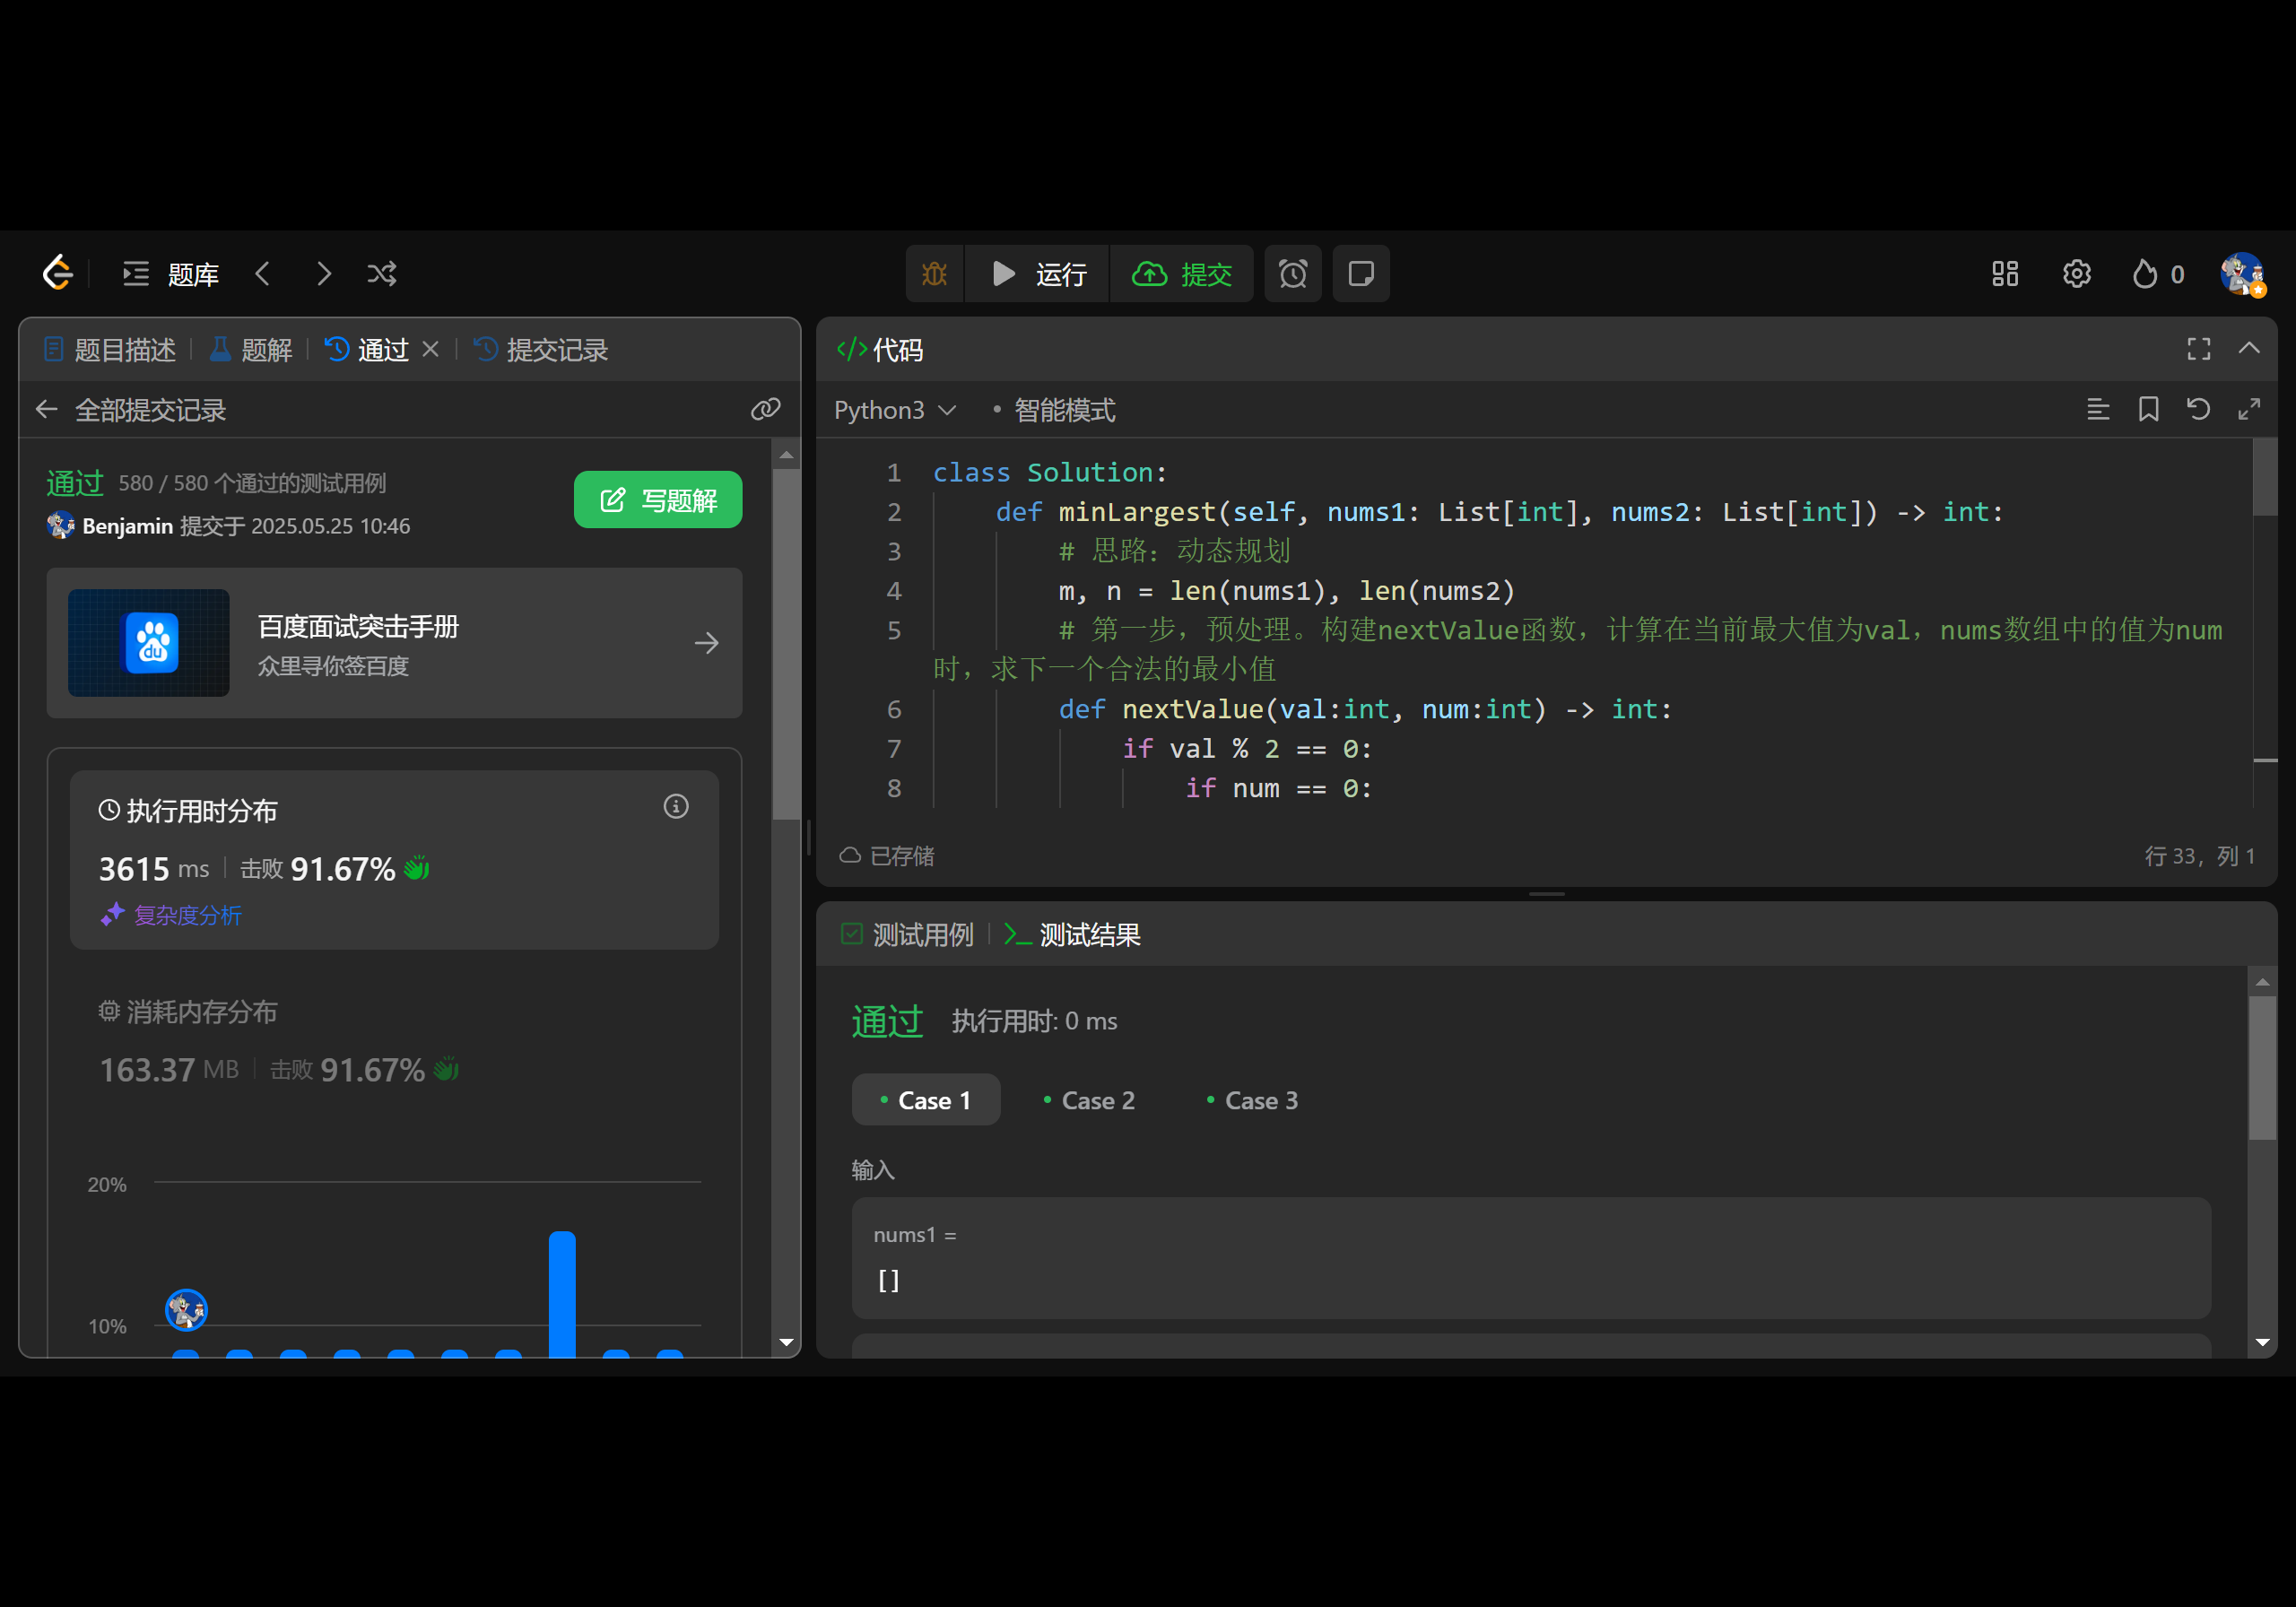
Leetcode 3269. 构建两个递增数组
1.题目基本信息 1.1.题目描述 给定两个只包含 0 和 1 的整数数组 nums1 和 nums2,你的任务是执行下面操作后使数组 nums1 和 nums2 中 最大 可达数字 尽可能小。 将每个 0 替换为正偶数,将每个 1 替换为正奇数。在替换后,两个数组都应该 递…...

三轴云台之积分分离PID控制算法篇
一、核心原理 积分分离PID控制的核心在于动态调整积分项的作用,以解决传统PID在三轴云台应用中的超调、振荡问题: 大误差阶段(如云台启动或快速调整时): 关闭积分项,仅使用比例(P)…...

【Elasticsearch】scripted_upsert
在 Elasticsearch 中,scripted_upsert 是一个用于更新操作的参数,它允许在文档不存在时通过脚本初始化文档内容,而不是直接使用 upsert 部分的内容。这种方式提供了更灵活的文档创建和更新逻辑。 scripted_upsert 的工作原理 当设置 scripte…...

uv - 一个现代化的项目+环境管理工具
参考: 【uv】Python迄今最好的项目管理环境管理工具(吧?)_哔哩哔哩_bilibili 项目需求 想象,每次创建一个项目的时候,我们需要去写 README. md, .git 仓库, .gitignore,你会感觉很头大 对于 …...

经典密码学和现代密码学的结构及其主要区别(2)维吉尼亚密码—附py代码
Vigenre cipher 维吉尼亚密码 维吉尼亚密码由布莱斯德维吉尼亚在 16 世纪发明,是凯撒密码的一个更复杂的扩展。它是一种多字母替换密码,使用一个关键字来确定明文中不同字母的多个移位值。 与凯撒密码不同,凯撒密码对所有字母都有固定的偏移…...

Elasticsearch 节点角色详解及协调节点请求策略
引言 Elasticsearch 集群中的节点可以承担多种角色,如主节点、数据节点、预处理节点和协调节点。合理配置和理解这些节点角色,对于保障集群的高可用性、性能优化以及请求调度至关重要。本文将深入解析各类节点的职责与配置方式,并介绍如何通…...

视频逐帧提取图片的工具
软件功能:可以将视频逐帧提取图片,可以设置每秒提取多少帧,选择提取图片质量测试环境:Windows 10软件设置:由于软件需要通过FFmpeg提取图片,运行软件前请先设置FFmpeg,具体步骤 1. 请将…...
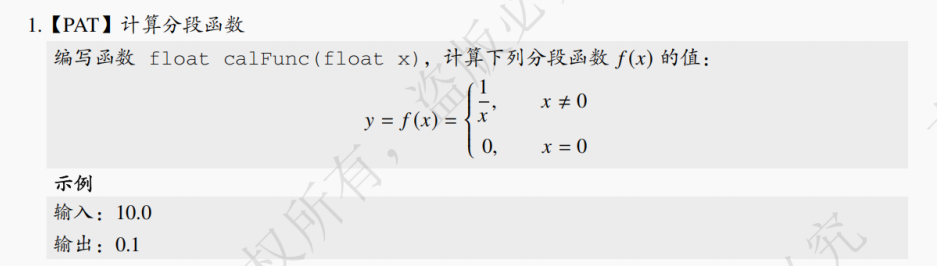
数据结构第1章编程基础 (竟成)
第 1 章 编程基础 1.1 前言 因为数据结构的代码大多采用 C 语言进行描述。而且,408 考试每年都有一道分值为 13 - 15 的编程题,要求使用 C/C 语言编写代码。所以,本书专门用一章来介绍 408 考试所需的 C/C 基础知识。有基础的考生可以快速浏览…...

互联网大厂Java求职面试:AI大模型与云原生架构融合中的挑战
互联网大厂Java求职面试:AI大模型与云原生架构融合中的挑战 在互联网大厂的Java求职面试中,面试官往往以技术总监的身份,针对候选人对AI、大模型应用集成、云原生和低代码等新兴技术的理解与实践能力进行考察。以下是一个典型的面试场景&…...

msql的乐观锁和幂等性问题解决方案
目录 1、介绍 2、乐观锁 2.1、核心思想 2.2、实现方式 1. 使用 version 字段(推荐) 2. 使用 timestamp 字段 2.3、如何处理冲突 2.4、乐观锁局限性 3、幂等性 3.1、什么是幂等性 3.2、乐观锁与幂等性的关系 1. 乐观锁如何辅助幂等性…...

Python 实现桶排序详解
1. 核心原理 桶排序是一种非比较型排序算法,通过将数据分配到多个“桶”中,每个桶单独排序后再合并。其核心步骤包括: 分桶:根据元素的范围或分布,将数据分配到有限数量的桶中。桶内排序:对每个非空桶内的…...
——编码器(Encoder)、解码器(Decoder))
大模型(5)——编码器(Encoder)、解码器(Decoder)
文章目录 一、编码器(Encoder)1. 核心作用2. 典型结构(以Transformer为例)3. 应用场景 二、解码器(Decoder)1. 核心作用2. 典型结构(以Transformer为例)3. 应用场景 三、编码器与解码…...

Web3怎么本地测试连接以太坊?
ETHEREUM_RPC_URLhttps://sepolia.infura.io/v3/你的_INFURA_API_KEY 如果你没有 Infura Key,注册 Infura 或 Alchemy,拿一个免费测试网节点就行: Infura:https://infura.io Alchemy:Alchemy - the web3 developme…...
)
Vue-02 (使用不同的 Vue CLI 插件)
使用不同的 Vue CLI 插件 Vue CLI 插件扩展了 Vue 项目的功能,让你可以轻松集成 TypeScript、Vuex、路由等功能。它们可以自动进行配置和设置,从而节省您的时间和精力。了解如何使用这些插件对于高效的 Vue 开发至关重要。 了解 Vue CLI 插件 Vue CLI…...

理解vue-cli 中进行构建优化
在 Vue CLI 项目中进行构建优化,是前端性能提升的重要手段。它涉及到 Webpack 配置、代码分包、懒加载、依赖优化、图片压缩等多个方面。 🧱 基础构建优化 设置生产环境变量 NODE_ENVproduction Vue CLI 会自动在 npm run build 时开启以下优化&…...
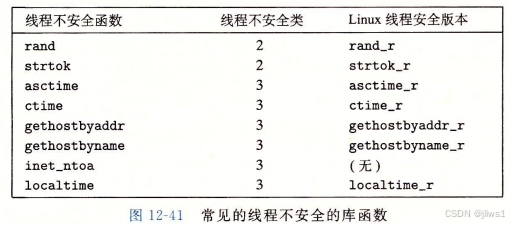
理解计算机系统_线程(九):线程安全问题
前言 以<深入理解计算机系统>(以下称“本书”)内容为基础,对程序的整个过程进行梳理。本书内容对整个计算机系统做了系统性导引,每部分内容都是单独的一门课.学习深度根据自己需要来定 引入 接续理解计算机系统_线程(八):并行-CSDN博客,内容包括12.7…...