C++复刻:[流光按钮]+[悬浮波纹按钮]
目录
- 参考
- 效果
- 实现
- main.cpp
- dialog.h
- dialog.cpp
- flowingRayButton.h 流动光线按钮
- flowingRayButton.cpp 流动光线按钮
- hoveringRippleButton.h 悬浮波纹按钮
- hoveringRippleButton.cpp 悬浮波纹按钮
- 模糊知识点
- 源码
参考
Python版本:GitHub地址
B站主页
效果
实现
main.cpp
#include "dialog.h"
#include <QApplication>
int main(int argc, char *argv[])
{QApplication a(argc, argv);Dialog w;w.show();return a.exec();
}
dialog.h
dialog.cpp
#include "dialog.h"
#include "flowingRayButton.h"
#include "hoveringRippleButton.h"
#pragma execution_character_set("utf-8")
Dialog::Dialog(QWidget *parent): QDialog(parent)
{//隐藏最大化按钮|置顶setWindowFlags(this->windowFlags()& ~Qt::WindowMaximizeButtonHint|Qt::WindowStaysOnTopHint);this->resize(800, 800);this->setStyleSheet("background:#000000");// 流动光线按钮FlowingRayButton *a1 = new FlowingRayButton(this);a1->setGeometry(QRect(200, 100, 440, 140));a1->setBorder(6);auto w =new QWidget(this);w->setGeometry(0,270,this->width(),this->height());w->setStyleSheet("background: qlineargradient(x1:0, y1:0, x2:1, y2:0, stop:0 #00bd39, ""stop:0.1 #00b844, stop:0.2 #00b44f, stop:0.3 #00af59, stop:0.4 #00aa64, ""stop:0.5 #01a66f, stop:0.6 #01a17a, stop:0.7 #019c84, stop:0.8 #01988f, ""stop:0.9 #01939a);");FlowingRayButton *a2 = new FlowingRayButton(this);a2->setGeometry(QRect(200, 300, 440, 140));/* Rborder-width 是一个自定义的属性,它不是官方的 CSS 属性;* Rborder-width 用于样式表中不会产生任何影响。可以忽略警告Unknown property Rborder-width*/a2->setStyleSheet("QFrame{""	background-color: rgba(255, 255, 255,255);""	border:none;""	border-radius:10px;"" Rborder-width:10px;""}""QPushButton{border-radius: 15px;color:#ffffff;}");a2->setStyleSheetConfig();new HoveringRippleButton(this,QRect(200, 500, 440, 140), QSize(440, 140));
}Dialog::~Dialog()
{
}
flowingRayButton.h 流动光线按钮
#ifndef FLOWINGRAYBUTTON_H
#define FLOWINGRAYBUTTON_H#include <QFrame>
#include <QPushButton>
#include <QWidget>
#include <QLineEdit>
#include <QGraphicsBlurEffect>
#include <QRect>
#include <QSize>
#include <Qt>
#include <QTimer>
#include <QParallelAnimationGroup>
#include <QPropertyAnimation>
#include <QEasingCurve>
#include <QPoint>
#include <QSequentialAnimationGroup>
#include <QAbstractAnimation>
#include <QRegularExpression>
#include <QBrush>
#include <QColor>
#include <QCursor>
#include <QFont>
#include <QPainter>
#include <QPainterPath>
#include <QLinearGradient>
#include <QDebug>
// 流动光线按钮
class FlowingRayButton : public QFrame
{Q_OBJECT
public:FlowingRayButton(QWidget *parent = nullptr);~FlowingRayButton();void setBorder(int border = 5); // 设置按钮在QFrame中的大小void setStyleSheetConfig();     // 根据样式重新配置(解析样式设置)QPushButton *getFlowingRayButton();
private:QPushButton *m_pPushButton;int border_radius;              // 边框圆角int border;                     // 边界QTimer *m_pTimer;int rect_1_offset;              //int rect_2_offset;int rect_1_start;int rect_2_start;int init_x;int flag;void initUI();void initAnimationConfig();     // 初始化动画配置void enterEvent(QEvent *event) override;//重写处理鼠标光标进入部件的事件void leaveEvent(QEvent *event) override;//重写处理鼠标光标离开部件的事件void paintEvent(QPaintEvent *event) override;//重写绘制事件private slots:void offsetUpdate();            // 偏移更新
};#endif // FLOWINGRAYBUTTON_H
flowingRayButton.cpp 流动光线按钮
#include "flowingRayButton.h"
// 流动光线按钮
FlowingRayButton::FlowingRayButton(QWidget *parent): QFrame(parent)
{border_radius=10;border=5;initUI();
}FlowingRayButton::~FlowingRayButton()
{}void FlowingRayButton::initUI()
{this->resize(300, 100);this->setStyleSheet("QFrame{""	background-color: rgba(255, 255, 255,0);""	border:none;""	border-radius:10px;"" Rborder-width:5px;""}""QPushButton{border-radius: 5px;color:#ff0066;}");m_pPushButton = new QPushButton(this);setBorder();QFont font;font.setPointSize(25);m_pPushButton->setFont(font);m_pPushButton->setText("Start Coding");m_pTimer = new QTimer(this);m_pTimer->setInterval(10);      //间隔毫秒connect(m_pTimer, SIGNAL(timeout()), this, SLOT(offsetUpdate()));initAnimationConfig();
}void FlowingRayButton::setBorder(int border)
{int btn_width = this->width() - border * 2;int btn_height = this->height() - border * 2;int btn_x = border;int btn_y = border;m_pPushButton->setGeometry(QRect(btn_x, btn_y, btn_width, btn_height));
}// 根据样式重新配置(解析样式设置)
void FlowingRayButton::setStyleSheetConfig()
{/*匹配规则;* 注意:正则表达式在找到第一个匹配项后就会停止查找,所以它不会再次匹配。* 从头开始查找匹配 border-radius: 的部分,然后尝试匹配一个或多个数字字符 (\\d+),而后匹配 px;* 使用 \\s* 来匹配可能存在的空格字符,包括零个或多个空格;* \\d+表示匹配一个或多个数字字符* 使用 (?P<border_radius>\\d+) 来匹配 border-radius 后面的数字,并将其命名为 border_radius;*/QRegularExpression radius_match("border-radius:\\s*(?P<border_radius>\\d+)px;");QRegularExpressionMatch radius_result = radius_match.match(this->styleSheet());if (radius_result.hasMatch()){//提取捕获组中命名为 border_radius的内容border_radius = radius_result.captured("border_radius").toInt();}QRegularExpression Rborder_width_match("Rborder-width:\\s*(?P<Rborder_width>\\d+)px;");QRegularExpressionMatch Rborder_width_result = Rborder_width_match.match(this->styleSheet());if (Rborder_width_result.hasMatch()) {border = Rborder_width_result.captured("Rborder_width").toInt();}// 根据样式重新配置QPushButton边界setBorder(border);initAnimationConfig();
}// 初始化动画配置
void FlowingRayButton::initAnimationConfig()
{rect_1_offset = 0;rect_2_offset = 0;rect_1_start = 0;rect_2_start = -this->width();init_x = -this->width();flag = 0;
}// 偏移更新
void  FlowingRayButton::offsetUpdate()
{if(rect_1_offset >= this->width()&&flag==0) {rect_1_offset = 0;rect_1_start = init_x;flag=1;}if(rect_1_offset >= this->width()*2&&flag==1) {rect_1_offset = 0;rect_1_start = init_x;}if (rect_2_offset >= this->width() * 2) {rect_2_offset = 0;rect_2_start = init_x;}rect_1_offset += 3;rect_2_offset += 3;update();
}//重写处理鼠标光标进入部件的事件
void FlowingRayButton::enterEvent(QEvent *event)
{m_pTimer->start();// 调用父类的 enterEvent 函数,以保持默认行为QFrame::enterEvent(event);
}//重写处理鼠标光标离开部件的事件
void FlowingRayButton::leaveEvent(QEvent *event)
{m_pTimer->stop();// 调用父类的 leaveEvent 函数,以保持默认行为QFrame::leaveEvent(event);
}//重写绘制事件
void FlowingRayButton::paintEvent(QPaintEvent *event)
{// 调用父类的 paintEvent 函数,以保持默认行为QFrame::paintEvent(event);QPainterPath path;//添加一个带有圆角的矩形路径path.addRoundedRect(0, 0, this->width(), this->height(), border_radius, border_radius);QPainter painter(this);//设置渲染提示; QPainter::Antialiasing 是一种渲染提示,用于抗锯齿绘制,使得图形边缘更加平滑painter.setRenderHint(QPainter::Antialiasing);//设置画笔; Qt::NoPen 表示不使用画笔,也就是不绘制边框painter.setPen(Qt::NoPen);//设置剪裁路径,即限制绘制区域为指定的路径范围内painter.setClipPath(path);//线性渐变QLinearGradient gradient_1(rect_1_start + rect_1_offset, 0, rect_1_start + rect_1_offset + this->width(), 0);//在(0,1)之间设置颜色的渐变过程,将一个颜色逐渐过渡到另一个gradient_1.setColorAt(0, QColor(0, 164, 128, 230));gradient_1.setColorAt(0.166, QColor(13, 88, 166, 230));gradient_1.setColorAt(0.333, QColor(118, 8, 170, 230));gradient_1.setColorAt(0.5, QColor(255, 144, 0, 230));gradient_1.setColorAt(0.666, QColor(255, 255, 0, 230));gradient_1.setColorAt(0.833, QColor(165, 239, 0, 230));gradient_1.setColorAt(1, QColor(83, 223, 0, 230));painter.setBrush(gradient_1);painter.drawRect(rect_1_start + rect_1_offset, 0, this->width(), this->height());QLinearGradient gradient_2(rect_2_start + rect_2_offset, 0,rect_2_start + rect_2_offset + this->width(), 0);gradient_2.setColorAt(0, QColor(0, 164, 128, 230));gradient_2.setColorAt(0.166, QColor(13, 88, 166, 230));gradient_2.setColorAt(0.333, QColor(118, 8, 170, 230));gradient_2.setColorAt(0.5, QColor(255, 144, 0, 230));gradient_2.setColorAt(0.666, QColor(255, 255, 0, 230));gradient_2.setColorAt(0.833, QColor(165, 239, 0, 230));gradient_2.setColorAt(1, QColor(83, 223, 0, 230));painter.setBrush(gradient_2);painter.drawRect(rect_2_start + rect_2_offset, 0, this->width(), this->height());}QPushButton *FlowingRayButton::getFlowingRayButton()
{return m_pPushButton;
}
hoveringRippleButton.h 悬浮波纹按钮
#ifndef HOVERINGRIPPLEBUTTON_H
#define HOVERINGRIPPLEBUTTON_H#include <QFrame>
#include <QFrame>
#include <QPushButton>
#include <QWidget>
#include <QPainter>
#include <QPainterPath>
#include <QTimer>
#include <QMouseEvent>
#include <QPropertyAnimation>
#include <QtCore/qmath.h>//悬浮波纹按钮
class HoveringRippleButton : public QFrame
{Q_OBJECT
public:HoveringRippleButton(QWidget *parent = nullptr);HoveringRippleButton(QWidget *parent = nullptr, const QRect &geometry = QRect(), const QSize &minSize = QSize());~HoveringRippleButton();private:QRect geometry;QSize minSize;QPushButton *m_pPushButton;int corner_radius;              // 按钮的圆角半径int radius_var;                 // 半径变化值int radius;                     // 起始半径qreal max_radius;               // 最大半径QPoint center;                  // 鼠标点击坐标QColor color;                   // 填充颜色int msec;                       // 定时时间QTimer *m_pTimer;void initUI();void initAnimationConfig();     // 初始化动画配置void enterEvent(QEvent *event) override;//重写处理鼠标光标进入部件的事件void leaveEvent(QEvent *event) override;//重写处理鼠标光标离开部件的事件void paintEvent(QPaintEvent *event) override;//重写绘制事件
private slots:void incRadius();void decRadius();};#endif // HOVERINGRIPPLEBUTTON_H
hoveringRippleButton.cpp 悬浮波纹按钮
#include "hoveringRippleButton.h"
#pragma execution_character_set("utf-8")
//悬浮波纹按钮
HoveringRippleButton::HoveringRippleButton(QWidget *parent): QFrame(parent)
{geometry=QRect(0,0,100,50);minSize =QSize(100,50);initUI();
}HoveringRippleButton::HoveringRippleButton(QWidget *parent, const QRect &geometry, const QSize &minSize): QFrame(parent), geometry(geometry), minSize(minSize)
{initUI();
}HoveringRippleButton::~HoveringRippleButton()
{}void HoveringRippleButton::initUI()
{setMinimumSize(minSize);setStyleSheet("QFrame{""	background-color: rgb(46, 22, 177);""	border:none;""	border-radius:10px;""}""QPushButton{""	background-color: rgba(255, 255, 255, 0);""	color: rgb(255, 255, 255);""}");m_pPushButton = new QPushButton(this);m_pPushButton->setMinimumSize(minSize);m_pPushButton->setFixedSize(QSize(width(), height()));QFont font;font.setPointSize(25);m_pPushButton->setFont(font);m_pPushButton->setText("悬浮会变色喔");setGeometry(geometry);initAnimationConfig();
}void HoveringRippleButton::initAnimationConfig()
{corner_radius = 10;                                     // 按钮的圆角半径radius_var = 2;                                         // 半径变化值radius = 0;                                             // 起始半径max_radius = qSqrt(width() * width() + height() * height());  // 最大半径center = QPoint();                                       // 鼠标点击坐标color = QColor(255, 89, 0);                              // 填充颜色msec = 10;                                               // 定时时间m_pTimer = new QTimer(this);m_pTimer->setInterval(msec);connect(m_pTimer,SIGNAL(timeout()), this, SLOT(incRadius()));
}//重写处理鼠标光标进入部件的事件
void HoveringRippleButton::enterEvent(QEvent *event)
{// 调用父类的 enterEvent 函数,以保持默认行为QFrame::enterEvent(event);/* QCursor::pos() 获取当前鼠标的全局坐标* mapFromGlobal()将全局坐标转换为窗口内部相对坐标*/center = mapFromGlobal(QCursor::pos());m_pTimer->disconnect();connect(m_pTimer, SIGNAL(timeout()), this, SLOT(incRadius()));m_pTimer->start();
}//重写处理鼠标光标离开部件的事件
void HoveringRippleButton::leaveEvent(QEvent *event)
{// 调用父类的 leaveEvent 函数,以保持默认行为QFrame::leaveEvent(event);center = mapFromGlobal(QCursor::pos());m_pTimer->disconnect();connect(m_pTimer, SIGNAL(timeout()), this, SLOT(decRadius()));m_pTimer->start();
}//重写绘制事件
void HoveringRippleButton::paintEvent(QPaintEvent *event)
{// 调用父类的 paintEvent 函数,以保持默认行为QFrame::paintEvent(event);if (center.isNull()) {return;}QPainter painter(this);//设置渲染提示; QPainter::Antialiasing 是一种渲染提示,用于抗锯齿绘制,使得图形边缘更加平滑painter.setRenderHint(QPainter::Antialiasing);QBrush brush(color);painter.setBrush(brush);//设置画笔; Qt::NoPen 表示不使用画笔,也就是不绘制边框painter.setPen(Qt::NoPen);QPainterPath path;//添加一个带有圆角的矩形路径path.addRoundedRect(rect(), corner_radius, corner_radius);//设置剪裁路径,即限制绘制区域为指定的路径范围内painter.setClipPath(path);//绘制椭圆(长轴==长轴,就圆形)painter.drawEllipse(center, radius, radius);
}void HoveringRippleButton::incRadius()
{radius += radius_var;if (radius > max_radius) {m_pTimer->stop();return;}update();
}void HoveringRippleButton::decRadius()
{radius -= radius_var;if (radius < 0) {m_pTimer->stop();return;}update();
}
模糊知识点
- 使用
QRegularExpression对象的match()函数,可以将正则表达式应用于目标文本,并检查是否存在匹配项;QRegularExpressionMatch类存储匹配结果,并提供方法来访问和提取捕获组中的具体内容。
 /*匹配规则;* 注意:正则表达式在找到第一个匹配项后就会停止查找,所以它不会再次匹配。* 从头开始查找匹配 border-radius: 的部分,然后尝试匹配一个或多个数字字符 (\\d+),而后匹配 px;* 使用 \\s* 来匹配可能存在的空格字符,包括零个或多个空格;* \\d+表示匹配一个或多个数字字符* 使用 (?P<border_radius>\\d+) 来匹配 border-radius 后面的数字,并将其命名为 border_radius;*/
QRegularExpression radius_match("border-radius:\\s*(?P<border_radius>\\d+)px;");
QRegularExpressionMatch radius_result = radius_match.match(this->styleSheet());
if (radius_result.hasMatch())
{//提取捕获组中命名为 border_radius的内容border_radius = radius_result.captured("border_radius").toInt();
}
QPainterPath用于绘制复杂图形路径的类;QPainter::setClipPath()设置剪裁路径,即限制绘制区域为指定的路径范围内
 QPainterPath path;
//添加一个带有圆角的矩形路径
path.addRoundedRectaddRoundedRect(qreal x, qreal y, qreal w, qreal h, qreal xRadius, qreal yRadius, Qt::SizeMode mode);QPainter painter(this);
//设置渲染提示; QPainter::Antialiasing 是一种渲染提示,用于抗锯齿绘制,使得图形边缘更加平滑
painter.setRenderHint(QPainter::Antialiasing);
//设置画笔; Qt::NoPen 表示不使用画笔,也就是不绘制边框
painter.setPen(Qt::NoPen);
//设置剪裁路径,即限制绘制区域为指定的路径范围内
painter.setClipPath(path);
QCursor::pos()获取当前鼠标的全局坐标
mapFromGlobal()将全局坐标转换为窗口内部相对坐标
QPoint mapFromGlobal(QCursor::pos());
源码
Gitee:06AnimationButton C++复刻:[流光按钮]+[悬浮波纹按钮]
相关文章:
C++复刻:[流光按钮]+[悬浮波纹按钮]
目录 参考效果实现main.cppdialog.hdialog.cppflowingRayButton.h 流动光线按钮flowingRayButton.cpp 流动光线按钮hoveringRippleButton.h 悬浮波纹按钮hoveringRippleButton.cpp 悬浮波纹按钮模糊知识点 源码 参考 Python版本:GitHub地址 B站主页 效果 实现 ma…...
CompletableFuture 详解
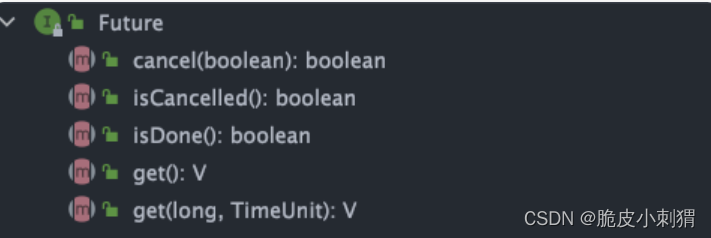
目录 简单介绍 常见操作 创建 CompletableFuture new 关键字 静态工厂方法 处理异步结算的结果 简单介绍 CompletableFuture 同时实现了 Future 和 CompletionStage 接口。 public class CompletableFuture<T> implements Future<T>, CompletionStage<T…...
el-table数据处理
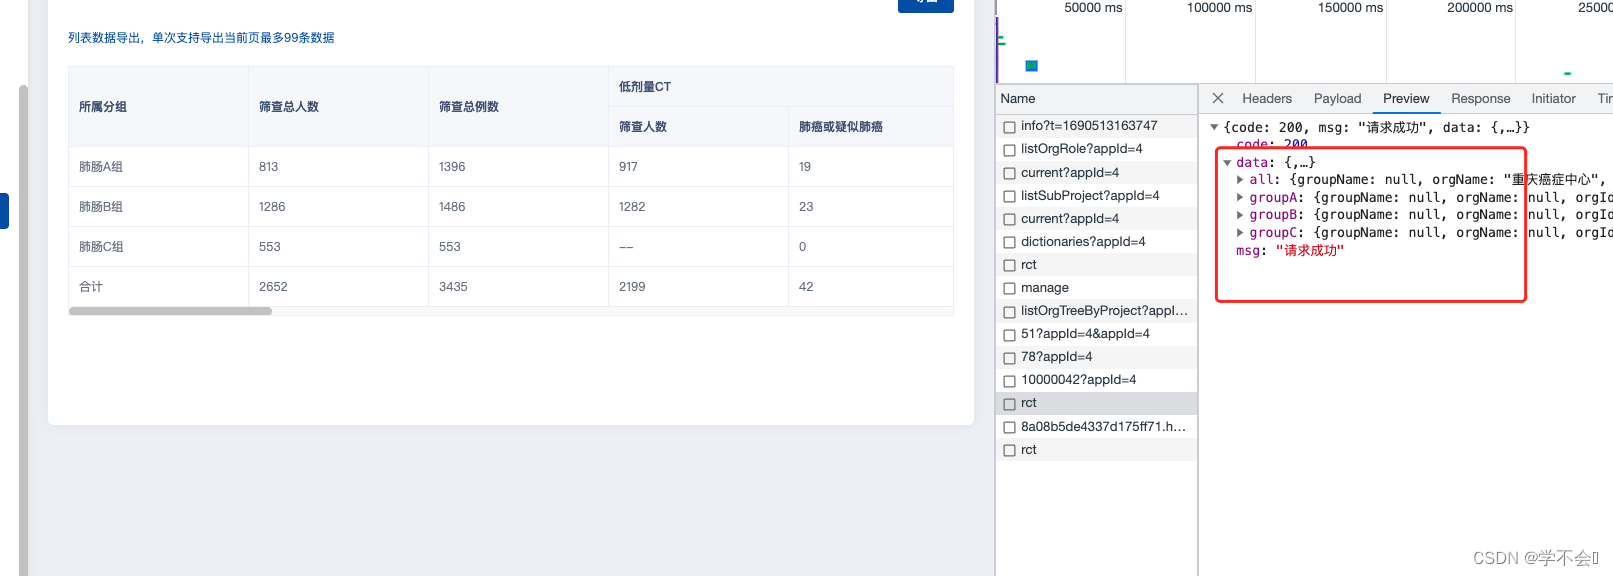
在写表格时遇到,后端返回的数据是对象,并且缺少字段 1.每一条数据加上 一个字段 2.将对象转成数组 以下是数据 {"groupA": {"groupName": null,"orgName": null,"orgId": null,"allPeoper": &quo…...

IPv4网络用户访问IPv6网络服务器
NAT64静态映射为一对一的对应关系,通常应用在IPv4网络主动访问IPv6网络的场景中。 要求位于IPv4网络中的PC通过IPv4地址1.1.1.10能够直接访问位于IPv6网络中Server。 操作步骤 配置FW。 # 配置接口GigabitEthernet 0/0/1的IPv4地址。 <FW> system-view [F…...

程序员是怎么记住代码的?
程序员能记住所有东西吗? 程序员不会记住他们使用的所有代码,相反,他们倾向于阅读文档,学习基本概念,并使用软件社区来解决问题。大约55%的软件开发人员报告每天至少使用一次StackOverflow来帮助解决编程问题。 使用…...
华为云NFS使用API删除大文件目录
最近在使用华为云SFS时,如果一个目录存储文件数超过100W,执行 “rm -rf path”时,存在删不动的情况,可以使用华为云API接口,执行异步删除。 华为官网: 删除文件系统目录_弹性文件服务 SFS_API参考_SFS Tu…...

国家金融监督管理总局明确将数据安全管理纳入操作风险管理范畴
为进一步完善银行保险机构操作风险监管规则,提升银行保险机构的操作风险管理水平,国家金融监督管理总局起草了《银行保险机构操作风险管理办法(征求意见稿)》(以下简称《办法》),现向社会公开征…...

.asScala爆红
转载:asScala报错 解决方案: 导入隐式转换 import scala.collection.JavaConverters._ //asScala需要使用隐式转换 代码中的asScala就可能不标红了,如果标红,就直接去掉,去掉就不报错了...
SOLIDWORKS Utilities应用
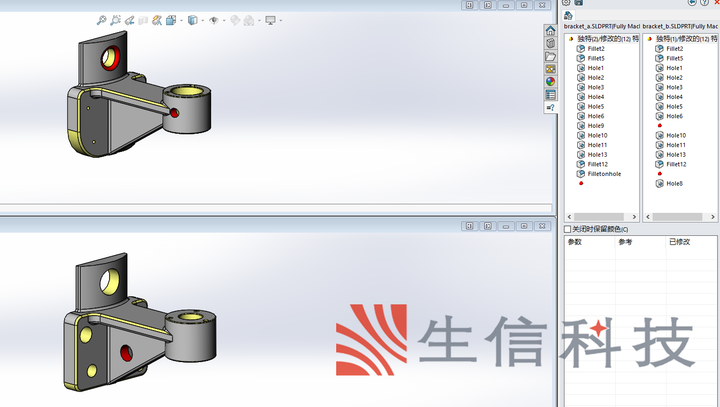
在实际的生产设计制造中,经常会遇到同一个零件多个版本,有可能再次调用零件的时间已经是很长时间之后,对于版本之间的区别就不会那么清楚,碰到简单明显的零件还可以轻松的找到区别,但是复杂的零件区别的查找可能会造成…...

发现的宝藏开源软件
1.华夏erp https://github.com/jishenghua/jshERP 2.s2b2c商城 后端 lilishop商城 电商 java商城系统: lilishop商城基于SpringBoot 全端开源 电商商城系统 支持小程序商城 H5商城 APP商城 PC商城 。支持业务模式包含 O2O商城 B2B商城 多语言商城 跨境电商 B2B2C商城 F2B2C商…...
【八】mybatis 日志模块设计
mybatis 日志模块设计 简介:闲来无事阅读一下mybatis的日志模块设计,学习一下优秀开源框架的设计思路,提升自己的编码能力 模块设计 在Mybatis内部定义了4个级别:Error:错误 、warn:警告、debug:调试、trance,日志优…...
Python-如何使用正则表达式
如何利用Python使用正则表达式 目录 正则表达式常用匹配规则 编辑re库的使用 match()方法: search()方法: findall()方法 : sub()方法: compile()方法; 通用匹配 贪婪与非贪婪匹配 贪婪匹配 非贪婪匹配 修饰符 转义匹配 正则表达式是处理字符的强大…...

分解质因子,将一个不小于2的整数分解质因数,例如,输入90,则输出:90=2*3*3*5
假设一个不小于2的整数n,对从2开始的自然数k,这个试探它是否是整数n的一个因子,如果是,则输出该因子,并将n/k的结果赋给n(接下来只需要对n除以已经找到的因子之后的结果继续找因子)。如果n的值不…...
C语言,vs各种报错分析(不断更新)
1.引发了异常: 写入访问权限冲突2.#error: Error in C Standard Library usage 1.引发了异常: 写入访问权限冲突 这里是malloc没有包含头文件<stdlib.h>,包含之后就好了 2.#error: Error in C Standard Library usage 这里就是用C语言写程序时使用了C的头文件…...
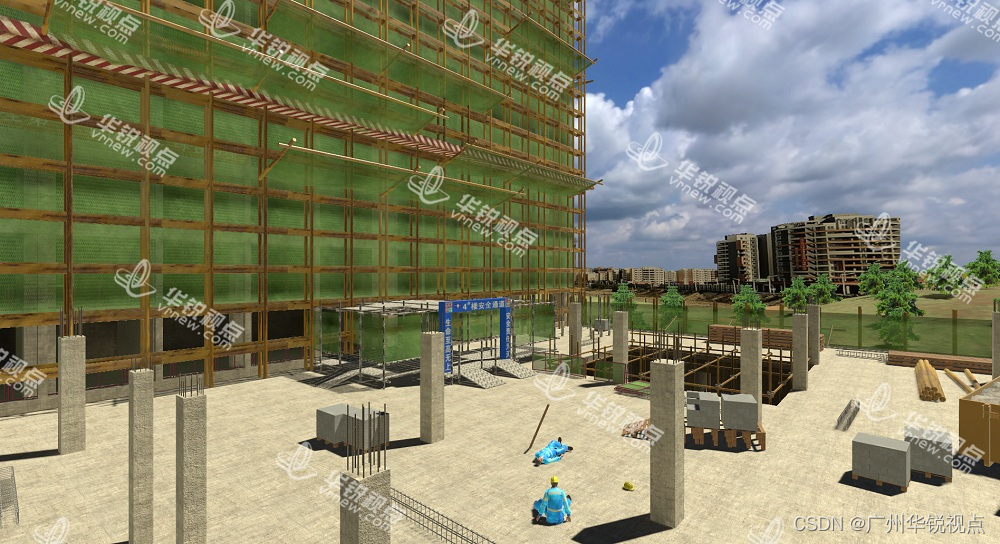
AR开发平台 | 探索AR技术在建筑设计中的创新应用与挑战
随着AR技术的不断发展和普及,越来越多的建筑师开始探索AR技术在建筑设计中的应用。AR(增强现实)技术可以通过将虚拟信息叠加到现实场景中,为设计师提供更加直观、真实的建筑可视化效果,同时也可以为用户带来更加沉浸式的体验。 AR开发平台广…...

小白到运维工程师自学之路 第六十集 (docker的概述与安装)
一、概述 1、客户(老板)-产品-开发-测试-运维项目周期不断延后,项目质量差。 随着云计算和DevOps生态圈的蓬勃发展,产生了大量优秀的系统和软件。软件开发人员可以自由选择各种软件应用环境。但同时带来的问题就是需要维护一个非…...

SpringBoot 集成 Elasticsearch
一、版本 spring-boot版本:2.3.7.RELEASEElasticsearch7.8.0版本说明详见 二、Elasticsearch 下载和安装 Elasticsearch 下载 kibana下载 ik分词器下载 配置IK分词器 2.1 解压,在elasticsearch-7.8.0\plugins 路径下新建ik目录 2.2 将ik分词器解压放…...

【ES】使用日志记录
1、修改操作 1、要删除Elasticsearch索引的分区下的数据 <index_name>是要删除数据的索引名称。这个命令会删除该索引下的所有数据。 POST /<index_name>/_delete_by_query {"query": {"match_all": {}} }2、删除特定条件下的数据 要删除a…...
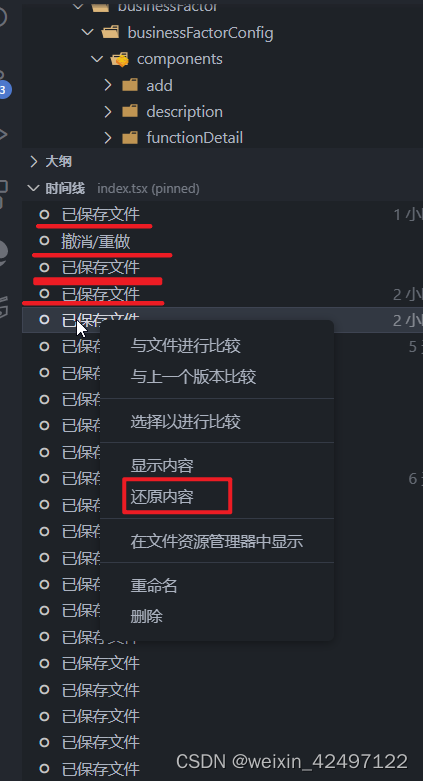
svn还原本地代码
svn代码还原 问题描述:在vscode中修改了代码,没有提交,而且不小心点击了svn更新,导致本地修改的最新代码被覆盖,因为没有提交,所以远程仓库中也没有刚才修改的代码记录 解决: 通过vscode的时间…...
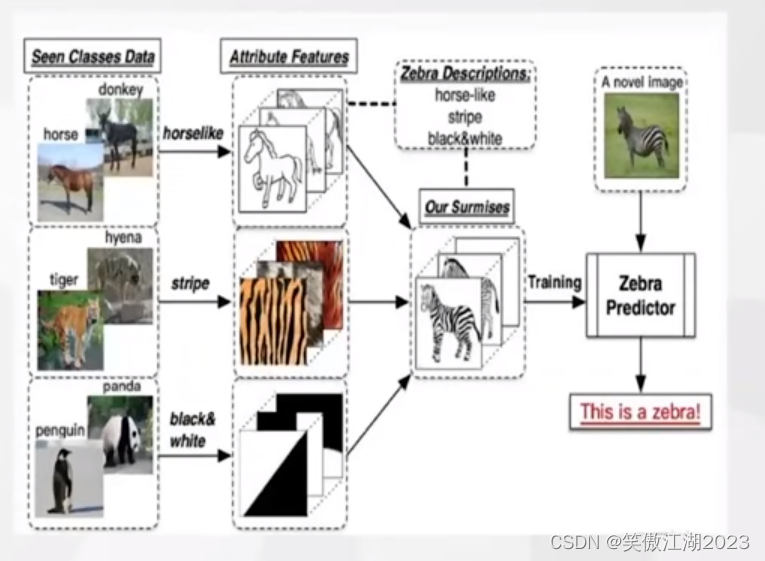
zore-shot,迁移学习和多模态学习
1.zero-shot 定义:在ZSL中,某一类别在训练样本中未出现,但是我们知道这个类别的特征,然后通过语料知识库,便可以将这个类别识别出来。概括来说,就是已知描述,对未知类别(未在训练集中…...

终极Illustrator脚本合集:10个免费工具彻底改变你的设计工作流
终极Illustrator脚本合集:10个免费工具彻底改变你的设计工作流 【免费下载链接】illustrator-scripts Adobe Illustrator scripts 项目地址: https://gitcode.com/gh_mirrors/il/illustrator-scripts 你是否曾经在Adobe Illustrator中花费数小时重复执行相同…...

3个跨设备方案:Playnite游戏库的移动化管理创新方法
3个跨设备方案:Playnite游戏库的移动化管理创新方法 【免费下载链接】Playnite Video game library manager with support for wide range of 3rd party libraries and game emulation support, providing one unified interface for your games. 项目地址: https…...

Phi-4-mini-reasoning保姆级教学:Windows WSL2环境部署全流程
Phi-4-mini-reasoning保姆级教学:Windows WSL2环境部署全流程 1. 模型介绍 Phi-4-mini-reasoning是微软推出的3.8B参数轻量级开源模型,专为数学推理、逻辑推导和多步解题等强逻辑任务设计。这个模型主打"小参数、强推理、长上下文、低延迟"的…...
)
YOLOv8鹰眼目标检测实战:一键部署,实时识别80种物体(附WebUI)
YOLOv8鹰眼目标检测实战:一键部署,实时识别80种物体(附WebUI) 1. 项目概述 1.1 什么是YOLOv8鹰眼目标检测 YOLOv8鹰眼目标检测是基于Ultralytics最新YOLOv8模型的工业级解决方案。它能够在毫秒级别完成图像中多达80类物体的识别…...

Python AI推理延迟骤降62%的秘密:一张未公开的Cuvil架构设计图,含3大专利级调度模块
第一章:Python AI推理延迟骤降62%的秘密:一张未公开的Cuvil架构设计图,含3大专利级调度模块Cuvil 架构并非传统加速器堆叠方案,而是一种面向 Python 原生执行栈深度协同的异构推理引擎。其核心突破在于绕过 PyTorch/TensorFlow 的…...

如何在5分钟内免费激活Windows和Office?KMS_VL_ALL_AIO智能脚本终极指南
如何在5分钟内免费激活Windows和Office?KMS_VL_ALL_AIO智能脚本终极指南 【免费下载链接】KMS_VL_ALL_AIO Smart Activation Script 项目地址: https://gitcode.com/gh_mirrors/km/KMS_VL_ALL_AIO 还在为Windows系统激活和Office办公软件激活而烦恼吗&#x…...

RAPTOR编程实战:从算法设计到图形化交互
1. RAPTOR入门:为什么它是最适合初学者的算法工具 第一次接触编程的人往往会被各种语法规则和复杂环境劝退。我教过不少零基础学生,发现他们最头疼的不是算法逻辑本身,而是记不住C的分号或者Python的缩进规则。这时候RAPTOR的优势就显现出来…...

DriverStore Explorer:释放20GB空间的Windows驱动管理神器
DriverStore Explorer:释放20GB空间的Windows驱动管理神器 【免费下载链接】DriverStoreExplorer Driver Store Explorer 项目地址: https://gitcode.com/gh_mirrors/dr/DriverStoreExplorer 你是否遇到过C盘空间莫名减少的情况?Windows系统在安装…...

IndexTTS2 V23应用案例:打造智能客服语音,让机器说话更有人情味
IndexTTS2 V23应用案例:打造智能客服语音,让机器说话更有人情味 1. 为什么智能客服需要情感语音? 在当今的客户服务场景中,冰冷的机械语音正在被市场淘汰。研究表明,带有适当情感的语音交互能显著提升用户体验&#…...

RAG集成:如何让你的企业知识库成为AI的“长期记忆”
核心命题:AI没有记忆,但你的知识库可以成为它的“外脑”。RAG(检索增强生成)是GEO的终极形态:让企业私有数据成为AI生成答案的唯一信源。引言:老陈的新困境——当AI“看见”了你的店,却“看不见…...