Spring笔记之Spring对IoC的实现
文章目录
- IoC控制反转
- 依赖注入
- set注入
- 注入外部Bean
- 注入内部Bean
- 注入简单类型
- 通过注入方式实现javax.sql.DateSource接口
- 测试简单类型
- 级联属性赋值(了解)
- 注入数组
- 注入List集合
- 注入Set集合
- 注入Map集合
- 注入Properties
- 注入null和空字符串
- 不给属性赋值
- 使用``
- 注入的值中含有特殊符号
- 转义字符
- CDATE
- 构造注入
- p命名空间注入
- c命名空间注入
- util命名空间
- 基于XML的自动装配
- 根据名称自动装配
- 根据类型自动装配
- Spring引入外部属性配置文件
IoC控制反转
- 控制反转是一种思想
- 控制反转是为了降低程序耦合度,提高程序扩展力,达到OCP原则,达到DIP原则。
- 控制反转,反转的是什么?
- 将对象的创建权力交出去,交给第三方容器负责
- 将对象和对象之间关系的维护权交出去,交给第三方容器负责
- 控制反转思想的实现方式:依赖注入(DI)
依赖注入
依赖注入实现了控制反转思想
Spring通过依赖注入的方式来完成Bean管理的
Bean管理说的是:Bean对象的创建,以及Bean对象中属性的赋值(或者叫做Bean对象之间关系的维护)
依赖注入:
- 依赖指的是对象和对象之间的关联关系。
- 注入指的是一种数据传递行为,通过注入行为来让对象和对象产生关系。
依赖注入常见的实现方式包括两种:
- 第一种:ser注入
- 第二种:构造注入
set注入
set注入,基于set方法实现的,底层会通过反射机制调用属性对应的set方法然后给属性赋值。这种方式要求属性必须对外提供set方法。
//UserDao
package com.powernode.spring6.dao;public class UserDao {public void insert(){System.out.println("正在保存用户数据。");}
}
//UserService
package com.powernode.spring6.service;import com.powernode.spring6.dao.UserDao;public class UserService {private UserDao userDao;// 使用set方式注入,必须提供set方法。// 反射机制要调用这个方法给属性赋值的。public void setUserDao(UserDao userDao) {this.userDao = userDao;}public void save(){userDao.insert();}
}
<!-- spring.xml -->
<?xml version="1.0" encoding="UTF-8"?>
<beans xmlns="http://www.springframework.org/schema/beans"xmlns:xsi="http://www.w3.org/2001/XMLSchema-instance"xsi:schemaLocation="http://www.springframework.org/schema/beans http://www.springframework.org/schema/beans/spring-beans.xsd"><bean id="userDaoBean" class="com.powernode.spring6.dao.UserDao"/><bean id="userServiceBean" class="com.powernode.spring6.service.UserService"><property name="userDao" ref="userDaoBean"/></bean></beans>
//test
public class DITest {@Testpublic void testSetDI(){ApplicationContext applicationContext = new ClassPathXmlApplicationContext("spring.xml");UserService userService = applicationContext.getBean("userServiceBean", UserService.class);userService.save();}
}
实现原理:
通过property标签获取到属性名:userDao
通过属性名推断出set方法名:setUserDao
通过反射机制调用setUserDao()方法给属性赋值
通过·property标签的name是属性名。
property标签的ref是要注入的bean对象的id(通过ref属性来完成bean的装配,这是bean最简单的一种装配方式。装配指的是:创建系统组件之间关联的动作)
底层时机调用了setUserDao()方法,所以需要确保这个方法存在
property标签的name是:setUserDao()方法名演变得到的。
演变规律:
- setUsername()演变为username
- setPassword()演变为password
- setUserDao()演变为userDao
- setUserService演变为userService
注入外部Bean
<?xml version="1.0" encoding="UTF-8"?>
<beans xmlns="http://www.springframework.org/schema/beans"xmlns:xsi="http://www.w3.org/2001/XMLSchema-instance"xsi:schemaLocation="http://www.springframework.org/schema/beans http://www.springframework.org/schema/beans/spring-beans.xsd"><bean id="userDaoBean" class="com.powernode.spring6.dao.UserDao"/><bean id="userServiceBean" class="com.powernode.spring6.service.UserService"><property name="userDao" ref="userDaoBean"/></bean></beans>
外部Bean的特点:bean定义到外面,在property标签中使用ref属性进行注入。
(好像没什么区别)
注入内部Bean
内部注入Bean的方式:在Bean标签中嵌套bean标签。
<?xml version="1.0" encoding="UTF-8"?>
<beans xmlns="http://www.springframework.org/schema/beans"xmlns:xsi="http://www.w3.org/2001/XMLSchema-instance"xsi:schemaLocation="http://www.springframework.org/schema/beans http://www.springframework.org/schema/beans/spring-beans.xsd"><bean id="userServiceBean" class="com.powernode.spring6.service.UserService"><property name="userDao"><bean class="com.powernode.spring6.dao.UserDao"/></property></bean>
</beans>
@Test
public void testInnerBean(){ApplicationContext applicationContext = new ClassPathXmlApplicationContext("spring-inner-bean.xml");UserService userService = applicationContext.getBean("userServiceBean", UserService.class);userService.save();
}
了解了解,用的不多
注入简单类型
我们在注入的时候,对象的属性是另一个对象,但是并没有涉及简单类型
package com.powernode.spring6.beans;public class User {private int age;public void setAge(int age) {this.age = age;}@Overridepublic String toString() {return "User{" +"age=" + age +'}';}
}
<?xml version="1.0" encoding="UTF-8"?>
<beans xmlns="http://www.springframework.org/schema/beans"xmlns:xsi="http://www.w3.org/2001/XMLSchema-instance"xsi:schemaLocation="http://www.springframework.org/schema/beans http://www.springframework.org/schema/beans/spring-beans.xsd"><bean id="userBean" class="com.powernode.spring6.beans.User"><!--如果像这种int类型的属性,我们称为简单类型,这种简单类型在注入的时候要使用value属性,不能使用ref--><!--<property name="age" value="20"/>--><property name="age"><value>20</value></property></bean>
</beans>
//test
@Test
public void testSimpleType(){ApplicationContext applicationContext = new ClassPathXmlApplicationContext("spring-simple-type.xml");User user = applicationContext.getBean("userBean", User.class);System.out.println(user);
}
给简单类型注入,只要用value标签或者value属性给它赋上值就行了
注意不是ref,ref译为参考,后面加的是个类名,参考这个类,就是它最后生成的样子就是这个类,参考这个类注入。
简单类型包括:
- 基本数据类型
- 基本数据类型对应的包装类
- String或其他的CharSequence子类
- Number子类
- Date子类(这玩意不好用,格式很复杂,正常人记不住)
- Enum子类
- URI
- URL
- Temporal子类
- Local
- Class
- 另外还包括以上简单类型对应的数组类型。
通过注入方式实现javax.sql.DateSource接口
//MyDataSource.java
package com.powernode.spring6.beans;import javax.sql.DataSource;
import java.io.PrintWriter;
import java.sql.Connection;
import java.sql.SQLException;
import java.sql.SQLFeatureNotSupportedException;
import java.util.logging.Logger;public class MyDataSource implements DataSource {private String driver;private String url;private String username;private String password;public void setDriver(String driver) {this.driver = driver;}public void setUrl(String url) {this.url = url;}public void setUsername(String username) {this.username = username;}public void setPassword(String password) {this.password = password;}@Overridepublic String toString() {return "MyDataSource{" +"driver='" + driver + '\'' +", url='" + url + '\'' +", username='" + username + '\'' +", password='" + password + '\'' +'}';}@Overridepublic Connection getConnection() throws SQLException {return null;}@Overridepublic Connection getConnection(String username, String password) throws SQLException {return null;}@Overridepublic PrintWriter getLogWriter() throws SQLException {return null;}@Overridepublic void setLogWriter(PrintWriter out) throws SQLException {}@Overridepublic void setLoginTimeout(int seconds) throws SQLException {}@Overridepublic int getLoginTimeout() throws SQLException {return 0;}@Overridepublic Logger getParentLogger() throws SQLFeatureNotSupportedException {return null;}@Overridepublic <T> T unwrap(Class<T> iface) throws SQLException {return null;}@Overridepublic boolean isWrapperFor(Class<?> iface) throws SQLException {return false;}
}
<!-- spring-datasource.xml -->
<?xml version="1.0" encoding="UTF-8"?>
<beans xmlns="http://www.springframework.org/schema/beans"xmlns:xsi="http://www.w3.org/2001/XMLSchema-instance"xsi:schemaLocation="http://www.springframework.org/schema/beans http://www.springframework.org/schema/beans/spring-beans.xsd"><bean id="dataSource" class="com.powernode.spring6.beans.MyDataSource"><property name="driver" value="com.mysql.cj.jdbc.Driver"/><property name="url" value="jdbc:mysql://localhost:3306/spring"/><property name="username" value="root"/><property name="password" value="123456"/></bean>
</beans>
//test
@Test
public void testDataSource(){ApplicationContext applicationContext = new ClassPathXmlApplicationContext("spring-datasource.xml");MyDataSource dataSource = applicationContext.getBean("dataSource", MyDataSource.class);System.out.println(dataSource);
}
测试简单类型
//类A
package com.powernode.spring6.beans;import java.net.URI;
import java.net.URL;
import java.time.LocalDate;
import java.util.Date;
import java.util.Locale;public class A {private byte b;private short s;private int i;private long l;private float f;private double d;private boolean flag;private char c;private Byte b1;private Short s1;private Integer i1;private Long l1;private Float f1;private Double d1;private Boolean flag1;private Character c1;private String str;private Date date;private Season season;private URI uri;private URL url;private LocalDate localDate;private Locale locale;private Class clazz;// 生成setter方法// 生成toString方法
}enum Season {SPRING, SUMMER, AUTUMN, WINTER
}
<!-- spring-all-simple-type.xml -->
<?xml version="1.0" encoding="UTF-8"?>
<beans xmlns="http://www.springframework.org/schema/beans"xmlns:xsi="http://www.w3.org/2001/XMLSchema-instance"xsi:schemaLocation="http://www.springframework.org/schema/beans http://www.springframework.org/schema/beans/spring-beans.xsd"><bean id="a" class="com.powernode.spring6.beans.A"><property name="b" value="1"/><property name="s" value="1"/><property name="i" value="1"/><property name="l" value="1"/><property name="f" value="1"/><property name="d" value="1"/><property name="flag" value="false"/><property name="c" value="a"/><property name="b1" value="2"/><property name="s1" value="2"/><property name="i1" value="2"/><property name="l1" value="2"/><property name="f1" value="2"/><property name="d1" value="2"/><property name="flag1" value="true"/><property name="c1" value="a"/><property name="str" value="zhangsan"/><!--注意:value后面的日期字符串格式不能随便写,必须是Date对象toString()方法执行的结果。--><!--如果想使用其他格式的日期字符串,就需要进行特殊处理了。具体怎么处理,可以看后面的课程!!!!--><property name="date" value="Fri Sep 30 15:26:38 CST 2022"/><property name="season" value="WINTER"/><property name="uri" value="/save.do"/><!--spring6之后,会自动检查url是否有效,如果无效会报错。--><property name="url" value="http://www.baidu.com"/><property name="localDate" value="EPOCH"/><!--java.util.Locale 主要在软件的本地化时使用。它本身没有什么功能,更多的是作为一个参数辅助其他方法完成输出的本地化。--><property name="locale" value="CHINESE"/><property name="clazz" value="java.lang.String"/></bean>
</beans>
//test
@Test
public void testAllSimpleType(){ApplicationContext applicationContext = new ClassPathXmlApplicationContext("spring-all-simple-type.xml");A a = applicationContext.getBean("a", A.class);System.out.println(a);
}
需要注意的是:
如果把Date当作简单类型的话,日期字符串格式不能随便写(随便写的话,会报错这是个字符串类型,不是date类型)。格式必须符合Date的toString方法格式(长这个臭样”Fri Sep 30 15:26:38 CST 2022“)。如果我们提供一个这样的日期字符串:2010-10-10,在这里无法赋值给Date类型的属性的。
spring6之后,当注入的是URL,那么这个url字符串是会进行有效性检测的。如果是一个存在的url,那就没问题。如果不存在就会报错
级联属性赋值(了解)
这个名字让我想起了mybatis里的级联赋值(帮助完成一对多,多对一映射的关联)
直接看一下如何在spring配置bean文件里的代码,我的评价是不如constructor-arg标签好用
<?xml version="1.0" encoding="UTF-8"?>
<beans xmlns="http://www.springframework.org/schema/beans"xmlns:xsi="http://www.w3.org/2001/XMLSchema-instance"xsi:schemaLocation="http://www.springframework.org/schema/beans http://www.springframework.org/schema/beans/spring-beans.xsd"><bean id="clazzBean" class="com.powernode.spring6.beans.Clazz"/><bean id="student" class="com.powernode.spring6.beans.Student"><property name="name" value="张三"/><!--要点1:以下两行配置的顺序不能颠倒--><property name="clazz" ref="clazzBean"/><!--要点2:clazz属性必须有getter方法--><property name="clazz.name" value="高三一班"/></bean>
</beans>
这种方式注意:
- 在spring配置文件中注意顺序
- 在spring配置文件中,clazz属性必须提供getter方法。
注入数组
当数组的元素是简单类型:
//Person.java
package com.powernode.spring6.beans;import java.util.Arrays;public class Person {private String[] favariteFoods;public void setFavariteFoods(String[] favariteFoods) {this.favariteFoods = favariteFoods;}@Overridepublic String toString() {return "Person{" +"favariteFoods=" + Arrays.toString(favariteFoods) +'}';}
}
<!-- spring-array-simple.xml -->
<?xml version="1.0" encoding="UTF-8"?>
<beans xmlns="http://www.springframework.org/schema/beans"xmlns:xsi="http://www.w3.org/2001/XMLSchema-instance"xsi:schemaLocation="http://www.springframework.org/schema/beans http://www.springframework.org/schema/beans/spring-beans.xsd"><bean id="person" class="com.powernode.spring6.beans.Person"><property name="favariteFoods"><array><value>鸡排</value><value>汉堡</value><value>鹅肝</value></array></property></bean>
</beans>
//test
@Test
public void testArraySimple(){ApplicationContext applicationContext = new ClassPathXmlApplicationContext("spring-array-simple.xml");Person person = applicationContext.getBean("person", Person.class);System.out.println(person);
}
当注入的元素是非简单类型:(一个订单中包含多个商品)
//Goods.java
package com.powernode.spring6.beans;public class Goods {private String name;public Goods() {}public Goods(String name) {this.name = name;}public String getName() {return name;}public void setName(String name) {this.name = name;}@Overridepublic String toString() {return "Goods{" +"name='" + name + '\'' +'}';}
}
//Order.java
package com.powernode.spring6.beans;import java.util.Arrays;public class Order {// 一个订单中有多个商品private Goods[] goods;public Order() {}public Order(Goods[] goods) {this.goods = goods;}public void setGoods(Goods[] goods) {this.goods = goods;}@Overridepublic String toString() {return "Order{" +"goods=" + Arrays.toString(goods) +'}';}
}
<!-- spring-array.xml -->
<?xml version="1.0" encoding="UTF-8"?>
<beans xmlns="http://www.springframework.org/schema/beans"xmlns:xsi="http://www.w3.org/2001/XMLSchema-instance"xsi:schemaLocation="http://www.springframework.org/schema/beans http://www.springframework.org/schema/beans/spring-beans.xsd"><bean id="goods1" class="com.powernode.spring6.beans.Goods"><property name="name" value="西瓜"/></bean><bean id="goods2" class="com.powernode.spring6.beans.Goods"><property name="name" value="苹果"/></bean><bean id="order" class="com.powernode.spring6.beans.Order"><property name="goods"><array><!--这里使用ref标签即可--><ref bean="goods1"/><ref bean="goods2"/></array></property></bean></beans>
//test
@Test
public void testArray(){ApplicationContext applicationContext = new ClassPathXmlApplicationContext("spring-array.xml");Order order = applicationContext.getBean("order", Order.class);System.out.println(order);
}
要点:
- 如果数组中的简单类型,使用
value标签直接赋值。 - 如果数组是非简单类型,使用
ref标签赋值。
注入List集合
List集合的特性:有序可重复
package com.powernode.spring6.beans;import java.util.List;public class People {// 一个人有多个名字private List<String> names;public void setNames(List<String> names) {this.names = names;}@Overridepublic String toString() {return "People{" +"names=" + names +'}';}
}
<?xml version="1.0" encoding="UTF-8"?>
<beans xmlns="http://www.springframework.org/schema/beans"xmlns:xsi="http://www.w3.org/2001/XMLSchema-instance"xsi:schemaLocation="http://www.springframework.org/schema/beans http://www.springframework.org/schema/beans/spring-beans.xsd"><bean id="peopleBean" class="com.powernode.spring6.beans.People"><property name="names"><list><value>张三</value><value>李四</value><value>王五</value><value>赵六</value><value>钱七</value><value>勾八</value><value>勾八</value><value>勾八</value></list></property></bean>
</beans>
//test
@Test
public void testCollection(){ApplicationContext applicationContext = new ClassPathXmlApplicationContext("spring-collection.xml");People peopleBean = applicationContext.getBean("peopleBean", People.class);System.out.println(peopleBean);
}
注意:
注入List集合的时候使用list标签,如果List集合中是简单类型使用value标签;反之使用ref标签
注入Set集合
Set集合的特性:无序,不可重复
//People.java
package com.powernode.spring6.beans;import java.util.List;
import java.util.Set;public class People {// 一个人有多个电话private Set<String> phones;public void setPhones(Set<String> phones) {this.phones = phones;}//......@Overridepublic String toString() {return "People{" +"phones=" + phones +", names=" + names +'}';}
}
<?xml version="1.0" encoding="UTF-8"?>
<beans xmlns="http://www.springframework.org/schema/beans"xmlns:xsi="http://www.w3.org/2001/XMLSchema-instance"xsi:schemaLocation="http://www.springframework.org/schema/beans http://www.springframework.org/schema/beans/spring-beans.xsd"><bean id="peopleBean" class="com.powernode.spring6.beans.People"><property name="phones"><set><!--非简单类型可以使用ref,简单类型使用value--><value>110</value><value>110</value><value>120</value><value>120</value><value>119</value><value>119</value></set></property></bean>
</beans>
注意:
使用<set>标签
set集合中元素是简单类型的使用value标签;反之使用ref标签
注入Map集合
//People.java
package com.powernode.spring6.beans;import java.util.List;
import java.util.Map;
import java.util.Set;public class People {// 一个人有多个住址private Map<Integer, String> addrs;public void setAddrs(Map<Integer, String> addrs) {this.addrs = addrs;}//......@Overridepublic String toString() {return "People{" +"addrs=" + addrs +", phones=" + phones +", names=" + names +'}';}}
<!-- spring-coolection.xml -->
<?xml version="1.0" encoding="UTF-8"?>
<beans xmlns="http://www.springframework.org/schema/beans"xmlns:xsi="http://www.w3.org/2001/XMLSchema-instance"xsi:schemaLocation="http://www.springframework.org/schema/beans http://www.springframework.org/schema/beans/spring-beans.xsd"><bean id="peopleBean" class="com.powernode.spring6.beans.People"><property name="addrs"><map><!--如果key不是简单类型,使用 key-ref 属性--><!--如果value不是简单类型,使用 value-ref 属性--><entry key="1" value="北京大兴区"/><entry key="2" value="上海浦东区"/><entry key="3" value="深圳宝安区"/></map></property></bean>
</beans>
要点:
使用<map>标签
如果key是简单类型,使用key属性;反之使用key-ref属性
如果value是简单类型,使用value属性,反之使用value-ref属性
注入Properties
java.util.Properties继承java.uril.Hashtable,所以Properties也是一个Map集合。
//People.java
package com.powernode.spring6.beans;import java.util.List;
import java.util.Map;
import java.util.Properties;
import java.util.Set;public class People {private Properties properties;public void setProperties(Properties properties) {this.properties = properties;}//......@Overridepublic String toString() {return "People{" +"properties=" + properties +", addrs=" + addrs +", phones=" + phones +", names=" + names +'}';}
}
<!-- spring-collection.xml -->
<?xml version="1.0" encoding="UTF-8"?>
<beans xmlns="http://www.springframework.org/schema/beans"xmlns:xsi="http://www.w3.org/2001/XMLSchema-instance"xsi:schemaLocation="http://www.springframework.org/schema/beans http://www.springframework.org/schema/beans/spring-beans.xsd"><bean id="peopleBean" class="com.powernode.spring6.beans.People"><property name="properties"><props><prop key="driver">com.mysql.cj.jdbc.Driver</prop><prop key="url">jdbc:mysql://localhost:3306/spring</prop><prop key="username">root</prop><prop key="password">123456</prop></props></property></bean>
</beans>
要点:
使用<props>标签嵌套<prop>标签完成。
注入null和空字符串
- 注入空字符串使用:
<value/>或者value="" - 注入null使用:
<null>或者不为该属性赋值
//Vip.java
package com.powernode.spring6.beans;public class Vip {private String email;public void setEmail(String email) {this.email = email;}@Overridepublic String toString() {return "Vip{" +"email='" + email + '\'' +'}';}
}
<!-- spring-null,xml -->
<?xml version="1.0" encoding="UTF-8"?>
<beans xmlns="http://www.springframework.org/schema/beans"xmlns:xsi="http://www.w3.org/2001/XMLSchema-instance"xsi:schemaLocation="http://www.springframework.org/schema/beans http://www.springframework.org/schema/beans/spring-beans.xsd"><bean id="vipBean" class="com.powernode.spring6.beans.Vip"><!--空串的第一种方式--><!--<property name="email" value=""/>--><!--空串的第二种方式--><property name="email"><value/></property></bean>
</beans>
//test
@Test
public void testNull(){ApplicationContext applicationContext = new ClassPathXmlApplicationContext("spring-null.xml");Vip vipBean = applicationContext.getBean("vipBean", Vip.class);System.out.println(vipBean);
}
如何注入null呢?
不给属性赋值
<?xml version="1.0" encoding="UTF-8"?>
<beans xmlns="http://www.springframework.org/schema/beans"xmlns:xsi="http://www.w3.org/2001/XMLSchema-instance"xsi:schemaLocation="http://www.springframework.org/schema/beans http://www.springframework.org/schema/beans/spring-beans.xsd"><bean id="vipBean" class="com.powernode.spring6.beans.Vip" /></beans>
使用<null/>
<?xml version="1.0" encoding="UTF-8"?>
<beans xmlns="http://www.springframework.org/schema/beans"xmlns:xsi="http://www.w3.org/2001/XMLSchema-instance"xsi:schemaLocation="http://www.springframework.org/schema/beans http://www.springframework.org/schema/beans/spring-beans.xsd"><bean id="vipBean" class="com.powernode.spring6.beans.Vip"><property name="email"><null/></property></bean></beans>
注入的值中含有特殊符号
XML中有5个特殊字符,分别是<、>、'、"、&
以上五个特殊符号在XML中会被特殊对待,会被当作XML语法的一部分进行解析,如果这些特殊符号直接出现在注入的字符串当中,会报错
解决方案包括两种
- 第一种:特殊符号使用转义字符代替
- 第二种:将含有特殊符号的字符串放到:
<![CDATE[]]>当中。因为放在CDATE区中的数据不会被XML文件解析器解析。
转义字符
//Math.java
package com.powernode.spring6.beans;public class Math {private String result;public void setResult(String result) {this.result = result;}@Overridepublic String toString() {return "Math{" +"result='" + result + '\'' +'}';}
}
<!-- spring-special.xml -->
<?xml version="1.0" encoding="UTF-8"?>
<beans xmlns="http://www.springframework.org/schema/beans"xmlns:xsi="http://www.w3.org/2001/XMLSchema-instance"xsi:schemaLocation="http://www.springframework.org/schema/beans http://www.springframework.org/schema/beans/spring-beans.xsd"><bean id="mathBean" class="com.powernode.spring6.beans.Math"><property name="result" value="2 < 3"/></bean>
</beans>
//test
@Test
public void testSpecial(){ApplicationContext applicationContext = new ClassPathXmlApplicationContext("spring-special.xml");Math mathBean = applicationContext.getBean("mathBean", Math.class);System.out.println(mathBean);
}
CDATE
<?xml version="1.0" encoding="UTF-8"?>
<beans xmlns="http://www.springframework.org/schema/beans"xmlns:xsi="http://www.w3.org/2001/XMLSchema-instance"xsi:schemaLocation="http://www.springframework.org/schema/beans http://www.springframework.org/schema/beans/spring-beans.xsd"><bean id="mathBean" class="com.powernode.spring6.beans.Math"><property name="result"><!--只能使用value标签--><value><![CDATA[2 < 3]]></value></property></bean></beans>
注意:
使用CDATE时,不能使用value属性,只能使用value标签
构造注入
核心原理:通过调用构造方法来给属性赋值。
//OrderDao.java
package com.powernode.spring6.dao;public class OrderDao {public void deleteById(){System.out.println("正在删除订单。。。");}
}
//OrderService.java
package com.powernode.spring6.service;import com.powernode.spring6.dao.OrderDao;public class OrderService {private OrderDao orderDao;// 通过反射机制调用构造方法给属性赋值public OrderService(OrderDao orderDao) {this.orderDao = orderDao;}public void delete(){orderDao.deleteById();}
}
<!-- spring.xml -->
<bean id="orderDaoBean" class="com.powernode.spring6.dao.OrderDao"/>
<bean id="orderServiceBean" class="com.powernode.spring6.service.OrderService"><!--index="0"表示构造方法的第一个参数,将orderDaoBean对象传递给构造方法的第一个参数。--><constructor-arg index="0" ref="orderDaoBean"/>
</bean>
//test
@Test
public void testConstructorDI(){ApplicationContext applicationContext = new ClassPathXmlApplicationContext("spring.xml");OrderService orderServiceBean = applicationContext.getBean("orderServiceBean", OrderService.class);orderServiceBean.delete();
}
如果构造参数有两个,那就需要将两个参数都加入到bean中,利用constructor-arg子标签将构造的参数补齐
- index属性名:补齐参数对应位置,用0,1方式对应参数的位置
- name属性名:补齐参数对应位置,用对应上构造参数值的名字赋值进去
- 空:也可以不指定参数的位置,利用spring强大的功能让他自己对应进去,位置可以不对应
- ref属性名:指向要映射成的类
p命名空间注入
目的:简化配置。
使用p命名空间注入的前提条件包括两个:
- 第一:在XML头部信息中添加p命名空间的配置信息:
xmlns:p="http://www.springframework.org/schema/p" - 第二:p命名空间注入是基于
setter方法的,所以需要对应的属性提供setter方法。
//Customer.java
package com.powernode.spring6.beans;public class Customer {private String name;private int age;public void setName(String name) {this.name = name;}public void setAge(int age) {this.age = age;}@Overridepublic String toString() {return "Customer{" +"name='" + name + '\'' +", age=" + age +'}';}
}
<!-- spring-p.xml -->
<?xml version="1.0" encoding="UTF-8"?>
<beans xmlns="http://www.springframework.org/schema/beans"xmlns:p="http://www.springframework.org/schema/p"xmlns:xsi="http://www.w3.org/2001/XMLSchema-instance"xsi:schemaLocation="http://www.springframework.org/schema/beans http://www.springframework.org/schema/beans/spring-beans.xsd"><bean id="customerBean" class="com.powernode.spring6.beans.Customer" p:name="zhangsan" p:age="20"/></beans>
//test
@Test
public void testP(){ApplicationContext applicationContext = new ClassPathXmlApplicationContext("spring-p.xml");Customer customerBean = applicationContext.getBean("customerBean", Customer.class);System.out.println(customerBean);
}
p命名空间实际上是对set注入的简化
c命名空间注入
c命名空间是简化构造方法注入的
使用c命名空间的两个前提条件:
- 第一:需要在xml配置信息文件头部添加信息:
xmlns:c="http://www.springframework.org/schema/c" - 第二:需要提供构造方法
//MyTime.java
package com.powernode.spring6.beans;public class MyTime {private int year;private int month;private int day;public MyTime(int year, int month, int day) {this.year = year;this.month = month;this.day = day;}@Overridepublic String toString() {return "MyTime{" +"year=" + year +", month=" + month +", day=" + day +'}';}
}
<!-- spring-c.xml -->
<?xml version="1.0" encoding="UTF-8"?>
<beans xmlns="http://www.springframework.org/schema/beans"xmlns:c="http://www.springframework.org/schema/c"xmlns:xsi="http://www.w3.org/2001/XMLSchema-instance"xsi:schemaLocation="http://www.springframework.org/schema/beans http://www.springframework.org/schema/beans/spring-beans.xsd"><!--<bean id="myTimeBean" class="com.powernode.spring6.beans.MyTime" c:year="1970" c:month="1" c:day="1"/>--><bean id="myTimeBean" class="com.powernode.spring6.beans.MyTime" c:_0="2008" c:_1="8" c:_2="8"/></beans>
//test
@Test
public void testC(){ApplicationContext applicationContext = new ClassPathXmlApplicationContext("spring-c.xml");MyTime myTimeBean = applicationContext.getBean("myTimeBean", MyTime.class);System.out.println(myTimeBean);
}
不管是p命名空间还是c命名空间,注入的时候都可以注入简单类型以及非简单类型
util命名空间
使用util命名空间可以让配置复用
使用util命名空间的前提是:在spring配置头文件添加配置信息
//MyDataSource1.java
package com.powernode.spring6.beans;import java.util.Properties;public class MyDataSource1 {private Properties properties;public void setProperties(Properties properties) {this.properties = properties;}@Overridepublic String toString() {return "MyDataSource1{" +"properties=" + properties +'}';}
}
//MyDataSource2.java
package com.powernode.spring6.beans;import java.util.Properties;public class MyDataSource2 {private Properties properties;public void setProperties(Properties properties) {this.properties = properties;}@Overridepublic String toString() {return "MyDataSource2{" +"properties=" + properties +'}';}
}
<!-- spring-util.xml -->
<?xml version="1.0" encoding="UTF-8"?>
<beans xmlns="http://www.springframework.org/schema/beans"xmlns:xsi="http://www.w3.org/2001/XMLSchema-instance"xmlns:util="http://www.springframework.org/schema/util"xsi:schemaLocation="http://www.springframework.org/schema/beans http://www.springframework.org/schema/beans/spring-beans.xsdhttp://www.springframework.org/schema/util http://www.springframework.org/schema/util/spring-util.xsd"><util:properties id="prop"><prop key="driver">com.mysql.cj.jdbc.Driver</prop><prop key="url">jdbc:mysql://localhost:3306/spring</prop><prop key="username">root</prop><prop key="password">123456</prop></util:properties><bean id="dataSource1" class="com.powernode.spring6.beans.MyDataSource1"><property name="properties" ref="prop"/></bean><bean id="dataSource2" class="com.powernode.spring6.beans.MyDataSource2"><property name="properties" ref="prop"/></bean>
</beans>
//test
@Test
public void testUtil(){ApplicationContext applicationContext = new ClassPathXmlApplicationContext("spring-util.xml");MyDataSource1 dataSource1 = applicationContext.getBean("dataSource1", MyDataSource1.class);System.out.println(dataSource1);MyDataSource2 dataSource2 = applicationContext.getBean("dataSource2", MyDataSource2.class);System.out.println(dataSource2);
}
基于XML的自动装配
Spring还可以完成自动化的注入,自动化注入又被称为自动装配。它可以根据名字进行自动装配,也可以根据类型进行自动装配。
根据名称自动装配
//UserDao.java
package com.powernode.spring6.dao;public class UserDao {public void insert(){System.out.println("正在保存用户数据。");}
}
package com.powernode.spring6.service;import com.powernode.spring6.dao.UserDao;public class UserService {private UserDao aaa;// 这个set方法非常关键public void setAaa(UserDao aaa) {this.aaa = aaa;}public void save(){aaa.insert();}
}
<!-- spring-autowire.xml -->
<?xml version="1.0" encoding="UTF-8"?>
<beans xmlns="http://www.springframework.org/schema/beans"xmlns:xsi="http://www.w3.org/2001/XMLSchema-instance"xsi:schemaLocation="http://www.springframework.org/schema/beans http://www.springframework.org/schema/beans/spring-beans.xsd"><bean id="userService" class="com.powernode.spring6.service.UserService" autowire="byName"/><bean id="aaa" class="com.powernode.spring6.dao.UserDao"/></beans>
这个配置起到关键作用:
- UserService Bean中需要添加autowire=“byName”,表示通过名称进行装配。
- UserService类中有一个UserDao属性,而UserDao属性的名字是aaa,对应的set方法是setAaa(),正好和UserDao Bean的id1是一样的。这就是根据名称自动装配。
//test
@Test
public void testAutowireByName(){ApplicationContext applicationContext = new ClassPathXmlApplicationContext("spring-autowire.xml");UserService userService = applicationContext.getBean("userService", UserService.class);userService.save();
}
如果根据名称装配(byName),底层会调用set方法进行注入。
例如:setAge()对应的名字是age,setPassword()对应的名字是password,setEmail()对应的名字是email。
根据类型自动装配
//AccountDao.java
package com.powernode.spring6.dao;public class AccountDao {public void insert(){System.out.println("正在保存账户信息");}
}
//AccountService.java
package com.powernode.spring6.service;import com.powernode.spring6.dao.AccountDao;/*** @author 动力节点* @version 1.0* @className AccountService* @since 1.0**/
public class AccountService {private AccountDao accountDao;public void setAccountDao(AccountDao accountDao) {this.accountDao = accountDao;}public void save(){accountDao.insert();}
}
<!-- spring-autowire.xml -->
<?xml version="1.0" encoding="UTF-8"?>
<beans xmlns="http://www.springframework.org/schema/beans"xmlns:xsi="http://www.w3.org/2001/XMLSchema-instance"xsi:schemaLocation="http://www.springframework.org/schema/beans http://www.springframework.org/schema/beans/spring-beans.xsd"><!--byType表示根据类型自动装配--><bean id="accountService" class="com.powernode.spring6.service.AccountService" autowire="byType"/><bean class="com.powernode.spring6.dao.AccountDao"/></beans>
@Test
public void testAutowireByType(){ApplicationContext applicationContext = new ClassPathXmlApplicationContext("spring-autowire.xml");AccountService accountService = applicationContext.getBean("accountService", AccountService.class);accountService.save();
}
无论是byName还是byType,在装配的时候都是基于set方法的。所以set方法是必须要提供的。提供构造方法是不行的。
当byType进行自动装配的时候,配置文件中,某种类型的Bean必须是唯一的,不能出现多个。
Spring引入外部属性配置文件
mybatis可以将配置文件的信息单独写到一个文件中,Spring也可以
- 第一步:写一个数据源类,提供相关属性
package com.powernode.spring6.beans;import javax.sql.DataSource;
import java.io.PrintWriter;
import java.sql.Connection;
import java.sql.SQLException;
import java.sql.SQLFeatureNotSupportedException;
import java.util.logging.Logger;public class MyDataSource implements DataSource {@Overridepublic String toString() {return "MyDataSource{" +"driver='" + driver + '\'' +", url='" + url + '\'' +", username='" + username + '\'' +", password='" + password + '\'' +'}';}private String driver;private String url;private String username;private String password;public void setDriver(String driver) {this.driver = driver;}public void setUrl(String url) {this.url = url;}public void setUsername(String username) {this.username = username;}public void setPassword(String password) {this.password = password;}//......
}
- 第二步:在类路径下新创建jdbc.propertirs文件,并配置信息
driver=com.mysql.cj.jdbc.Driver
url=jdbc:mysql://localhost:3306/数据库名
username=账号
password=密码
- 在spring配置文件中引入context命名空间
<?xml version="1.0" encoding="UTF-8"?>
<beans xmlns="http://www.springframework.org/schema/beans"xmlns:xsi="http://www.w3.org/2001/XMLSchema-instance"xmlns:context="http://www.springframework.org/schema/context"xsi:schemaLocation="http://www.springframework.org/schema/beans http://www.springframework.org/schema/beans/spring-beans.xsdhttp://www.springframework.org/schema/context http://www.springframework.org/schema/context/spring-context.xsd"></beans>
- 在spring中配置使用jdbc.properties文件
<?xml version="1.0" encoding="UTF-8"?>
<beans xmlns="http://www.springframework.org/schema/beans"xmlns:xsi="http://www.w3.org/2001/XMLSchema-instance"xmlns:context="http://www.springframework.org/schema/context"xsi:schemaLocation="http://www.springframework.org/schema/beans http://www.springframework.org/schema/beans/spring-beans.xsdhttp://www.springframework.org/schema/context http://www.springframework.org/schema/context/spring-context.xsd"><context:property-placeholder location="jdbc.properties"/><bean id="dataSource" class="com.powernode.spring6.beans.MyDataSource"><property name="driver" value="${driver}"/><property name="url" value="${url}"/><property name="username" value="${username}"/><property name="password" value="${password}"/></bean>
</beans>
//test
@Test
public void testProperties(){ApplicationContext applicationContext = new ClassPathXmlApplicationContext("spring-properties.xml");MyDataSource dataSource = applicationContext.getBean("dataSource", MyDataSource.class);System.out.println(dataSource);
}
注意一个事情,就是properties文件中的username在注入的时候会先查询windows本地的,所以在调试的时候会发现username注入的值不是我们提供的值,而是本地的一个值
建议properties文件加个前缀jdbc啥的
相关文章:

Spring笔记之Spring对IoC的实现
文章目录 IoC控制反转依赖注入set注入注入外部Bean注入内部Bean注入简单类型通过注入方式实现javax.sql.DateSource接口测试简单类型 级联属性赋值(了解)注入数组注入List集合注入Set集合注入Map集合注入Properties注入null和空字符串不给属性赋值使用 注…...
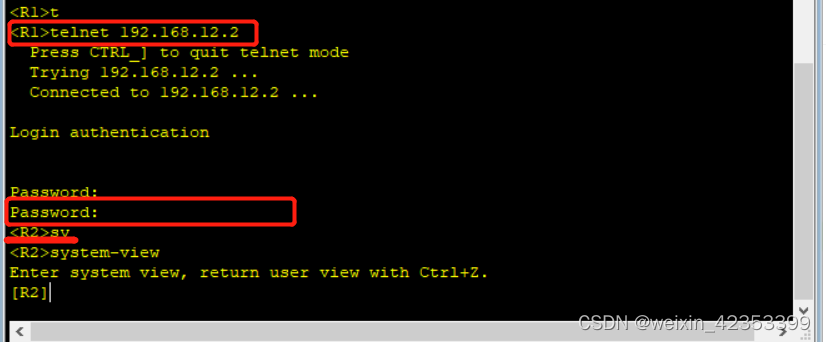
【eNSP】Telnet远程登录
Telnet远程登录 eNSP软件TelnetTelnet远程登录-路由连接关闭防火墙eNSP根据图1画图路线配置路由端口IP配置路由R1改名配置接口IP 配置路由R2 配置R2的远程登录设置登录用户授权级别退出登录超时时间 Telnet测试 eNSP软件 eNSP(Enterprise Network Simulation Platform)是一款由…...

SOP/详解*和**/python数据结构(iter,list,tuple,dict)/ 解包
一、错误解决合集 1. > combined_seq.named_children() 2. isinstance 2th parameter : must be a type or tuple of types > 改为tuple,不要用列表。改为 LLLayer (nn.Conv2d,nn.Linear) 3. File “test.py”, line 90, in calculate_fin_fout print(“hi”…...

使用webdriver-manager解决浏览器与驱动不匹配所带来自动化无法执行的问题
1、前言 在我们使用 Selenium 进行 UI 自动化测试时,常常会因为浏览器驱动与浏览器版本不匹配,而导致自动化测试无法执行,需要手动去下载对应的驱动版本,并替换原有的驱动,可能还会遇到跨操作系统进行测试的时候&…...

【vue】Vue中debugger报错 unexpected ‘debugger’ statement no-debugger
前言: Vue中debugger报错 unexpected ‘debugger’ statement no-debugger (意外的“调试器”语句没有调试器) eslink规则没有开启’debugger’ ,被规则屏蔽了,需要手动放开 解决方法 方式一: 找到.esl…...

课题方向a
首先在无线感知的研究方向下,辅以深度学习和计算机视觉的技术和知识,可以从事哪些具体课题的研究?请你尽可能多的给出课题名称供我选择 在无线感知的研究方向下,辅以深度学习和计算机视觉的技术,有很多具体课题可以进行研究。以下是一些供您选择的课题名称: 基于深度学习…...

【Matter】基于Ubuntu 22.04 交叉编译chip-tool
编译工程之际,记录一下编译过程,免得后续遗忘,总结下来chip-tool 交叉编译涉及到的知识点: 需要了解如何支持交叉编译,基于GN编译框架需要理解应用库如何交叉编译,理解pkg-config的使用meson 编译…...
Qt/C++音视频开发50-不同ffmpeg版本之间的差异处理
一、前言 ffmpeg的版本众多,从2010年开始计算的项目的话,基本上还在使用的有ffmpeg2/3/4/5/6,最近几年版本彪的比较厉害,直接4/5/6,大版本之间接口有一些变化,特别是一些废弃接口被彻底删除了,…...

低碳 Web 实践指南
现状和问题 2023年7月6日,世界迎来有记录以来最热的一天。气候变化是如今人类面临的最大健康威胁。据世界卫生组织预测2030年至2050年期间,气候变化预计每年将造成约25万人死亡。这是人们可以真切感受到的变化,而背后的主要推手是碳排放。 …...
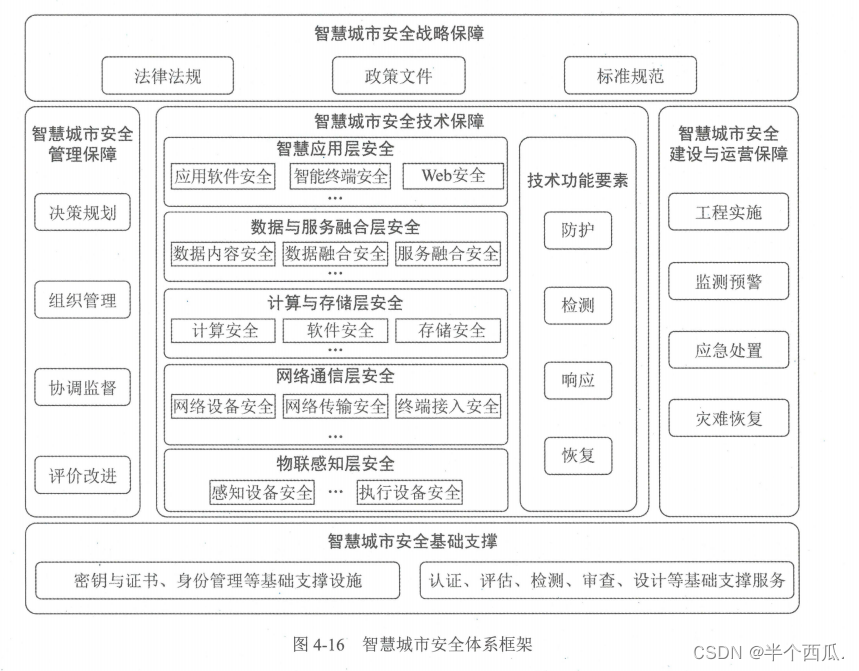
信息安全:网络安全体系 与 网络安全模型.
信息安全:网络安全体系 与 网络安全模型. 网络安全保障是一项复杂的系统工程,是安全策略、多种技术、管理方法和人员安全素质的综合。一般而言,网络安全体系是网络安全保障系统的最高层概念抽象,是由各种网络安全单元按照一定的规…...
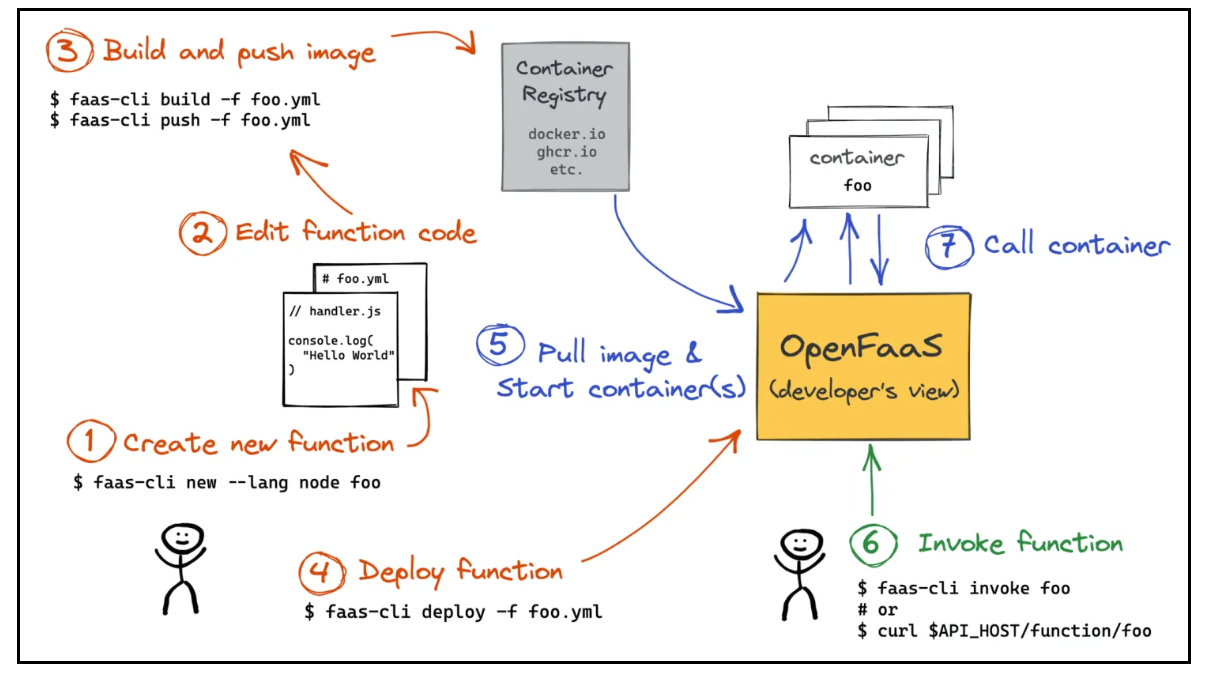
【云原生】Serverless 技术架构分析
一、什么是Serverless? 1、Serverless技术简介 Serverless(无服务器架构)指的是由开发者实现的服务端逻辑运行在无状态的计算容器中,它由事件触发, 完全被第三方管理,其业务层面的状态则被开发者使用的数据库和存…...

Visual Studio Code 设置文件头部添加作者、日期和函数注释
step1:安装插件KoroFileHeader step2:左下角选择管理—设置—输入"fileheader"—点击"在setting.json中编辑" step3:添加下面的代码到json文件中 // 文件头部注释 "fileheader.customMade": {"Descripttion":"","ve…...

HCIA云计算 V5.0题库
云计算,这是近几年听得最多词了,云计算对于网络的发展帮助非常大,它自身所产生的价值是不可估量的!所以云计算的岗位对于很多IT公司来说,都是有一定地位的。华为认证云计算面向的对象很简单就是对云计算技术感兴趣的人…...
)
基于Matlab实现帧间差分法的运动目标检测(附上完整源码+图像+程序运行说明)
帧间差分法是一种常用的运动目标检测方法,可以通过对连续帧之间的差异进行分析来确定目标的运动情况。在本文中,我们将介绍如何使用Matlab实现帧间差分法的运动目标检测。 文章目录 部分源码完整源码图像程序运行说明下载 部分源码 首先,我们…...
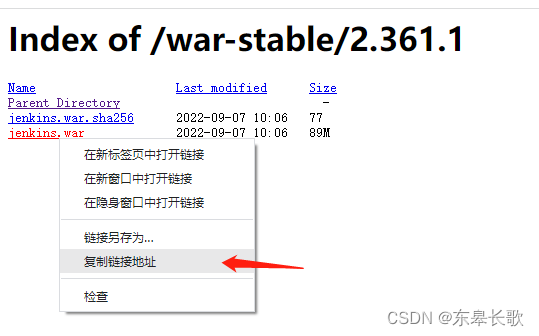
Jenkins搭建最简教程
纠结了一小会儿,到底要不要写这个,最终还是决定简单记录一下,因为Jenkins搭建实在是太简单了,虽然也有坑,但是坑主要在找稳定的版本上。 先学一个简称,LTS (Long Term Support) 属实是长见识了,…...

设置git可以同时推送gitee和github
查看当前的远程仓库设置: git remote -v 这会列出你当前配置的远程仓库。你可能会看到类似以下的输出:origin-gitee <gitee仓库地址> (fetch)origin-gitee <gitee仓库地址> (push) 新增一个远程仓库 git remote add origin-github <githu…...

Java给Excel设置单元格格式
maven 依赖 <!--读取excel文件--> <dependency><groupId>org.apache.poi</groupId><artifactId>poi</artifactId><version>5.2.3</version> </dependency> <dependency><groupId>org.apache.poi</group…...

__block的深入研究
__block可以用于解决block内部无法修改auto变量值的问题 __block不能修饰全局变量、静态变量(static) 编译器会将__block变量包装成一个对象 调用的是,从__Block_byref_a_0的指针找到 a所在的内存,然后修改值 第一层拷贝&…...
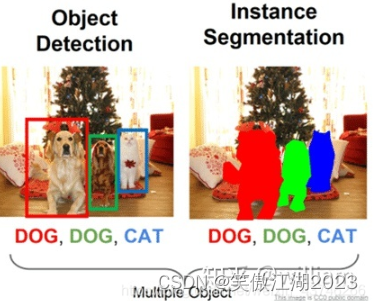
Segment anything(图片分割大模型)
目录 1.Segment anything 2.补充图像分割和目标检测的区别 1.Segment anything 定义:图像分割通用大模型 延深:可以预计视觉检测大模型,也快了。 进一步理解:传统图像分割对于下图处理时,识别房子的是识别房子的模型…...

【雕爷学编程】MicroPython动手做(27)——物联网之掌控板小程序3
知识点:什么是掌控板? 掌控板是一块普及STEAM创客教育、人工智能教育、机器人编程教育的开源智能硬件。它集成ESP-32高性能双核芯片,支持WiFi和蓝牙双模通信,可作为物联网节点,实现物联网应用。同时掌控板上集成了OLED…...

Orbit间隔重复算法深度解析:从理论到实践
Orbit间隔重复算法深度解析:从理论到实践 【免费下载链接】orbit Experimental spaced repetition platform for exploring ideas in memory augmentation and programmable attention 项目地址: https://gitcode.com/gh_mirrors/orbit1/orbit Orbit是一个实…...

【深度解析】从 Antigravity 2.0 看 AI Agent 的产品化演进:动态子代理、项目工作区与多模型编排实战
摘要: Google Antigravity 2.0 的核心变化,不只是功能增加,而是把 AI Agent 从“对话工具”推进到“可编排的执行系统”。本文解析动态子代理、项目级工作区、后台任务与工具链设计,并给出基于 OpenAI 兼容接口的 Python 实战代码…...

Java全栈工程师面试实录:从基础到微服务的深度技术对话
Java全栈工程师面试实录:从基础到微服务的深度技术对话 面试官与程序员的对话 面试官(李哥): 你好,欢迎来参加我们公司的面试。我是李哥,负责技术面试。先简单介绍一下你自己吧。 程序员(张浩&a…...

长期使用后回顾 Taotoken 在 API 调用稳定性与客服响应上的综合体验
🚀 告别海外账号与网络限制!稳定直连全球优质大模型,限时半价接入中。 👉 点击领取海量免费额度 长期使用后回顾 Taotoken 在 API 调用稳定性与客服响应上的综合体验 作为一项服务于项目开发的基础设施,大模型 API 的…...
OpenAvatarChat终极指南:5分钟打造你的专属AI数字人
OpenAvatarChat终极指南:5分钟打造你的专属AI数字人 【免费下载链接】OpenAvatarChat 项目地址: https://gitcode.com/gh_mirrors/op/OpenAvatarChat 想象一下,你正在开发一个智能客服系统,需要让数字人能够自然流畅地与用户对话。传…...

端口映射配置后连不上?别慌!按这4步排查,一学就会
一、什么是端口映射监控端口映射监控是指对端口映射规则的状态、流量及连通性进行全面监测,确保映射规则正常生效,及时发现并排查故障。它涵盖两个层面:本机端口监听状态检测和网络层端口映射连通性验证。二、本机端口监控(服务端…...

十大榜单全覆盖,价值兑现引领:联想定义中国AI企业新高度
当前,全球 AI 产业已正式迈入规模化商业落地的关键周期,“技术炫技”让位于“价值兑现”,“算力筑基—技术创新—场景落地”的协同闭环成为高质量发展的核心逻辑。据《全球首席信息官(CIO)报告:企业级 AI 竞…...

PaddleOCR训练集制作避坑指南:从text_renderer合成到roLabelImg标注的全链路解析
PaddleOCR训练集制作全流程实战:从数据合成到模型调优的完整方法论 在工业级OCR项目落地过程中,数据集质量往往比模型架构更能决定最终效果上限。不同于学术界的标准benchmark竞赛,真实业务场景面临字体缺失、背景干扰、版式多变等复杂挑战。…...

FLUX.1-dev FP8低显存优化版终极指南:破解大模型部署难题
FLUX.1-dev FP8低显存优化版终极指南:破解大模型部署难题 【免费下载链接】flux1-dev 项目地址: https://ai.gitcode.com/hf_mirrors/Comfy-Org/flux1-dev 在AI图像生成领域,显存限制一直是开发者面临的核心挑战。当主流模型动辄需要24GB以上显存…...

【ElevenLabs福建话语音落地实战】:20年语音AI专家亲授3大避坑指南与本地化部署全流程
更多请点击: https://codechina.net 第一章:ElevenLabs福建话语音落地的行业价值与技术定位 福建话(闽南语泉州/厦门腔)作为联合国教科文组织认定的“严重濒危语言”,其语音合成能力的工程化落地,已超越单…...