docker容器创建私有仓库(第三篇)
目录
六、创建私有仓库
七、Docker资源限制
7.1、CPU使用率
7.2、CPU共享比例
7.3、CPU周期限制
7.4、CPU核心限制
7.5、CPU 配额控制参数的混合案例
7.6、内存限制
7.7、Block IO 的限制
7.8、限制bps 和iops
8、Docker数据持久化
8.1、数据持久化介绍
8.2、Volume的基本使用
8.2.1、管理卷
8.2.2、创建使用指定卷的容器
8.2.3、清理卷
8.3、Bind Mounts的基本使用
8.3.1 使用卷创建一个容器
8.3.2、验证绑定
8.3.3、清理
8.4、数据卷容器
8.4.1、数据卷容器概述
8.4.2、创建数据卷容器
六、创建私有仓库
仓库(Repository)是集中存放镜像的地方。
仓库注册服务器才是存放仓库具体的服务器(Registry),每个服务器上都可以放置多个仓库,而每个仓库下可以放置多个镜像,每个镜像上可以运行多个容器,每个容器上可以跑一个应用或应用组。
仓库自身可以分为:公共仓库和私有仓库
安装docker后,可以通过官方提供的registry镜像部署一套本地的私有仓库环境
[root@localhost ~]# mkdir -p /opt/data/registry[root@localhost ~]# docker run -d --restart=always -p 5000:5000 -v /opt/data/registry:/tmp/registry registryUnable to find image 'registry:latest' locally
latest: Pulling from library/registry
79e9f2f55bf5: Pull complete
0d96da54f60b: Pull complete
5b27040df4a2: Pull complete
e2ead8259a04: Pull complete
3790aef225b9: Pull complete
Digest: sha256:169211e20e2f2d5d115674681eb79d21a217b296b43374b8e39f97fcf866b375
Status: Downloaded newer image for registry:latest
f5b026b082957e416f2facf2fb8739ee5002d31e44ffa05c71eff08c588b0f1f[root@localhost ~]# docker ps -lCONTAINER ID   IMAGE      COMMAND                   CREATED          STATUS          PORTS                                       NAMESf5b026b08295   registry   "/entrypoint.sh /etc…"   17 seconds ago   Up 16 seconds   0.0.0.0:5000->5000/tcp, :::5000->5000/tcp   hardcore_cori
准备测试镜像
[root@localhost ~]# docker run -d -p 800:80 nginx                #将宿主机800端口映射给容器的业务端口Unable to find image 'nginx:latest' locally
latest: Pulling from library/nginx
a2abf6c4d29d: Pull complete
a9edb18cadd1: Pull complete
589b7251471a: Pull complete
186b1aaa4aa6: Pull complete
b4df32aa5a72: Pull complete
a0bcbecc962e: Pull complete
Digest: sha256:0d17b565c37bcbd895e9d92315a05c1c3c9a29f762b011a10c54a66cd53c9b31
Status: Downloaded newer image for nginx:latest
bc0698d60239d036f737d18370a81eb84a0a7f69ec536a8b208118aace4fa79a[root@localhost ~]# docker ps -lCONTAINER ID   IMAGE     COMMAND                   CREATED         STATUS         PORTS                                 NAMESbc0698d60239   nginx     "/docker-entrypoint.…"   7 seconds ago   Up 6 seconds   0.0.0.0:800->80/tcp, :::800->80/tcp   zealous_darwin
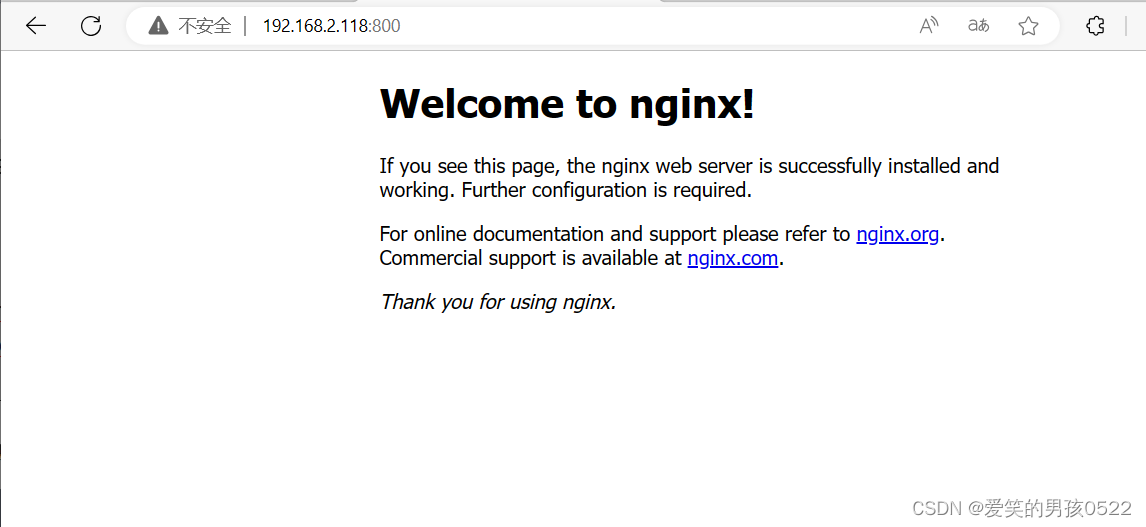
宿主机(192.168.2.118)访问8000端口测试:
[root@localhost ~]# docker logs bc0698d60239                #查看日志/docker-entrypoint.sh: /docker-entrypoint.d/ is not empty, will attempt to perform configuration
/docker-entrypoint.sh: Looking for shell scripts in /docker-entrypoint.d/
/docker-entrypoint.sh: Launching /docker-entrypoint.d/10-listen-on-ipv6-by-default.sh
10-listen-on-ipv6-by-default.sh: info: Getting the checksum of /etc/nginx/conf.d/default.conf
10-listen-on-ipv6-by-default.sh: info: Enabled listen on IPv6 in /etc/nginx/conf.d/default.conf
/docker-entrypoint.sh: Launching /docker-entrypoint.d/20-envsubst-on-templates.sh
/docker-entrypoint.sh: Launching /docker-entrypoint.d/30-tune-worker-processes.sh
/docker-entrypoint.sh: Configuration complete; ready for start up
2023/08/02 03:56:56 [notice] 1#1: using the "epoll" event method
2023/08/02 03:56:56 [notice] 1#1: nginx/1.21.5
2023/08/02 03:56:56 [notice] 1#1: built by gcc 10.2.1 20210110 (Debian 10.2.1-6)
2023/08/02 03:56:56 [notice] 1#1: OS: Linux 3.10.0-1160.92.1.el7.x86_64
2023/08/02 03:56:56 [notice] 1#1: getrlimit(RLIMIT_NOFILE): 1048576:1048576
2023/08/02 03:56:56 [notice] 1#1: start worker processes
2023/08/02 03:56:56 [notice] 1#1: start worker process 32
2023/08/02 03:56:56 [notice] 1#1: start worker process 33
2023/08/02 03:56:56 [notice] 1#1: start worker process 34
2023/08/02 03:56:56 [notice] 1#1: start worker process 35
192.168.2.1 - - [02/Aug/2023:03:58:40 +0000] "GET / HTTP/1.1" 200 615 "-" "Mozilla/5.0 (Windows NT 10.0; Win64; x64) AppleWebKit/537.36 (KHTML, like Gecko) Chrome/115.0.0.0 Safari/537.36 Edg/115.0.1901.188" "-"
2023/08/02 03:58:40 [error] 34#34: *1 open() "/usr/share/nginx/html/favicon.ico" failed (2: No such file or directory), client: 192.168.2.1, server: localhost, request: "GET /favicon.ico HTTP/1.1", host: "192.168.2.118:800", referrer: "http://192.168.2.118:800/"
192.168.2.1 - - [02/Aug/2023:03:58:40 +0000] "GET /favicon.ico HTTP/1.1" 404 555 "http://192.168.2.118:800/" "Mozilla/5.0 (Windows NT 10.0; Win64; x64) AppleWebKit/537.36 (KHTML, like Gecko) Chrome/115.0.0.0 Safari/537.36 Edg/115.0.1901.188" "-"
将修改过的nginx镜像做标记封装,准备上传到私有仓库
[root@localhost ~]# docker tag nginx 192.168.2.118:5000/nginx-test[root@localhost ~]# docker push 192.168.2.118:5000/nginx-testUsing default tag: latest
The push refers to repository [192.168.2.118:5000/nginx-test]
Get "https://192.168.2.118:5000/v2/": http: server gave HTTP response to HTTPS client[root@localhost ~]#  cat /etc/docker/daemon.json {"registry-mirrors":[ "https://nyakyfun.mirror.aliyuncs.com" ],"insecure-registries":["192.168.2.118:5000"]
}[root@localhost ~]# systemctl daemon-reload[root@localhost ~]# systemctl restart docker
将镜像上传到私有仓库
[root@localhost ~]# docker push 192.168.2.118:5000/nginx-testUsing default tag: latest
The push refers to repository [192.168.2.118:5000/nginx-test]
d874fd2bc83b: Pushed
32ce5f6a5106: Pushed
f1db227348d0: Pushed
b8d6e692a25e: Pushed
e379e8aedd4d: Pushed
2edcec3590a4: Pushed
latest: digest: sha256:ee89b00528ff4f02f2405e4ee221743ebc3f8e8dd0bfd5c4c20a2fa2aaa7ede3 size: 1570
从私有仓库中下载镜像到本地
[root@localhost ~]# docker rmi 192.168.2.118:5000/nginx-testUntagged: 192.168.2.118:5000/nginx-test:latest
Untagged: 192.168.2.118:5000/nginx-test@sha256:ee89b00528ff4f02f2405e4ee221743ebc3f8e8dd0bfd5c4c20a2fa2aaa7ede3[root@localhost ~]# docker imagesREPOSITORY   TAG       IMAGE ID       CREATED         SIZE
nginx        latest    605c77e624dd   19 months ago   141MB
registry     latest    b8604a3fe854   20 months ago   26.2MB[root@localhost ~]# docker pull 192.168.2.118:5000/nginx-testUsing default tag: latest
latest: Pulling from nginx-test
Digest: sha256:ee89b00528ff4f02f2405e4ee221743ebc3f8e8dd0bfd5c4c20a2fa2aaa7ede3
Status: Downloaded newer image for 192.168.2.118:5000/nginx-test:latest
192.168.2.118:5000/nginx-test:latest[root@localhost ~]# docker imagesREPOSITORY                      TAG       IMAGE ID       CREATED         SIZE
nginx                           latest    605c77e624dd   19 months ago   141MB
192.168.2.118:5000/nginx-test   latest    605c77e624dd   19 months ago   141MB
registry                        latest    b8604a3fe854   20 months ago   26.2MB
七、Docker资源限制
Docker容器技术底层是通过Cgroup(Control Group 控制组)实现容器对物理资源使用的限制,限制的资源包括CPU、内存、磁盘三个方面。基本覆盖了常见的资源配额和使用量控制。
Cgroup 是Linux 内核提供的一种可以限制、记录、隔离进程组所使用的物理资源的机制,被LXC及Docker等很多项目用于实现进程的资源控制。
Cgroup 是提供将进程进行分组化管理的功能和接口的基础结构,Docker中I/O 或内存的分配控制等具体的资源管理功能都是通过Cgroup功能来实现的。这些具体的资源管理功能称为Cgroup子系统,以下是对几大子系统的介绍。
- blkio:限制块设备的输入输出控制。如:磁盘、光盘、USB等。
- cpu:限制CPU资源的访问
- cpuacct:产生Cgroup 任务的CPU资源报告。
- cpuset:限制分配单独的cpu 和内存资源。
- devices:允许或拒绝对设备的访问。
- freezer:暂停和恢复Cgroup 任务。
- memory:设置每个Cgroup 的内存限制以及产生内存资源报告。
- net_cls:用于标记每个网络包。
- ns:命名空间子系统。
- perf_event:增加了对每group 的监测跟踪的能力,可以监测属于某个特定的group 的所有线程以及运行在特定CPU 上的线程。
centos-7-x86_64.tar提取链接:https://pan.baidu.com/s/155YCVkJr6rXKf7VP-ZXFwQ?pwd=e12x
提取码:e12x
使用下面的Dockerfile 来创建一个基于CentOS的stress工具镜像。
[root@localhost ~]# cat centos-7-x86_64.tar.gz | docker import - centos:7sha256:bd0569f5d7da160cecb1437baf48b28d31a303777785053f4189ff1af97e7342[root@localhost ~]# mkdir stress[root@localhost ~]# cd stress[root@localhost stress]# vim DockerfileFROM centos:7
MAINTAINER crushlinux "crushlinux@163.com"
RUN yum -y install wget
RUN wget -O /etc/yum.repos.d/epel.repo http://mirrors.aliyun.com/repo/epel-7.repo
RUN yum -y install stress[root@localhost stress]# docker build -t centos:stress .[+] Building 48.6s (8/8) FINISHED                                                   docker:default=> [internal] load build definition from Dockerfile                                          0.0s=> => transferring dockerfile: 288B                                                          0.0s=> [internal] load .dockerignore                                                             0.0s=> => transferring context: 2B                                                               0.0s=> [internal] load metadata for docker.io/library/centos:7                                   0.0s=> [1/4] FROM docker.io/library/centos:7                                                     0.0s=> [2/4] RUN yum -y install wget                                                            31.9s=> [3/4] RUN wget -O /etc/yum.repos.d/epel.repo http://mirrors.aliyun.com/repo/epel-7.repo   1.8s=> [4/4] RUN yum -y install stress                                                          14.1s => exporting to image                                                                        0.7s => => exporting layers                                                                       0.6s => => writing image sha256:4907ba4a7a63ba68cab027bcc5191665bad0898ad7229435b528e364e154d399  0.0s => => naming to docker.io/library/centos:stress
7.1、CPU使用率
在CentOS7中可以通过修改对应的Cgroup配置文件cpu.cfs_quota_us的值来实现,直接执行echo命令将设定值导入到文件中就会立即生效。
例如将容器ddb8e55d1c09的CPU使用设置为20000,设置CPU的使用率限定为20%。
[root@localhost ~]# docker run -itd centos:stress /bin/bashddb8e55d1c094fe9734994ffe3a61fafebf2237eded6ebffa507f61d32921010[root@localhost ~]# docker ps -a CONTAINER ID IMAGE COMMAND CREATED STATUS PORTS NAMESddb8e55d1c09 centos:stress "/bin/bash" 9 seconds ago Up 8 seconds dazzling_euclid[root@localhost ~]# echo "20000" > /sys/fs/cgroup/cpu,cpuacct/docker/ddb8e55d1c094fe9734994ffe3a61fafebf2237eded6ebffa507f61d32921010/cpu.cfs_quota_us
7.2、CPU共享比例
当多个容器任务运行时,很难计算CPU的使用率,为了使容器合理使用CPU资源,可以通过--cpu-shares选项设置容器按比例共享CPU资源,这种方式还可以实现CPU使用率的动态调整。
命令中的--cpu-shares 选项值不能保证可以获得1 个vcpu 或者多少GHz 的CPU 资源,仅仅只是一个弹性的加权值。
默认情况下,每个docker容器的cpu份额都是1024。单独一个容器的份额是没有意义的。只有在同时运行多个容器时,容器的CPU加权的效果才能体现出来。例如,两个容器A、B的CPU份额分别为1000和500,在CPU进行时间片分配的时候,容器A比容器B多一倍的机会获得CPU的时间片。但分配的结果取决于当时主机和其他容器的运行状态,实际上也无法保证容器A一定能获得CPU时间片。比如容器A的进程一直是空闲的,那么容器B 是可以获取比容器A更多的CPU时间片的。极端情况下,比如说主机上只运行了一个容器,即使它的CPU份额只有50,它也可以独占整个主机的CPU资源。
Cgroups 只在容器分配的资源紧缺时,也就是说在需要对容器使用的资源进行限制时才会生效。因此无法单纯根据某个容器的CPU份额来确定有多少CPU 资源分配给它,资源分配结果取决于同时运行的其他容器的CPU分配和容器中进程运行情况。
换句话说,可以通过cpu shares可以设置容器使用CPU的优先级,比如启动了两个容器及运行查看CPU使用百分比。
[root@localhost ~]# docker run -tid --name cpu512 --cpu-shares 512 centos:stress stress -c 10b2d3e64065f09a683e352722d187c097e2b4bf161a4cc08444a304700a101e23[root@localhost ~]#  docker run -tid --name cpu1024 --cpu-shares 1024 centos:stress stress -c 105c59dc0f47d3f6bde8003d8b6f684e6fc8268ef792d282e1c335abbbcc3edfa8[root@localhost ~]# docker ps -aCONTAINER ID   IMAGE           COMMAND                   CREATED              STATUS                   PORTS                                       NAMES5c59dc0f47d3   centos:stress   "stress -c 10"            10 seconds ago       Up 8 seconds
cpu1024b2d3e64065f0   centos:stress   "stress -c 10"            About a minute ago   Up About a minute                                                    cpu512ddb8e55d1c09   centos:stress   "/bin/bash"               53 minutes ago       Up 53 minutes                                                        dazzling_euclidbc0698d60239   nginx           "/docker-entrypoint.…"   4 hours ago          Exited (0) 2 hours ago                                               zealous_darwinf5b026b08295   registry        "/entrypoint.sh /etc…"   4 hours ago          Up About an hour         0.0.0.0:5000->5000/tcp, :::5000->5000/tcp   hardcore_cori[root@localhost ~]# docker exec -it b2d3e64065f0 /bin/bash[root@b2d3e64065f0 /]# toptop - 03:31:32 up  5:48,  0 users,  load average: 19.89, 12.06, 5.18
Tasks:  14 total,  11 running,   3 sleeping,   0 stopped,   0 zombie
%Cpu(s): 99.9 us,  0.1 sy,  0.0 ni,  0.0 id,  0.0 wa,  0.0 hi,  0.0 si,  0.0 st
KiB Mem :  3861080 total,  1333692 free,   350952 used,  2176436 buff/cache
KiB Swap:  2097148 total,  2097148 free,        0 used.  3107816 avail Mem PID USER      PR  NI    VIRT    RES    SHR S  %CPU %MEM     TIME+ COMMAND                      9 root      20   0    7260     96      0 R  14.3  0.0   1:00.20 stress                       11 root      20   0    7260     96      0 R  14.3  0.0   0:59.15 stress                       12 root      20   0    7260     96      0 R  14.3  0.0   1:00.03 stress                       15 root      20   0    7260     96      0 R  14.3  0.0   1:01.25 stress                       13 root      20   0    7260     96      0 R  14.0  0.0   0:59.02 stress                       16 root      20   0    7260     96      0 R  14.0  0.0   1:01.54 stress                       8 root      20   0    7260     96      0 R  12.7  0.0   0:59.61 stress                       10 root      20   0    7260     96      0 R  12.7  0.0   0:59.41 stress                       7 root      20   0    7260     96      0 R  12.3  0.0   1:00.28 stress                       14 root      20   0    7260     96      0 R  12.3  0.0   0:59.47 stress                       1 root      20   0    7260    644    548 S   0.0  0.0   0:00.03 stress                       23 root      20   0   11772   1804   1448 S   0.0  0.0   0:00.01 bash                         39 root      20   0   11772   1808   1448 S   0.0  0.0   0:00.01 bash                         55 root      20   0   51864   1920   1408 R   0.0  0.0   0:00.00 top
[root@localhost ~]# docker exec -it 5c59dc0f47d3 /bin/bash[root@5c59dc0f47d3 /]# toptop - 03:34:52 up 5:51, 0 users, load average: 20.41, 16.06, 8.10
Tasks: 13 total, 11 running, 2 sleeping, 0 stopped, 0 zombie
%Cpu(s):100.0 us, 0.0 sy, 0.0 ni, 0.0 id, 0.0 wa, 0.0 hi, 0.0 si, 0.0 st
KiB Mem : 3861080 total, 1338616 free, 345936 used, 2176528 buff/cache
KiB Swap: 2097148 total, 2097148 free, 0 used. 3112744 avail Mem PID USER PR NI VIRT RES SHR S %CPU %MEM TIME+ COMMAND 11 root 20 0 7260 92 0 R 30.9 0.0 1:56.49 stress 12 root 20 0 7260 92 0 R 28.2 0.0 1:55.71 stress 16 root 20 0 7260 92 0 R 28.2 0.0 1:57.39 stress 14 root 20 0 7260 92 0 R 27.6 0.0 1:53.74 stress 13 root 20 0 7260 92 0 R 25.2 0.0 1:57.68 stress 7 root 20 0 7260 92 0 R 24.9 0.0 1:55.63 stress 8 root 20 0 7260 92 0 R 24.9 0.0 1:55.41 stress 9 root 20 0 7260 92 0 R 24.9 0.0 1:54.88 stress 15 root 20 0 7260 92 0 R 24.9 0.0 1:59.09 stress 10 root 20 0 7260 92 0 R 24.6 0.0 1:56.37 stress 1 root 20 0 7260 640 548 S 0.0 0.0 0:00.01 stress 17 root 20 0 11772 1808 1448 S 0.0 0.0 0:00.04 bash 33 root 20 0 51860 1924 1408 R 0.0 0.0 0:00.00 top 开启了10 个stress 进程,目的是充分让系统资源变得紧张。只有这样竞争资源,设定的资源比例才可以显现出来。如果只运行一个进行,会自动分配到空闲的CPU,这样比例就无法看出来。由于案例的环境不一样,可能导致上面两张图中占用CPU 百分比会不同,但是从cpu share 来看两个容器总比例一定会是1:2。
7.3、CPU周期限制
docker 提供了--cpu-period、--cpu-quota 两个参数控制容器可以分配到的CPU 时钟周期。
- --cpu-period 是用来指定容器对CPU的使用要在多长时间内做一次重新分配。
- --cpu-quota 是用来指定在这个周期内,最多可以有多少时间用来跑这个容器。与--cpu-shares 不同的是:这种配置是指定一个绝对值,而且没有弹性在里面,容器对CPU 资源的使用绝对不会超过配置的值。
cpu-period 和cpu-quota 的单位为微秒(μs)。cpu-period 的最小值为1000 微秒,
最大值为1 秒(10^6 μs),默认值为0.1 秒(100000 μs)。cpu-quota 的值默认为-1,
表示不做控制。cpu-period、cpu-quota 这两个参数一般联合使用。
举个例子,如果容器进程需要每1 秒使用单个CPU 的0.2 秒时间,可以将cpu-period 设置为1000000(即1 秒),cpu-quota 设置为200000(0.2 秒)。当然,在多核情况下,如果允许容器进程需要完全占用两个CPU,则可以将cpu-period 设置为100000(即0.1 秒),cpu-quota 设置为200000(0.2 秒)。
[root@localhost ~]# docker run -it --cpu-period 10000 --cpu-quota 20000 centos:stress /bin/bash[root@aa6136f8cb7b /]# cat /sys/fs/cgroup/cpu/cpu.cfs_period_us 10000[root@aa6136f8cb7b /]# cat /sys/fs/cgroup/cpu/cpu.cfs_quota_us 20000
7.4、CPU核心限制
多核CPU的服务器Docker还可以控制容器运行限定使用哪些CPU内核,可以使用--cpuset-cpus选项来使某些程序独享CPU核心,以便提高其处理速度,对应的Cgroup文件为/sys/fs/cgroup/cpuset/docker/容器ID号/cpuset.cpus。选项后直接跟参数0、1、2……表示第1个内核,第2个内核,第3个内核,与/proc/cpuinfo中的标号相同。
如果服务器有16个核心,那么CPU编号为0~15,使新建容器绑定第1~4的核心使用:
[root@localhost ~]# docker run -itd --cpuset-cpus 0,1,2,3 centos:stress /bin/bash
7f26046560e1f1e1d91dfe3d16bded32d37ffcaef964725a68eaf16b99722fa7或[root@localhost ~]# docker run -itd --cpuset-cpus 0-3 centos:stress /bin/bash
1b69dabb453be291dcd87dbeca4f15f6761c0868feae0d53ea80097fbbd210b6
那么该容器内的进程只会在0,1,2,3的CPU上运行。
通过下面指令也可以看到容器中进程与CPU 内核的绑定关系,可以认为达到了绑定CPU 内核的目的。
[root@localhost ~]# docker exec 1b69dabb453b taskset -c -p 1
pid 1's current affinity list: 0-3            #容器内部第一个进程编号一般为1
尽量使用绑定内核的方式分配CPU资源给容器进程使用,然后在配合--cpu-shares选项动态调整CPU使用资源的比例。
7.5、CPU 配额控制参数的混合案例
通过--cpuset-cpus 指定容器A 使用CPU 内核0,容器B 只是用CPU 内核1。在主机上只有这两个容器使用对应CPU 内核的情况,它们各自占用全部的内核资源,--cpu-shares 没有明显效果。
--cpuset-cpus、--cpuset-mems 参数只在多核、多内存节点上的服务器上有效,并且必须与实际的物理配置匹配,否则也无法达到资源控制的目的。
在系统具有多个CPU 内核的情况下,需要通过cpuset-cpus 为容器CPU 内核才能比较方便地进行测试。
用下列命令创建测试用的容器:
[root@localhost ~]# docker run -itd --name cpu3 --cpuset-cpus 3 --cpu-shares 512 centos:stress stress -c 1004cb93f1d76e4b30e001ad7b2afc51dfcedef818970edcf0763aba56a45cea2[root@localhost ~]# docker exec -it 004cb93f1d76 /bin/bash[root@004cb93f1d76 /]# toptop - 03:57:24 up  6:14,  0 users,  load average: 5.43, 15.35, 15.68
Tasks:   4 total,   2 running,   2 sleeping,   0 stopped,   0 zombie
%Cpu(s):  8.0 us,  0.1 sy,  0.0 ni, 91.9 id,  0.0 wa,  0.0 hi,  0.0 si,  0.0 st
KiB Mem :  3861080 total,  1396020 free,   291912 used,  2173148 buff/cache
KiB Swap:  2097148 total,  2097148 free,        0 used.  3170028 avail Mem PID USER      PR  NI    VIRT    RES    SHR S  %CPU %MEM     TIME+ COMMAND                      7 root      20   0    7260     96      0 R 100.0  0.0   1:18.70 stress                       1 root      20   0    7260    436    352 S   0.0  0.0   0:00.01 stress                       8 root      20   0   11772   1800   1444 S   0.0  0.0   0:00.01 bash                         24 root      20   0   51880   1872   1388 R   0.0  0.0   0:00.00 top
[root@localhost ~]# docker run -itd --name cpu4 --cpuset-cpus 3 --cpu-shares 1024 centos:stress stress -c 18998d47911ade2227fe71fce69a125be34a5714868cb7d4fbf3fe40a9fae4164[root@localhost ~]# docker exec -it 8998d47911ad /bin/bash[root@8998d47911ad /]# toptop - 04:00:08 up 6:16, 0 users, load average: 2.03, 9.50, 13.38
Tasks: 4 total, 2 running, 2 sleeping, 0 stopped, 0 zombie
%Cpu(s): 24.8 us, 0.0 sy, 0.0 ni, 74.7 id, 0.0 wa, 0.0 hi, 0.5 si, 0.0 st
KiB Mem : 3861080 total, 1383908 free, 302924 used, 2174248 buff/cache
KiB Swap: 2097148 total, 2097148 free, 0 used. 3158056 avail Mem PID USER PR NI VIRT RES SHR S %CPU %MEM TIME+ COMMAND 7 root 20 0 7260 92 0 R 66.4 0.0 0:48.96 stress 1 root 20 0 7260 432 352 S 0.0 0.0 0:00.01 stress 8 root 20 0 11772 1804 1448 S 0.0 0.0 0:00.01 bash 24 root 20 0 51852 1912 1408 R 0.0 0.0 0:00.00 top 上面的centos:stress 镜像安装了stress 工具,用来测试CPU 和内存的负载。通过在两个容器上分别执行stress -c 1 命令,将会给系统一个随机负载,产生1 个进程。这个进程都反复不停的计算由rand() 产生随机数的平方根,直到资源耗尽。
观察到宿主机上的CPU 试用率,第三个内核的使用率接近100%,并且一批进程的CPU 使用率明显存在2:1 的使用比例的对比。
7.6、内存限制
与操作系统类似,容器可使用的内存包括两部分:物理内存和swap。Docker 通过下面两组参数来控制容器内存的使用量。
- -m 或--memory:设置内存的使用限额,例如100M, 1024M。
- --memory-swap:设置内存swap 的使用限额。
当执行如下命令:
其含义是允许该容器最多使用200M 的内存和300M 的swap。
[root@localhost ~]# docker run -it -m 200M --memory-swap=300M progrium/stress --vm 1 --vm-bytes 280Mstress: info: [1] dispatching hogs: 0 cpu, 0 io, 1 vm, 0 hdd
stress: dbug: [1] using backoff sleep of 3000us
stress: dbug: [1] --> hogvm worker 1 [7] forked
stress: dbug: [7] allocating 293601280 bytes ...
stress: dbug: [7] touching bytes in strides of 4096 bytes ...
stress: dbug: [7] freed 293601280 bytes
stress: dbug: [7] allocating 293601280 bytes ...
stress: dbug: [7] touching bytes in strides of 4096 bytes ...
stress: dbug: [7] freed 293601280 bytes
- --vm 1:启动1 个内存工作线程。
- --vm-bytes 280M:每个线程分配280M 内存。
默认情况下,容器可以使用主机上的所有空闲内存。与CPU 的cgroups 配置类似,docker 会自动为容器在目录/sys/fs/cgroup/memory/docker/<容器的完整长ID>中创建相应cgroup 配置文件。
因为280M 在可分配的范围(300M)内,所以工作线程能够正常工作,其过程是:
- 分配280M 内存。
- 释放280M 内存。
- 再分配280M 内存。
- 再释放280M 内存。
- 一直循环......
如果让工作线程分配的内存超过300M,分配的内存超过限额,stress 线程报错,容器退出。
[root@localhost ~]# docker run -it -m 200M --memory-swap=300M progrium/stress --vm 1 --vm-bytes 380Mstress: info: [1] dispatching hogs: 0 cpu, 0 io, 1 vm, 0 hdd
stress: dbug: [1] using backoff sleep of 3000us
stress: dbug: [1] --> hogvm worker 1 [7] forked
stress: dbug: [7] allocating 398458880 bytes ...
stress: dbug: [7] touching bytes in strides of 4096 bytes ...
stress: FAIL: [1] (416) <-- worker 7 got signal 9
stress: WARN: [1] (418) now reaping child worker processes
stress: FAIL: [1] (422) kill error: No such process
stress: FAIL: [1] (452) failed run completed in 0s
7.7、Block IO 的限制
默认情况下,所有容器能平等地读写磁盘,可以通过设置--blkio-weight 参数来改变容器block IO 的优先级。
--blkio-weight 与--cpu-shares 类似,设置的是相对权重值,默认为500。在下面的例子中,容器A 读写磁盘的带宽是容器B 的两倍。
[root@localhost ~]# docker run -it --name container_A --blkio-weight 600 centos:stress /bin/bash[root@9a1ade37e4a2 /]# cat /sys/fs/cgroup/blkio/blkio.weight600[root@9a1ade37e4a2 /]# cat /sys/fs/cgroup/blkio/blkio.weight[root@localhost ~]# [root@localhost ~]# docker run -it --name container_B --blkio-weight 300 centos:stress /bin/bash[root@82d39cad4b92 /]# cat /sys/fs/cgroup/blkio/blkio.weight300
7.8、限制bps 和iops
如果在一台服务器上进行容器的混合部署,那么会存在同时几个程序写磁盘数据的情况,这时可以通过--device-write-iops选项来限制每秒写io次数来限制制定设备的写速度。相应的还有--device-read-iops选项可以限制读取IO的速度,但是这种方法只能限制设备,而不能限制分区,相应的Cgroup写配置文件为/sys/fs/cgroup/blkio/容器ID/ blkio.throttle.write_iops_device。
- bps 是byte per second,每秒读写的数据量。
- iops 是io per second,每秒IO 的次数。
可通过以下参数控制容器的bps 和iops:
- --device-read-bps,限制读某个设备的bps
- --device-write-bps,限制写某个设备的bps
- --device-read-iops,限制读某个设备的iops
- --device-write-iops,限制写某个设备的iops
下面的示例是限制容器写/dev/sda 的速率为5 MB/s。
[root@localhost ~]# docker run -it --device-write-bps /dev/sda:5MB centos:stress /bin/bash[root@f4b37691fa4d /]# dd if=/dev/zero of=test bs=1M count=100 oflag=direct100+0 records in
100+0 records out
104857600 bytes (105 MB) copied, 20.006 s, 5.2 MB/s
通过dd 测试在容器中写磁盘的速度。因为容器的文件系统是在host /dev/sda 上的,在容器中写文件相当于对宿主机/dev/sda 进行写操作。另外,oflag=direct 指定用direct
IO 方式写文件,这样--device-write-bps 才能生效。
结果表明,bps 5.2 MB/s 在限速5MB/s 左右。作为对比测试,如果不限速,结果如下:
[root@localhost ~]# docker run -it centos:stress /bin/bash[root@d324fcfe3cbb /]# dd if=/dev/zero of=test bs=1M count=100100+0 records in
100+0 records out
104857600 bytes (105 MB) copied, 0.0527029 s, 2.0 GB/s
8、Docker数据持久化
8.1、数据持久化介绍
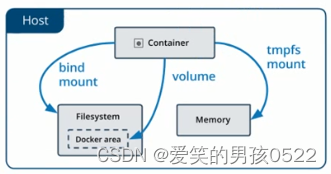
在Docker中若要想实现容器数据的持久化(所谓的数据持久化即数据不随着Container的结束而销毁),需要将数据从宿主机挂载到容器中。目前Docker提供了三种不同的方式将数据从宿主机挂载到容器中。
(1)Volumes:Docker会管理宿主机文件系统的一部分资源,默认位于 /var/lib/docker/volumes 目录中;(最常用的方式)
[root@localhost ~]# docker run -it -v /opt/ centos /bin/bashUnable to find image 'centos:latest' locally
latest: Pulling from library/centos
a1d0c7532777: Already exists
Digest: sha256:a27fd8080b517143cbbbab9dfb7c8571c40d67d534bbdee55bd6c473f432b177
Status: Downloaded newer image for centos:latest[root@630ab274dcd8 /]# touch /opt/test.txt[root@630ab274dcd8 /]# ls /opt/         test.txt[root@localhost ~]# ls /var/lib/docker/volumes/3e75601aeaa96d13807f38d22fd13666db6ead38af2ce543a249e5515d497bca/_data/test.txt
目前所有Container的数据都保存在/var/lib/docker/volumes/目录下边,由于没有在创建时指定卷,所以Docker帮我们默认创建许多匿名(就上面这一堆很长ID的名字)卷。
(2)bind mounts:意为着可以指定存储在宿主机系统的任意位置;(比较常用的方式)
但是bind mounts在不同的宿主机系统之间是不可移植的,比如Windows和Linux的存储结构是不一样的,bind mount所指向的host目录也不能一样。这也是为什么bind mount不能出现在Dockerfile中的原因,因为会导致Dockerfile无法移植。
(3)tmpfs:挂载存储在宿主机系统的内存中,而不会写入宿主机的文件系统;(一般都不会用的方式)
8.2、Volume的基本使用
8.2.1、管理卷
创建一个自定义容器卷
[root@localhost ~]# docker volume create nginx-data
nginx-data
查看所有容器卷
[root@localhost ~]# docker volume lsDRIVER    VOLUME NAME
local     nginx-data
查看指定容器卷详情信息
[root@localhost ~]# docker volume inspect nginx-data
[{"CreatedAt": "0001-01-01T00:00:00Z","Driver": "local","Labels": null,"Mountpoint": "/var/lib/docker/volumes/nginx-data/_data","Name": "nginx-data","Options": null,"Scope": "local"}
]
8.2.2、创建使用指定卷的容器
有了自定义容器卷,我们可以创建一个使用这个数据卷的容器
[root@localhost ~]# docker run -d -it --name=nginx -p 800:80 -v nginx-data:/usr/share/nginx/html nginx67a5acf397730011f702127cd7d5001f3c87d12060ed2b0e7bf2015c0d8ba94e[root@localhost ~]# docker exec -it nginx /bin/bashroot@67a5acf39773:/# ls /usr/share/nginx/html/50x.html index.html
选项-v代表挂载数据卷,这里使用自定数据卷nginx-data,并且将数据卷挂载到 /usr/share/nginx/html (这个目录是yum安装nginx的默认网页目录)。如果没有通过-v指定,那么Docker会默认帮我们创建匿名数据卷进行映射和挂载。
注意:
- 数据卷下无文件,显示容器对应目录下的文件
- 数据卷下有文件,显示数据卷原有文件,并将容器对应目录的文件隐藏,显示数据卷文件
可以看到网页目录下有两个默认页面,这时我们可以查看宿主机文件系统的数据
[root@localhost ~]# ls /var/lib/docker/volumes/nginx-data/_data/50x.html index.html
可以看到容器里面的两个默认页面,由此可知Volume帮我们做了类似于一个软链接的功能。在容器里边的改动,我们可以在宿主机里感知,而在宿主机里面的改动,在容器里边可以感知到。
如果我们手动stop并且remove当前nginx容器,我们会发现容器卷里面的文件还在,并没有随着容器被删除掉。
[root@localhost ~]# docker stop nginxnginx[root@localhost ~]# docker rm nginxnginx[root@localhost ~]# ls /var/lib/docker/volumes/nginx-data/_data/50x.html index.html
所以在数据卷里边的东西是可以持久化的。如果下次还需要创建一个nginx容器,那么时候复用当前数据卷里面文件的。
[root@localhost ~]# docker run -d -it --name=nginx2 -p 801:80 -v nginx-data:/usr/share/nginx/html nginx6741a1c3ea19a45333e0330191c023bc3e04bfad85498edd4c160e0871996ea7[root@localhost ~]# docker exec -it nginx2 /bin/bashroot@6741a1c3ea19:/# ls /usr/share/nginx/html/50x.html index.html此外,我们还可以启动多个nginx容器实例,共享同一个数据卷。数据卷的复用性和扩展性较强的。
8.2.3、清理卷
如果不再使用自定义数据卷了,那么可以手动清理掉:
[root@localhost ~]# docker volume rm -f nginx-datanginx-data[root@localhost ~]# docker volume lsDRIVER VOLUME NAME
8.3、Bind Mounts的基本使用
8.3.1 使用卷创建一个容器
[root@localhost ~]# docker run -d -it --name=nginx -p 800:80 -v /wwwroot:/usr/share/nginx/html nginx0bc4e5c1975bb7fff3d8e5886e78c6711de7204ba7a09cddb24c410421c53f23这里指定了将宿主机上的 /wwwroot 目录(如果没有会自动创建)挂载到 /usr/share/nginx/html (这个目录是yum安装nginx的默认网页目录)。
docker挂载的默认权限是读写(rw),用户也可以通过ro指定为只读
[root@localhost ~]# docker run -d -it --name=nginx2 -p 801:80 -v /wwwroot:/usr/share/nginx/html:ro nginx0aba96663db35032504213f6aab44424e88d2e0a2e39592e3f1c94ae23e35269
[root@localhost ~]# docker exec -it nginx /bin/bashroot@0bc4e5c1975b:/# ls /usr/share/nginx/html/
可以看到,与volumes不同,bind mounts的方式会隐藏掉被挂载目录里面的内容(如果非空的话),这里是/usr/share/nginx/html 目录下的内容被隐藏掉了,因此我们看不到。
但是,我们可以将宿主机上的文件随时挂载到容器中:
新建一个index.html,并在容器中查看
[root@localhost ~]# echo "test html" > /wwwroot/index.html[root@localhost ~]# docker exec -it nginx /bin/bashroot@0bc4e5c1975b:/# ls /usr/share/nginx/html/index.html
8.3.2、验证绑定
[root@localhost ~]# docker inspect nginx"HostConfig": {"Binds": ["/wwwroot:/usr/share/nginx/html"],
8.3.3、清理
[root@localhost ~]# docker stop nginxnginx[root@localhost ~]# docker rm nginxnginx[root@localhost ~]# ls /wwwroot/index.html
同volumes一样,当我们清理掉容器之后,挂载目录里面的文件仍然还在,不会随着容器的结束而消失,从而实现数据持久化。
8.4、数据卷容器
8.4.1、数据卷容器概述
用户需要在容器之间共享一些持续性更新的数据时,可以使用数据卷容器。数据容器也是一个普通的容器。里边带有设置好的数据卷,专门提供给其他容器挂载使用。 通过--volumes-from 数据卷容器名来实现。
8.4.2、创建数据卷容器
[root@localhost ~]# docker run -it -v /dbdata:/dbdata --name=dbdata centos /bin/bashUnable to find image 'centos:latest' locally
latest: Pulling from library/centos
a1d0c7532777: Already exists
Digest: sha256:a27fd8080b517143cbbbab9dfb7c8571c40d67d534bbdee55bd6c473f432b177
Status: Downloaded newer image for centos:latest[root@36cd7b069c08 /]# exitexit
//创建一个数据卷容器,并在其中创建一个数据卷挂载到/dbdata
进入test1容器创建文件测试
[root@localhost ~]# docker run -it --volumes-from dbdata --name test1 centos /bin/bash[root@e06b68cbae34 /]# lsbin	dev  home  lib64       media  opt   root  sbin	sys  usr
dbdata	etc  lib   lost+found  mnt    proc  run   srv	tmp  var[root@e06b68cbae34 /]# touch dbdata/crushlinux[root@e06b68cbae34 /]# lsbin	dev  home  lib64       media  opt   root  sbin	sys  usr
dbdata	etc  lib   lost+found  mnt    proc  run   srv	tmp  var[root@e06b68cbae34 /]# ls dbdata/crushlinux[root@e06b68cbae34 /]# exitexit
//在test1容器的/dbdata目录创建测试文件
进入test2容器验证结果
[root@localhost ~]# docker run -it --volumes-from dbdata --name test2 centos /bin/bash[root@bbaf174a1aa9 /]# lsbin	dev  home  lib64       media  opt   root  sbin	sys  usr
dbdata	etc  lib   lost+found  mnt    proc  run   srv	tmp  var[root@bbaf174a1aa9 /]# ls dbdata/crushlinux
说明:
- 可以多次使用--volume-from参数从多个容器挂载多个目录。也可以从其他已经挂载了数据卷的容器来挂载数据卷(类似传递)。
- 再次强调:如果删除了挂载的容器,数据卷不会被自动删除。如果要删除容器的时候同时删除数据卷,需加上-v参数。
相关文章:
docker容器创建私有仓库(第三篇)
目录 六、创建私有仓库 七、Docker资源限制 7.1、CPU使用率 7.2、CPU共享比例 7.3、CPU周期限制 7.4、CPU核心限制 7.5、CPU 配额控制参数的混合案例 7.6、内存限制 7.7、Block IO 的限制 7.8、限制bps 和iops 8、Docker数据持久化 8.1、数据持久化介绍 8.2、Volum…...

Eureka 学习笔记4:客户端 DiscoveryClient
版本 awsVersion ‘1.11.277’ DiscoveryClient # cacheRefreshTask // 配置shouldFetchRegistry if (clientConfig.shouldFetchRegistry()) {// 配置client.refresh.intervalint registryFetchIntervalSeconds clientConfig.getRegistryFetchIntervalSeconds();// 配置expB…...
【方法】PDF可以转换成Word文档吗?如何操作?
很多人喜欢在工作中使用PDF,因为PDF格式可以准确地保留文档的原始格式,比如字体、图像、布局和颜色等。 但如果编辑文档的话,PDF还是没有Word文档方便。那可以将PDF转换成Word格式,再来编辑吗?如何操作呢?…...

AlphaControls crack
AlphaControls crack AlphaControls-一组通用和一些独特的组件,支持皮肤(AlphaSkins),并具有一些附加功能。所有皮肤元素都可以有自己的属性,用于高级绘制渐变、逼真的框架、半透明和模糊的阴影。图形功能实时生成所有计算和绘图。添加了用于…...

论文笔记——Influence Maximization in Undirected Networks
Influence Maximization in Undirected Networks ContributionMotivationPreliminariesNotations Main resultsReduction to Balanced Optimal InstancesProving Theorem 3.1 for Balanced Optimal Instances Contribution 好久没发paper笔记了,这篇比较偏理论&…...

Stable Diffusion - SDXL 1.0 全部样式设计与艺术家风格的配置与提示词
欢迎关注我的CSDN:https://spike.blog.csdn.net/ 本文地址:https://spike.blog.csdn.net/article/details/132072482 来源于 Anna Dittmann 安娜迪特曼,艺术家风格的图像,融合幻想、数字艺术、纹理等样式。 SDXL 是 Stable Diffus…...

Hbase pe 压测 OOM问题解决
说明:本人使用CDH虚拟机搭建了Hbase集群,但是在压测的时发现线程多个的时候直接回OOM,记录一下 执行命令 hbase pe --nomapred --oneContrue --tablerw_test_1 --rows1000 --valueSize100 --compressSNAPPY --presplit10 --autoFlushtrue randomWrite …...

问题解决——datagrip远程连接虚拟机中ubuntu的mysql失败
问题解决——datagrid远程连接虚拟机中ubuntu的mysql失败 情况:datagrip远程win11系统下虚拟机里的ubuntu20.04的mysql,连接失败。 1 如果是防火墙没开放3306端口,则需要开放:linux 3306端口无法连接 无法通过防火墙的解决办法 …...

【晚风摇叶之随机密码生成器】随机生成密码
需求:想要生成位数不低于16的随机密码,而且要包含大小写字母,数字,特殊字符四类 用别人的在线生成器,生成的密码有个别没有数字或者特殊字符,验证方式就是,生成几个长度是4的密码,看…...

Spring Cache
什么是Spring Cache? Spring Cache是Spring框架的一个模块,它提供了对应用程序方法级别的缓存支持。通过使用Spring Cache,您可以在方法的结果被计算后,将其缓存起来,从而避免相同输入导致的重复计算。 Spring Cache…...
em3288 linux_4.19 sd卡调试
默认配置,根据实际配置即可。...

前端vue uni-app cc-countdown倒计时组件
随着技术的不断发展,传统的开发方式使得系统的复杂度越来越高。在传统开发过程中,一个小小的改动或者一个小功能的增加可能会导致整体逻辑的修改,造成牵一发而动全身的情况。为了解决这个问题,我们采用了组件化的开发模式。通过组…...
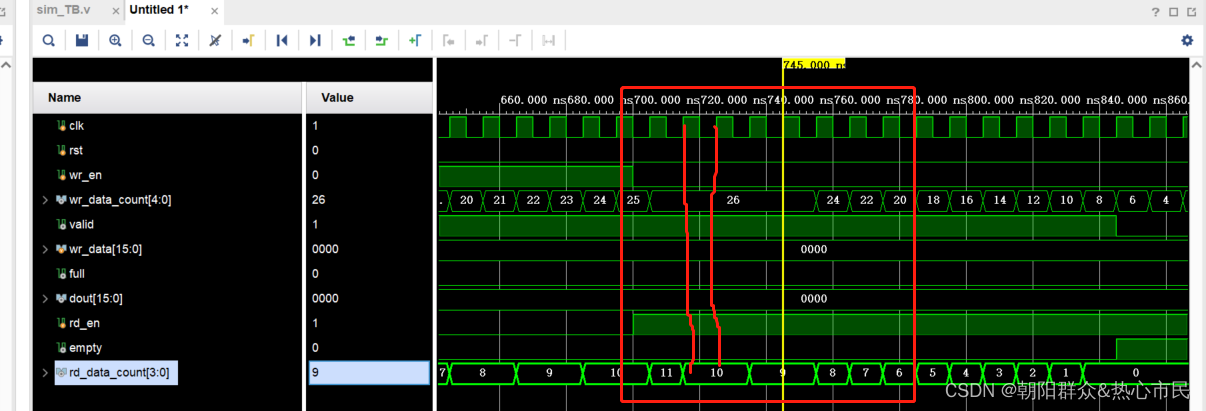
fifo读写的数据个数
fifo IP核设置读写个数 如果不勾选精确值,则统计的当前写入和待读出的数据为估计值,可能会相差2个左右。且fifo设计的wr_data_count. wr_data_count:当前的fifo中剩余已经写入的数据。 rd_data_count:当前的fifo中剩余可以读出…...
Java之Map接口
文章目录 简述Map中key-value特点 Map接口的常用方法Map的主要实现类:HashMapHashMap概述 Map实现类之二:LinkedHashMapMap实现类之三:TreeMapMap实现类之四:Hashtable(古老实现类)Map实现类之五࿱…...
,但是pycharm的terminal中无法使用。)
windows系统中的命令行可以用python,pip等命令(已在系统中添加过python环境变量),但是pycharm的terminal中无法使用。
如果你已经在Windows系统中添加了Python环境变量,那么在命令行中使用python和pip命令应该是没有问题的。但是在PyCharm的Terminal中无法使用这些命令,可能是因为PyCharm的Terminal使用的是自己的虚拟环境,而不是系统环境。 你可以尝试在PyCh…...

编译 OneFlow 模型
本篇文章译自英文文档 Compile OneFlow Models tvm 0.14.dev0 documentation 作者是 BBuf (Xiaoyu Zhang) GitHub 更多 TVM 中文文档可访问 →Apache TVM 是一个端到端的深度学习编译框架,适用于 CPU、GPU 和各种机器学习加速芯片。 | Apache TVM 中文站 本文介…...

【kubernetes】k8s单master集群环境搭建及kuboard部署
k8s入门学习环境搭建 学习于许大仙: https://www.yuque.com/fairy-era k8s官网 https://kubernetes.io/ kuboard官网 https://kuboard.cn/ 基于k8s 1.21.10版本 前置环境准备 一主两从,三台虚拟机 CPU内存硬盘角色主机名IPhostname操作系统4C16G50Gmasterk8s-mast…...
0802|IO进程线程 day5 进程概念
一、进程的基础 1.1 什么是进程 1)进程是程序的一次执行过程 程序:是静态的,它是存储在外存上的可执行二进制文件;进程:动态的概念,它是程序的一次执行过程,包括了进程的创建,调度、…...
4 Promethues监控主机和容器
目录 目录 1. 监控节点 1.1 安装Node exporter 解压包 拷贝至目标目录 查看版本 1.2 配置Node exporter 1.3 配置textfile收集器 1.4 启动systemd收集器 1.5 基于Docker节点启动node_exporter 1.6 抓取Node Exporter 1.7 过滤收集器 2. 监控Docker容器 2.1 运行cAdviso…...
亚马逊买家账号ip关联怎么处理
对于亚马逊买家账号,同样需要注意IP关联问题。在亚马逊的眼中,如果多个买家账号共享相同的IP地址,可能会被视为潜在的操纵、违规或滥用行为。这种情况可能导致账号受到限制或处罚。 处理亚马逊买家账号IP关联问题,建议采取以下步骤…...

癫痫手术精准定位:基于脑电信号昼夜节律与多生物标志物的机器学习分析框架
1. 项目概述:当机器学习遇见脑电信号,如何让癫痫手术更精准?作为一名长期耕耘在生物医学信号处理与机器学习交叉领域的工程师,我常常思考如何将算法模型从实验室的“玩具”变成临床医生手中可靠的“手术刀”。癫痫,这个…...

智慧无人机巡检-无人机可见光红外数据集 无人机多模态检测数据集 红外与可见光检测数据集
智慧无人机巡检-无人机可见光红外数据集,已完成标注,可导出各种常用数据集,yolo,voc,coco等格式。可见光33000张,红外16100张,目标一张一个 无人机可见光红外目标数据集项目详细信息数据集名称无…...

为什么软件开发偏爱 Linux?深度剖析 Linux 相较于 Windows 的核心优势
引言 在软件开发的世界里,一个有趣的现象是:无论是大型互联网公司的服务器集群,还是资深程序员的个人开发机,Linux 操作系统的身影无处不在。与之形成鲜明对比的是,尽管 Windows 在个人消费市场占据绝对主导地位&…...

人类防伪指南:为什么你越写错字,HR越信你是真人?
前言各位码农、算法侠、CtrlC/V十级学者请注意:你有没有过这样的经历?辛辛苦苦肝了一晚上文档,逻辑严密、语法丝滑、连Markdown都对齐得像军训方阵,结果老板幽幽来一句:“这真是你自己写的?”那一刻&#x…...

3大实战秘籍:揭秘raylib如何让游戏开发像搭积木一样简单
3大实战秘籍:揭秘raylib如何让游戏开发像搭积木一样简单 【免费下载链接】raylib A simple and easy-to-use library to enjoy videogames programming 项目地址: https://gitcode.com/GitHub_Trending/ra/raylib 你是否曾经被复杂的游戏引擎配置搞得焦头烂额…...

巨量投放总结
巨量商务管理平台 : https://business.oceanengine.com 巨量广告投放平台: https://ad.oceanengine.com 商务管理平台 账户 广告组 计划 广告投放平台 层级关系: 广告组 -> 计划 -> 创意 对应FB: 系列 - > 广告组 -> 广告...

从安装到排错:手把手解决Linux服务器上Nacos启动失败的十大常见问题
从安装到排错:手把手解决Linux服务器上Nacos启动失败的十大常见问题当你在Linux服务器上部署Nacos时,是否遇到过启动失败却无从下手的困境?作为阿里巴巴开源的服务发现和配置管理平台,Nacos在微服务架构中扮演着重要角色。然而&am…...

PvZ Toolkit终极指南:三步掌握植物大战僵尸最强修改器
PvZ Toolkit终极指南:三步掌握植物大战僵尸最强修改器 【免费下载链接】pvztoolkit 植物大战僵尸 PC 版综合修改器 项目地址: https://gitcode.com/gh_mirrors/pv/pvztoolkit PvZ Toolkit是一款专为植物大战僵尸PC版设计的综合修改器工具,能够让你…...

NHSE终极教程:5分钟掌握动物森友会存档编辑技巧
NHSE终极教程:5分钟掌握动物森友会存档编辑技巧 【免费下载链接】NHSE Animal Crossing: New Horizons save editor 项目地址: https://gitcode.com/gh_mirrors/nh/NHSE 还在为《集合啦!动物森友会》的收集烦恼吗?想快速打造梦想岛屿却…...

为什么92%的数据库重构失败?Claude设计辅助如何在48小时内规避反范式陷阱?
更多请点击: https://codechina.net 第一章:为什么92%的数据库重构失败?——反范式陷阱的本质溯源 数据库重构失败率高达92%,其核心症结并非技术能力不足,而是对“反范式”这一设计策略的误读与滥用。许多团队在性能压…...