Android中级——RemoteView
RemoteView
- RemoteView的应用
- Notification
- Widget
- PendingIntent
- RemoteViews内部机制
- 模拟RemoteViews
RemoteView的应用
Notification
如下开启一个系统的通知栏,点击后跳转到某网页
public class MainActivity extends AppCompatActivity {private static final String TAG = "MainActivity";protected void onCreate(Bundle savedInstanceState) {super.onCreate(savedInstanceState);setContentView(R.layout.activity_main);Intent intent = new Intent(Intent.ACTION_VIEW, Uri.parse("http://www.baidu.com"));PendingIntent pendingIntent = PendingIntent.getActivity(this, 0, intent, PendingIntent.FLAG_UPDATE_CURRENT);NotificationManager manager = (NotificationManager) getSystemService(Context.NOTIFICATION_SERVICE);NotificationChannel channel1 = new NotificationChannel("0", "channel1", NotificationManager.IMPORTANCE_LOW);manager.createNotificationChannel(channel1);Notification.Builder builder = new Notification.Builder(this, "0");builder.setSmallIcon(R.drawable.ic_launcher).setLargeIcon(Icon.createWithResource(this, R.drawable.ic_launcher)).setContentTitle("Notification").setContentText("Hello World").setContentIntent(pendingIntent);manager.notify(1, builder.build());}
}
效果如下

若采用RemoteView,可以自定义通知栏的布局,notification.xml文件如下
<?xml version="1.0" encoding="utf-8"?>
<LinearLayout xmlns:android="http://schemas.android.com/apk/res/android"android:id="@+id/root"android:layout_width="match_parent"android:layout_height="match_parent"><ImageViewandroid:id="@+id/iv"android:layout_width="0dp"android:layout_height="match_parent"android:layout_weight="1" /><TextViewandroid:id="@+id/tv"android:layout_width="0dp"android:layout_height="match_parent"android:layout_weight="1"android:gravity="center_vertical" />
</LinearLayout>
代码如下,可通过一系列set方法设置布局
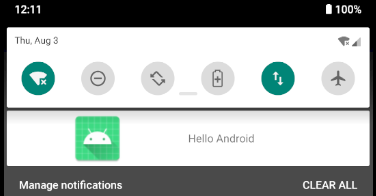
public class MainActivity extends AppCompatActivity {private static final String TAG = "MainActivity";protected void onCreate(Bundle savedInstanceState) {super.onCreate(savedInstanceState);setContentView(R.layout.activity_main);Intent intent = new Intent(Intent.ACTION_VIEW, Uri.parse("http://www.baidu.com"));PendingIntent pendingIntent = PendingIntent.getActivity(this, 0, intent, PendingIntent.FLAG_UPDATE_CURRENT);NotificationManager manager = (NotificationManager) getSystemService(Context.NOTIFICATION_SERVICE);NotificationChannel channel1 = new NotificationChannel("0", "channel1", NotificationManager.IMPORTANCE_LOW);manager.createNotificationChannel(channel1);RemoteViews remoteViews = new RemoteViews(getPackageName(), R.layout.notification);remoteViews.setTextViewText(R.id.tv, "Hello Android");remoteViews.setImageViewResource(R.id.iv, R.drawable.ic_launcher);remoteViews.setOnClickPendingIntent(R.id.root, pendingIntent);Notification.Builder builder = new Notification.Builder(this, "0");builder.setSmallIcon(R.drawable.ic_launcher).setCustomContentView(remoteViews);manager.notify(1, builder.build());}
}
效果如下
Widget
res/layout下创建widget.xml
<?xml version="1.0" encoding="utf-8"?>
<LinearLayout xmlns:android="http://schemas.android.com/apk/res/android"android:layout_width="match_parent"android:layout_height="match_parent"><ImageViewandroid:id="@+id/iv"android:layout_width="wrap_content"android:layout_height="wrap_content"android:src="@drawable/ic_launcher" />
</LinearLayout>
res/xml下创建appwidget_provider_info.xml,设置最小宽高、自动更新的周期(ms)
<?xml version="1.0" encoding="utf-8"?>
<appwidget-provider xmlns:android="http://schemas.android.com/apk/res/android"android:initialLayout="@layout/widget"android:minWidth="84dp"android:minHeight="84dp"android:updatePeriodMillis="86400000"></appwidget-provider>
创建MyAppWidgetProvider,给小组件设置一个点击动画
- onEnable:第一次添加时调用,可添加多次,但只在第一次调用
- onUpdate:添加或更新(周期时间到)时调用
- onDeleted:删除时调用
- onDisabled:最后一个小组件被删除时调用
- onReceive :分发上面的事件
public class MyAppWidgetProvider extends AppWidgetProvider {private static final String TAG = "MyAppWidgetProvider";public static final String CLICK_ACTION = "com.demo.demo0.MyAppWidgetProvider.CLICK";public MyAppWidgetProvider() {super();}@Overridepublic void onReceive(Context context, Intent intent) {super.onReceive(context, intent);String action = intent.getAction();Log.d(TAG, "onReceive: action = " + action);if (CLICK_ACTION.equals(action)) {Toast.makeText(context, "click", Toast.LENGTH_SHORT).show();new Thread(new Runnable() {@Overridepublic void run() {Bitmap srcBitmap = BitmapFactory.decodeResource(context.getResources(), R.drawable.ic_launcher);AppWidgetManager appWidgetManager = AppWidgetManager.getInstance(context);for (int i = 0; i < 37; i++) {float degree = (i * 10) % 360;RemoteViews remoteViews = new RemoteViews(context.getPackageName(), R.layout.widget);remoteViews.setImageViewBitmap(R.id.iv, rotateBitmap(context, srcBitmap, degree));/*Intent clickIntent = new Intent();clickIntent.setAction(CLICK_ACTION);clickIntent.setComponent(new ComponentName(context, "com.demo.demo0.MyAppWidgetProvider"));PendingIntent pendingIntent = PendingIntent.getBroadcast(context, 0, clickIntent, 0);remoteViews.setOnClickPendingIntent(R.id.iv, pendingIntent);*/appWidgetManager.updateAppWidget(new ComponentName(context, MyAppWidgetProvider.class), remoteViews);SystemClock.sleep(30);}}}).start();}}@Overridepublic void onUpdate(Context context, AppWidgetManager appWidgetManager, int[] appWidgetIds) {super.onUpdate(context, appWidgetManager, appWidgetIds);Log.d(TAG, "onUpdate: ");int count = appWidgetIds.length;Log.d(TAG, "onUpdate: count = " + count);for (int appWidgetId : appWidgetIds) {onWidgetUpdate(context, appWidgetManager, appWidgetId);}}private void onWidgetUpdate(Context context, AppWidgetManager appWidgetManager, int appWidgetId) {Log.d(TAG, "onWidgetUpdate: appWidgetId = " + appWidgetId);RemoteViews remoteViews = new RemoteViews(context.getPackageName(), R.layout.widget);Intent intentClick = new Intent();intentClick.setAction(CLICK_ACTION);intentClick.setComponent(new ComponentName(context, "com.demo.demo0.MyAppWidgetProvider"));PendingIntent pendingIntent = PendingIntent.getBroadcast(context, 0, intentClick, 0);remoteViews.setOnClickPendingIntent(R.id.iv, pendingIntent);appWidgetManager.updateAppWidget(appWidgetId, remoteViews);}private Bitmap rotateBitmap(Context context, Bitmap srcBitmap, float degree) {Matrix matrix = new Matrix();matrix.reset();matrix.setRotate(degree);return Bitmap.createBitmap(srcBitmap, 0, 0, srcBitmap.getWidth(), srcBitmap.getHeight(), matrix, true);}
}
AppWidgetProvider本质是一个广播,需要在Manifest中注册,第二个Action是桌面组件的标识必须要加
<receiverandroid:name=".MyAppWidgetProvider"><meta-dataandroid:name="android.appwidget.provider"android:resource="@xml/appwidget_provider_info" /><intent-filter><action android:name="com.demo.demo0.MyAppWidgetProvider.CLICK" /><action android:name="android.appwidget.action.APPWIDGET_UPDATE" /></intent-filter>
</receiver>
PendingIntent
PendingIntent是在将来的某个不确定的时刻发生,而Intent是立刻发生
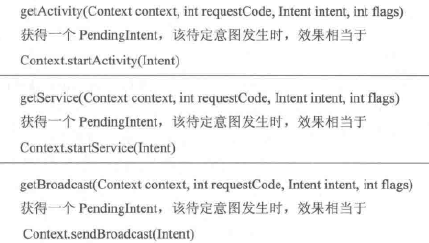
PendingIntent通过send和cancel方法发送和取消特定的Intent
- requesetCode一般情况下设为0
- 当ComponentName和intent-filter相同时,两个Intent相同
- 当Intent和requestCode相同时,两个PendingIntent相同
Flag常用的有:
- FLAG_ONE_SHOT:当前PendingIntent只能被调用一次,随后被自动cancel,后续send会调用失败。对于消息来说,后续通知和第一条通知保持一致,单击任一条通知后,其他无法再打开
- FLAG_NO_CREATE:当前PendingIntent不会主动创建,若之前不存在,则调用上面方法返回null
- FLAG_CANCEL_CURRENT:若当前PendingIntent已存在,则会被cancel并创建新的,被cancel的通知再点击无作用。对于消息来说,只有最新的才能打开
- FLAG_UPDATE_CURRENT:若当前PendingIntent已存在,则更新Intent中的Extra。对于消息来说,前面通知和最后一条通知保持一致,且都可以打开
RemoteViews内部机制
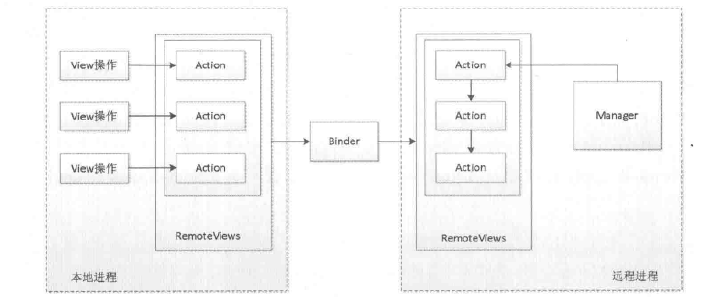
RemoteViews用于在其他进程中显示并更新UI,所支持的类型有

为避免每次对RemoteViews的操作都通过Binder传输,提供了Action封装对View的操作,如下
如对于setTextViewText()方法,传入对应操作的方法名
public void setTextViewText(int viewId, CharSequence text) {setCharSequence(viewId, "setText", text);
}
而在setCharSequence()中添加子类ReflectionAction
public void setCharSequence(int viewId, String methodName, CharSequence value) {addAction(new ReflectionAction(viewId, methodName, ReflectionAction.CHAR_SEQUENCE, value));
}
并将Action添加到ArrayList
private void addAction(Action a) {......if (mActions == null) {mActions = new ArrayList<>();}mActions.add(a);
}
每当调用setxxx()方法时,并不会立即更新界面,而必须要通过NotificationManager的notify()或AppWidgetManager的updateAppWidget(),其内部会调用RemoteViews的
- apply():加载布局并更新界面
- reApply():只会更新界面
如下为AppWidgetHostView的updateAppWidget()方法
public void updateAppWidget(RemoteViews remoteViews) {applyRemoteViews(remoteViews, true);
}protected void applyRemoteViews(RemoteViews remoteViews, boolean useAsyncIfPossible) {......if (content == null && layoutId == mLayoutId) {try {remoteViews.reapply(mContext, mView, mOnClickHandler);content = mView;recycled = true;if (LOGD) Log.d(TAG, "was able to recycle existing layout");} catch (RuntimeException e) {exception = e;}}if (content == null) {try {content = remoteViews.apply(mContext, this, mOnClickHandler);if (LOGD) Log.d(TAG, "had to inflate new layout");} catch (RuntimeException e) {exception = e;}}......
}
apply()方法通过inflateView()获取View返回
public View apply(Context context, ViewGroup parent, OnClickHandler handler) {RemoteViews rvToApply = getRemoteViewsToApply(context);View result = inflateView(context, rvToApply, parent);rvToApply.performApply(result, parent, handler);return result;
}
performApply()则是遍历调用Action的apply()方法
private void performApply(View v, ViewGroup parent, OnClickHandler handler) {if (mActions != null) {handler = handler == null ? DEFAULT_ON_CLICK_HANDLER : handler;final int count = mActions.size();for (int i = 0; i < count; i++) {Action a = mActions.get(i);a.apply(v, parent, handler);}}
}
再看子类ReflectionAction中apply()具体实现,可知其通过反射调用
@Override
public void apply(View root, ViewGroup rootParent, OnClickHandler handler) {final View view = root.findViewById(viewId);if (view == null) return;Class<?> param = getParameterType();if (param == null) {throw new ActionException("bad type: " + this.type);}try {getMethod(view, this.methodName, param, false /* async */).invoke(view, this.value);} catch (Throwable ex) {throw new ActionException(ex);}
}
模拟RemoteViews
如下模拟在MainActivity中通过广播传递RemoteViews,修改SecondActivity中的布局,manifest如下
<?xml version="1.0" encoding="utf-8"?>
<manifest xmlns:android="http://schemas.android.com/apk/res/android"xmlns:tools="http://schemas.android.com/tools"package="com.demo.demo0"><applicationandroid:allowBackup="true"android:icon="@mipmap/ic_launcher"android:label="@string/app_name"android:roundIcon="@mipmap/ic_launcher_round"android:supportsRtl="true"android:theme="@style/AppTheme"><activityandroid:name=".SecondActivity"android:process=":remote"><intent-filter><action android:name="android.intent.action.MAIN" /><category android:name="android.intent.category.LAUNCHER" /></intent-filter></activity><activity android:name=".MainActivity"></activity></application></manifest>
MainActivity创建RemoteViews并发送广播
public class MainActivity extends AppCompatActivity {private static final String TAG = "MainActivity";protected void onCreate(Bundle savedInstanceState) {super.onCreate(savedInstanceState);setContentView(R.layout.activity_main);RemoteViews remoteViews = new RemoteViews(getPackageName(), R.layout.notification);remoteViews.setTextViewText(R.id.tv, "Hello RemoteViews");remoteViews.setImageViewResource(R.id.iv, R.drawable.ic_launcher);Intent remoteViewsIntent = new Intent(Intent.ACTION_VIEW, Uri.parse("http://www.baidu.com"));PendingIntent pendingIntent = PendingIntent.getActivity(this, 0, remoteViewsIntent, PendingIntent.FLAG_UPDATE_CURRENT);remoteViews.setOnClickPendingIntent(R.id.root, pendingIntent);Intent broadcastIntent = new Intent(SecondActivity.ACTION_REMOTE_VIEWS);broadcastIntent.putExtra(SecondActivity.EXTRA_REMOTE_VIEWS, remoteViews);sendBroadcast(broadcastIntent);finish();}
}
布局notification.xml如下
<?xml version="1.0" encoding="utf-8"?>
<LinearLayout xmlns:android="http://schemas.android.com/apk/res/android"android:id="@+id/root"android:layout_width="match_parent"android:layout_height="match_parent"><ImageViewandroid:id="@+id/iv"android:layout_width="0dp"android:layout_height="match_parent"android:layout_weight="1" /><TextViewandroid:id="@+id/tv"android:layout_width="0dp"android:layout_height="match_parent"android:layout_weight="1"android:gravity="center_vertical" />
</LinearLayout>
SecondActivity接收广播获取RemoteViews,调用apply方法并把View添加到自身布局
public class SecondActivity extends AppCompatActivity {private static final String TAG = "SecondActivity";private LinearLayout mRemoteViesContainer;public static final String ACTION_REMOTE_VIEWS = "ACTION_REMOTE_VIEWS";public static final String EXTRA_REMOTE_VIEWS = "EXTRA_REMOTE_VIEWS";private BroadcastReceiver mRemoteViewsReceiver = new BroadcastReceiver() {@Overridepublic void onReceive(Context context, Intent intent) {RemoteViews remoteViews = intent.getParcelableExtra(EXTRA_REMOTE_VIEWS);if (remoteViews != null) {updateUI(remoteViews);}}};private void updateUI(RemoteViews remoteViews) {View view = remoteViews.apply(getApplicationContext(), mRemoteViesContainer);mRemoteViesContainer.addView(view);}@Overrideprotected void onCreate(Bundle savedInstanceState) {super.onCreate(savedInstanceState);setContentView(R.layout.activity_second);initView();startActivity(new Intent(this, MainActivity.class));}private void initView() {mRemoteViesContainer = findViewById(R.id.remote_views_container);IntentFilter intentFilter = new IntentFilter(ACTION_REMOTE_VIEWS);registerReceiver(mRemoteViewsReceiver, intentFilter);}@Overrideprotected void onDestroy() {super.onDestroy();unregisterReceiver(mRemoteViewsReceiver);}
}
SecondActivity布局为一个空的LinearLayout
<?xml version="1.0" encoding="utf-8"?>
<LinearLayout xmlns:android="http://schemas.android.com/apk/res/android"android:id="@+id/remote_views_container"android:layout_width="match_parent"android:layout_height="match_parent"android:orientation="vertical"></LinearLayout>
相关文章:
Android中级——RemoteView
RemoteView RemoteView的应用NotificationWidgetPendingIntent RemoteViews内部机制模拟RemoteViews RemoteView的应用 Notification 如下开启一个系统的通知栏,点击后跳转到某网页 public class MainActivity extends AppCompatActivity {private static final …...
SpringBoot核心内容梳理
1.SpringBoot是什么? Spring Boot是一个基于Spring框架的快速开发应用程序的工具。它简化了Spring应用程序的创建和开发过程,使开发人员能够更快速地创建独立的、生产就绪的Spring应用程序。它采用了“约定优于配置”的原则,尽可能地减少开发人员需要进…...
Benchmarking Augmentation Methods for Learning Robust Navigation Agents 论文阅读
论文信息 题目:Benchmarking Augmentation Methods for Learning Robust Navigation Agents: the Winning Entry of the 2021 iGibson Challenge 作者:Naoki Yokoyama, Qian Luo 来源:arXiv 时间:2022 Abstract 深度强化学习和…...

面试题:HTTP Code码及应用场景分析
1xx 消息(临时响应) 属于临时相应,代表所发出的请求已经被接受,需要继续进行处理。只包含状态行和某些可选的响应头信息,并以空行结束。由于 HTTP/1.0 协议中没有定义任何 1xx 状态码,所以除非在某些试验条件下,服务器…...
The ‘kotlin-android-extensions‘ Gradle plugin is no longer supported.
Android使用kotlin开发,运行报错 The kotlin-android-extensions Gradle plugin is no longer supported. Please use this migration guide (https://goo.gle/kotlin-android-extensions-deprecation) to start working with View Binding (https://developer.an…...
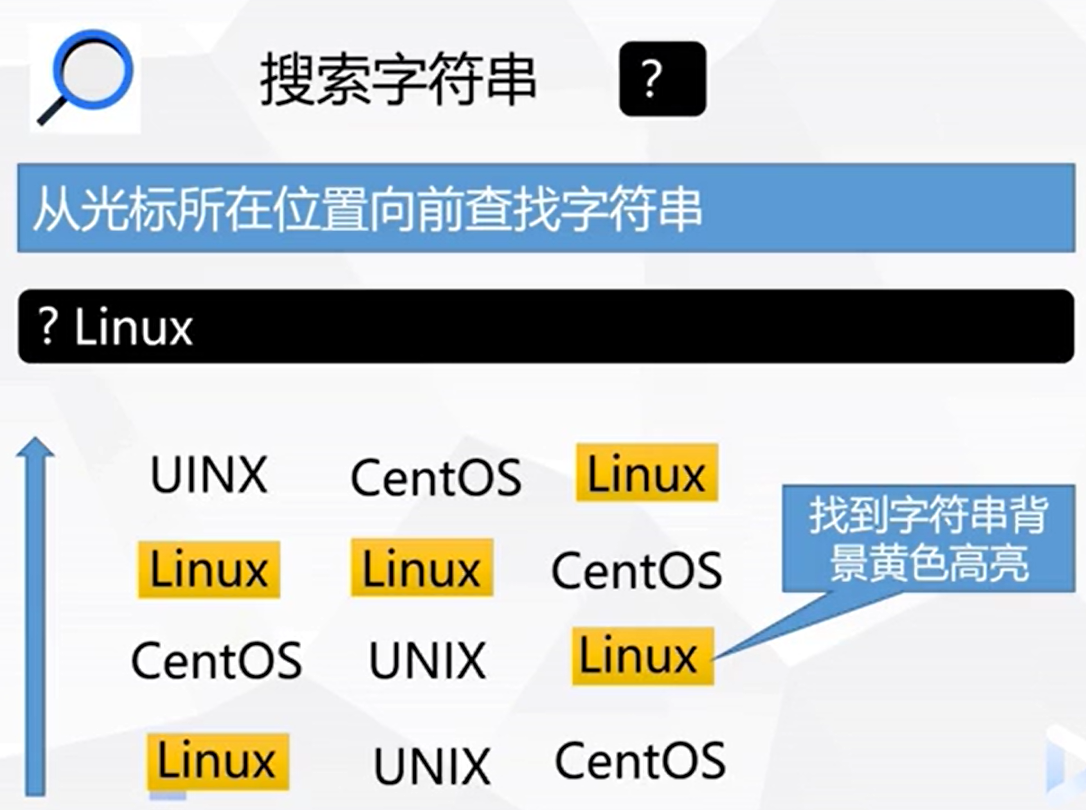
vi 编辑器入门到高级
vi 编辑器的初级用法vi 编辑器的工作模式1. 命令模式2. 文本输入模式3. 状态行vi 工作模式切换存储缓冲区 vi 编辑器命令1. 启动 vi2. 文本输入3. 退出 vi4. 命令模式下的 光标移动5. 命令模式下的 文本修改6. 从 命令模式 进入 文本输入模式7. 搜索字符串8. vi 在线帮助文档 v…...

【大数据】Flink 详解(二):核心篇 Ⅰ
Flink 详解(二):核心篇 Ⅰ 14、Flink 的四大基石是什么? Flink 的四大基石分别是: Checkpoint(检查点)State(状态)Time(时间)Windowÿ…...

Day 75:通用BP神经网络 (2. 单层实现)
代码: package dl;import java.util.Arrays; import java.util.Random;/*** Ann layer.*/ public class AnnLayer {/*** The number of input.*/int numInput;/*** The number of output.*/int numOutput;/*** The learning rate.*/double learningRate;/*** The m…...
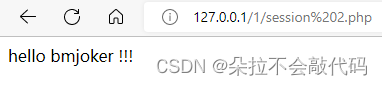
PHP序列化,反序列化
一.什么是序列化和反序列化 php类与对象 类是定义一系列属性和操作的模板,而对象,就是把属性进行实例化,完事交给类里面的方法,进行处理。 <?php class people{//定义类属性(类似变量),public 代表可…...

Android google admob Timeout for show call succeed 问题解决
项目场景: 项目中需要接入 google admob sdk 实现广告商业化 问题描述 在接入Institial ad 时,onAdLoaded 成功回调,但是onAdFailedToShowFullScreenContent 也回调了错误信息 “Timeout for show call succeed.” InterstitialAd.load(act…...
EFLFK——ELK日志分析系统+kafka+filebeat架构
环境准备 node1节点192.168.40.16elasticsearch2c/4Gnode2节点192.168.40.17elasticsearch2c/4GApache节点192.168.40.170logstash/Apache/kibana2c/4Gfilebeat节点192.168.40.20filebeat2c/4G https://blog.csdn.net/m0_57554344/article/details/132059066?spm1001.2014.30…...
)
C# MVC controller 上传附件及下载附件(笔记)
描述:Microsoft.AspNetCore.Http.IFormFileCollection 实现附件快速上传功能代码。 上传附件代码 [Route("myUploadFile")][HttpPost]public ActionResult MyUploadFile([FromForm] upLoadFile rfile){string newFileName Guid.NewGuid().ToString(&quo…...

安装element-plus报错:Conflicting peer dependency: eslint-plugin-vue@7.20.0
VSCode安装element-plus报错: D:\My Programs\app_demo>npm i element-plus npm ERR! code ERESOLVE npm ERR! ERESOLVE could not resolve npm ERR! npm ERR! While resolving: vue/eslint-config-standard6.1.0 npm ERR! Found: eslint-plugin-vue8.7.1 npm E…...

【操作系统】进程和线程对照解释
进程(Process)和线程(Thread)都是操作系统中用于执行任务的基本单位,但它们有着不同的特点和使用方式。 进程(Process): 进程是正在运行的程序的实例。一个程序在运行时会被操作系统…...
4用opencv玩转图像2
opencv绘制文字和几何图形 黑色底图 显示是一张黑色图片 使用opencv画圆形 #画一个圆 cv2.circle(imgblack_img,center(400,400),radius100,color(0,0,255),thickness10) 画实心圆 只需要把thickness-1。 cv2.circle(imgblack_img,center(500,600),radius50,color(0,0,255),t…...

Swagger的使用
提示:文章写完后,目录可以自动生成,如何生成可参考右边的帮助文档 文章目录 前言1 .介绍2. 使用步骤完整的WebMvcConfiguration.java 3. 常用注解 前言 1 .介绍 Swagger 是一个规范和完整的框架,用于生成、描述、调用和可视化 RE…...
python高阶技巧
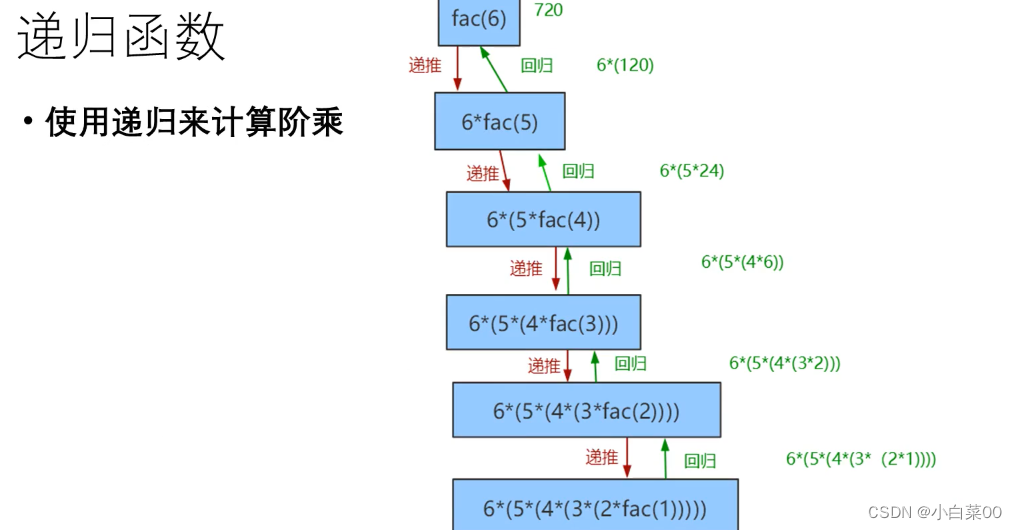
目录 设计模式 单例模式 具体用法 工厂模式 优点 闭包 案例 修改闭包外部变量 闭包优缺点 装饰器 装饰器原理 装饰器写法 递归 递归的调用过程 递归的优缺点 用递归计算阶乘 设计模式 含义:设计模式是一种编程套路,通过这种编程套路可…...

Linux和Windows安装MySQL服务
Linux和Windows安装MySQL服务 1 Linux安装MySQL服务1.1 安装1.2 服务端启动1.3 客户端连接 2 Windows安装MySQL服务2.1官网下载安装包(windows)并解压2.2 配置系统环境变量2.3 服务端启动(管理员DOS)2.4 客户端连接(管理员DOS) 3 修改密码4 Windows问题 1 Linux安装MySQL服务 …...

Vue3 第四节 自定义hook函数以及组合式API
1.自定义hook函数 2.toRef和toRefs 3.shallowRef和shallowReactive 4.readonly和shallowReadonly 5.toRaw和markRaw 6.customref 一.自定义hook函数 ① 本质是一个函数,把setup函数中使用的Composition API 进行了封装,类似于vue2.x中的mixin 自定义hook函数…...

门面模式(C++)
定义 为子系统中的一组接口提供一个一致(稳定) 的界面,Facade模式定义了一个高层接口,这个接口使得这一子系统更加容易使用(复用)。 应用场景 上述A方案的问题在于组件的客户和组件中各种复杂的子系统有了过多的耦合,随着外部客户程序和各子…...

OpenClaw+Qwen3.5-9B:技术文档翻译与本地化自动化
OpenClawQwen3.5-9B:技术文档翻译与本地化自动化 1. 为什么选择这个技术组合? 去年参与一个开源项目时,我遇到了文档本地化的难题。项目文档有300多页Markdown文件,需要翻译成5种语言。传统翻译工具要么破坏格式,要么…...
)
手把手教你用Copilot插件在Obsidian里免费接入DeepSeek-R1(附硅基流动API密钥获取)
零成本解锁Obsidian智能助手:DeepSeek-R1全流程实战指南 在信息爆炸的时代,如何让个人知识管理工具具备AI思维能力,已成为数字笔记用户的核心诉求。Obsidian作为一款以本地优先为理念的Markdown笔记工具,其插件生态正逐步融入大语…...

收藏备用|小白/程序员必看!Agentic AI时代,手把手教你构建高效可靠AI Agent
在Agentic AI飞速迭代的当下,AI Agent已成为大模型落地的核心载体,不少小白程序员和入行开发者都想抓住这一风口,但常常陷入“不知从何下手”的困境。本文将从实操角度,详细拆解构建可靠高效AI Agent应用的全流程,核心…...

linux——消息队列进程间通信
ftok函数key_t ftok( char * fname, int id ) //系统建立IPC通讯(如消息队列、共享内存时)必须指定一个ID值。通常情况下,该id值通过ftok函数得到。 参数: fname就时你指定的文件名(该文件必须是存在而且可以访问的)。 id是子序…...

嵌入式开发中GNU C扩展特性解析与应用
1. 嵌入式开发中的C语言选择困境作为一名在嵌入式领域摸爬滚打多年的工程师,我深刻理解C语言在这个领域无可替代的地位。但很多刚入行的朋友可能不知道,我们日常使用的"Linux C"和教科书上的"标准C"其实存在不少差异。第一次看到GNU…...

Arduino轻量URL编解码库:RFC 3986兼容的嵌入式urlencode/urldecode实现
1. 项目概述URLCode 是一个专为 Arduino 平台设计的轻量级 URL 编解码库,其核心目标是提供符合 RFC 3986 标准的application/x-www-form-urlencoded格式字符串的编码(urlencode)与解码(urldecode)能力。该库不依赖 Ard…...

如何用Dify API和GPT-4o高效识别图片?附避坑指南
如何用Dify API和GPT-4o高效识别图片?附避坑指南 在当今数字化时代,图片识别技术已成为众多应用场景中的核心需求。从电商平台的商品自动分类到社交媒体内容审核,再到医疗影像分析,高效准确的图片识别能力正变得越来越重要。Dify作…...

10分钟掌握 Terraform AWS EKS Blueprints 的 Karpenter 集成:实现自动节点扩展与成本优化终极指南
10分钟掌握 Terraform AWS EKS Blueprints 的 Karpenter 集成:实现自动节点扩展与成本优化终极指南 【免费下载链接】terraform-aws-eks-blueprints Configure and deploy complete EKS clusters. 项目地址: https://gitcode.com/gh_mirrors/te/terraform-aws-eks…...

深入解析BulletinBoard:iOS上下文卡片库的完整架构指南与核心实现
深入解析BulletinBoard:iOS上下文卡片库的完整架构指南与核心实现 【免费下载链接】BulletinBoard General-purpose contextual cards for iOS 项目地址: https://gitcode.com/gh_mirrors/bu/BulletinBoard BulletinBoard是一个功能强大的iOS库,专…...

Whistle Mock实战:精准模拟流式JSON接口的响应头与数据体
1. 为什么我们需要精准模拟流式JSON接口 在前后端分离的开发模式下,前端工程师经常需要模拟后端接口进行开发调试。特别是遇到流式JSON数据这种特殊场景时,简单的数据Mock往往无法满足需求。我遇到过不少这样的情况:明明数据内容完全正确&…...