SpringBoot框架
一、SpringBoot概述
1. 简介
springboot是spring家族中的一个全新框架,用来简化spring程序的创建和开发过程。在以往我们通过SpringMVC+Spring+Mybatis框架进行开发的时候,我们需要配置web.xml,spring配置,mybatis配置,然后整合在一起,而springboot抛弃了繁琐的xml配置过程,采用大量默认的配置来简化我们的spring开发过程。
SpringBoot化繁为简,使开发变得更加的简单迅速。
2. 特性
(1) 能够快速创建基于spring的程序
(2) 能够直接使用Java main方法启动内嵌的Tomcat服务器运行springboot程序,不需要部署war包
(3) 提供约定的starter POM来简化Maven配置,让Maven的配置变得简单
(4) 自动化配置,根据项目的Maven依赖配置,springboot自动配置spring、springmvc等
(5) 提供了程序的健康检查功能
(6) 基本可以完全不使用xml配合文件,采用注解配置
3. 四大核心
自动配置、起步依赖、Actuator、命令行界面二、springboot入门案例
1. SpringBoot 项目开发步骤
(1)创建一个 Module,选择类型为Spring Initializr 快速构建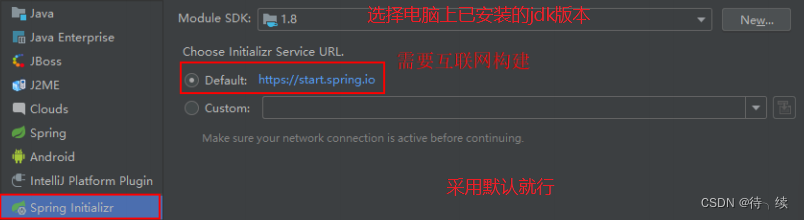
(2)设置 GAV 坐标及 pom 配置信息 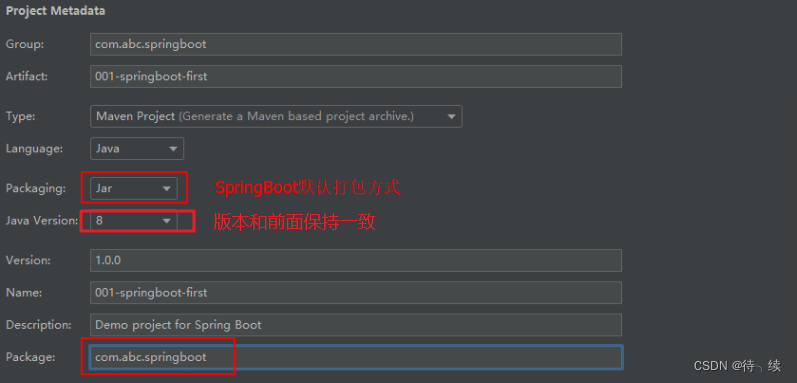
(3)选择 Spring Boot 版本及依赖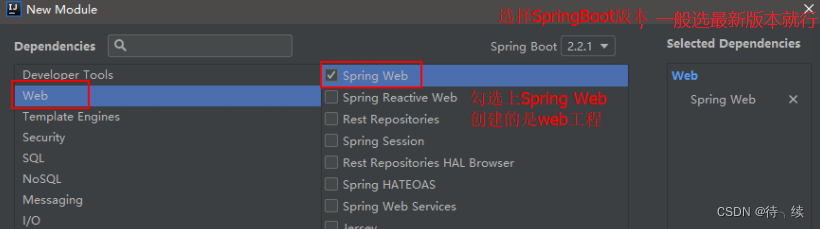
(4)设置模块名称、Content Root 路径及模块文件的目录,然后点击finish即可
(5)项目结构如下:
static:存放静态资源。如图片、CSS、JavaScript 等 templates:存放 Web 页面的模板文件 application.properties/application.yml 用于存放程序的各种依赖模块的配置信息,比如 服务端口,数据库连接配置等.gitignore:使用版本控制工具 git 的时候,设置一些忽略提交的内容 Application.java:SpringBoot 程序执行的入口,执行该程序中的 main 方法,启动当前SpringBoot项目。(6)对pom.xml文件进行解释
<?xml version="1.0" encoding="UTF-8"?>
<project xmlns="http://maven.apache.org/POM/4.0.0"
xmlns:xsi="http://www.w3.org/2001/XMLSchema-instance" xsi:schemaLocation="http://maven.apache.org/POM/4.0.0
http://maven.apache.org/xsd/maven-4.0.0.xsd"> <modelVersion>4.0.0</modelVersion> <!--继承 SpringBoot 框架的一个父项目,所有自己开发的 Spring Boot 都必须的继承--> <parent> <groupId>org.springframework.boot</groupId> <artifactId>spring-boot-starter-parent</artifactId> <version>2.2.1.RELEASE</version> <relativePath/> <!-- lookup parent from repository --> </parent> <!--当前项目的 GAV 坐标--> <groupId>com.bjpowernode.springboot</groupId> <artifactId>002-springboot-springmvc</artifactId> <version>1.0.0</version> <!--maven 项目名称,可以删除--> <name>002-springboot-springmvc</name> <!--maven 项目描述,可以删除--> <description>Demo project for Spring Boot</description> <!--maven 属性配置,可以在其它地方通过${}方式进行引用--> <properties> <java.version>1.8</java.version> </properties> <dependencies> <!--SpringBoot 框架 web 项目起步依赖,通过该依赖自动关联其它依赖,不需要我们一个一个去添加
--> <dependency> <groupId>org.springframework.boot</groupId> <artifactId>spring-boot-starter-web</artifactId> </dependency> <!--SpringBoot 框架的测试起步依赖,例如:junit 测试,如果不需要的话可以删除--> <dependency> <groupId>org.springframework.boot</groupId> <artifactId>spring-boot-starter-test</artifactId> <scope>test</scope> <exclusions> <exclusion> <groupId>org.junit.vintage</groupId> <artifactId>junit-vintage-engine</artifactId> </exclusion> </exclusions> </dependency> </dependencies> <build> <plugins> <!--SpringBoot提供的打包编译等插件--> <plugin> <groupId>org.springframework.boot</groupId> <artifactId>spring-boot-maven-plugin</artifactId> </plugin> </plugins> </build>
</project>
2. 创建一个 Spring MVC 的 Spring BootController
(1)创建SpringBootController 类
注意:新创建的类一定要位于 Application 同级目录或者下级目录,否则 SpringBoot 加
载不到。
package com.bjpowernode.springboot.web; import org.springframework.stereotype.Controller;
import org.springframework.web.bind.annotation.RequestMapping;
import org.springframework.web.bind.annotation.ResponseBody; @Controller
public class SpringBootController { @RequestMapping(value = "/springBoot/say") public @ResponseBody String say() { return "Hello,springBoot!"; }
}
(2)启动Application类中的main方法
通过在控制台的输出,可以看到启动 SpringBoot 框架,会启动一个内嵌的 tomcat,端
口号为 8080,上下文根为空 。
(3)在浏览器中输入 http://localhost:8080/springBoot/say进行访问
3. 分析
(1)spring-boot-starter-parent 是一个 Springboot 的父级依赖,开发 SpringBoot 程序都需
要继承该父级项目,它用来提供相关的 Maven 默认依赖,使用它之后,常用的 jar
包依赖可以省去 version 配置
(2)Spring Boot 提供了一些默认的jar 包的依赖,可查看该父级依赖的 pom 文件
(3)如果不想使用某个默认的依赖版本,可以通过 pom.xml 文件的属性配置覆盖各个
依赖项,比如覆盖 Spring 版本:
<properties> <spring-framework.version>5.0.0.RELEASE</ spring-framework.version > </properties> (4) @SpringBootApplication 注解是 Spring Boot 项目的核心注解,主要作用是开启
Spring 自动配置,如果在 Application 类上去掉该注解,那么不会启动 SpringBoot程序
(5)main 方法是一个标准的 Java 程序的 main 方法,是boot项目启动运行的入口
(6)@Controller 及 @ResponseBody 依然是我们之前的 Spring MVC,因为 Spring Boot
的里面依然是使用我们的 Spring MVC + Spring + MyBatis 等框架
4. 核心配置文件格式
(1).properties 文件(默认采用该文件)
通过修改 application.properties 配置文件,修改默认 tomcat 端口号及项目上下文件根:
#设置内嵌 Tomcat 端口号
server.port=9090 #配置项目上下文根
server.servlet.context-path=/003-springboot-port-context-path 页面显示结果:
(2) .yml 文件 :
项目名称:004-springboot-yml
yml 是一种 yaml 格式的配置文件,主要采用一定的空格、换行等格式排版进行配置。它能够直观的被计算机识别数据序列化格式,容易被人类阅读,yaml 类似于 xml,但是语法比 xml 简洁很多,值与前面的冒号配置项必须要有一个空格, yml 后缀也可以使用 yaml 后缀 。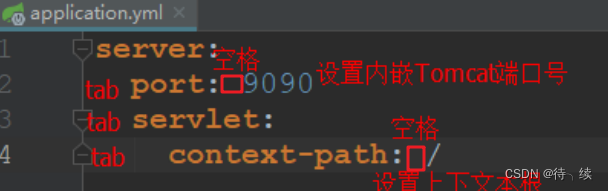
注意:当两种格式配置文件同时存在时,使用的是.properties 配置文件。
(3)多环境配置(.properties方式)
在实际开发的过程中,我们的项目会经历很多的阶段(开发->测试->上线),每个阶段
的配置也会不同,例如:端口、上下文根、数据库等,那么这个时候为了方便在不同的环境
之间切换,SpringBoot 提供了多环境配置,具体步骤如下 :
为每个环境创建一个配置文件,命名必须为 application-环境标识.properties|yml
application-dev.properties (开发环境核心置文件)
#开发环境
#设置内嵌 Tomcat 默认端口号
server.port=8080 #设置项目的上下文根
server.servlet.context-path=/005-springboot-multi-environment-dev
application-product.properties (生产环境核心置文件)
#生产环境 #配置内嵌 Tomcat 默认端口号
server.port=80 #配置项目上下文根
server.servlet.context-path=/005-springboot-multi-environment-product
application-test.properties (测试环境核心置文件)
#测试环境 #配置内嵌 Tomcat 端口号
server.port=8081 #配置项目的上下文根
server.servlet.context-path=/005-springboot-multi-environment-test
在总配置文件 application.properties 进行环境的激活
#SpringBoot 的总配置文件 #激活开发环境
#spring.profiles.active=dev #激活测试环境
#spring.profiles.active=test #激活生产环境
spring.profiles.active=product
(4)多环境配置(.yml方式)
application-dev.yml
#设置开发环境配置 server: port: 8080 #设置 Tomcat 内嵌端口号 servlet: context-path: /dev #设置上下文根
application-product.yml
#设置生产环境配置 server: port: 80 servlet: context-path: /product
application-test.yml
#设置测试环境配置 server: port: 9090 servlet: context-path: /test
在总配置文件 application.yml进行环境的激活
#springboot 总配置文件 #激活开发环境
#spring:
# profiles:
#  active: dev #激活测试环境
#spring:
# profiles:
#  active: test #激活生产环境
spring: profiles: active: product
(5)Spring Boot 自定义配置
在 SpringBoot 的核心配置文件中,除了使用内置的配置项之外,我们还可以在自定义配
置,然后采用如下注解去读取配置的属性值:
(A)@Value注解 用于逐个读取application.properties中的配置
案例演示:
(1) 在核心配置文件 applicatin.properties 中,添加两个自定义配置项 school.name 和
website。在 IDEA 中可以看到这两个属性不能被 SpringBoot 识别,背景是桔色的 :
.properties方式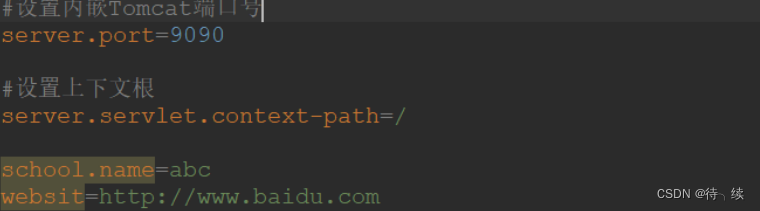
.yml方式
#设置端口号及上下文根
server: port: 9090 servlet: context-path: / school: name: ssm
websit: http://www.baidu.com
(2)在 SpringBootController 中定义属性,并使用@Value 注解或者自定义配置值,并对其方法进行测试
@Controller
public class SpringBootController { @Value("${school.name}") private String schoolName; @Value("${websit}") private String websit; @RequestMapping(value = "/springBoot/config") public @ResponseBody String say() { return schoolName + "------" + websit; }
}
(3)重新运行 Application,在浏览器中进行测试 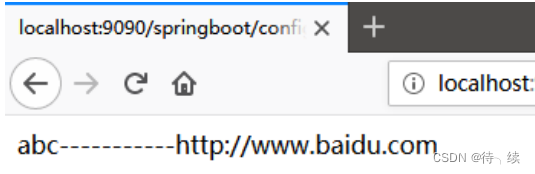
(B)@ConfigurationProperties
作用:将整个文件映射成一个对象,用于自定义配置项比较多的情况 。
案例演示:
(1)在 com.abc.springboot.config 包下创建 ConfigInfo 类,并为该类加上 Component 和
ConfigurationProperties 注解,并在 ConfigurationProperties 注解中添加属性 prefix,可以区分同名配置 。
@Data
@Component
@ConfigurationProperties(prefix = "school")
public class ConfigInfo { private String name; private String websit;
}
(2)application.properties 配置文件
#设置内嵌 Tomcat 端口号
server.port=9090 #设置上下文根
server.servlet.context-path=/config school.name=ssm
school.websit=http://www.baidu.com
(3)在 SpringBootController 中注入 ConfigInfo 配置类
@Autowired
private ConfigInfo configInfo;
(4)修改 SpringBootController 类中的测试方法
@RequestMapping(value = "/springBoot/config")
public @ResponseBody String say() { return configInfo.getName() + "=======" + configInfo.getWebsit();
}
(5)重新运行 Application,在浏览器中进行测试 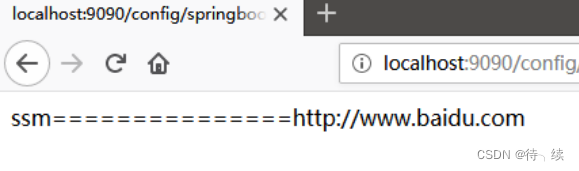
(C)警告解决
在 ConfigInfo 类中使用了 ConfigurationProperties 注解后,IDEA 会出现一个警告,不影响程序的执行。
点击 open documentnation 跳转到网页,在网页中提示需要加一个依赖,我们将这
个依赖拷贝,粘贴到 pom.xml 文件中 即可。
<!--解决使用@ConfigurationProperties 注解出现警告问题-->
<dependency> <groupId>org.springframework.boot</groupId> <artifactId>spring-boot-configuration-processor</artifactId> <optional>true</optional>
</dependency>
(D)中文乱码
如果在 SpringBoot 核心配置文件中有中文信息,会出现乱码:
一般在配置文件中,不建议出现中文(注释除外)
如果出现中文,可以先转化为 ASCII 码
2.5 Spring Boot 前端使用 JSP
(1)在 pom.xml 文件中配置以下依赖项
<!--引入 Spring Boot 内嵌的 Tomcat 对 JSP 的解析包,不加解析不了 jsp 页面-->
<!--如果只是使用 JSP 页面,可以只添加该依赖-->
<dependency>
<groupId>org.apache.tomcat.embed</groupId>
<artifactId>tomcat-embed-jasper</artifactId>
</dependency>
<!--如果要使用 servlet 必须添加该以下两个依赖-->
<!-- servlet 依赖的 jar 包-->
<dependency>
<groupId>javax.servlet</groupId>
<artifactId>javax.servlet-api</artifactId>
</dependency>
<dependency>
<groupId>javax.servlet.jsp</groupId>
<artifactId>javax.servlet.jsp-api</artifactId>
<version>2.3.1</version>
</dependency>
<!--如果使用 JSTL 必须添加该依赖-->
<!--jstl 标签依赖的 jar 包 start-->
<dependency>
<groupId>javax.servlet</groupId>
<artifactId>jstl</artifactId>
</dependency>
(2)在 pom.xml 的 build 标签中要配置以下信息
SpringBoot 要求 jsp 文件必须编译到指定的 META-INF/resources 目录下才能访问,否则
访问不到。其实官方已经更建议使用模板技术。
<!--
SpringBoot 要求 jsp 文件必须编译到指定的 META-INF/resources 目录下才能访问,否则访问
不到。
其它官方已经建议使用模版技术
-->
<resources>
<resource>
<!--源文件位置-->
<directory>src/main/webapp</directory>
<!--指定编译到 META-INF/resources,该目录不能随便写-->
<targetPath>META-INF/resources</targetPath>
<!--指定要把哪些文件编译进去,**表示 webapp 目录及子目录,*.*表示所有文件-->
<includes>
<include>**/*.*</include>
</includes>
</resource>
</resources>
(3)在 application.properties 文件配置 Spring MVC 的视图展示为jsp,这里相当于 Spring MVC 的配置。
#SpringBoot 核心配置文件
#指定内嵌 Tomcat 端口号
server.port=8090
#配置 SpringMVC 视图解析器
#其中:/ 表示目录为 src/main/webapp
spring.mvc.view.prefix=/
spring.mvc.view.suffix=.jsp
(4)在 com.abc.springboot.controller 包下创建 JspController 类
@Controller
public class SpringBootController {
@RequestMapping(value = "/springBoot/jsp")
public String jsp(Model model) {
model.addAttribute("data","SpringBoot 前端使用 JSP 页面!");
return "index";
}
}
(5)在 src/main 下创建一个 webapp 目录,然后在该目录下新建index.jsp 页面
注意: 如果在webapp目录下右键,没有创建jsp的选项,可以在Project Structure中指定webapp为 Web Resource Directory 。
(6)在 index.jsp 中获取 Controller 传递过来的数据
(7)重新运行 Application,通过浏览器访问测试
3 SpringBoot框架Web开发
通过实际代码案例进行梳理:
3.1 Spring Boot 集成 MyBatis
通过 SpringBoot +MyBatis 实现对数据库学生表的查询操作的实现步骤:
(1)创建新的数据库springboot并向表中插入数据
(2)创建一个新的 SpringBoot 的 Module
创建项目的过程省略
(3)在 pom.xml 中添加相关 jar 依赖
<!--MyBatis 整合 SpringBoot 的起步依赖-->
<dependency>
<groupId>org.mybatis.spring.boot</groupId>
<artifactId>mybatis-spring-boot-starter</artifactId>
<version>2.0.0</version>
</dependency>
<!--MySQL 的驱动依赖-->
<dependency>
<groupId>mysql</groupId>
<artifactId>mysql-connector-java</artifactId>
</dependency>
(4)在 Springboot 的核心配置文件 application.properties 中配置数据源
#配置内嵌 Tomcat 端口号
server.port=9090
#配置项目上下文根
server.servlet.context-path=/010-springboot-web-mybatis
#配置数据库的连接信息
#注意这里的驱动类有变化
spring.datasource.driver-class-name=com.mysql.cj.jdbc.Driver
spring.datasource.url=jdbc:mysql://localhost:3306/springboot?useUnicode=true&characterEncoding=UTF-8&useJDBCCompliantTimezoneShift=true&useLegacyDatetimeCode=false&serverTimezone=GMT%2B8
spring.datasource.username=root
spring.datasource.password=root
(5)开发代码(代码生成器)
使用 Mybatis 反向工程生成接口、映射文件以及实体 bean,具体步骤参见附录 1
(A)在 web 包下创建 StudentController 并编写代码
@Controller
public class StudentController {
@Autowired
private StudentService studentService;
@RequestMapping(value = "/springBoot/student")
public @ResponseBody Object student() {
Student student = studentService.queryStudentById(1);
return student;
}
}
(B)在 service 包下创建 service 接口并编写代码
public interface StudentService {
/**
* 根据学生标识获取学生详情
* @param id
* @return
*/
Student queryStudentById(Integer id);
}
(C)在 service.impl 包下创建 service 接口并编写代码
@Service
public class StudentServiceImpl implements StudentService {
@Autowired
private StudentMapper studentMapper;
@Override
public Student queryStudentById(Integer id) {
return studentMapper.selectByPrimaryKey(id);
}
}
(D)如果在 web 中导入 service 存在报错,可以尝试进行如下配置解决
(E) 在 Mybatis 反向工程生成的 StudentMapper 接口上加一个 Mapper 注解
@Mapper 作用:mybatis 自动扫描数据持久层的映射文件及 DAO 接口的关系
@Mapper
public interface StudentMapper {
}
(F)默认情况下,Mybatis 的 xml 映射文件不会编译到 target 的 class 目录下,所
以我们需要在 pom.xml 文件中配置 resource 。
<resources>
<resource>
<directory>src/main/java</directory>
<includes>
<include>**/*.xml</include>
</includes>
</resource>
</resources>
(G)启动 Application 应用,浏览器访问测试运行
3.2 DAO 的其它开发方式
方式一:
(A)注释掉 StudentMapper 接口上的@Mapper 注解
(B)在运行的主类上添加注解包扫描MapperScan("com.abc.springboot.mapper")
@SpringBootApplication
@MapperScan("com.abc.springboot.mapper")
public class Application {
或
@SpringBootApplication
//Mybatis 提供的注解:扫描数据持久层的 mapper 映谢配置文件,DAO 接口上就不用加@Mapper
//basePackages 通常指定到数据持久层包即可
@MapperScan(basePackages = "com.abc.springboot.mapper")
public class Application {
方式二:
因为 SpringBoot 不能自动编译接口映射的 xml 文件,还需要手动在 pom 文件中指定,
所以有的公司直接将映射文件直接放到 resources 目录下 ,在 resources 目录下新建目录 mapper 存放映射文件,将 StudentMapper.xml 文件移到resources/mapper 目录下:
在 application.properties 配置文件中指定映射文件的位置,这个配置只有接口和映
射文件不在同一个包的情况下,才需要指定:
# 指定 Mybatis 映射文件的路径
mybatis.mapper-locations=classpath:mapper/*.xml
3.3 Spring Boot 事务支持
springboot事务底层依然采用的是 Spring 本身提供的事务管理。
在入口类中使用注解@EnableTransactionManagement开启事务支持
在访问数据库的service方法上添加注解@Transactional即可
在上述案例的基础上,通过 SpringBoot +MyBatis 实现对数据库学生表的更新操作,在 service 层的方法中构建异常,查看事务是否生效:
(1)在 StudentController 中添加更新学生的方法
@RequestMapping(value = "/springboot/modify")
public @ResponseBody Object modifyStudent() {
int count = 0;
try {
Student student = new Student();
student.setId(1);
student.setName("Jack");
student.setAge(33);
count = studentService.modifyStudentById(student);
} catch (Exception e) {
e.printStackTrace();
return "fail";
}
return count;
}
(2)在 StudentService 接口中添加更新学生方法
int modifyStudentById(Student student);
(3)在 StudentServiceImpl 接口实现类中对更新学生方法进行实现,并构建一个异常,同时在该方法上加@Transactional 注解。
@Override
@Transactional //添加此注解说明该方法添加的事务管理
public int update(Student student) {
int updateCount = studentMapper.updateByPrimaryKeySelective(student);
System.out.println("更新结果:" + updateCount);
//在此构造一个除数为 0 的异常,测试事务是否起作用
int a = 10/0;
return updateCount;
}
(4)在Application类上加@EnableTransactionManagement开启事务支持。
@EnableTransactionManagement 可选,但是业务方法上必须添加@Transactional 事务才生效
@SpringBootApplication
@MapperScan(basePackages = "com.abc.springboot.mapper")
@EnableTransactionManagement //开启事务支持(可选项,但@Transactional 必须添加)
public class Application {
3.4 Spring Boot 下的 Spring MVC(注解)
springboot下的springMVC主要有以下注解:
(1)@Controller:Spring MVC 的注解,处理 http 请求
(2)@RestController :@Controller 与@ResponseBody 的组合注解
如果一个 Controller 类添加了@RestController,那么该 Controller 类下的所有方法都相当
于添加了@ResponseBody 注解 ,用于返回字符串或json数据。
创建 MyRestController 类,演示@RestController 替代@Controller + @ResponseBody
@RestController
public class MyRestController {
@Autowired
private StudentService studentService;
@RequestMapping("/boot/stu")
public Object stu(){
return studentService.getStudentById(1);
}
}
(3)@RequestMapping:支持 Get 请求,也支持 Post 请求 。
(4)@GetMapping :只支持 Get 请求,主要用于查询操作。
(5)@PostMapping:只支持Post请求,主要用于新增数据。
(6)@PutMapping:只支持put请求,主要用于修改数据
(7)@DeleteMapping:只支持delete请求,通常用与删除数据
(8)综合案例:
(A)创建一个 MVCController,里面使用上面介绍的各种注解接收不同的请求
//RestController 注解相当于加了给方法加了@ResponseBody 注解,所以是不能跳转页面的,只能返回字符串或者 json 数据
@RestController
public class MVCController {
@GetMapping(value = "/query")
public String get() {
return "@GetMapping 注解,通常查询时使用";
}
@PostMapping(value = "/add")
public String add() {
return "@PostMapping 注解,通常新增时使用";
}
@PutMapping(value = "/modify")
public String modify() {
return "@PutMapping 注解,通常更新数据时使用";
}
@DeleteMapping(value = "/remove")
public String remove() {
return "@DeleteMapping 注解,通常删除数据时使用";
}
}
(B)启动应用,在浏览器中输入不同的请求进行测试
(C)结合POSTMan工具测试其他请求类型
3.5 SpringBoot实现RESTFUL
(1)简介
它是一种互联网软件设计的风格,它只是提出了一组客户端和服务器交互时的架构理念和设计原则,基于这种理念和原则设计的接口可以更简洁,更有层次。
比如我们要访问一个 http 接口:http://localhost:8080/boot/order?id=1021&status=1
采用 RESTFul 风格则 http 地址为:http://localhost:8080/boot/order/1021/1
(2)开发RESTFUL,主要用到以下注解:
@PathVariable :获取 url 中的数据,该注解是实现 RESTFul 最主要的一个注解
@PostMapping :接收和处理post方式的请求
@DeleteMapping:接收delete方式的请求,可以用GetMapping代替
@PutMapping :接收put方式的请求,可以用 PostMapping 代替
@GetMapping :接收get方式请求
(3)案例:使用 RESTful 风格模拟实现对学生的增删改查操作
该项目集成了 MyBatis、spring、SpringMVC,通过模拟实现对学生的增删改查操作
pom.xml文件
<dependencies>
<!--SpringBoot 框架 web 项目起步依赖-->
<dependency>
<groupId>org.springframework.boot</groupId>
<artifactId>spring-boot-starter-web</artifactId>
</dependency>
<!--MyBatis 集成 SpringBoot 框架起步依赖-->
<dependency>
<groupId>org.mybatis.spring.boot</groupId>
<artifactId>mybatis-spring-boot-starter</artifactId>
<version>2.0.1</version>
</dependency>
<!--MySQL 驱动-->
<dependency>
<groupId>mysql</groupId>
<artifactId>mysql-connector-java</artifactId>
</dependency>
</dependencies>
<build>
<!--指定配置资源的位置-->
<resources>
<resource>
<directory>src/main/java</directory>
<includes>
<include>**/*.xml</include>
</includes>
</resource>
</resources>
<plugins>
<!--mybatis 代码自动生成插件-->
<plugin>
<groupId>org.mybatis.generator</groupId>
<artifactId>mybatis-generator-maven-plugin</artifactId>
<version>1.3.6</version>
<configuration>
<!--配置文件的位置-->
<configurationFile>GeneratorMapper.xml</configurationFile>
<verbose>true</verbose>
<overwrite>true</overwrite>
</configuration>
</plugin>
<plugin>
<groupId>org.springframework.boot</groupId>
<artifactId>spring-boot-maven-plugin</artifactId>
</plugin>
</plugins>
</build>
application. properties核心配置文件
#配置内嵌 Tomcat 端口号
server.port=8090
#配置项目上下文根
server.servlet.context-path=/
#配置数据库的连接信息
#注意这里的驱动类有变化
spring.datasource.driver-class-name=com.mysql.cj.jdbc.Driver
spring.datasource.url=jdbc:mysql://localhost:3306/springboot?useUnicode=true&characterEncoding=UTF-8&useJDBCCompliantTimezoneShift=true&useLegacyDatetimeCode=false&serverTimezone=GMT%2B8
spring.datasource.username=root
spring.datasource.password=root
通过逆向工程生成 DAO
创建 RESTfulController
@RestController
public class RESTfulController {
/**
* 添加学生
* 请求地址:
http://localhost:9090/014-springboot-restful/springBoot/student/wangpeng/23
* 请求方式:POST
* @param name
* @param age
* @return
*/
@PostMapping(value = "/springBoot/student/{name}/{age}")
public Object addStudent(@PathVariable("name") String name, @PathVariable("age") Integer age) {
Map<String,Object> retMap = new HashMap<String, Object>();
retMap.put("name",name);
retMap.put("age",age);
return retMap;
}
/**
* 删除学生
* 请求地址:
http://localhost:9090/014-springboot-restful/springBoot/student/1
* 请求方式:Delete
* @param id
* @return
*/
@DeleteMapping(value = "/springBoot/student/{id}")
public Object removeStudent(@PathVariable("id") Integer id) {
return "删除的学生 id 为:" + id;
}
/**
* 修改学生信息
* 请求地址:
http://localhost:9090/014-springboot-restful/springBoot/student/2
* 请求方式:Put
* @param id
* @return
*/
@PutMapping(value = "/springBoot/student/{id}")
public Object modifyStudent(@PathVariable("id") Integer id) {
return "修改学生的 id 为" + id;
}
@GetMapping(value = "/springBoot/student/{id}")
public Object queryStudent(@PathVariable("id") Integer id) {
return "查询学生的 id 为" + id;
}
}
使用 Postman 模拟发送请求,进行测试 :
(4)请求冲突的问题
解决方案:<1>修改路径 <2>修改请求方式
创建 RESTfulController 类,结合 Postman 进行测试说明 :
@RestController
public class RESTfulController {
/**
* id:订单标识
* status:订单状态
* 请求路径:
http://localhost:9090/015-springboot-restful-url-conflict/springBoot/orde
r/1/1001
* @param id
* @param status
* @return
*/
@GetMapping(value = "/springBoot/order/{id}/{status}")
public Object queryOrder(@PathVariable("id") Integer id, @PathVariable("status") Integer status) {
Map<String,Object> map = new HashMap<String,Object>();
map.put("id",id);
map.put("status",status);
return map;
}
/**
* id:订单标识
* status:订单状态
* 请求路径:
http://localhost:9090/015-springboot-restful-url-conflict/springBoot/1/or
der/1001
* @param id
* @param status
* @return
*/
@GetMapping(value = "/springBoot/{id}/order/{status}")
public Object queryOrder1(@PathVariable("id") Integer id, @PathVariable("status") Integer status) {
Map<String,Object> map = new HashMap<String,Object>();
map.put("id",id);
map.put("status",status);
return map;
}
/**
* id:订单标识
* status:订单状态
* 请求路径:
http://localhost:9090/015-springboot-restful-url-conflict/springBoot/1001
/order/1
* @param id
* @param status
* @return
*/
@GetMapping(value = "/springBoot/{status}/order/{id}")
public Object queryOrder2(@PathVariable("id") Integer id,
@PathVariable("status") Integer status) {
Map<String,Object> map = new HashMap<String,Object>();
map.put("id",id);
map.put("status",status);
return map;
}
/**
* id:订单标识
* status:订单状态
* 请求路径:
http://localhost:9090/015-springboot-restful-url-conflict/springBoot/1001
/order/1
* @param id
* @param status
* @return
*/
@PostMapping(value = "/springBoot/{status}/order/{id}")
public Object queryOrder3(@PathVariable("id") Integer id, @PathVariable("status") Integer status) {
Map<String,Object> map = new HashMap<String,Object>();
map.put("id",id);
map.put("status",status);
return map;
}
/**
* query1 和 query2 两个请求路径会发生请求路径冲突问题
* query3 与 query1 和 query2 发生请求冲突
* 注意:虽然两个路径写法改变了,但是由于传递的两个参数都是 int 值,所以不知道该交给
哪个请求进行处理
* 就会出现匹配模糊不清的异常,所以要想解决冲突,有两种方式:
* 1.修改请求路径
* 2.修改请求方式
*/
}
(5)RESTful 原则
增 post 请求、删 delete 请求、改 put 请求、查 get 请求
请求路径不要出现动词:
分页、排序等操作,不需要使用斜杠传参数
3.6 Spring Boot 集成 Redis
完善根据学生 id 查询学生的功能:先从 redis 缓存中查找,如果找不到,再从数据库中
查找,然后放到 redis 缓存中。
具体实现步骤:
(A)首先通过 MyBatis 逆向工程生成实体 bean 和数据持久层 :
(B)在 pom.xml 文件中添加 redis 依赖
<!-- 加载 spring boot redis 包 -->
<dependency>
<groupId>org.springframework.boot</groupId>
<artifactId>spring-boot-starter-data-redis</artifactId>
</dependency>
(C)Spring Boot 核心配置文件application.properties 如下:
#配置内嵌 Tomcat 端口号
server.port=9090
#配置项目上下文根
server.servlet.context-path=/016-springboot-redis
#配置连接 MySQL 数据库信息
spring.datasource.url=jdbc:mysql://127.0.0.1:3306/springboot?useUnicode=true&characterEncoding=UTF8&useJDBCCompliantTimezoneShift=true&useLegacyDa
tetimeCode=false&serverTimezone=GMT%2B8
spring.datasource.driver-class-name=com.mysql.cj.jdbc.Driver
spring.datasource.username=root
spring.datasource.password=root
#配置 redis 连接信息
spring.redis.host=127.0.0.1
spring.redis.port=6379
#spring.redis.password=root
(D)启动redis服务
(E)RedisController类
@RestController
public class RedisController {
@Autowired
private StudentService studentService;
/**
* 请求地址:
http://localhost:9090/016-springboot-redis//springboot/allStudentCount
* @param request
* @return
*/
@GetMapping(value = "/springboot/allStudentCount")
public Object allStudentCount(HttpServletRequest request) {
Long allStudentCount = studentService.queryAllStudentCount();
return "学生总人数:" + allStudentCount;
}
}
(F)StudentService 接口
public interface StudentService {
/**
* 获取学生总人数
* @return
*/
Long queryAllStudentCount();
}
(G)在 StudentServiceImpl 中注入 RedisTemplate,并编写根据 id获取学生的方法
配置了上面的步骤,Spring Boot 将自动配置 RedisTemplate,在需要操作 redis 的类中注入 redisTemplate 即可。
注意:Spring Boot 帮我们注入 RedisTemplate 类,泛型里面只能写 <String, String>、<Object, Object>或者什么都不写。
@Service
public class StudentServiceImpl implements StudentService {
@Autowired
private StudentMapper studentMapper;
@Autowired
private RedisTemplate<Object,Object> redisTemplate;
@Override
public Long queryAllStudentCount() {
//设置 redisTemplate 对象 key 的序列化方式
redisTemplate.setKeySerializer(new StringRedisSerializer());
//从 redis 缓存中获取总人数
Long allStudentCount = (Long) redisTemplate.opsForValue().get("allStudentCount");
//判断是否为空
if ( allStudentCount==null) {
//去数据库查询,并存放到 redis 缓存中
allStudentCount = studentMapper.selectAllStudentCount();
redisTemplate.opsForValue().set("allStudentCount",allStudentCount,15,TimeUnit.SECONDS);
}
return allStudentCount;
}
}
(H)StudentMapper 接口
@Mapper
public interface StudentMapper {
/**
* 获取学生总人数
* @return
*/
Long selectAllStudentCount();
}
(I)StudentMapper 映射文件
<!--获取学生总人数-->
<select id="selectAllStudentCount" resultType="java.lang.Long">
select count(*) from t_student
</select>
(J)启动类 Application
在 SpringBoot 启动类上添加扫描数据持久层的注解并指定扫描包:
@SpringBootApplication
@MapperScan(basePackages = "com.abc.springboot.mapper")//扫描数据持久层
public class Application {
public static void main(String[] args) {
SpringApplication.run(Application.class, args);
}
}
(K)让 Student 类实现序列化接口(可选)
在类名上 Alt + 回车,如果没有提示生成序列化 id,那么需要做如下的配置 :
相关文章:
SpringBoot框架
一、SpringBoot概述 1. 简介 springboot是spring家族中的一个全新框架,用来简化spring程序的创建和开发过程。在以往我们通过SpringMVCSpringMybatis框架进行开发的时候,我们需要配置web.xml,spring配置,mybatis配置,…...
Chrome有些网站打不开,但是火狐可以打开
Chrome有些网站打不开,但是火狐可以打开 问题描述火狐成功界面谷歌报错界面局域网设置使用代理服务器访问成功 解决方案参考 问题描述 开了一个tizi,Chrome不能使用,火狐可以。之前装过插件Ghelper白嫖科学上网,那次之后好像浏览…...
Linux网络基础(中)
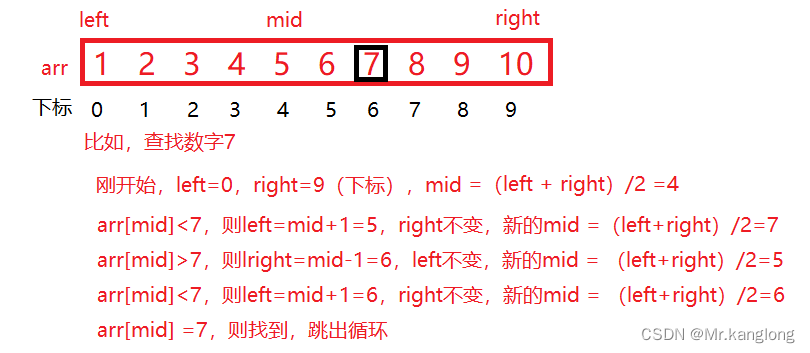
目录: 再谈“协议” HTTP协议 认识URL: urlnecode和urldecode HTTP协议格式: HTTP的方法: 简易HTTP服务器: 传输层 再谈端口号: 端口号范围划分: netstat: pidof&…...
【C++起飞之路】初级—— auto、范围for循环、宏函数和内联函数
auto、范围for、内联函数、宏函数和nullptr 一、auto — 类型推导的魔法(C 11)1、auto 是什么?2、工作原理3、优势4、限制和注意事项 二、范围for (C11)1、基本语法2、优势3、工作原理4、注意事项5、C11: 范围 for 循环的扩展: 三…...
开发工具Eclipse的使用之导入项目(import)
🥳🥳Welcome Huihuis Code World ! !🥳🥳 接下来看看由辉辉所写的关于Eclipse使用的相关操作吧 目录 🥳🥳Welcome Huihuis Code World ! !🥳🥳 一.导读 二.详细操作步骤 1.右击项…...
decimal类型在MySQL中的正确使用 (长度和小数点)
1. MySQL(decimal) 对应 Java(BigDecimal) 2. decimal(16,2) MySQL中类型的设置, 长度16, 保留2位小数 3. 如果长度小于14, 则会出现没小数位的情况...
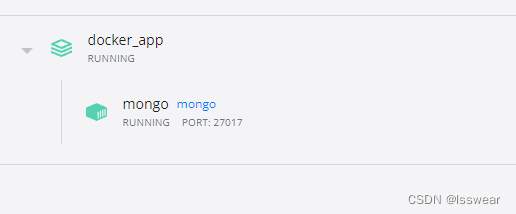
Mongodb 安装
一、win10安装 服务端下载地址:Download MongoDB Community Server | MongoDB shell 工具下载地址:MongoDB Shell Download | MongoDB 服务端安装时选择custom,否则安装文件没有bin目录。 将安装后的文件中的bin目录加到环境变量。 设置…...
—— Spring篇)
Java技术整理(5)—— Spring篇
Spring是一个全面的全面的、企业应用开发一站式的解决方案,贯穿表现层、业务层、持久层。但是 Spring 仍然可以和其他的框架无缝整合。 1、Spring的核心组件 (1)数据层: JDBC、ORM、OXM、JMS、Transations (2&#x…...

07-MySQL-基础篇-函数
函数之字符串函数 前言函数字符串函数数值函数日期函数流程函数 前言 本篇来学习下MySQL中的函数–字符串函数。 函数 函数:是指一段可以直接被另一段程序调用的程序或代码MySQL中的函数主要分为以下四类: 字符串函数、数值函数、日期函数、流程函数。…...
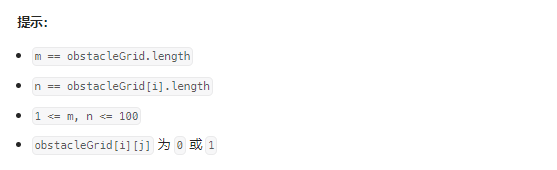
不同路径 II——力扣63
class Solution {public:int uniquePathsWithObstacles(vector<vector<int>>& obstacleGrid) {int n=...
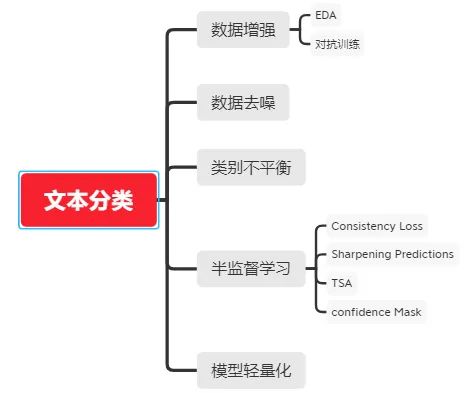
NLP文本分类
NLP文本分类 落地实战五大利器!_kaiyuan_sjtu的博客-CSDN博客https://zhuanlan.zhihu.com/p/432619164 https://github.com/alibaba/EasyNLP/blob/master/README.cn.md...

进程和线程的联系与区别
文章目录 一、进程和线程的联系二、进程和线程的区别 一、进程和线程的联系 操作系统中可以有很多进程,每个进程都有自己独立的资源;一个进程中可以有很多线程,系统中的每个线程都能独立调度,同一个进程中的各个线程共享内存/硬盘…...
分支和循环语句(2)(C语言)
目录 do...while()循环 do语句的语法 do语句的特点 do while循环中的break和continue 练习 goto语句 do...while()循环 do语句的语法 do 循环语句; while(表达式); do语句的特点 循环至少执行一次,使用的场景有限,所以不是经常使用。 #inc…...
Flutter: A RenderFlex overflowed by 42 pixels on the bottom.
Flutter:渲染活动底部上方溢出了42个像素 Flutter 控件超出异常:A RenderFlex overflowed by 42 pixels on the bottom. 解决方案 1.Scaffold内添加 resizeToAvoidBottomInset 属性,缺点是软键盘下面的控件被挡住 Scaffold( resizeToAvoidBot…...

第三章,矩阵,07-用初等变换求逆矩阵、矩阵的LU分解
第三章,矩阵,07-用初等变换求逆矩阵、矩阵的LU分解 一个基本的方法求 A − 1 B A^{-1}B A−1BLU分解例1,求矩阵A的LU分解:例12,LU分解解线性方程组: 玩转线性代数(19)初等矩阵与初等变换的相关应用的笔记&a…...
STM32F429IGT6使用CubeMX配置SPI通信(W25Q256芯片)
1、硬件电路 需要系统性的看一下W25Q256芯片手册 2、设置RCC,选择高速外部时钟HSE,时钟设置为180MHz 3、配置SPI 4、生成工程配置 5、相关代码 #define sFLASH_ID 0XEF4019 // W25Q256#define SPI_FLASH_PageSize 256 #define SPI_FLASH_PerWritePageSize 256#def…...

C++11异步与通信之 packaged_task
概念简介 packaged_task 用于包装可调用目标(Callable)为一个对象,如lambda,普通函数,小括号重载等,用于异步调用。 其返回值或所抛异常被存储于能通过 std::future 对象访问的共享状态中,和promise类似。 将函数的调用与函数返…...
磁盘的管理
一、磁盘的分区 查看磁盘 lsblk fdisk -l 2、分区 没有e扩展,则都是主分区,已经有三个主分区了,剩下的全设置为扩展 查看分区结果: 二、格式化 三、挂载...

数据结构:完全二叉树的性质
完全二叉树的性质: 具有 n n n个结点的完全二叉树的深度为 [ l o g 2 n ] 1 ( [ x ] 表示不大于 x 的最大整数 ) [log_2n]1([x]表示不大于x的最大整数) [log2n]1([x]表示不大于x的最大整数) 对于任意一个结点 ( 1 < i < n ) &…...

【数据结构】‘双向链表’冲冲冲
💐 🌸 🌷 🍀 🌹 🌻 🌺 🍁 🍃 🍂 🌿 🍄🍝 🍛 🍤 📃个人主页 :阿然成长日记 …...

Win11Debloat终极指南:如何快速清理Windows 11预装软件和优化系统性能
Win11Debloat终极指南:如何快速清理Windows 11预装软件和优化系统性能 【免费下载链接】Win11Debloat A simple, lightweight PowerShell script that allows you to remove pre-installed apps, disable telemetry, as well as perform various other changes to d…...

从SPI引脚别名到实战选型:当芯片手册上的SDI/SDO把你搞晕时,这份避坑指南请收好
从SPI引脚别名到实战选型:当芯片手册上的SDI/SDO把你搞晕时,这份避坑指南请收好 刚拿到一款新传感器的评估板,准备用STM32的硬件SPI接口对接时,发现手册上标注的引脚名称竟然是SDI和SDO——这和教科书上常见的MOSI/MISO完全对不上…...

Altium Designer 20 画效果器原理图:从模块拆分到封装选择的保姆级避坑指南
Altium Designer 20 画效果器原理图:从模块拆分到封装选择的保姆级避坑指南 第一次用Altium Designer画电吉他效果器原理图时,我盯着空白的画布发呆了半小时——不是不会用软件,而是不知道从哪下手。直到把整个电路拆分成AMP、SWITCH等模块&a…...

基于YOLOv26深度学习算法的门窗异常开启检测系统研究与实现
文章目录 基于YOLOv26深度学习算法的门窗异常开启检测系统研究与实现 一、研究背景和意义 二、相关技术介绍 2.1 智能家居安防系统 2.2 YOLOv26目标检测算法 2.3 状态检测与异常识别 三、基于YOLOv26的门窗异常开启检测算法研究实现方法 3.1 系统架构设计 3.2 数据集构建 3.3 模…...

Chaplin:零代码实现实时唇语识别的终极指南
Chaplin:零代码实现实时唇语识别的终极指南 【免费下载链接】chaplin A real-time silent speech recognition tool. 项目地址: https://gitcode.com/gh_mirrors/chapl/chaplin 想象一下这样的场景:在安静的图书馆里,你想与朋友交流却…...

从SQL到Cypher:一个后端工程师的Neo4j避坑与效率提升指南
从SQL到Cypher:一个后端工程师的Neo4j避坑与效率提升指南 第一次接触Neo4j时,我被它处理复杂关联查询的能力震撼了。记得当时需要分析一个社交网络的六度关系,用传统SQL写了三层嵌套JOIN还是性能堪忧,而切换到Cypher后,…...

Spring Boot WebFlux 响应式架构原理
Spring Boot WebFlux 响应式架构原理探析 在当今高并发、低延迟的应用场景下,传统的同步阻塞式架构逐渐显露出性能瓶颈。Spring Boot WebFlux 作为响应式编程的典范,通过非阻塞、异步的事件驱动模型,为现代应用提供了更高效的解决方案。本文…...

告别点击跳转烦恼:给Zotero+Word/WPS添加文献引用超链接的两种方法
科研写作效率革命:Zotero文献引用超链接的终极解决方案 每次修改论文时,最让人抓狂的莫过于在几十页的文档中来回翻找参考文献。明明Zotero已经帮我们自动生成了完美的引用格式,却还要手动在正文和参考文献列表之间来回切换——这种低效的操作…...

51单片机新手必看:用Proteus仿真LM016L液晶屏,从接线到显示完整流程
51单片机与Proteus仿真:LM016L液晶屏从零到显示的实战指南 第一次接触51单片机和Proteus仿真时,面对LM016L液晶屏的接线与显示控制,很多新手都会感到无从下手。屏幕不亮、显示乱码、无法初始化——这些问题看似简单,却往往让初学者…...

WorkshopDL:打破平台壁垒的模组自由之门
WorkshopDL:打破平台壁垒的模组自由之门 【免费下载链接】WorkshopDL WorkshopDL - The Best Steam Workshop Downloader 项目地址: https://gitcode.com/gh_mirrors/wo/WorkshopDL 想象一下,您在Epic Games Store上购买了一款心仪已久的游戏&…...