RocketMQ 5.1.0 源码详解 | Producer 发送流程
文章目录
- 初始化DefaultMQProducer实例
- 发送流程
- DefaultMQProducer#send
- DefaultMQProducerImpl#send
- MQClientInstance#updateTopicRouteInfoFromNameServer
- 使用特定 topic 获取路由信息
- 使用默认 topic 获取路由信息
- DefaultMQProducerImpl#sendDefaultImpl
- 发送流程总结
初始化DefaultMQProducer实例
详细内容见文章
RocketMQ 5.1.0 源码详解 | Producer 启动流程
第一部分
发送流程
DefaultMQProducer#send
只需要执行以下代码即可开始消息的发送流程
try {Message msg = new Message(TOPIC, TAG, "OrderID188", "Hello world".getBytes(StandardCharsets.UTF_8));SendResult sendResult = producer.send(msg);System.out.printf("%s%n", sendResult);
} catch (Exception e) {e.printStackTrace();
}
RocketMQ 发送普通消息有同步(Sync)发送、异步(Async)发送和单向(Oneway)发送三种方式,send() 方法中只传入 message 则默认为 SYNC 模式
producer 的 send 方法内容如下
public SendResult send(Message msg) throws MQClientException, RemotingException, MQBrokerException, InterruptedException {msg.setTopic(withNamespace(msg.getTopic()));return this.defaultMQProducerImpl.send(msg);
}
可以看到在发送消息时 DefaultMQProducer 也只是一个门面类,具体的实现都是由 DefaultMQProducerImpl 去做的
DefaultMQProducerImpl#send
DefaultMQProducerImpl 的 send 方法内容如下
public SendResult send(Message msg) throws MQClientException, RemotingException, MQBrokerException, InterruptedException {return send(msg, this.defaultMQProducer.getSendMsgTimeout());
}public SendResult send(Message msg,long timeout) throws MQClientException, RemotingException, MQBrokerException, InterruptedException {return this.sendDefaultImpl(msg, CommunicationMode.SYNC, null, timeout);
}
可以看到,基本就是继续调用了几个函数以补齐缺失的参数如超时时间、发送消息的类型和回调函数(由于是同步发送因此回调函数为 null),发送消息的逻辑则主要是在 sendDefaultImpl 方法中实现的
由于此方法内容太多,因此先看看整体的流程
private SendResult sendDefaultImpl(Message msg,final CommunicationMode communicationMode,final SendCallback sendCallback,final long timeout
) throws MQClientException, RemotingException, MQBrokerException, InterruptedException {// 确认生产者处于RUNNING状态this.makeSureStateOK();// 检查消息是否合法Validators.checkMessage(msg, this.defaultMQProducer);final long invokeID = random.nextLong();long beginTimestampFirst = System.currentTimeMillis();long beginTimestampPrev = beginTimestampFirst;long endTimestamp = beginTimestampFirst;// 获取topic的路由信息TopicPublishInfo topicPublishInfo = this.tryToFindTopicPublishInfo(msg.getTopic());// topicPublishInfo不为空且可用if (topicPublishInfo != null && topicPublishInfo.ok()) {...}// 校验 NameServer 配置是否正确validateNameServerSetting();throw new MQClientException("No route info of this topic: " + msg.getTopic() + FAQUrl.suggestTodo(FAQUrl.NO_TOPIC_ROUTE_INFO),null).setResponseCode(ClientErrorCode.NOT_FOUND_TOPIC_EXCEPTION);
}
首先检查生产者是否处于 RUNNING 状态,接着检查要发送的消息是否合法,然后会调用 tryToFindTopicPublishInfo 获取路由信息,如果获取成功则进入分支语句中的逻辑,否则校验 NameServer 配置是否正确。如果 NameServer 配置为空则抛出 No name server address 异常,否则抛出 No route info of this topic 异常
由于其他的逻辑相对容易,我们接下来先直接分析 tryToFindTopicPublishInfo 方法的内容
private TopicPublishInfo tryToFindTopicPublishInfo(final String topic) {// 从本地缓存(ConcurrentMap< String/* topic */,  TopicPublishInfo>)中尝试获取,第一次肯定为空TopicPublishInfo topicPublishInfo = this.topicPublishInfoTable.get(topic);if (null == topicPublishInfo || !topicPublishInfo.ok()) {this.topicPublishInfoTable.putIfAbsent(topic, new TopicPublishInfo());// 1.尝试从NameServer获取特定topic路由信息并更新本地缓存配置this.mQClientFactory.updateTopicRouteInfoFromNameServer(topic);topicPublishInfo = this.topicPublishInfoTable.get(topic);}// 如果找到可用的路由信息并返回if (topicPublishInfo.isHaveTopicRouterInfo() || topicPublishInfo.ok()) {return topicPublishInfo;} else { // 2.如果未找到路由信息,则再次尝试使用默认的topic获取路由信息this.mQClientFactory.updateTopicRouteInfoFromNameServer(topic, true, this.defaultMQProducer);topicPublishInfo = this.topicPublishInfoTable.get(topic);return topicPublishInfo;}
}
可以看到此方法首先会从本地的 topicPublishInfoTable 中寻找 topicPublishInfo,由于之前没有向 topic 发送过消息,因此第一次必然不会从本地找到
此时会首先向 topicPublishInfoTable 中添加空白 topicPublishInfo,然后再调用 mQClientFactory 对象的 updateTopicRouteInfoFromNameServer 方法来更新 topicPublishInfoTable 中 topicPublishInfo 的数据
又因为是向一个还不存在的 topic 发送消息,因此第一次尝试从 NameServer 获取配置信息并更新本地缓存配置失败,会进行尝试使用默认的 topic 去找路由配置信息
MQClientInstance#updateTopicRouteInfoFromNameServer
由上述章节可知此方法被调用了两次,第一次尝试从 NameServer 获取特定 topic 路由信息并更新本地缓存配置失败,第二次尝试使用默认的 topic 获取路由信息
使用特定 topic 获取路由信息
第一次尝试使用特定 topic 获取路由信息,调用方法为 updateTopicRouteInfoFromNameServer(topic)
public boolean updateTopicRouteInfoFromNameServer(final String topic) {return updateTopicRouteInfoFromNameServer(topic, false, null);
}
此方法又会调用其重载方法,即updateTopicRouteInfoFromNameServer(final String topic, boolean isDefault, DefaultMQProducer defaultMQProducer),其中 isDefault 传入的值为 false
由于方法的内容太多,因此我们只看代码走过的部分
TopicRouteData topicRouteData;
if (isDefault && defaultMQProducer != null) {// ...
} else {// 获取指定topic的配置信息topicRouteData = this.mQClientAPIImpl.getTopicRouteInfoFromNameServer(topic, clientConfig.getMqClientApiTimeout());
}
isDefault 的值为 false,因此进入 else 分支,尝试从 NameServer 中获取特定 topic 的路由信息,其中 getTopicRouteInfoFromNameServer 方法通过 Netty 使用 RPC 调用获取 Topic 路由信息,方法内容如下
public TopicRouteData getTopicRouteInfoFromNameServer(final String topic, final long timeoutMillis)throws RemotingException, MQClientException, InterruptedException {return getTopicRouteInfoFromNameServer(topic, timeoutMillis, true);
}public TopicRouteData getTopicRouteInfoFromNameServer(final String topic, final long timeoutMillis,boolean allowTopicNotExist) throws MQClientException, InterruptedException, RemotingTimeoutException, RemotingSendRequestException, RemotingConnectException {GetRouteInfoRequestHeader requestHeader = new GetRouteInfoRequestHeader();requestHeader.setTopic(topic);RemotingCommand request = RemotingCommand.createRequestCommand(RequestCode.GET_ROUTEINFO_BY_TOPIC, requestHeader);RemotingCommand response = this.remotingClient.invokeSync(null, request, timeoutMillis);assert response != null;switch (response.getCode()) {case ResponseCode.TOPIC_NOT_EXIST: {if (allowTopicNotExist) {log.warn("get Topic [{}] RouteInfoFromNameServer is not exist value", topic);}break;}//...}throw new MQClientException(response.getCode(), response.getRemark());
}
但是我们向一个不存在的 topic 发送消息,因此进入 case ResponseCode.TOPIC_NOT_EXIST 分支。又因为 allowTopicNotExist 传入的值为 true,所以打印警告并抛出异常,方法结束
使用默认 topic 获取路由信息
第二次获取时调用了 updateTopicRouteInfoFromNameServer(final String topic, boolean isDefault, DefaultMQProducer defaultMQProducer) ,其中 isDefault 传入的值为 true
TopicRouteData topicRouteData;
if (isDefault && defaultMQProducer != null) {// 从NameServer中获取默认的topic路由信息topicRouteData = this.mQClientAPIImpl.getDefaultTopicRouteInfoFromNameServer(defaultMQProducer.getCreateTopicKey(),clientConfig.getMqClientApiTimeout());if (topicRouteData != null) {// 修正topic路由信息中的读写队列数,使其最大不超过默认的topic队列数for (QueueData data : topicRouteData.getQueueDatas()) {int queueNums = Math.min(defaultMQProducer.getDefaultTopicQueueNums(), data.getReadQueueNums());data.setReadQueueNums(queueNums);data.setWriteQueueNums(queueNums);}}
}
上述代码分为两个步骤:
- 从 NameServer 中获取默认 topic 即 TBW102 的路由信息
- 修正获取到的默认 topic 路由信息
此时我们的 topicRouteData 不为空,且其 QueueData 属性也经过了修正,具体内容如下
TopicRouteData [orderTopicConf=null, queueDatas=[QueueData [brokerName=broker-a, readQueueNums=4, writeQueueNums=4, perm=6, topicSysFlag=0]], brokerDatas=[BrokerData [brokerName=broker-a, brokerAddrs={0=192.168.142.1:10911}, enableActingMaster=false]], filterServerTable={}, topicQueueMappingInfoTable=null
]
接着执行下面的代码
if (topicRouteData != null) {TopicRouteData old = this.topicRouteTable.get(topic);// 与本地缓存中的 topic 发布信息进行比较,如果有变化,则需要同步更新发送者、消费者关于该 topic 的缓存boolean changed = topicRouteData.topicRouteDataChanged(old);if (!changed) {changed = this.isNeedUpdateTopicRouteInfo(topic);} else {log.info("the topic[{}] route info changed, old[{}] ,new[{}]", topic, old, topicRouteData);}if (changed) { // 如果有变化,则需要同步更新发送者、消费者关于该 topic 的缓存for (BrokerData bd : topicRouteData.getBrokerDatas()) {// 更新broker地址this.brokerAddrTable.put(bd.getBrokerName(), bd.getBrokerAddrs());}// Update endpoint map{ConcurrentMap<MessageQueue, String> mqEndPoints = topicRouteData2EndpointsForStaticTopic(topic, topicRouteData);if (!mqEndPoints.isEmpty()) {topicEndPointsTable.put(topic, mqEndPoints);}}// Update Pub info{// 根据topic路由信息组装TopicPublishInfo对象TopicPublishInfo publishInfo = topicRouteData2TopicPublishInfo(topic, topicRouteData);publishInfo.setHaveTopicRouterInfo(true);for (Entry<String, MQProducerInner> entry : this.producerTable.entrySet()) {MQProducerInner impl = entry.getValue();if (impl != null) {// 更新DefaultMQProducerImpl的topicPublishInfoTable表impl.updateTopicPublishInfo(topic, publishInfo);}}}// Update sub info 生产者实例的consumerTable为空if (!consumerTable.isEmpty()) {//...}TopicRouteData cloneTopicRouteData = new TopicRouteData(topicRouteData);log.info("topicRouteTable.put. Topic = {}, TopicRouteData[{}]", topic, cloneTopicRouteData);this.topicRouteTable.put(topic, cloneTopicRouteData);return true;}
}
很明显新获取到的和本地缓存中的 topic 路由信息相比有变化,因此 changed 为 true
接着会根据 topicRouteData 组装TopicPublishInfo 对象,并将其保存到 DefaultMQProducerImpl 的 topicPublishInfoTable 中,key 为 topic 名称,value 为 TopicPublishInfo 对象
最后将 topicRouteData 保存在 topicRouteTable 中,方法结束
DefaultMQProducerImpl#sendDefaultImpl
现在我们已经获取到了要发送的 topic 的发布路由 topicPublishInfo,之后就开始发送了
boolean callTimeout = false;
MessageQueue mq = null;
Exception exception = null;
SendResult sendResult = null;
// 发送失败后重试最多的次数
int timesTotal = communicationMode == CommunicationMode.SYNC ? 1 + this.defaultMQProducer.getRetryTimesWhenSendFailed() : 1;
int times = 0;
String[] brokersSent = new String[timesTotal];
for (; times < timesTotal; times++) {String lastBrokerName = null == mq ? null : mq.getBrokerName();// 选择一个MessageQueue发送消息MessageQueue mqSelected = this.selectOneMessageQueue(topicPublishInfo, lastBrokerName);if (mqSelected != null) {//发送消息...} else {break;}
}
其中 selectOneMessageQueue 方法就是选择一个可用的 MessageQueue 发送消息
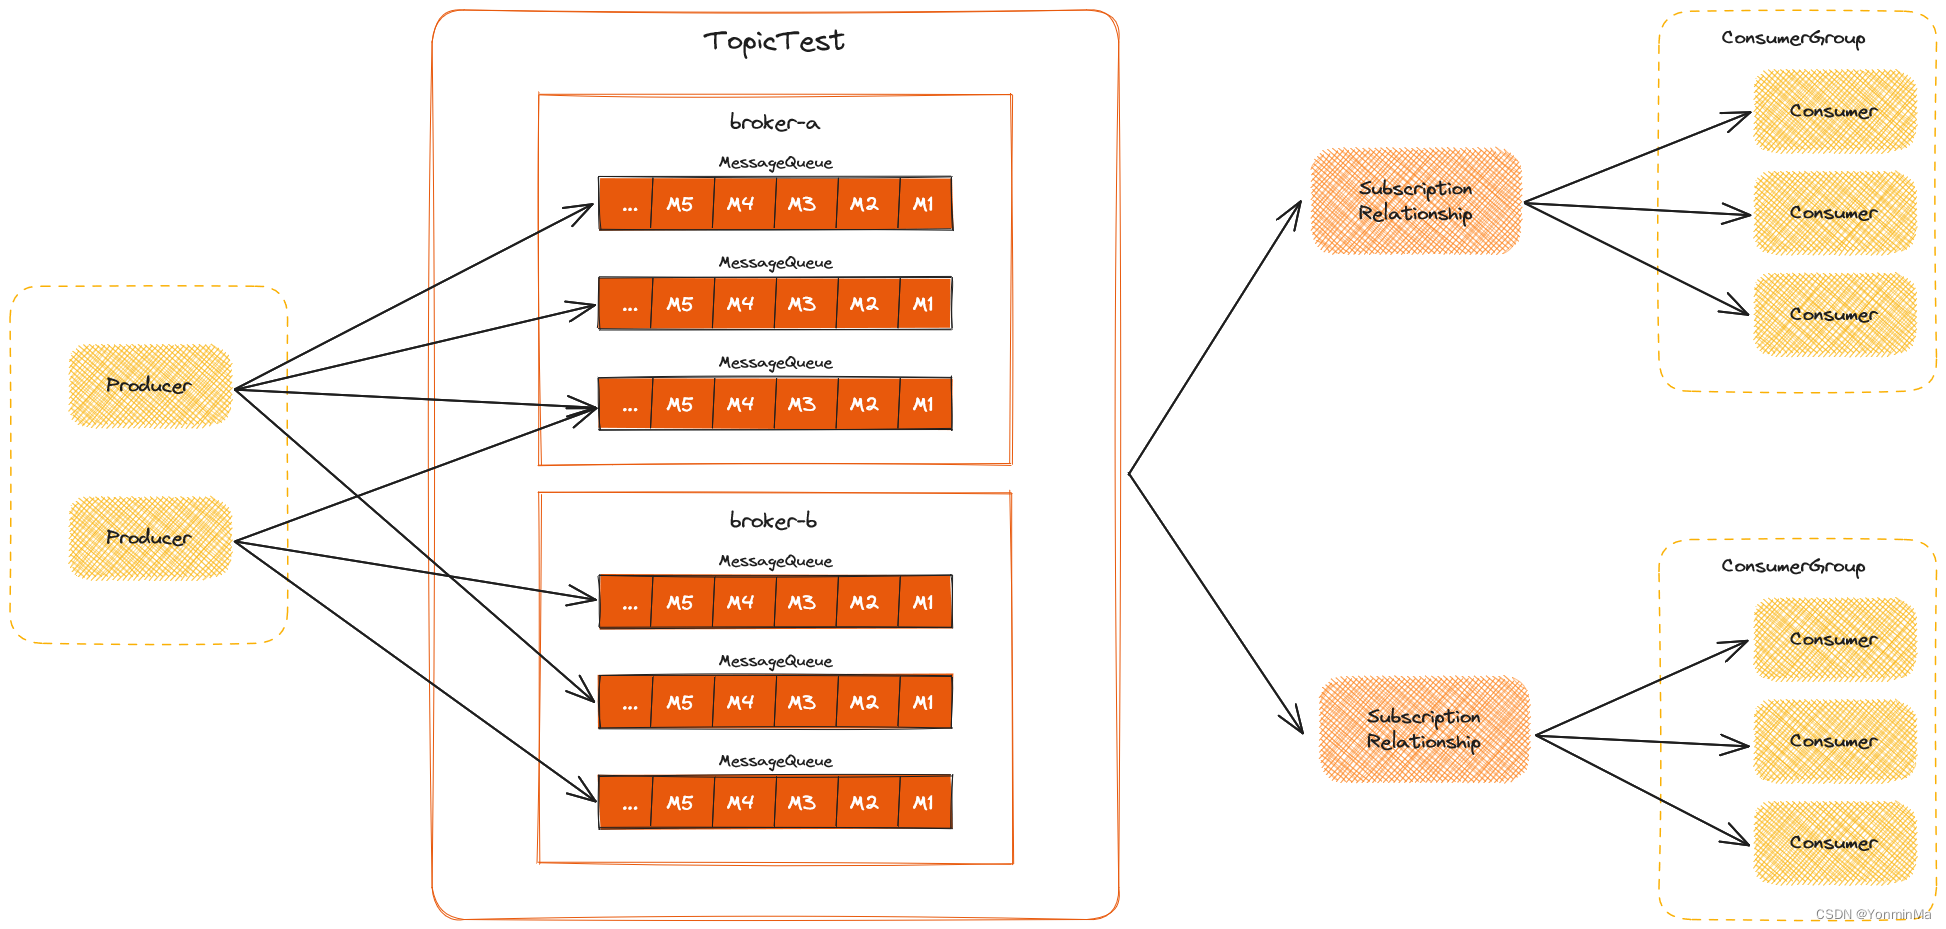
如上图所示,MessageQueue 有一个三元组标识唯一一个队列,即 (topic, brokerName, queueId),最上方的 MessageQueue 的三元组可能是 (TopicTest, broker-a, 0)
当我们得到了要发送的 MessageQueue 后就开始执行发送消息的步骤
mq = mqSelected;
brokersSent[times] = mq.getBrokerName();
try {beginTimestampPrev = System.currentTimeMillis();if (times > 0) {//Reset topic with namespace during resend.msg.setTopic(this.defaultMQProducer.withNamespace(msg.getTopic()));}long costTime = beginTimestampPrev - beginTimestampFirst;if (timeout < costTime) {callTimeout = true;break;}// 向 MessageQueue 发送消息sendResult = this.sendKernelImpl(msg, mq, communicationMode, sendCallback, topicPublishInfo, timeout - costTime);endTimestamp = System.currentTimeMillis();this.updateFaultItem(mq.getBrokerName(), endTimestamp - beginTimestampPrev, false);switch (communicationMode) {case ASYNC:return null;case ONEWAY:return null;case SYNC:// 同步调用方式(SYNC)下如果发送失败则执行失败重试策略,默认重试两次,即最多发送三次if (sendResult.getSendStatus() != SendStatus.SEND_OK) {if (this.defaultMQProducer.isRetryAnotherBrokerWhenNotStoreOK()) {continue;}}return sendResult;default:break;}
}
通过代码可以看出又调用了 sendKernelImpl 方法发送消息
private SendResult sendKernelImpl(final Message msg,final MessageQueue mq,final CommunicationMode communicationMode,final SendCallback sendCallback,final TopicPublishInfo topicPublishInfo,final long timeout) throws MQClientException, RemotingException, MQBrokerException, InterruptedException {long beginStartTime = System.currentTimeMillis();String brokerName = this.mQClientFactory.getBrokerNameFromMessageQueue(mq);String brokerAddr = this.mQClientFactory.findBrokerAddressInPublish(brokerName);if (null == brokerAddr) {tryToFindTopicPublishInfo(mq.getTopic());brokerName = this.mQClientFactory.getBrokerNameFromMessageQueue(mq);brokerAddr = this.mQClientFactory.findBrokerAddressInPublish(brokerName);}SendMessageContext context = null;if (brokerAddr != null) {// 根据配置判断是否使用VIP通道brokerAddr = MixAll.brokerVIPChannel(this.defaultMQProducer.isSendMessageWithVIPChannel(), brokerAddr);byte[] prevBody = msg.getBody();try {//for MessageBatch,ID has been set in the generating process// 检查消息是否为 MessageBatch 类型if (!(msg instanceof MessageBatch)) {MessageClientIDSetter.setUniqID(msg);}boolean topicWithNamespace = false;// 检查客户端配置中是否设置了命名空间if (null != this.mQClientFactory.getClientConfig().getNamespace()) {msg.setInstanceId(this.mQClientFactory.getClientConfig().getNamespace());topicWithNamespace = true;}// sysFlag是消息的系统标志位,包含压缩标志位、事务标志位、批量标志位、多队列标志位等int sysFlag = 0;boolean msgBodyCompressed = false;// 尝试压缩消息体if (this.tryToCompressMessage(msg)) {sysFlag |= MessageSysFlag.COMPRESSED_FLAG;sysFlag |= compressType.getCompressionFlag();msgBodyCompressed = true;}final String tranMsg = msg.getProperty(MessageConst.PROPERTY_TRANSACTION_PREPARED);// 检查消息是否为事务消息if (Boolean.parseBoolean(tranMsg)) {sysFlag |= MessageSysFlag.TRANSACTION_PREPARED_TYPE;}// 发送消息的校验钩子if (hasCheckForbiddenHook()) {CheckForbiddenContext checkForbiddenContext = new CheckForbiddenContext();checkForbiddenContext.setNameSrvAddr(this.defaultMQProducer.getNamesrvAddr());checkForbiddenContext.setGroup(this.defaultMQProducer.getProducerGroup());checkForbiddenContext.setCommunicationMode(communicationMode);checkForbiddenContext.setBrokerAddr(brokerAddr);checkForbiddenContext.setMessage(msg);checkForbiddenContext.setMq(mq);checkForbiddenContext.setUnitMode(this.isUnitMode());this.executeCheckForbiddenHook(checkForbiddenContext);}// 发送消息前的钩子if (this.hasSendMessageHook()) {context = new SendMessageContext();context.setProducer(this);context.setProducerGroup(this.defaultMQProducer.getProducerGroup());context.setCommunicationMode(communicationMode);context.setBornHost(this.defaultMQProducer.getClientIP());context.setBrokerAddr(brokerAddr);context.setMessage(msg);context.setMq(mq);context.setNamespace(this.defaultMQProducer.getNamespace());String isTrans = msg.getProperty(MessageConst.PROPERTY_TRANSACTION_PREPARED);if (isTrans != null && isTrans.equals("true")) {context.setMsgType(MessageType.Trans_Msg_Half);}if (msg.getProperty("__STARTDELIVERTIME") != null || msg.getProperty(MessageConst.PROPERTY_DELAY_TIME_LEVEL) != null) {context.setMsgType(MessageType.Delay_Msg);}this.executeSendMessageHookBefore(context);}// 设置发送消息的请求头SendMessageRequestHeader requestHeader = new SendMessageRequestHeader();requestHeader.setProducerGroup(this.defaultMQProducer.getProducerGroup());requestHeader.setTopic(msg.getTopic());requestHeader.setDefaultTopic(this.defaultMQProducer.getCreateTopicKey());requestHeader.setDefaultTopicQueueNums(this.defaultMQProducer.getDefaultTopicQueueNums());requestHeader.setQueueId(mq.getQueueId());requestHeader.setSysFlag(sysFlag);requestHeader.setBornTimestamp(System.currentTimeMillis());requestHeader.setFlag(msg.getFlag());requestHeader.setProperties(MessageDecoder.messageProperties2String(msg.getProperties()));requestHeader.setReconsumeTimes(0);requestHeader.setUnitMode(this.isUnitMode());requestHeader.setBatch(msg instanceof MessageBatch);requestHeader.setBname(brokerName);// 如果是重发消息,则设置重发消息的次数if (requestHeader.getTopic().startsWith(MixAll.RETRY_GROUP_TOPIC_PREFIX)) {// 重发消息的次数String reconsumeTimes = MessageAccessor.getReconsumeTime(msg);if (reconsumeTimes != null) {// 设置重发消息的次数requestHeader.setReconsumeTimes(Integer.valueOf(reconsumeTimes));// 清除消息的重发次数属性,因为消息的重发次数属性是在消息重发时设置的MessageAccessor.clearProperty(msg, MessageConst.PROPERTY_RECONSUME_TIME);}// 消息的最大重发次数String maxReconsumeTimes = MessageAccessor.getMaxReconsumeTimes(msg);if (maxReconsumeTimes != null) {// 设置消息的最大重发次数requestHeader.setMaxReconsumeTimes(Integer.valueOf(maxReconsumeTimes));// 清除消息的最大重发次数属性,因为消息的最大重发次数属性是在消息重发时设置的MessageAccessor.clearProperty(msg, MessageConst.PROPERTY_MAX_RECONSUME_TIMES);}}SendResult sendResult = null;switch (communicationMode) {case ASYNC:Message tmpMessage = msg;boolean messageCloned = false;if (msgBodyCompressed) {//If msg body was compressed, msgbody should be reset using prevBody.//Clone new message using commpressed message body and recover origin massage.//Fix bug:https://github.com/apache/rocketmq-externals/issues/66tmpMessage = MessageAccessor.cloneMessage(msg);messageCloned = true;// 防止压缩后的消息体重发时被再次压缩msg.setBody(prevBody);}if (topicWithNamespace) {if (!messageCloned) {tmpMessage = MessageAccessor.cloneMessage(msg);messageCloned = true;}// 防止设置了命名空间的topic重发时被再次设置命名空间msg.setTopic(NamespaceUtil.withoutNamespace(msg.getTopic(), this.defaultMQProducer.getNamespace()));}long costTimeAsync = System.currentTimeMillis() - beginStartTime;if (timeout < costTimeAsync) {throw new RemotingTooMuchRequestException("sendKernelImpl call timeout");}sendResult = this.mQClientFactory.getMQClientAPIImpl().sendMessage(brokerAddr,brokerName,tmpMessage,requestHeader,timeout - costTimeAsync,communicationMode,sendCallback,topicPublishInfo,this.mQClientFactory,this.defaultMQProducer.getRetryTimesWhenSendAsyncFailed(),context,this);break;case ONEWAY:case SYNC:long costTimeSync = System.currentTimeMillis() - beginStartTime;if (timeout < costTimeSync) {throw new RemotingTooMuchRequestException("sendKernelImpl call timeout");}sendResult = this.mQClientFactory.getMQClientAPIImpl().sendMessage(brokerAddr,brokerName,msg,requestHeader,timeout - costTimeSync,communicationMode,context,this);break;default:assert false;break;}// 发送消息后的钩子if (this.hasSendMessageHook()) {context.setSendResult(sendResult);this.executeSendMessageHookAfter(context);}return sendResult;} catch (RemotingException | InterruptedException | MQBrokerException e) {if (this.hasSendMessageHook()) {context.setException(e);this.executeSendMessageHookAfter(context);}throw e;} finally {msg.setBody(prevBody);msg.setTopic(NamespaceUtil.withoutNamespace(msg.getTopic(), this.defaultMQProducer.getNamespace()));}}throw new MQClientException("The broker[" + brokerName + "] not exist", null);
}
这段代码虽然比较长,但是结合注释还是挺容易理解的。不过其中在异步 (ASYNC) 发送消息时有下面一段代码可能会让人疑惑
Message tmpMessage = msg;
boolean messageCloned = false;
if (msgBodyCompressed) {//If msg body was compressed, msgbody should be reset using prevBody.//Clone new message using commpressed message body and recover origin massage.//Fix bug:https://github.com/apache/rocketmq-externals/issues/66tmpMessage = MessageAccessor.cloneMessage(msg);messageCloned = true;// 防止压缩后的消息体重发时被再次压缩msg.setBody(prevBody);
}if (topicWithNamespace) {if (!messageCloned) {tmpMessage = MessageAccessor.cloneMessage(msg);messageCloned = true;}// 防止设置了命名空间的topic重发时被再次设置命名空间msg.setTopic(NamespaceUtil.withoutNamespace(msg.getTopic(), this.defaultMQProducer.getNamespace()));
}
这段代码主要是克隆了一个和 msg 内容一样的 tmpMessage 并发送,而 msg 本身的 body 被设置成了压缩之前的 body,topic 也被设置成了添加命名空间之前的 topic
发送流程总结
- 检查消息是否合法
- 获取 topic 路由信息
- 先尝试从本地获取路由信息,没有则向 NameServer 获取
- 向 NameServer 获取路由信息并更新本地缓存,没有则抛出异常并返回
- 从本地获取路由信息
- 如果本地扔获取不到路由信息则获取默认路由信息
- 向 NameServer 获取默认路由信息,如果获取不到则抛出异常并返回
- 修改获取到的默认路由信息为新的 topic 的路由信息
- 更新本地路由信息缓存
- 先尝试从本地获取路由信息,没有则向 NameServer 获取
- 获取路由信息成功;失败则跳转到第4步
- 选择一个
MessageQueue - 向
MessageQueue发送消息- 根据配置判断是否使用 VIP 通道
- 检查消息是否为 MessageBatch 类型
- 检查客户端配置中是否设置了命名空间
- 设置消息的标志位
sysFlag- 尝试压缩消息体并更新
sysFlag - 检查消息是否为事务消息并更新
sysFlag
- 尝试压缩消息体并更新
- 调用钩子函数
- 设置消息请求头
- 根据发送消息的方式发送消息
- 选择一个
- 获取路由信息失败
- 校验 NameServer 配置是否正确
- 抛出异常结束
相关文章:
RocketMQ 5.1.0 源码详解 | Producer 发送流程
文章目录 初始化DefaultMQProducer实例发送流程DefaultMQProducer#sendDefaultMQProducerImpl#sendMQClientInstance#updateTopicRouteInfoFromNameServer使用特定 topic 获取路由信息使用默认 topic 获取路由信息 DefaultMQProducerImpl#sendDefaultImpl发送流程总结 初始化De…...

电脑ip地址怎么改 ip地址怎么改到别的城市
一、ip地址怎么改到别的城市 1.ip地址怎么改到别的城市,1、重启WIFI路由设备 一般手机或电脑在家或公司上网时都是接入到路由器的WIFI网络,再由路由器分配上网IP地址,如果要更换上网IP那么重启路由器设备后,路由器会向网络运营商进行宽带的重新拨号,此时手机或电脑设…...
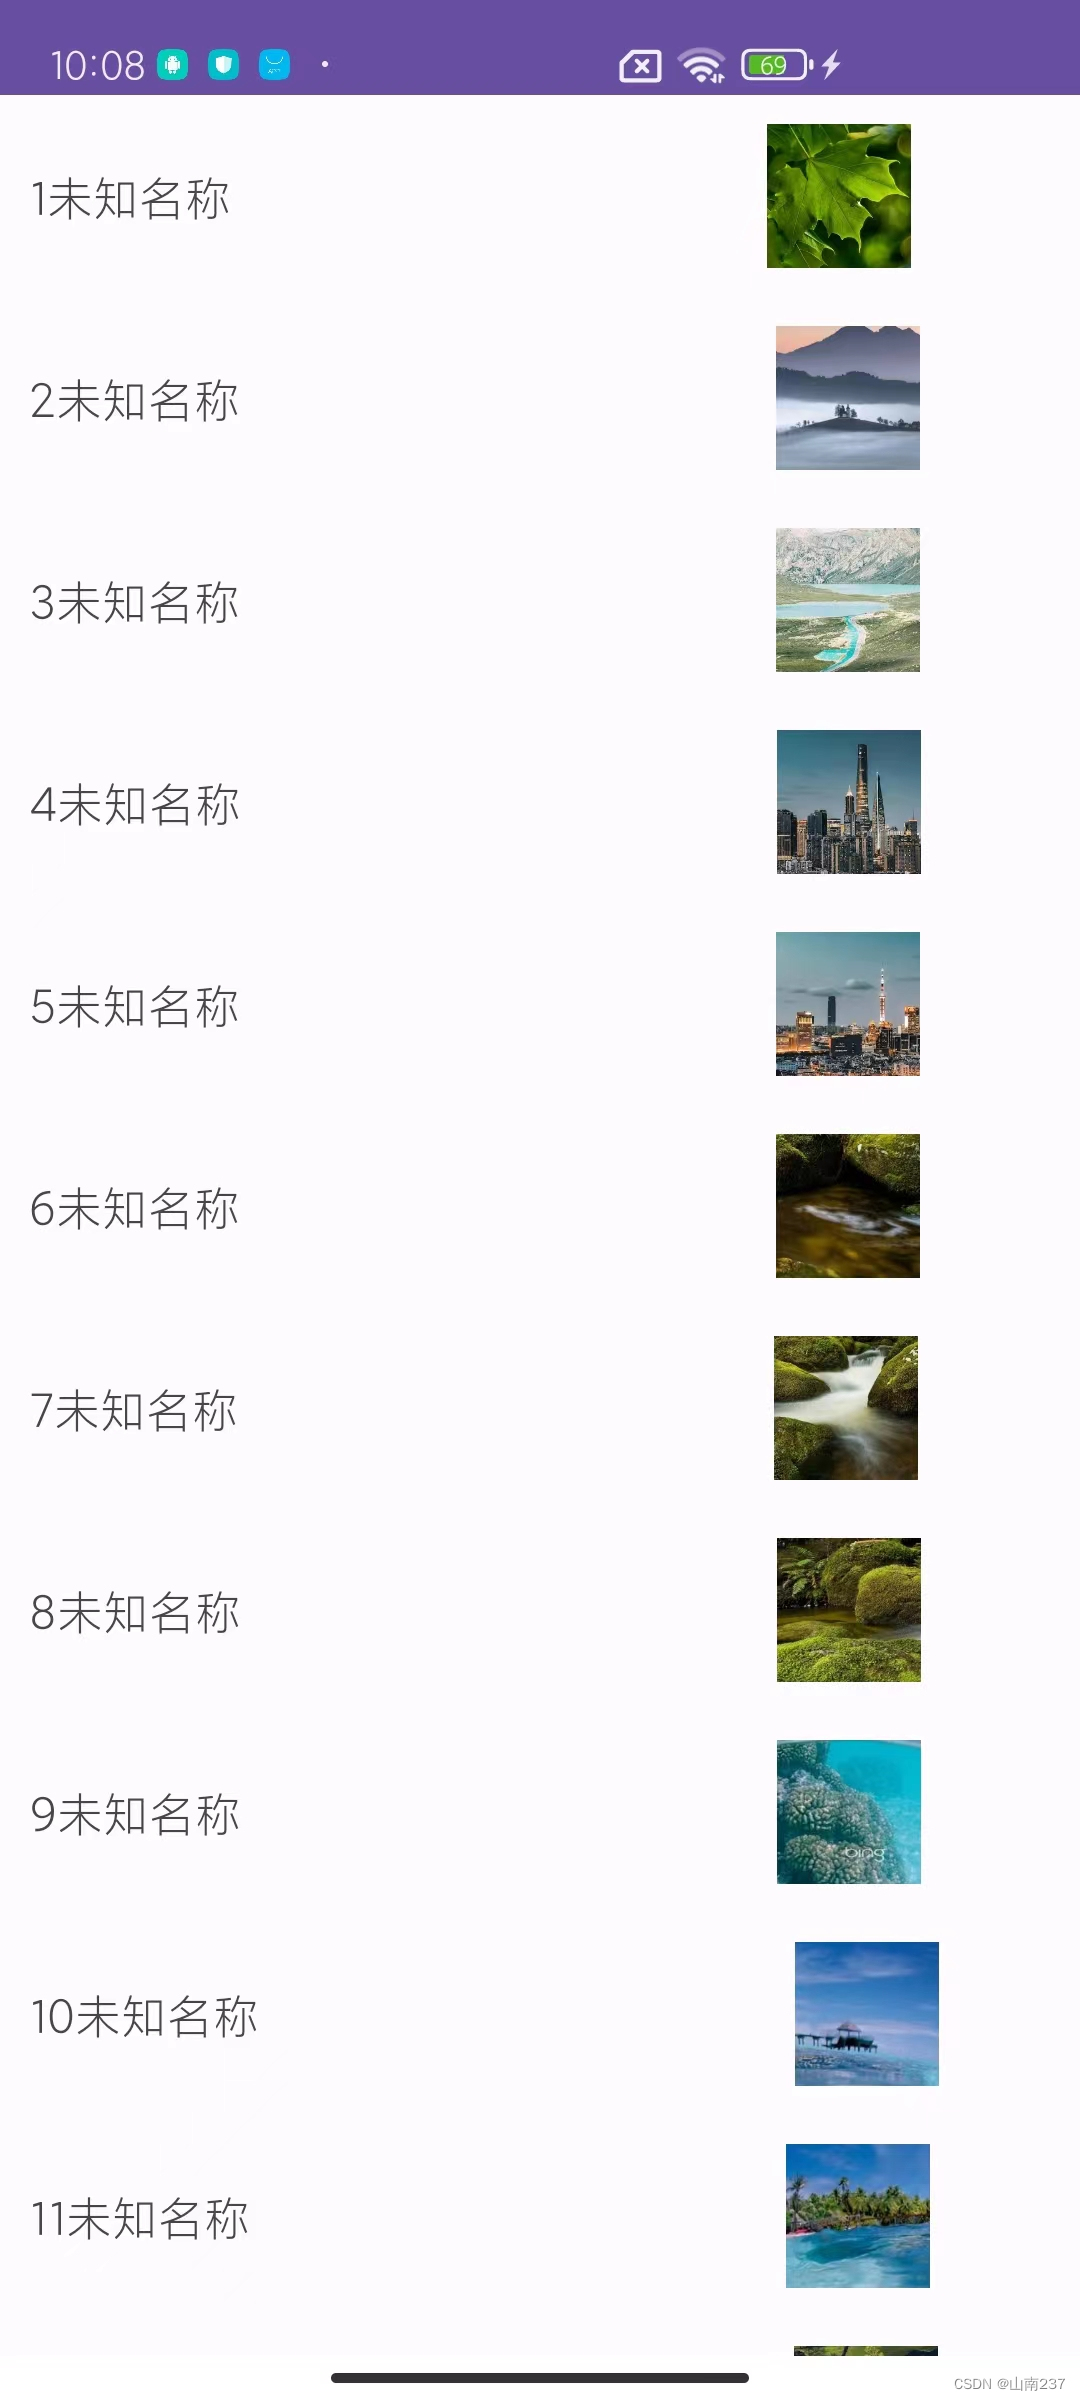
Android Studio实现列表展示图片
效果: MainActivity 类 package com.example.tabulation;import android.content.Intent; import android.os.Bundle; import android.view.View;import androidx.appcompat.app.AppCompatActivity; import androidx.recyclerview.widget.LinearLayoutManager; im…...

每天一道leetcode:300. 最长递增子序列(动态规划中等)
今日份题目: 给你一个整数数组 nums ,找到其中最长严格递增子序列的长度。 子序列 是由数组派生而来的序列,删除(或不删除)数组中的元素而不改变其余元素的顺序。例如,[3,6,2,7] 是数组 [0,3,1,6,2,2,7] …...
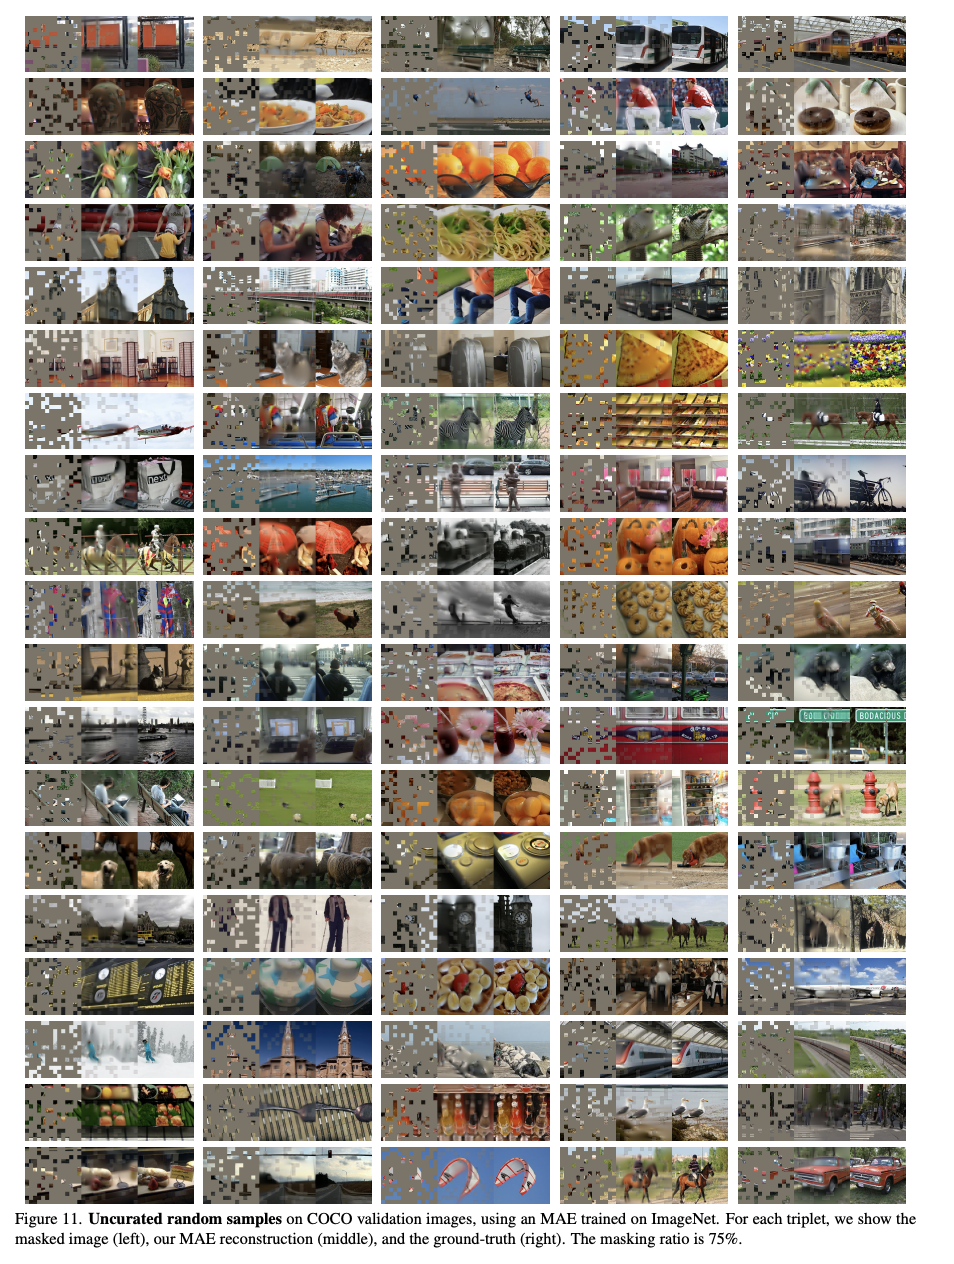
【无监督】2、MAE | 自监督模型提取的图像特征也很能打!(CVPR2022 Oral)
文章目录 一、背景二、方法三、效果 论文:Masked Autoencoders Are Scalable Vision Learners 代码:https://github.com/facebookresearch/mae 出处:CVPR2022 Oral | 何凯明 | FAIR 一、背景 本文的标题突出了两个词: masked…...

pytorch单机多卡后台运行
nohup sh ./train_chat.sh > train_chat20230814.log 2>1&参考资料 Pytorch单机多卡后台运行的解决办法...
linux配置上网 linux adsl拨号上网设置
Linux里面配置ADSL上网是件很麻烦的事。但配置完成之后就能开机自动拨号上网,可谓十分的方便。支持的系统有Redhat,CentOS,SuSE,FreeBSD,Ubuntu等常见的Linux。 工具/原料 ADSL网络,电信,网通,移动等常见宽带。 Linux系统的安装光…...
)
XML学习基础知识归纳(一)
一、XML基本概述 (1)概念:XML是可扩展的标记语言,xml文档的后缀名为 .xml (2)作用:用来用来传输和存储数据,不用于表现和展示数据,这点呢相比于HTML来说是不同的&#…...
2023.8.14论文阅读
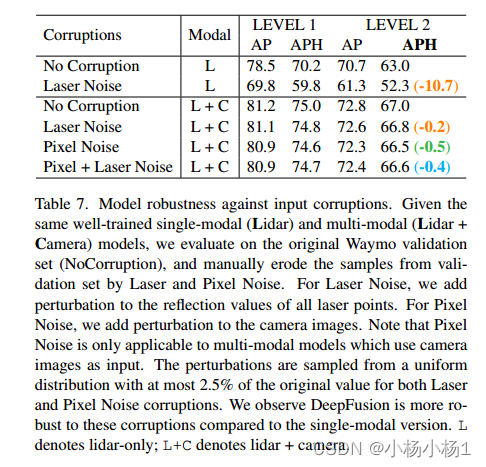
文章目录 ESPNet: Efficient Spatial Pyramid of Dilated Convolutions for Semantic Segmentation摘要本文方法实验结果 DeepFusion: Lidar-Camera Deep Fusion for Multi-Modal 3D Object Detection摘要本文方法实验结果 ESPNet: Efficient Spatial Pyramid of Dilated Convo…...

FL Studio for Windows-21.1.0.3713中文直装版功能介绍及系统配置要求
FL Studio 21简称FL水果软件,全称是:Fruity Loops Studio编曲,由于其Logo长的比较像一款水果因此,在大家更多的是喜欢称他为水果萝卜,FL studio21是目前最新的版本,这是一款可以让你的计算机就像是一个全功能的录音室&…...

基于网格变形的二维图像变形算法:C++实现与应用
在计算机图形学中,图像变形是一种常见的技术,它可以改变图像的形状和结构,以满足特定的视觉效果或者应用需求。本文将介绍一种基于网格变形的二维图像变形算法,并使用C进行实现。 一、算法原理 网格变形是一种基于网格的图像变形…...
【数据结构】八大排序详解
🚀 作者简介:一名在后端领域学习,并渴望能够学有所成的追梦人。 🐌 个人主页:蜗牛牛啊 🔥 系列专栏:🛹数据结构、🛴C 📕 学习格言:博观而约取&…...
VSCode如何设置高亮
一、概述 本文主要介绍在 VSCode 看代码时,怎样使某个单词高亮显示,主要通过以下三步实现: 安装 highlight-words 插件 配置 highlight-words 插件 设置高亮快捷键F8 工作是嵌入式开发的,代码主要是C/C的,之前一直用…...

密钥大全ubuntu
VMware Workstation Tech Preview 20H2 GG1JR-APD1P-0857Q-DQQN9-PU2CA VMware Workstation v16 Pro for Windows(反馈失效) ZF3R0-FHED2-M80TY-8QYGC-NPKYF YF390-0HF8P-M81RQ-2DXQE-M2UT6 ZF71R-DMX85-08DQY-8YMNC-PPHV8 VMware Workstation v15 f…...

Spring Task入门案例
Spring Task 是Spring框架提供的任务调度工具,可以按照约定的时间自动执行某个代码逻辑。 定位:定时任务框架 作用:定时自动执行某段Java代码 强调:只要是需要定时处理的场景都可以使用Spring Task 1. cron表达式 cron表达式…...
针对Android项目蓝牙如何学习
一、概述(Overview) 蓝牙是一种专有的开放式无线技术标准,用于在固定和移动设备之间进行短距离数据交换(使用2400–2480 MHz ISM波段的短波长无线电传输),从而创建具有高度安全性的个人局域网(PANs)。由电信供应商爱立信(telecoms vendor Ericsson)于1994年创建,[1…...

C++学习笔记总结练习:内存分配器编程实现
内存分配器练习 C内存分配器是用于管理程序运行时内存的工具。它负责分配和释放内存,以满足程序在运行过程中的动态内存需求。在C中,有几种内存分配器可供选择,包括操作系统提供的默认分配器、自定义分配器和第三方库提供的分配器。 默认分配…...
【uniapp】使用Vs Code开发uniapp:
文章目录 一、使用命令行创建uniapp项目:二、安装插件与配置:三、编译和运行:四、修改pinia: 一、使用命令行创建uniapp项目: 二、安装插件与配置: 三、编译和运行: 该项目下的dist》dev》mp-weixin文件导入微信开发者…...
【STM32】高效开发工具CubeMonitor快速上手
工欲善其事必先利其器。拥有一个辅助测试工具,能极大提高开发项目的效率。STM32CubeMonitor系列工具能够实时读取和呈现其变量,从而在运行时帮助微调和诊断STM32应用,类似于一个简单的示波器。它是一款基于流程的图形化编程工具,类…...

React 使用 i18n 翻译换行解决方法
当前问题: json 配置文件 "detail": {"10001": "Top 10 \nBIGGEST WINS" } 按以上方式文本在渲染的时候并不能识别我们加入 \n 要实现换行的意图,通过拆分成两个多语来实现又太低级。 解决方法: 在该多语…...

MCP Server生产级配置:Playwright与LLM集成的避坑指南
1. 这不是又一个“Playwright入门教程”,而是一份能直接塞进CI流水线的MCP Server生产级配置实录你有没有遇到过这样的场景:团队刚决定用AI驱动自动化测试,技术选型会上大家一致看好Playwright MCP(Model Context Protocol&#…...

利用DiSEqC协议与AVR单片机驱动卫星天线电机改造户外设备
1. 项目概述:用卫星天线电机驱动一切如果你手头有一些需要承受风吹日晒、还得精确转动的设备,比如一个户外的大型定向天线,或者一个需要定期调整角度的太阳能板支架,甚至是一个坚固的监控云台,你可能会为驱动机构发愁。…...
到panic:深入Linux 5.4内核,看异常处理如何层层递进)
从BUG()到panic:深入Linux 5.4内核,看异常处理如何层层递进
从BUG()到panic:Linux内核异常处理的防御体系全解析当你在深夜调试一个内核模块时,突然屏幕刷出一串红色警告——这可能是每个Linux内核开发者都经历过的噩梦时刻。但你是否想过,从第一行警告出现到系统完全崩溃,内核究竟经历了怎…...

Airtest Poco实战:5分钟搞定微信小程序自动化测试环境搭建与元素抓取
Airtest Poco实战:5分钟搞定微信小程序自动化测试环境搭建与元素抓取微信小程序作为轻量级应用的代表,已经渗透到电商、社交、工具等各个领域。随着小程序功能的日益复杂,自动化测试成为保障产品质量的重要手段。本文将带你快速搭建微信小程序…...
)
实战对比:用直方图均衡化与CLAHE拯救你的背光/过曝照片(附Python完整代码)
拯救逆光废片:直方图均衡化与CLAHE的实战效果对比每次旅行回来整理照片时,总会有几张因为光线问题几乎要删除的废片——要么是逆光下的人脸黑得看不清五官,要么是天空过曝失去所有云层细节。这些照片往往记录着重要时刻,直接删除实…...

3分钟上手:NBTExplorer终极指南 - 可视化编辑Minecraft游戏数据的免费神器
3分钟上手:NBTExplorer终极指南 - 可视化编辑Minecraft游戏数据的免费神器 【免费下载链接】NBTExplorer A graphical NBT editor for all Minecraft NBT data sources 项目地址: https://gitcode.com/gh_mirrors/nb/NBTExplorer 你是否曾经想要修改Minecraf…...
)
大模型测试新范式:Claude端到端验证的5层断言体系(语义一致性/上下文连贯性/安全边界/成本阈值/时序鲁棒性)
更多请点击: https://codechina.net 第一章:大模型测试新范式:Claude端到端验证的5层断言体系(语义一致性/上下文连贯性/安全边界/成本阈值/时序鲁棒性) 传统LLM测试常聚焦于准确率或BLEU等静态指标,而Cla…...

PrediPrune:机器学习驱动的编译器超级优化候选剪枝策略
1. 项目概述与核心挑战在编译器优化的世界里,我们总在追求极致的性能。传统的编译器优化器,比如LLVM的Pass,依赖于一系列预定义的、经过验证的转换规则。它们很高效,但想象力也受限于这些规则。超级优化器(Superoptimi…...

3分钟掌握抖音视频批量下载:解放双手的素材收集革命
3分钟掌握抖音视频批量下载:解放双手的素材收集革命 【免费下载链接】douyinhelper 抖音批量下载助手 项目地址: https://gitcode.com/gh_mirrors/do/douyinhelper 还在为一个个手动保存抖音视频而烦恼吗?想要高效收集创作者素材却苦于没有合适的…...

ESP32搭建TFT_LCD中文字库,附常用字库
(一)简介 在使用ESP32的时候,我们知道OLED屏幕是有中文库的,里面有非常多的常用字,但是LCD屏幕只有取模才能得到中文字体,那我们本期教程就来教大家如何搭建自己的字体库,使用中文字体更加方便快…...