Andriod 简单控件
目录
- 一、文本显示
- 1.1 设置文本内容
- 1.2 设置文本大小
- 1.3 设置文本颜色
- 二、视图基础
- 2.1 设置视图宽高
- 2.2 设置视图间距
- 2.3 设置视图对齐方式
- 三、常用布局
- 3.1 线性布局LinearLayout
- 3.2 相对布局RelativeLayout
- 3.3 网格布局GridLayout
- 3.4 滚动视图ScrollView
- 四、按钮触控
- 4.1 按钮控件
- 4.2 点击和长按事件
- 4.3 禁用与恢复按钮
- 五、图像显示
- 5.1 图像视图ImageView
- 5.2 图像按钮ImageButton
- 5.3 同时展示文本与图像
一、文本显示
1.1 设置文本内容
android:text属性
<?xml version="1.0" encoding="utf-8"?>
<LinearLayout xmlns:android="http://schemas.android.com/apk/res/android"android:layout_width="match_parent"android:layout_height="match_parent"><TextViewandroid:id="@+id/tv_hello"android:layout_width="wrap_content"android:layout_height="wrap_content"android:text="@string/hello"/>
</LinearLayout>
1.2 设置文本大小
字体大小用sp单位
android:textSize属性
<?xml version="1.0" encoding="utf-8"?>
<LinearLayout xmlns:android="http://schemas.android.com/apk/res/android"android:layout_width="match_parent"android:layout_height="match_parent"android:orientation="vertical"><TextViewandroid:id="@+id/tv_dp"android:layout_width="wrap_content"android:layout_height="wrap_content"android:text="@string/hello"android:textSize="30sp"/>
</LinearLayout>
1.3 设置文本颜色
android:textColor属性
<?xml version="1.0" encoding="utf-8"?>
<LinearLayout xmlns:android="http://schemas.android.com/apk/res/android"android:layout_width="match_parent"android:layout_height="match_parent"android:orientation="vertical"><TextViewandroid:id="@+id/tv_code_system"android:layout_width="wrap_content"android:layout_height="wrap_content"android:text="代码设置系统自动的颜色代码"android:textSize="17sp"/><TextViewandroid:id="@+id/tv_code_eight"android:layout_width="wrap_content"android:layout_height="wrap_content"android:text="代码设置8位颜色"android:textSize="17sp"/><TextViewandroid:id="@+id/tv_code_six"android:layout_width="wrap_content"android:layout_height="wrap_content"android:text="代码设置6位颜色"android:textSize="17sp"/><TextViewandroid:id="@+id/tv_xml"android:layout_width="wrap_content"android:layout_height="wrap_content"android:text="xml设置6位颜色"android:textSize="17sp"android:textColor="#ff00ff"/><TextViewandroid:id="@+id/tv_values"android:layout_width="wrap_content"android:layout_height="wrap_content"android:text="xml设置6位颜色"android:textSize="17sp"android:textColor="@color/teal_200"/><TextViewandroid:id="@+id/tv_code_background"android:layout_width="wrap_content"android:layout_height="wrap_content"android:text="背景设置绿色"android:textSize="17sp"/><!--  android:background="@color/teal_200" -->
</LinearLayout>
二、视图基础
2.1 设置视图宽高
视图宽高和间距用dp单位
android:layout_width设置宽度
android:layout_height设置高度
wrap_content 由内容撑开,match_parent 匹配父容器
<?xml version="1.0" encoding="utf-8"?>
<LinearLayout xmlns:android="http://schemas.android.com/apk/res/android"android:layout_width="match_parent"android:layout_height="match_parent"android:orientation="vertical"><TextViewandroid:layout_width="wrap_content"android:layout_height="wrap_content"android:textColor="@color/teal_200"android:layout_marginTop="5dp"android:background="@color/black"android:textSize="17sp"/></LinearLayout>
2.2 设置视图间距
间距用dp单位
这里和前端的css属性非常类似,比如左边距margin-lfet,在安卓中就是layout_marginLeft
android:padding设置内边距
android:layout_margin设置外边距
<?xml version="1.0" encoding="utf-8"?>
<LinearLayout xmlns:android="http://schemas.android.com/apk/res/android"android:layout_width="match_parent"android:layout_height="300dp"android:orientation="vertical"android:background="#00aaff"android:padding="30dp"><!--中间层布局颜色为黄色--><LinearLayoutandroid:layout_width="match_parent"android:layout_height="match_parent"android:layout_margin="20dp"android:background="#ffff99"android:padding="60dp"><!--内层视图颜色为红色--><Viewandroid:layout_width="match_parent"android:layout_height="match_parent"android:background="#00ff00" /></LinearLayout></LinearLayout>
2.3 设置视图对齐方式
android:layout_gravity 设置父容器的对齐方式
android:gravity 设置子组件在父容器的对齐方式
<?xml version="1.0" encoding="utf-8"?>
<LinearLayout xmlns:android="http://schemas.android.com/apk/res/android"android:layout_height="300dp"android:layout_width="match_parent"android:background="#ffff99"android:orientation="horizontal"><!-- 第一个子布局背景为红色,它在上级视图中朝下对齐,它的下级视图则靠左对齐 --><LinearLayoutandroid:layout_width="0dp"android:layout_height="200dp"android:layout_weight="1"android:layout_margin="10dp"android:padding="10dp"android:background="#ff0000"android:layout_gravity="bottom"android:gravity="center"><!--内部视图的宽度和高度都是100dp,且背景色为青色--><Viewandroid:layout_width="100dp"android:layout_height="100dp"android:background="@color/teal_200"/></LinearLayout><!--第二个子布局背景为红色,它在上级视图中朝上对齐,它的下级视图则靠右对齐--><LinearLayoutandroid:layout_width="0dp"android:layout_height="200dp"android:layout_weight="1"android:layout_margin="10dp"android:padding="10dp"android:background="#ff0000"android:gravity="right"><!--内部视图的宽度和高度都是100dp,且背景色为青色--><Viewandroid:layout_width="100dp"android:layout_height="100dp"android:background="@color/teal_200"/></LinearLayout></LinearLayout>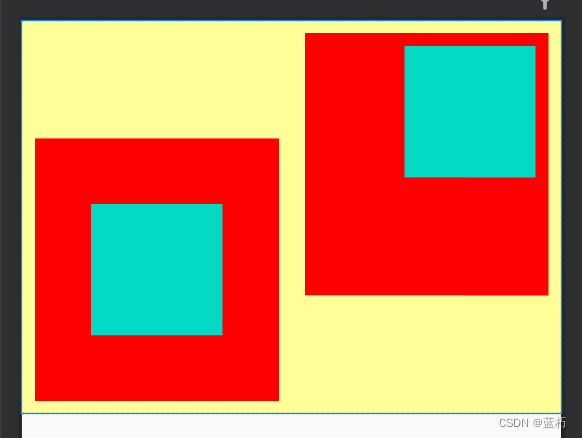
三、常用布局
3.1 线性布局LinearLayout
LinearLayout 为线性布局,它可以通过android:orientation 来设置页面的排列方向,vertical是垂直方向,horizontal是水平方向排列
代码示例:
<!--水平排列--><LinearLayoutandroid:layout_width="match_parent"android:layout_height="wrap_content"android:orientation="horizontal"><TextViewandroid:layout_width="wrap_content"android:layout_height="wrap_content"android:text="横排第一个"android:textSize="17sp"android:textColor="#000000"/><TextViewandroid:layout_width="wrap_content"android:layout_height="wrap_content"android:text="横排第二个"android:layout_marginLeft="10dp"android:textSize="17sp"android:textColor="#000000"/></LinearLayout>
3.2 相对布局RelativeLayout
相对布局可以相对某一个组件设置对齐方式,比如要让A组件在B组件的下面,就可以使用android:layout_below="@id/B"
常用属性如下:
android:layout_centerInParent="true"在父容器中间对齐android:layout_centerHorizontal="true"在父容器水平居中android:layout_centerVertical="true"在父容器垂直居中android:layout_alignParentLeft="true"在父容器左边对齐android:layout_alignParentRight="true"在父容器右边对齐android:layout_alignParentTop="true"在父容器顶部对齐android:layout_alignParentBottom="true"在父容器底部对齐android:layout_toLeftOf="@id/tv_center"在tv_center组件的左边android:layout_toRightOf="@id/tv_center"在tv_center组件的右边android:layout_above="@id/tv_center"在tv_center组件的上边android:layout_below="@id/tv_center"在tv_center组件的下方android:layout_alignTop="@id/tv_center"与tv_center组件顶部对齐android:layout_alignBottom="@id/tv_center"与tv_center组件底部对齐android:layout_alignLeft="@id/tv_center"与tv_center组件左边对齐android:layout_alignRight="@id/tv_center"与tv_center组件右边对齐
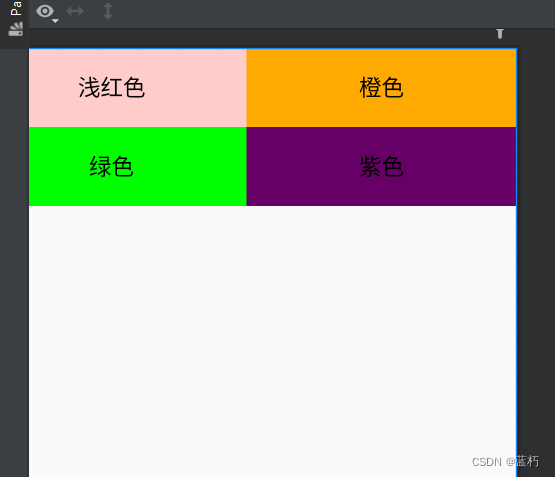
3.3 网格布局GridLayout
网格布局就是类似表格一样的布局,用起来还是很方便的
常用属性:
| 属性 | 作用 |
|---|---|
| android:columnCount | 设置列数 |
| android:rowCount | 设置行数 |
| android:layout_columnWeight | 设置列宽的权重 |
| android:layout_rowWeight | 纵向乘剩余空间分配方式 |
| android:layout_rowSpan | 横向跨几行 |
| android:layout_columnSpan | 横向跨几列 |
代码示例:
<?xml version="1.0" encoding="utf-8"?>
<GridLayout xmlns:android="http://schemas.android.com/apk/res/android"android:layout_width="match_parent"android:layout_height="match_parent"android:columnCount="2"android:rowCount="2"><TextViewandroid:layout_height="60dp"android:layout_width="0dp"android:layout_columnWeight="1"android:text="浅红色"android:background="#ffcccc"android:textColor="#000000"android:textSize="17sp"android:gravity="center"/><TextViewandroid:layout_height="60dp"android:layout_width="0dp"android:layout_columnWeight="1"android:text="橙色"android:background="#ffaa00"android:textColor="#000000"android:textSize="17sp"android:gravity="center"/><TextViewandroid:layout_height="60dp"android:layout_width="0dp"android:layout_columnWeight="1"android:text="绿色"android:background="#00ff00"android:textColor="#000000"android:textSize="17sp"android:gravity="center"/><TextViewandroid:layout_height="60dp"android:layout_width="0dp"android:layout_columnWeight="1"android:text="紫色"android:background="#660066"android:textColor="#000000"android:textSize="17sp"android:gravity="center"/>
</GridLayout>
3.4 滚动视图ScrollView
滚动视图分为垂直滚动和水平滚动
1.水平滚动HorizontalScrollView
<?xml version="1.0" encoding="utf-8"?>
<LinearLayout xmlns:android="http://schemas.android.com/apk/res/android"android:layout_width="match_parent"android:layout_height="match_parent"android:orientation="vertical"><!--水平滚动--><HorizontalScrollViewandroid:layout_width="wrap_content"android:layout_height="200dp"><!-- 水平方向的线性布局,两个于视图的颜色分别为青色和黄色--><LinearLayoutandroid:layout_width="wrap_content"android:layout_height="match_parent"android:orientation="horizontal"><Viewandroid:layout_width="300dp"android:layout_height="match_parent"android:background="#aaffff" /><Viewandroid:layout_width="300dp"android:layout_height="match_parent"android:background="#aaff00"/></LinearLayout></HorizontalScrollView></LinearLayout>

2. 垂直滚动ScrollView
<?xml version="1.0" encoding="utf-8"?>
<LinearLayout xmlns:android="http://schemas.android.com/apk/res/android"android:layout_width="match_parent"android:layout_height="match_parent"android:orientation="vertical"><!--垂直滚动--><ScrollViewandroid:layout_width="match_parent"android:layout_height="wrap_content"><LinearLayoutandroid:layout_width="wrap_content"android:layout_height="match_parent"android:orientation="vertical"><Viewandroid:layout_width="match_parent"android:layout_height="400dp"android:background="#00ff00" /><Viewandroid:layout_width="match_parent"android:layout_height="400dp"android:background="#ffffaa"/></LinearLayout></ScrollView>
</LinearLayout>

四、按钮触控
可以通过findViewById找到在xml中定义的组件,只要在xml中定义组件时指定id即可
4.1 按钮控件
按钮控件用Button标签,按钮控件自带样式,如果想要自定义样式要先修改res->values->themes.xml中的parent属性值为"Theme.MaterialComponents.DayNight.DarkActionBar.Bridge"
代码示例:
<Buttonandroid:layout_width="match_parent"android:layout_height="wrap_content"android:text="Hello world"android:textColor="@color/black"android:textSize="17sp"/>
4.2 点击和长按事件
1.点击事件
定义两个按钮,演示不同的绑定事件的方法
<Buttonandroid:id="@+id/btn_click_single"android:layout_width="match_parent"android:layout_height="wrap_content"android:text="指定点击事件监听"android:textColor="#000000"android:textSize="17sp"/><Buttonandroid:id="@+id/btn_click_public"android:layout_width="match_parent"android:layout_height="wrap_content"android:text="指定公点击事件监听"android:textColor="#000000"android:textSize="17sp"/>
在ButtonClickActivity中绑定监听事件。绑定监听事件有两种方式,第一种让本类实现View.OnClickListener接口,重写onClick方法,第二种是自定义一个类实现View.OnClickListener接口,重写onClick方法
public class ButtonClickActivity extends AppCompatActivity implements View.OnClickListener{private TextView tv_result;@Overrideprotected void onCreate(Bundle savedInstanceState) {super.onCreate(savedInstanceState);setContentView(R.layout.activity_button_click);tv_result = findViewById(R.id.tv_result);Button btn_click_single = findViewById(R.id.btn_click_single);Button btn_click_public = findViewById(R.id.btn_click_public);btn_click_single.setOnClickListener(new MyOnClickListener(tv_result));btn_click_public.setOnClickListener(this);}//第二种方式@Overridepublic void onClick(View v) {if (v.getId() == R.id.btn_click_public){String s = String.format("%s 你点击了按钮: %s", DateUtil.getNowTime(), ((Button) v).getText());tv_result.setText(s);}}//第一种方式static class MyOnClickListener implements View.OnClickListener{private final TextView tv_result;public MyOnClickListener(TextView tv_result) {this.tv_result = tv_result;}@Overridepublic void onClick(View v) {String s = String.format("%s 你点击了按钮: %s", DateUtil.getNowTime(), ((Button) v).getText());tv_result.setText(s);}}
}
4.3 禁用与恢复按钮
按钮的禁用和启动主要通过enabled属性来控制,false禁用,true启用
可以通过xml配置,也可通过java代码设置。
1.xml设置
<Buttonandroid:id="@+id/btn_test"android:layout_width="match_parent"android:layout_height="wrap_content"android:text="测试按钮"android:enabled="false"android:textColor="#888888"android:textSize="17sp"/>
2.java代码设置
public class ButtonEnableActivity extends AppCompatActivity implements View.OnClickListener{private Button btn_test;@Overrideprotected void onCreate(Bundle savedInstanceState) {super.onCreate(savedInstanceState);setContentView(R.layout.activity_button_enable);btn_test = findViewById(R.id.btn_test);//启用true|禁用falsebtn_test.setEnabled(true);}
}
五、图像显示
标签ImageView
1.android:adjustViewBounds:设置ImageView是否调整自己的边界来保持所显示图片的长宽比。
2.android:maxHeight:设置ImageView的最大高度。
3.android:maxWidth:设置ImageView的最大宽度。
5.android:src:设置ImageView所显示的Drawable对象的ID。
6.android:scaleType 图像在ImageView中的显示效果,下面是一些常用属性
- fitXY :横向、纵向独立缩放,以适应该ImageView。
- fitStart:保持纵横比缩放图片,并且将图片放在ImageView的左上角。
- fitCenter:保持纵横比缩放图片,缩放完成后将图片放在ImageView的中央。
- fitEnd:保持纵横比缩放图片,缩放完成后将图片放在ImageView的右下角。
- center:把图片放在ImageView的中央,但是不进行任何缩放。
- centerCrop:保持纵横比缩放图片,以使图片能完全覆盖ImageView。
- centerInside:保持纵横比缩放图片,以使得ImageView能完全显示该图片。
图片资源放在下图中,注意不能用数字命名开头
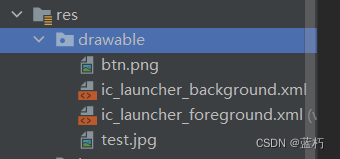
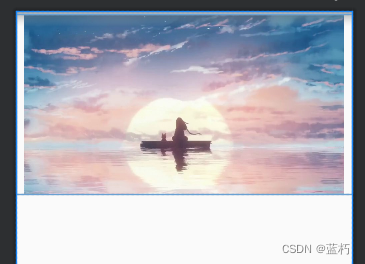
5.1 图像视图ImageView
代码示例:
<?xml version="1.0" encoding="utf-8"?>
<LinearLayout xmlns:android="http://schemas.android.com/apk/res/android"android:layout_width="match_parent"android:layout_height="match_parent"android:orientation="vertical"><ImageViewandroid:id="@+id/iv_scale"android:layout_width="match_parent"android:layout_height="220dp"android:layout_marginTop="5dp"android:scaleType="centerInside"android:src="@drawable/test"/><!--android:src="@drawable/ic_launcher_background"-->
</LinearLayout>
5.2 图像按钮ImageButton
标签是ImageButton,它继承于Button类
代码示例:
<LinearLayout xmlns:android="http://schemas.android.com/apk/res/android"android:layout_width="match_parent"android:layout_height="match_parent"android:orientation="vertical"><ImageButtonandroid:layout_width="match_parent"android:layout_height="80dp"android:scaleType="centerCrop"android:src="@drawable/test" />
</LinearLayout>
5.3 同时展示文本与图像
常用属性值:
android:drawableBottom底部添加图片android:drawableEnd在末尾添加图片android:drawableLeft在左边添加图片android:drawableRight在右边添加图片android:drawabLeStart在开始位置添加图片android:drawableTop在顶部添加图片
给Button添加图片和文字
代码示例:
<?xml version="1.0" encoding="utf-8"?>
<LinearLayout xmlns:android="http://schemas.android.com/apk/res/android"android:layout_width="match_parent"android:layout_height="match_parent"android:orientation="vertical"><Buttonandroid:layout_width="wrap_content"android:layout_height="wrap_content"android:text="图标在左"android:drawableLeft="@drawable/btn"android:background="#ffffff"android:drawablePadding="5dp"/>
</LinearLayout>

相关文章:
Andriod 简单控件
目录 一、文本显示1.1 设置文本内容1.2 设置文本大小1.3 设置文本颜色 二、视图基础2.1 设置视图宽高2.2 设置视图间距2.3 设置视图对齐方式 三、常用布局3.1 线性布局LinearLayout3.2 相对布局RelativeLayout3.3 网格布局GridLayout3.4 滚动视图ScrollView 四、按钮触控4.1 按…...

Substructure‑aware subgraph reasoning for inductive relation prediction
摘要 关系预测的目的是推断知识图中实体之间缺失的关系,其中归纳关系预测因其适用于新兴实体的有效性而广受欢迎。大多数现有方法学习逻辑组合规则或利用子图来预测缺失关系。尽管在性能方面已经取得了很大的进展,但目前的模型仍然不是最优的,因为它们捕获拓扑信息的能力有…...
古诗词学习鉴赏APP设计与实现(源码+lw+部署文档+讲解等)
文章目录 前言具体实现截图论文参考详细视频演示为什么选择我自己的网站自己的小程序(小蔡coding)有保障的售后福利 代码参考源码获取 前言 💗博主介绍:✌全网粉丝10W,CSDN特邀作者、博客专家、CSDN新星计划导师、全栈领域优质创作…...

深度学习与python theano
文章目录 前言1.人工神经网络2.计算机神经网络3.反向传播4.梯度下降-cost 函数1.一维2.二维3.局部最优4.迁移学习 5. theano-GPU-CPU theano介绍1.安装2.基本用法1.回归2.分类 3.function用法4.shared 变量5.activation function6.Layer层7.regression 回归例子8.classificatio…...
【算法优选】双指针专题——贰
文章目录 😎前言🌲[快乐数](https://leetcode.cn/problems/happy-number/)🚩题目描述🚩题⽬分析:🚩算法思路:🚩代码实现: 🎋[盛水最多的容器](https://leetco…...

AI智能电话机器人实用吗
近几年,人工智能得到很大的发展,同时语音识别技术的不断完善,很多以语音识别为基础的应用涌现出来,尤其是最近3年,出现了很多智能电话机器人。百度开发者大会上展示了百度智能客服也吸引了很多人对智能电话机器人的兴趣…...
网络爬虫--伪装浏览器
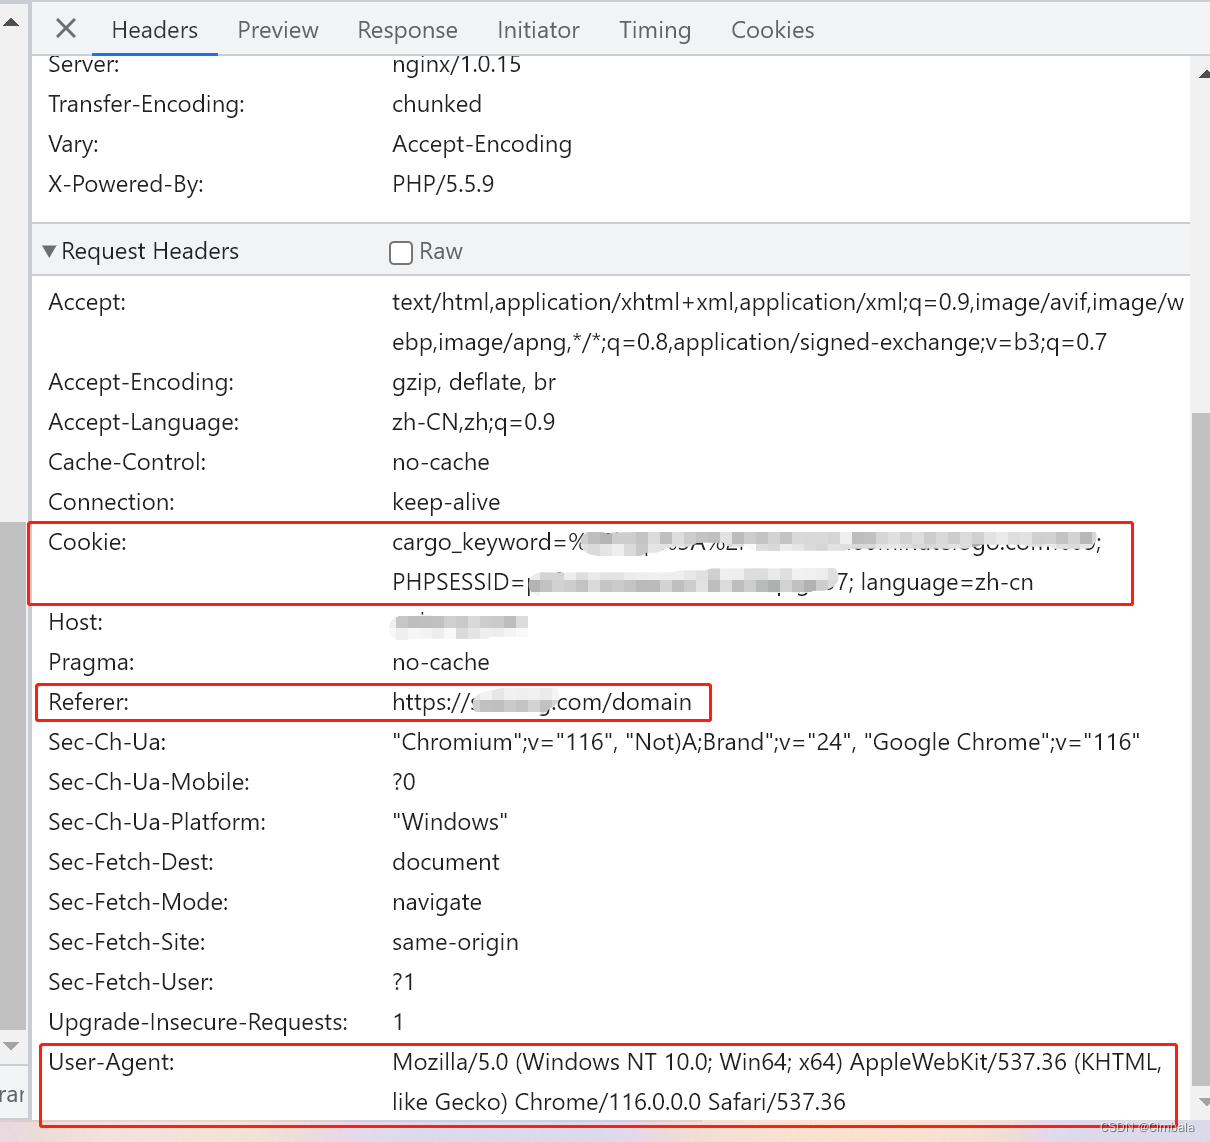
从用户请求的Headers反反爬 在访问某些网站的时候,网站通常会用判断访问是否带有头文件来鉴别该访问是否为爬虫,用来作为反爬取的一种策略。很多网站都会对Headers的User-Agent进行检测,还有一部分网站会对Referer进行检测(一些资…...
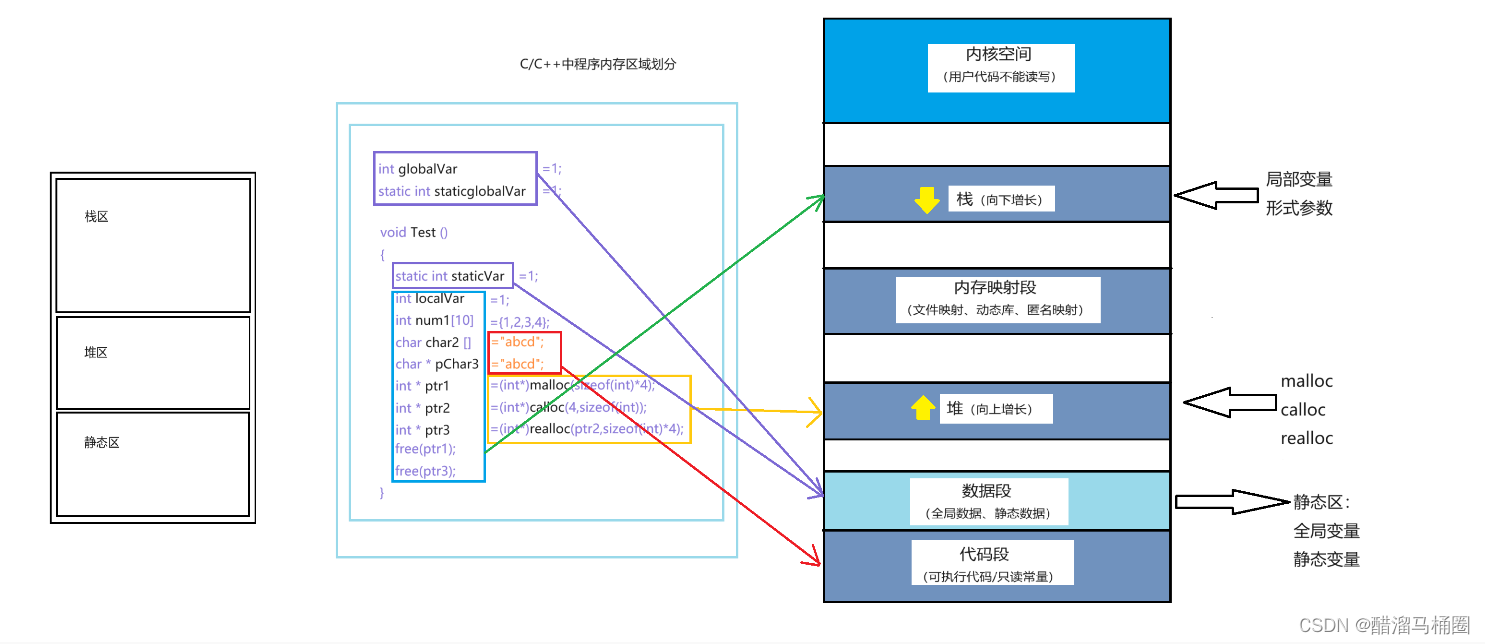
C/C++程序的内存开辟
前面我们说过,计算机中内存分为三个区域:栈区,堆区,静态区 但是这只是个简化的版本,接下来我们仔细看看内存区域的划分 C/C程序内存分配的几个区域: 栈区(stack):在执行…...
【Java 进阶篇】JDBC DriverManager 详解
JDBC(Java Database Connectivity)是 Java 标准库中用于与数据库进行交互的 API。它允许 Java 应用程序连接到各种不同的数据库管理系统(DBMS),执行 SQL 查询和更新操作,以及处理数据库事务。在 JDBC 中&am…...

2023年Linux总结常用命令
1.常用命令 1.1创建文件夹 mkdir -p forever/my 1.2当前目录 pwd 1.3创建文件 touch 1.txt 1.4查看文件 cat 1.txt 1.5复制文件 说明:-r是复制文件夹 cp -r my myCopy 1.6删除文件 说明:-r带包删除文件夹,-f表示强制删除(保存问题) rm -r…...
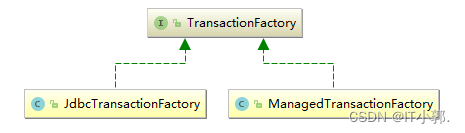
Mybatis3详解 之 全局配置文件详解
1、全局配置文件 前面我们看到的Mybatis全局文件并没有全部列举出来,所以这一章我们来详细的介绍一遍,Mybatis的全局配置文件并不是很复杂,它的所有元素和代码如下所示: <?xml version"1.0" encoding"UTF-8&…...

力扣-345.反转字符串中的元音字母
Idea 将s中的元音字母存在字符串sv中,并且使用一个数组依次存储元音字母的下标。 然后将字符串sv进行反转,并遍历元音下标数组,将反转后的字符串sv依次插入到源字符串s中 AC Code class Solution { public:string reverseVowels(string s) {…...
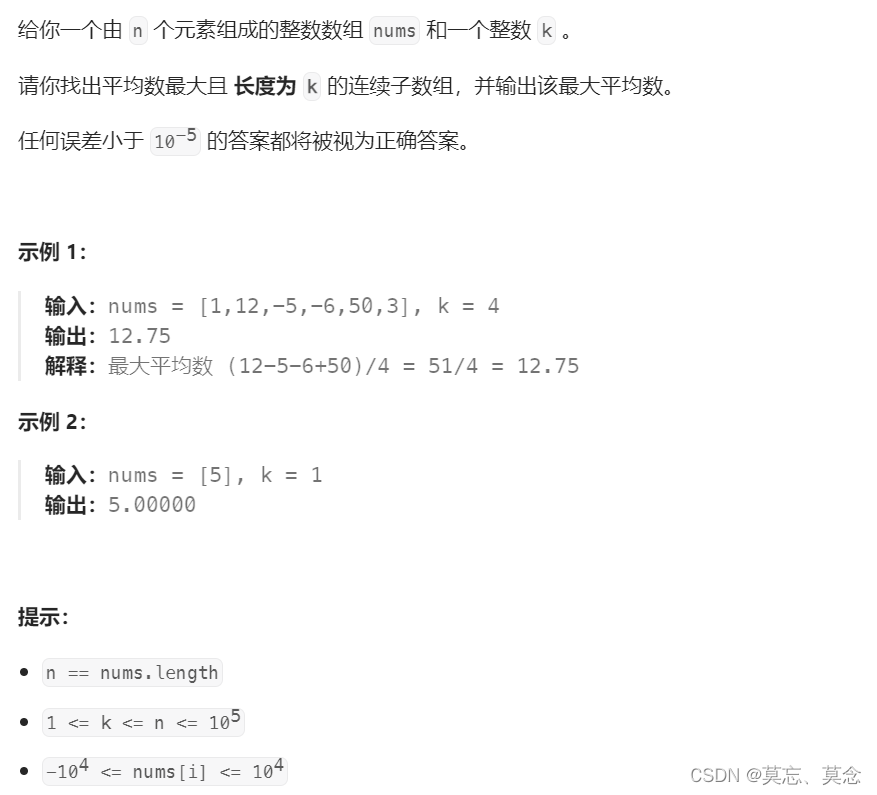
643. 子数组最大平均数I(滑动窗口)
目录 一、题目 二、代码 一、题目 643. 子数组最大平均数 I - 力扣(LeetCode) 二、代码 class Solution { public:double findMaxAverage(vector<int>& nums, int k) {double Average INT_MIN;double sum nums[0];int left 0, right 0…...

Java 21 新特性:虚拟线程(Virtual Threads)
I often take exercise. Why only yesterday I had breakfast in bed. 在Java 21中,引入了虚拟线程(Virtual Threads)来简化和增强并发性,这使得在Java中编程并发程序更容易、更高效。 虚拟线程,也称为“用户模式线程…...
18scala笔记
Scala2.12 视频地址 1 入门 1.1 发展历史 … 1.2 Scala 和 Java Scala Java 编写代码使用scalac编译成.class字节码文件scala .class文件 执行代码 1.3 特点 1.4 安装 视频地址 注意配置好环境变量 简单代码 1.5 编译文件 编译scala文件会产生两个.class文件 使用java…...

【LeetCode周赛】LeetCode第365场周赛
目录 有序三元组中的最大值 I有序三元组中的最大值 II无限数组的最短子数组 有序三元组中的最大值 I 给你一个下标从 0 开始的整数数组nums。 请你从所有满足 i < j < k 的下标三元组 (i, j, k) 中,找出并返回下标三元组的最大值。如果所有满足条件的三元组的…...
响应式设计的实现方式
一. 什么是响应式 响应式网站设计是一种网络页面设计布局。页面的设计与开发应当根据用户行为以及设备环境(系统平台,屏幕尺寸,屏幕定向等)进行相应的响应和调整。 响应式网站常见特点: 1. 同时适配PC平板手机。 2…...
PHP 反序列化漏洞:__PHP_Incomplete_Class 与 serialize(unserialize($x)) !== $x;
文章目录 参考环境声明__PHP_Incomplete_Class灵显为什么需要 __PHP_Incomplete_Class?不可访问的属性 serialize(unserialize($x)) $x;serialize(unserialize($x)) ! $x;雾现__PHP_Incomplete_Class 对象与其序列化文本的差异试构造 __PHP__Incomplete_Class 对象…...

TempleteMethod
TempleteMethod 动机 在软件构建过程中,对于某一项任务,它常常有稳定的整体操作结构,但各个子步骤却有很多改变的需求,或者由于固有的原因 (比如框架与应用之间的关系)而无法和任务的整体结构同时实现。如…...
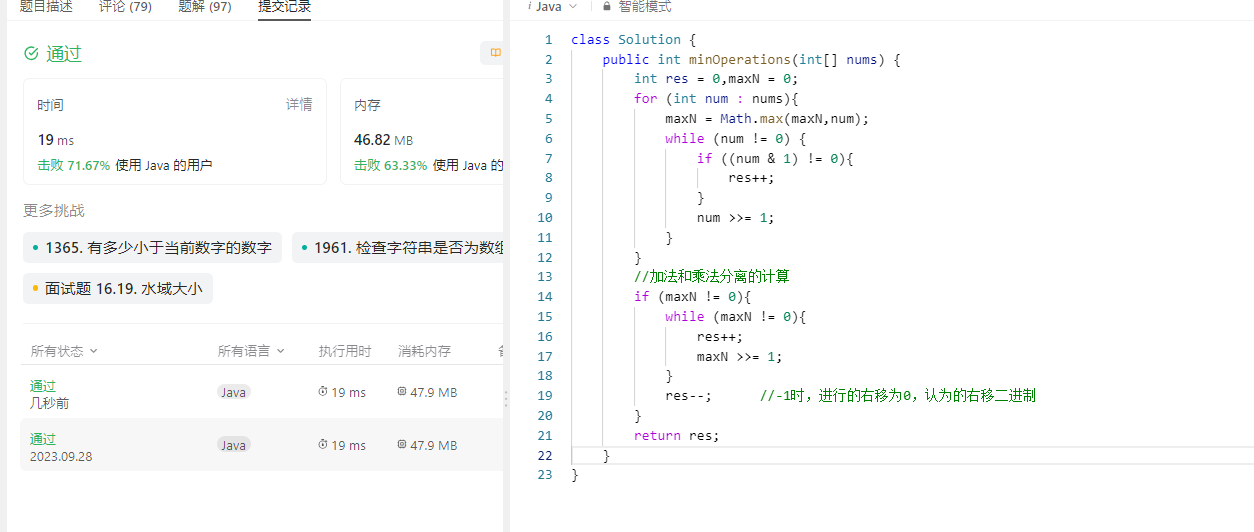
1558. 得到目标数组的最少函数调用次数
1558. 得到目标数组的最少函数调用次数 原题链接:完成情况:解题思路:参考代码: 原题链接: 1558. 得到目标数组的最少函数调用次数 https://leetcode.cn/problems/minimum-numbers-of-function-calls-to-make-target…...

Cursor编辑器AI操作完成音效插件:原理、实现与效能提升
1. 项目概述:一个提升编码体验的“听觉反馈”工具如果你和我一样,每天有大量时间与代码编辑器为伴,那么你一定对那种“沉浸式”的编码状态又爱又恨。爱的是心流状态下的高效产出,恨的是一旦被打断,重新进入状态需要耗费…...

数据库完整性约束与安全机制全解析
一、数据库完整性约束1、数据库完整性基本概念与核心机制(1)完整性定义与作用数据库完整性(Database Integrity)是指在任何情况下保证数据的正确性(Validity)和一致性(Consistency)&…...

最小扩张三角剖分:算法优化与计算几何实践
1. 最小扩张三角剖分问题概述在计算几何领域,最小扩张三角剖分(Minimum Dilation Triangulation, MDT)是一个经典的优化问题。给定平面上的n个点集P,MDT的目标是找到一个三角剖分T,使得对于P中的任意两点s和tÿ…...

云原生监控一体化实践:从零部署mco实现指标、日志、追踪统一管理
1. 项目概述:一个面向现代容器化应用的开源监控解决方案最近在梳理团队的技术栈,发现随着微服务和Kubernetes的普及,传统的监控体系越来越力不从心。我们需要的不仅仅是对主机和进程的监控,更需要能深入理解容器、Pod、Service以及…...

移动SoC设计演进:从骁龙600/400系列看芯片战略与体验竞争
1. 从一场发布会看移动芯片的十年演进2015年2月,巴塞罗那世界移动通信大会前夕,高通的一则新闻稿在业内激起了不小的涟漪。他们宣布了全新的骁龙600和400系列移动平台,其中最引人注目的,是首次将当时ARM最新的64位Cortex-A72核心引…...

PheroPath:自定义代谢通路构建与可视化工具在组学数据分析中的应用
1. 项目概述与核心价值最近在生物信息学和计算生物学领域,一个名为“PheroPath”的项目引起了我的注意。这个项目由用户starpig1129托管,从名字上就能嗅到一丝“信息素”和“路径”结合的味道。作为一名长期在组学数据分析、特别是代谢通路研究一线摸爬滚…...

从ARIMA差分到MIM网络:一个老派时间序列技巧如何革新了深度学习预测
从差分思想到记忆网络:传统时间序列技巧如何重塑深度学习架构 在气象预报的雷达回波图中,降水云团的形态每秒钟都在剧烈变化;城市交通流量监测数据里,早晚高峰的波动与平峰期形成鲜明对比;股票市场的价格曲线更是以难以…...

从 Token 消耗到 AI 资产:企业如何把一次调用沉淀成模板、流程、知识库和制度
关键词:Token 管理、AI 资产、模板库、流程化、知识库、制度化、投入产出比 开篇:企业真正要管的不是 Token,而是 Token 之后留下了什么 很多企业开始使用 AI 以后,第一反应是看成本:这个月用了多少 Token,哪个部门调用最多,哪个模型最贵,哪些场景消耗最高。 这当然重…...

别再死记硬背了!用Python和C语言手把手带你理解CRC32查表法的实现原理
从数学到代码:用Python和C语言彻底搞懂CRC32查表法的实现 在数据传输和存储过程中,错误检测是确保数据完整性的关键环节。CRC32作为一种广泛应用的校验算法,从网络协议到压缩工具,再到文件系统,几乎无处不在。但很多开…...

大模型评测实战指南:从基准测试到业务落地的科学评估体系
1. 项目概述:为什么我们需要一个“大模型评测”清单?如果你最近也在关注大语言模型(LLM)的发展,可能会和我有一样的感受:兴奋,但也伴随着巨大的信息过载。几乎每天都有新的模型发布,…...