Linux内存管理 (2):memblock 子系统的建立
前一篇:Linux内存管理 (1):内核镜像映射临时页表的建立
文章目录
- 1. 前言
- 2. 分析背景
- 3. memblock 简介
- 3.1 memblock 数据结构
- 3.2 memblock 接口
- 4. memblock 的构建过程
1. 前言
限于作者能力水平,本文可能存在谬误,因此而给读者带来的损失,作者不做任何承诺。
2. 分析背景
本文基于 ARMv7 架构,Linux 4.14 内核进行分析。
3. memblock 简介
memblock 是内核在启动初期用来管理系统中内存的子系统,经由配置项 CONFIG_HAVE_MEMBLOCK 开启,用于替代更早期内核版本中的 bootmem 。bootmem 经由配置项 CONFIG_NO_BOOTMEM 关闭。在启用了 memblock 的情形下,bootmem 会被禁用,为保持了对 bootmem 接口的兼容,引入 mm/nobootmem.c 模块,将 bootmem 的 __alloc_bootmem() 等系列接口封装为对 memblock 接口的调用。
3.1 memblock 数据结构
/* include/linux/memblock.h */#define INIT_MEMBLOCK_REGIONS 128 /* "memory", "reserved" 类型内存区域最大个数 *//* Definition of memblock flags. */
enum {MEMBLOCK_NONE  = 0x0, /* No special request */MEMBLOCK_HOTPLUG = 0x1, /* hotpluggable region */MEMBLOCK_MIRROR  = 0x2, /* mirrored region */MEMBLOCK_NOMAP  = 0x4, /* don't add to kernel direct mapping */
};/* 内存区域 */
struct memblock_region {phys_addr_t base; /* 内存区域起始物理地址 */phys_addr_t size; /* 内存区域大小 */unsigned long flags; /* 内存区域特征标记: HOTPLUG, MIRROR, NOMAP */
#ifdef CONFIG_HAVE_MEMBLOCK_NODE_MAPint nid; /* 内存区域所在的 NUMA 节点 ID */
#endif
};/* @name 类型内存区域列表 */
struct memblock_type {unsigned long cnt; /* number of regions: 当前类型内存区域列表 @regions 的已用长度 */unsigned long max; /* size of the allocated array: 当前类型内存区域列表 @regions 的最大长度 */phys_addr_t total_size; /* size of all regions: 已添加到当前类型内存区域列表 @regions 的所有区域的总大小 */struct memblock_region *regions; /* 当前类型内存区域列表 */char *name; /* 内存区域类型名称: "memory", "reserved" */
};/* memblock 子系统管理数据结构 */
struct memblock {bool bottom_up;  /* is bottom up direction? */phys_addr_t current_limit; /* 所管理内存的最大地址 */struct memblock_type memory; /* 各种类型的内存区域 */struct memblock_type reserved; /* 系统保留的内存区域(如 initrd, DTB, 内核 crash dump 等内存区域) */...
};
定义 memblock 子系统管理数据:
/* mm/memblock.c *//* "memory" 内存区域列表 */
static struct memblock_region memblock_memory_init_regions[INIT_MEMBLOCK_REGIONS] __initdata_memblock;
/* "reserved" 内存区域列表 */
static struct memblock_region memblock_reserved_init_regions[INIT_MEMBLOCK_REGIONS] __initdata_memblock;struct memblock memblock __initdata_memblock = {/* "memory" 内存区域 */.memory.regions  = memblock_memory_init_regions,.memory.cnt  = 1, /* empty dummy entry */.memory.max  = INIT_MEMBLOCK_REGIONS,.memory.name  = "memory",/* "reserved" 内存区域 */.reserved.regions = memblock_reserved_init_regions,.reserved.cnt  = 1, /* empty dummy entry */.reserved.max  = INIT_MEMBLOCK_REGIONS,.reserved.name  = "reserved",....bottom_up  = false, /* 地址增长方向 */.current_limit  = MEMBLOCK_ALLOC_ANYWHERE, /* 初始为最大物理地址,后续会修正为 lowmem 的最大地址 */
};
3.2 memblock 接口
memblock 子系统提供了一系列 添加移除内存区域、分配释放内存 等功能的接口,下面重点挑选几个典型的接口进行下简单说明。
/* include/linux/memblock.h *//* 添加 内存区域(region) 到 "memory" 内存区列表 */
int memblock_add_node(phys_addr_t base, phys_addr_t size, int nid);
int memblock_add(phys_addr_t base, phys_addr_t size);/* 添加 内存区域(region) 到指定类型 @type 的内存区列表 */
int memblock_add_range(struct memblock_type *type,phys_addr_t base, phys_addr_t size,int nid, unsigned long flags);/* 从 "memory" 内存区列表移除 内存区域(region) */
int memblock_remove(phys_addr_t base, phys_addr_t size);/* 添加 内存区域(region) 到 "reserved" 内存区列表 */
int memblock_reserve(phys_addr_t base, phys_addr_t size);/* * 管理 "memory" 内存区中 可热插拔(hot pluggable) 内存区域(region). * 可能引起 内存区域(region) 的拆分和合并。*/
int memblock_mark_hotplug(phys_addr_t base, phys_addr_t size);
int memblock_clear_hotplug(phys_addr_t base, phys_addr_t size);
/* 从 "memory" 内存区列表内存区域分配内存 */
phys_addr_t memblock_alloc_nid(phys_addr_t size, phys_addr_t align, int nid);
phys_addr_t memblock_alloc_try_nid(phys_addr_t size, phys_addr_t align, int nid);
phys_addr_t memblock_alloc(phys_addr_t size, phys_addr_t align);/* * 释放内存区域:* 将内存区域从 "memory" 内存区列表移到 "reserved" 内存区列表,* 这些释放的内存区域将不纳入 伙伴管理系统 进行管理。*/
int memblock_free(phys_addr_t base, phys_addr_t size);
void __memblock_free_early(phys_addr_t base, phys_addr_t size);以上接口都是基于物理地址进行操作,以下是基于虚拟地址进行操作的 memblock 接口:
/* include/linux/bootmem.h */#if defined(CONFIG_HAVE_MEMBLOCK) && defined(CONFIG_NO_BOOTMEM)void *memblock_virt_alloc_try_nid_nopanic(phys_addr_t size,phys_addr_t align, phys_addr_t min_addr,phys_addr_t max_addr, int nid);
void *memblock_virt_alloc_try_nid(phys_addr_t size, phys_addr_t align,phys_addr_t min_addr, phys_addr_t max_addr, int nid);
void __memblock_free_early(phys_addr_t base, phys_addr_t size);
void __memblock_free_late(phys_addr_t base, phys_addr_t size);#else...#endif
4. memblock 的构建过程
start_kernel() /* init/main.c */setup_arch() /* arch/arm/kernel/setup.c */mdesc = setup_machine_fdt(__atags_pointer); /* arch/arm/kernel/devtree.c */early_init_dt_scan_nodes(); /* drivers/of/fdt.c *//* 扫描 DTS 配置的内存区域,添加到 memblock */of_scan_flat_dt(early_init_dt_scan_memory, NULL);of_scan_flat_dt() /* drivers/of/fdt.c */for (offset = fdt_next_node(blob, -1, &depth);offset >= 0 && depth >= 0 && !rc; offset = fdt_next_node(blob, offset, &depth)) {pathp = fdt_get_name(blob, offset, NULL);if (*pathp == '/')pathp = kbasename(pathp);rc = it(offset, pathp, depth, data);early_init_dt_scan_memory(offset, pathp, depth, data)}/** DTS 配置的内存区域几种形式: * (1) 用 memory@0 标记 (可以没有 device_type 属性)* /{* memory@0 {* device_type = "memory"; // 可选* reg = <0x00000000 0x40000000>; // 1 GB* };* };* (2) device_type = "memory" 标记* /{* memory {* device_type = "memory";* reg = <0x00000000 0x20000000>;* };* };*/
early_init_dt_scan_memory(offset, pathp, depth, data) /* drivers/of/fdt.c */.../* 节点可以用 linux,usable-memory 属性指定内存区域 */reg = of_get_flat_dt_prop(node, "linux,usable-memory", &l);if (reg == NULL) /* 节点没有 linux,usable-memory 属性 */reg = of_get_flat_dt_prop(node, "reg", &l); /* 节点可以用 reg 属性指定内存区域范围 */if (reg == NULL)return 0;endp = reg + (l / sizeof(__be32));/* 节点 hotpluggable 属性指定内存区域是否是 可热插拔 的 */hotpluggable = of_get_flat_dt_prop(node, "hotpluggable", NULL);/* 提取内存区域信息: base, size[, base, size [...]] */while ((endp - reg) >= (dt_root_addr_cells + dt_root_size_cells)) {u64 base, size;/* * 节点的 linux,usable-memory 或 reg 属性中,每两个数据对定义一个内存区域: * . 第1个数据定义内存区域物理基址* . 第2个数据定义内存区域大小* 即 (base size), 如 0x00000000 0x20000000*/base = dt_mem_next_cell(dt_root_addr_cells, ®); /* 当前内存区域物理基址 */size = dt_mem_next_cell(dt_root_size_cells, ®); /* 当前内存区域大小 */if (size == 0) /* 内存区域大小为 0 */continue;/* 添加 新内存区域 到 memblock */early_init_dt_add_memory_arch(base, size);if (!hotpluggable) /* 非 热插拔内存区域 */continue;/* * 同一内存区域,不能同时包含 非可热插拔 和 可热插拔 内存,* 必须独立管理可热插拔(hot pluggable)内存区域.* 考虑这样一种情形: * memblock 发现当前可热插拔内存区域 和 一块 memblock 里已有* 的非可热插拔内存区域相邻, 于是将它们合并了进行管理; 然后* 在某个时间点, 可热插拔内存区域拔出, 但是内存管理却因为将* 它和相邻非可插拔内存区域合并了,所以没有了可热插拔内存区* 域的区间信息(起始地址和大小), 于是就没法单独只移除可热插* 拔内存区域了。这显然是有问题的: 如果我们选择和可热插拔内* 存区域相邻的非可热插拔内存区域一起移除,浪费了本可以使用* 的空间,极端情形下,如果这个和可热插拔内存区域相邻的非可* 热插拔内存区域是系统中剩下的唯一内存,移除这块内存将变得* 不可能; 但如果不移除可热插拔内存区域,允许继续访问,也会* 出问题。* 基于上述原因, 在系统插入可热插拔内存区域时, 不能将它们和* 其它 memblock 里面已存在的非可热插拔内存区域合并, 必须对* 所有的可热插拔内存区域进行独立管理.*/if (early_init_dt_mark_hotplug_memory_arch(base, size))pr_warn("failed to mark hotplug range 0x%llx - 0x%llx\n",base, base + size);}early_init_dt_add_memory_arch(base, size) /* drivers/of/fdt.c */// 做内存区域对齐、边界检查:// . 不合规的部分或全部丢弃// . 小于 PHYS_OFFSET 内存部分全部丢弃...memblock_add(base, size); /* 添加内存区域到 memblock */在插入新内存区域时,新内存区域和要插入类型的内存区内的已有区域,在位置上可能存在以下6种关系:
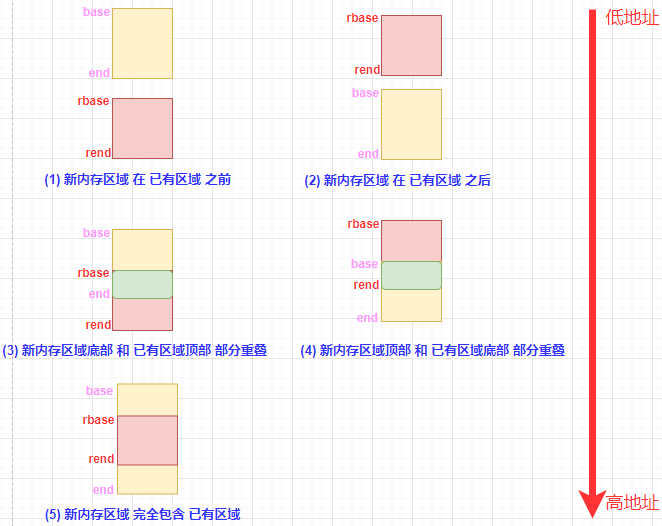
其中,[base, end) 表示新内存区域物理地址范围,[rbase, rend) 表示已有区域的物理地址范围。上图中没有给出 新内存区域 和 已有区域 完全重叠的情形,因为它可以视为情形 (5) 或 (6) 的一种特殊情形。参照上图,我们继续来看新内存区域的插入过程:
memblock_add(base, size); /* mm/memblock.c *//* 添加 新内存区域 [base, base+size-1] 到 "memory" 类型内存区域列表 */return memblock_add_range(&memblock.memory, base, size, MAX_NUMNODES, 0);memblock_add_range(&memblock.memory, base, size, MAX_NUMNODES, 0);bool insert = false;phys_addr_t obase = base; /* 保存 新内存区域 基地址 */phys_addr_t end = base + memblock_cap_size(base, &size); /* 新内存区域 结束地址 + 1 *//** @idx   : 要插入的 新内存区域 在 @type 内存区域列表中索引* @nr_new: 要插入的 新内存区域 计数: 可能会对 新内存区域 进行拆分 */int idx, nr_new;struct memblock_region *rgn;if (!size)return 0;/* special case for empty array */if (type->regions[0].size == 0) { /* 第1个添加到 @type 类型内存区间 的 内存块 */WARN_ON(type->cnt != 1 || type->total_size);type->regions[0].base = base;type->regions[0].size = size;type->regions[0].flags = flags;memblock_set_region_node(&type->regions[0], nid);type->total_size = size;return 0;}repeat:/** The following is executed twice.  Once with %false @insert and* then with %true.  The first counts the number of regions needed* to accommodate the new area.  The second actually inserts them.*//* * 下面的代码会被执行两遍: * . 第1遍用来确定需新插入的内存区域数目 (@nr_nw), 不做实际*   内存区域的插入操作 (@insert == false). 在 @type 类型的*   内存区域不够存放要新插入的 @nr_nw 个内存区域时, 扩展 *   @type 类型内存区域列表长度.* . 第2遍执行新增的 @nr_nw 个内存区域的插入操作 (@insert == true).*/base = obase;nr_new = 0;for_each_memblock_type(type, rgn) { /* 遍历 @type 类型内存区 当前所有的 内存区间(region) */phys_addr_t rbase = rgn->base;phys_addr_t rend = rbase + rgn->size;/** 新内存区域 在 已有区域 之前 (见前面的图片情形 (1))* 表示已经为 新内存区域 找到合适的插入位置,且整块* 新内存区域 已经处理完毕,则可进入第2编的 新内存区域* 的插入过程。*/if (rbase >= end)break;/** 新内存区域 在 已有区域 之后 (见前面的图片情形 (2))* 继续比较 新内存区域 和后面 已有内存区域 位置, 插入* 新内存区域 后, 要保证内存区域按地址从低到高排列, 这* 是后续的内存区域 插入 和 分配 操作所要求的。*/if (rend <= base)continue;/** @rgn overlaps.  If it separates the lower part of new* area, insert that portion.*//* 新内存区域 和 已有内存区域 存在重叠,彼此之间如前面图中 (3) 或 (4) 的关系 */if (rbase > base) { /* 新内存区域底部 和 已有区域顶部 部分重叠 (见前面的图片情形 (3)) */
#ifdef CONFIG_HAVE_MEMBLOCK_NODE_MAPWARN_ON(nid != memblock_get_region_node(rgn));
#endifWARN_ON(flags != rgn->flags);nr_new++; /* 需新插入一个内存区域: [base, rbase - 1] */if (insert) /* 第1编执行不做插入操作(@insert==false), 第2编执行插入操作(@insert==true) */memblock_insert_region(type, idx++, base, rbase - base, nid, flags); /* 插入内存区域 */}/* area below @rend is dealt with, forget about it *//** 新内存区域 和 已有区域 部分重叠:* . 如果是 新内存区域 和 已有区域 位置关系是情形 (3),*   在第1编执行时, 已经在 if (rbase > base) 代码分支中,*   将需插入的 新内存区域 和 @rgn 非重叠部分 纳入到需新*   插入计数内存区域计数 @nr_new 中; 在第2编执行已经在*   if (rbase > base) 代码分支中, 对需插入的 新内存区域 *   和 @rgn 非重叠部分 执行了插入操作. 无论是第1编还是第*   2编执行, 新内存区域都已经处理完毕, 这种情形下在这里将*   base 和 end 置成相同的位置(base == end).* . 如果 新内存区域 和 已有区域 位置关系是情形 (4), 这里*   让 base 指向 新内存区域 非重叠部分的开始位置, 然后 *   [base, end) 覆盖新内存区域 非重叠部分, 继续和下一个*   已有内存区域进行位置比较, 最终找到合适的插入位置并*   进行处理.*/base = min(rend, end);}/* insert the remaining portion *//* 新内存区域 仍有未处理部分, 插入这一部分 */if (base < end) {nr_new++;if (insert)memblock_insert_region(type, idx, base, end - base,nid, flags); /* 插入内存区域 */}/* 没有内存区域需要插入: 新内存区域可能完全包含于已有内存区域 */if (!nr_new)return 0;/** If this was the first round, resize array and repeat for actual* insertions; otherwise, merge and return.*/if (!insert) { /* 第1遍 *//** 如果 @type 类型内存区域列表无法容纳新增的 @nr_new 个 * 内存区域, 动态扩展 @type 类型内存区域列表长度, 直到* 能容纳新增内存区域为止.*/while (type->cnt + nr_new > type->max)if (memblock_double_array(type, obase, size) < 0)return -ENOMEM;/* 进入第2遍的实际插入操作阶段 */ insert = true;goto repeat;} else {memblock_merge_regions(type);return 0;}/* 插入 内存区域 */
static void __init_memblock memblock_insert_region(struct memblock_type *type,int idx, phys_addr_t base,phys_addr_t size,int nid, unsigned long flags)
{struct memblock_region *rgn = &type->regions[idx];BUG_ON(type->cnt >= type->max);/* 将新内存区信息记录在 @idx 位置上,首先需将 @idx 位置开始的所有已有旧区域的信息往后移动一个位置 */memmove(rgn + 1, rgn, (type->cnt - idx) * sizeof(*rgn));rgn->base = base; /* 记录新内存区域物理基址 */rgn->size = size; /* 记录新内存区域容量 */rgn->flags = flags; /* 记录新内存区域特性标记: MEMBLOCK_NONE, MEMBLOCK_HOTPLUG, ... */memblock_set_region_node(rgn, nid); /* 记录新内存区域所属的 NUMA 节点 ID */type->cnt++; /* @type 类型内存区域个数加1 */type->total_size += size; /* 更新 @type 类型所有内存区域总容量 */
}到此,新增内存区域的插入过程已经分析完毕,还剩下的就是对于热插拔内存区域隔离处理:
/* 接前面的分析代码 */
early_init_dt_scan_memory(offset, pathp, depth, data) /* drivers/of/fdt.c */.../* 节点 hotpluggable 属性指定内存区域是否是 可热插拔 的 */hotpluggable = of_get_flat_dt_prop(node, "hotpluggable", NULL);...while ((endp - reg) >= (dt_root_addr_cells + dt_root_size_cells)) {.../* 添加 新内存区域 到 memblock */early_init_dt_add_memory_arch(base, size);if (!hotpluggable) /* 非 热插拔内存区域 */continue;/* 热插拔内存区域处理 */if (early_init_dt_mark_hotplug_memory_arch(base, size))pr_warn("failed to mark hotplug range 0x%llx - 0x%llx\n",base, base + size);}early_init_dt_mark_hotplug_memory_arch(base, size) /* drivers/of/fdt.c */return memblock_mark_hotplug(base, size);memblock_mark_hotplug(base, size); /* mm/memblock.c */return memblock_setclr_flag(base, size, 1, MEMBLOCK_HOTPLUG);static int __init_memblock memblock_setclr_flag(phys_addr_t base,phys_addr_t size, int set, int flag)
{struct memblock_type *type = &memblock.memory;int i, ret, start_rgn, end_rgn;/* * 分离区间 [base,base+size) 和 已有内存区域重叠部分, * 从 start_rgn,end_rgn 分别返回 第1个 和 最后1个(+1) 包含* 区间 [base,base+size) 的 内存区域索引。*/ret = memblock_isolate_range(type, base, size, &start_rgn, &end_rgn);if (ret)return ret;/* 设置内存区间 [base,base+size) 所有内存区域 的 flags (MEMBLOCK_HOTPLUG) */for (i = start_rgn; i < end_rgn; i++)if (set) /* 本文的场景 */memblock_set_region_flags(&type->regions[i], flag);elsememblock_clear_region_flags(&type->regions[i], flag);/** 可能因对内存区域 flags 的设置/清除 操作, * 导致原本相邻、具有不同 flags 标记相邻内存区域, * 现在具有具有了一样的 flags, 这时候需要合并。*/memblock_merge_regions(type);return 0;
}
函数 memblock_isolate_range() 找到 指定内存区间 和 memblock 中已有内存区域重叠相交部分,将重叠相交部分从 memblock 中原有的内存区域分离出来,成为一个新的内存区域,添加插入 memblock 。 memblock_isolate_range() 的功能,举一个具体的例子就很容易理解了,假定已经有 [0,3], [4,8], [9,10] 这3个内存区域,现在想将 [2,6] 内存区间分离出来,经过 memblock_isolate_range() 处理后,区间被重新分割成 [0,2], [2,3], [4,6], [6,8], [9,10] 这5个内存区域,同时 start_rgn 返回 1,end_rgn 返回 3(内存区域索引从 0 开始)。来看 memblock_isolate_range() 实现细节:
/* mm/memblock.c */
static int __init_memblock memblock_isolate_range(struct memblock_type *type,phys_addr_t base, phys_addr_t size,int *start_rgn, int *end_rgn)
{phys_addr_t end = base + memblock_cap_size(base, &size);int idx;struct memblock_region *rgn;*start_rgn = *end_rgn = 0;if (!size)return 0;/* we'll create at most two more regions */while (type->cnt + 2 > type->max)if (memblock_double_array(type, base, size) < 0)return -ENOMEM;for_each_memblock_type(type, rgn) {phys_addr_t rbase = rgn->base;phys_addr_t rend = rbase + rgn->size;/** 指定区间 在 已有区域 @rgn 之前 (见前面的图片情形 (1))* 指定区间处理完毕: 不可能再和其它内存区域相交。*/if (rbase >= end)break;/* * 指定区间 在 已有区域 @rgn 之后 (见前面的图片情形 (2)) * 继续处理更高地址内存区域。*/if (rend <= base)continue;if (rbase < base) { /* 指定区间顶部 和 已有区域 @rgn 底部 部分重叠 (见前面的图片情形 (4)) *//** @rgn intersects from below.  Split and continue* to process the next region - the new top half.*//** 将区域 @rgn 一分为二:* . 非重叠、高地址 部分 [base, rend)* . 重叠 低地址 部分 [rbase, base)* 分别记录为两个不同的区域。*/ /* 区域 @rgn 缩减为只记录 非重叠、高地址部分 [base, rend) */rgn->base = base;rgn->size -= base - rbase;type->total_size -= base - rbase;/* 在 @rgn 前插入一个新的内存区域,记录 重叠的 低地址 部分 [rbase, base) */memblock_insert_region(type, idx, rbase, base - rbase,memblock_get_region_node(rgn),rgn->flags);}  else if (rend > end) { /* 指定区间底部 和 已有区域 @rgn 顶部 部分重叠 (见前面的图片情形 (3)) *//** @rgn intersects from above.  Split and redo the* current region - the new bottom half.*//** 将区域 @rgn 一分为二:* . 非重叠、高地址 部分 [end, rend)* . 重叠 低地址 部分 [rbase, end)* 分别记录为两个不同的区域。*//* 区域 @rgn 缩减为只记录 非重叠、高地址部分 [end, rend) */rgn->base = end;rgn->size -= end - rbase;type->total_size -= end - rbase;/* 在 @rgn 前插入一个新的内存区域,记录 重叠的 低地址 部分 [rbase, end) */memblock_insert_region(type, idx--, rbase, end - rbase, memblock_get_region_node(rgn),rgn->flags);}  else { /* 已有区域 @rgn 完全包含于 指定内存区间 [base,end) (见前面的图片情形 (5)) *//* @rgn is fully contained, record it *//** 更新包含 指定内存区间 [base,end) 的内存区域起始索引:* 只有当 @rgn 完全包含于区间 [base,end) 时才更新起始索引,* 因为这代表区间 [base,end) 和 区域 @rgn 相关的部分已经完全处理完毕。*/if (!*end_rgn)*start_rgn = idx;*end_rgn = idx + 1;}}return 0;
}
热插拔内存区间的分离操作完成后,继续看后续逻辑:
memblock_mark_hotplug(base, size)return memblock_setclr_flag(base, size, 1, MEMBLOCK_HOTPLUG);...ret = memblock_isolate_range(type, base, size, &start_rgn, &end_rgn);...for (i = start_rgn; i < end_rgn; i++)if (set) /* 本文的场景: 标记所有 可热插拔 内存区域 */memblock_set_region_flags(&type->regions[i], flag);else.../* 修改 内存区域 flags,可能需要进行内存区域的合并  */memblock_merge_regions(type);static void __init_memblock memblock_merge_regions(struct memblock_type *type)
{int i = 0;/* cnt never goes below 1 */while (i < type->cnt - 1) {struct memblock_region *this = &type->regions[i];struct memblock_region *next = &type->regions[i + 1];/* * 相邻区域可以合并的必须 同时 满足下列条件: * . 两区间空间相邻且没有空洞* . 位于同一 NUMA 节点* . 具有相同的特定标记 flags*/if (this->base + this->size != next->base || memblock_get_region_node(this) != memblock_get_region_node(next) ||this->flags != next->flags) {BUG_ON(this->base + this->size > next->base);i++;continue;}/* 相邻两内存区域合二为一,内存区域数减1 */this->size += next->size;/* move forward from next + 1, index of which is i + 2 */memmove(next, next + 1, (type->cnt - (i + 2)) * sizeof(*next));type->cnt--;}
}
相关文章:
Linux内存管理 (2):memblock 子系统的建立
前一篇:Linux内存管理 (1):内核镜像映射临时页表的建立 文章目录 1. 前言2. 分析背景3. memblock 简介3.1 memblock 数据结构3.2 memblock 接口 4. memblock 的构建过程 1. 前言 限于作者能力水平,本文可能存在谬误,因此而给读者…...

创新学习方式,电大搜题助您迈向成功之路
近年来,随着信息技术的发展,互联网在教育领域发挥的作用越来越显著。贵州开放大学作为国内首家电视大学,一直致力于创新教学模式,帮助学生更好地获取知识。在学习过程中,学生常常遇到疑难问题,而解决这些问…...

Mybatis整理
Mybatis 定义 Mybatis是一个半ORM(对象关系映射)框架,它内部封装了JDBC,加载驱动、创建连接、创建statement等繁杂的过程,开发者开发时只需要关注如何编写SQL语句,可以严格控制sql执行性能,灵…...

pytorch定义datase多次重复采样
有的时候训练需要对样本重复抽样为一个batch,可以按如下格式定义: class TrainLoader(Dataset):def __init__(self, fns, repeat1):super(TrainLoader, self).__init__()self.length len(fns) # 数据数量self.repeat repeat # 数据重复次数def __getitem__(self,…...
自动化测试 —— Pytest fixture及conftest详解!
前言 fixture是在测试函数运行前后,由pytest执行的外壳函数。fixture中的代码可以定制,满足多变的测试需求,包括定义传入测试中的数据集、配置测试前系统的初始状态、为批量测试提供数据源等等。fixture是pytest的精髓所在,类似u…...

Nginx解析漏洞
常见的解析漏洞: IIS 5.x/6.0解析漏洞 IIS 7.0/IIS 7.5/ Nginx <0.8.3畸形解析漏洞 Nginx <8.03 空字节代码执行漏洞 Apache解析漏洞 Nginx文件解析漏洞 对于任意文件名,例如:cd.jpg在后面添加/x.php后,即可将文件作为php解析。 原理…...
【机器学习】决策树原理及scikit-learn使用
文章目录 决策树详解ID3 算法C4.5算法CART 算法 scikit-learn使用分类树剪枝参数重要属性和接口 回归树重要参数,属性及接口交叉验证代码示例 一维回归的图像绘制 决策树详解 决策树(Decision Tree)是一种非参数的有监督学习方法,…...
系统时钟)
#基于一个小车项目的FREERTOS分析(一)系统时钟
系统时钟 //初始化延迟函数 //SYSTICK的时钟固定为AHB时钟,基础例程里面SYSTICK时钟频率为AHB/8 //这里为了兼容FreeRTOS,所以将SYSTICK的时钟频率改为AHB的频率! //SYSCLK:系统时钟频率 /* 系统定时器是一个 24bit 的向下递减的计数器&…...
ubuntu mmdetection配置
mmdetection配置最重要的是版本匹配,特别是cuda,torch与mmcv-full 本项目以mmdetection v2.28.2为例介绍 1.查看显卡算力 因为gpu的算力需要与Pytorch依赖的CUDA算力匹配,低版本GPU可在相对高的CUDA版本下运行,相反则不行 算力…...
嵌入式面试常见问题(一)
目录 1.什么情况下会出现段错误? 2.swap() 函数为什么不能交换两个变量的值 3.一个函数有六个参数 分别放在哪个区? 4.定义一个变量,赋初值和不赋初值分别保存在哪个区? 5.linux查看端口状态的命令 6.结构体中->和.的区…...

docker批量删除本地镜像
docker rmi -f $(docker images|grep docker|awk {print $3})...
数据结构(一)—— 数据结构简介
文章目录 一、基本概念和术语?1.1、数据1.2、数据元素1.3、数据项(属性、字段)1.4、数据对象1.5、数据结构 二、逻辑结构和物理结构(存储结构)2.1、逻辑结构1、定义2、分类(线性结构和非线性结构࿰…...
Ubuntu输入正确密码重新跳到登录界面
Ubuntu输入正确密码重新跳到登录界面 问题描述 输入正确的密码登录后闪一下又回到锁屏界面 输入正确的密码后还是回到这个界面 产生的原因 /etc/profile或者/etc/enviroment出现了问题,导致无法正常登录 该错误产生的原因不止一个 这里是因为/etc/profile或者/etc/enviromen出…...

TCP/IP(十四)流量控制
一 流量控制 说明: 本文只是原理铺垫,没有用tcpdumpwiresahrk鲜活的案例讲解,后续补充 ① 基本概念 流量控制: TCP 通过接受方实际能接收的数据量来控制发送方的窗口大小 ② 正常传输过程 背景:1、客户端是接收方,服务端是发送方 --> 下载2、假设接收窗…...

CSS网页标题图案和LOGO SEO优化
favicon图标 将网页的头名字旁边放入一个图案 想将想要的图案切成png图片 然后把png图片转换成ico图案可以借助进行访问 将语法引用到head里面 SEO译为搜索引擎优化。是一种利用搜索引擎的规则提高网站有关搜索引擎的自然排名的方式 SEO的目的是对网站进行深度的优化&…...
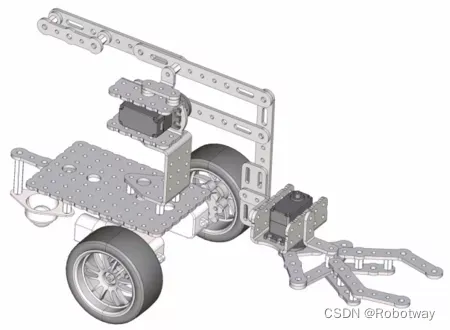
机器人制作开源方案 | 双轮提升搬运小车
1. 功能描述 双轮提升搬运小车是一种用于搬运和移动物体的机械设备,它通常采用双轮驱动和提升装置。一般具备以下特点: ① 双轮驱动:该小车配备两个驱动轮,通过电动机或其它动力源驱动,提供足够的动力和扭矩࿰…...
5G安卓核心板-MT6833/MT6853核心板规格参数
随着智能手机的不断发展,芯片技术在推动手机性能和功能方面发挥着关键作用。MT6833和MT6853安卓核心板是两款高度集成的基带平台,为LTE/5G/NR和C2K智能手机应用提供强大的处理能力和多样化的接口。 这两款安卓核心板都集成了蓝牙、FM、WLAN和GPS模块&…...
信创之国产浪潮电脑+统信UOS操作系统体验4:visual studio code中怎么显示中文
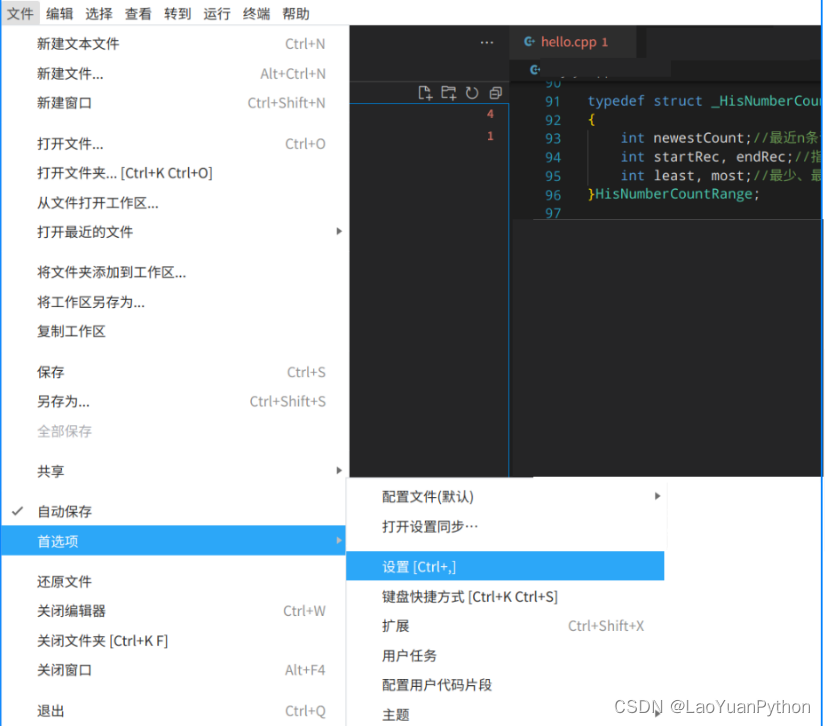
☞ ░ 前往老猿Python博客 ░ https://blog.csdn.net/LaoYuanPython 一、引言 今天在vscode中打开以前的一段C代码,其中的中文显示为乱码,如图所示: 而在统信文本编辑器打开是正常的,打开所有菜单,没有找到相关配置…...
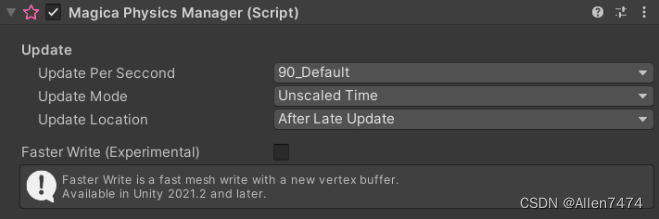
Magica Cloth 使用方法笔记
Magica Cloth 使用方法笔记 效果展示: 参考资料: 1、官方使用文档链接: インストールガイド – Magica Soft 2、鱼儿效果案例: https://www.patreon.com/posts/69459293 3、插件工具链接:版本() 目录:…...
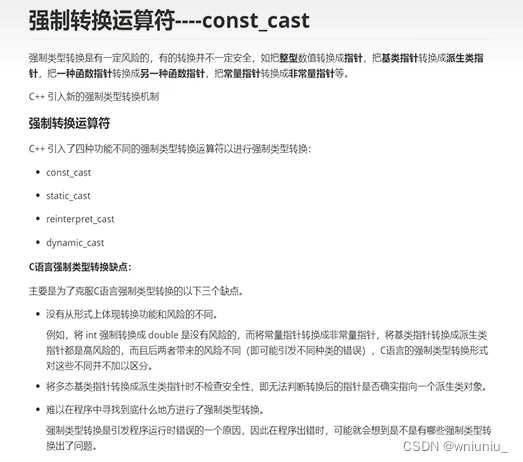
c++ 学习之 强制类型转换运算符 const_cast
看例子怎么用 int main() {int a 1;int* p a;// 会发生报错// 如果学着 c的风格类型转换int* pp (int*)a;*pp 1; // 编译不报错,但是运行报错// const_castconst int n 5;const std::string s "lalal";// const cast 只针对指针,引用&…...

OpenCore Legacy Patcher终极指南:让老Mac免费运行最新macOS的完整教程
OpenCore Legacy Patcher终极指南:让老Mac免费运行最新macOS的完整教程 【免费下载链接】OpenCore-Legacy-Patcher Experience macOS just like before 项目地址: https://gitcode.com/GitHub_Trending/op/OpenCore-Legacy-Patcher OpenCore Legacy Patcher是…...
)
【限时公开】后印象派专属--ar 16:9 --style raw --stylize 800参数组合包(含塞尚构图/修拉点彩/劳特累克动态线共12套已验证prompt模板)
更多请点击: https://intelliparadigm.com 第一章:后印象派艺术精神与Midjourney风格迁移的本质逻辑 后印象派并非对印象派的简单延续,而是对主观表达、结构重构与象征张力的自觉回归——梵高旋转的星云、塞尚凝练的几何体、高更原始的色域&…...

Emacs AI编程助手:ai-code-interface.el深度集成指南
1. 项目概述:一个为Emacs注入AI灵魂的代码接口如果你是一位Emacs的深度用户,同时又对AI辅助编程抱有极大的热情,那么你很可能已经厌倦了在浏览器、终端和编辑器之间反复横跳的割裂体验。tninja/ai-code-interface.el这个项目,正是…...

Onekey:重构Steam Depot清单下载流程的现代化解决方案
Onekey:重构Steam Depot清单下载流程的现代化解决方案 【免费下载链接】Onekey Onekey Steam Depot Manifest Downloader 项目地址: https://gitcode.com/gh_mirrors/one/Onekey Onekey作为一款专为Steam Depot清单设计的自动化下载工具,通过其创…...
、连读规则注入与敬语语调开关(内测白名单已开放))
仅限菲律宾本地团队使用的ElevenLabs隐藏功能:Tagalog重音标记语法(`[ˈba.ka]`)、连读规则注入与敬语语调开关(内测白名单已开放)
更多请点击: https://intelliparadigm.com 第一章:ElevenLabs菲律宾文语音能力的本地化演进背景 菲律宾语(Filipino)作为以他加禄语(Tagalog)为基础的国家官方语言,拥有约1.05亿母语及第二语言…...
)
【Midjourney数字艺术风格终极指南】:20年AI视觉专家亲授7大核心风格参数调优法则(含V6.1新增Realism Mode实测数据)
更多请点击: https://intelliparadigm.com 第一章:Midjourney数字艺术风格演进与V6.1核心变革 Midjourney自V1发布以来,其图像生成范式经历了从纹理模拟到语义理解、从风格模仿到跨模态协同的深层跃迁。V6.1标志着模型首次在原生架构中集成…...

自主智能体框架构建指南:从LLM工具调用到多任务规划系统
1. 项目概述:一个能“开疆拓土”的智能体框架最近在开源社区里,一个名为njbrake/agent-of-empires的项目引起了我的注意。光看这个名字,就充满了野心和想象力——“帝国的代理人”。这可不是一个简单的脚本工具,而是一个旨在构建能…...

结构化数字工作空间:提升创意工作效率的目录设计与自动化实践
1. 项目概述:一个为创意工作者量身定制的数字工作空间 如果你是一名设计师、开发者、内容创作者,或者任何需要处理大量数字资产、管理复杂项目流程的创意工作者,那么“Workspace-di-Yivo”这个名字可能会让你眼前一亮。这不仅仅是一个简单的文…...

我给了智能体$100去赚钱,结果...
你看过那些演示。一个自主智能体启动,获得一个目标,然后——跳到两周后的 Twitter 帖子——它不知怎么地就在运营一个 Shopify 店铺、写通讯和炒币了。未来已来。AGI 即将降临。买课吧。 我想找出实际发生了什么。 所以我给了一个智能体 100 美元和一个…...

AI模型GUI开发实战:从架构设计到部署的完整指南
1. 项目概述:一个为AI模型打造的图形化交互界面最近在GitHub上看到一个挺有意思的项目,叫GrahamMiranda-AI/openclaw-model-gui。光看名字,就能猜个八九不离十:这大概率是一个为某个名为“OpenClaw”的AI模型配套开发的图形用户界…...