MVC架构_Qt自己的MV架构
文章目录
- 前言
- 模型/视图编程
- 1.先写模型
- 2. 视图
- 3. 委托
- 例子(Qt代码)
- 例1 查询本机文件系统
- 例2 标准模型项操作
- 例3 自定义模型示例:军事武器模型
- 例4 只读模型操作示例
- 例5 选择模型操作
- 例6 自 定 义委 托(在testSelectionModel上修改)
前言
在Qt中,有两种常见的模型/视图架构用于实现大量的数据存储、处理和显示:Model/View和Model/View/Controller。
两者的区别是什么?其实就是看:开发者是否想要自己自定义控制器
下面我举个例子,你就明白了:
QAbstractItemModel属于Model层,负责数据的存储和管理。QAbstractItemDelegate属于View层,负责定制视图中单元格的显示和编辑。控制器(Controller)是开发者自行设计和实现的,用于处理用户输入事件,并更新模型或视图。
这样,可以将Qt中的模型/视图架构描述为Model/View,并通过自定义的控制器来实现Model/View/Controller的设计模式。
下面来详细写一下MVC:
模型/视图编程
Qt 中 的 模 型 / 视 图 架 构 用 来 实 现 大 量 的 数 据 存 储 、 处 理 及 显 示 。
==MVC(Model-View-Controller)==包括了 3 个组件:
- 模型(Model)是应用对象,用来表示数据;
- 视图(View)是模型的用户界面,用来显示数据;
控制(Controller)定义了用户界面对用户输入的反应方式。- 委托(Delegate)用于定制数据的渲染和编辑方式。
(control和Delegate不用分的太清,你就直接理解为:Delegate就是Controller即可)
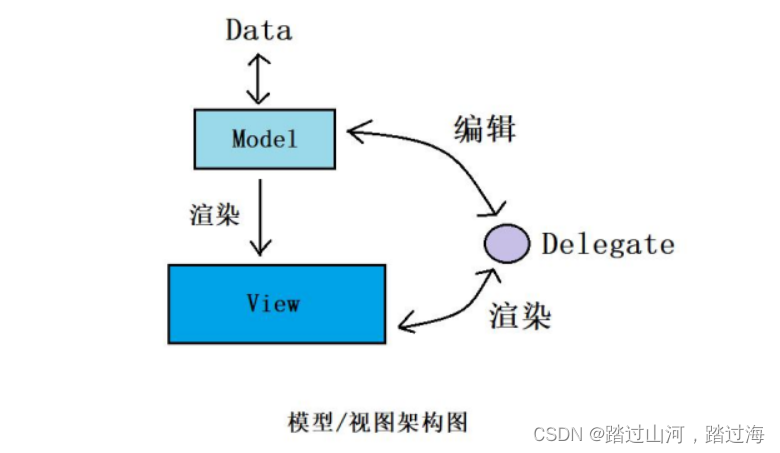
说白了,MVC就是3个部分,一个是Data数据;第二个相当于容器,用来放数据的,然后将数据可视化;第三个是负责数据和容器的交互问题。
菜鸟教程 :https://www.runoob.com/design-pattern/mvc-pattern.html
最后再理解一波:(这个是最正确的!!!)mvc是经典的三层结构,将数据,视图和逻辑分离,这个不是Qt专属,单纯的cpp编程,java编程,python编程,Kotlin编程…都能使用,更像是一种框架模式【注意:框架模式不是设计模式】,而Model/View框架才是qt自己的,查了一下大概是从qt4开始引入,在Qt中这个框架模式中设计到三个类,model类,view类和delegate类。model类保存数据,view负责显示,而delegate负责协调model和view之间的数据edit(编辑)和render(渲染)
然后,再讲一下流程:
- 第一步,用户通过与View进行交互,例如编辑单元格、拖放操作等,触发用户操作事件。
- 第二步,View将用户的操作事件传递给Delegate进行处理。Delegate根据需要对数据进行修改、验证或其他特定操作。
- 第三步,Delegate将更新后的数据传递给Model进行存储和更新。
- 第四步,Model通知View数据的变化,View重新获取更新后的数据并刷新显示。
(举个不太恰当的例子:比如用户编辑了单元格上的数据【在View上操作】,触发了某个功能,比如说是根据已有数据生成新的数据,然后View将这个请求发给Delegate进行委托,Delegate计算出了新生成的数据,并将更新的数据发给了Model,然后Model通知View:数据有变,然后View更新数据(刷新用户界面),这样,用户就看到了新的界面)
然后,不正确的想法,我用横线划掉了,就不删了,全当做一种思考过程了
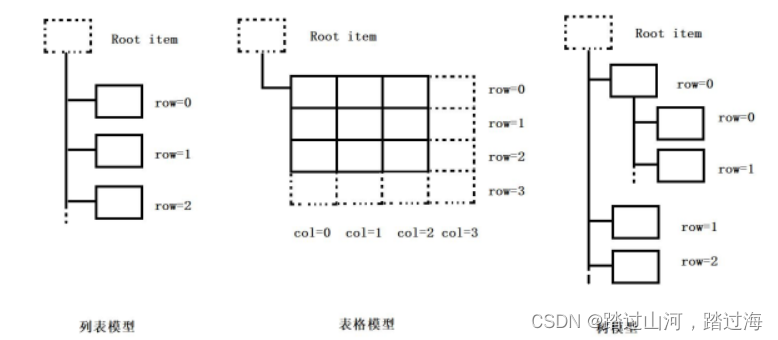
1.先写模型
所有的模型都基于 $QAbstractItemModel 类,该类提供了十分灵活的接口来处理各种视图,这些视图可以将数据的表现形式为表格( 类,该类提供了十分灵活的接口来处理各种视 图,这些视图可以将数据的表现形式为表格( 类,该类提供了十分灵活的接口来处理各种视图,这些视图可以将数据的表现形式为表格(table )、列表( )、列表( )、列表(list )、树( )、树( )、树(tree$)。
Qt 提供了一些现成的模型来处理数据项:
- $QStringListModel $存储简单的 Q S t r i n g QString QString 项目列表;
- $QStandardItemModel $管理复杂的属性结构数据项,每一个数据项可以包含任意的数据;
- Q F i l e S y s t e m M o d e l QFileSystemModel QFileSystemModel 提供了本地文件系统中文件和目录信息;
- Q S q l Q u e r y M o d e l QSqlQueryModel QSqlQueryModel、 Q S q l T a b l e M o d e l QSqlTableModel QSqlTableModel 和 Q S q l R e l a t i o n T a b l e M o d e l QSqlRelationTableModel QSqlRelationTableModel 用来访问数据库。
若标准模型还无法满足需要时,可子类化 QAbstractItemModel、QAbstractListModel 或
QAbstractTableModel 来创建自定义的模型。
常见的 3 种模型为列表模型、表格模型、树模型,如下图所示:
为确保数据表示与数据获取相分离,Qt 引入了模型索引的概念,输入和委托均可
通过模型索引来请求数据并显示。只有模型需要知道怎样获取数据,被模型管理的数据类型
可以被广泛的定义。模型索引包含一个指针,指向创建他们的模型,使用多个模型时可避免
混淆。模型索引 Q M o d e l I n d e x QModelIndex QModelIndex 类提供对一块数据的临时引用,用来修改或检索模型中的数
据,获取一个数据项的模型索引必须指定模型的 3 个属性:行号、列号和父项的模型索引。
如:
QModelIndex index = model->index(row,column,parent);
也可通过模型指定的相关数据项对应的模型索引以及特定的角色来获取需要的类型数据,如:
QVariant value = model->data(index,role);
常用的角色类型:
| 常量 | 描述 |
|---|---|
| Qt::DisplayRole | 数据被渲染为文本(数据类型为QString类型) |
| Qt::DecorationRole | 数据被渲染为图标等装饰(数据为QColor、Qlcon,或QPixmap类型) |
| Qt::EditRole | 数据可以在编辑器中进行编辑(数据为QSring类型) |
| Qt::ToolTipRole | 数据显示在数据项的工具提示中(数据类型为 QString) |
| Qt::StatusTipRole | 数据显示在状态栏中(数据为 QString 类型) |
| Qt::WhatsThisRole | 数据显示在数据项的“What’s This?”模式下(数据为 QString 类型) |
| Qt::SizeHintRole | 数据项的大小提示,将会应用到视图(数据为 QSize 类型) |
| Qt::FontRole | 默认代理的绘制使用的字体 |
| Qt::TextAlignmentRole | 默认代理的对齐方式 |
| Qt::BackgroundRole | 默认代理的背景画刷 |
| Qt::ForegroundRole | 默认代理的前景画刷 |
| Qt::CheckStateRole | 默认代理的前景画刷 |
| Qt::UserRole(重点) | 用户自定义的数据的起始位置 |
| … | |
| … | |
| … |
2. 视图
Qt 提供了 QListView、QTableView 视图、QTreeView 视图分别实现列表、表格与树视
图效果。
QListView 将数据项显示为一个列表;
QTableView 将模型中的数据显示在一个表格中;
QTreeView 将模型中的数据项显示在具有层次的列表中。
QTableView 和 QTreeView 在显示项目的时候同时还可以显示标头,通过 QHeaderView 类实现。
自定义视图类是基于QAbstractItemView 抽象基类,如实现条形图,饼状图等特殊显示方式。
视图类的选择行为
| 常量 | 描述 |
|---|---|
| QAbstractView::SelectItems | 选择单个项目 |
| QAbstractView::SelectRows | 只选择行 |
| QAbstractView::SelectColumns | 只选择列 |
视图类的选择模式
| 常量 | 描述 |
|---|---|
| QAbstractItemView::SigleSelection | 当用户选择一个项目时,所有已经选择的项目将成为未选择状态,而且用户无法在已经选择的项目上单击来取消选择 |
| QAbstractView::ContiguousSelection | 用户单击一个项目的同时,按 Shift 键,则所有当前项目和单击项目之间的项目都将被选择或取消选择 |
| QAbstractView::ContiguousSelection | 具有 ContiguousSelection 的特性,且可按 Ctrl 键进行不连续选择 |
| QAbstractView::MultiSelection | 用户选择一个项目时不影响其他已经选择的项目 |
| QAbstractView::NoSelection | 项目无法被选择 |
选择模型更新方式
| 常量 | 描述 |
|---|---|
| QItemSelectionModel::NoUpdate | 不做选择 |
| QItemSelectionModel::Clear | 选择被清除 |
| QItemSelectionModel::Select | 选择指定索引 |
| QItemSelectionModel::Deselect | 取消指定索引的选择 |
| QItemSelectionModel::Toggle | 切换指定索引的选择 |
| QItemSelectionModel::Current | 当前选择被更新 |
| QItemSelectionModel::Rows | 索引扩展为跨行 |
| QItemSelectionModel::Columns | 索引扩展为跨列 |
| QItemSelectionModel::SelectCurrent | Select|Current组合 |
| QItemSelectionModel::ToggleCurrent | Toggle|Current组合 |
| QItemSelectionModel::ClearAndSelect | Clear|Select组合 |
3. 委托
在模型/视图框架中,
Q A b s t r a c t I t e m D e l e g a t e QAbstractItemDelegate QAbstractItemDelegate 是委托类的抽象基类,
Qt 默认的委托实现由 Q S t y l e d I t e m D e l e g a t e QStyledItemDelegate QStyledItemDelegate 类 提 供 ,
这 也 被 用 作 Qt 标 准 视 图 的 默 认 委 托 ,
选 择== Q S t y l e d I t e m D e l e g a t e QStyledItemDelegate QStyledItemDelegate== 或者 QItemDelegate 中其一来为视图中的项目 绘制和提供编辑器。
不同的是 : == Q S t y l e d I t e m D e l e g a t e QStyledItemDelegate QStyledItemDelegate使用当前的样式来绘制项目,实现自定义委托建议使用 Q S t y l e d I t e m D e l e g a t e QStyledItemDelegate QStyledItemDelegate==作为基类。
Qt 提供了项目视图的便捷类,这些类底层通过模型/视图框架实现。
这些部件分别是:
-
QListWidget 提供一个项目列表,
-
QTreeWidget 显示一个多层次的树结构,
-
QTableWidget提供了一个以项目作为单元的表格。
它们每一个类都继承了 QAbstractItemView 类的行为。
之所以成为便捷因其用起来比较简单,使用于少量的数据的存储和显示。因没有将视图与模型分离,所以没有视图类灵活,不能和任意的模型一起使用。
例子(Qt代码)
例1 查询本机文件系统
//项目名:testModelView
//效果:查询本机文件系统//修改内容如下://main.cpp
#include "mainwindow.h"#include <QApplication>
#include <QAbstractItemModel>
#include <QDirModel>
#include <QTreeView>
#include <QListView>
#include <QTableView>
#include <QAbstractItemView>
#include <QItemSelectionModel>
#include <QSplitter>int main(int argc, char *argv[])
{QApplication app(argc, argv);//1.创建模型QDirModel model;//默认情况下,QDirModel打开的系统上的c,d,e,f盘等(也就是你系统的根目录)//2.创建树视图、列表视图、表格视图QTreeView tree;QListView list;QTableView table;//3.在视图中设置模型tree.setModel(&model);list.setModel(&model);table.setModel(&model);//4.设置视图对象的选择方式为多选,然后list/table选择方式同treetree.setSelectionMode(QAbstractItemView::MultiSelection);list.setSelectionMode(tree.selectionMode());table.setSelectionMode(tree.selectionMode());//5.树视图双击信号发射后,列表以及表格视图都要刷新内容QObject::connect(&tree,SIGNAL(doubleClicked(QModelIndex)),&list,SLOT(setRootIndex(QModelIndex)));QObject::connect(&tree,SIGNAL(doubleClicked(QModelIndex)),&table,SLOT(setRootIndex(QModelIndex)));//6.创建分割器,他可以将界面分割成多个子区域QSplitter *splitter = new QSplitter;splitter->addWidget(&tree);splitter->addWidget(&list);splitter->addWidget(&table);splitter->setWindowTitle(QString("模型/视图"));splitter->show();//MainWindow w;//w.show();return app.exec();
}
例2 标准模型项操作
//项目名 : testQModelIndex
//效果:标准模型项操作//修改内容如下://main.cpp
#include "mainwindow.h"#include <QApplication>
#include <QStandardItemModel>
#include <QTreeView>
#include <QDebug>int main(int argc, char *argv[])
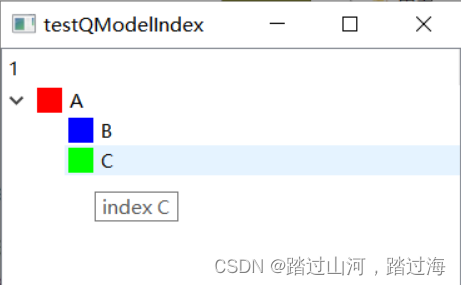
{QApplication a(argc, argv);//MainWindow w;//w.show();//1.创建标准项模型QStandardItemModel model;//2.获取标准项模型的根项,根项是不可见的QStandardItem *parentItem = model.invisibleRootItem();//3.创建标准项item0,设置文本,设置图标,工具提示QStandardItem *item0 = new QStandardItem;item0->setText(QString("A"));//4.PixmapQPixmap pixmap0(50,50);pixmap0.fill(Qt::red);item0->setIcon(QIcon(pixmap0));item0->setToolTip( QString("A's tips"));//将item0作为父项的子项parentItem->appendRow(item0);parentItem = item0;//创建item0的子项QStandardItem *item1 = new QStandardItem;item1->setText(QString("B"));QPixmap pixmap1(50,50);pixmap1.fill(Qt::blue);item1->setIcon(pixmap1);item1->setToolTip(QString("B's ..."));parentItem->appendRow(item1);QStandardItem * item2 = new QStandardItem;QPixmap pixmap2(50,50);pixmap2.fill(Qt::green);item2->setData("C",Qt::EditRole);item2->setData("index C",Qt::ToolTipRole);item2->setData(QIcon(pixmap2),Qt::DecorationRole);parentItem->appendRow(item2);//在树视图中显示数据QTreeView view;view.setModel(&model);view.show();QModelIndex indexA = model.index(0,0,QModelIndex());qDebug()<<"indexA row coutn:"<<model.rowCount(indexA);QModelIndex indexB = model.index(0,0,indexA);qDebug()<<"indexB text:"<<model.data(indexB,Qt::EditRole).toString();qDebug() <<"indexB toolTip:"<<model.data(indexB,Qt::ToolTipRole).toString();return a.exec();
}
例3 自定义模型示例:军事武器模型
//testCustomModel//添加 c++类 WeaponModel 继承自 QAbstractTableModel//weaponmodel.h
#ifndef WEAPONMODEL_H
#define WEAPONMODEL_H#include <QAbstractTableModel>class WeaponModel : public QAbstractTableModel
{
public:explicit WeaponModel(QObject *parent = nullptr);virtual int rowCount(const QModelIndex &parent = QModelIndex()) const;virtual int columnCount(const QModelIndex &parent = QModelIndex())const;QVariant data(const QModelIndex &index,int role) const;QVariant headerData(int section,Qt::Orientation orientation,int role)const;private:QVector<short>army;//军队QVector<short>weaponType;//武器类型QMap<short,QString>armyMap;    //军队映射QMap<short,QString> weaponMap;//武器映射QStringList weapon; // 武器QStringList header; //表头void populateModel();//表格数据的初始化
};#endif // WEAPONMODEL_H//weaponmodel.cpp
#include "weaponmodel.h"WeaponModel::WeaponModel(QObject *parent): QAbstractTableModel{parent}
{//请坚持使用英文,英文代码,中文注释armyMap[1] = QString("air force");//空军armyMap[2] = QString("Navy");//海军armyMap[3] = QString("army");//陆军armyMap[4] = QString("marines");//海军陆战队weaponMap[1] = QString("bomber");//轰炸机weaponMap[2] = QString("fighter");//战斗机weaponMap[3] = QString("aircraft carrier");//航空母舰weaponMap[4] = QString("destroyer");//驱逐舰weaponMap[5] = QString("helicopter");//直升机weaponMap[6] = QString("tank");//坦克weaponMap[7] = QString("Amphibious assault ship");//两栖攻击舰weaponMap[8] = QString("Amphibious tank");//两栖战车populateModel();}int WeaponModel::rowCount(const QModelIndex &parent) const
{return army.size();
}int WeaponModel::columnCount(const QModelIndex &parent) const
{return 3;
}//放置指定索引的数据,将数据映射成文字
QVariant WeaponModel::data(const QModelIndex &index, int role) const
{if(!index.isValid())return QVariant();if(role == Qt::DisplayRole){switch(index.column()){case 0:return armyMap[army[index.row()]];break;case 1:return weaponMap[weaponType[index.row()]];break;case 2:return weapon[index.row()];default:return QVariant();}}return QVariant();
}QVariant WeaponModel::headerData(int section, Qt::Orientation orientation, int role) const
{if(role == Qt::DisplayRole & orientation == Qt::Horizontal)return header[section];return QAbstractTableModel::headerData(section,orientation,role);
}void WeaponModel::populateModel()
{header << QString("军种")//军种<<QString("种类")//种类<<QString("武器");//武器army<<1<<2<<3<<4<<2<<4<<3<<1;//weaponType<<1<<3<<5<<7<<4<<8<<6<<2;//8个数据内容随便写weapon<<QString("B-2")<<QString("尼尔兹极")//尼尔兹极<<QString("APACHE")<<QString("Wasp class")//阿帕奇 黄蜂级<<QString("Proportional Burke level")<<QString("AAAV")//比例伯克级 AAAV<<QString("M1A1")<<QString("F-22");//M1A1 F-22}//main.cpp
#include "mainwindow.h"
#include "weaponmodel.h"
#include <QApplication>
#include <QTableView>int main(int argc, char *argv[])
{QApplication app(argc, argv);WeaponModel model;QTableView view;view.setModel(&model);view.setWindowTitle(QString("table view"));//一定不要写中文,空格可以有view.resize(600,400);view.show();//MainWindow w;//w.show();return app.exec();
}
例4 只读模型操作示例
//testModel//添加自定义类 StringListModel 继承自 QAbstractListModel
//stringlistmodel.h
#ifndef STRINGLISTMODEL_H
#define STRINGLISTMODEL_H#include <QAbstractListModel>class StringListModel : public QAbstractListModel
{Q_OBJECT
public:StringListModel(const QStringList &strings,QObject *parent = 0):QAbstractListModel(parent),m_stringList(strings){}//模型行数int rowCount(const QModelIndex &parent = QModelIndex()) const;//指定模型索引的数据项QVariant data(const QModelIndex &index,int role)const;//表头内容(数或表格)QVariant headerData(int section,Qt::Orientation orientation,int role = Qt::DisplayRole)const;//项目属性Qt::ItemFlags flags(const QModelIndex &index)const;//编辑数据bool setData(const QModelIndex &index,const QVariant &value,int role = Qt::EditRole);//插入行bool insertRows(int position,int rows,const QModelIndex &index = QModelIndex());//删除行bool removeRows(int position,int rows,const QModelIndex &index = QModelIndex());
private:QStringList m_stringList;
};#endif // STRINGLISTMODEL_H//stringlistmodel.cpp
#include "stringlistmodel.h"//row 行数
int StringListModel::rowCount(const QModelIndex &parent) const
{return m_stringList.count();
}/**用于获取模型中特定索引位置的数据。如果索引无效,它会返回一个空的 QVariant。*如果索引是最后一个元素,也会返回一个空的 QVariant。*否则,它根据传入的 role 返回对应的数据。**Qt::DisplayRole 和 Qt::EditRole 角色用于显示和编辑数据。*在这里,它返回了 m_stringList 中相应索引位置的字符串。
*/
QVariant StringListModel::data(const QModelIndex &index, int role) const
{if(!index.isValid())return QVariant();if(index.row() == m_stringList.size())return QVariant();if(role == Qt::DisplayRole || role == Qt::EditRole)return m_stringList.at(index.row());elsereturn QVariant();
}/** headerData 函数返回表头的数据。在这里,如果 role 不是 Qt::DisplayRole,它会返回一个空的 QVariant。* 否则,它会根据传入的 section 和 orientation 返回对应的表头数据。
*/
QVariant StringListModel::headerData(int section, Qt::Orientation orientation, int role) const
{if(role != Qt::DisplayRole)return QVariant();//水平表头if(orientation == Qt::Horizontal)return QString("Column %1").arg(section);//Column 0...elsereturn QString("Row %1").arg(section);//Row 0...
}
/** Qt::ItemIsEnabled,表示项目是可用的。* 否则,它返回默认标志并添加了 Qt::ItemIsEditable 标志,表示项目可以被编辑。
*/
Qt::ItemFlags StringListModel::flags(const QModelIndex &index) const
{if(!index.isValid())return Qt::ItemIsEnabled;return QAbstractItemModel::flags(index) | Qt::ItemIsEditable;
}/** 检查索引是否有效且角色是否为 Qt::EditRole。如果是,它将替换 m_stringList 中相应位置的字符串,* 并发出 dataChanged 信号来通知其他组件数据已经改变。
*/
bool StringListModel::setData(const QModelIndex &index, const QVariant &value, int role)
{//检测索引有效且项目可编辑if(index.isValid()&&role==Qt::EditRole){m_stringList.replace(index.row(),value.toString());emit dataChanged(index,index);return true;}return false;
}
/** 它首先使用 beginInsertRows 告知其他组件将要开始插入行的操作。然后,在指定的位置插入了指定数量的字符串,* 这些字符串都是固定的 "You are coming from Star."。* 最后,使用 endInsertRows 告知其他组件插入操作已经完成。
*/
bool StringListModel::insertRows(int position, int rows, const QModelIndex &index)
{//告知其他组件指定的行开始插入操作beginInsertRows(QModelIndex(),position,position + rows - 1);for(int row = 0; row < rows; ++ row){m_stringList.insert(position,QString("You are coming from Star."));}//告知其他组件完成操作endInsertRows();return true;
}//从那一行开始,删除多少行
bool StringListModel::removeRows(int position,int rows, const QModelIndex &index)
{//告知其他组件指定的行开始删除操作beginRemoveRows(QModelIndex(),position,position + rows -1);for(int row = 0; row < rows ; ++ row){m_stringList.removeAt(position);}//告知其他组件完成操作return true;
}//main.cpp
#include "mainwindow.h"#include <QApplication>
#include "stringlistmodel.h"
#include <QListView>
#include <QTableView>int main(int argc, char *argv[])
{QApplication app(argc, argv);QStringList list;list << QString("Sun")<<QString("the Earth")<< QString("moon")<<QString("Saturn");StringListModel model(list);model.insertRows(3,4);//从第3行开始插入,插入4列(You are coming from Star.)model.removeRows(3,2);QListView listview;listview.setModel(&model);listview.setWindowTitle("List View");//在Qt中,你可以通过使用 setWindowTitle() 方法来为任意窗口设置标题名称。listview.show();QTableView tableview;tableview.setModel(&model);tableview.setWindowTitle("Table View");tableview.show();//MainWindow w;//w.show();return app.exec();
}
例5 选择模型操作
//testSelectionModel//添加自定义类 MainWindow 继承自 QMainWindow
//mainwindow.h
#ifndef MAINWINDOW_H
#define MAINWINDOW_H#include <QMainWindow>QT_BEGIN_NAMESPACE
namespace Ui { class mainwindow; }
QT_END_NAMESPACEclass QTableView;
class QItemSelection;
class QModelIndex;class mainwindow : public QMainWindow
{Q_OBJECTpublic:mainwindow(QWidget *parent = nullptr);~mainwindow();private slots:void getCurrentItemData();//当前选择void toggleSection();//切换选择//更新选择,selected表新的选择,deselected表以前的选择void updateSelection(const QItemSelection &selected,const QItemSelection &deselected);//改变当前模型索引void changeCurrent(const QModelIndex ¤t,const QModelIndex &previous);private:Ui::mainwindow *ui;QTableView *m_tableView;QTableView *m_tableView2;
};
#endif // MAINWINDOW_H//mainwindow.cpp
#include "mainwindow.h"
#include "ui_mainwindow.h"
#include <QTableView>
#include <QDebug>
#include <QStandardItemMOdel>
#include <QItemSelection>
//#include "spinboxdelegate.h"mainwindow::mainwindow(QWidget *parent): QMainWindow(parent), ui(new Ui::mainwindow)
{ui->setupUi(this);//创建标准项模型,7行4列QStandardItemModel *model = new QStandardItemModel(7,4,this);for(int row = 0 ; row < 7 ; ++ row){for(int column = 0; column < 4 ;++column){QStandardItem * item =new QStandardItem(QString("%1").arg(row*4 + column));//标准模型设置数据项model->setItem(row,column,item);}}m_tableView = new QTableView;m_tableView->setModel(model);setCentralWidget(m_tableView);//设置主窗口的中心部件为表格视图//获取视图的选择模式QItemSelectionModel *selectionModel = m_tableView->selectionModel();QModelIndex topLeft;//左上角模型索引QModelIndex bottomRight;//右上角模型索引topLeft = model->index(1,1);//1行1列bottomRight = model->index(5,2);//5行2列//创建模型选择QItemSelection selection(topLeft,bottomRight);//以选择的方式唉选择项目selectionModel->select(selection,QItemSelectionModel::Select);//添加动作addAction(动作文本,响应这,槽方法)ui->menubar->addAction(QString("Current Project"),this,&mainwindow::getCurrentItemData);ui->menubar->addAction(QString("Switch Selection"),this,&mainwindow::toggleSection);//关联选择模型的选择改变,当前项改变的信号connect(selectionModel,&QItemSelectionModel::selectionChanged,this,&mainwindow::updateSelection);connect(selectionModel,&QItemSelectionModel::currentChanged,this,&mainwindow::changeCurrent);m_tableView2 = new QTableView;m_tableView2->setWindowTitle("tableView2");m_tableView2->resize(400,300);m_tableView2->setModel(model);m_tableView2->setSelectionModel(selectionModel);m_tableView2->show();}mainwindow::~mainwindow()
{delete ui;delete m_tableView2;
}void mainwindow::getCurrentItemData()
{qDebug()<< QString("Current Data:")<<m_tableView->selectionModel()->currentIndex().data();
}void mainwindow::toggleSection()
{//左上角模型索引QModelIndex topLeft = m_tableView->model()->index(0,0,QModelIndex());//右下角模型索引QModelIndex bottomRight = m_tableView->model()->index(m_tableView->model()->rowCount(QModelIndex())-1,m_tableView->model()->columnCount(QModelIndex())-1,QModelIndex());//项选择QItemSelection curSelection(topLeft,bottomRight);m_tableView->selectionModel()->select(curSelection,QItemSelectionModel::Toggle);}void mainwindow::updateSelection(const QItemSelection &selected, const QItemSelection &deselected)
{QModelIndex index;//indexes()返回所有选择项的模型索引QModelIndexList list = selected.indexes();//给现在选择的项目填充数据foreach (index, list) {QString text = QString("%1,%2").arg(index.row()).arg(index.column());m_tableView->model()->setData(index,text);}//清空上一次选择的内容list = deselected.indexes();foreach (index, list) {m_tableView->model()->setData(index,"");}
}void mainwindow::changeCurrent(const QModelIndex ¤t, const QModelIndex &previous)
{qDebug()<<QString("from (%1,%2) to (%3,%4)").arg(previous.row()).arg(previous.column()).arg(previous.row()).arg(current.column());
}//main.cpp

例6 自 定 义委 托(在testSelectionModel上修改)
//testSelectionModel//testSelectionModel 项 目 中添 加 自 定 义 委托 类 SpinBoxDelegate 继 承 自QItemDelegate//spinboxdelegate.h
#ifndef SPINBOXDELEGATE_H
#define SPINBOXDELEGATE_H#include <QItemDelegate>class SpinBoxDelegate : public QItemDelegate
{Q_OBJECT
public:SpinBoxDelegate(QObject *parent = 0);//创建编辑器QWidget *createEditor(QWidget *parent,const QStyleOptionViewItem &option,const QModelIndex &index)const override;//设置编辑器数据void setEditorData(QWidget *editor,const QModelIndex &index)const override;//更新编辑器几何属性void updateEditorGeometry(QWidget *editor,const QStyleOptionViewItem &option,const QModelIndex &index)const override;
};#endif // SPINBOXDELEGATE_H//spinboxdelegate.cpp
#include "spinboxdelegate.h"#include <QSpinBox>SpinBoxDelegate::SpinBoxDelegate(QObject *parent):QItemDelegate(parent)
{}QWidget *SpinBoxDelegate::createEditor(QWidget *parent, const QStyleOptionViewItem &option, const QModelIndex &index) const
{QSpinBox *editor = new QSpinBox(parent);editor->setMinimum(0);editor->setMaximum(100);return editor;
}void SpinBoxDelegate::setEditorData(QWidget *editor, const QModelIndex &index) const
{int value = index.model()->data(index,Qt::EditRole).toInt();//类型转换:QWidget* 转 QSpinBox*QSpinBox * spinBox = static_cast<QSpinBox*>(editor);//编辑器设置数据spinBox->setValue(value);
}void SpinBoxDelegate::updateEditorGeometry(QWidget *editor, const QStyleOptionViewItem &option, const QModelIndex &index) const
{editor->setGeometry(option.rect);
}//mainwindow.cpp的构造函数中添加
SpinBoxDelegate *delegate = new SpinBoxDelegate(this);
//视图设置自定义委托
m_tableView->setItemDelegate(delegate);
相关文章:
MVC架构_Qt自己的MV架构
文章目录 前言模型/视图编程1.先写模型2. 视图3. 委托 例子(Qt代码)例1 查询本机文件系统例2 标准模型项操作例3 自定义模型示例:军事武器模型例4 只读模型操作示例例5 选择模型操作例6 自 定 义委 托(在testSelectionModel上修改) 前言 在Qt中…...
CentOS - 安装 Elasticsearch
"Elasticsearch"是一个流行的开源搜索和分析引擎,它可以用于实时搜索、日志和事件数据分析等任务。以下是在 CentOS 上安装 Elasticsearch 的基本步骤: 安装 Java: Elasticsearch 是基于 Java 的应用程序,所以首先需要…...
IDEA 断点高阶
一、按钮介绍 1.1 补充 返回断点处: 设置debug配置: 二、增加/切换debugger视图 三、window快捷键 所在行处: CtrlF8断点属性编辑: CtrlShiftF8 四、一些常用的高级功能 4.1 查看对象内存-Attach memory agent 1.勾选Atta…...

Qt中的单例模式
QT单例类管理信号和槽函数 Chapter1 Qt中的单例模式一、什么是单例模式?二、Qt中单例模式的实现2.1、静态成员变量2.2、静态局部变量2.3、Q_GLOBAL_STATIC 宏实例2 三、使用场景四、注意事项 Chapter2 QT单例类管理信号和槽函数一、创建单例类二、主界面添加组件三、…...
ROS自学笔记十五:URDF工具
要使用工具之前,首先需要安装,安装命令: sudo apt install liburdfdom-tools 1.check_urdf 语法检查 在ROS中,你可以使用.check_urdf命令行工具来对URDF(Unified Robot Description Format)文件进行语法检查和验证。…...
Pytorch代码入门学习之分类任务(三):定义损失函数与优化器
一、定义损失函数 1.1 代码 criterion nn.CrossEntropyLoss() 1.2 损失函数简介 神经网络的学习通过某个指标表示目前的状态,然后以这个指标为基准,寻找最优的权重参数。神经网络以某个指标为线索寻找最优权重参数,该指标称为损失函数&am…...

【Linux】安装VMWare虚拟机(安装配置)和配置Windows Server 2012 R2(安装配置连接vm虚拟机)以及环境配置
前言: 一、操作系统简介 1、什么是操作系统 操作系统是一种软件,它管理计算机系统的硬件和软件资源,并提供给用户和应用程序接口,使它们能够与计算机系统交互和运行。操作系统负责调度和分配系统资源,例如处理器、内存…...
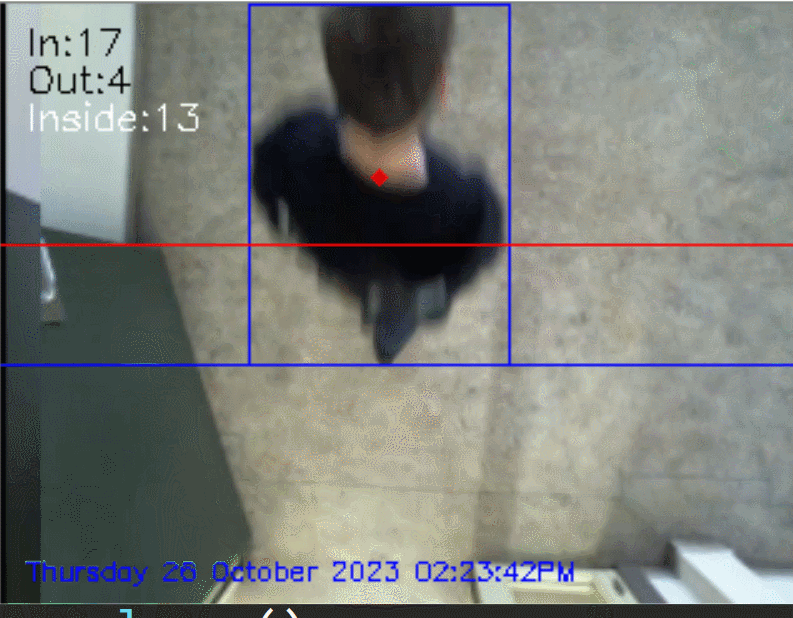
Python入口顶部人体检测统计进出人数
程序示例精选 Python入口顶部人体检测统计进出人数 如需安装运行环境或远程调试,见文章底部个人QQ名片,由专业技术人员远程协助! 前言 这篇博客针对《Python入口顶部人体检测统计进出人数》编写代码,代码整洁,规则&a…...

移动端自动化-Appium元素定位
文章目录 Appium元素定位第一类:属性定位第二类:路径定位 常见问题理解appium server 和 appium inspector 以及 appium-python-client的关系 appium是跨平台的,支持OSX,Windows以及Linux系统。它允许测试人员在不同的平台&#x…...
menuconfig 图形化配置原理说明三
一. 简介 本文继续简单了解一下,uboot的图形化配置原理。具体了解 Kconfig语法。 之前文章了解了几个 Kconfig语法。地址如下: menuconfig 图形化配置原理说明二-CSDN博客 二. menuconfig 图形化配置之 Kconfig语法 1. config 条目 顶层 Kconfig …...
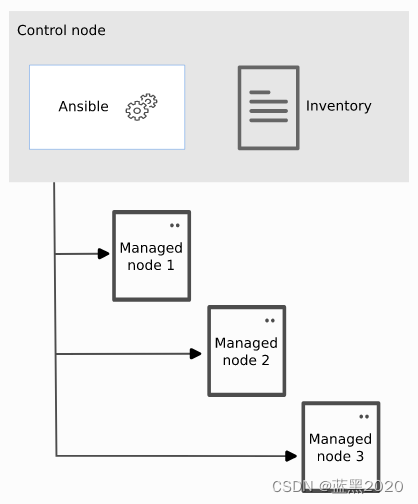
Ansible简介
环境 控制节点:Ubuntu 22.04Ansible 2.10.8管理节点:CentOS 8 组成 Ansible环境主要由三部分组成: 控制节点(Control node):安装Ansible的节点,在此节点上运行Ansible命令管理节点ÿ…...
Tomcat+nginx负载均衡和动静分离
Nginx实现负载均衡和动静分离的原理 Nginx实现负载均衡是通过反向代理实现Nginx服务器作为前端,Tomcat服务器作为后端,web页面请求由Nginx服务来进行转发。 但是不是把所有的web请求转发,而是将静态页面请求Ncinx服务器自己来处理,…...

全景环视AVM标定
目录 一、前言 二、鱼眼模型 三、标定流程 四、角点提取 4.1 亚像素坐标计算...

【JavaScript】leetcode链表相关题解
【JavaScript】leetcode链表相关题解 一、什么是链表?二、Javascript中的链表三、leetcode相关链表2.两数相加237.删除链表中的节点206.反转链表 💎个人主页: 阿选不出来 💎个人简介: 大三学生,热爱Web前端,随机掉落学…...
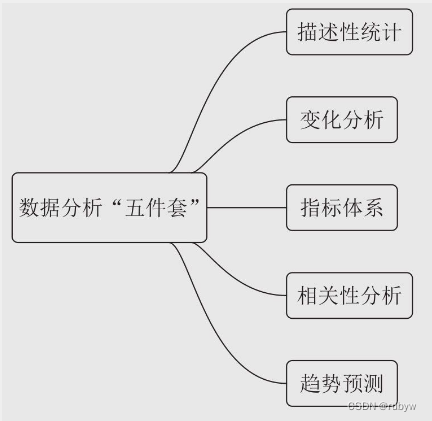
洞察运营机会的数据分析利器
这套分析方法包括5个分析工具: 用“描述性统计”来快速了解数据的整体特点。用“变化分析”来寻找数据的问题和突破口。用“指标体系”来深度洞察变化背后的原因。用“相关性分析”来精确判断原因的影响程度。用“趋势预测”来科学预测未来数据的走势,...

使用Python实现文字的声音播放
winsound 是 Python 的一个内置模块,它提供了访问 Windows 操作系统的声音播放功能的接口。这个模块可以用来播放简单的声音,例如提示音或者短促的音效。 # Author : 小红牛 # 微信公众号:WdPython import win32com.client import winsound#…...
gulp自动化构建
什么是Gulp? Gulp是一种前端开发过程中广泛使用的自动化构建工具,它是基于Node.js构建的,能够极大地提高开发效率和代码质量。Gulp的主要功能包括文件的压缩、合并、重命名等,同时它也支持文件监听和浏览器自动刷新等功能。使用Gulp&#x…...
java时间解析生成定时Cron表达式工具类
Cron表达式工具类CronUtil 构建Cron表达式 /****方法摘要:构建Cron表达式*param taskScheduleModel*return String*/public static String createCronExpression(TaskScheduleModel taskScheduleModel){StringBuffer cronExp new StringBuffer("");if(…...
JavaEE 网络原理——TCP的工作机制(末篇 其余TCP特点)
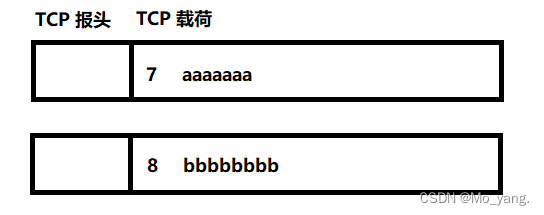
文章目录 一、滑动窗口二、流量控制三、拥堵控制四、延时应答五、捎带应答六、面向字节流七、异常情况八、总结 其余相关文章: JavaEE 网络原理——TCP的工作机制(中篇 三次握手和四次挥手) 本篇文章衔接的是前面两篇文章的内容,在这里继续解释 TCP 的内…...
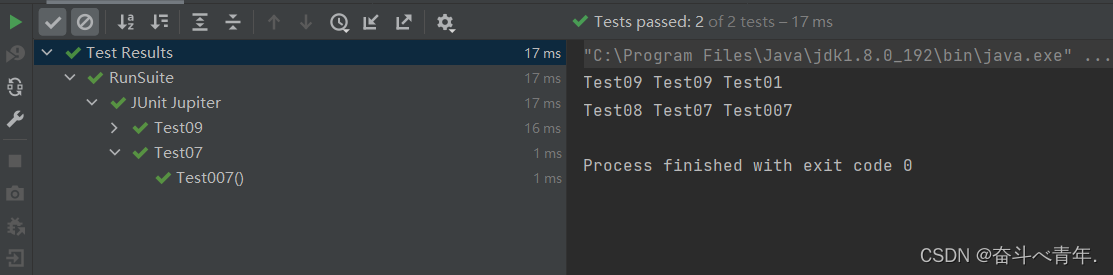
【软件测试】了解JUnit单元测试框架常用注解
目录 1、认识JUnit 2、Junit中常见的注解 1、Test 2、Disabled 3、BeforeAll和AfterAll 4、BeforeEach和AfterEach 5、 ParameterizedTest:参数化 6、order 3、断言 1、断言相等【Assertions.assertEquals(预期,比较值)】;相等测试通…...

为什么你的暗影精灵游戏本需要开源硬件控制?OmenSuperHub深度解析
为什么你的暗影精灵游戏本需要开源硬件控制?OmenSuperHub深度解析 【免费下载链接】OmenSuperHub 使用 WMI BIOS控制性能和风扇速度,自动解除DB功耗限制。 项目地址: https://gitcode.com/gh_mirrors/om/OmenSuperHub 在游戏本的世界里࿰…...

3个方法解决C盘空间不足问题的系统优化工具
3个方法解决C盘空间不足问题的系统优化工具 【免费下载链接】WindowsCleaner Windows Cleaner——专治C盘爆红及各种不服! 项目地址: https://gitcode.com/gh_mirrors/wi/WindowsCleaner WindowsCleaner是一款开源的系统优化工具,专为解决Windows…...

5分钟零门槛搭建全功能免费AI接口:本地部署与场景化应用指南
5分钟零门槛搭建全功能免费AI接口:本地部署与场景化应用指南 【免费下载链接】kimi-free-api 🚀 KIMI AI 长文本大模型逆向API【特长:长文本解读整理】,支持高速流式输出、智能体对话、联网搜索、探索版、K1思考模型、长文档解读、…...

xArm机械臂电气接口全解析:从末端法兰到RS485的实战避坑指南
xArm机械臂电气接口全解析:从末端法兰到RS485的实战避坑指南 在工业自动化领域,机械臂的电气接口设计往往是决定系统稳定性的关键因素。作为国内领先的协作机器人品牌,xArm以其出色的性价比和开放性接口设计赢得了众多工程师的青睐。但当我们…...

技术深度解析:如何通过Turbo Boost动态控制优化Mac系统性能与散热管理
技术深度解析:如何通过Turbo Boost动态控制优化Mac系统性能与散热管理 【免费下载链接】Turbo-Boost-Switcher Turbo Boost disabler / enable app for Mac OS X 项目地址: https://gitcode.com/gh_mirrors/tu/Turbo-Boost-Switcher Turbo Boost Switcher是一…...

关于reverse的tea题目回顾
ea的短暂性小总结说实话今天做的内容不算太多,但是感觉很超出自己的承受范围。 话不多说进行短暂总结tea模式tea的题目做起来的话公式比较固定。就比如用下面这个简单的题目进行示范这个就是图片,有en和de两种模式。de是我自己写出来的。查看en代码时能够…...

AI驱动开发:在快马平台上让AI模型协作构建你的智能体框架
今天想和大家分享一个最近在InsCode(快马)平台上实践的AI辅助开发项目——构建一个用于代码审查的智能体框架。这个框架特别适合在快马这样的AI开发平台上实现,因为可以直接调用平台内置的多种AI模型来完成智能体之间的协作。 框架设计思路 整个智能体框架由三个核…...

Socket.IO-Client-Swift终极指南:构建实时iOS应用的第一步
Socket.IO-Client-Swift终极指南:构建实时iOS应用的第一步 【免费下载链接】socket.io-client-swift 项目地址: https://gitcode.com/gh_mirrors/so/socket.io-client-swift Socket.IO-Client-Swift是一个强大的开源库,为iOS开发者提供了简单高效…...

网站页面标题和描述如何设置更有利于SEO_网站标题、标题标签、副标题如何设置
网站页面标题和描述如何设置更有利于SEO_网站标题、标题标签、副标题如何设置 在当今数字化时代,网站的SEO(搜索引擎优化)至关重要。如何设置网站的页面标题和描述,不仅能提升网站的可见度,还能吸引更多的点击和流量。…...

SEO_中小企业低成本开展SEO推广的实用方案
引言:为什么中小企业需要SEO推广 在当今的互联网时代,中小企业如何在海量的网站中脱颖而出,吸引更多的潜在客户,这是一个迫切需要解决的问题。搜索引擎优化(SEO)推广是提升网站在搜索引擎上排名的重要手段…...