OAK相机如何将yoloV8模型转换成blob格式?
编辑:OAK中国
首发:oakchina.cn
喜欢的话,请多多👍⭐️✍
内容可能会不定期更新,官网内容都是最新的,请查看首发地址链接。
▌前言
Hello,大家好,这里是OAK中国,我是助手君。
最近咱社群里有几个朋友在将yolox转换成blob的过程有点不清楚,所以我就写了这篇博客。(请夸我贴心!咱的原则:合理要求,有求必应!)
1.其他Yolo转换及使用教程请参考
2.检测类的yolo模型建议使用在线转换(地址),如果在线转换不成功,你再根据本教程来做本地转换。
▌.pt 转换为 .onnx
使用下列脚本(将脚本放到 YOLOv8 根目录中)将 pytorch 模型转换为 onnx 模型,若已安装 openvino_dev,则可进一步转换为 OpenVINO 模型:
示例用法:
python export_onnx.py -w <path_to_model>.pt -imgsz 640
export_onnx.py :
#!/usr/bin/env python3
# -*- coding:utf-8 -*-
import argparse
import json
import math
import subprocess
import sys
import time
import warnings
from pathlib import Pathimport onnx
import torch
import torch.nn as nnwarnings.filterwarnings("ignore")ROOT = Path.cwd()
if str(ROOT) not in sys.path:sys.path.append(str(ROOT))from ultralytics.nn.modules import Detect
from ultralytics.nn.tasks import attempt_load_weights
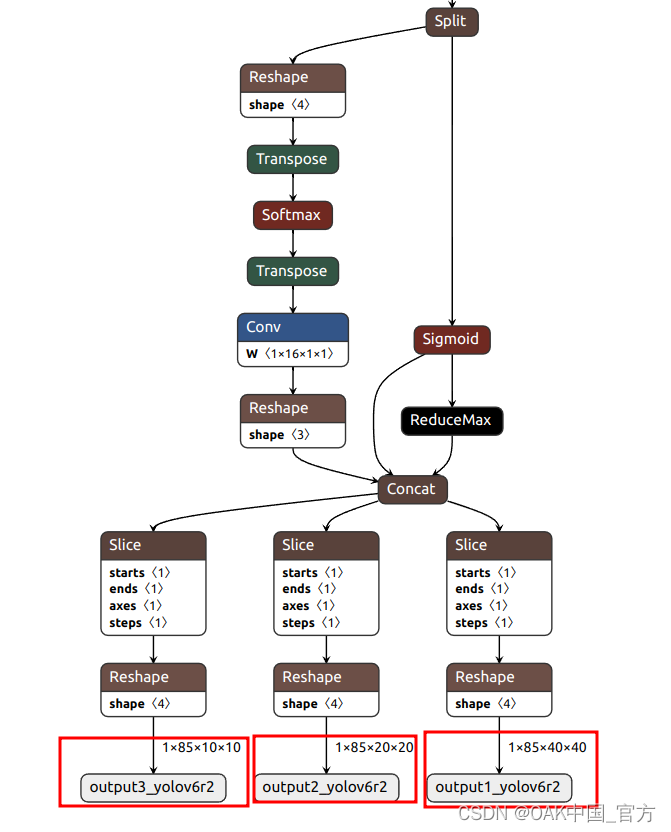
from ultralytics.yolo.utils import LOGGERclass DetectV8(nn.Module):"""YOLOv8 Detect head for detection models"""dynamic = False # force grid reconstructionexport = False # export modeshape = Noneanchors = torch.empty(0) # initstrides = torch.empty(0) # initdef __init__(self, old_detect):super().__init__()self.nc = old_detect.nc # number of classesself.nl = old_detect.nl # number of detection layersself.reg_max = (old_detect.reg_max) # DFL channels (ch[0] // 16 to scale 4/8/12/16/20 for n/s/m/l/x)self.no = old_detect.no # number of outputs per anchorself.stride = old_detect.stride # strides computed during buildself.cv2 = old_detect.cv2self.cv3 = old_detect.cv3self.dfl = old_detect.dflself.f = old_detect.fself.i = old_detect.idef forward(self, x):shape = x[0].shape # BCHWfor i in range(self.nl):x[i] = torch.cat((self.cv2[i](x[i]), self.cv3[i](x[i])), 1)box, cls = torch.cat([xi.view(shape[0], self.no, -1) for xi in x], 2).split((self.reg_max * 4, self.nc), 1)box = self.dfl(box)cls_output = cls.sigmoid()# Get the maxconf, _ = cls_output.max(1, keepdim=True)# Concaty = torch.cat([box, conf, cls_output], axis=1)# Split to 3 channelsoutputs = []start, end = 0, 0for i, xi in enumerate(x):end += xi.shape[-2] * xi.shape[-1]outputs.append(y[:, :, start:end].view(xi.shape[0], -1, xi.shape[-2], xi.shape[-1]))start += xi.shape[-2] * xi.shape[-1]return outputsdef bias_init(self):# Initialize Detect() biases, WARNING: requires stride availabilitym = self # self.model[-1] # Detect() modulefor a, b, s in zip(m.cv2, m.cv3, m.stride): # froma[-1].bias.data[:] = 1.0 # boxb[-1].bias.data[: m.nc] = math.log(5 / m.nc / (640 / s) ** 2) # cls (.01 objects, 80 classes, 640 img)if __name__ == "__main__":parser = argparse.ArgumentParser(formatter_class=argparse.ArgumentDefaultsHelpFormatter)parser.add_argument("-w", "--weights", type=Path, default="./yolov8s.pt", help="weights path")parser.add_argument("-imgsz","--img-size",nargs="+",type=int,default=[640, 640],help="image size",) # height, widthparser.add_argument("--opset", type=int, default=12, help="opset version")args = parser.parse_args()args.img_size *= 2 if len(args.img_size) == 1 else 1 # expandLOGGER.info(args)t = time.time()# Check devicedevice = torch.device("cpu")# Load PyTorch modelmodel = attempt_load_weights(str(args.weights), device=device, inplace=True, fuse=True) # load FP32 modellabels = (model.module.names if hasattr(model, "module") else model.names) # get class nameslabels = labels if isinstance(labels, list) else list(labels.values())# check num classes and labelsassert model.nc == len(labels), f"Model class count {model.nc} != len(names) {len(labels)}"# Replace with the custom Detection Headif isinstance(model.model[-1], (Detect)):model.model[-1] = DetectV8(model.model[-1])num_branches = model.model[-1].nl# Inputimg = torch.zeros(1, 3, *args.img_size).to(device) # image size(1,3,320,192) iDetection# Update modelmodel.eval()# ONNX exporttry:LOGGER.info("\nStarting to export ONNX...")output_list = [f"output{i+1}_yolov6r2" for i in range(num_branches)]export_file = args.weights.with_suffix(".onnx") # filenametorch.onnx.export(model,img,export_file,verbose=False,opset_version=args.opset,training=torch.onnx.TrainingMode.EVAL,do_constant_folding=True,input_names=["images"],output_names=output_list,dynamic_axes=None,)# Checksonnx_model = onnx.load(export_file) # load onnx modelonnx.checker.check_model(onnx_model) # check onnx modeltry:import onnxsimLOGGER.info("\nStarting to simplify ONNX...")onnx_model, check = onnxsim.simplify(onnx_model)assert check, "assert check failed"except Exception as e:LOGGER.warning(f"Simplifier failure: {e}")LOGGER.info(f"ONNX export success, saved as {export_file}")except Exception as e:LOGGER.error(f"ONNX export failure: {e}")export_json = export_file.with_suffix(".json")export_json.with_suffix(".json").write_text(json.dumps({"anchors": [],"anchor_masks": {},"coordinates": 4,"labels": labels,"num_classes": model.nc,},indent=4,))LOGGER.info("Labels data export success, saved as %s" % export_json)# OpenVINO exportprint("\nStarting to export OpenVINO...")export_dir = Path(str(export_file).replace(".onnx", "_openvino"))OpenVINO_cmd = ("mo --input_model %s --output_dir %s --data_type FP16 --scale 255 --reverse_input_channel --output '%s' "% (export_file, export_dir, ",".join(output_list)))try:subprocess.check_output(OpenVINO_cmd, shell=True)LOGGER.info(f"OpenVINO export success, saved as {export_dir}")except Exception as e:LOGGER.warning(f"OpenVINO export failure: {e}")LOGGER.info("\nBy the way, you can try to export OpenVINO use:")LOGGER.info("\n%s" % OpenVINO_cmd)# OAK Blob exportLOGGER.info("\nThen you can try to export blob use:")export_xml = export_dir / export_file.with_suffix(".xml")export_blob = export_dir / export_file.with_suffix(".blob")blob_cmd = ("compile_tool -m %s -ip U8 -d MYRIAD -VPU_NUMBER_OF_SHAVES 6 -VPU_NUMBER_OF_CMX_SLICES 6 -o %s"% (export_xml, export_blob))LOGGER.info("\n%s" % blob_cmd)# FinishLOGGER.info("\nExport complete (%.2fs)" % (time.time() - t))可以使用 Netron 查看模型结构:
▌转换
openvino 本地转换
onnx -> openvino
mo 是 openvino_dev 2022.1 中脚本,
安装命令为
pip install openvino-dev
mo --input_model yolov8n.onnx --scale 255 --reverse_input_channel
openvino -> blob
<path>/compile_tool -m yolov8n.xml \
-ip U8 -d MYRIAD \
-VPU_NUMBER_OF_SHAVES 6 \
-VPU_NUMBER_OF_CMX_SLICES 6
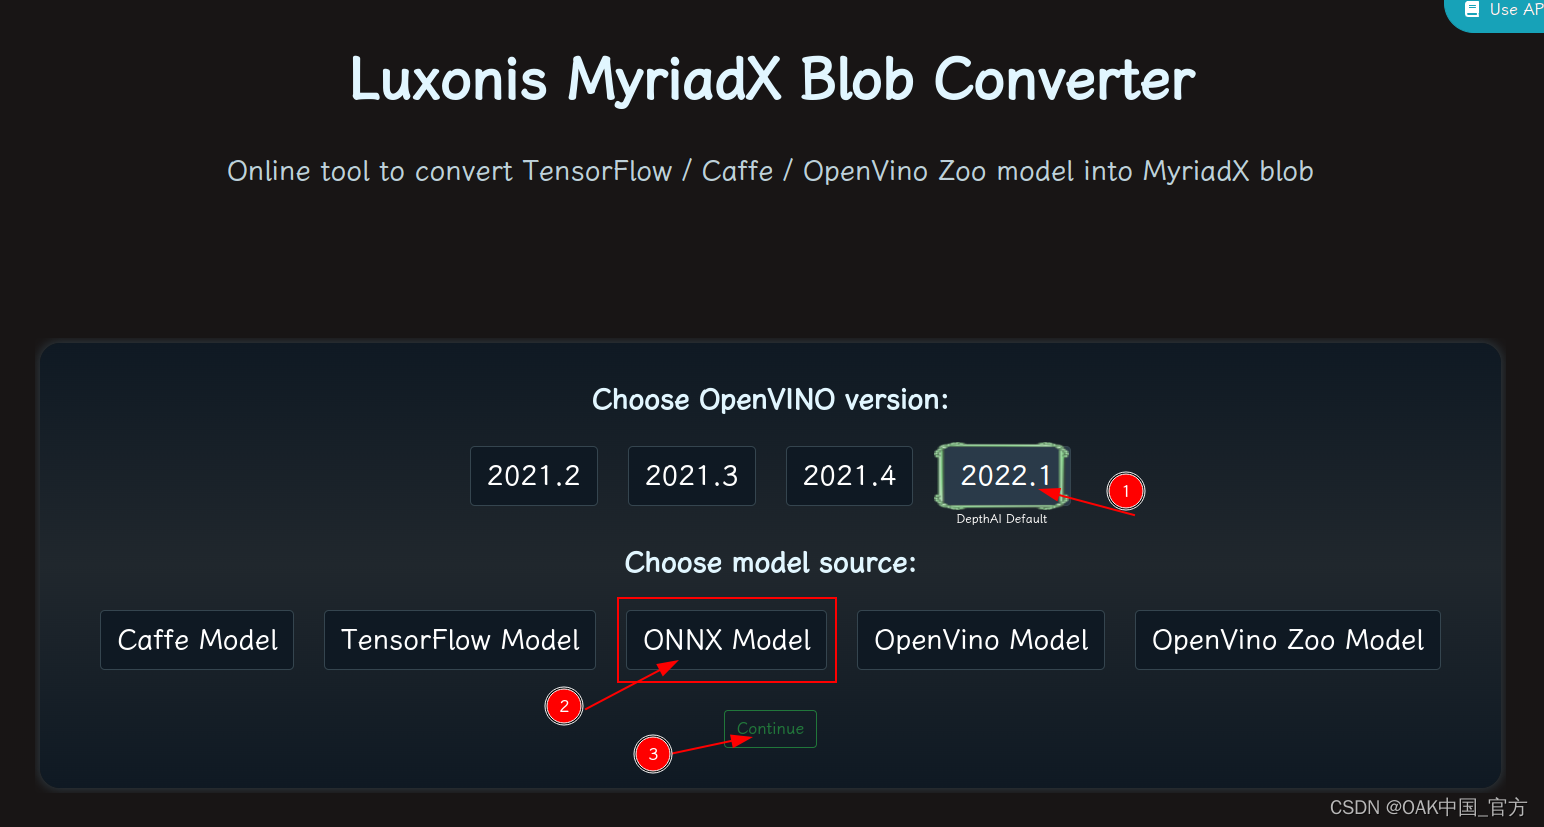
在线转换
blobconvert 网页 http://blobconverter.luxonis.com/
- 进入网页,按下图指示操作:
- 修改参数,转换模型:
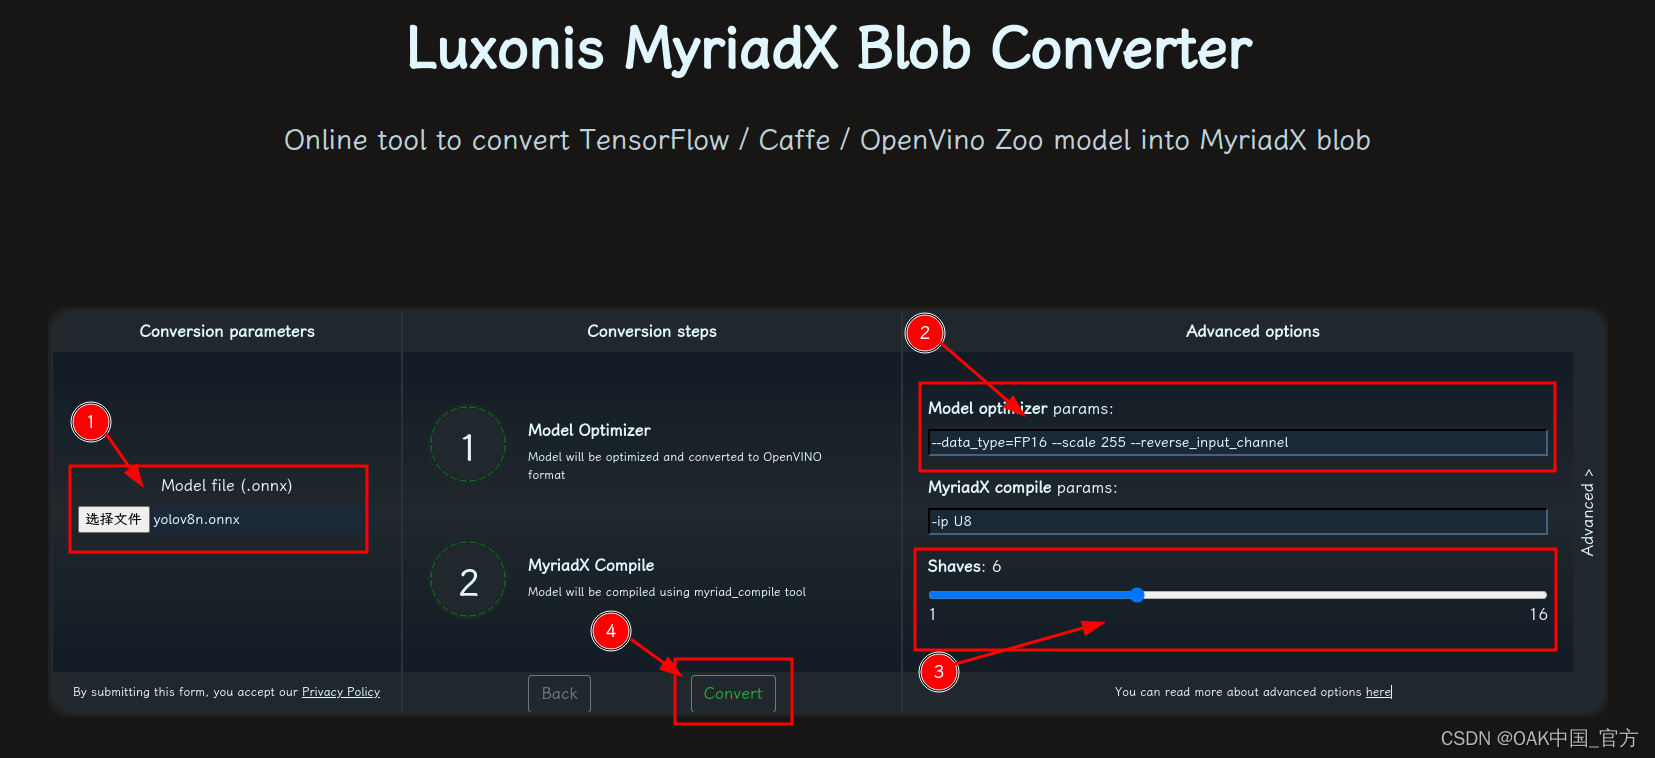
- 选择 onnx 模型
- 修改
optimizer_params为--data_type=FP16 --scale 255 --reverse_input_channel - 修改
shaves为6 - 转换
blobconverter python 代码
blobconverter.from_onnx("yolov8n.onnx", optimizer_params=["--scale 255","--reverse_input_channel",],shaves=6,)
blobconvert cli
blobconverter --onnx yolov8n.onnx -sh 6 -o . --optimizer-params "scale=255 --reverse_input_channel"
▌DepthAI 示例
正确解码需要可配置的网络相关参数:
- setNumClasses - YOLO 检测类别的数量
- setIouThreshold - iou 阈值
- setConfidenceThreshold - 置信度阈值,低于该阈值的对象将被过滤掉
import cv2
import depthai as dai
import numpy as npmodel = dai.OpenVINO.Blob("yolov8n.blob")
dim = model.networkInputs.get("images").dims
W, H = dim[:2]
labelMap = [# "class_1","class_2","...""class_%s"%i for i in range(80)
]# Create pipeline
pipeline = dai.Pipeline()# Define sources and outputs
camRgb = pipeline.create(dai.node.ColorCamera)
detectionNetwork = pipeline.create(dai.node.YoloDetectionNetwork)
xoutRgb = pipeline.create(dai.node.XLinkOut)
nnOut = pipeline.create(dai.node.XLinkOut)xoutRgb.setStreamName("rgb")
nnOut.setStreamName("nn")# Properties
camRgb.setPreviewSize(W, H)
camRgb.setResolution(dai.ColorCameraProperties.SensorResolution.THE_1080_P)
camRgb.setInterleaved(False)
camRgb.setColorOrder(dai.ColorCameraProperties.ColorOrder.BGR)
camRgb.setFps(40)# Network specific settings
detectionNetwork.setBlob(model)
detectionNetwork.setConfidenceThreshold(0.5)
detectionNetwork.setNumClasses(80)
detectionNetwork.setCoordinateSize(4)
detectionNetwork.setAnchors([])
detectionNetwork.setAnchorMasks({})
detectionNetwork.setIouThreshold(0.5)# Linking
camRgb.preview.link(detectionNetwork.input)
camRgb.preview.link(xoutRgb.input)
detectionNetwork.out.link(nnOut.input)# Connect to device and start pipeline
with dai.Device(pipeline) as device:# Output queues will be used to get the rgb frames and nn data from the outputs defined aboveqRgb = device.getOutputQueue(name="rgb", maxSize=4, blocking=False)qDet = device.getOutputQueue(name="nn", maxSize=4, blocking=False)frame = Nonedetections = []color2 = (255, 255, 255)# nn data, being the bounding box locations, are in <0..1> range - they need to be normalized with frame width/heightdef frameNorm(frame, bbox):normVals = np.full(len(bbox), frame.shape[0])normVals[::2] = frame.shape[1]return (np.clip(np.array(bbox), 0, 1) * normVals).astype(int)def displayFrame(name, frame):color = (255, 0, 0)for detection in detections:bbox = frameNorm(frame, (detection.xmin, detection.ymin, detection.xmax, detection.ymax))cv2.putText(frame, labelMap[detection.label], (bbox[0] + 10, bbox[1] + 20), cv2.FONT_HERSHEY_TRIPLEX, 0.5, 255)cv2.putText(frame, f"{int(detection.confidence * 100)}%", (bbox[0] + 10, bbox[1] + 40), cv2.FONT_HERSHEY_TRIPLEX, 0.5, 255)cv2.rectangle(frame, (bbox[0], bbox[1]), (bbox[2], bbox[3]), color, 2)# Show the framecv2.imshow(name, frame)while True:inRgb = qRgb.tryGet()inDet = qDet.tryGet()if inRgb is not None:frame = inRgb.getCvFrame()if inDet is not None:detections = inDet.detectionsif frame is not None:displayFrame("rgb", frame)if cv2.waitKey(1) == ord('q'):break
▌参考资料
https://www.oakchina.cn/2023/02/24/yolov8-blob/
https://docs.oakchina.cn/en/latest/
https://www.oakchina.cn/selection-guide/
OAK中国
| OpenCV AI Kit在中国区的官方代理商和技术服务商
| 追踪AI技术和产品新动态
戳「+关注」获取最新资讯↗↗
相关文章:
OAK相机如何将yoloV8模型转换成blob格式?
编辑:OAK中国 首发:oakchina.cn 喜欢的话,请多多👍⭐️✍ 内容可能会不定期更新,官网内容都是最新的,请查看首发地址链接。 ▌前言 Hello,大家好,这里是OAK中国,我是助手…...
Python解题 - CSDN周赛第32期 - 运输石油(三维背包)
上期周赛因为最后一题出现bug,再加上都是经典的模板题,问哥就懒得写题解了。 本期也是有两道考过的题目,不过最后一题因为考到了背包问题的特殊类型,还是值得拿出来记个笔记。 第一题:传奇霸业 传奇霸业,是…...
JVM - G1垃圾收集器深入剖析
1、G1收集器概述 HotSpot团队一直努力朝着高效收集、减少停顿(STW: Stop The World)的方向努力,也贡献了从串行Serial收集器、到并行收集器Parallerl收集器,再到CMS并发收集器,乃至如今的G1在内的一系列优秀的垃圾收集器。 G…...

角度制与弧度制的相互转换np.deg2radnp.rad2deg
【小白从小学Python、C、Java】【计算机等级考试500强双证书】【Python-数据分析】角度制与弧度制的相互转换np.deg2radnp.rad2deg选择题以下关于python代码表述错误的一项是?import numpy as npprint("【执行】np.rad2deg(np.pi)")print(np.rad2deg(np.pi))print(&…...
)
【SAP Abap】X-DOC:SAP ABAP 语法更新之一(Open SQL新增特性)
SAP ABAP 语法更新之一(Open SQL新增特性)1、前言2、演示1、前言 自从 SAP 推出 SAP ON HANA,与之相随的 AS ABAP NW 7.40 版本以后,ABAP 语法也有了较多的更新,本篇对 Open Sql的语法更新部分做一个DEMO演示。 NW 7…...

【改进灰狼优化算法】改进收敛因子和比例权重的灰狼优化算法【期刊论文完美复现】(Matlab代码实现)
👨🎓个人主页:研学社的博客💥💥💞💞欢迎来到本博客❤️❤️💥💥🏆博主优势:🌞🌞🌞博客内容尽量做到思维缜密…...

Linux C代码获取线程ID
Linux C代码获取线程ID gettid可以获取线程id,但是通过man gettid可以看到下面这两句 也就是说glibc没有为这个gettid封装系统调用,需要使用syscall。 #define _GNU_SOURCE#include <unistd.h>#include <sys/syscall.h>#include <sys/types.h>pi…...
基本密码技术
AESAES取代DES,是一种对称加密技术,分为AES-128/192/256, 其分组长度固定为128b,若最后一个分组长度不够,需要补全至128b长度。所支持的秘钥长度分别为128b/192b/256b.分组密码模式AES是对明文进行分组之后逐块进行加密࿰…...
【力扣周赛#334】6369. 左右元素和的差值 + 6368. 找出字符串的可整除数组 + 6367. 求出最多标记下标
目录 6369. 左右元素和的差值 - 前缀后缀和 ac 6368. 找出字符串的可整除数组 - 操作余数ac 6367. 求出最多标记下标 - 二分答案 贪心 6369. 左右元素和的差值 - 前缀后缀和 ac class Solution {public int[] leftRigthDifference(int[] nums) {int nnums.length;int[] re…...
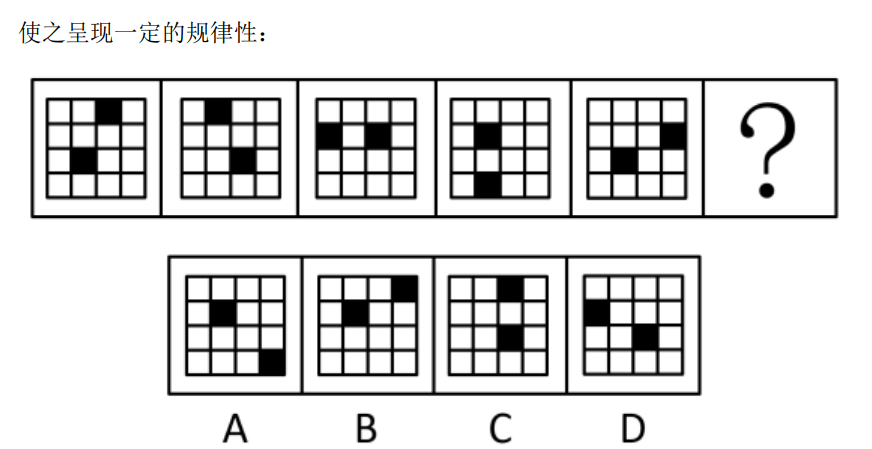
行测-判断推理-图形推理-位置规律-平移
位置平移,选D空白每次顺时针移动一格,黑色圆每次逆时针移动2格选C两个黑色⚪,每次顺时针移动2格白色⚪,先到对角位置,再顺时针移动一格选B三角形的底,顺时针移动三角形的顶点,在正方形的内部顺时…...
)
数据库基础知识(一)
目录 什么是数据库 表,列,行 主键 什么是SQL 什么是数据库 数据库(database):保存有组织的数据的容器(通常是一个文件或一组文件)。 数据库软件(DMBS):又名数据库管理系统。数据库是通过数据库软件创建和操纵的容器。因为你并…...
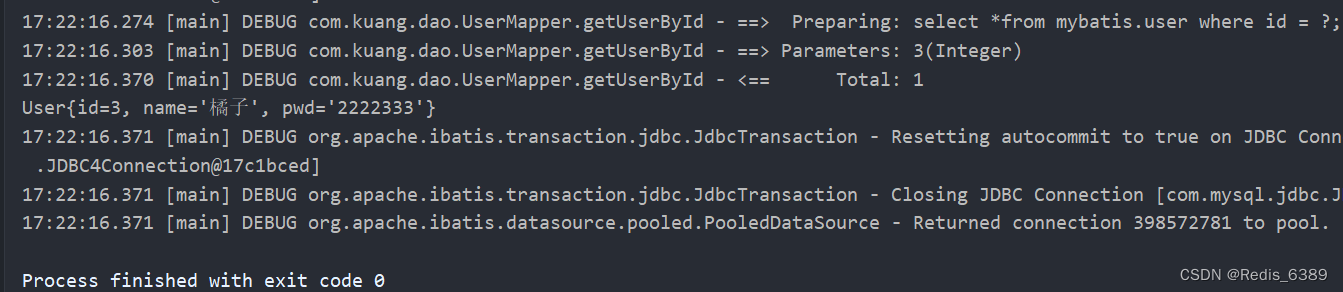
MyBatis 的工作原理解析
文章目录前言一、mybatis工作原理1.1 流程图1.2 步骤解析1.3 代码实现前言 本文记录 Mybatis 的工作原理,做到知识梳理总结的作用。 一、mybatis工作原理 Mybatis 的总体工作原理流程图如下图所示 1.1 流程图 1.2 步骤解析 Mybatis 框架在工作时大致经过8个步骤…...
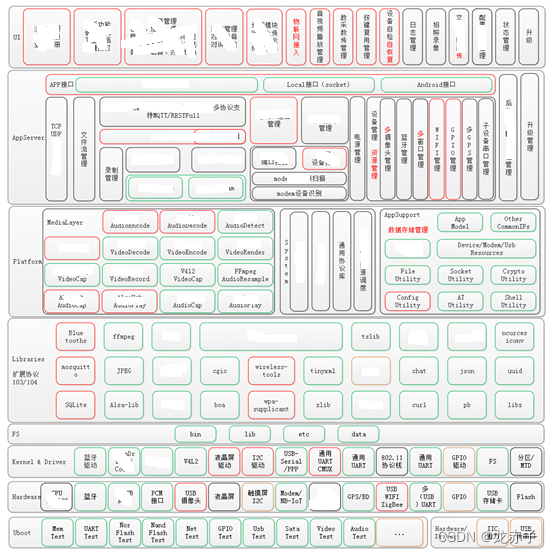
终端软件架构说
目录 零:前言 一,基于服务的架构 二,基于多进程多线程的架构 三,以数据为中心的架构 四,类Android的分层架构设计 五,总结 零:前言 谈到架构,可能大家的第一感觉是信息系统的…...
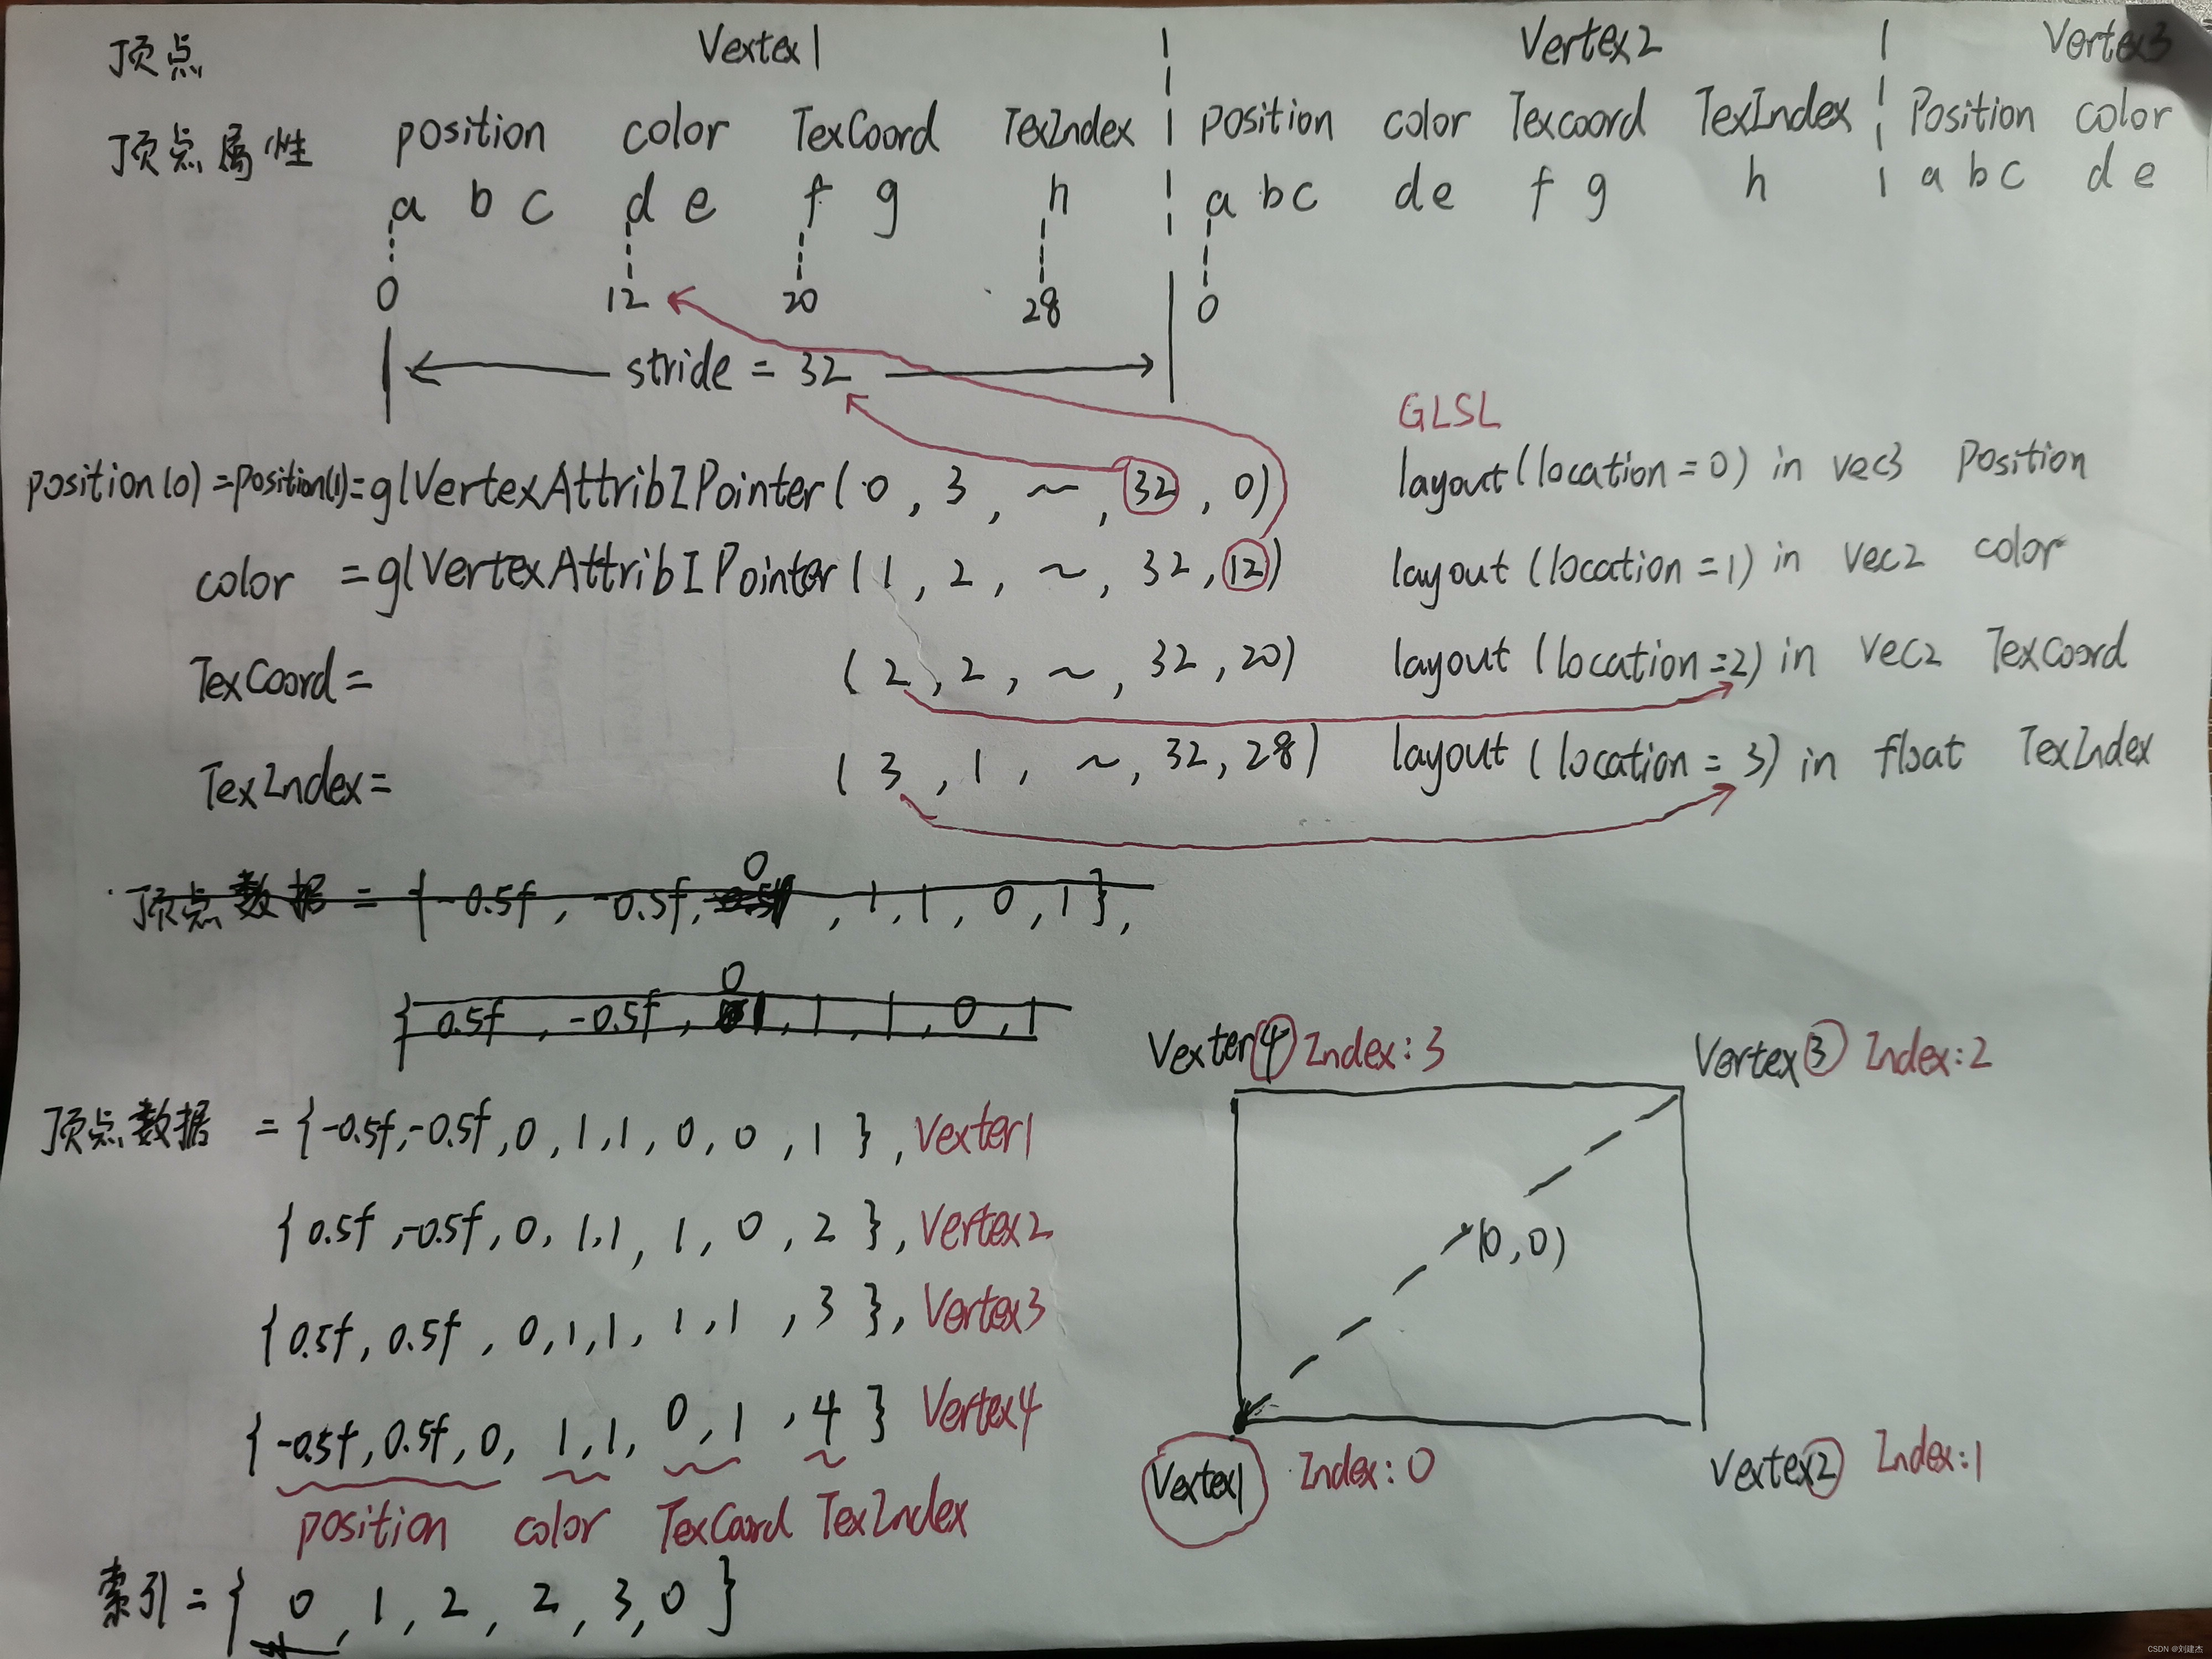
LearnOpenGL-入门-你好,三角形
本人刚学OpenGL不久且自学,文中定有代码、术语等错误,欢迎指正 我写的项目地址:https://github.com/liujianjie/LearnOpenGLProject LearnOpenGL中文官网:https://learnopengl-cn.github.io/ 文章目录图形渲染管线基本介绍着色器…...

SOEM 源码解析 ecx_init_redundant
/* Initialise lib in redundant NIC mode* 在冗余网卡模式下初始化lib库* param[in] context context struct* 上下文结构体* param[in] redport pointer to redport, redundant port data* 指向冗余端口的指针ÿ…...
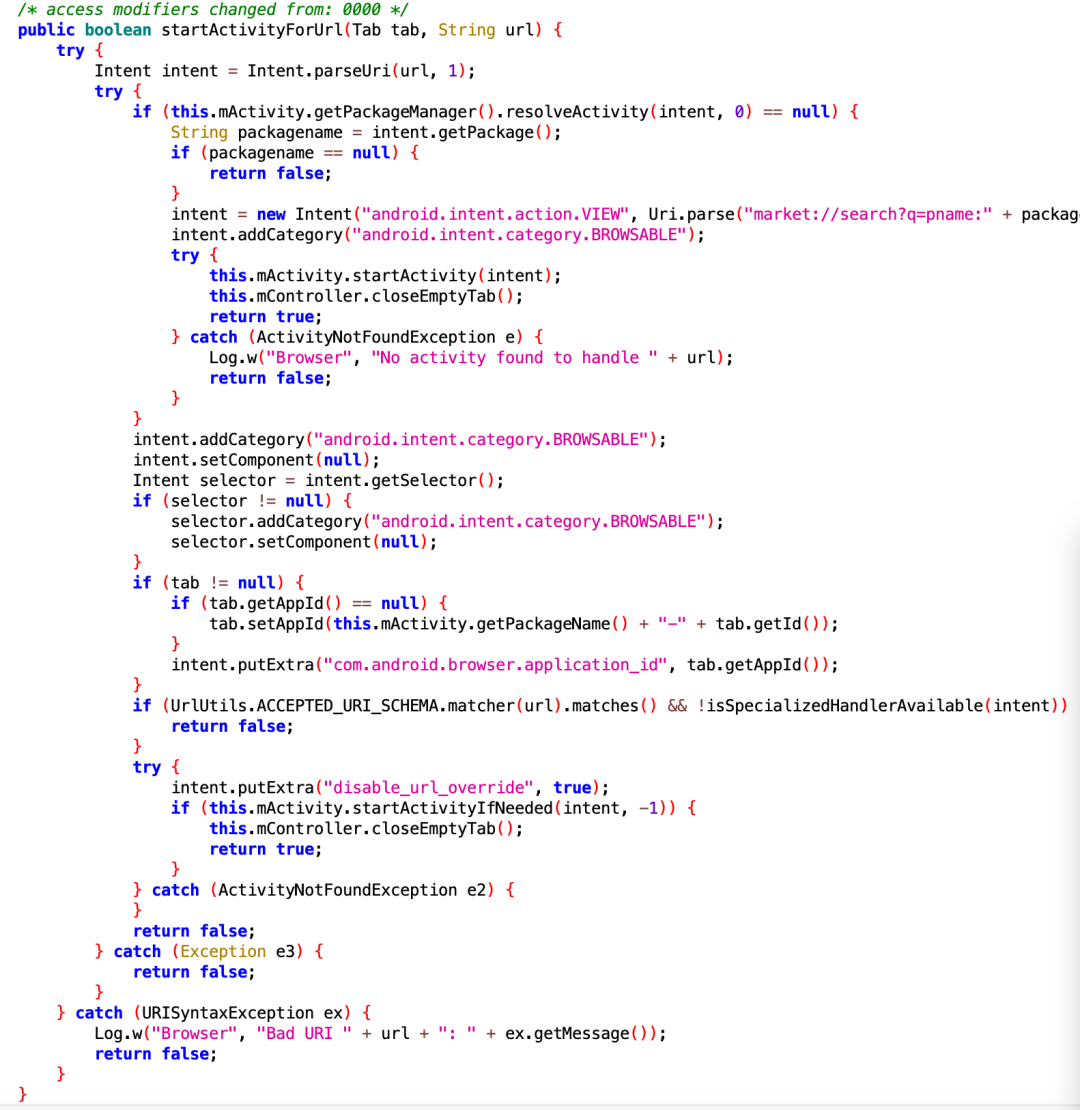
网页唤起 APP中Activity的实现原理
疑问的开端大家有没有想过一个问题:在浏览器里打开某个网页,网页上有一个按钮点击可以唤起App。这样的效果是怎么实现的呢?浏览器是一个app;为什么一个app可以调起其他app的页面?说到跨app的页面调用,大家是…...
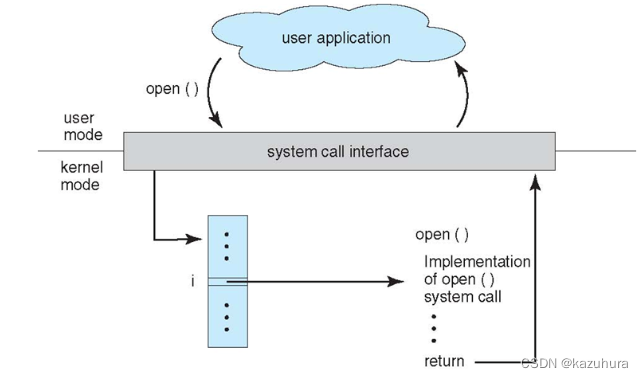
【操作系统】概述
基本特征 1. 并发 并发是指宏观上在一段时间内能同时运行多个程序,而并行则指同一时刻能运行多个指令。 并行需要硬件支持,如多流水线、多核处理器或者分布式计算系统。 操作系统通过引入进程和线程,使得程序能够并发运行 2. 共享 共享…...
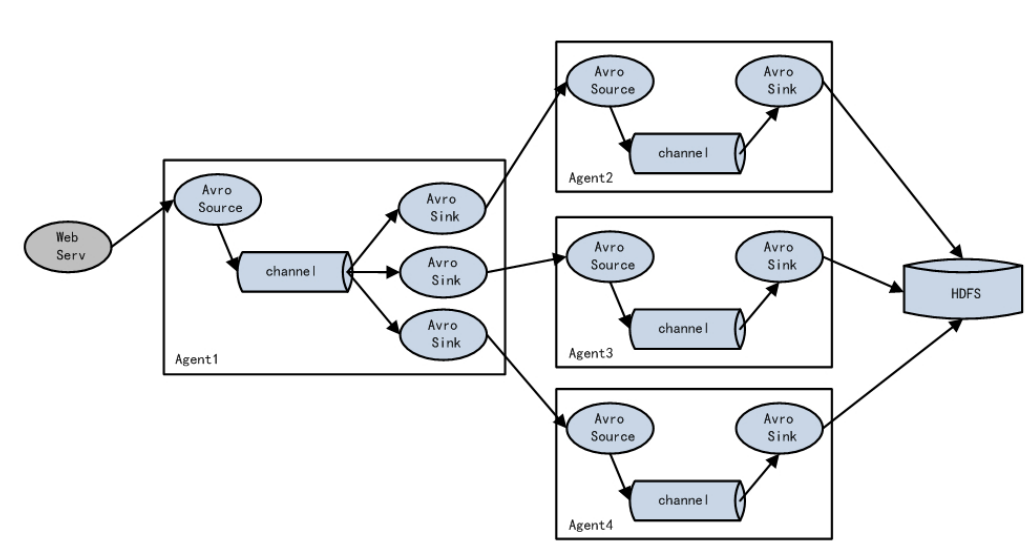
Flume三种组件的选择对比
文章目录1.source2.channel3.sink1.source Source: 数据源:通过source组件可以指定让Flume读取哪里的数据,然后将数据传递给后面的 channel Flume内置支持读取很多种数据源,基于文件、基于目录、基于TCP\UDP端口、基于HTTP、Kafka的 等等、当然了&#x…...

响应性基础API
一.什么是proxy和懒代理?什么是proxy?proxy对象是用于定义基本操作的自定义行为(如:属性查找,赋值,枚举,函数调用等等)。什么是懒代理?懒代理:在初始化的时候不会进行全部代理,而是…...

剑指 Offer 25. 合并两个排序的链表
剑指 Offer 25. 合并两个排序的链表 难度:easy\color{Green}{easy}easy 题目描述 输入两个递增排序的链表,合并这两个链表并使新链表中的节点仍然是递增排序的。 示例1: 输入:1->2->4, 1->3->4 输出:1…...

AI Agent技能生成器:从零创建精准高效的SKILL.md文件
1. 项目概述:一个为AI Agent生成“技能说明书”的元技能如果你和我一样,经常在Claude Code、Cursor或者Codex这类AI编程助手工具里折腾,想让它帮你处理一些特定的、重复性的开发任务,那你肯定对“技能”(Skill…...

Ctool:一站式解决开发者的日常编码烦恼
Ctool:一站式解决开发者的日常编码烦恼 【免费下载链接】Ctool 程序开发常用工具 chrome / edge / firefox / utools / windows / linux / mac 项目地址: https://gitcode.com/gh_mirrors/ct/Ctool 在日常开发工作中,我们常常需要处理各种编码转换…...
下载分享)
上古卷轴5天际整合包下载最新全热门MOD整合(画质+人物+功能+场景全美化)下载分享
一、整合包基础概况 新手向懒人专属整合资源,适配电脑Windows系统。整合包集成多款热门优质MOD,无需玩家单独下载模组,整合包整体兼容性强,适配主流家用电脑,官方提前做好模组适配优化,规避多数模组冲突问…...

从ADI收购LTC看电源管理趋势:软件定义电源与能量收集技术解析
1. 从一笔天价收购案,看电源管理技术的未来十年2016年,模拟芯片行业发生了一场地震级的并购:模拟巨头亚德诺半导体(Analog Devices Inc., ADI)以148亿美元的天价,收购了以高性能模拟芯片闻名的凌力尔特&…...

FPGA新手避坑指南:用SPWM驱动电机时,你的死区时间加对了吗?
FPGA电机驱动实战:SPWM死区时间设计的核心要点与避坑策略 在数字电源和电机控制领域,FPGA因其并行处理能力和精确时序控制而备受青睐。许多工程师在成功实现SPWM信号生成后,往往忽略了驱动电路中最致命的一环——死区时间设置。我曾亲眼见证过…...
)
DIY红外热像仪进阶:手把手教你用C语言实现7种伪彩色编码(附完整代码)
DIY红外热像仪进阶:手把手教你用C语言实现7种伪彩色编码(附完整代码) 当32x24的温度矩阵在屏幕上呈现为单调的灰度图像时,你是否想过如何让它焕发生机?伪彩色编码技术正是打开这扇门的钥匙。本文将带你深入探索七种经…...

2026 年 Redis 面试题全解析:原理 + 实战 + 高频考点
Redis 高频面试题全解析(2026 最新版) Redis 作为后端开发高并发、高可用架构的核心组件,是面试中必问的核心考点。本文从基础入门、核心原理、高并发实战、高可用架构、进阶运维五大模块,整理大厂高频面试题与标准答案ÿ…...

终极免费跨平台方案:3步将知网CAJ论文转换为可编辑PDF的完整指南
终极免费跨平台方案:3步将知网CAJ论文转换为可编辑PDF的完整指南 【免费下载链接】caj2pdf Convert CAJ (China Academic Journals) files to PDF. 转换中国知网 CAJ 格式文献为 PDF。佛系转换,成功与否,皆是玄学。 项目地址: https://gitc…...
)
别再只用VLC看片了!手把手教你把它变成家庭流媒体服务器(支持UDP/TCP)
解锁VLC的隐藏技能:打造家庭专属流媒体系统的完整指南 你是否曾为在不同设备间切换观看本地视频而烦恼?每次都要用U盘拷贝或者忍受云盘缓慢的上传下载速度?其实,你电脑上那个熟悉的橙色锥形图标——VLC播放器,远比你想…...

League Akari:3步打造你的英雄联盟智能游戏助手,告别繁琐操作
League Akari:3步打造你的英雄联盟智能游戏助手,告别繁琐操作 【免费下载链接】League-Toolkit An all-in-one toolkit for LeagueClient. Gathering power 🚀. 项目地址: https://gitcode.com/gh_mirrors/le/League-Toolkit League A…...