【Pytorch】Visualization of Feature Maps(3)

学习参考来自:
- Image Style Transform–关于图像风格迁移的介绍
- github:https://github.com/wmn7/ML_Practice/tree/master/2019_06_03
文章目录
- 风格迁移
风格迁移
风格迁移出处:
《A Neural Algorithm of Artistic Style》(arXiv-2015)


风格迁移的实现

让 Random Image 在内容上可以接近 Content Image,在风格上可以接近 Style Image,当然, Random Image 可以初始化为 Content Image
导入基本库,数据读取
import torch
import torch.nn as nn
import torch.nn.functional as F
import torch.optim as optimfrom PIL import Image
import matplotlib.pyplot as pltimport torchvision.transforms as transforms
import torchvision.models as modelsimport numpy as np
import copy
import osdevice = torch.device("cuda" if torch.cuda.is_available() else "cpu")def image_loader(image_name, imsize):loader = transforms.Compose([transforms.Resize(imsize),  # scale imagestransforms.ToTensor()])image = Image.open(image_name).convert("RGB")image = loader(image).unsqueeze(0)return image.to(device, torch.float)def image_util(img_size=512, style_img="./1.jpg", content_img="./2.jpg"):"the size of style_img and contend_img should be same"imsize = img_size if torch.cuda.is_available() else 128  # use small size if no gpustyle_img = image_loader(style_img, imsize)content_img = image_loader(content_img, imsize)print("Style Image Size:{}".format(style_img.size()))print("Content Image Size:{}".format(content_img.size()))assert style_img.size() == content_img.size(), "we need to import style and content images of the same size"return style_img, content_img
定义内容损失

"content loss"
class ContentLoss(nn.Module):def __init__(self, target):super(ContentLoss, self).__init__()self.target = target.detach()def forward(self, input):self.loss = F.mse_loss(input, self.target)return input
定义风格损失
def gram_matrix(input):a, b, c, d = input.size() # N, C,features = input.view(a * b, c * d)G = torch.mm(features, features.t())return G.div(a * b * c * d)

Gram Matrix 最后输出大小只和 filter 的个数有关(channels),上面的例子输出为 3x3
Gram Matrix 可以表示出特征出现的关系(特征 f1、f2、f3 之间的关系)。
我们可以通过计算 Gram Matrix 的差,来计算两张图片风格上的差距

class StyleLoss(nn.Module):def __init__(self, target_feature):# we "detach" the target content from the tree used to dynamically# compute the gradient: this is stated value, not a variable .# Otherwise the forward method of the criterion will throw an errorsuper(StyleLoss, self).__init__()self.target = gram_matrix(target_feature).detach()def forward(self, input):G = gram_matrix(input)self.loss = F.mse_loss(G, self.target)return input
写好前处理减均值,除方差
"based on VGG-16"
"put the normalization to the first layer"
class  Normalization(nn.Module):def __init__(self, mean, std):super(Normalization, self).__init__()# view the mean and std to make them [C,1,1] so that they can directly work with image Tensor of shape [B,C,H,W]self.mean = mean.view(-1, 1, 1)  # [3] -> [3, 1, 1]self.std = std.view(-1, 1, 1)def forward(self, img):return (img - self.mean) / self.std
定义网络,引入 loss
"modify to a style network"
def get_style_model_and_losses(cnn, normalization_mean, normalization_std,style_img, content_img,content_layers,style_layers):cnn = copy.deepcopy(cnn)# normalization modulenormalization = Normalization(normalization_mean, normalization_std).to(device)# just in order to have an iterable acess to or list of content / style# lossescontent_losses = []style_losses = []# assuming that cnn is a nn.Sequantial, so we make a new nn.Sequential to put# in modules that are supposed to be activated sequantiallymodel = nn.Sequential(normalization)i = 0  # increment every time we see a convfor layer in cnn.children():if isinstance(layer, nn.Conv2d):i += 1name = "conv_{}".format(i)elif isinstance(layer, nn.ReLU):name = "relu_{}".format(i)layer = nn.ReLU(inplace=False)elif isinstance(layer, nn.MaxPool2d):name = "pool_{}".format(i)elif isinstance(layer, nn.BatchNorm2d):name = "bn_{}".format(i)else:raise RuntimeError("Unrecognized layer: {}".format(layer.__class__.__name__))model.add_module(name, layer)if name in content_layers:# add content losstarget = model(content_img).detach()content_loss = ContentLoss(target)model.add_module("content_loss_{}".format(i), content_loss)content_losses.append(content_loss)if name in style_layers:# add style losstarget_feature = model(style_img).detach()style_loss = StyleLoss(target_feature)model.add_module("style_loss_{}".format(i), style_loss)style_losses.append(style_loss)# now we trim off the layers afater the last content and style lossesfor i in range(len(model)-1, -1, -1):if isinstance(model[i], ContentLoss) or isinstance(model[i], StyleLoss):breakmodel = model[:(i+1)]return model, style_losses, content_lossesdef get_input_optimizer(input_img):optimizer = optim.LBFGS([input_img.requires_grad_()])return optimizerdef run_style_transfer(cnn, normalization_mean, normalization_std, content_img, style_img, input_img, content_layers,style_layers, num_steps=50, style_weight=1000000, content_weight=1):print('Building the style transfer model..')model, style_losses, content_losses = get_style_model_and_losses(cnn, normalization_mean, normalization_std,style_img, content_img, content_layers,style_layers)optimizer = get_input_optimizer(input_img) # 网络不变,反向传播优化的是输入图片print('Optimizing..')run = [0]while run[0] <= num_steps:def closure():# correct the values of updated input imageinput_img.data.clamp_(0, 1)optimizer.zero_grad()model(input_img)  # 前向传播style_score = 0content_score = 0for sl in style_losses:style_score += sl.lossfor cl in content_losses:content_score += cl.lossstyle_score *= style_weightcontent_score *= content_weight# loss为style loss 和 content loss的和loss = style_score + content_scoreloss.backward()  # 反向传播# 打印loss的变化情况run[0] += 1if run[0] % 50 == 0:print("run {}:".format(run))print('Style Loss : {:4f} Content Loss: {:4f}'.format(style_score.item(), content_score.item()))print()return style_score + content_score# 进行参数优化optimizer.step(closure)# a last correction...# 数值范围的纠正, 使其范围在0-1之间input_img.data.clamp_(0, 1)return input_img
搭建完成,开始训练,仅优化更新 input image(get_input_optimizer),网络不更新
# 加载content image和style image
style_img,content_img = image_util(img_size=270, style_img="./style9.jpg", content_img="./content.jpg")  # [1, 3, 270, 270]
# input image使用content image
input_img = content_img.clone()
# 加载预训练好的模型
cnn = models.vgg19(pretrained=True).features.to(device).eval()
# 模型标准化的值
cnn_normalization_mean = torch.tensor([0.485, 0.456, 0.406]).to(device)
cnn_normalization_std = torch.tensor([0.229, 0.224, 0.225]).to(device)
# 定义要计算loss的层
content_layers_default = ['conv_4']
style_layers_default = ['conv_1', 'conv_2', 'conv_3', 'conv_4', 'conv_5']
# 模型进行计算
output = run_style_transfer(cnn, cnn_normalization_mean, cnn_normalization_std,content_img, style_img, input_img,content_layers=content_layers_default,style_layers=style_layers_default,num_steps=300, style_weight=100000, content_weight=1)image = output.cpu().clone()
image = image.squeeze(0)  # ([1, 3, 270, 270] -> [3, 270, 270])
unloader = transforms.ToPILImage()
image = unloader(image)
import cv2
image = cv2.cvtColor(np.asarray(image), cv2.COLOR_RGB2BGR)
cv2.imwrite("t9.jpg", image)
torch.cuda.empty_cache()"""VGG-19
Sequential((0): Conv2d(3, 64, kernel_size=(3, 3), stride=(1, 1), padding=(1, 1))(1): ReLU(inplace=True)(2): Conv2d(64, 64, kernel_size=(3, 3), stride=(1, 1), padding=(1, 1))(3): ReLU(inplace=True)(4): MaxPool2d(kernel_size=2, stride=2, padding=0, dilation=1, ceil_mode=False)(5): Conv2d(64, 128, kernel_size=(3, 3), stride=(1, 1), padding=(1, 1))(6): ReLU(inplace=True)(7): Conv2d(128, 128, kernel_size=(3, 3), stride=(1, 1), padding=(1, 1))(8): ReLU(inplace=True)(9): MaxPool2d(kernel_size=2, stride=2, padding=0, dilation=1, ceil_mode=False)(10): Conv2d(128, 256, kernel_size=(3, 3), stride=(1, 1), padding=(1, 1))(11): ReLU(inplace=True)(12): Conv2d(256, 256, kernel_size=(3, 3), stride=(1, 1), padding=(1, 1))(13): ReLU(inplace=True)(14): Conv2d(256, 256, kernel_size=(3, 3), stride=(1, 1), padding=(1, 1))(15): ReLU(inplace=True)(16): Conv2d(256, 256, kernel_size=(3, 3), stride=(1, 1), padding=(1, 1))(17): ReLU(inplace=True)(18): MaxPool2d(kernel_size=2, stride=2, padding=0, dilation=1, ceil_mode=False)(19): Conv2d(256, 512, kernel_size=(3, 3), stride=(1, 1), padding=(1, 1))(20): ReLU(inplace=True)(21): Conv2d(512, 512, kernel_size=(3, 3), stride=(1, 1), padding=(1, 1))(22): ReLU(inplace=True)(23): Conv2d(512, 512, kernel_size=(3, 3), stride=(1, 1), padding=(1, 1))(24): ReLU(inplace=True)(25): Conv2d(512, 512, kernel_size=(3, 3), stride=(1, 1), padding=(1, 1))(26): ReLU(inplace=True)(27): MaxPool2d(kernel_size=2, stride=2, padding=0, dilation=1, ceil_mode=False)(28): Conv2d(512, 512, kernel_size=(3, 3), stride=(1, 1), padding=(1, 1))(29): ReLU(inplace=True)(30): Conv2d(512, 512, kernel_size=(3, 3), stride=(1, 1), padding=(1, 1))(31): ReLU(inplace=True)(32): Conv2d(512, 512, kernel_size=(3, 3), stride=(1, 1), padding=(1, 1))(33): ReLU(inplace=True)(34): Conv2d(512, 512, kernel_size=(3, 3), stride=(1, 1), padding=(1, 1))(35): ReLU(inplace=True)(36): MaxPool2d(kernel_size=2, stride=2, padding=0, dilation=1, ceil_mode=False)
)
""""""modify name, add loss layer
Sequential((0): Normalization()(conv_1): Conv2d(3, 64, kernel_size=(3, 3), stride=(1, 1), padding=(1, 1))(style_loss_1): StyleLoss()(relu_1): ReLU()(conv_2): Conv2d(64, 64, kernel_size=(3, 3), stride=(1, 1), padding=(1, 1))(style_loss_2): StyleLoss()(relu_2): ReLU()(pool_2): MaxPool2d(kernel_size=2, stride=2, padding=0, dilation=1, ceil_mode=False)(conv_3): Conv2d(64, 128, kernel_size=(3, 3), stride=(1, 1), padding=(1, 1))(style_loss_3): StyleLoss()(relu_3): ReLU()(conv_4): Conv2d(128, 128, kernel_size=(3, 3), stride=(1, 1), padding=(1, 1))(content_loss_4): ContentLoss()(style_loss_4): StyleLoss()(relu_4): ReLU()(pool_4): MaxPool2d(kernel_size=2, stride=2, padding=0, dilation=1, ceil_mode=False)(conv_5): Conv2d(128, 256, kernel_size=(3, 3), stride=(1, 1), padding=(1, 1))(style_loss_5): StyleLoss()(relu_5): ReLU()(conv_6): Conv2d(256, 256, kernel_size=(3, 3), stride=(1, 1), padding=(1, 1))(relu_6): ReLU()(conv_7): Conv2d(256, 256, kernel_size=(3, 3), stride=(1, 1), padding=(1, 1))(relu_7): ReLU()(conv_8): Conv2d(256, 256, kernel_size=(3, 3), stride=(1, 1), padding=(1, 1))(relu_8): ReLU()(pool_8): MaxPool2d(kernel_size=2, stride=2, padding=0, dilation=1, ceil_mode=False)(conv_9): Conv2d(256, 512, kernel_size=(3, 3), stride=(1, 1), padding=(1, 1))(relu_9): ReLU()(conv_10): Conv2d(512, 512, kernel_size=(3, 3), stride=(1, 1), padding=(1, 1))(relu_10): ReLU()(conv_11): Conv2d(512, 512, kernel_size=(3, 3), stride=(1, 1), padding=(1, 1))(relu_11): ReLU()(conv_12): Conv2d(512, 512, kernel_size=(3, 3), stride=(1, 1), padding=(1, 1))(relu_12): ReLU()(pool_12): MaxPool2d(kernel_size=2, stride=2, padding=0, dilation=1, ceil_mode=False)(conv_13): Conv2d(512, 512, kernel_size=(3, 3), stride=(1, 1), padding=(1, 1))(relu_13): ReLU()(conv_14): Conv2d(512, 512, kernel_size=(3, 3), stride=(1, 1), padding=(1, 1))(relu_14): ReLU()(conv_15): Conv2d(512, 512, kernel_size=(3, 3), stride=(1, 1), padding=(1, 1))(relu_15): ReLU()(conv_16): Conv2d(512, 512, kernel_size=(3, 3), stride=(1, 1), padding=(1, 1))(relu_16): ReLU()(pool_16): MaxPool2d(kernel_size=2, stride=2, padding=0, dilation=1, ceil_mode=False)
)
""""""after trim
Sequential((0): Normalization()(conv_1): Conv2d(3, 64, kernel_size=(3, 3), stride=(1, 1), padding=(1, 1))(style_loss_1): StyleLoss()(relu_1): ReLU()(conv_2): Conv2d(64, 64, kernel_size=(3, 3), stride=(1, 1), padding=(1, 1))(style_loss_2): StyleLoss()(relu_2): ReLU()(pool_2): MaxPool2d(kernel_size=2, stride=2, padding=0, dilation=1, ceil_mode=False)(conv_3): Conv2d(64, 128, kernel_size=(3, 3), stride=(1, 1), padding=(1, 1))(style_loss_3): StyleLoss()(relu_3): ReLU()(conv_4): Conv2d(128, 128, kernel_size=(3, 3), stride=(1, 1), padding=(1, 1))(content_loss_4): ContentLoss()(style_loss_4): StyleLoss()(relu_4): ReLU()(pool_4): MaxPool2d(kernel_size=2, stride=2, padding=0, dilation=1, ceil_mode=False)(conv_5): Conv2d(128, 256, kernel_size=(3, 3), stride=(1, 1), padding=(1, 1))(style_loss_5): StyleLoss()
)
"""
原图,花宝叽

不同风格

产生的结果

更直观的展示

相关文章:
【Pytorch】Visualization of Feature Maps(3)
学习参考来自: Image Style Transform–关于图像风格迁移的介绍github:https://github.com/wmn7/ML_Practice/tree/master/2019_06_03 文章目录 风格迁移 风格迁移 风格迁移出处: 《A Neural Algorithm of Artistic Style》(ar…...

人工智能对我们的生活影响
目录 前言 一、人工智能的领域 二、人工智能的应用 三、对人工智能的看法 总结 🌈嗨!我是Filotimo__🌈。很高兴与大家相识,希望我的博客能对你有所帮助。 💡本文由Filotimo__✍️原创,首发于CSDNǴ…...

Mysql存储引擎分类
Mysql存储引擎分类: 在选择存储引擎时,应该根据应用系统的特点选择合适的存储引擎。对于复杂的应用系统,还可以根据实际情况选择多种存储引擎进行组合。 InnoDB: 是Mysql的默认存储引擎,支持事务、外键。如果应用对事务的完整性有…...
基于Python+TensorFlow+Django的交通标志识别系统
欢迎大家点赞、收藏、关注、评论啦 ,由于篇幅有限,只展示了部分核心代码。 文章目录 一项目简介 二、功能三、系统四. 总结 一项目简介 随着交通网络的不断扩展和智能交通系统的发展,交通标志的自动识别变得愈发重要。本项目旨在利用Python编…...

【Java 进阶篇】Jedis:让Java与Redis轻松对话的利器
在现代软件开发中,缓存系统是提高系统性能的常见手段之一,而Redis作为一个高性能的缓存数据库,被广泛应用于各类系统。如果你是Java开发者,那么使用Jedis库可以让你轻松地与Redis进行交互。本文将带你深入了解Jedis的快速入门&…...

【数据分享】我国12.5米分辨率的DEM地形数据(免费获取/地理坐标系)
DEM地形数据是我们在各种研究和设计中经常使用的数据!之前我们分享过500米分辨率的DEM地形数据、90米分辨率的DEM地形数据、30米分辨率的DEM地形数据(均可查看之前的文章获悉详情)。 本次我们为大家带来的是分辨率为12.5m的DEM地形数据&#…...
C++设计模式之策略模式
策略模式 介绍示例示例测试运行结果应用场景优点总结 介绍 策略模式是一种行为设计模式。在策略模式中,可以创建一些独立的类来封装不同的算法,每一个类封装一个具体的算法,每一个封装算法的类叫做策略(Strategy),为了保证这些策…...

spring-webflux的一些概念的理解
Spring5的webflux可以支持高吞吐量,使用相同的资源可以处理更加多的请求,它将会成为未来技术的趋势,但是相对于学习其他的框架相比,它的学习曲线很高,综合了很多现有的技术,即使按照教程学习能编写代码&…...
OpenCV快速入门:特征点检测与匹配
文章目录 前言一、角点检测1.1 角点特征1.1.1 角点特征概念1.1.2 角点的特点1.1.3 关键点绘制代码实现1.1.4 函数解析 1.2 Harris角点检测1.2.1 Harris角点检测原理1.2.2 Harris角点检测公式1.2.3 代码实现1.2.4 函数解析 1.3 Shi-Tomasi角点检测1.3.1 Shi-Tomasi角点检测原理1…...

旋转的数组
分享今天看到的一个题目,不同思路解法 题目 思路1:时间复杂度0(N*k) void rotate(int *a,int N,int k)//N为数组元素个数 { while(k--) { int tema[N-1]; for(int rightN-2;right>0;right--) { a[right1]a[right]; } a[0]tem; …...

Hive VS Spark
spark是一个计算引擎,hive是一个存储框架。他们之间的关系就像发动机组与加油站之间的关系。 类似于spark的计算引擎还有很多,像mapreduce,flink等等。 类似于hive的存储框架也是数不胜数,比如pig。 最底层的存储往往都是使用h…...

SAST静态分析工具所支持的规则
综合国内外SAST工具支持的规则,这些规则包括了国际标准、国内标准、行业标准等,这里我罗列了一下,这些规则对应的标准集合。 评估一款SAST工具时,支持规则集的多少,且每个规则集是否为全集,或者接近全集&am…...

torch 的数据加载 Datasets DataLoaders
点赞收藏关注! 如需要转载,请注明出处! torch的模型加载有两种方式: Datasets & DataLoaders torch本身可以提供两数据加载函数: torch.utils.data.DataLoader()和torch.utils.data.Datase…...

【Promise】某个异步方法执行结束后 在执行下面方法
使用Promise ,当 layer.msg(查询成功) 这个方法执行结束后 ,下面代码才会执行 let thas this async function showMessage() {await new Promise(resolve > layer.msg(查询成功, resolve));// 这里的代码将在 layer.msg 执行结束后执行thas.isGuaran…...
任意文件下载漏洞(CVE-2021-44983)
简介 CVE-2021-44983是Taocms内容管理系统中的一个安全漏洞,可以追溯到版本3.0.1。该漏洞主要源于在登录后台后,文件管理栏存在任意文件下载漏洞。简言之,这个漏洞可能让攻击者通过特定的请求下载系统中的任意文件,包括但不限于敏…...
:通过source_location实现日志函数)
C++(20):通过source_location实现日志函数
C++20中引入了std::source_location,用来描述函数调用的上下文信息。 其主要的成员函数如下: line():获取行号。column():获取列号。file_name():获取文件名。function_name():获取函数域名。#include <iostream> #include <string_view> #include <sour…...
【数据结构】树与二叉树(廿二):树和森林的遍历——后根遍历(递归算法PostOrder、非递归算法NPO)
文章目录 5.1 树的基本概念5.1.1 树的定义5.1.2 森林的定义5.1.3 树的术语 5.2 二叉树5.3 树5.3.1 树的存储结构1. 理论基础2. 典型实例3. Father链接结构4. 儿子链表链接结构5. 左儿子右兄弟链接结构 5.3.2 获取结点的算法5.3.3 树和森林的遍历1. 先根遍历(递归、非…...
-安全管控之防暴露、限制访问、防DDos攻击、防爬虫、防非法引用)
精通Nginx(17)-安全管控之防暴露、限制访问、防DDos攻击、防爬虫、防非法引用
安全是每个系统都需要考虑的关键因素,Nginx在这方面提供了丰富的功能,使我们可以就实际情形做很精细调整。这些功能包括防信息暴露、客户端访问限制、通讯加密、防DDos攻击、防爬虫、防非法引用及防非法域名请求等。 目录 防信息暴露 关闭版本号 关闭目录列表 客户端访问…...
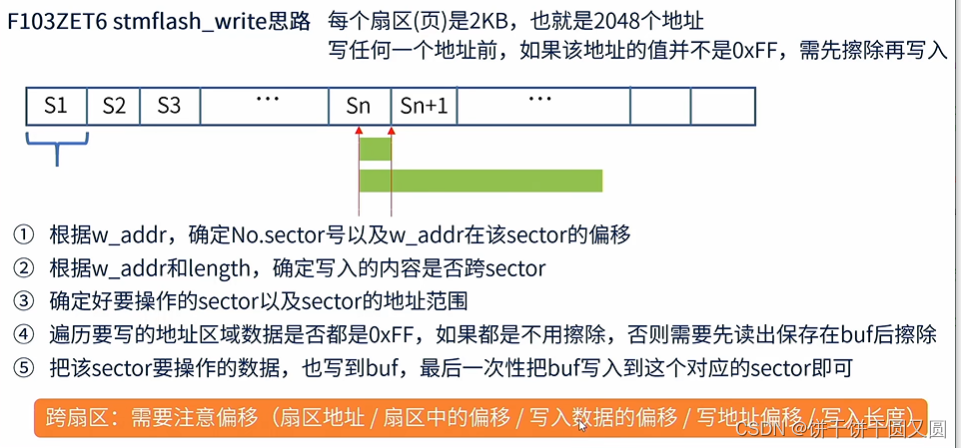
STM32 Flash
FLASH简介 Flash是常用的用于存储数据的半导体器件,它具有容量大,可重复擦写,按“扇区/块”擦除、掉电后数据可继续保存的特性。 常见的FLASH主要有NOR FLASH和NAND FLASH两种类型。NOR和NAND是两种数字门电路,可以简单地认为FL…...

文件批量重命名技巧:图片文件名太长怎么办?告别手动改名方法
在日常生活中,常常会遇到文件名过长导致的问题。尤其是在处理大量图片文件时,过长的文件名可能会使得文件管理变得混乱不堪。现在来看下云炫文件管理器如何批量重命名,让图片文件名变得更简洁,提高工作效率。 操作1、在云炫文件…...

Real-Anime-Z行业落地:国产动漫工业化流程中风格锚定与质量可控实践
Real-Anime-Z行业落地:国产动漫工业化流程中风格锚定与质量可控实践 1. 项目概述 Real-Anime-Z是一款基于Stable Diffusion技术开发的写实向动漫风格大模型,由国内团队Devilworld训练发布。该模型创新性地实现了介于写实与纯动漫之间的2.5D风格表现&am…...

零刻EQ12 N100双网口AIO实战:从ESXI部署到多系统融合
1. 零刻EQ12 N100双网口AIO方案解析 第一次接触零刻EQ12 N100这款小主机时,我就被它的双2.5G网口设计吸引了。这种配置在家庭网络改造和轻量级数据中心建设中简直就是神器。AIO(All In One)方案的核心思想就是把路由、存储、虚拟化等功能整合…...
)
别再问FreeSWITCH能不能搞WebRTC了,手把手教你用Verto模块5分钟搭个Web电话(附避坑清单)
5分钟用FreeSWITCH Verto模块打造Web电话系统:极简配置与实战避坑指南 如果你正在寻找一种比传统SIP更轻量、更"Web原生"的实时通信解决方案,FreeSWITCH的Verto模块可能正是你需要的答案。不同于需要复杂配置的SIP over WebSocket方案…...

抖音下载器完整指南:三步轻松下载视频、音乐和封面
抖音下载器完整指南:三步轻松下载视频、音乐和封面 【免费下载链接】douyin-downloader A practical Douyin downloader for both single-item and profile batch downloads, with progress display, retries, SQLite deduplication, and browser fallback support.…...
)
第52篇:AI内容营销全攻略——从爆款文案到个性化推荐,引爆流量与转化(操作教程)
文章目录前言环境准备:搭建你的AI营销工具箱分步操作:四步构建AI内容营销闭环第一步:用AI批量生成爆款内容草稿第二步:数据驱动的标题与内容优化第三步:构建用户画像与内容标签体系第四步:实现简易个性化内…...

深入理解DFD图和ERD图的区别
DFD(数据流图)与 ERD(实体关系图)的区别 DFD(Data Flow Diagram,数据流图)和 ERD(Entity Relationship Diagram,实体关系图)是系统分析与设计中两种常用的建模…...

Blender3mfFormat:Blender专业3D打印格式转换终极指南
Blender3mfFormat:Blender专业3D打印格式转换终极指南 【免费下载链接】Blender3mfFormat Blender add-on to import/export 3MF files 项目地址: https://gitcode.com/gh_mirrors/bl/Blender3mfFormat Blender3mfFormat是一个功能强大的Blender插件…...

推测解码技术:提升大语言模型推理效率的关键策略
1. 从理论到实践:为什么每个ML从业者都该了解推测解码上周调试大语言模型推理时,我盯着GPU监控面板上25%的利用率直摇头——这些昂贵的计算资源就像高峰期空驶的出租车,明明可以搭载更多乘客却白白浪费着燃油。这正是推测解码(Spe…...

杭州安卡工具:专注钢板钻智造,为钢结构孔加工提供高效解决方案
在钢结构工程、桥梁建设、船舶制造与铁路施工等领域,高效、稳定、高精度的金属钻孔工具,是保障工程质量与施工进度的关键。杭州安卡硬质合金工具有限公司(ACTOOL)凭借多年刀具制造经验与专业技术积淀,成为国内钢板钻领…...

Ceph块存储与对象存储实战指南
Ceph 分布式存储学习笔记(三):块存储和对象存储管理 Ceph 是一个开源的分布式存储系统,提供高性能、高可靠性和可扩展性。块存储(RBD)和对象存储(RGW)是 Ceph 的两种核心存储类型&a…...