设计跳表(动态设置节点高度)
最近学习redis的zset时候,又看到跳表的思想,突然对跳表的设置有了新的思考
这是19年设计的跳表,在leetcode的执行时间是200+ms
现在我对跳表有了新的想法
1、跳表的设计,类似二分查找,但是不是二分查找,比较像之前遇到的一个面试题,使用有限个数鸡蛋,确定鸡蛋易损程度
2、跳表无法在设计的时候,就达到完美状态,而是在操作过程中一直维护较完美状态(动态平衡)
基于以上想法,我开始重新进行跳表的设计,在leetCode执行时间为14ms
设计思路如下:
0、设计节点,节点有next和pre两个指针,且因为多层结构,所以是数组表达
1、设计多层数据结构,多层均为有序链表,其中第0层包含所有数值
2、初始时,只有一层结构,先设计为10层结构
3、新增数据时,如果发现步数(即执行next次数)过长(大于3倍层高),就进行抬升节点高度行为,即节点high值增加
2023-03-04有补充,看最下方
最初代码如下:
Node类
class Node {Node[] next = new Node[10];Node[] pre = new Node[10];//节点高度int high = 0;//节点值int value;//最近一次走到这个节点的步数int step = 0;//这个仅是为了后续show方法使用int k = 0;}
基础参数及构造器
//头节点Node head;int maxHigh = 0;//步数int step = 0;public Skiplist() {}
查询操作,不直接查是否有,而是查floor值后,与tagert进行比较,查floor作用是,复用
public boolean search(int target) {if (head == null) {return false;}if (head.value > target) {return false;}//查询Floorreturn searchFloor(head, maxHigh, target).value == target;
}private Node searchFloor(Node node, int high, int target) {//查到了if (node.value == target) {return node;}//已经最下层了if (high == -1) {return node;}//如果next值小于tagert,就进行next操作while (node.next[high] != null &&node.next[high].value <= target) {//步数增加step++;node = node.next[high];node.step = step;}//向下找return searchFloor(node, high - 1, target);
}
新增节点
public void add(int num) {if (head == null) {head = new Node();head.value = num;//没有head,好处理return;}if (num < head.value) {Node newHead = new Node();newHead.value = num;//比head还小,加上之后,充当新headsetNewHead(newHead, head);return;}step = 0;Node newNode = new Node();newNode.value = num;//找到floor,就加在floor后面Node node = searchFloor(head, maxHigh, num);setNext(node, newNode);if (step > 3 * maxHigh) {//需要抬高高度了,这个方法很重要,类似hashmap的扩容resize(newNode);}
}
先把几个简单的方法展示出来
private void setNext(Node pre, Node node) {int high = node.high;if (pre.next[high] == null) {pre.next[high] = node;node.pre[high] = pre;} else {Node next = pre.next[high];pre.next[high] = node;node.pre[high] = pre;node.next[high] = next;next.pre[high] = node;}}private void setNewHead(Node newHead, Node head) {newHead.high = head.high;for (int i = 0; i <= newHead.high; i++) {newHead.next[i] = head;head.pre[i] = newHead;}this.head = newHead;}
重点在resize
private void resize(Node node) {if (node.high == maxHigh) {//如果当前高度已经是最高高度了,将maxHigh增高maxHigh++;if (maxHigh == 10) {show();}node.high = maxHigh;head.high = maxHigh;head.next[maxHigh] = node;node.pre[maxHigh] = head;return;}//找前者Node pre = getMoreHighPre(node);//抬高高度node.high++;//加入节点(比如,开始加在0层,这时就记在1层)setNext(pre, node);//更新步数值node.step = pre.step + 1;//步数还大,继续增高if (node.step > 3 * (maxHigh + 1)) {resize(node);}}private Node getMoreHighPre(Node node) {int high = node.high;Node pre = node.pre[high];//找到高一层级的上一个节点while (pre.high == high) {pre = pre.pre[high];}return pre;}
删除操作
public boolean erase(int num) {if (head == null) {return false;}if (head.value == num) {if (head.next[0] != null && head.next[0].value == num) {//能不删head尽量不删headremoveNode(head.next[0]);} else {//只能删除headremoveHead();}return true;}//一样,找到对应节点Node node = searchFloor(head, maxHigh, num);if (node.value == num) {//移除removeNode(node);return true;}return false;}private void removeNode(Node node) {for (int i = 0; i <= node.high; i++) {//每一层,都要删除Node pre = node.pre[i];Node next = node.next[i];if (next == null) {//注意可能没有nextpre.next[i] = null;} else {pre.next[i] = next;next.pre[i] = pre;}}}private void removeHead() {//删除头节点,就是把老二当老大用if (head.next[0] == null) {head = null;}Node node = head.next[0];node.high = head.high;for (int i = 1; i <= maxHigh; i++) {if (head.next[i] != null && head.next[i] != node) {node.next[i] = head.next[i];head.next[i].pre[i] = node;}}head = node;}
以上代码执行后,leetCode执行时长为19ms,已经远快于19年的代码
但是,我发现了问题所在
因为数组高度有限,设置的高度为10,如果高度不够,就会出现数组越界,我尝试进行测试,写了show方法
private void show() {System.out.println("总数"+i+"为出现越界");System.out.println("0级,并设置k");head.k = 0;int k = 0;Node node = head;while (node != null) {node.k = k++;node = node.next[0];}for (int i = 1; i < 10; i++) {System.out.println(i + "级间隔:");node = head;Node next = node.next[i];while (next != null) {System.out.print(next.k - node.k + ",");node = next;next = node.next[i];}System.out.println();}}
结果如下
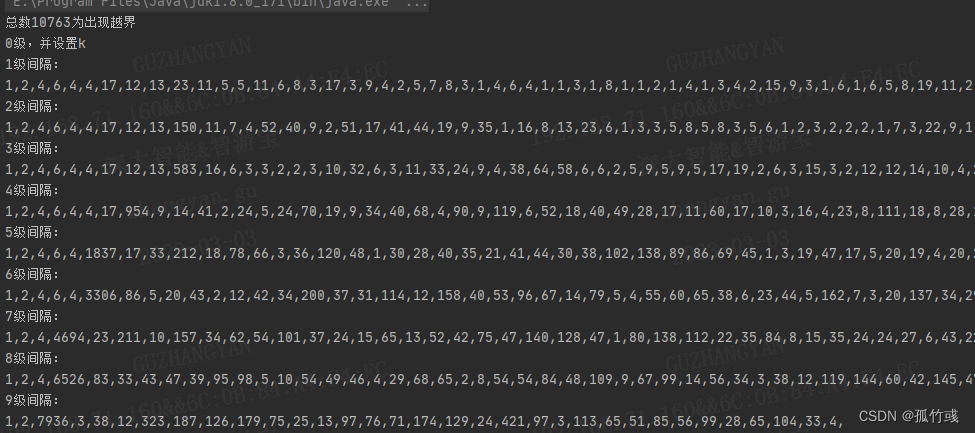
居然一万多数值之后就越界了,思考原因所在
应该是,抬高的node,不应该是插入的那个node,应该是node所在层次的中间node,调整接口如下
通过middleNode,找到需要抬高的node
private void resize(Node node) {if (node.high == maxHigh) {//最高层,这个可以接受maxHigh++;if (maxHigh == max) {show();}node.high = maxHigh;head.high = maxHigh;head.next[maxHigh] = node;node.pre[maxHigh] = head;return;}//找前人Node pre = getMoreHighPre(node);//不应该直接用node升级,应该用node区间的中间值node = middleNode(pre, node);node.high++;//加入节点setNext(pre, node);node.step = pre.step + 1;if (node.step > 3 * (maxHigh + 1)) {resize(node);}
}
寻找middleNode的代码如下
private Node middleNode(Node pre, Node node) {int high = node.high;if (pre.next[high + 1] == null) {return getLast(node);}Node next = pre.next[high + 1];int left = getLen(pre, node, node.high);int right = getLen(node, next, node.high);if (left == right) {return node;}if (left > right) {return left(node, (left - right) / 2);} else {return right(node, (right - left) / 2);}
}private int getLen(Node left, Node right, int high) {int step = 0;while (left != right) {left = left.next[high];step++;}return step;
}private Node left(Node node, int step) {if (step == 0) {return node;}return left(node.pre[node.high], step - 1);
}private Node right(Node node, int step) {if (step == 0) {return node;}return right(node.next[node.high], step - 1);
}private Node getLast(Node node) {int high = node.high;while (node.next[high] != null) {node = node.next[high];}return node;
}
同时发现,最左侧有一些数字极低值,优化setNewHead方法
private void setNewHead(Node newHead, Node head) {newHead.high = head.high;newHead.next[0] = head;head.pre[0] = newHead;head.high = 0;for (int i = 1; i <= newHead.high; i++) {Node next = head.next[i];if(next==null){break;}newHead.next[i] = next;next.pre[i] = newHead;}this.head = newHead;}
执行leetCode,14ms

使用show方法
结果如下:
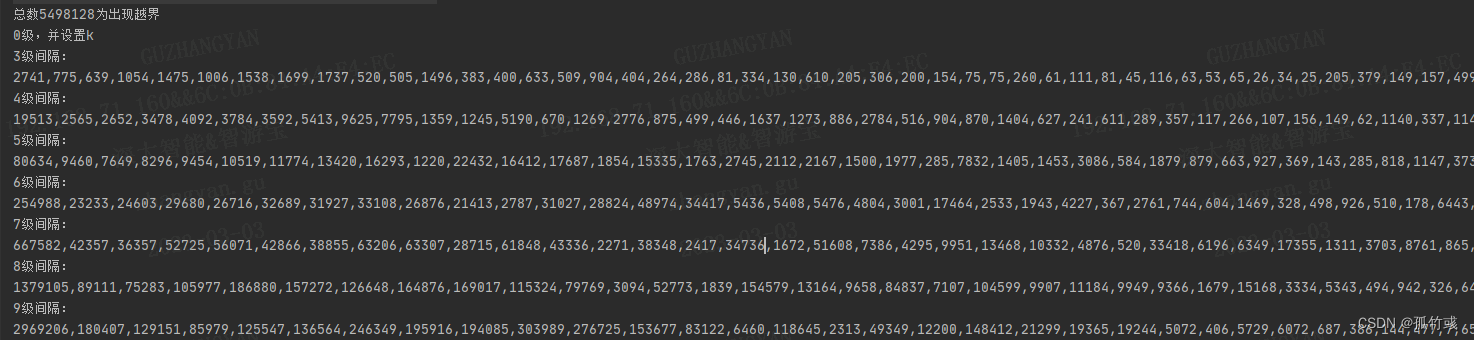
数据超过我的想象,百万级了
当然,这不是完美的跳表,比如我只在新增时,判断是否需要抬高(resize),查询时没有,可能出现某些节点运气不好,查询就是很慢
完整代码包括test在下方
public class TiaoBIaoNewTest {static int i =0;public static void main(String[] args) {Skiplist skiplist = new Skiplist();Random random = new Random();for (i = 0; i < 1000000000; i++) {skiplist.add(random.nextInt());}System.out.println();}static class Skiplist {static int max = 10;class Node {Node[] next = new Node[max];Node[] pre = new Node[max];int high = 0;int value;//最近一次走到这个节点的步数int step = 0;int k = 0;}Node head;int maxHigh = 0;//1)先分割0级public Skiplist() {}public boolean search(int target) {if (head == null) {return false;}if (head.value > target) {return false;}Node node = searchFloor(head, maxHigh, target);return node.value == target;}int step = 0;private Node searchFloor(Node node, int high, int target) {if (node.value == target) {return node;}if (high == -1) {return node;}while (node.next[high] != null &&node.next[high].value <= target) {step++;node = node.next[high];node.step = step;}return searchFloor(node, high - 1, target);}public void add(int num) {if (head == null) {head = new Node();head.value = num;return;}if (num < head.value) {Node newHead = new Node();newHead.value = num;setNewHead(newHead, head);return;}step = 0;Node newNode = new Node();newNode.value = num;Node node = searchFloor(head, maxHigh, num);setNext(node, newNode);if (step > 3 * maxHigh) {resize(newNode);}}private void setNewHead(Node newHead, Node head) {newHead.high = head.high;newHead.next[0] = head;head.pre[0] = newHead;head.high = 0;for (int i = 1; i <= newHead.high; i++) {Node next = head.next[i];if(next==null){break;}newHead.next[i] = next;next.pre[i] = newHead;}this.head = newHead;}public boolean erase(int num) {if (head == null) {return false;}if (head.value == num) {if (head.next[0] != null && head.next[0].value == num) {removeNode(head.next[0]);} else {removeHead();}return true;}Node node = searchFloor(head, maxHigh, num);if (node.value == num) {removeNode(node);return true;}return false;}private void removeNode(Node node) {for (int i = 0; i <= node.high; i++) {Node pre = node.pre[i];Node next = node.next[i];if (next == null) {pre.next[i] = null;} else {pre.next[i] = next;next.pre[i] = pre;}}}private void removeHead() {if (head.next[0] == null) {head = null;}Node node = head.next[0];node.high = head.high;for (int i = 1; i <= maxHigh; i++) {if (head.next[i] != null && head.next[i] != node) {node.next[i] = head.next[i];head.next[i].pre[i] = node;}}head = node;}private void resize(Node node) {if (node.high == maxHigh) {//最高层,这个可以接受maxHigh++;if (maxHigh == max) {show();}node.high = maxHigh;head.high = maxHigh;head.next[maxHigh] = node;node.pre[maxHigh] = head;return;}//找前人Node pre = getMoreHighPre(node);//不应该直接用node升级,应该用node区间的中间值node = middleNode(pre, node);node.high++;//加入节点setNext(pre, node);node.step = pre.step + 1;if (node.step > 3 * (maxHigh + 1)) {resize(node);}}private Node middleNode(Node pre, Node node) {int high = node.high;if (pre.next[high + 1] == null) {return getLast(node);}Node next = pre.next[high + 1];int left = getLen(pre, node, node.high);int right = getLen(node, next, node.high);if (left == right) {return node;}if (left > right) {return left(node, (left - right) / 2);} else {return right(node, (right - left) / 2);}}private int getLen(Node left, Node right, int high) {int step = 0;while (left != right) {left = left.next[high];step++;}return step;}private Node left(Node node, int step) {if (step == 0) {return node;}return left(node.pre[node.high], step - 1);}private Node right(Node node, int step) {if (step == 0) {return node;}return right(node.next[node.high], step - 1);}private Node getLast(Node node) {int high = node.high;while (node.next[high] != null) {node = node.next[high];}return node;}private Node getMoreHighPre(Node node) {int high = node.high;Node pre = node.pre[high];while (pre.high == high) {pre = pre.pre[high];}return pre;}private void setNext(Node pre, Node node) {int high = node.high;if (pre.next[high] == null) {pre.next[high] = node;node.pre[high] = pre;} else {Node next = pre.next[high];pre.next[high] = node;node.pre[high] = pre;node.next[high] = next;next.pre[high] = node;}}private void show() {System.out.println("总数"+i+"为出现越界");System.out.println("0级,并设置k");head.k = 0;int k = 0;Node node = head;while (node != null) {node.k = k++;node = node.next[0];}for (int i = 3; i < max; i++) {System.out.println(i + "级间隔:");node = head;Node next = node.next[i];while (next != null) {System.out.print(next.k - node.k + ",");node = next;next = node.next[i];}System.out.println();}}@Overridepublic String toString() {String s = "";Node node = head;while (node != null) {s += node.value + ",";node = node.next[0];}return s;}}
}
2023-03-04补充
今日验证每个节点的搜索路径,验证结果如下:
总数5445676为出现越界
0级,并设置k
9级最大step:33
8级最大step:35
7级最大step:35
6级最大step:35
5级最大step:35
4级最大step:36
3级最大step:38
2级最大step:39
1级最大step:44
0级最大step:58
平均step24.20			总数6749752为出现越界
0级,并设置k
9级最大step:31
8级最大step:32
7级最大step:34
6级最大step:34
5级最大step:36
4级最大step:37
3级最大step:39
2级最大step:45
1级最大step:47
0级最大step:59
平均step24.38总数5829201为出现越界
0级,并设置k
9级最大step:32
8级最大step:33
7级最大step:35
6级最大step:35
5级最大step:37
4级最大step:38
3级最大step:41
2级最大step:46
1级最大step:49
0级最大step:62
平均step24.40
最大step也只是60左右,之所以不是30,之前也说了,是因为没有对查询操作进行提高判断操作(加了判断,有可能反而导致查询减慢),个人也觉得没必要,平均的查询步骤是24
进行局部修改,当出现待提高node的左相邻节点,本身高度就够情况下,提高左节点(防止较低层级节点密集)
如下
private void resize(Node node) {if (node.high == maxHigh) {//最高层,这个可以接受maxHigh++;if (maxHigh == max) {show();}node.high = maxHigh;head.high = maxHigh;head.next[maxHigh] = node;node.pre[maxHigh] = head;return;}//找前人Node pre = getMoreHighPre(node);//不应该直接用node升级,应该用node区间的中间值node = middleNode(pre, node);if(pre.next[node.high]==node){//升自己不如升preresize(pre);return;}node.high++;//加入节点setNext(pre, node);node.step = pre.step + 1;if (node.step > 3 * (maxHigh + 1)) {resize(node);}}
验证结果如下:
总数11386207为出现越界
0级,并设置k
9级最大step:32
8级最大step:32
7级最大step:36
6级最大step:37
5级最大step:38
4级最大step:39
3级最大step:41
2级最大step:42
1级最大step:52
0级最大step:62
平均step24.78总数13122318为出现越界
0级,并设置k
9级最大step:30
8级最大step:32
7级最大step:37
6级最大step:38
5级最大step:39
4级最大step:41
3级最大step:42
2级最大step:43
1级最大step:49
0级最大step:63
平均step25.30			总数11352711为出现越界
0级,并设置k
9级最大step:28
8级最大step:30
7级最大step:31
6级最大step:32
5级最大step:35
4级最大step:37
3级最大step:39
2级最大step:42
1级最大step:46
0级最大step:59
平均step25.09
最大步骤没有明显增加,平均步骤从24+增加至25+,查询会些许减慢,但是可容纳数据量,从600w左右,提升至1000w以上,提升明显
以上只是个人实现的跳表,肯定会有问题,欢迎大家一起讨论
相关文章:
设计跳表(动态设置节点高度)
最近学习redis的zset时候,又看到跳表的思想,突然对跳表的设置有了新的思考 这是19年设计的跳表,在leetcode的执行时间是200ms 现在我对跳表有了新的想法 1、跳表的设计,类似二分查找,但是不是二分查找,比较…...

基于神经辐射场(Neural Radiance Fileds, NeRF)的三维重建- 简介(1)
Nerf简介 Nerf(neural Radiance Fileds) 为2020年ICCV上提出的一个基于隐式表达的三维重建方法,使用2D的 Posed Imageds 来生成(表达)复杂的三维场景。现在越来越多的研究人员开始关注这个潜力巨大的领域,也…...
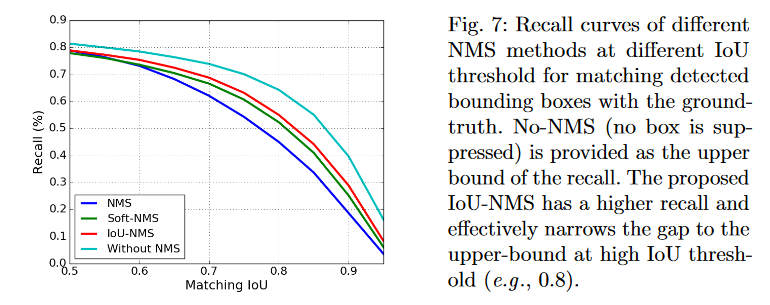
【AI面试】NMS 与 Soft NMS 的辨析
往期文章: AI/CV面试,直达目录汇总【AI面试】L1 loss、L2 loss和Smooth L1 Loss,L1正则化和L2正则化 一、NMS 非极大值抑制(Non-Maximum Suppression,NMS),并不是深度学习时期,目标…...
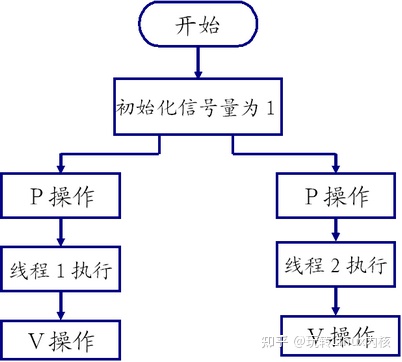
一文让你彻底理解Linux内核多线程(互斥锁、条件变量、读写锁、自旋锁、信号量)
一、互斥锁(同步) 在多任务操作系统中,同时运行的多个任务可能都需要使用同一种资源。这个过程有点类似于,公司部门里,我在使用着打印机打印东西的同时(还没有打印完),别人刚好也在…...

利用python写一个gui小公举--环境搭建
文章目录背景搭建环境安装必要库添加工具快捷方式检验背景 在实习过程中遇到一个问题,某项目是通过python代码实现的,而且需要一直修改参数实现功能,过程有些繁琐。虽然师兄用PHP study搭了一个网站用于查看结果,但是还是过于繁琐…...

英飞凌Tricore实战系列02_ENDINIT属性看门狗原理及应用
目录 1.概述2.ENDINIT功能及使用2.1 ENDINIT属性2.2 改写受ENDINIT保护寄存器的步骤3. Tricore 看门狗介绍及使用3.1 看门狗系统介绍3.1.1 安全看门狗介绍3.1.2 CPU看门狗介绍3.2 看门狗模式介绍3.2.1 Time-out模式3.2.2 正常模式(Normal Mode)3.2.3 禁用模式(Disabled Mode…...

Java Number类
Java Number 类是一个抽象类,它是所有数字类的基类。Java 中的数字类包括 Byte、Short、Integer、Long、Float 和 Double,它们都继承自 Number 类。Java Number 类提供了一些常用的方法,可以用于将数字类型转换为不同的格式,以及进…...
C++构造和析构
欢迎来观看温柔了岁月.c的博客 目前 设有C学习专栏 C语言项目专栏 数据结构与算法专栏 目前主要更新C学习专栏,C语言项目专栏不定时更新 待C专栏完毕,会陆续更新C项目专栏和数据结构与算法专栏 一周主要三更,星期三,星期五&#x…...
docker安装即docker连接mysql(window)
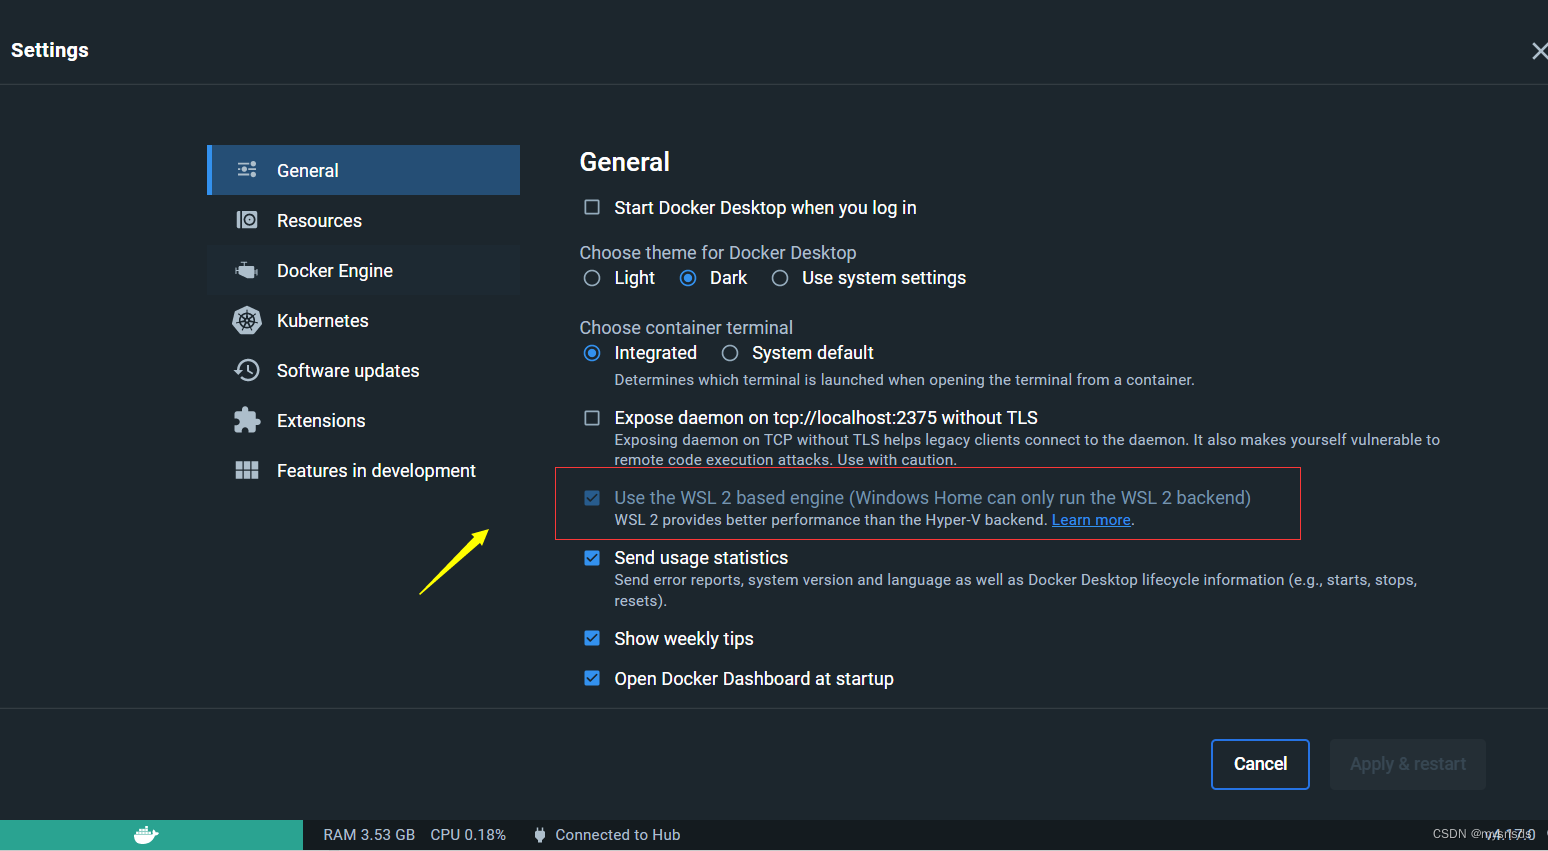
一 安装docker 1.什么是docker Docker容器与虚拟机类似,但二者在原理上不同。容器是将操作系统层虚拟化,虚拟机则是虚拟化硬件,因此容器更具有便携性、高效地利用服务器。 2.WSL2 WSL,即Windows Subsystem on Linux,中…...

HMM-维特比算法
HMM-维特比算法(viterbi)HMM回顾隐马科夫链解法:维特比算法(Viterbi)HMM回顾 最终的公式可以解释主要分为两个部分: P(xi|yi),发射概率,字面意思是从一个词性中发射/生成出某一个单…...
【C++初阶】2. 类和对象_1
1. 面向过程和面向对象的初步认识 2. 类的引入 C语言结构体中只能定义变量,在C中,结构体内不仅可以定义变量,也可以定义函数。比如: 之前在数据结构初阶中,用C语言方式实现的栈,结构体中只能定义变量&#…...

kotlin把函数作为参数转递给另一个函数
kotlin把函数作为参数转递给另一个函数 fun say(s: String, foo: (String) -> Unit) {print("hello")foo(s) }fun hi(str: String) {println(str) }fun main(args: Array<String>) {say("hello", ::hi) } 输出: hellohello...
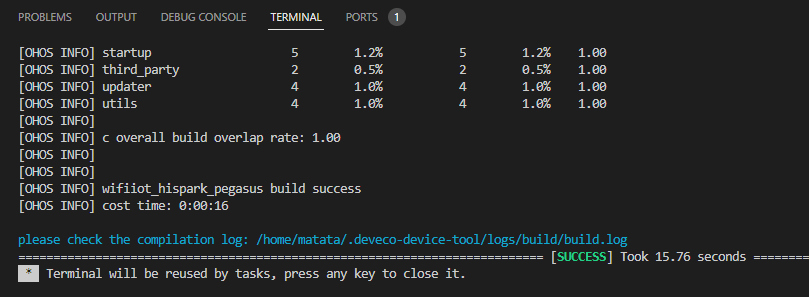
海思嵌入式开发-005-OpenHarmony源码编译问题
海思嵌入式开发-005-OpenHarmony源码编译问题一、问题描述二、解决方案2.1解决原理2.2获取OpenHarmony 3.1.1 Release源码2.3最后解决问题,编译成功。一、问题描述 按照链接拉取master源码,出现如下问题,打开build.log文件 提示相应位置的文…...
指针的进阶续(笔试题强化练习)
写在前面:在上次我们学习了指针的相关类型的知识,对指针家族的成员基本有了了解,这次让我们跟着一些题目来练习和补充一些知识,这有助于我们强化理解这些知识。 话不多说,我们马上开始: 1.指针和数组的笔…...

一个供参考的计算机的学习路线
本文是介绍如何成为一个Geek,一个真正的计算机高手。 适合有成为IT领域技术大牛的人参考。 写给大一新生和所有向深耕IT领域的人,避免走一些弯路。 仅代表个人想法,供批判性参考。 第一门入门的必备功课-语法与算法 什么是计算机?…...
React(五):受控组件、高阶组件、Portals、Fragment、CSS的编写方式
React(五)一、受控组件1.什么是受控组件(v-model)2.收集表单数据:input和单选框3.收集表单数据:下拉框二、非受控组件三、高阶组件1.什么是高阶组件2.高阶组件的应用13.高阶组件的应用2-注入Context4.高阶组件的应用3-登录鉴权5.高…...
MATLAB——系统环境
MATLAB概述MATLAB的发展MATLAB:MATrix LABoratory1980年前后,Cleve Moler教授编写的Linpack 和Eispack的接口程序。1984年,MATLAB第1版(DOS版)1992年,MATLAB4.0版1994年,MATLAB 4.2版1997年,MATLAB 5.0版1999年&#x…...

2 GateWay工作流程+GateWay搭建
GateWay工作流程GateWay搭建 核心流程图如下: 核心概念: 客户端向 Spring Cloud Gateway 发出请求。如果Gateway Handler Mapping确定请求与路由匹配,则将其发送到Gateway Web Handler 处理程序。此处理程序通过特定于请求的Fliter链运行请求…...

【微信小程序】富文本rich-text的图片预览效果的几种方法
前言 使用原生小程序开发,实现在富文本rich-text中的图片预览效果的几种方法对比。 1.正则wx.previewImage(有明显不足) 一个不需要用额外组件或插件的方法: 思路:使用正则把图片的url进行剖离出来,push…...

通信网络-Socket、Java中的网络支持、多线程服务器
前言 通信网络-Socket、Java中的网络支持、多线程服务器 场景:使用java网络创建一个聊天室 博客地址:芒果橙的个人博客 文章目录前言通信网络-SocketTCP/IPTCP/IP 模型端口Java中的网络支持概念1. InetAddress2. URL3. Socket4. Datagram多线程服务器应用…...
)
HDMI数据的接收发送实验(八)
一、 概述 上一章节创建hex文件写入EDID编码,接下来我们需要把ROM中的数据通过IIC协议传输到HDMI中,为了能够更方便观察具体时序,我们首先模拟主机发送的IIC请求,这样可以根据仿真来观察IIC的传输过程。 二、模拟主机发送IIC时序 …...

ssh远程登录的时候同一个秘钥可以用于多个不同服务器
可以看到:这2台服务器使用了同一个秘钥,现在都可以正常登录:可以看出来第二个云服务器有安全更新没有激活赶快要更新了。...

Element-UI表格避坑指南:修改展开图标+整行点击+智能隐藏,这些细节你知道吗?
Element-UI表格交互优化实战:图标定制与智能展开的进阶技巧 第一次使用Element-UI的Table组件时,我对着文档折腾了半天才让展开功能正常工作。但当我看到默认的小箭头图标时,总觉得和产品设计风格格格不入;点击展开区域太小导致用…...

FreeRTOS任务优先级怎么设?从智能健康助手项目看LVGL、传感器、看门狗任务的调度实战
FreeRTOS任务优先级设计实战:智能健康助手的调度艺术 在嵌入式系统开发中,任务优先级设置往往决定了整个系统的响应性和稳定性。我曾在一个智能健康监测设备项目中,面对LVGL界面、多传感器数据采集和系统监控等多任务协同工作的挑战…...

免费开源的质谱分析革新工具:从数据到发现的完整路径
免费开源的质谱分析革新工具:从数据到发现的完整路径 【免费下载链接】OpenMS The codebase of the OpenMS project 项目地址: https://gitcode.com/gh_mirrors/op/OpenMS OpenMS作为一款免费开源的质谱数据分析平台,为科研人员提供了从原始质谱数…...

GIMP Resynthesizer完整教程:掌握纹理合成与图像修复的核心技术
GIMP Resynthesizer完整教程:掌握纹理合成与图像修复的核心技术 【免费下载链接】resynthesizer Suite of gimp plugins for texture synthesis 项目地址: https://gitcode.com/gh_mirrors/re/resynthesizer 当你面对一张需要修复的老照片,或者需…...
)
项目7-5 单表数据记录查询—— 任务7.6.6 查询结果不重复、7.6.7 范围查询、7.6.8 字符匹配查询(二)
项目7-4 单表数据记录查询—— 任务7.6.6 查询结果不重复、7.6.7 范围查询、7.6.8 字符匹配查询(二) 一、教学目标【2分钟】 **二、课程导入【4分钟】** **三、核心内容讲解** **【第一部分:概念讲解】用大白话理解三个关键字** **【第二部分:实操演示】** **四、课堂小结与…...
完全解析)
数据仓库进阶:缓慢变化维度(SCD)完全解析
数据仓库进阶:缓慢变化维度(SCD)完全解析1. 缓慢变化维度概述1.1 什么是SCD?1.2 为什么需要SCD?2. SCD处理流程图3. 常见SCD类型详解3.1 Type 0:保持不变(Retain Original)3.2 Type …...
Retinexformer Unleashed: A Deep Dive into Transformer-Based Low-Light Image Enhancement
1. Retinexformer:当Transformer遇见低光图像增强 深夜拍的照片总是又暗又糊?Retinexformer可能是目前最聪明的AI解决方案。这个将Transformer架构与Retinex理论结合的创新模型,在ICCV 2023上以6dB的性能优势碾压传统方法。我实测过它的增强效…...

批量为视频文件添加内嵌封面:两种模式的适用场景与配置
记录一下使用【批量添加MP4封面工具】的实践经验,重点讲两种封面模式的选择和配置。背景视频文件(MP4、MKV等)支持在文件内部嵌入封面图片(attached_pic)。嵌入后,在文件管理器的缩略图视图中会显示指定的封…...