vue+springboot登录与注册功能的实现
①首先写一个登录页面
<template>
<div style="background-color: #42b983;display: flex;align-items: center;justify-content: center;height: 100vh"><div style="background-color: white;display: flex;width: 50%;height: 50%;overflow: hidden;border-radius: 5px"><div style="flex:1"><img src="@/assets/login.png" style="width: 100%"></div><div style="flex: 1;display: flex;justify-content: center;align-items: center"><el-form style="width: 80%" :model="user"><div style="font-weight: bold;font-size: 20px;margin-bottom: 20px">欢迎登录后台管理系统</div><el-form-item><el-input placeholder="请输入用户名" prefix-icon="el-icon-user" v-model="user.username"></el-input></el-form-item><el-form-item><el-input placeholder="请输入密码" prefix-icon="el-icon-lock" v-model="user.password" show-password></el-input></el-form-item><el-form-item><el-input placeholder="请输入验证码" prefix-icon="el-icon-circle-check" v-model="user.validcode"></el-input></el-form-item><el-form-item><el-button type="primary" style="width: 100%">登录</el-button></el-form-item><div style="display: flex"><div style="flex: 1">还没账号?去<span style="color: #42b983;cursor: pointer">注册</span></div><div style="text-align: right;flex: 1;color: #42b983;cursor:pointer;">忘记密码</div></div></el-form></div></div>
</div>
</template>
<script>
export default {data(){return{user:{username:'',password:'',validcode:''}}}
}
</script>
<style scoped></style>
大致效果:
②引入验证码组件
在component目录下新建一个ValidCode.vue:

<template><div class="ValidCode disabled-select" style="width: 100%; height: 100%" @click="refreshCode"><span v-for="(item, index) in codeList" :key="index" :style="getStyle(item)">{{item.code}}</span></div>
</template><script>
export default {name: 'validCode',data () {return {length: 4,codeList: []}},mounted () {this.createdCode()},methods: {refreshCode () {this.createdCode()},createdCode () {let len = this.length,codeList = [],chars = 'ABCDEFGHJKMNPQRSTWXYZabcdefhijkmnprstwxyz0123456789',charsLen = chars.length// 生成for (let i = 0; i < len; i++) {let rgb = [Math.round(Math.random() * 220), Math.round(Math.random() * 240), Math.round(Math.random() * 200)]codeList.push({code: chars.charAt(Math.floor(Math.random() * charsLen)),color: `rgb(${rgb})`,padding: `${[Math.floor(Math.random() * 10)]}px`,transform: `rotate(${Math.floor(Math.random() * 90) - Math.floor(Math.random() * 90)}deg)`})}// 指向this.codeList = codeList// 将当前数据派发出去this.$emit('update:value', codeList.map(item => item.code).join(''))},getStyle (data) {return `color: ${data.color}; font-size: ${data.fontSize}; padding: ${data.padding}; transform: ${data.transform}`}}
}
</script><style>
.ValidCode{display: flex;justify-content: center;align-items: center;cursor: pointer;
}
.ValidCode span {display: inline-block;font-size: 18px;
}
</style>
在登录页引入:
<template>
<div style="background-color: #42b983;display: flex;align-items: center;justify-content: center;height: 100vh"><div style="background-color: white;display: flex;width: 50%;height: 50%;overflow: hidden;border-radius: 5px"><div style="flex:1"><img src="@/assets/login.png" style="width: 100%"></div><div style="flex: 1;display: flex;justify-content: center;align-items: center"><el-form style="width: 80%" :model="user"><div style="font-weight: bold;font-size: 20px;margin-bottom: 20px">欢迎登录后台管理系统</div><el-form-item><el-input placeholder="请输入用户名" prefix-icon="el-icon-user" v-model="user.username"></el-input></el-form-item><el-form-item><el-input placeholder="请输入密码" prefix-icon="el-icon-lock" v-model="user.password" show-password></el-input></el-form-item><el-form-item><div style="display: flex"><el-input placeholder="请输入验证码" prefix-icon="el-icon-circle-check" v-model="user.validCode" style="flex: 1"></el-input><div style="flex: 1;height: 32px"><valid-code @update:value="getCode"></valid-code></div></div></el-form-item><el-form-item><el-button type="primary" style="width: 100%">登录</el-button></el-form-item><div style="display: flex"><div style="flex: 1">还没账号?去<span style="color: #42b983;cursor: pointer">注册</span></div><div style="text-align: right;flex: 1;color: #42b983;cursor:pointer;">忘记密码</div></div></el-form></div></div>
</div>
</template>
<script>
import ValidCode from "@/components/ValidCode.vue";export default {name:'login-demo',components:{ValidCode},data(){return{code:'',user:{username:'',password:'',validCode:''}}},methods:{getCode(code){this.code=code}}
}
</script>
<style scoped></style>
效果图(可以看到多了验证码):

③springboot搭建后端接口
首先准备数据库:

CREATE TABLE `user` (`id` int(11) NOT NULL AUTO_INCREMENT,`username` varchar(255) COLLATE utf8mb4_unicode_ci DEFAULT NULL COMMENT '用户名',`password` varchar(255) COLLATE utf8mb4_unicode_ci DEFAULT NULL COMMENT '密码',`name` varchar(255) COLLATE utf8mb4_unicode_ci DEFAULT NULL COMMENT '姓名',`phone` varchar(255) COLLATE utf8mb4_unicode_ci DEFAULT NULL COMMENT '电话',`email` varchar(255) COLLATE utf8mb4_unicode_ci DEFAULT NULL COMMENT '邮箱',`address` varchar(255) COLLATE utf8mb4_unicode_ci DEFAULT NULL COMMENT '地址',`avatar` varchar(255) COLLATE utf8mb4_unicode_ci DEFAULT NULL COMMENT '头像',PRIMARY KEY (`id`)
) ENGINE=InnoDB DEFAULT CHARSET=utf8mb4 COLLATE=utf8mb4_unicode_ci COMMENT='用户表';
用IDEA创建springboot工程:
创建springboot教程
连接数据库:
application.yml:
server:port: 9090
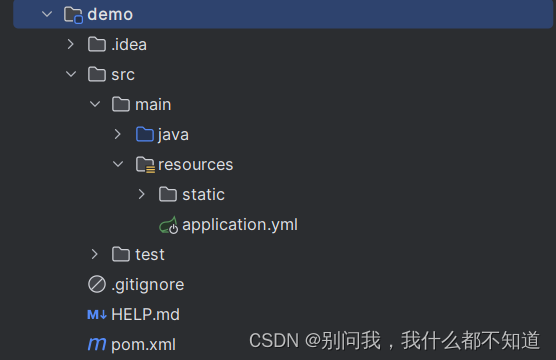
spring:datasource:driver-class-name: com.mysql.cj.jdbc.Driverurl: jdbc:mysql://localhost:3306/honey2024?useSSL=false&useUnicode=true&characterEncoding=UTF-8&serverTimezone=GMT%2b8username: rootpassword: 123456目录结构:
按照该目录创建文件夹

CorsConfig:解决跨域问题
package com.example.springboot.common;import org.springframework.context.annotation.Bean;
import org.springframework.context.annotation.Configuration;
import org.springframework.web.cors.CorsConfiguration;
import org.springframework.web.cors.UrlBasedCorsConfigurationSource;
import org.springframework.web.filter.CorsFilter;@Configuration
public class CorsConfig {// 当前跨域请求最大有效时长。这里默认1天private static final long MAX_AGE = 24 * 60 * 60;@Beanpublic CorsFilter corsFilter() {UrlBasedCorsConfigurationSource source = new UrlBasedCorsConfigurationSource();CorsConfiguration corsConfiguration = new CorsConfiguration();corsConfiguration.addAllowedOrigin("*"); // 1 设置访问源地址corsConfiguration.addAllowedHeader("*"); // 2 设置访问源请求头corsConfiguration.addAllowedMethod("*"); // 3 设置访问源请求方法corsConfiguration.setMaxAge(MAX_AGE);source.registerCorsConfiguration("/**", corsConfiguration); // 4 对接口配置跨域设置return new CorsFilter(source);}
}
Result:返回数据
package com.example.springboot.common;import lombok.AllArgsConstructor;
import lombok.Builder;
import lombok.Data;
import lombok.NoArgsConstructor;/*** 接口统一返回包装类* 作者:程序员青戈*/
@Data
@AllArgsConstructor
@NoArgsConstructor
@Builder
public class Result {public static final String CODE_SUCCESS = "200";public static final String CODE_AUTH_ERROR = "401";public static final String CODE_SYS_ERROR = "500";private String code;private String msg;private Object data;public static Result success() {return new Result(CODE_SUCCESS, "请求成功", null);}public static Result success(Object data) {return new Result(CODE_SUCCESS, "请求成功", data);}public static Result error(String msg) {return new Result(CODE_SYS_ERROR, msg, null);}public static Result error(String code, String msg) {return new Result(code, msg, null);}public static Result error() {return new Result(CODE_SYS_ERROR, "系统错误", null);}}
WebController(controller文件夹下只用写这个):控制登录和注册接口
package com.example.springboot.controller;import cn.hutool.core.util.StrUtil;
import com.example.springboot.common.Result;
import com.example.springboot.entity.User;
import com.example.springboot.exception.ServiceException;
import com.example.springboot.service.UserService;
import org.springframework.web.bind.annotation.*;import javax.annotation.Resource;@RestController
public class WebController {@ResourceUserService userService;@GetMapping("/")public Result hello(){return Result.success("success");}@PostMapping("/login")public Result login(@RequestBody User user){if(StrUtil.isBlank(user.getUsername())||StrUtil.isBlank(user.getPassword())){return Result.error("数据输入错误");}user=userService.login(user);return Result.success(user);}@PostMapping("/register")public Result register(@RequestBody User user){if(StrUtil.isBlank(user.getUsername())||StrUtil.isBlank(user.getPassword())){throw new ServiceException("输入不合法");}if(user.getUsername().length()>10||user.getPassword().length()>20){throw new ServiceException("长度过长");}user=userService.register(user);return Result.success(user);}
}
User:用户实体类,用来承接数据
package com.example.springboot.entity;import lombok.AllArgsConstructor;
import lombok.Data;@Data
public class User {private Integer id;private String username;private String password;private String name;private String phone;private String email;private String address;private String avatar;
}
GlobalException:引入自定义并使用
package com.example.springboot.exception;import com.example.springboot.common.Result;
import org.springframework.web.bind.annotation.ControllerAdvice;
import org.springframework.web.bind.annotation.ExceptionHandler;
import org.springframework.web.bind.annotation.ResponseBody;@ControllerAdvice
public class GlobalExeception {@ExceptionHandler(ServiceException.class)@ResponseBodypublic Result serviceException(ServiceException e){return Result.error("500",e.getMessage());}
}
ServiceException: 自定义异常
package com.example.springboot.exception;public class ServiceException extends RuntimeException{public ServiceException(String msg){super(msg);}
}
UserMapper:定义接口,对数据库进行增删改查
package com.example.springboot.mapper;import com.example.springboot.entity.User;
import org.apache.ibatis.annotations.*;import java.util.List;@Mapper
public interface UserMapper {@Insert("insert into `user` (username, password, name, phone, email, address, avatar) " +"values (#{username}, #{password}, #{name}, #{phone}, #{email}, #{address}, #{avatar})")void insert(User user);@Update("update `user` set username = #{username} , password = #{password} , name = #{name} , phone=#{phone} , email = #{email} , avatar=#{avatar} where id = #{id}")void updateUser(User user);@Delete("delete from `user` where id=#{id}")void deleteUser(Integer id);@Select("select * from `user` order by id desc")List<User> selectall();@Select("select * from `user` where id =#{id} order by id desc")User selectbyid(Integer id);@Select("select * from `user` where name = #{name} order by id desc")List<User> selectbyname(String name);@Select("select * from `user` where username = #{username} and name = #{name} order by id desc")List<User> selectbymore(@Param("username") String username,@Param("name") String name);@Select("select * from `user` where username like  concat('%',#{username},'%') or name like concat('%',#{name},'%') order by id desc")List<User> selectbymo(@Param("username") String username,@Param("name") String name);@Select("select * from `user` where username = #{username} order by id desc")User selectbyUsername(String username);
}
Userservice:给接口编写实体方法
package com.example.springboot.service;import com.example.springboot.entity.User;
import com.example.springboot.exception.ServiceException;
import com.example.springboot.mapper.UserMapper;
import org.springframework.beans.factory.annotation.Autowired;
import org.springframework.stereotype.Service;
import org.springframework.web.bind.annotation.RequestBody;import java.util.List;@Service
public class UserService {@AutowiredUserMapper userMapper;public void insertUser(User user){userMapper.insert(user);}public void updateUser(User user) {userMapper.updateUser(user);}public void deleteUser(Integer id) {userMapper.deleteUser(id);}public void batchdeleteUser(List<Integer> ids) {for(Integer id : ids){userMapper.deleteUser(id);}}public List<User> selectall() {return userMapper.selectall();}public User selectbyid(Integer id) {return userMapper.selectbyid(id);}public List<User> selectbyname(String name) {return userMapper.selectbyname(name);}public List<User> selectbymore(String username, String name) {return userMapper.selectbymore(username,name);}public List<User> selectbymo(String username, String name) {return userMapper.selectbymo(username,name);}public User login(User user) {User dbuser=userMapper.selectbyUsername(user.getUsername());if(dbuser == null){throw new ServiceException("账号不存在");}if(!user.getPassword().equals(dbuser.getPassword())){throw new ServiceException("账号或者密码错误");}return dbuser;}public User register(User user) {User dbuser=userMapper.selectbyUsername(user.getUsername());if(dbuser != null){throw new ServiceException("用户名已存在");}userMapper.insert(user);return user;}
}
引入hutool:在pom.xml引进依赖
<dependency><groupId>cn.hutool</groupId><artifactId>hutool-all</artifactId><version>5.8.18</version>
</dependency>
④封装vue的网络请求
在vue终端安装依赖:
npm i axios在vue中新建utils文件夹,该文件夹下新建request.js文件:
import axios from 'axios'// 创建可一个新的axios对象
const request = axios.create({baseURL: 'http://localhost:9090',   // 后端的接口地址  ip:porttimeout: 30000
})// request 拦截器
// 可以自请求发送前对请求做一些处理
// 比如统一加token,对请求参数统一加密
request.interceptors.request.use(config => {config.headers['Content-Type'] = 'application/json;charset=utf-8';// let user = localStorage.getItem("user") ? JSON.parse(localStorage.getItem("user")) : null// config.headers['token'] = 'token'  // 设置请求头return config
}, error => {console.error('request error: ' + error) // for debugreturn Promise.reject(error)
});// response 拦截器
// 可以在接口响应后统一处理结果
request.interceptors.response.use(response => {let res = response.data;// 兼容服务端返回的字符串数据if (typeof res === 'string') {res = res ? JSON.parse(res) : res}return res;},error => {console.error('response error: ' + error) // for debugreturn Promise.reject(error)}
)export default request
main.js引入:
import Vue from 'vue'
import App from './App.vue'
import router from './router'
import ElementUI from 'element-ui';
import 'element-ui/lib/theme-chalk/index.css';
import request from "@/utils/request";
Vue.config.productionTip = false
Vue.use(ElementUI,{size:'small'});
Vue.prototype.$request=request //引入request
new Vue({router,render: h => h(App)
}).$mount('#app')
登录页补充登录函数:
<template>
<div style="background-color: #42b983;display: flex;align-items: center;justify-content: center;height: 100vh"><div style="background-color: white;display: flex;width: 50%;height: 50%;overflow: hidden;border-radius: 5px"><div style="flex:1"><img src="@/assets/login.png" style="width: 100%"></div><div style="flex: 1;display: flex;justify-content: center;align-items: center"><el-form style="width: 80%" :model="user"><div style="font-weight: bold;font-size: 20px;margin-bottom: 20px">欢迎登录后台管理系统</div><el-form-item><el-input placeholder="请输入用户名" prefix-icon="el-icon-user" v-model="user.username"></el-input></el-form-item><el-form-item><el-input placeholder="请输入密码" prefix-icon="el-icon-lock" v-model="user.password" show-password></el-input></el-form-item><el-form-item><div style="display: flex"><el-input placeholder="请输入验证码" prefix-icon="el-icon-circle-check" v-model="user.validCode" style="flex: 1"></el-input><div style="flex: 1;height: 32px"><valid-code @update:value="getCode"></valid-code></div></div></el-form-item><el-form-item><el-button type="primary" style="width: 100%" @click="login">登录</el-button></el-form-item><div style="display: flex"><div style="flex: 1">还没账号?去<span style="color: #42b983;cursor: pointer">注册</span></div><div style="text-align: right;flex: 1;color: #42b983;cursor:pointer;">忘记密码</div></div></el-form></div></div>
</div>
</template>
<script>
import ValidCode from "@/components/ValidCode.vue";export default {name:'login-demo',components:{ValidCode},data(){return{code:'',user:{username:'',password:'',validCode:''}}},methods:{getCode(code){this.code=code},login(){this.$request.post('/login',this.user).then(res=>{console.log(res)})}}
}
</script>
<style scoped></style>
效果图:

⑤表单验证
填写完表单验证规则后就是最终代码:
<template>
<div style="background-color: #42b983;display: flex;align-items: center;justify-content: center;height: 100vh"><div style="background-color: white;display: flex;width: 50%;height: 50%;overflow: hidden;border-radius: 5px"><div style="flex:1"><img src="@/assets/login.png" style="width: 100%"></div><div style="flex: 1;display: flex;justify-content: center;align-items: center"><el-form style="width: 80%" :model="user" :rules="rules" ref="loginRef"><div style="font-weight: bold;font-size: 20px;margin-bottom: 20px">欢迎登录后台管理系统</div><el-form-item prop="username"><el-input placeholder="请输入用户名" prefix-icon="el-icon-user" v-model="user.username"></el-input></el-form-item><el-form-item prop="password"><el-input placeholder="请输入密码" prefix-icon="el-icon-lock" v-model="user.password" show-password></el-input></el-form-item><el-form-item prop="code"><div style="display: flex"><el-input placeholder="请输入验证码" prefix-icon="el-icon-circle-check" v-model="user.code" style="flex: 1"></el-input><div style="flex: 1;height: 32px"><valid-code @update:value="getCode"></valid-code></div></div></el-form-item><el-form-item><el-button type="primary" style="width: 100%" @click="login">登录</el-button></el-form-item><div style="display: flex"><div style="flex: 1">还没账号?去<span style="color: #42b983;cursor: pointer">注册</span></div><div style="text-align: right;flex: 1;color: #42b983;cursor:pointer;">忘记密码</div></div></el-form></div></div>
</div>
</template>
<script>
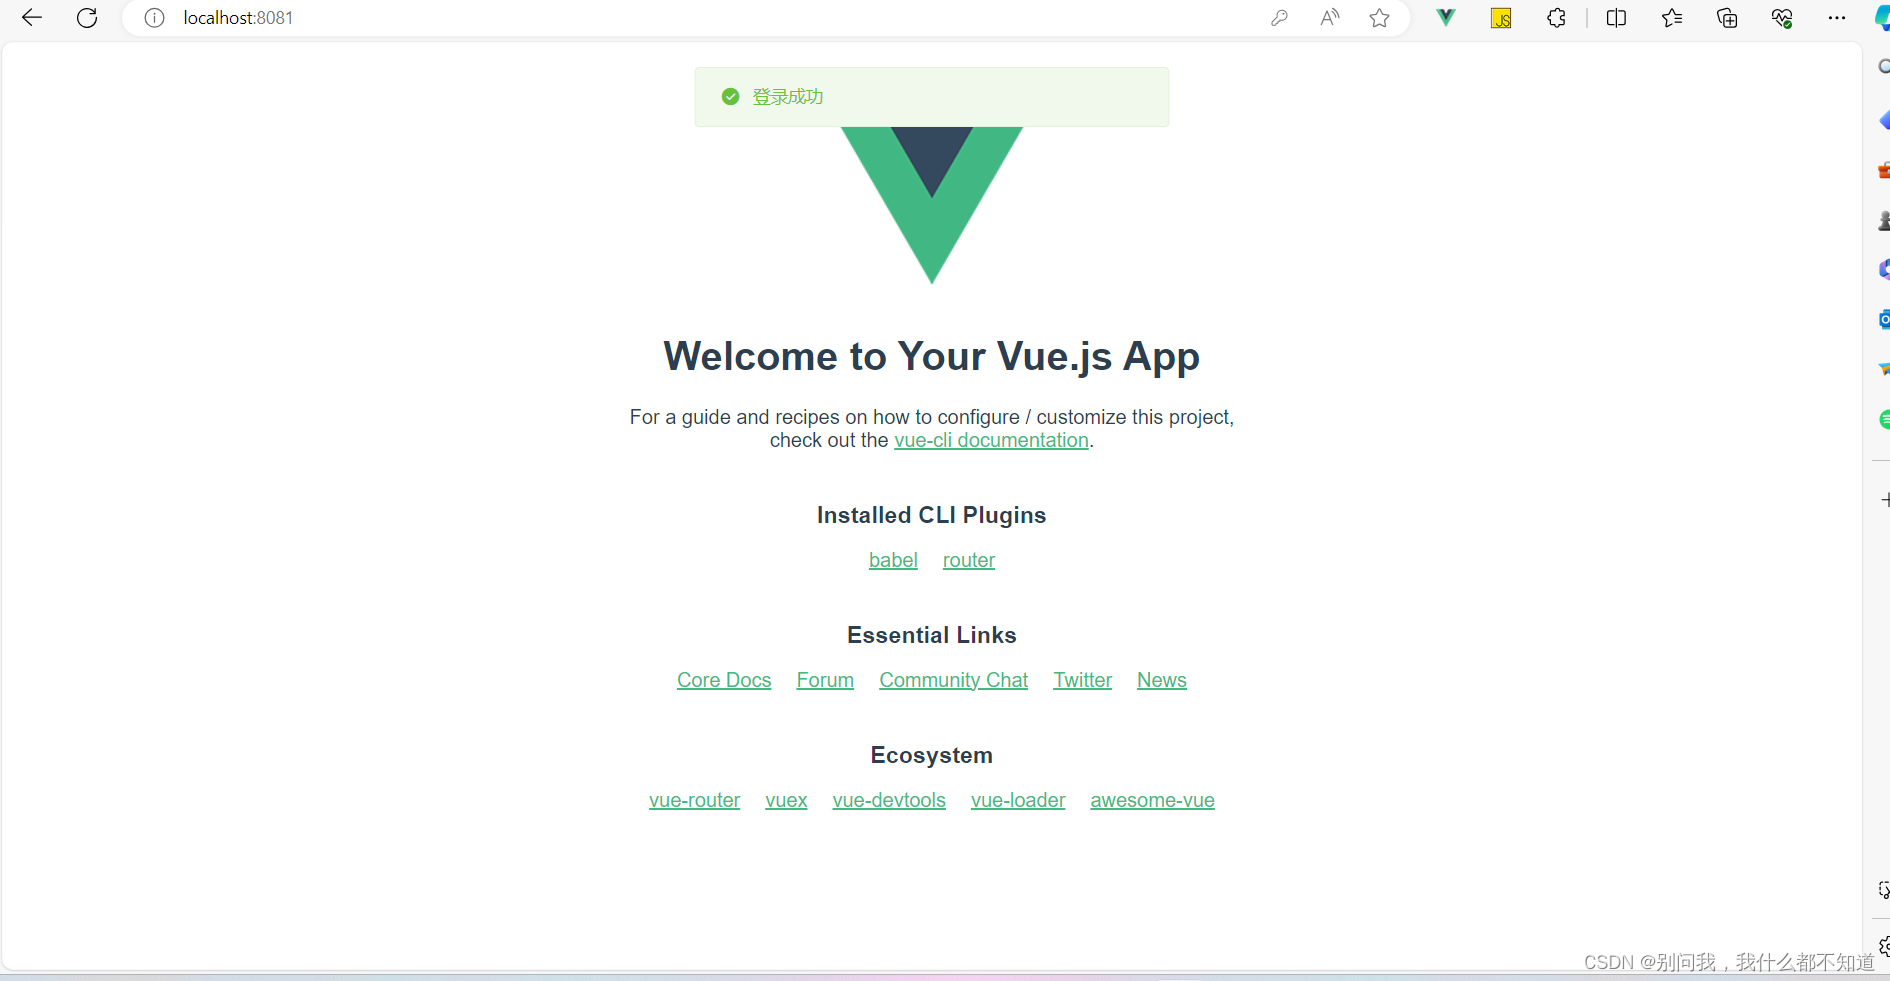
import ValidCode from "@/components/ValidCode.vue";export default {name:'login-demo',components:{ValidCode},data(){const validateCode = (rule, value, callback) => {if (value === '') {callback(new Error('请输入验证码'));} else if(value.toLowerCase() !== this.code){callback(new Error('验证码错误'));} else {callback();}};return{code:'',user:{username:'',password:'',code:''},rules:{username:[{required:true,trigger:'blur',message:'请输入用户名'}],password:[{required:true,trigger:'blur',message:'请输入密码'}],code:[{validator:validateCode,trigger:'blur'}],}}},methods:{getCode(code){this.code=code.toLowerCase()},login(){this.$refs['loginRef'].validate((valid)=>{if(valid){this.$request.post("/login",this.user).then(res=>{if(res.code === '200'){this.$router.push('/')this.$message.success('登录成功')localStorage.setItem('honey-user',JSON.stringify(res.data))}else{this.$message.error(res.msg)}console.log(res);})}})}}
}
</script>
<style scoped></style>注册页面与登录页面代码逻辑相似:
<template><div style="display: flex;align-items: center;justify-content: center;background-color: #669fefff;height: 100vh;"><div style="display: flex;width: 50%;background-color: white;border-radius: 5px;overflow: hidden;"><div style="flex: 1;"><img src="@/assets/register.png" alt="" style="width: 100%;"></div><div style="flex: 1;display: flex;align-items: center;justify-content: center;"><el-form :model="user" style="width: 80%;" :rules="rules" ref="registerRef"><div style="font-weight: bold; font-size: 20px;margin-bottom: 20px;text-align: center;">欢迎注册后台管理系统</div><el-form-item prop="username"><el-input placeholder="请输入用户名" v-model="user.username" prefix-icon="el-icon-user"></el-input></el-form-item><el-form-item prop="password"><el-input placeholder="请输入密码" v-model="user.password" show-password prefix-icon="el-icon-lock"></el-input></el-form-item><el-form-item prop="confirmPass"><el-input placeholder="请确认密码" v-model="user.confirmPass"></el-input></el-form-item><el-form-item><el-button type="primary" style="width: 100%;" @click="register">注册</el-button></el-form-item><div style="display: flex;"><div style="flex: 1;text-align: left">已没有账号?去<span style="color:aquamarine;cursor: pointer;" @click="$router.push('/login')">登录</span></div></div></el-form></div></div></div>
</template><script>
export default {name:'register',data() {const validatePass = (rule, value, callback) => {if (value === '') {callback(new Error('请输入确认密码'));} else if(value !== this.user.password){callback(new Error('两次密码不一致'));} else {callback();}};return {code:'',user: {code:'',username: '',password: '',confirmPass:''},rules:{username:[{required:'true',message:'请输入账号',trigger:'blur'}],password:[{required:'true',message:'请输入密码',trigger:'blur'}],confirmPass:[{validator:validatePass,trigger:'blur'}],},}},methods:{getCode(code){this.code=code.toLowerCase()},register(){this.$refs['registerRef'].validate((valid=>{if(valid){this.$request.post("/register",this.user).then(res=>{if(res.code === '200'){this.$router.push('/login')this.$message.success('注册成功')}else{this.$message.error(res.msg)}console.log(res);})}}))}}
}
</script><style scoped></style>
最终效果:

相关文章:
vue+springboot登录与注册功能的实现
①首先写一个登录页面 <template> <div style"background-color: #42b983;display: flex;align-items: center;justify-content: center;height: 100vh"><div style"background-color: white;display: flex;width: 50%;height: 50%;overflow: h…...
数据结构D3作业
1. 2. 按位插入 void insert_pos(seq_p L,datatype num,int pos) { if(LNULL) { printf("入参为空,请检查\n"); return; } if(seq_full(L)1) { printf("表已满,不能插入\n"); …...
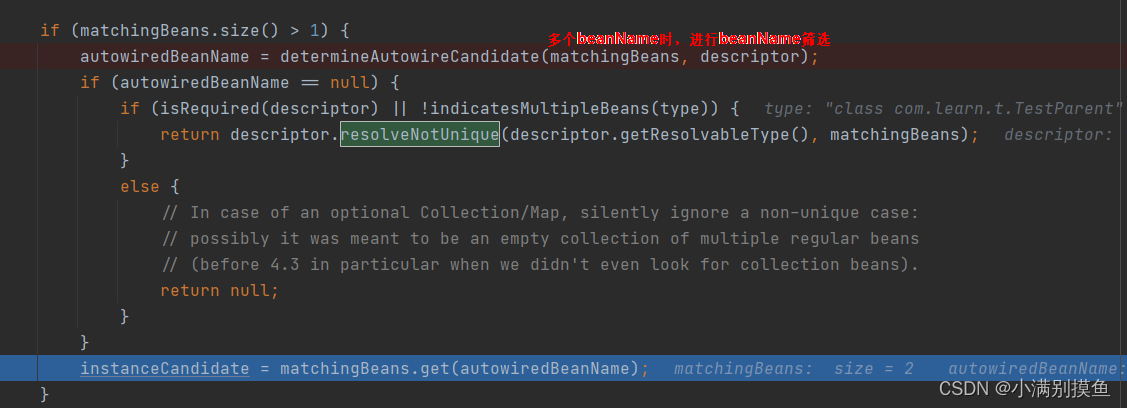
Spring框架@Autowired注解进行字段时,使用父类类型接收子类变量,可以注入成功吗?(@Autowired源码跟踪)
一、 前言 平常我们在使用spring框架开发项目过程中,会使用Autowired注解进行属性依赖注入,一般我们都是声明接口类型来接收接口实现变量,那么使用父类类型接收子类变量,可以注入成功吗?答案是肯定可以的!…...

【springblade】springblade(bladeX) 数据权限失效原因分析
文章目录 数据权限接口权限 前言:最近博主在按照bladeX官方文档 配置数据权限 结果发现失效了,网上搜了一下没找到合适的答案,本着求人不如求己的精神,自己调试了一下发现了问题所在,也大致看了一下bladeX的权限逻辑。…...

单例模式的几种实现方式
在Java中,实现单例模式主要有几种方式:懒汉式、饿汉式、双重检查锁定、静态内部类和枚举。每种方式都有其特点和适用场景。 1. 饿汉式(线程安全) 饿汉式是最简单的一种实现方式,通过静态初始化实例,保证了…...
‘ does not meet UI component syntax.)
鸿蒙OS运行报错 ‘ToDoListItem({ item })‘ does not meet UI component syntax.
在学习harmonyOS时,原本是好好运行的。但是突然报错 ToDoListItem({ item }) does not meet UI component syntax. 一脸懵逼,以为是自己语法问题检查了半天也没问题。 网上搜索了一下,说把多余的js\map文件删除就行 才发现我的 鸿蒙的开…...

React18源码: reconciler执行流程
reconciler执行流程 1 )概述 此处先归纳一下react-reconciler包的主要作用,将主要功能分为4个方面: 输入:暴露api函数(如:scheduleUpdateOnFiber), 供给其他包(如react包࿰…...
mapbox面图层标注
mapbox并没有一个属性类似于’text-field’的symbol图层的直接可以标注的办法,这里笔者提供两种其他的面图层标注的办法用来大家参考 效果图 方案一 把面图层当做点图层直接展示 在mapbox里面,面图层是可以直接渲染成线图层和点图层的,这里…...
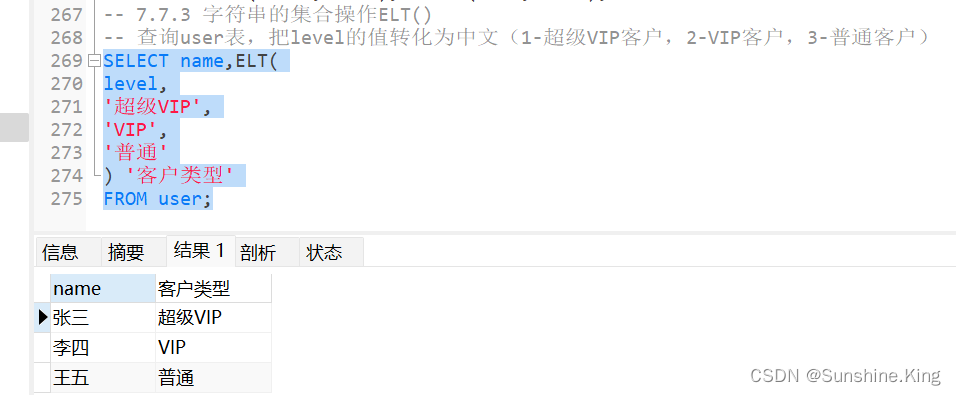
MySQL|MySQL基础(求知讲堂-学习笔记【详】)
MySQL基础 目录 MySQL基础一、 MySQL的结构二、 管理数据库1)查询所有的数据库2)创建数据库3)修改数据库的字符编码4)删除数据库5)切换操作的数据库 三、表的概念四、字段的数据类型4.1 整型4.2 浮点型(float和double)…...

10.docker exec -it /bin/bash报错解决、sh与bash区别
报错 进入容器时,报如下错误 dockeruserdell-PowerEdge-R740:~$ docker exec -it daf2 /bin/bash OCI runtime exec failed: exec failed: unable to start container process: exec: "/bin/bash": stat /bin/bash: no such file or directory: unknown…...
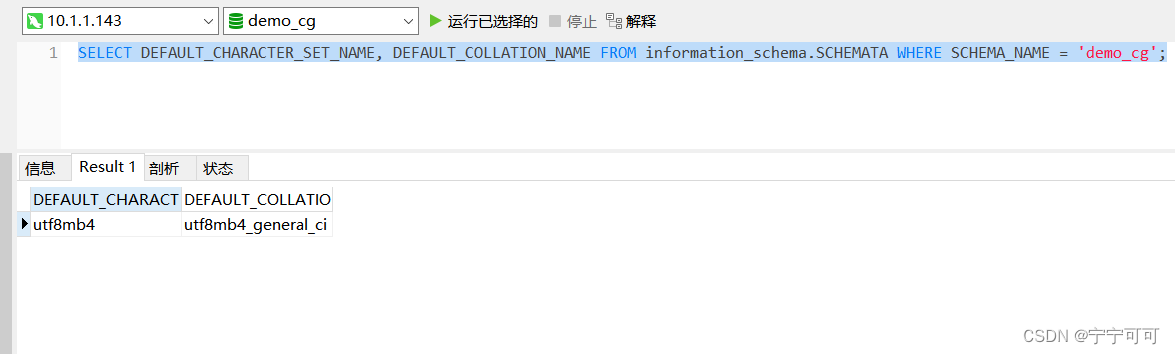
查询数据库的编码集Oracle,MySQL
1、查询数据库的编码集Oracle,MySQL 1.1、oracle select * from v$nls_parameters where parameterNLS_CHARACTERSET; 查询版本:SELECT * FROM v$version 2、MySQL编码集 SELECT DEFAULT_CHARACTER_SET_NAME, DEFAULT_COLLATION_NAME FROM information_schema.SC…...

电商数据采集+跨境电商|API电商数据采集接口洞悉数字新零售发展
随着全球经济一体化和电子商务的快速发展,网络购物的需求日益增加。不断涌现的电商企业使得行业的竞争情况愈演愈烈。在这种情况下,企业不仅要加大经营力度,还要在自己的基础设施和技术上持续投入,才能更好的适应市场和消费习惯。…...

linux之用户和用户组
文章目录 一、简介1.1 用户1.2 用户组1.3 UID和GID1.4 用户账户分类 二、用户2.1 添加新的用户账号:useradd2.2 删除账号:userdel2.3 修改账号:usermod(modmodify)2.4 用户口令的管理:passwd2.5 切换用户:su 三、用户组3.1 增加一…...

人工智能深度学习
目录 人工智能 深度学习 机器学习 神经网络 机器学习的范围 模式识别 数据挖掘 统计学习 计算机视觉 语音识别 自然语言处理 机器学习的方法 回归算法 神经网络 SVM(支持向量机) 聚类算法 降维算法 推荐算法 其他 机器学习的分类 机器…...

python reshape 和 transpose的区别
reshape() 和 transpose() 是用于改变数组或张量形状的两种不同方法, 它们的主要区别在于如何重新排列元素以及是否可以改变轴的顺序。 1 reshape() reshape() 函数用于改变数组或张量的形状,但是不改变元素的排列顺序。它只是简单地将数组的维度重新…...

音视频技术-网络视频会议“回声”的消除
目录 一、“回音”的成因原理 二、解决思路 三、解决方案 1、方案一 2...

有哪些令人惊讶的心理学效应
大家可以想象一个场景: 如果一次考试,你考了95分,比上次还进步了10分,你会感到高兴吗? 听起来很牛逼啊,值得干杯庆祝,好好开心几天了。 这时,你看到同桌这次居然是一百分…...
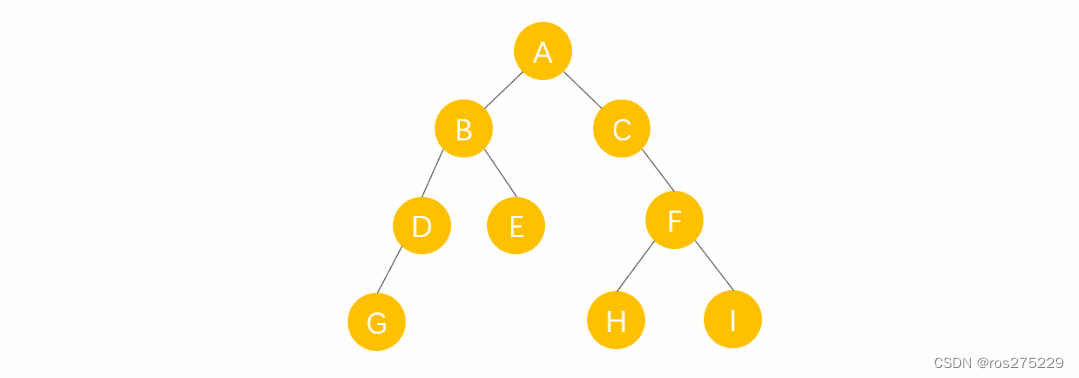
二叉树基础知识总结
目录 二叉树基础知识 概念 : 根节点的五个形态 : 特殊的二叉树 满二叉树 : 完全二叉树 : 二叉搜索树 : 平衡二叉搜索树 : 二叉树的性质 : 二叉树的存储结构 二叉树的顺序存储结构 二叉树的链式存储结构 二叉树的遍历方式 : 基础概念 前中后遍历 层序遍历 :…...

IDEA2023.3.4开启SpringBoot项目的热部署【简单明了4步操作】
添加devtools依赖 <dependency><groupId>org.springframework.boot</groupId><artifactId>spring-boot-devtools</artifactId><scope>runtime</scope><optional>true</optional> </dependency>IDEA开启自动编译 …...

QT中调用python
一.概述 1.Python功能强大,很多Qt或者c/c开发不方便的功能可以由Python编码开发,尤其是一些算法库的应用上,然后Qt调用Python。 2.在Qt调用Python的过程中,必须要安装python环境,并且Qt Creator中编译器与Python的版…...
)
别再手动点菜单了!用这招让Cadence Virtuoso Schematic效率翻倍(附Net高亮快捷键配置)
电路设计效率革命:Cadence Virtuoso Schematic高阶快捷键配置指南 在集成电路设计的浩瀚宇宙中,Cadence Virtuoso如同设计师手中的光刻机,每一次精准操作都直接影响最终芯片的性能与可靠性。然而,当面对数百个晶体管组成的复杂模…...

App Inventor蓝牙调试避坑指南:从连接失败到数据乱码,一次讲清所有常见问题
App Inventor蓝牙调试避坑指南:从连接失败到数据乱码的实战解决方案在移动应用开发领域,蓝牙通信一直是实现设备间短距离数据交换的核心技术之一。对于使用App Inventor的开发者而言,蓝牙模块提供了无需复杂编码即可实现无线通信的便捷途径。…...

[智能体-69]:重新认知MCP:协议不生产智能,只是AI全域交互的标准化基石
MCP只是提供了大模型、编排调度、外部工具能够进行结构化交流的标准,而整个系统的智能主要依赖编排调度,与外部软件系统的交互取决于外部工具,包括外部语音交互、视觉交互、数字化交互。当下MCP(Model Context Protocol࿰…...

BLE四大广播模式详解:可连接/不可连接/定向/周期广播
一、前言在低功耗蓝牙(BLE)开发中,广播(Advertising)是设备发现、连接建立、数据广播、设备重连的核心基石,所有BLE交互流程均始于广播报文的收发。不同于传统经典蓝牙,BLE所有广播行为标准化、…...

Agent开发面试通关攻略:吃透稳拿offer
阅读前置:2026年当下最卷也最缺人的AI岗位,一定是AI Agent开发。最近刷遍CSDN、牛客、力扣最新面经,发现一个非常明显的招聘趋势:普通大模型微调岗位饱和内卷,而AI Agent开发岗位人才严重缺口,薪资更高、竞…...

从入门到实践:EEG公开数据集分类与应用场景全解析
1. EEG公开数据集入门指南刚接触脑电信号分析的研究者,常常会被一个问题困扰:"我应该从哪里获取可靠的EEG数据?"作为一个在这个领域摸爬滚打多年的研究者,我完全理解这种困惑。记得我第一次接触EEG研究时,光…...
)
放弃编码器!纯靠MPU6050和PID算法,手把手教你用TT马达实现平衡小车稳定控制(STM32F103C8T6实战)
纯MPU6050STM32F103的TT马达平衡车实战:无编码器PID控制全解析当大多数平衡小车方案都在强调编码器对速度反馈的不可或缺性时,我们决定挑战一个更极简的配置:仅用5美元的TT马达、9轴的MPU6050和STM32F103C8T6最小系统板,完全舍弃编…...

FM3773 低功耗离线式恒流/恒压 PSR 控制器
概述 FM3773 是一种高性能的交流/直流用于电池充电器和适配器的电源控制器,内置 850V 功率三极管。该设备采用脉冲频率调制(PFM)的方法来建立非连续导通模式(DCM)反激式电源。 FM3773 提供精确的恒定电压,恒…...

基于Arduino与nRF24L01+的无线传感器平台设计与部署指南
1. 项目概述与设计思路如果你和我一样,喜欢在阳台或者小院子里种点蔬菜瓜果,那你肯定也遇到过这样的烦恼:出门几天,心里总惦记着家里的番茄苗是不是缺水了,小温室里的温度会不会太高。传统的温湿度计只能让你在现场读数…...

Taotoken的审计日志功能为企业API安全与合规管理提供支持
🚀 告别海外账号与网络限制!稳定直连全球优质大模型,限时半价接入中。 👉 点击领取海量免费额度 Taotoken的审计日志功能为企业API安全与合规管理提供支持 当企业决定将大模型能力集成到内部业务流程中时,IT管理员和安…...