YOLOv5代码解读[02] models/yolov5l.yaml文件解析
文章目录
- YOLOv5代码解读[02] models/yolov5l.yaml文件解析
- yolov5l.yaml文件
- 检测头1--->耦合头
- 检测头2--->解耦头
- 检测头3--->ASFF检测头
- Model类解析
- parse_model函数
YOLOv5代码解读[02] models/yolov5l.yaml文件解析
yolov5l.yaml文件
# YOLOv5 🚀 by Ultralytics, GPL-3.0 license# Parameters
nc: 27 # number of classes
depth_multiple: 1.0 # model depth multiple
width_multiple: 1.0 # layer channel multiple
anchors:- [10,13, 16,30, 33,23] # P3/8- [30,61, 62,45, 59,119] # P4/16- [116,90, 156,198, 373,326] # P5/32# YOLOv5 v6.0 backbone
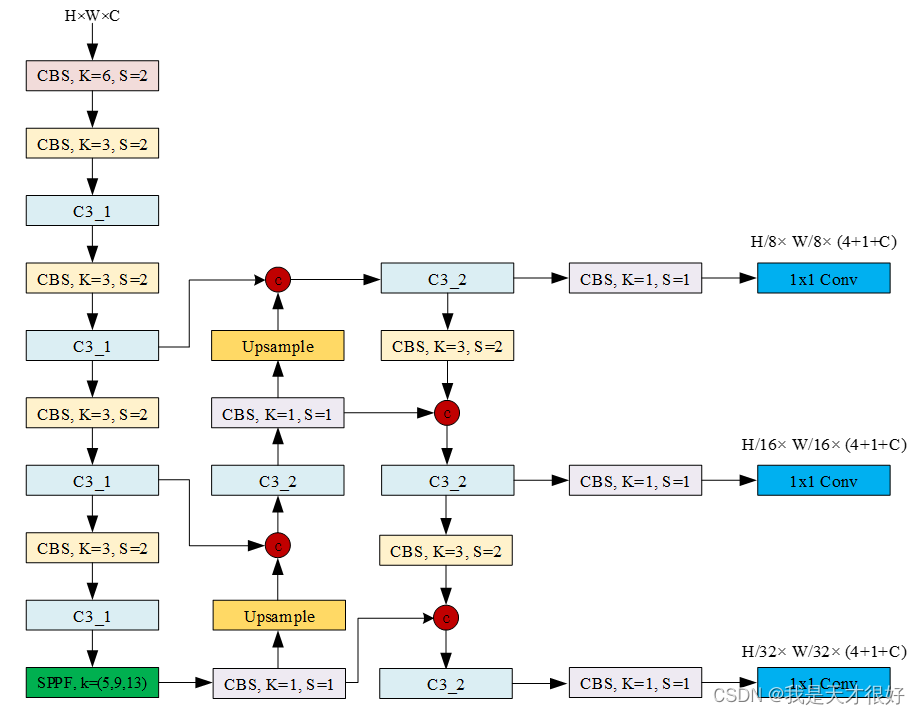
backbone:# [from, number, module, args][[-1, 1, Conv, [64, 6, 2, 2]], # 0-P1/2[-1, 1, Conv, [128, 3, 2]], # 1-P2/4[-1, 3, C3, [128]],[-1, 1, Conv, [256, 3, 2]], # 3-P3/8[-1, 6, C3, [256]],[-1, 1, Conv, [512, 3, 2]], # 5-P4/16[-1, 9, C3, [512]],[-1, 1, Conv, [1024, 3, 2]], # 7-P5/32[-1, 3, C3, [1024]],[-1, 1, SPPF, [1024, 5]], # 9]# YOLOv5 v6.0 head
head:[[-1, 1, Conv, [512, 1, 1]],[-1, 1, nn.Upsample, [None, 2, 'nearest']],[[-1, 6], 1, Concat, [1]], # cat backbone P4[-1, 3, C3, [512, False]], # 13[-1, 1, Conv, [256, 1, 1]],[-1, 1, nn.Upsample, [None, 2, 'nearest']],[[-1, 4], 1, Concat, [1]], # cat backbone P3[-1, 3, C3, [256, False]], # 17 (P3/8-small)[-1, 1, Conv, [256, 3, 2]],[[-1, 14], 1, Concat, [1]], # cat head P4[-1, 3, C3, [512, False]], # 20 (P4/16-medium)[-1, 1, Conv, [512, 3, 2]],[[-1, 10], 1, Concat, [1]], # cat head P5[-1, 3, C3, [1024, False]], # 23 (P5/32-large)[[17, 20, 23], 1, Detect, [nc, anchors, False]], # Detect(P3, P4, P5)]
检测头1—>耦合头
class Detect(nn.Module):stride = None onnx_dynamic = Falseexport = Falsedef __init__(self, nc=80, anchors=(), Decoupled=False, ch=(), inplace=True): super().__init__()# 是否解耦头self.decoupled = Decoupled# 类别数目self.nc = nc # 每个anchor输出维度 self.no = nc + 5 # 检测层的输出数量(不同尺度个数) self.nl = len(anchors) # 每个尺度特征图的anchor数量self.na = len(anchors[0]) // 2 # 初始化步长init gridself.grid = [torch.zeros(1)] * self.nl # 初始化anchor gridself.anchor_grid = [torch.zeros(1)] * self.nl # self.register_buffer("a", torch.ones(2,3)) # register_buffer的作用是将torch.ones(2,3)这个tensor注册到模型的buffers()属性中,并命名为a,# 这代表a对应的是一个持久态,不会有梯度传播给它,但是能被模型的state_dict记录下来,可以理解为模型的常数。self.register_buffer('anchors', torch.tensor(anchors).float().view(self.nl, -1, 2)) # (3,3,2) == (nl,na,2)# 检测头head输出卷积# 如果是解耦头if self.decoupled:self.m = nn.ModuleList(DecoupledHead(x, self.nc, anchors) for x in ch) # 如果是耦合头else:self.m = nn.ModuleList(nn.Conv2d(x, self.no*self.na, 1) for x in ch) # use in-place ops (e.g. slice assignment)self.inplace = inplace def forward(self, x):# inference outputz = []# 对于每个尺度的特征图来说for i in range(self.nl):# conv# P3: [1, 128, 80, 80]->[1, 3*(nc+5), 80, 80]# P4: [1, 256, 40, 40]->[1, 3*(nc+5), 40, 40]# P5: [1, 512, 20, 20]->[1, 3*(nc+5), 20, 20]x[i] = self.m[i](x[i])# 以coco数据集为例,x(bs,255,20,20) -> x(bs,3,20,20,85) (x,y,w,h,c,c1,c2,.........)bs, _, ny, nx = x[i].shapex[i] = x[i].view(bs, self.na, self.no, ny, nx).permute(0, 1, 3, 4, 2).contiguous()# 推断过程inferenceif not self.training:# self.grid: [tensor([0.]), tensor([0.]), tensor([0.])]if self.onnx_dynamic or self.grid[i].shape[2:4] != x[i].shape[2:4]:self.grid[i], self.anchor_grid[i] = self._make_grid(nx, ny, i)y = x[i].sigmoid()if self.inplace:# 中心点xy 网格gridy[..., 0:2] = (y[..., 0:2] * 2 - 0.5 + self.grid[i]) * self.stride[i]# 长宽wh 锚anchor_gridy[..., 2:4] = (y[..., 2:4] * 2) ** 2 * self.anchor_grid[i]else:xy = (y[..., 0:2] * 2 - 0.5 + self.grid[i]) * self.stride[i]wh = (y[..., 2:4] * 2) ** 2 * self.anchor_grid[i]y = torch.cat((xy, wh, y[..., 4:]), -1)z.append(y.view(bs, -1, self.no))return x if self.training else (torch.cat(z, 1),) if self.export else (torch.cat(z, 1), x)# # 转成caffe时候的代码# def forward(self, x):# # inference output# z = []# # 对于每个尺度的特征图来说# for i in range(self.nl):# # conv# # P3: [1, 128, 80, 80]->[1, 3*(nc+5), 80, 80]# # P4: [1, 256, 40, 40]->[1, 3*(nc+5), 40, 40]# # P5: [1, 512, 20, 20]->[1, 3*(nc+5), 20, 20]# x[i] = self.m[i](x[i])# # y = x[i]# y = x[i].sigmoid()# z.append(y)# return zdef _make_grid(self, nx=20, ny=20, i=0, torch_1_10=check_version(torch.__version__, '1.10.0')):d = self.anchors[i].devicet = self.anchors[i].dtypey, x = torch.arange(ny, device=d, dtype=t), torch.arange(nx, device=d, dtype=t)# torch>=1.10.0 meshgrid workaround for torch>=0.7 compatibilityif torch_1_10:yv, xv = torch.meshgrid(y, x, indexing='ij')else:yv, xv = torch.meshgrid(y, x)# 网格grid (x, y)# x[i] --> (bs,3,ny,nx,85)# grid --> (1,3,ny,nx,2)grid = torch.stack((xv, yv), 2).expand((1, self.na, ny, nx, 2))# 锚anchor (w, h)# x[i] --> (bs,3,ny,nx,85)# anchor_grid --> (1,3,ny,nx,2)# self.stride: tensor([ 8., 16., 32.])anchor_grid = (self.anchors[i].clone() * self.stride[i]).view((1, self.na, 1, 1, 2)).expand((1, self.na, ny, nx, 2))return grid, anchor_grid
检测头2—>解耦头
class DecoupledHead(nn.Module):def __init__(self, ch=256, nc=80, anchors=()):super().__init__()# 类别个数self.nc = nc# 检测层的数量self.nl = len(anchors)# 每一层anchor个数self.na = len(anchors[0]) // 2self.merge = Conv(ch, 128 , 1, 1) # 默认256self.cls_convs1 = Conv(128, 64, 3, 1, 1)self.cls_convs2 = Conv(64, 64, 3, 1, 1)self.reg_convs1 = Conv(128, 64, 3, 1, 1)self.reg_convs2 = Conv(64, 64, 3, 1, 1)self.cls_preds = nn.Conv2d(64 , self.nc*self.na, 1)self.reg_preds = nn.Conv2d(64 , 4*self.na, 1)self.obj_preds = nn.Conv2d(64 , 1*self.na, 1)def forward(self, x):x = self.merge(x)x1 = self.cls_convs1(x)x1 = self.cls_convs2(x1)x1 = self.cls_preds(x1)x2 = self.reg_convs1(x)x2 = self.reg_convs2(x2)x21 = self.reg_preds(x2)x22 = self.obj_preds(x2)out = torch.cat([x21, x22, x1], 1)return out
检测头3—>ASFF检测头
class ASFF_Detect(nn.Module): stride = None onnx_dynamic = False def __init__(self, nc=80, anchors=(), ch=(), multiplier=0.5, rfb=False, inplace=True): super().__init__()# 类别数目self.nc = nc # 每个anchor输出维度self.no = nc + 5 # 检测层的输出数量(不同尺度个数) self.nl = len(anchors) # 每个尺度特征图的anchor数量self.na = len(anchors[0]) // 2 # 初始化步长init gridself.grid = [torch.zeros(1)] * self.nl # init anchor gridself.anchor_grid = [torch.zeros(1)] * self.nl# self.register_buffer("a", torch.ones(2,3)) # register_buffer的作用是将torch.ones(2,3)这个tensor注册到模型的buffers()属性中,并命名为a,# 这代表a对应的是一个持久态,不会有梯度传播给它,但是能被模型的state_dict记录下来,可以理解为模型的常数。self.register_buffer('anchors', torch.tensor(anchors).float().view(self.nl, -1, 2)) # (3,3,2) == (nl,na,2)# ASFF模块self.l0_fusion = ASFFV5(level=0, multiplier=multiplier, rfb=rfb)self.l1_fusion = ASFFV5(level=1, multiplier=multiplier, rfb=rfb)self.l2_fusion = ASFFV5(level=2, multiplier=multiplier, rfb=rfb)# 检测头head输出卷积self.m = nn.ModuleList(nn.Conv2d(x, self.no * self.na, 1) for x in ch) # use in-place ops (e.g. slice assignment)self.inplace = inplace def forward(self, x):# inference outputz = [] result = []result.append(self.l2_fusion(x))result.append(self.l1_fusion(x))result.append(self.l0_fusion(x))x = result # 对于每个尺度的特征图来说for i in range(self.nl):# conv # P3: [1, 128, 80, 80]->[1, 3*(nc+5), 80, 80]# P4: [1, 256, 40, 40]->[1, 3*(nc+5), 40, 40]# P5: [1, 512, 20, 20]->[1, 3*(nc+5), 20, 20]x[i] = self.m[i](x[i]) # 以coco数据集为例,x(bs,255,20,20) -> x(bs,3,20,20,85) (x,y,w,h,c,c1,c2,.........)bs, _, ny, nx = x[i].shape x[i] = x[i].view(bs, self.na, self.no, ny, nx).permute(0, 1, 3, 4, 2).contiguous()# 推断过程inference if not self.training: # self.grid: [tensor([0.]), tensor([0.]), tensor([0.])]if self.onnx_dynamic or self.grid[i].shape[2:4] != x[i].shape[2:4]:self.grid[i], self.anchor_grid[i] = self._make_grid(nx, ny, i)y = x[i].sigmoid()# 这块xy的计算存在大量疑惑?????????????????????????if self.inplace:# 中心点xy 网格gridy[..., 0:2] = (y[..., 0:2] * 2 - 0.5 + self.grid[i]) * self.stride[i] # 长宽wh 锚anchor_gridy[..., 2:4] = (y[..., 2:4] * 2) ** 2 * self.anchor_grid[i] else: # for YOLOv5 on AWS Inferentia https://github.com/ultralytics/yolov5/pull/2953xy = (y[..., 0:2] * 2 - 0.5 + self.grid[i]) * self.stride[i] wh = (y[..., 2:4] * 2) ** 2 * self.anchor_grid[i] y = torch.cat((xy, wh, y[..., 4:]), -1)z.append(y.view(bs, -1, self.no))return x if self.training else (torch.cat(z, 1), x)def _make_grid(self, nx=20, ny=20, i=0):d = self.anchors[i].deviceif check_version(torch.__version__, '1.10.0'): # torch>=1.10.0 meshgrid workaround for torch>=0.7 compatibilityyv, xv = torch.meshgrid([torch.arange(ny, device=d), torch.arange(nx, device=d)], indexing='ij')else:yv, xv = torch.meshgrid([torch.arange(ny, device=d), torch.arange(nx, device=d)])# 网格grid (x, y)# x[i] --> (bs,3,ny,nx,85)# grid --> (1,3,ny,nx,2)grid = torch.stack((xv, yv), 2).expand((1, self.na, ny, nx, 2)).float()# 锚anchor (w, h)# x[i] --> (bs,3,ny,nx,85)# anchor_grid --> (1,3,ny,nx,2)# self.stride: tensor([ 8., 16., 32.])anchor_grid = (self.anchors[i].clone() * self.stride[i]).view((1, self.na, 1, 1, 2)).expand((1, self.na, ny, nx, 2)).float()return grid, anchor_grid
Model类解析
class Model(nn.Module):def __init__(self, cfg='yolov5s.yaml', ch=3, nc=None, anchors=None): super().__init__()# 字典dict类型if isinstance(cfg, dict):self.yaml = cfg # yaml文件else: self.yaml_file = Path(cfg).name# 用ascii编码,忽略错误的形式打开文件cfgwith open(cfg, encoding='ascii', errors='ignore') as f:self.yaml = yaml.safe_load(f) # 输入通道ch = self.yaml['ch'] = self.yaml.get('ch', ch) # 重写yaml文件中的ncif nc and nc != self.yaml['nc']:LOGGER.info(f"Overriding model.yaml nc={self.yaml['nc']} with nc={nc}")self.yaml['nc'] = nc # 重写yaml文件中的anchors if anchors:LOGGER.info(f'Overriding model.yaml anchors with anchors={anchors}')self.yaml['anchors'] = round(anchors) # 根据yaml文件的model_dict解析模型self.model, self.save = parse_model(deepcopy(self.yaml), ch=[ch]) # 默认类别名字 从0到nc-1self.names = [str(i) for i in range(self.yaml['nc'])] self.inplace = self.yaml.get('inplace', True)# 设置Detect()中的inplace, stride, anchorsm = self.model[-1] if isinstance(m, Detect) or isinstance(m, ASFF_Detect):s = 256m.inplace = self.inplace# 根据前向传播forward 计算步长stridem.stride = torch.tensor([s / x.shape[-2] for x in self.forward(torch.zeros(1, ch, s, s))])# 把anchors放缩到了3个不同的尺度# 这块的形状为什么这样变化??????m.anchors /= m.stride.view(-1, 1, 1)# 根据YOLOv5 Detect()模块m的步幅顺序检查给定锚框顺序,必要时进行纠正。check_anchor_order(m)self.stride = m.strideif m.decoupled:LOGGER.info('decoupled done')pass else:self._initialize_biases() # only run once # 初始化权重weights和偏置biasesinitialize_weights(self)self.info()LOGGER.info('')def forward(self, x, augment=False, profile=False, visualize=False):# 推断时增强augmented inferenceif augment:return self._forward_augment(x) # 单尺度推断single-scale inference 或者训练trainreturn self._forward_once(x, profile, visualize) def _forward_augment(self, x):# height, widthimg_size = x.shape[-2:] s = [1, 0.83, 0.67] # scalesf = [None, 3, None] # flips (2-ud, 3-lr)y = [] # outputsfor si, fi in zip(s, f):xi = scale_img(x.flip(fi) if fi else x, si, gs=int(self.stride.max()))yi = self._forward_once(xi)[0] # forward# cv2.imwrite(f'img_{si}.jpg', 255 * xi[0].cpu().numpy().transpose((1, 2, 0))[:, :, ::-1]) # saveyi = self._descale_pred(yi, fi, si, img_size)y.append(yi)y = self._clip_augmented(y) # clip augmented tailsreturn torch.cat(y, 1), None # augmented inference, traindef _forward_once(self, x, profile=False, visualize=False):y, dt = [], [] for m in self.model:# 输入不是来自于上一个层的输出if m.f != -1: x = y[m.f] if isinstance(m.f, int) else [x if j == -1 else y[j] for j in m.f]if profile:self._profile_one_layer(m, x, dt)# 计算输出x = m(x)y.append(x if m.i in self.save else None) # 特征可视化if visualize:feature_visualization(x, m.type, m.i, save_dir=visualize)return xdef _descale_pred(self, p, flips, scale, img_size):# de-scale predictions following augmented inference (inverse operation)if self.inplace:p[..., :4] /= scale # de-scaleif flips == 2:p[..., 1] = img_size[0] - p[..., 1] # de-flip udelif flips == 3:p[..., 0] = img_size[1] - p[..., 0] # de-flip lrelse:x, y, wh = p[..., 0:1] / scale, p[..., 1:2] / scale, p[..., 2:4] / scale # de-scaleif flips == 2:y = img_size[0] - y # de-flip udelif flips == 3:x = img_size[1] - x # de-flip lrp = torch.cat((x, y, wh, p[..., 4:]), -1)return pdef _clip_augmented(self, y):# Clip YOLOv5 augmented inference tailsnl = self.model[-1].nl # number of detection layers (P3-P5)g = sum(4 ** x for x in range(nl)) # grid pointse = 1 # exclude layer counti = (y[0].shape[1] // g) * sum(4 ** x for x in range(e)) # indicesy[0] = y[0][:, :-i] # largei = (y[-1].shape[1] // g) * sum(4 ** (nl - 1 - x) for x in range(e)) # indicesy[-1] = y[-1][:, i:] # smallreturn ydef _profile_one_layer(self, m, x, dt):c = isinstance(m, Detect) or isinstance(m, ASFF_Detect) # is final layer, copy input as inplace fixo = thop.profile(m, inputs=(x.copy() if c else x,), verbose=False)[0] / 1E9 * 2 if thop else 0 # FLOPst = time_sync()for _ in range(10):m(x.copy() if c else x)dt.append((time_sync() - t) * 100)if m == self.model[0]:LOGGER.info(f"{'time (ms)':>10s} {'GFLOPs':>10s} {'params':>10s} {'module'}")LOGGER.info(f'{dt[-1]:10.2f} {o:10.2f} {m.np:10.0f} {m.type}')if c:LOGGER.info(f"{sum(dt):10.2f} {'-':>10s} {'-':>10s} Total")def _initialize_biases(self, cf=None): # initialize biases into Detect(), cf is class frequency# https://arxiv.org/abs/1708.02002 section 3.3# cf = torch.bincount(torch.tensor(np.concatenate(dataset.labels, 0)[:, 0]).long(), minlength=nc) + 1.m = self.model[-1] # mi--> Conv2d(128, 255, kernel_size=(1, 1), stride=(1, 1)) # s --> tensor(8.)for mi, s in zip(m.m, m.stride): # conv.bias(255) to (3,85)b = mi.bias.view(m.na, -1) b.data[:, 4] += math.log(8 / (640 / s) ** 2) # obj (8 objects per 640 image)b.data[:, 5:] += math.log(0.6 / (m.nc - 0.999999)) if cf is None else torch.log(cf / cf.sum()) # clsmi.bias = torch.nn.Parameter(b.view(-1), requires_grad=True)def _print_biases(self):m = self.model[-1] for mi in m.m: b = mi.bias.detach().view(m.na, -1).T LOGGER.info(('%6g Conv2d.bias:' + '%10.3g' * 6) % (mi.weight.shape[1], *b[:5].mean(1).tolist(), b[5:].mean()))def _print_weights(self):for m in self.model.modules():if type(m) is Bottleneck:LOGGER.info('%10.3g' % (m.w.detach().sigmoid() * 2)) # shortcut weightsdef fuse(self): # fuse model Conv2d() + BatchNorm2d() layersLOGGER.info('Fusing layers... ')for m in self.model.modules():if isinstance(m, (Conv, DWConv)) and hasattr(m, 'bn'):m.conv = fuse_conv_and_bn(m.conv, m.bn) # update convdelattr(m, 'bn') # remove batchnormm.forward = m.forward_fuse # update forwardself.info()return selfdef info(self, verbose=False, img_size=640): # 打印模型信息model_info(self, verbose, img_size)def _apply(self, fn):# Apply to(), cpu(), cuda(), half() to model tensors that are not parameters or registered buffersself = super()._apply(fn)m = self.model[-1] # Detect()if isinstance(m, Detect) or isinstance(m, ASFF_Detect) or isinstance(m, Decoupled_Detect):m.stride = fn(m.stride)m.grid = list(map(fn, m.grid))if isinstance(m.anchor_grid, list):m.anchor_grid = list(map(fn, m.anchor_grid))return self
parse_model函数
def parse_model(d, ch): # model_dict, input_channels(3)LOGGER.info(f"\n{'':>3}{'from':>18}{'n':>3}{'params':>10} {'module':<40}{'arguments':<30}")# nc:类别数; gd:'depth_multiple'; gw:'width_multiple'anchors, nc, gd, gw = d['anchors'], d['nc'], d['depth_multiple'], d['width_multiple']# anchor数目, 每层为3na = (len(anchors[0]) // 2) if isinstance(anchors, list) else anchors # 每层的输出,na*(classes+5)no = na * (nc + 5) # layers, savelist, ch_outlayers, save, c2 = [], [], ch[-1] # from, number, module, args# 以[-1, 1, Conv, [64, 6, 2, 2]为例, ch=[3], f=-1, n=1, m=Conv, args=[64, 6, 2, 2]# [-1, 1, Conv, [128, 3, 2]# [-1, 3, C3, [128]]# [-1, 1, SPPF, [1024, 5]]# [-1, 1, nn.Upsample, [None, 2, 'nearest']]# [[-1, 6], 1, Concat, [1]]# [-1, 3, C3, [512, False]]for i, (f, n, m, args) in enumerate(d['backbone'] + d['head']):# 把strings转为本身的类型m = eval(m) if isinstance(m, str) else m for j, a in enumerate(args):try:# 列表形式args[j] = eval(a) if isinstance(a, str) else a except NameError:pass# depth_gain 深度缩放因子n = n_ = max(round(n*gd), 1) if n > 1 else n # 对于不同类型的卷积模块 if m in [Conv, DWConv, CrossConv, GhostConv, Bottleneck, GhostBottleneck,BottleneckCSP, MobileBottleneck, SPP, SPPF, MixConv2d, Focus,InvertedResidual, ConvBNReLU, C3, C3TR, C3SPP, C3Ghost, CoordAtt,CoordAttv2, OSA_Stage]:# i=0, c1=3, c2=64; # i=1, c1=32, c2=128; # i=2, c1=64, c2=128;# c1输入通道;c2输出通道;c1, c2 = ch[f], args[0]# width_gain 宽度缩放因子# 说明不是输出if c2 != no: # 输出通道数必须为8的倍数c2 = make_divisible(c2*gw, 8)# i=0, [3, 32, 6, 2, 2]# i=1, [32, 64, 3, 2]# i=2, [64, 64]args = [c1, c2, *args[1:]]# 堆叠次数number of repeats# 注意网络设计理念:stage ---> block ---> layerif m in [BottleneckCSP, C3, C3TR, C3Ghost]:args.insert(2, n) n = 1elif m is nn.BatchNorm2d:args = [ch[f]]elif m is Concat:c2 = sum(ch[x] for x in f)elif m is Detect:args.append([ch[x] for x in f])if isinstance(args[1], int): # number of anchorsargs[1] = [list(range(args[1] * 2))] * len(f)elif m is ASFF_Detect :args.append([ch[x] for x in f])if isinstance(args[1], int): # number of anchorsargs[1] = [list(range(args[1] * 2))] * len(f) elif m is Contract:c2 = ch[f] * args[0] ** 2elif m is Expand:c2 = ch[f] // args[0] ** 2elif m is ConvNeXt_Block:c2 = args[0]args = args[1:]else:c2 = ch[f]# module# Conv(3, 32, 6, 2, 2]m_ = nn.Sequential(*(m(*args) for _ in range(n))) if n > 1 else m(*args) # m ===> <class 'models.common.Conv'># str(m)[8:-2] ===> models.common.Convt = str(m)[8:-2].replace('__main__.', '') # 参数(parameters)/模型参数, 由模型通过学习得到的变量,比如权重和偏置.# m_.parameters(): <generator object Module.parameters at 0x7fcf4c2059d0>np = sum(x.numel() for x in m_.parameters()) # attach index, 'from' index, type, number paramsm_.i, m_.f, m_.type, m_.np = i, f, t, np LOGGER.info(f'{i:>3}{str(f):>18}{n_:>3}{np:10.0f} {t:<40}{str(args):<30}') # savelist [6, 4, 14, 10, 17, 20, 23]save.extend(x % i for x in ([f] if isinstance(f, int) else f) if x != -1) # layers列表layers.append(m_)if i == 0:ch = []# ch列表ch.append(c2)return nn.Sequential(*layers), sorted(save)
相关文章:
YOLOv5代码解读[02] models/yolov5l.yaml文件解析
文章目录 YOLOv5代码解读[02] models/yolov5l.yaml文件解析yolov5l.yaml文件检测头1--->耦合头检测头2--->解耦头检测头3--->ASFF检测头Model类解析parse_model函数 YOLOv5代码解读[02] models/yolov5l.yaml文件解析 yolov5l.yaml文件 # YOLOv5 🚀 by Ult…...
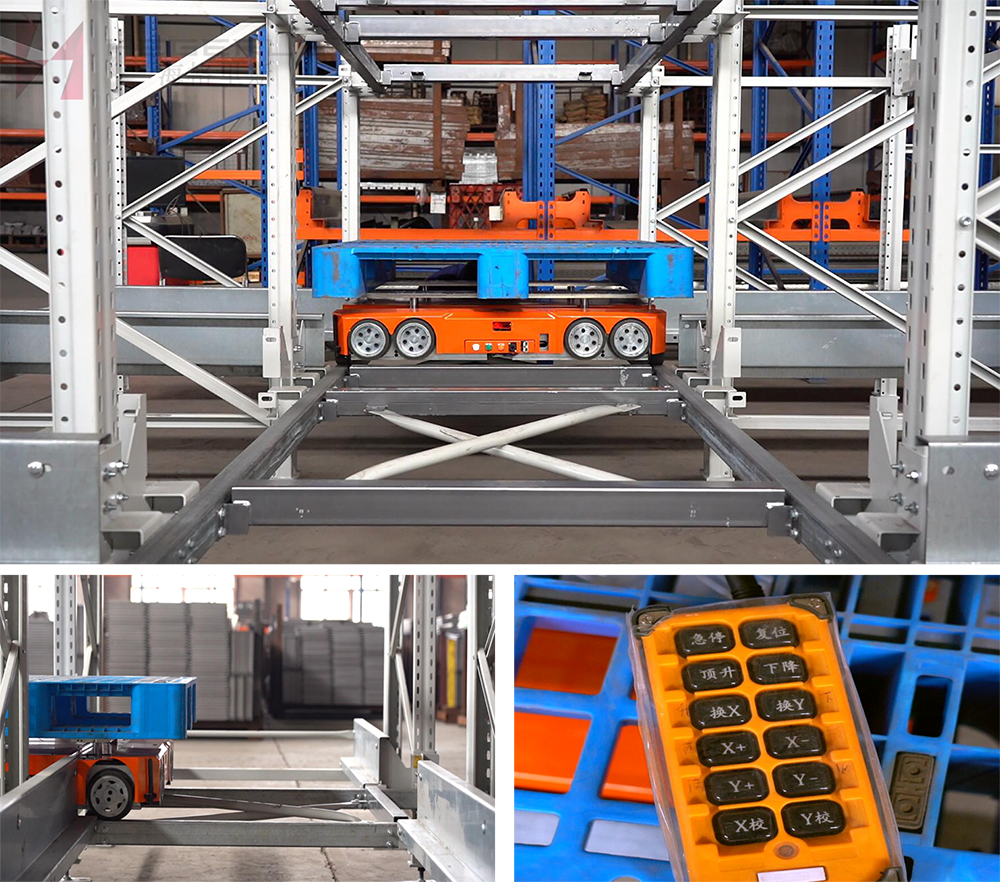
智能搬运机器人|海格里斯将如何持续推进工业和物流的智能化升级与发展?
存取、搬运、分拣是物流行业中的通用功能,但具体到每个行业又十分不同,例如:新能源电池领域,它所搬运的东西是电池,50KG~200KG;快递行业领域,所要处理的物料是那种扁平件和信封等等,…...
linux之前后端项目部署与发布
目录 前言 简介 一、安装Nginx 二、后端部署 2.1多个tomcat负载均衡 2.2 负载均衡 2.3 后端项目部署 三、前端部署 1.解压前端 2.Nginx配置文件修改 3.IP域名映射 4.重启Nginx服务 前言 上篇博主已经讲解过了单机项目的部署linux之JAVA环境配置JDK&Tomcat&a…...

Python 高级语法:一切皆对象
1 “一切皆对象”是一种核心设计哲学 在编程领域,特别是面向对象编程(OOP)中,“一切皆对象”是一种核心设计哲学。这种哲学主张,无论是数据、函数、还是更复杂的结构,都可以被视为对象,并赋予…...
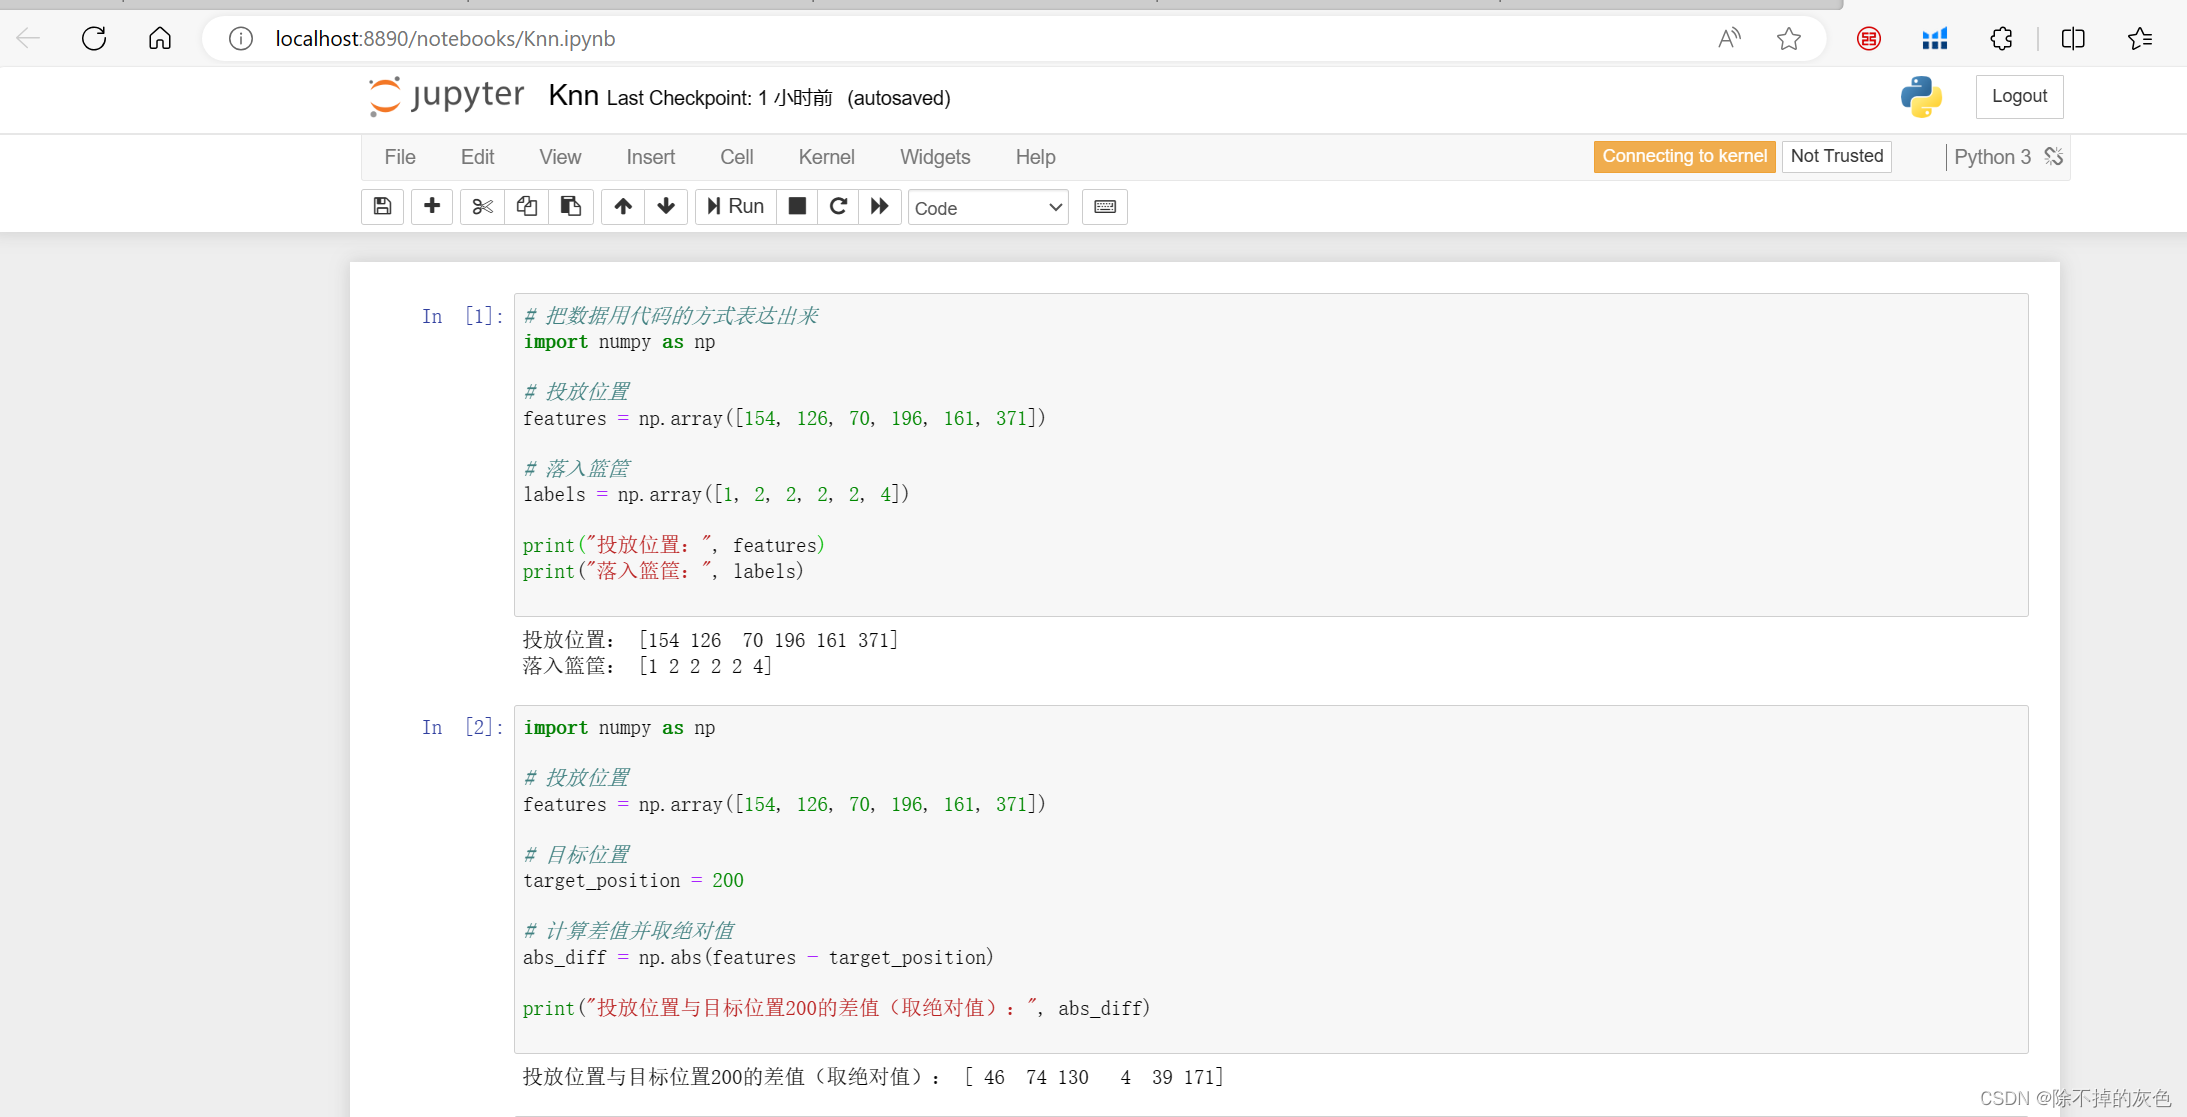
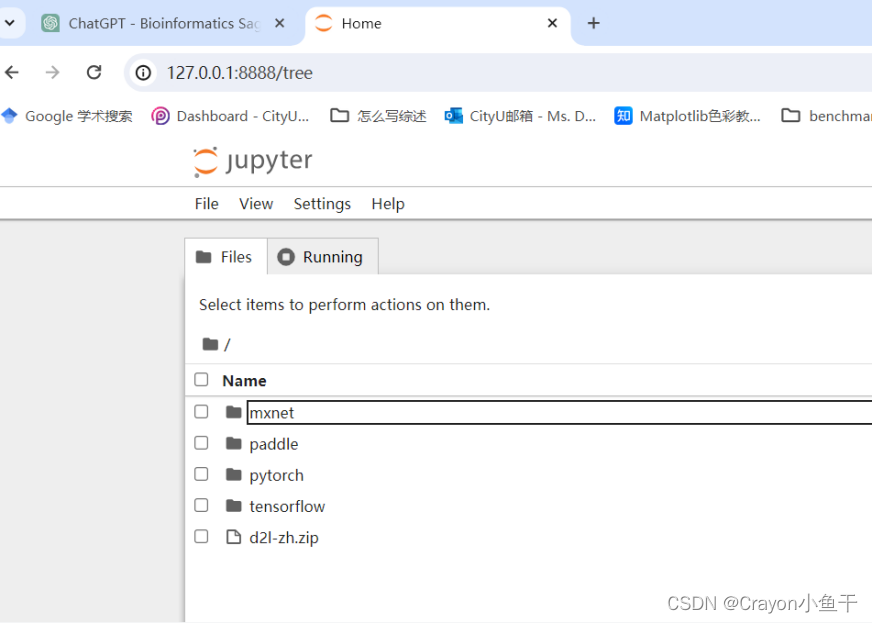
python jupyter notebook打开页面方便使用
如果没安装jupyter, 请安装: pip install jupyter notebook 运行jupyter notebook jupyter-notebook...
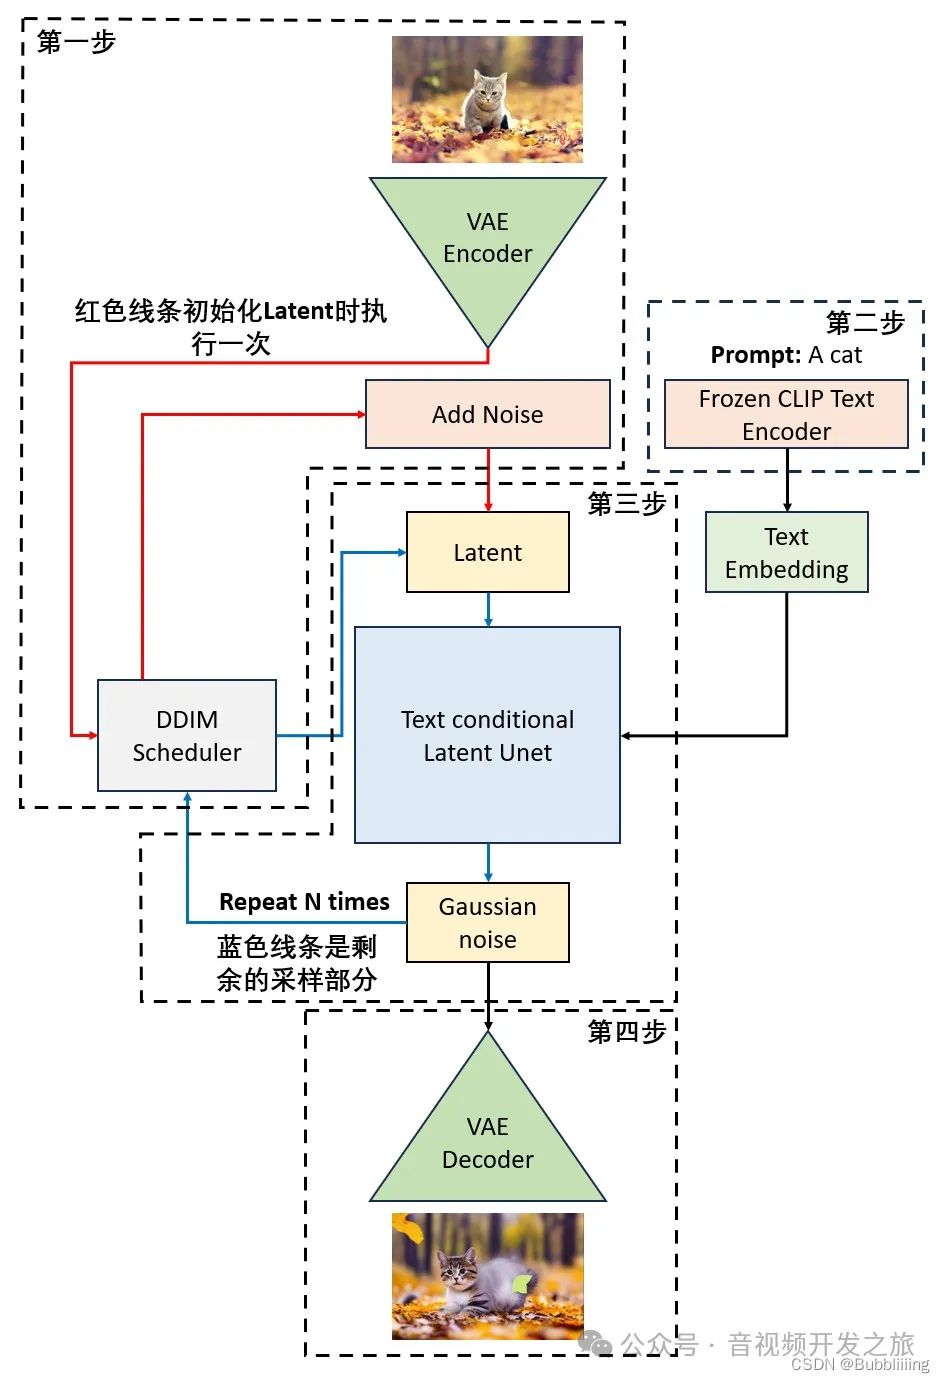
音视频开发之旅(69)-SD图生图
目录 1. 效果展示 2. ControlNet介绍 3. 图生图流程浅析 4. SDWebui图生图代码流程 5. 参考资料 一、效果展示 图生图的应用场景非常多,比较典型的应用场景有风格转化(真人与二次元)、线稿上色、换装和对图片进行扩图等,下面…...
)
數據集成平台:datax將hive數據步到mysql(全部列和指定列)
數據集成平台:datax將hive數據步到mysql(全部列和指定列) 1.py腳本 傳入參數: target_database:數據庫 target_table:表 target_columns:列 target_positions:hive列的下標&#x…...
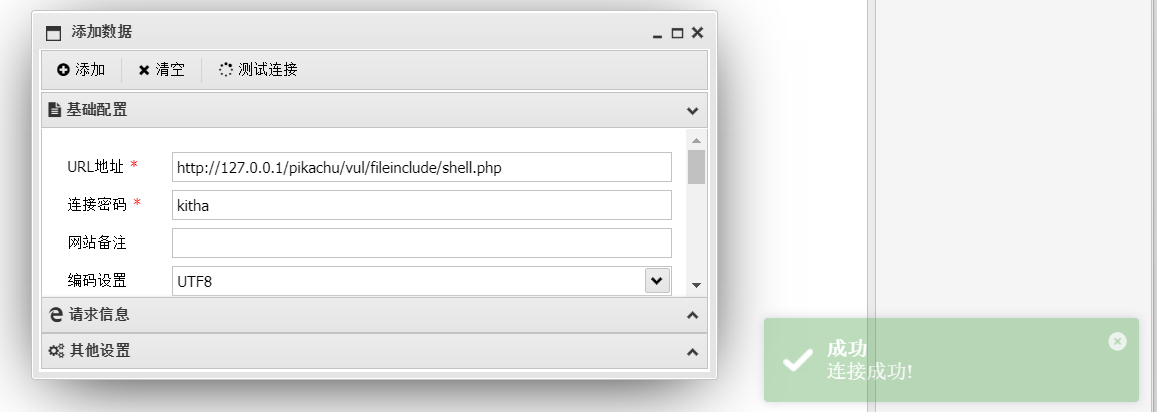
pikachu靶场-File Inclusion
介绍: File Inclusion(文件包含漏洞)概述 文件包含,是一个功能。在各种开发语言中都提供了内置的文件包含函数,其可以使开发人员在一个代码文件中直接包含(引入)另外一个代码文件。 比如 在PHP中,提供了&…...

[今天跟AI聊聊职场] ~你能接受你的直接领导能力不如你,年纪还比你小很多吗?
知乎问题: 弟弟今年35岁,刚换了一份工作,直接领导小A比他小5岁,各方面经验没有他成熟。难的工作都是弟弟在做,功劳都被直接领导小A抢走了,有时候还要被直接领导小A打压。弟弟感觉升职加薪无望。现在找工作不…...
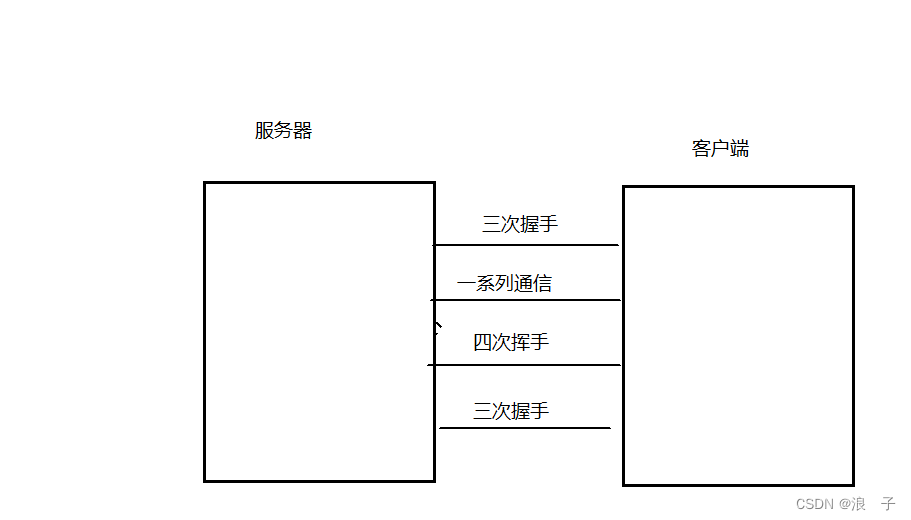
网络原理TCP之“三次握手“
TCP内核中的建立连接 众所周知,TCP是有连接的. 当我们在客户端敲出socket new Socket(serverIp,severPort)时,就在系统内核就在建立连接 真正建立连接是在系统内核中建立的,我们程序员只是调用相关的api. 在此处,我们把TCP的建立连接称为三次握手. 系统在内核建立连接时如上…...

990-03产品经理与程序员:什么是 IT 与业务协调以及为什么它很重要?
What is IT-business alignment and why is it important? 什么是IT-业务一致性?为什么它很重要? It’s more important than ever that IT and the business operate from the same playbook(剧本). So why do so many organizations struggle to ach…...
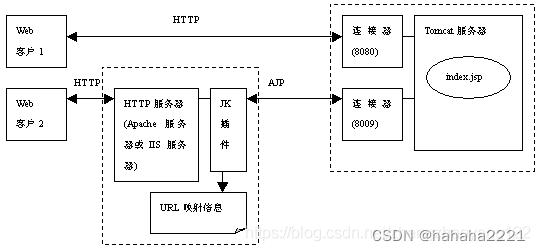
Java Web(七)__Tomcat(二)
Tomcat工作模式 Tomcat作为Servlet容器,有以下三种工作模式。 1)独立的Servlet容器,由Java虚拟机进程来运行 Tomcat作为独立的Web服务器来单独运行,Servlet容器组件作为Web服务器中的一部分而存在。这是Tomcat的默认工作模式。…...

【项目实战】帮美女老师做一个点名小程序(Python tkinter)
前言 博主有一个非常漂亮的老师朋友😍。最近,她急需一个能够实现随机点名的小程序,而博主正好擅长这方面的技术🤏。所以,今天博主决定为她制作一个专门用于点名的小程序💪。 博主在美女老师面前吹完牛皮之…...

Elasticsearch 去重后求和
标题的要求可以用如下 SQL 表示 select sum(column2) from (select distinct(column1),column2 from table)t 要如何用 DSL 实现呢,先准备下索引和数据 PUT test_index {"mappings": {"properties": {"column1": {"type"…...
)
考研数学——高数:函数与极限(3)
函数的连续性与间断点 函数的连续性 左连续 右连续 区间上的连续性 在xo处连续 函数的间断点 第一类间断点(左右极限都存在) 可去间断点: f(xo-0)= f(xo+0) 跳跃间断点: f(xo-0)≠ f(xo+0) 第二类间断点(震荡间断点、无穷间断点)...

LeetCode49 字母异位词分组
LeetCode49 字母异位词分组 在这篇博客中,我们将探讨 LeetCode 上的一道经典算法问题:字母异位词分组。这个问题要求将给定的字符串数组中的字母异位词组合在一起,并以任意顺序返回结果列表。 问题描述 给定一个字符串数组 strs࿰…...
【Python】Windows本地映射远程Linux服务器上的端口(解决jupyter notebook无法启动问题)
创作日志: 学习深度学习不想在本地破电脑上再安装各种软件,我就用实验室的服务器配置环境,启动jupyter notebook时脑子又瓦特了,在自己Windows电脑上打开服务器提供的网址,那肯定打不开啊,以前在其它电脑上…...

C++面试:用户态和内核态的基本概念、区别
目录 一、基本概念 概念: 区别: 二、Windows示例 基础介绍 用户态到内核态的切换过程: 程序实例 三、Linux示例 特权级别: 用户态到内核态的切换过程: 调度和中断处理: 程序实例 总结 在操作系…...
)
Vue计算属性computed()
1. 计算属性定义 获取计算属性值 <div>{{ 计算属性名称}}</div>创建计算属性 let 定义的属性ref/reactive....let 计算属性名称 computed(() > {//这里写函数式,函数式里面包含定义属性//只有这个包含的定义属性被修改时才出发此函数式//通过计算属性名称co…...
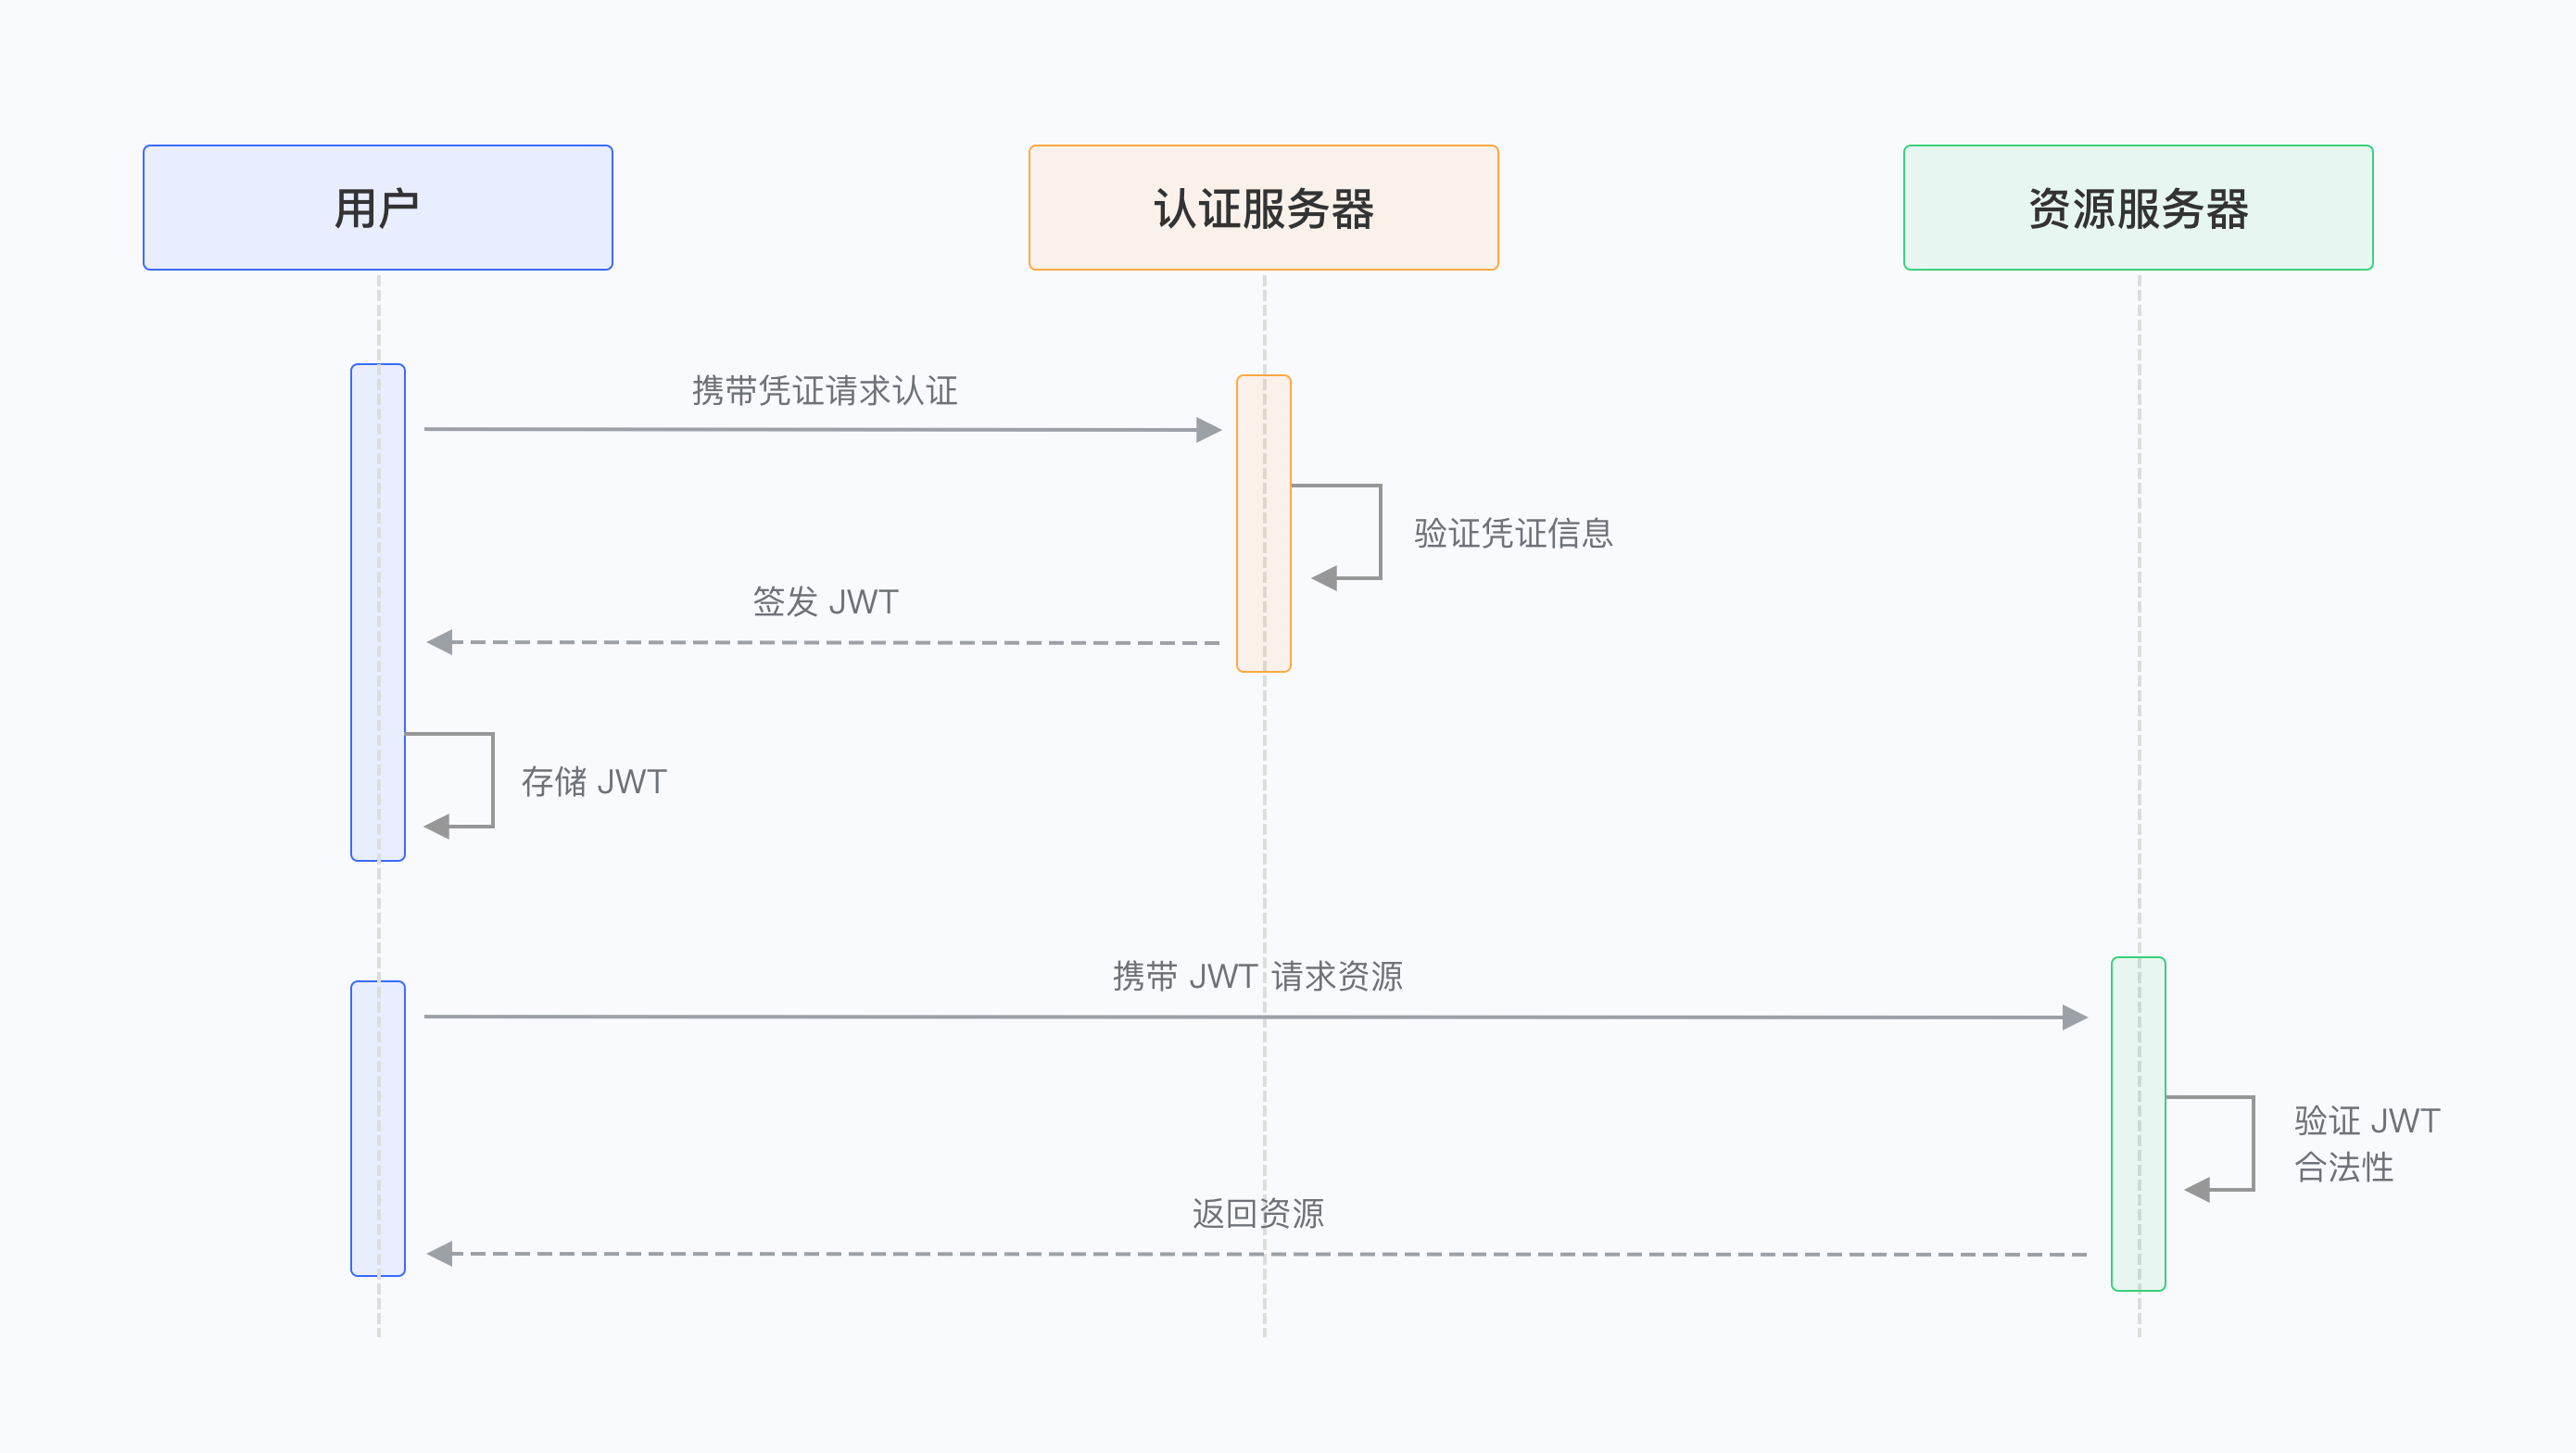
JWT学习笔记
了解 JWT Token 释义及使用 | Authing 文档 JSON Web Token Introduction - jwt.io JSON Web Token (JWT,RFC 7519 (opens new window)),是为了在网络应用环境间传递声明而执行的一种基于 JSON 的开放标准((RFC 7519)。该 token 被设计为紧凑…...

小学生如何学好GESP
一、按年龄段科学规划学习路径 1. 6–9岁(小学低年级):重在逻辑启蒙,不急于学代码 A、核心任务:培养计算思维、问题拆解、条件判断等能力。 B、推荐方式: (1)、…...

【资讯】《二〇二五年中国知识产权保护状况》白皮书正式发布
2026年5月7日,《二〇二五年中国知识产权保护状况》白皮书正式发布,呈现了2025年中国知识产权保护工作进展,系统介绍制度建设、审批登记、文化建设、国际合作等方面的扎实成果,为社会各界和国际社会了解中国知识产权保护最新实践提…...

CIMR-V架构:RISC-V与存内计算融合的边缘AI加速方案
1. CIMR-V架构设计背景与核心挑战在边缘AI设备领域,能效比和实时性是两个最关键的指标。传统冯诺依曼架构中"内存墙"问题尤为突出——数据在存储单元和计算单元之间的频繁搬运消耗了系统60%以上的能量。存内计算(CIM)技术通过将计算单元嵌入存储阵列&…...

Neovim原生GitHub Copilot客户端gp.nvim:从安装配置到高级实战
1. 项目概述:一个为Neovim量身打造的GitHub Copilot客户端如果你和我一样,是个重度Neovim用户,同时又对GitHub Copilot这类AI编程助手爱不释手,那你肯定也经历过那种“鱼与熊掌”的纠结时刻。在VSCode里,Copilot的集成…...

从LLM到智能体:基于推理循环的AI应用开发框架解析
1. 项目概述:一个面向推理任务的智能体框架最近在探索如何让AI模型更“聪明”地处理复杂任务时,我注意到了GitHub上一个名为“zyron-reasoning”的项目。这个由kaiogs07维护的仓库,其核心定位是一个用于构建和运行“推理智能体”的框架。简单…...

sagents框架实战:从零构建具备记忆与协作能力的AI智能体
1. 项目概述:一个面向开发者的AI智能体构建框架最近在AI应用开发领域,一个名为sagents的开源项目引起了我的注意。它不是一个直接面向终端用户的聊天机器人,而是一个旨在帮助开发者快速构建、管理和编排复杂AI智能体(Agent&#x…...

从 LLM 到 Agent:Harness Engineering 的角色演变
从 LLM 到 Agent:Harness Engineering 的角色演变 本文字数:约10200字 | 阅读时间:25分钟 | 适合人群:AI算法工程师、产品经理、技术负责人、AI应用开发者 1. 引入与连接:被忽略的AI落地核心桥梁 1.1 开场:一个真实的AI落地场景 2024年中,某互联网公司运维团队负责人李…...

开发者技能图谱实战指南:从碎片化学习到系统性成长
1. 项目概述:一个面向开发者的技能图谱与实战指南最近在GitHub上看到一个挺有意思的项目,叫moltoffer/moltoffer-skills。光看名字,你可能会觉得这又是一个“面试宝典”或者“八股文合集”。但当我点进去仔细研究后,发现它的定位远…...
)
科研绘图避坑指南:手把手教你用Cytoscape处理String PPI数据(TSV文件导入、节点筛选与双环图制作)
科研绘图避坑指南:Cytoscape实战PPI网络分析与双环图设计 在生物医学研究中,蛋白互作网络(PPI)可视化是揭示分子机制的重要工具。许多研究者在使用String数据库和Cytoscape软件时会遇到数据导入失败、节点筛选困难、图形美化耗时等问题。本文将针对这些痛…...

Agentica:模块化AI智能体框架的设计、实现与生产部署指南
1. 项目概述:当AI智能体遇上开源协作最近在AI智能体这个圈子里,一个名为“Agentica”的项目开始引起不少开发者的注意。它不是一个单一的AI应用,而是一个由wrtnlabs团队发起的开源项目,旨在构建一个模块化、可扩展的AI智能体框架。…...