Spring重点记录
文章目录
- 1.Spring的组成
- 2.Spring优点
- 3.IOC理论推导
- 4.IOC本质
- 5.IOC实现:xml或者注解或者自动装配(零配置)。
- 6.hellospring
- 6.1beans.xml的结构为:
- 6.2.Spring容器
- 6.3对象的创建和控制反转
- 7.IOC创建对象方式
- 7.1以有参构造的方式创建对象:
- 8.spring配置说明
- 8.1别名
- 8.2Bean的配置
- 8.3import
- 9.依赖注入方式
- 9.1三种注入方式
- 9.2.set注入方式(`重点`)
- 9.3.p命名空间和c命名空间注入:
- 9.4.bean的作用域:
- 10.Bean的自动装配
- 11.注解实现自动装配
- 11.1 在beans.xml中加入注解支持:
- 11.2注解实例
- 11.3@Resource和@Autowired的区别
- 12.使用注解开发
- 12.1注解的应用场景
- 12.2注解说明:
- 13.使用javaconfig实现配置
- 13.1配置类实现配置的步骤:
- 13.2回顾:
- 14.代理
- 14.1.静态代理模式:
- 14.2.动态代理:
- 14.3代理类ProxyInvocationHandler.java
- 15.AOP
- 15.1.什么是AOP?
- 15.2.使用spring实现AOP
- 15.2.1方式一:使用原生的Spring API接口
- 15.2.2方式二:自定义diy类
- 15.2.3方式三:使用注解方式实现AOP
- 16.整合Mybatis
- 1.导入相关jar包:
- 2.编写配置文件
- 3.实体类,Mapper及xml文件和实现类
- 1.UserMapperImpl
- 2.UserMapperImpl2
- 17.Spring声明式事务
- 17.1回顾事务
- 17.2配置声明式事务
- 17.3spring中的事务管理
1.Spring的组成
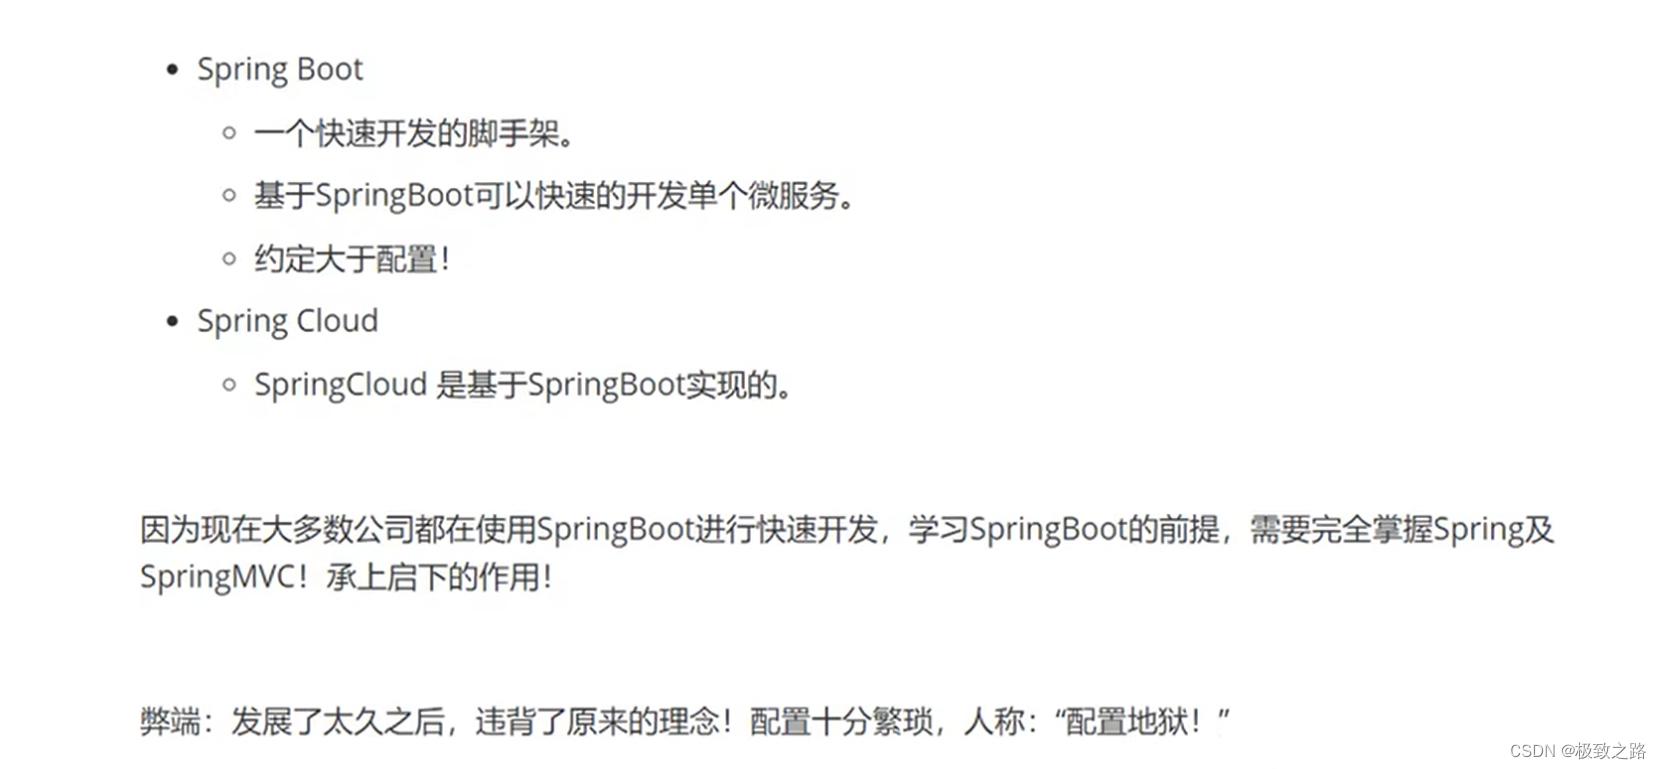
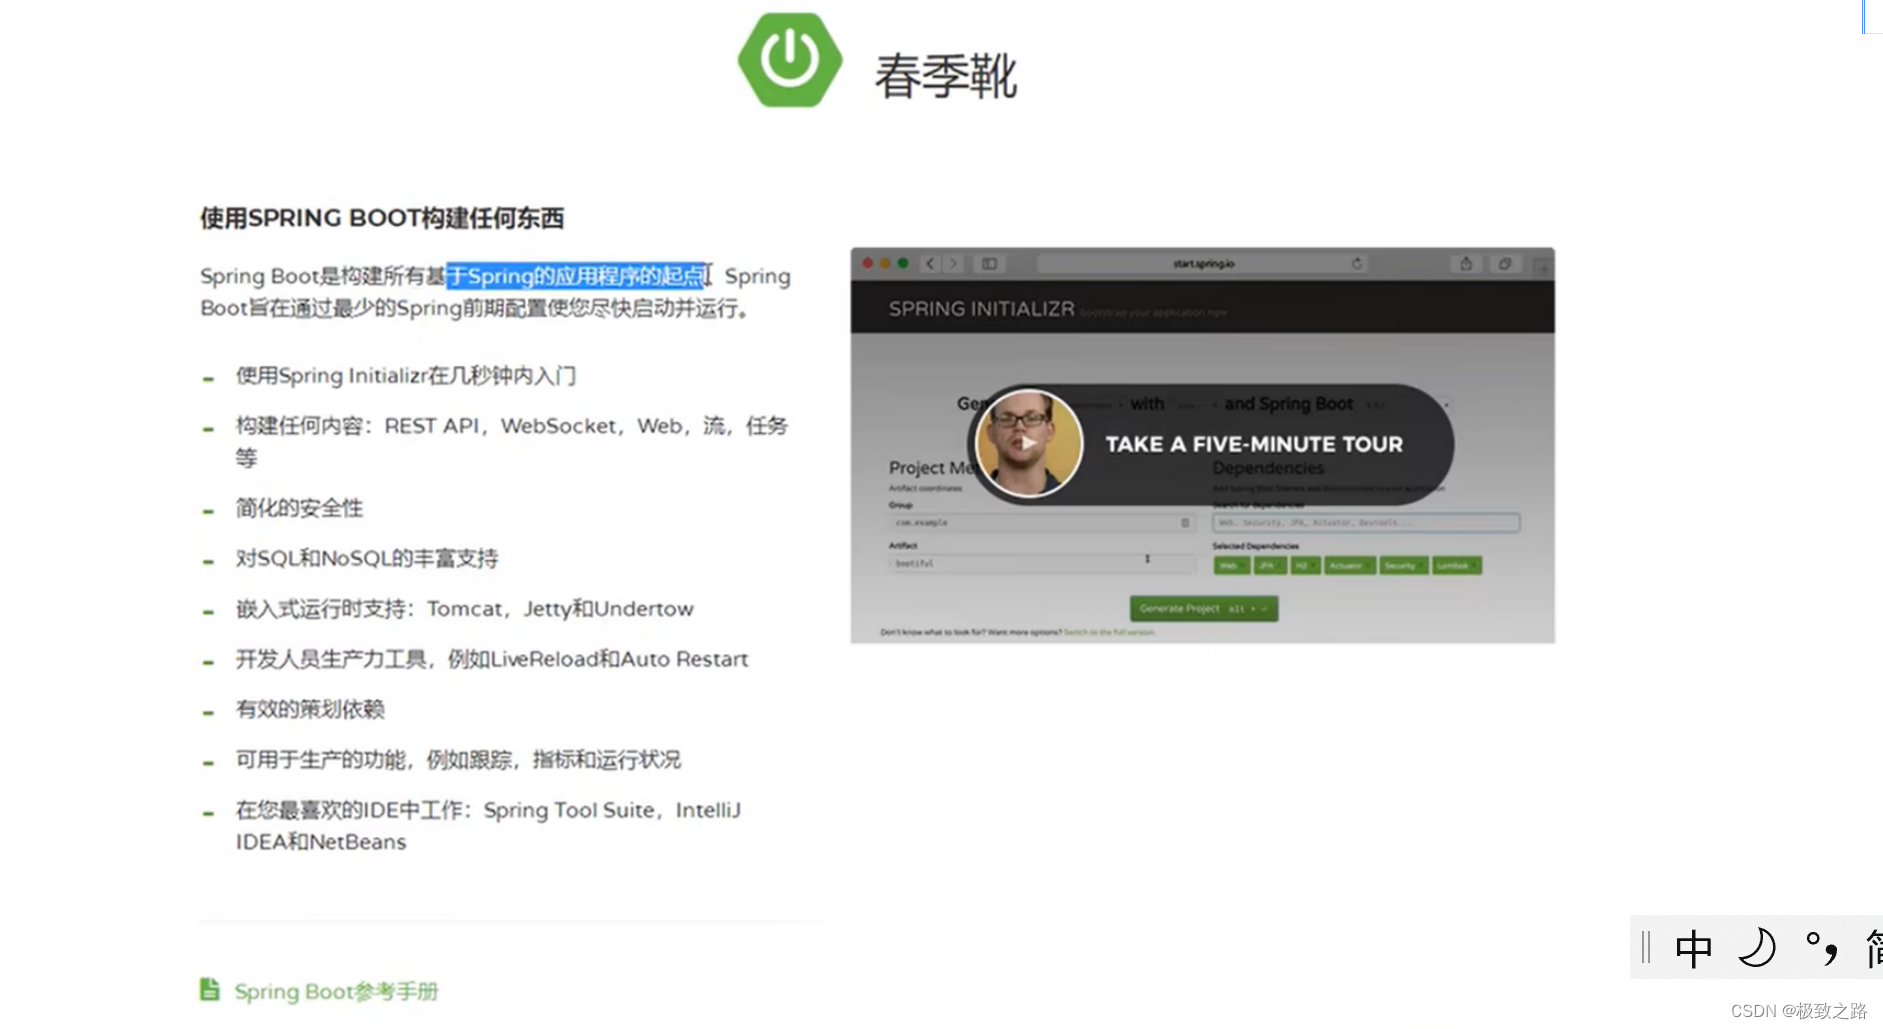
2.Spring优点

3.IOC理论推导
IOC(控制反转):获得依赖对象的方式反转了。
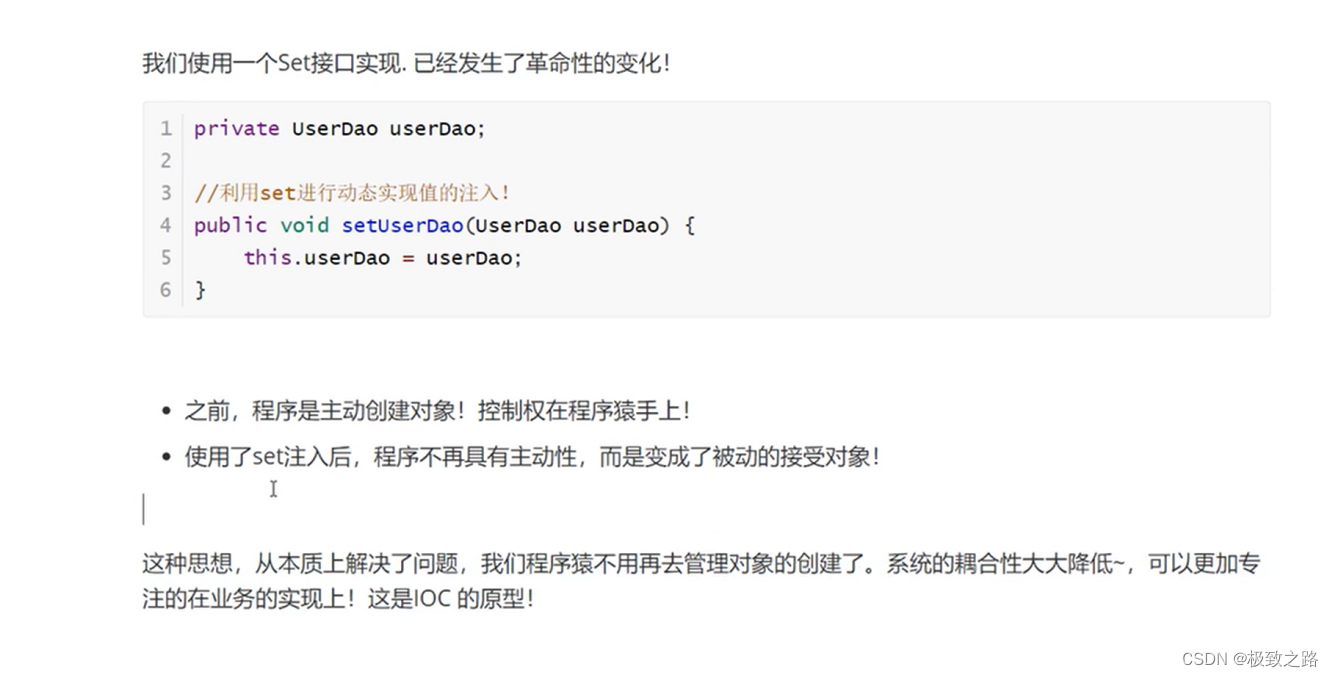
控制反转后,主动权交给用户了,不在程序员手上了。
4.IOC本质
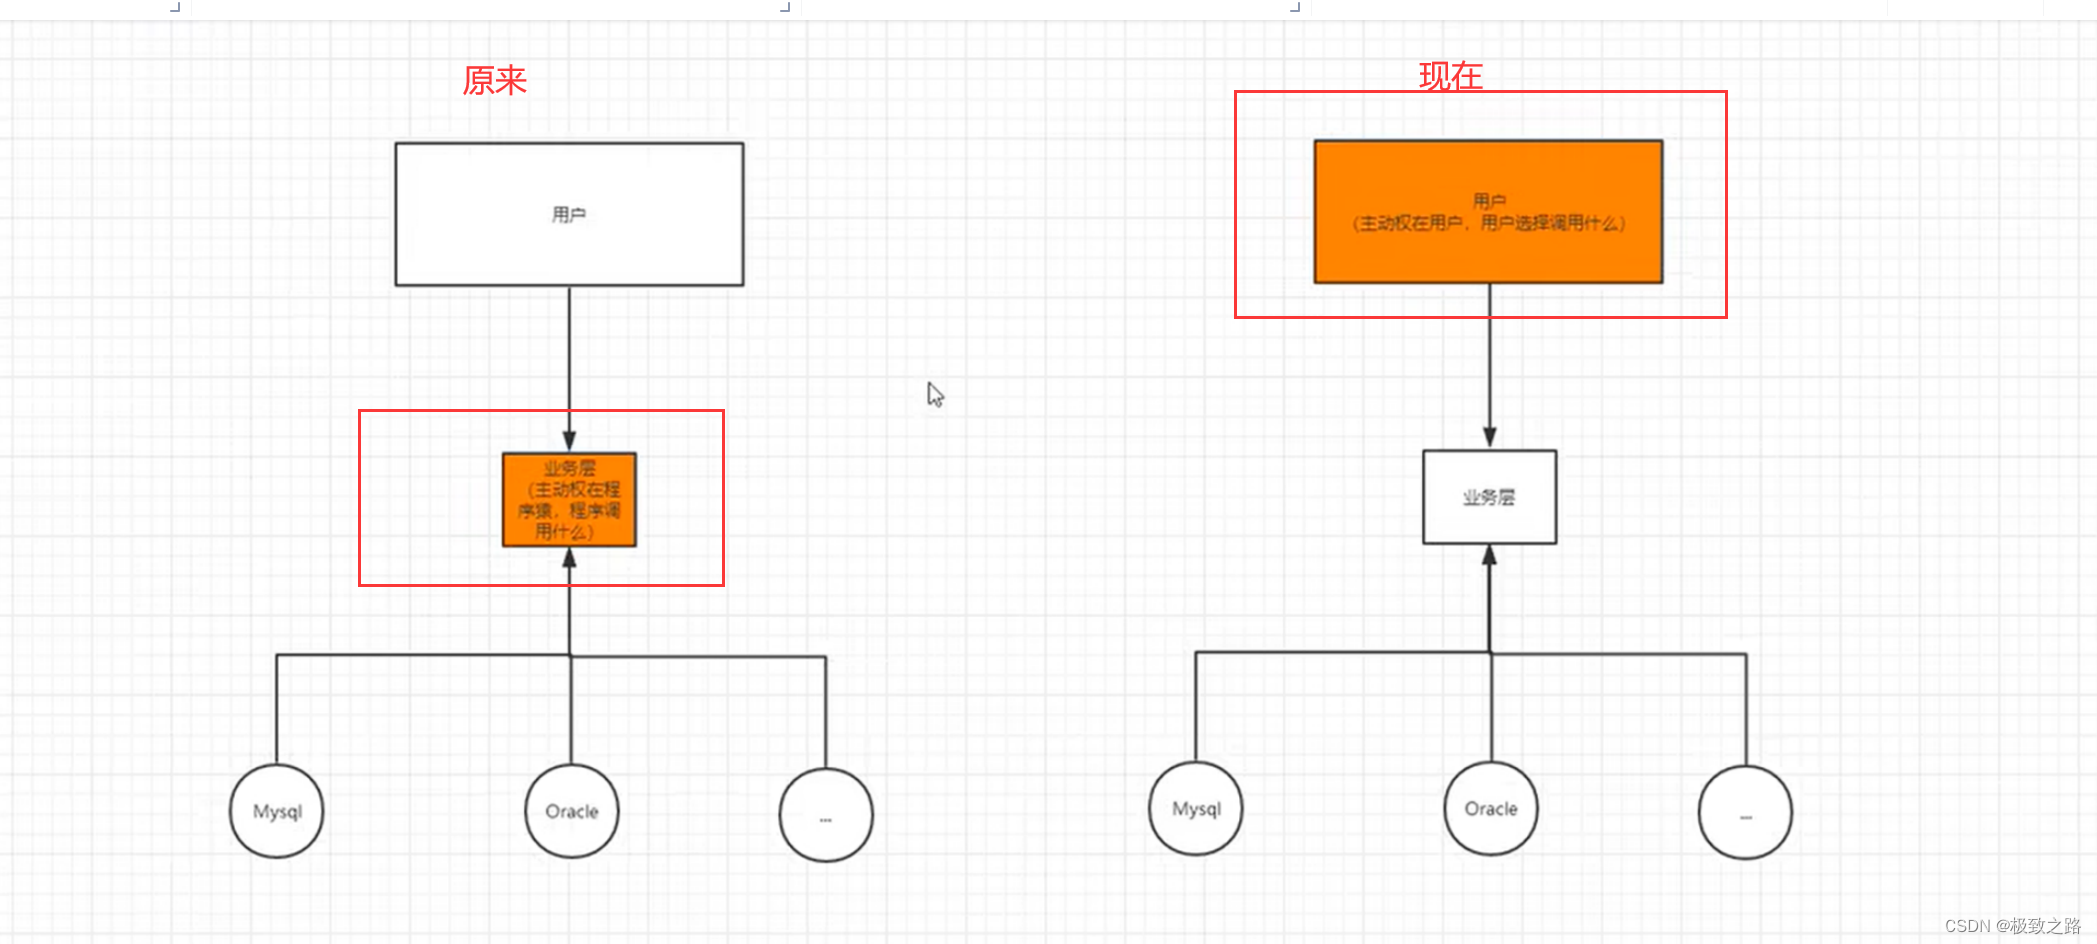
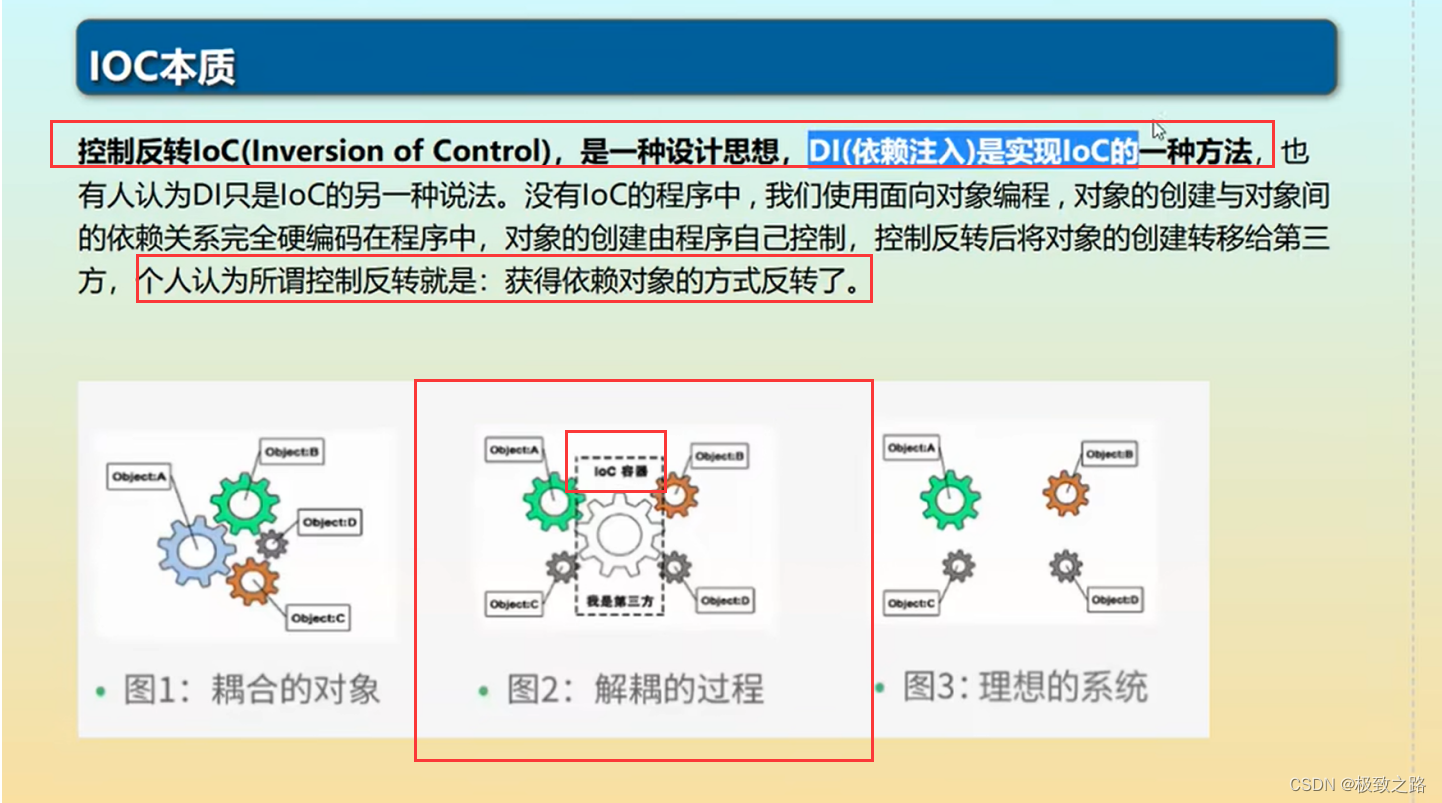
ioc容器把他们解耦了。通过接口的调用就没有原来的强联系了。
5.IOC实现:xml或者注解或者自动装配(零配置)。

6.hellospring
spring核心配置文件官方名:applicationContext.xml。
这里记为beans.xml。
6.1beans.xml的结构为:
<?xml version="1.0" encoding="UTF-8"?>
<beans xmlns="http://www.springframework.org/schema/beans"xmlns:xsi="http://www.w3.org/2001/XMLSchema-instance"xsi:schemaLocation="http://www.springframework.org/schema/beanshttp://www.springframework.org/schema/beans/spring-beans-3.0.xsd "></beans>
Hello.java
public class Hello {public String str;public String getStr() {return str;}public void setStr(String str) {this.str = str;}@Overridepublic String toString() {return "hello{" +"str='" + str + '\'' +'}';}
}
beans.xml
<?xml version="1.0" encoding="UTF-8"?>
<beans xmlns="http://www.springframework.org/schema/beans"xmlns:xsi="http://www.w3.org/2001/XMLSchema-instance"xsi:schemaLocation="http://www.springframework.org/schema/beanshttp://www.springframework.org/schema/beans/spring-beans-3.0.xsd "><!--使用spring创建对象,在spring中这些都成为bean--><bean id="hello" class="com.kuang.pojo.Hello"><property name="str" value="SPRING"/></bean></beans>
MyTest测试:
public class MyTest {public static void main(String[] args) {//获取spring的上下文对象ApplicationContext context=new ClassPathXmlApplicationContext("beans.xml");//对象都在spring容器中管理,要使用,直接取出就可以了Hello hello = (Hello) context.getBean("hello");System.out.println(hello.toString());}
}
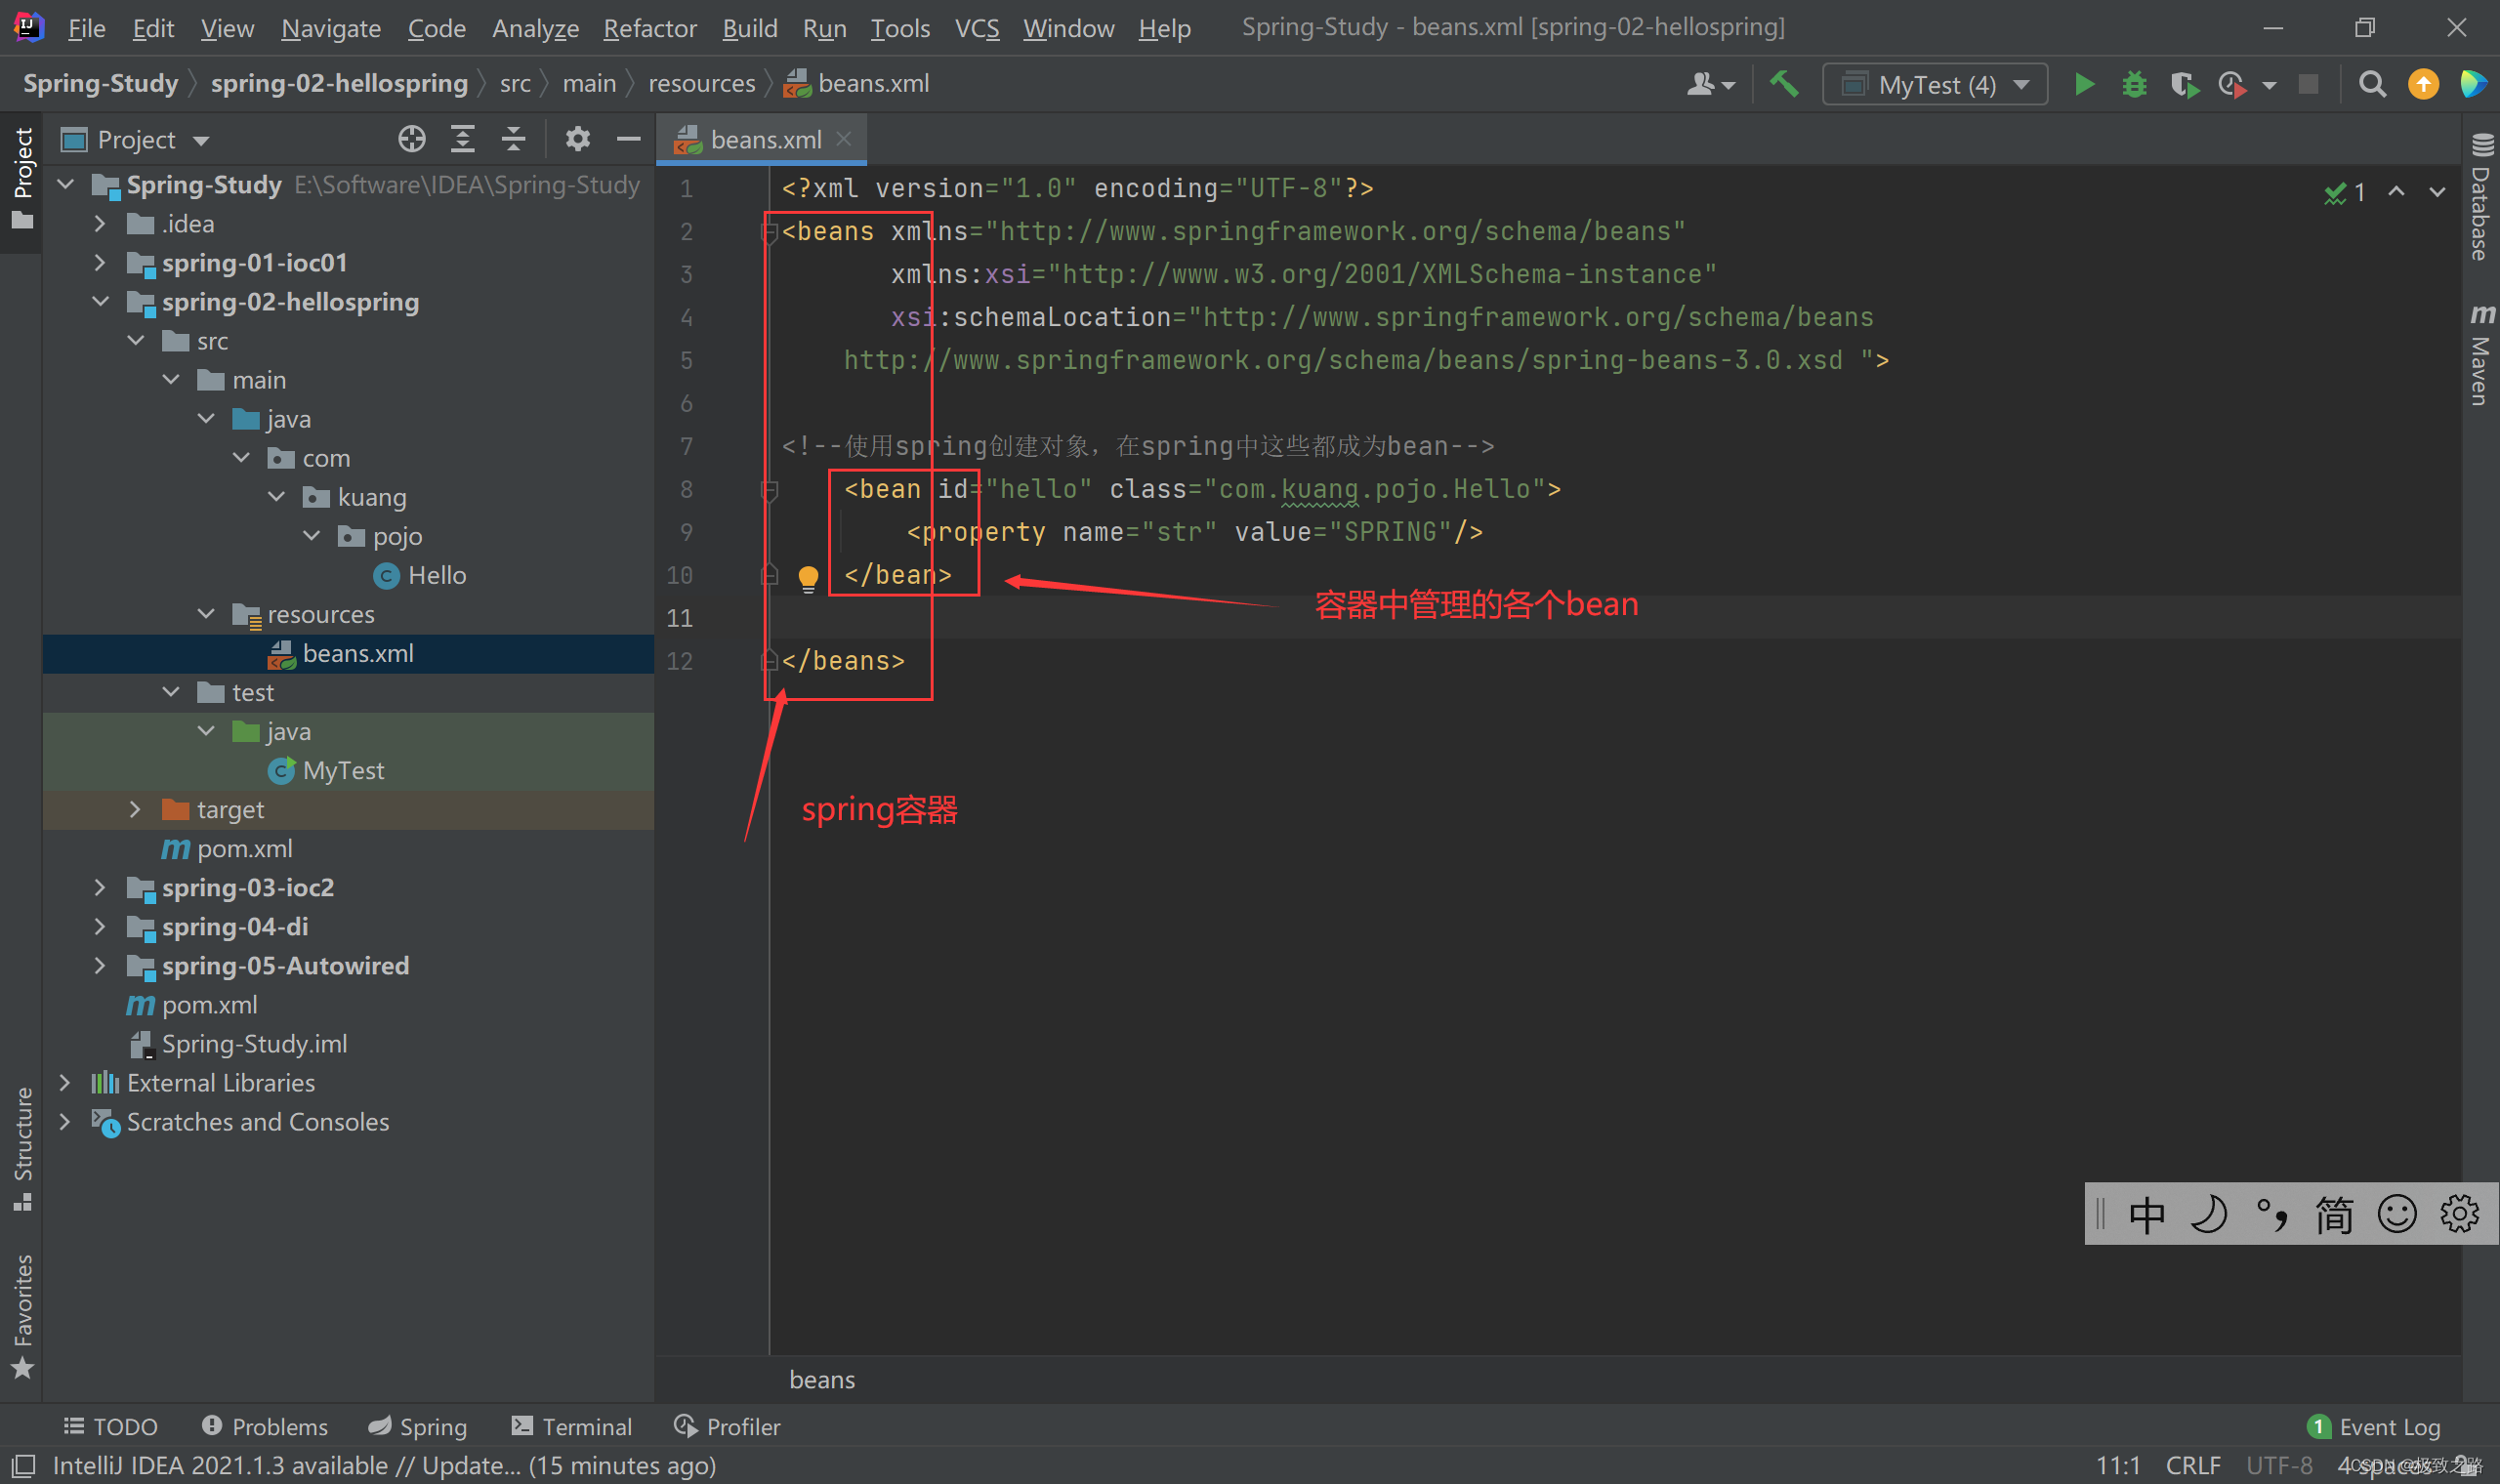
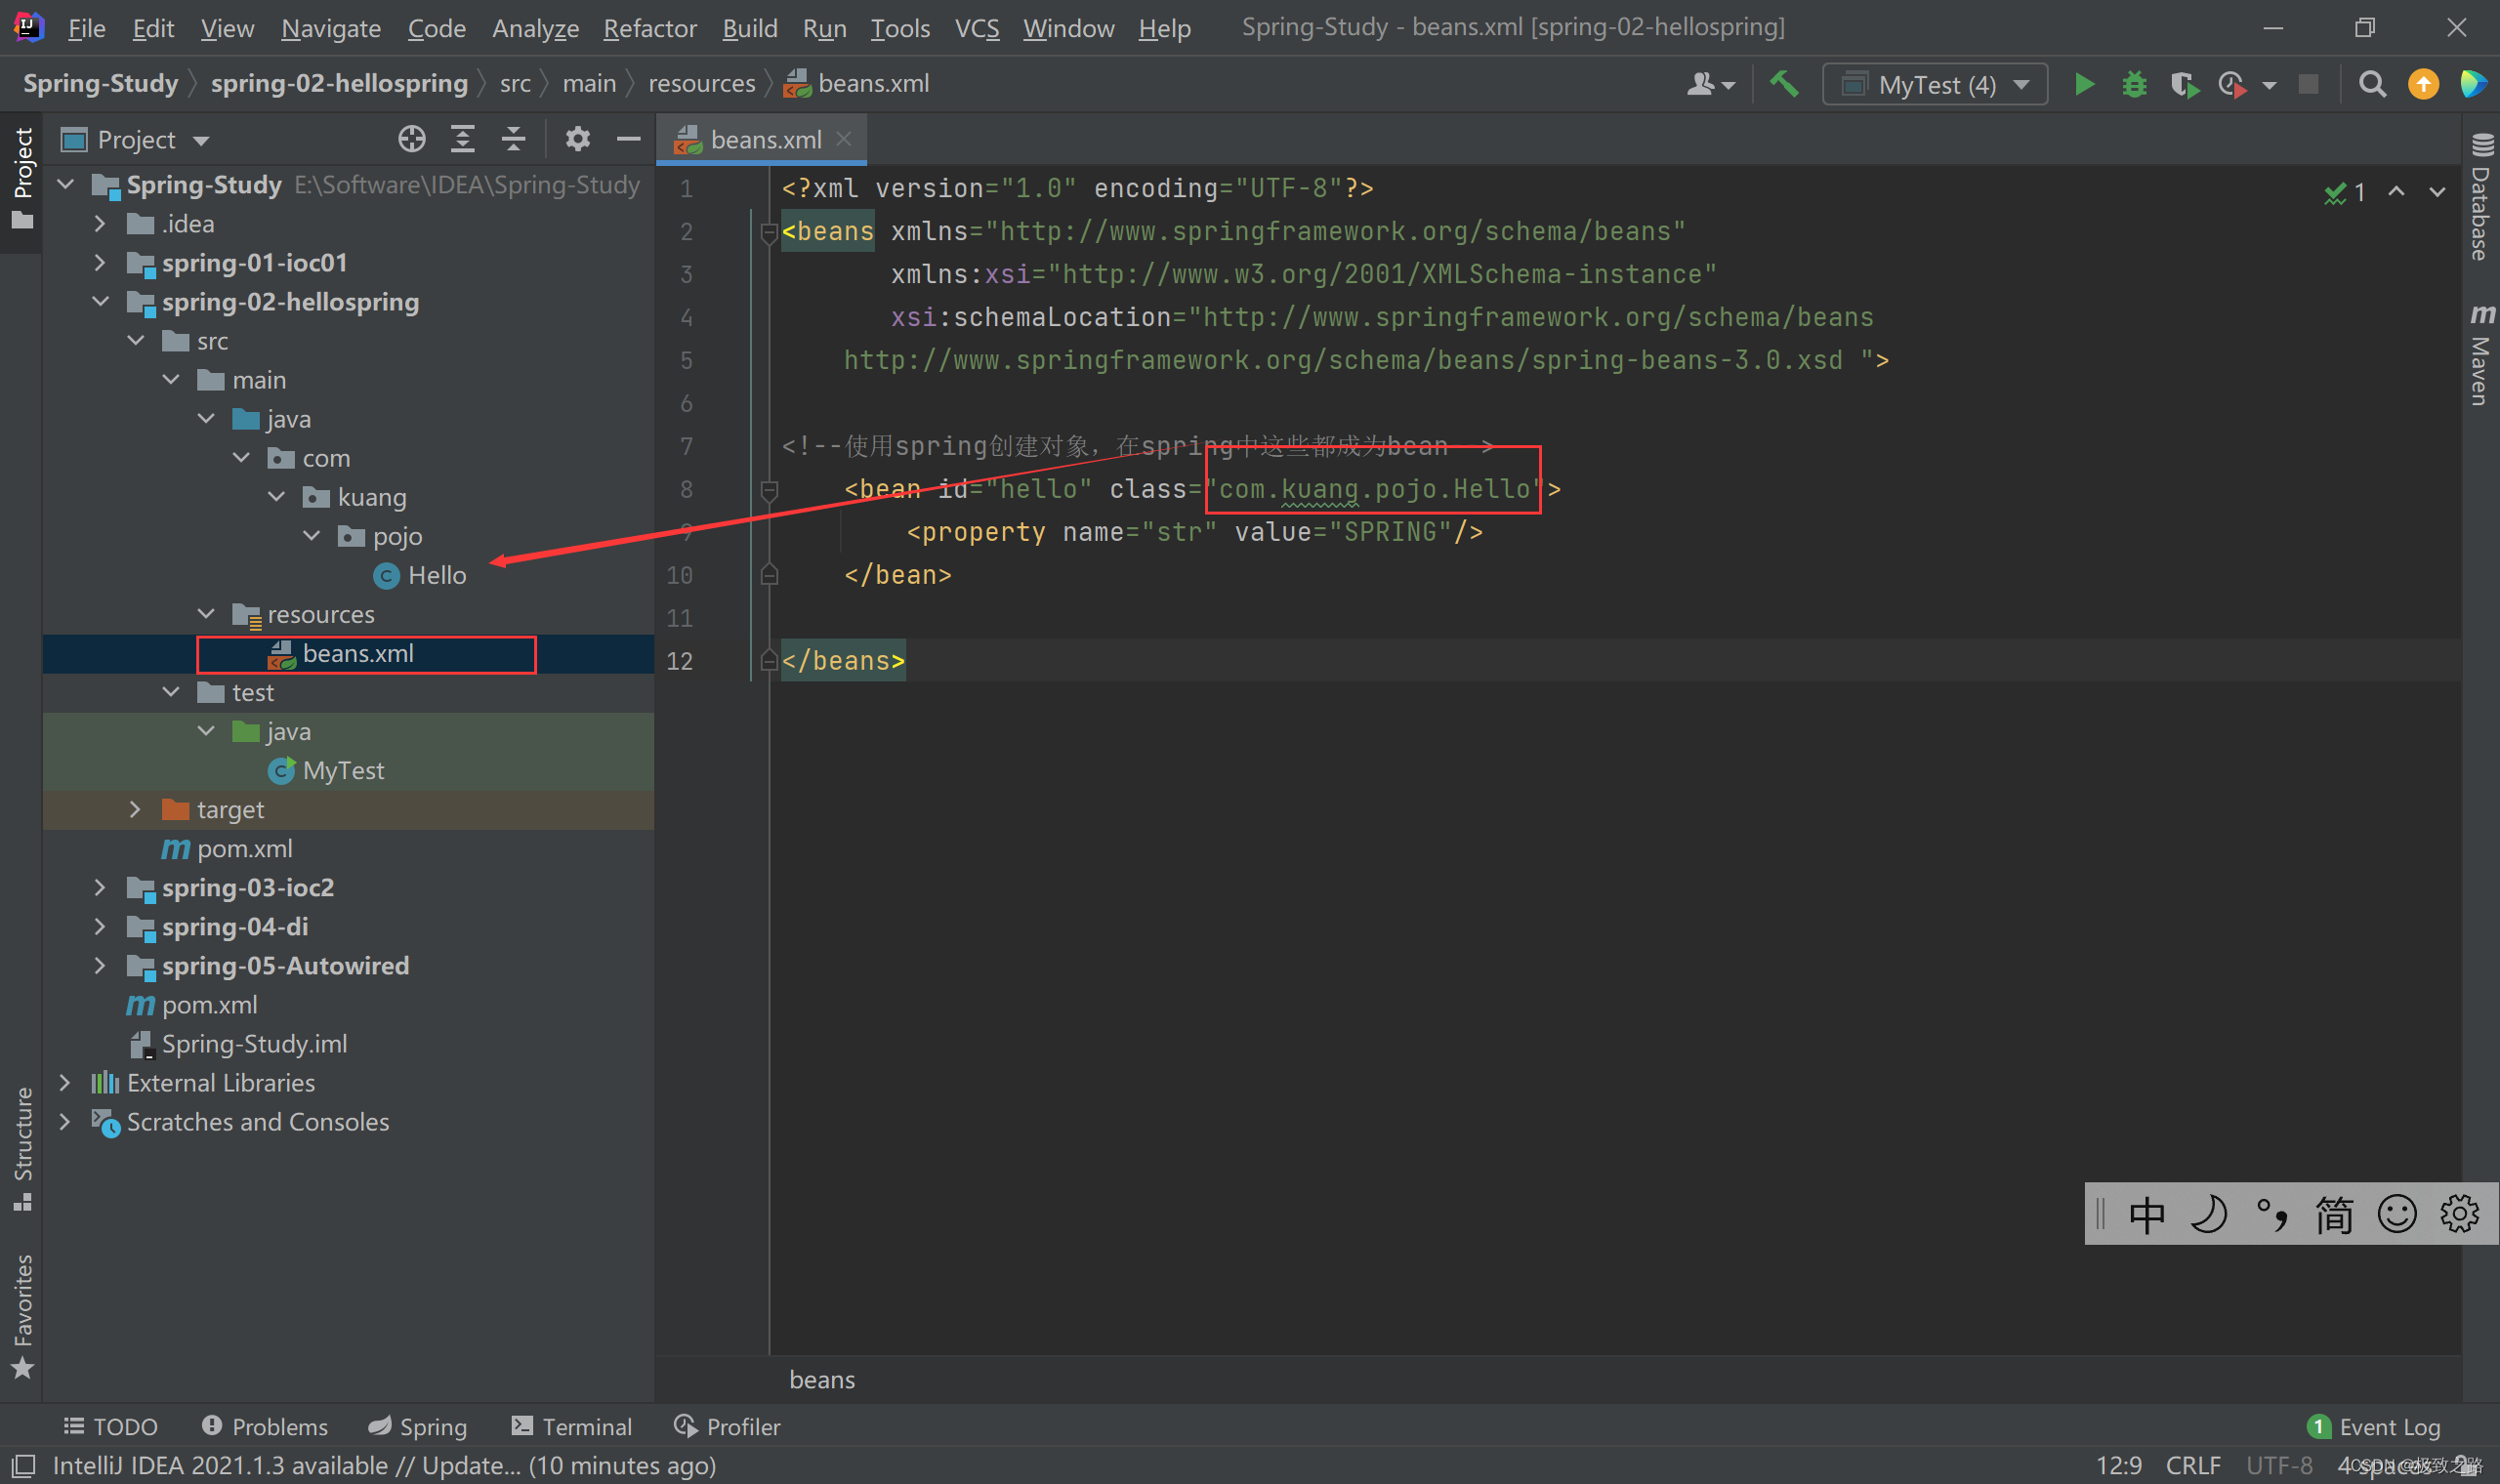
6.2.Spring容器
这里的spring容器:
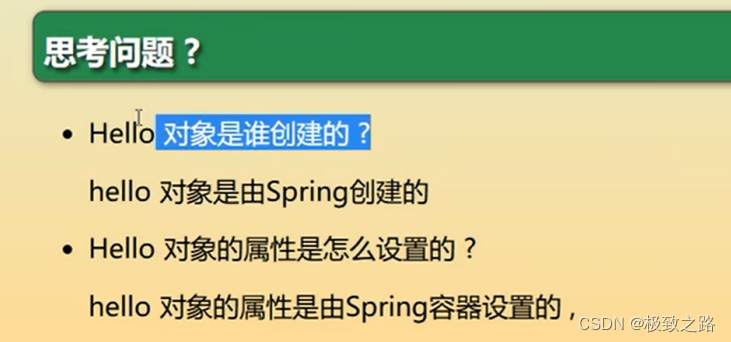
6.3对象的创建和控制反转
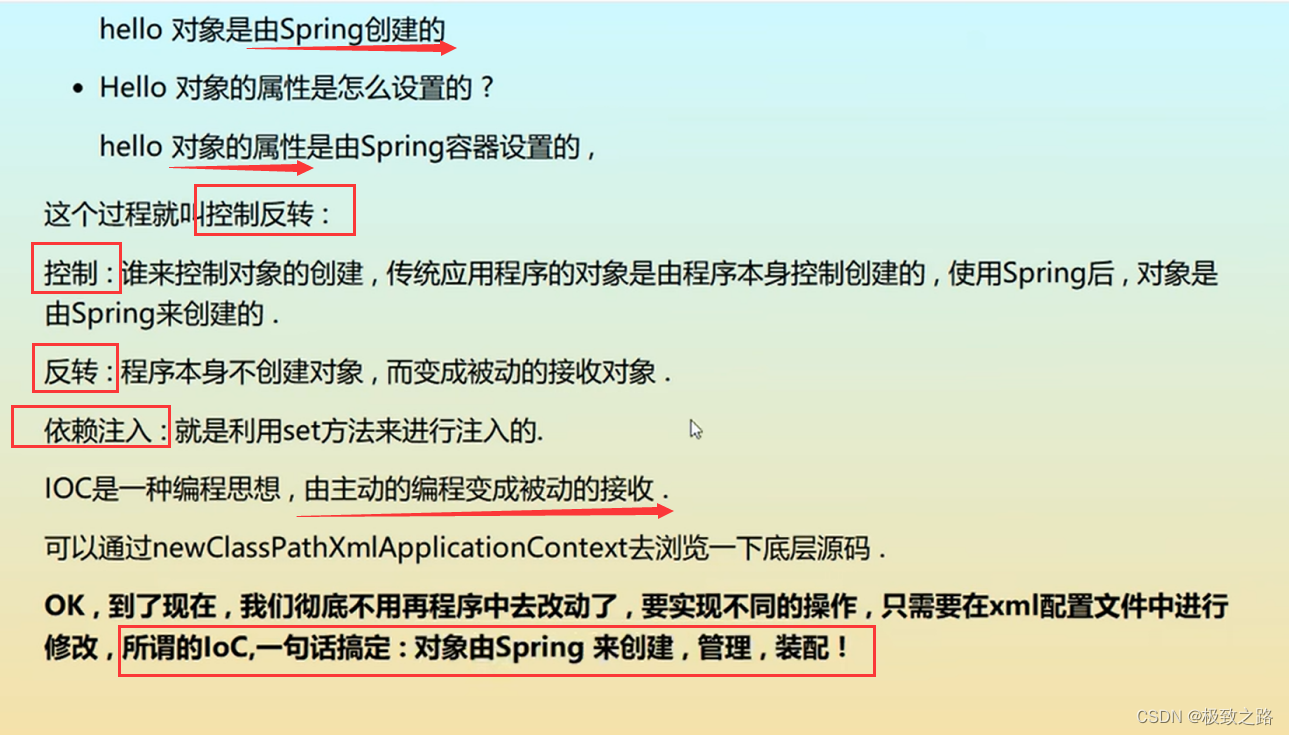
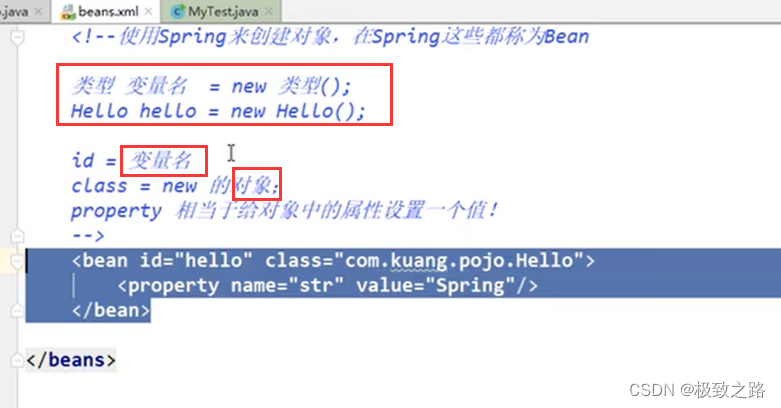
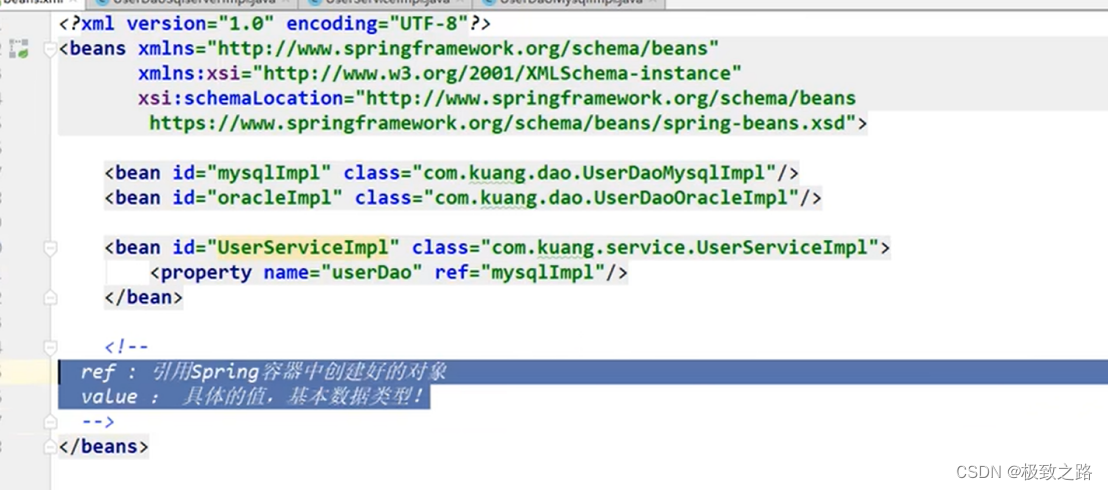
7.IOC创建对象方式
默认走的 无参构造 创建对象。
7.1以有参构造的方式创建对象:
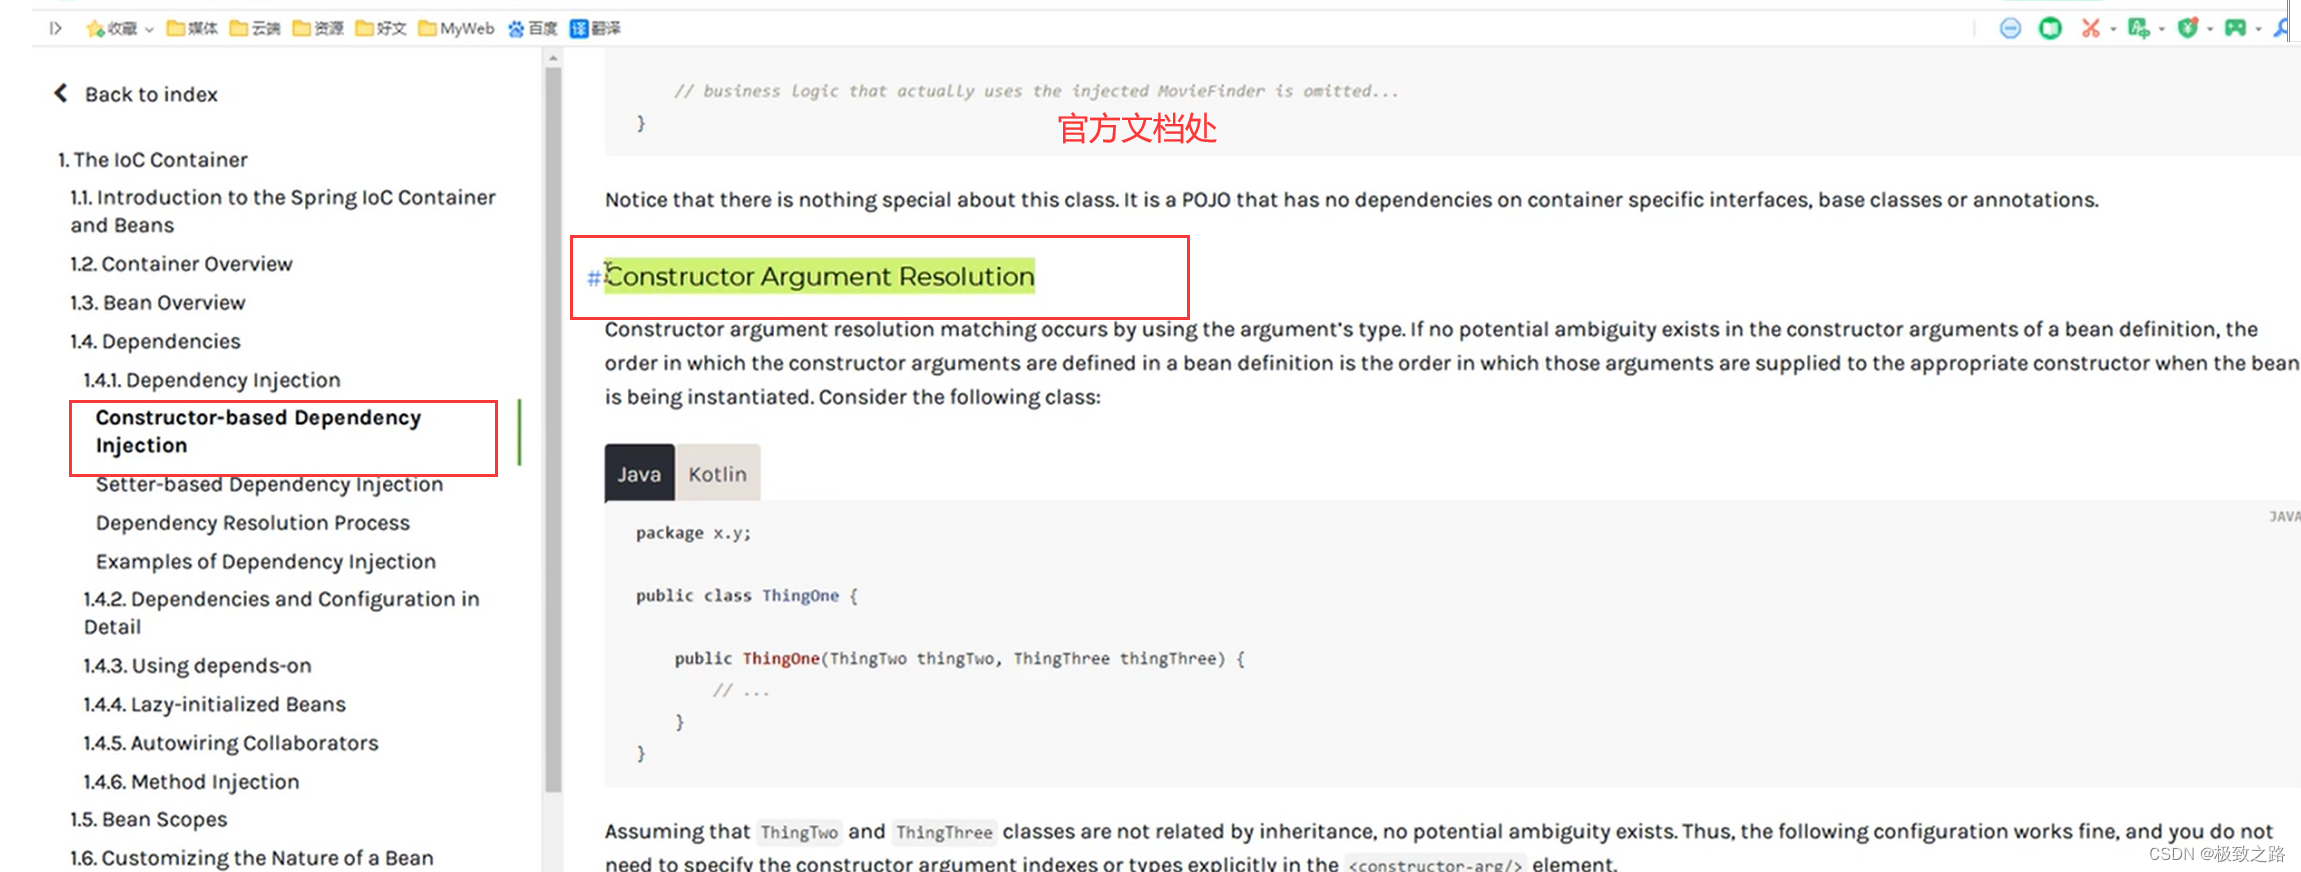
测试类User.java
public class User {private String name;
//public User(){
//    System.out.println("默认构造器");
//}public User(String name){this.name=name;}public String getName() {return name;}public void setName(String name) {this.name = name;}public void show(){System.out.println("name="+name);}
}
beans.xml
<?xml version="1.0" encoding="UTF-8"?>
<beans xmlns="http://www.springframework.org/schema/beans"xmlns:xsi="http://www.w3.org/2001/XMLSchema-instance"xsi:schemaLocation="http://www.springframework.org/schema/beanshttp://www.springframework.org/schema/beans/spring-beans-3.0.xsd ">
<!--    1.无参构造器创建对象-->
<!--<bean id="user" class="com.kuang.pojo.User">-->
<!--    <property name="name" value="请见"/>-->
<!--</bean>-->
<!--    2.有参构造器通过下标-->
<!--<bean id="user" class="com.kuang.pojo.User">-->
<!--    <constructor-arg index="0" value="123"/>-->
<!--</bean>-->
<!--3.有参构造器通过类型 创建对象,【不推荐使用】-->
<!--    <bean id="user" class="com.kuang.pojo.User">-->
<!--        <constructor-arg type="java.lang.String" value="345"/>-->
<!--    </bean>-->
<!--4.有参构造通过参数名【推荐】--><bean id="user" class="com.kuang.pojo.User"><constructor-arg name="name" value="777"/></bean></beans>
8.spring配置说明
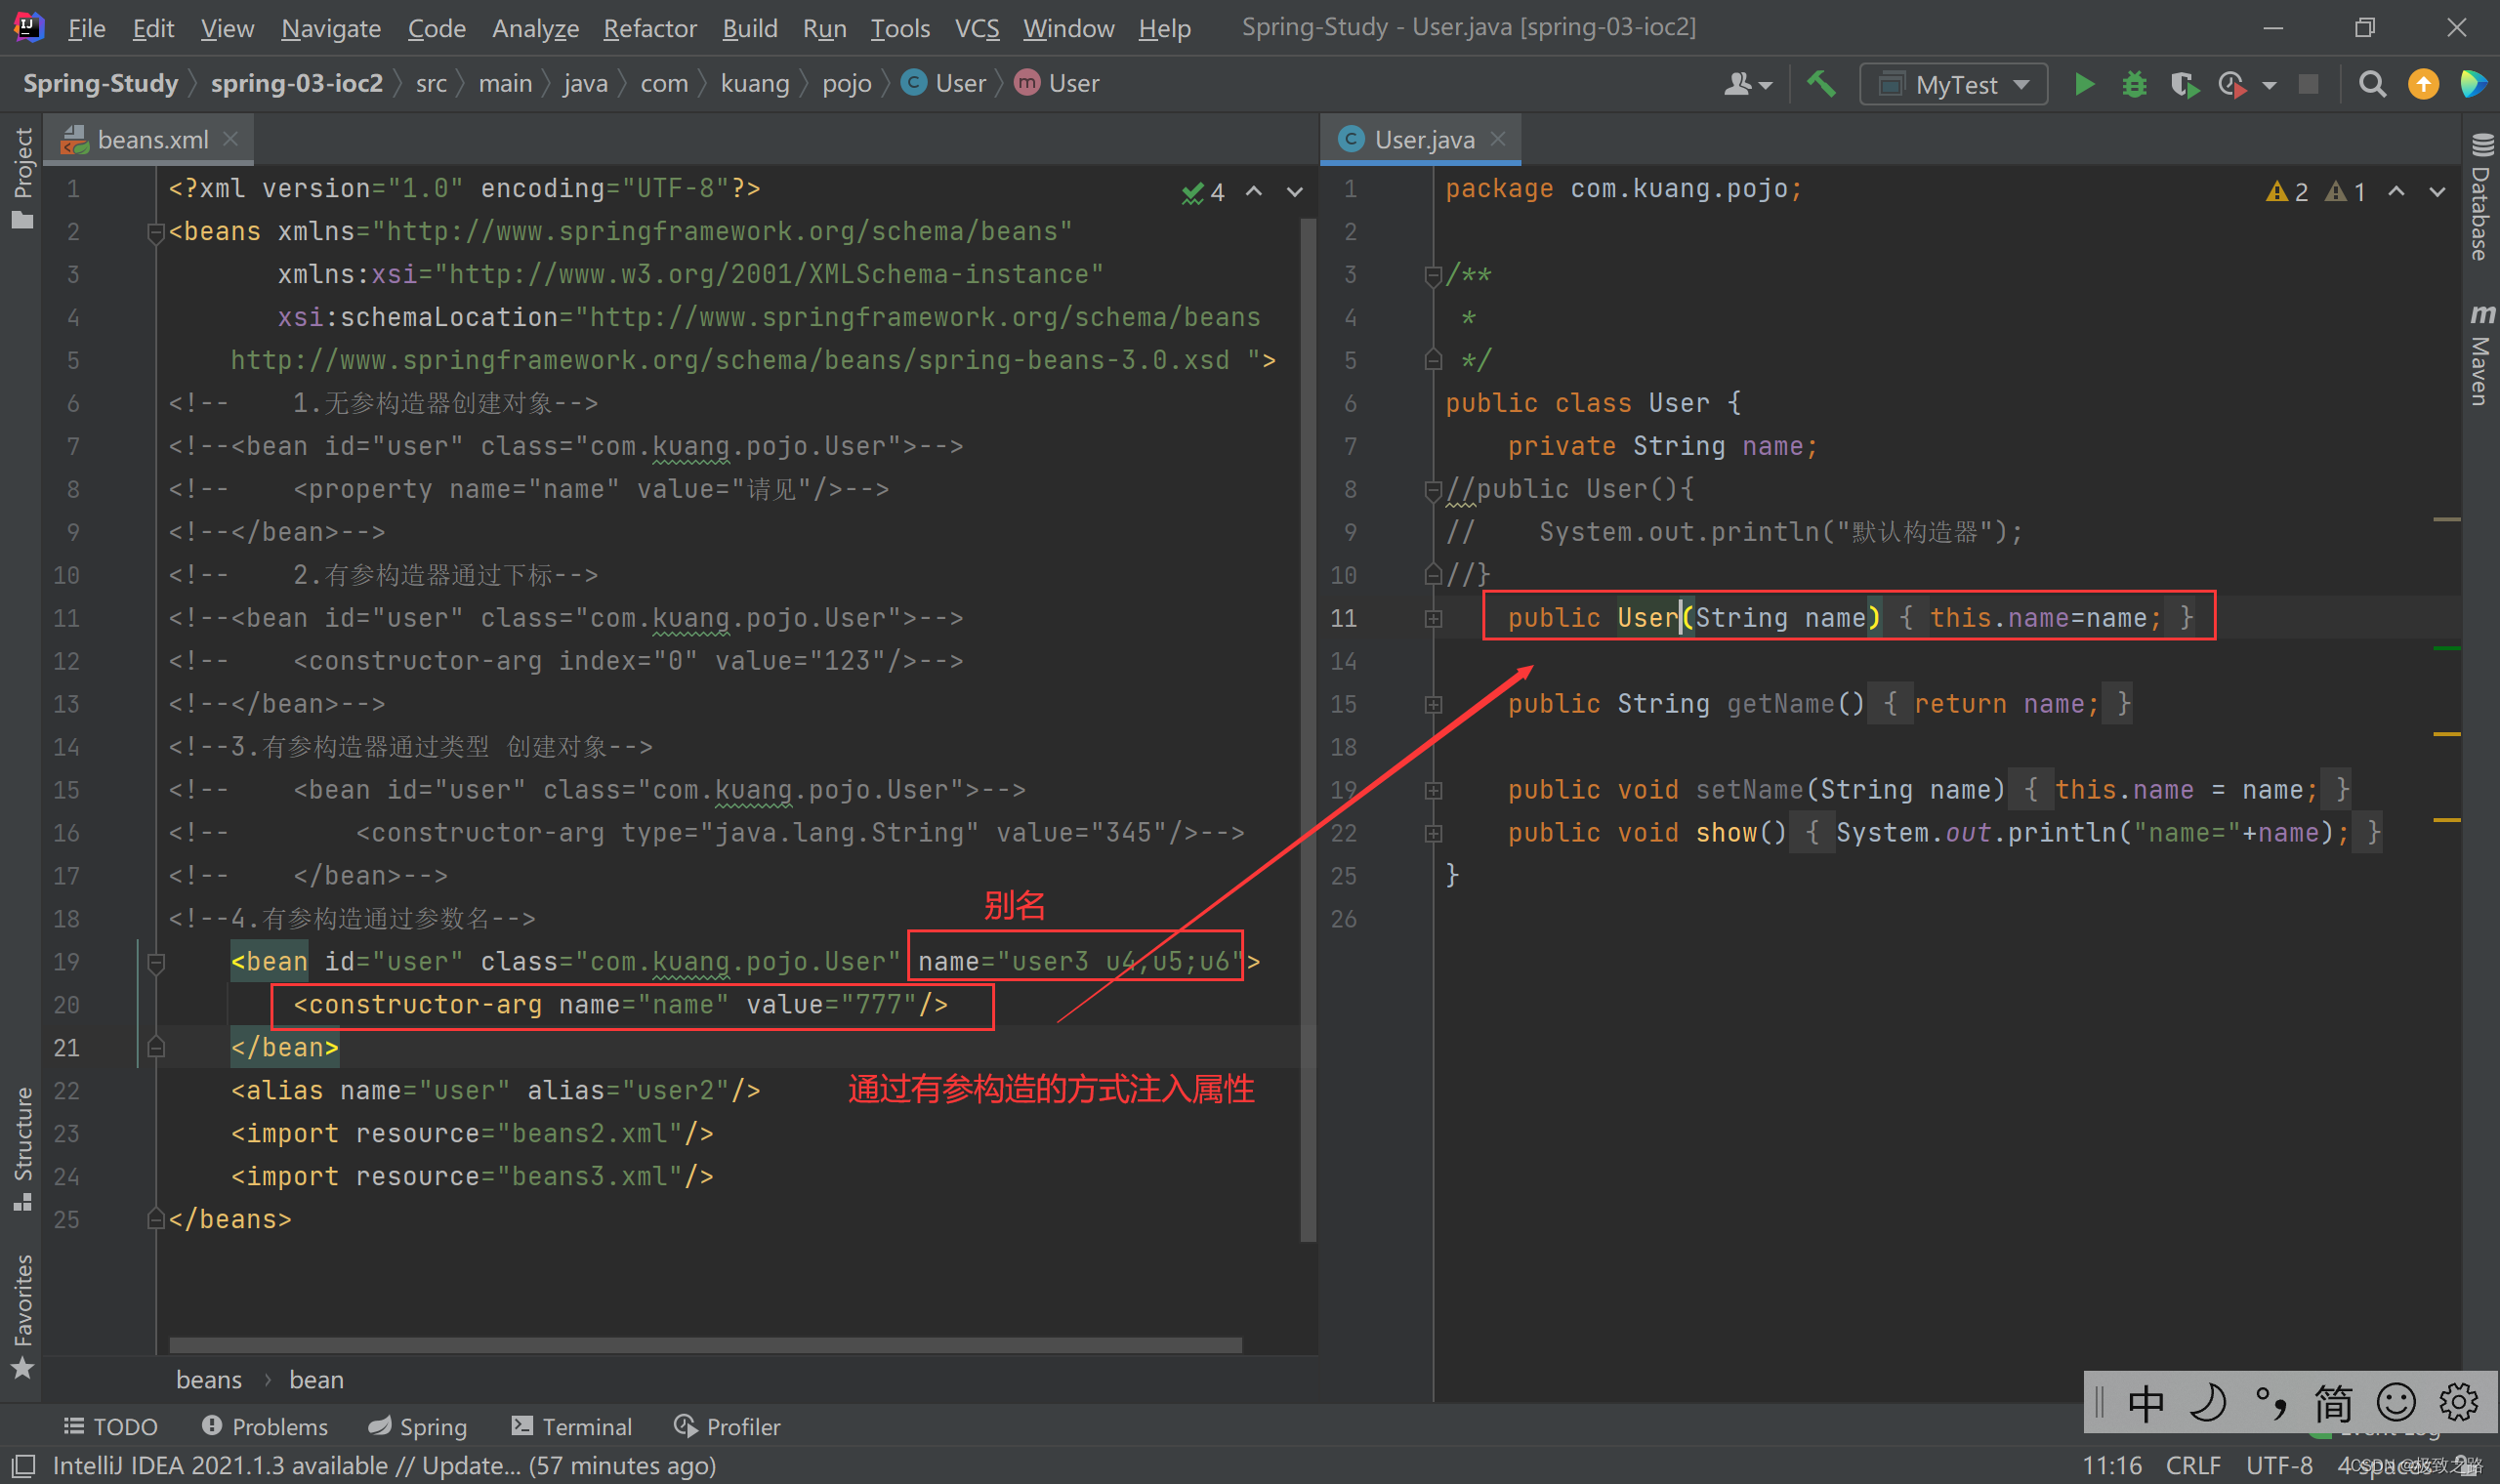
8.1别名
<alias name="user" alias="user2"/>
8.2Bean的配置
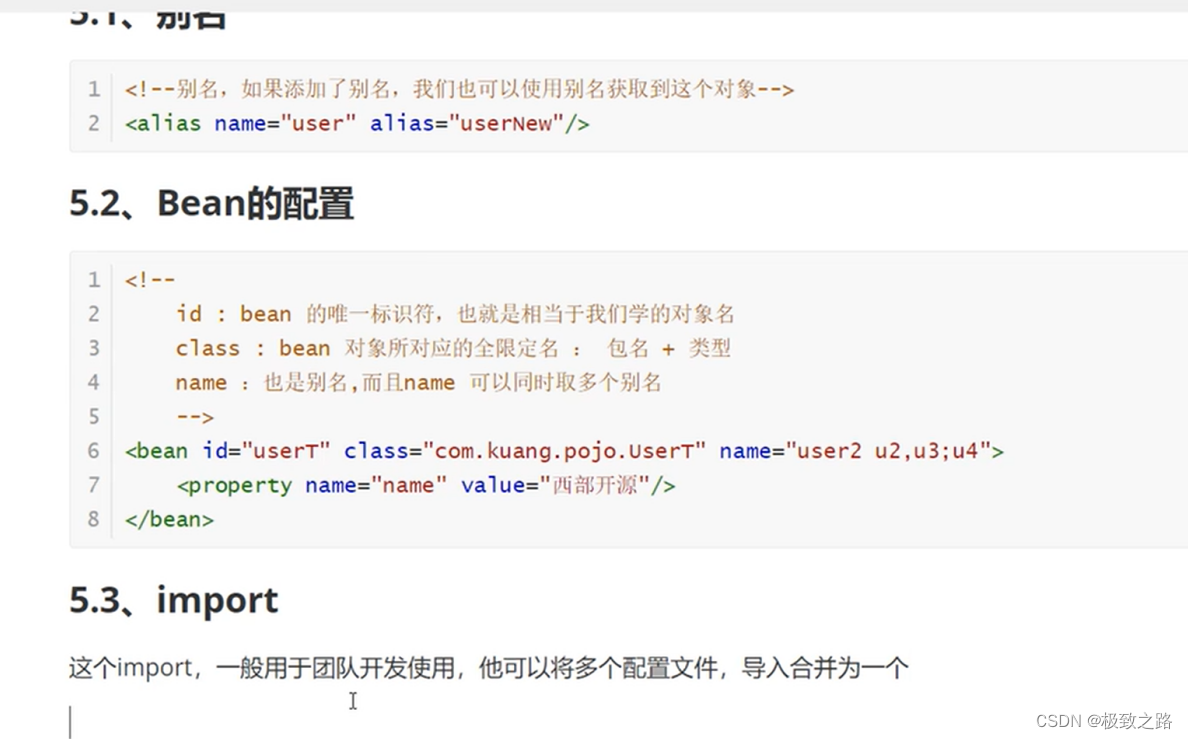
8.3import
9.依赖注入方式
9.1三种注入方式
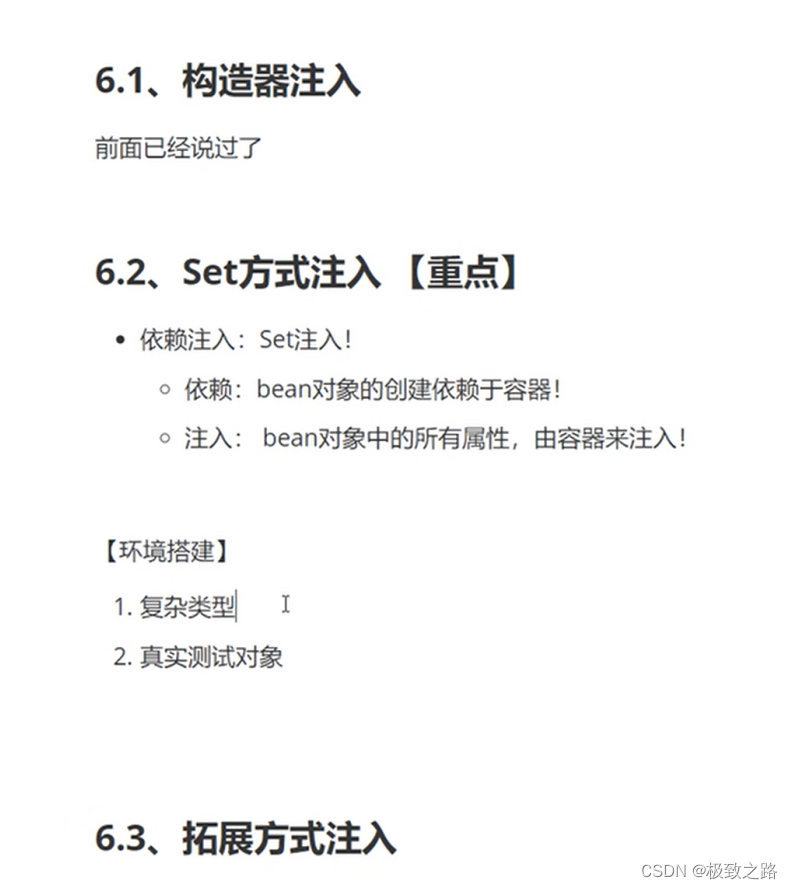
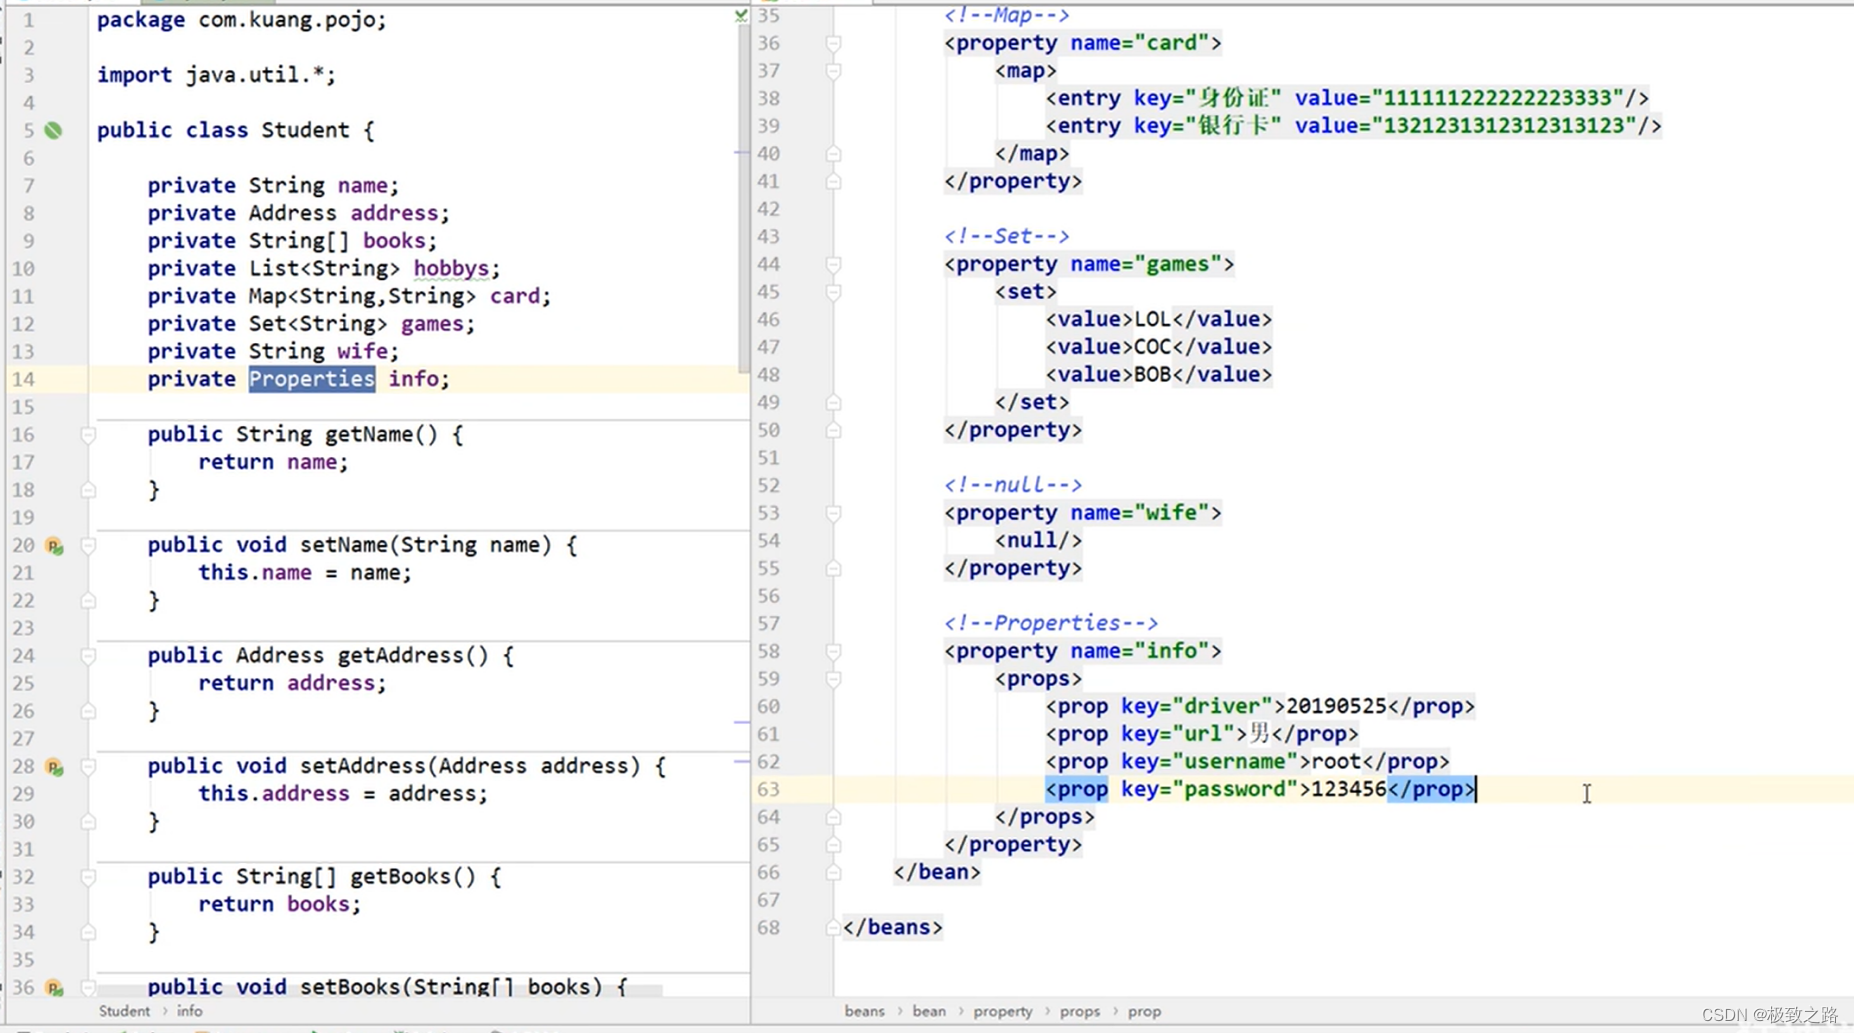
9.2.set注入方式(重点)
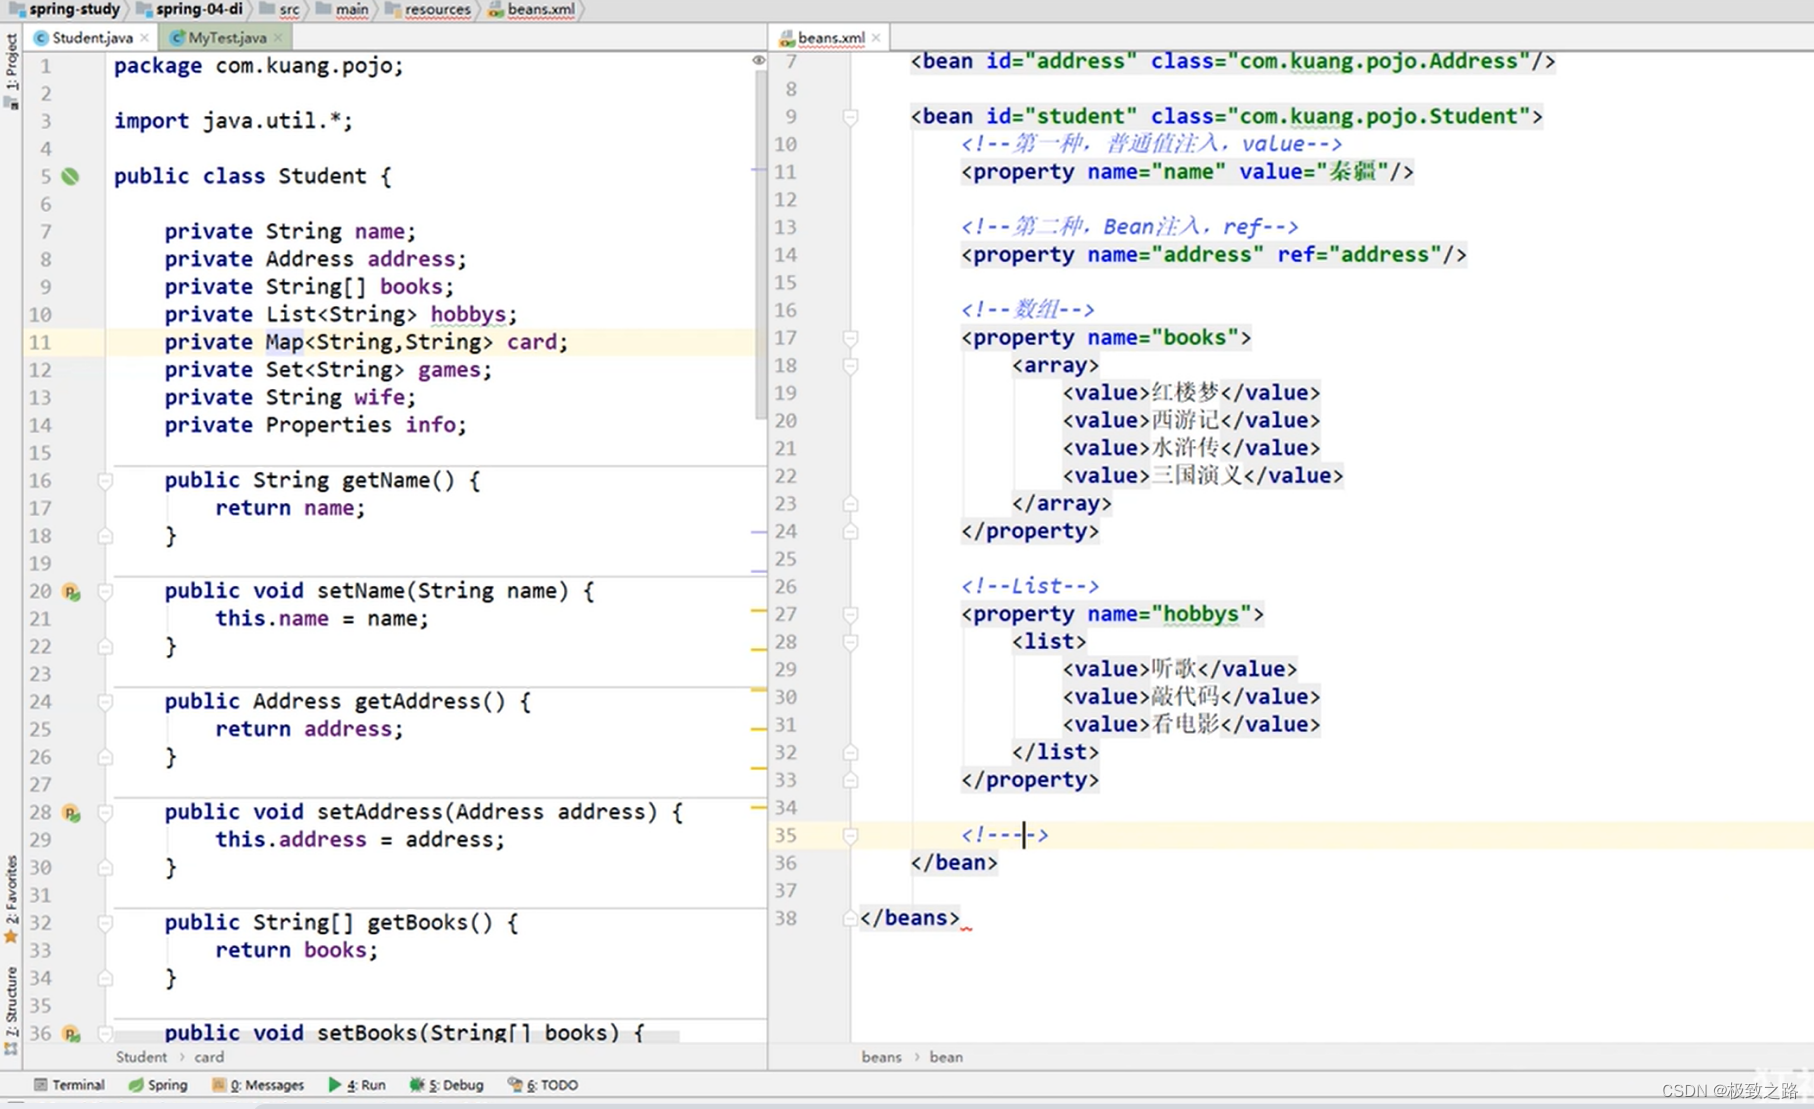
Student:
public class Student {private String name;private Address address;private String[] books;private List<String> hobbys;//List<Address>private Map<String, String> card;private Set<String> games;private String wife;private Properties info;}
Address
public class Address {private String address;
}
User
public class User {private String name;private int age;
}
beans.xml
<?xml version="1.0" encoding="UTF-8"?>
<beans xmlns="http://www.springframework.org/schema/beans"xmlns:xsi="http://www.w3.org/2001/XMLSchema-instance"xsi:schemaLocation="http://www.springframework.org/schema/beanshttp://www.springframework.org/schema/beans/spring-beans-3.0.xsd ">
<bean id="address" class="com.kuang.pojo.Address"><property name="address" value="中安路风华街123号"/>
</bean><bean id="student" class="com.kuang.pojo.Student"><property name="name" value="李明"/><property name="address" ref="address"/><property name="books"><array><value>十四号书</value><value>传奇书</value><value>史诗书</value></array></property><property name="hobbys" ><list><value>足球</value><value>篮球</value><value>羽毛球</value></list></property><property name="card"><map><entry key="蓝色" value="大海"/><entry key="金色" value="太阳"/><entry key="黑色" value="夜晚"/></map></property><property name="games"><set><value>按此</value><value>阿斯顿</value><value>雪国</value></set></property>
<property name="wife"><null/>
</property><property name="info"><props><prop key="1">123</prop><prop key="2">456</prop><prop key="3">789</prop></props></property></bean>
</beans>
9.3.p命名空间和c命名空间注入:

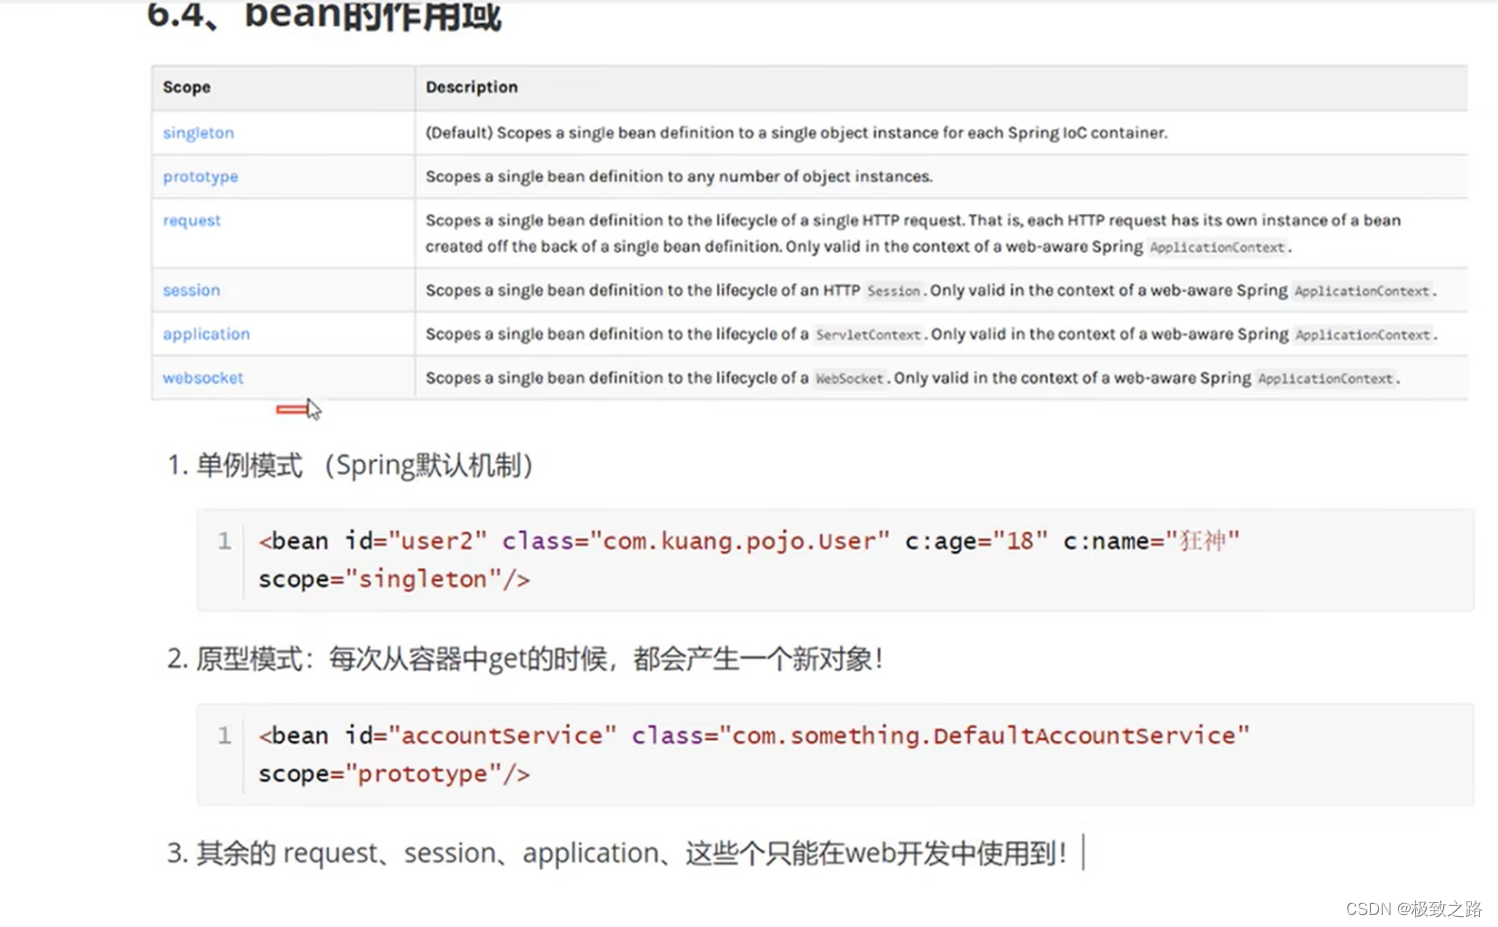
9.4.bean的作用域:
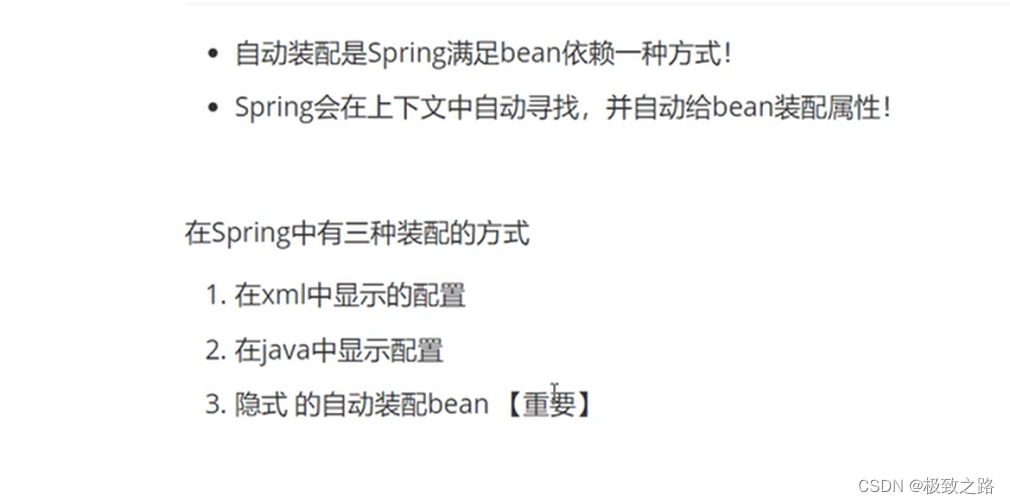
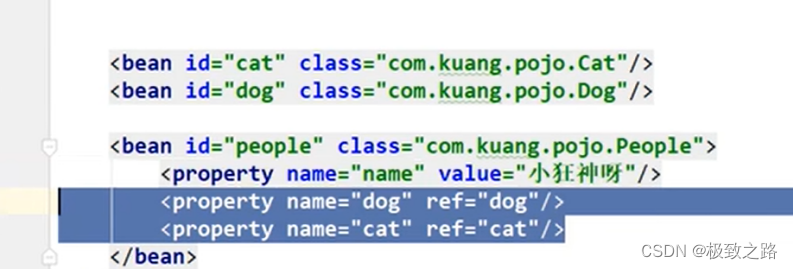
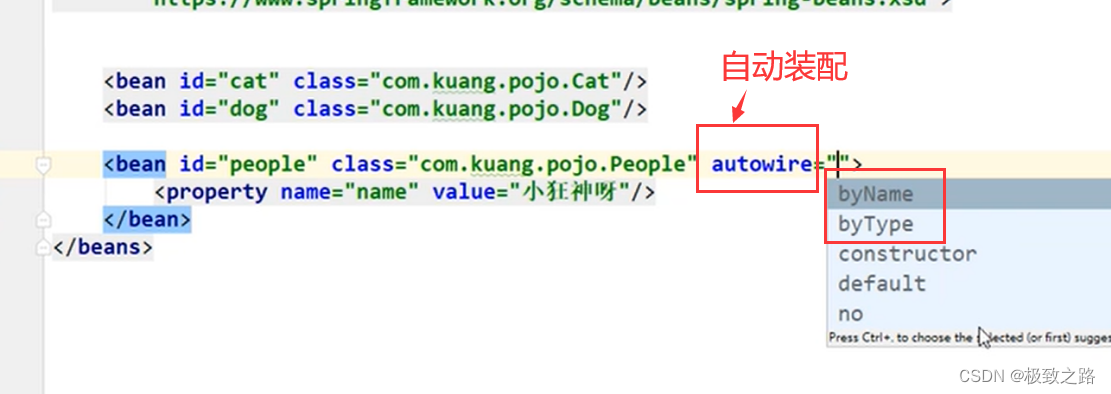
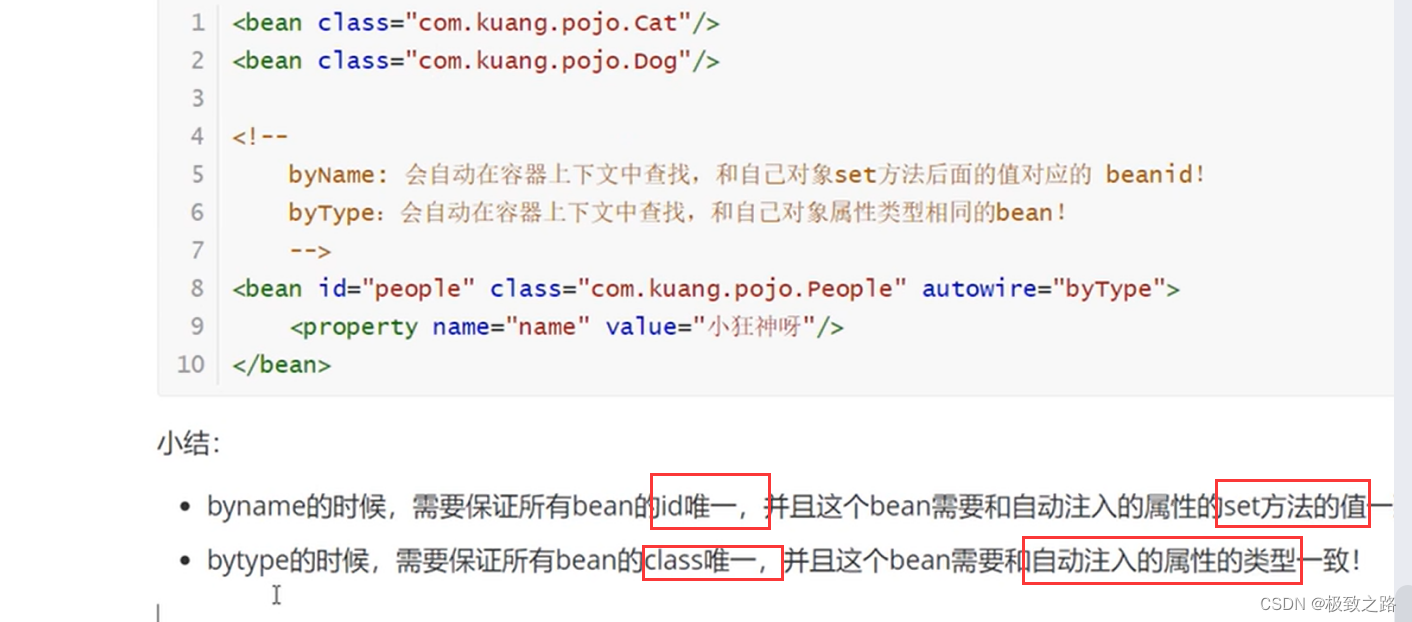
10.Bean的自动装配
11.注解实现自动装配
11.1 在beans.xml中加入注解支持:
<?xml version="1.0" encoding="UTF-8"?>
<beans xmlns="http://www.springframework.org/schema/beans"xmlns:xsi="http://www.w3.org/2001/XMLSchema-instance"xmlns:context="http://www.springframework.org/schema/context"xsi:schemaLocation="http://www.springframework.org/schema/beanshttp://www.springframework.org/schema/beans/spring-beans-3.0.xsdhttp://www.springframework.org/schema/contexthttp://www.springframework.org/schema/context/spring-context-3.0.xsd "><!--    指定扫描的包,这个包下的注解就会生效。--><context:component-scan base-package="com.kuang.pojo"/><context:annotation-config/></beans>
11.2注解实例
<?xml version="1.0" encoding="UTF-8"?>
<beans xmlns="http://www.springframework.org/schema/beans"xmlns:xsi="http://www.w3.org/2001/XMLSchema-instance"xmlns:context="http://www.springframework.org/schema/context"xsi:schemaLocation="http://www.springframework.org/schema/beanshttp://www.springframework.org/schema/beans/spring-beans-3.0.xsdhttp://www.springframework.org/schema/contexthttp://www.springframework.org/schema/context/spring-context-3.0.xsd "><!--    加入注解支持。3个约束,1个标签。-->
<context:annotation-config/><bean id="cat111" class="com.kuang.pojo.Cat"/><bean id="cat11" class="com.kuang.pojo.Cat"/><bean id="dog111" class="com.kuang.pojo.Dog"/><bean id="dog11" class="com.kuang.pojo.Dog"/>
<!--    <bean id="people" class="com.kuang.pojo.People"/>--><bean id="people" class="com.kuang.pojo.People"><property name="name" value="奥斯"/></bean>
<!--    虽然在容器中没有写autowired,但是因为在People中对属性使用了@Autowired的注解,也是实现了自动注入。-->
</beans>
public class People {private String name;
//    @Autowired按类型自动注入。类型相同时,加入@Qualifier加入ByName方式.
//    表示使用对应bean的对象作为属性注入。
//    @Resource不能指定name,在通过Type和Name都失败的情况下,才会报错。可通过name指定@Resource(name = "dog11")private Dog dog;@Autowired@Qualifier(value = "cat11")private Cat cat;public String getName() {return name;}public void setName(String name) {this.name = name;}public Dog getDog() {return dog;}public void setDog(Dog dog) {this.dog = dog;}public Cat getCat() {return cat;}public void setCat(Cat cat) {this.cat = cat;}@Overridepublic String toString() {return "People{" +"name='" + name + '\'' +", dog=" + dog +", cat=" + cat +'}';}
}
11.3@Resource和@Autowired的区别

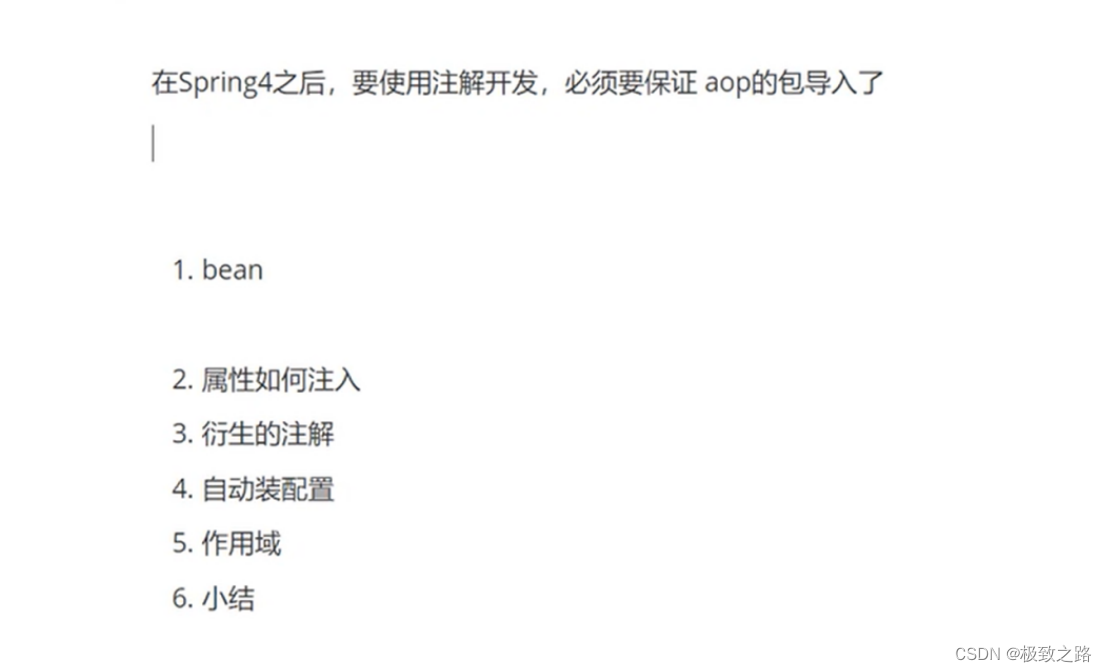
12.使用注解开发
12.1注解的应用场景
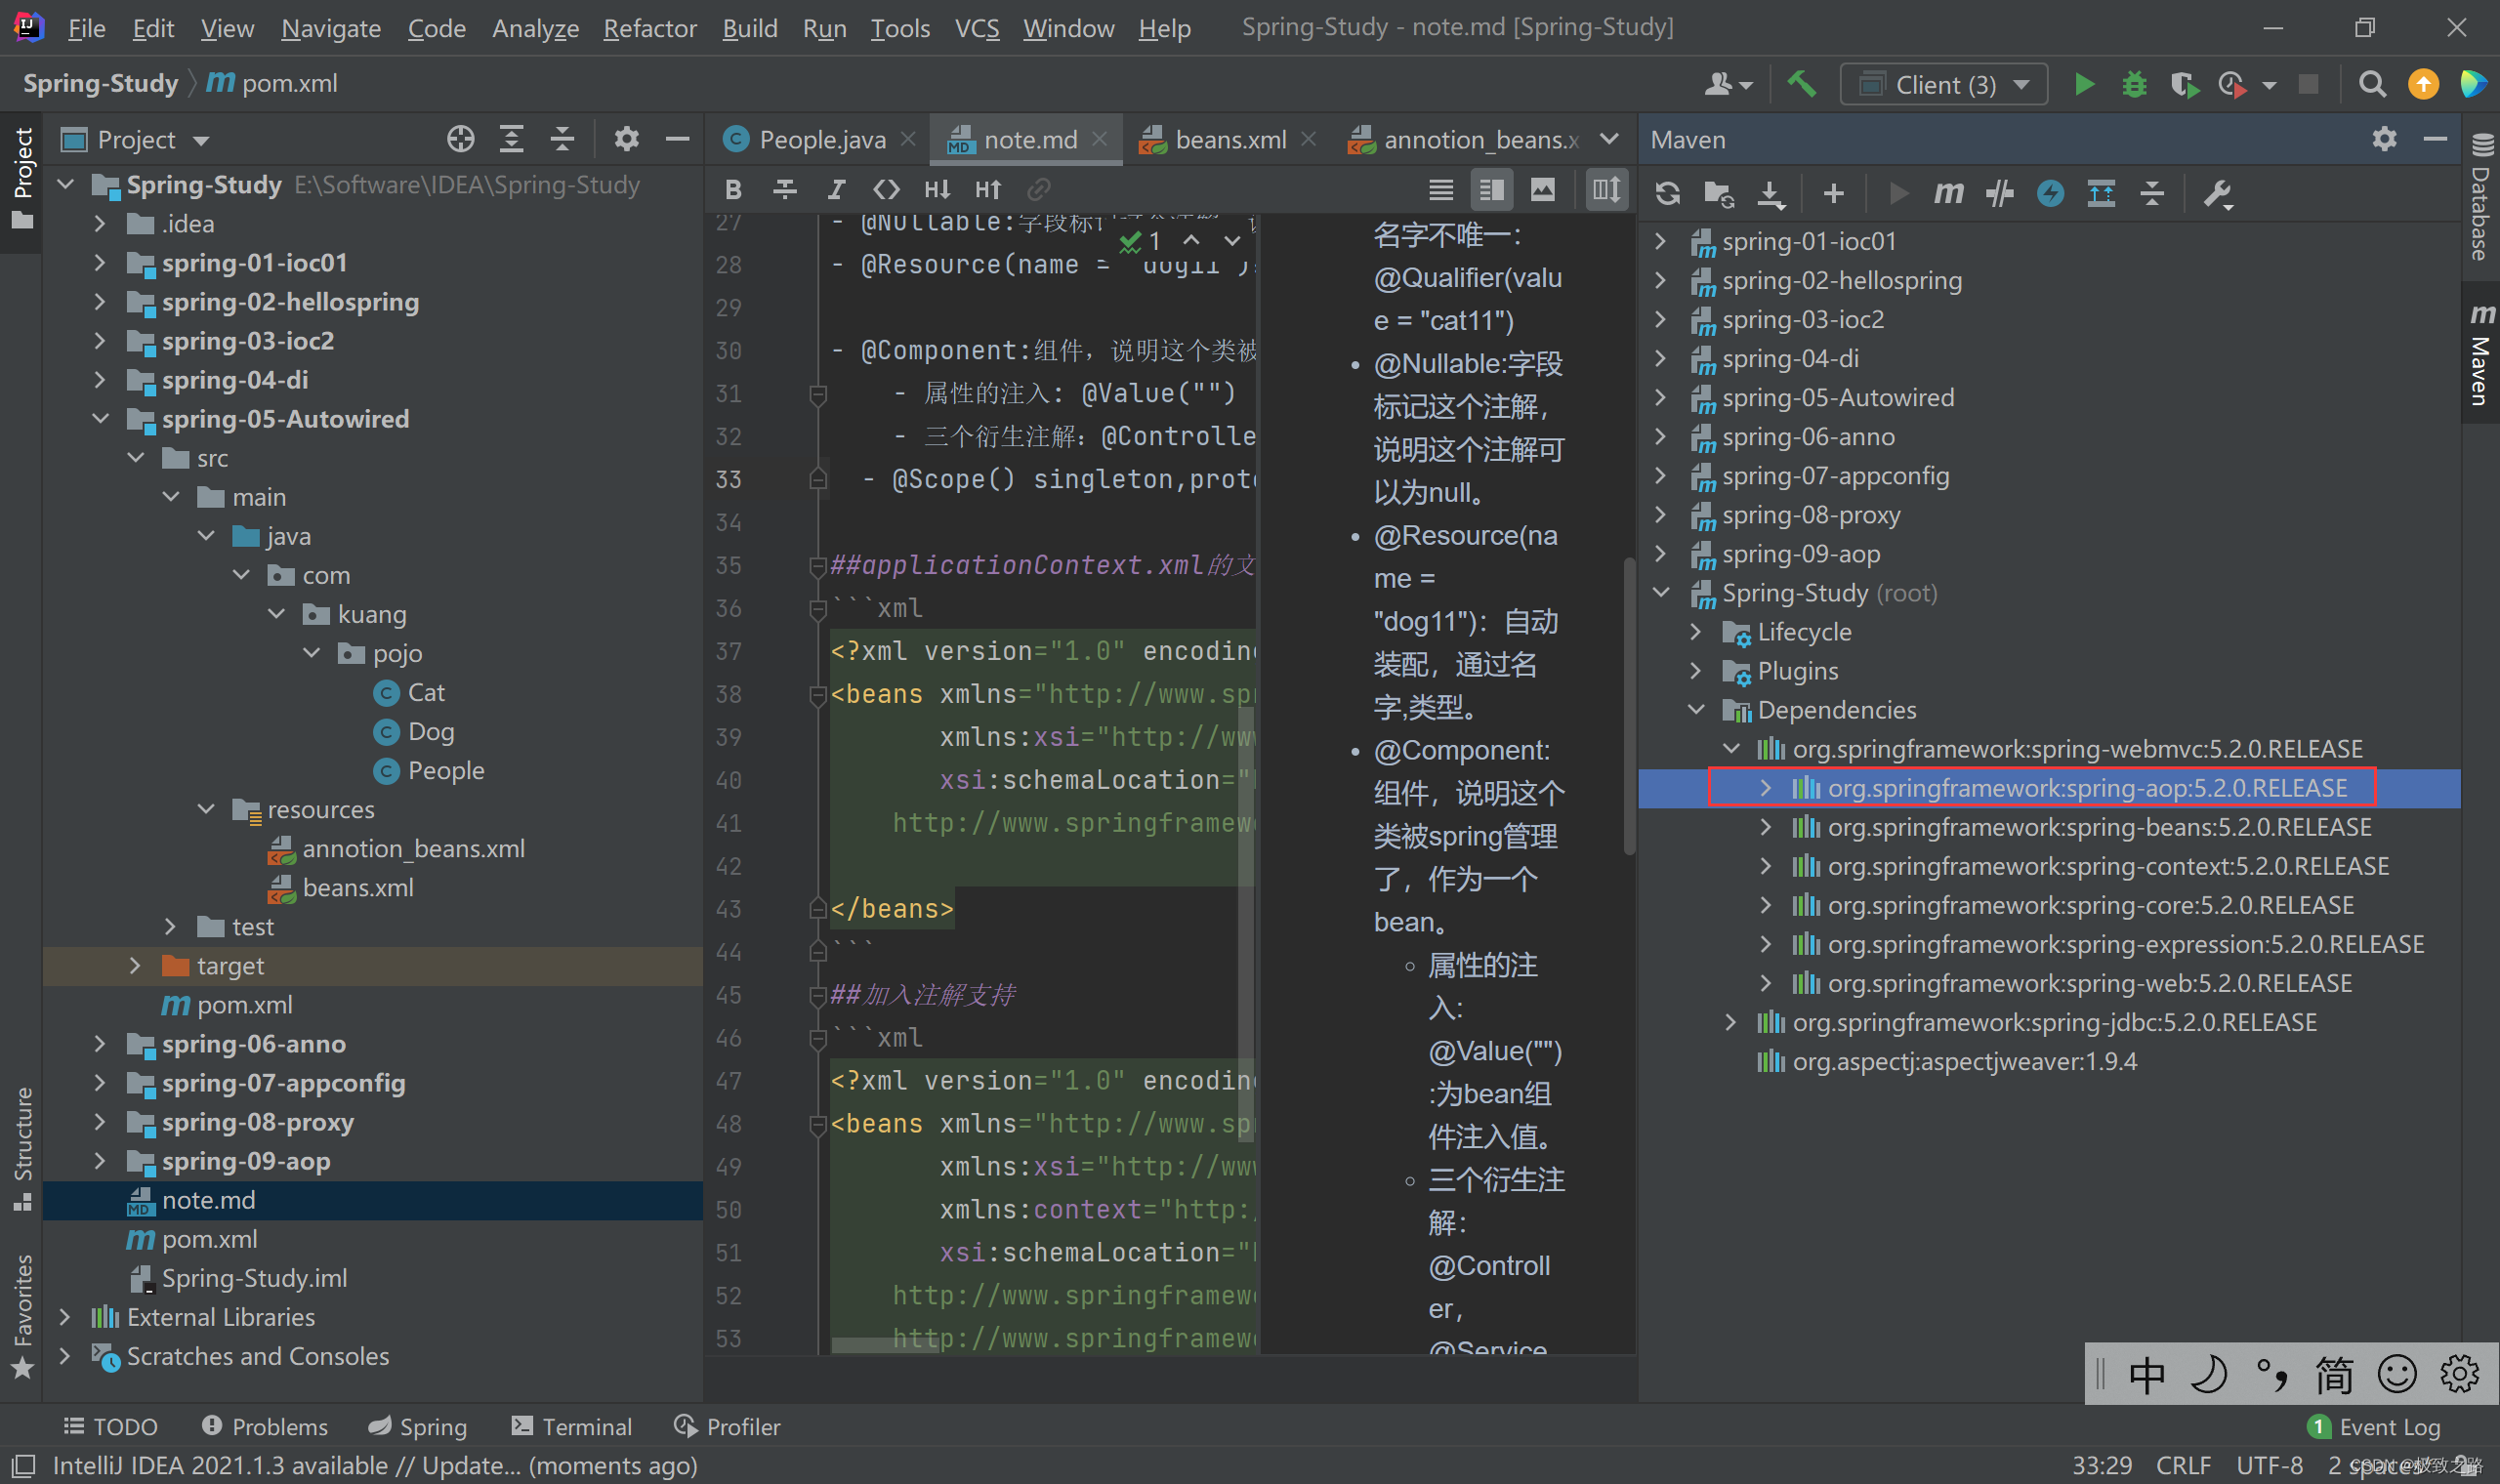
aop包查看是否存在。
//等价于<bean id="user" class="com.kuang.pojo.User"/>
@Component
@Scope("singleton")
public class User {
//    相当于<property name="name" value="kuangshen"/>
@Value("8888")public String name;}
一些复杂的还是建议走配置文件,比如:
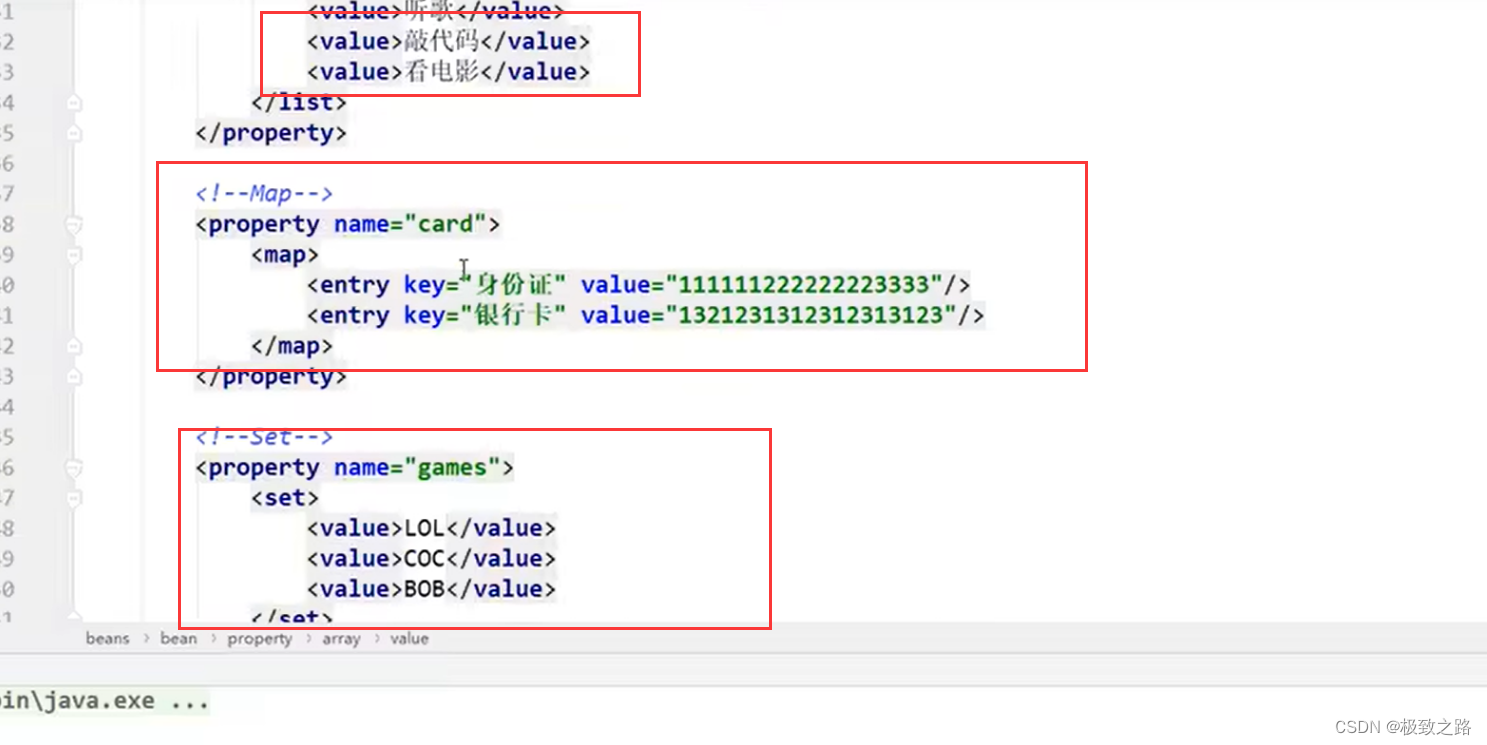
12.2注解说明:
-
自动装配的注解:
-
@Autowired:自动装配,通过类型,名字。
如果名字不唯一: @Qualifier(value = “cat11”) -
@Nullable:字段标记这个注解,说明这个注解可以为null。
-
@Resource(name = “dog11”):自动装配,通过名字,类型。
-
@Component:组件,说明这个类被spring管理了,作为一个bean。
- 属性的注入: @Value(“”) :为bean组件注入值。
- 三个衍生注解:@Controller,@Service,@Repository作用都和@Component一样,只是起一个标识的作用。
- @Scope() singleton,prototype
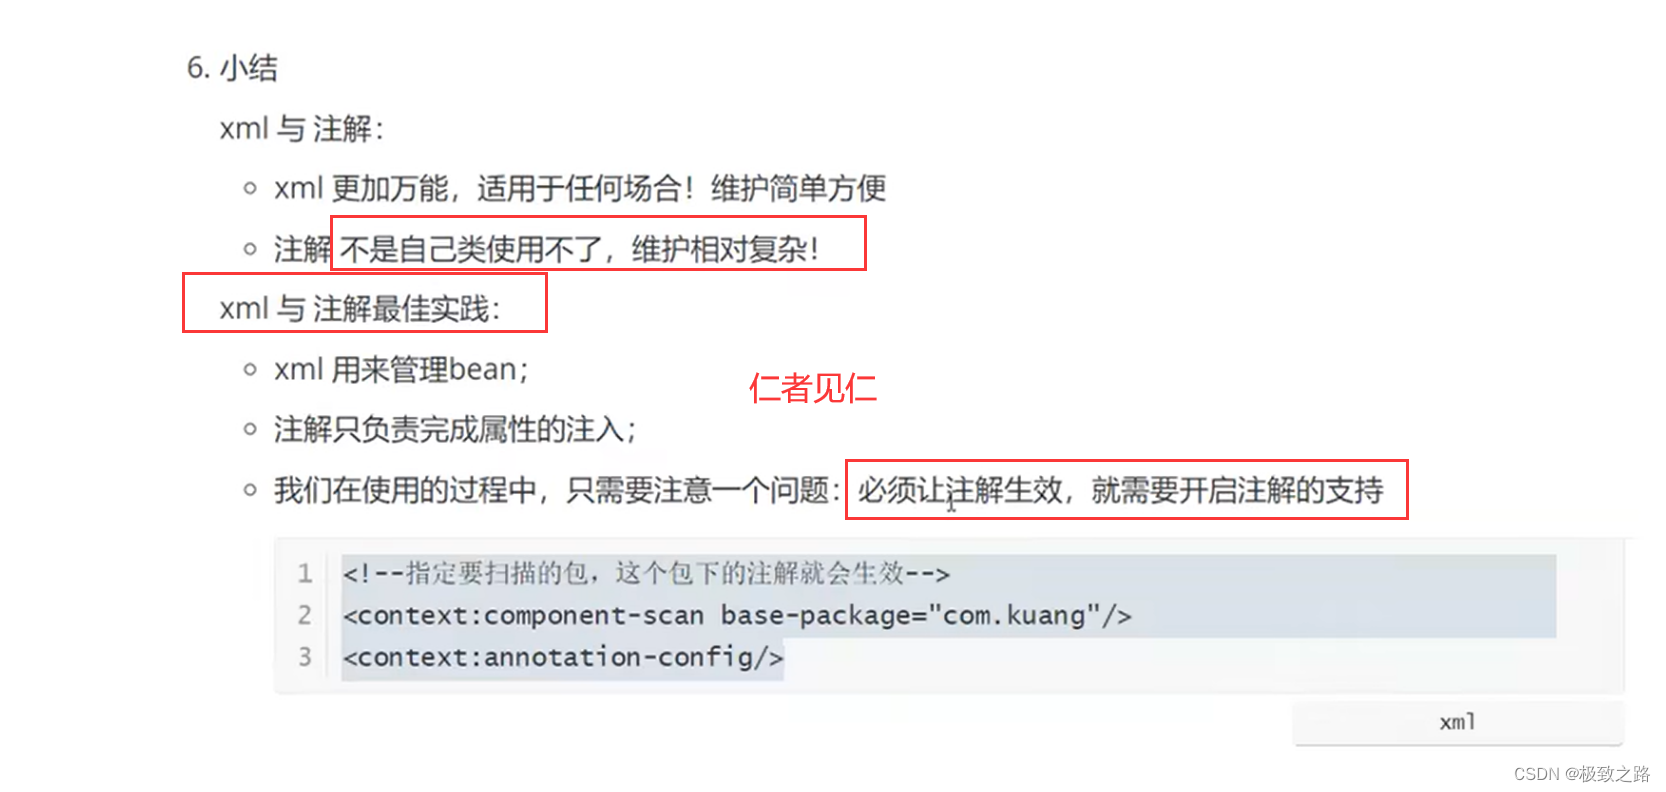
13.使用javaconfig实现配置
13.1配置类实现配置的步骤:
使用这样一个java配置类等价于配置文件:
package com.kuang.config;import com.kuang.pojo.User;
import org.springframework.context.annotation.Bean;
import org.springframework.context.annotation.ComponentScan;
import org.springframework.context.annotation.Configuration;
import org.springframework.context.annotation.Import;//这个也会被spring托管,注册到容器,底层也是@Component
@Configuration //@Configuration表示这是一个配置类,类似之前的beans.xml
@ComponentScan("com.kuang.pojo")
@Import(MyConfig2.class)
public class MyConfig {@Beanpublic User getUser(){return new User();}
}
User类:
@Component
public class User {private String name;public String getName() {return name;}
@Value("萨科理解的")public void setName(String name) {this.name = name;}@Overridepublic String toString() {return "User{" +"name='" + name + '\'' +'}';}
}
测试类MyTest.java
import com.kuang.config.MyConfig;
import com.kuang.pojo.User;
import org.springframework.context.ApplicationContext;
import org.springframework.context.annotation.AnnotationConfigApplicationContext;public class MyTest {public static void main(String[] args) {//        如果完全使用了配置类的方式去做,就只能通过AnnotationConfig 上下文来获取容器,通过配置类的class对象加载。ApplicationContext context = new AnnotationConfigApplicationContext(MyConfig.class);User user = context.getBean("getUser",User.class);System.out.printf(user.getName());}
}
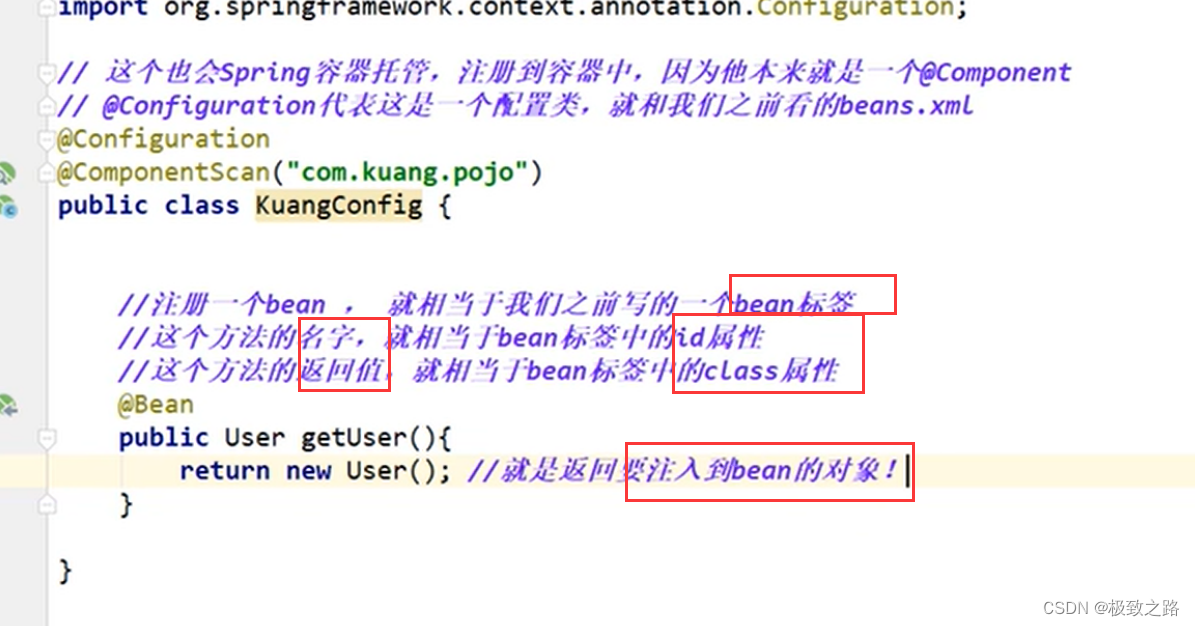
这种纯java的配置方式,在SpringBoot中随处可见。
注解学习尽量去看源码,是在平时的学习中去养成。
13.2回顾:
1.所有的类都要放到bean里面。
2.所有的bean都要通过容器去取。
3.容器中的bean取出后就是一个对象。
Mybatis建议用xml去配,因为能够适应复杂的情况。
14.代理
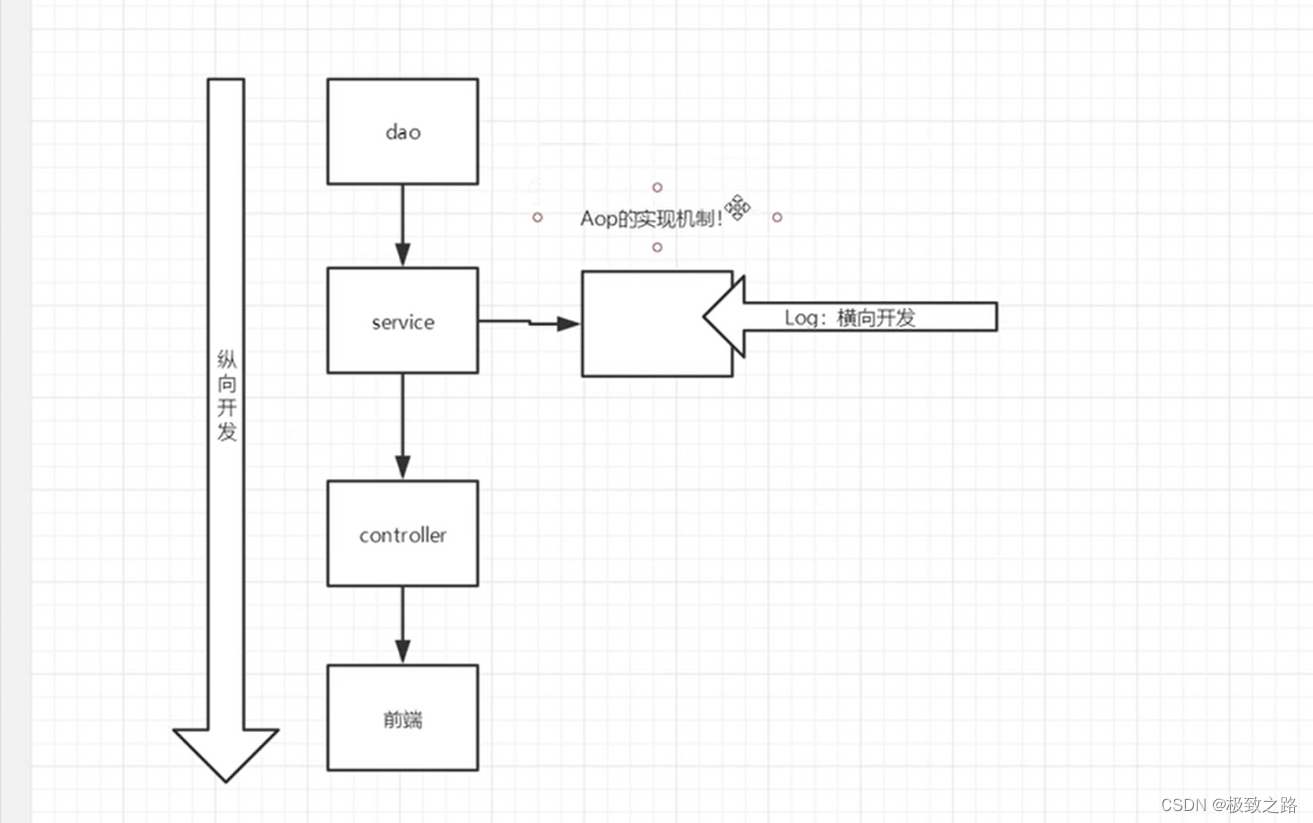
代理模式是SpringAOP的底层【SpringAOP和SpringMVC】
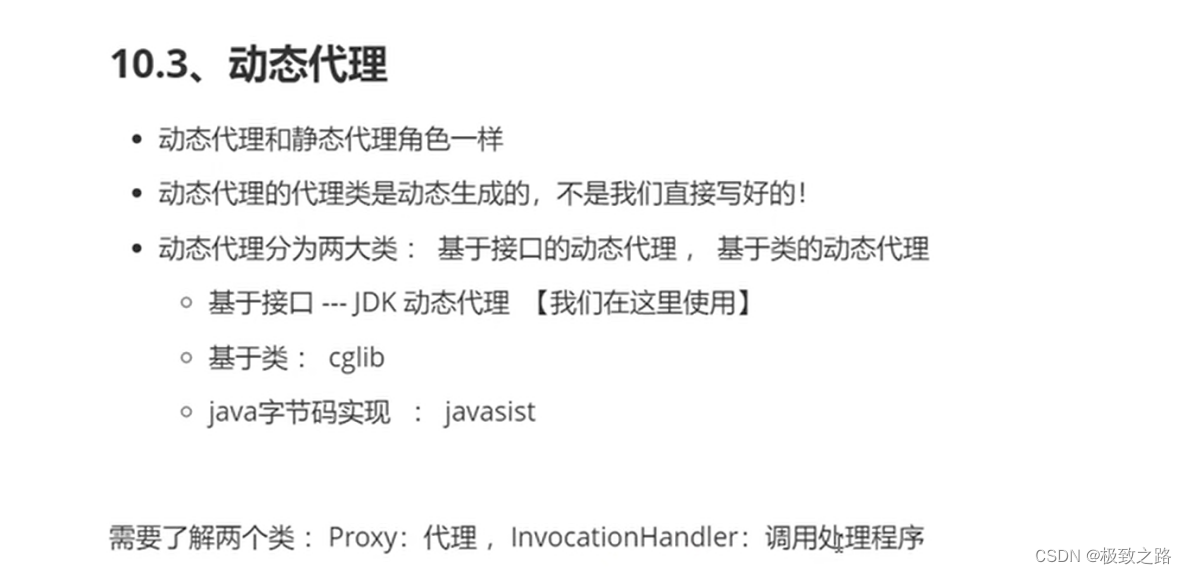
代理模式的分类:
- 静态代理
- 动态代理
14.1.静态代理模式:
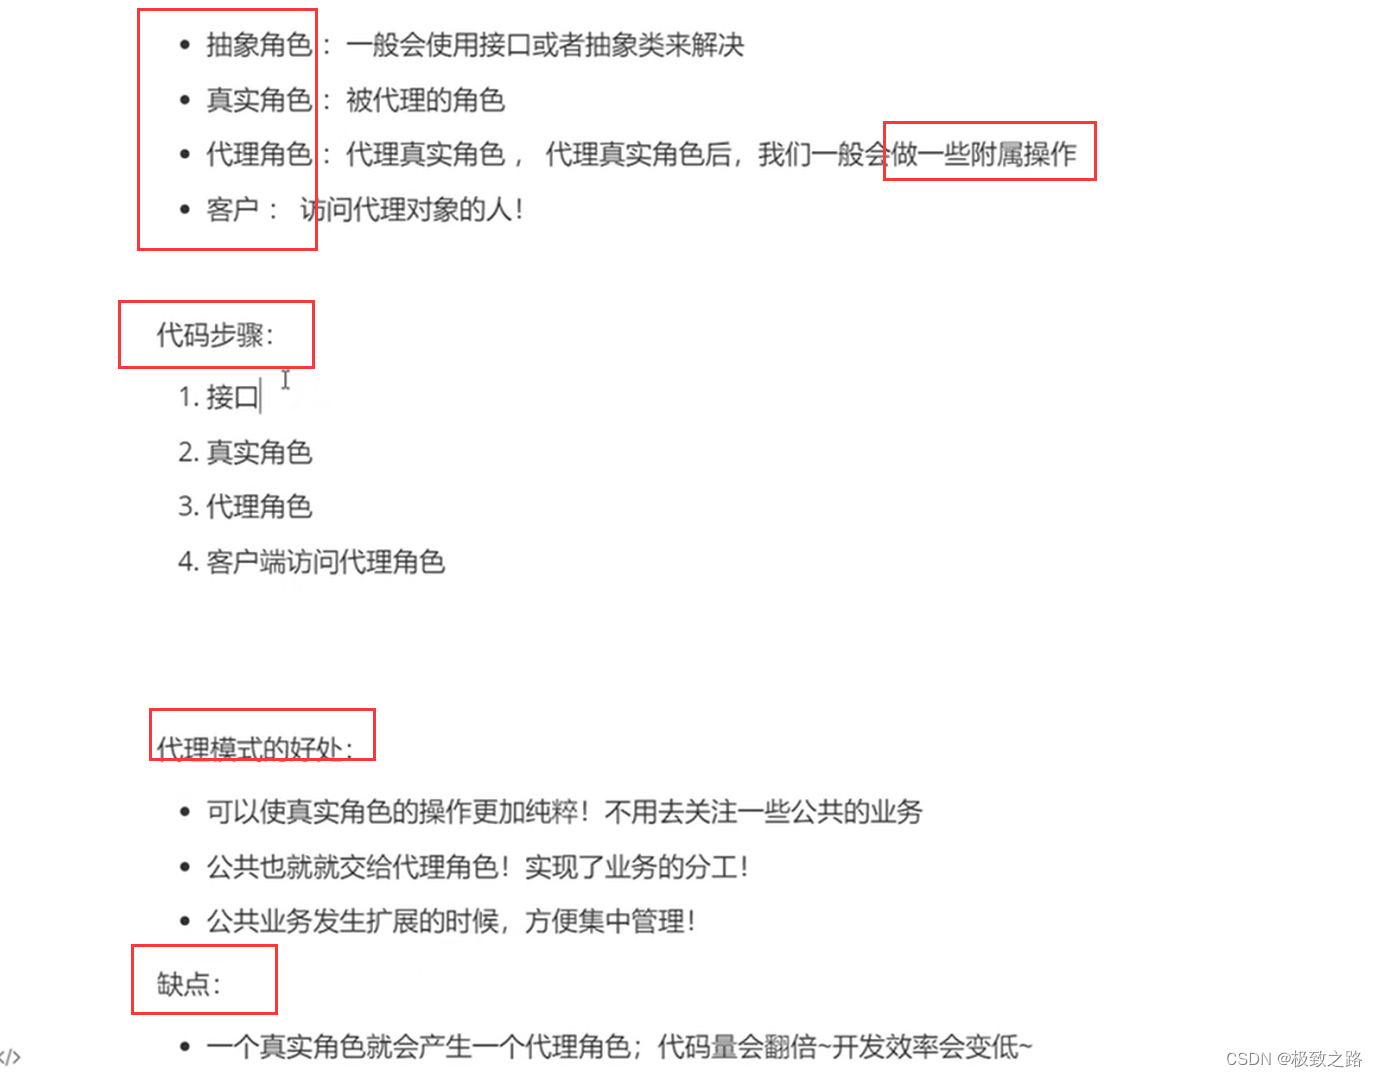
程序的一个原则:尽量不去改变原有的代码。
14.2.动态代理:
14.3代理类ProxyInvocationHandler.java
package com.kuang.demo04;import com.kuang.demo03.Rent;import java.lang.reflect.InvocationHandler;
import java.lang.reflect.Method;
import java.lang.reflect.Proxy;/*** 自动生成代理类*/
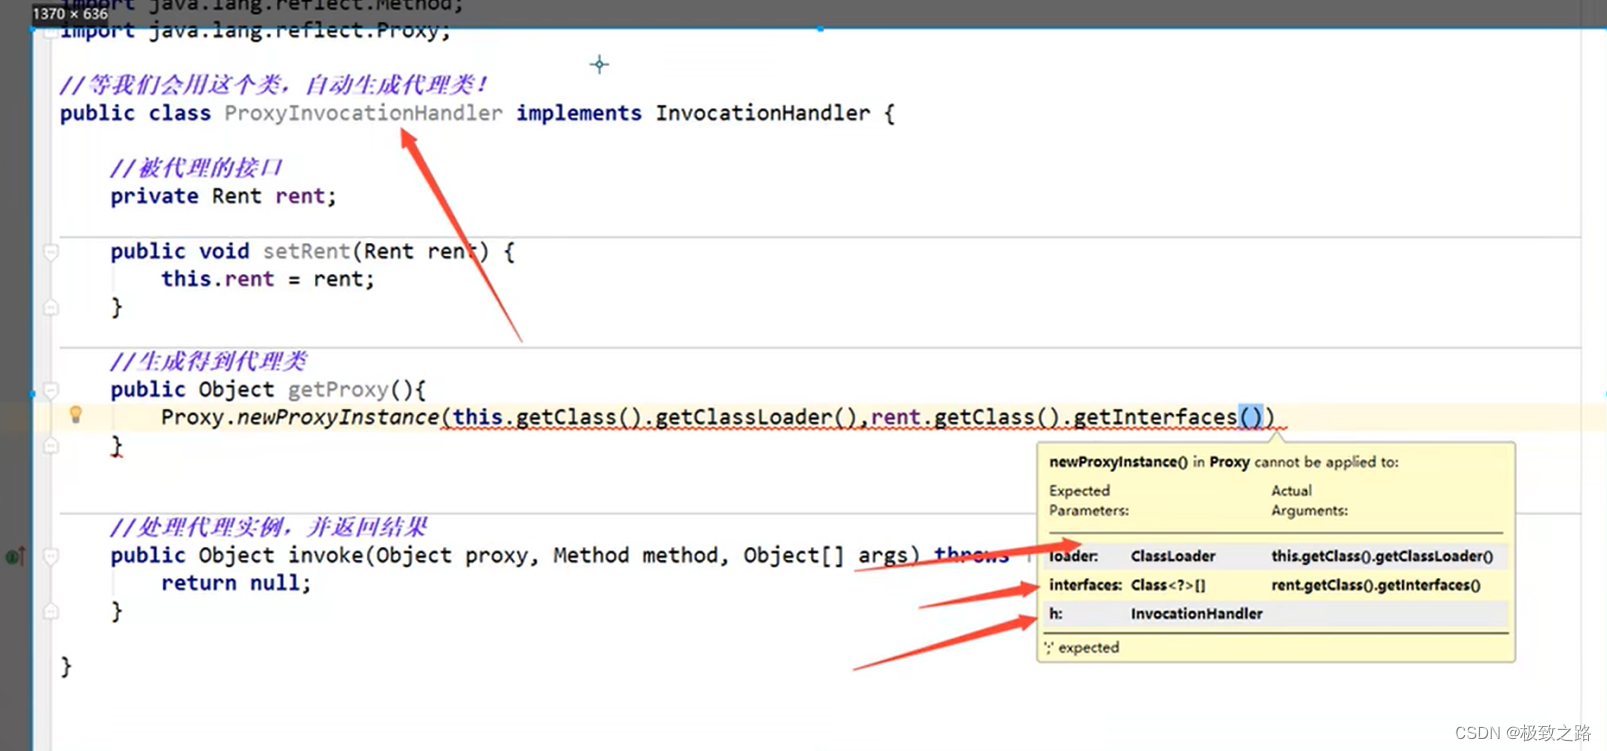
public class ProxyInvocationHandler implements InvocationHandler {//    被代理的接口private Object target;public void setRent(Object target) {this.target = target;}//    生成得到代理类public Object getProxy(){return Proxy.newProxyInstance(this.getClass().getClassLoader(),target.getClass().getInterfaces() ,this);}//处理代理实例并返回结果。@Overridepublic Object invoke(Object proxy, Method method, Object[] args) throws Throwable {
//        动态代理的本质就是使用反射机制实现log(method.getName());Object result = method.invoke(target, args);return result;}public void log(String msg){System.out.println("调用了"+msg+"方法");}
}
Client.java
public class Client {public static void main(String[] args) {//真实角色UserServiceImpl userService = new UserServiceImpl();//生成代理角色的类ProxyInvocationHandler pih = new ProxyInvocationHandler();//通过调用程序处理角色来处理我们要调用的接口对象pih.setRent(userService);UserService proxy = (UserService) pih.getProxy();proxy.add();}
}
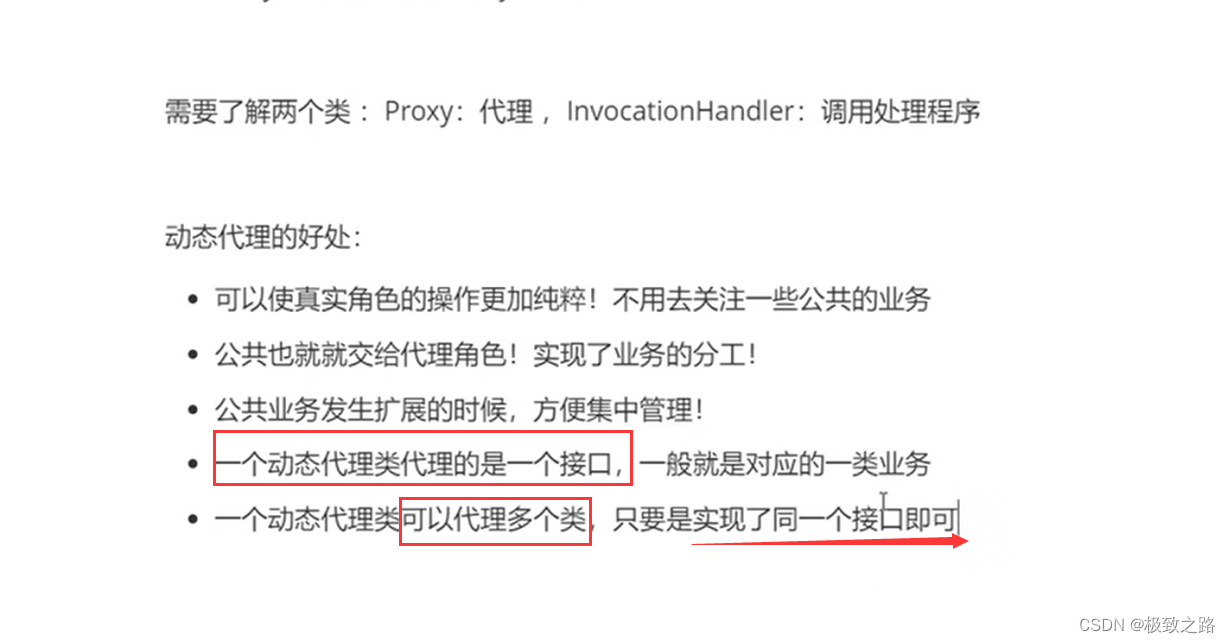
别人问可以知道有InvocationHandler和Proxy这两个类,
- InvocationHandler这个类是用于生成动态实例的,通过设置要代理的对象(真实角色),动态生成代理类。
- InvocationHanler调用处理程序并返回一个结果。
- Proxy:提供动态代理类的静态方法。
15.AOP
15.1.什么是AOP?
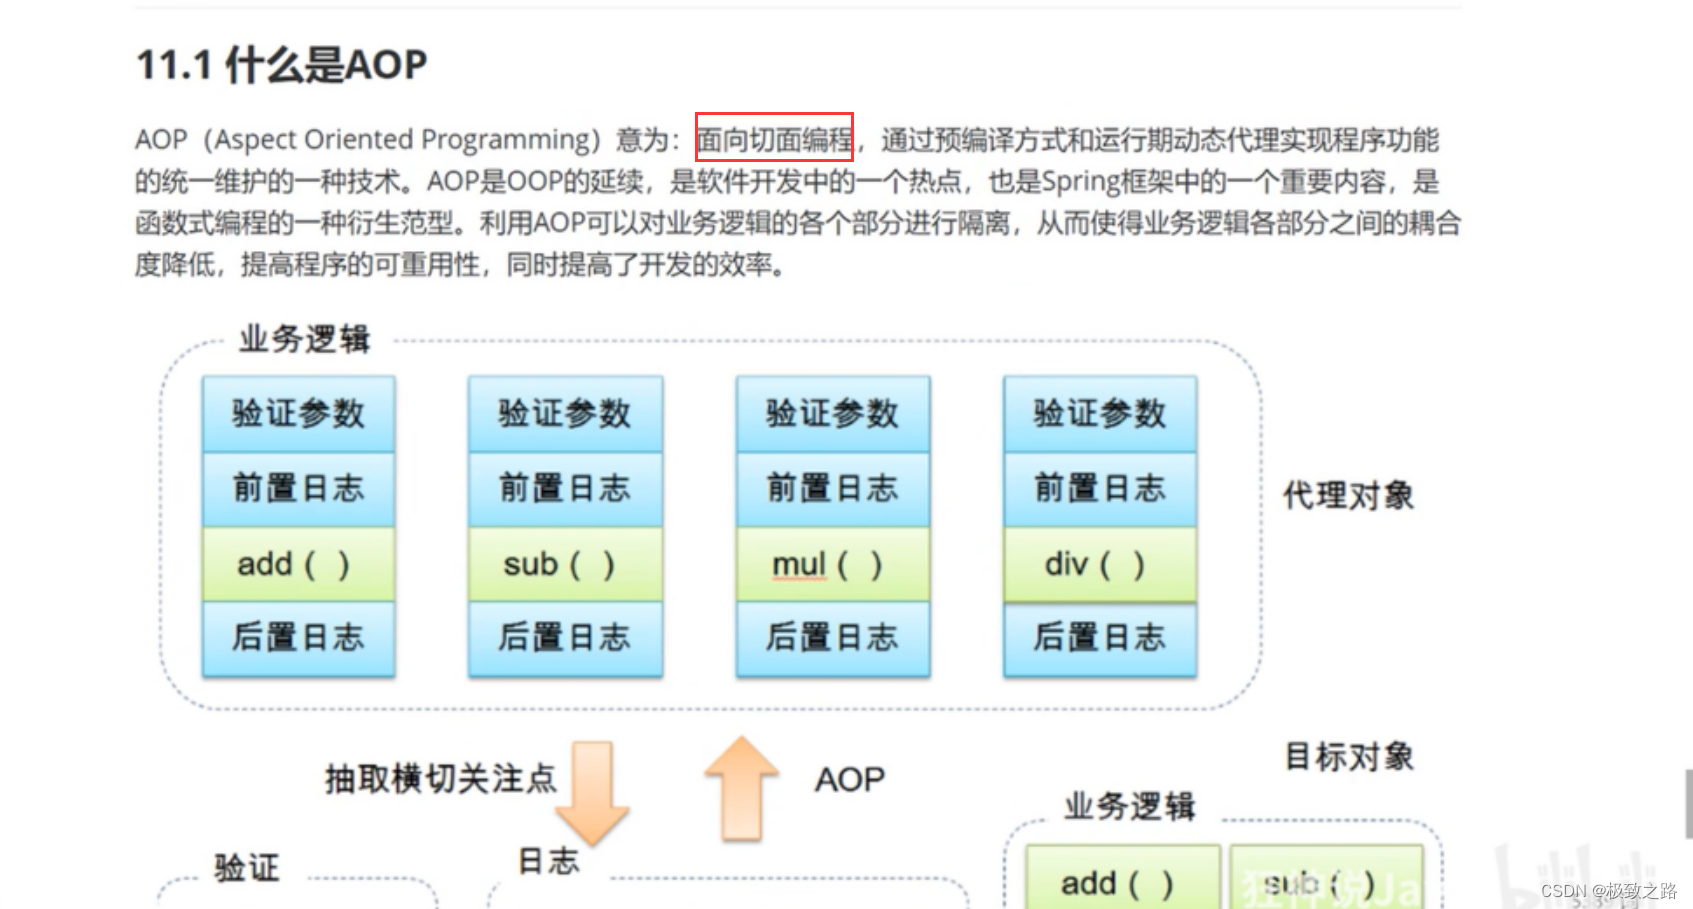
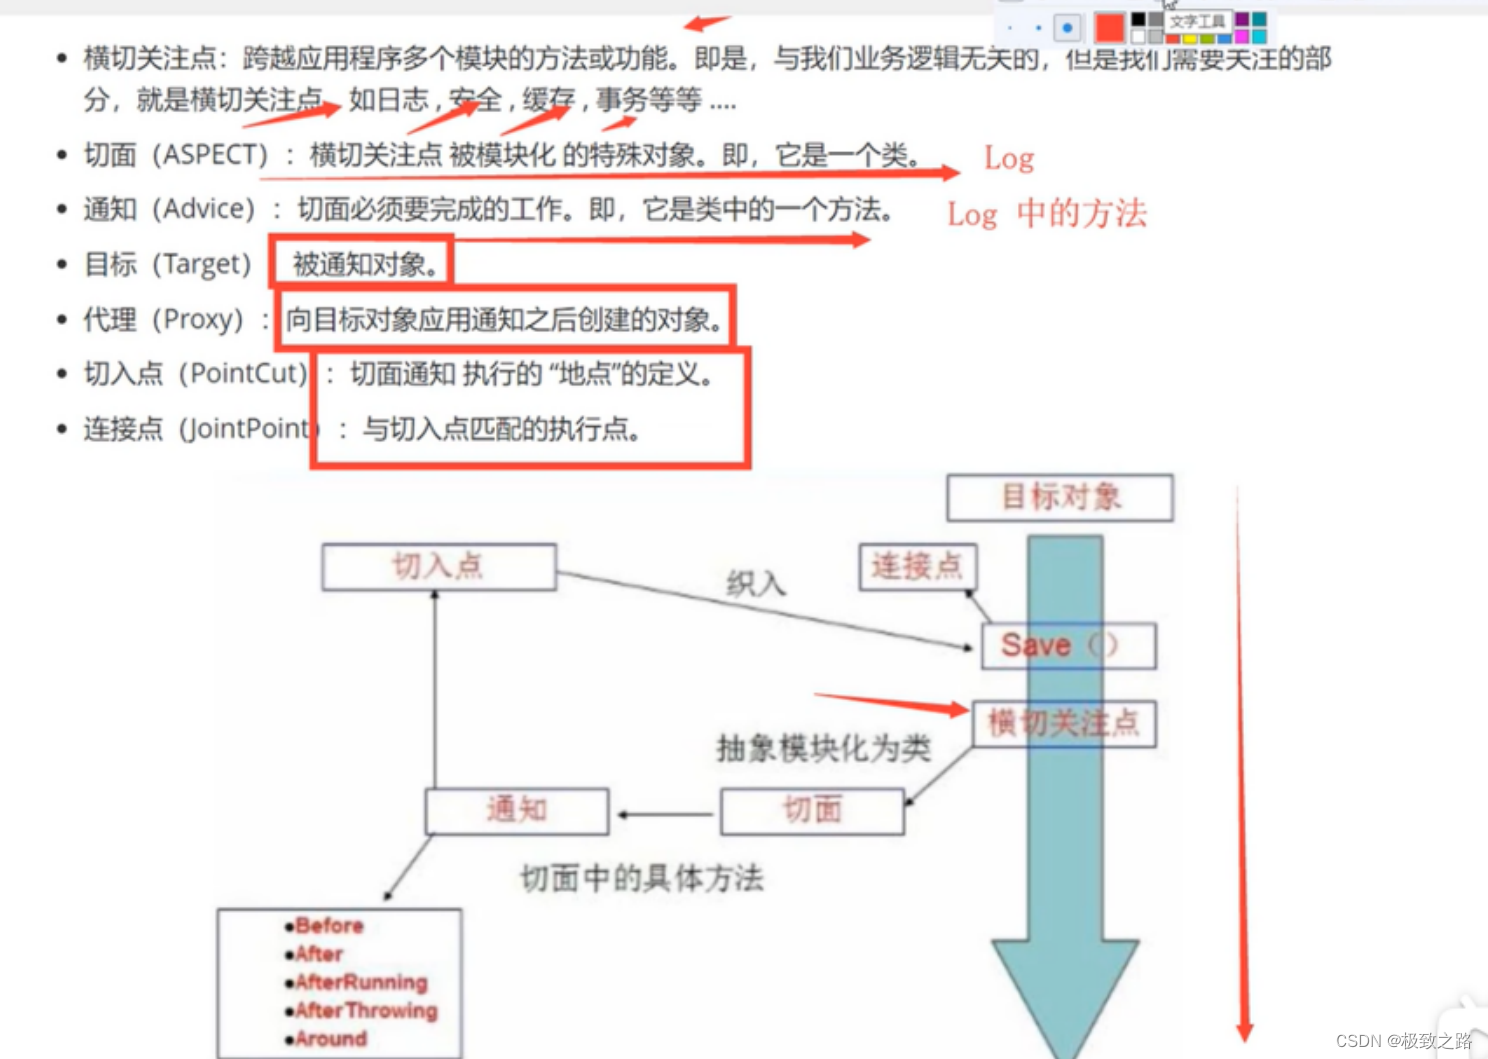
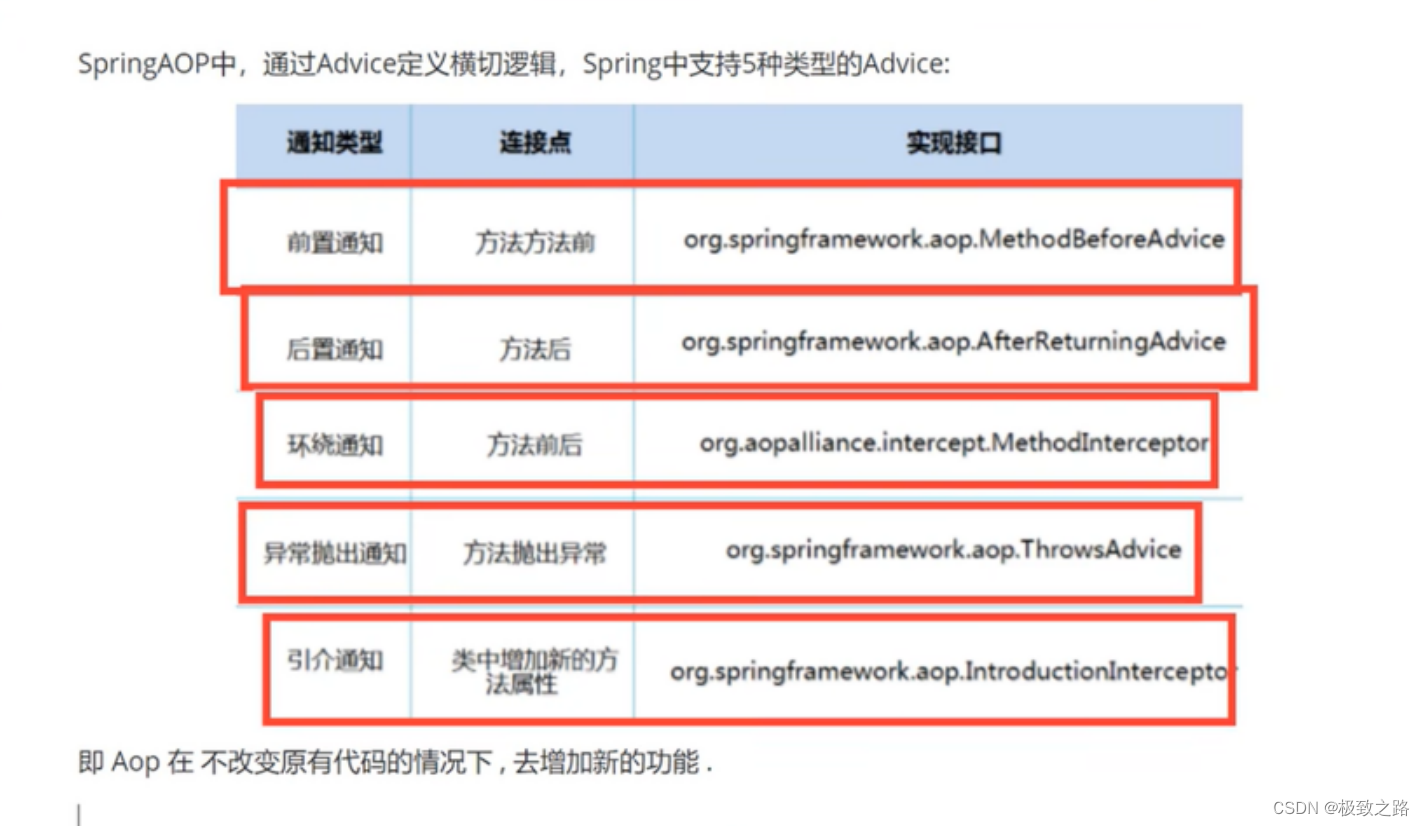
15.2.使用spring实现AOP
使用AOP需要导入织入包:
  <!--    使用aop织入,需要导入的包--><dependency><groupId>org.aspectj</groupId><artifactId>aspectjweaver</artifactId><version>1.9.4</version></dependency>
</dependencys>
在beans.xml中导入AOP约束:
<?xml version="1.0" encoding="UTF-8"?>
<beans xmlns="http://www.springframework.org/schema/beans"xmlns:xsi="http://www.w3.org/2001/XMLSchema-instance"xmlns:aop="http://www.springframework.org/schema/aop"xsi:schemaLocation="http://www.springframework.org/schema/beanshttp://www.springframework.org/schema/beans/spring-beans-3.0.xsdhttp://www.springframework.org/schema/aophttp://www.springframework.org/schema/aop/spring-aop-3.0.xsd"></beans>
15.2.1方式一:使用原生的Spring API接口
定义后置日志:
package com.kuang.log;
import org.springframework.aop.AfterReturningAdvice;
import java.lang.reflect.Method;public class AfterLog implements AfterReturningAdvice {@Overridepublic void afterReturning(Object returnValue, Method method, Object[] objects, Object o1) throws Throwable {System.out.println("执行了"+method.getName()+"方法,返回结果为:"+returnValue);}
}
定义前置日志:
package com.kuang.log;
import org.springframework.aop.MethodBeforeAdvice;
import java.lang.reflect.Method;public class Log implements MethodBeforeAdvice {//method:要执行目标对象的方法//objects:参数//o:目标对象@Overridepublic void before(Method method, Object[] objects, Object o) throws Throwable {System.out.println(o.getClass().getName()+"的"+method.getName()+"被执行了");}
}
在beans.xml中配置:
 <!--     方式一:使用原生的Spring API接口配置aop:需要导入aop的约束 -->
<aop:config>
<!--    切入点 expression表达式,execution(要执行的位置(修饰词 返回值 类名 方法名 参数))类.*(..)表示该类下的所有方法带参数--><aop:pointcut id="pointcut" expression="execution(* com.kuang.service.UserServiceImpl.*(..))"/><!--    执行环绕增加,即要增加哪个类?切入到哪里?--><aop:advisor advice-ref="log" pointcut-ref="pointcut"/><aop:advisor advice-ref="afterlog" pointcut-ref="pointcut"/>
</aop:config>
切入点:在哪个地方去执行方法。
执行UserServiceImpl类的所有方法。两个点代表可以有任意的参数。
aop:advisor:执行环绕增加,即要增加哪个类?切入到哪里?
MyTest测试类:
import com.kuang.service.UserService;
import com.kuang.service.UserServiceImpl;
import org.springframework.context.ApplicationContext;
import org.springframework.context.support.ClassPathXmlApplicationContext;public class MyTest {public static void main(String[] args) {ApplicationContext cpx = new ClassPathXmlApplicationContext("beans.xml");UserService userservice = cpx.getBean("userservice", UserService.class);userservice.del();}
}
15.2.2方式二:自定义diy类
public class DiyPointCut {public void before(){System.out.println("方法执行前");}public void after(){System.out.println("方法执行后");}
}
<!-- 方式二:自定义类 --><bean id="diy" class="com.kuang.diy.DiyPointCut"/><aop:config>
<!-- 自定义切面,ref:要引用的类--><aop:aspect ref="diy">
<!-- 切入点--><aop:pointcut id="pointcut" expression="execution(* com.kuang.service.UserServiceImpl.*(..))"/>
<!-- 通知--><aop:before method="before" pointcut-ref="pointcut"/><aop:after method="after" pointcut-ref="pointcut"/></aop:aspect></aop:config>
15.2.3方式三:使用注解方式实现AOP
package com.kuang.diy;import org.aspectj.lang.ProceedingJoinPoint;
import org.aspectj.lang.Signature;
import org.aspectj.lang.annotation.After;
import org.aspectj.lang.annotation.Around;
import org.aspectj.lang.annotation.Aspect;
import org.aspectj.lang.annotation.Before;/***方式三:使用注解方式实现AOP*/
@Aspect //标注这个类是一个切面
public class AnnotationPointCut {@Before("execution(* com.kuang.service.UserServiceImpl.*(..))")public void before(){System.out.println("====方法执行前=====");}
@After("execution(* com.kuang.service.UserServiceImpl.*(..))")public void after(){System.out.println("=====方法执行后=====");}
@Around("execution(* com.kuang.service.UserServiceImpl.*(..))")public void around(ProceedingJoinPoint jp) throws Throwable {System.out.println("环绕前");Object proceed = jp.proceed();Signature signature = jp.getSignature();//获得签名System.out.println("signature:"+signature);System.out.println("环绕后");
}}
在beans.xml中注册并开启注解支持:
<!--    注册注解方式的类--><bean id="annotationPointCut" class="com.kuang.diy.AnnotationPointCut"/>
<!--    开启注解支持--><aop:aspectj-autoproxy/>
16.整合Mybatis

1.导入相关jar包:
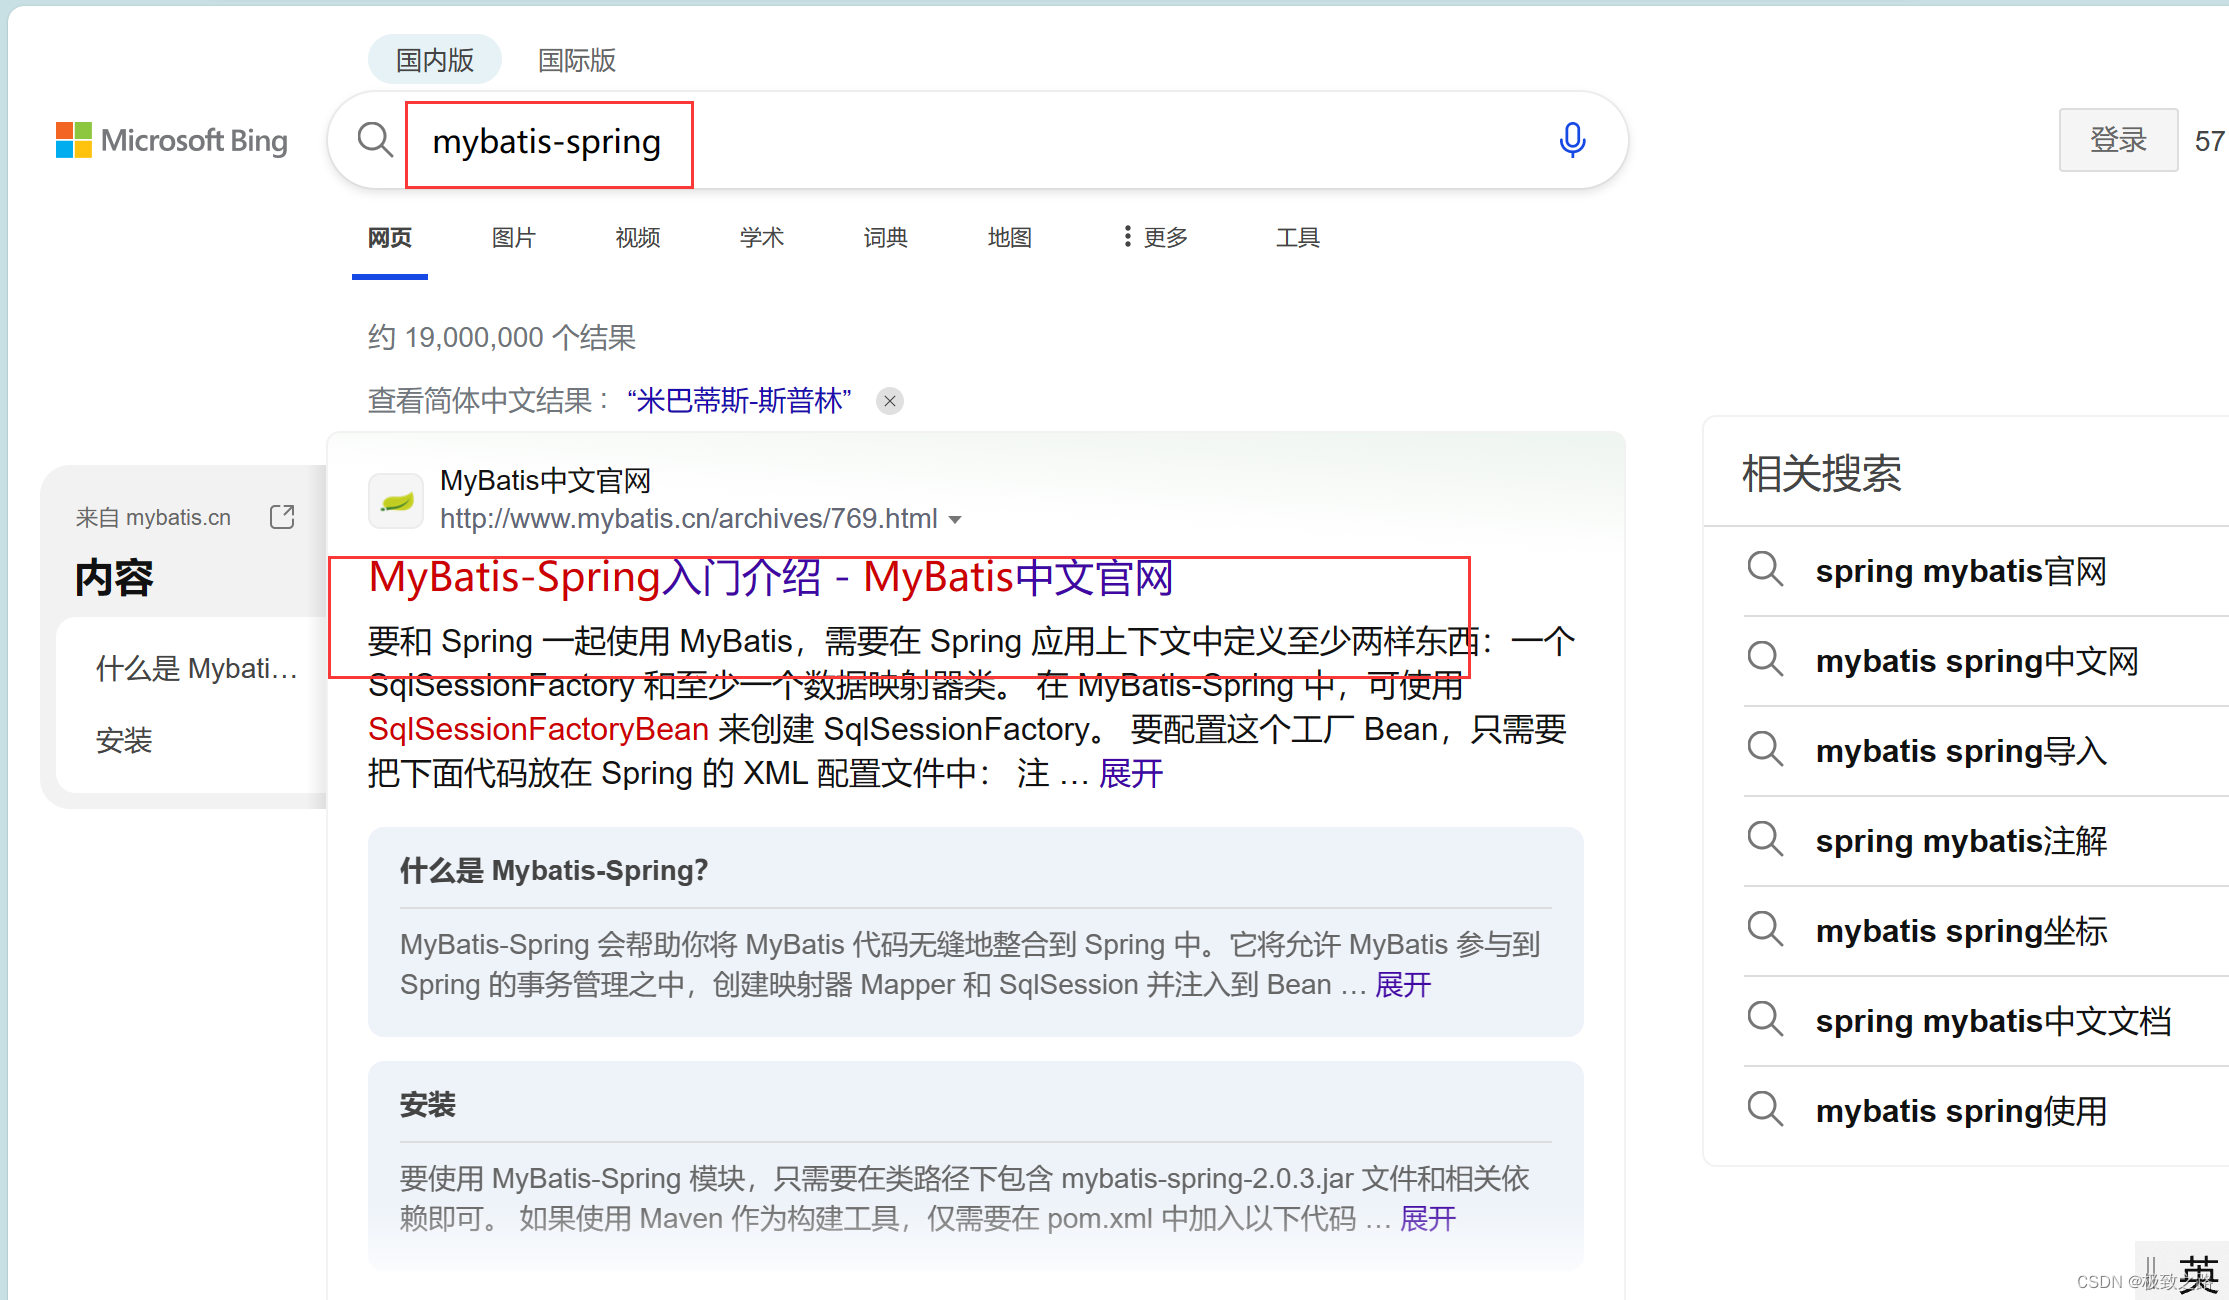
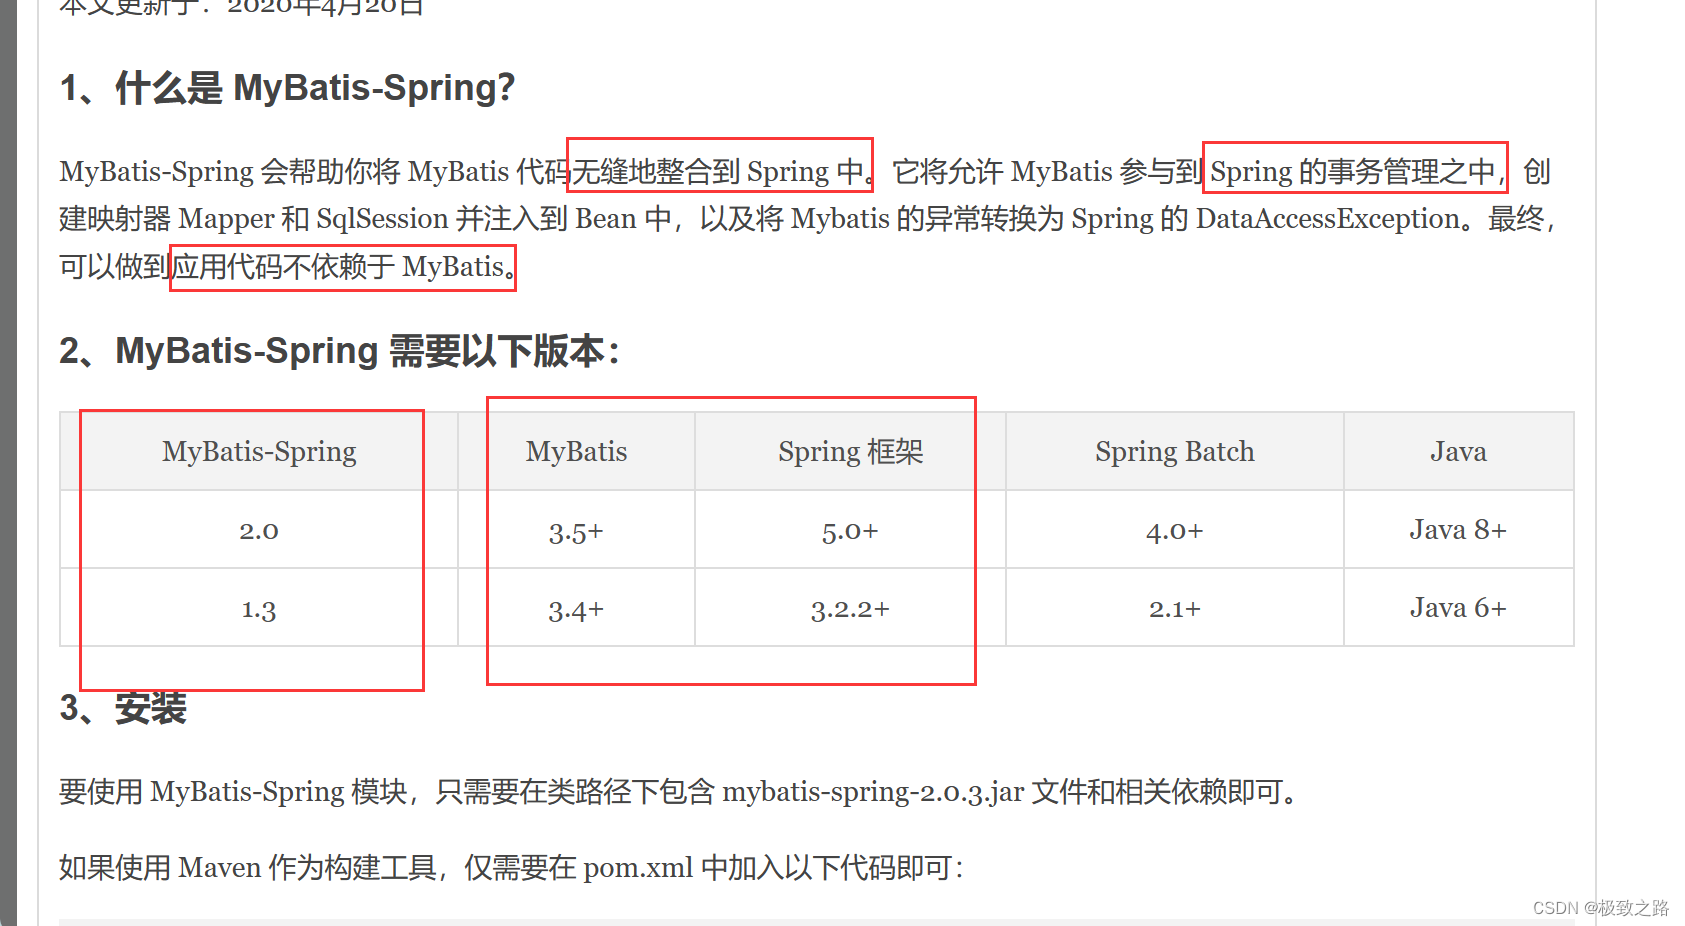
整合Mybatis需要引入依赖:
<dependency><groupId>org.mybatis</groupId><artifactId>mybatis-spring</artifactId><version>2.0.2</version>
</dependency><!--        spring操作数据库,还需要一个spring-jdbc-->
<dependency><groupId>org.springframework</groupId><artifactId>spring-jdbc</artifactId><version>5.2.0.RELEASE</version></dependency>
mybatis跟谁整合就-谁就行了
2.编写配置文件
2.1引入mybatis核心配置文件: mybatis-config.xml:
<?xml version="1.0" encoding="UTF-8" ?>
<!DOCTYPE configurationPUBLIC "-//mybatis.org//DTD Config 3.0//EN""http://mybatis.org/dtd/mybatis-3-config.dtd">
<!--configuration核心配置文件-->
<configuration><typeAliases><package name="com.kuang.pojo"/></typeAliases><!-- Environments:多套环境,default可以选择其中一个环境作为默认的环境。-->
<!-- <environments default="development">-->
<!-- <environment id="development">-->
<!-- <transactionManager type="JDBC"/>-->
<!-- <dataSource type="POOLED">-->
<!-- <property name="driver" value="com.mysql.jdbc.Driver"/>-->
<!-- <!– 在xml文件中,&不能用,需要转义&。–>-->
<!-- <property name="url" value="jdbc:mysql://localhost:3306/mybatis?useSSL=true&useUnicode=true&characterEncoding=UTF-8"/>-->
<!-- <property name="username" value="root"/>-->
<!-- <property name="password" value="123456"/>-->
<!-- </dataSource>-->
<!-- </environment>-->
<!-- </environments>--><!-- <mappers>-->
<!-- <!– 注册xxxMapper.xml文件, 路径以/代替.–>-->
<!-- <mapper resource="com/kuang/mapper/UserMapper.xml"/>-->
<!-- </mappers>--></configuration>注释的地方由整合后的spring(spring-dao.xml) 实现,mybatis配置文件中这部分的内容可以删掉,一般会留别名和设置(日志开启) 在mybatis-config.xml文件中。
2.2引入spring整合mybatis的配置文件: spring-dao.xml
<?xml version="1.0" encoding="UTF-8"?>
<beans xmlns="http://www.springframework.org/schema/beans"xmlns:xsi="http://www.w3.org/2001/XMLSchema-instance"xmlns:aop="http://www.springframework.org/schema/aop"xsi:schemaLocation="http://www.springframework.org/schema/beanshttp://www.springframework.org/schema/beans/spring-beans-3.0.xsdhttp://www.springframework.org/schema/aophttp://www.springframework.org/schema/aop/spring-aop-3.0.xsd"><!--DataSource:使用Spring的数据源替换Mybatis的配置这里使用Spring提供的JDBC,有了数据源,自然要有数据源的属性-->
<bean id="datasource" class="org.springframework.jdbc.datasource.DriverManagerDataSource"><property name="url" value="jdbc:mysql://localhost:3306/mybatis?useSSL=true&useUnicode=true&characterEncoding=UTF-8"/><property name="driverClassName" value="com.mysql.jdbc.Driver"/><property name="username" value="root"/><property name="password" value="123456"/>
</bean><!-- sqlSessionFactory :通过datasource得到sqlSessionFactory-->
<bean id="sqlSessionFactory" class="org.mybatis.spring.SqlSessionFactoryBean"><property name="dataSource" ref="datasource"/>
<!-- 绑定mybatis配置文件--><property name="configLocation" value="classpath:mybatis-config.xml"/><property name="mapperLocations" value="classpath:com/kuang/mapper/*.xml"/>
</bean><!-- SqlSessionTemplate就是sqlSession :通过 sqlSessionFactory得到sqlSession-->
<bean id="sqlSession" class="org.mybatis.spring.SqlSessionTemplate">
<!-- 只能使用构造器注入sqlSessionFactory,因为它没有Set方法--><constructor-arg index="0" ref="sqlSessionFactory"/>
</bean>
<!-- 注入sqlSession--><bean id="userMapper" class="com.kuang.mapper.UserMapperImpl"><property name="sqlSession" ref="sqlSession"/></bean></beans>
2.3引入spring的核心配置文件: applicationContext.xml
<?xml version="1.0" encoding="UTF-8"?>
<beans xmlns="http://www.springframework.org/schema/beans"xmlns:xsi="http://www.w3.org/2001/XMLSchema-instance"xmlns:aop="http://www.springframework.org/schema/aop"xsi:schemaLocation="http://www.springframework.org/schema/beanshttp://www.springframework.org/schema/beans/spring-beans-3.0.xsdhttp://www.springframework.org/schema/aophttp://www.springframework.org/schema/aop/spring-aop-3.0.xsd">
<import resource="spring-dao.xml"/><bean id="userMapper" class="com.kuang.mapper.UserMapperImpl"><property name="sqlSession" ref="sqlSession"/></bean><bean id="userMapper2" class="com.kuang.mapper.UserMapperImpl2"><property name="sqlSessionFactory" ref="sqlSessionFactory"/></bean></beans>
applicationContext.xml中调userMapper,然后调里面的方法就可以了。 spring-dao.xml以后就用于专注的操作数据库。
3.实体类,Mapper及xml文件和实现类
User
public class User {private int id;private String name;private String pwd;}
UserMapper
public interface UserMapper {public List<User> selectUsers();
}
UserMapper.xml
<?xml version="1.0" encoding="UTF-8" ?>
<!DOCTYPE mapperPUBLIC "-//mybatis.org//DTD Config 3.0//EN""http://mybatis.org/dtd/mybatis-3-mapper.dtd">
<!--configuration核心配置文件-->
<mapper namespace="com.kuang.mapper.UserMapper"><select id="selectUsers" resultType="user">select * from User;</select>
</mapper>
两种实现类,选择一种即可
为什么写实现类?
用来替换原来mybatis的操作(原来Mybatis在测试类中实现,现在移到实现类中了)。
两种实现类的区别?
第二中继承了SqlSessionDaoSupport ,里面自带有getSqlSession()方法
两个实现类都做原来mybatis做的事情。
1.UserMapperImpl
package com.kuang.mapper;import com.kuang.pojo.User;
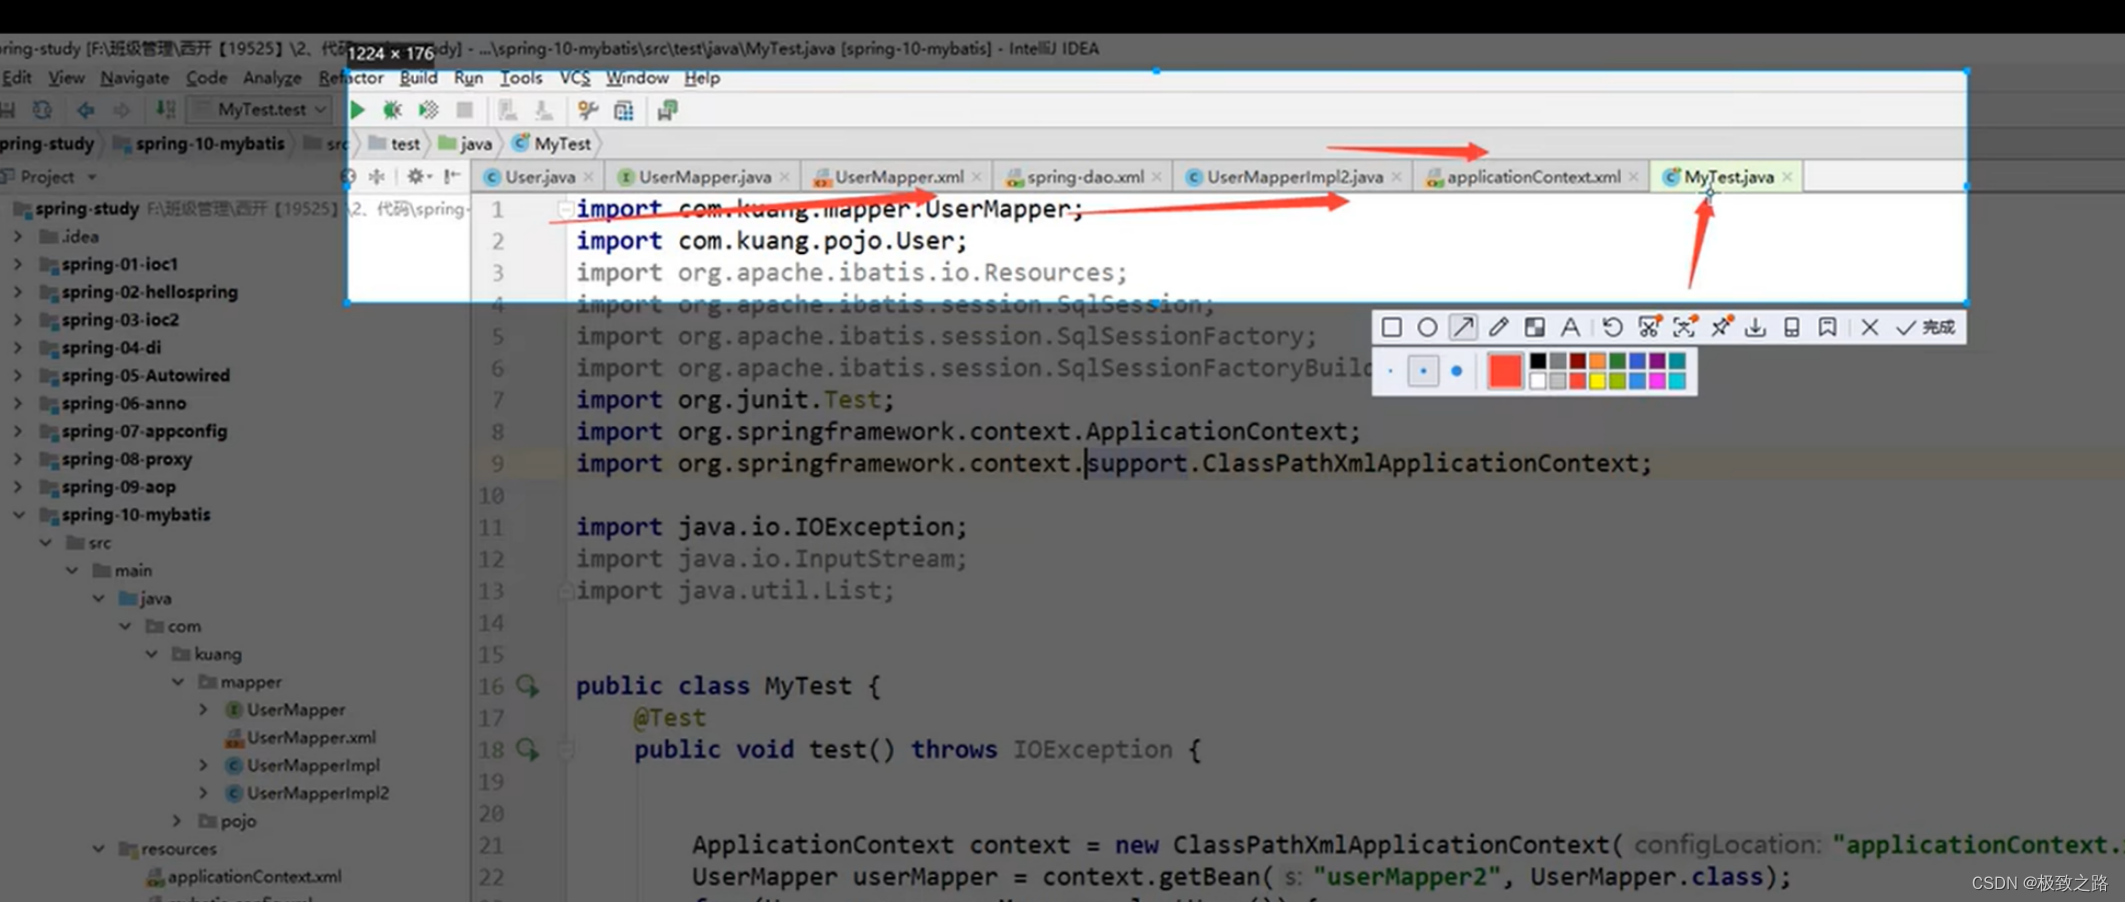
import org.mybatis.spring.SqlSessionTemplate;import java.util.List;public class UserMapperImpl implements UserMapper{
//所有的操作原来都使用sqlSession来执行,现在是SqlSessionTemplate,两者等价。private SqlSessionTemplate sqlSession;public void setSqlSession(SqlSessionTemplate sqlSession) {this.sqlSession = sqlSession;}
//原来在测试类中,现在mybatis的操作在这里面@Overridepublic List<User> selectUsers() {UserMapper mapper = sqlSession.getMapper(UserMapper.class);return mapper.selectUsers();}
}
注册实现类:
<!-- 注入sqlSession--><bean id="userMapper" class="com.kuang.mapper.UserMapperImpl"><property name="sqlSession" ref="sqlSession"/></bean>
2.UserMapperImpl2
package com.kuang.mapper;import com.kuang.pojo.User;
import org.mybatis.spring.support.SqlSessionDaoSupport;import java.util.List;public class UserMapperImpl2 extends SqlSessionDaoSupport implements UserMapper{@Overridepublic List<User> selectUsers() {return  getSqlSession().getMapper(UserMapper.class).selectUsers();}
}
注册实现类:
<bean id="userMapper2" class="com.kuang.mapper.UserMapperImpl2"><property name="sqlSessionFactory" ref="sqlSessionFactory"/>
</bean>
测试:
public class MyTest {@Testpublic void tets1() throws IOException {
//        String resource = "mybatis-config.xml";
//        InputStream is = Resources.getResourceAsStream(resource);
//        SqlSessionFactory sqlSessionFactory = new SqlSessionFactoryBuilder().build(is);
//        SqlSession sqlSession = sqlSessionFactory.openSession(true);
//        UserMapper mapper = sqlSession.getMapper(UserMapper.class);
//        List<User> users = mapper.selectUsers();
//        for (User user : users) {
//            System.out.println(user);
//        }ApplicationContext context = new ClassPathXmlApplicationContext("applicationContext.xml");UserMapper userMapper = context.getBean("userMapper2", UserMapper.class);for (User user : userMapper.selectUsers()) {System.out.println(user);}}
}
17.Spring声明式事务
17.1回顾事务
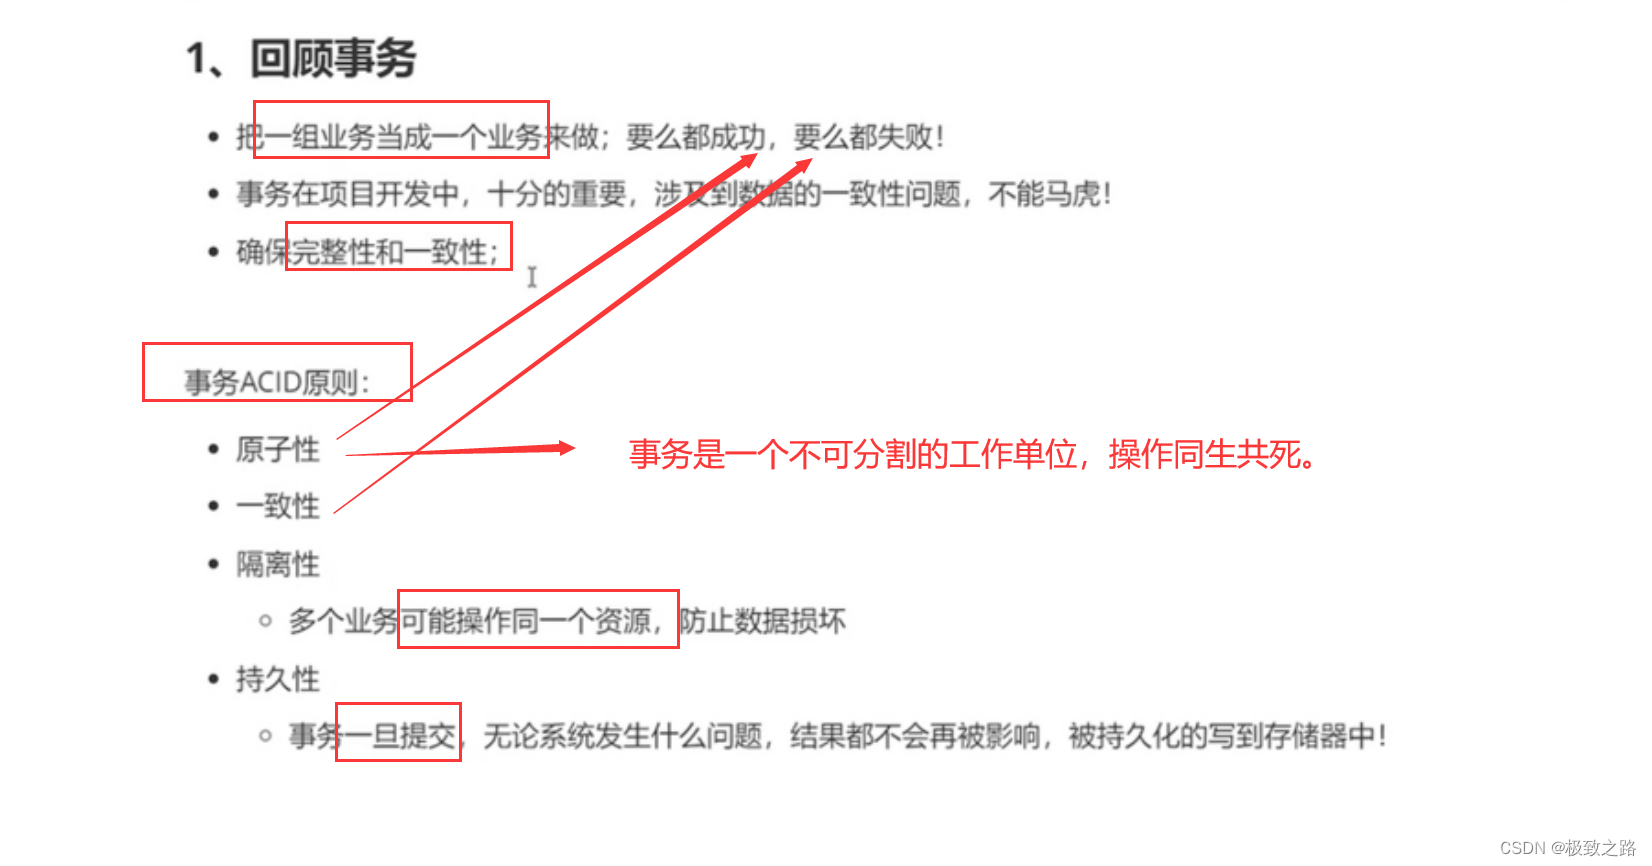
事务的实现:要么改变原来的类,要么横切AOP去实现。
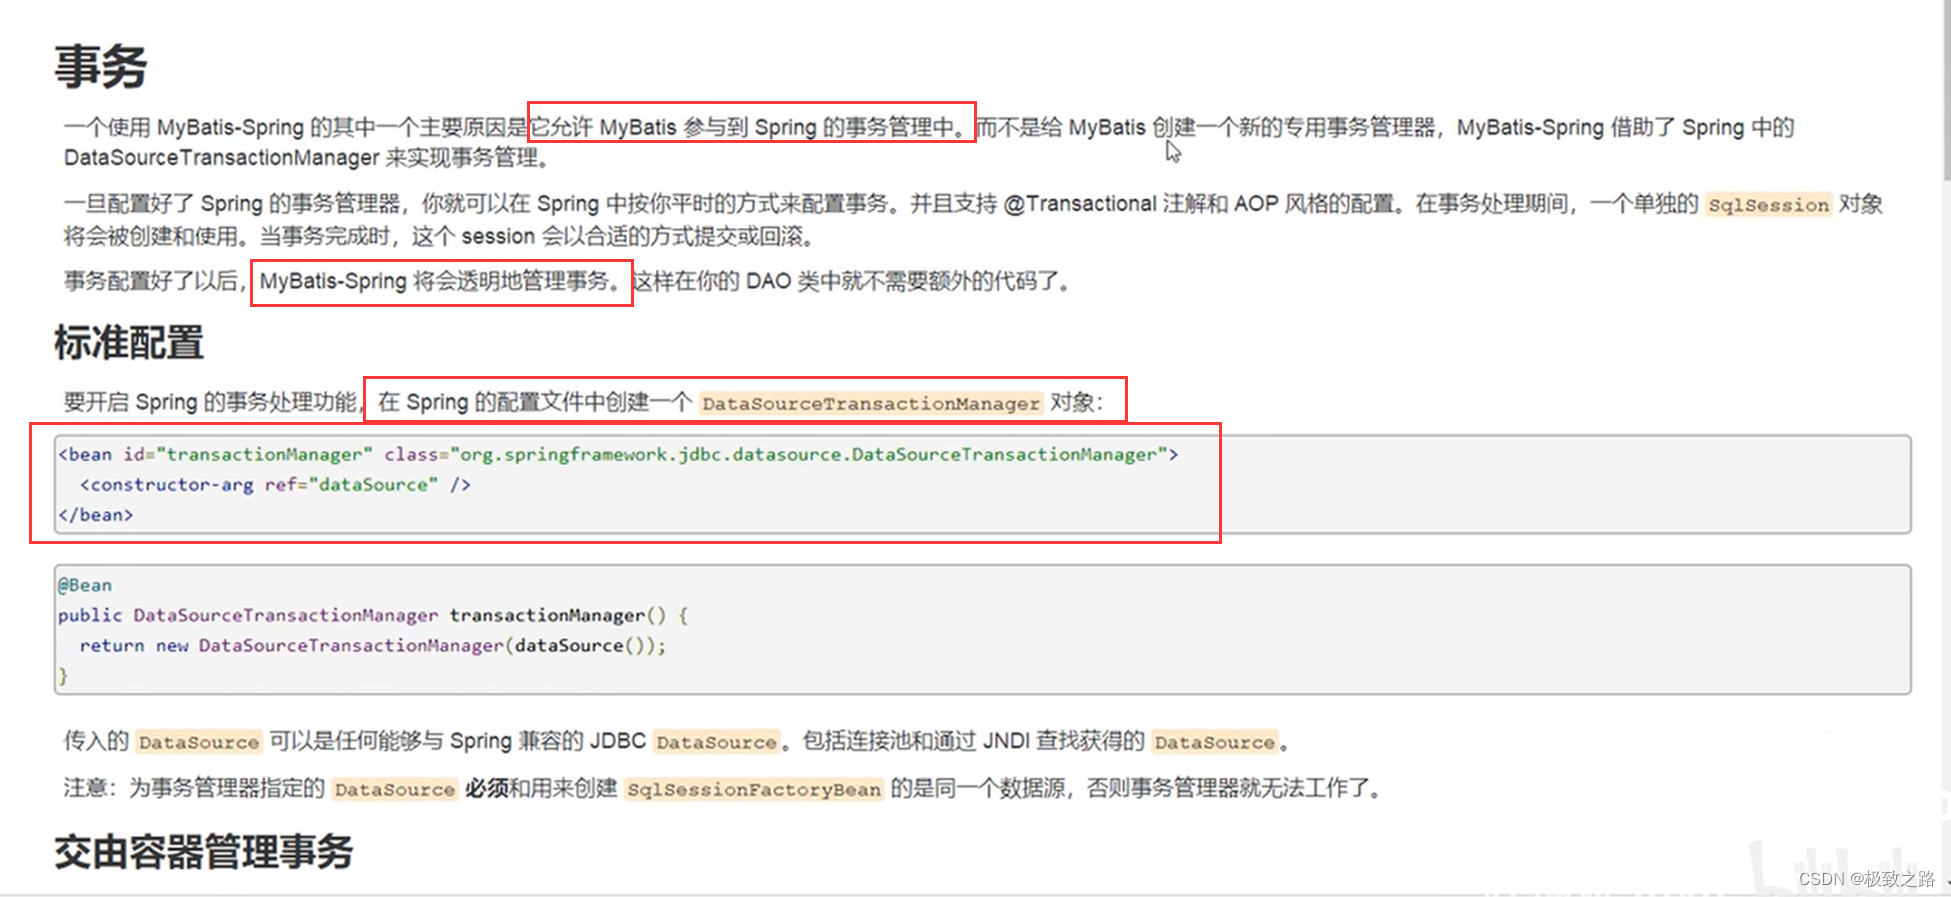
17.2配置声明式事务
在spring-dao.xml中
导入事务的约束:
<?xml version="1.0" encoding="UTF-8"?>
<beans xmlns="http://www.springframework.org/schema/beans"xmlns:xsi="http://www.w3.org/2001/XMLSchema-instance"xmlns:tx="http://www.springframework.org/schema/tx"xmlns:aop="http://www.springframework.org/schema/aop"xsi:schemaLocation="http://www.springframework.org/schema/beanshttp://www.springframework.org/schema/beans/spring-beans-3.0.xsdhttp://www.springframework.org/schema/txhttp://www.springframework.org/schema/tx/spring-tx-3.0.xsdhttp://www.springframework.org/schema/aophttp://www.springframework.org/schema/aop/spring-aop-3.0.xsd"></beans>
tx就是事务的缩写。
配置事务:
 <!--    配置声明式事务--><bean id="transactionManager" class="org.springframework.jdbc.datasource.DataSourceTransactionManager"><property name="dataSource" ref="datasource"/></bean><!--    结合AOP实现事务的织入--><!--    配置事务的通知:-->
<tx:advice id="txAdvice" transaction-manager="transactionManager">
<!--    给哪些方法配置事务?-->
<!--    配置事务的传播特性:new propagation=--><tx:attributes><tx:method name="add" propagation="REQUIRED"/><tx:method name="delete" propagation="REQUIRED"/><tx:method name="update" propagation="REQUIRED"/><tx:method name="query" propagation="REQUIRED"/><tx:method name="*" propagation="REQUIRED"/></tx:attributes>
</tx:advice><!--    配置事务切入--><aop:config><aop:pointcut id="txPointCut" expression="execution(* com.kuang.*.*(..))"/><aop:advisor advice-ref="txAdvice" pointcut-ref="txPointCut"/></aop:config>
这些代码是固定的,今后可以直接拿来用,只需要改动execution里面的切入类就可以了。
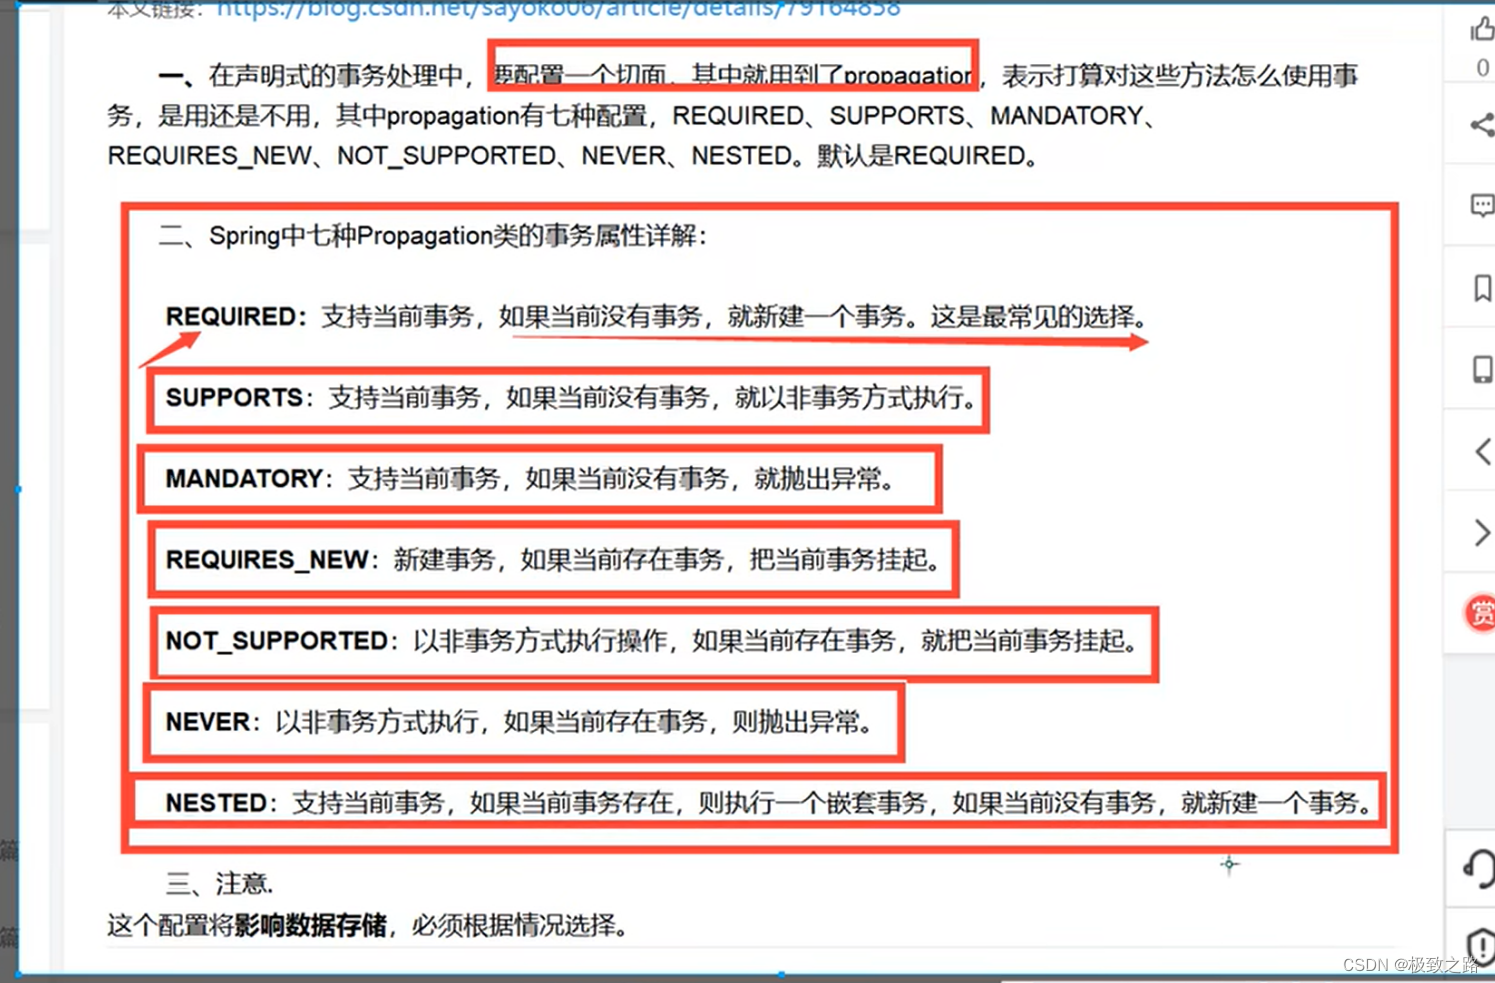
了解即可。
17.3spring中的事务管理
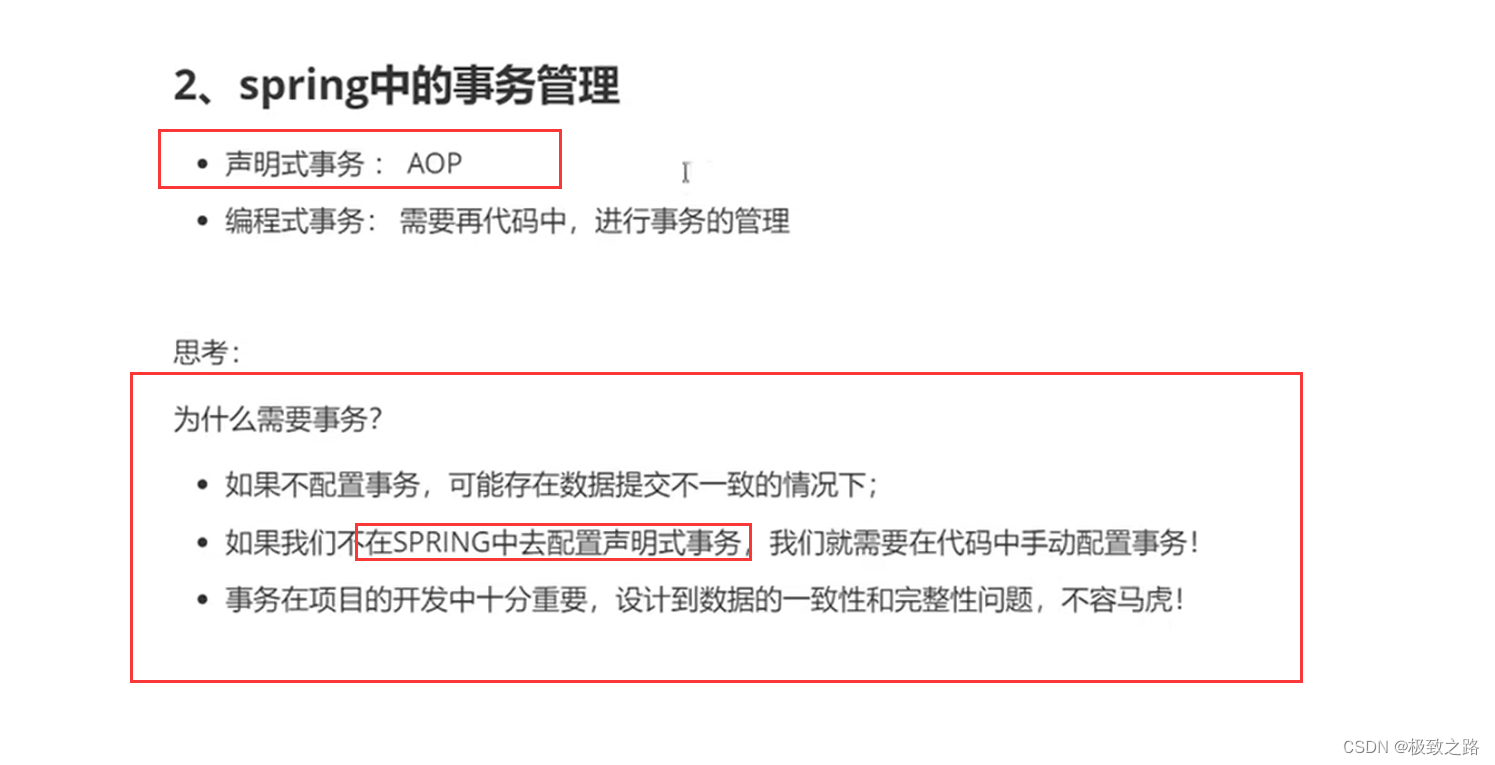
相关文章:

Spring重点记录
文章目录 1.Spring的组成2.Spring优点3.IOC理论推导4.IOC本质5.IOC实现:xml或者注解或者自动装配(零配置)。6.hellospring6.1beans.xml的结构为:6.2.Spring容器6.3对象的创建和控制反转 7.IOC创建对象方式7.1以有参构造的方式创建…...

代码覆盖率工具Gcovr和Fastcov的性能对比
在软件开发过程中,代码覆盖率工具是非常重要的,它可以帮助开发人员评估他们的代码覆盖情况,从而更好地进行测试和调试。在这方面,Gcovr和fastcov是两个常用的工具。本文将对这两种工具的性能进行对比分析。 首先,让我…...

css - flex布局实现div横向滚动
父盒子: display: flex; //将容器设置为Flex布局。overflow-x: scroll; //设置容器水平方向出现滚动条。white-space: nowrap; //防止项目换行显示。 子盒子: flex: 0 0 auto; //设置项目为固定宽度。width: 200px; //设置项目的宽度。margin-rig…...

关于在Ubuntu20.04环境下安装GRPC
关于在Ubuntu20.04环境下安装GRPC 1 cmake安装 要在Ubuntu 20.04上安装CMake 3.26.4,请按照以下步骤进行操作: 打开终端并更新apt软件包列表: sudo apt update安装必要的依赖项: sudo apt install -y wget gcc g++ build-essential下载CMake 3.26.4的源代码: wget https…...

力扣601 体育馆的人流量
在解决"连续三天及以上人流量超过100的记录"问题时,MySQL方案作为力扣解决问题的方案通过窗口函数和分组技巧高效地识别连续记录。而Python与Pandas方案作为扩展则展示了在数据处理和分析方面的灵活性,通过行号变换和分组计数来筛选符合条件的…...

ubuntu20.04设置docker容器开机自启动
ubuntu20.04设置docker容器开机自启动 1 docker自动启动2 容器设置自动启动3 容器自启动失败处理 1 docker自动启动 (1)查看已启动的服务 $ sudo systemctl list-units --typeservice此命令会列出所有当前加载的服务单元。默认情况下,此命令…...
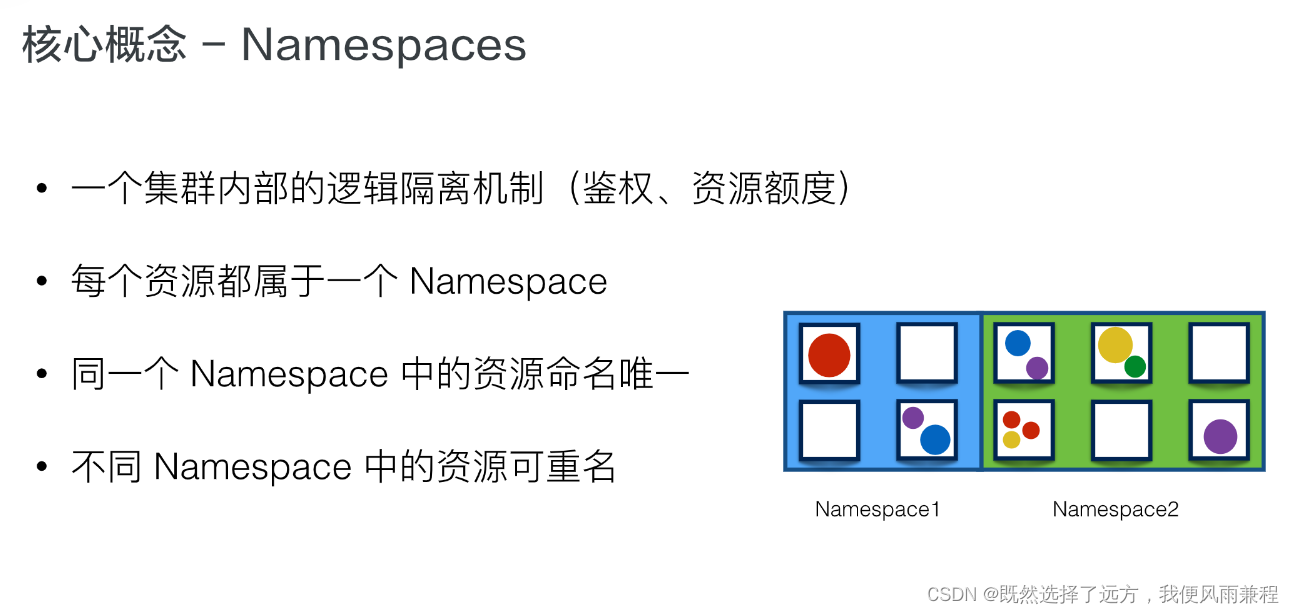
Kubernetes/k8s的核心概念
一、什么是 Kubernetes Kubernetes,从官方网站上可以看到,它是一个工业级的容器编排平台。Kubernetes 这个单词是希腊语,它的中文翻译是“舵手”或者“飞行员”。在一些常见的资料中也会看到“ks”这个词,也就是“k8s”ÿ…...

vue 前端预览 Excel 表
一、安装依赖包官网 npm i luckyexceltemplate 模板 <!-- 用于渲染表格的容器 --> <div id"luckysheet" stylewidth:100vw;height:100vh></div>二、加载 异步加载及 import LuckyExcel from luckyexcel;/* 下列代码加载 cdn 文件,你…...

【JS】生成N位随机数
作用 用于邮箱验证码 码 ramNum.js /*** 生成N位随机数字* param {Number} l 默认:6,默认生成6位随机数字* returns 返回N位随机数字*/ const ramNum (l 6) > {let num for (let i 0; i < l; i) {const n Math.random()const str String(n…...

2024年FPGA可以进吗
2024年,IC设计FPGA行业仍有可能是一个极具吸引力和活力的行业,主要原因包括: 1. 技术发展趋势:随着5G、人工智能、物联网、自动驾驶、云计算等高新技术的快速发展和广泛应用,对集成电路尤其是高性能、低功耗、定制化芯…...
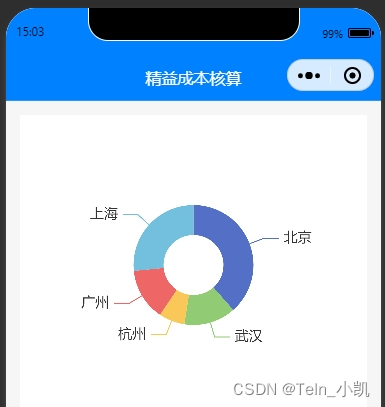
小程序图形:echarts-weixin 入门使用
去官网下载整个项目: https://github.com/ecomfe/echarts-for-weixin 拷贝ec-canvs文件夹到小程序里面 index.js里面的写法 import * as echarts from "../../components/ec-canvas/echarts" const app getApp(); function initChart(canvas, width, h…...

百度百科人物创建要求是什么?
百度百科作为我国最大的中文百科全书,其收录的人物词条要求严谨、客观、有权威性。那么,如何撰写一篇高质量的人物词条呢?本文伯乐网络传媒将从内容要求、注意事项以及创建流程与步骤三个方面进行详细介绍。 一、内容要求 1. 基本信息&#…...
)
练习2-线性回归迭代(李沐函数简要解析)
环境:再练习1中 视频链接:https://www.bilibili.com/video/BV1PX4y1g7KC/?spm_id_from333.999.0.0 代码与详解 数据库 numpy 数据处理处理 torch.utils 数据加载与数据 d2l 专门的库 nn 包含各种层与激活函数 import numpy as np import torch from torch.utils import da…...

人像背景分割SDK,智能图像处理
美摄科技人像背景分割SDK解决方案:引领企业步入智能图像处理新时代 随着科技的不断进步,图像处理技术已成为许多行业不可或缺的一部分。为了满足企业对于高质量、高效率人像背景分割的需求,美摄科技推出了一款领先的人像背景分割SDK…...
100M服务器能同时容纳多少人访问
100M服务器的并发容纳人数会受到多种因素的影响,这些因素包括单个用户的平均访问流量大小、每个用户的平均访问页面数、并发用户比例、服务器和网络的流量利用率以及服务器自身的处理能力。 点击以下任一云产品链接,跳转后登录,自动享有所有…...
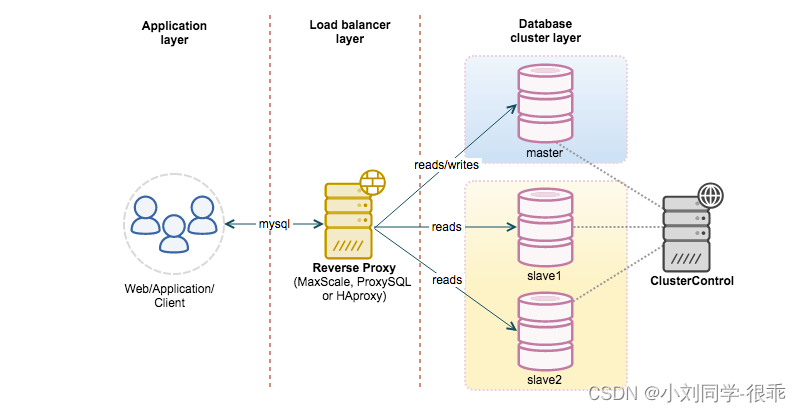
Mysql 的高可用详解
Mysql 高可用 复制 复制是解决系统高可用的常见手段。其思路就是:不要把鸡蛋都放在一个篮子里。 复制解决的基本问题是让一台服务器的数据与其他服务器保持同步。一台主库的数据可以同步到多台备库上,备库本身也可以被配置成另外一台服务器的主库。主…...
)
Acwing枚举、模拟与排序(一)
连号区间数 原题链接:https://www.acwing.com/problem/content/1212/ 初始最小值和最大值的依据是题目给出的数据范围。只要在数据范围之外就可以。 连号的时候,相邻元素元素之间,差值为1。那么区间右边界和左边界,的值的差&#…...

MySQL的主从同步原理
MySQL的主从同步(也称为复制)是一种数据同步技术,用于将一个MySQL服务器(主服务器)上的数据和变更实时复制到另一个或多个MySQL服务器(从服务器)。这项技术支持数据备份、读写分离、故障恢复等多…...
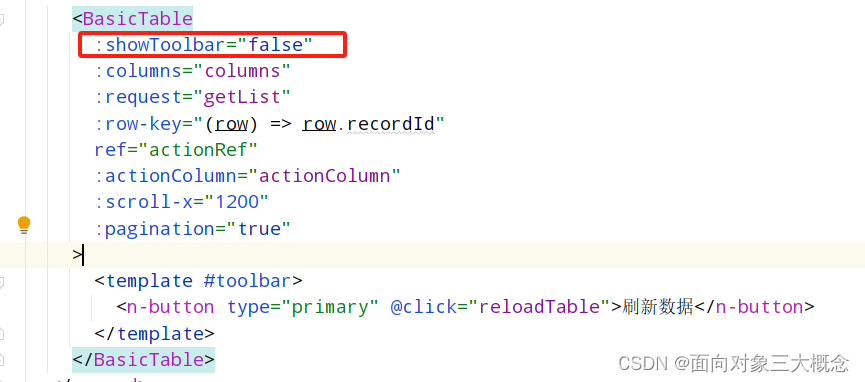
naive-ui-admin 表格去掉工具栏toolbar
使用naive-ui-admin的时候,有时候不需要显示工具栏,工具栏太占地方了。 1.在src/components/Table/src/props.ts 里面添加属性 showToolbar 默认显示,在不需要的地方传false。也可以默认不显示 ,这个根据需求来。 2.在src/compo…...

C++之结构体
结构体 //一、结构体的概念、定义和使用 // 概念:结构体属于用户自定义的数据类型,允许用户存储不同的数据类型 #include<iostream> using namespace std; #include<string> //1.创建学生数据类型:学生包括(姓名&am…...
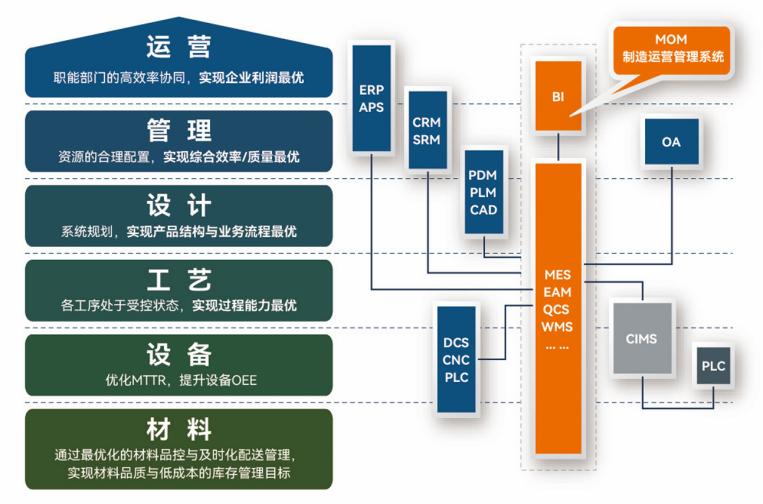
盘古信息PCB行业解决方案:以全域场景重构,激活智造新未来
一、破局:PCB行业的时代之问 在数字经济蓬勃发展的浪潮中,PCB(印制电路板)作为 “电子产品之母”,其重要性愈发凸显。随着 5G、人工智能等新兴技术的加速渗透,PCB行业面临着前所未有的挑战与机遇。产品迭代…...

Java 8 Stream API 入门到实践详解
一、告别 for 循环! 传统痛点: Java 8 之前,集合操作离不开冗长的 for 循环和匿名类。例如,过滤列表中的偶数: List<Integer> list Arrays.asList(1, 2, 3, 4, 5); List<Integer> evens new ArrayList…...
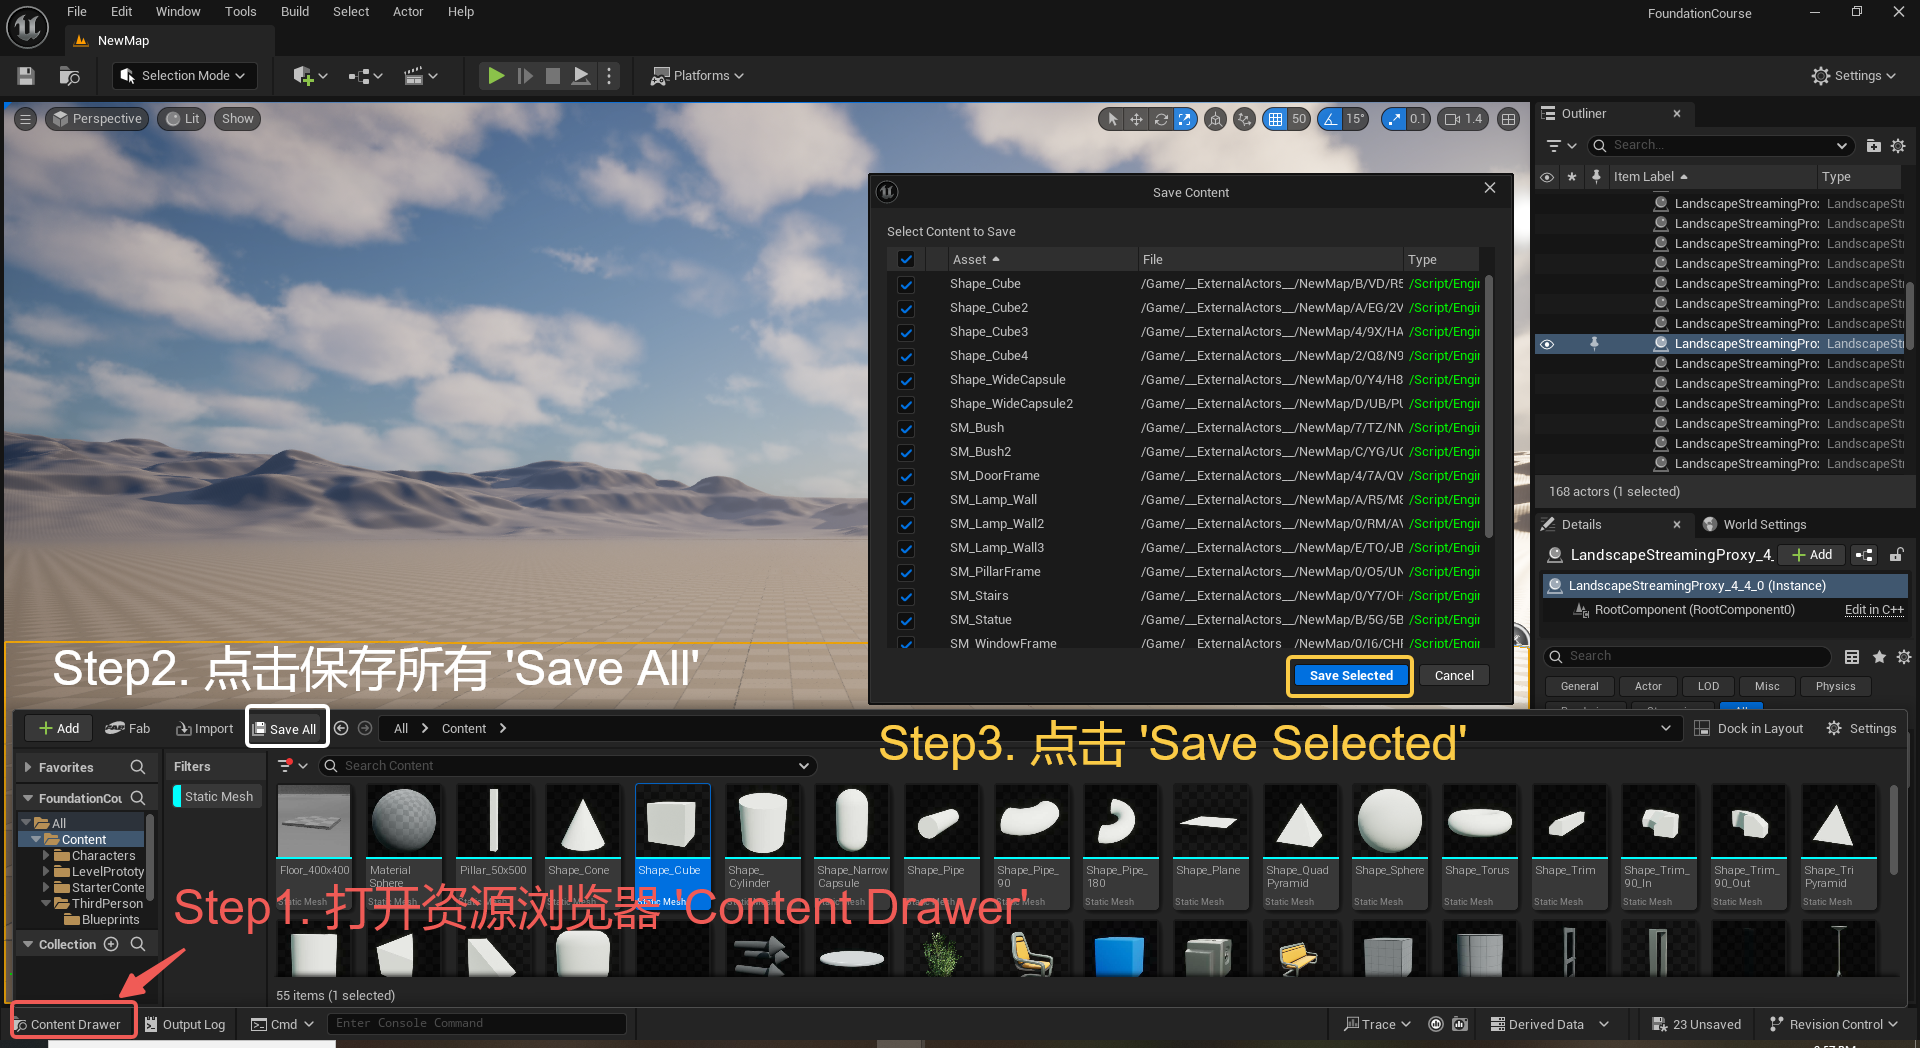
UE5 学习系列(三)创建和移动物体
这篇博客是该系列的第三篇,是在之前两篇博客的基础上展开,主要介绍如何在操作界面中创建和拖动物体,这篇博客跟随的视频链接如下: B 站视频:s03-创建和移动物体 如果你不打算开之前的博客并且对UE5 比较熟的话按照以…...
cf2117E
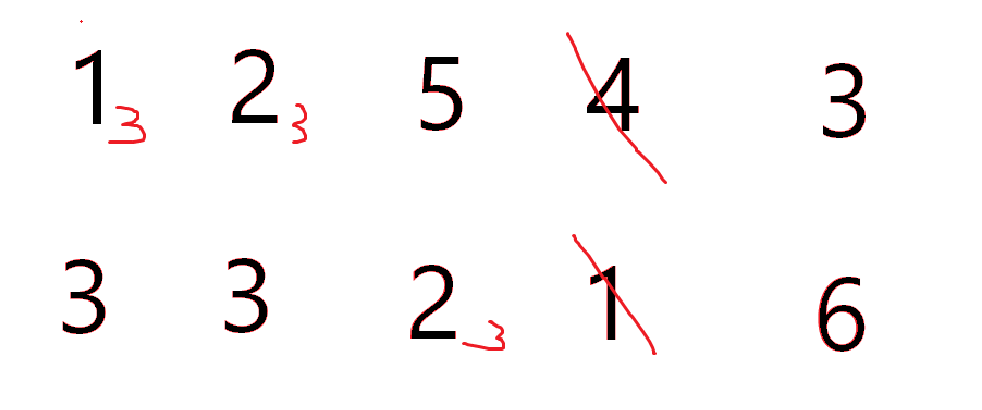
原题链接:https://codeforces.com/contest/2117/problem/E 题目背景: 给定两个数组a,b,可以执行多次以下操作:选择 i (1 < i < n - 1),并设置 或,也可以在执行上述操作前执行一次删除任意 和 。求…...
前端开发面试题总结-JavaScript篇(一)
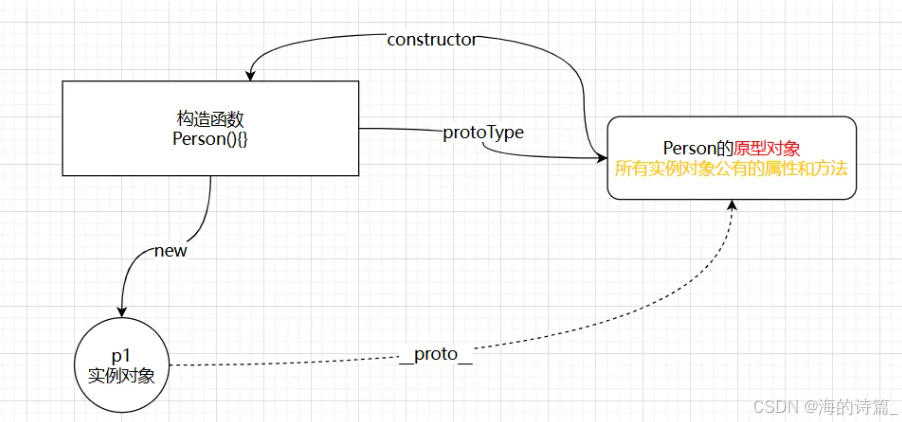
文章目录 JavaScript高频问答一、作用域与闭包1.什么是闭包(Closure)?闭包有什么应用场景和潜在问题?2.解释 JavaScript 的作用域链(Scope Chain) 二、原型与继承3.原型链是什么?如何实现继承&a…...

数据库分批入库
今天在工作中,遇到一个问题,就是分批查询的时候,由于批次过大导致出现了一些问题,一下是问题描述和解决方案: 示例: // 假设已有数据列表 dataList 和 PreparedStatement pstmt int batchSize 1000; // …...

Rapidio门铃消息FIFO溢出机制
关于RapidIO门铃消息FIFO的溢出机制及其与中断抖动的关系,以下是深入解析: 门铃FIFO溢出的本质 在RapidIO系统中,门铃消息FIFO是硬件控制器内部的缓冲区,用于临时存储接收到的门铃消息(Doorbell Message)。…...

React---day11
14.4 react-redux第三方库 提供connect、thunk之类的函数 以获取一个banner数据为例子 store: 我们在使用异步的时候理应是要使用中间件的,但是configureStore 已经自动集成了 redux-thunk,注意action里面要返回函数 import { configureS…...

网站指纹识别
网站指纹识别 网站的最基本组成:服务器(操作系统)、中间件(web容器)、脚本语言、数据厍 为什么要了解这些?举个例子:发现了一个文件读取漏洞,我们需要读/etc/passwd,如…...

windows系统MySQL安装文档
概览:本文讨论了MySQL的安装、使用过程中涉及的解压、配置、初始化、注册服务、启动、修改密码、登录、退出以及卸载等相关内容,为学习者提供全面的操作指导。关键要点包括: 解压 :下载完成后解压压缩包,得到MySQL 8.…...
