Vue开发实例(六)实现左侧菜单导航
左侧菜单导航
- 一、一级菜单
- 二、二级菜单
- 三、三级菜单
- 1、加入相关事件
- 四、菜单点击跳转
- 1. 创建新页面
- 2. 配置路由
- 3. 菜单中加入路由配置
- 4、处理默认的Main窗口为空的情况
- 五、动态左侧菜单导航
- 1、动态实现一级菜单
- 2、动态实现二级菜单
一、一级菜单
在之前的Aside.vue中去实现代码,一级菜单其实非常的简单,直接用el-menu 和el-menu-item 就行,Aside.vue代码如下:
<template><el-menu><el-menu-item>一级菜单1</el-menu-item><el-menu-item>一级菜单2</el-menu-item><el-menu-item>一级菜单3</el-menu-item></el-menu>
</template><script>
export default {name: "Aside",
};
</script><style scoped>
</style>

- 设置菜单背景颜色和文字颜色
- 在el-menu中设置 background-color 和 text-color 属性
- 设置选中后菜单文字颜色
- 设置 active-text-color 属性,但是必须在需要生效的子菜单中设置index属性,否则不生效,先不设置index
- 设置默认的选中菜单
- 设置default-active为对应的index值即可
- 比如我设置默认选中第2个菜单,第2个菜单的index为2,所以我们在el-menu中加入 default-active=“2”
- 在菜单中加入图标
- 用 i 标签即可,在菜单名前面加入
<i class=“el-icon-XXX”>,XXX是图标的名称。
- 用 i 标签即可,在菜单名前面加入
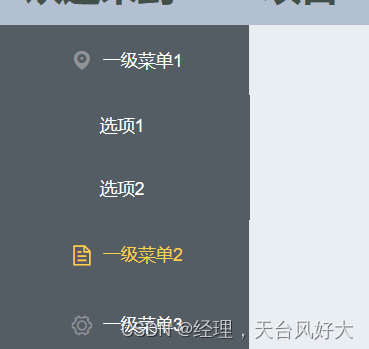
效果如图所示:

一级菜单全部代码
<template><el-menubackground-color="#545c64"text-color="#ffffff"active-text-color="#ffd04b"default-active="2"><el-menu-item index="1"><i class="el-icon-location"></i>一级菜单1</el-menu-item><el-menu-item index="2"><i class="el-icon-document"></i>一级菜单2</el-menu-item><el-menu-item index="3"><i class="el-icon-setting"></i>一级菜单3</el-menu-item></el-menu>
</template><script>
export default {name: "Aside",
};
</script><style scoped>
.el-icon-location,
.el-icon-document,
.el-icon-setting {display: inline-flex;align-items: center;justify-content: center;
}
</style>
二、二级菜单
<div><el-menu background-color="#545c64" text-color="#ffffff"active-text-color="#ffd04b" default-active="2" ><el-submenu index="1"><template slot="title"><i class="el-icon-location"></i><span>一级菜单1</span></template><el-menu-item index="1-1">选项1</el-menu-item><el-menu-item index="1-2">选项2</el-menu-item></el-submenu><el-menu-item index="2"><i class="el-icon-document"></i>一级菜单2</el-menu-item><el-menu-item index="3"><i class="el-icon-setting"></i>一级菜单3</el-menu-item></el-menu></div>
修改步骤:
- 将
el-menu修改为el-submenu - 按钮名称、图标用
template标签包裹,必须加入slot="title"属性,否则菜单样式不对。 - 加入新的两个
el-menu-item。
参考代码:
由于之前挖过一个坑,就是global.css里面的height,之前也提到过,所以要设置一下,
el-submenu的高度,具体的参考代码
<template><div><el-menubackground-color="#545c64"text-color="#ffffff"active-text-color="#ffd04b"default-active="2"><el-submenu index="1"><template slot="title"><i class="el-icon-location"></i><span>一级菜单1</span></template><el-menu-item index="1-1">选项1</el-menu-item><el-menu-item index="1-2">选项2</el-menu-item></el-submenu><el-menu-item index="2"><i class="el-icon-document"></i>一级菜单2</el-menu-item><el-menu-item index="3"><i class="el-icon-setting"></i>一级菜单3</el-menu-item></el-menu></div>
</template><script>
export default {name: "Aside",
};
</script><style scoped>
.el-submenu {height: auto;
}
.el-icon-location,
.el-icon-document,
.el-icon-setting {display: inline-flex;align-items: center;justify-content: center;
}
</style>
三、三级菜单
跟二级菜单的修改方式是一样的,就是多加一层
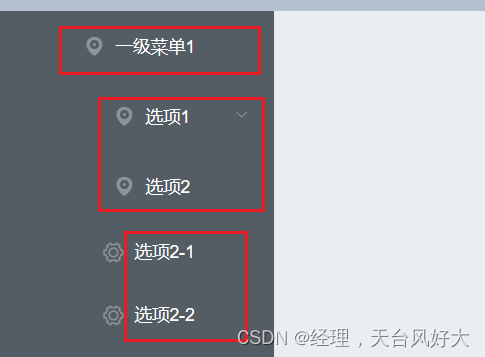
参考代码:
<template><div><el-menubackground-color="#545c64"text-color="#ffffff"active-text-color="#ffd04b"default-active="2"><el-submenu index="1"><template slot="title"><i class="el-icon-location"></i><span>一级菜单1</span></template><el-submenu index="1-1"><template slot="title"><i class="el-icon-location"></i><span>选项1</span></template><el-menu-item index="1-1-1"><i class="el-icon-document"></i>选项1-1</el-menu-item><el-menu-item index="1-1-2"><i class="el-icon-document"></i>选项1-2</el-menu-item></el-submenu><el-submenu index="1-2"><template slot="title"><i class="el-icon-location"></i><span>选项2</span></template><el-menu-item index="1-2-1"><i class="el-icon-setting"></i>选项2-1</el-menu-item><el-menu-item index="1-2-2"><i class="el-icon-setting"></i>选项2-2</el-menu-item></el-submenu></el-submenu><el-menu-item index="2"><i class="el-icon-document"></i>一级菜单2</el-menu-item><el-menu-item index="3"><i class="el-icon-setting"></i>一级菜单3</el-menu-item></el-menu></div>
</template><script>
export default {name: "Aside",
};
</script><style scoped>
.el-submenu {height: auto;
}
.el-icon-location,
.el-icon-document,
.el-icon-setting {display: inline-flex;align-items: center;justify-content: center;
}
</style>
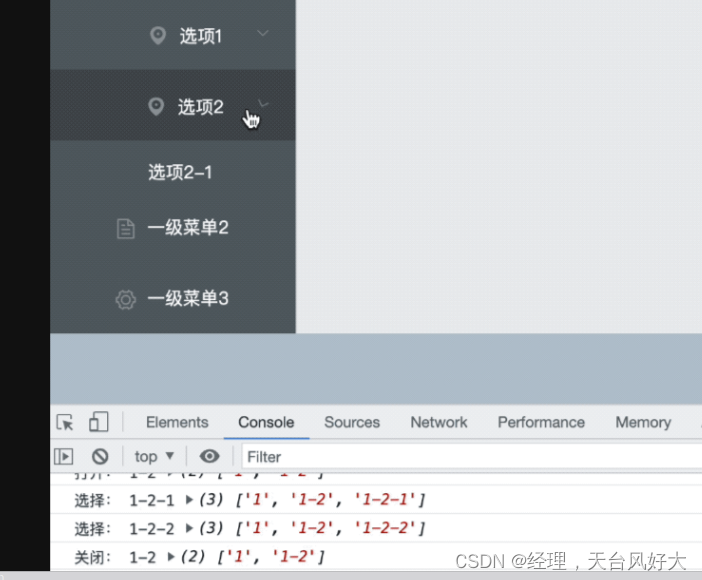
1、加入相关事件
打开open、关闭close、选择select 3个事件
在el-menu中加入三个事件属性,并编写对应的method
全部参考代码:
<template><div><el-menubackground-color="#545c64"text-color="#ffffff"active-text-color="#ffd04b"default-active="2"@open="handleOpen"@close="handleClose"@select="handSelect"><el-submenu index="1"><template slot="title"><i class="el-icon-location"></i><span>一级菜单1</span></template><el-submenu index="1-1"><template slot="title"><i class="el-icon-location"></i><span>选项1</span></template><el-menu-item index="1-1-1"><i class="el-icon-document"></i>选项1-1</el-menu-item><el-menu-item index="1-1-2"><i class="el-icon-document"></i>选项1-2</el-menu-item></el-submenu><el-submenu index="1-2"><template slot="title"><i class="el-icon-location"></i><span>选项2</span></template><el-menu-item index="1-2-1"><i class="el-icon-setting"></i>选项2-1</el-menu-item><el-menu-item index="1-2-2"><i class="el-icon-setting"></i>选项2-2</el-menu-item></el-submenu></el-submenu><el-menu-item index="2"><i class="el-icon-document"></i>一级菜单2</el-menu-item><el-menu-item index="3"><i class="el-icon-setting"></i>一级菜单3</el-menu-item></el-menu></div>
</template><script>
export default {name: "Aside",methods: {handleOpen(key, keyPath) {console.log("打开:", key, keyPath);},handleClose(key, keyPath) {console.log("关闭:", key, keyPath);},handSelect(key, keyPath) {console.log("选择:", key, keyPath);},},
};
</script><style scoped>
.el-submenu {height: auto;
}
.el-icon-location,
.el-icon-document,
.el-icon-setting {display: inline-flex;align-items: center;justify-content: center;
}
</style>
四、菜单点击跳转
当点击菜单项,能够在右边的Main窗口中显示对应的页面。
1. 创建新页面
在 Main/ 文件夹下创建三个页面,如图所示

代码如下:
<template><div>这是Main1</div>
</template><script>export default {name: "Main1"}
</script><style scoped>
</style>
2. 配置路由
- 安装配置路由
- 在src下创建
router/index.js - 创建了主路由index,就是进入的主页面
- 这3个index子路由,用来跳转,分别对应 main1、main2、main3 几个页面。
- 子路由的跳转位置为,index的Main位置,因为我们管理系统只需要Main位置发生改变,头部、左边导航、下方footer是不需要改变的。
安装路由
npm install vue-router@3.5.2
注意:
- vue2搭配vue-router3
- vue3搭配vue-router4
在main.js中注册router,让路由生效
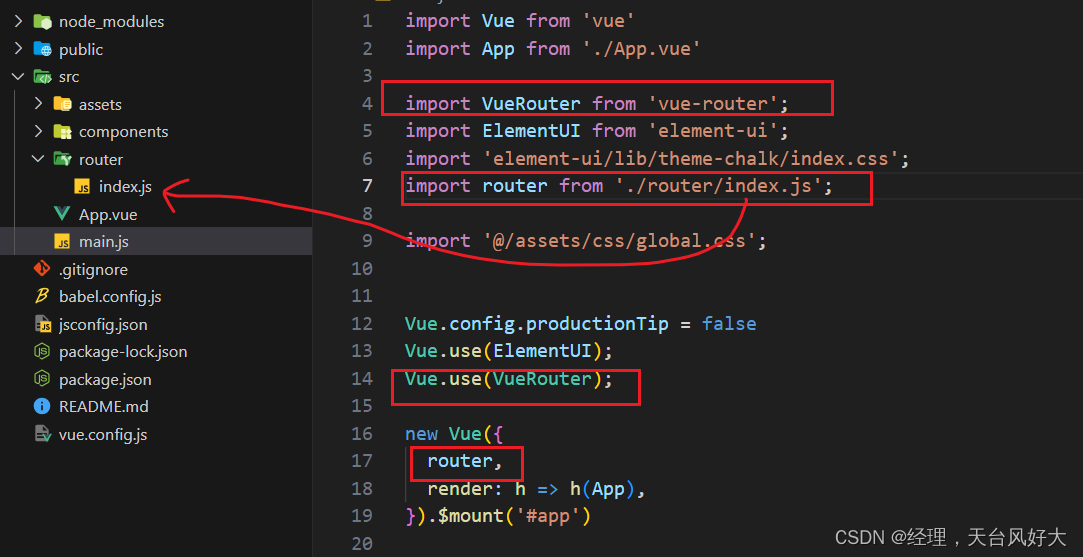
router/index.js代码如下:
import VueRouter from "vue-router"
import Index from "@/components/Index";const routes = [//一级路由{path: '/index',name: 'index',component: Index,//路由嵌套children:[{path: '/index/menu1',component: () => import('@/components/Main/Main1.vue')},{path: '/index/menu2',component: () => import('@/components/Main/Main2.vue')},{path: '/index/menu3',component: () => import('@/components/Main/Main3.vue')}]}
]const router = new VueRouter({mode:'history',routes
})export  default router;
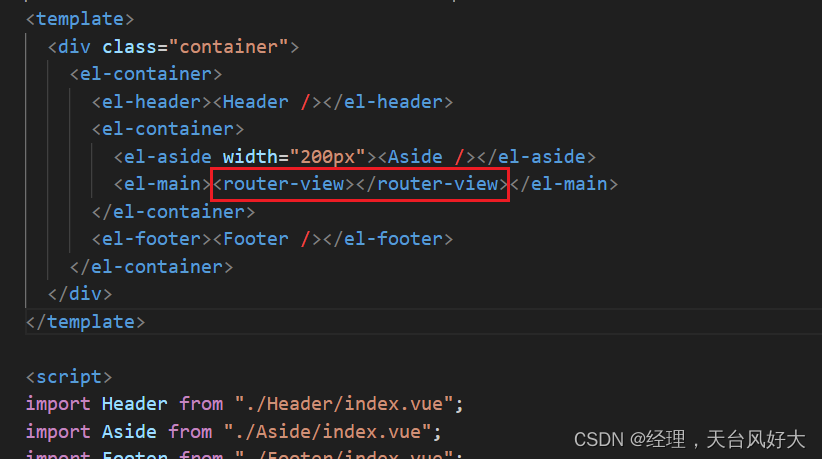
在原来的Index.vue页面,设置路由跳转位置,这里我们在原来的<Main />位置修改位 router-view即可。
3. 菜单中加入路由配置
- 这里我们使用一级菜单,简单方便,修改
Aside/index.vue的代码。 - 在
el-menu里面加入router属性 - 在
el-menu-item的index,设置对应的子路由
代码参考如下:
<template><div style="height: 100%"><el-menubackground-color="#545c64"text-color="#ffffff"active-text-color="#ffd04b"class="el-menu-vertical-demo"router><el-menu-item index="/index/menu1"><i class="el-icon-location"></i>一级菜单1</el-menu-item><el-menu-item index="/index/menu2"><i class="el-icon-document"></i>一级菜单2</el-menu-item><el-menu-item index="/index/menu3"><i class="el-icon-setting"></i>一级菜单3</el-menu-item></el-menu></div>
</template><script>
export default {name: "Aside",
};
</script><style scoped>
.el-icon-location,
.el-icon-document,
.el-icon-setting {display: inline-flex;align-items: center;justify-content: center;
}
</style>
我们进入index主路由,发现页面是空的
点击左侧导航菜单,就会有对应的页面内容

4、处理默认的Main窗口为空的情况
设置默认的跳转位置,设置如下:
- 在子路由中添加一个新的路由,用来默认跳转
- 在主路由中配置redirect 值为这个子路由
router/index.js的代码如下
import VueRouter from "vue-router"
import Index from "@/components/Index";const routes = [//一级路由{path: '/index',name: 'index',component: Index,redirect: 'index/Main',//路由嵌套children:[{path: '/index/Main',component: () => import('@/components/Main/index.vue')},{path: '/index/menu1',component: () => import('@/components/Main/Main1.vue')},{path: '/index/menu2',component: () => import('@/components/Main/Main2.vue')},{path: '/index/menu3',component: () => import('@/components/Main/Main3.vue')}]}
]const router = new VueRouter({mode:'history',routes
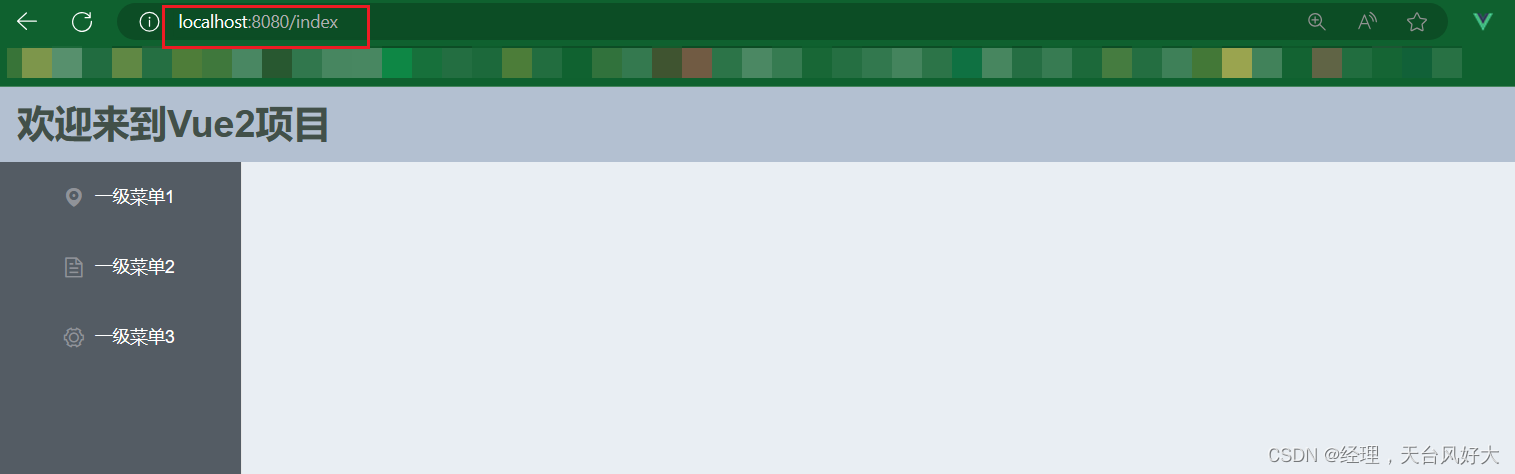
})export default router;其实就是一个重定向的操作,当直接输入index路由时就会默认跳转到Main路由里面,这样就会有个默认的页面了。
下方我们在地址栏只输入到index,敲回车后,会在后面默认加上 “/Main”,直接重定向了,同时Main窗口的页面也显示了我们指定的页面。

五、动态左侧菜单导航
在项目中,比较多见的是会将菜单存储到后台的数据库中,通过返回数据来决定菜单的模样,并不是由前端来控制菜单的模样,所以就来实现动态的菜单导航,根据后台数据来生成菜单导航。

1、动态实现一级菜单
分析上述代码,其中代码
<el-menu-item index=“/index/menu1”>一级菜单1</el-menu-item>是比较相似的,不同的地方有3个:
- index 表示路由的path
- 图标的名称
- 菜单的名称
基于以上几个不同,我们可以考虑设置一个数组,数组的元素包含 路由路径、图标名、菜单名等几个属性,然后以循环的方式来输出这个菜单。
实现代码:
<template><div style="height: 100%"><el-menubackground-color="#545c64"text-color="#ffffff"active-text-color="#ffd04b"class="el-menu-vertical-demo"router><el-menu-item:index="item.path"v-for="item in menu_data":key="item.name"><i :class="item.icon"></i>{{ item.name }}</el-menu-item></el-menu></div>
</template><script>
export default {name: "Aside",data() {return {menu_data: [{name: "一级菜单1",icon: "el-icon-location",path: "/index/menu1",},{name: "一级菜单2",icon: "el-icon-document",path: "/index/menu2",},{name: "一级菜单3",icon: "el-icon-setting",path: "/index/menu3",},],};},
};
</script><style scoped>
.el-icon-location,
.el-icon-document,
.el-icon-setting {display: inline-flex;align-items: center;justify-content: center;
}
</style>
- 菜单数据menu_data包含3个元素,每个元素分别有name、icon和path属性,这个三个属性分别对应菜单名、图标、路由的路径。
- 使用v-for循环menu_data,填入对应的属性就可。
2、动态实现二级菜单
在一级菜单的数据对象里面加入 child 属性,这个属性也是跟现在的菜单数据menu_data一样的,
child也是一个数组,包含多个元素,每个元素分别有name、icon和path属性,这个三个属性分别对应菜单名、图标、路由的路径。

参考代码:
<template><div style="height: 100%"><el-menubackground-color="#545c64"text-color="#ffffff"active-text-color="#ffd04b"class="el-menu-vertical-demo"router><el-submenu :index="item.path" v-for="item in menu_data" :key="item.name"><template slot="title"><i :class="item.icon"></i><span>{{ item.name }}</span></template><el-menu-item:index="child.path"v-for="child in item.child":key="child.name"><i :class="child.icon"></i>{{ child.name }}</el-menu-item></el-submenu></el-menu></div>
</template><script>
export default {name: "Aside",data() {return {menu_data: [{name: "一级菜单1",icon: "el-icon-location",path: "/index/menu1",child: [{name: "二级菜单1-1",icon: "el-icon-user",path: "/index/menu11",},{name: "二级菜单1-2",icon: "el-icon-user-solid",path: "/index/menu12",},],},{name: "一级菜单2",icon: "el-icon-document",path: "/index/menu2",child: [{name: "二级菜单2-1",icon: "el-icon-star-on",path: "/index/menu21",},{name: "二级菜单2-2",icon: "el-icon-star-off",path: "/index/menu22",},],},{name: "一级菜单3",icon: "el-icon-setting",path: "/index/menu3",child: [{name: "二级菜单3-1",icon: "el-icon-s-help",path: "/index/menu31",},{name: "二级菜单3-2",icon: "el-icon-help",path: "/index/menu32",},],},],};},
};
</script><style scoped>
.el-submenu{height: auto;
}.el-icon-help,
.el-icon-s-help,
.el-icon-star-off,
.el-icon-star-on,
.el-icon-user-solid,
.el-icon-user,
.el-icon-location,
.el-icon-document,
.el-icon-setting {display: inline-flex;align-items: center;justify-content: center;
}
</style>
相关文章:
Vue开发实例(六)实现左侧菜单导航
左侧菜单导航 一、一级菜单二、二级菜单三、三级菜单1、加入相关事件 四、菜单点击跳转1. 创建新页面2. 配置路由3. 菜单中加入路由配置4、处理默认的Main窗口为空的情况 五、动态左侧菜单导航1、动态实现一级菜单2、动态实现二级菜单 一、一级菜单 在之前的Aside.vue中去实现…...
[嵌入式系统-37]:龙芯1B 开发学习套件 -6-协处理器CP0之CPU异常处理与外部中断控制器的中断处理
目录 一、CP0概述 1.1 CP0概述 1.2 龙芯异常exception与中断interrupt的区别 二、CPU协处理器的异常处理 三、外部中断与外部中断控制器 3.1 外部中断源 3.2 如何配置外部中断源 3.3 外部中断的中断向量表 3.2.1 软件中断向量表结构定义:ls1b_irq.c 3.2.2…...
前端实现一个绕圆心转动的功能
前言: 今天遇到了一个有意思的需求,如何实现一个元素绕某一个点来进行圆周运动,用到了一些初高中的数学知识,实现起来还是挺有趣的,特来分享🎁。 一. 效果展示 我们先展示效果,如下图所示&…...

【vue.js】文档解读【day 2】 | 响应式基础
如果阅读有疑问的话,欢迎评论或私信!! 本人会很热心的阐述自己的想法!谢谢!!! 文章目录 响应式基础声明响应式状态(属性)响应式代理 vs 原始值声明方法深层响应性DOM 更新时机有状态方法 响应式…...

element-ui radio 组件源码分享
今日简单分享 radio 组件的实现原理,主要从以下三个方面来分享: 1、radio 页面结构 2、radio 组件属性 3、radio 组件方法 一、radio 页面结构 1.1 页面结构如下: 二、radio 属性 2.1 value / v-model 属性,类型为 string / …...
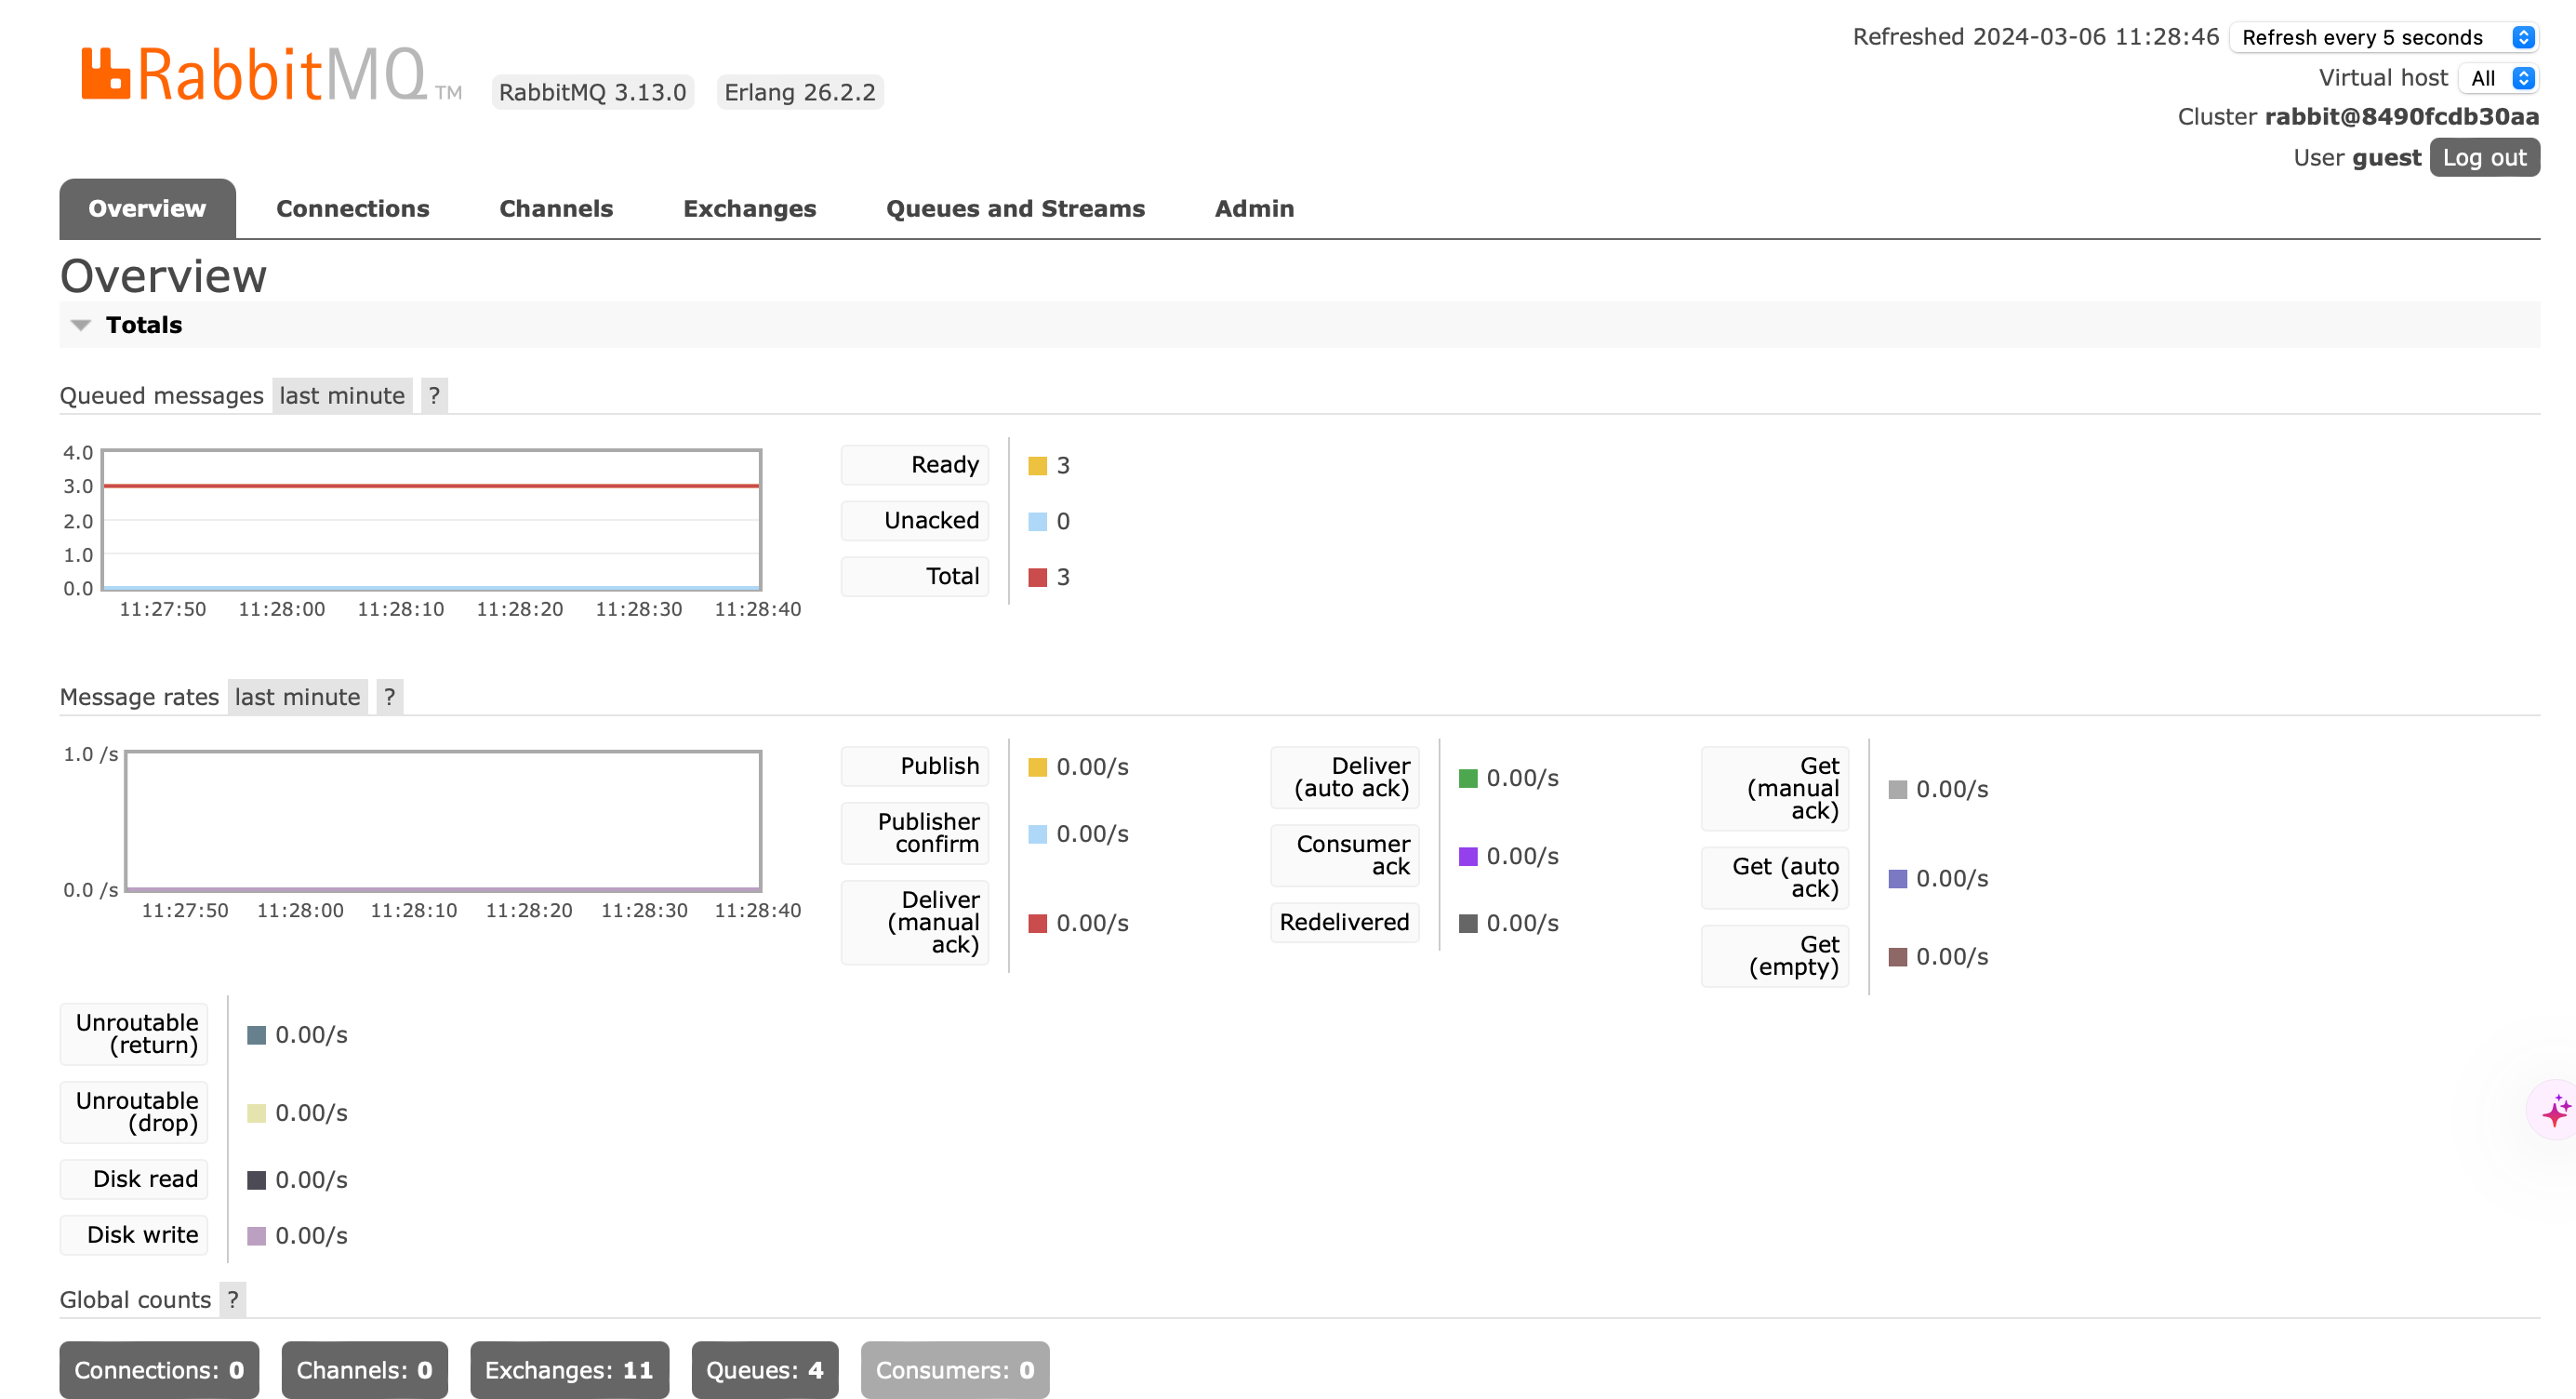
1-安装rabbitmq
rabbitmq官网: https://www.rabbitmq.com/docs/download 本机环境:mac,使用orbstack提供的docker 使用docker部署rabbitmq docker run -it --rm --name rabbitmq -p 5672:5672 -p 15672:15672 rabbitmq:3.13-management 然后报错…...

C/C++编程-理论学习-通信协议理论
通信协议理论 protobuf简述 protobuf 简述 作用: 1. 将结构化数据 序列化 进行信息通信、存储。意为,数据结构化管理;意为,对结构化的数据进行序列化,便于发送、存储。可类比XML、JSON。 弊端: 1. buffe…...
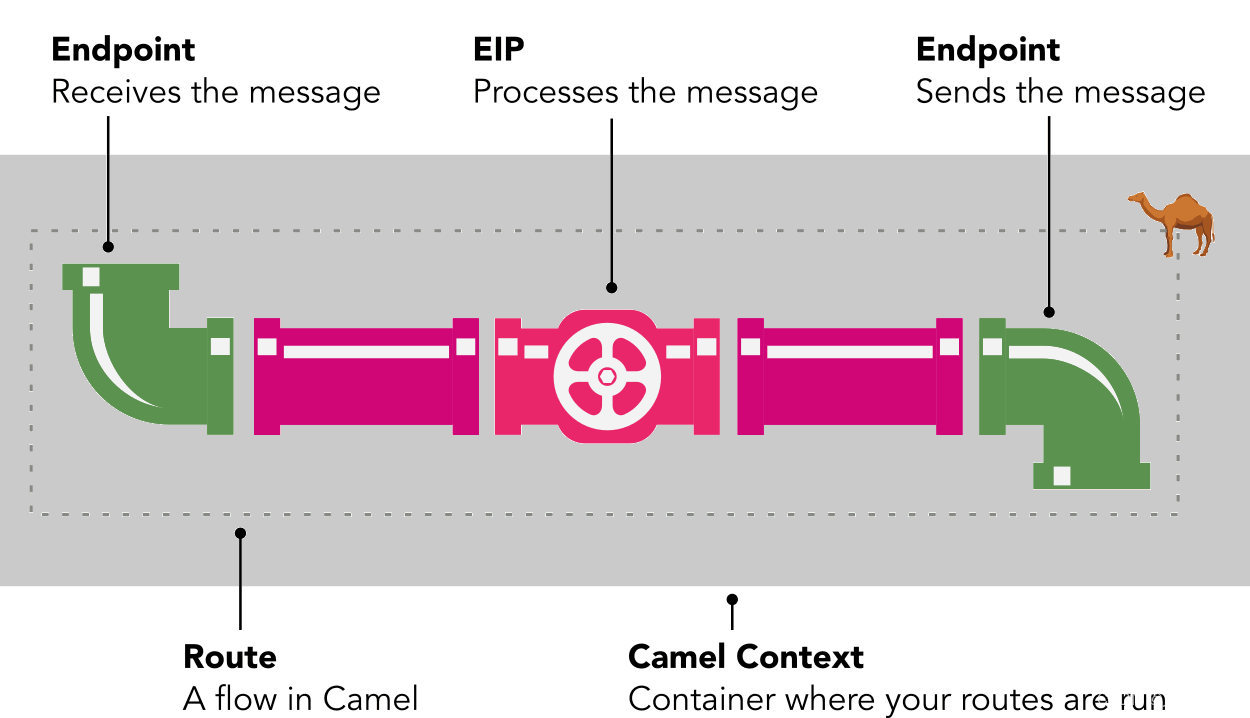
【Apache Camel】基础知识
【Apache Camel】基础知识 Apache Camel是什么Apache Camel基本概念和术语CamelContextEndpointsRoutesRouteBuilderComponentsMessageExchangeProcessorsDomain Specific Language(DSL) Apache Camel 应用执行步骤Apache Camel 示意图参考 Apache Camel…...

Python之访问集合的迭代器
对迭代器的理解对于我们访问数据量大是有很大的帮助,将介绍它。 一、概念 迭代:是访问集合元素的一种方式,按照某种顺序逐个访问集合中的每一项。 可迭代对象:能够被迭代的对象,称为可迭代对象 判定依据:能…...

【Spring连载】使用Spring Data访问 MongoDB----对象映射之基于类型的转换器
【Spring连载】使用Spring Data访问 MongoDB----对象映射之基于类型的转换器 一、自定义转换二、转换器消歧(Disambiguation)三、基于类型的转换器3.1 写转换3.2 读转换3.3 注册转换器 一、自定义转换 下面的Spring Converter实现示例将String对象转换为自定义Email值对象: R…...

在ubuntu上安装hadoop完分布式
准备工作 Xshell安装包 Xftp7安装包 虚拟机安装包 Ubuntu镜像源文件 Hadoop包 Java包 一、安装虚拟机 创建ubuntu系统 完成之后会弹出一个新的窗口 跑完之后会重启一下 按住首先用ctrlaltf3进入命令界面,输入root,密码登录管理员账号 按Esc 然后输入 …...
Python 语句(二)【循环语句】
循环语句允许执行一个语句或语句组多次,其程序流程图如下: 在python中有三种循环方式: while 循环 当判断条件为 true 时执行循环体,否则退出循环体。for 循环 重复执行语句嵌套循环 (在while循环体中嵌套for循环&…...

(3)(3.3) MAVLink高延迟协议
文章目录 前言 1 配置 2 说明 3 消息说明 前言 ArduPilot 支持 MAVLink 高延迟协议(MAVLink High Latency)。该协议专为卫星或 LoRA 等低带宽或高成本链路而设计。 在此协议中,每 5s 只发送一次 HIGH_LATENCY2 MAVLink 信息。对 MAVLink 命令或请求(…...
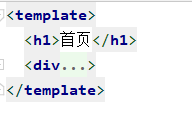
【异常处理】Vue报错 Component template should contain exactly one root element.
问题描述 启动VUE项目后控制台报错: Component template should contain exactly one root element. If you are using v-if on multiple elements, use v-else-if to chain them instead.翻译为:组件模板应该只包含一个根元素 查看vue代码࿰…...

Eth-trunk隧道
目录 Eth-trunk (划为二层) 二层trunk 三层交换机 网关冗余 Eth-trunk (划为二层) 一,...
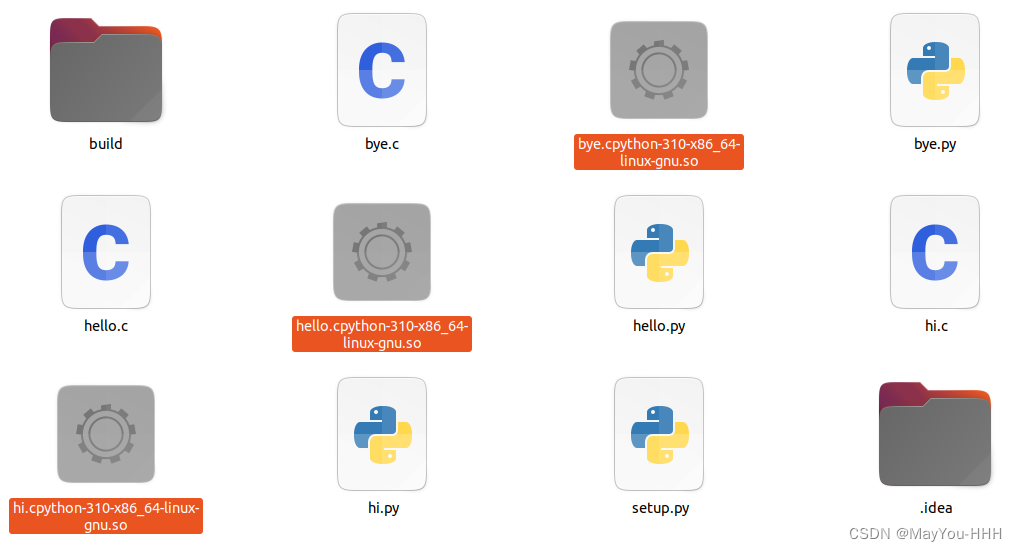
【Ubuntu】将多个python文件打包为.so文件
1.为什么要将python打包为.so文件? 保护源码 2.实战例子 a.安装相应的包 pip install cython 验证安装是否成功 cython --version b.实战的文件目录和内容 hi.py # This is a sample Python script.# Press ShiftF10 to execute it or replace it with your…...

FreeRtos自学笔记3-----参考正点原子视频
FreeRtos任务的创建与删除 任务的创建与删除本质上是调用FreeRtos的API函数。 API函数: 1.xTaskGreate():动态创建任务函数; 2.xTaskGreateStatic();静态创建任务函数; 3.xTaskDelete():任务删除 动态创建任务:任务的任务控制块以…...
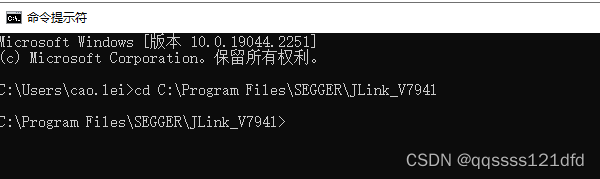
使用J-Link Commander通过J-LINK以命令的形式来访问ARM通用MCU
通常我们的操作是写好程序然后将程序下载到芯片里面,然后运行程序来进行相应的操作,其实还可以使用 J − L i n k C o m m a n d e r J-Link\quad Commander J−LinkCommander通过 J − L I N K J-LINK J−LINK以命令的形式来简单访问ARM通用MCU…...
19.删除链表的倒数第N个节点
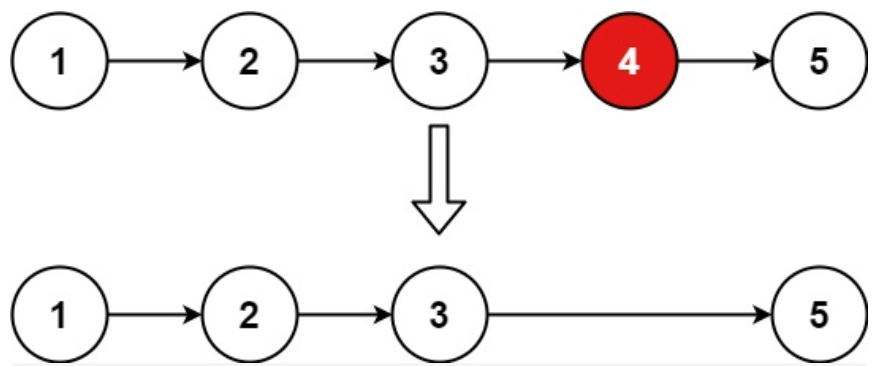
19.删除链表的倒数第N个节点 力扣题目链接(opens new window) 给你一个链表,删除链表的倒数第 n 个结点,并且返回链表的头结点。 进阶:你能尝试使用一趟扫描实现吗? 示例 1: 输入:head [1,2,3,4,5], n…...

【Linux C | 网络编程】广播概念、UDP实现广播的C语言例子
😁博客主页😁:🚀https://blog.csdn.net/wkd_007🚀 🤑博客内容🤑:🍭嵌入式开发、Linux、C语言、C、数据结构、音视频🍭 🤣本文内容🤣&a…...

【亲测免费】 Zebra打印机中文转ZPL指令的.NET实现
Zebra打印机中文转ZPL指令的.NET实现 【下载地址】Zebra打印机中文转ZPL指令的.NET实现 本项目提供了一个用于将中文文本转换为ZPL指令的.NET实现,旨在替代Zebra官方提供的非托管组件FNTHEX32.DLL。该组件在托管环境下需要额外的封装,并且缺乏64位程序的…...

Cursor Free VIP:三合一解决方案彻底解决AI编辑器使用限制
Cursor Free VIP:三合一解决方案彻底解决AI编辑器使用限制 【免费下载链接】cursor-free-vip [Support 0.45](Multi Language 多语言)自动注册 Cursor Ai ,自动重置机器ID , 免费升级使用Pro 功能: Youve reached your…...

Google 的 IDE 演进小史
不知道你平时用的 IDE 是什么?小七的工程师同事有在用 Vim 的,也有 Emacs 党,IntelliJ 全家桶也有人在用,用得最多的可能是 VS Code。只要代码能写好、工具链能跑通,似乎大家没有必要使用同一个 IDE。 Google 早年也是…...

从鼠类到人体:汉坦病毒的全球威胁与科研突破
2026年5月17日,加拿大正式确诊一名“洪迪厄斯”号邮轮乘员感染汉坦病毒。结合世界卫生组织(WHO)的通报,疫情已陆续造成9人感染并出现3例死亡。这引起广泛的关注和担忧。汉坦病毒究竟是哪类病毒呢?感染力强吗࿱…...

别再只会用MI了!深入对比PLV、MVL、MI:在Python中如何为你的EEG数据选择最佳跨频耦合算法
别再只会用MI了!深入对比PLV、MVL、MI:在Python中如何为你的EEG数据选择最佳跨频耦合算法 脑电信号分析中,跨频耦合(Cross-Frequency Coupling, CFC)已成为揭示神经活动协调机制的重要工具。面对PLV、MVL、MI这三种主流…...

Sun-to-Spotify 技术架构深度剖析:AI 播客生成、CLI 交互与 Spotify 自动化发布全链路实现
摘要 Sun-to-Spotify 是一款基于 Claude Code Skill 生态构建的开源 AI 音频工程工具,核心实现自然语言指令→智能内容生成→多角色对话脚本创作→TTS 音频合成→混音处理→Spotify 平台自动发布的全流程自动化闭环。项目深度整合命令行工具(sun-cli&am…...

用FPGA驱动TDC-GPX2做高精度时间测量:一个基于XC7A35T的完整Verilog状态机实现
基于XC7A35T的TDC-GPX2高精度时间测量系统:状态机设计与工程实践 在精密时间测量领域,TDC-GPX2作为一款高分辨率时间数字转换芯片,配合FPGA的灵活控制能力,能够实现皮秒级的时间间隔测量。本文将深入探讨如何利用Xilinx Artix-7系…...

Vue3后台管理系统终极指南:V3 Admin Vite 5.0快速上手教程
Vue3后台管理系统终极指南:V3 Admin Vite 5.0快速上手教程 【免费下载链接】v3-admin-vite ☀️ A crafted Vue3 admin template | Vue Admin | Vue Template | Vue3 Admin | Vue3 Template | Vue 后台 | Vue 模板 | Vue3 后台 | Vue3 模板 项目地址: https://git…...

告别手动调试!用西门子STEP7组态软件,5分钟搞定步进电机多段速与正反转控制逻辑
西门子STEP7高效编程:5步构建步进电机智能控制系统 在工业自动化现场,调试步进电机控制逻辑往往是耗时费力的工作——传统方法需要反复修改硬件接线和梯形图程序,每次速度切换或方向调整都可能引发意外停机。而西门子STEP7组态软件提供的结构…...

PIC32MZ EF嵌入式开发实战:硬件FPU与多协议连接方案解析
1. 项目概述:为什么是PIC32MZ EF?在嵌入式开发领域,尤其是涉及复杂控制、实时信号处理或物联网边缘计算时,我们常常面临一个经典矛盾:对计算性能的渴求与对功耗、成本和开发复杂度的现实考量。几年前,当我接…...