ReactNative项目构建分析与思考之react-native-gradle-plugin
前一段时间由于业务需要,接触了下React Native相关的知识,以一个Android开发者的视角,对React Native 项目组织和构建流程有了一些粗浅的认识,同时也对RN混合开发项目如何搭建又了一点小小的思考。
RN环境搭建
RN文档提供了两种搭建RN环境的方式
- 搭建开发环境 创建纯RN项目
- 把RN集成到已有项目
文档写的也比较清晰,按照步骤做就可以。
默认项目结构分析
按照文档 https://reactnative.cn/docs/environment-setup 创建好项目后,我们来分析下目录结构
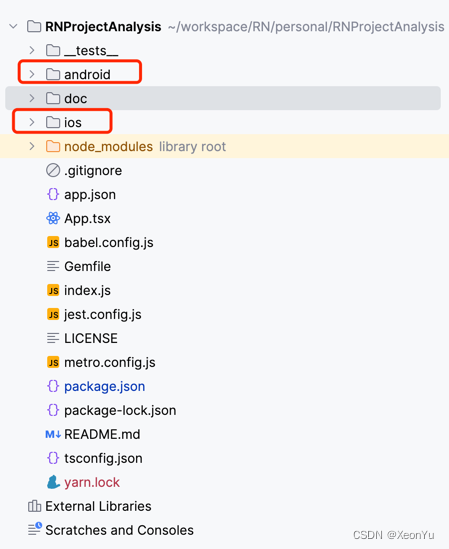
根目录就是一个标准的RN项目,其中有一个node_modules目录,该目录是项目的依赖包。
根项目目录下有一个android目录和一个ios目录,分别是Android和iOS的原生代码目录,也就是说,android和ios项目是作为RN项目的子项目存在的。
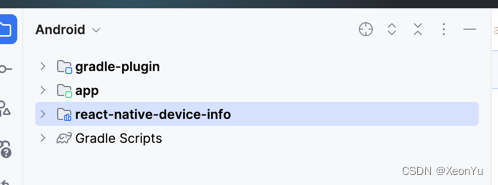
来看下android目录中的代码,这个目录下的代码是一个标准的Android项目,直接使用Android Studio打开即可。
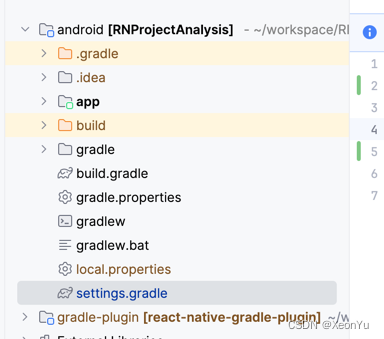
可以看到,除了一个标准的Android项目外,还有一个gradle-plugin的。
下面是 settings.gradle 文件的内容

在settings.gradle 中,应用了一个叫做 native_modules.gradle 的脚本
apply from: file("../node_modules/@react-native-community/cli-platform-android/native_modules.gradle"); applyNativeModulesSettingsGradle(settings)
还通过includeBuild引入了一个RN插件
includeBuild('../node_modules/@react-native/gradle-plugin')
再来接着看看根目录下build.gradle文件中的内容
buildscript {ext {buildToolsVersion = "34.0.0"minSdkVersion = 21compileSdkVersion = 34targetSdkVersion = 34ndkVersion = "25.1.8937393"kotlinVersion = "1.8.0"}repositories {google()mavenCentral()}dependencies {classpath("com.android.tools.build:gradle")//RN插件classpath("com.facebook.react:react-native-gradle-plugin")classpath("org.jetbrains.kotlin:kotlin-gradle-plugin")}
}
//应用了一个叫做com.facebook.react.rootproject的插件
apply plugin: "com.facebook.react.rootproject"
接着看下app目录下的build.gradle文件
apply plugin: "com.android.application"
apply plugin: "org.jetbrains.kotlin.android"
//应用了一个叫做com.facebook.react的插件
apply plugin: "com.facebook.react"/*** This is the configuration block to customize your React Native Android app.* By default you don't need to apply any configuration, just uncomment the lines you need.*/
react {/* Folders *///   The root of your project, i.e. where "package.json" lives. Default is '..'// root = file("../")//   The folder where the react-native NPM package is. Default is ../node_modules/react-native// reactNativeDir = file("../node_modules/react-native")//   The folder where the react-native Codegen package is. Default is ../node_modules/@react-native/codegen// codegenDir = file("../node_modules/@react-native/codegen")//   The cli.js file which is the React Native CLI entrypoint. Default is ../node_modules/react-native/cli.js// cliFile = file("../node_modules/react-native/cli.js")/* Variants *///   The list of variants to that are debuggable. For those we're going to//   skip the bundling of the JS bundle and the assets. By default is just 'debug'.//   If you add flavors like lite, prod, etc. you'll have to list your debuggableVariants.// debuggableVariants = ["liteDebug", "prodDebug"]/* Bundling *///   A list containing the node command and its flags. Default is just 'node'.// nodeExecutableAndArgs = ["node"]////   The command to run when bundling. By default is 'bundle'// bundleCommand = "ram-bundle"////   The path to the CLI configuration file. Default is empty.// bundleConfig = file(../rn-cli.config.js)////   The name of the generated asset file containing your JS bundle// bundleAssetName = "MyApplication.android.bundle"////   The entry file for bundle generation. Default is 'index.android.js' or 'index.js'// entryFile = file("../js/MyApplication.android.js")////   A list of extra flags to pass to the 'bundle' commands.//   See https://github.com/react-native-community/cli/blob/main/docs/commands.md#bundle// extraPackagerArgs = []/* Hermes Commands *///   The hermes compiler command to run. By default it is 'hermesc'// hermesCommand = "$rootDir/my-custom-hermesc/bin/hermesc"////   The list of flags to pass to the Hermes compiler. By default is "-O", "-output-source-map"// hermesFlags = ["-O", "-output-source-map"]
}/*** Set this to true to Run Proguard on Release builds to minify the Java bytecode.*/
def enableProguardInReleaseBuilds = false/*** The preferred build flavor of JavaScriptCore (JSC)** For example, to use the international variant, you can use:* `def jscFlavor = 'org.webkit:android-jsc-intl:+'`** The international variant includes ICU i18n library and necessary data* allowing to use e.g. `Date.toLocaleString` and `String.localeCompare` that* give correct results when using with locales other than en-US. Note that* this variant is about 6MiB larger per architecture than default.*/
def jscFlavor = 'org.webkit:android-jsc:+'android {ndkVersion rootProject.ext.ndkVersioncompileSdk rootProject.ext.compileSdkVersionnamespace "com.yzq.rn_project_analysis"defaultConfig {applicationId "com.yzq.rn_project_analysis"minSdkVersion rootProject.ext.minSdkVersiontargetSdkVersion rootProject.ext.targetSdkVersionversionCode 1versionName "1.0"}signingConfigs {debug {storeFile file('debug.keystore')storePassword 'android'keyAlias 'androiddebugkey'keyPassword 'android'}}buildTypes {debug {signingConfig signingConfigs.debug}release {// Caution! In production, you need to generate your own keystore file.// see https://reactnative.dev/docs/signed-apk-android.signingConfig signingConfigs.debugminifyEnabled enableProguardInReleaseBuildsproguardFiles getDefaultProguardFile("proguard-android.txt"), "proguard-rules.pro"}}
}dependencies {// The version of react-native is set by the React Native Gradle Pluginimplementation("com.facebook.react:react-android")implementation("com.facebook.react:flipper-integration")if (hermesEnabled.toBoolean()) {implementation("com.facebook.react:hermes-android")} else {implementation jscFlavor}
}
//应用了一个脚本文件
apply from: file("../../node_modules/@react-native-community/cli-platform-android/native_modules.gradle"); applyNativeModulesAppBuildGradle(project)
可以看到,工程的依赖配置也比较的清晰,主要是配置了一些Android的基本配置,然后应用了RN的插件和脚本。
三方库使用
三方库在RN中有着非常重要的地位,因为RN本身的功能是有限的,所以需要依赖一些三方库来实现一些功能。
三方库一般提供了跨平台的支持,对前端开发同学来讲是非常友好的,不需要去了解原生的开发技术,就可以实现一些原生的功能。
三方库的使用方式非常简单,按照使用三方库文档来就可以了。
下面随便去 https://reactnative.directory/ 找一个三方库来简单使用一下看看。
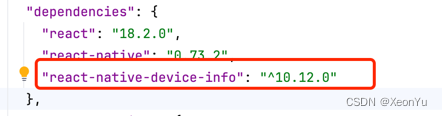
就以 react-native-device-info 为例吧
在项目根目录下执行下面命令安装即可
yarn add react-native-device-info
安装完成后会发现,项目根目录下的package.json文件中多了一条依赖
然后在RN项目中使用一下
import DeviceInfo from "react-native-device-info";<Button title={"deviceInfo"} onPress={() => {DeviceInfo.getAndroidId().then((id) => {console.log(id);})}}/>然后重新运行项目, 点击按钮,就可以看到控制台输出了设备的id
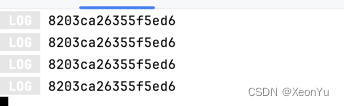
使用起来非常简单,可以看到,这里实际上完全不需要关心native端的代码,就可以实现一些原生的功能。
那作为 native 端开发的同学,这里不免就会好奇一个问题:
正常来讲如果我们在原生项目中使用三方库,是需要引入三方库的jar包或者aar包的,大部分sdk还需要进行初始化操作,然后才能调用相关的方法,
只需要一个yarn add react-native-device-info就能让RN项目使用原生的功能,这是怎么做到的呢?
带着这个问题,先来看看Android项目有什么变化。
这个module是怎么引入的呢?正常来讲在Android中我们想要引入一个本地的module,需要在settings.gradle中include进来,然后在build.gradle中引入依赖。
但是,再次去看看settings.gradle和build.gradle文件,发现并没有类似的代码,那这个module是怎么引入的呢?
还记得上面在分析项目结构的时候,我们提到的一个脚本和一个插件吗?
- apply from: file(“…/node_modules/@react-native-community/cli-platform-android/native_modules.gradle”);
- includeBuild(‘…/node_modules/@react-native/gradle-plugin’)
实际上,这两个东西就是管理RN Android项目的配置和依赖的,是非常重要的角色。
react-native-gradle-plugin 分析
我们先来分析一下react-native-gradle-plugin这个插件,这个插件是RN项目的核心插件,它的作用是管理RN项目的依赖和配置。
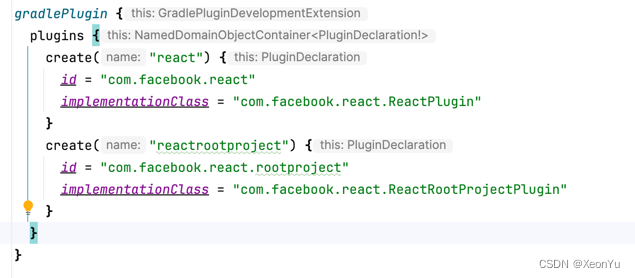
通过源码配置可以看到,一共提供了两个插件
- com.facebook.react
- com.facebook.react.rootproject
com.facebook.react.rootproject
我们先来看看 com.facebook.react.rootproject
该插件在项目的根目录下的build.gradle文件中被应用了
/*** 该插件应用于`android/build.gradle`文件。* 该插件的作用是确保app项目在库项目之前被配置,以便在库项目被配置时可以使用app项目的配置** @constructor*/
class ReactRootProjectPlugin : Plugin<Project> {override fun apply(project: Project) {project.subprojects {// As the :app project (i.e. ReactPlugin) configures both namespaces and JVM toolchains// for libraries, its evaluation must happen before the libraries' evaluation.// Eventually the configuration of namespace/JVM toolchain can be moved inside this plugin.if (it.path != ":app") {it.evaluationDependsOn(":app")}}}
}
代码非常少,其作用就是是确保app项目在库项目之前被配置,以便在库项目被配置时可以使用app项目的配置。
简单说就是app中会有一些rn相关的配置,一些三方库中也会用到这些配置,此时需要确保app项目的配置在库项目之前被配置,以确保其他模块能够正常使用。
com.facebook.react
该插件是在app项目的build.gradle文件中被应用了
这个插件的代码相对多一些,我们来一点一点的分析
override fun apply(project: Project) {//检查JVM版本,不能低于17checkJvmVersion(project)//创建react配置val extension = project.extensions.create("react", ReactExtension::class.java, project)// We register a private extension on the rootProject so that project wide configs// like codegen config can be propagated from app project to libraries./*** 在根项目创建一个私有的配置项 privateReact,如果已经存在则获取* 用于在app项目和库项目之间共享配置*/val rootExtension =project.rootProject.extensions.findByType(PrivateReactExtension::class.java)?: project.rootProject.extensions.create("privateReact", PrivateReactExtension::class.java, project)// App Only Configuration/*** 如果项目中使用了com.android.application插件,也就是app模块中会执行以下代码*/project.pluginManager.withPlugin("com.android.application") {// We wire the root extension with the values coming from the app (either user populated or// defaults)./*** 下面代码实际上就是把用户自定义的配置赋值给rootExtension,就是把用户自定义的配置传递给上面创建好的一个私有配置项 privateReact*/rootExtension.root.set(extension.root)rootExtension.reactNativeDir.set(extension.reactNativeDir)rootExtension.codegenDir.set(extension.codegenDir)rootExtension.nodeExecutableAndArgs.set(extension.nodeExecutableAndArgs)println("rootExtension root: ${rootExtension.root.get()}")println("rootExtension reactNativeDir: ${rootExtension.reactNativeDir.get()}")println("rootExtension codegenDir: ${rootExtension.codegenDir.get()}")println("rootExtension nodeExecutableAndArgs: ${rootExtension.nodeExecutableAndArgs.get()}")/*** 项目配置完成后,执行以下代码*/project.afterEvaluate {val reactNativeDir = extension.reactNativeDir.get().asFileval propertiesFile = File(reactNativeDir, "ReactAndroid/gradle.properties")//获取版本号和groupNameval versionAndGroupStrings = readVersionAndGroupStrings(propertiesFile)val versionString = versionAndGroupStrings.firstval groupString = versionAndGroupStrings.second//配置依赖,主要是做了依赖替换和统一版本的逻辑configureDependencies(project, versionString, groupString)//配置仓库configureRepositories(project, reactNativeDir)}//配置NDKconfigureReactNativeNdk(project, extension)//配置App的构建配置字段configureBuildConfigFieldsForApp(project, extension)//配置开发端口 默认8081configureDevPorts(project)//处理老版本配置兼容性configureBackwardCompatibilityReactMap(project)//配置Java工具链,确保项目中的 Java 和 Kotlin 代码使用 Java 17 版本configureJavaToolChains(project)//根据不同的构建类型配置不同的任务project.extensions.getByType(AndroidComponentsExtension::class.java).apply {onVariants(selector().all()) { variant ->//配置react任务,用于执行react-native的打包操作project.configureReactTasks(variant = variant, config = extension)}}//配置react-native-codegen,用于生成所需代码configureCodegen(project, extension, rootExtension, isLibrary = false)}// Library Only ConfigurationconfigureBuildConfigFieldsForLibraries(project)configureNamespaceForLibraries(project)project.pluginManager.withPlugin("com.android.library") {configureCodegen(project, extension, rootExtension, isLibrary = true)}}插件主要有以下逻辑
- 检查JVM版本,不能低于17
private fun checkJvmVersion(project: Project) {val jvmVersion = Jvm.current()?.javaVersion?.majorVersionprintln("jvmVersion: $jvmVersion")if ((jvmVersion?.toIntOrNull() ?: 0) <= 16) {project.logger.error("""********************************************************************************ERROR: requires JDK17 or higher.Incompatible major version detected: '$jvmVersion'********************************************************************************""".trimIndent())exitProcess(1)}}
- 创建react配置
val extension = project.extensions.create("react", ReactExtension::class.java, project)
- 在根项目创建一个私有的配置项 privateReact,如果已经存在则获取,用于在app项目和库项目之间共享配置
val rootExtension =project.rootProject.extensions.findByType(PrivateReactExtension::class.java)?: project.rootProject.extensions.create("privateReact", PrivateReactExtension::class.java, project)
PrivateReactExtension 的代码如下
abstract class PrivateReactExtension @Inject constructor(project: Project) {private val objects = project.objects/*** 创建一个根目录的属性* 最终的值根据项目名称决定* 如果项目名称为"react-native-github"或"react-native-build-from-source",则目录为"../../"* 如果项目名称为其他,则目录为"../"*/val root: DirectoryProperty = objects.directoryProperty().convention(if (project.rootProject.name == "react-native-github" || project.rootProject.name == "react-native-build-from-source") {project.rootProject.layout.projectDirectory.dir("../../")} else {project.rootProject.layout.projectDirectory.dir("../")})/*** reactNativeDir的默认值为"node_modules/react-native"*/val reactNativeDir: DirectoryProperty =objects.directoryProperty().convention(root.dir("node_modules/react-native"))/*** 指定 Node.js 可执行文件及其运行时参数,默认就是node,一般不会改*/val nodeExecutableAndArgs: ListProperty<String> =objects.listProperty(String::class.java).convention(listOf("node"))/*** 生成代码的目录*/val codegenDir: DirectoryProperty =objects.directoryProperty().convention(root.dir("node_modules/@react-native/codegen"))
}- 如果项目中使用了com.android.application插件,也就是app模块中会执行以下代码
-
用户自定义的配置赋值给rootExtension,就是把用户自定义的配置传递给上面创建好的一个私有配置项 privateReact
project.pluginManager.withPlugin("com.android.application") {// We wire the root extension with the values coming from the app (either user populated or// defaults).rootExtension.root.set(extension.root)rootExtension.reactNativeDir.set(extension.reactNativeDir)rootExtension.codegenDir.set(extension.codegenDir)rootExtension.nodeExecutableAndArgs.set(extension.nodeExecutableAndArgs)} -
配置依赖,主要是做了依赖替换和统一版本的逻辑,这也就是为什么在app的build.gradle中的react
native相关的依赖没有指定版本,实际上是在这里统一配置的val reactNativeDir = extension.reactNativeDir.get().asFile val propertiesFile = File(reactNativeDir, "ReactAndroid/gradle.properties")//获取版本号和groupName val versionAndGroupStrings = readVersionAndGroupStrings(propertiesFile) val versionString = versionAndGroupStrings.first val groupString = versionAndGroupStrings.second //配置依赖,主要是做了依赖替换和统一版本的逻辑 configureDependencies(project, versionString, groupString)readVersionAndGroupStrings方法,实际上就是从/node_modules/reactnative/ReactAndroid/gradle.properties文件中读取版本号和group字符串
/*** 读取版本和group字符串* @param propertiesFile File* @return Pair<String, String>*/fun readVersionAndGroupStrings(propertiesFile: File): Pair<String, String> {println("readVersionAndGroupStrings: $propertiesFile")val reactAndroidProperties = Properties()propertiesFile.inputStream().use { reactAndroidProperties.load(it) }val versionStringFromFile = reactAndroidProperties[INTERNAL_VERSION_NAME] as? String ?: ""// If on a nightly, we need to fetch the -SNAPSHOT artifact from Sonatype.val versionString =if (versionStringFromFile.startsWith("0.0.0") || "-nightly-" in versionStringFromFile) {"$versionStringFromFile-SNAPSHOT"} else {versionStringFromFile}// Returns Maven group for repos using different group for Maven artifactsval groupString =reactAndroidProperties[INTERNAL_PUBLISHING_GROUP] as? String?: DEFAULT_INTERNAL_PUBLISHING_GROUPreturn Pair(versionString, groupString)}configureDependencies方法,主要做了依赖替换和统一版本的逻辑
/*** 配置依赖* 1.替换依赖* 2.强制使用指定版本** @param project Project* @param versionString String* @param groupString String*/fun configureDependencies(project: Project,versionString: String,groupString: String = DEFAULT_INTERNAL_PUBLISHING_GROUP) {println("configureDependencies: $versionString, $groupString")if (versionString.isBlank()) return//遍历所有项目project.rootProject.allprojects { eachProject ->println("eachProject: ${eachProject.name}")//遍历项目的所有配置eachProject.configurations.all { configuration ->/*** configuration.resolutionStrategy 用于配置解析策略,一般用于配置依赖替换和强制使用指定版本*/configuration.resolutionStrategy.dependencySubstitution {//获取依赖替换列表getDependencySubstitutions(versionString,groupString).forEach { (module, dest, reason) ->//将指定的依赖替换为目标依赖it.substitute(it.module(module)).using(it.module(dest)).because(reason)}}//强制使用指定版本configuration.resolutionStrategy.force("${groupString}:react-android:${versionString}","${groupString}:flipper-integration:${versionString}",)//如果用户没有选择使用夜间版本进行本地开发,则强制使用hermes-android指定版本if (!(eachProject.findProperty(INTERNAL_USE_HERMES_NIGHTLY) as? String).toBoolean()) {// Contributors only: The hermes-engine version is forced only if the user has// not opted into using nightlies for local development.configuration.resolutionStrategy.force("${groupString}:hermes-android:${versionString}")}}}}getDependencySubstitutions方法,主要是生成需要进行依赖替换的列表
/*** 生成依赖替换列表* @param versionString String* @param groupString String* @return List<Triple<String, String, String>>*/internal fun getDependencySubstitutions(versionString: String,groupString: String = DEFAULT_INTERNAL_PUBLISHING_GROUP): List<Triple<String, String, String>> {/*** 生成依赖替换列表* first:原始依赖* second:替换后的依赖* third:原因*/val dependencySubstitution = mutableListOf<Triple<String, String, String>>()// react-native替换为react-androiddependencySubstitution.add(Triple("com.facebook.react:react-native","${groupString}:react-android:${versionString}","The react-native artifact was deprecated in favor of react-android due to https://github.com/facebook/react-native/issues/35210."))// hermes-engine替换为hermes-androiddependencySubstitution.add(Triple("com.facebook.react:hermes-engine","${groupString}:hermes-android:${versionString}","The hermes-engine artifact was deprecated in favor of hermes-android due to https://github.com/facebook/react-native/issues/35210."))// 如果 groupString 不是默认值 com.facebook.react,则修改react-android和hermes-android的Maven groupif (groupString != DEFAULT_INTERNAL_PUBLISHING_GROUP) {dependencySubstitution.add(Triple("com.facebook.react:react-android","${groupString}:react-android:${versionString}","The react-android dependency was modified to use the correct Maven group."))dependencySubstitution.add(Triple("com.facebook.react:hermes-android","${groupString}:hermes-android:${versionString}","The hermes-android dependency was modified to use the correct Maven group."))}return dependencySubstitution} -
配置仓库源,这个比较简单,就是配置了一些依赖所需的仓库地址
fun configureRepositories(project: Project, reactNativeDir: File) {println("configureRepositories: $reactNativeDir")project.rootProject.allprojects { eachProject ->with(eachProject) {if (hasProperty(INTERNAL_REACT_NATIVE_MAVEN_LOCAL_REPO)) {val mavenLocalRepoPath =property(INTERNAL_REACT_NATIVE_MAVEN_LOCAL_REPO) as StringmavenRepoFromURI(File(mavenLocalRepoPath).toURI())}// We add the snapshot for users on nightlies.mavenRepoFromUrl("https://oss.sonatype.org/content/repositories/snapshots/")repositories.mavenCentral { repo ->// We don't want to fetch JSC from Maven Central as there are older versions there.repo.content { it.excludeModule("org.webkit", "android-jsc") }}// Android JSC is installed from npmmavenRepoFromURI(File(reactNativeDir, "../jsc-android/dist").toURI())repositories.google()mavenRepoFromUrl("https://www.jitpack.io")}}} -
配置NDK(Native Development Kit)相关设置
fun configureReactNativeNdk(project: Project, extension: ReactExtension) {project.pluginManager.withPlugin("com.android.application") {project.extensions.getByType(AndroidComponentsExtension::class.java).finalizeDsl { ext ->//是否启用新架构 没有直接返回if (!project.isNewArchEnabled(extension)) {// For Old Arch, we don't need to setup the NDKreturn@finalizeDsl}// We enable prefab so users can consume .so/headers from ReactAndroid and hermes-engine// .aarext.buildFeatures.prefab = true// If the user has not provided a CmakeLists.txt path, let's provide// the default one from the frameworkif (ext.externalNativeBuild.cmake.path == null) {ext.externalNativeBuild.cmake.path = File(extension.reactNativeDir.get().asFile,"ReactAndroid/cmake-utils/default-app-setup/CMakeLists.txt")}// Parameters should be provided in an additive manner (do not override what// the user provided, but allow for sensible defaults).val cmakeArgs = ext.defaultConfig.externalNativeBuild.cmake.argumentsif (cmakeArgs.none { it.startsWith("-DPROJECT_BUILD_DIR") }) {cmakeArgs.add("-DPROJECT_BUILD_DIR=${project.layout.buildDirectory.get().asFile}")}if (cmakeArgs.none { it.startsWith("-DREACT_ANDROID_DIR") }) {cmakeArgs.add("-DREACT_ANDROID_DIR=${extension.reactNativeDir.file("ReactAndroid").get().asFile}")}if (cmakeArgs.none { it.startsWith("-DANDROID_STL") }) {cmakeArgs.add("-DANDROID_STL=c++_shared")}// Due to the new NDK toolchain file, the C++ flags gets overridden between compilation// units. This is causing some libraries to don't be compiled with -DANDROID and other// crucial flags. This can be revisited once we bump to NDK 25/26if (cmakeArgs.none { it.startsWith("-DANDROID_USE_LEGACY_TOOLCHAIN_FILE") }) {cmakeArgs.add("-DANDROID_USE_LEGACY_TOOLCHAIN_FILE=ON")}val architectures = project.getReactNativeArchitectures()// abiFilters are split ABI are not compatible each other, so we set the abiFilters// only if the user hasn't enabled the split abi feature.if (architectures.isNotEmpty() && !ext.splits.abi.isEnable) {ext.defaultConfig.ndk.abiFilters.addAll(architectures)}}}} -
配置App的构建配置字段
/*** 确保在 Android 应用或库项目中启用buildConfig,并添加了两个自定义的布尔类型的构建配置字段,用于表示新架构是否启用以及是否启用了 Hermes 引擎。* 这些字段将在生成的 BuildConfig 类中作为静态字段提供。* @param project Project* @param extension ReactExtension*/fun configureBuildConfigFieldsForApp(project: Project, extension: ReactExtension) {val action =Action<AppliedPlugin> {project.extensions.getByType(AndroidComponentsExtension::class.java).finalizeDsl { ext ->ext.buildFeatures.buildConfig = trueext.defaultConfig.buildConfigField("boolean","IS_NEW_ARCHITECTURE_ENABLED",project.isNewArchEnabled(extension).toString())ext.defaultConfig.buildConfigField("boolean", "IS_HERMES_ENABLED", project.isHermesEnabled.toString())}}project.pluginManager.withPlugin("com.android.application", action)project.pluginManager.withPlugin("com.android.library", action)} -
配置开发端口 默认8081
fun configureDevPorts(project: Project) {val devServerPort =project.properties["reactNativeDevServerPort"]?.toString() ?: DEFAULT_DEV_SERVER_PORTval inspectorProxyPort =project.properties["reactNativeInspectorProxyPort"]?.toString() ?: devServerPortval action =Action<AppliedPlugin> {project.extensions.getByType(AndroidComponentsExtension::class.java).finalizeDsl { ext ->ext.defaultConfig.resValue("integer","react_native_dev_server_port",devServerPort)ext.defaultConfig.resValue("integer", "react_native_inspector_proxy_port", inspectorProxyPort)}}project.pluginManager.withPlugin("com.android.application", action)project.pluginManager.withPlugin("com.android.library", action)} -
处理老版本配置兼容性
fun configureBackwardCompatibilityReactMap(project: Project) { if (project.extensions.extraProperties.has("react")) {@Suppress("UNCHECKED_CAST")val reactMap =project.extensions.extraProperties.get("react") as? Map<String, Any?> ?: mapOf()if (reactMap.isNotEmpty()) {project.logger.error("""********************************************************************************ERROR: Using old project.ext.react configuration. We identified that your project is using a old configuration block as:project.ext.react = [// ...]You should migrate to the new configuration:react {// ...}You can find documentation inside `android/app/build.gradle` on how to use it.********************************************************************************""".trimIndent())} }// We set an empty react[] map so if a library is reading it, they will find empty values. project.extensions.extraProperties.set("react", mapOf<String, String>()) } -
配置Java工具链,确保项目中的 Java 和 Kotlin 代码使用 Java 17 版本
fun configureJavaToolChains(input: Project) {// Check at the app level if react.internal.disableJavaVersionAlignment is set.if (input.hasProperty(INTERNAL_DISABLE_JAVA_VERSION_ALIGNMENT)) {return}input.rootProject.allprojects { project ->// Allows every single module to set react.internal.disableJavaVersionAlignment also.if (project.hasProperty(INTERNAL_DISABLE_JAVA_VERSION_ALIGNMENT)) {return@allprojects}val action =Action<AppliedPlugin> {project.extensions.getByType(AndroidComponentsExtension::class.java).finalizeDsl { ext->ext.compileOptions.sourceCompatibility = JavaVersion.VERSION_17ext.compileOptions.targetCompatibility = JavaVersion.VERSION_17}}project.pluginManager.withPlugin("com.android.application", action)project.pluginManager.withPlugin("com.android.library", action)project.pluginManager.withPlugin("org.jetbrains.kotlin.android") {project.extensions.getByType(KotlinTopLevelExtension::class.java).jvmToolchain(17)}project.pluginManager.withPlugin("org.jetbrains.kotlin.jvm") {project.extensions.getByType(KotlinTopLevelExtension::class.java).jvmToolchain(17)}} } -
根据不同的构建类型配置不同的任务
//根据不同的构建类型配置不同的任务project.extensions.getByType(AndroidComponentsExtension::class.java).apply {onVariants(selector().all()) { variant ->//配置react任务,用于执行react-native的打包操作project.configureReactTasks(variant = variant, config = extension)}}configureReactTasks 扩展方法
internal fun Project.configureReactTasks(variant: Variant, config: ReactExtension) {val targetName = variant.name.capitalizeCompat()val targetPath = variant.nameval buildDir = this.layout.buildDirectory.get().asFile// Resources: generated/assets/react/<variant>/index.android.bundleval resourcesDir = File(buildDir, "generated/res/react/$targetPath")// Bundle: generated/assets/react/<variant>/index.android.bundleval jsBundleDir = File(buildDir, "generated/assets/react/$targetPath")// Sourcemap: generated/sourcemaps/react/<variant>/index.android.bundle.mapval jsSourceMapsDir = File(buildDir, "generated/sourcemaps/react/$targetPath")// Intermediate packager:// intermediates/sourcemaps/react/<variant>/index.android.bundle.packager.map// Intermediate compiler:// intermediates/sourcemaps/react/<variant>/index.android.bundle.compiler.mapval jsIntermediateSourceMapsDir = File(buildDir, "intermediates/sourcemaps/react/$targetPath")// The location of the cli.js file for React Nativeval cliFile = detectedCliFile(config)val isHermesEnabledInProject = project.isHermesEnabledval isHermesEnabledInThisVariant =if (config.enableHermesOnlyInVariants.get().isNotEmpty()) {config.enableHermesOnlyInVariants.get().contains(variant.name) && isHermesEnabledInProject} else {isHermesEnabledInProject}val isDebuggableVariant =config.debuggableVariants.get().any { it.equals(variant.name, ignoreCase = true) }//配置新架构打包选项configureNewArchPackagingOptions(project, config, variant)//配置JS引擎打包选项configureJsEnginePackagingOptions(config, variant, isHermesEnabledInThisVariant)if (!isDebuggableVariant) {val entryFileEnvVariable = System.getenv("ENTRY_FILE")val bundleTask =tasks.register("createBundle${targetName}JsAndAssets", BundleHermesCTask::class.java) {it.root.set(config.root)it.nodeExecutableAndArgs.set(config.nodeExecutableAndArgs)it.cliFile.set(cliFile)it.bundleCommand.set(config.bundleCommand)it.entryFile.set(detectedEntryFile(config, entryFileEnvVariable))it.extraPackagerArgs.set(config.extraPackagerArgs)it.bundleConfig.set(config.bundleConfig)it.bundleAssetName.set(config.bundleAssetName)it.jsBundleDir.set(jsBundleDir)it.resourcesDir.set(resourcesDir)it.hermesEnabled.set(isHermesEnabledInThisVariant)it.minifyEnabled.set(!isHermesEnabledInThisVariant)it.devEnabled.set(false)it.jsIntermediateSourceMapsDir.set(jsIntermediateSourceMapsDir)it.jsSourceMapsDir.set(jsSourceMapsDir)it.hermesCommand.set(config.hermesCommand)it.hermesFlags.set(config.hermesFlags)it.reactNativeDir.set(config.reactNativeDir)}//将生成的资源目录添加到源集variant.sources.res?.addGeneratedSourceDirectory(bundleTask,BundleHermesCTask::resourcesDir)variant.sources.assets?.addGeneratedSourceDirectory(bundleTask,BundleHermesCTask::jsBundleDir)}} -
配置react-native-codegen,用于生成所需代码,帮助我们避免编写重复代码的工具。
-
配置library项目的构建配置字段
/*** 配置构建配置字段* @param appProject Project*/fun configureBuildConfigFieldsForLibraries(appProject: Project) {appProject.rootProject.allprojects { subproject ->subproject.pluginManager.withPlugin("com.android.library") {subproject.extensions.getByType(AndroidComponentsExtension::class.java).finalizeDsl { ext ->ext.buildFeatures.buildConfig = true}}}} -
配置library项目的namespace
fun configureNamespaceForLibraries(appProject: Project) {appProject.rootProject.allprojects { subproject ->subproject.pluginManager.withPlugin("com.android.library") {subproject.extensions.getByType(AndroidComponentsExtension::class.java).finalizeDsl { ext ->if (ext.namespace == null) {val android =subproject.extensions.getByType(LibraryExtension::class.java)val manifestFile = android.sourceSets.getByName("main").manifest.srcFilemanifestFile.takeIf { it.exists() }?.let { file ->getPackageNameFromManifest(file)?.let { packageName ->ext.namespace = packageName}}}}}}} -
如果项目中使用了com.android.library插件,也就是library模块中会执行以下代码
- 配置react-native-codegen,用于生成所需代码,帮助我们避免编写重复代码的工具。
总结
到这里,我们基本就清楚了react-native-gradle-plugin这个插件的主要作用
- 做了一些编译环境的检查
- 创建了一些配置项,用于在app项目和库项目之间共享配置
- 统一替换项目中的react-native相关的依赖,并确保版本一致
- 配置任务,包括打包,生成代码等
但是插件中并没有看到RN三方库依赖处理的逻辑,所以,并没有解答我们一开始的问题,我们接着分析。
篇幅原因,本篇文章就到这里,下面我们来分析一下 native_modules.gradle 的作用是什么。
详情请看下一篇文章:
ReactNative项目构建分析与思考之native_modules.gradle
感谢阅读,觉有有帮助点赞支持,如果有任何疑问或建议,欢迎在评论区留言。如需转载,请注明出处:喻志强的博客 ,谢谢!
相关文章:
ReactNative项目构建分析与思考之react-native-gradle-plugin
前一段时间由于业务需要,接触了下React Native相关的知识,以一个Android开发者的视角,对React Native 项目组织和构建流程有了一些粗浅的认识,同时也对RN混合开发项目如何搭建又了一点小小的思考。 RN环境搭建 RN文档提供了两种…...

LeetCode454 四数相加
给你四个整数数组 nums1、nums2、nums3 和 nums4 ,数组长度都是 n ,请你计算有多少个元组 (i, j, k, l) 能满足: 0 < i, j, k, l < n nums1[i] nums2[j] nums3[k] nums4[l] 0 示例 1: 输入:nums1 [1,2], nu…...
Kafka消费者重平衡
「(重平衡)Rebalance本质上是一种协议,规定了一个Consumer Group下的所有Consumer如何达成一致,来分配订阅Topic的每个分区」。 比如某个Group下有20个Consumer实例,它订阅了一个具有100个分区的Topic。 正常情况下&…...

【线代基础】张量、向量、标量、矩阵的区别
1、标量(Scalar) 纯数字,无方向性、无维度概念。因此也叫 标量张量、零维张量、0D张量 例如,x18,x21.34 x1、x2即为标量 2、张量(tensor) 具有方向性,可以理解为一个多维数组&a…...

用chatgpt写论文重复率高吗?如何降低重复率?
ChatGPT写的论文重复率很低 ChatGPT写作是基于已有的语料库和文献进行训练的,因此在写作过程中会不可避免地引用或借鉴已有的研究成果和观点。同时,由于ChatGPT的表述方式和写作风格与人类存在一定的差异,也可能会导致论文与其他文章相似度高…...
字节跳动也启动春季校园招聘了(含二面算法原题)
字节跳动 - 春招启动 随着各个大厂陆续打响春招的响头炮,字节跳动也官宣了春季校园招聘的正式开始。 还是那句话:连互联网大厂启动校招计划尚且争先恐后,你还有什么理由不马上行动?! 先来扫一眼「春招流程」和「面向群…...

二,几何相交---4,BO算法---(3)数据结构
数据结构分两块,一个是某一时间状态的局部相交线段。一个是事件队列,是某一时刻局部相交线段的集合。...

中间件MQ面试题之Kafka
MQ相关面试题 Kafka面试题 (1)rockermq和kafka 的区别在哪里? 使用场景有什么不一样? 不同点: 数据可靠性 不同: RocketMQ:支持异步实时刷盘、同步刷盘、同步复制、异步复制;kafka:使用异步刷盘方式,异步复制/同步复制。性能对比:kafka单机写入TPS比较高单机支持…...

Prometheus 安装部署
文章目录 1.部署Prometheus1.1.修改配置文件1.2.配置告警规则1.3.运行Docker 2.部署Alertmanager2.1.修改配置文件2.2.Prometheus监控配置2.3.运行Docker 3.部署Grafana3.1.运行Docker3.2. 配置数据源3.3. 配置dashboard 开源中间件 # Prometheushttps://iothub.org.cn/docs/m…...

龙芯杯赛道-学习过程记录
Preface&免责声明: 由于参赛资料企业并未开源,所以我不能开放出有关参赛的资料 但是我会在这里记录参赛时看不懂的一系列知识补充 ------------------------------------------------------------------------------------------------------- TSEN…...
)
76. 最小覆盖子串-力扣hot100(C++)
76. 最小覆盖子串s 初始化和特判 //本题做题思想 //从头开始,首先找到一个包含所有字母的字串,将i移动到包含字串字母的位置,然后更新长度和字符串ans后, //i的位置加1,j的位置也加1,从新开始上面的流程&…...

vue的生命周期有那些
1.v-text 相当于js的innerText <div v-text"姓名:name"></div>const name ref(张三); //声明 2.v-html 相当于js的innerHTML <div v-html"html"></div>const html ref(<s>这是一段文字</s>) 3.v-bin…...

OpenStack安装步骤
一、准备OpenStack安装环境 1、创建实验用的虚拟机实例。 内存建议16GB(8GB也能运行)CPU(处理器)双核且支持虚拟化硬盘容量不低于200GB(!)网络用net桥接模式 运行虚拟机 2、禁用防火墙与SELin…...

如何借助CRM系统获得直观的业务洞察?CRM系统图表视图解析!
Zoho CRM管理系统在优化客户体验方面持续发力,新年新UI,一波新功能正在赶来的路上。今天要介绍的新UI功能在正式推出之前,已经通过早鸟申请的方式给部分国际版用户尝过鲜了。Zoho CRM即将推出图表视图,将原始数据转换为直观的图表…...
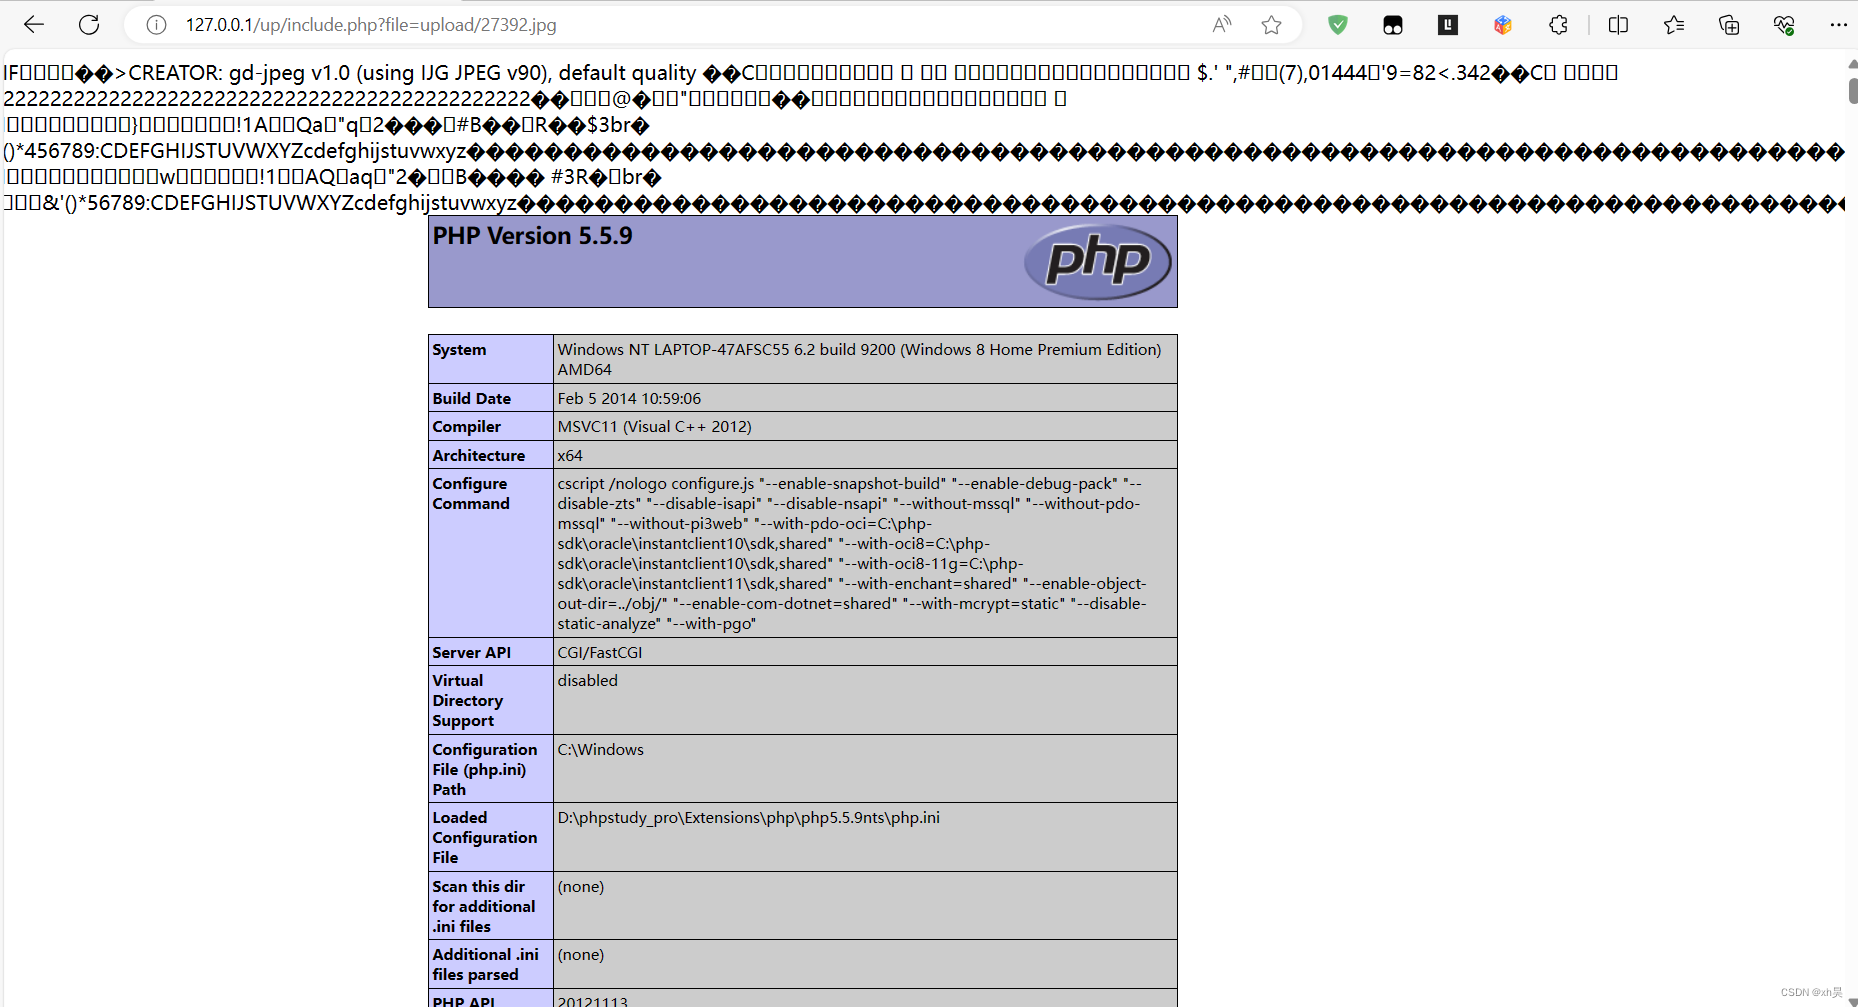
制作图片马:二次渲染(upload-labs第17关)
代码分析 $im imagecreatefromjpeg($target_path);在本关的代码中这个imagecreatefromjpeg();函数起到了将上传的图片打乱并重新组合。这就意味着在制作图片马的时候要将木马插入到图片没有被改变的部分。 gif gif图的特点是无损,我们可以对比上传前后图片的内容…...

XGB-20:XGBoost中不同参数的预测函数
有许多在XGBoost中具有不同参数的预测函数。 预测选项 xgboost.Booster.predict() 方法有许多不同的预测选项,从 pred_contribs 到 pred_leaf 不等。输出形状取决于预测的类型。对于多类分类问题,XGBoost为每个类构建一棵树,每个类的树称为…...
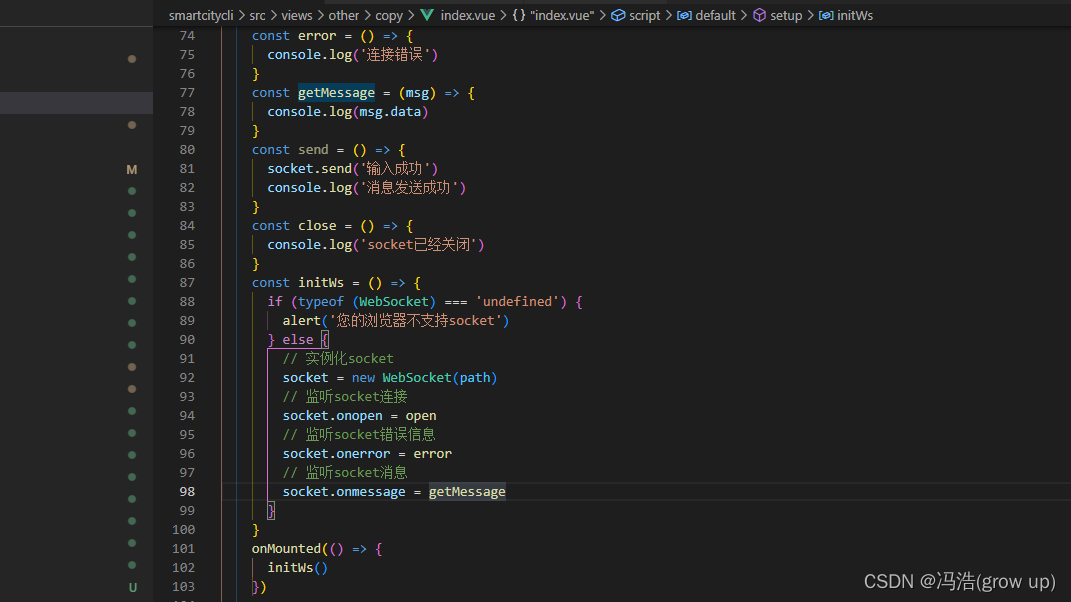
websocket 使用示例
websocket 使用示例 前言html中使用vue3中使用1、安装websocket依赖2、代码 vue2中使用1、安装websocket依赖2、代码 前言 即时通讯webSocket 的使用 html中使用 以下是一个简单的 HTML 页面示例,它连接到 WebSocket 服务器并包含一个文本框、一个发送按钮以及 …...

基于YOLOv8/YOLOv7/YOLOv6/YOLOv5的水下目标检测系统(深度学习模型+UI界面+训练数据集)
摘要:本研究详述了一种采用深度学习技术的水下目标检测系统,该系统集成了最新的YOLOv8算法,并与YOLOv7、YOLOv6、YOLOv5等早期算法进行了性能评估对比。该系统能够在各种媒介——包括图像、视频文件、实时视频流及批量文件中——准确地识别水…...

中间件 Redis 服务集群的部署方案
前言 在互联网业务发展非常迅猛的早期,如果预算不是问题,强烈建议使用“增强单机硬件性能”的方式提升系统并发能力,因为这个阶段,公司的战略往往是发展业务抢时间,而“增强单机硬件性能”往往是最快的方法。 正是在这…...
)
生成哈夫曼树C卷(JavaPythonC++Node.jsC语言)
给定长度为n的无序的数字数组,每个数字代表二叉树的叶子节点的权值,数字数组的值均大于等于1。请完成一个函数,根据输入的数字数组,生成哈夫曼树,并将哈夫曼树按照中序遍历输出。 为了保证输出的二又树中序遍历结果统一,增加以下限制:二叉树节点中,左节点权值小于等于右…...

癫痫手术精准定位:基于脑电信号昼夜节律与多生物标志物的机器学习分析框架
1. 项目概述:当机器学习遇见脑电信号,如何让癫痫手术更精准?作为一名长期耕耘在生物医学信号处理与机器学习交叉领域的工程师,我常常思考如何将算法模型从实验室的“玩具”变成临床医生手中可靠的“手术刀”。癫痫,这个…...
)
别再乱用npm install了!手把手教你用npx only-allow为项目指定包管理器(支持pnpm/yarn/npm)
用only-allow统一团队包管理器:从配置到CI的全流程指南 你是否曾经在拉取一个新项目后,面对npm install、yarn还是pnpm i的抉择感到困惑?或者更糟的是,团队成员混用不同包管理器导致node_modules结构不一致,引发各种诡…...
)
手把手教你为WCH CH582移植CherryUSB主机栈(基于RT-Thread,含中断优化)
基于RT-Thread的WCH CH582 USB主机协议栈深度移植指南在嵌入式开发领域,USB主机功能的实现往往意味着设备能够直接连接各类USB外设,从简单的键盘鼠标到复杂的存储设备。对于使用WCH CH582这类RISC-V内核MCU的开发者而言,原厂SDK提供的USB主机…...

Veo 2提示词性能瓶颈诊断:基于1726组AB测试的token敏感度热力图与阈值红线预警
更多请点击: https://kaifayun.com 第一章:Veo 2提示词编写最佳实践总览 Veo 2 是 Google 推出的高性能视频生成模型,其对提示词(prompt)的语义精度、结构清晰度和上下文控制能力高度敏感。高质量提示词并非简单堆砌关…...
)
告别硬编码!在UE5.1里用蓝图动态配置MySQL连接参数(控件蓝图实战)
动态配置MySQL连接:UE5.1控件蓝图的工程化实践在游戏开发中,数据库连接往往是项目架构中不可或缺的一环。传统硬编码方式虽然简单直接,却带来了维护困难、安全性差、灵活性低等一系列问题。本文将深入探讨如何在UE5.1中构建一个完全动态化的M…...

基于PIC32的嵌入式MIDI合成器:从波表合成到硬件实现
1. 项目概述:一个基于嵌入式微控制器的MIDI声音合成器如果你对电子音乐制作、嵌入式开发,或者DIY硬件合成器感兴趣,那么“REMI Synth”这个项目绝对值得你花时间深入了解。它本质上是一个数字单音MIDI控制的声音合成器,核心是一块…...

如何快速解锁艾尔登法环帧率限制:终极性能优化指南
如何快速解锁艾尔登法环帧率限制:终极性能优化指南 【免费下载链接】EldenRingFpsUnlockAndMore A small utility to remove frame rate limit, change FOV, add widescreen support and more for Elden Ring 项目地址: https://gitcode.com/gh_mirrors/el/EldenR…...

终极歌词同步神器LRCGET:5分钟为你的音乐库添加完美歌词
终极歌词同步神器LRCGET:5分钟为你的音乐库添加完美歌词 【免费下载链接】lrcget Utility for mass-downloading LRC synced lyrics for your offline music library. 项目地址: https://gitcode.com/gh_mirrors/lr/lrcget 你是否厌倦了在听歌时手动搜索歌词…...

PvZ Toolkit终极指南:三步掌握植物大战僵尸最强修改器
PvZ Toolkit终极指南:三步掌握植物大战僵尸最强修改器 【免费下载链接】pvztoolkit 植物大战僵尸 PC 版综合修改器 项目地址: https://gitcode.com/gh_mirrors/pv/pvztoolkit PvZ Toolkit是一款专为植物大战僵尸PC版设计的综合修改器工具,能够让你…...

从配置到运行时:Forge Admin 的动态 API 配置管理是怎么做的
问题:同一个接口,今天要加认证、明天要加加密、后天要限流,这些行为散落在拦截器、过滤器、注解里,改一次牵一发动全身,怎么集中管理和动态刷新? 1. 这个问题在企业后台里为什么常见 在企业后台开发中&am…...