K8S Deployment HA
文章目录
- K8S Deployment HA
- 1.机器规划
- 2.前期准备
- 2.1 安装ansible
- 2.2 修改 hostname
- 2.3 配置免密
- 2.4 时间同步
- 2.5 系统参数调整
- 2.6 安装 Docker
- 2.7 部署 Haproxy+Keepalived
- 3. 部署 K8S
- 3.1 安装 k8s命令
- 3.2 k8s初始化
- 3.3 添加其他master节点
- 3.4 添加 Node节点
- 3.5 安装 CNI
- 3.6 查看pod状态
- 3.7 配置IPVS
K8S Deployment HA
1.机器规划
| IP | 主机名 | 角色 |
|---|---|---|
| 10.83.195.6 | master1 | master |
| 10.83.195.7 | master2 | master |
| 10.83.195.8 | master3 | master |
| 10.83.195.9 | node1 | node |
| 10.83.195.10 | node2 | node |
| 10.83.195.250 | VIP |
2.前期准备
2.1 安装ansible
# master1节点
yum install -y ansible
2.2 修改 hostname
# 修改hostname
hostnamectl set-hostname xxx# 配置hosts
# 127.0.0.1 localhost xxx ::1 localhost6xxx 需要保留,否则calico pod会报错
ansible -i /opt/ansible/nodes all -m shell -a "cat >> /etc/hosts<<EOF
127.0.0.1 localhost localhost.localdomain localhost4 localhost4.localdomain4
::1 localhost6 localhost6.localdomain6 localhost6.localdomain
10.83.195.6 master1
10.83.195.7 master2
10.83.195.8 master3
10.83.195.9 node1
10.83.195.10 node2
EOF
"
2.3 配置免密
# 生成ssh密钥对
ssh-keygen # root免密
ansible -i /opt/ansible/nodes all -m shell -a "sudo sed -i 's/PermitRootLogin no/PermitRootLogin yes/' /etc/ssh/sshd_config && sudo grep PermitRootLogin /etc/ssh/sshd_config && sudo systemctl restart sshd"# master1 ssh-copy-id
ssh-copy-id  10.83.195.6
# 可以把 maste1的公私钥 拷贝到 master2、3节点,方便免密
2.4 时间同步
ansible -i /opt/ansible/nodes all -m shell -a "yum install chrony -y"
ansible -i /opt/ansible/nodes all -m shell -a "systemctl start chronyd && systemctl enable chronyd && chronyc sources"
2.5 系统参数调整
# 临时关闭;关闭swap主要是为了性能考虑
# 通过free命令查看swap是否关闭
ansible -i /opt/ansible/nodes all -m shell -a 'sudo swapoff -a && free'# 永久关闭
ansible -i /opt/ansible/nodes all -m shell -a "sudo sed -i 's/.*swap.*/#&/' /etc/fstab"# 禁用SELinux
# 临时关闭
ansible -i /opt/ansible/nodes all -m shell -a "setenforce 0"
# 永久禁用
ansible -i /opt/ansible/nodes all -m shell -a "sed -i 's/^SELINUX=enforcing$/SELINUX=disabled/' /etc/selinux/config"# 关闭防火墙
ansible -i /opt/ansible/nodes all -m shell -a "systemctl stop firewalld && systemctl disable firewalld"# 允许 iptables 检查桥接流量
ansible -i /opt/ansible/nodes all -m shell -a "sudo modprobe br_netfilter && lsmod | grep br_netfilter"ansible -i /opt/ansible/nodes all -m shell -a "sudo cat <<EOF | sudo tee /etc/modules-load.d/k8s.conf
overlay
br_netfilter
EOF"ansible -i /opt/ansible/nodes all -m shell -a "sudo modprobe overlay && sudo modprobe br_netfilter"# 设置所需的 sysctl 参数,参数在重新启动后保持不变
ansible -i /opt/ansible/nodes all -m shell -a "sudo cat <<EOF | sudo tee /etc/sysctl.d/k8s.conf
net.bridge.bridge-nf-call-iptables  = 1
net.bridge.bridge-nf-call-ip6tables = 1
net.ipv4.ip_forward                 = 1
EOF"ansible -i /opt/ansible/nodes all -m shell -a "echo 1|sudo tee /proc/sys/net/ipv4/ip_forward"# 应用 sysctl 参数而不重新启动
ansible -i /opt/ansible/nodes all -m shell -a "sudo sysctl --system"
2.6 安装 Docker
# centos7
ansible -i /opt/ansible/nodes all -m shell -a "wget -O /etc/yum.repos.d/CentOS-Base.repo http://mirrors.aliyun.com/repo/Centos-7.repo"# centos8
# wget -O /etc/yum.repos.d/CentOS-Base.repo http://mirrors.aliyun.com/repo/Centos-8.repo# 安装yum-config-manager配置工具
ansible -i /opt/ansible/nodes all -m shell -a "sudo yum -y install yum-utils"
# 设置yum源
ansible -i /opt/ansible/nodes all -m shell -a "sudo yum-config-manager --add-repo http://mirrors.aliyun.com/docker-ce/linux/centos/docker-ce.repo"# 软链,修改docker镜像存储目录
ansible -i /opt/ansible/nodes all -m shell -a "sudo mkdir /data/docker && sudo ln -s /data/docker /var/lib/docker"# 安装docker-ce版本
ansible -i /opt/ansible/nodes all -m shell -a "sudo yum install -y docker-ce"
# 自启、启动
ansible -i /opt/ansible/nodes all -m shell -a "sudo systemctl start docker && sudo systemctl enable docker && sudo docker --version"# 查看版本号
# sudo docker --version
# 查看版本具体信息
# sudo docker version# 修改Docker镜像源设置
# 修改文件 /etc/docker/daemon.json,没有这个文件就创建
ansible -i /opt/ansible/nodes all -m shell -a 'sudo cat <<EOF | sudo tee /etc/docker/daemon.json
{"registry-mirrors": ["https://ogeydad1.mirror.aliyuncs.com"],"exec-opts": ["native.cgroupdriver=systemd"]
}
EOF
'# 重载、重启 docker
ansible -i /opt/ansible/nodes all -m shell -a "sudo systemctl reload docker &&sudo systemctl restart docker && sudo systemctl status docker"
2.7 部署 Haproxy+Keepalived
K8S Master HA 通过 Haproxy+Keepalived 实现
# 3个master节点上执行
ansible -i /opt/ansible/nodes master -m shell -a "yum install  keepalived haproxy  -y"
修改 haproxy.cfg配置
# vim /etc/haproxy/haproxy.cfg 追加如下配置
frontend k8s-masterbind 0.0.0.0:16443mode tcpoption tcplogtcp-request inspect-delay 5sdefault_backend k8s-masterbackend k8s-mastermode tcpoption tcplogoption tcp-checkbalance roundrobindefault-server inter 10s downinter 5s rise 2 fall 2 slowstart 60s maxconn 250 maxqueue 256 weight 100server master1 10.83.195.6:6443  check inter 10000 fall 2 rise 2 weight 100server master2 10.83.195.7:6443  check inter 10000 fall 2 rise 2 weight 100server master3 10.83.195.8:6443  check inter 10000 fall 2 rise 2 weight 100# 分发到其他master
ansible -i /opt/ansible/nodes master -m copy -a "src=/etc/haproxy/haproxy.cfg dest=/etc/haproxy/haproxy.cfg"
修改keepalived.conf配置
# vim /etc/keepalived/keepalived.conf 替换内容
# state: 主节点为MASTER,从节点为BACKUP
# interface: ifconfig 查看网卡名
# priority: MASTER使用101,BACKUP使用100# master
! Configuration File for keepalived
global_defs {script_user rootenable_script_securityrouter_id LVS_DEVEL
}
vrrp_script check_apiserver {script "/etc/keepalived/check_k8s.sh"interval 3weight -2fall 2rise 2
}vrrp_instance VI_1 {# 主节点为MASTER,从节点为BACKUPstate MASTER# 网卡名interface ens192virtual_router_id 51# MASTER当中使用101,BACKUP当中使用100priority 101authentication {auth_type PASSauth_pass admin}virtual_ipaddress {# VIP10.83.195.250}track_script {check_k8s}
}# backup
! Configuration File for keepalived
global_defs {router_id LVS_DEVEL
}
vrrp_script check_apiserver {script "/etc/keepalived/check_k8s.sh"interval 3weight -2fall 2rise 2
}vrrp_instance VI_1 {# 主节点为MASTER,从节点为BACKUPstate BACKUP# 网卡名interface ens192virtual_router_id 51# MASTER当中使用101,BACKUP当中使用100priority 100authentication {auth_type PASSauth_pass admin}virtual_ipaddress {# VIP10.83.195.250}track_script {check_k8s}
}
检测脚本 check_k8s.sh
#!/bin/bashfunction check_k8s() {for ((i=0;i<5;i++));doapiserver_pid_id=$(pgrep kube-apiserver)if [[ ! -z $apiserver_pid_id ]];thenreturnelsesleep 2fiapiserver_pid_id=0done
}# 1:running  0:stopped
check_k8s
if [[ $apiserver_pid_id -eq 0 ]];then/usr/bin/systemctl stop keepalivedexit 1
elseexit 0
fi# 分发
ansible -i /opt/ansible/nodes master -m copy -a "src=/etc/keepalived/check_k8s.sh dest=/etc/keepalived/"
ansible -i /opt/ansible/nodes master -m shell -a "chmod +x /etc/keepalived/check_k8s.sh"
# 启动
ansible -i /opt/ansible/nodes master -m shell -a "systemctl enable --now keepalived haproxy"# 查看VIP
ip a
3. 部署 K8S
3.1 安装 k8s命令
# 所有节点
ansible -i /opt/ansible/nodes all -m shell -a "sudo cat <<EOF | sudo tee /etc/yum.repos.d/kubernetes.repo
[k8s]
name=k8s
enabled=1
gpgcheck=0
baseurl=https://mirrors.aliyun.com/kubernetes/yum/repos/kubernetes-el7-x86_64/
EOF
"# disableexcludes=kubernetes:禁掉除了这个kubernetes之外的别的仓库
ansible -i /opt/ansible/nodes all -m shell -a "yum install -y kubelet-1.23.6 kubeadm-1.23.6 kubectl-1.23.6 --disableexcludes=kubernetes"# 查看k8s版本
# sudo kubectl version命令 会报错正常 Unable to connect to the server: dial tcp: lookup localhost on 10.82.26.252:53: no such host
ansible -i /opt/ansible/nodes all -m shell -a "sudo kubectl version && sudo yum info kubeadm"# 设置为开机自启并现在立刻启动服务 --now:立刻启动服务
ansible -i /opt/ansible/nodes all -m shell -a "sudo systemctl enable --now kubelet && sudo systemctl status kubelet"
3.2 k8s初始化
# master1 节点执行
# --control-plane-endpoint VIP:16443
# --pod-network-cidr=192.168.0.0/16 需要与calico.yaml 文件中的 CALICO_IPV4POOL_CIDR 配置网段一致
kubeadm init --image-repository registry.aliyuncs.com/google_containers --kubernetes-version v1.23.6 --pod-network-cidr=192.168.0.0/16 --control-plane-endpoint 10.83.195.250:16443 --upload-cert# Your Kubernetes control-plane has initialized successfully!# To start using your cluster, you need to run the following as a regular user:#   mkdir -p $HOME/.kube
#   sudo cp -i /etc/kubernetes/admin.conf $HOME/.kube/config
#   sudo chown $(id -u):$(id -g) $HOME/.kube/config# Alternatively, if you are the root user, you can run:#   export KUBECONFIG=/etc/kubernetes/admin.conf# You should now deploy a pod network to the cluster.
# Run "kubectl apply -f [podnetwork].yaml" with one of the options listed at:
#   https://kubernetes.io/docs/concepts/cluster-administration/addons/# You can now join any number of the control-plane node running the following command on each as root:#   kubeadm join 10.83.195.250:16443 --token 6z1jge.6hue81vruwh8msdl \
# 	--discovery-token-ca-cert-hash sha256:a3db8061e0b570e897b2d0e7c243ef7342c51299d04ef649737187e50aee8ea6 \
# 	--control-plane --certificate-key 35e73eae794acd9275445902cfd8d545a0e3b8e017f8d5960bd2e6796f74c386# Please note that the certificate-key gives access to cluster sensitive data, keep it secret!
# As a safeguard, uploaded-certs will be deleted in two hours; If necessary, you can use
# "kubeadm init phase upload-certs --upload-certs" to reload certs afterward.# Then you can join any number of worker nodes by running the following on each as root:# kubeadm join 10.83.195.250:16443 --token 6z1jge.6hue81vruwh8msdl \
# 	--discovery-token-ca-cert-hash sha256:a3db8061e0b570e897b2d0e7c243ef7342c51299d04ef649737187e50aee8ea6
3.3 添加其他master节点
# You can now join any number of the control-plane node running the following command on each as root:kubeadm join 10.83.195.250:16443 --token 6z1jge.6hue81vruwh8msdl \--discovery-token-ca-cert-hash sha256:a3db8061e0b570e897b2d0e7c243ef7342c51299d04ef649737187e50aee8ea6 \--control-plane --certificate-key 35e73eae794acd9275445902cfd8d545a0e3b8e017f8d5960bd2e6796f74c386# 3个master节点
# 临时生效(退出当前窗口重连环境变量失效)
export KUBECONFIG=/etc/kubernetes/admin.conf
# 永久生效(推荐)
echo "export KUBECONFIG=/etc/kubernetes/admin.conf" >> ~/.bash_profile && source  ~/.bash_profile# 重新部署
# kubeadm reset
# rm -rf $HOME/.kube && rm -rf /etc/cni/net.d && rm -rf /etc/kubernetes/*
# 再执行kubeadm init 命令
3.4 添加 Node节点
# Then you can join any number of worker nodes by running the following on each as root:
# kubeadm token create --print-join-commandkubeadm join 10.83.195.250:16443 --token 6z1jge.6hue81vruwh8msdl \--discovery-token-ca-cert-hash sha256:a3db8061e0b570e897b2d0e7c243ef7342c51299d04ef649737187e50aee8ea6
3.5 安装 CNI
# master1 节点
# kubectl apply -f https://raw.githubusercontent.com/coreos/flannel/master/Documentation/kube-flannel.yml# master1节点执行
# 下载 calico 配置文件,可能会网络超时
curl https://docs.projectcalico.org/manifests/calico.yaml -O # 生成重定向链接
curl https://calico-v3-25.netlify.app/archive/v3.25/manifests/calico.yaml -O
kubectl apply -f calico.yaml# 修改 calico.yaml 文件中的 CALICO_IPV4POOL_CIDR 配置,修改为与初始化的 cidr 相同
# 修改 IP_AUTODETECTION_METHOD 下的网卡名称
# 删除镜像 docker.io/ 前缀,避免下载过慢导致失败
# sed -i 's#docker.io/##g' calico.yaml
3.6 查看pod状态
kubectl get pods -A
3.7 配置IPVS
解决集群内无法ping通ClusterIP(或ServiceName)
# 加载ip_vs相关内核模块
ansible -i /opt/ansible/nodes all -m shell -a "sudo modprobe -- ip_vs && sudo modprobe -- ip_vs_sh && sudo sudo modprobe -- ip_vs_rr && sudo modprobe -- ip_vs_wrr && sudo modprobe -- nf_conntrack_ipv4"# 验证开启ipvs:
ansible -i /opt/ansible/nodes all -m shell -a "sudo lsmod |grep ip_vs"# 安装ipvsadm工具
ansible -i /opt/ansible/nodes all -m shell -a "sudo yum install ipset ipvsadm -y"# 编辑kube-proxy配置文件,mode修改成ipvs
kubectl edit  configmap -n kube-system  kube-proxy# 先查看
kubectl get pod -n kube-system | grep kube-proxy
# delete让它自拉起
kubectl get pod -n kube-system | grep kube-proxy |awk '{system("kubectl delete pod "$1" -n kube-system")}'
# 再查看
kubectl get pod -n kube-system | grep kube-proxy# 查看ipvs转发规则
ipvsadm -Ln
相关文章:

K8S Deployment HA
文章目录 K8S Deployment HA1.机器规划2.前期准备2.1 安装ansible2.2 修改 hostname2.3 配置免密2.4 时间同步2.5 系统参数调整2.6 安装 Docker2.7 部署 HaproxyKeepalived 3. 部署 K8S3.1 安装 k8s命令3.2 k8s初始化3.3 添加其他master节点3.4 添加 Node节点3.5 安装 CNI3.6 查…...

【Linux】linux 在指定根目录下,查找wav文件并删除
要在Linux的指定根目录下查找.wav文件并删除它们,您可以使用find命令结合-exec选项来执行删除操作。请注意,这个操作是不可逆的,所以在执行之前请确保您知道自己在做什么,并且已经备份了重要数据。 以下是一个示例命令࿰…...

三、SpringBoot3 整合 SpringMVC
本章概要 实现过程web 相关配置静态资源处理自定义拦截器(SpringMVC 配置) 3.1 实现过程 创建程序引入依赖 <?xml version"1.0" encoding"UTF-8"?> <project xmlns"http://maven.apache.org/POM/4.0.0"xmlns:xsi"http://www…...
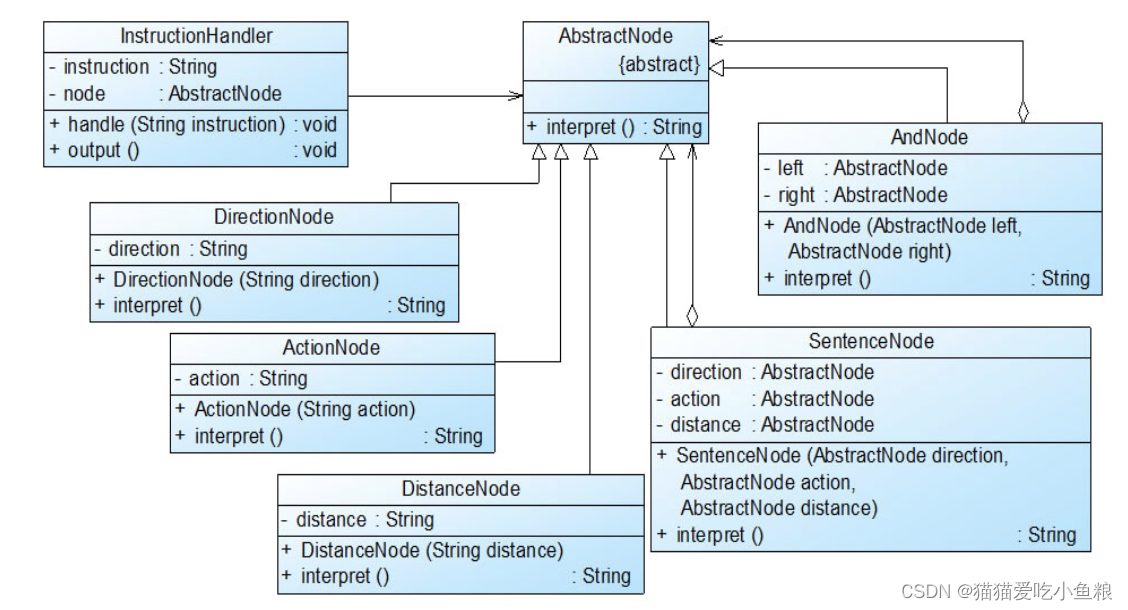
设计模式之解释器模式(上)
解释器模式 1)概述 1.定义 定义一个语言的文法,并且建立一个解释器来解释该语言中的句子,这里的“语言”是指使用规定格式和语法的代码。 2.结构图 3.角色 AbstractExpression(抽象表达式):在抽象表达…...

[23年蓝桥杯] 买二赠一
题目描述 【问题描述】 某商场有 N 件商品,其中第 i 件的价格是 A i 。现在该商场正在进行 “ 买二 赠一” 的优惠活动,具体规则是: 每购买 2 件商品,假设其中较便宜的价格是 P (如果两件商品价格一样, 则…...

PgSQL的with as语法
returning 返回的这一些字段,然后进行汇总为remove_alarms 然后select一下remove_alarms 出来的数据然后保存到tb_alarm_his 里面 with remove_alarms as( delete fromtb_alarm whereid in (508) returning 0,now(),admin,alarmadvice,alarmadvicecn,alarmarises…...

六、c++代码中的安全风险-fopen
(misc) fopen: Check when opening files - can an attacker redirect it (via symlinks), force the opening of special file type (e.g., device files), move things around to create a race condition, control its ancestors, or change its contents? (CWE-362). 为…...
uniapp项目问题及解决(前后端互联)
1.路由跳转的问题 uni.navigateTo() 保留当前页面,跳转到应用内的某个页面,使用uni.navigateBack可以返回到原页面 uni.redirectTo() 关闭当前页面,跳转到应用内的某个页面。 uni.reLaunch&…...

面试算法-154-搜索二维矩阵 II
题目 编写一个高效的算法来搜索 m x n 矩阵 matrix 中的一个目标值 target 。该矩阵具有以下特性: 每行的元素从左到右升序排列。 每列的元素从上到下升序排列。 示例 1: 输入:matrix [[1,4,7,11,15],[2,5,8,12,19],[3,6,9,16,22],[10,…...

Java中Stream流介绍
Java 8引入的Stream API是Java中处理集合的一种高效方式,它提供了一种高级的迭代方式,允许你以声明式方式处理数据。Stream API可以对数据执行复杂的查询操作,而不需要编写冗长且复杂的循环语句。下面是一些使用Stream API的常见场景和示例&a…...

深度学习的层、算子和函数空间
目录 一、层、算子和函数空间概念 二、层(Layers) 三、算子(Operators) 3.1常见算子 3.2常见算子的性质 四、函数空间(Function Space) 一、层、算子和函数空间概念 层(Layers)…...

Pillow教程11:九宫格切图的实现方法(安排!!!)
---------------Pillow教程集合--------------- Python项目18:使用Pillow模块,随机生成4位数的图片验证码 Python教程93:初识Pillow模块(创建Image对象查看属性图片的保存与缩放) Pillow教程02:图片的裁…...

Macos 部署自己的privateGpt(2024-0404)
Private Chatgpt 安装指引 https://docs.privategpt.dev/installation/getting-started/installation#base-requirements-to-run-privategpt 下载源码 git clone https://github.com/imartinez/privateGPT cd privateGPT安装软件 安装: Homebrew /bin/bash -c…...

先安装CUDA后安装Visual Studio的额外配置
VS新建项目中增加CUDA选项 以vs2019 cuda 11.3为例 关闭vs2019解压cuda的windows安装包cuda_11.3.0_465.89_win10.exe进入路径cuda_11.3.0_465.89_win10\visual_studio_integration\CUDAVisualStudioIntegration\extras\visual_studio_integration\CudaProjectVsWizards\拷贝…...

2024 蓝桥打卡Day35
20240407蓝桥杯备赛 1、学习蓝桥云课省赛冲刺课 【3-搜索算法】【4-枚举与尺度法】2、学习蓝桥云课Java省赛无忧班 【1-语言基础】3、代码练习数字反转数字反转优化算法sort排序相关String字符串相关StringBuilder字符串相关HashSet相关 1、学习蓝桥云课省赛冲刺课 【3-搜索算法…...
【Java】单例模式
单例模式是面试中常考的设计模式之一 在面试中,面试官常常会要求写出两种类型的单例模式并解释原理 本文中,将从0到1的介绍单例模式究竟是什么 文章目录 ✍一、什么是设计模式?✍二、单例模式是什么?✍三、单例模式的类型**1.饿汉…...

Linux|从 STDIN 读取 Awk 输入
简介 在之前关于 Awk 工具的系列文章中,主要探讨了如何从文件中读取数据。但如果你希望从标准输入(STDIN)中读取数据,又该如何操作呢? 在本文中,将介绍几个示例,展示如何使用 Awk 来过滤其他命令…...

关于K8S集群中maste节点r和worker节点的20道面试题
1. 什么是Kubernetes(K8S)? Kubernetes(通常简称为K8S)是一种开源的容器编排平台,用于自动化部署、扩展和管理容器化应用程序。以下是Kubernetes的一些核心特性和优势: 自动化部署和扩展&…...
基于 OpenHarmony HistogramComponent 柱状图开发指南
1. HistogramComponent 组件功能介绍 1.1. 功能介绍 应用开发过程,用鸿蒙提供的 Component 自定义柱状图效果。 HistogramComponent 组件可以更快速实现一个简单的柱状图功能。 HistogramComponent 对外提供数据源,修改柱状图颜色,间距的…...

C语言指针相关
C语言指针int(*p)[4]如何理解? 快速搞懂 C/C 指针声明...

MobaXterm实战:一站式打通串口调试与远程SSH管理
1. 为什么选择MobaXterm作为全能终端工具 第一次接触嵌入式开发时,我被各种终端工具搞得晕头转向——串口调试要用SecureCRT,SSH连接得开PuTTY,文件传输还得额外装WinSCP。直到同事推荐了MobaXterm,这个法国开发者打造的免费工具彻…...

如何快速制作专业演示文稿?终极免费开源在线PPT工具PPTist完整指南
如何快速制作专业演示文稿?终极免费开源在线PPT工具PPTist完整指南 【免费下载链接】PPTist PowerPoint-ist(/pauəpɔintist/), An online presentation application that replicates most of the commonly used features of MS PowerPoint,…...
大语言模型实战:从Transformer到QLoRA微调与RAG应用
1. 项目概述:为什么我们需要一门关于大语言模型的课程?如果你在过去一年里关注过技术圈,那么“大语言模型”这个词一定已经听得耳朵起茧了。从ChatGPT的横空出世,到各类开源模型的百花齐放,再到企业级应用的遍地开花&a…...

SoC设计全流程解析:从架构到流片的核心步骤与挑战
1. 项目概述:从“黑盒子”到“城市蓝图”每次拿起手机,我们都在与一个极其复杂的微型“城市”互动。这个城市,就是SoC。对于很多刚入行的朋友,甚至是一些有经验的软件工程师来说,SoC常常像一个“黑盒子”——我们知道它…...

react项目优化方案
下面给你一套实战级、可直接落地的 React 项目优化策略,覆盖 渲染性能、打包体积、代码层面、体验层面、工程层面。 适合 中大型 React / React TS 项目。一、渲染性能优化(最核心 ⭐) 1️⃣ 减少不必要的重渲染 ✅ React.memo const Child …...

NoFences:免费开源桌面分区工具,Windows用户必备的效率神器
NoFences:免费开源桌面分区工具,Windows用户必备的效率神器 【免费下载链接】NoFences 🚧 Open Source Stardock Fences alternative 项目地址: https://gitcode.com/gh_mirrors/no/NoFences NoFences是一款基于C#开发的开源桌面分区工…...

5个技巧掌握Obsidian Dataview:从静态笔记到动态知识库的蜕变
5个技巧掌握Obsidian Dataview:从静态笔记到动态知识库的蜕变 【免费下载链接】obsidian-dataview A data index and query language over Markdown files, for https://obsidian.md/. 项目地址: https://gitcode.com/gh_mirrors/ob/obsidian-dataview Obsid…...

吵翻了!龙虾之父晒天价账单,一个月烧了 130 万美元,消耗 6030 亿 Token
前段时间,昆仑万维董事长方汉的一次访谈引发热议,他自曝“一个月才用 20 多亿,有点惭愧。” 他有位 CTO 朋友每月烧 600 亿 token,3 个月完成百名程序员七八年写的 800 万行代码。不过呢,今天小程程刷到一个更绝的案例…...

【MATLAB】基于MATLAB的图像加密传输平台【GUI+源码+项目说明】
【MATLAB】基于MATLAB的图像加密传输平台【GUI源码项目说明】 一、项目介绍 数字图像具有数据量大、像素间相关性强、视觉冗余度高的特点, 传统的字节级加密 (如 AES) 直接作用于图像比特流虽能保密, 但无法破坏图像在空间域的统计特征. 本项目采用 “Arnold 置乱 明文相关 Lo…...

Shermie-proxy:基于Node.js的脚本化HTTP/HTTPS代理调试工具实战指南
1. 项目概述与核心价值最近在折腾一些本地开发环境下的网络请求调试和抓包,发现一个挺有意思的开源项目kxg3030/shermie-proxy。这本质上是一个基于 Node.js 实现的 HTTP/HTTPS 代理服务器,但它的定位非常清晰:专为开发者本地调试和网络请求分…...